Agent批量安装手册
2025年5月9日大约 6 分钟
Agent批量安装手册
1. 概述
本手册适用于 HyperMotion 和 HyperBDR 的 Linux Agent 和 Windows Agent 批量安装,同时也支持 HyperBDR 回切 Agent 的批量安装与升级。
在执行过程中,如有任务失败,重新运行时将仅执行失败的任务,以提高安装效率。
2. 安装环境要求
2.1 运行环境
批量安装程序需独立部署,建议在生产侧环境运行,具体要求如下:
- 操作系统:Ubuntu 20.04
- 容器环境:Docker
2.2 网络架构
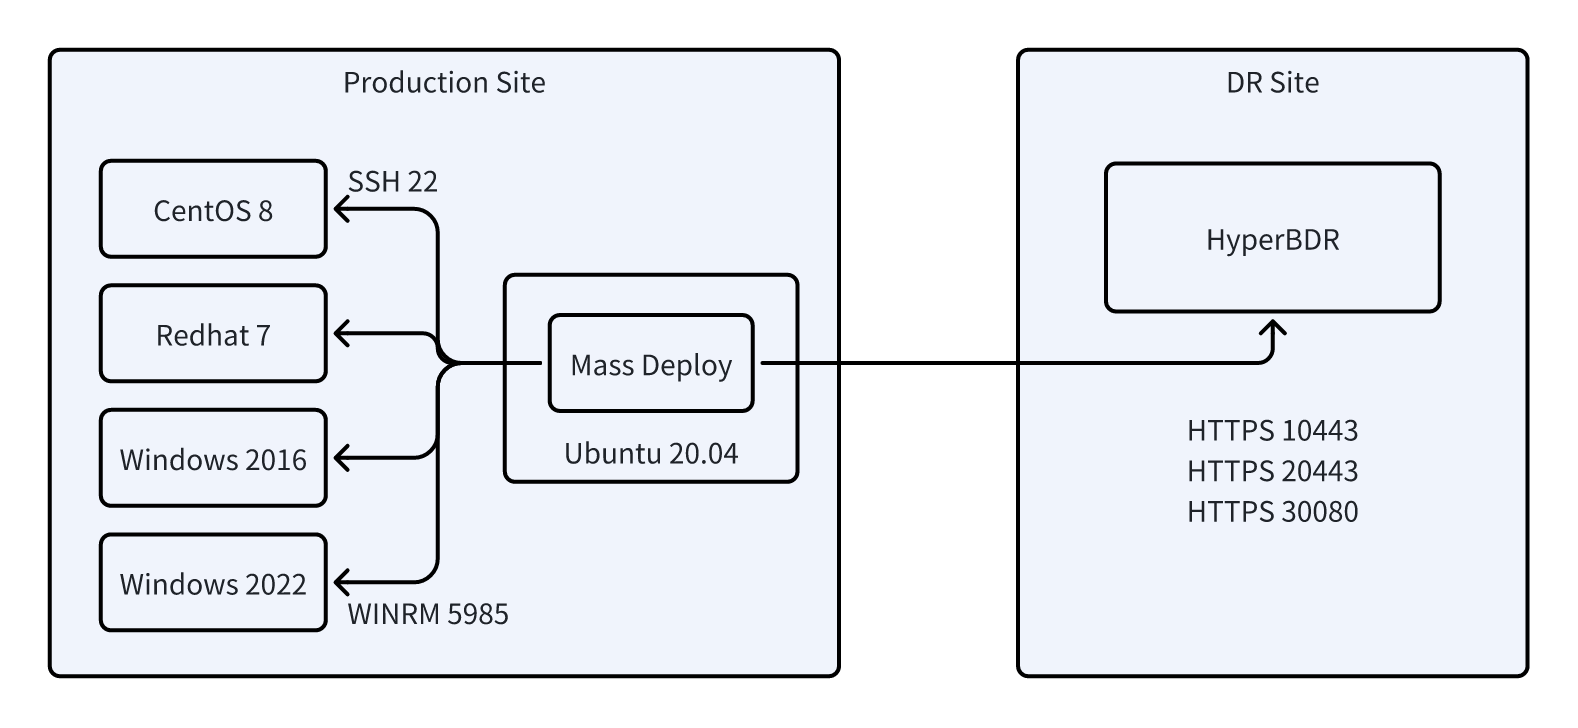
3. 安装主机要求
| 操作系统 | 限制条件 | 网络要求 | 权限要求 |
|---|---|---|---|
| Windows | ✅ Windows Server 2012 及以上版本 ❌ 不支持 Windows Server 2008 及以下版本(需额外安装系统补丁) | - 必须启用 WinRM 服务 - 确保 5985 端口可访问 | 必须使用Administrator用户 |
| Linux | Python ≥ 2.7 (低于此版本需手动安装) | 必须支持SSH连接 | ✅ 支持 root 用户直接安装 ✅ 支持 sudo 权限安装(需配置免密切换) |
4. 安装工具准备
4.1 工具安装
# 拉取部署镜像
docker pull registry.cn-beijing.aliyuncs.com/oneprocloud-opensource/massdeploy:latest
4.2 工具验证
docker run --rm registry.cn-beijing.aliyuncs.com/oneprocloud-opensource/massdeploy:latest mass-deploy -version
# 返回: mass-deploy 2025-02-27

docker run --rm registry.cn-beijing.aliyuncs.com/oneprocloud-opensource/massdeploy:latest hyperbdr -version
# 返回: hyperbdr 0.0.1
5. 批量安装流程
5.1 配置主机列表
mkdir -p ./mass-deploy && cd ./mass-deploy创建hosts_to_install.csv(下载)文件用于批量安装,字段说明如下:
| 字段名 | 必填 | 说明 |
|---|---|---|
| ip | 是 | 主机可访问 IP 地址 |
| protocol | 是 | 通信协议 (winrm/ssh) |
| port | 是 | 服务端口 (WinRM:5985 / SSH:22) |
| username | 是 | 认证用户名 |
| password | 是 | 认证密码/密钥文件路径(密钥需与 CSV 同目录) 密钥文件权限需设置为 600 推荐使用相对路径存放密钥 |
| os_type | 是 | 系统类型 (windows/linux) |
| tag | 否 | 程序自动生成,任务的标签,如果为空则表示未设置标签 |
| hostname | 否 | 程序自动生成,主机名,如果为空则表示未获取主机名 |
| os_name | 否 | 程序自动生成,操作系统,如果为空则表示未识别操作系统 |
| status | 否 | 程序自动生成,任务的状态,deploying=部署中,success=成功,failed=失败 |
| node_uuid | 否 | 程序自动生成,HyperBDR 注册编号,如果为空则表示未注册 |
| error | 否 | 程序自动生成,错误详情,部署失败时会显示错误信息 |
5.2 启动部署容器
docker run -itd --rm --name massdeploy \
  -v $(pwd):/root \
  registry.cn-beijing.aliyuncs.com/oneprocloud-opensource/massdeploy:latest bash
5.3 目标主机连通性检测
docker exec massdeploy mass-deploy ping如果不可达的机器,会将状态更改为 unreachable,再次检查主机连通性只会检查 unreachable 状态的主机。以下为输出样例:
# docker exec massdeploy mass-deploy ping
2025-02-27 05:54:29,432 - INFO - The current working directory is /root
2025-02-27 05:54:29,433 - INFO - Successfully read 3 hosts
2025-02-27 05:54:34,345 - INFO - Host 192.168.8.21 is ok
2025-02-27 05:54:34,384 - INFO - Host 192.168.8.22 is ok
2025-02-27 05:54:35,103 - WARNING - Host 192.168.8.23 is unreachable, Failed to connect to the host via ssh: ssh: connect to host 192.168.8.23 port 22: No route to host
2025-02-27 05:54:36,803 - INFO - Host check completed. A total of 3 hosts were tested, and 1 hosts failed the connectivity check.
2025-02-27 05:54:36,803 - INFO - The CSV file has been saved successfully.
5.4 获取 Agent 安装包
docker exec massdeploy bash download-hyperbdr-agent <控制台IP>:端口号 <账号> <密码>- HyperBDR控制台的URL通常为:https://<控制台IP>:10443
- HyperBDR回切控制台的URL通常为:https://<控制台IP>:20443
- HyperMotion控制台的URL通常为:https://<控制台IP>:20443
执行完成后,mass-deploy 目录下会有一个 agents 目录,如果下载成功则包含以下四个文件:
install-cli.bat
linux_agent.sh
Windows_server_32bit_beta.zip
Windows_server_64bit_beta.zip
5.5 执行批量部署
docker exec massdeploy mass-deploy deploy部署完成后,成功的状态为:success,失败的状态为:failed。
输出示例:
[root@localhost ~]# docker exec massdeploy mass-deploy deploy
2025-02-27 06:14:40,538 - INFO - The current working directory is /root
2025-02-27 06:14:40,538 - INFO - Successfully read 2 hosts
2025-02-27 06:14:40,539 - INFO - Starting the deploy of 0 hosts. A total of 2 hosts, with 2 remaining.
2025-02-27 06:14:40,539 - INFO - Starting the deploy of 1 hosts. A total of 2 hosts, with 1 remaining.
2025-02-27 06:14:48,181 - ERROR - Host 192.168.7.232 deployment failed, info {"msg": "The linux agent already exists", "_ansible_no_log": null, "changed": false}
2025-02-27 06:14:48,182 - INFO - The CSV file has been saved successfully.
2025-02-27 06:17:23,404 - INFO - Host 192.168.7.235 has been successfully deployed.
2025-02-27 06:17:23,404 - INFO - The CSV file has been saved successfully.
2025-02-27 06:17:23,405 - INFO - The CSV file has been saved successfully.
成功的主机日志示例:
INFO - Host 192.168.7.235 has been successfully deployed.失败的主机日志示例:
ERROR - Host 192.168.7.232 deployment failed, info {"msg": "The linux agent already exists", "_ansible_no_log": null, "changed": false}6. 批量升级流程
本工具可以支持Agent的批量升级功能,也可以通过产品页面中的升级功能实现。
在控制端完成升级后,需要获取升级包,并执行升级命令。
6.1 升级主机列表配置
创建hosts_to_upgrade.csv(下载)文件用于批量升级。
6.2 获取升级包
# 下载升级包
wget -O ./agents/upgrade_x86.zip https://<控制台IP>:30080/softwares/windows-agent-new/upgrade_x86.zip
wget -O ./agents/upgrade_agent.sh https://<控制台IP>:30080/softwares/upgrade_agent.sh
6.3 批量升级
docker exec massdeploy mass-deploy upgrade7. 高级功能
7.1 批量执行命令
注意
本工具可以支持批量执行命令,可以自定义执行命令,不支持脚本。
- 在指定标签的主机上运行命令
通过-t指定标签为unsupported_kernel的主机,运行命令。
docker exec massdeploy mass-deploy -t unsupported_kernel shell -os linux "uname -a"- 批量查询主机内核版本
docker exec massdeploy mass-deploy shell -os linux "uname -a"- 判断主机能否连通 HyperBDR
docker exec massdeploy mass-deploy shell -os linux ping -c 2 -w 5 <HyperBDR控制台IP>附录
如何在 Ubuntu 20.04 上安装 Docker?
# 更新现有的包列表
sudo apt update

# 安装必要的包以允许 apt 使用仓库通过 HTTPS
sudo apt install apt-transport-https ca-certificates curl software-properties-common

# 添加 Docker 的官方 GPG 密钥
curl -fsSL https://download.docker.com/linux/ubuntu/gpg | sudo apt-key add -

# 添加 Docker 的稳定版仓库
sudo add-apt-repository "deb [arch=amd64] https://download.docker.com/linux/ubuntu $(lsb_release -cs) stable"

# 再次更新包列表
sudo apt update

# 安装 Docker
sudo apt install docker-ce

# 启动 Docker 并设置为开机自启
sudo systemctl start docker
sudo systemctl enable docker
常见错误信息
| 错误现象 | 原因分析 |
|---|---|
The linux agent directory already exists | 目标主机已存在 Agent 安装目录 |
cat: /var/lib/egisplus-agent/registered: No such file or directory | Agent 服务未成功注册(通常因服务启动失败) |
Sorry, the current kernel version ... is not supported | 不兼容的 Linux 内核版本 |
ansible-core requires a minimum of Python2 version 2.7... | Python 运行时版本过低 |
版本更新记录
| 日期 | 更新内容 |
|---|---|
| 2024/12/06 | ✅ 新增标签筛选功能 ✅ 支持按指定标签/IP 执行任务 |
| 2024/12/02 | 🔄 代码架构重构 ⏱️ 优化超时机制(检查 60s/部署 10min) |
| 2024/11/29 | 🚦 新增不可达状态识别机制 ⏭️ 自动跳过不可达主机 |
| 2024/11/28 | 👥 支持 Linux 非 root 用户部署 |
| 2024/11/27 | 🛠️ 优化 Windows QEMU Guest Agent 服务处理逻辑 |