FAQ
FAQ
How do I connect to SSH on Windows?
Q: How do I connect to SSH on Windows?
A: Please note that starting from Windows 10, Microsoft has integrated an OpenSSH client, allowing you to use the ssh command directly in the Command Prompt or PowerShell. Follow these steps:
Open Command Prompt or PowerShell:
- Press
Win + Xand select "Windows PowerShell" or "Command Prompt."
- Press
Run the SSH command:
In the opened window, type the following command to connect to a remote server:
ssh username@remote_host替换
usernamewith your remote server username andremote_hostwith the server's address.If your remote server uses a non-standard port (not the default 22), use the
-pparameter to specify the port:ssh -p port_number username@remote_hostReplace
port_numberwith your server's port.If you need to use a private key for authentication, use the
-iparameter to specify the path to the private key:ssh -i path/to/private/key username@remote_host
Examples:
ssh john@example.com
ssh -p 2222 jane@192.168.1.100
ssh -i C:\path\to\private\key.pem user@remote-server
These commands will establish an SSH session, allowing you to execute commands or transfer files on the remote server.
Note: Ensure your network connection is stable, and the remote server allows SSH connections. If you encounter issues, check firewall settings, SSH server configuration, or network connectivity.
Connecting to Linux with PuTTY on Windows
Q: How can I use PuTTY to connect to a Linux server from Windows?
A: PuTTY is a popular SSH client for Windows. Follow these steps to connect to a Linux server:
Download and Install PuTTY:
- Download PuTTY from the official website: PuTTY Download.
- Install PuTTY by following the installation instructions.
Open PuTTY:
- Launch PuTTY from the Start menu or desktop shortcut.
Configure the Connection:
- In the PuTTY configuration window:
- Enter the IP address or hostname of your Linux server in the "Host Name (or IP address)" field.
- Ensure that the "Port" is set to 22 (the default for SSH).
- In the PuTTY configuration window:
Choose Connection Type:
- On the left panel, navigate to "Connection" > "SSH."
- Make sure "SSH" is selected.
Optional: Save Session:
- To save your settings for future use, enter a name in the "Saved Sessions" field and click "Save."
Initiate Connection:
- Click the "Open" button to start the connection.
Enter Login Credentials:
- Once the terminal window opens, you will be prompted to enter your Linux username and password.
Success:
- If the credentials are correct, you will be connected to your Linux server via SSH.
Note: Ensure that SSH is enabled on your Linux server and that you have the correct login credentials.
Troubleshooting:
- If you encounter issues, double-check your server's IP address, ensure SSH is running, and confirm your login details.
How HyperBDR ensure the integrity of Windows Data?
Q1: How does HyperBDR ensure the integrity of Windows data?
A1: HyperBDR primarily utilizes Windows VSS (Volume Shadow Copy Service) technology to ensure data integrity. In VMware without an agent, it achieves this by invoking VSS through VMware Tools. In Windows Agent mode, it directly calls the VSS interface.
Q2: What is Windows VSS technology?
A2: VSS, or Volume Shadow Copy Service, is a Windows service that enables the creation of point-in-time snapshots of volumes, including those containing databases. These snapshots, or shadow copies, provide a consistent view of the data, even if changes are being made to the database during the snapshot creation process.
VSS ensures database integrity through a process known as "shadow copy creation." When a VSS snapshot is triggered, the service coordinates with various components, including VSS writers associated with applications such as databases. These writers temporarily freeze write I/O operations to ensure that the data on the disk is in a consistent state at the time of the snapshot.
VSS is compatible with various Database Management Systems (DBMS), including SQL Server. Most major DBMS vendors provide VSS writers that integrate with the VSS framework, allowing for the creation of consistent and reliable database snapshots.
Q3: In VMware without an agent, how does HyperBDR call VSS?
A3: In VMware without an agent, HyperBDR collaborates with VMware Tools to invoke VSS, freezing the file system and application states to ensure data consistency during snapshot creation.
Q4: In Windows Agent mode, how does HyperBDR directly call the VSS interface?
A4: In Windows Agent mode, HyperBDR directly calls the VSS interface provided by the Windows operating system to freeze data and create snapshots, ensuring the backup data is in a transactionally consistent state.
Q5: Does HyperBDR's data integrity assurance apply to specific applications like databases?
A5: Yes, HyperBDR's VSS integration is application-aware and applicable to specific applications, including databases. VSS ensures that application data is in a consistent state during snapshot creation.
Configuration of Antivirus Software on Windows Agent Source Host
Kaspersky
Kaspersky Pause Protection
Set the running Kaspersky to Pause Protection status.
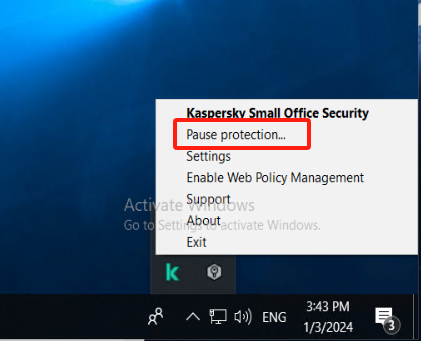
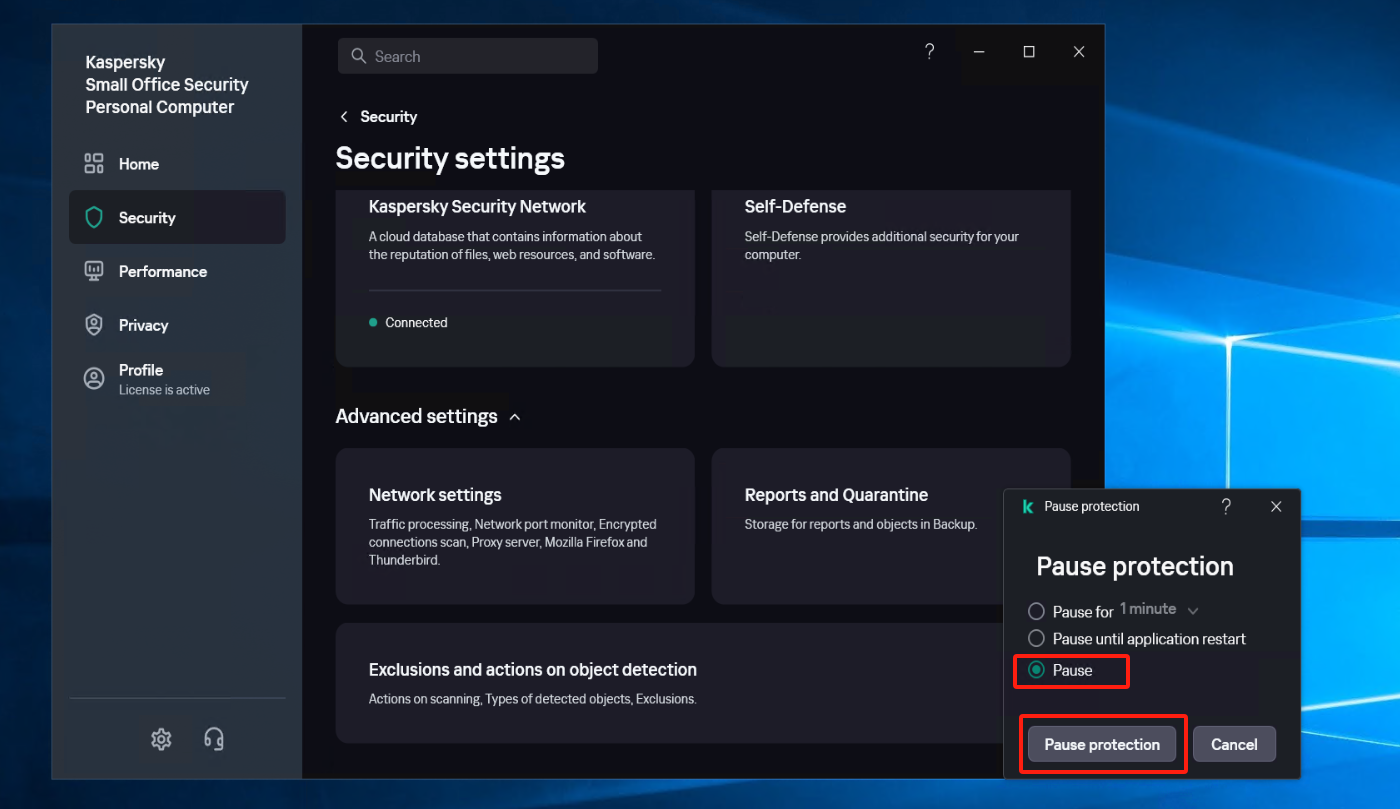
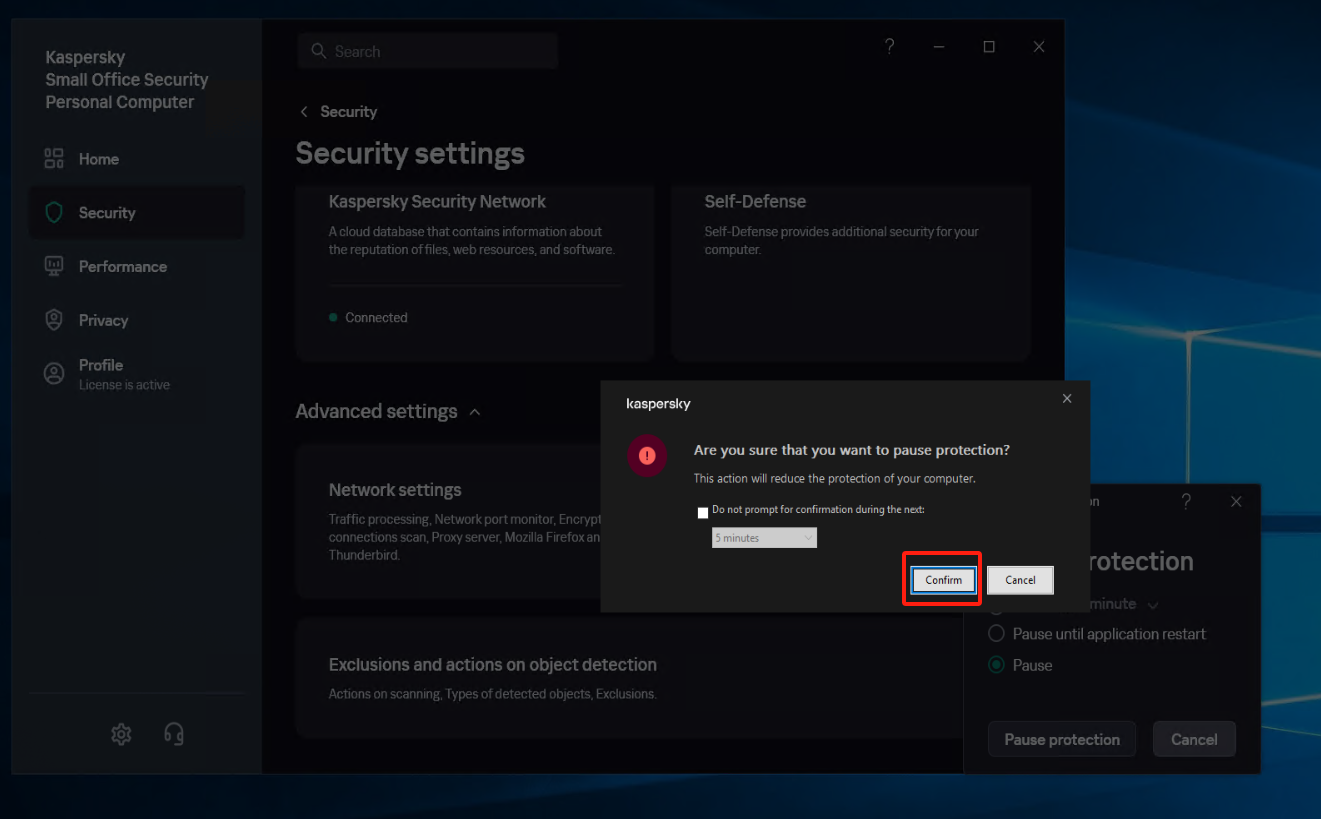
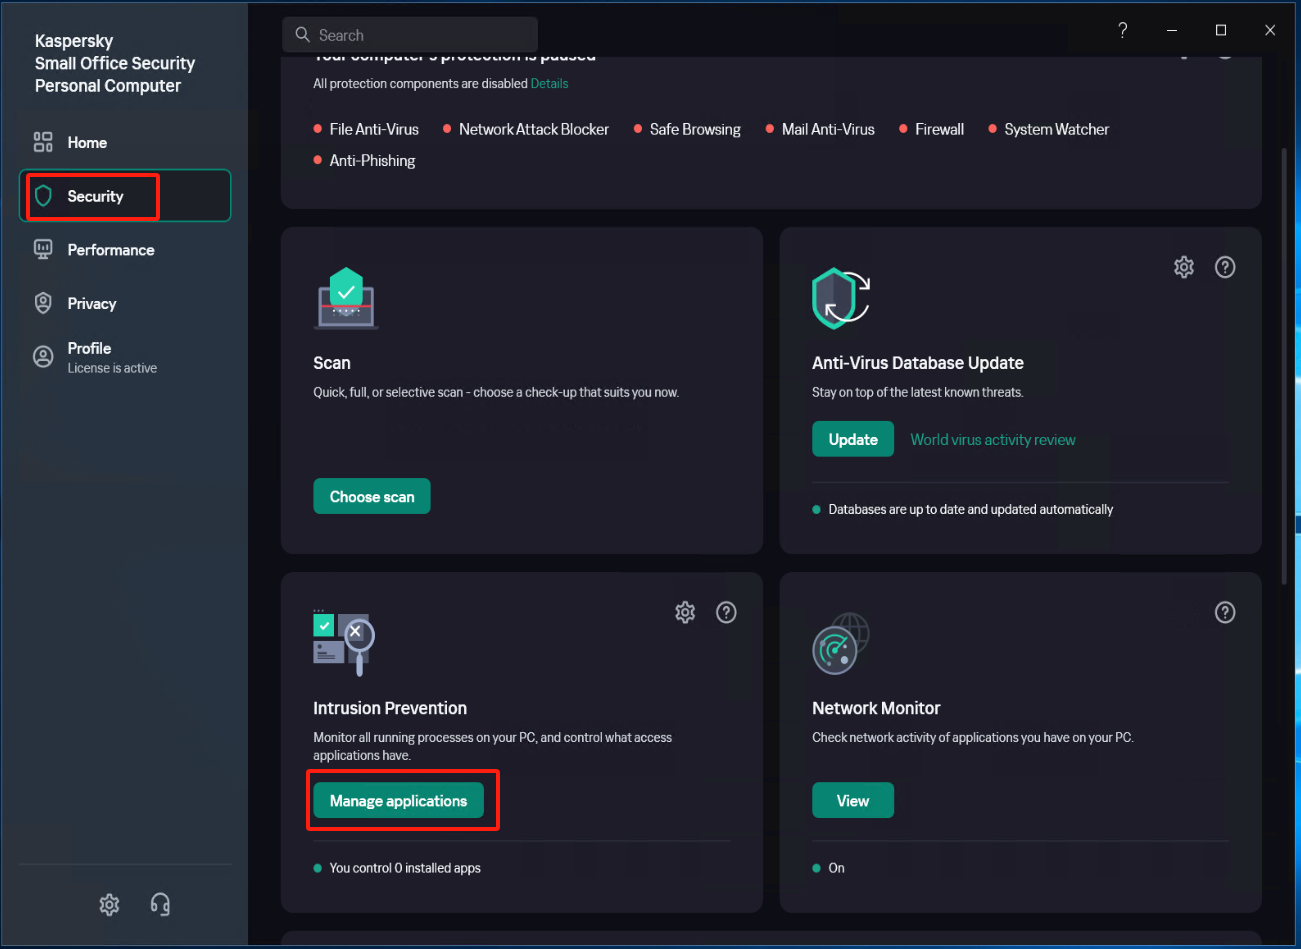
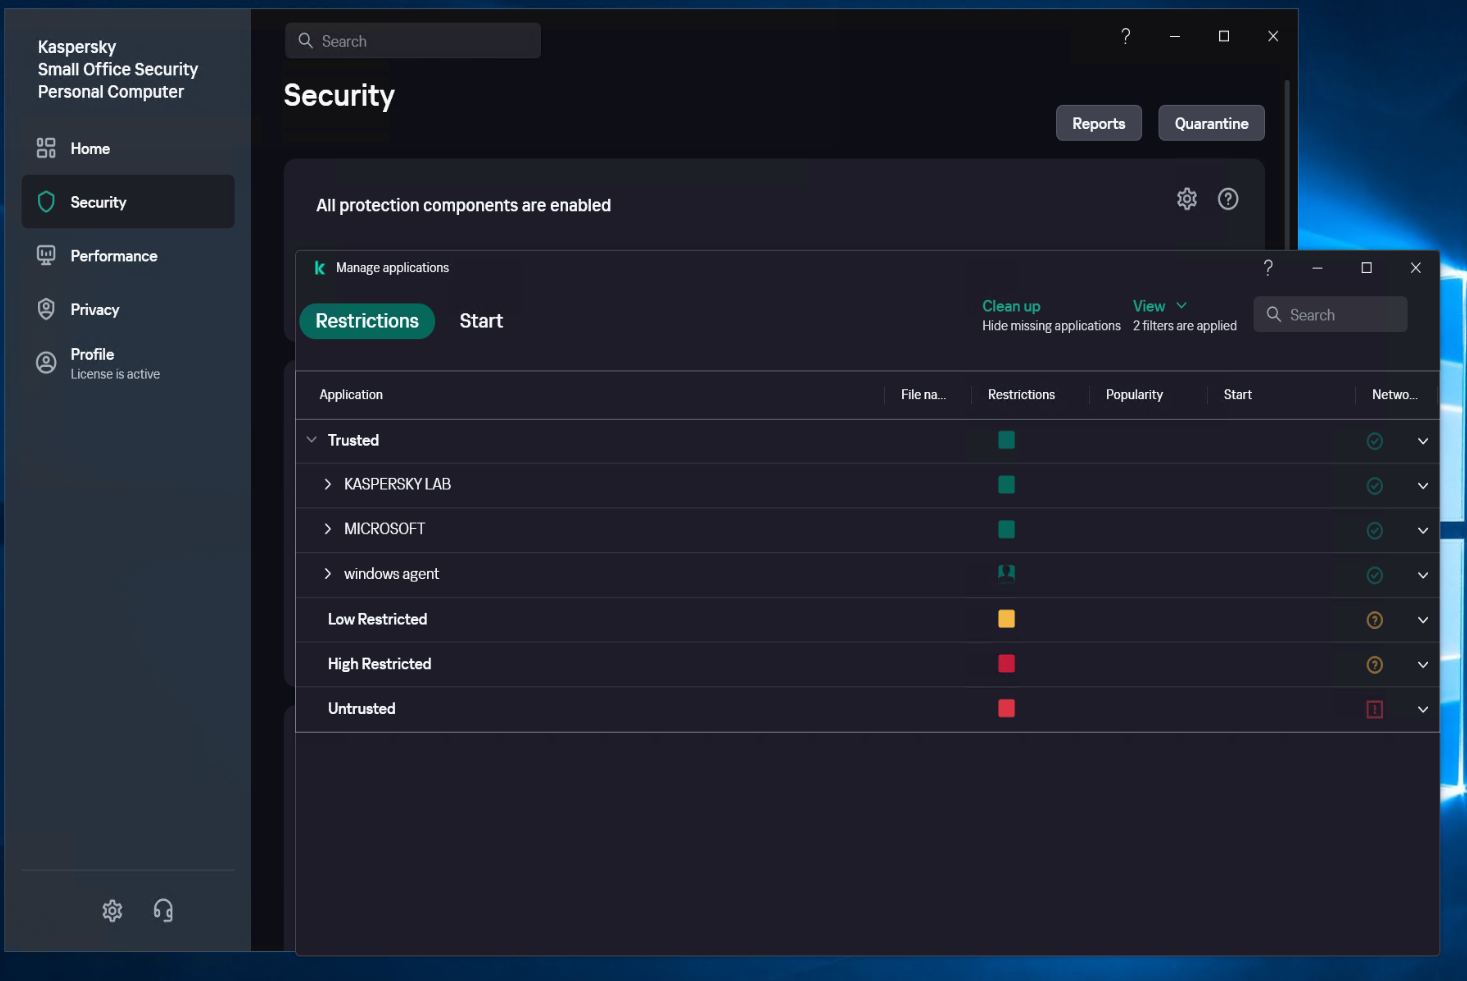
Create a new subgroup named "windows agent" under [Application]
Select [Security] - [Intrusion Prevention] - [Manage applications], and create a new subgroup named "windows agent" under [Application].
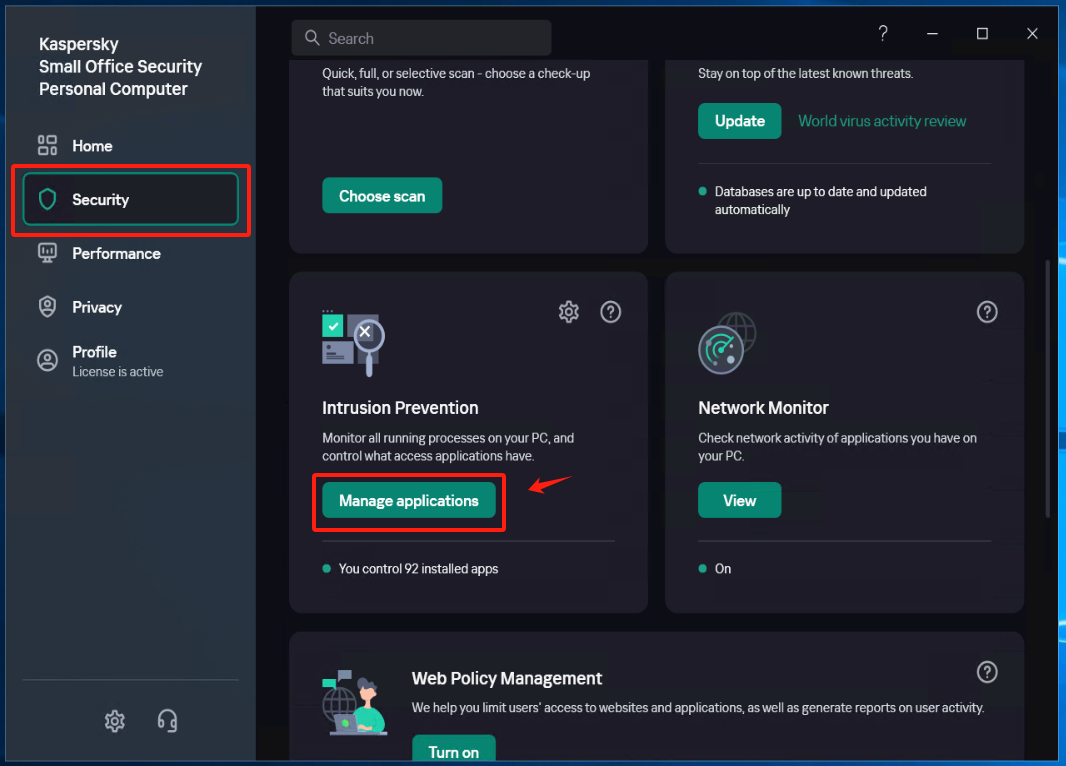
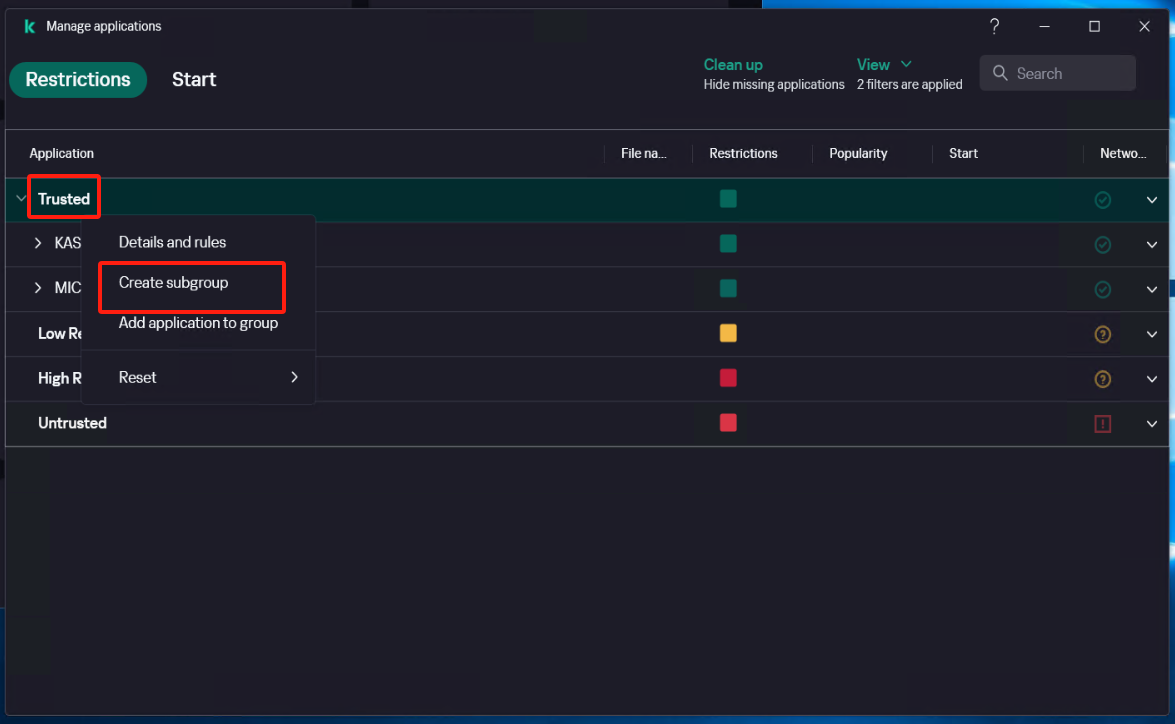
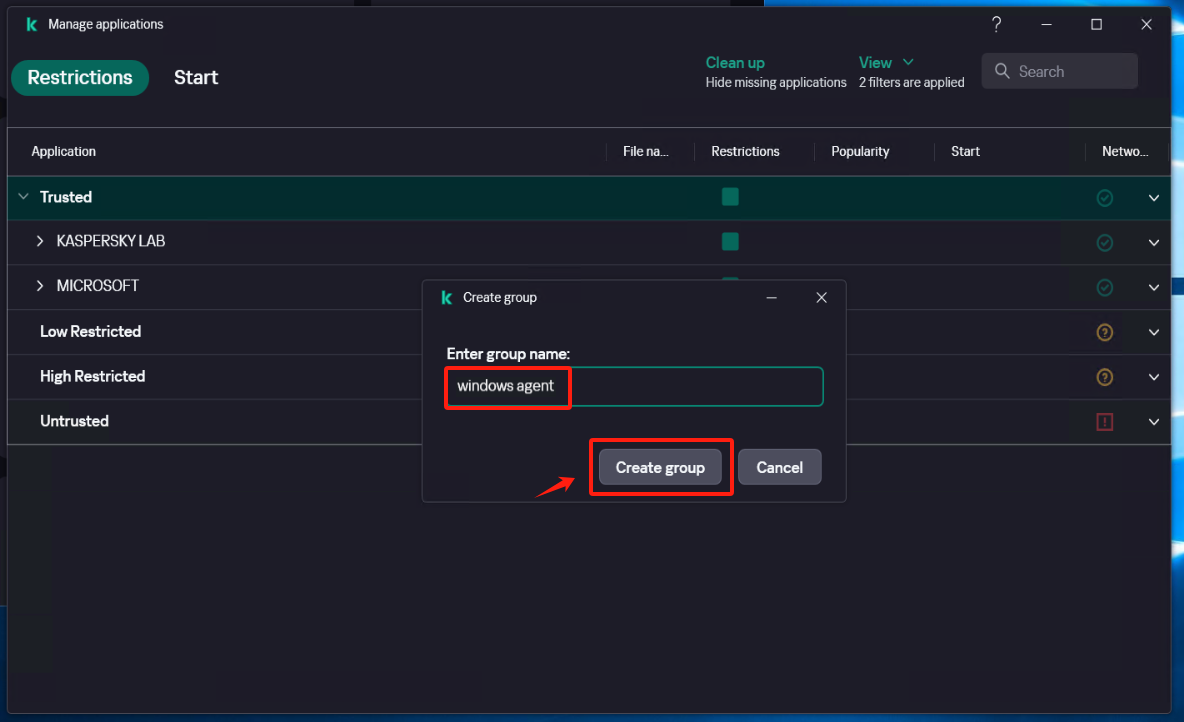
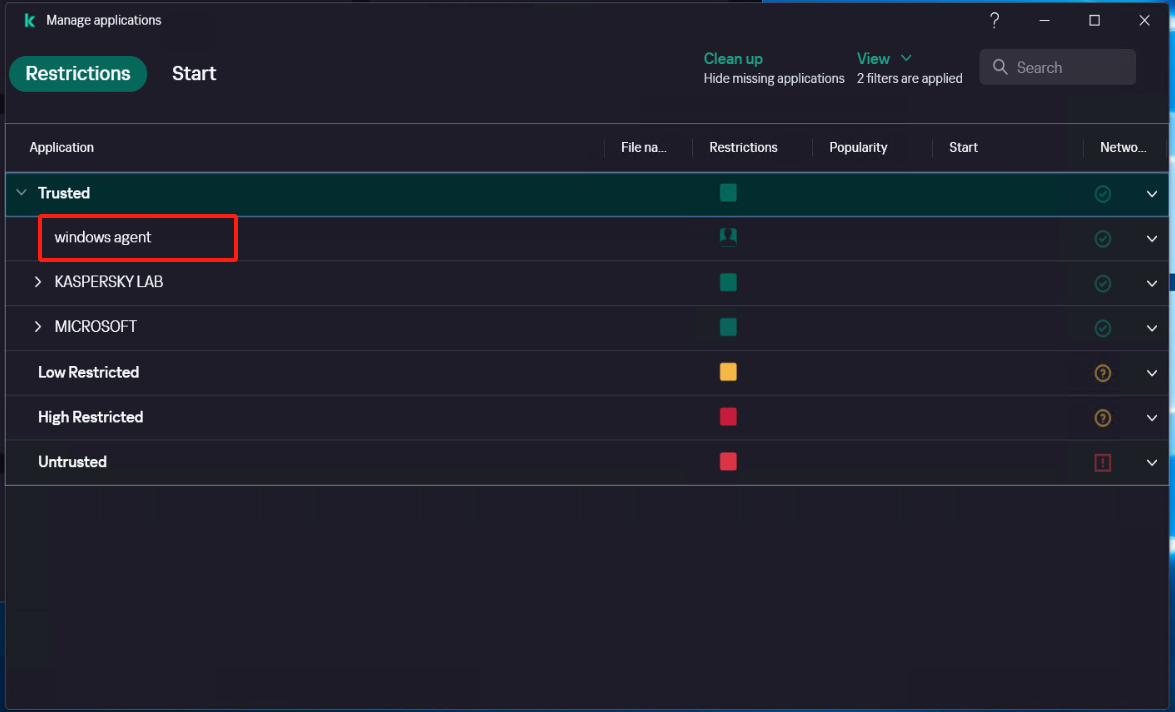
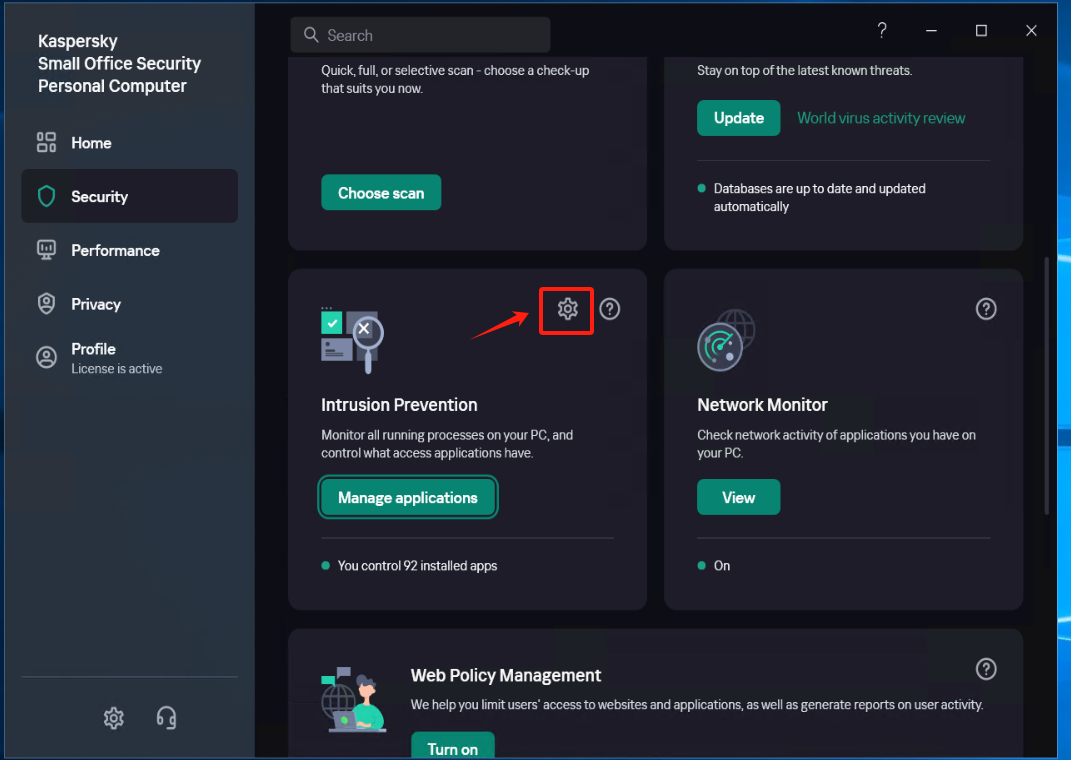
Configure [Intrusion Prevention]
Locate the [Trust group for applications started before startup of Kaspersky Small Office Security] item and set it to the recently created trust group "windows agent", save the configuration.
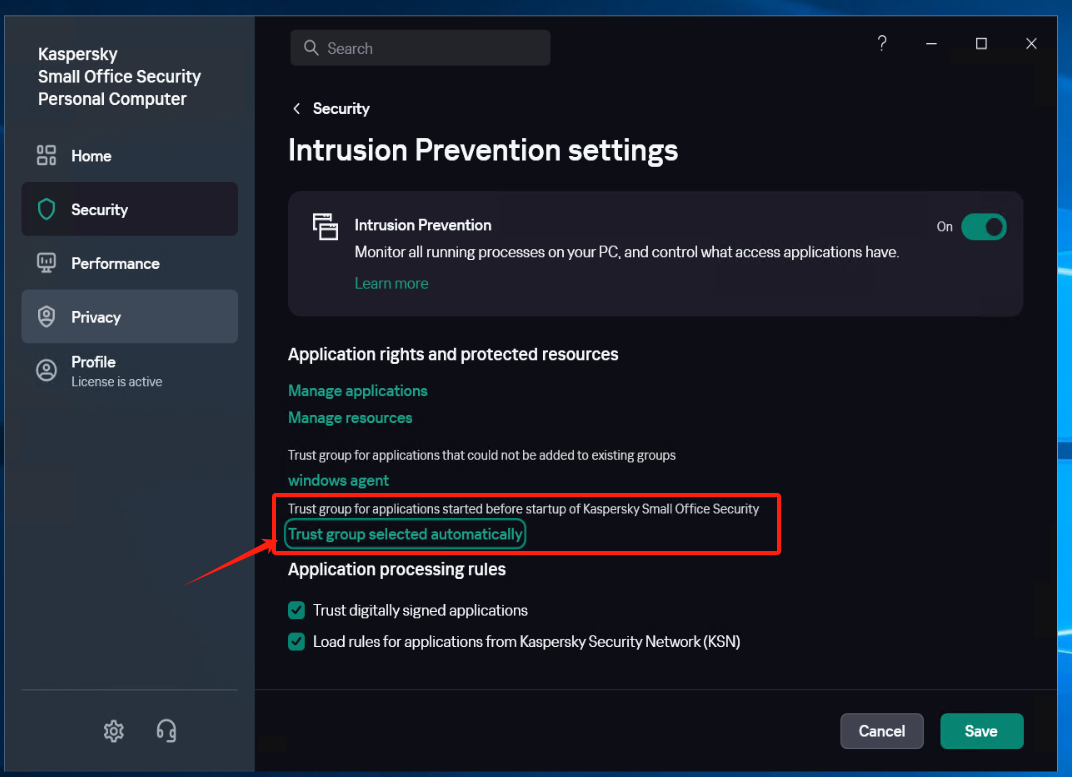
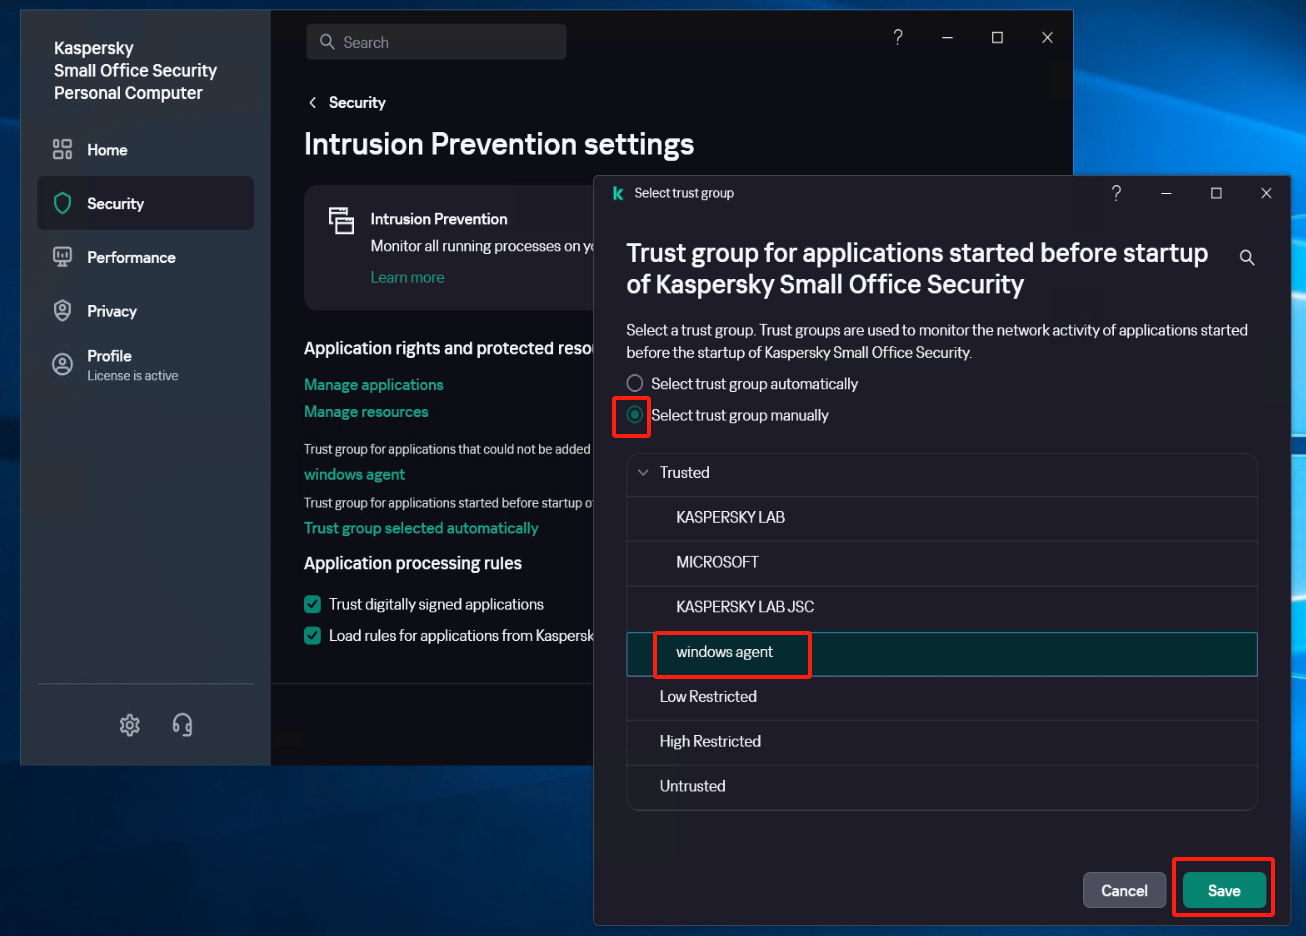
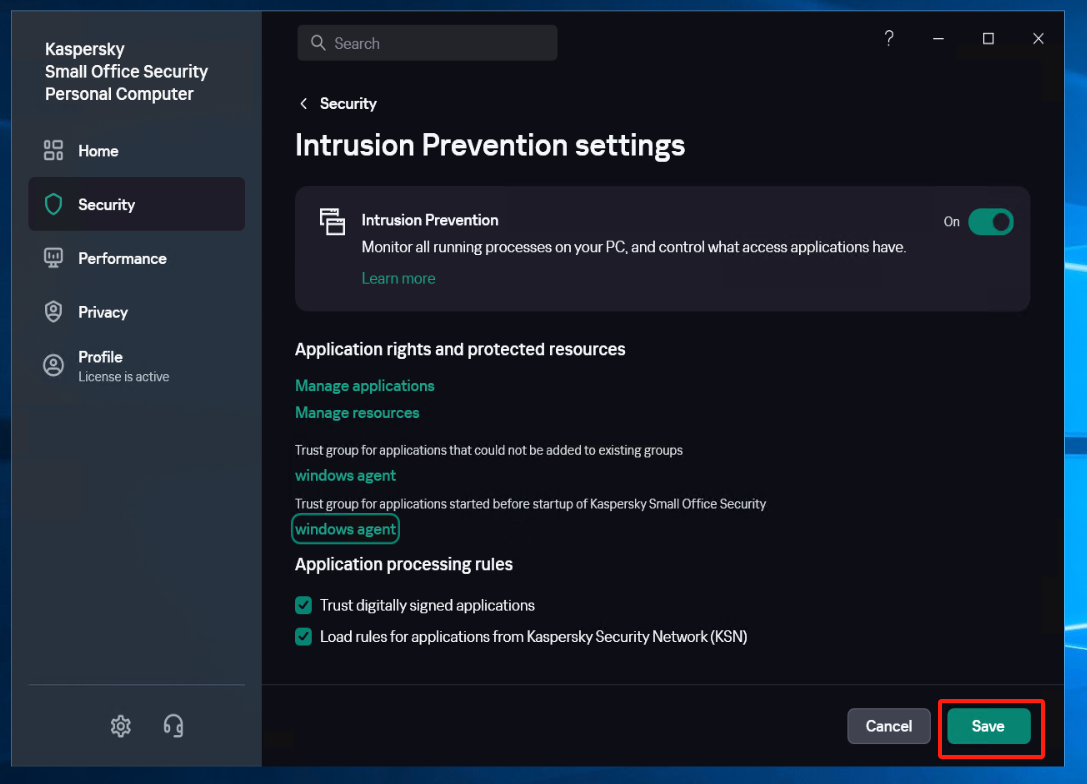
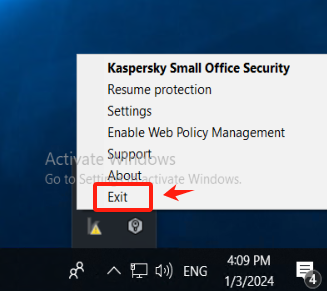
Exit Kaspersky
Install Windows Agent
提示
After installing Windows Agent, do not start Windows Agent temporarily.
Reference Document: https://docs.oneprocloud.com/userguide/poc/agent-pre-settings.html#unzip-the-installation-package-and-proceed-with-the-installation
Run the Kaspersky
提示
When Kaspersky is restarted, it remains in the paused protection state.
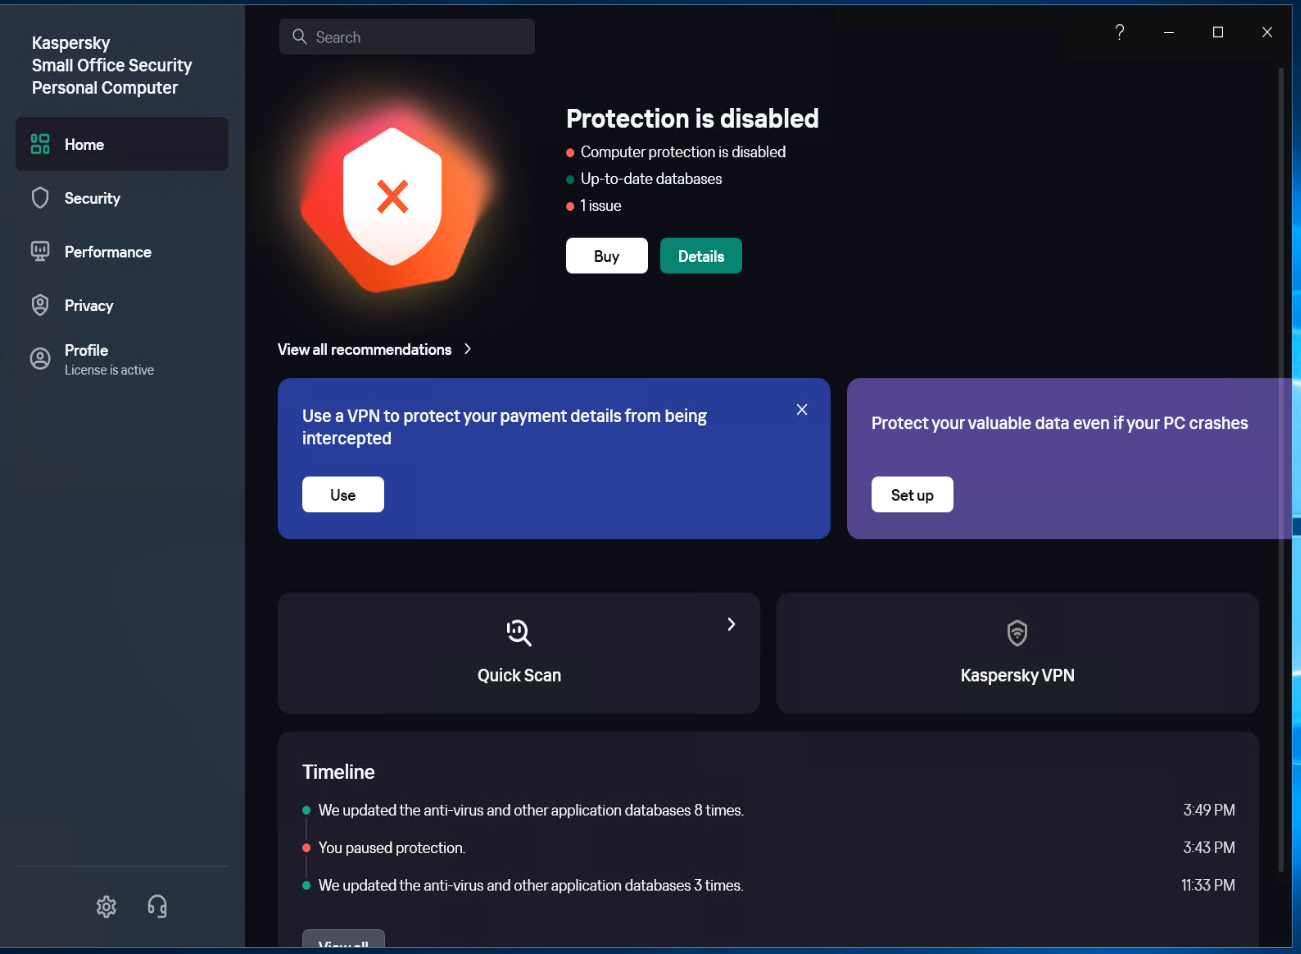
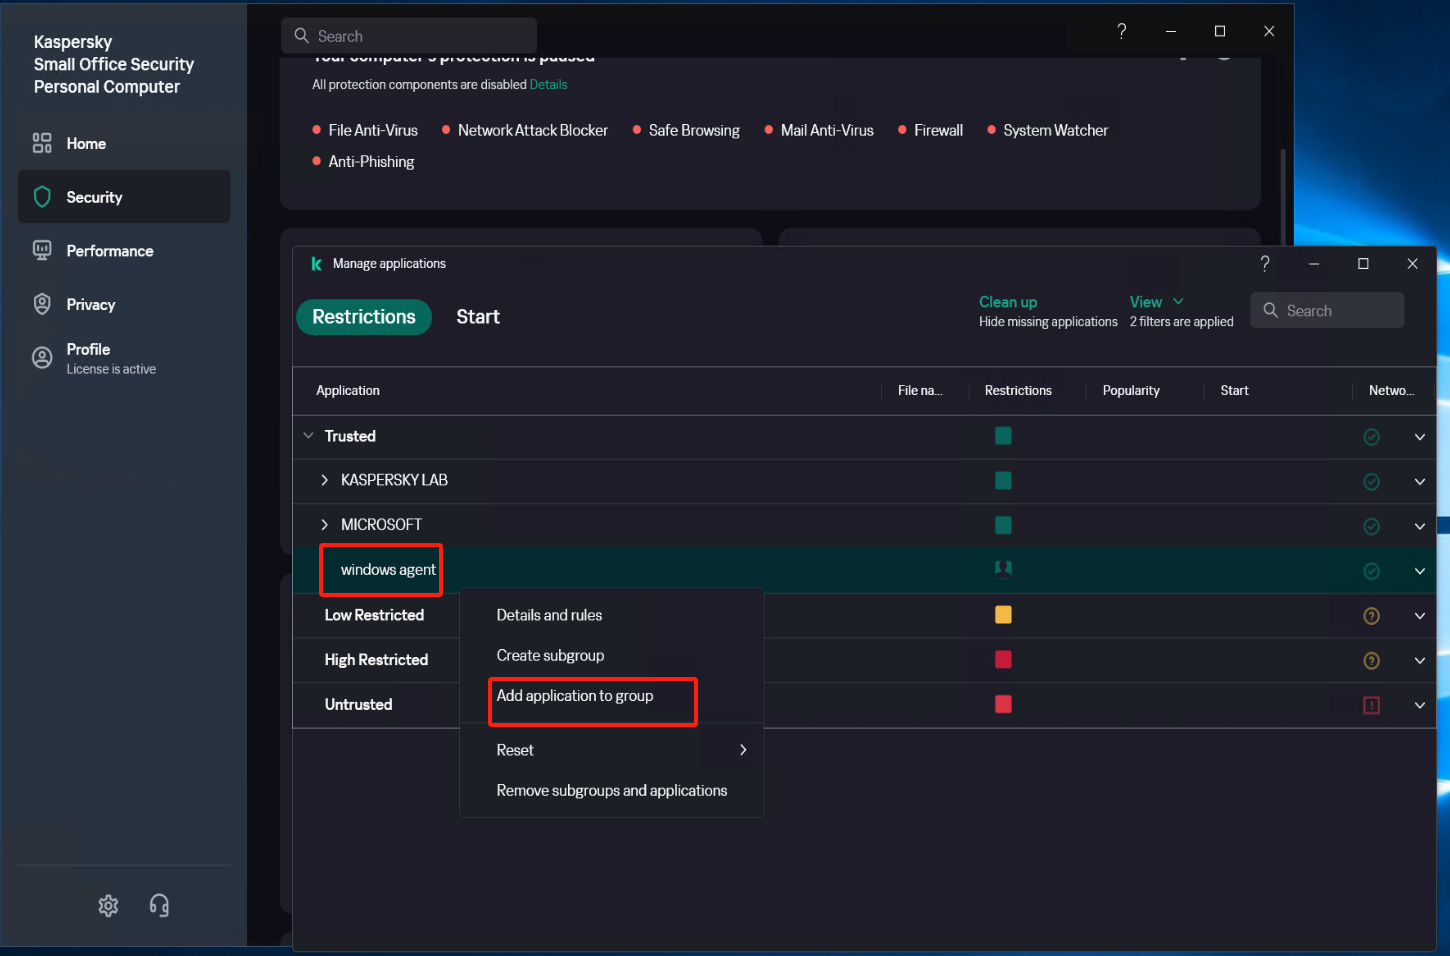
Add the application of Windows Agent to the trusted group.
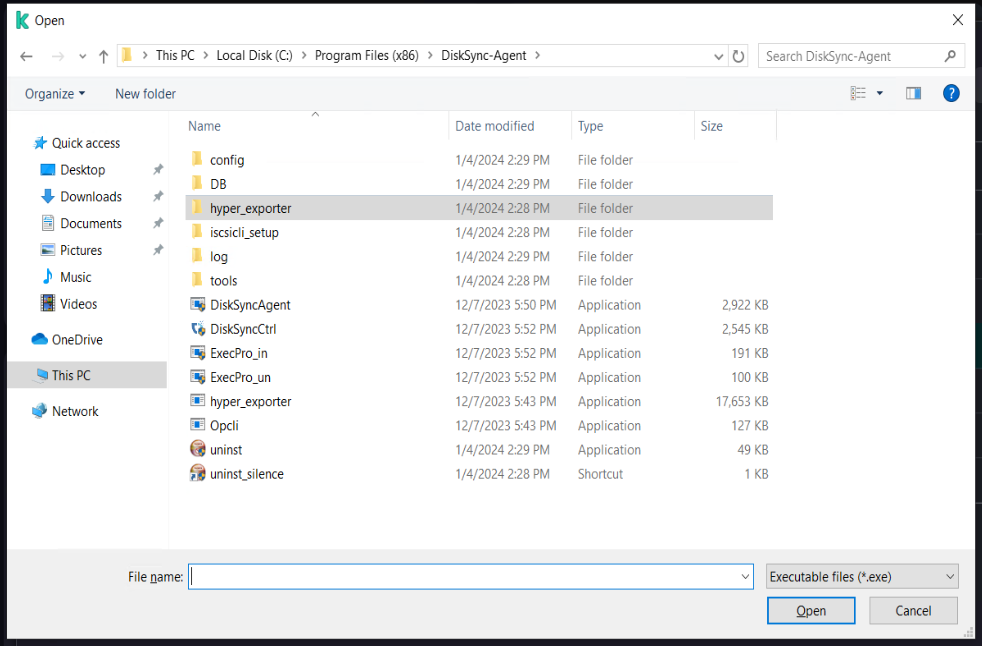
Select [Security] - [Intrusion Prevention] - [Manage applications], Right-click on "windows agent", click on [Add Application to Group], and add all exe, bat, and sys files under the installation directory of Windows Agent and its subdirectory "hyper_exporter".
Modify Security settings (1)
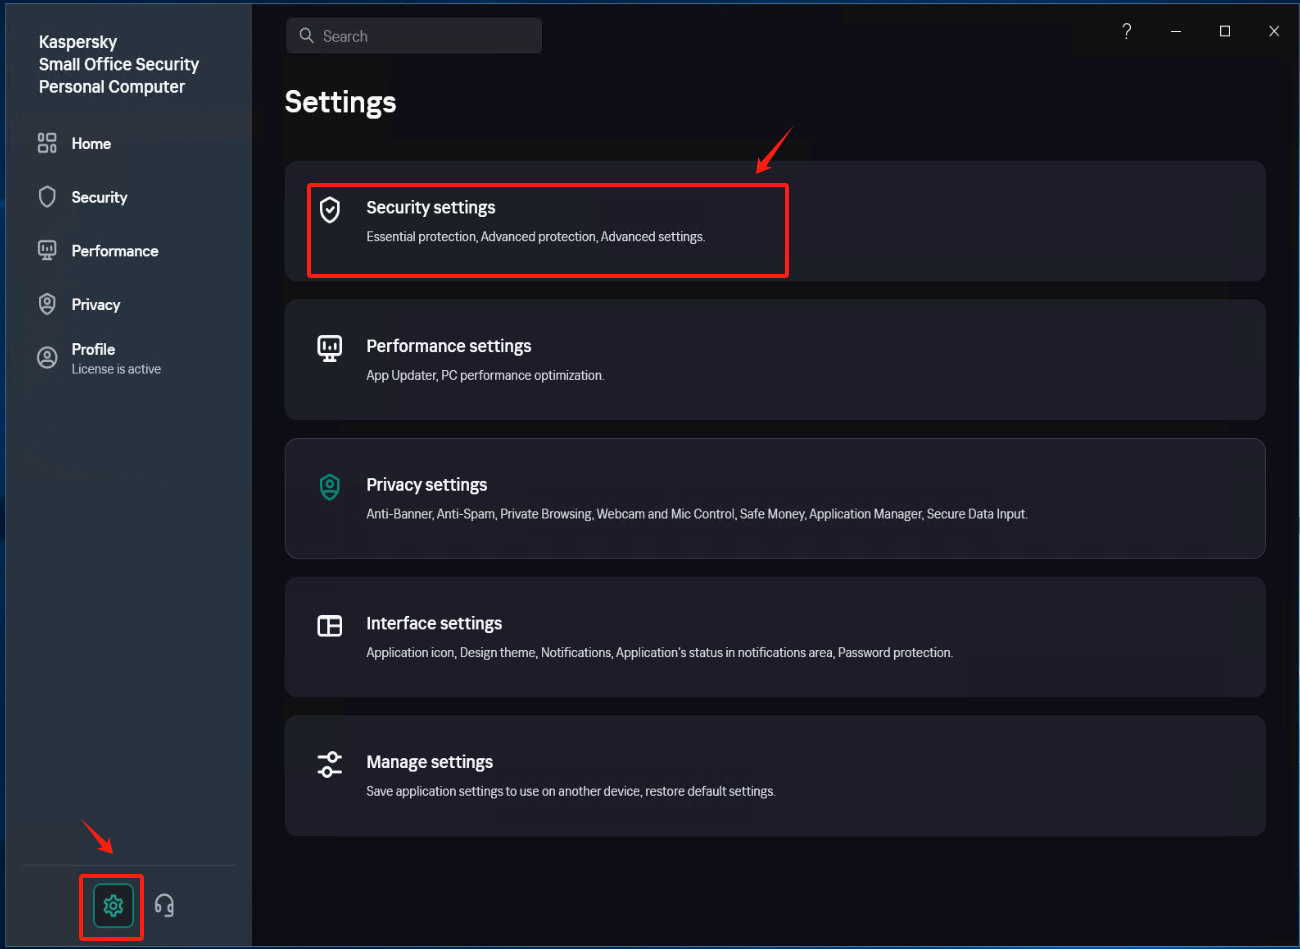
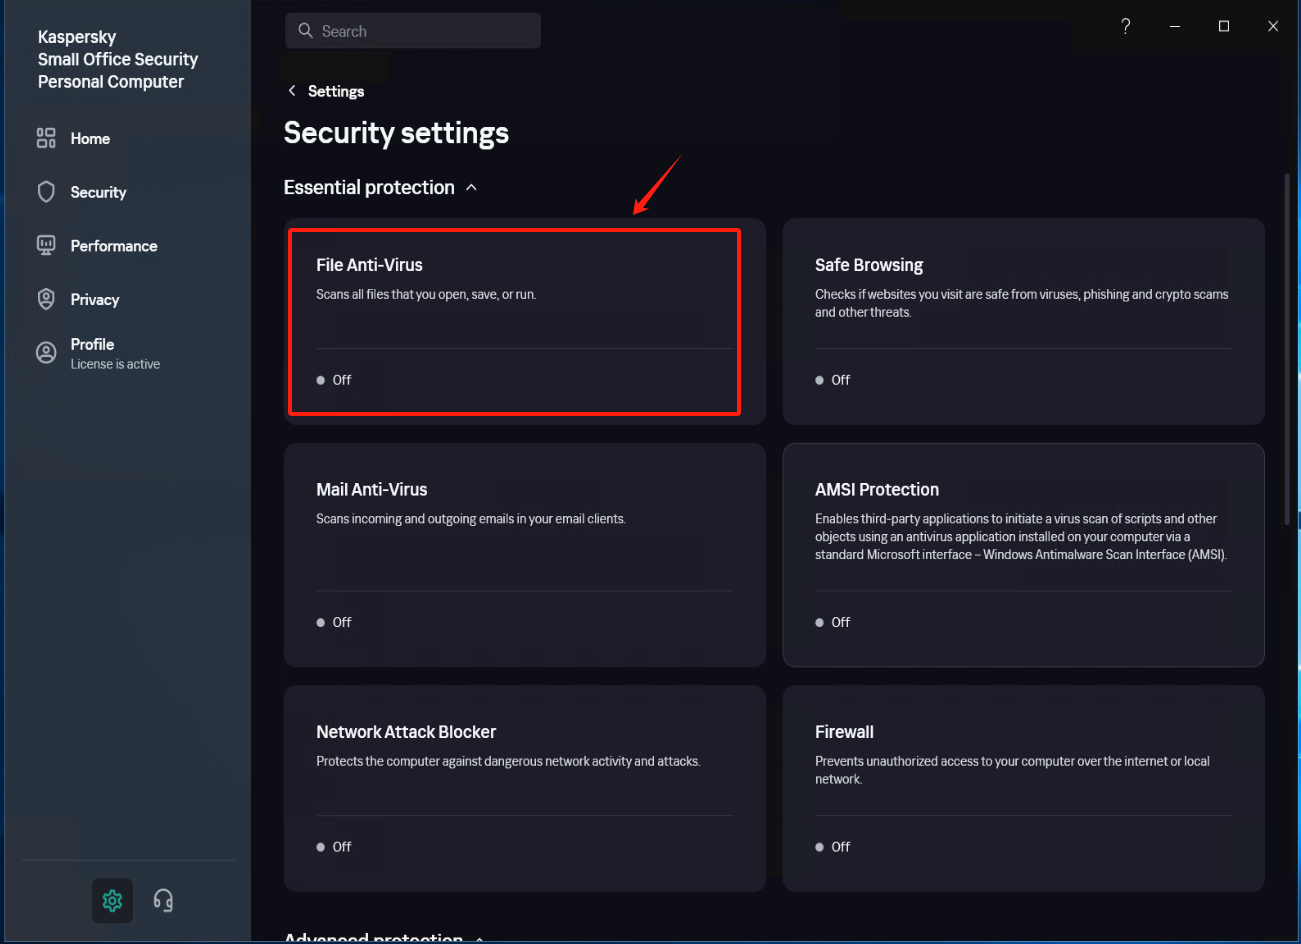
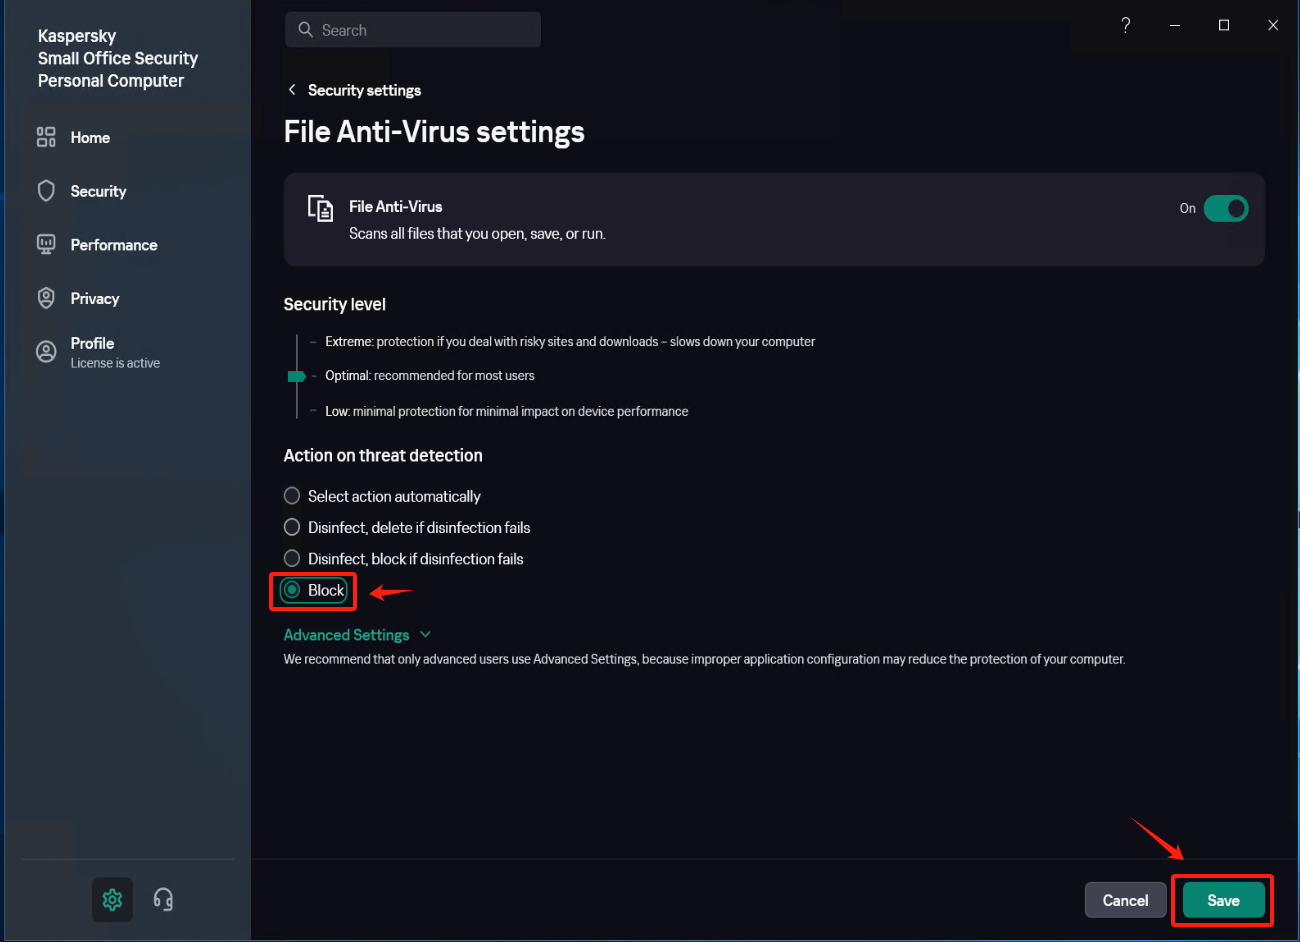
In [Settings] - [Security Settings] - [File Anti-Virus], locate the [Actions on threat detection] option, check [Block], and save the settings.
Modify Security settings (2)
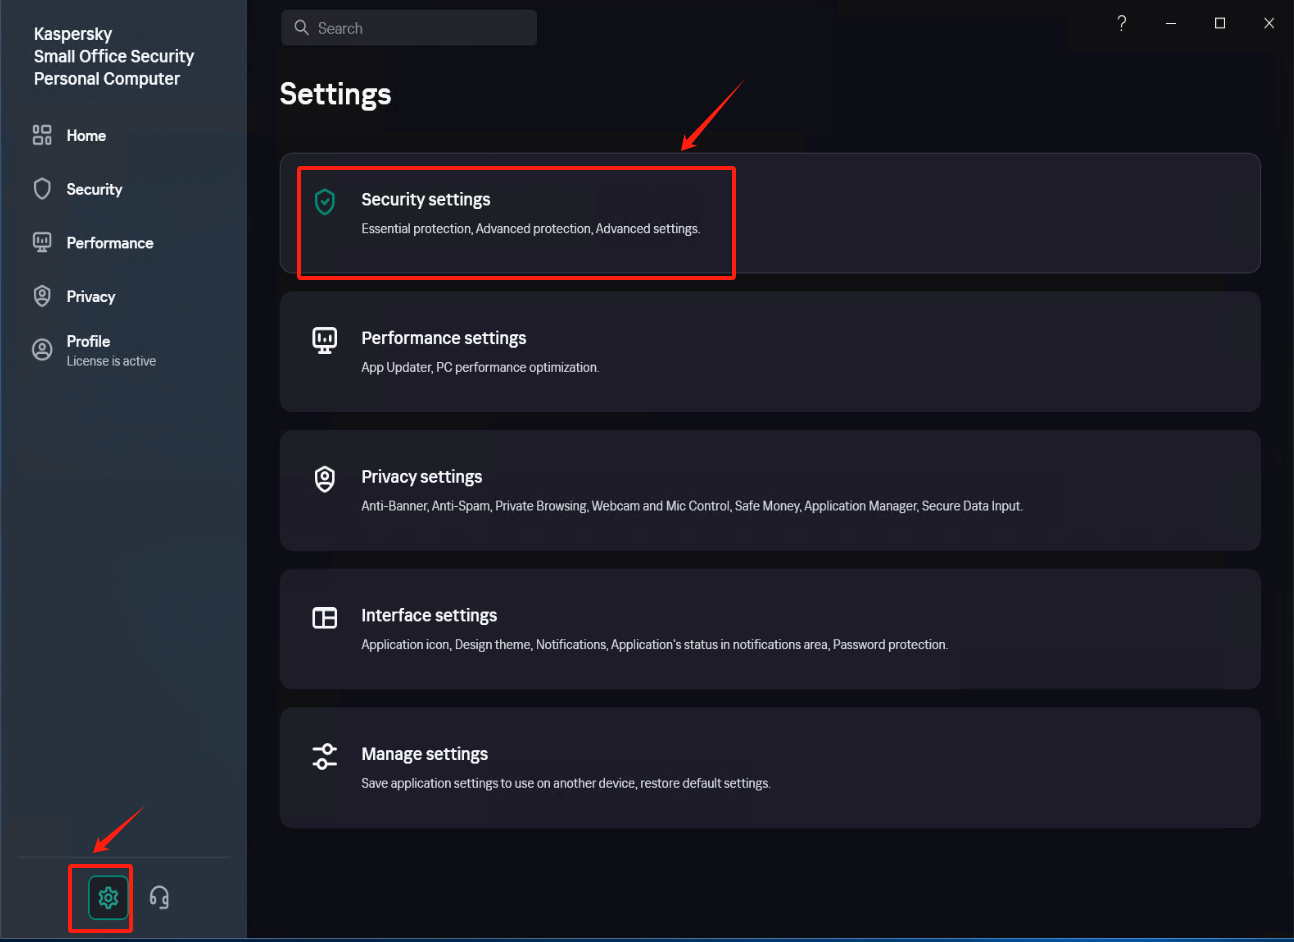
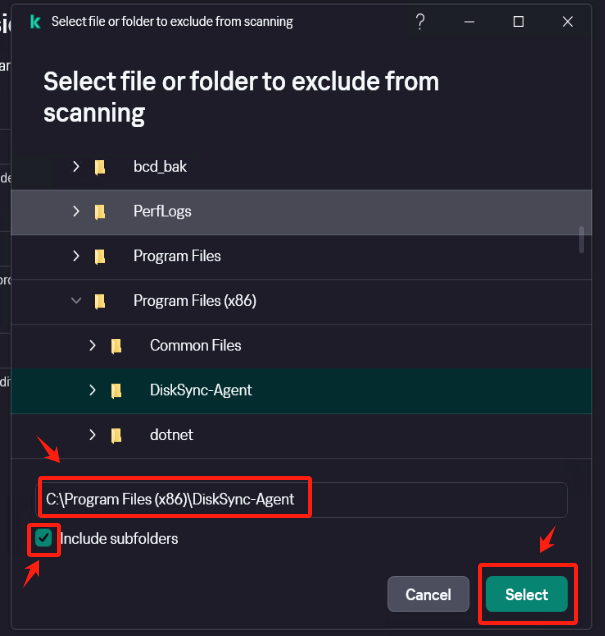
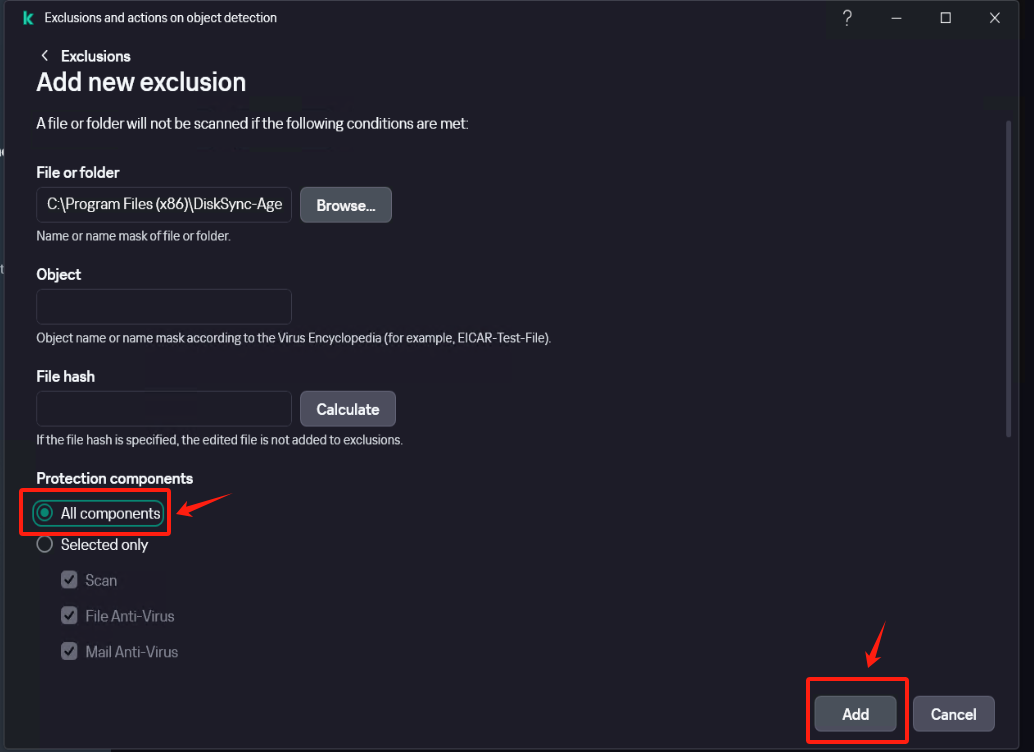
In [Settings] - [Security Settings] - [Exclusions and actions on object detected], click [Manage Exclusions] - [+Add] add the installation directory of Windows Agent as an exclusion, check [Protect components] - [All components], Click [Add] after confirmation.
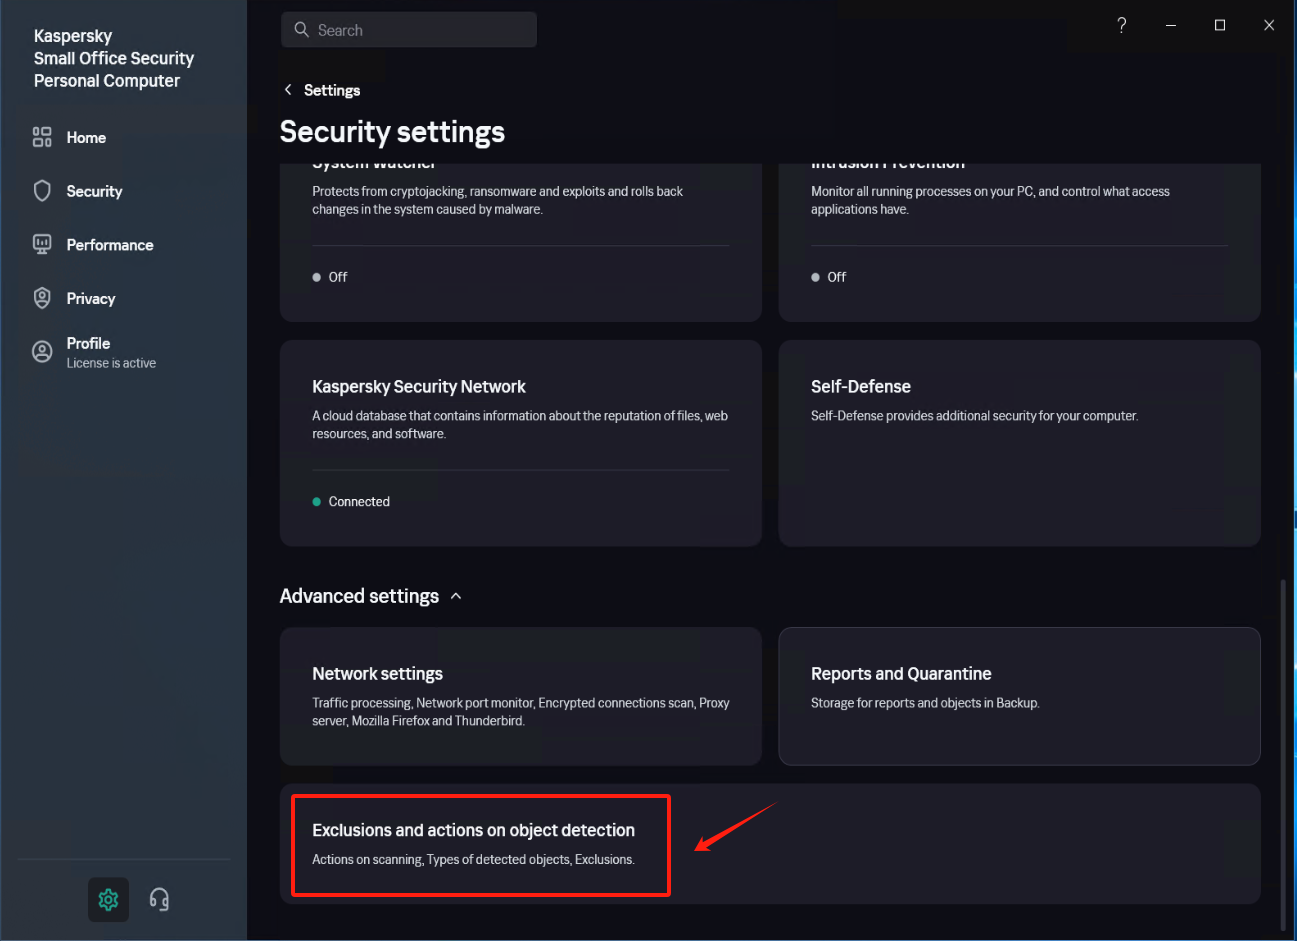
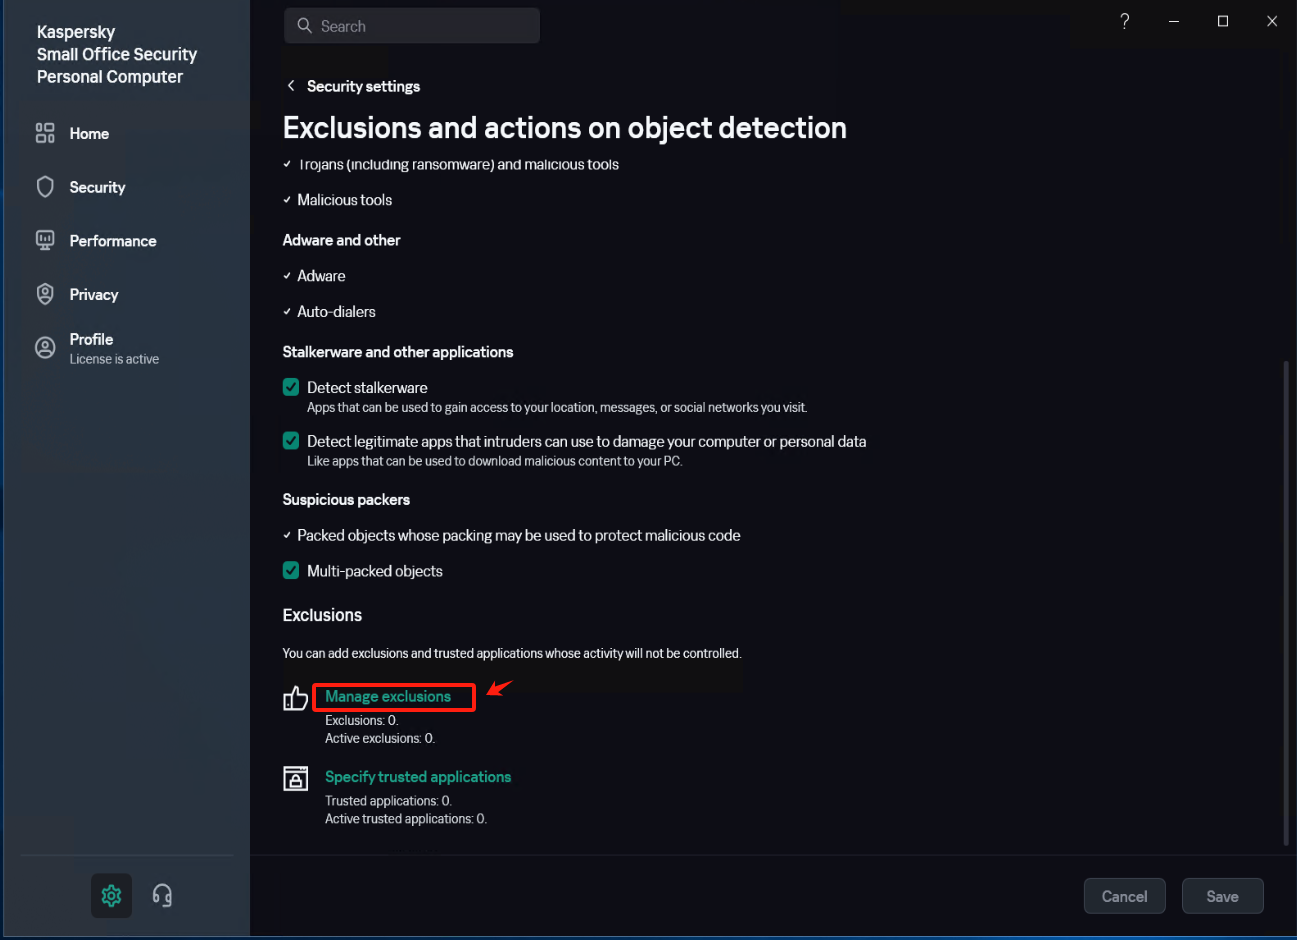
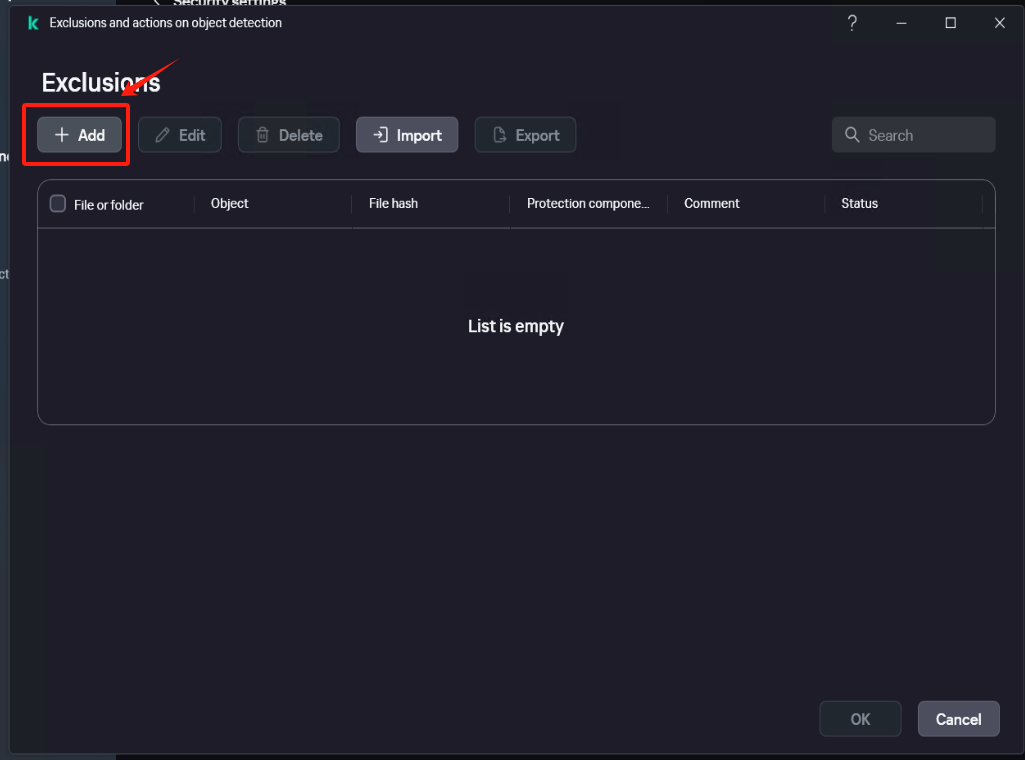
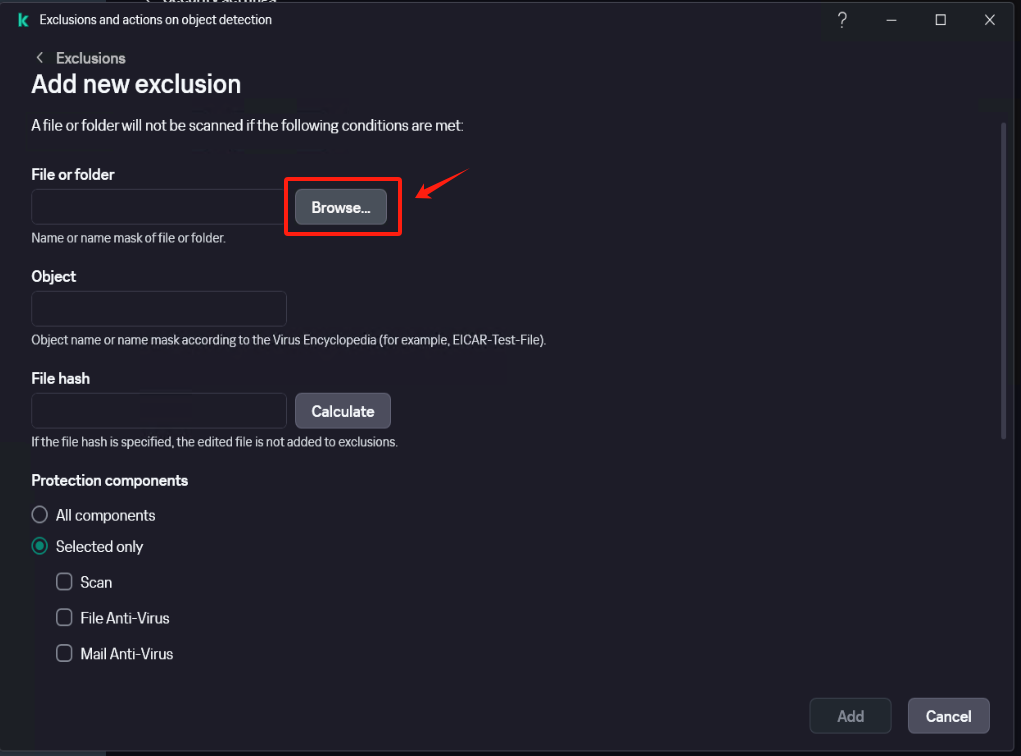
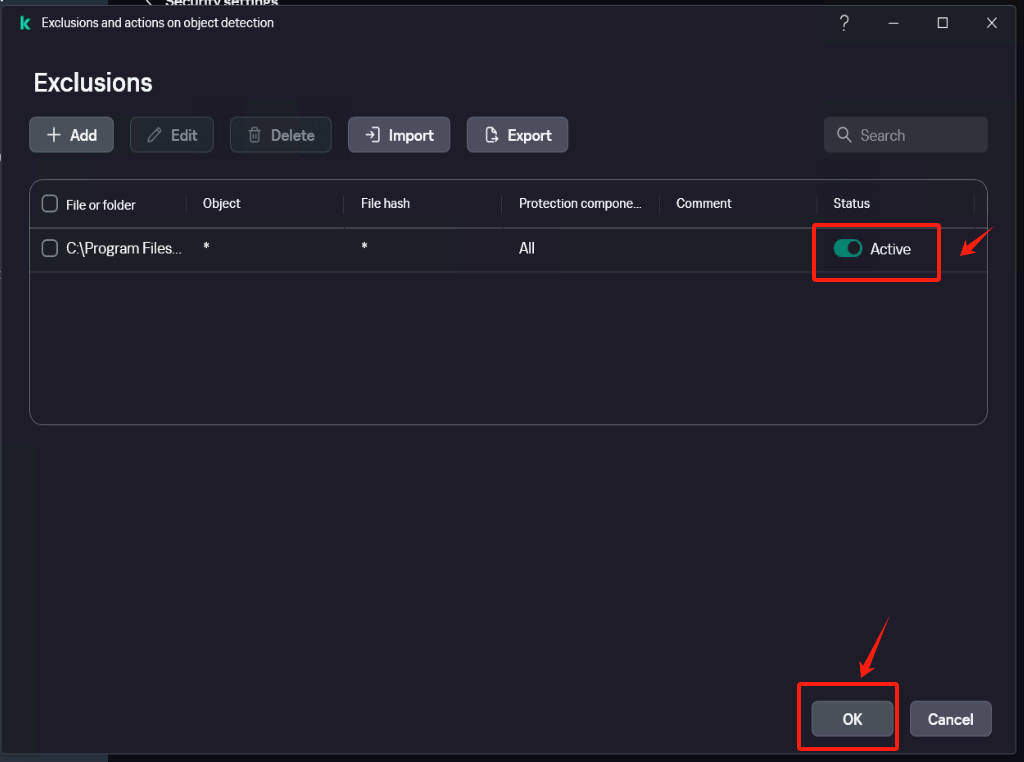
Confirm that the exclusion status is set to [Active].
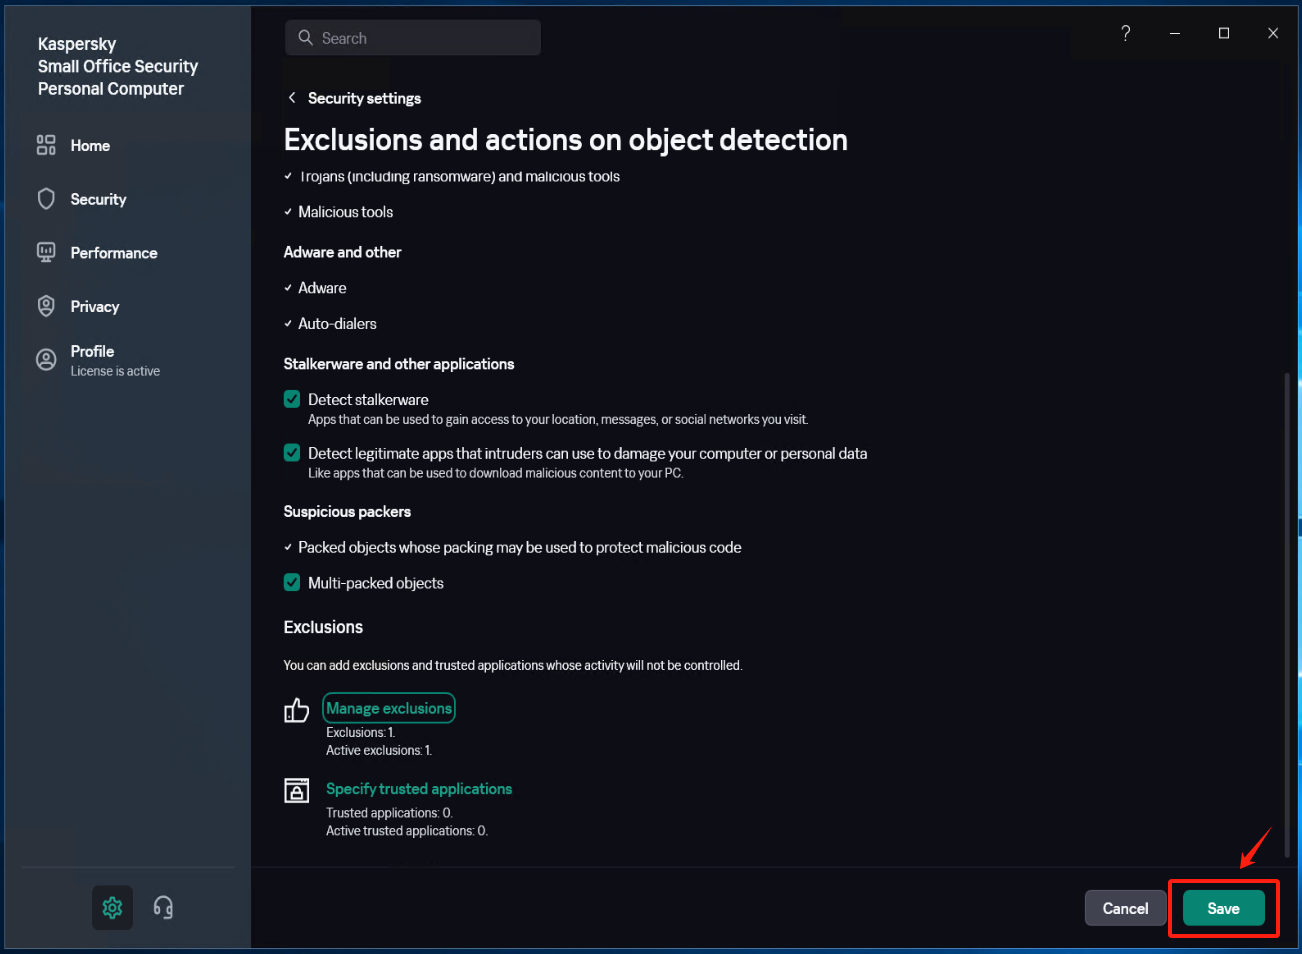
Save the settings
Run Windows Agent
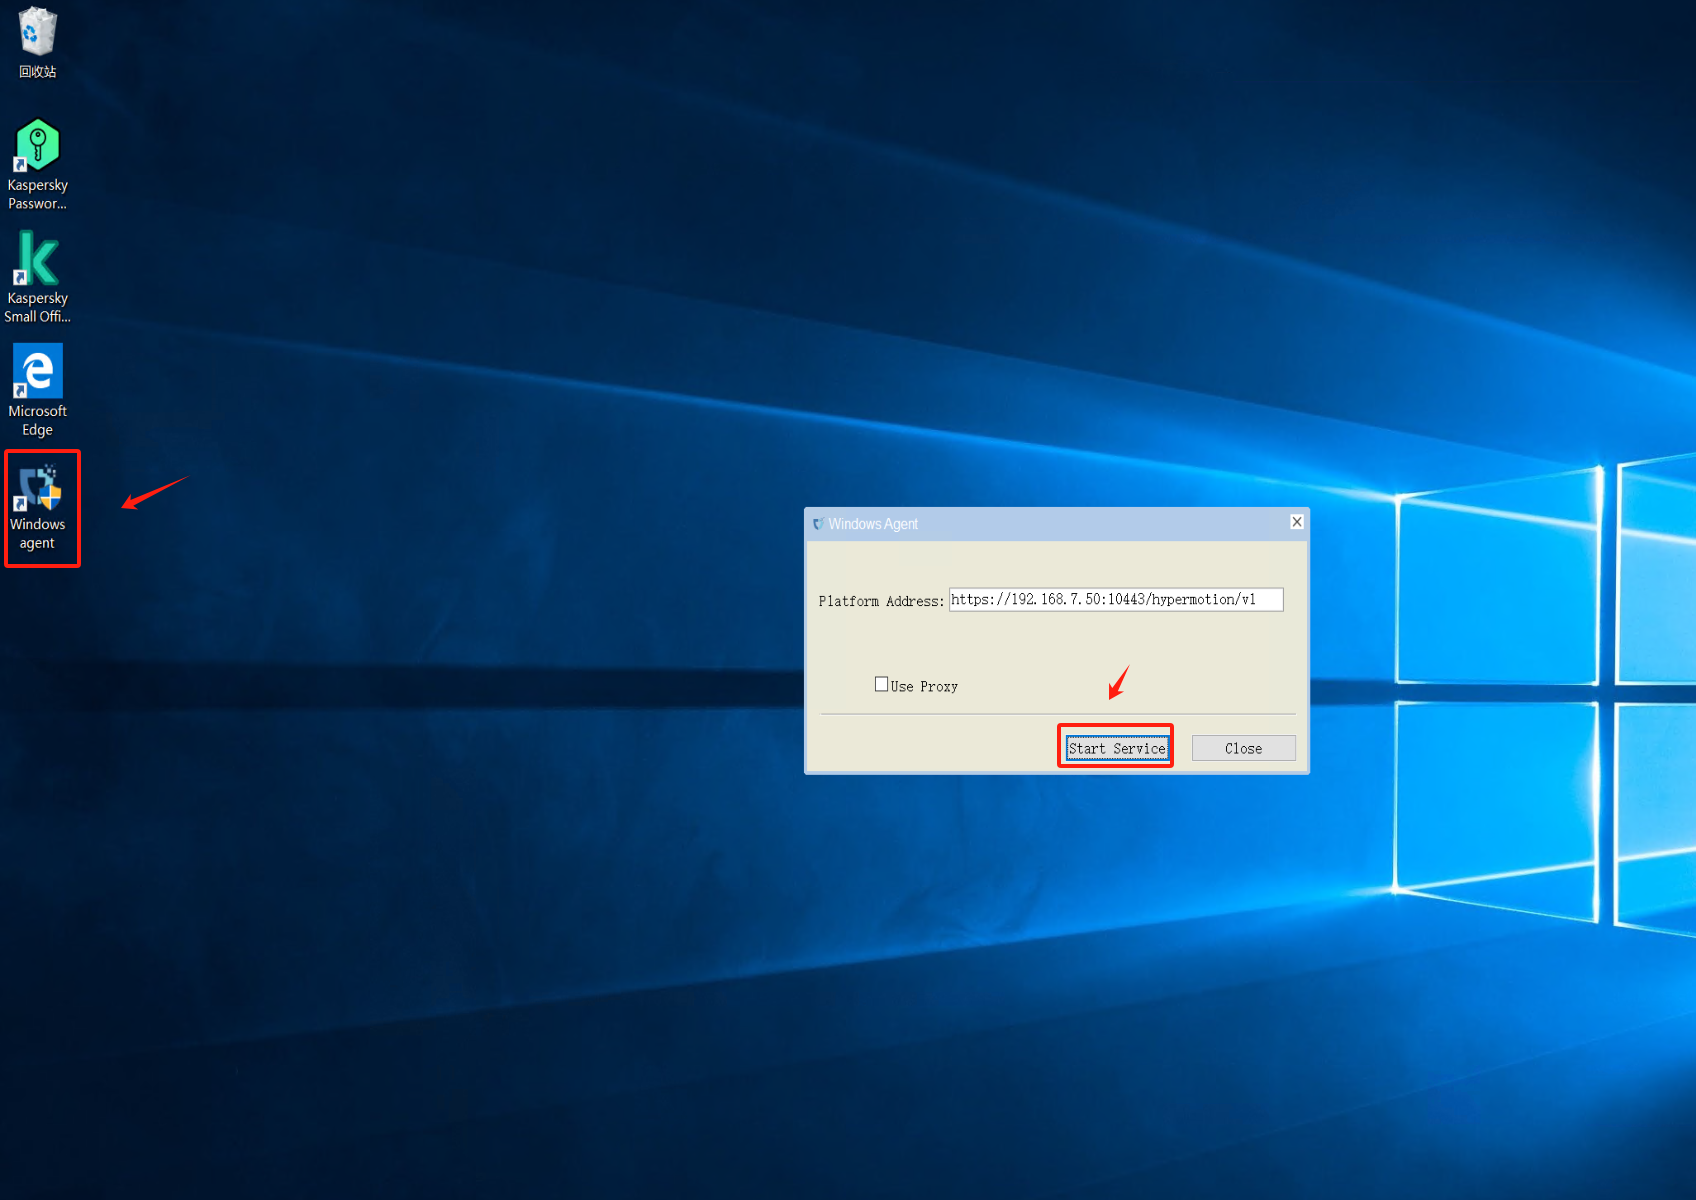
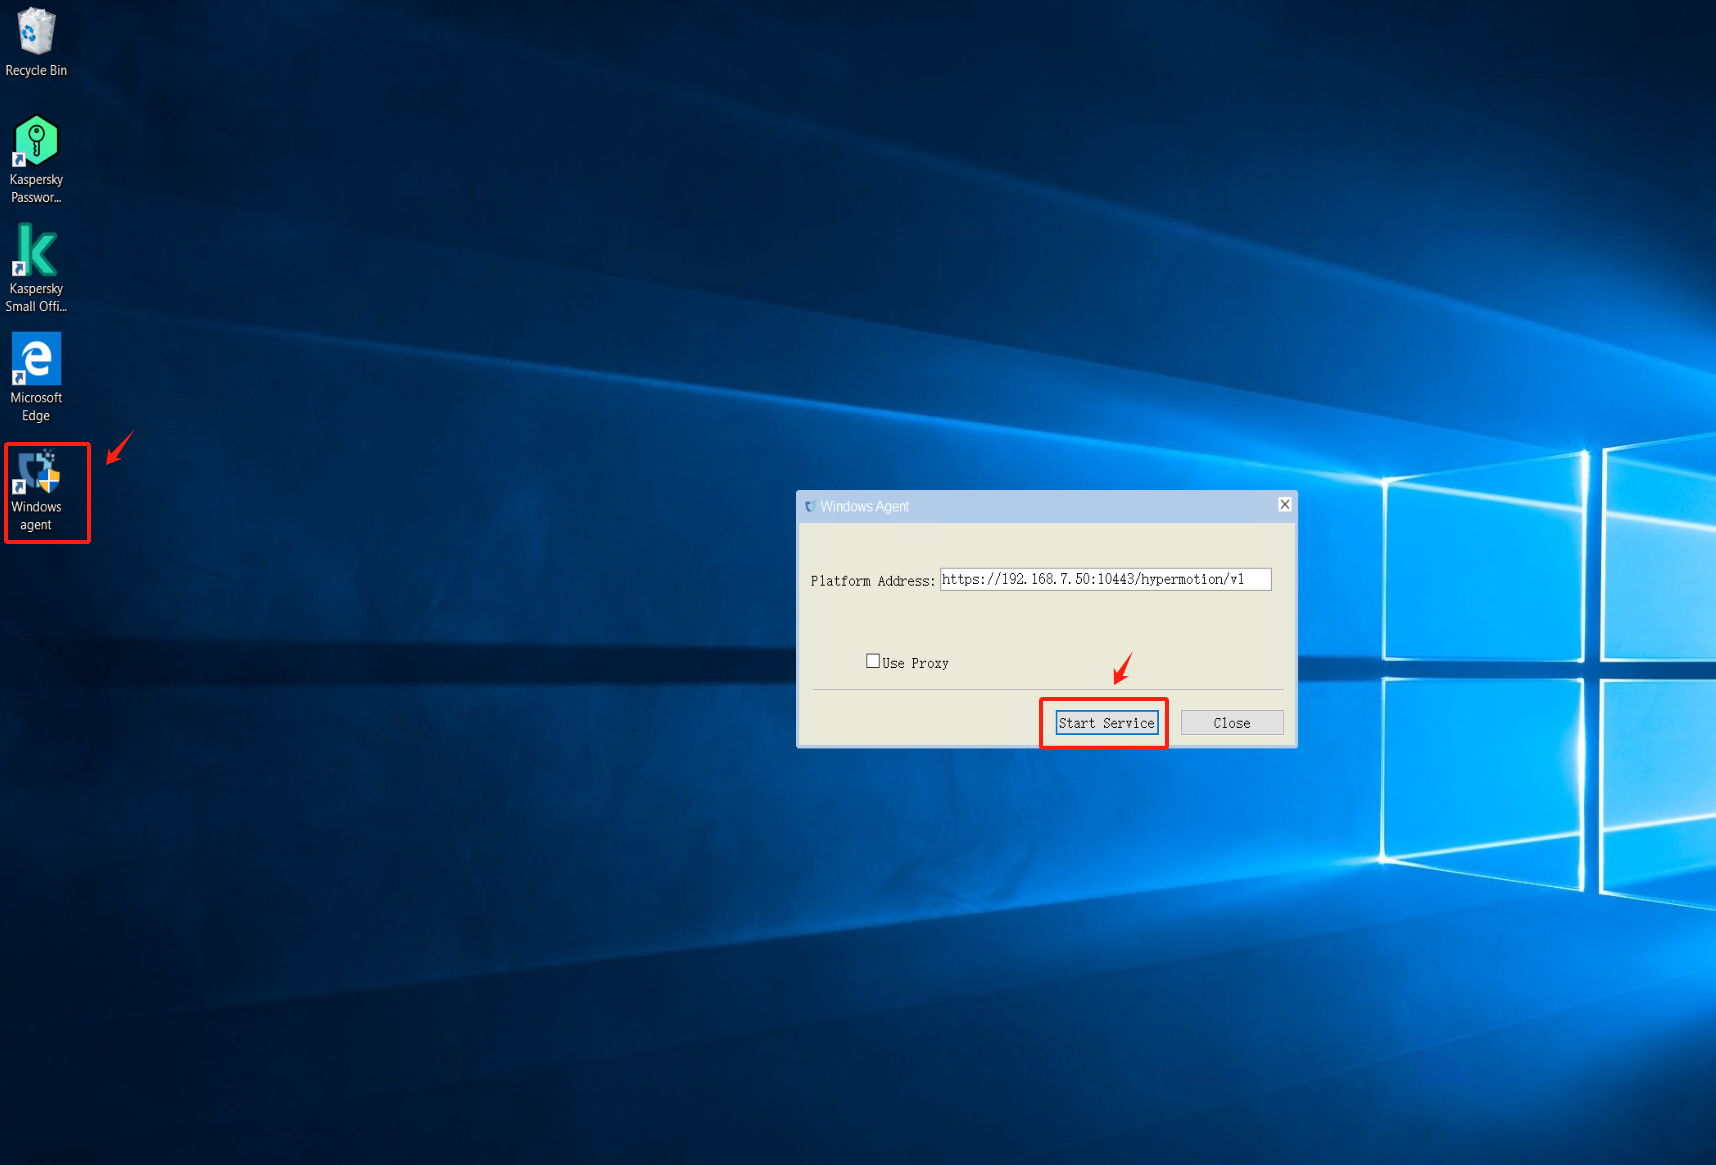
Click on the Windows Agent shortcut on the desktop, start the service, and check if the registration is successful after 1-2 minutes. Verify if the service status is normal.
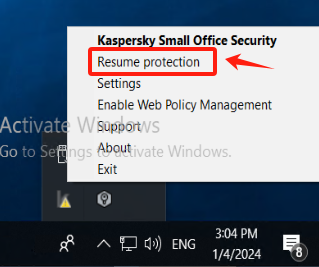
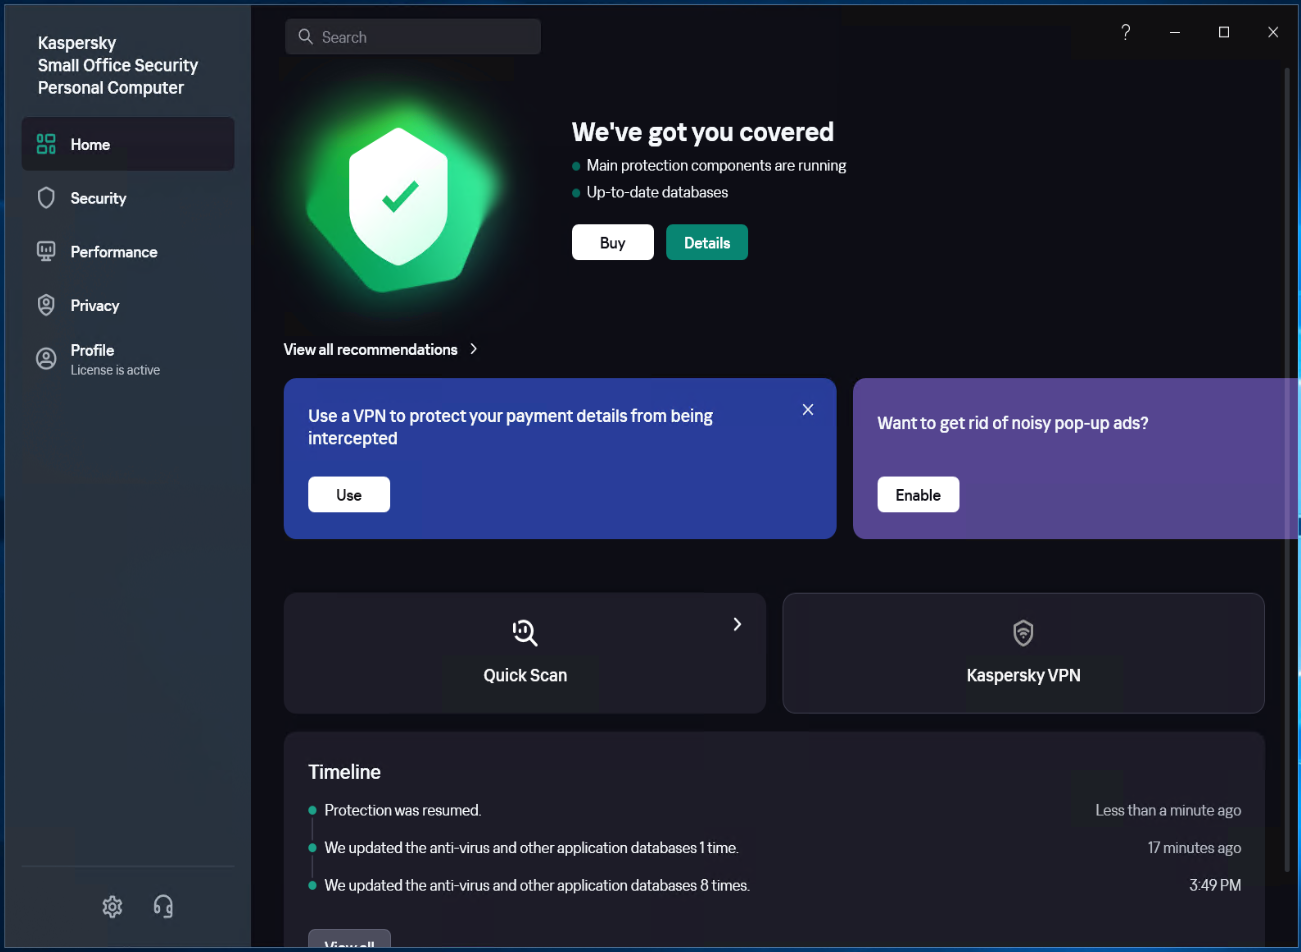
Restore Kaspersky protection status
注意
If any application is added to [Low Restricted] during the operation, it needs to be manually added back to the trusted group "Windows Agent."
McAfee
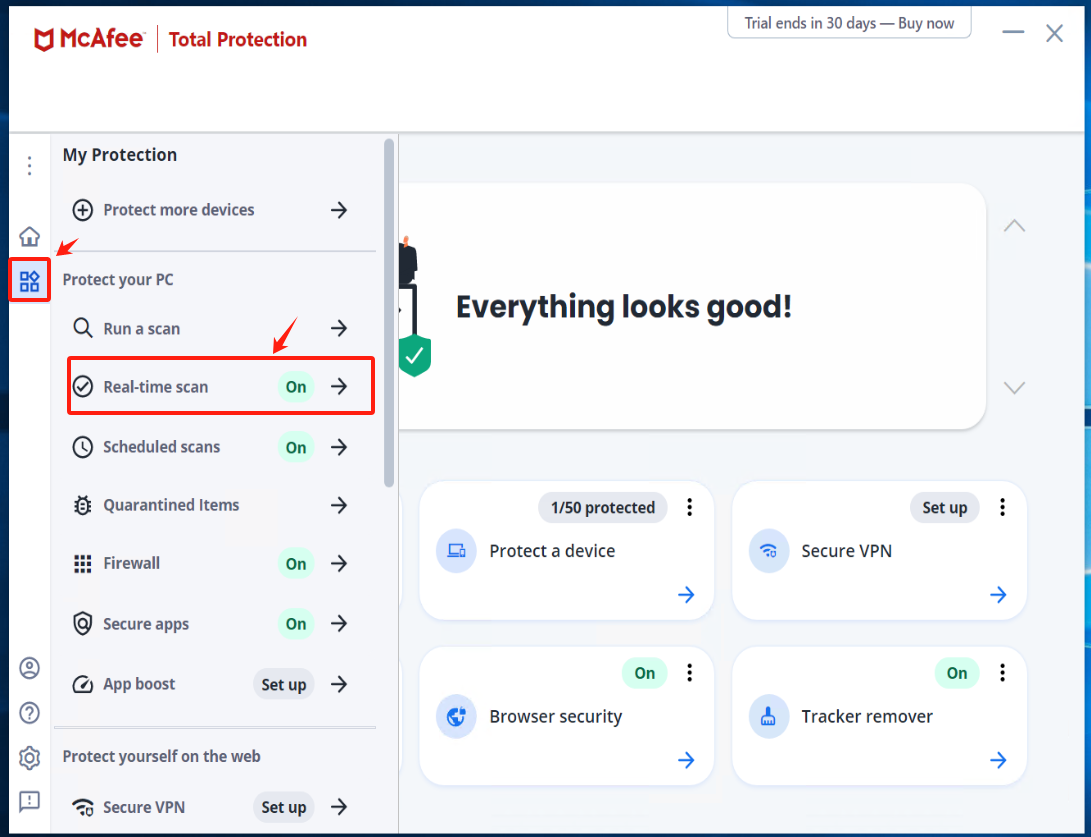
Turn off Real-Time Scanning in McAfee
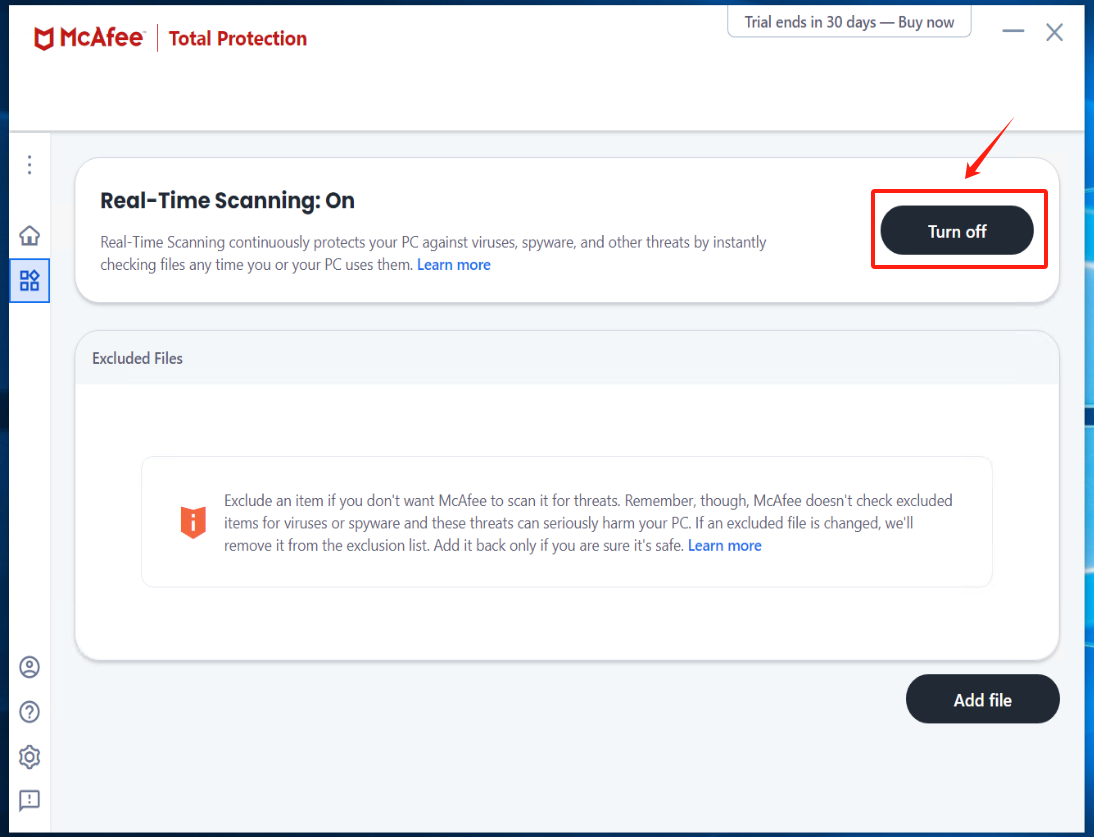
Access Real-time scan from the left-side menu and click on [Turn off]
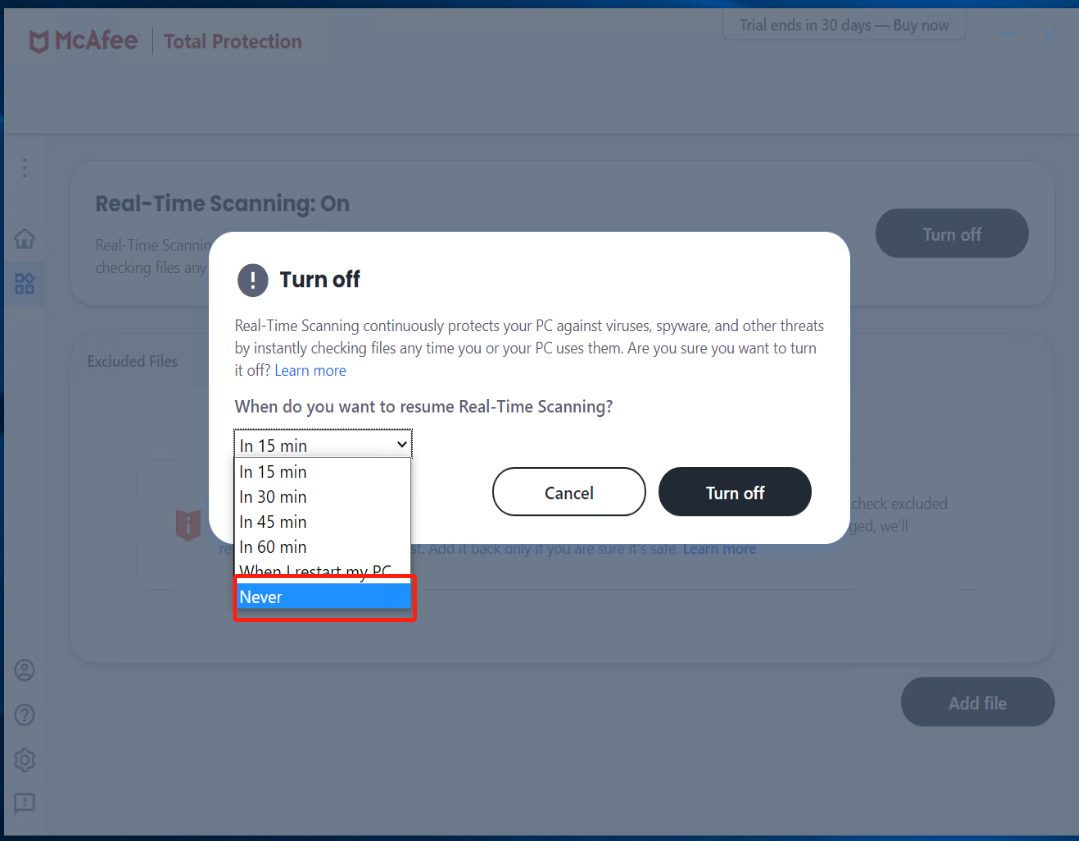
Check the option "Never" under [When do you want to resume Real-Time Scanning?] and click the [Turn off].
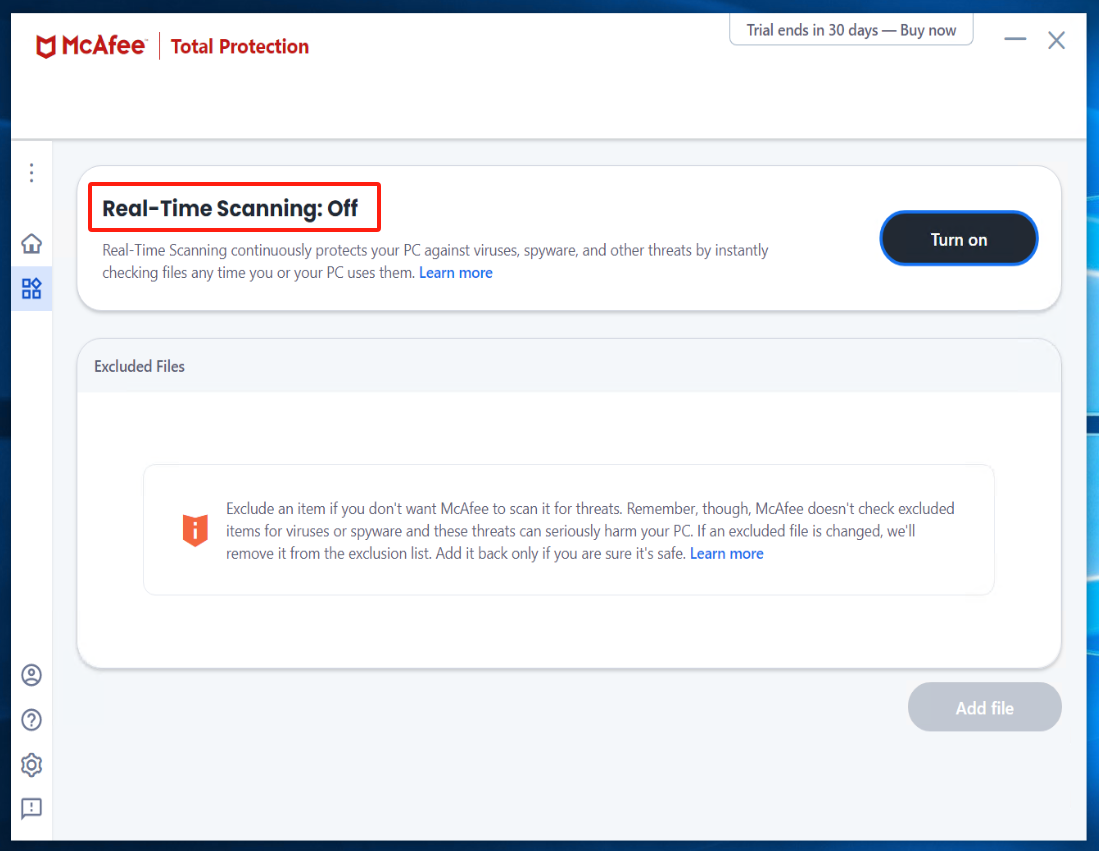
Install Windows Agent and run Windows Agent
Reference Document:https://docs.oneprocloud.com/userguide/poc/agent-pre-settings.html#unzip-the-installation-package-and-proceed-with-the-installation
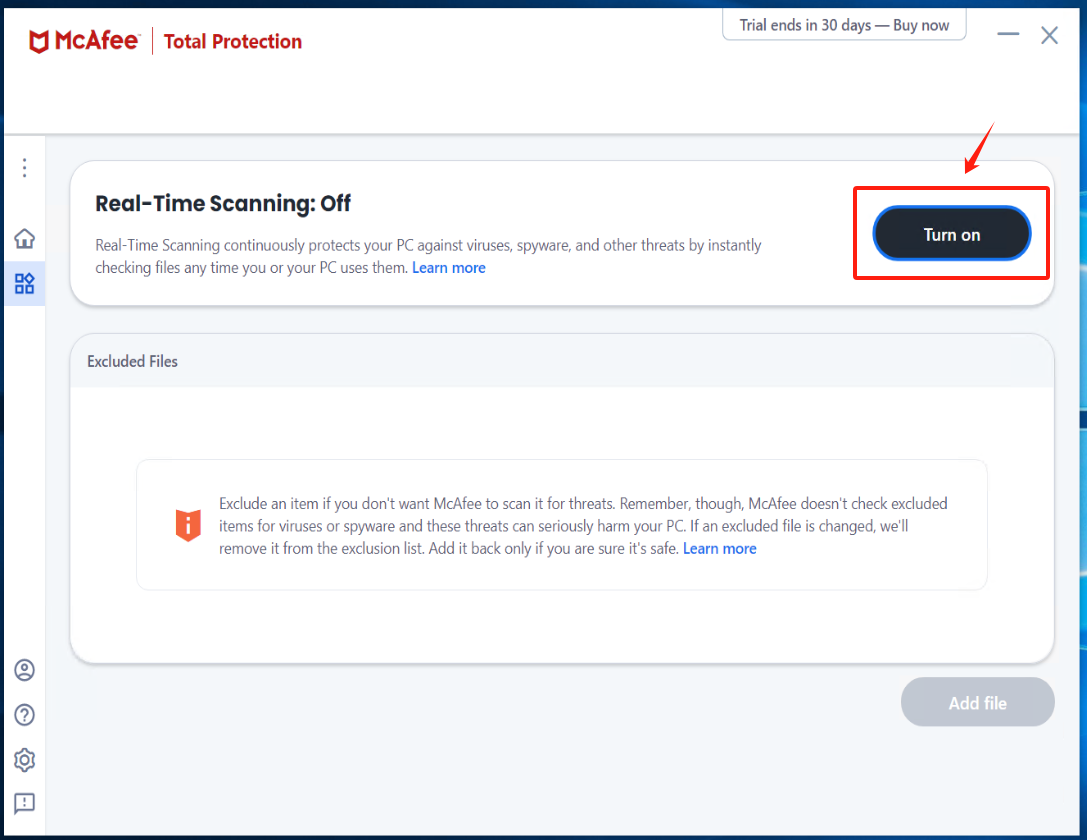
Turn on Real-Time Scanning in McAfee and add Excluded files
click [Turn on] Real-Time Scanning
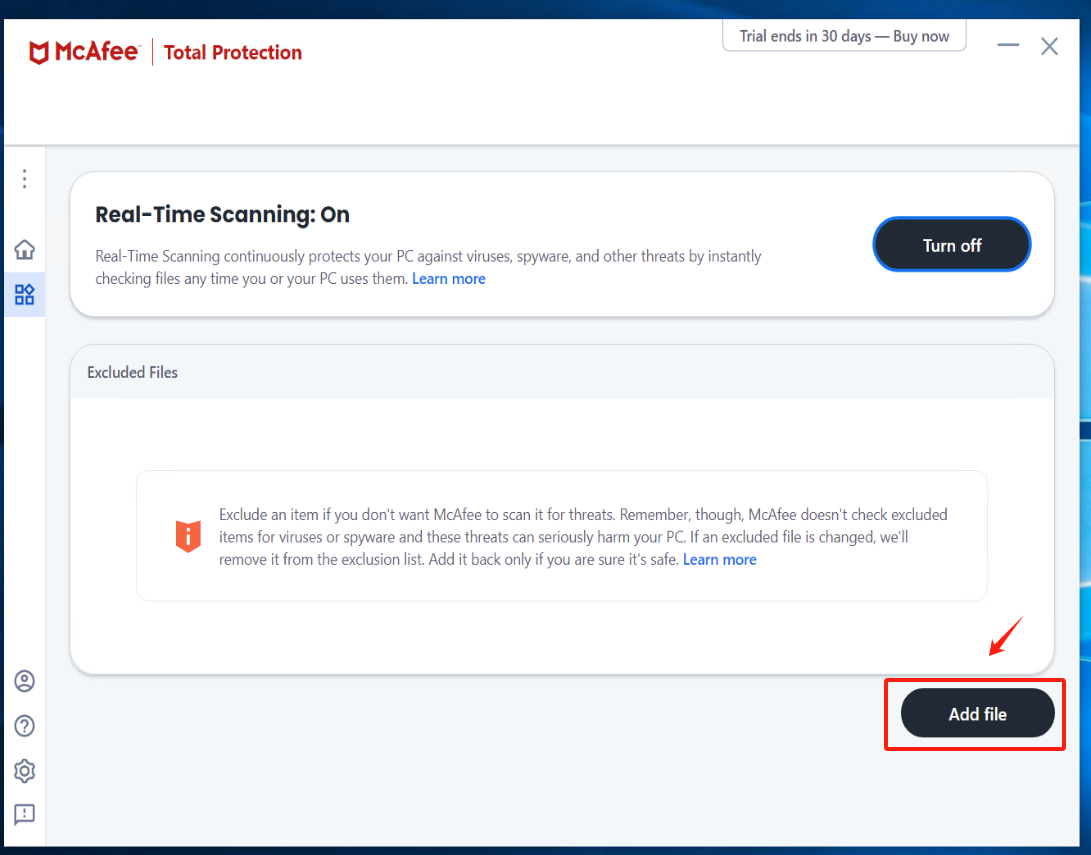
click [Add file] add all exe, bat, and sys files under the installation directory of Windows Agent and its subdirectory "yper_exporter".
提示
The default installation path for Windows Agent: C:\Program Files (x86)\DiskSync-Agent
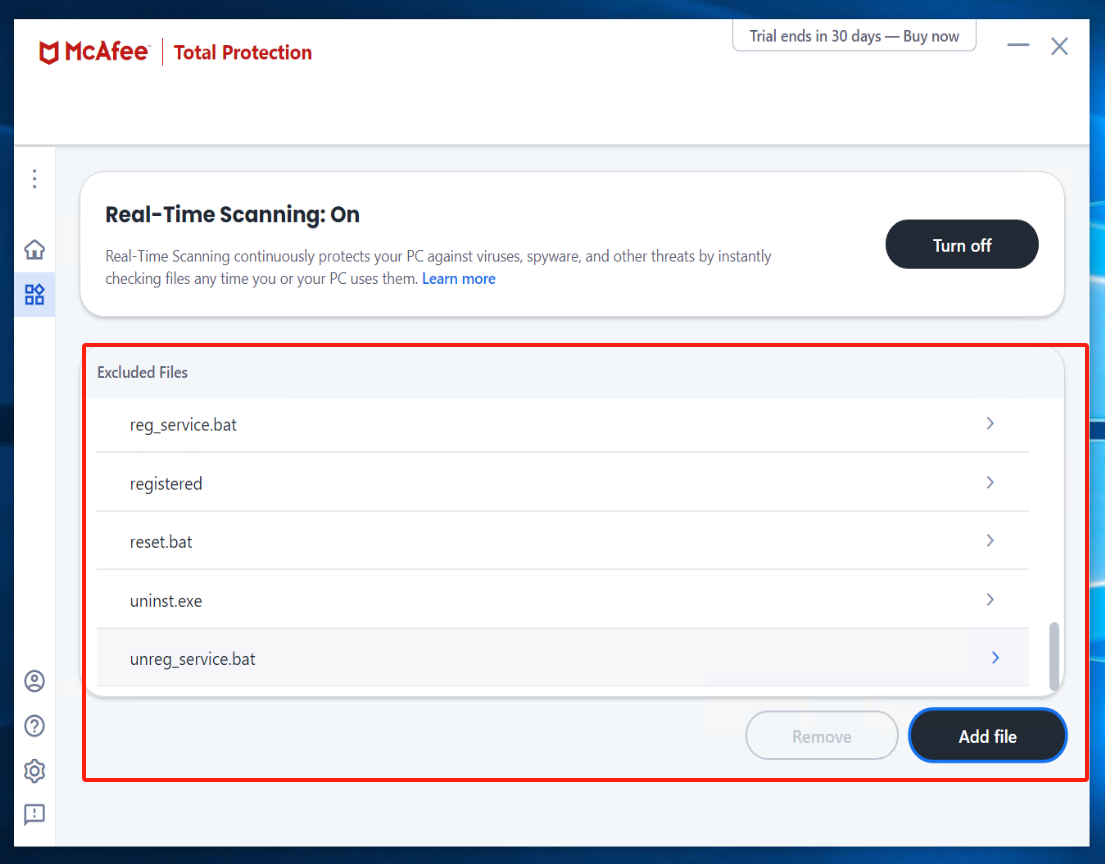
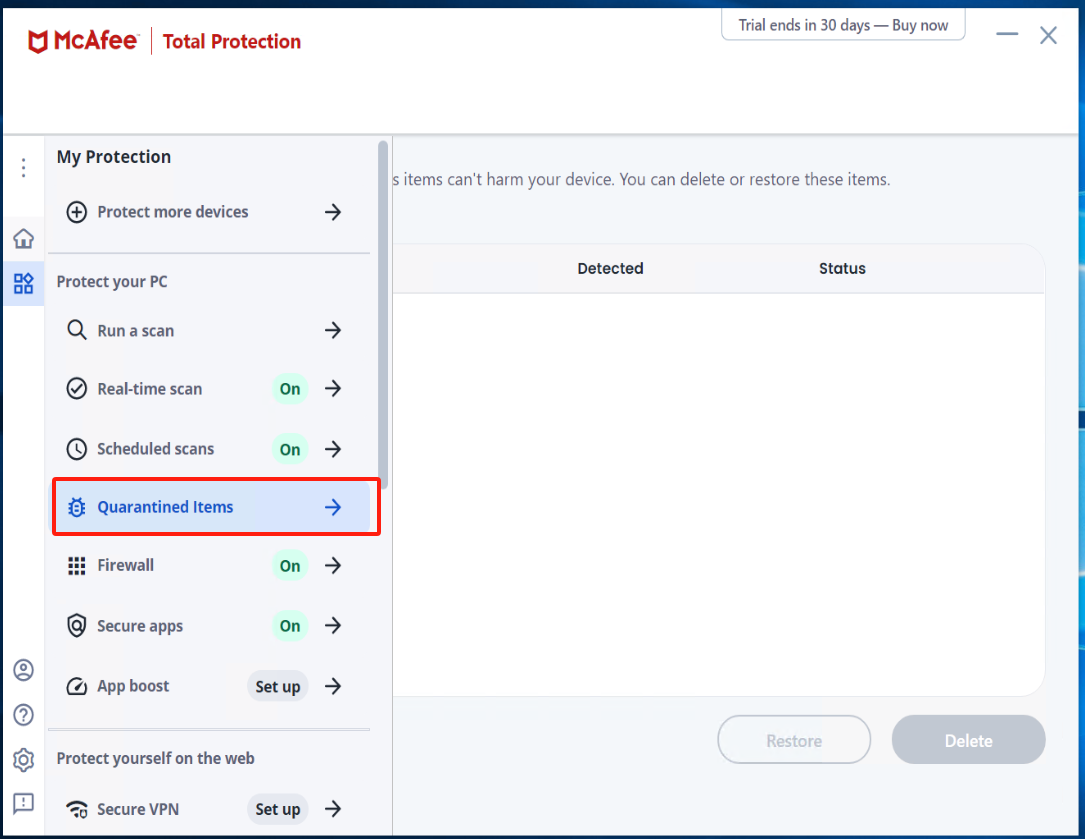
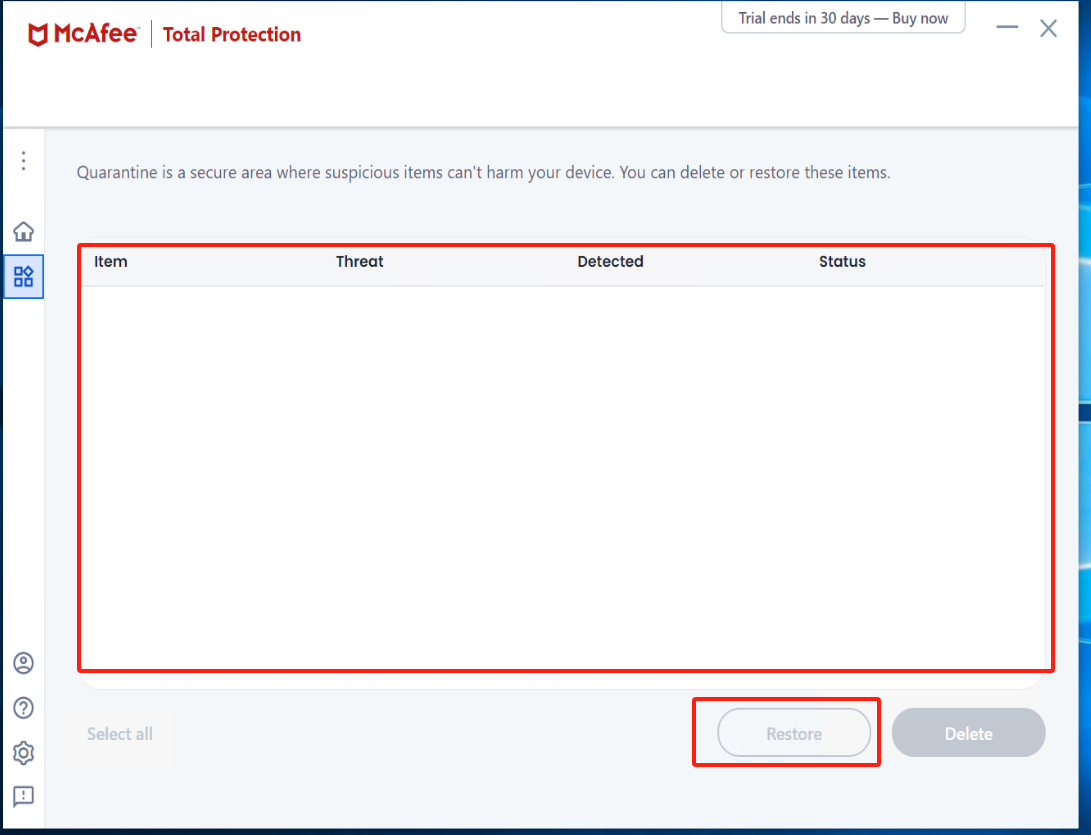
Check Quarantined items
注意
If there is an abnormal termination of the Windows Agent service, enter McAfee to check the Quarantined items. Select the files related to Windows Agent and proceed with the restoration.
How to Create a Failback Gateway(HyperDoor) on a Physical Machine
Physical servers can utilize the IPMI console to create a fallback gateway by loading the HyperDoor image.
提示
The HyperDoor image has already been downloaded to the local machine by default.
1. Log in to the IPMI console
Open a web browser locally and enter the IPMI address of the physical machine (usually accessed through a browser, for example: https://ipmi_address). Log in to the IPMI interface using the username and password assigned to the server.
2. Locate the 'Virtual Media' or a similar option
Navigate to the menu on the IPMI console, and find an option similar to 'Virtual Media' or other related options.
3. Choose to mount the image
In the Virtual Media menu, there is typically an option for "Mount ISO" or a similar choice. Select this option.
4. Upload the image file
Provide the local path of the HyperDoor image file or upload the HyperDoor image file.
5. Confirm the mounting
Confirm the mounting of the image. The system will use the provided image file to simulate an optical drive, allowing the server to boot from it.
6. Restart the server
In the IPMI console, find "Power Control" or a similar option, and select restart for the server.
7. Enter the BIOS/Boot Menu of the server
When the server restarts, follow the on-screen prompts to enter BIOS settings or the boot menu. This is typically done by pressing a specific key (such as F2, F10, Del, etc.).
8. Choose virtual media as the boot device
In the BIOS or boot menu, select virtual media as the boot device, ensuring that the system will boot from the virtual optical drive.
9. Save settings and exit
In the BIOS settings, save the changes and exit, allowing the system to boot from the virtual media. The system will load the HyperDoor image file.
10. Failback Gateway startup
After the system restarts again, it will successfully load the HyperDoor image, becoming a HyperDoor failback gateway.
提示
Please note that different servers and IPMI implementations may have slight variations, so be sure to refer to the documentation for specific operational guidance.
Instructions for Migration or DR on a physical machine
Due to the diverse models of underlying hardware in physical machines and the potential need for different drivers to accommodate various hardware models, it is essential to proactively query the hardware information of the physical machine, including RAID cards, disks, network cards, etc., when migrating or reverting.
Currently, manual intervention is required for the adaptation and repair of physical machine drivers. This involves the installation of hardware drivers to ensure compatibility and functionality.
SmartX导入和创建模板
镜像源文件
华为云HyperOne国内账户 / 亚太-新加坡 / 对象存储 / 存储桶private-image-zl /SmartX
镜像信息
linux
版本:Ubuntu 20.04
大小: 1.70 GB
存储位置:
http://downloads.oneprocloud.com/smartx/linux/zl-20.04-template_t8jclld4.ovf
http://downloads.oneprocloud.com/smartx/linux/zl-ubuntu22.04-1.vmdk
windows
版本:Windows Server 2019
大小:5.08 GB
存储位置:
http://downloads.oneprocloud.com/smartx/windows/123123-1.vmdk
http://downloads.oneprocloud.com/smartx/windows/zl-2019-lastest.ovf
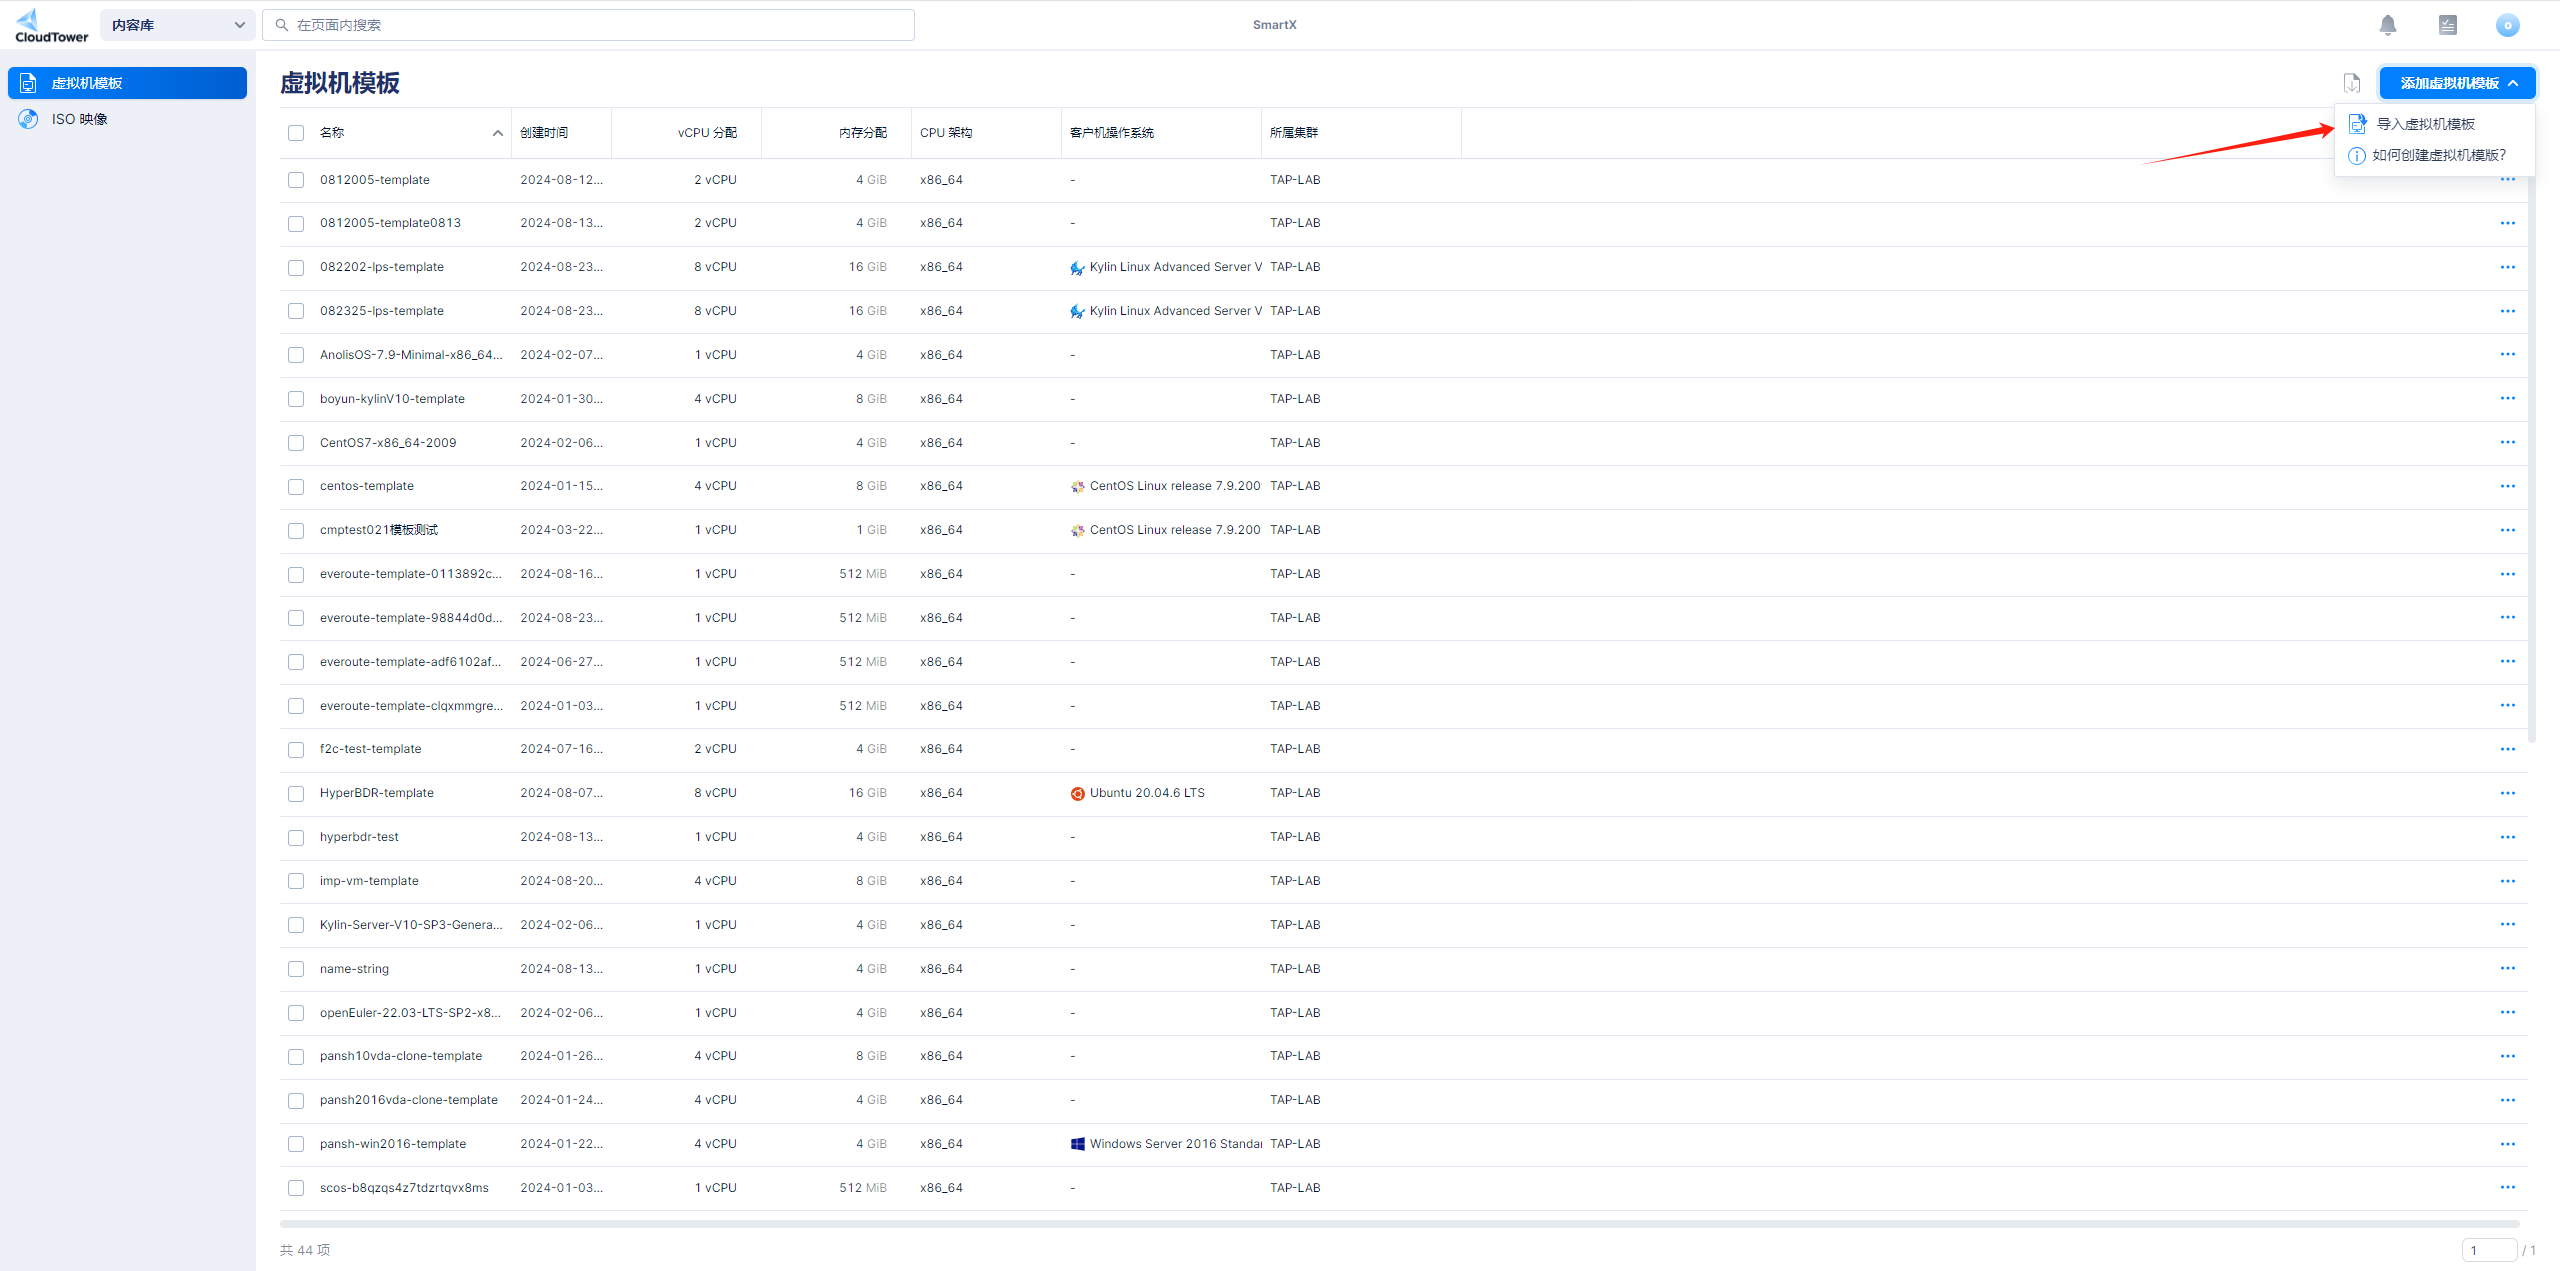
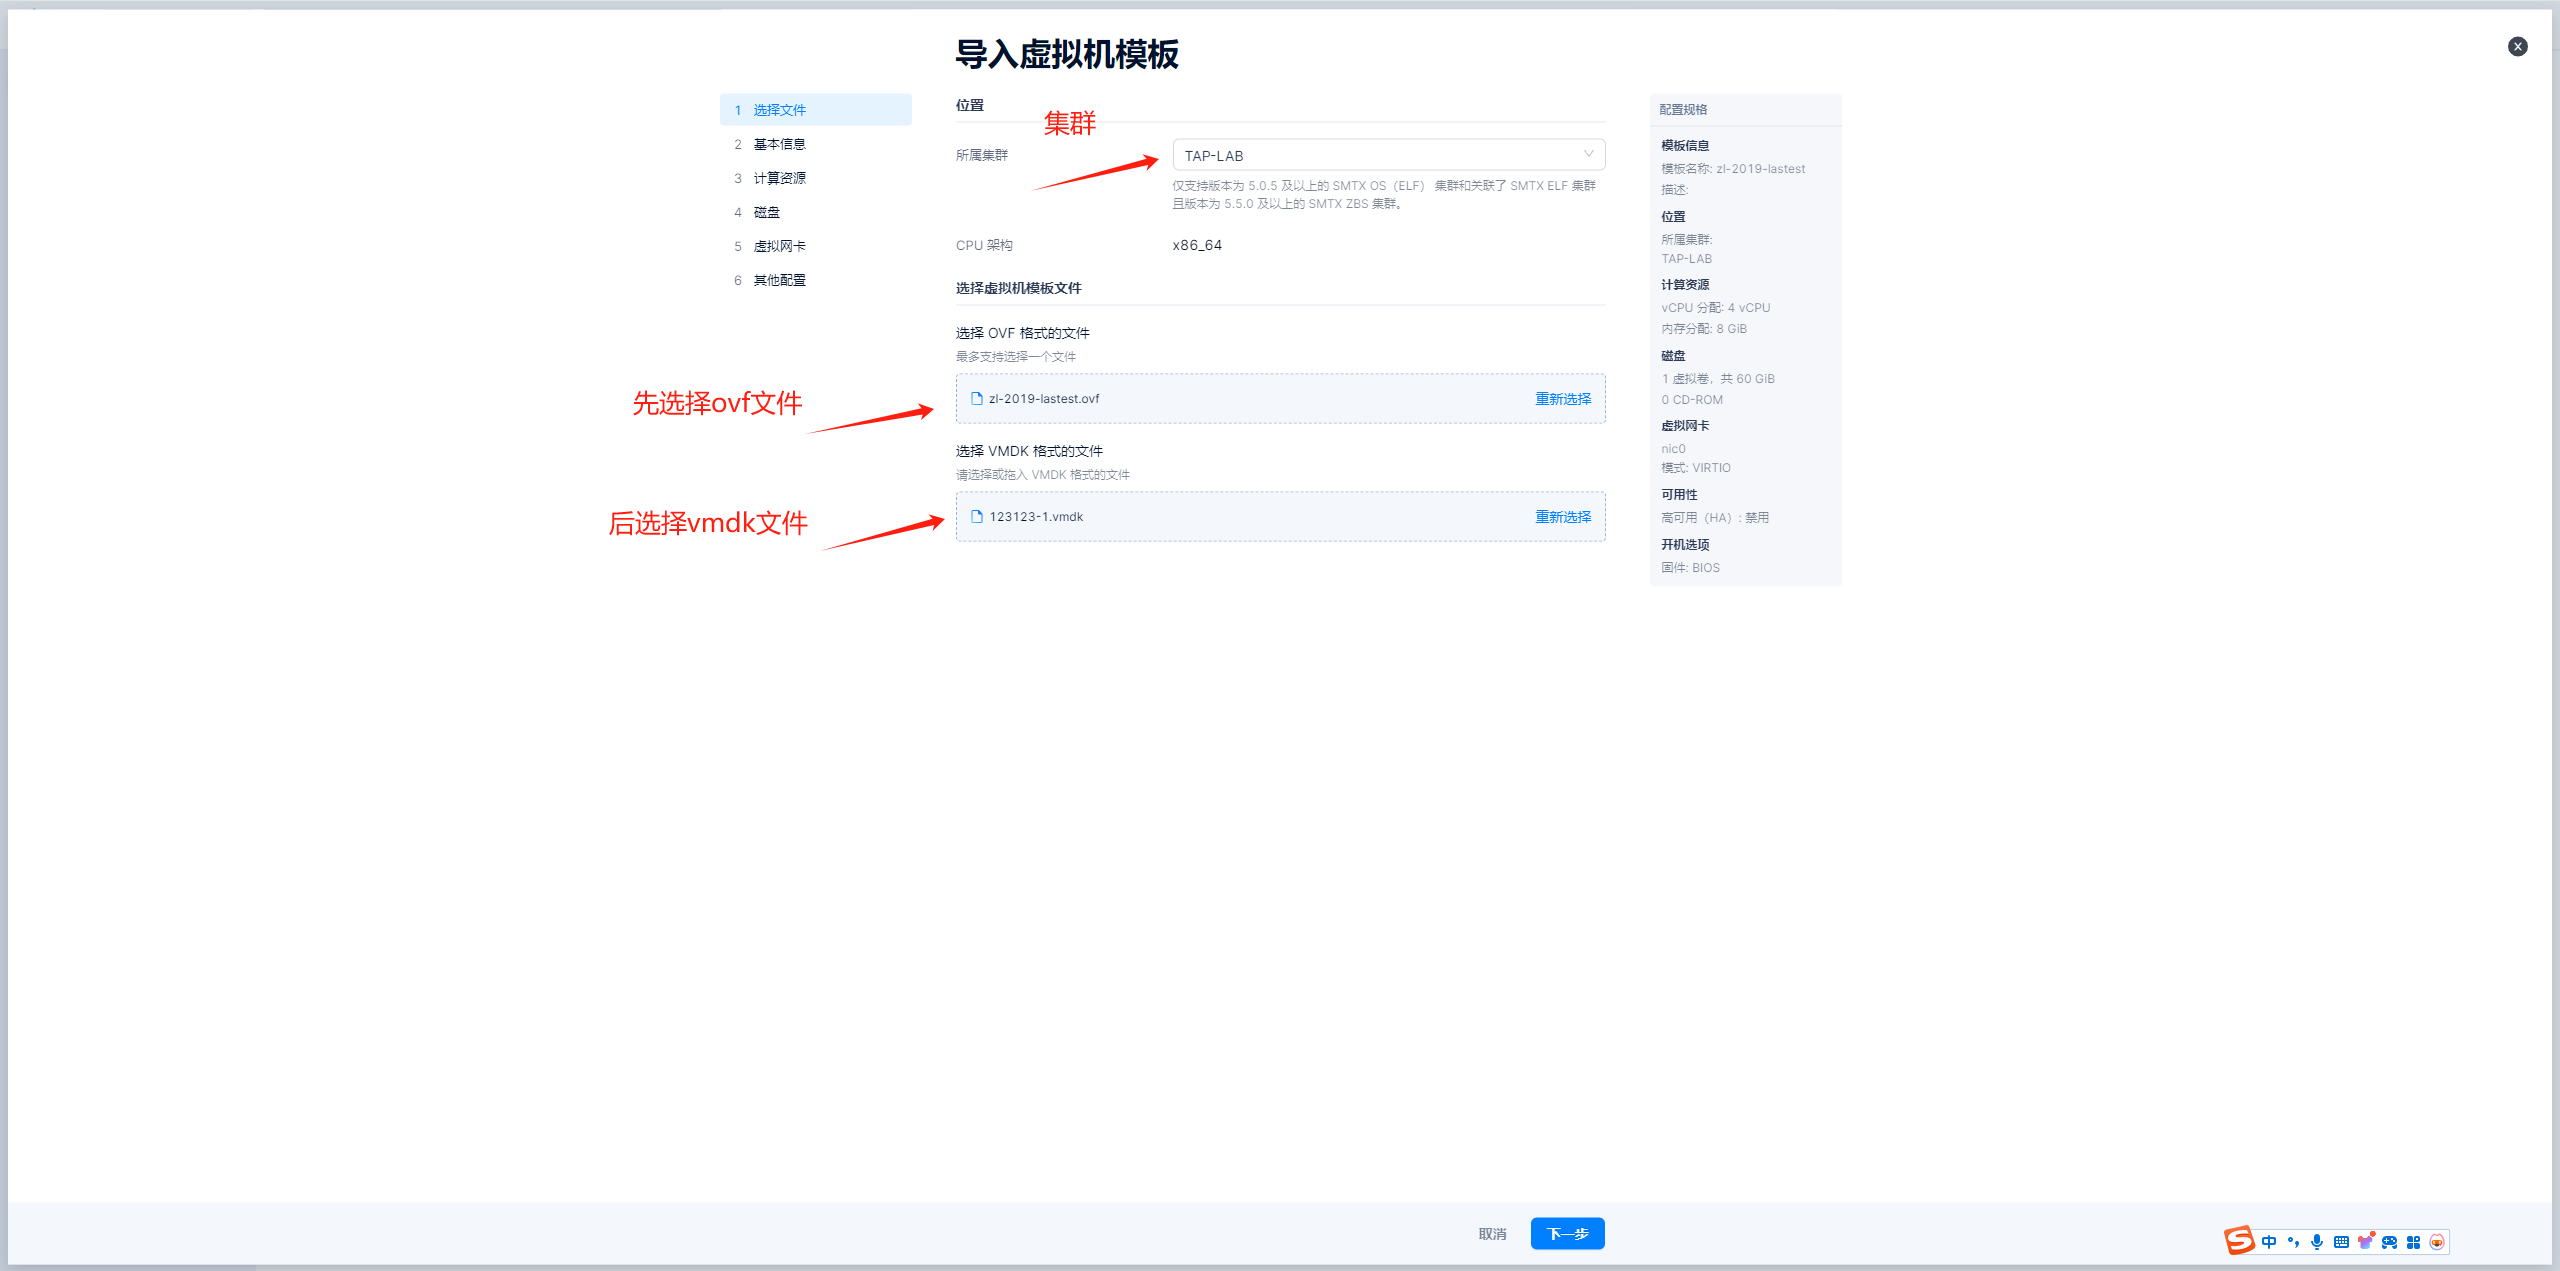
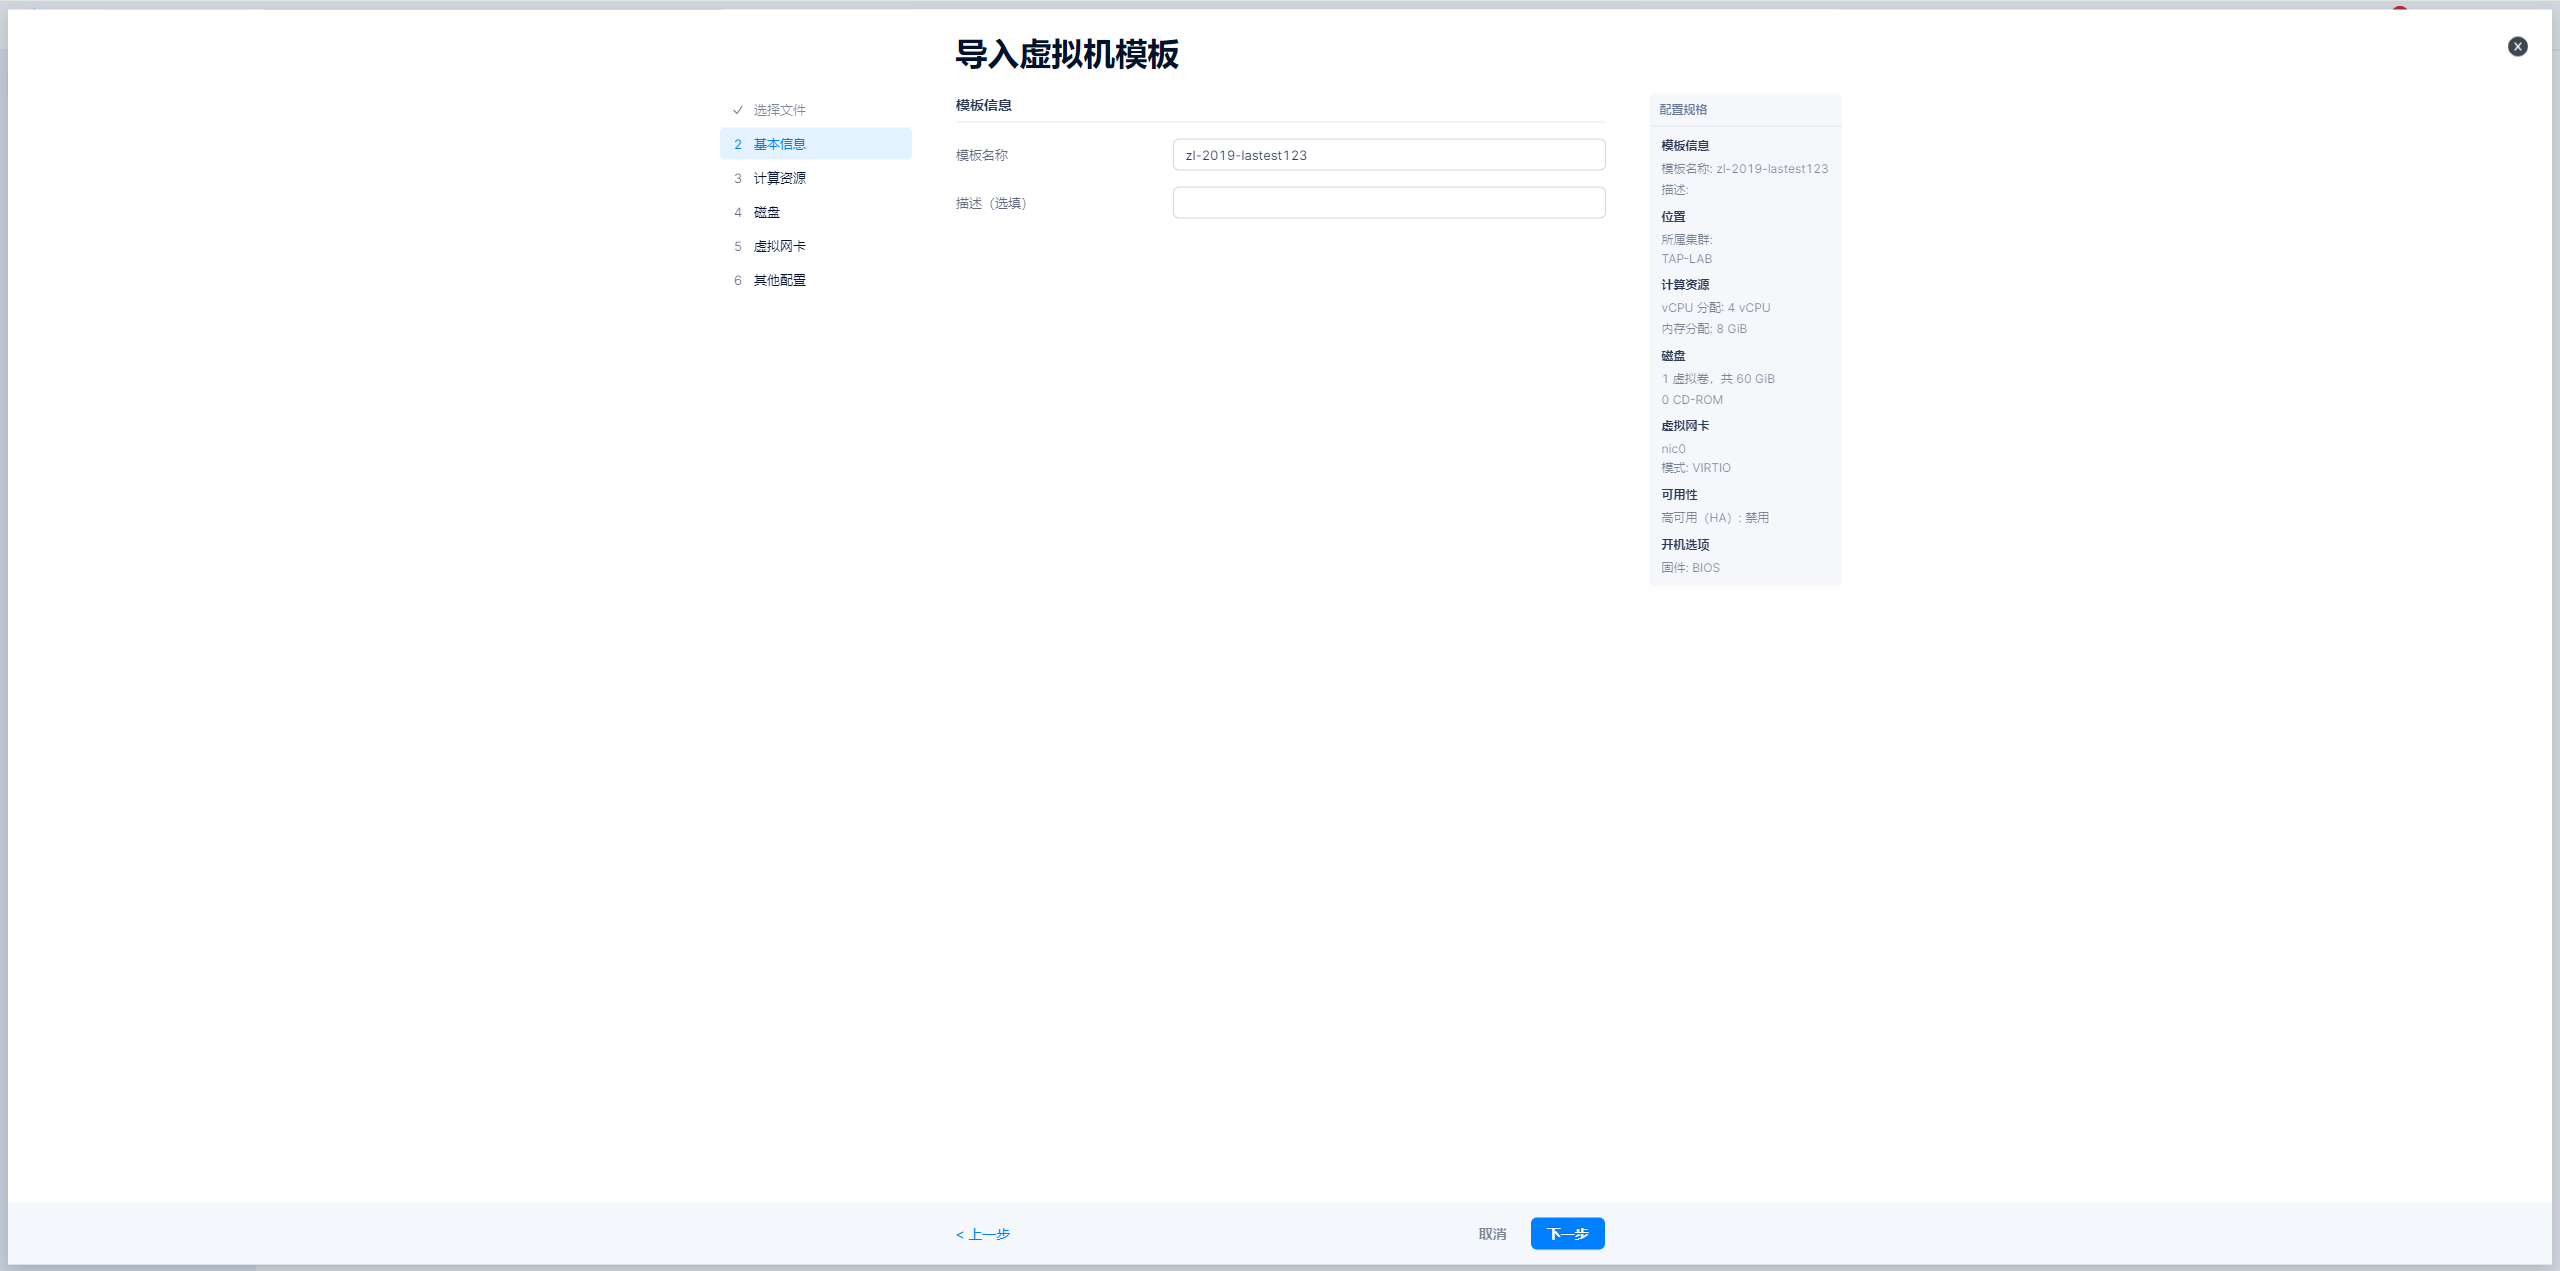
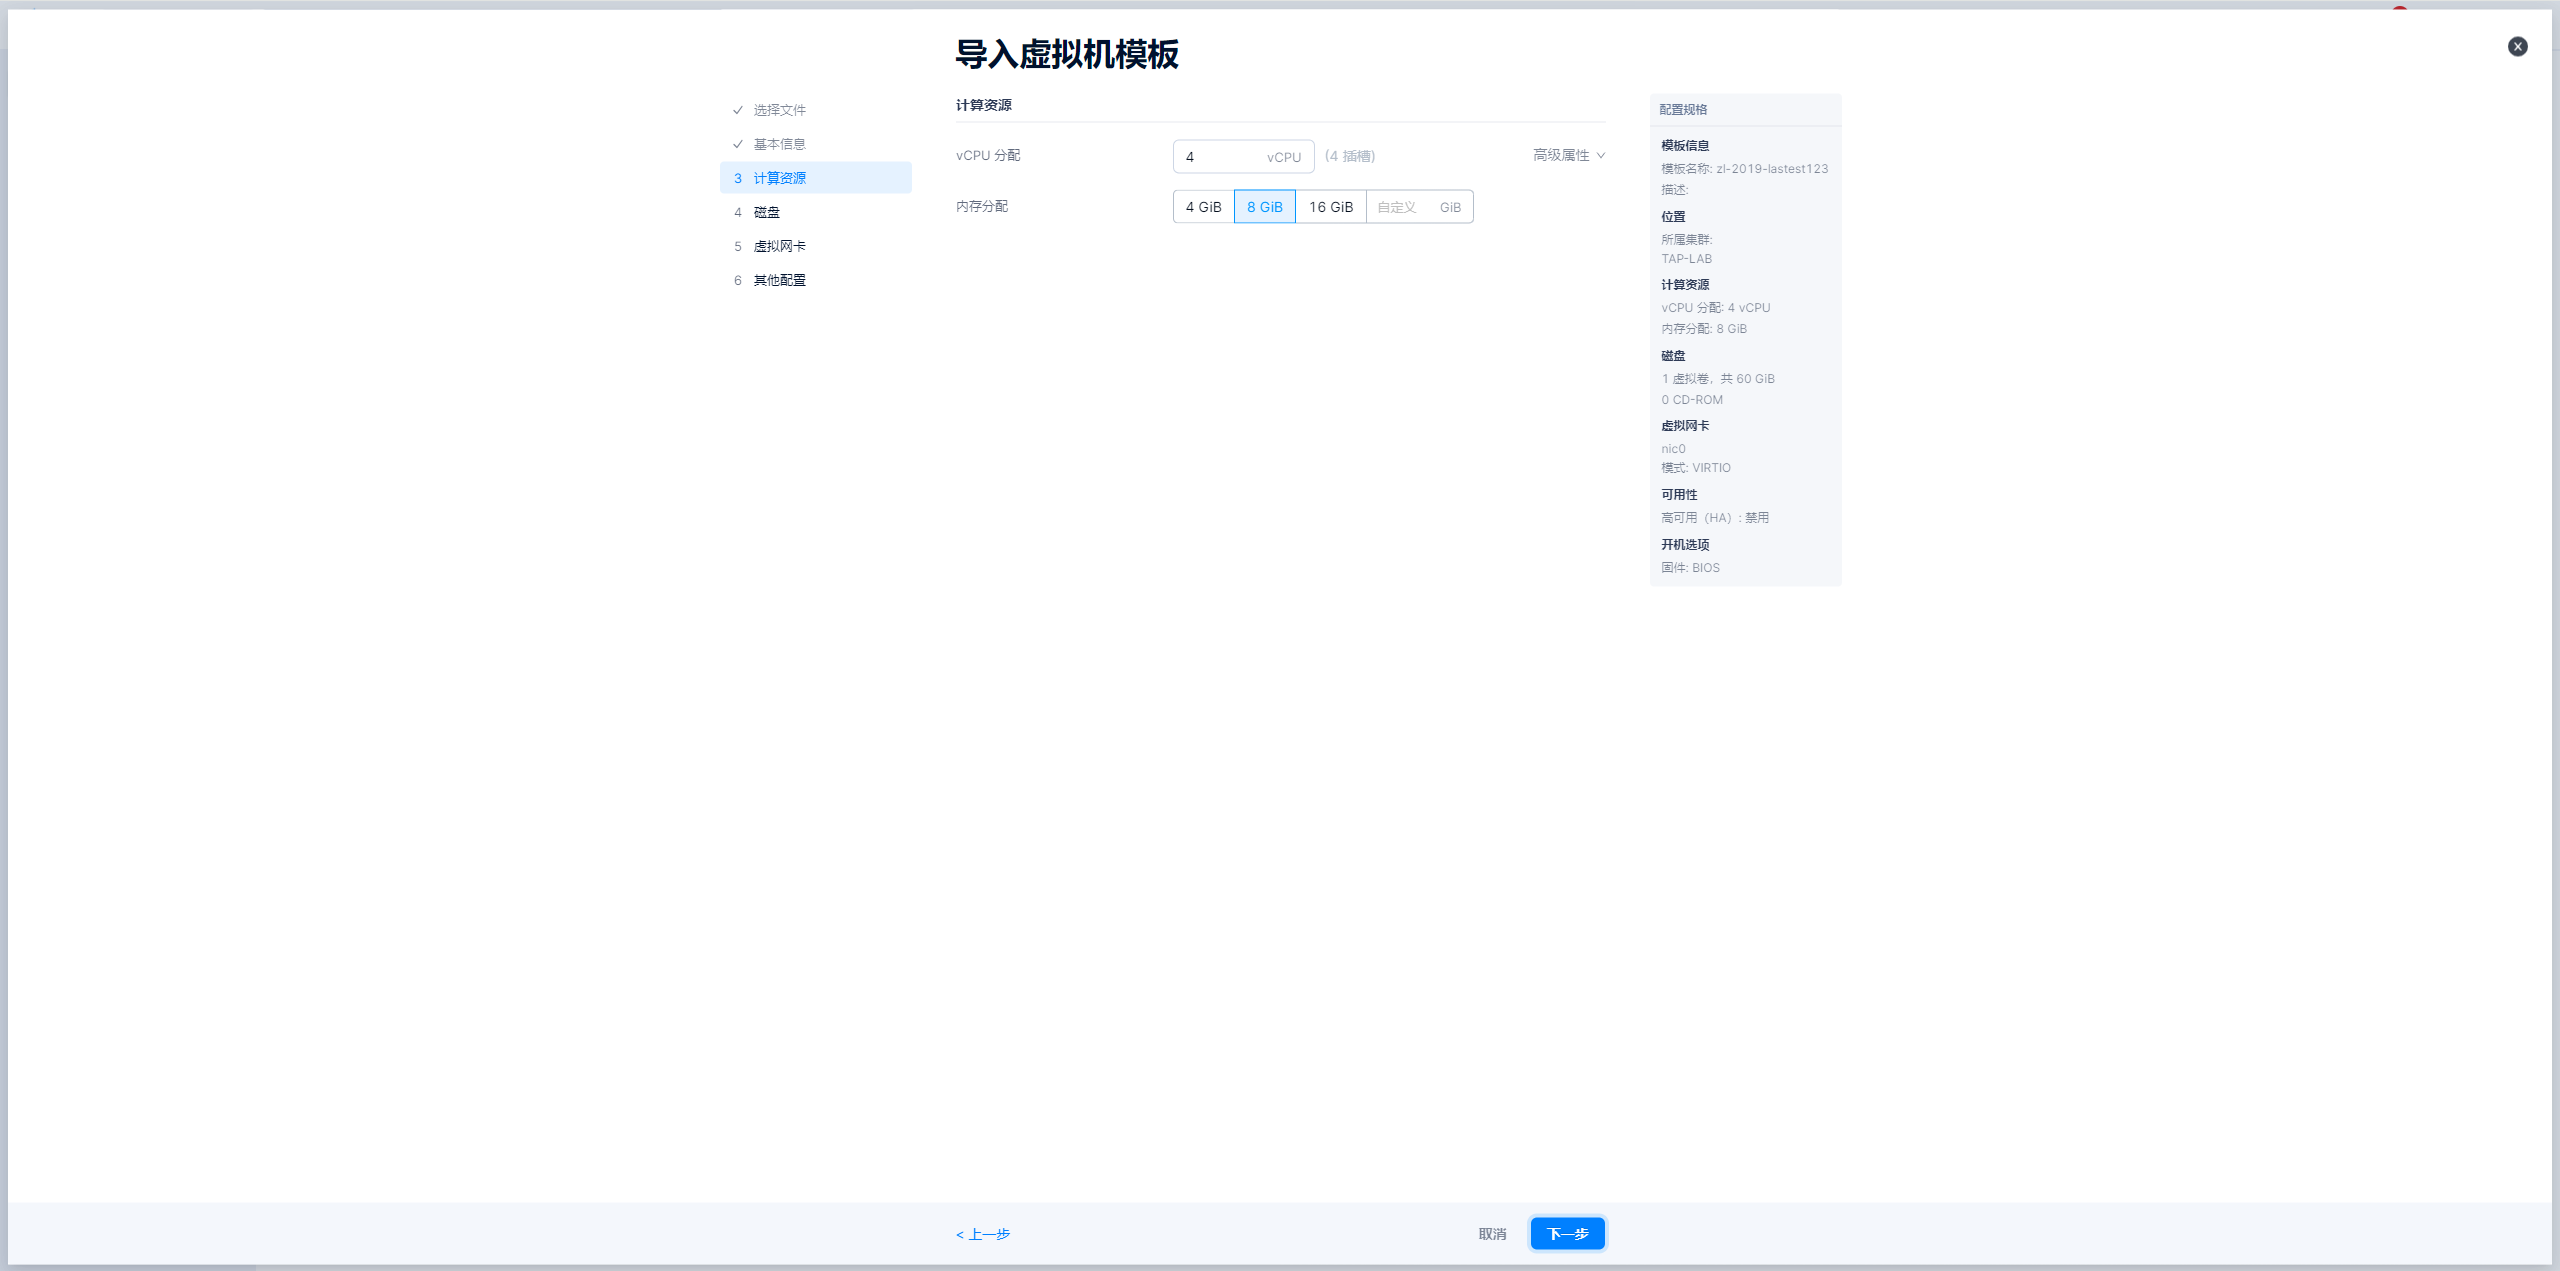
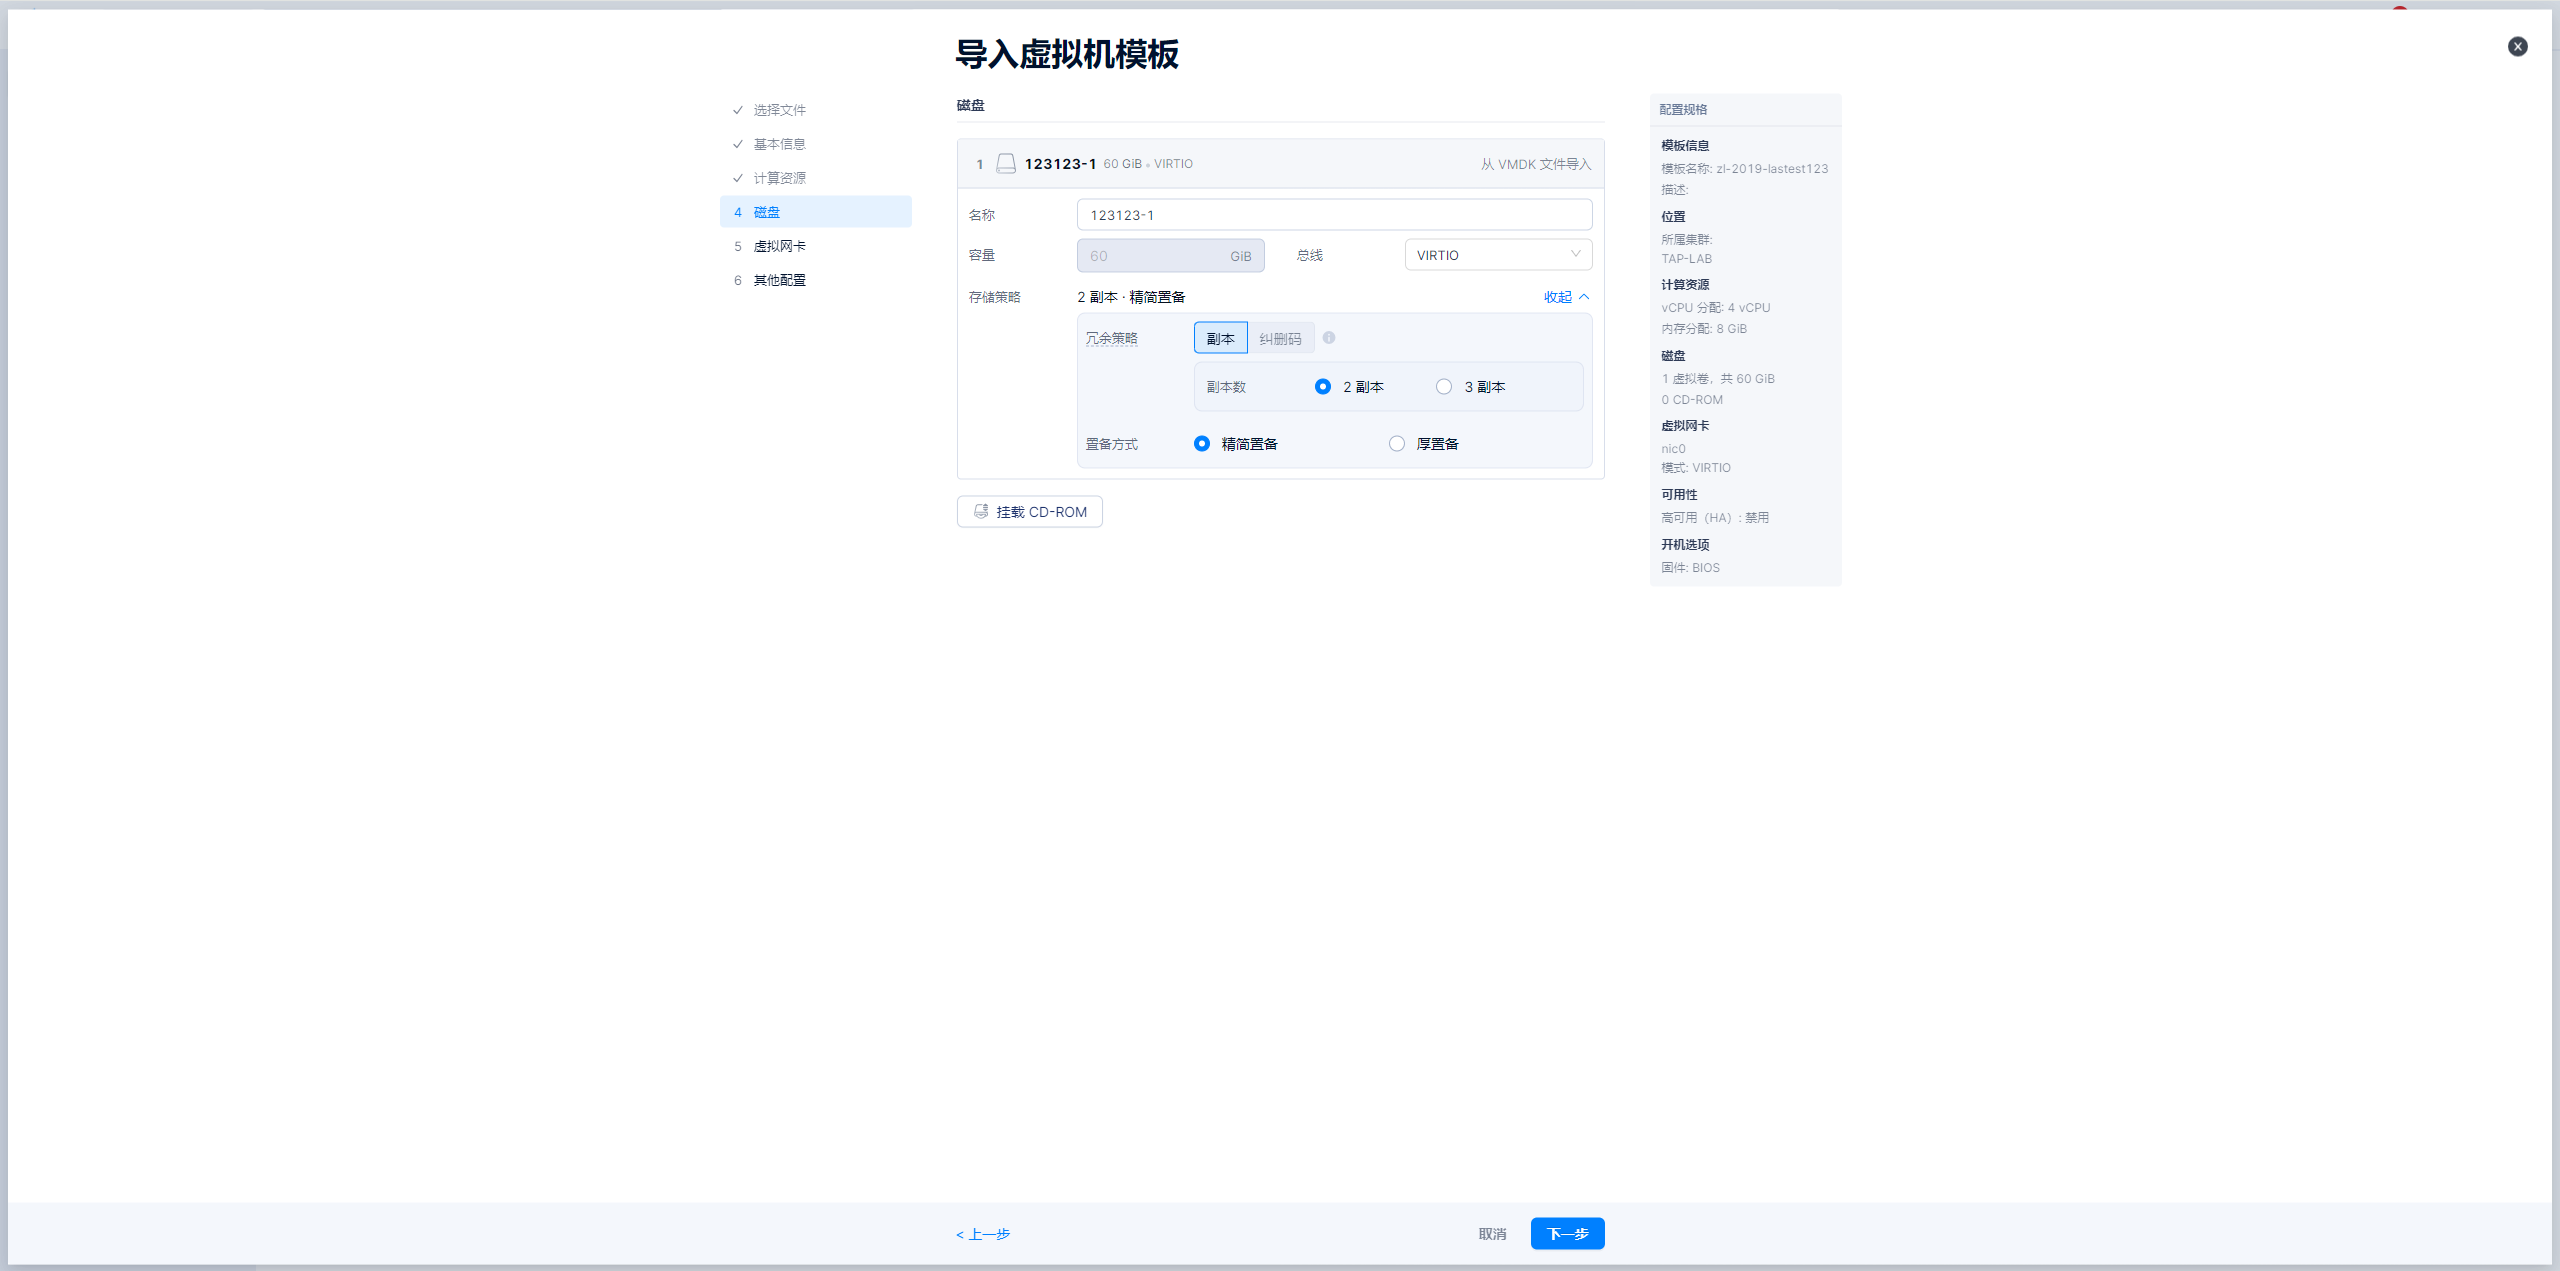
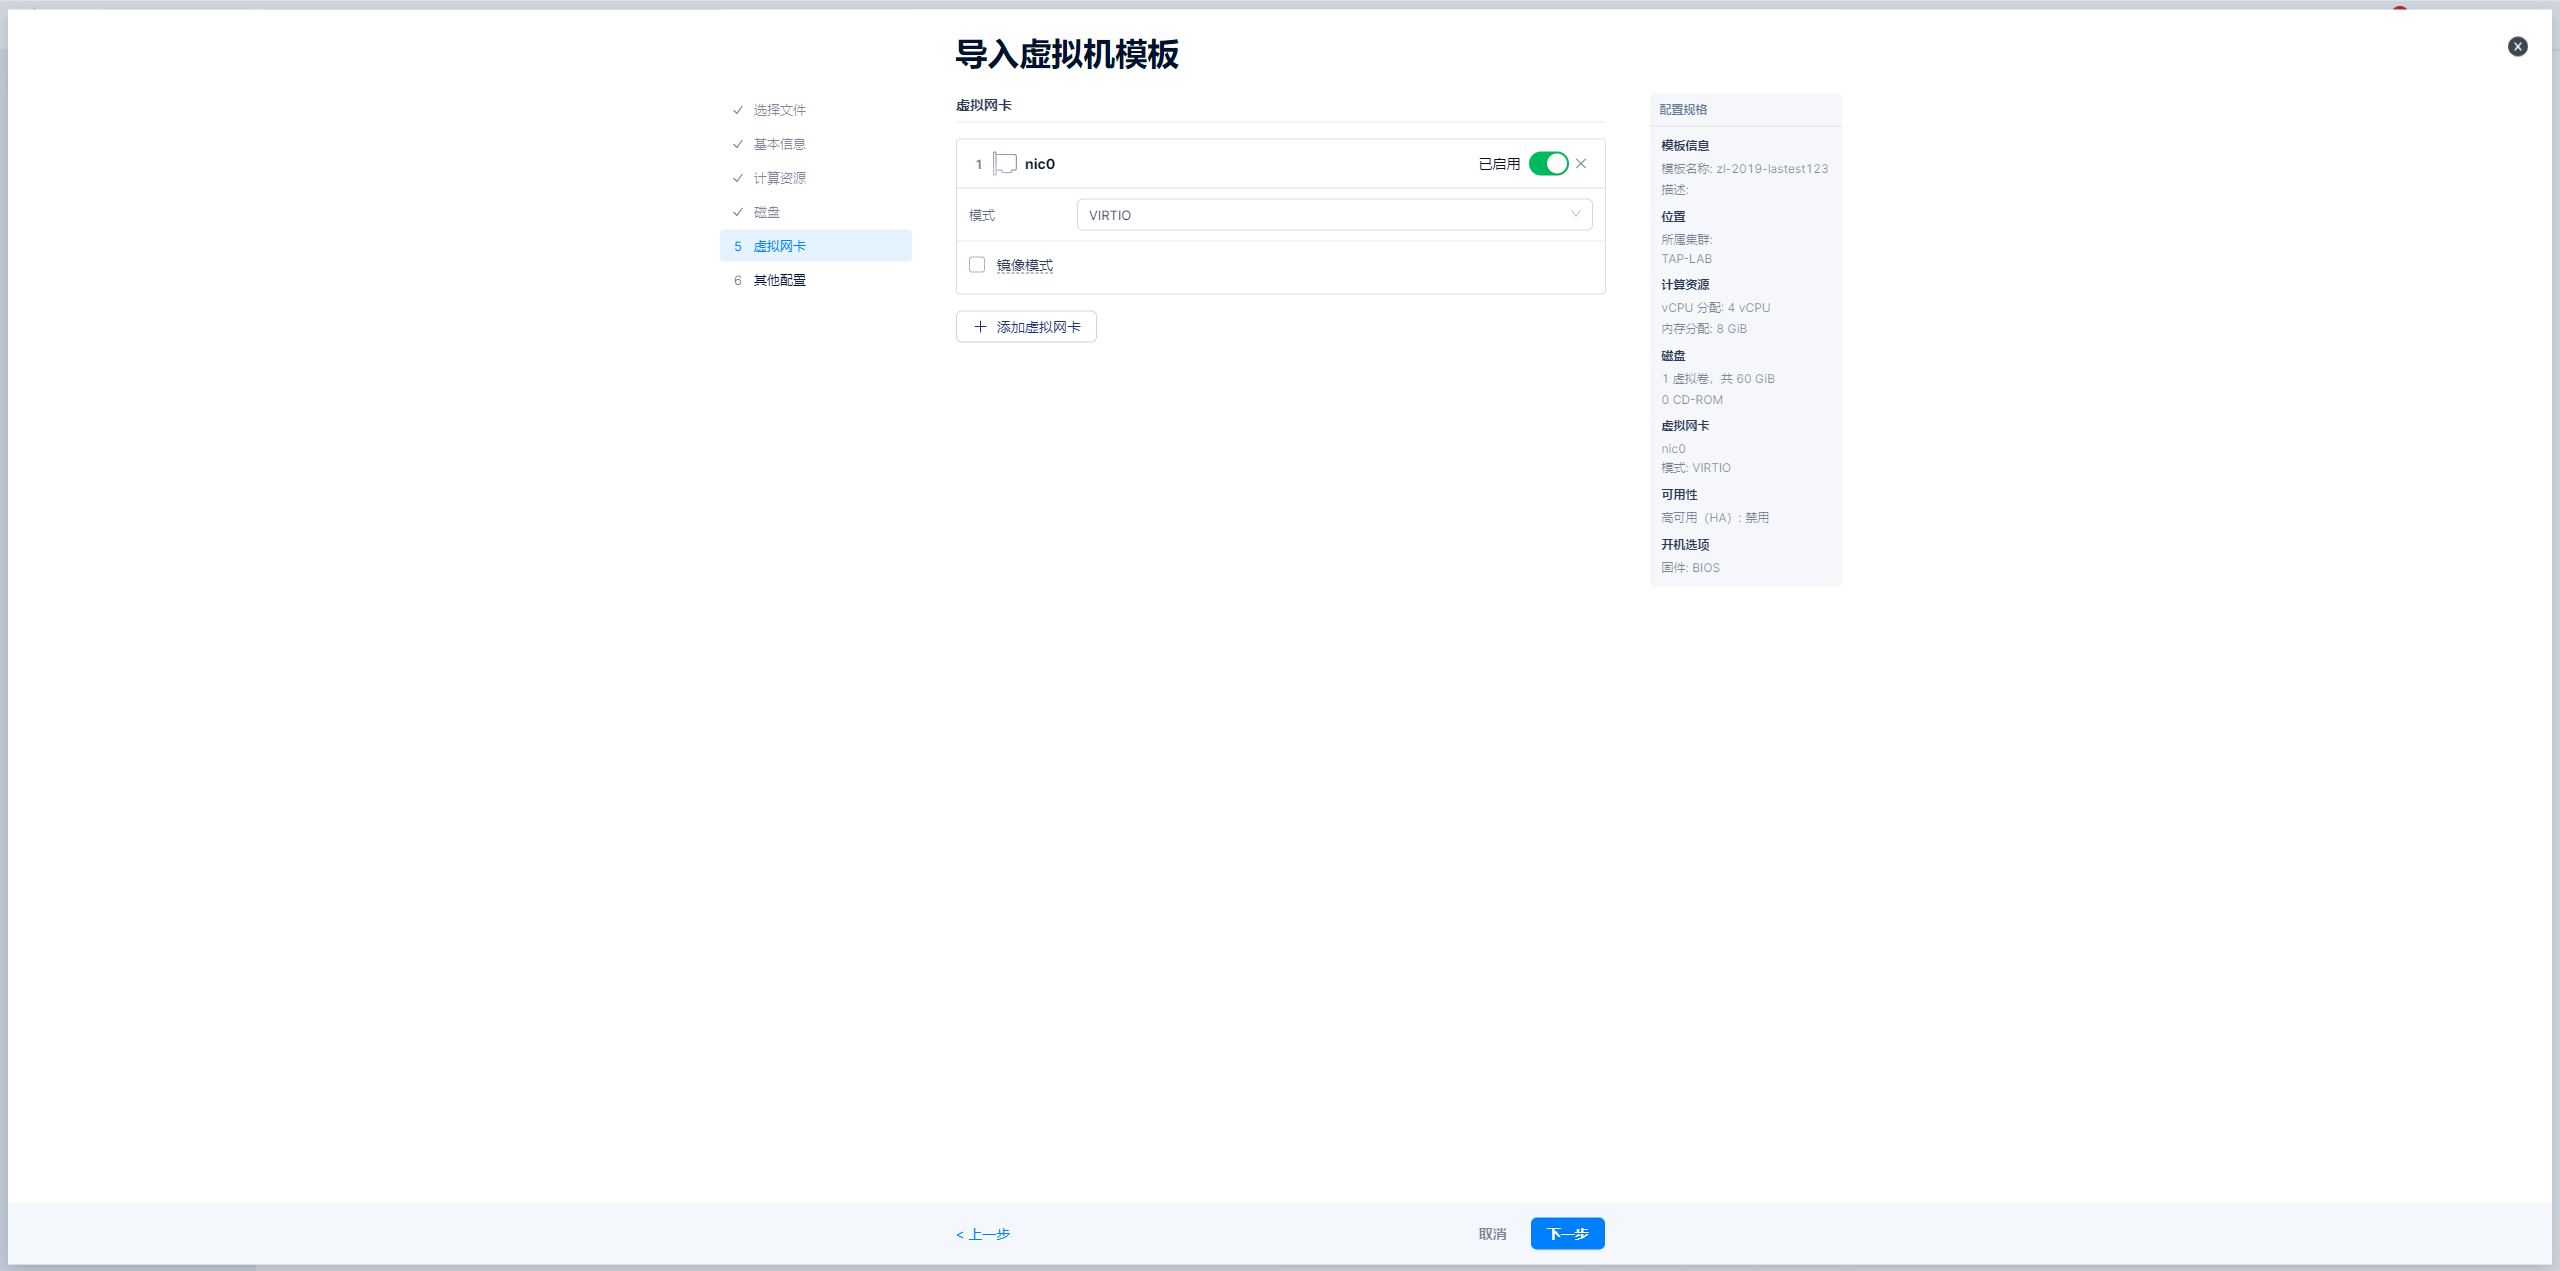
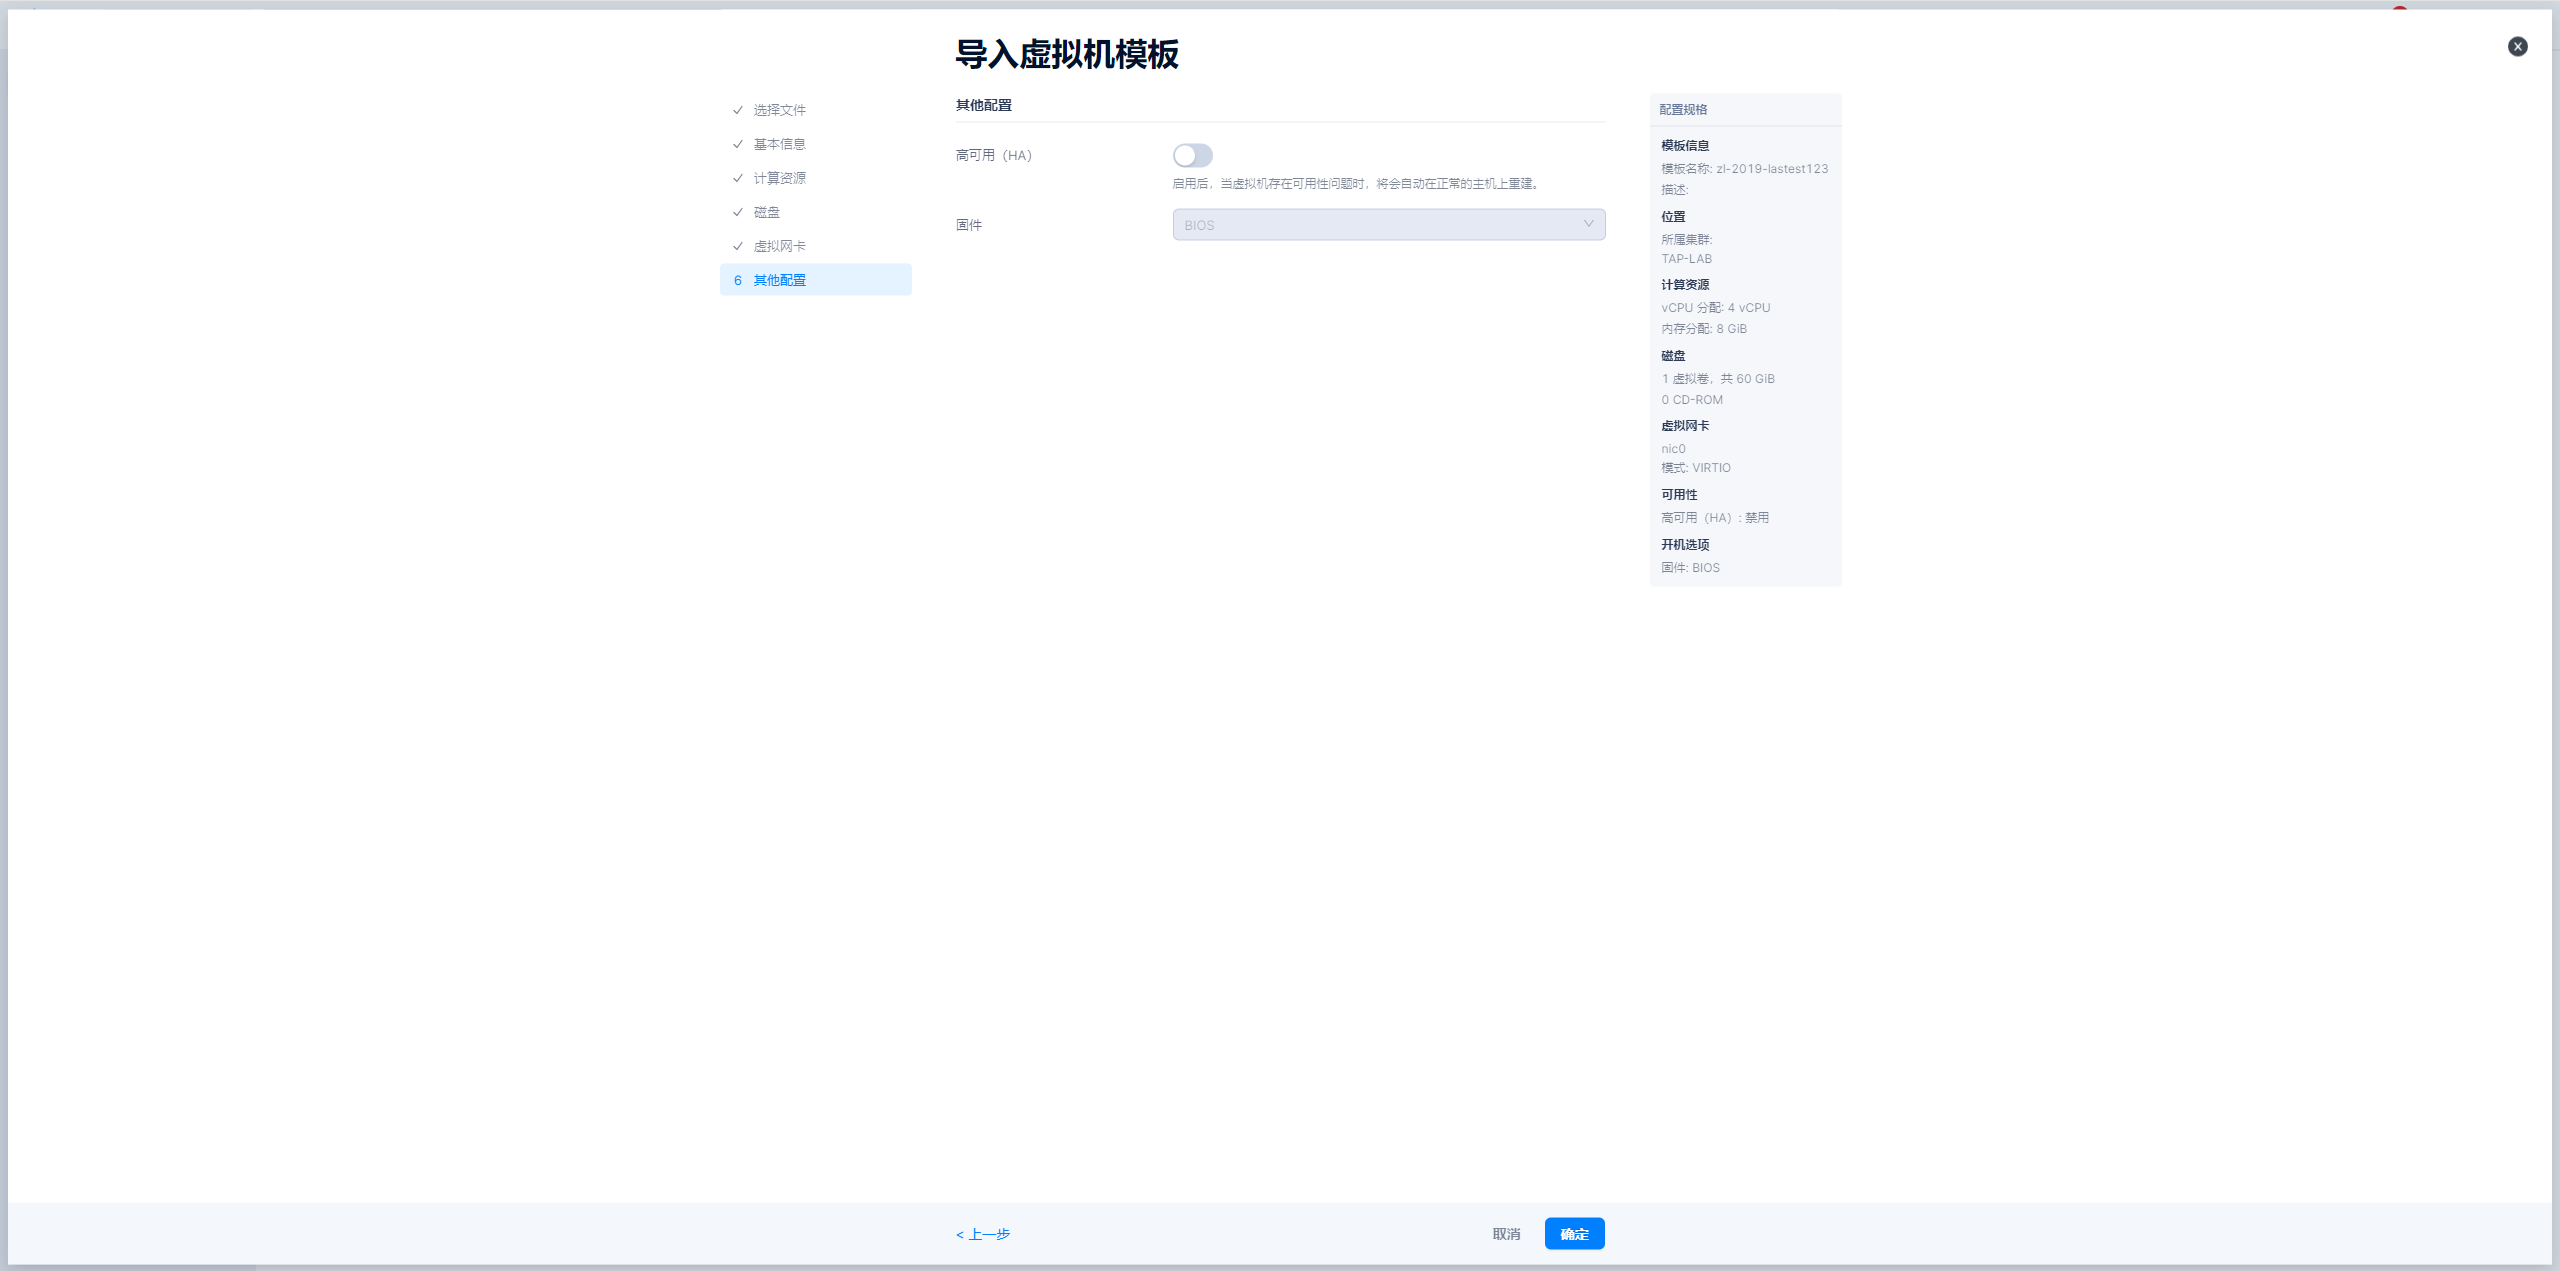
导入模板
如果厂商已经提供了镜像模版,那么直接按步骤导入即可。如若需要再次制作镜像模版,可参考下面“制作模版”的步骤。
导入windows模板-图示
导入linux模板-图示
参考上述windows镜像导入
制作模板
文档下载地址: SmartX TAP-LAB快速上手指南.pdf
制作windows模板
下载windows2019的iso镜像,并导入smartx内容库

创建空白虚拟机,并添加对应的****CD-ROM
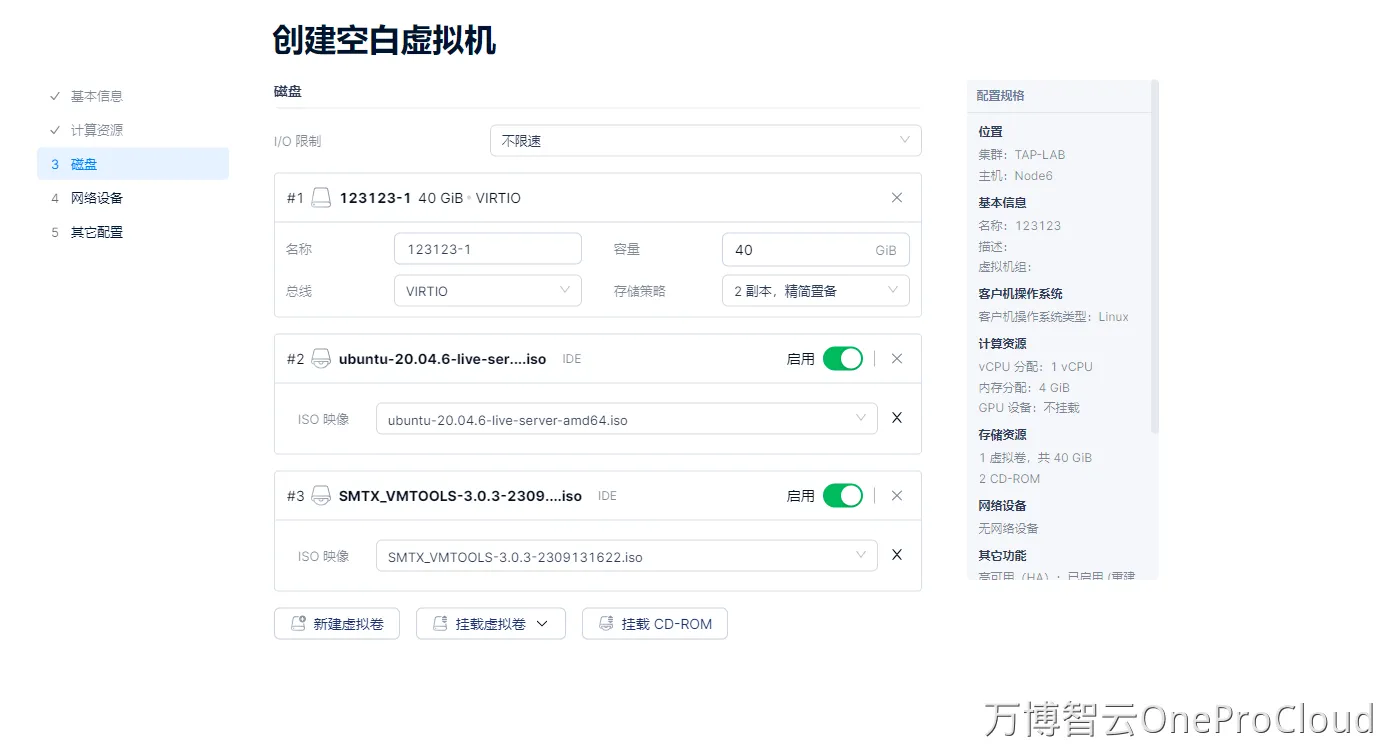
根据smartx文档,构建对应的启动模板
文档下载地址: SMTX_OS_cloudbase-init_虚拟机初始化配置指南 (1).pdf
windows创建时设置Administrator用户,密码设置 Abc999@123.Instance (因windows模板无法修改密码)
制作linux模板
下载ubuntu20.04的iso镜像,并导入smartx内容库

创建空白虚拟机,并添加对应的****CD-ROM
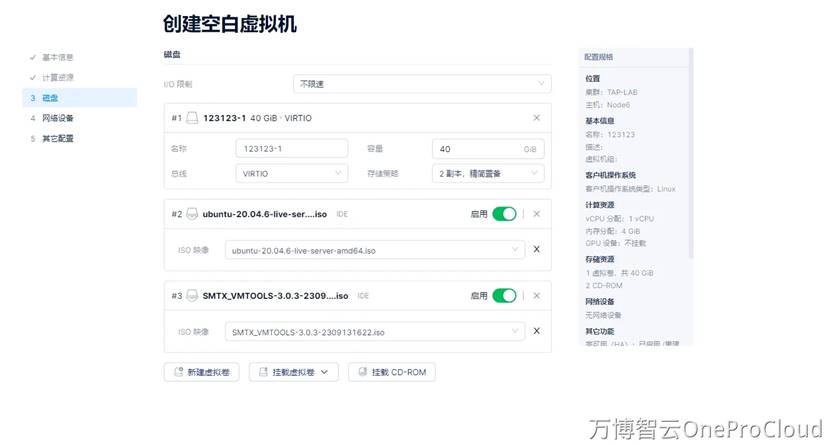
根据smartx文档,构建对应的启动模板
文档下载地址: SMTX OS cloud-init 虚拟机初始化配置指南-6.0.0.pdf
ubuntu需要配置root用户登录,创建的模板名称不可带有ubuntu字符。(unicloud模块检测模板名称带有ubuntu,会使用ubuntu用户连接)