FAQ
FAQ
How do I connect to SSH on Windows?
Q: How do I connect to SSH on Windows?
A: Please note that starting from Windows 10, Microsoft has integrated an OpenSSH client, allowing you to use the ssh command directly in the Command Prompt or PowerShell. Follow these steps:
Open Command Prompt or PowerShell:
- Press
Win + Xand select "Windows PowerShell" or "Command Prompt."
- Press
Run the SSH command:
In the opened window, type the following command to connect to a remote server:
ssh username@remote_host替换
usernamewith your remote server username andremote_hostwith the server's address.If your remote server uses a non-standard port (not the default 22), use the
-pparameter to specify the port:ssh -p port_number username@remote_hostReplace
port_numberwith your server's port.If you need to use a private key for authentication, use the
-iparameter to specify the path to the private key:ssh -i path/to/private/key username@remote_host
Examples:
ssh john@example.com
ssh -p 2222 jane@192.168.1.100
ssh -i C:\path\to\private\key.pem user@remote-server
These commands will establish an SSH session, allowing you to execute commands or transfer files on the remote server.
Note: Ensure your network connection is stable, and the remote server allows SSH connections. If you encounter issues, check firewall settings, SSH server configuration, or network connectivity.
Connecting to Linux with PuTTY on Windows
Q: How can I use PuTTY to connect to a Linux server from Windows?
A: PuTTY is a popular SSH client for Windows. Follow these steps to connect to a Linux server:
Download and Install PuTTY:
- Download PuTTY from the official website: PuTTY Download.
- Install PuTTY by following the installation instructions.
Open PuTTY:
- Launch PuTTY from the Start menu or desktop shortcut.
Configure the Connection:
- In the PuTTY configuration window:
- Enter the IP address or hostname of your Linux server in the "Host Name (or IP address)" field.
- Ensure that the "Port" is set to 22 (the default for SSH).
- In the PuTTY configuration window:
Choose Connection Type:
- On the left panel, navigate to "Connection" > "SSH."
- Make sure "SSH" is selected.
Optional: Save Session:
- To save your settings for future use, enter a name in the "Saved Sessions" field and click "Save."
Initiate Connection:
- Click the "Open" button to start the connection.
Enter Login Credentials:
- Once the terminal window opens, you will be prompted to enter your Linux username and password.
Success:
- If the credentials are correct, you will be connected to your Linux server via SSH.
Note: Ensure that SSH is enabled on your Linux server and that you have the correct login credentials.
Troubleshooting:
- If you encounter issues, double-check your server's IP address, ensure SSH is running, and confirm your login details.
How HyperBDR ensure the integrity of Windows Data?
Q1: How does HyperBDR ensure the integrity of Windows data?
A1: HyperBDR primarily utilizes Windows VSS (Volume Shadow Copy Service) technology to ensure data integrity. In VMware without an agent, it achieves this by invoking VSS through VMware Tools. In Windows Agent mode, it directly calls the VSS interface.
Q2: What is Windows VSS technology?
A2: VSS, or Volume Shadow Copy Service, is a Windows service that enables the creation of point-in-time snapshots of volumes, including those containing databases. These snapshots, or shadow copies, provide a consistent view of the data, even if changes are being made to the database during the snapshot creation process.
VSS ensures database integrity through a process known as "shadow copy creation." When a VSS snapshot is triggered, the service coordinates with various components, including VSS writers associated with applications such as databases. These writers temporarily freeze write I/O operations to ensure that the data on the disk is in a consistent state at the time of the snapshot.
VSS is compatible with various Database Management Systems (DBMS), including SQL Server. Most major DBMS vendors provide VSS writers that integrate with the VSS framework, allowing for the creation of consistent and reliable database snapshots.
Q3: In VMware without an agent, how does HyperBDR call VSS?
A3: In VMware without an agent, HyperBDR collaborates with VMware Tools to invoke VSS, freezing the file system and application states to ensure data consistency during snapshot creation.
Q4: In Windows Agent mode, how does HyperBDR directly call the VSS interface?
A4: In Windows Agent mode, HyperBDR directly calls the VSS interface provided by the Windows operating system to freeze data and create snapshots, ensuring the backup data is in a transactionally consistent state.
Q5: Does HyperBDR's data integrity assurance apply to specific applications like databases?
A5: Yes, HyperBDR's VSS integration is application-aware and applicable to specific applications, including databases. VSS ensures that application data is in a consistent state during snapshot creation.
Configuration of Antivirus Software on Windows Agent Source Host
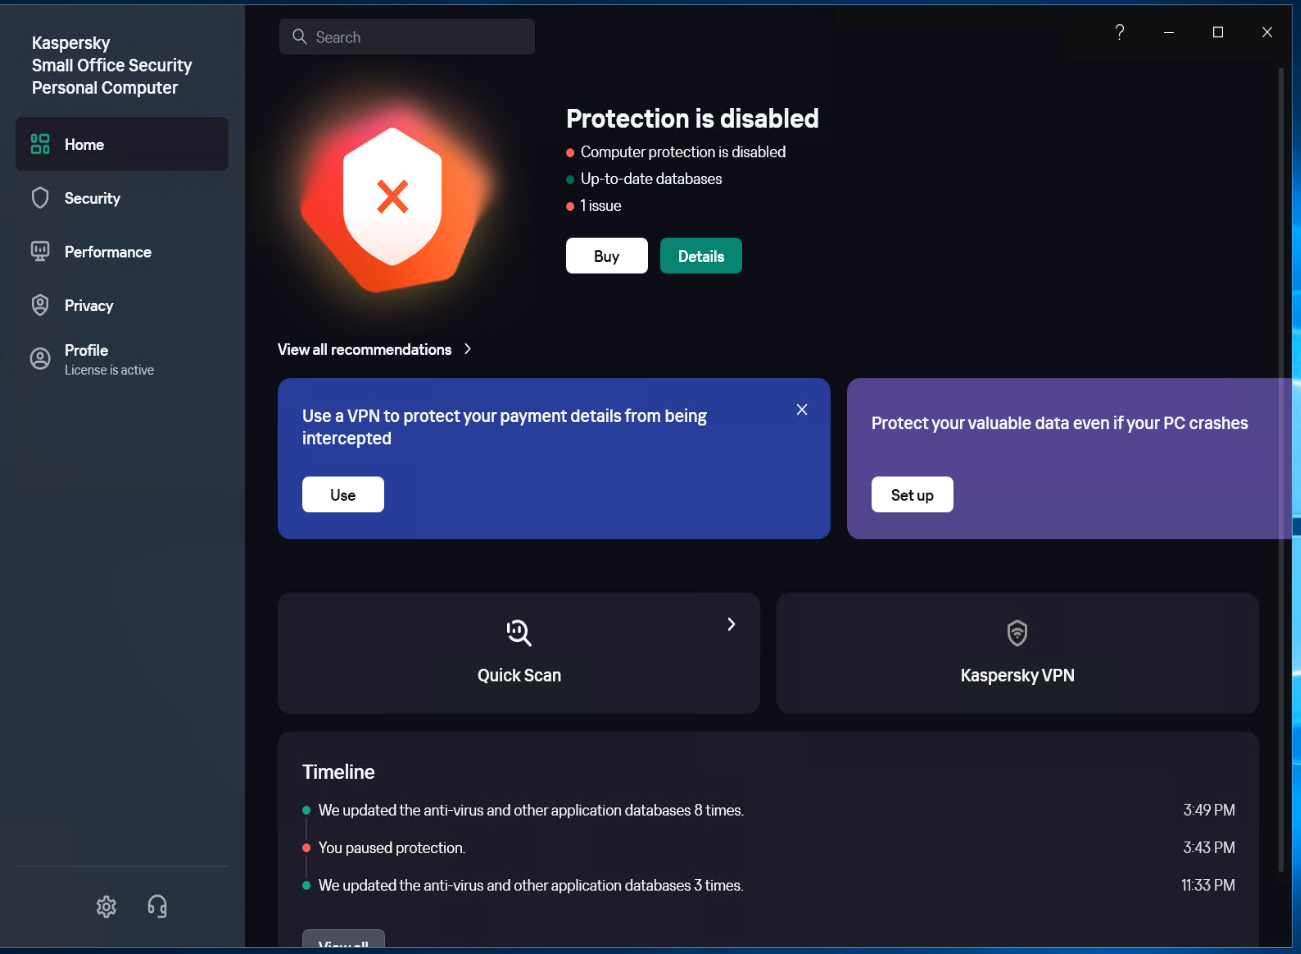
Kaspersky
Kaspersky Pause Protection
Set the running Kaspersky to Pause Protection status.
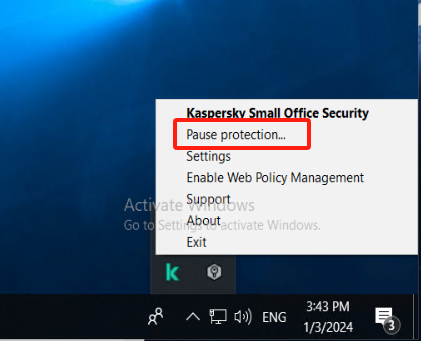
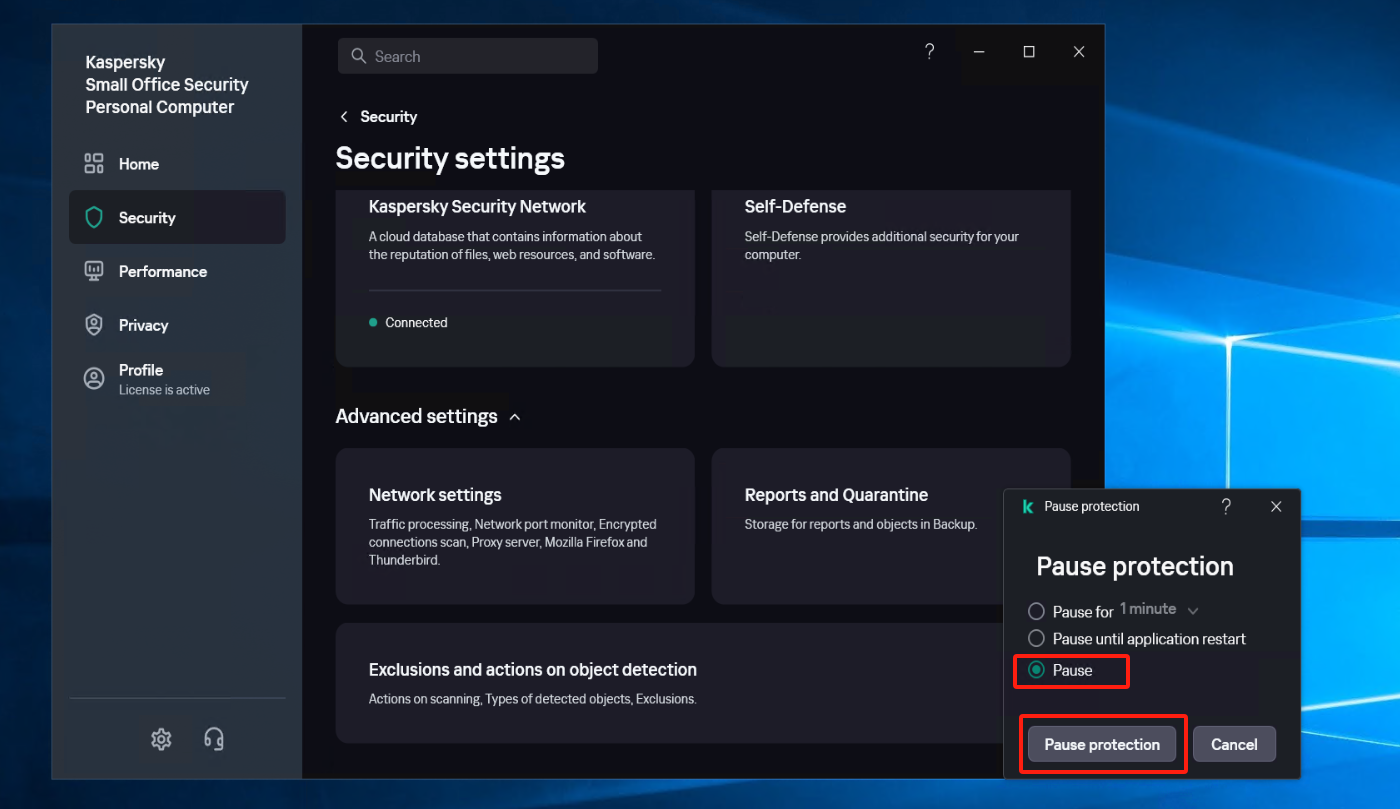
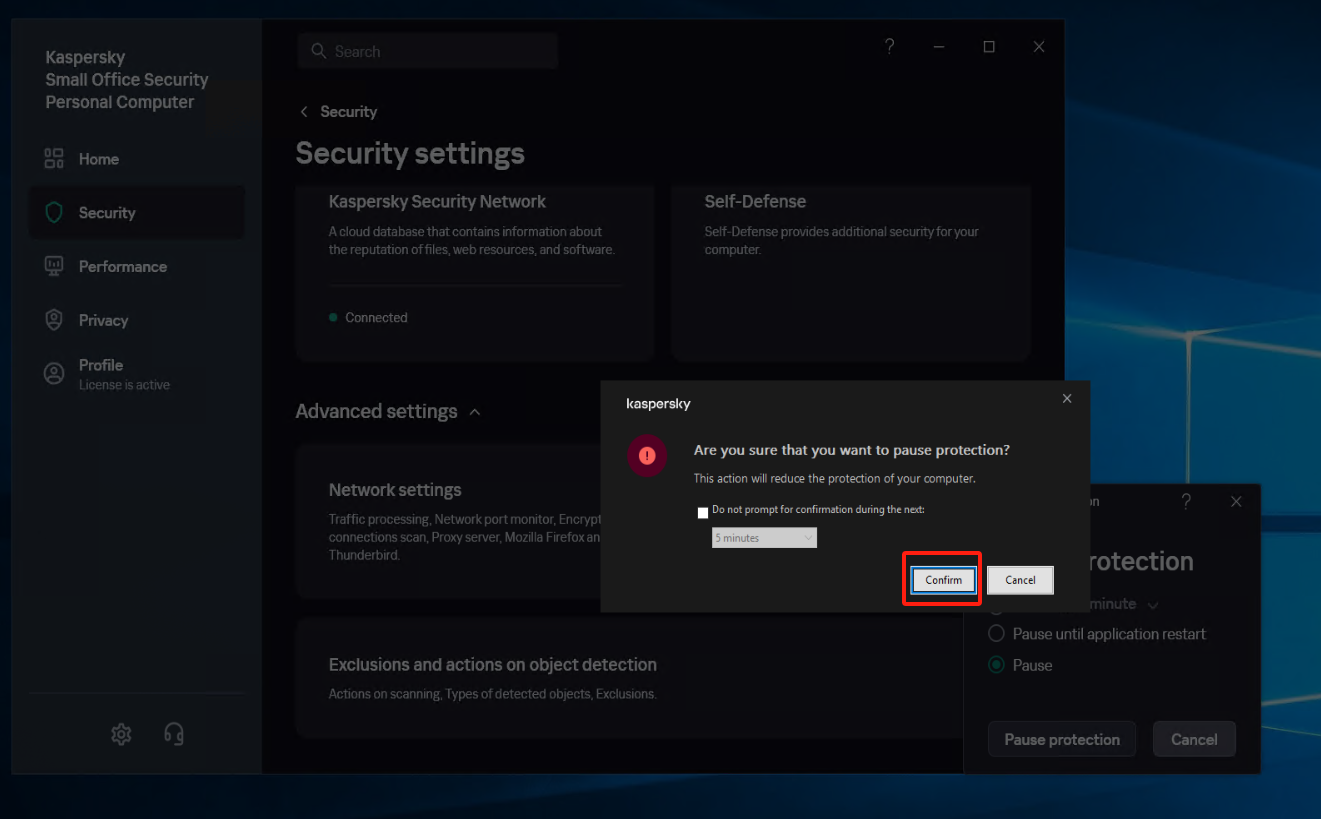
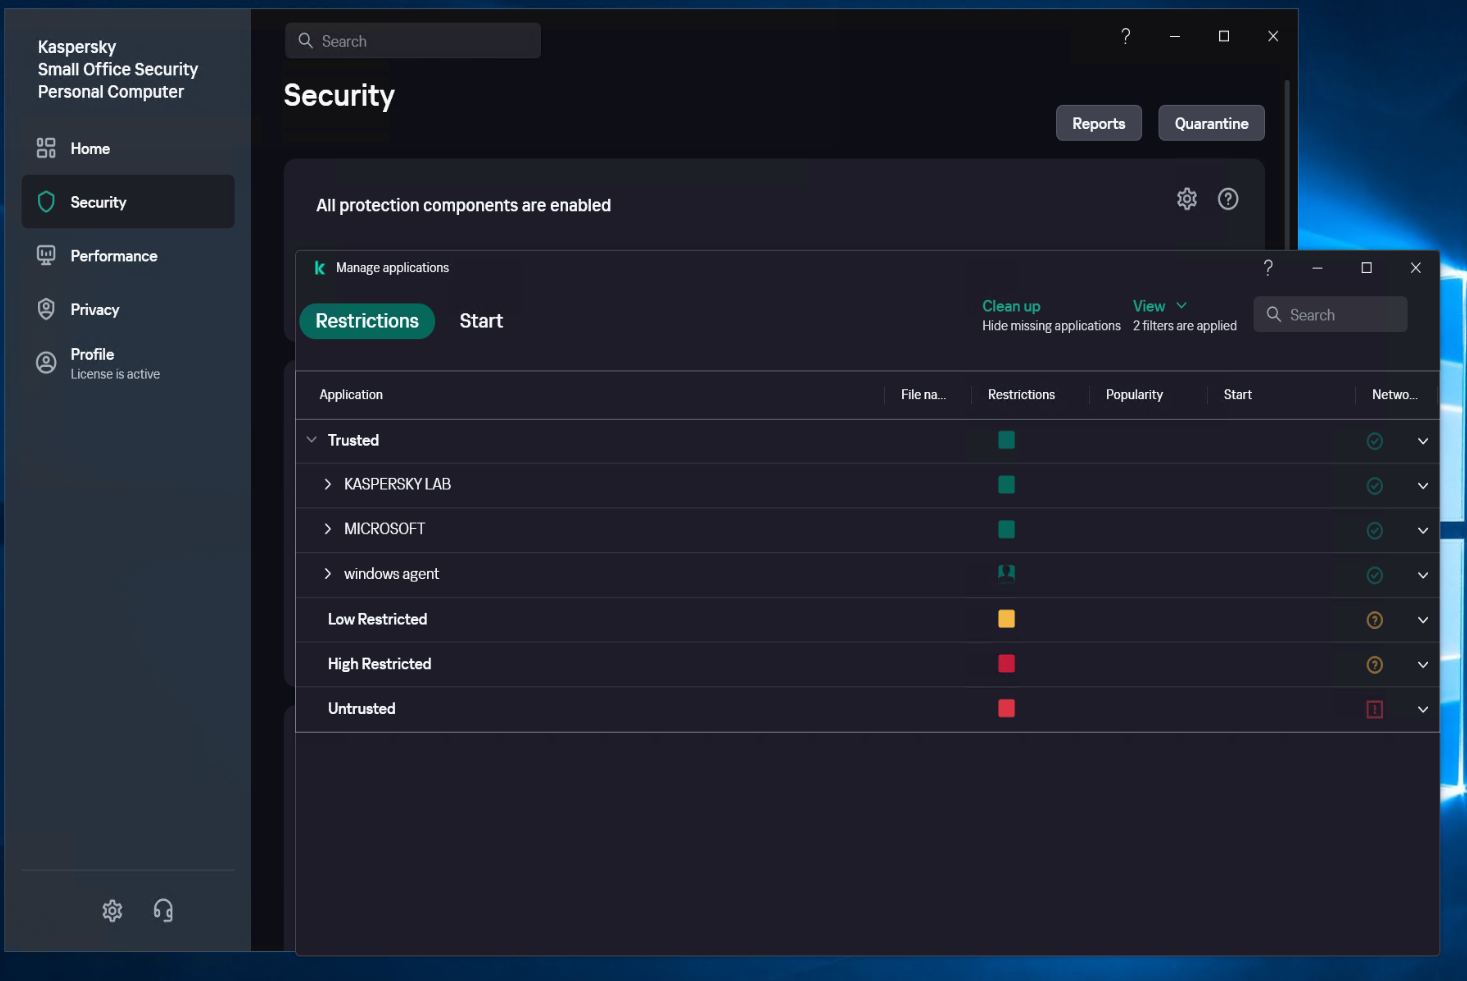
Create a new subgroup named "windows agent" under [Application]
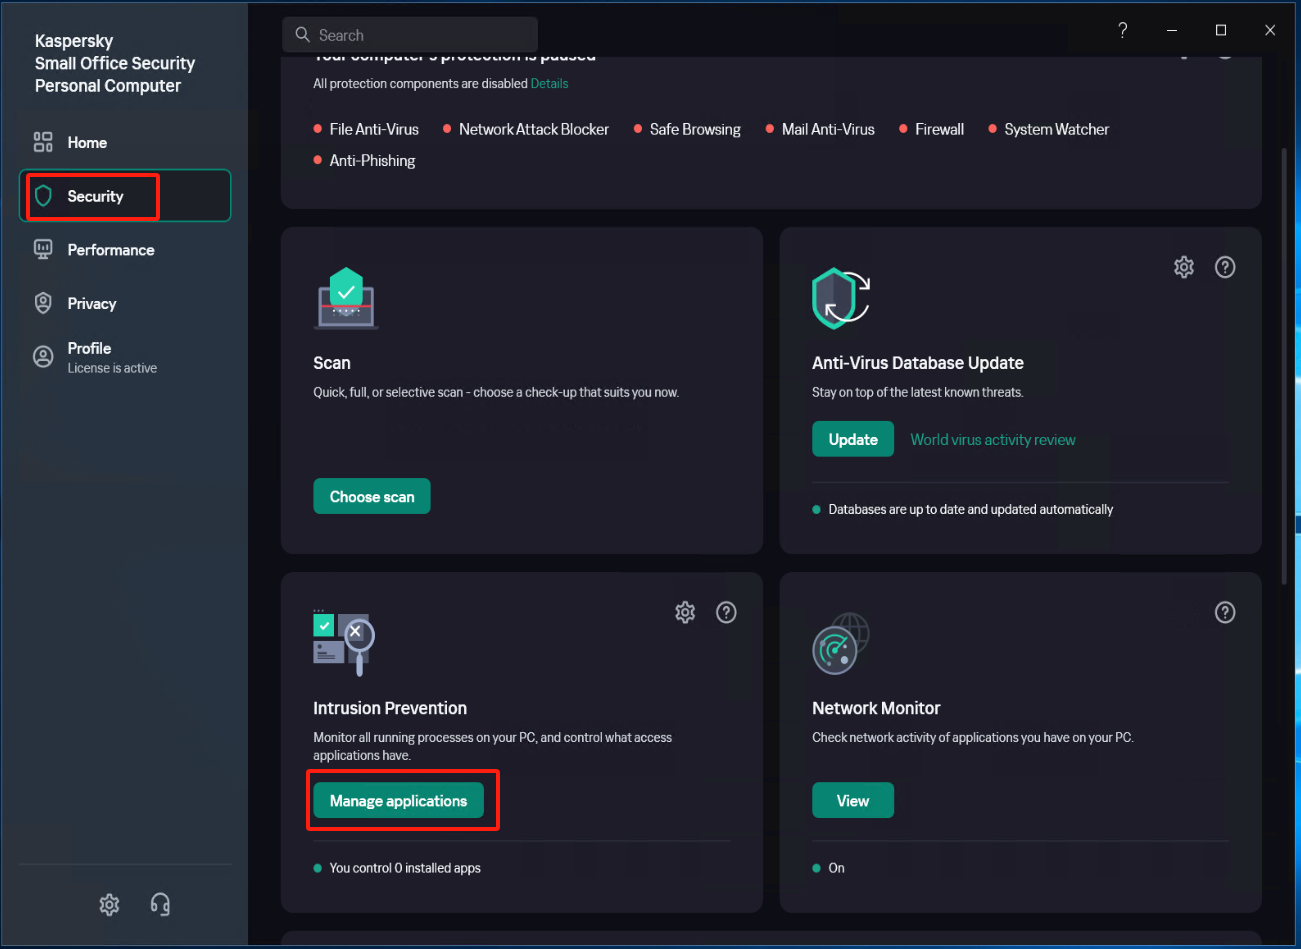
Select [Security] - [Intrusion Prevention] - [Manage applications], and create a new subgroup named "windows agent" under [Application].
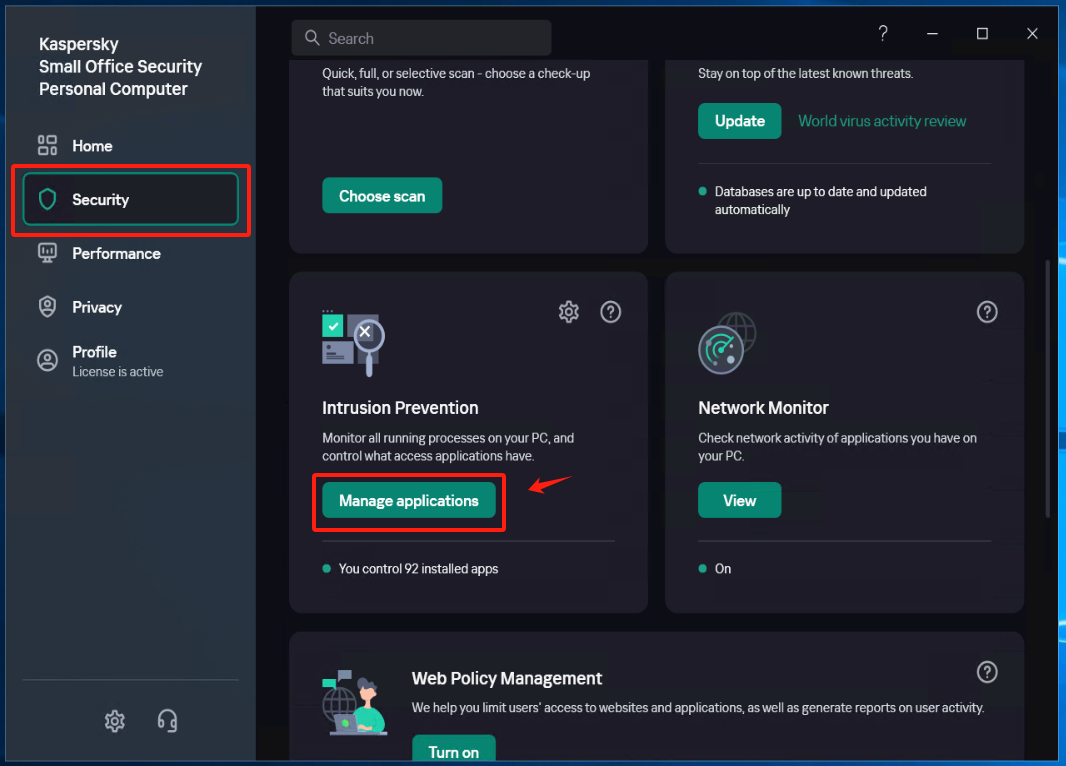
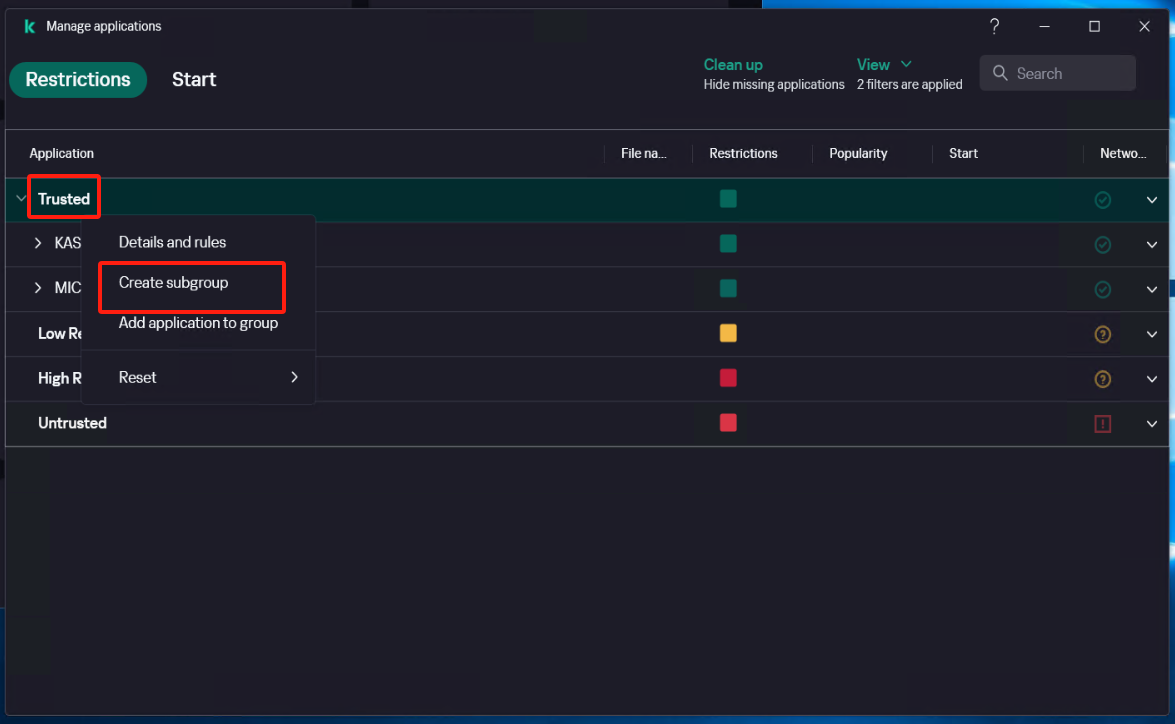
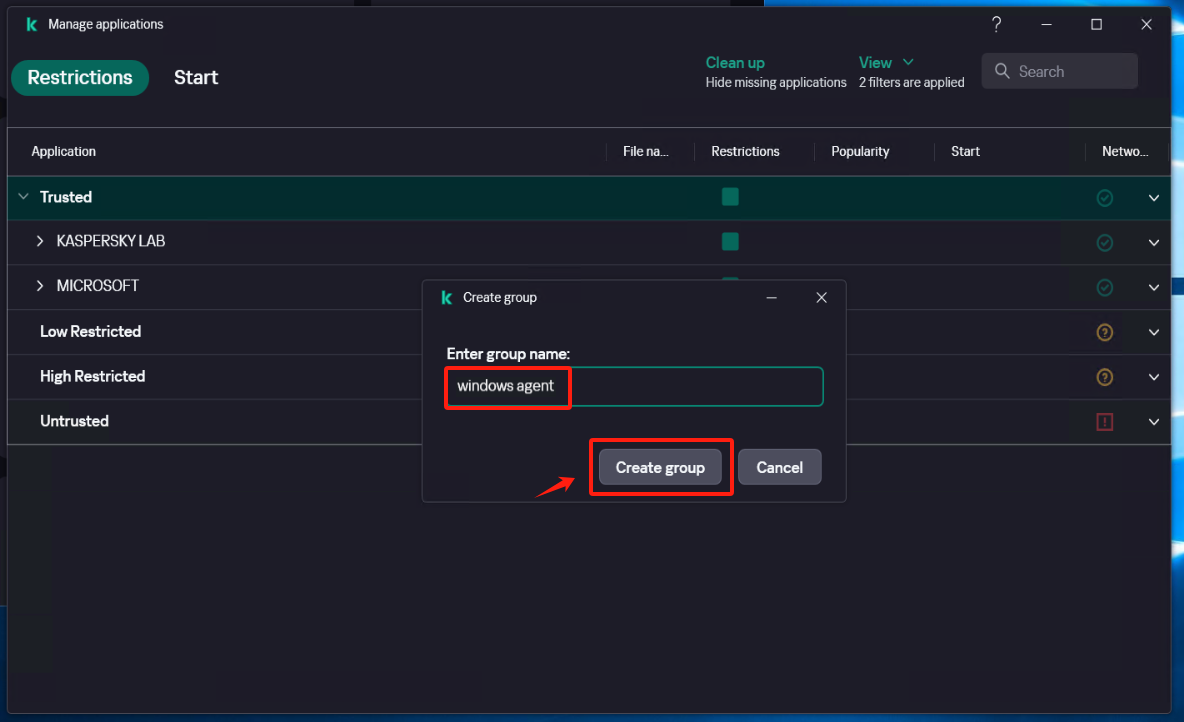
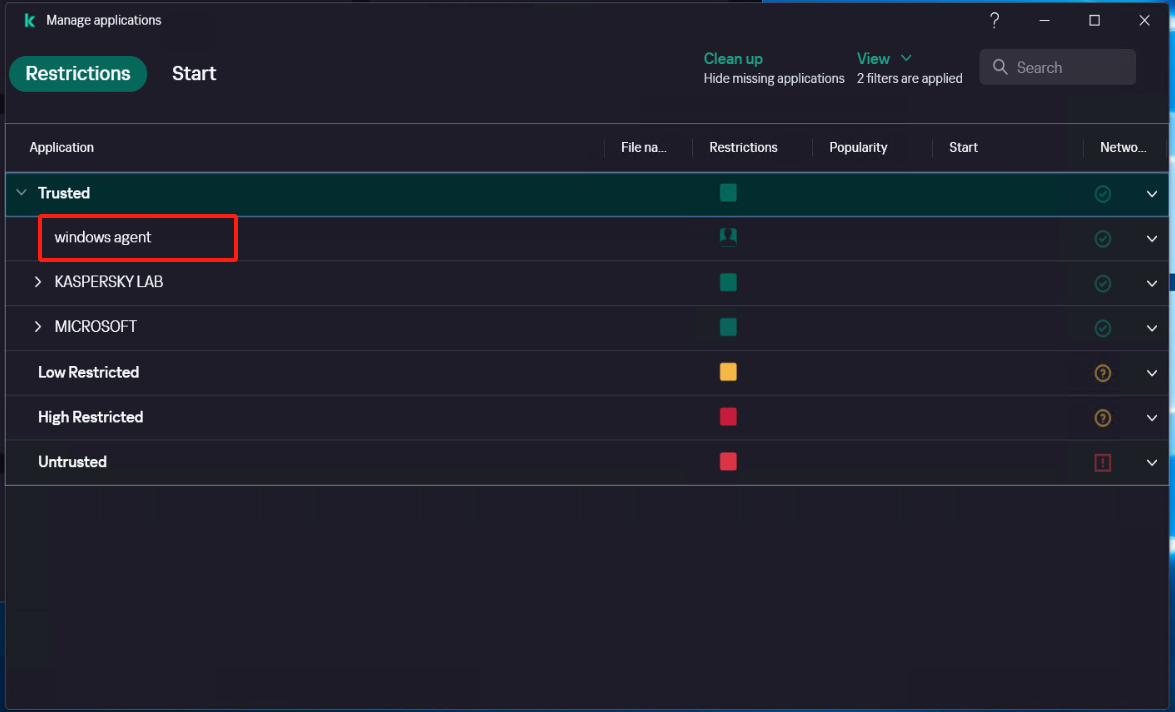
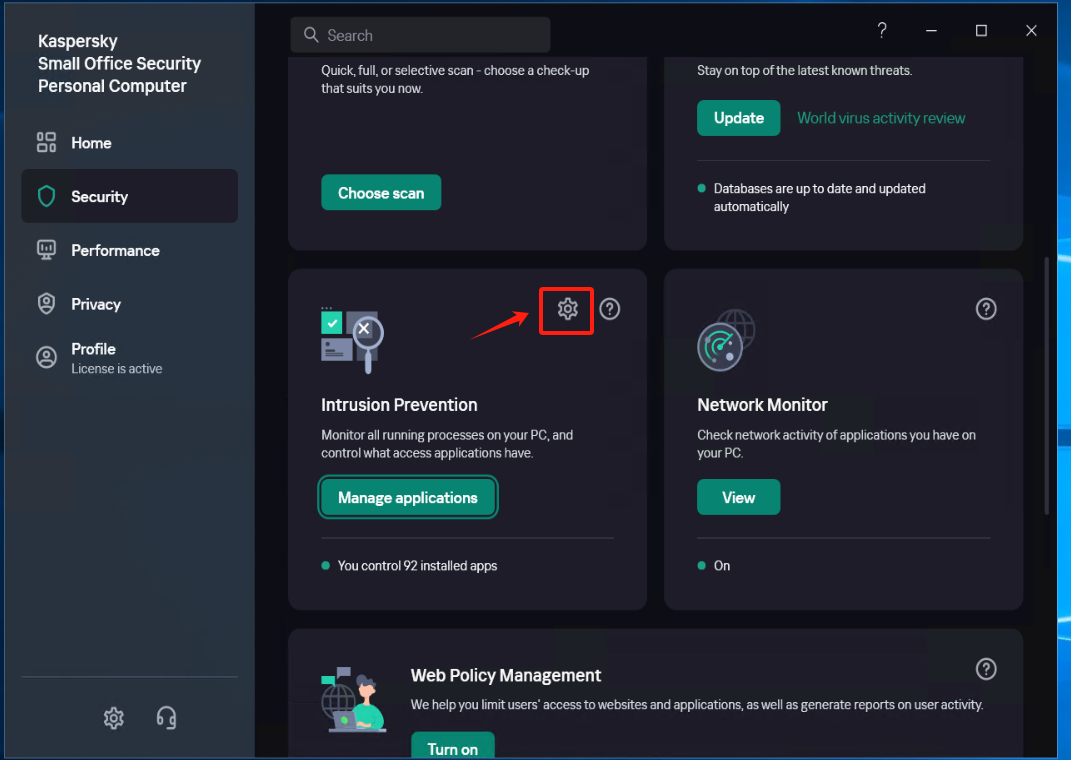
Configure [Intrusion Prevention]
Locate the [Trust group for applications started before startup of Kaspersky Small Office Security] item and set it to the recently created trust group "windows agent", save the configuration.
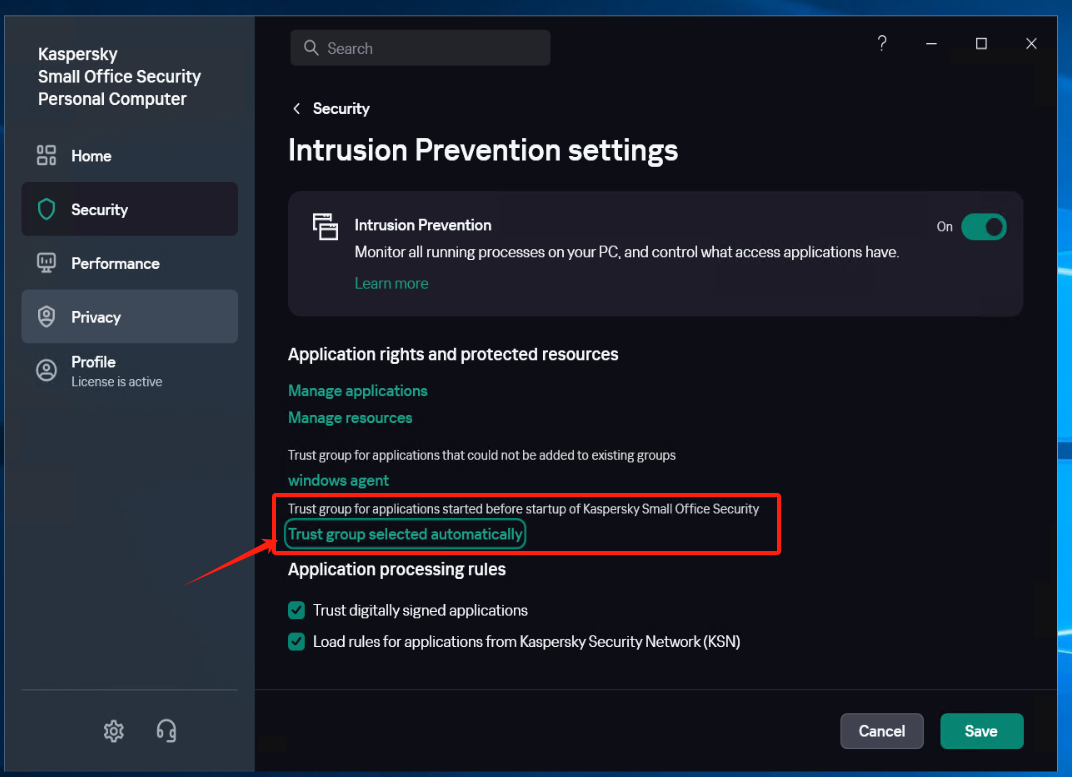
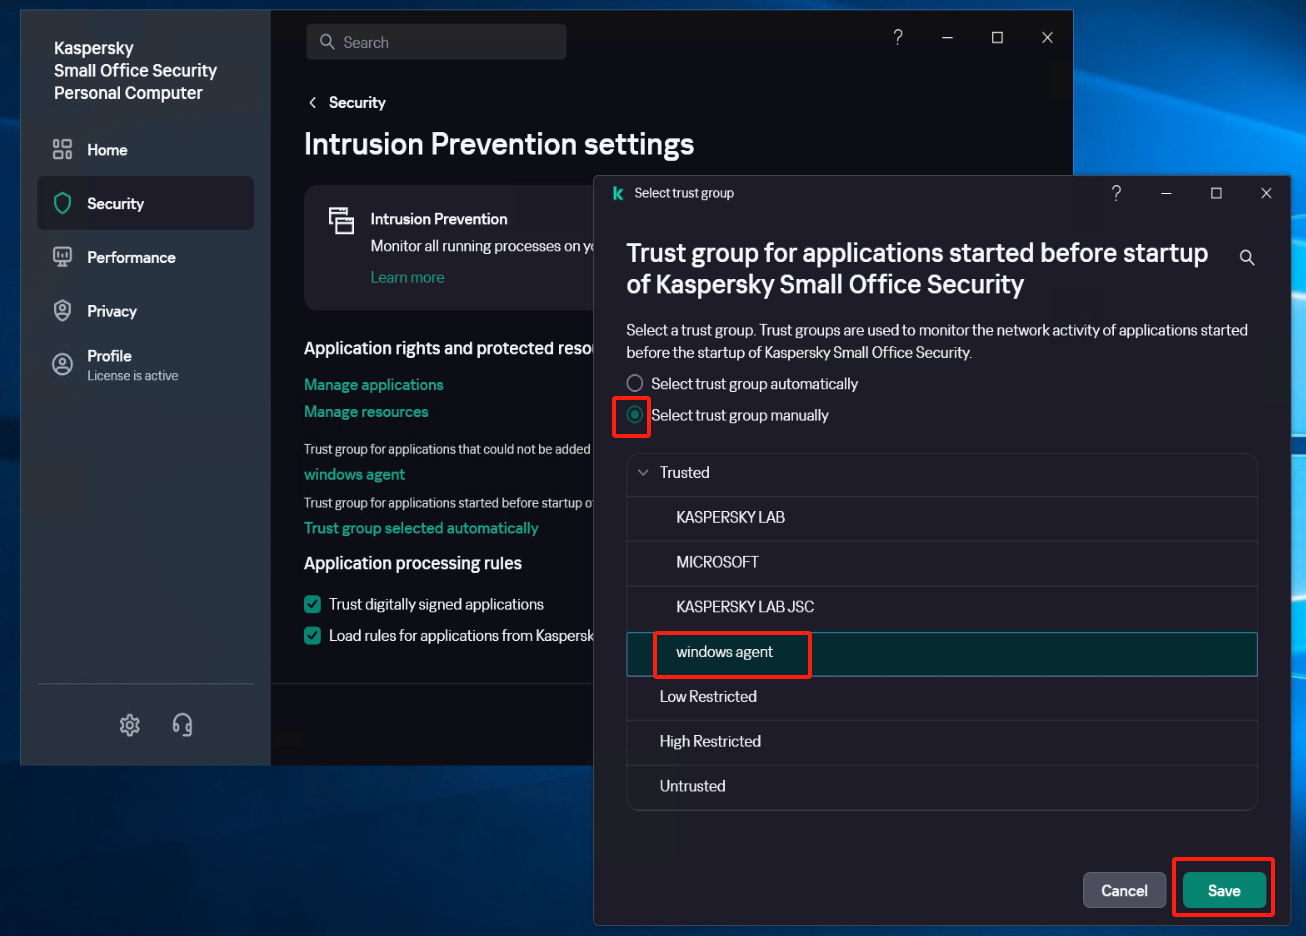
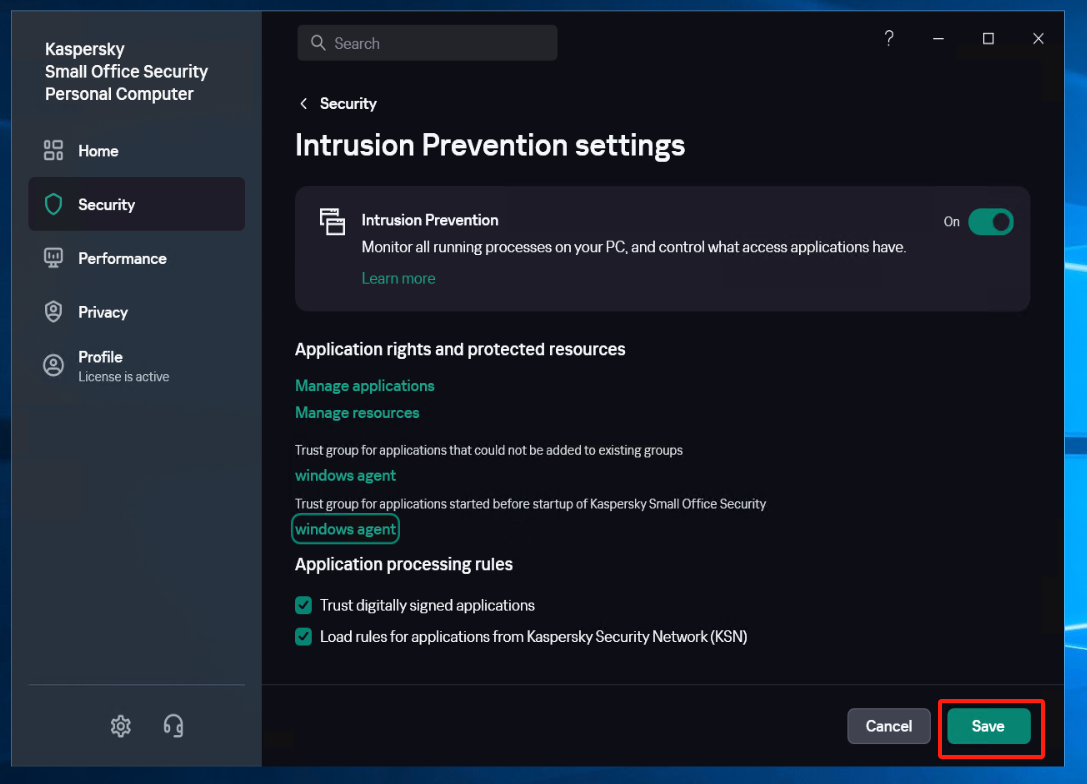
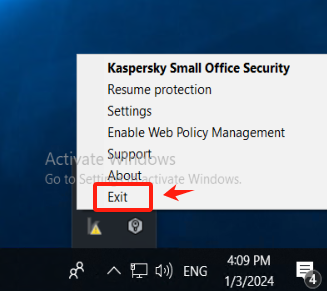
Exit Kaspersky
Install Windows Agent
Tips
After installing Windows Agent, do not start Windows Agent temporarily.
Reference Document: https://docs.oneprocloud.com/userguide/poc/agent-pre-settings.html#unzip-the-installation-package-and-proceed-with-the-installation
Run the Kaspersky
Tips
When Kaspersky is restarted, it remains in the paused protection state.
Add the application of Windows Agent to the trusted group.
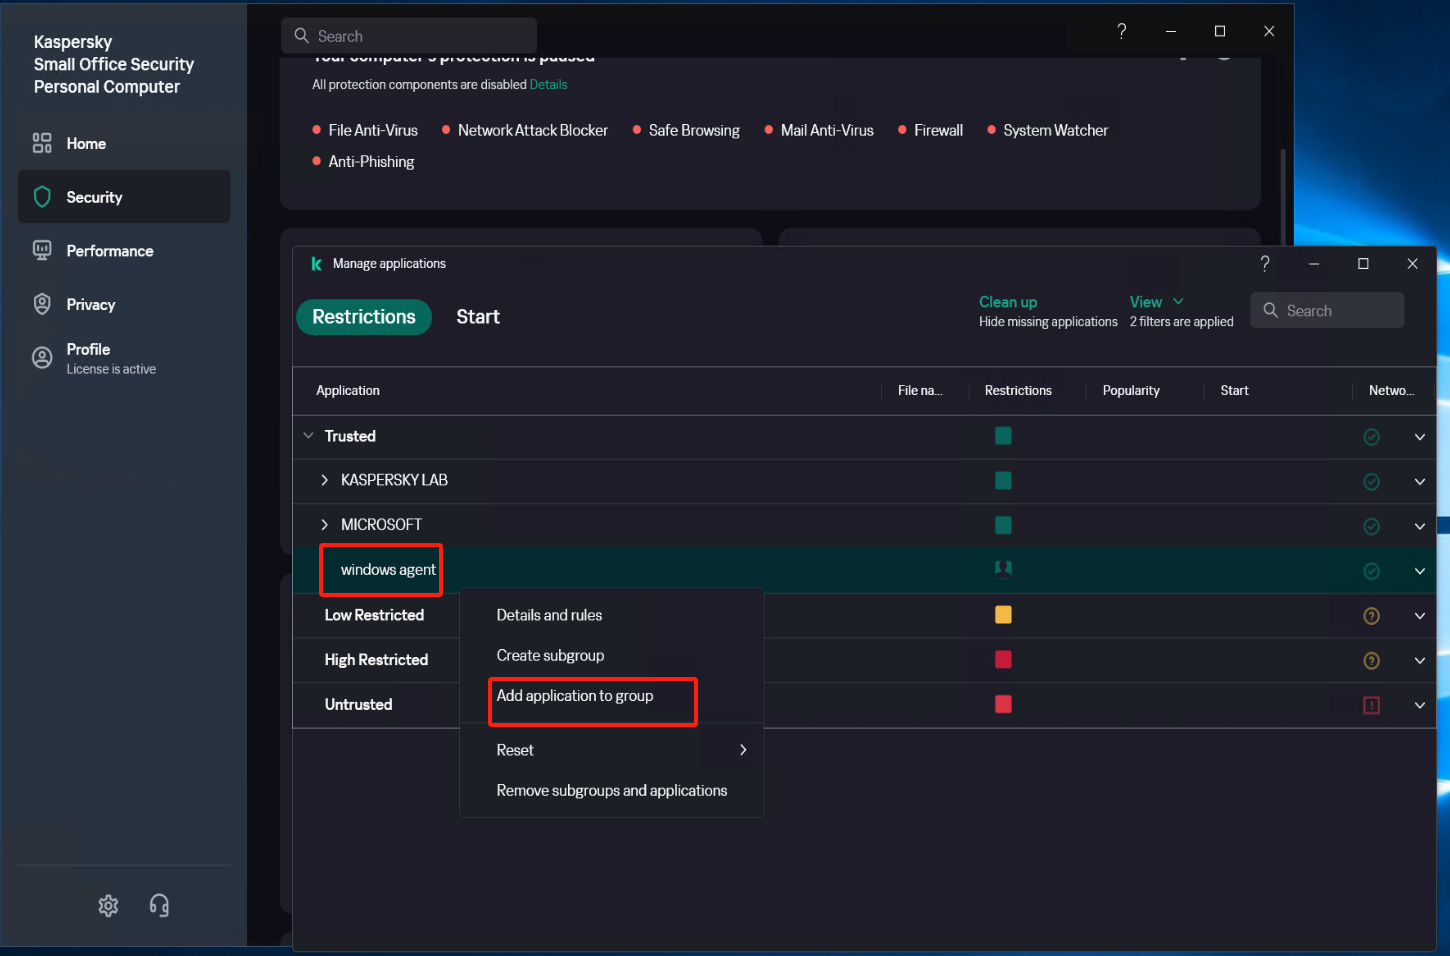
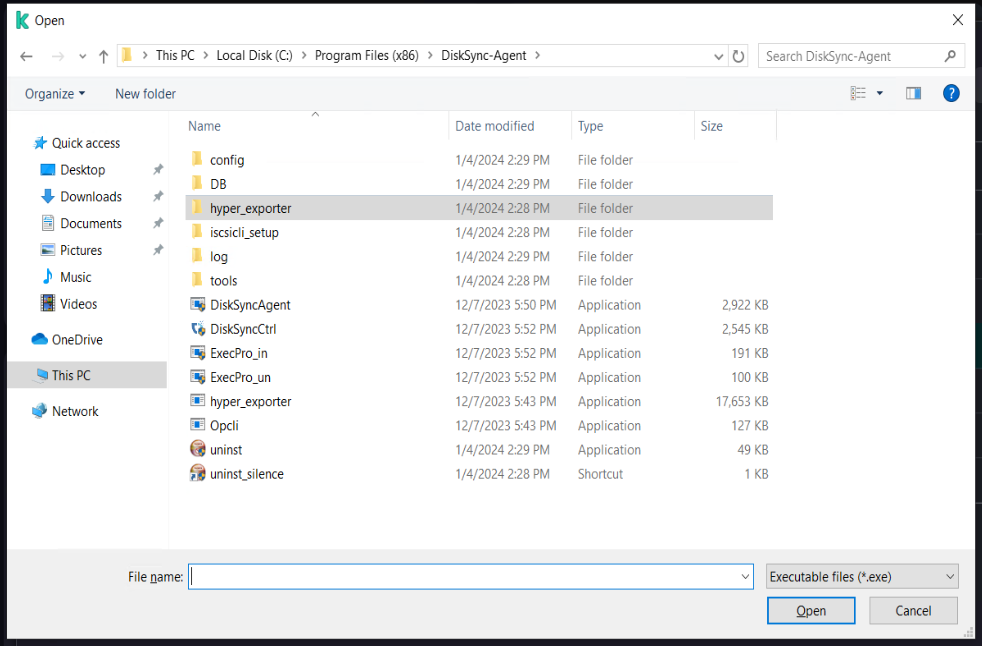
Select [Security] - [Intrusion Prevention] - [Manage applications], Right-click on "windows agent", click on [Add Application to Group], and add all exe, bat, and sys files under the installation directory of Windows Agent and its subdirectory "hyper_exporter".
Modify Security settings (1)
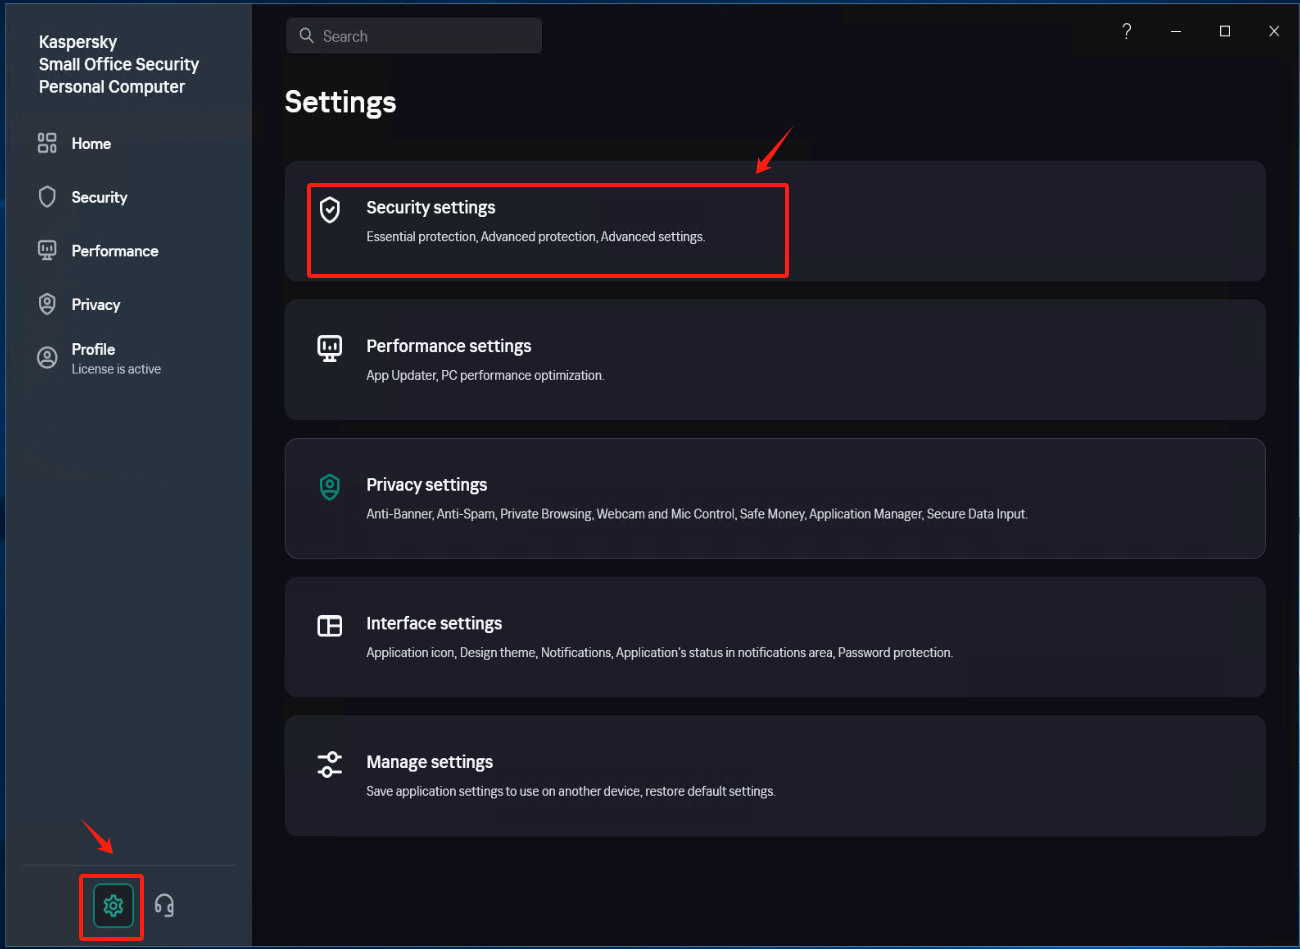
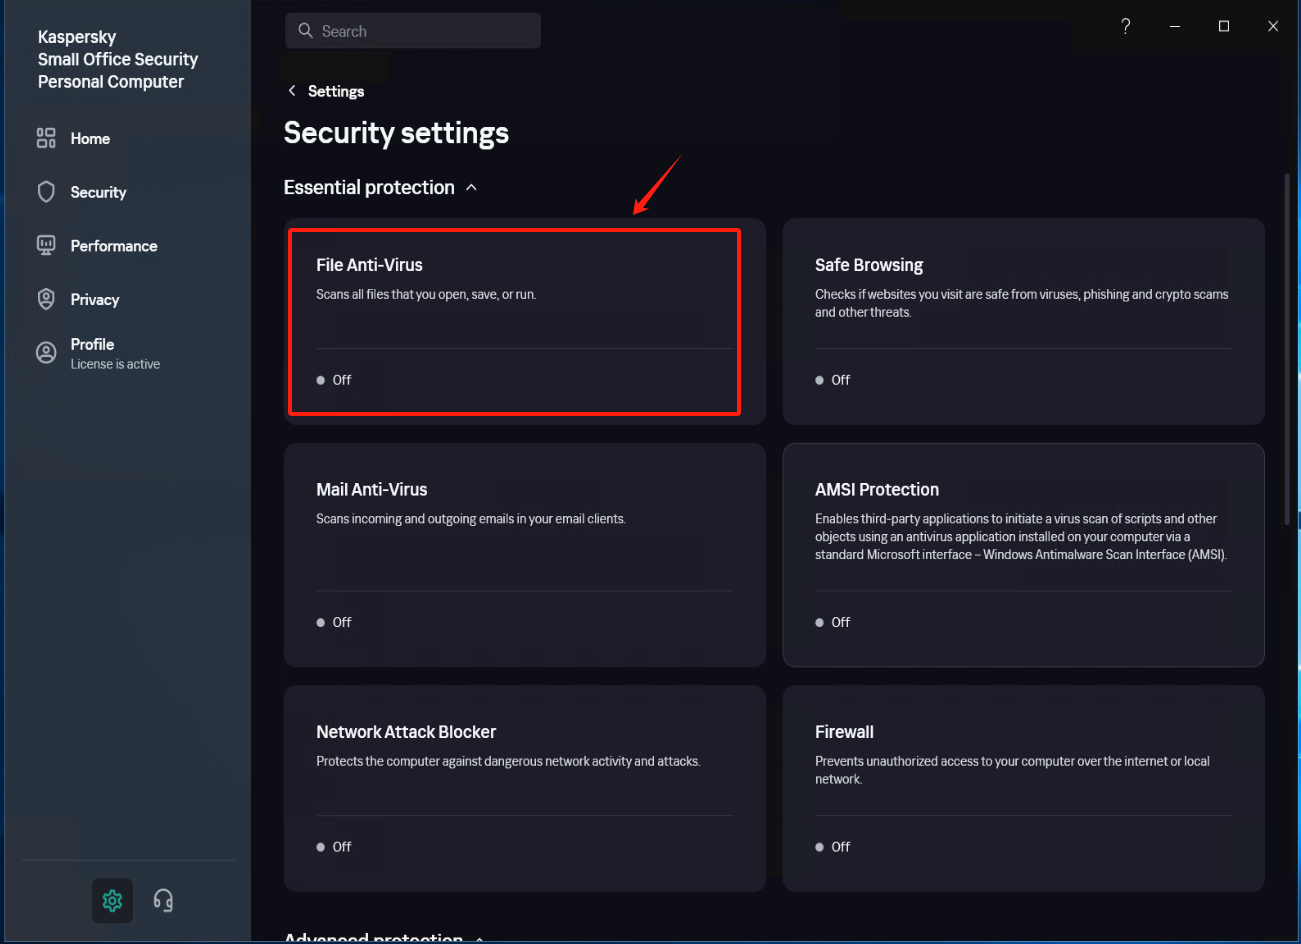
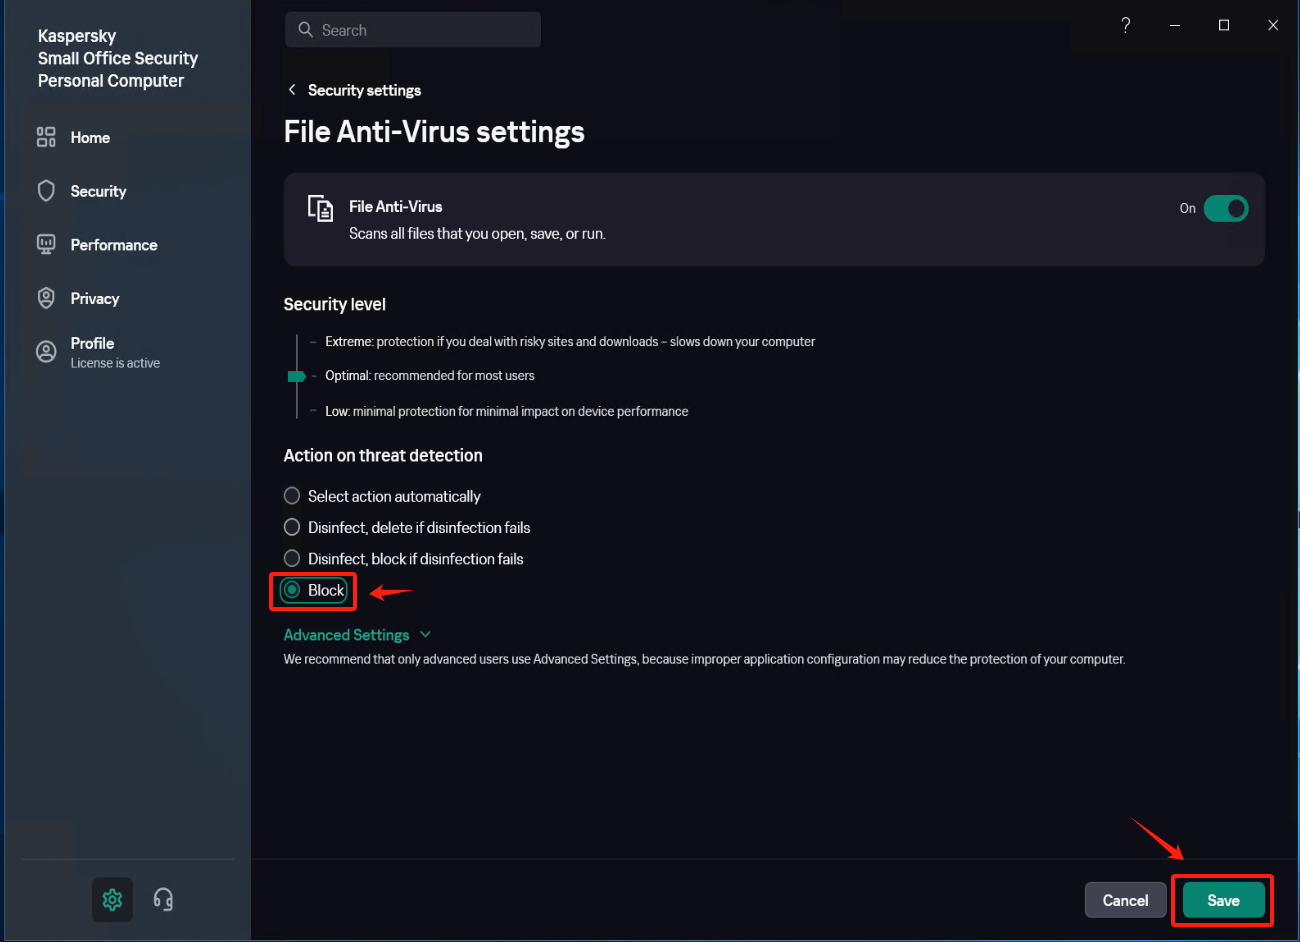
In [Settings] - [Security Settings] - [File Anti-Virus], locate the [Actions on threat detection] option, check [Block], and save the settings.
Modify Security settings (2)
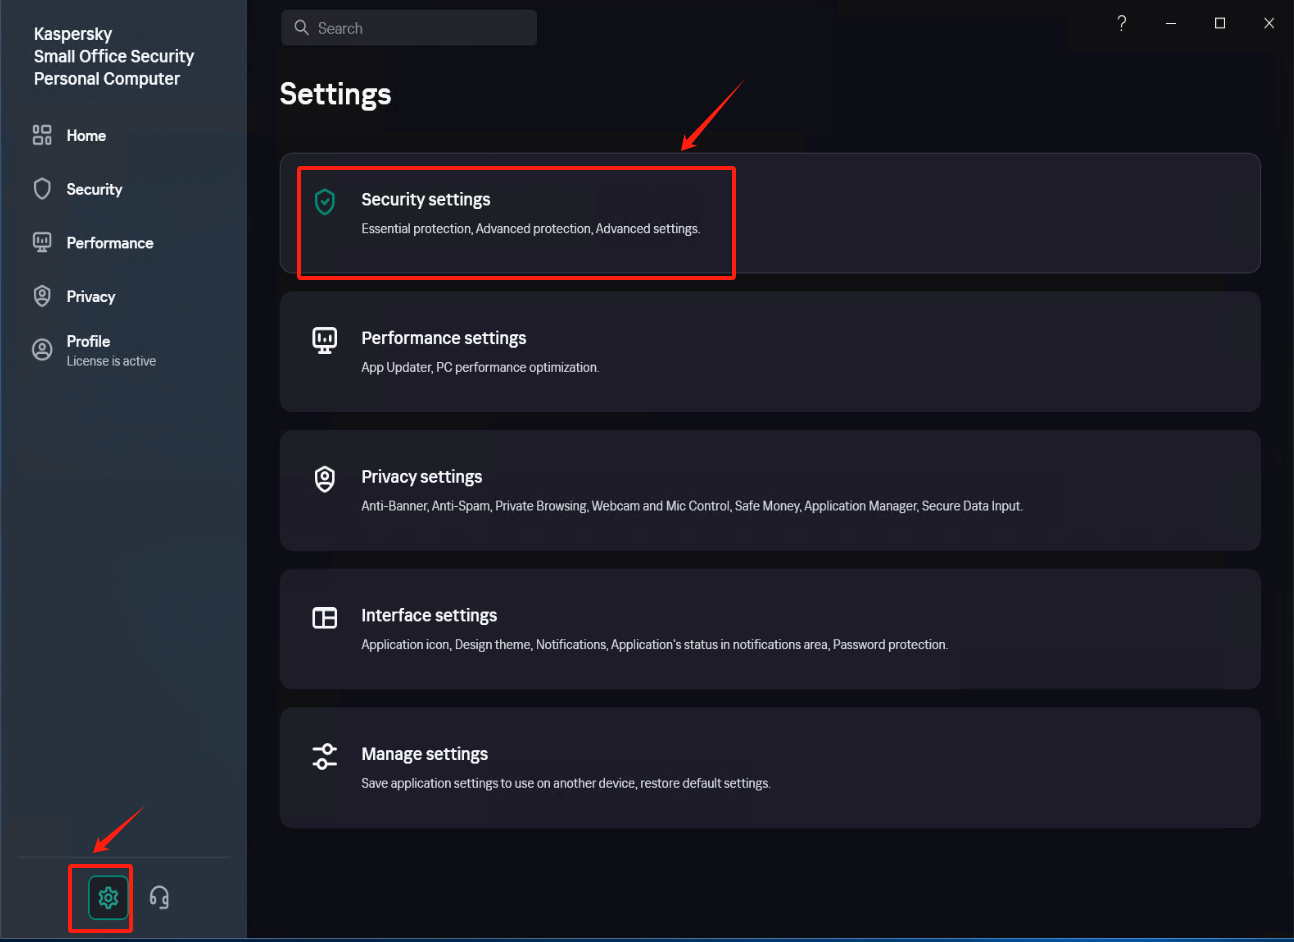
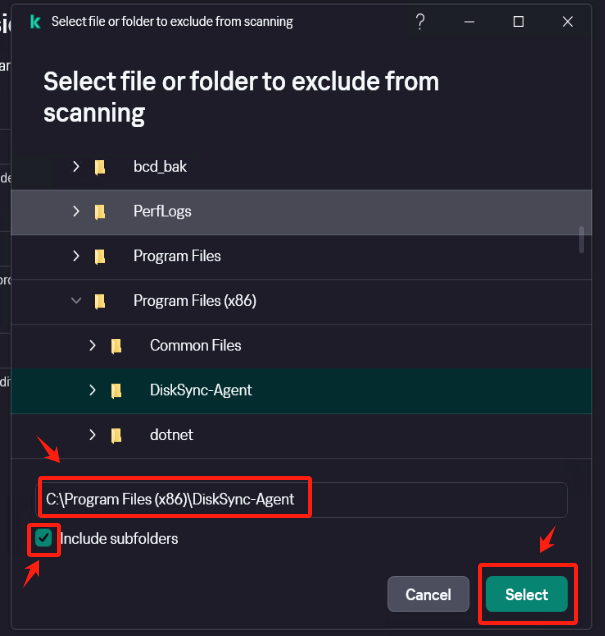
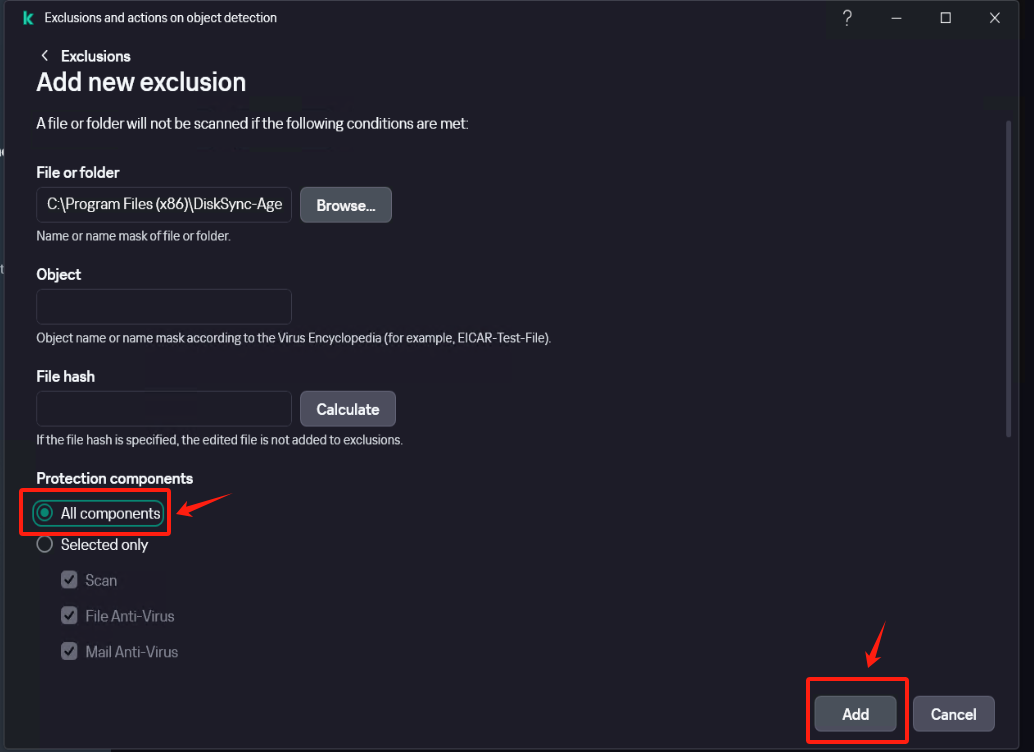
In [Settings] - [Security Settings] - [Exclusions and actions on object detected], click [Manage Exclusions] - [+Add] add the installation directory of Windows Agent as an exclusion, check [Protect components] - [All components], Click [Add] after confirmation.
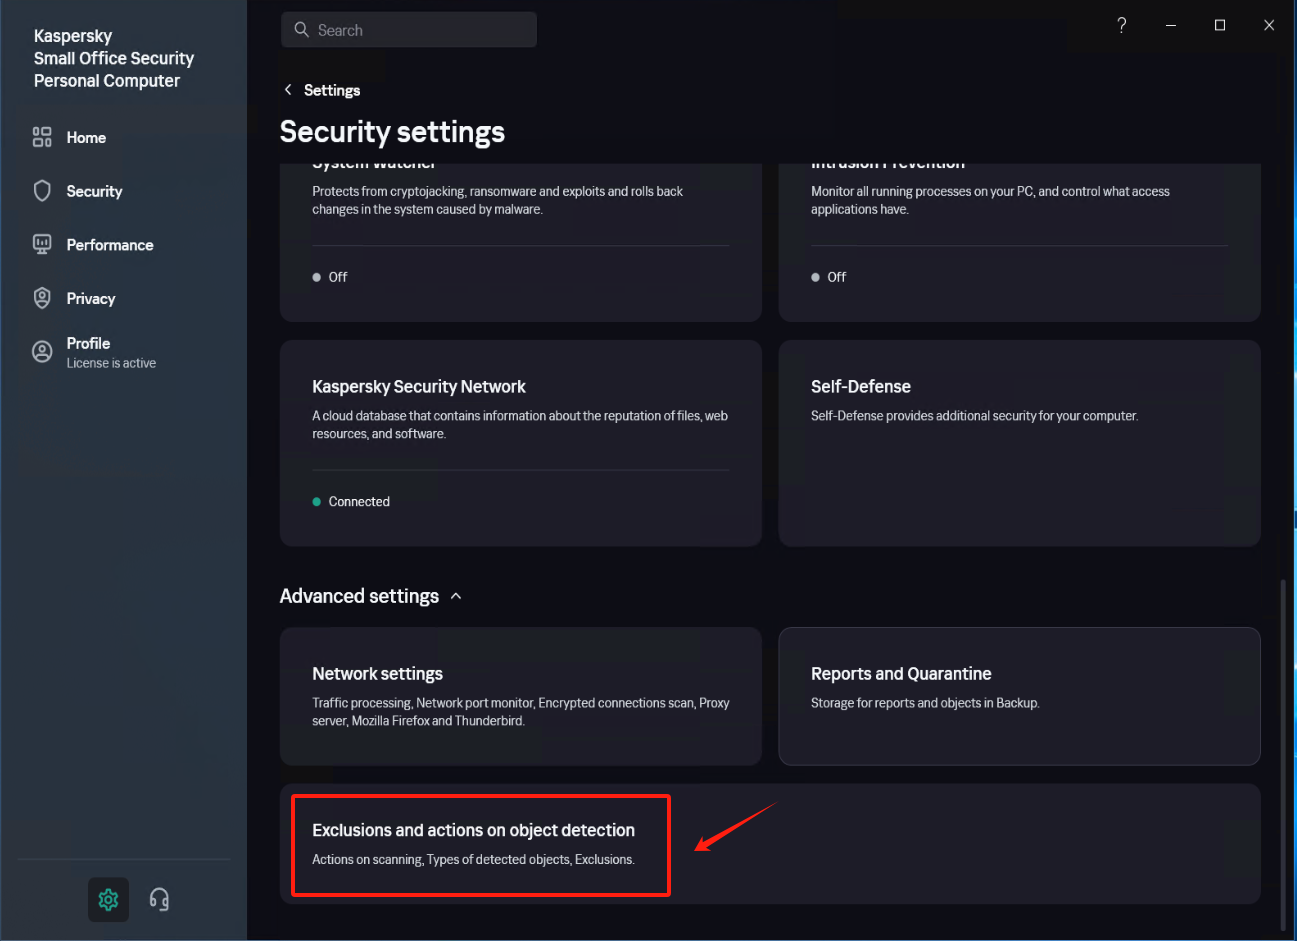
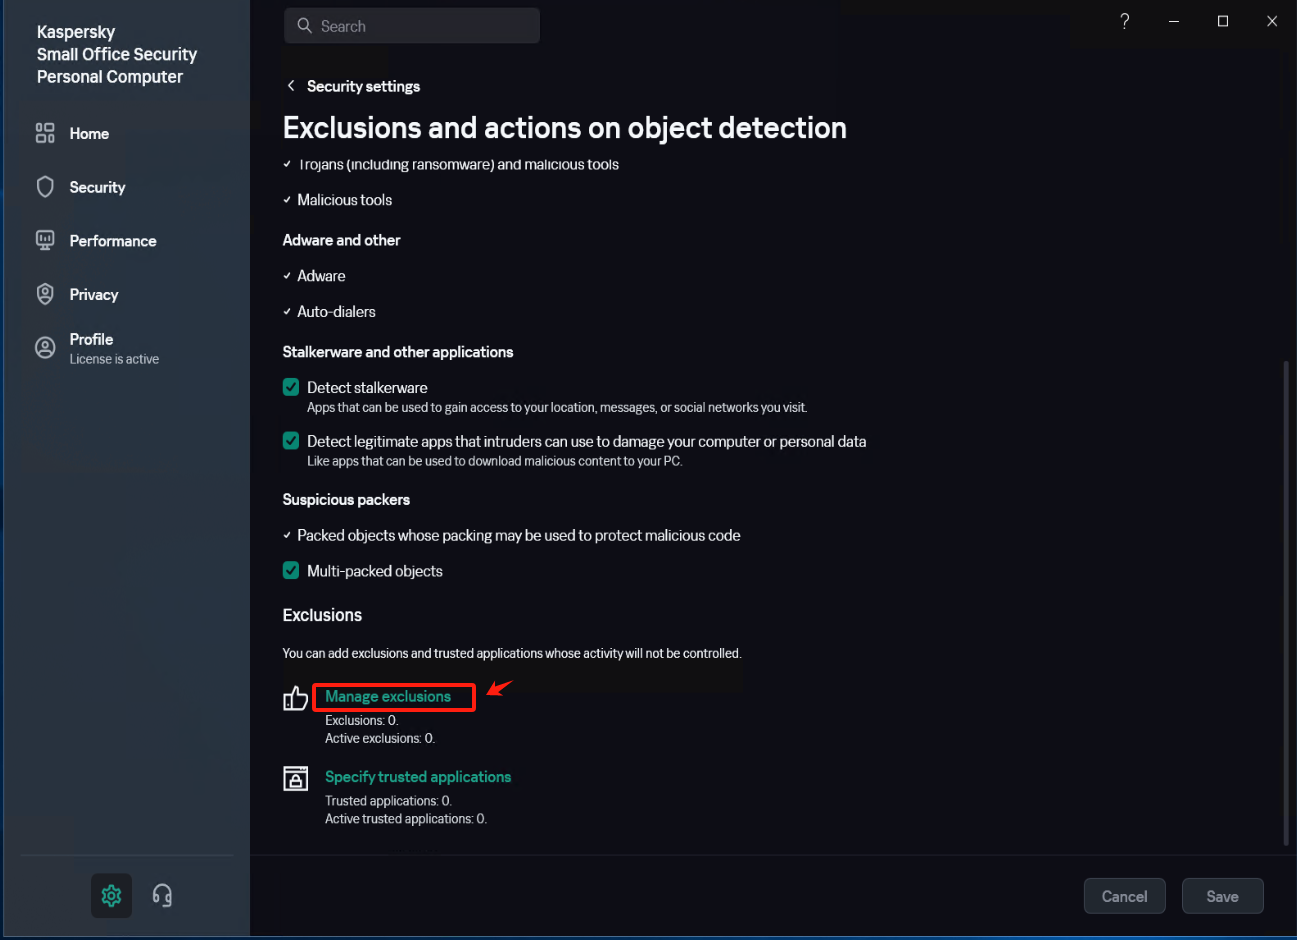
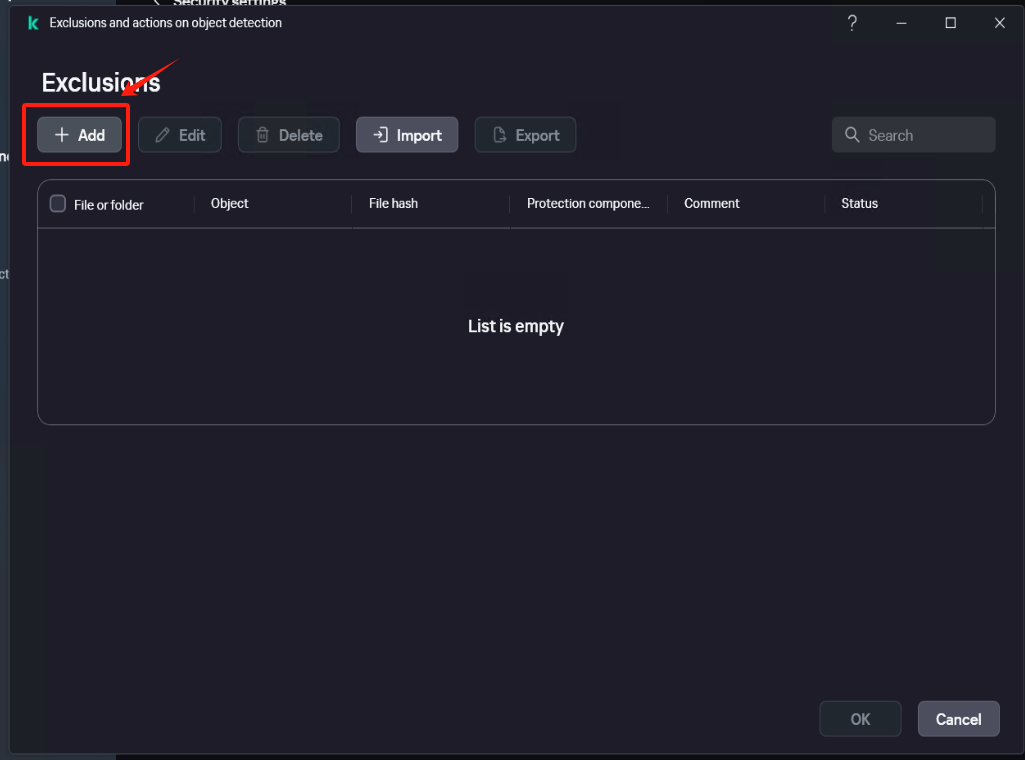
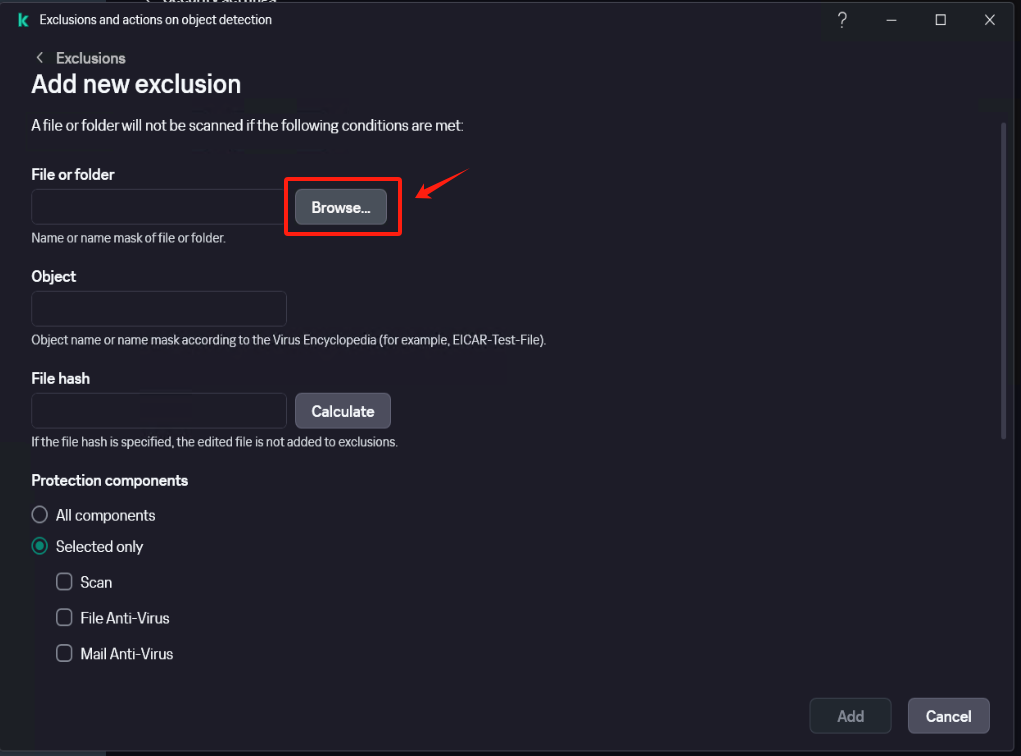
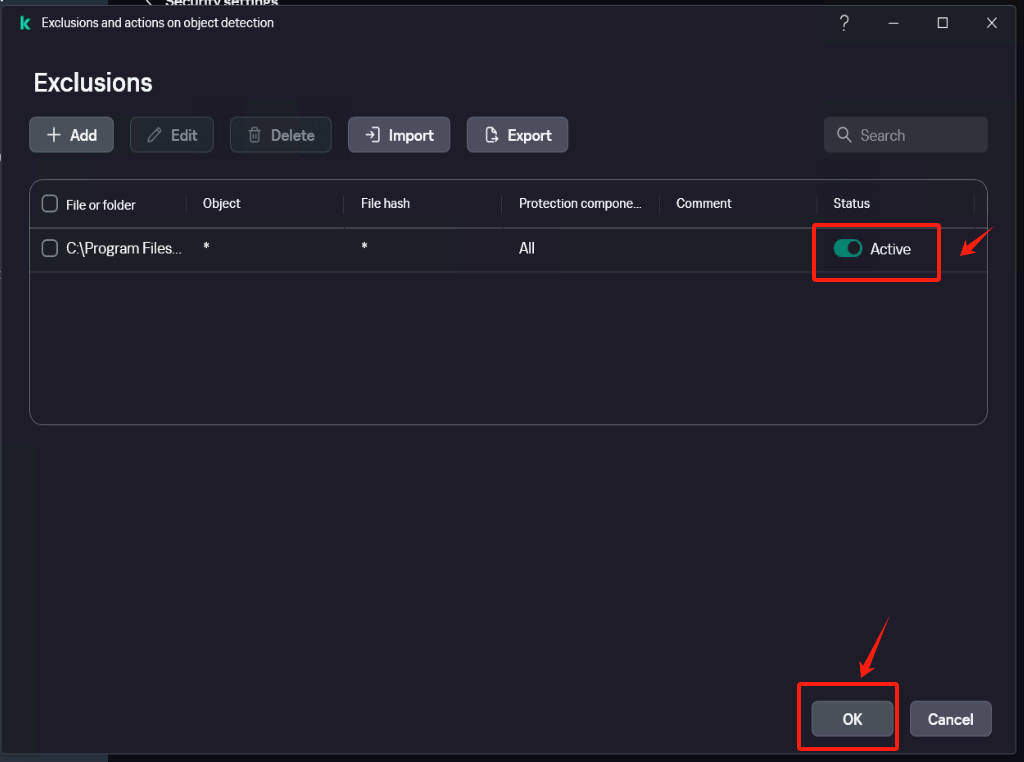
Confirm that the exclusion status is set to [Active].
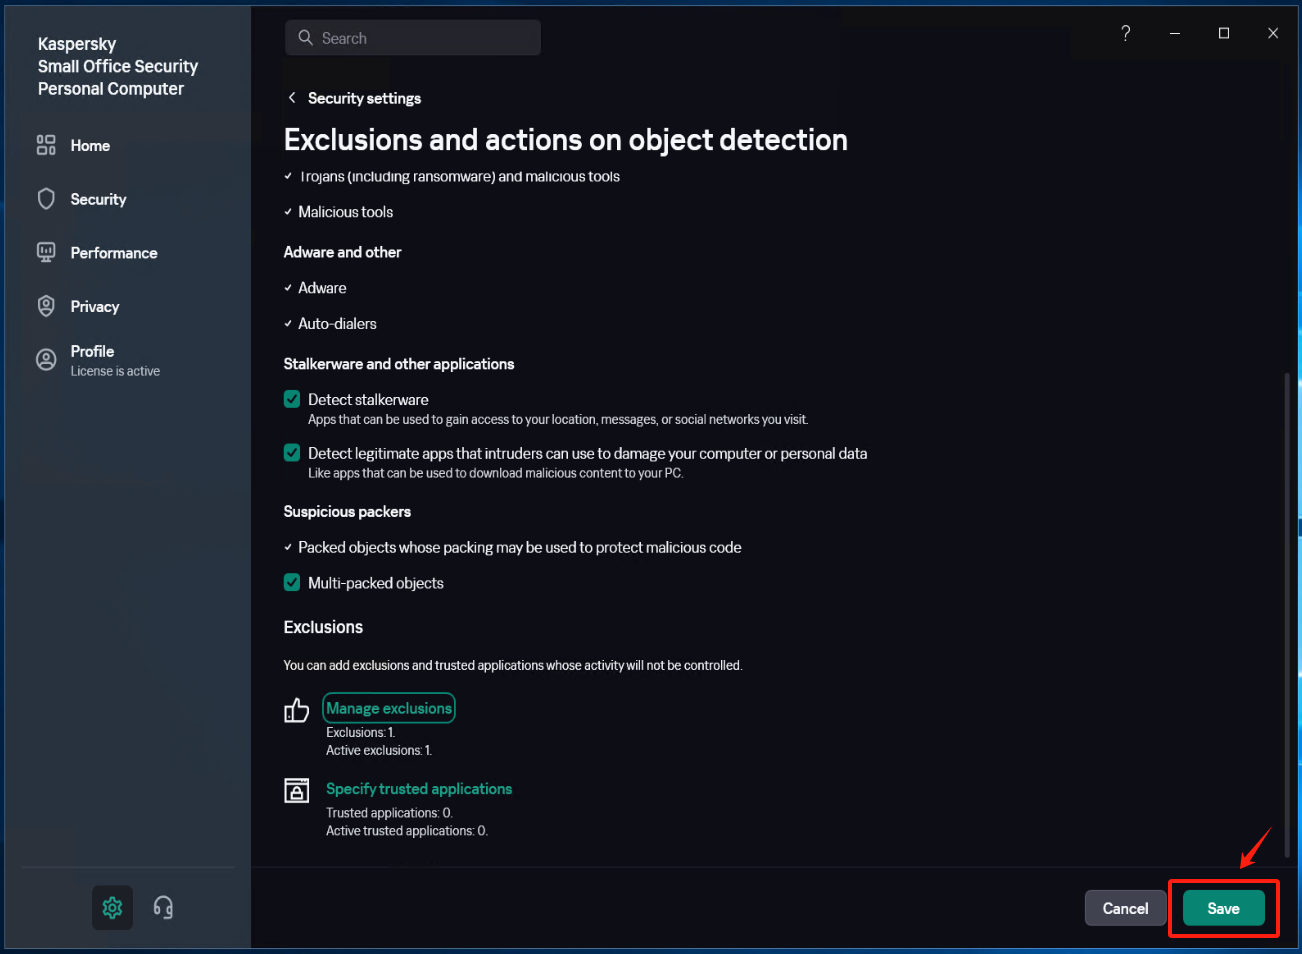
Save the settings
Run Windows Agent
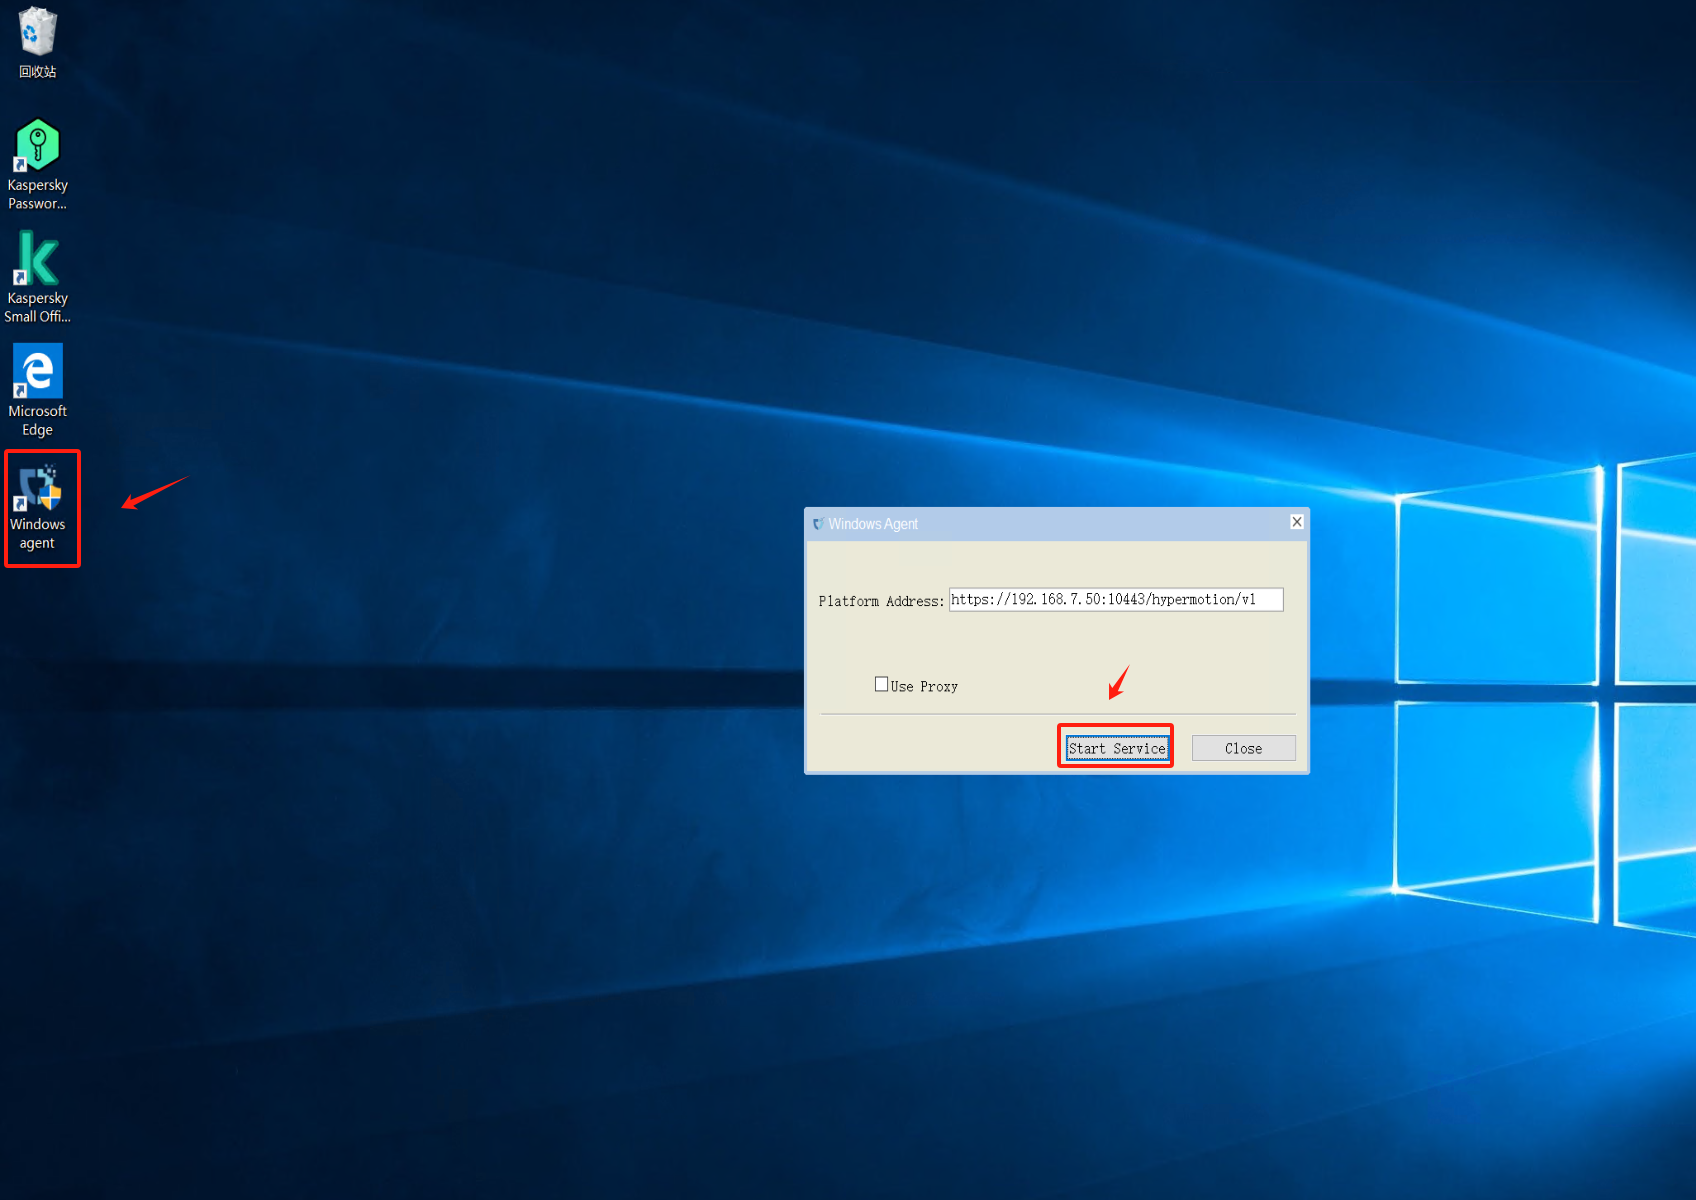
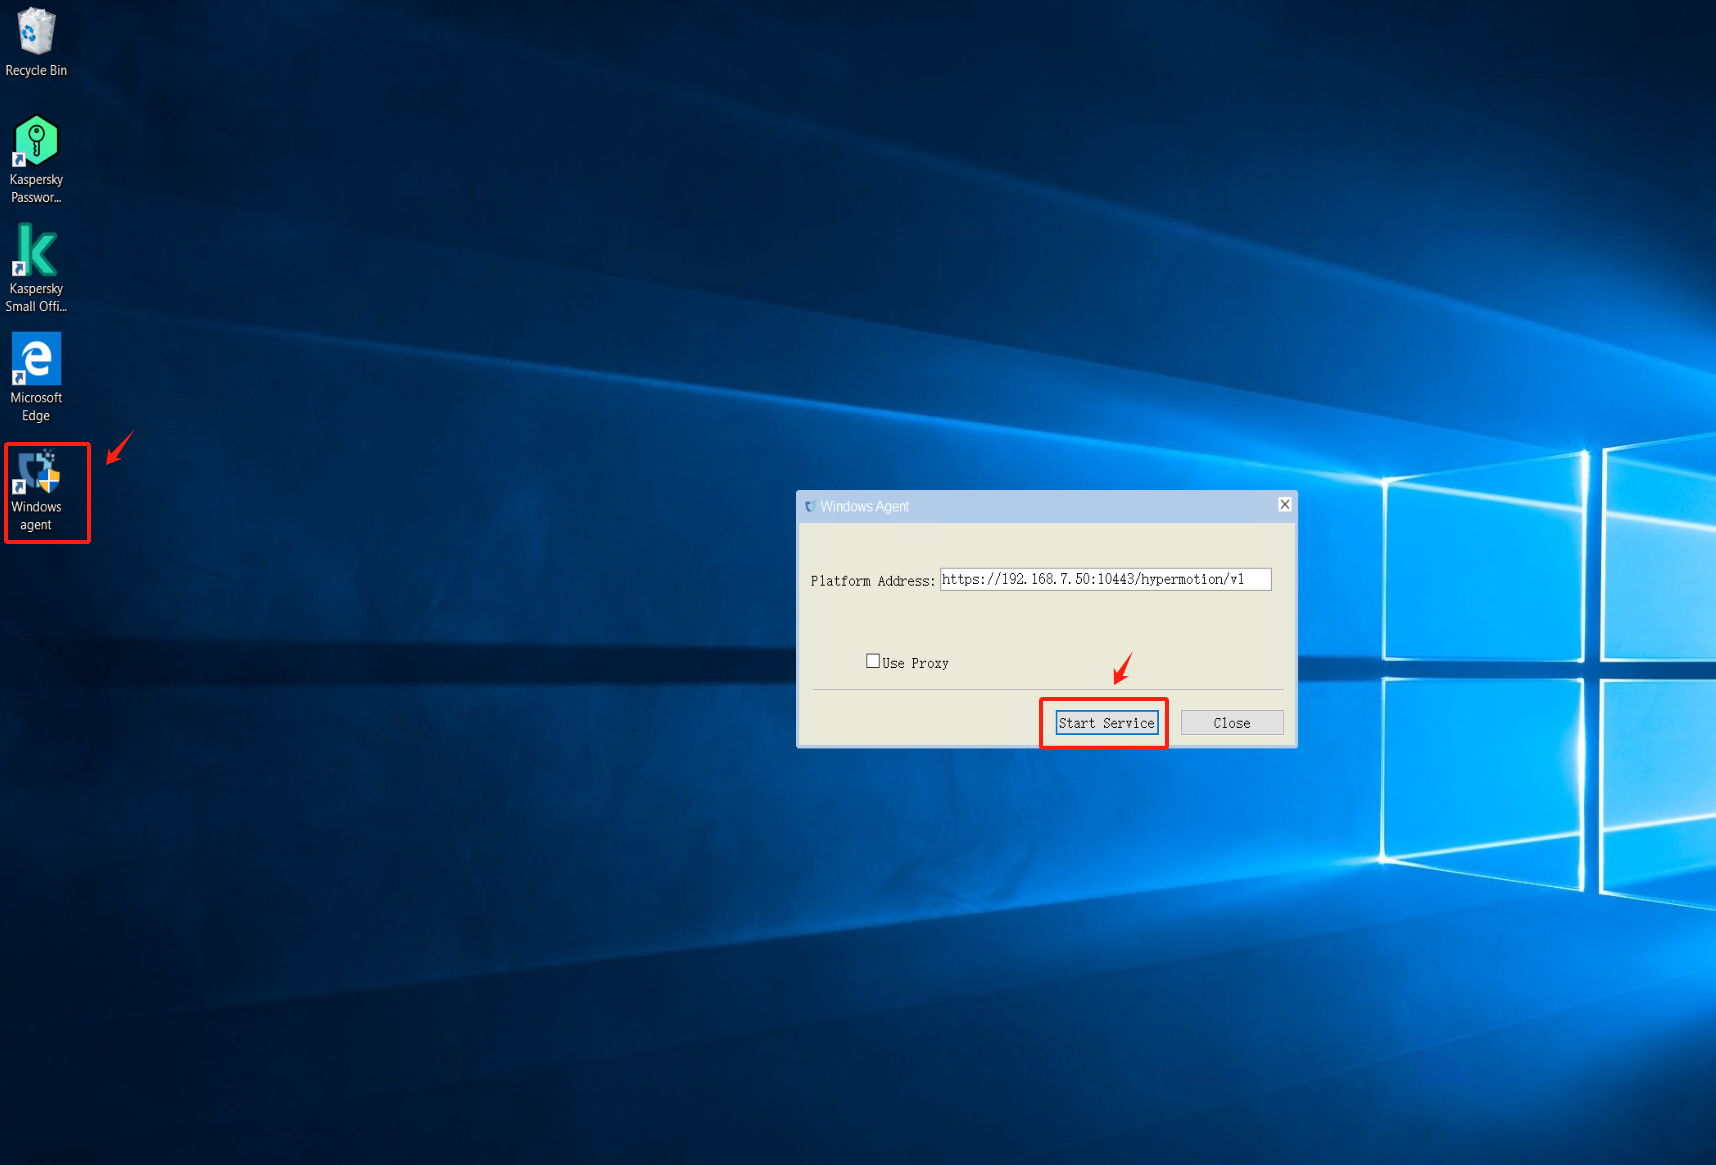
Click on the Windows Agent shortcut on the desktop, start the service, and check if the registration is successful after 1-2 minutes. Verify if the service status is normal.
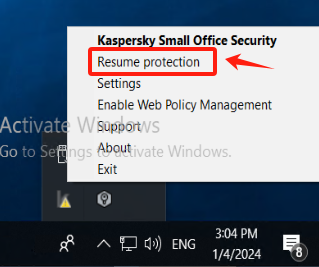
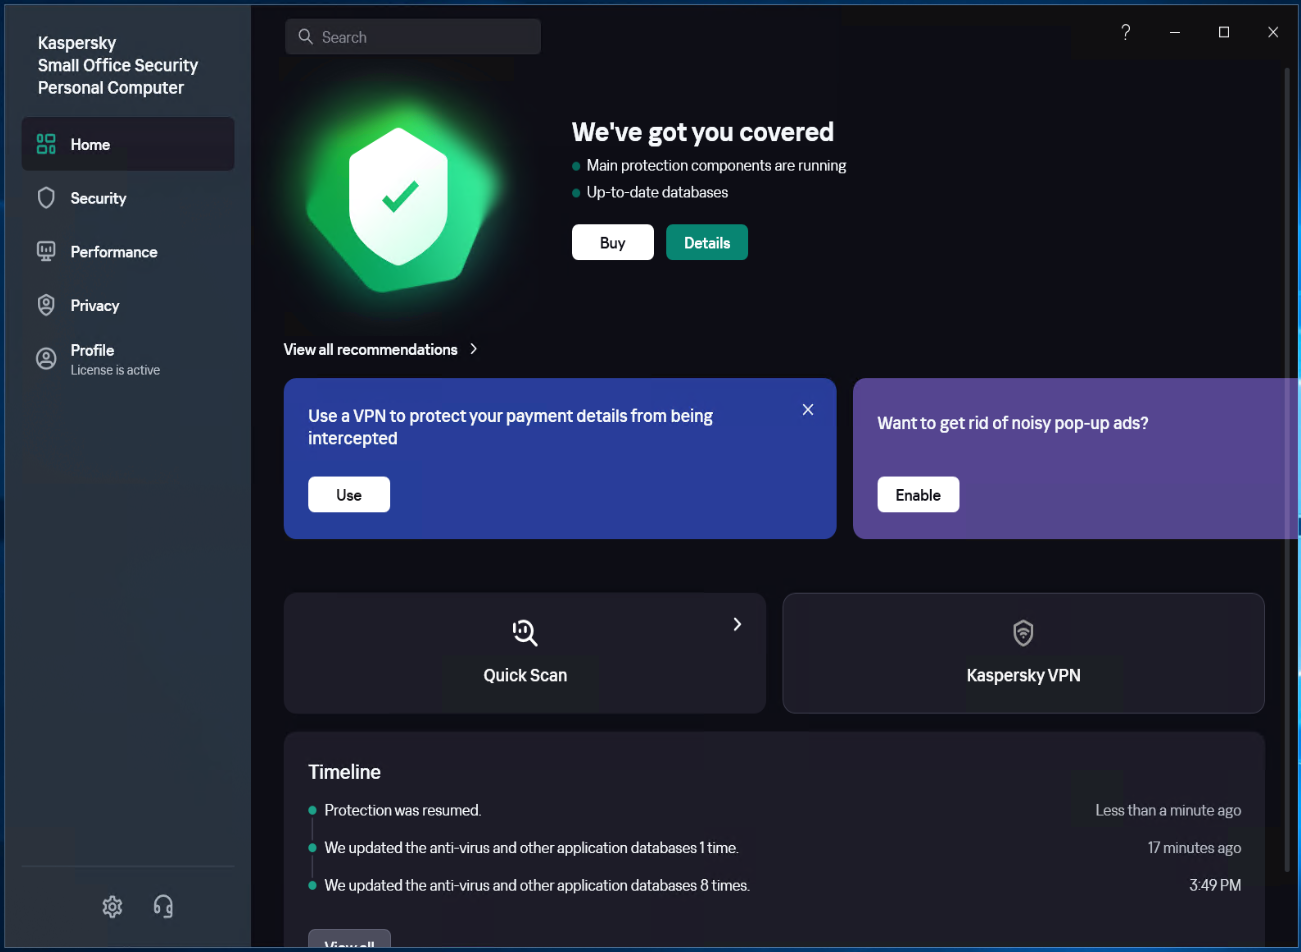
Restore Kaspersky protection status
Warning
If any application is added to [Low Restricted] during the operation, it needs to be manually added back to the trusted group "Windows Agent."
McAfee
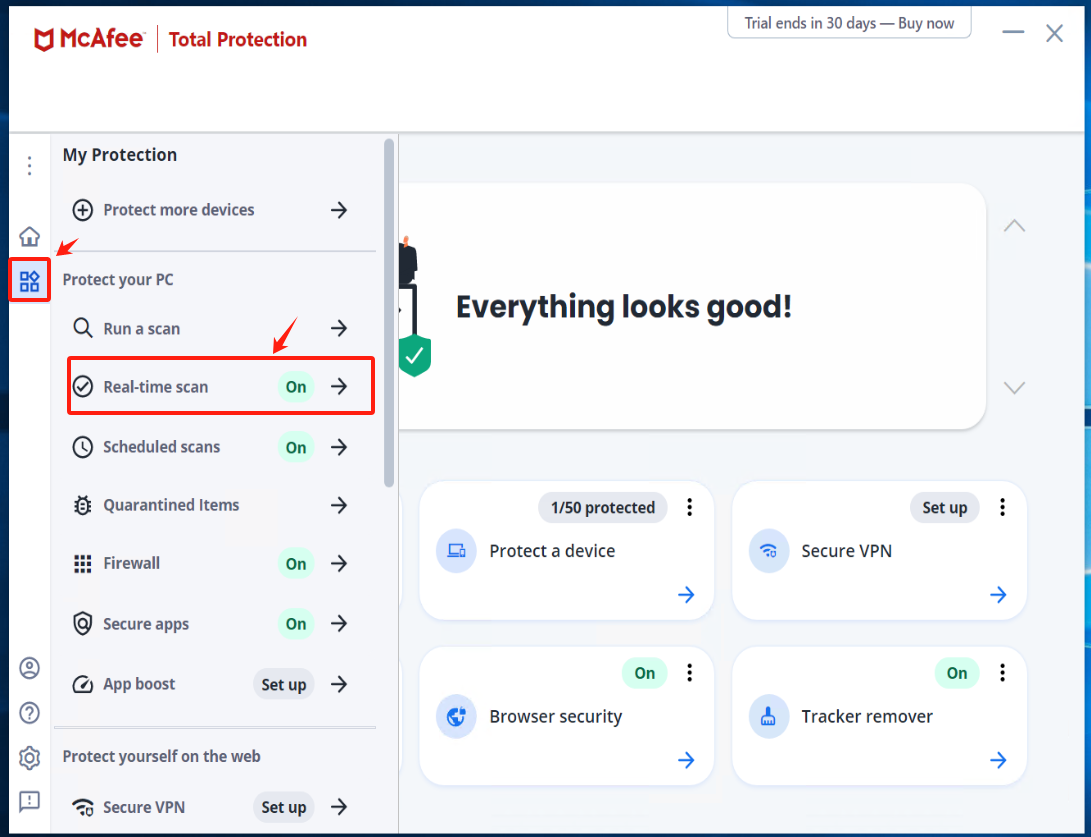
Turn off Real-Time Scanning in McAfee
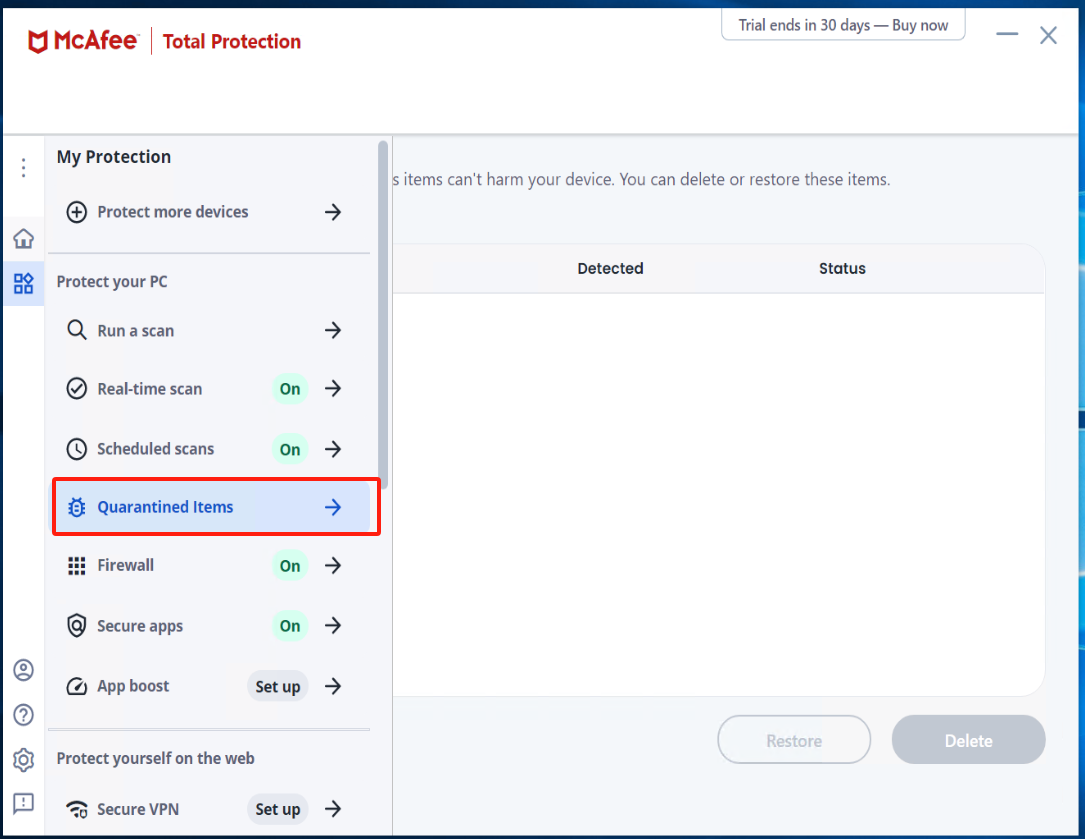
Access Real-time scan from the left-side menu and click on [Turn off]
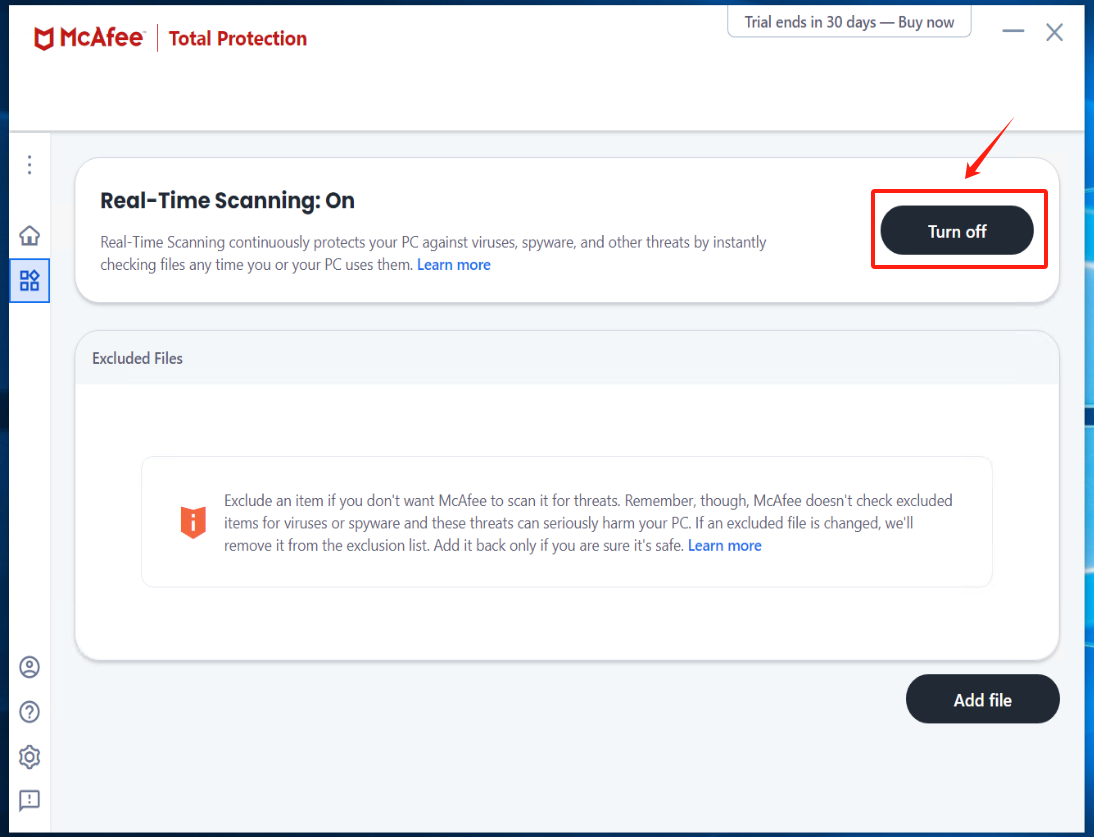
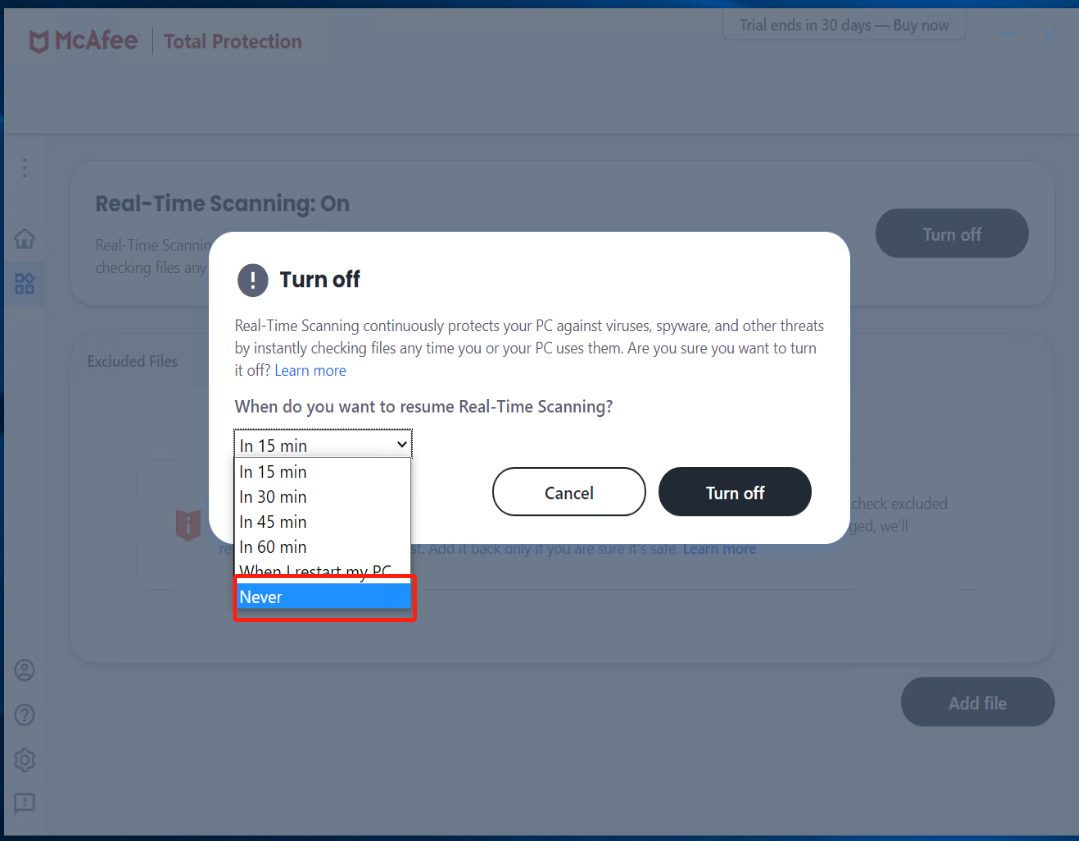
Check the option "Never" under [When do you want to resume Real-Time Scanning?] and click the [Turn off].
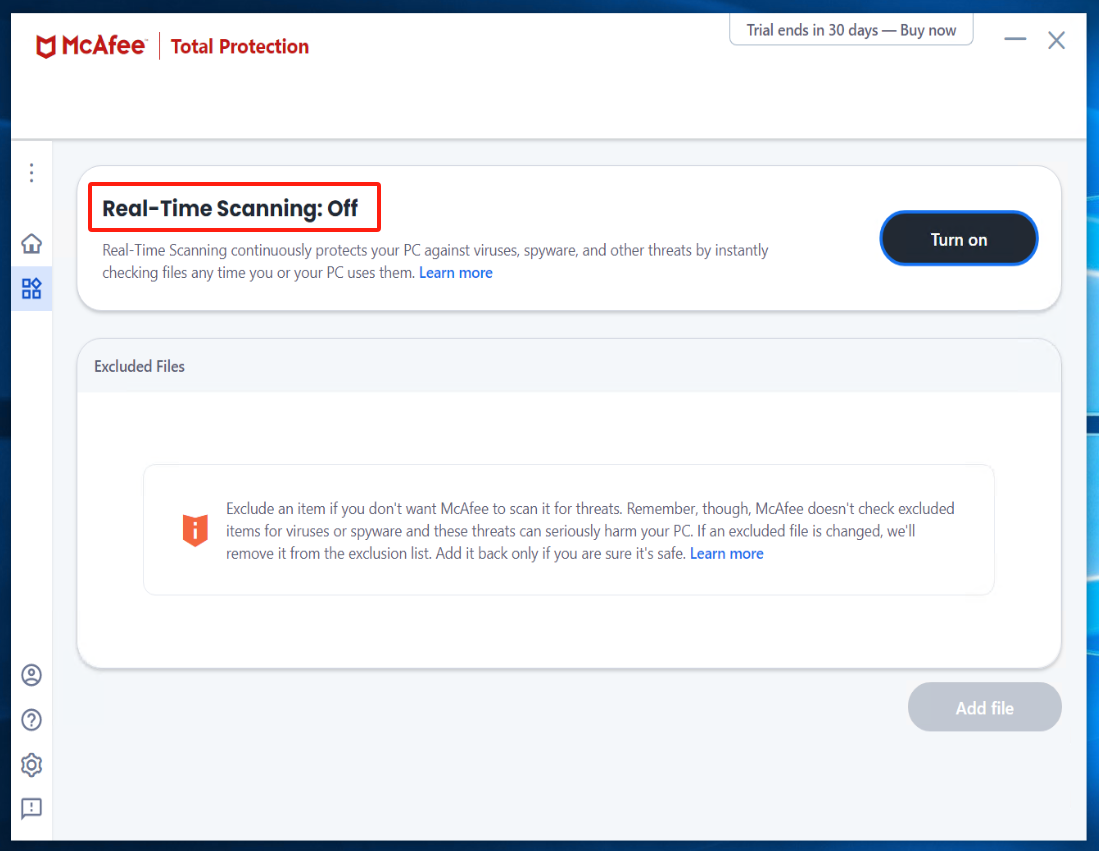
Install Windows Agent and run Windows Agent
Reference Document: https://docs.oneprocloud.com/userguide/poc/agent-pre-settings.html#unzip-the-installation-package-and-proceed-with-the-installation
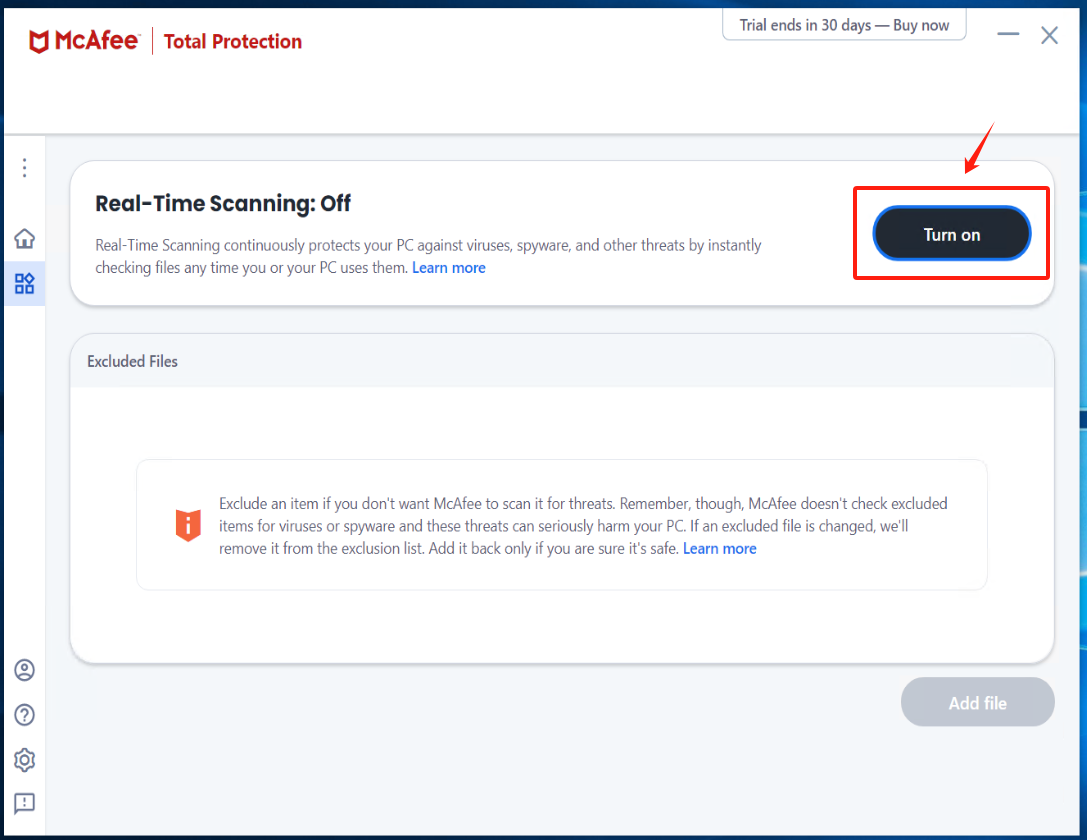
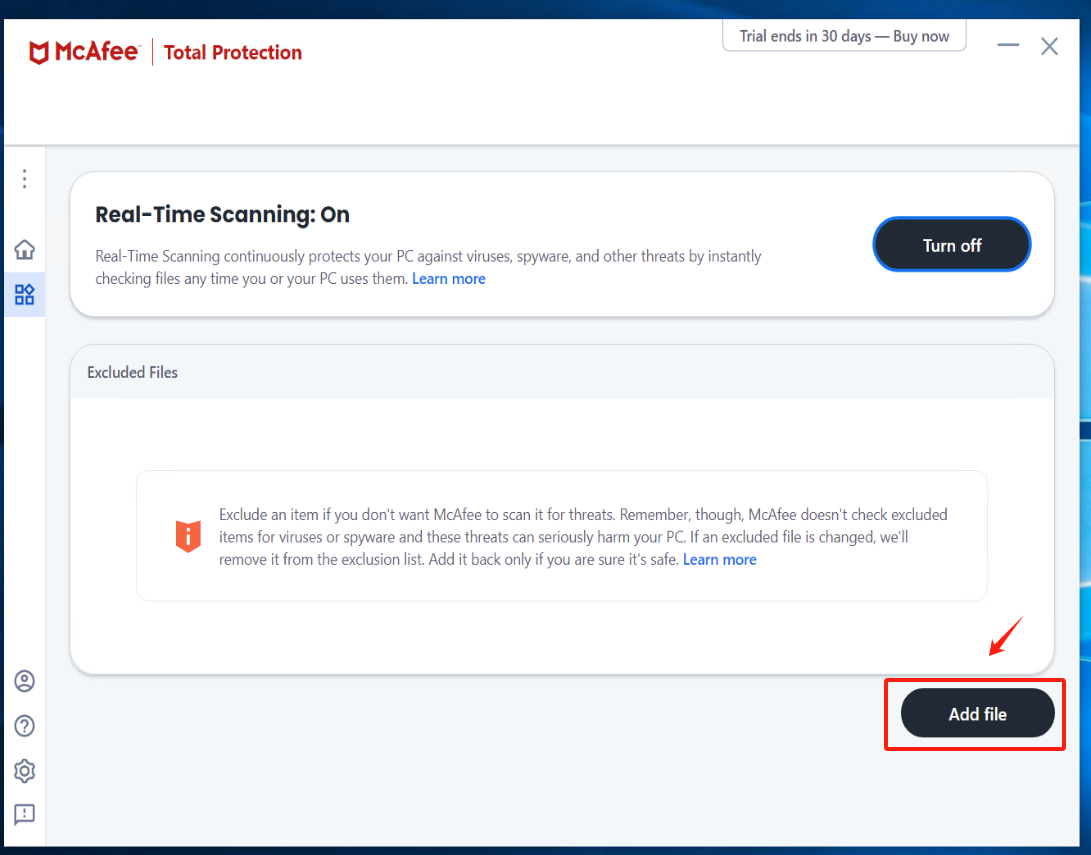
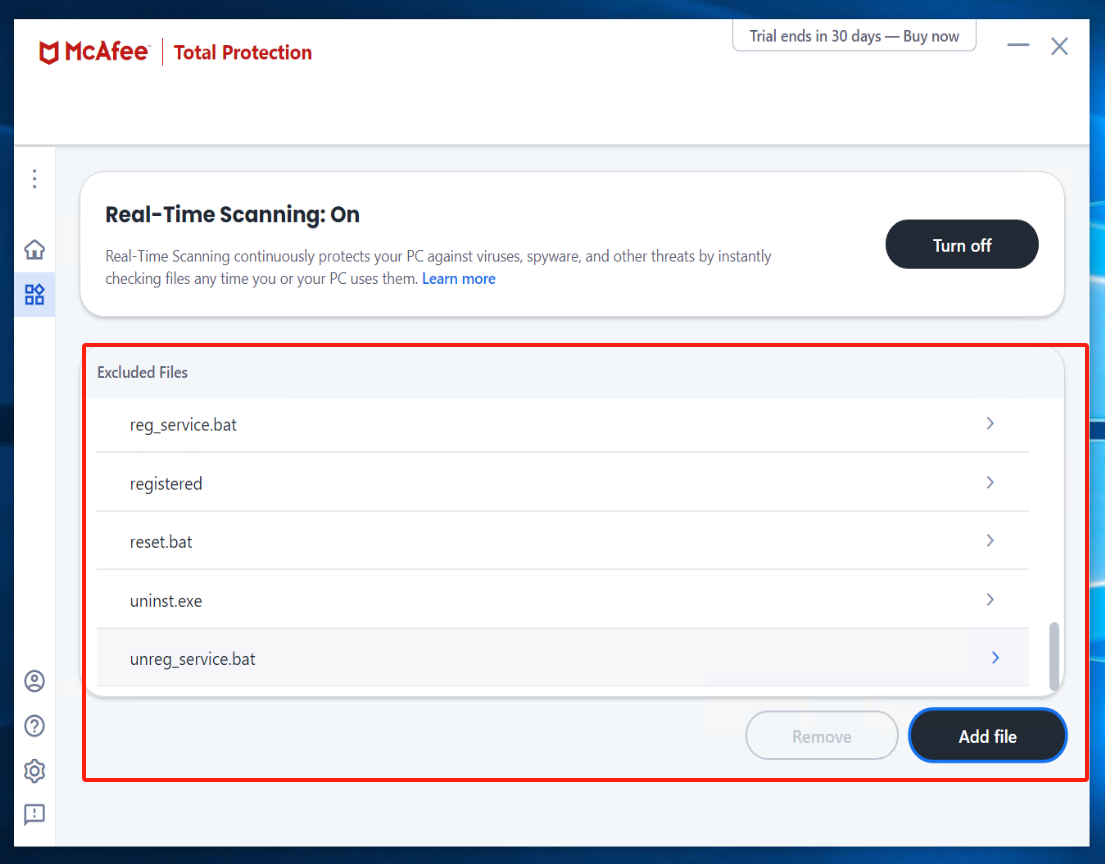
Turn on Real-Time Scanning in McAfee and add Excluded files
click [Turn on] Real-Time Scanning
click [Add file] add all exe, bat, and sys files under the installation directory of Windows Agent and its subdirectory "yper_exporter".
Tips
The default installation path for Windows Agent: C:\Program Files (x86)\DiskSync-Agent
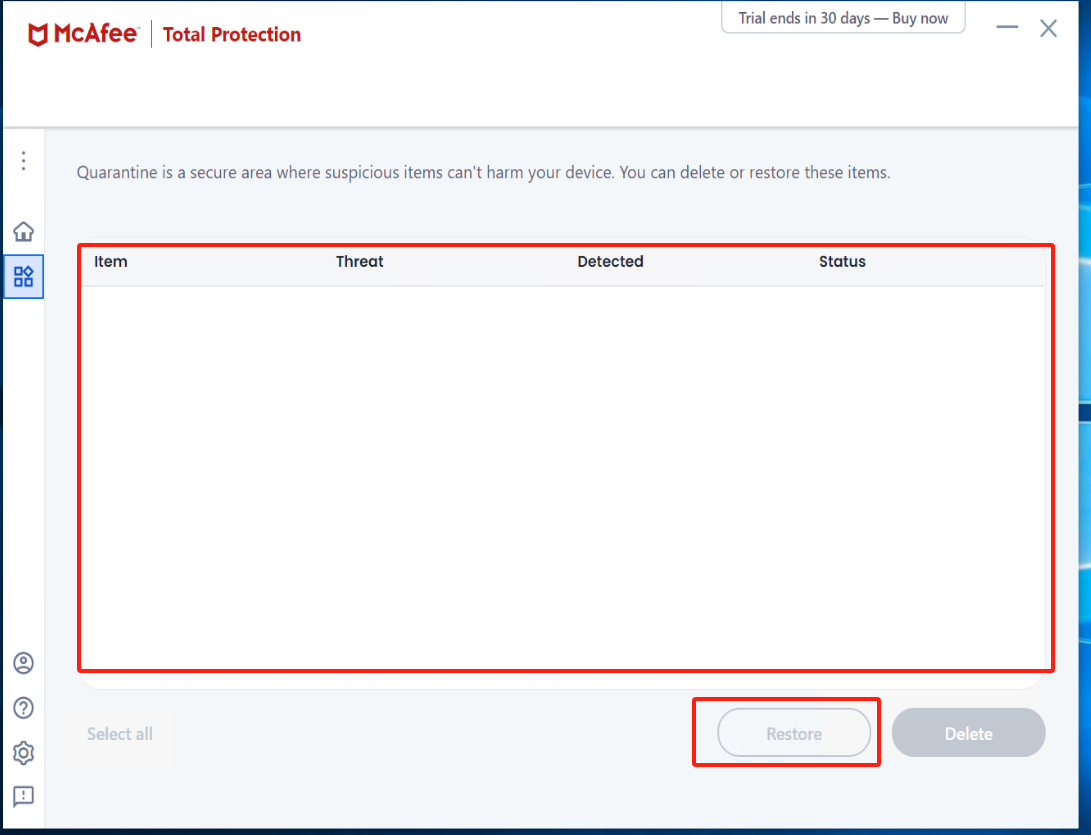
Check Quarantined items
Warning
If there is an abnormal termination of the Windows Agent service, enter McAfee to check the Quarantined items. Select the files related to Windows Agent and proceed with the restoration.
How to Create a Failback Gateway(HyperDoor) on a Physical Machine
Physical servers can utilize the IPMI console to create a fallback gateway by loading the HyperDoor image.
Tips
The HyperDoor image has already been downloaded to the local machine by default.
1. Log in to the IPMI console
Open a web browser locally and enter the IPMI address of the physical machine (usually accessed through a browser, for example: https://ipmi_address). Log in to the IPMI interface using the username and password assigned to the server.
2. Locate the 'Virtual Media' or a similar option
Navigate to the menu on the IPMI console, and find an option similar to 'Virtual Media' or other related options.
3. Choose to mount the image
In the Virtual Media menu, there is typically an option for "Mount ISO" or a similar choice. Select this option.
4. Upload the image file
Provide the local path of the HyperDoor image file or upload the HyperDoor image file.
5. Confirm the mounting
Confirm the mounting of the image. The system will use the provided image file to simulate an optical drive, allowing the server to boot from it.
6. Restart the server
In the IPMI console, find "Power Control" or a similar option, and select restart for the server.
7. Enter the BIOS/Boot Menu of the server
When the server restarts, follow the on-screen prompts to enter BIOS settings or the boot menu. This is typically done by pressing a specific key (such as F2, F10, Del, etc.).
8. Choose virtual media as the boot device
In the BIOS or boot menu, select virtual media as the boot device, ensuring that the system will boot from the virtual optical drive.
9. Save settings and exit
In the BIOS settings, save the changes and exit, allowing the system to boot from the virtual media. The system will load the HyperDoor image file.
10. Failback Gateway startup
After the system restarts again, it will successfully load the HyperDoor image, becoming a HyperDoor failback gateway.
Tips
Please note that different servers and IPMI implementations may have slight variations, so be sure to refer to the documentation for specific operational guidance.
Instructions for Migration or DR on a physical machine
Due to the diverse models of underlying hardware in physical machines and the potential need for different drivers to accommodate various hardware models, it is essential to proactively query the hardware information of the physical machine, including RAID cards, disks, network cards, etc., when migrating or reverting.
Currently, manual intervention is required for the adaptation and repair of physical machine drivers. This involves the installation of hardware drivers to ensure compatibility and functionality.
Configuring Firewall Settings
To configure firewall settings in two different environments, please follow the steps below:
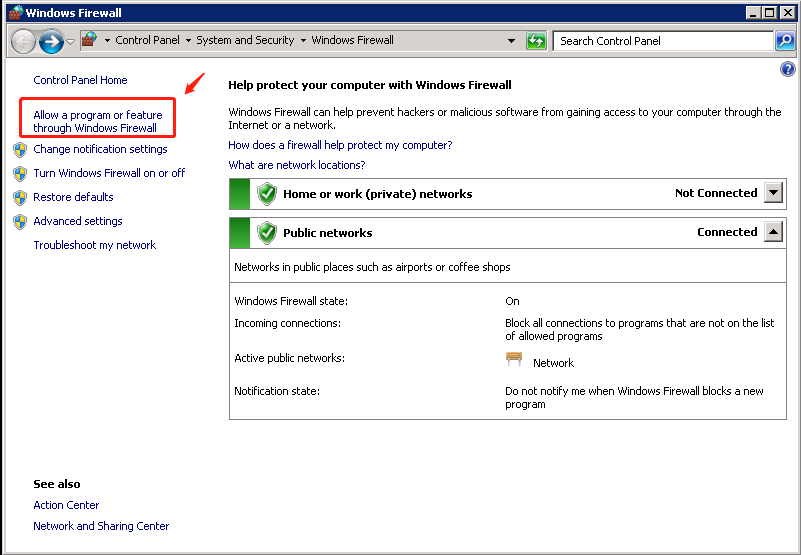
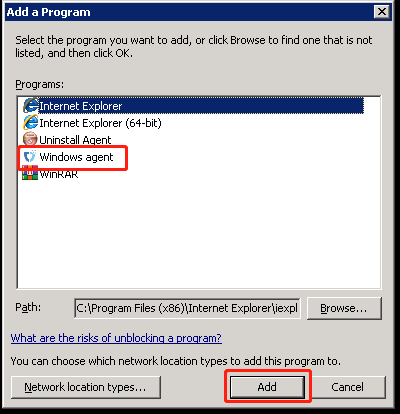
1: Windows 2008/2012/2016
Access the "Windows Firewall" settings, add the "Windows Agent.exe" service to the "Allow another program through the firewall" list, as illustrated in the screenshots below:
2. Windows 2003
Access the "Windows Firewall" settings; click on the "Exceptions" tab, select "Add a program, click "Browse" to locate the program you want to add:
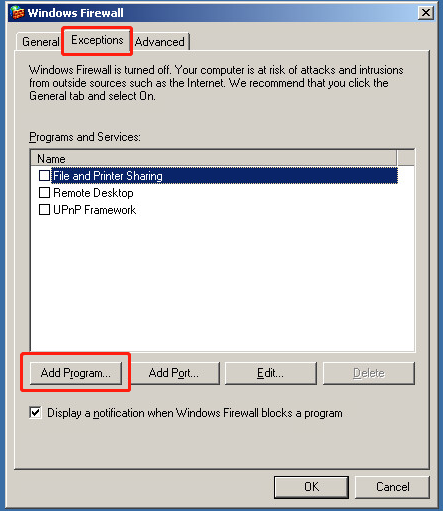
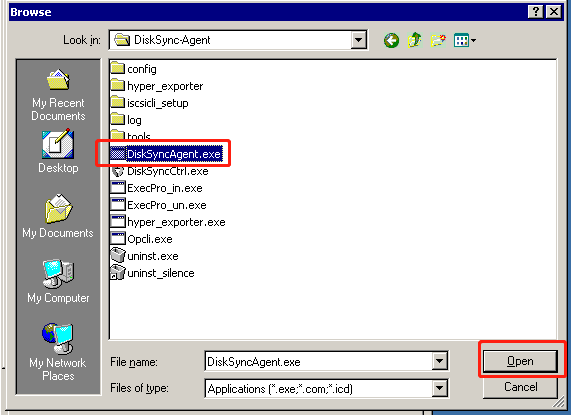
In Figure 3; select "DiskSyncAgent.exe", then click "Open".
In Figure 4, you will see "DiskSyncAgent.exe" already selected in the "Add a Program" list. Click "OK" to complete the addition. Afterward, restart the system.
Note: The default directory for "DiskSync-Agent.exe" is "C:\Program Files\DiskSync-Agent\DiskSyncAgent.exe."
How does Sync Proxy access EXSi using a domain name?
In VMware production environment, maybe use a domain name to access EXSi. You need to configure domain name mapping or DNS service address for Sync Proxy to resolve the domain name.
Configure Sync Proxy's hosts domain name mapping
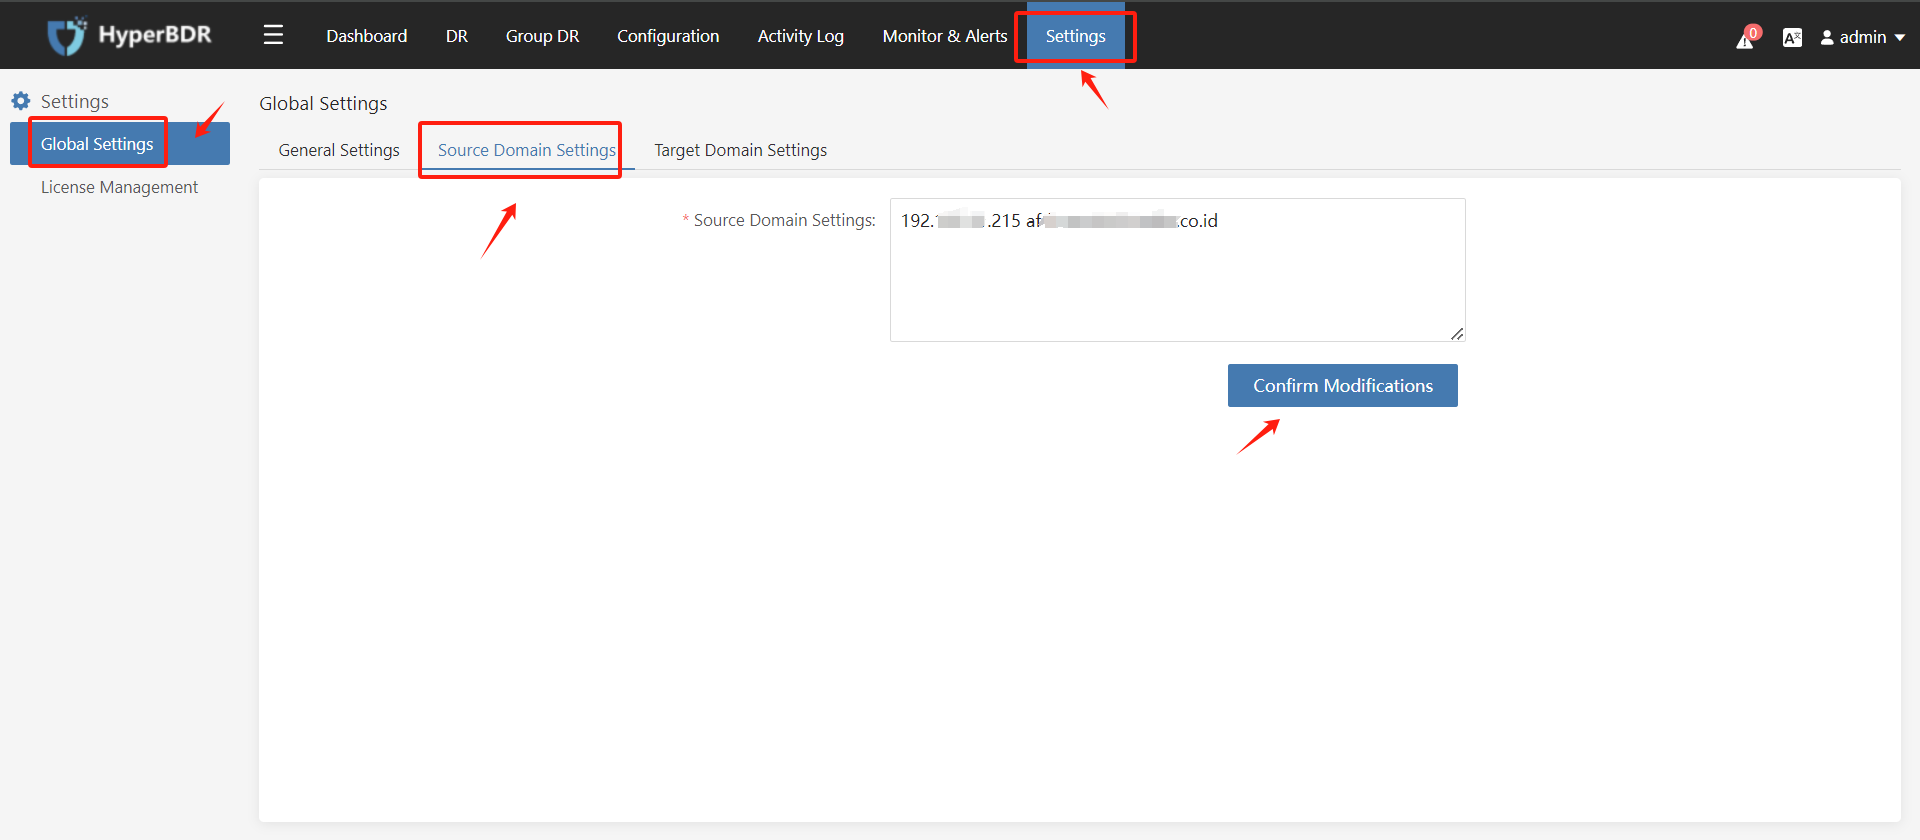
In the HyperBDR/HyperMotion console, click [Setting] > [Global Settings] > [Source Domain Settings], add the EXSi domain name mapping, and click [Confirm Modifications] to save.
Modify Sync Proxy's Docker global configuration and add DNS address
If VMware production environment use DNS service for domain name resolution, need to modify the Docker global configuration of Sync Proxy and add the DNS address.
Modify or create new file /etc/docker/daemon.json , and add NDS information.
{
  "default-ulimits": {
    "nofile": {
      "Name": "nofile",
      "Hard": 1048576,
      "Soft": 1048576
    }
  },
  "dns": ["DNS1 IP", "DNS2 IP"]
}
Restart the Docker service after modifying and saving the file.
systemctl restart dockerHow to obtain Huawei Cloud HCS 8.x Platform Credentials information?
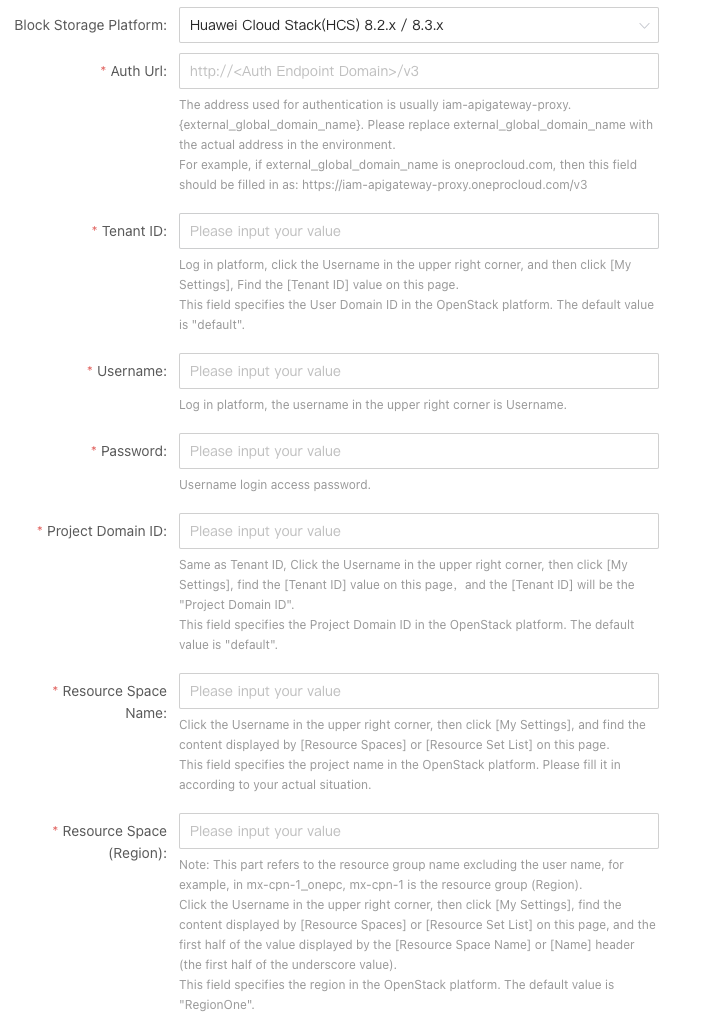
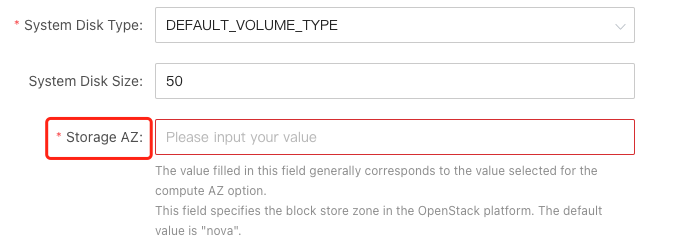
When targeting the Huawei Cloud HCS 8.x version, the following authentication information of the HCS 8.x platform is required to complete the authentication docking of the API interface.
| Parameter | Link |
|---|---|
| Auth Url | [How to obtain Huawei Cloud HCS 8.x Platform Credentials information] |
| Tenant ID | [How to obtain Huawei Cloud HCS 8.x Platform Credentials information] |
| Username | [How to obtain Huawei Cloud HCS 8.x Platform Credentials information] |
| Password | The current user's authenticated login access password |
| Project Domain ID | [How to obtain Huawei Cloud HCS 8.x Platform Credentials information] |
| Resource Space Name | [How to obtain Huawei Cloud HCS 8.x Platform Credentials information] |
| Resource Space(Region) | [How to obtain Huawei Cloud HCS 8.x Platform Credentials information] |
| Storage AZ | [How to obtain Huawei Cloud HCS 8.x Platform Credentials information] |
1. Auth Url
You can get the endpoint of a zone, for example: iam-apigateway-proxy.{external_global_domain_name}, the prefix is usually iam-aigateway-proxy., and {external_global_name_name} is a variable value. You need to modify it according to the domain name of the current network environment.
For example: iam-apigateway-proxy.oneprocloud.com
Auth Url: https://iam-apigateway-proxy.oneprocloud.com/v3
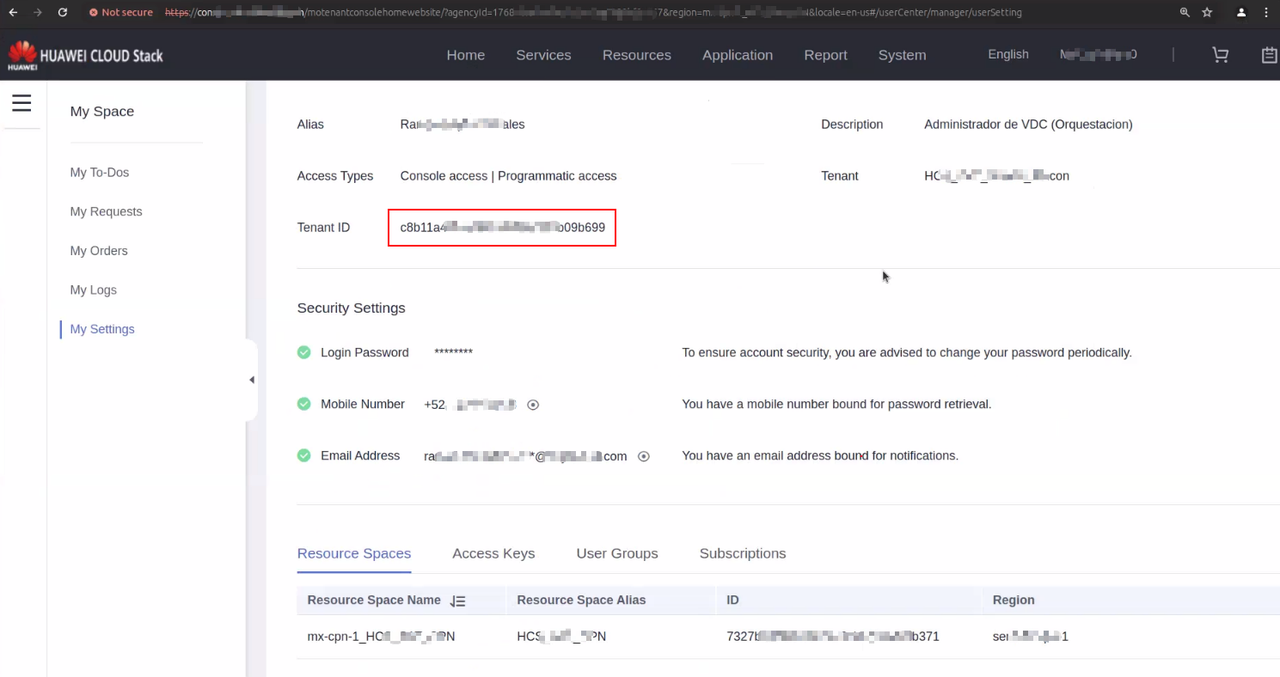
2. User Domain ID
Log in to the HCS tenant side platform, click the User name in the upper right corner, then click "My Settings", and find the "Tenant ID" value on this page.
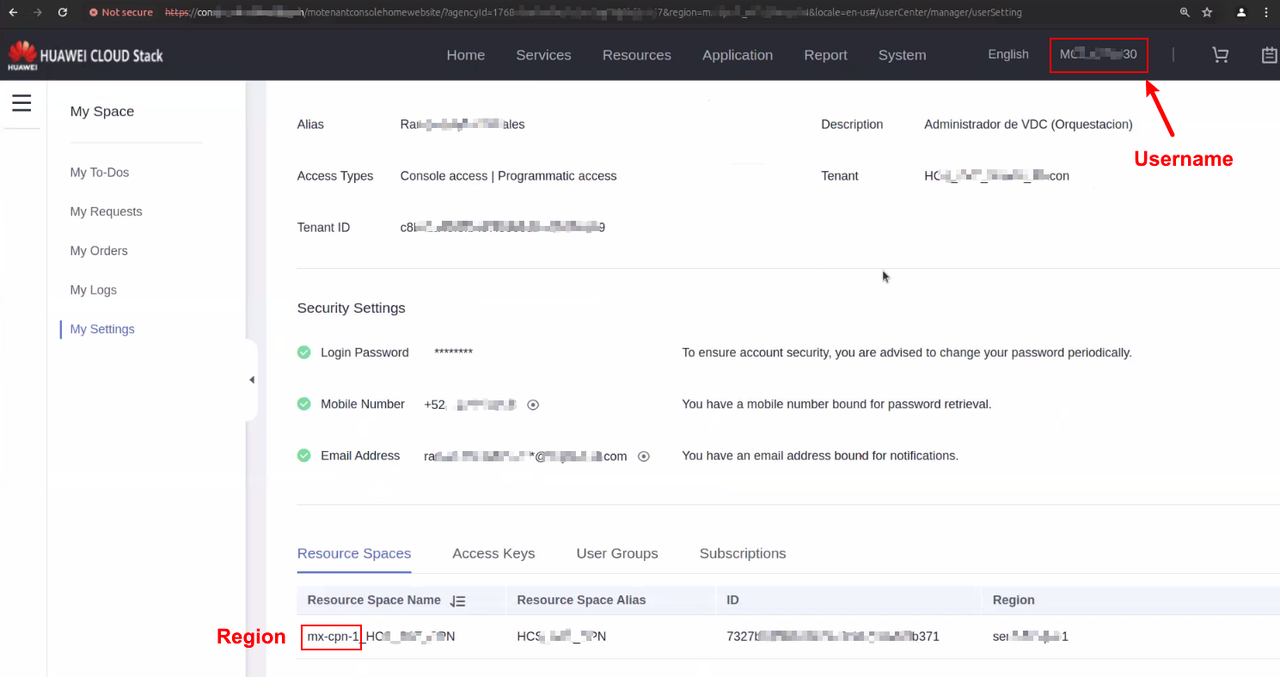
3. Username
The user name in the upper right corner is Username.
4. Password
Usename login access password.
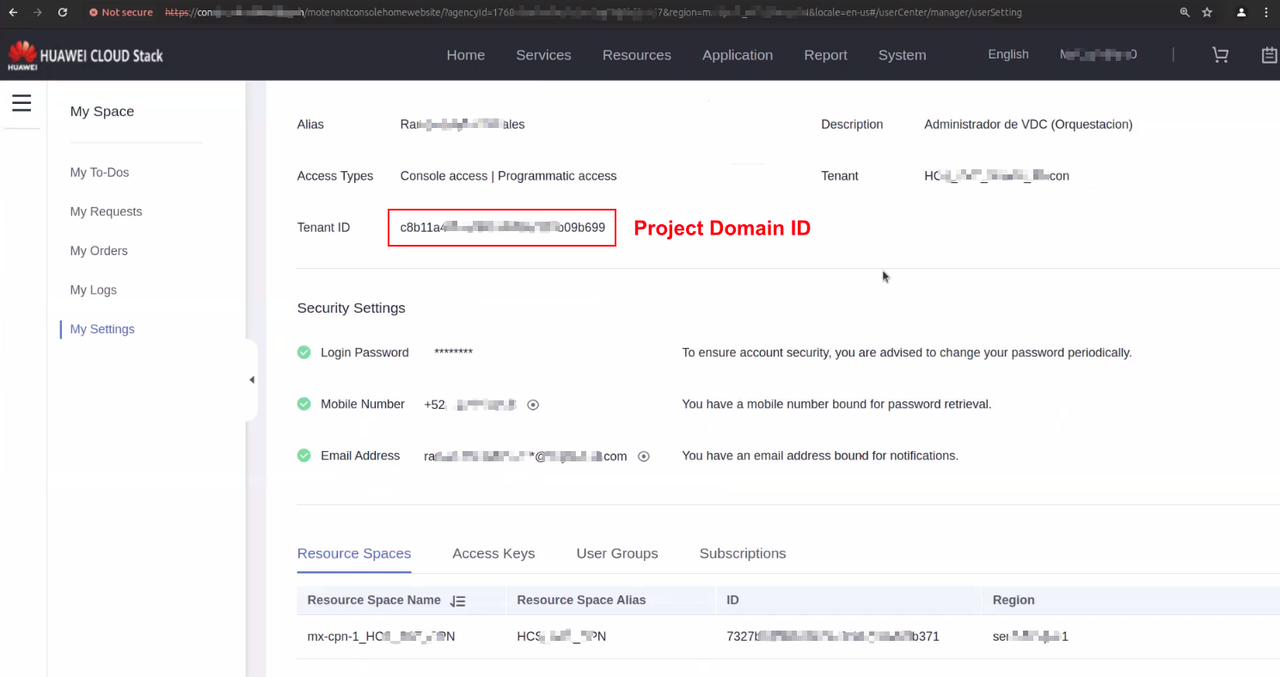
5. Project Domain ID
Click on the User name in the upper right corner, then click "My Settings", find the value of "Tenant ID" and "Project Domain ID" on this page.
6. Resource Space Name
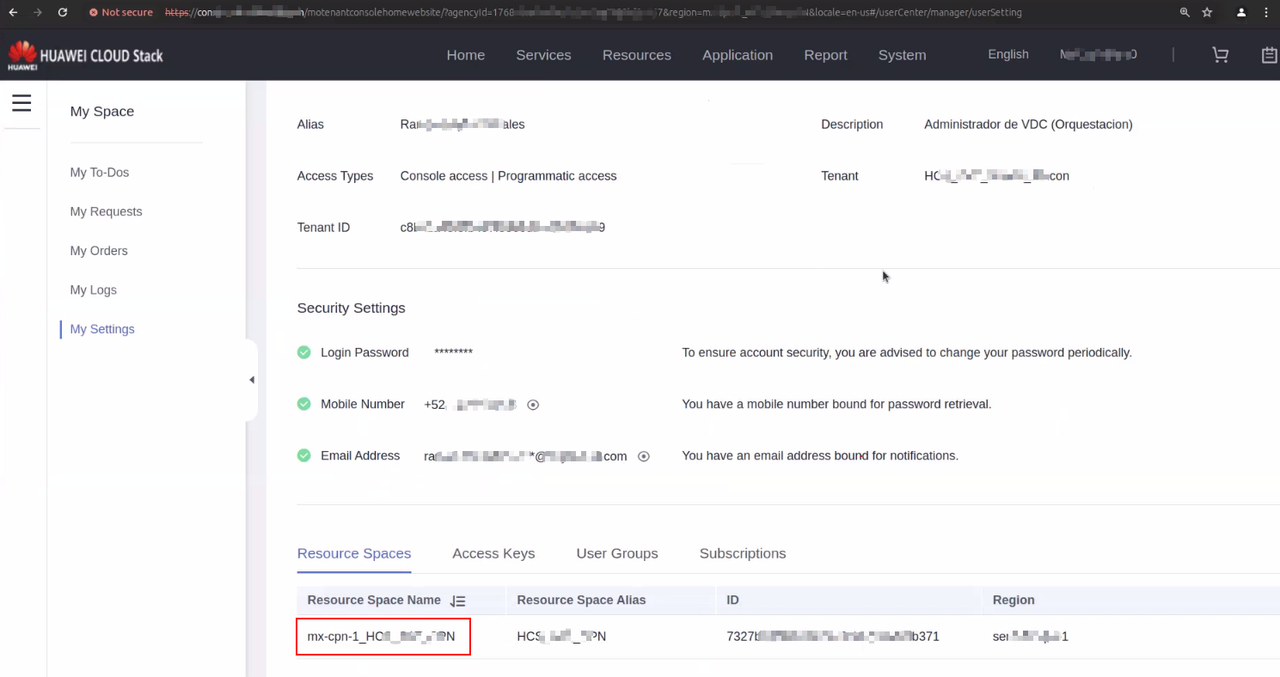
Click on the User name in the upper right corner, then click "My Settings". Find the content displayed in "Resource Spaces" or "Resource Set List" on this page, and the value displayed in the "Resource Space Name" or "Name" table header.
Note: There may be multiple "Resource Spaces" on the platform here, so you need to obtain relevant information based on the "Resource Spaces" you need to connect to.
7. Resource Space(Region)
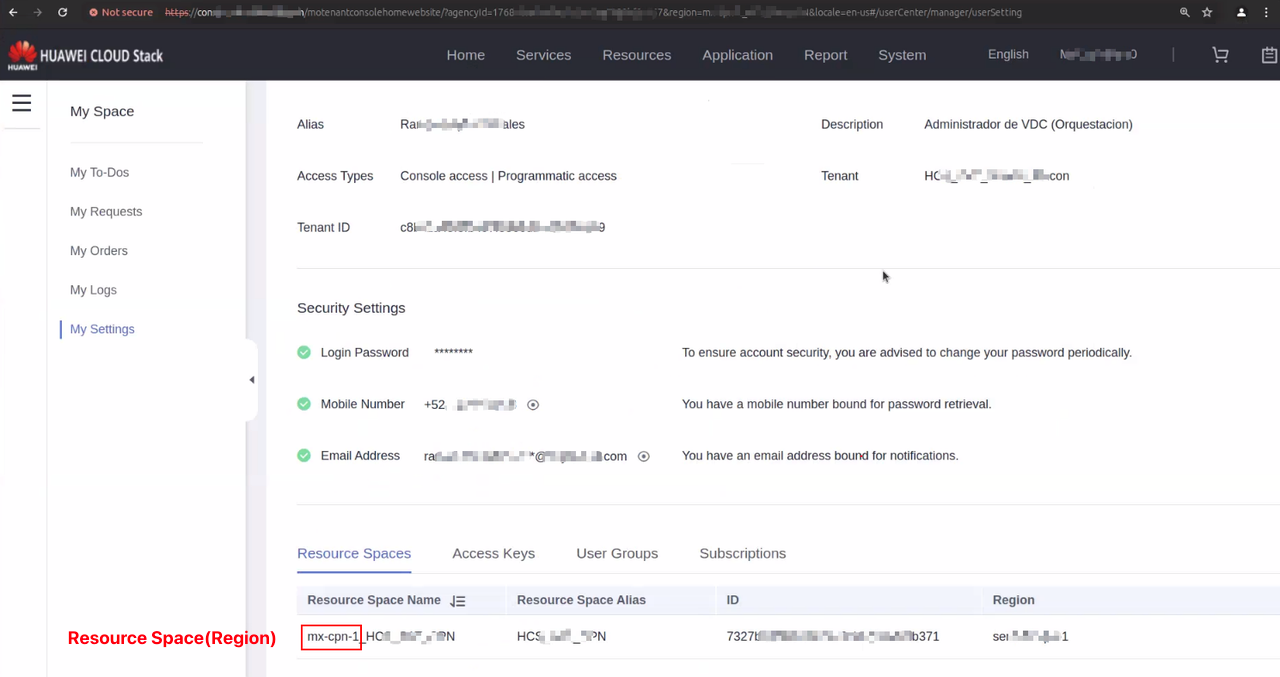
Click on the User name in the upper right corner, then click "My Settings". Find the content displayed in "Resource Spaces" or "Resource Set List" on this page, and the first half of the value displayed in the "Resource Space Name" or "Name" table header (the first half of the underlined value).
Note: There may be multiple "Resource Spaces" on the platform here, so you need to obtain relevant information based on the "Resource Spaces" you need to connect to.
8. Storage AZ
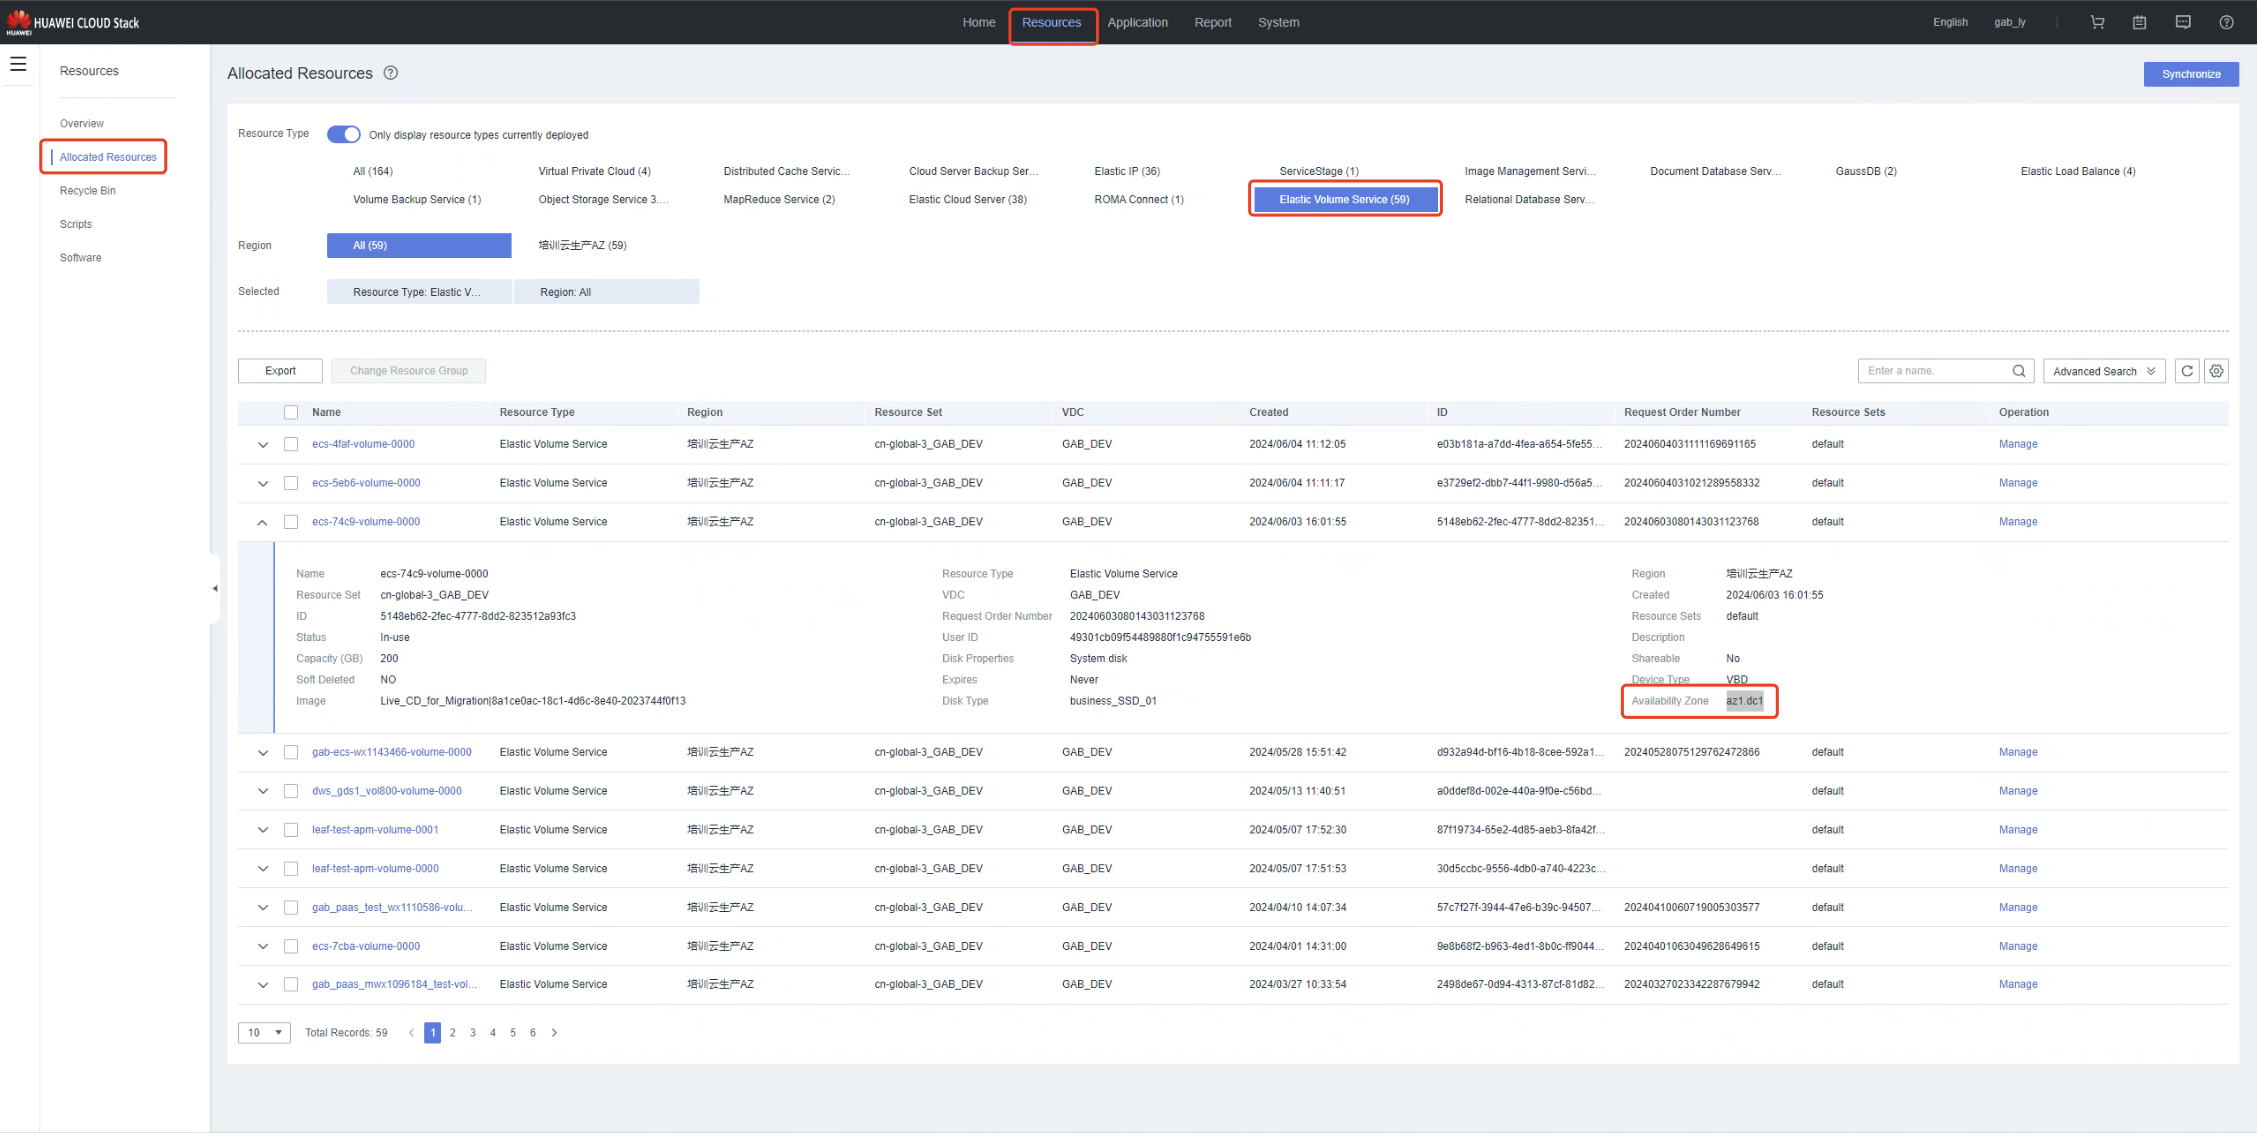
Click "Resources" at the top, "Allocated Resources" on the right, select "Elastic Volume Service", expand one of the volumes in the displayed volume list, and find the value of "Availability Zone" in the displayed volume details information as "Storage AZ".
8.1. How to get the display page of Storage Availability Zone in HCS 8.2.x version
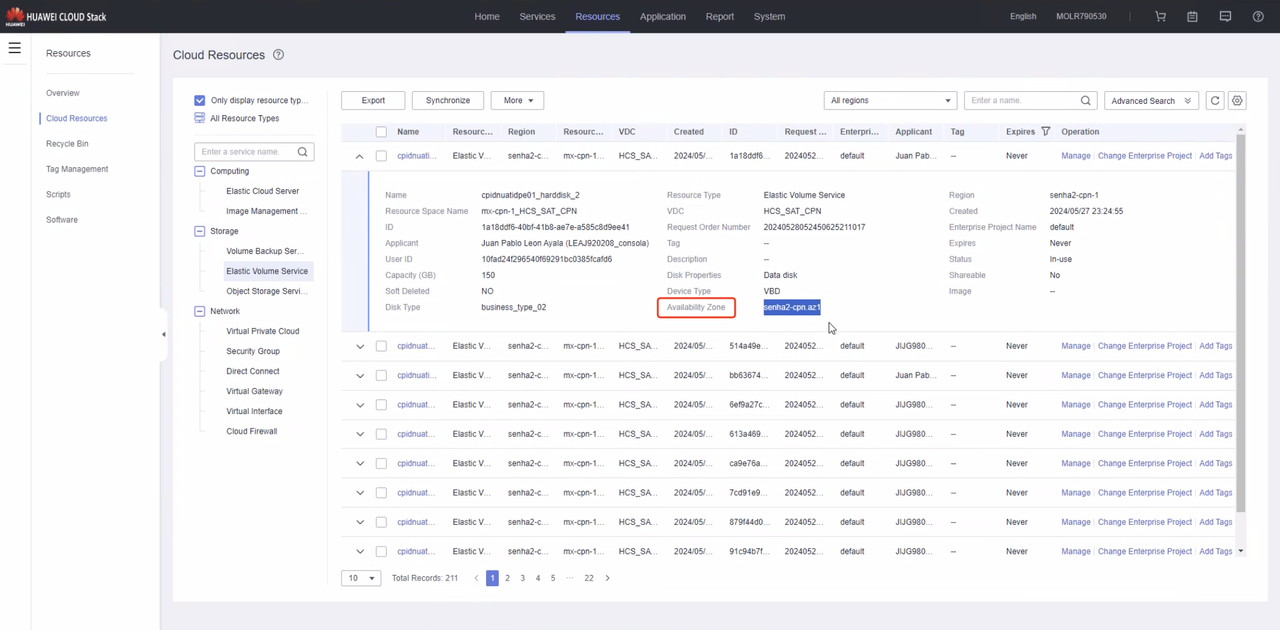
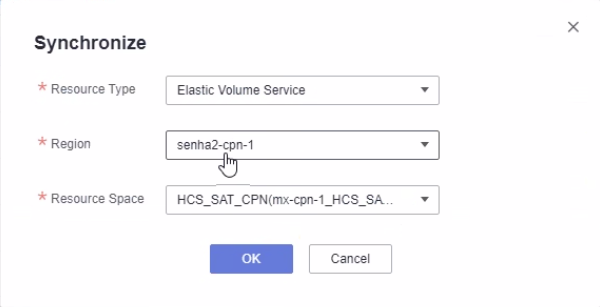
If the corresponding value of "Availability Zone" is empty, it may be necessary to synchronize the background information before it will be displayed. You can also look for other volumes that have already been synchronized.
8.2. How to obtain the display page of Storage Availability Zone in HCS 8.3.x version
What to do if kernel panic occurs when Oracle Linux 6.6 is booted in the cloud?
How to obtain ApsaraStack authentication information during object storage disaster recovery
To target the ApsaraStack version of Aliyun's ApsaraStack cloud, the following authentication information from the ApsaraStack platform is required to complete the API interface authentication integration.
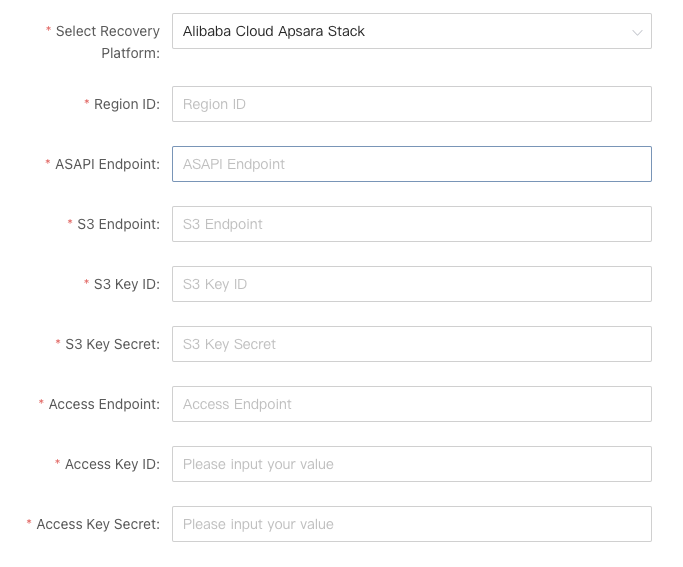
1. Obtain ApsaraStack authentication information
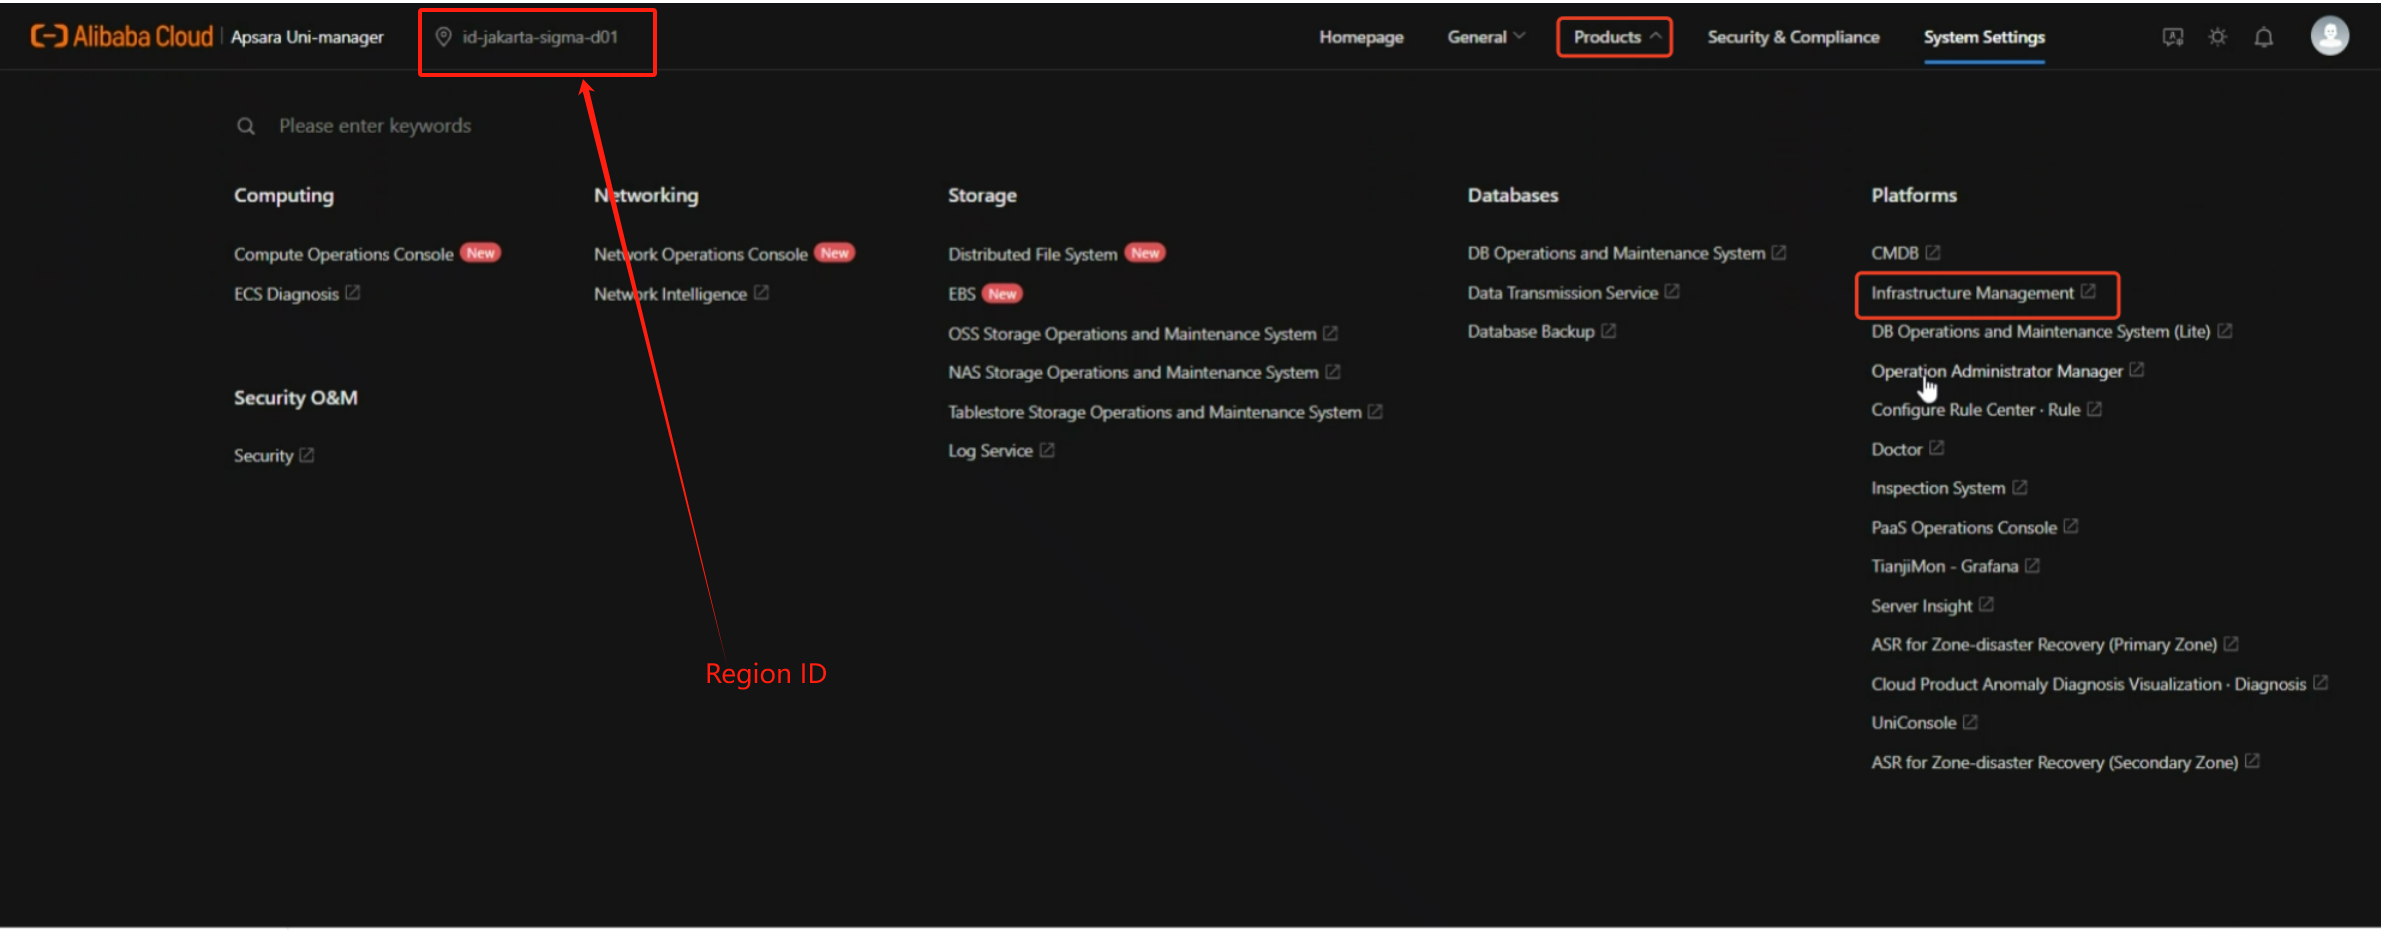
1.1 Region ID
1.2 ASAPI Endpoint
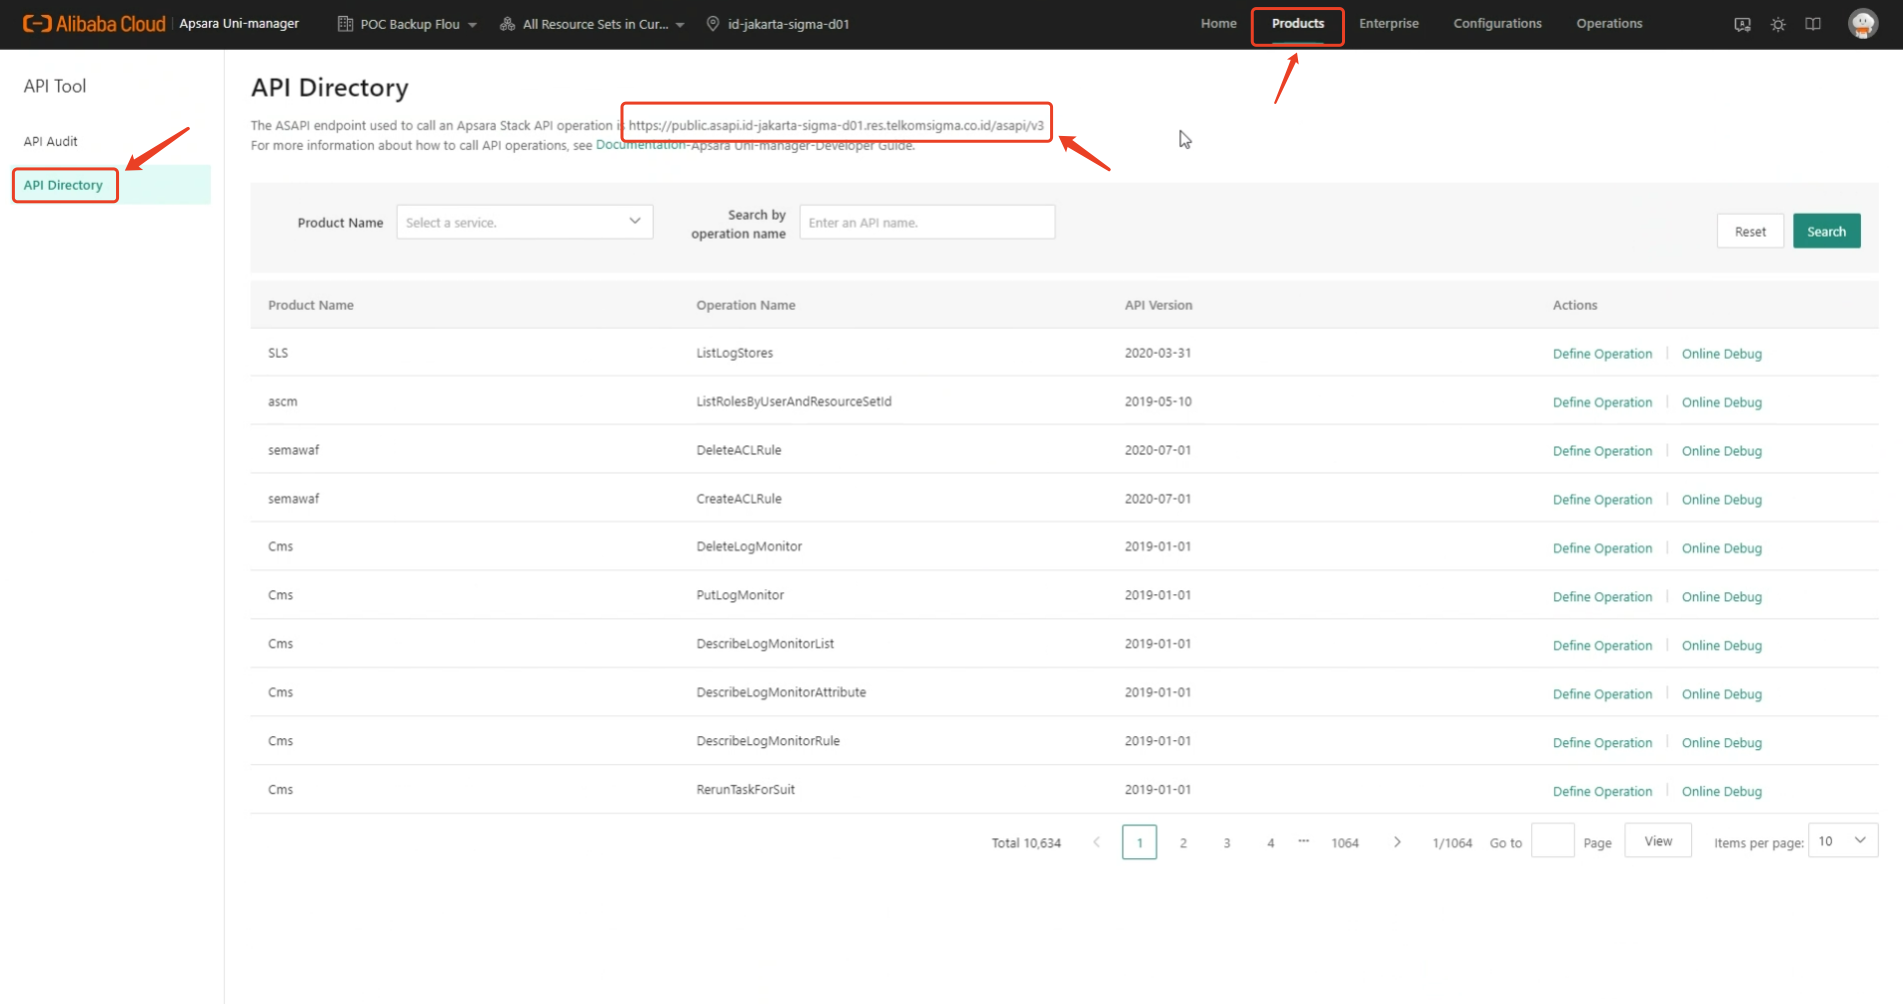
Log in to the ApsaraStack tenant platform, click on the "Products" menu in the upper right corner, and then click "API Directory" on the left side. On the page, you will find the ASAPI Endpoint address.
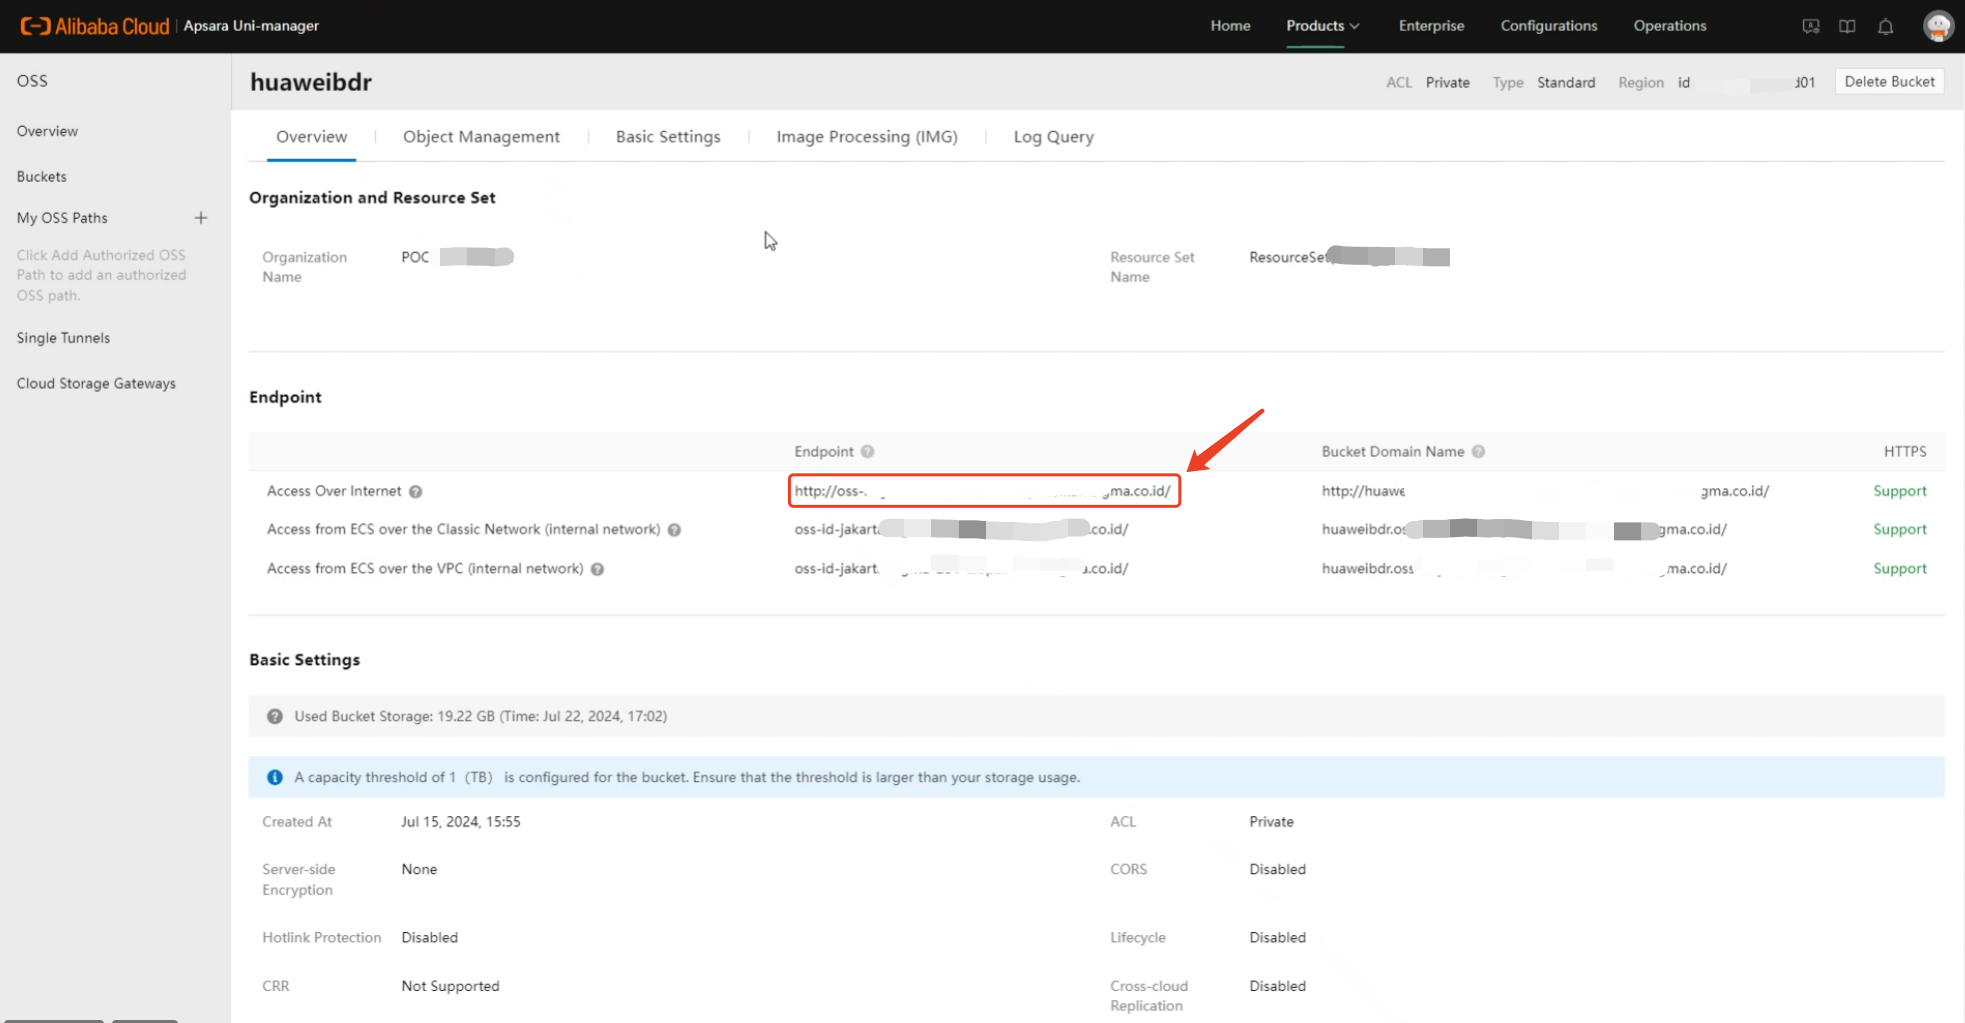
1.3 S3 Endpoint
On the "Overview" page of the OSS service, you can find the endpoint address for object storage.
1.4 S3 KeyID & KeySecret
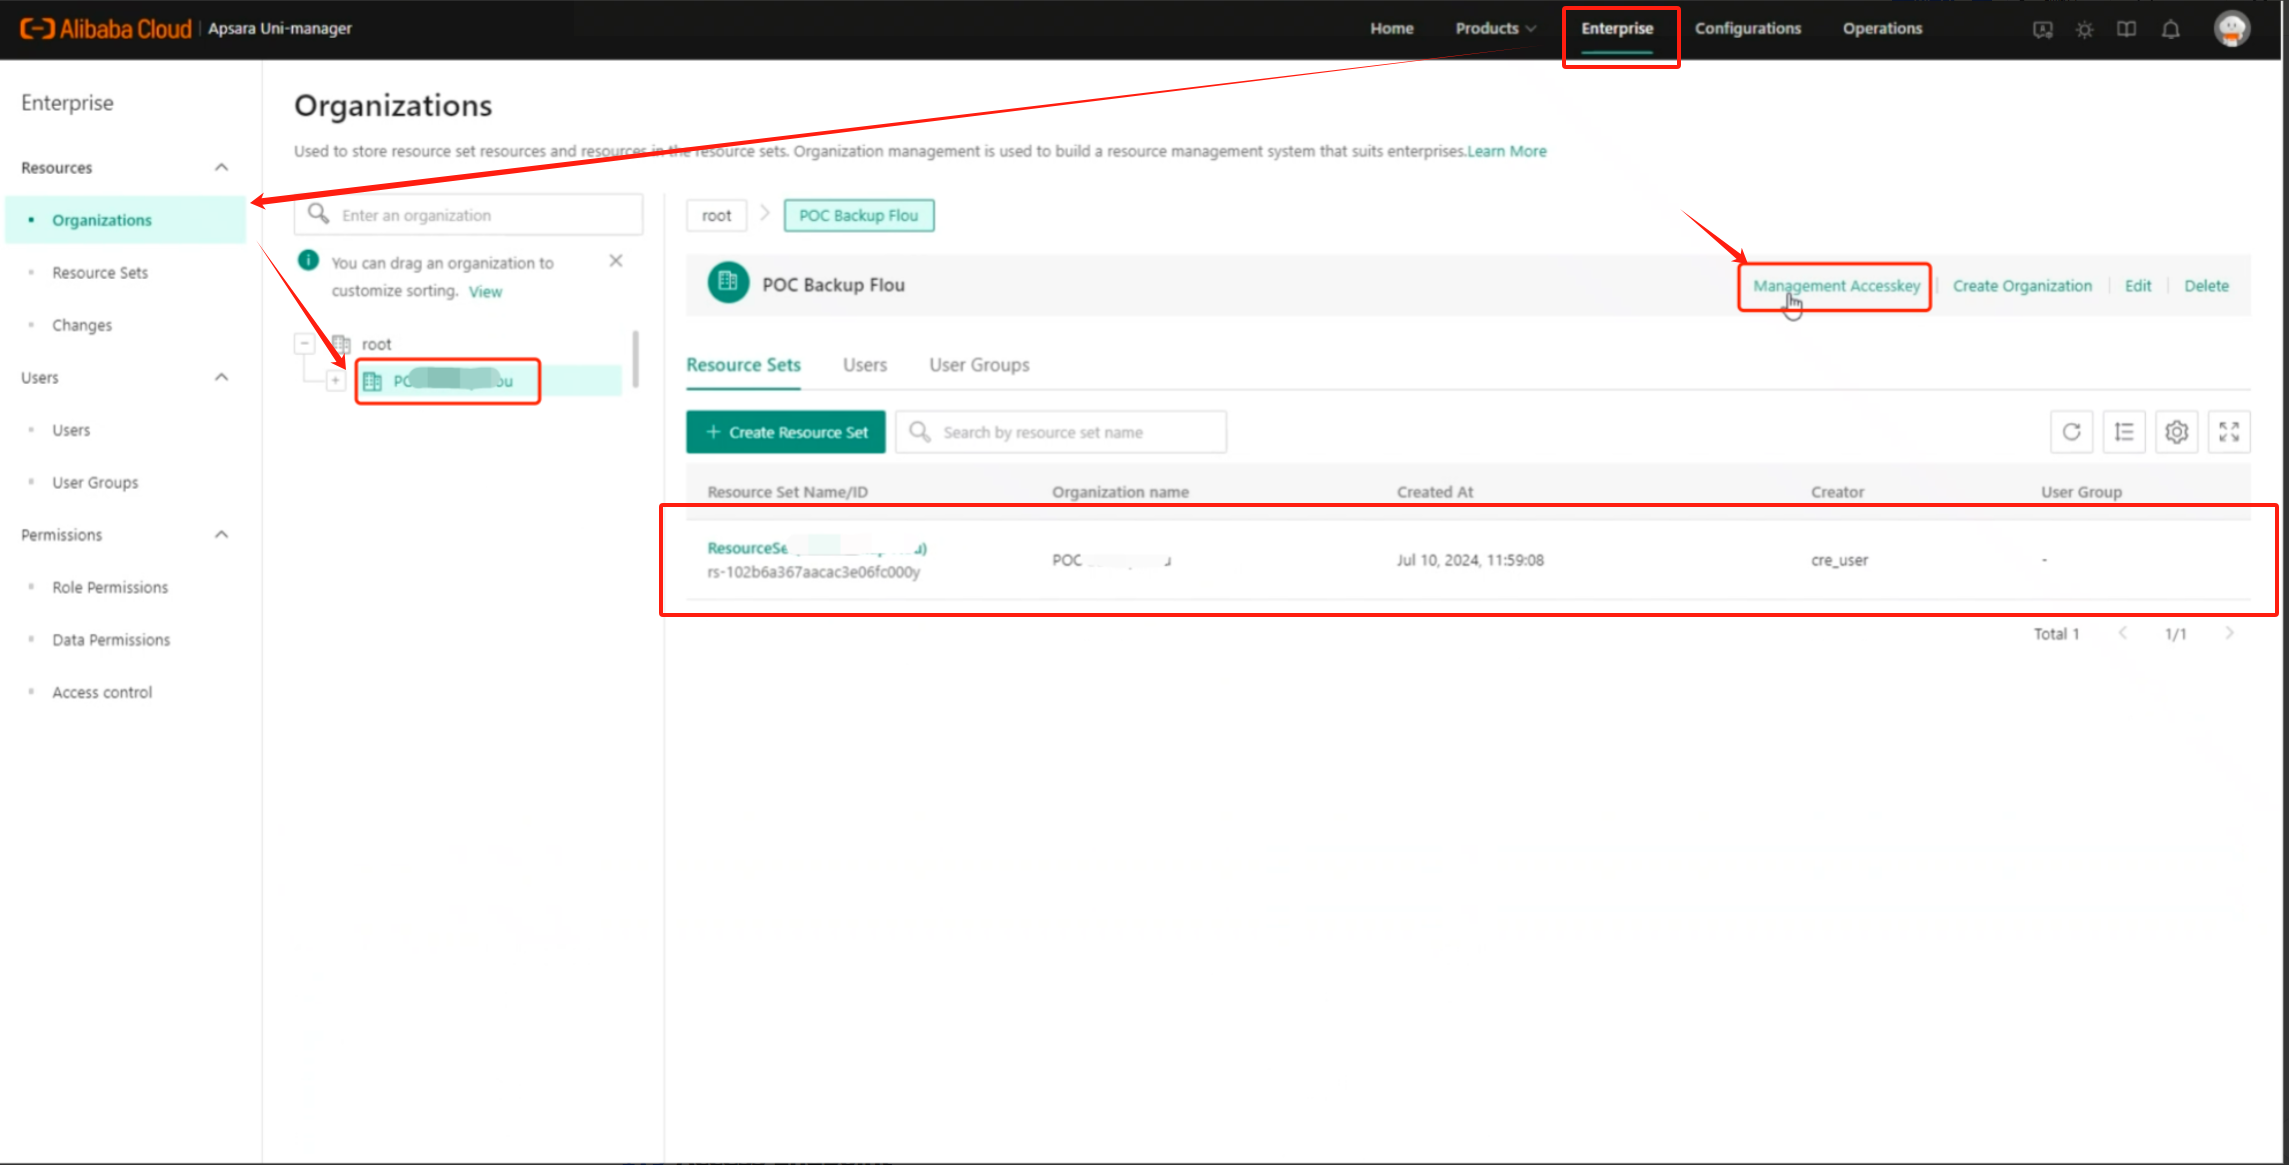
1.5 Access Endpoint
Obtaining the access endpoint is a bit complex. Please follow the steps below patiently.
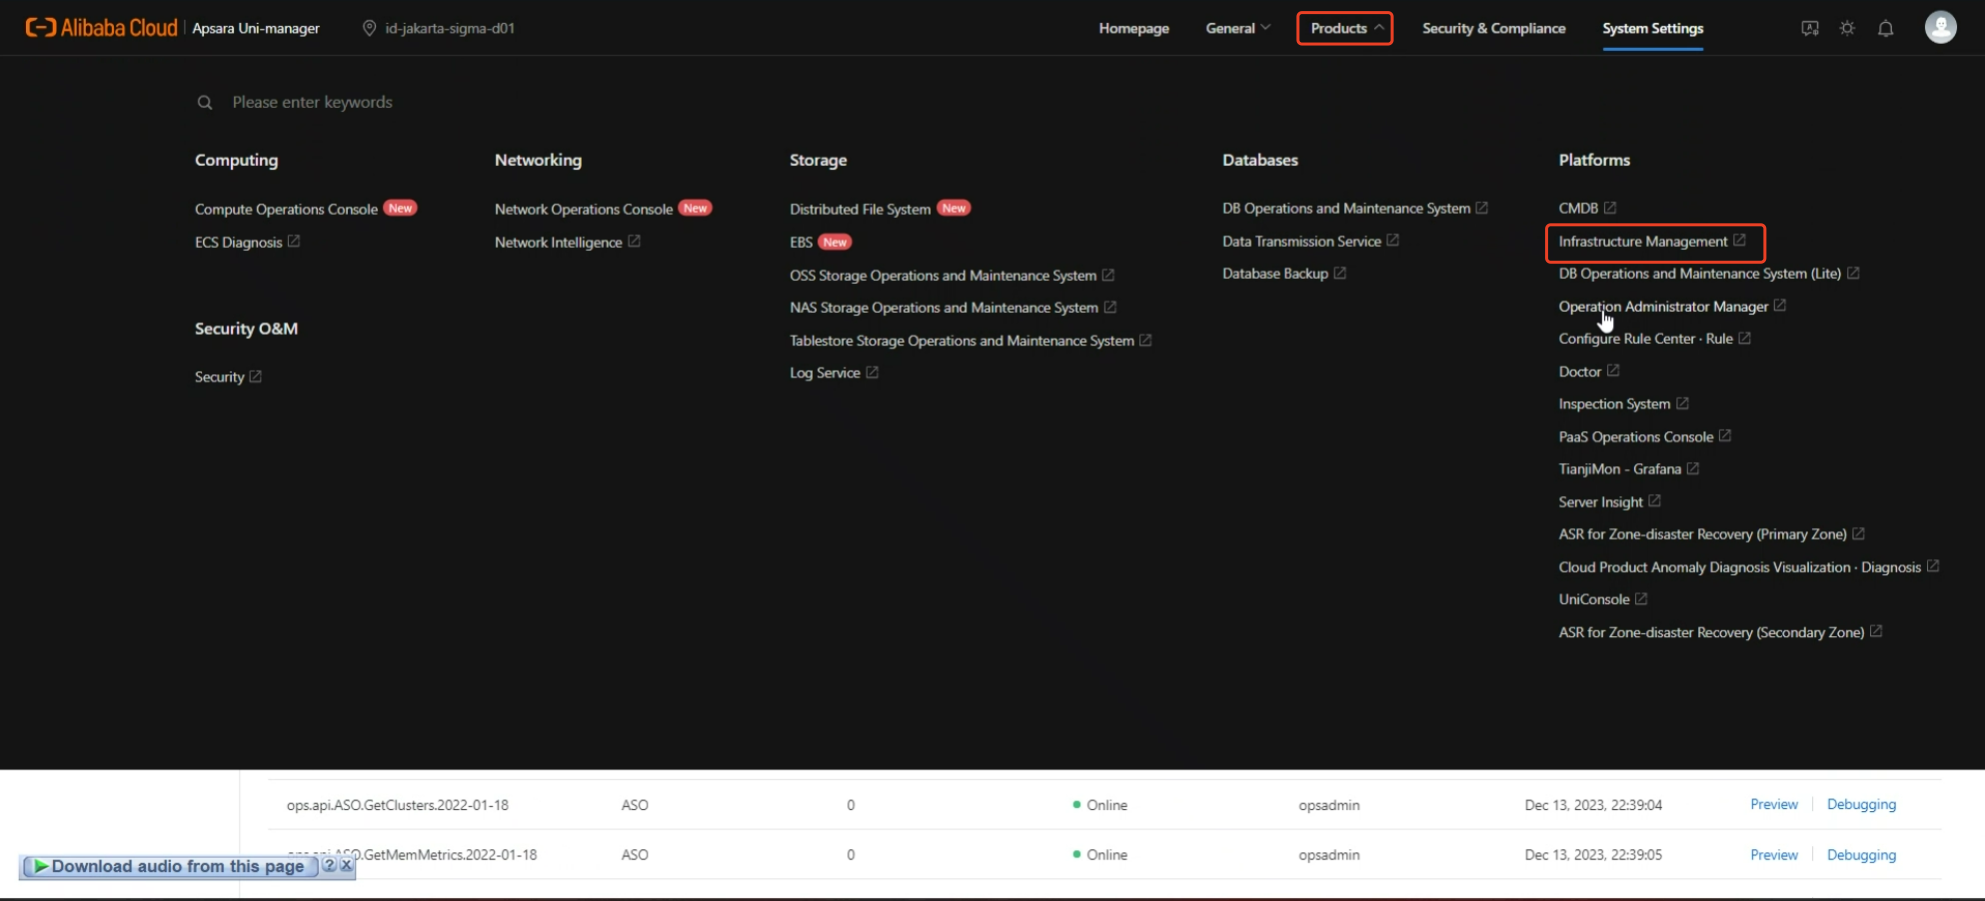
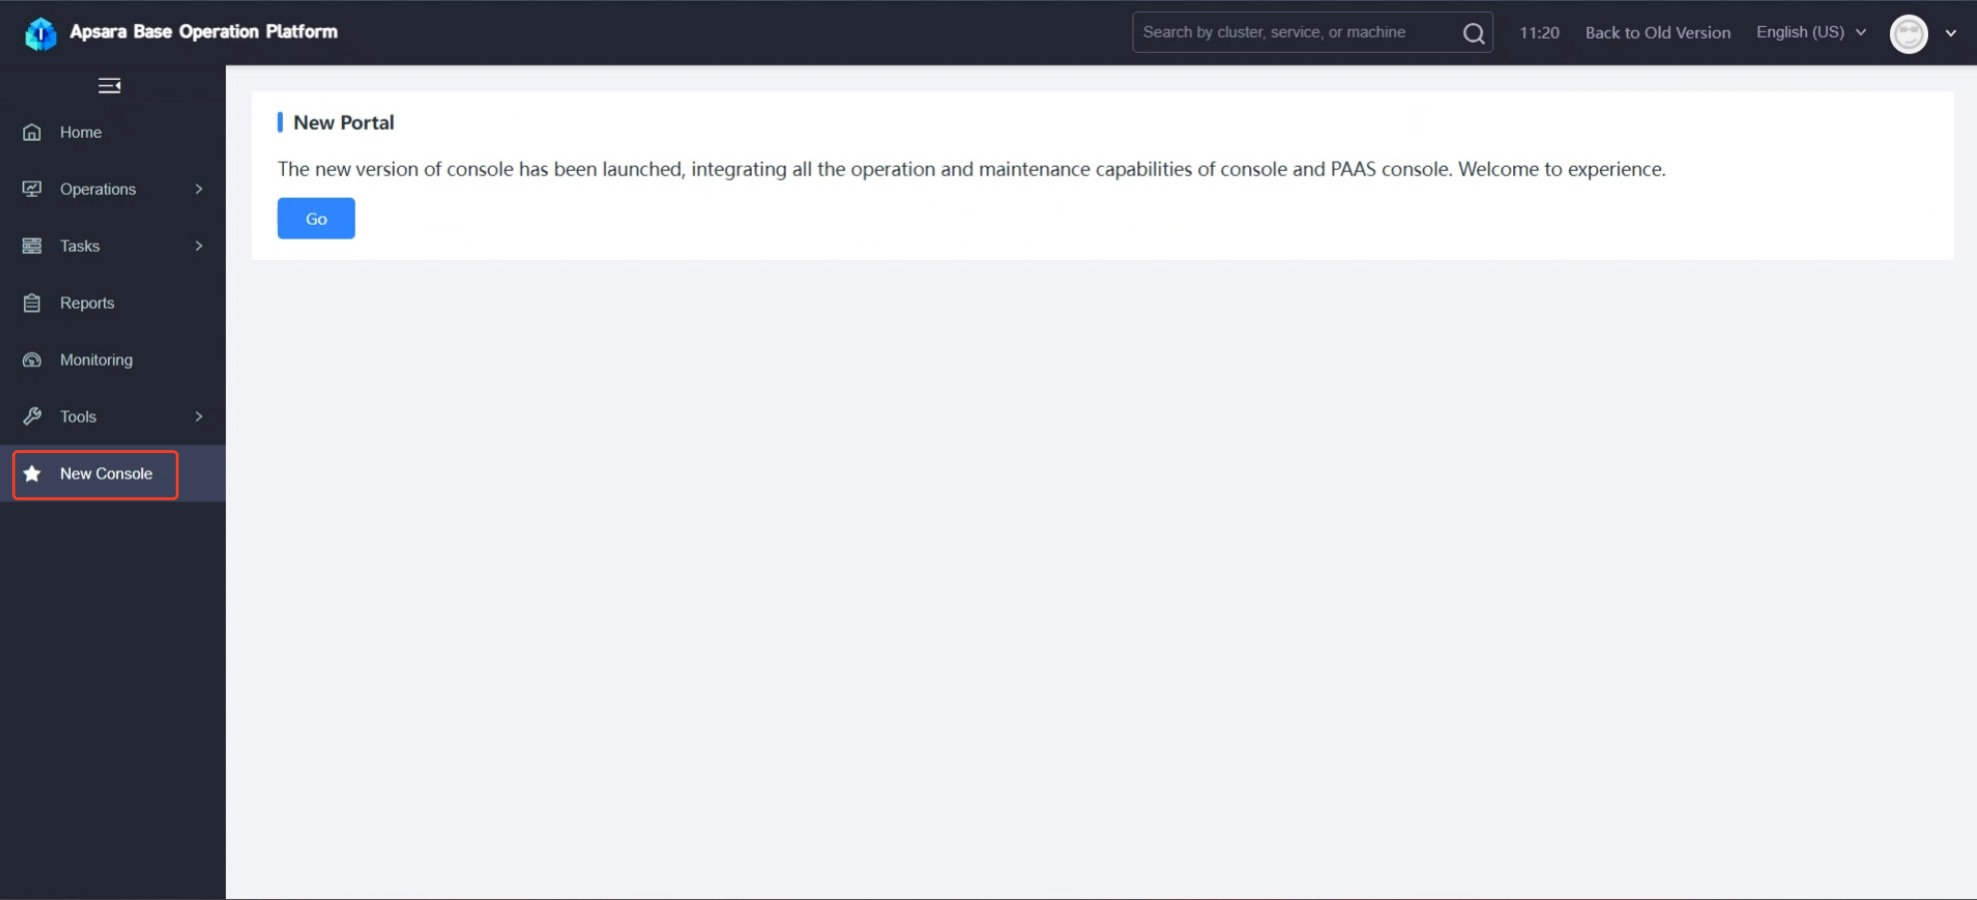
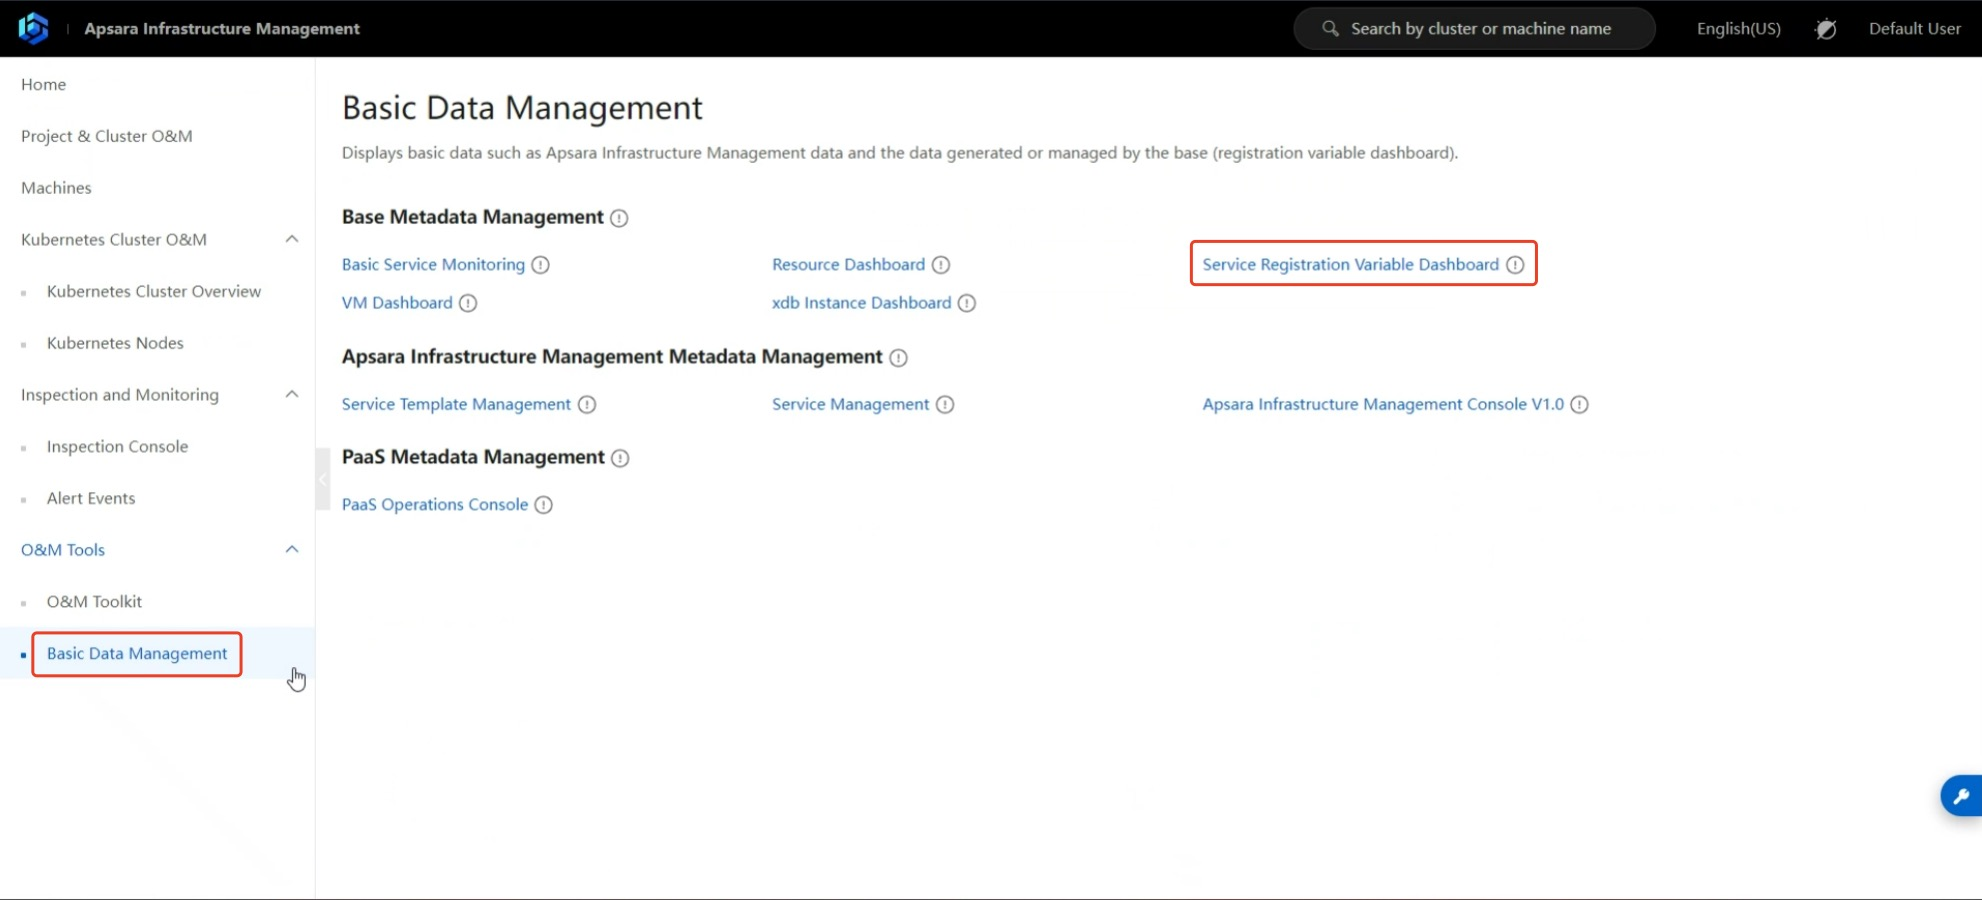
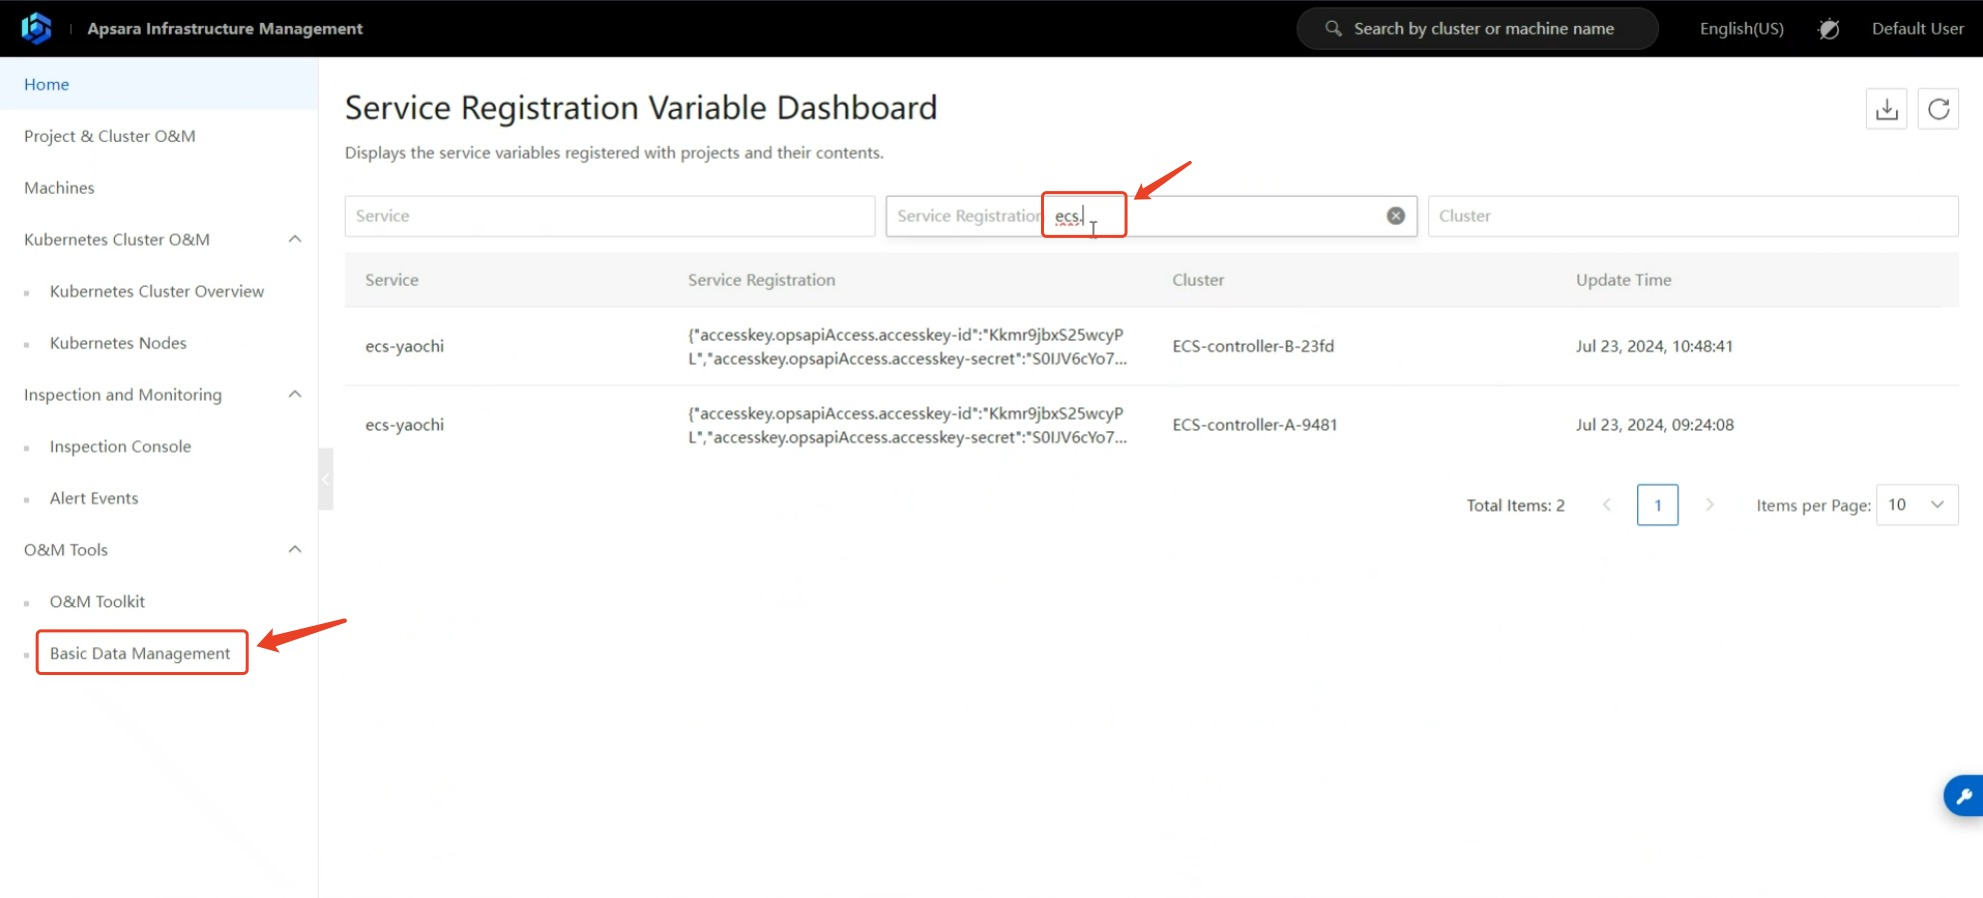
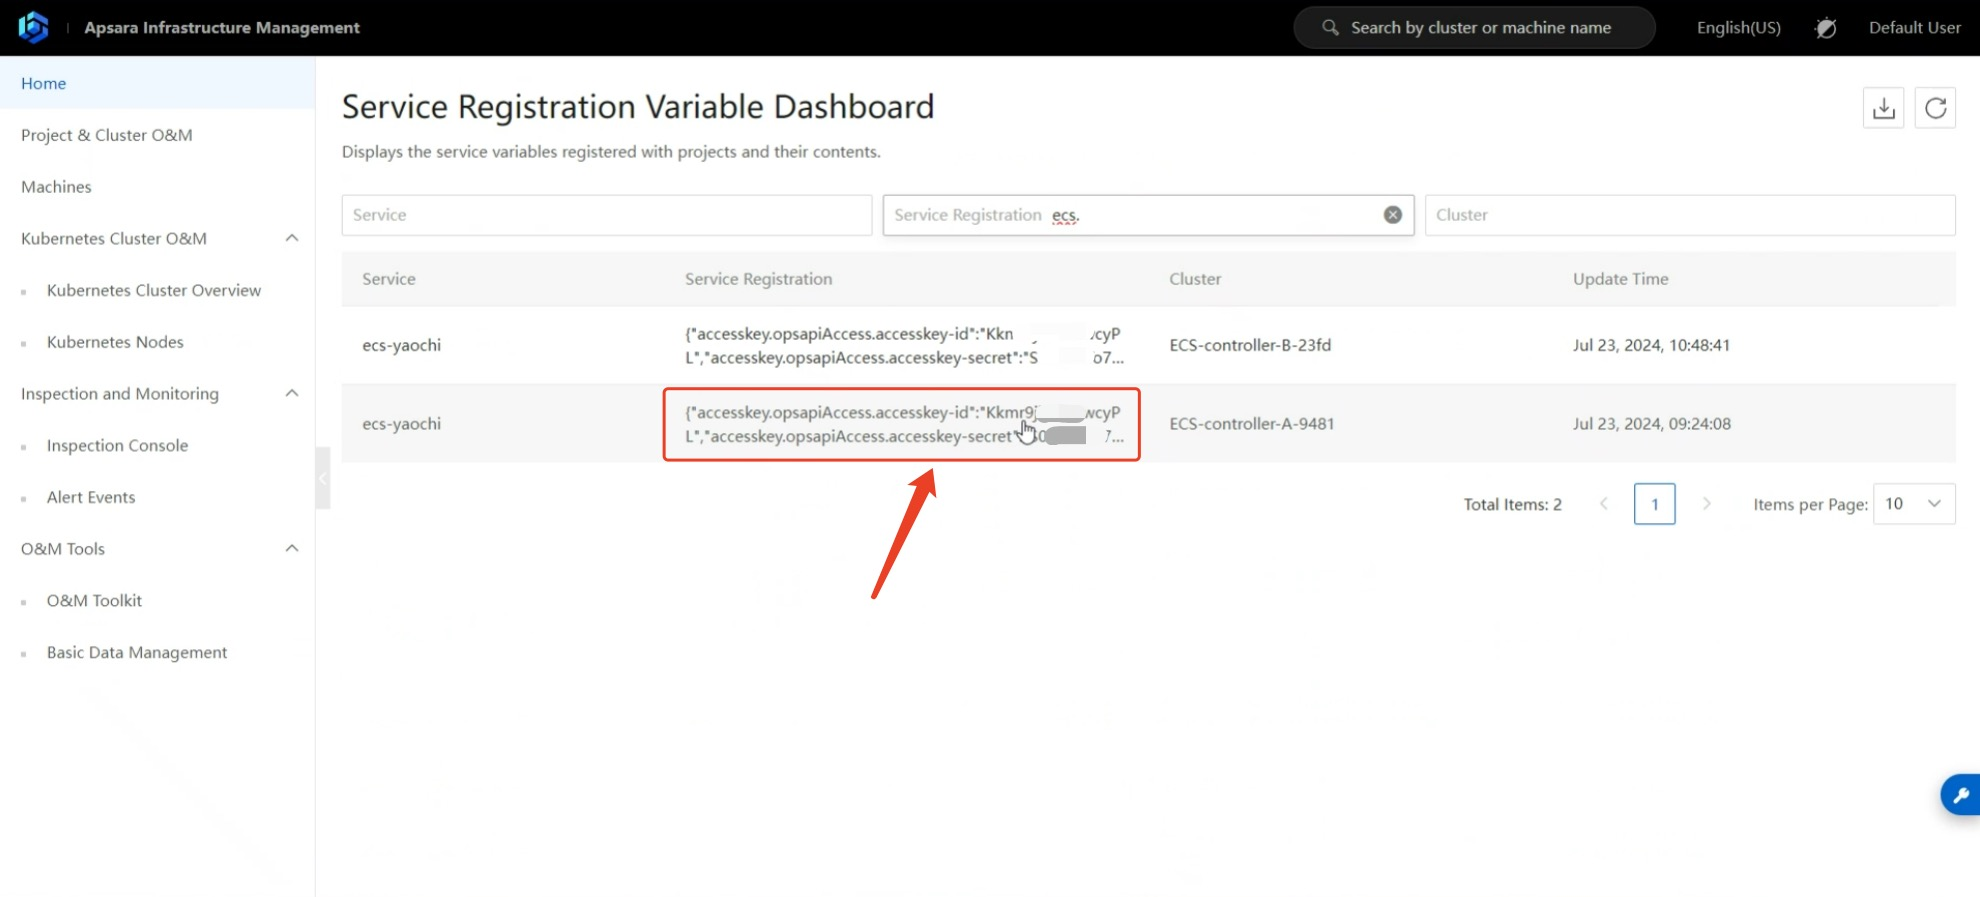

1.6 Access Key ID & Key Secret
Click on the username in the upper right corner to find the corresponding User's AKSK.
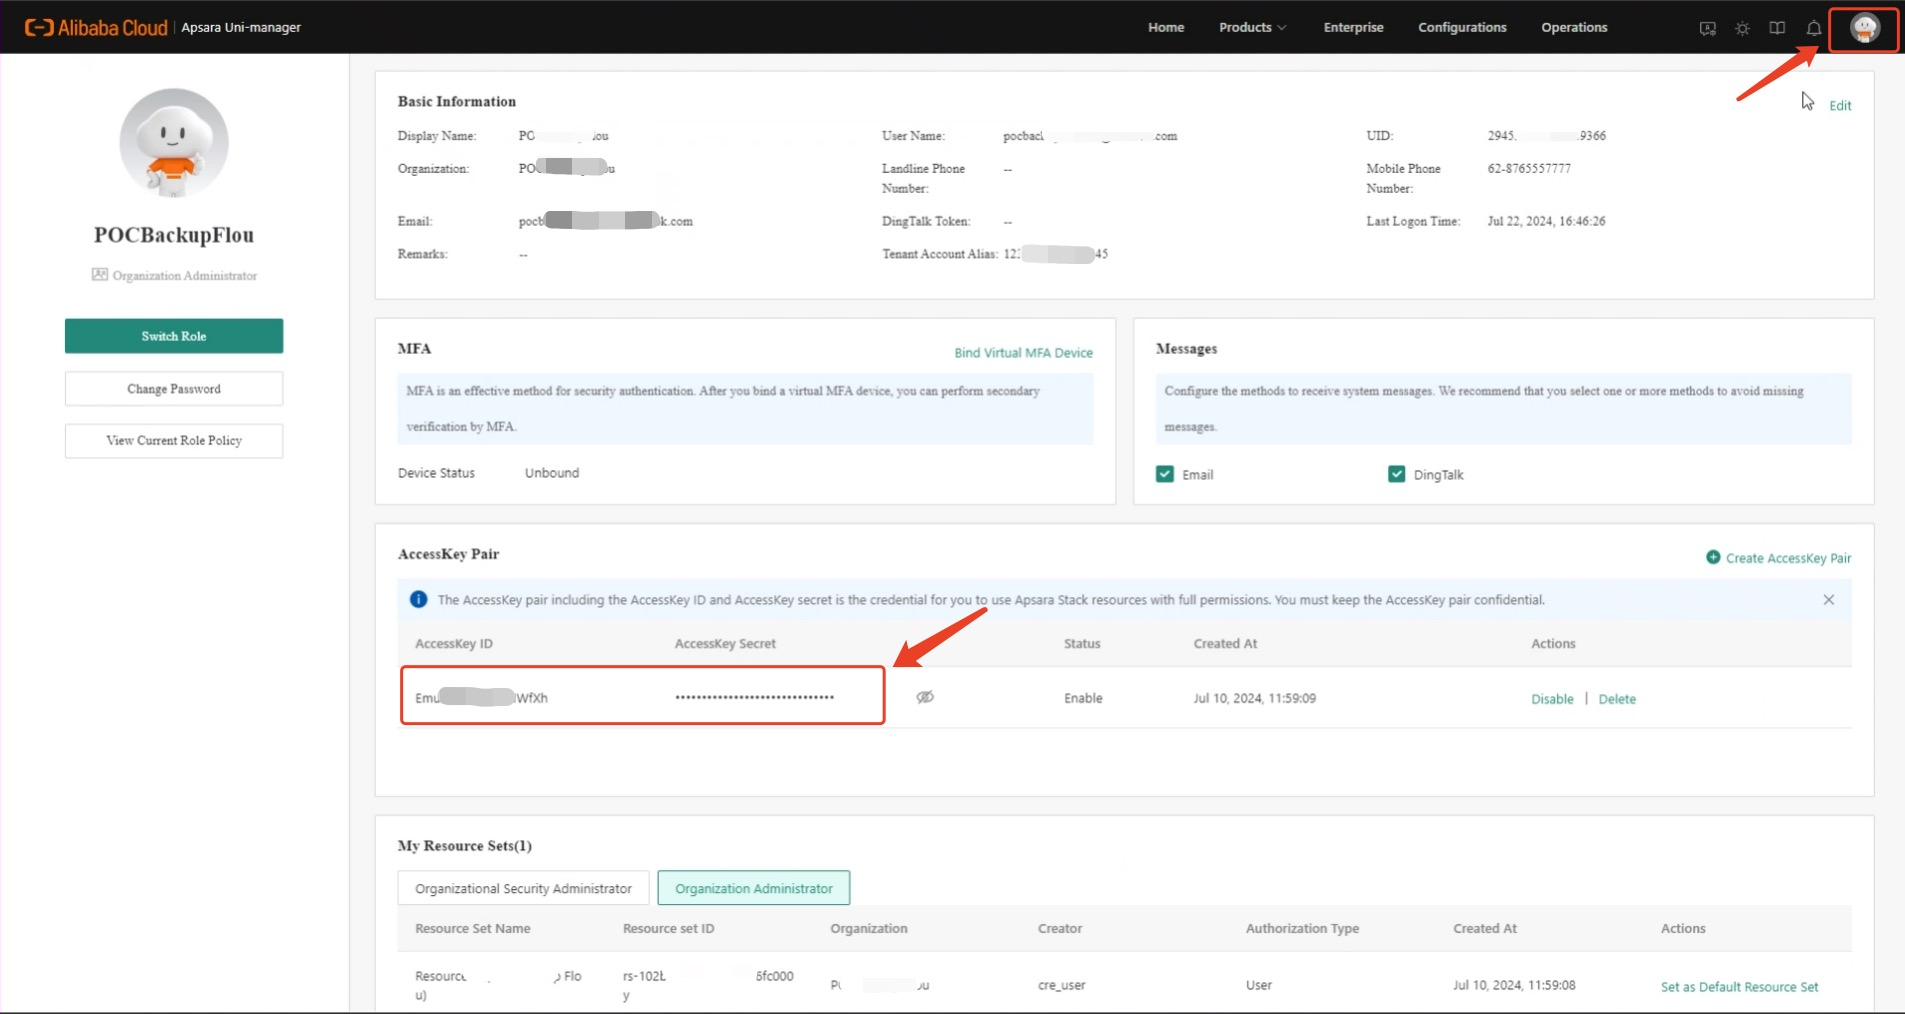
How to obtain Google Cloud Platform Credentials information?
When targeting the Google Cloud, the following authentication information of the Goole Cloud platform is required to complete the authentication docking of the API interface.
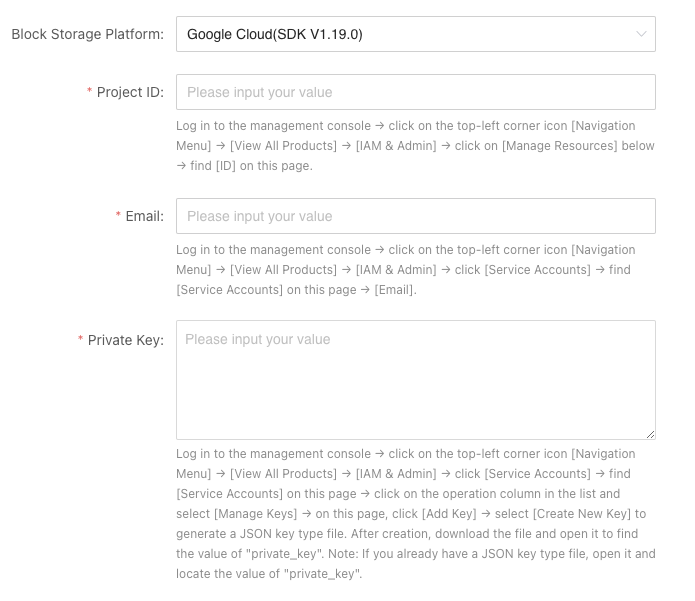
1. Project ID
- Login to the Manage resources, find the ID column value and copy it.
Find the column corresponding to the project to which the service account belongs.

2. Email
- Login the Service Accounts, find the Email column value and copy it.
This service account must have Editor permissions and access to relevant projects.
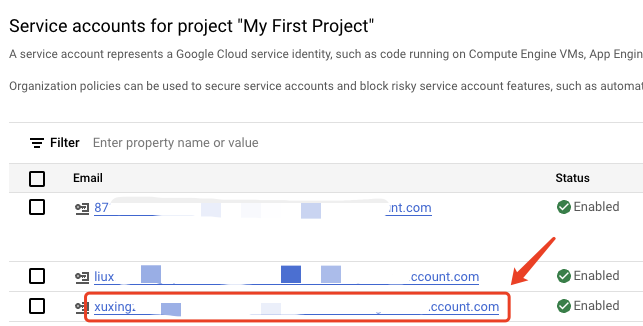
3. Private Key
In the Google Cloud console, go to the Service accounts page.
Select a project.
Tips
If you have already created a KEY, you can directly obtain the value of private_key from the downloaded key pair file. The downloaded key has the following format, where PRIVATE_KEY is the private portion of the public/private key pair:
{
    "type": "service_account",
    "project_id": "PROJECT_ID",
    "private_key_id": "KEY_ID",
    "private_key": "-----BEGIN PRIVATE KEY-----\nPRIVATE_KEY\n-----END PRIVATE KEY-----\n",
    "client_email": "SERVICE_ACCOUNT_EMAIL",
    "client_id": "CLIENT_ID",
    "auth_uri": "https://accounts.google.com/o/oauth2/auth",
    "token_uri": "https://accounts.google.com/o/oauth2/token",
    "auth_provider_x509_cert_url": "https://www.googleapis.com/oauth2/v1/certs",
    "client_x509_cert_url": "https://www.googleapis.com/robot/v1/metadata/x509/SERVICE_ACCOUNT_EMAIL"
}
open it and locate the value of private_key and copy it.
If you do not already have a key or you want to create a new key, you can refer to the Create Google Cloud service account and create a key DR purpose document to do so
How to configure DNS for Sync Proxy
- Sync Proxy is installed by default.
- Please complete the DNS configuration before starting DR.
Log in to Sync Proxy EC2 by default. Execute Command:
- Please modify the DNS address according to the actual situation.
sudo echo -e "\n[Resolve]\nDNS=10.10.0.23" >> /etc/systemd/resolved.conf && systemctl restart systemd-resolved

sudo cat /etc/systemd/resolved.conf

[Resolve]
DNS=10.10.0.23
Modify the daemon.json file of docker service and add DNS configuration.
{
  "default-ulimits": {
    "nofile": {
      "Name": "nofile",
      "Hard": 1048576,
      "Soft": 1048576
    }
  },
  "dns": ["127.0.0.53"]
}
Restart the Docker service.
sudo systemctl restart dockerWhat port strategies should be opened for HyperBDR and Cloud Sync Gateway?
HyperBDR required network policy
Warning
For the source IP range
We strongly recommend setting the source access for TCP:22 to a secure range instead of 0.0.0.0/0. Setting it to 0.0.0.0/0 means your Instances host is exposed to the internet, allowing anyone to access and potentially attack it, posing a security risk.
For example, if your external IP address is 110.242.68.66, the source IP range can be configured as 110.242.68.66/32.
| No. | Action | Type | Protocol & Port | Source | Description |
|---|---|---|---|---|---|
| 1 | Allow | IPv4 | TCP:22 | 0.0.0.0/0 | Permit default Linux SSH port |
| 2 | Allow | IPv4 | TCP:10443 | 0.0.0.0/0 | Permit HyperBDR web console |
| 3 | Allow | IPv4 | TCP:30443 | 0.0.0.0/0 | Permit HyperBDR Operation and maintenance management platform web console port |
| 4 | Allow | IPv4 | TCP:30080 | 0.0.0.0/0 | Permit HyperBDR https services port |
Cloud Sync Gateway required network policy
Warning
For the source IP range
we strongly recommend setting the source access for TCP:22,10729, TCP:3260 to a secure range instead of 0.0.0.0/0. Setting it to 0.0.0.0/0 means your Instances host is exposed to the internet, allowing anyone to access and potentially attack it, posing a security risk.
For TCP: 22,10729
If HyperBDR is deployed in a private network environment without a fixed public IP, you need to use HyperBDR's egress public IP as the source IP. For example, if your HyperBDR external IP address is 110.242.68.66, the source IP range can be configured as 110.242.68.66/32.
For TCP: 3260
You must obtain the communication addresses of all source-side backup hosts and cloud synchronization gateways, whether on the intranet or the public network, and add them to the source whitelist. This ensures the security of data transmission and prevents synchronization data failure caused by attacks on the cloud gateway by other machines on the Internet.
| No. | Action | Type | Protocol & Port | Source | Description |
|---|---|---|---|---|---|
| 1 | Allow | IPv4 | TCP:22,10729 | 0.0.0.0/0 | Permit default Linux Remote control SSH port |
| 2 | Allow | IPv4 | TCP:3260 | 0.0.0.0/0 | Data transfer port |
How to configure a disaster recovery network policy?
Tips
This step is applicable to the disaster recovery architecture for intranet access. Data synchronization and disaster recovery communication through the public network are not within the scope of explanation in this chapter.
When taking over during disaster recovery host drill, the disaster recovery program needs to perform a series of preparatory work. It is necessary to ensure that the disaster recovery program can normally access the network where the disaster recovery host is located. Otherwise, it cannot take over the disaster recovery host normally. Then the following prerequisite conditions for disaster recovery network need to be ensured.
- The network where HyperBDR and Cloud Sync Gateway are located can communicate with the network where the disaster recovery drill/takeover host is located. Refer to the access port policy What port strategies should be opened for HyperBDR and Cloud Sync Gateway? documentation
The technical configuration methods for communication between different cloud-set VPC networks vary. Please refer to the documentation provided by cloud service providers for configuration or request the help of MSP partners.
The common implementation technology for accessing VPC network interconnection configuration is VPC Peering Connect.