Sync Proxy Setup
Sync Proxy Setup
Configure Sync Proxy IP Address
Login Sync Proxy VM
Tips
Default username and password for Sync Proxy ova:
- Username: root
- Password: Acb@132.Inst
Use vCenter Web Console to login the Sync Proxy VM and to the following configurations. 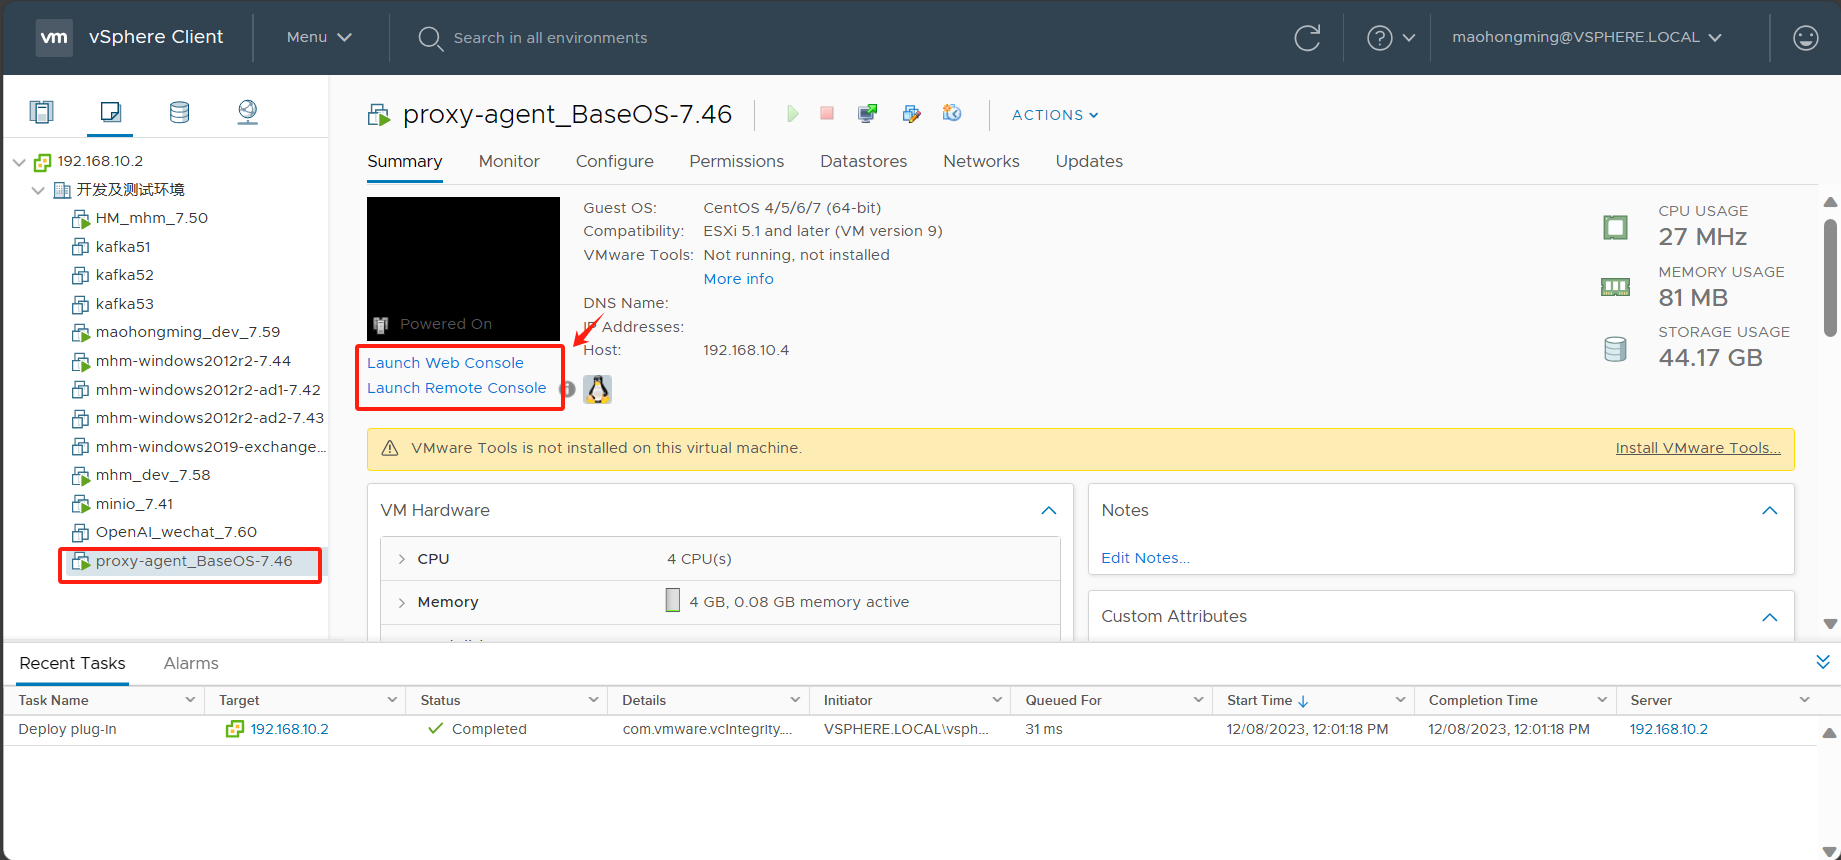
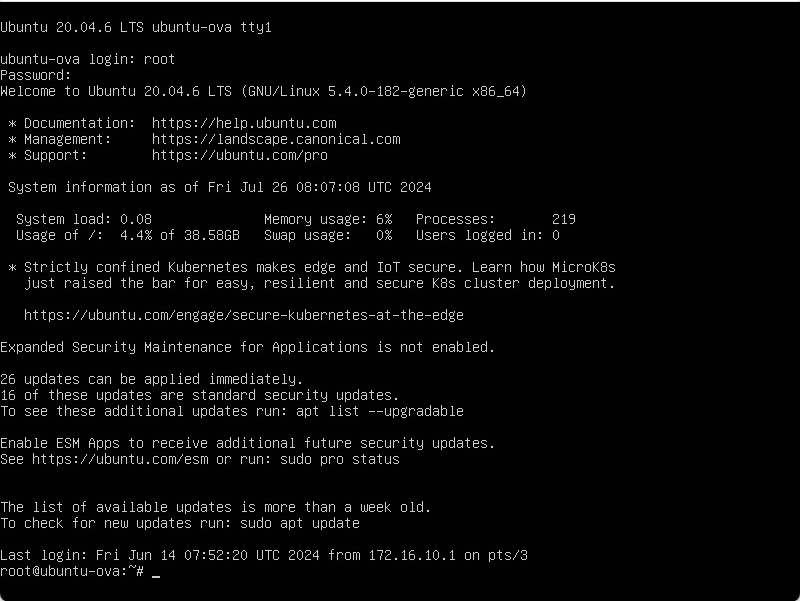
Configure Sync Proxy VM network
Tips
The Sync Proxy ova is configured with default DHCP mode for networking. If the source production environment network you selected supports DHCP, confirm the virtual machine's IP and proceed. If the source production environment network does not use DHCP, manual configuration of the machine's network is required.
Confirm the virtual machine's network adapter device name
ip a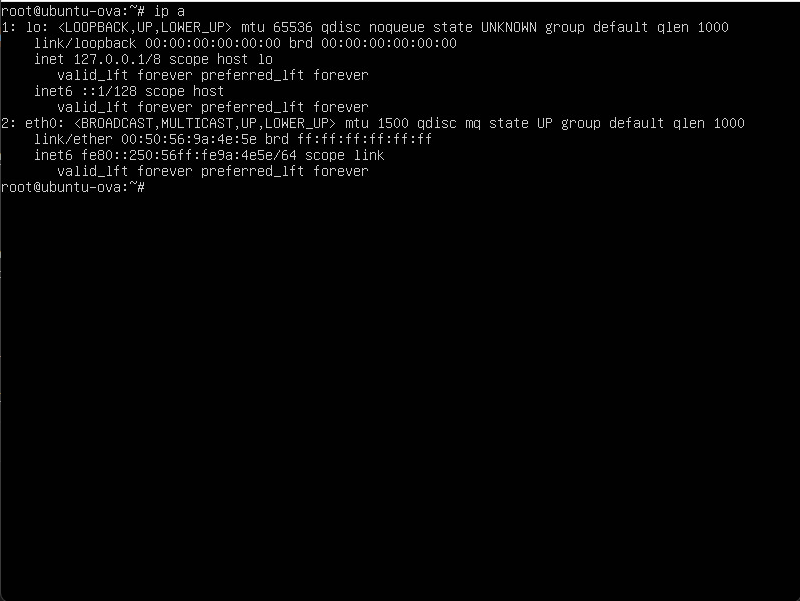
Configure a IP address and gateway
Tips
Configuring the network of the Sync Proxy VM using the command method is temporary. An unexpected restart will lose the network configuration. It is recommended to configure the network using the configuration file method.
sudo ifconfig eth0 192.168.7.48/20 && sudo route add default gw 192.168.0.1 eth0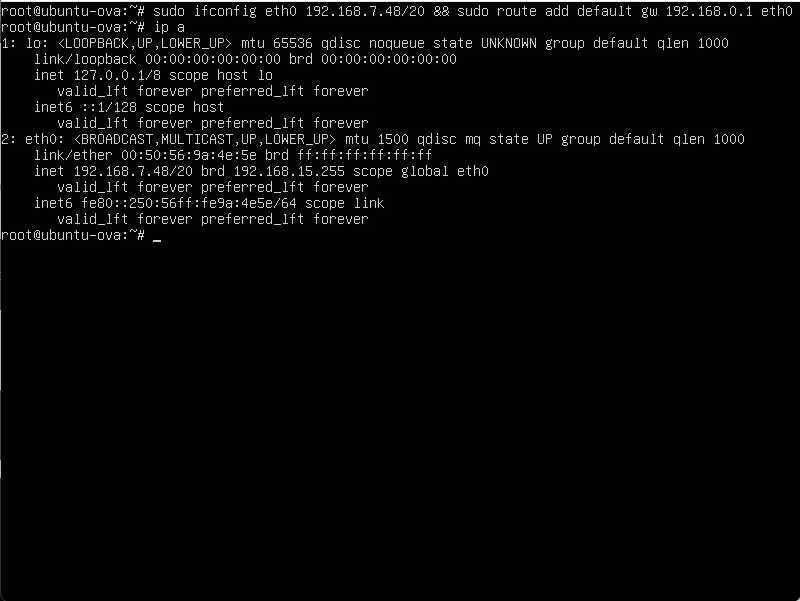
Modify network interface configuration file
Confirm the network interface configuration file
The file extension is usually [.yaml]
The following command will directly overwrite the specified network configuration content into the specified configuration file. Please modify the network parameters (such as IP address, gateway, DNS, etc.) according to your actual needs.
echo "network:
  version: 2
  renderer: networkd
  ethernets:
    eth0:
      addresses:
        - 192.168.7.48/20
      gateway4: 192.168.0.1
" | sudo tee /etc/netplan/70-netplan-set.yaml && sudo netplan apply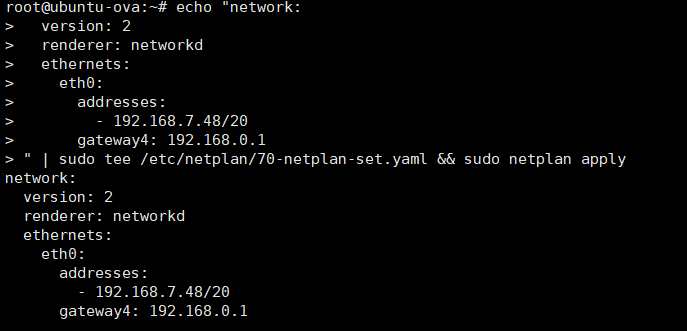
Restart Network
sudo systemctl restart systemd-networkdTesting
Try to ping VMware vCenter IP or ESXi IP, check if you can get correct response.
ping <vcenter ip or esxi ip>Configure NTP Server
Check Current Time Synchronization Status
timedatectl statusThis command shows the current system time, time synchronization status, and the NTP server in use.
Modify timesyncd Configuration
Edit the configuration file /etc/systemd/timesyncd.conf:
sudo vim /etc/systemd/timesyncd.confFind and modify the [Time] section as below:
[Time]
NTP=ntp.aliyun.com
FallbackNTP=ntp1.aliyun.com ntp2.aliyun.com- NTP: Preferred NTP server.
- FallbackNTP: Backup servers if the primary fails.
There <ntp.aliyun.com> is your ntp server ip address or FQDN domain name. There <ntp1.aliyun.com> <ntp2.aliyun.com> is your backup ntp server ip address or FQDN domain name, if you don't have this, you use # to annotation on this line begen.
Save and exit the editor.
Restart timesyncd Service
After modifying the configuration, restart the service:
systemctl restart systemd-timesyncdEnable the service to start automatically on boot:
systemctl enable systemd-timesyncdVerify Synchronization
Check synchronization status again:
timedatectl statusYou should see System clock synchronized: yes. To view detailed synchronization logs:
journalctl -u systemd-timesyncd(Optional) Set the Correct Timezone
If necessary, set the correct system timezone, for example:
sudo timedatectl set-timezone Asia/ShanghaiThere <Asia/Shanghai> is your local timezone.
Enable Access Policy for Sync Proxy
Open the network access policy in your firewall for synchronizing Sync Proxy nodes to vCenter and all ESXi hosts managed by vCenter.
- Sync Proxy nodes need to have normal access to vCenter on port 443.
- Sync Proxy nodes need to have normal access to all ESXi hosts managed by vCenter on port 902.
Tips
Sync Proxy nodes access the vCenter API interface for authentication, and they retrieve data by calling the ESXi host where the disaster recovery production site VM are located. Therefore, it is necessary to open network access policies for all ESXi hosts managed by vCenter.
Tips
In VMware production environment, maybe use domain name to access EXSi. You need to configure domain name mapping or DNS service address for Sync Proxy to resolve the domain name. Reference Documentation: How does Sync Proxy access EXSi using a domain name?
Test Access Policy for Sync Proxy
Test if Sync Proxy can connect to vCenter 443 port and ESXis 902 port which is management by vCenter.
Test vCenter/ESXi Connectivity
NOTE: Repeat this steps if you have multiple vCenter or ESXis to be protected.
Test Port 443
ssh -v -p 443 <vCenter/ESXi IP/Domain>Success Response:
Tips
If it displays 'Connection established', it means the link port is normal.
OpenSSH_7.4p1, OpenSSL 1.0.2k-fips  26 Jan 2017
debug1: Reading configuration data /etc/ssh/ssh_config
debug1: /etc/ssh/ssh_config line 58: Applying options for *
debug1: Connecting to <vCenter/ESXi IP/Domain> [<vCenter/ESXi IP/Domain>] port 443.
debug1: Connection established.
Test Port 902
ssh -v -p 902 <ESXi IP/Domain>Success Response:
Tips
If it displays 'Connection established', it means the link port is normal.
OpenSSH_7.4p1, OpenSSL 1.0.2k-fips  26 Jan 2017
debug1: Reading configuration data /etc/ssh/ssh_config
debug1: /etc/ssh/ssh_config line 58: Applying options for *
debug1: Connecting to <vCenter/ESXi IP/Domain> [<vCenter/ESXi IP/Domain>] port 902.
debug1: Connection established.
Test Network Connectivity from Sync Proxy to Object Storage
Tips
Make sure you already login to Sync Proxy VM
Internet
Ensure your Sync Proxy can access internet before testing.
Public DNS Connectivity Testing
ping -c 4 -t 2 8.8.8.8Success Response:
ping -c 4 -t 2 8.8.8.8
PING 8.8.8.8 (8.8.8.8): 56 data bytes
64 bytes from 8.8.8.8: icmp_seq=0 ttl=111 time=43.362 ms
64 bytes from 8.8.8.8: icmp_seq=1 ttl=111 time=49.807 ms

--- 8.8.8.8 ping statistics ---
2 packets transmitted, 2 packets received, 0.0% packet loss
round-trip min/avg/max/stddev = 43.362/46.585/49.807/3.222 ms
Huawei Object Storage Bucket Connectivity
curl -I https://obs.ap-southeast-3.myhuaweicloud.comSuccess Response:
HTTP/1.1 405 Method Not Allowed
Server: OBS
Date: Thu, 29 Feb 2024 08:29:51 GMT
Content-Type: application/xml
Content-Length: 380
Connection: close
x-reserved: amazon, aws and amazon web services are trademarks or registered trademarks of Amazon Technologies, Inc
x-amz-request-id: 0000018DF3FBF121900FFB988BE0FC8D
Allow: HEAD, GET, OPTIONS
x-amz-id-2: 32AAAQAAEAABAAAQAAEAABAAAQAAEAABCRjxc+HEW3ehsrcsKS60jUgz7XhG8uyS
Note: This command is primarily used to test the accessibility of Huawei Cloud Object Storage buckets. Currently, the tested OBS domain is for the Huawei Cloud Singapore region. If you need to test in a different region, please refer to the official Huawei Cloud documentation to find the corresponding Endpoint domain address.
Reference Link: https://developer.huaweicloud.com/intl/en-us/endpoint?OBS
VPN
Check Object Storage Service Endpoint
Make sure object storage service endpoint address return internal ip address.
ping obs.ap-southeast-3.myhuaweicloud.comSuccess Response:
[root@data-sync-proxy-2024-0229-145824 ~]# ping obs.ap-southeast-3.myhuaweicloud.com
PING obs.lz01.ap-southeast-3.myhuaweicloud.com (100.125.80.30) 56(84) bytes of data.
64 bytes from ecs-159-138-80-62.compute.hwclouds-dns.com (100.125.80.30): icmp_seq=1 ttl=53 time=1.24 ms
64 bytes from ecs-159-138-80-62.compute.hwclouds-dns.com (100.125.80.30): icmp_seq=2 ttl=53 time=0.971 ms
64 bytes from ecs-159-138-80-62.compute.hwclouds-dns.com (100.125.80.30): icmp_seq=3 ttl=53 time=0.972 ms
Tips
Huawei Cloud Object Storage Service internal IP Range: 100.125.xx. If there is no ICMP response, it is considered normal.
Huawei Object Storage Bucket Connectivity
curl -I https://obs.ap-southeast-3.myhuaweicloud.comSuccess Response:
HTTP/1.1 405 Method Not Allowed
Server: OBS
Date: Thu, 29 Feb 2024 08:29:51 GMT
Content-Type: application/xml
Content-Length: 380
Connection: close
x-reserved: amazon, aws and amazon web services are trademarks or registered trademarks of Amazon Technologies, Inc
x-amz-request-id: 0000018DF3FBF121900FFB988BE0FC8D
Allow: HEAD, GET, OPTIONS
x-amz-id-2: 32AAAQAAEAABAAAQAAEAABAAAQAAEAABCRjxc+HEW3ehsrcsKS60jUgz7XhG8uyS
Tips
This command is primarily used to test the accessibility of Huawei Cloud Object Storage buckets. Currently, the tested OBS domain is for the Huawei Cloud Singapore region. If you need to test in a different region, please refer to the official Huawei Cloud documentation to find the corresponding Endpoint domain address.
Reference Link: https://developer.huaweicloud.com/intl/en-us/endpoint?OBS
Test Network Connectivity from Sync Proxy to HyperBDR
Tips
This step needs to be tested after the installation of HyperBDR is completed.
Tips
Default username and password for Sync Proxy ova:
- Username: root
- Password: Acb@132.Inst
If you don't know how to use SSH on a Windows system, please refer to the following link:
Option 1: Public Network Access
Test the network connectivity from the production site to Huawei Cloud HyperBDR
Step1: Log in to the Sync Proxy Node
Step2: Test Access to HyperBDR Port 10443 and Port 30080
Execute Command:
ssh -v -p 10443 <HyperBDR Public IP>Test Result: If the input results include the information "[debug1: Connection established.]" it indicates that there are no issues with network connectivity.
OpenSSH_7.4p1, OpenSSL 1.0.2k-fips 26 Jan 2017
debug1: Reading configuration data /etc/ssh/ssh_config
debug1: /etc/ssh/ssh_config line 58: Applying options for *
debug1: Connecting to <HyperBDR Public IP> [<HyperBDR Public IP>] port 10443.
debug1: Connection established.
Execute Command:
ssh -v -p 30080 <HyperBDR Public IP>Test Result: If the input results include the information "[debug1: Connection established.]" it indicates that there are no issues with network connectivity.
OpenSSH_7.4p1, OpenSSL 1.0.2k-fips 26 Jan 2017
debug1: Reading configuration data /etc/ssh/ssh_config
debug1: /etc/ssh/ssh_config line 58: Applying options for *
debug1: Connecting to <HyperBDR Public IP> [<HyperBDR Public IP>] port 30080.
debug1: Connection established.
Option 2: Internal VPN Access
Test the network connectivity from the production site to Huawei Cloud HyperBDR
Step1: Log in to the Sync Proxy Node
Step2: Test Access to HyperBDR Port 10443 and Port 30080
Execute Command:
ssh -v -p 10443 <HyperBDR Internal IP>Test Result: If the input results include the information "[debug1: Connection established.]" it indicates that there are no issues with network connectivity.
OpenSSH_7.4p1, OpenSSL 1.0.2k-fips  26 Jan 2017
debug1: Reading configuration data /etc/ssh/ssh_config
debug1: /etc/ssh/ssh_config line 58: Applying options for *
debug1: Connecting to <HyperBDR Internal IP> [<HyperBDR Internal IP>] port 10443.
debug1: Connection established.
Execute Command:
ssh -v -p 30080 <HyperBDR Internal IP>Test Result: If the input results include the information "[debug1: Connection established.]" it indicates that there are no issues with network connectivity.
OpenSSH_7.4p1, OpenSSL 1.0.2k-fips  26 Jan 2017
debug1: Reading configuration data /etc/ssh/ssh_config
debug1: /etc/ssh/ssh_config line 58: Applying options for *
debug1: Connecting to <HyperBDR Internal IP> [<HyperBDR Internal IP>] port 30080.
debug1: Connection established.
Sync Proxy DNS Settings
Tips
This step is only used when connecting to the cloud platform via VPN.
If your disaster recovery environment is interconnected with the production site's intranet through Huawei Cloud VPN, after creating the VPC Endpoint service, you need to add the resolution address of the Huawei Cloud intranet OBS VPC Endpoint service in the network where the production site's Proxy host is located.
Tips
Default username and password for Sync Proxy ova:
- Username: root
- Password: Acb@132.Inst
If you don't know how to use SSH on a Windows system, please refer to the following link:
Get DNS domain name
Tips
<Huawei DNS Endpoint Service IPaddress> is the IP address of the DNS endpoint service after creating the VPC Endpoint service.

Configure Firewall or Network Devices such as Switches
Tips
Example: Palo Alto Firewall
The following operations are performed in the firewall web management interface.
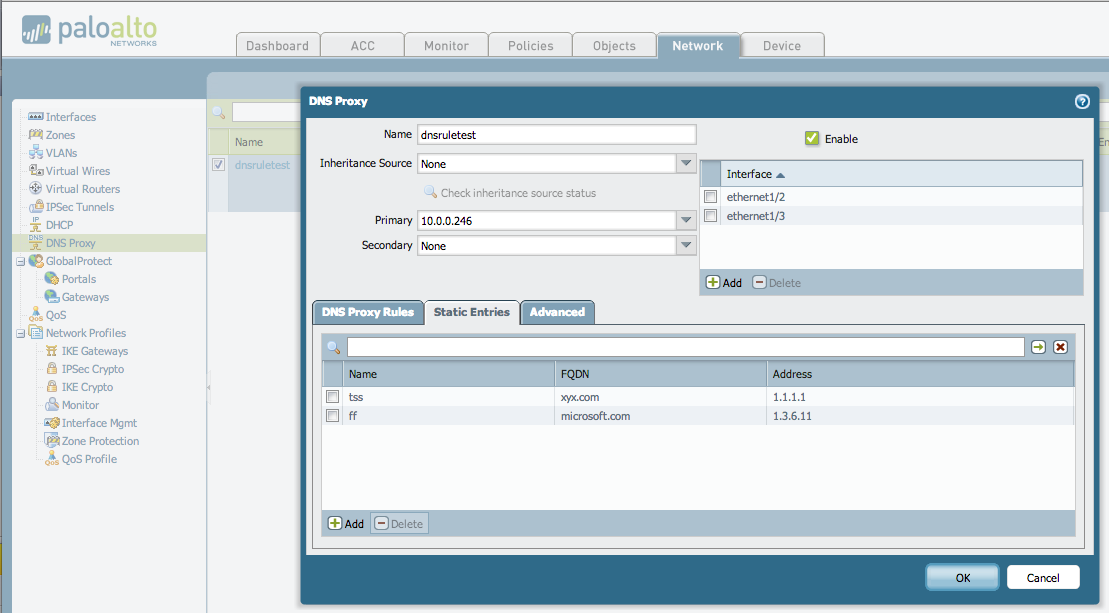
Navigate to [Network] > [DNS Sync Proxy] .
Click [Add] to bring up the DNS Sync Proxy dialog box.
Select the interface on which DNS Sync Proxy should be enabled. In the following figure, DNS Sync Proxy is enabled on Ethernet 1/2 and 1/3 interfaces.
Select the primary and secondary servers to which the firewall should forward DNS queries. This example shows the configuration of enabling DNS Sync Proxy on Ethernet interfaces 1/2 and 1/3. The active DNS server is set to 10.0.0.246 (This IP is configured as the Huawei Cloud internal DNS Server Addresse).
Tips
Configure the Huawei Cloud internal DNS address based on the region where you use Huawei Cloud resources.
Huawei Cloud internal DNS service address at: https://support.huaweicloud.com/intl/en-us/dns_faq/dns_faq_002.html
Install Sync Proxy
Tips
Sync Proxy should be installation after the completion of the HyperBDR installation process.
Tips
Default username and password for Sync Proxy ova:
- Username: root
- Password: Acb@132.Inst
If you don't know how to use SSH on a Windows system, please refer to the following link:
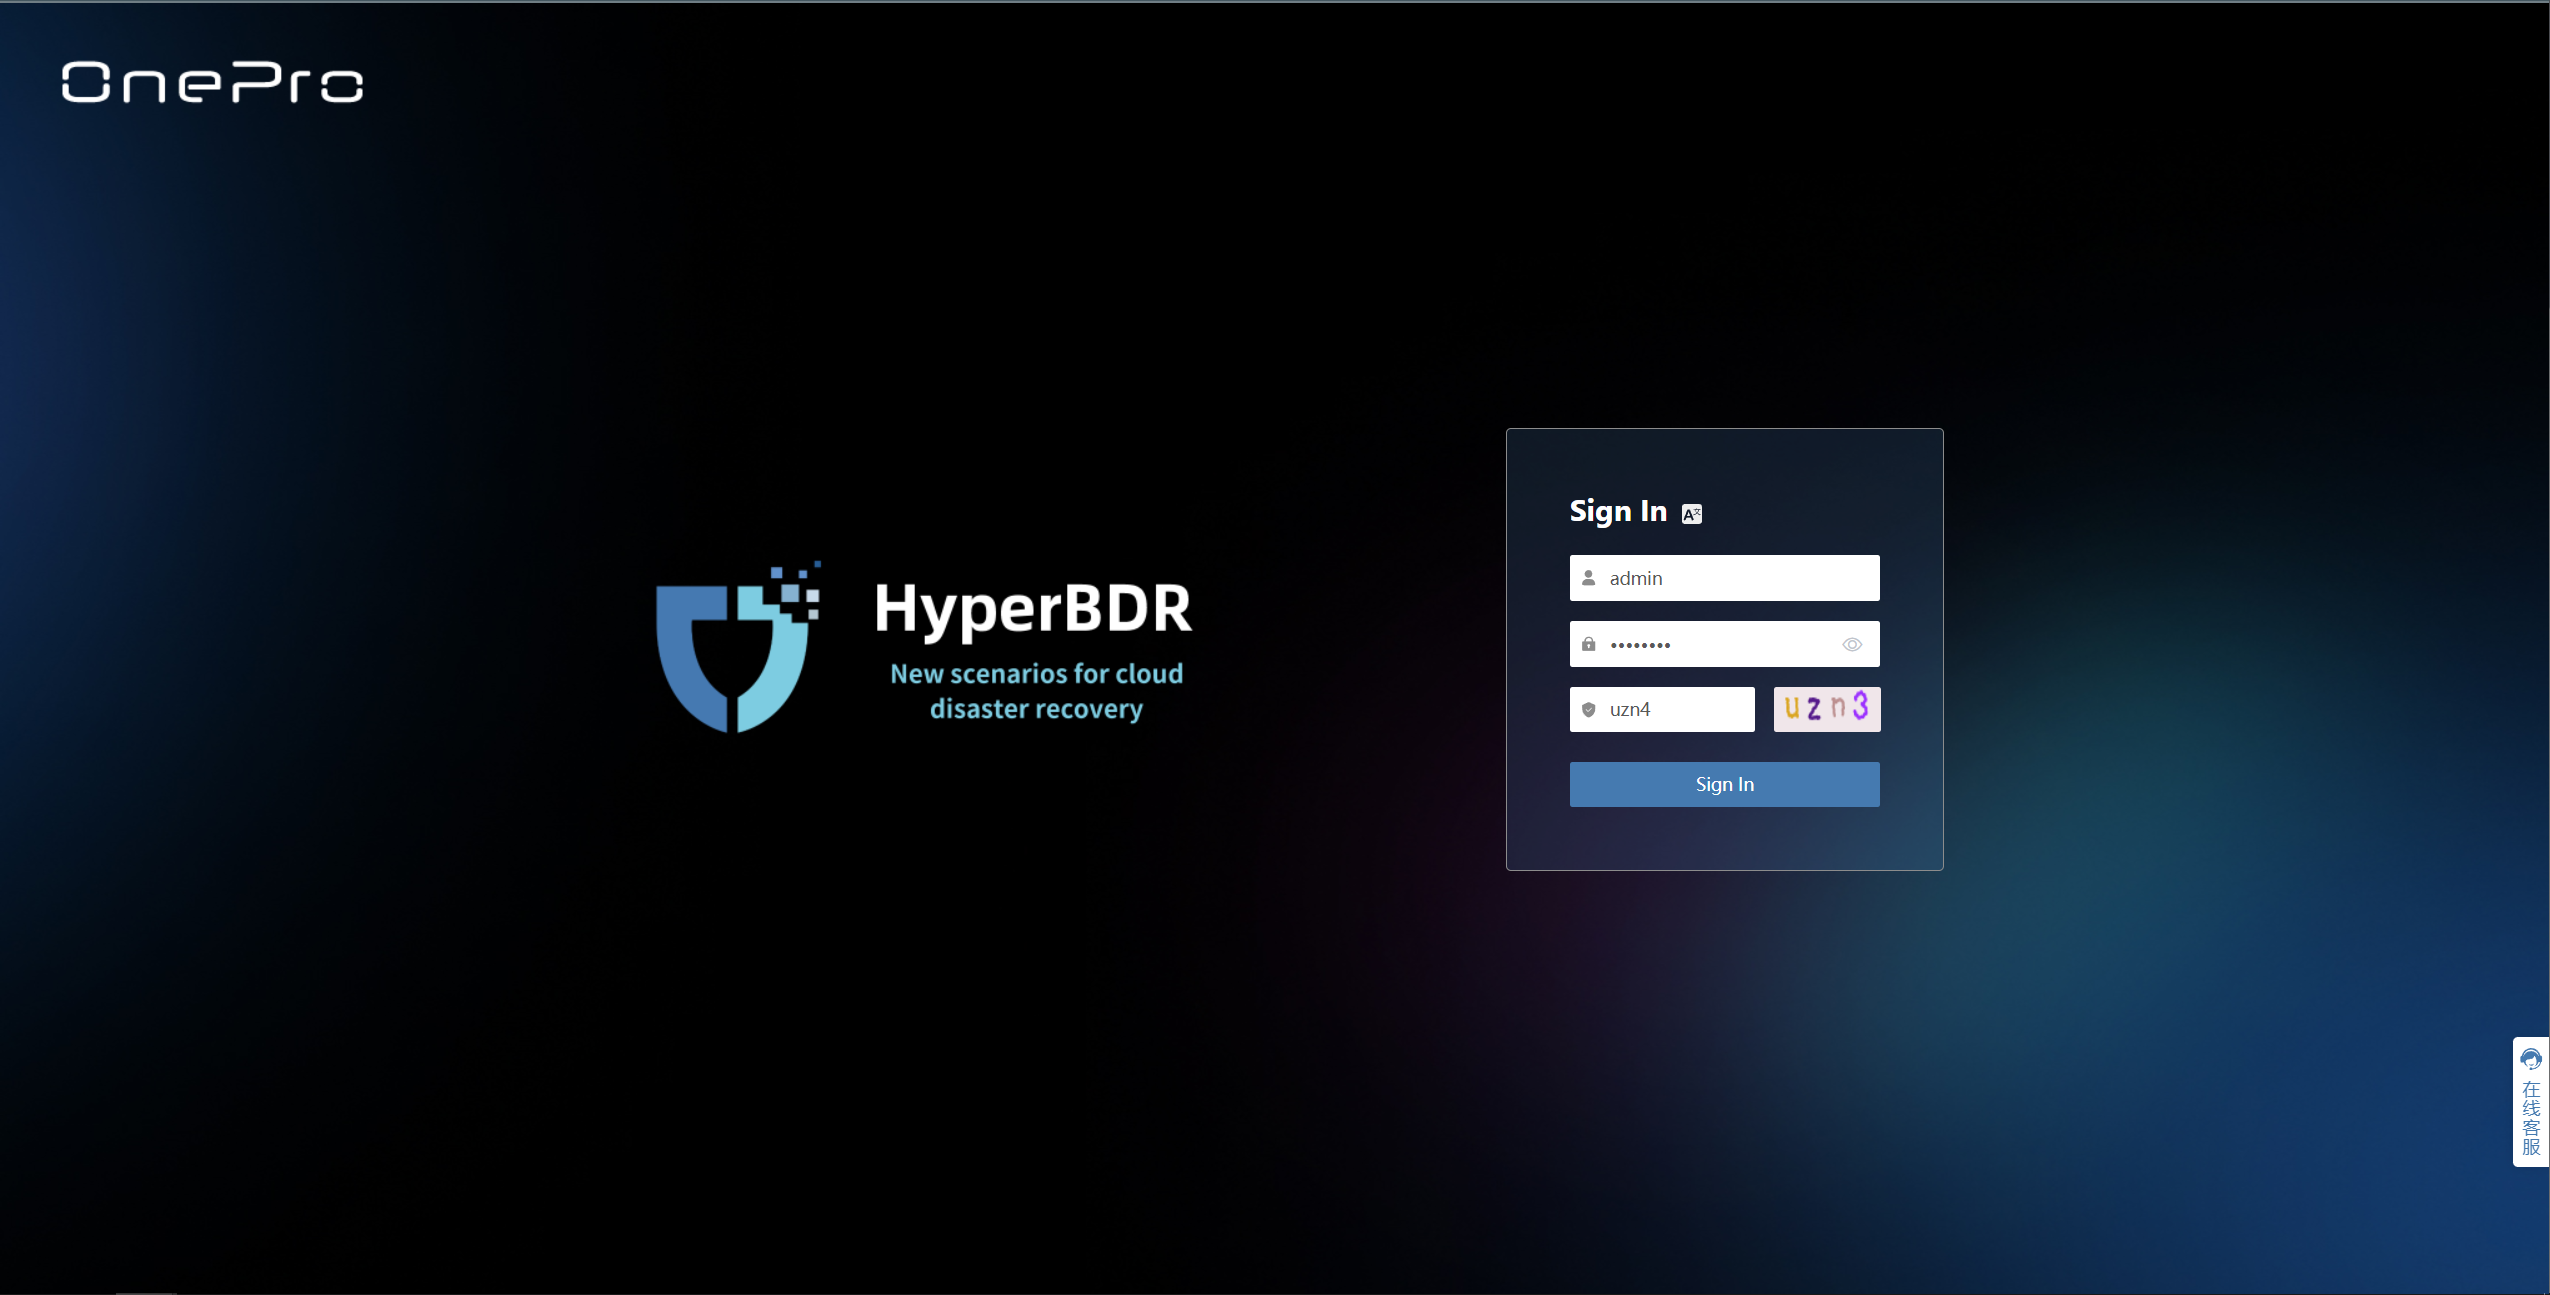
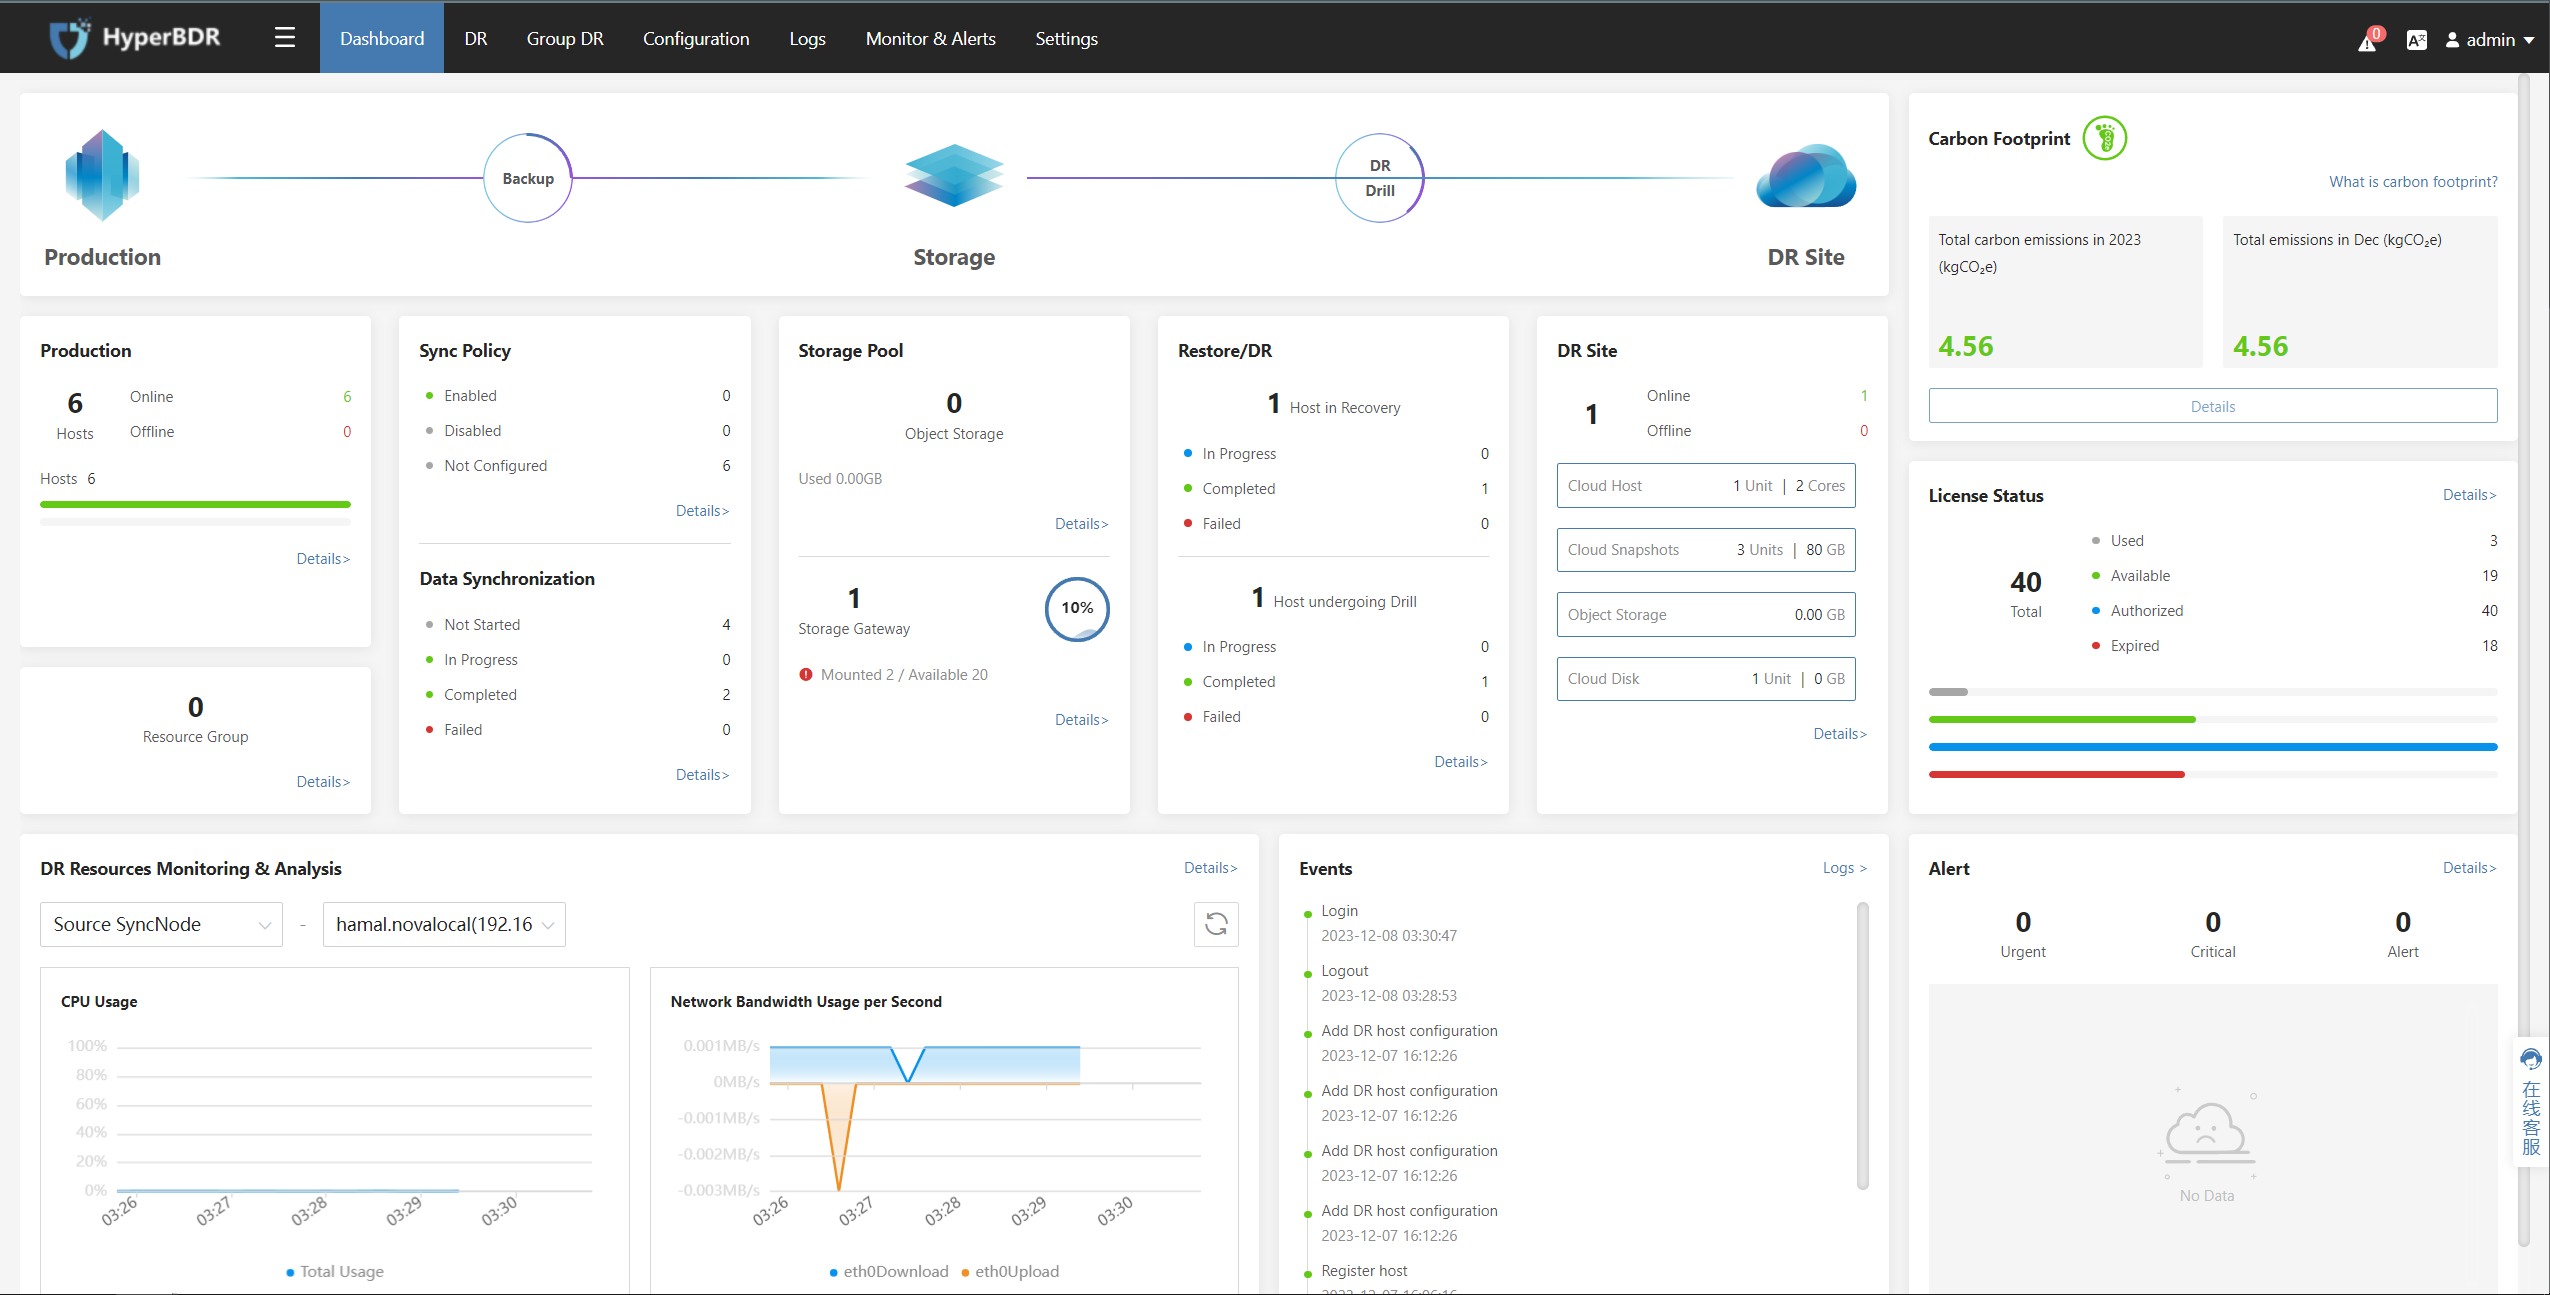
Log in to the HyperBDR console
Retrieve the installation command
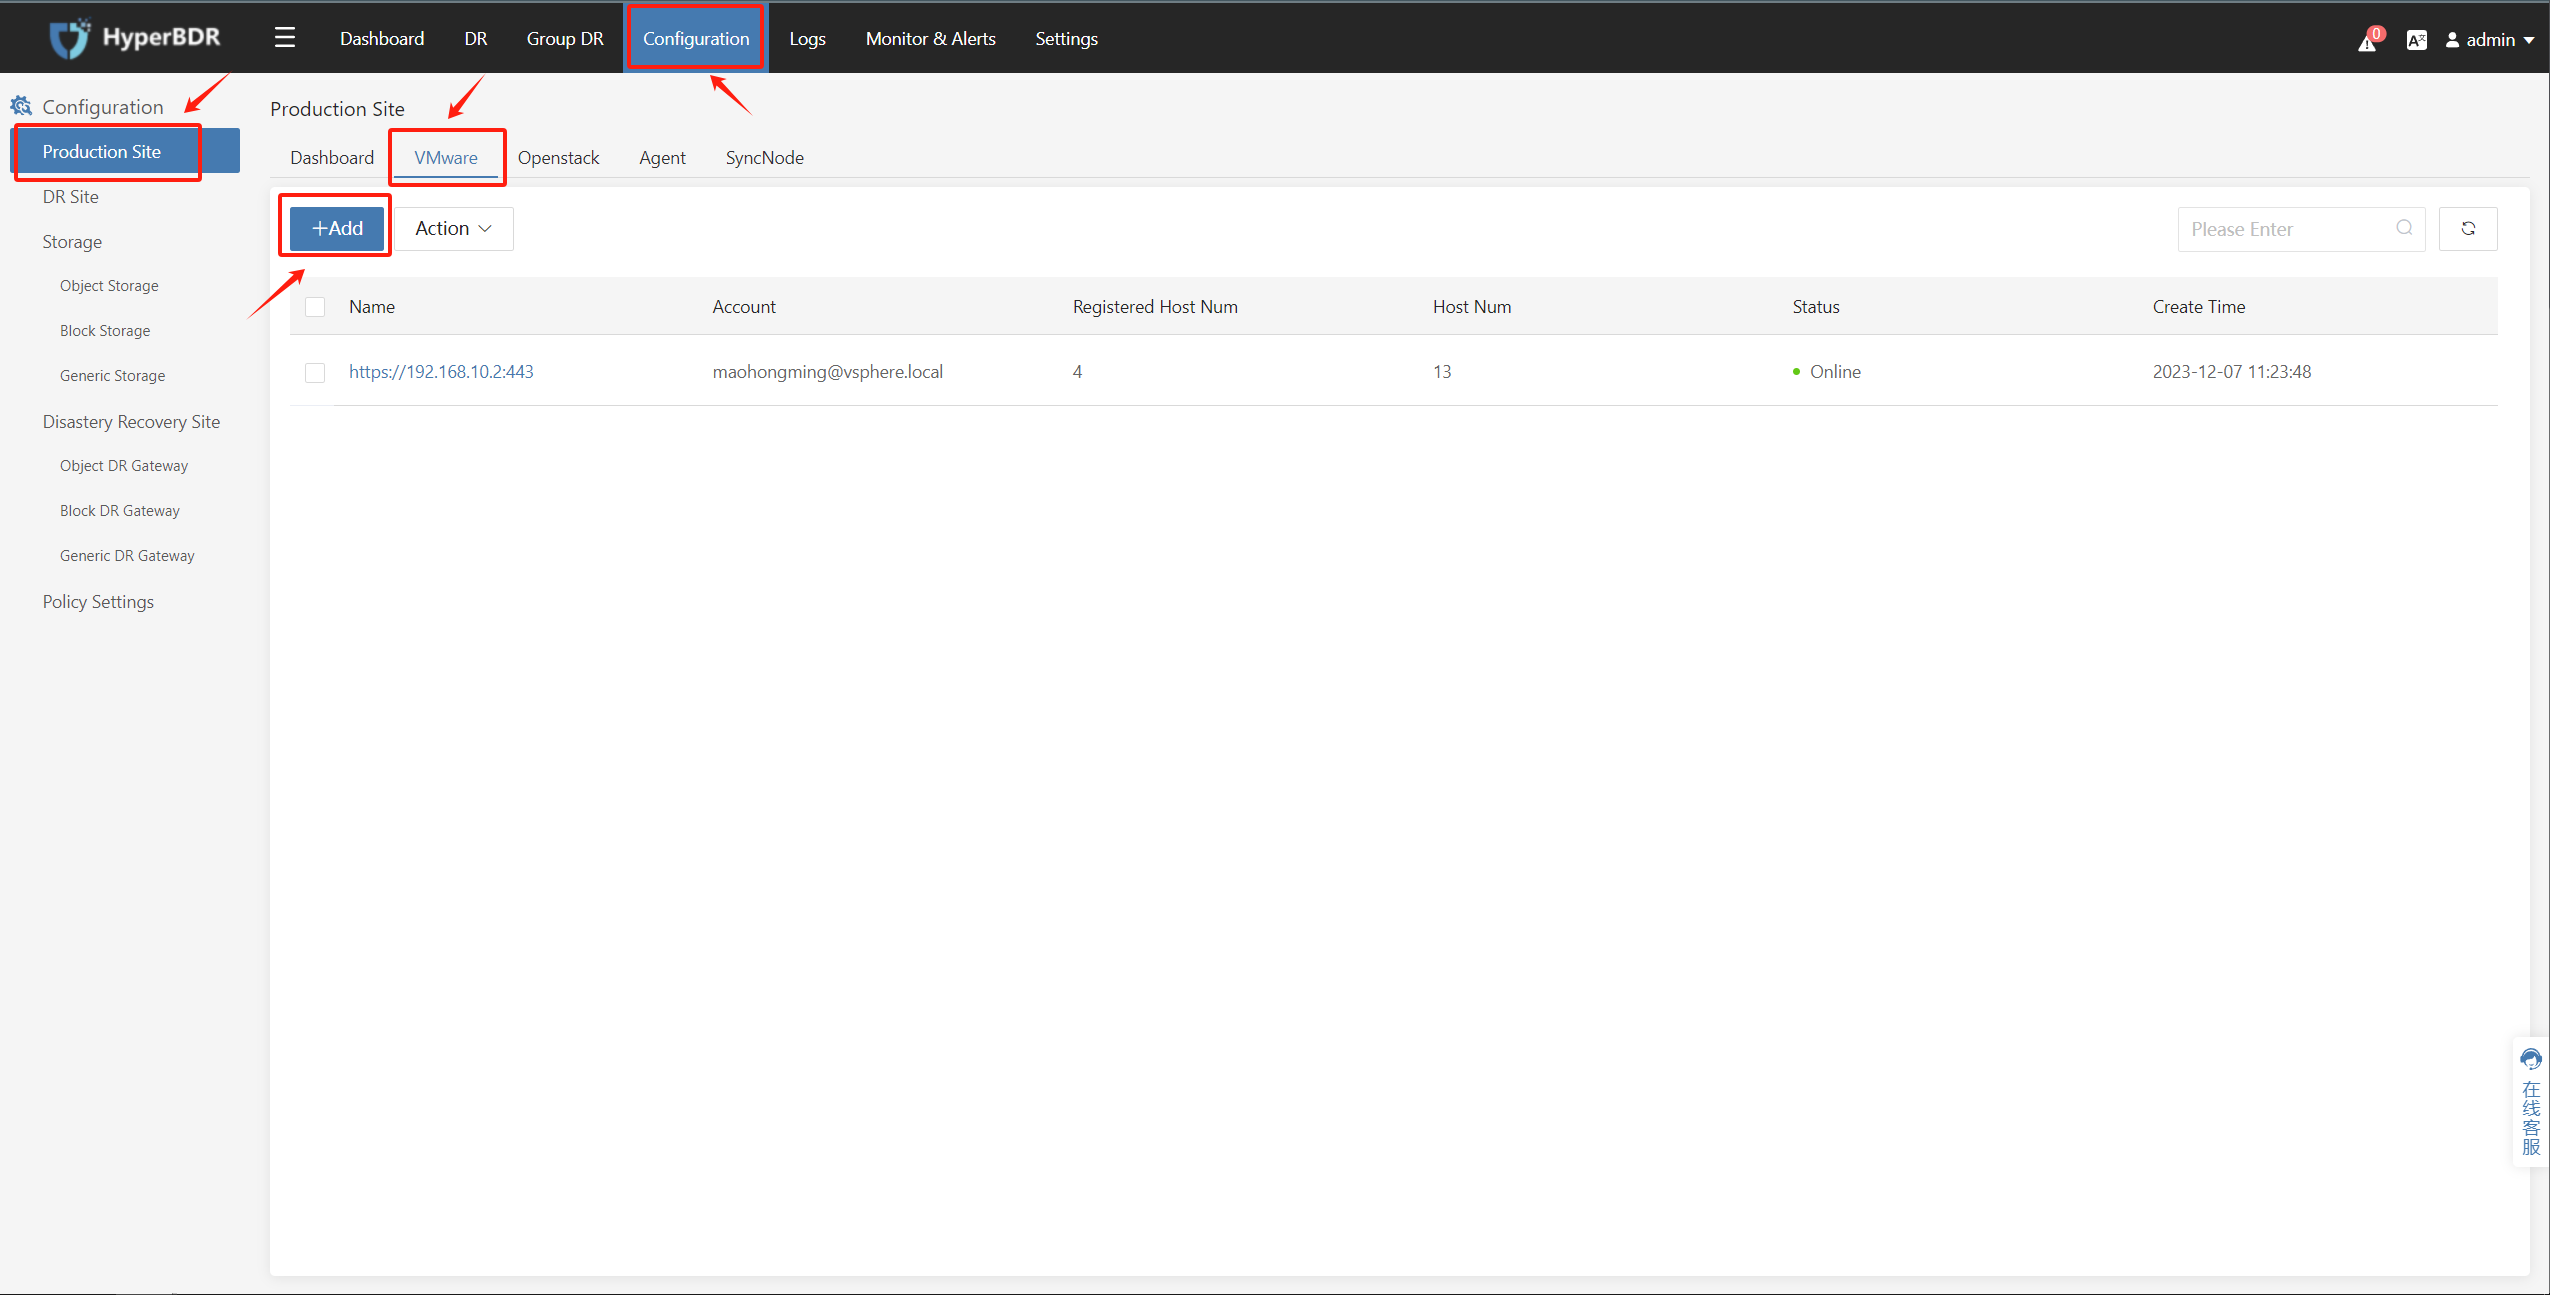
Click on the top menu bar "Configuration", "Production Site", "VMware" then click the "Add" button.
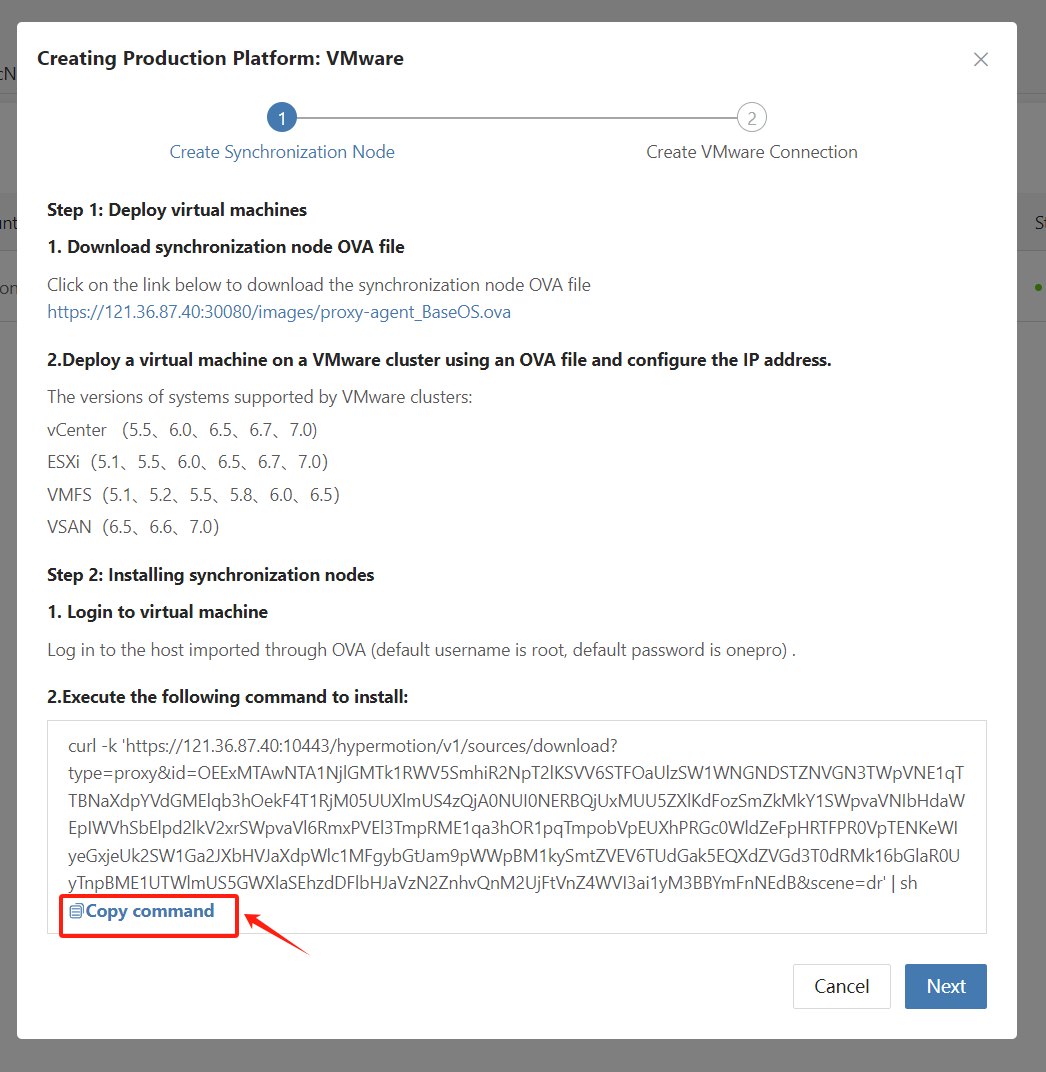
In the popped-up page, in the "Step 2: Installing synchronization nodes" section, under "2. Execute the following command to install" click on "Copy command" to obtain the installation command for the Sync Proxy node.
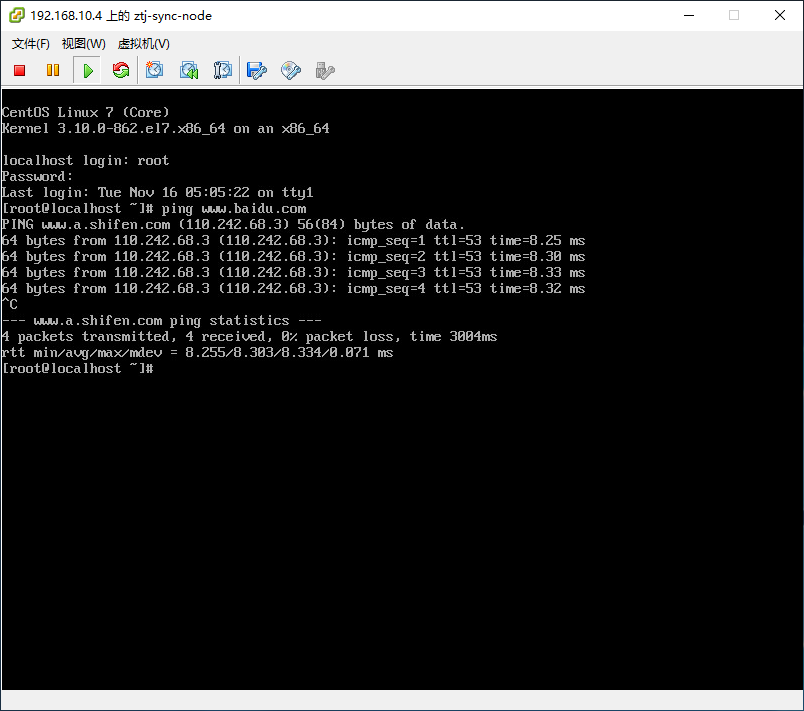
Log in to the Proxy Node
Execute the installation command on the Sync Proxy node
Paste the copied installation command into the command line and execute it. Wait for the command to execute successfully; this indicates that the Sync Proxy synchronization node program is running normally.

Add and Configure Cloud Sync Gateway
Tips
Already logged in to the HyperBDR console by default.
After configuring Cloud Sync Gateway, it will automatically invoke the API of the DR target cloud platform to create a cloud instance as Cloud Sync Gateway.
Cloud Sync Gateway CPU : 2 Core
Cloud Sync Gateway RAM : 2 GB
Cloud Sync Gateway System Disk Size : 40 GB
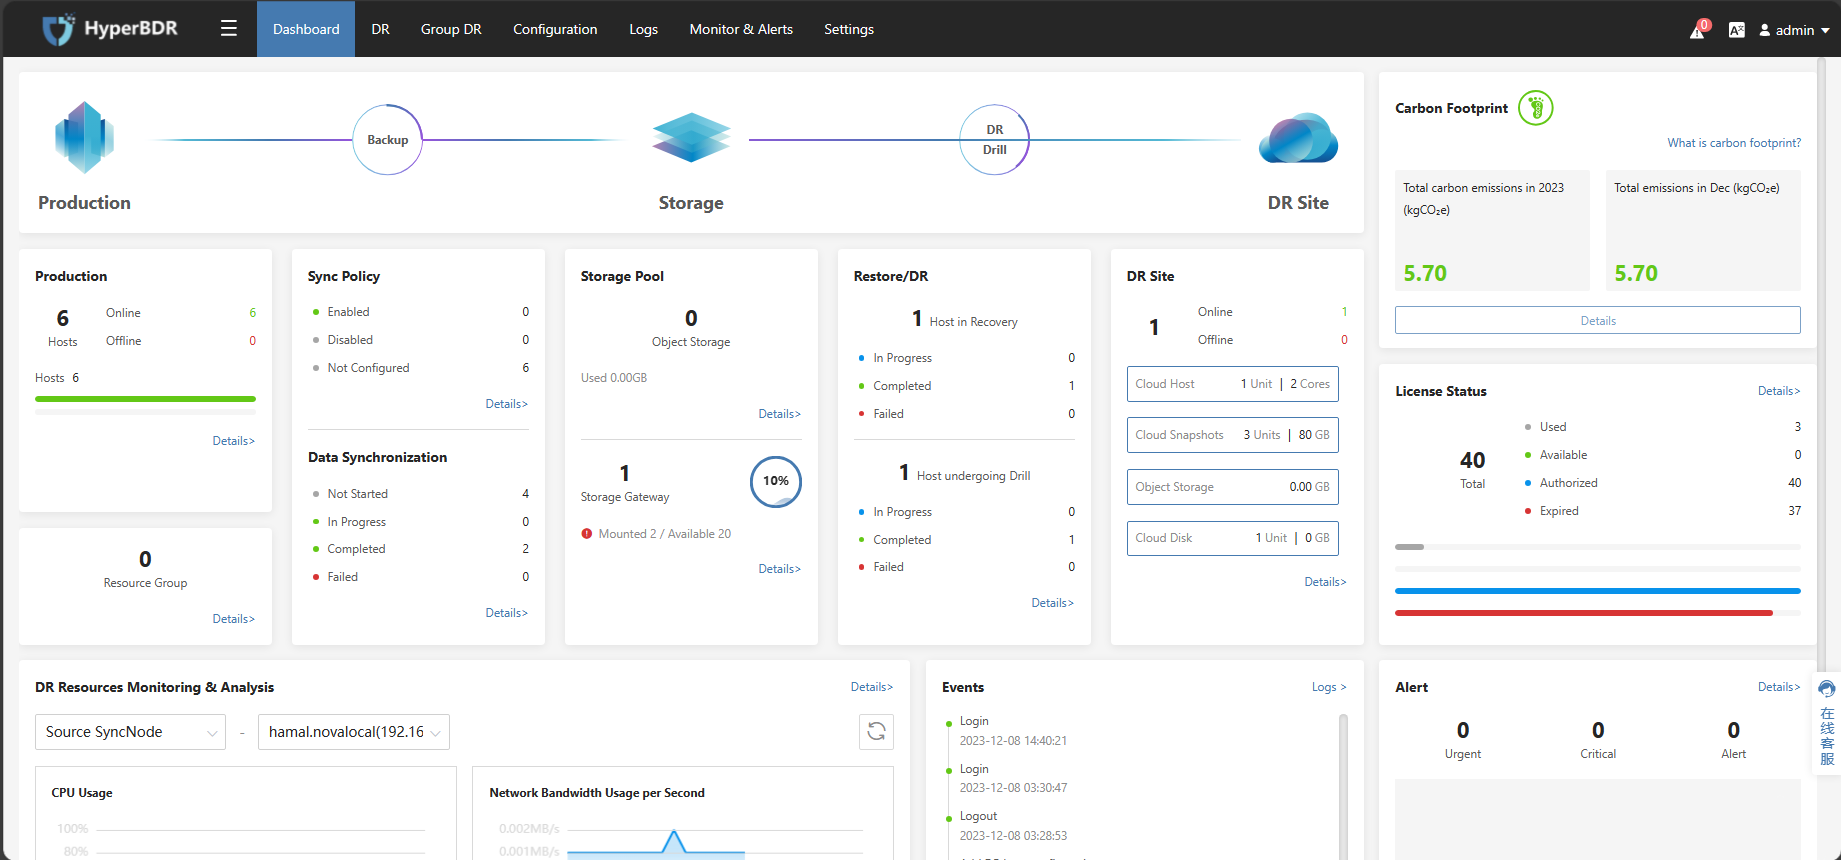
Operational Steps
Tips
The following operations use Huawei Cloud as an example. Please choose the corresponding disaster recovery target cloud based on your actual disaster recovery scenario.
Tips
The Cloud Sync Gateway is an automatically created cloud instance that needs to be in the same region as the business VPC for DR.
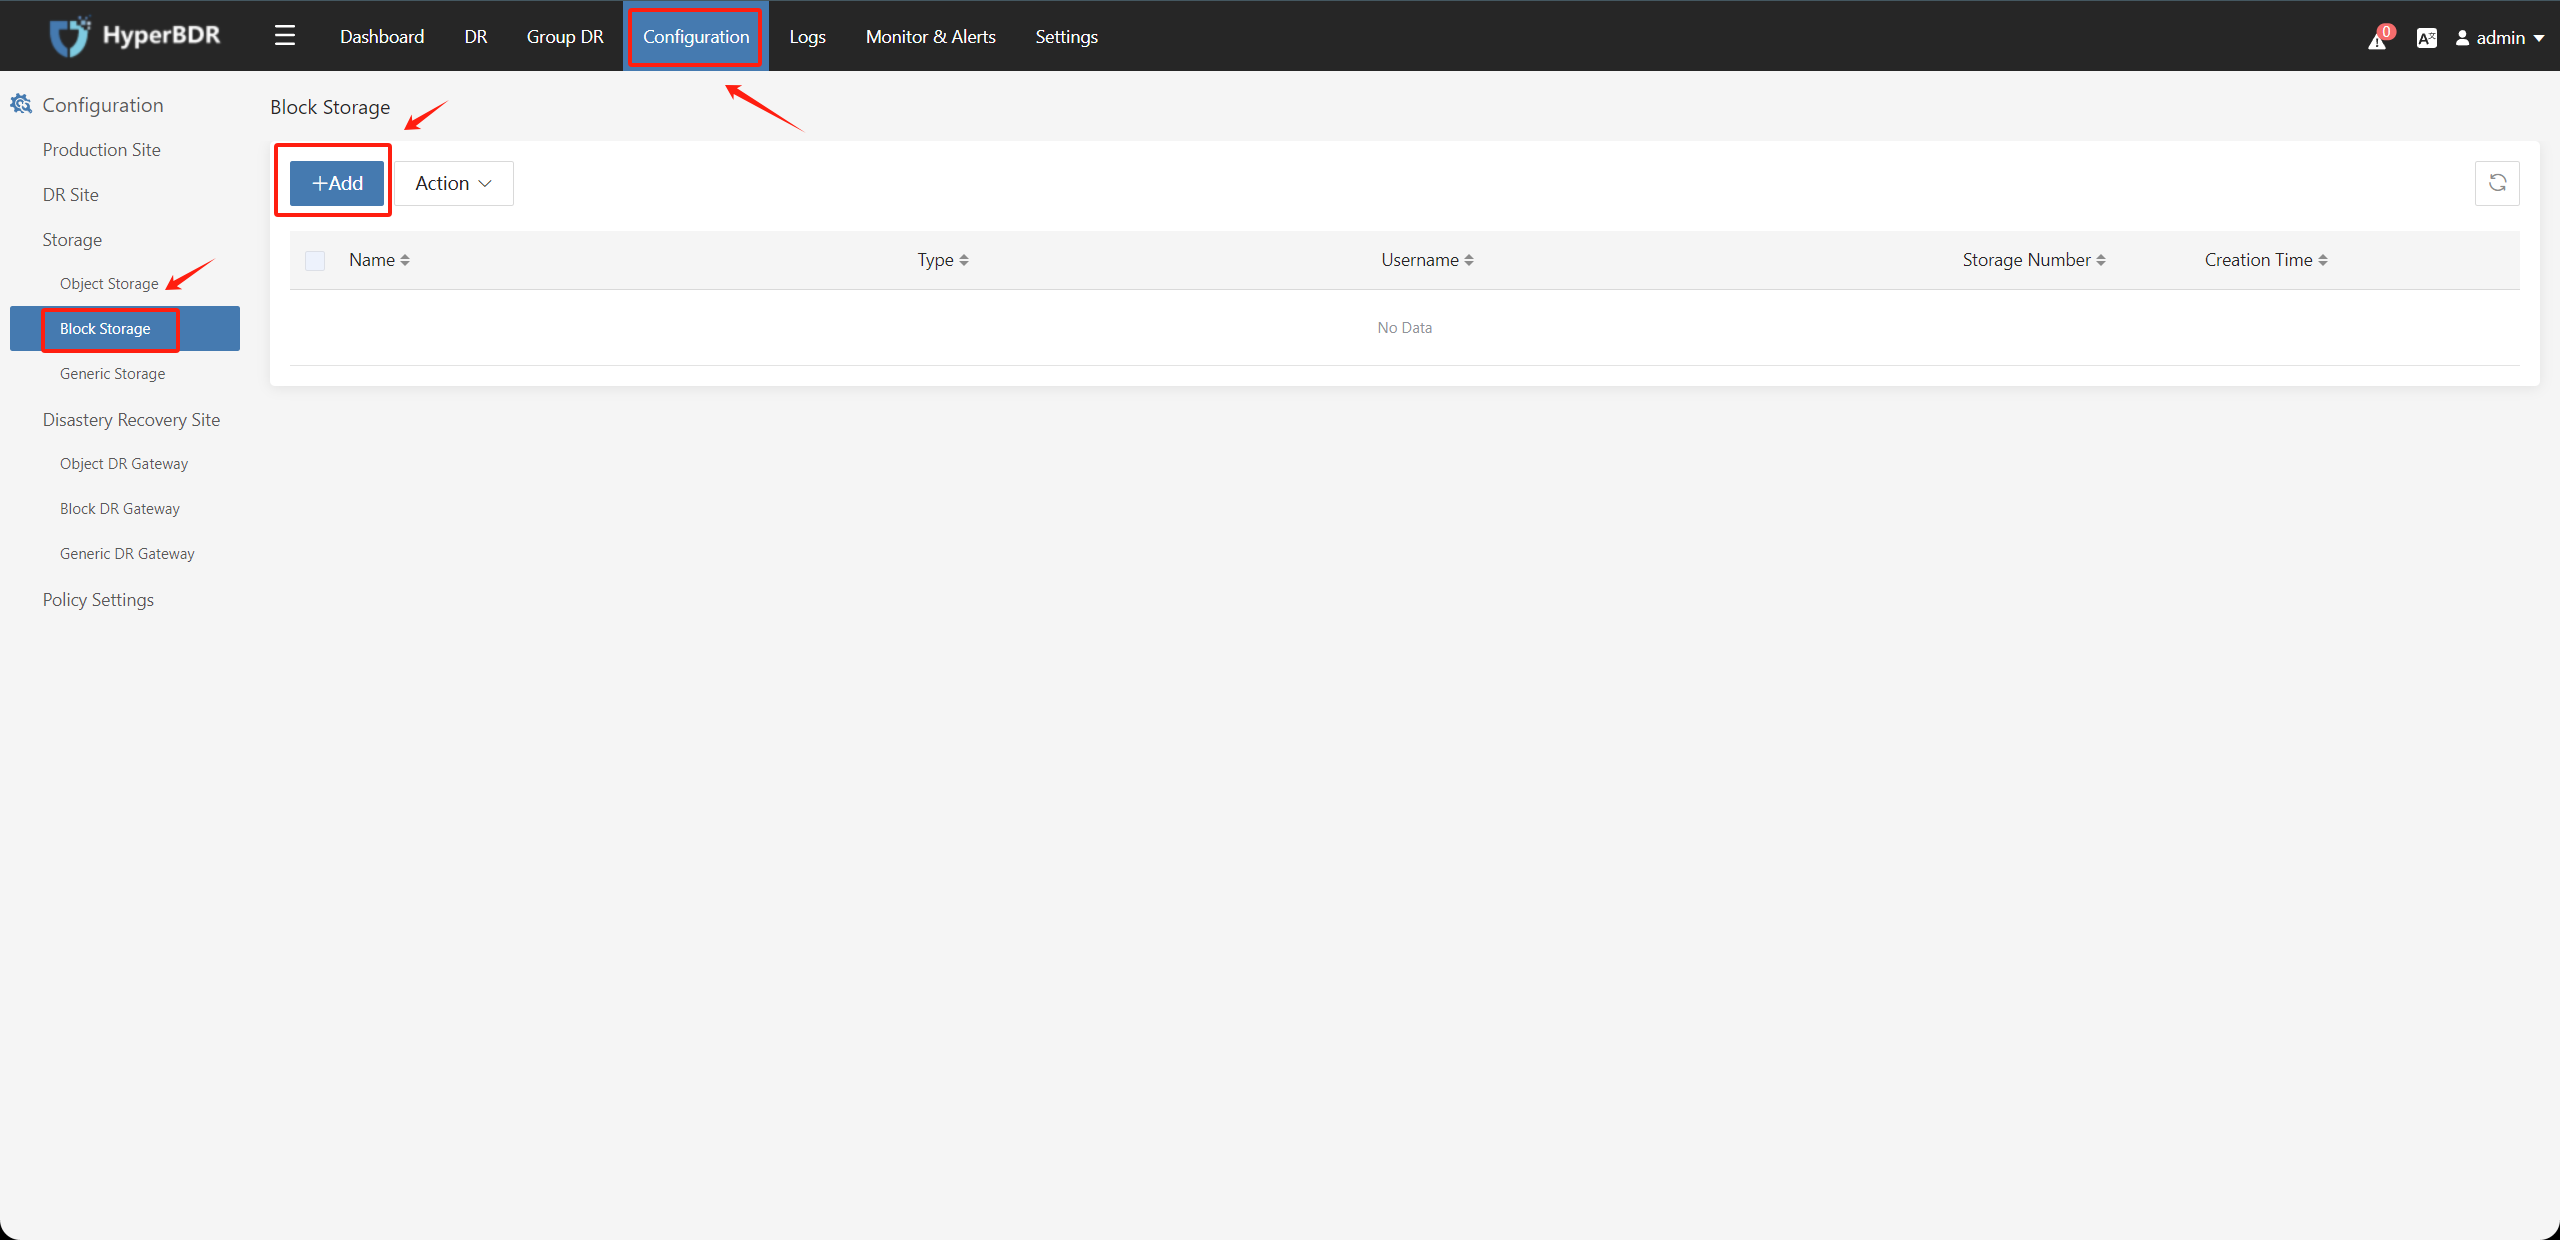
Step1. Click on "Configuration Management" in the top menu, choose "Storage Configuration" on the left, select "Block Storage," and click on the "Add" button.
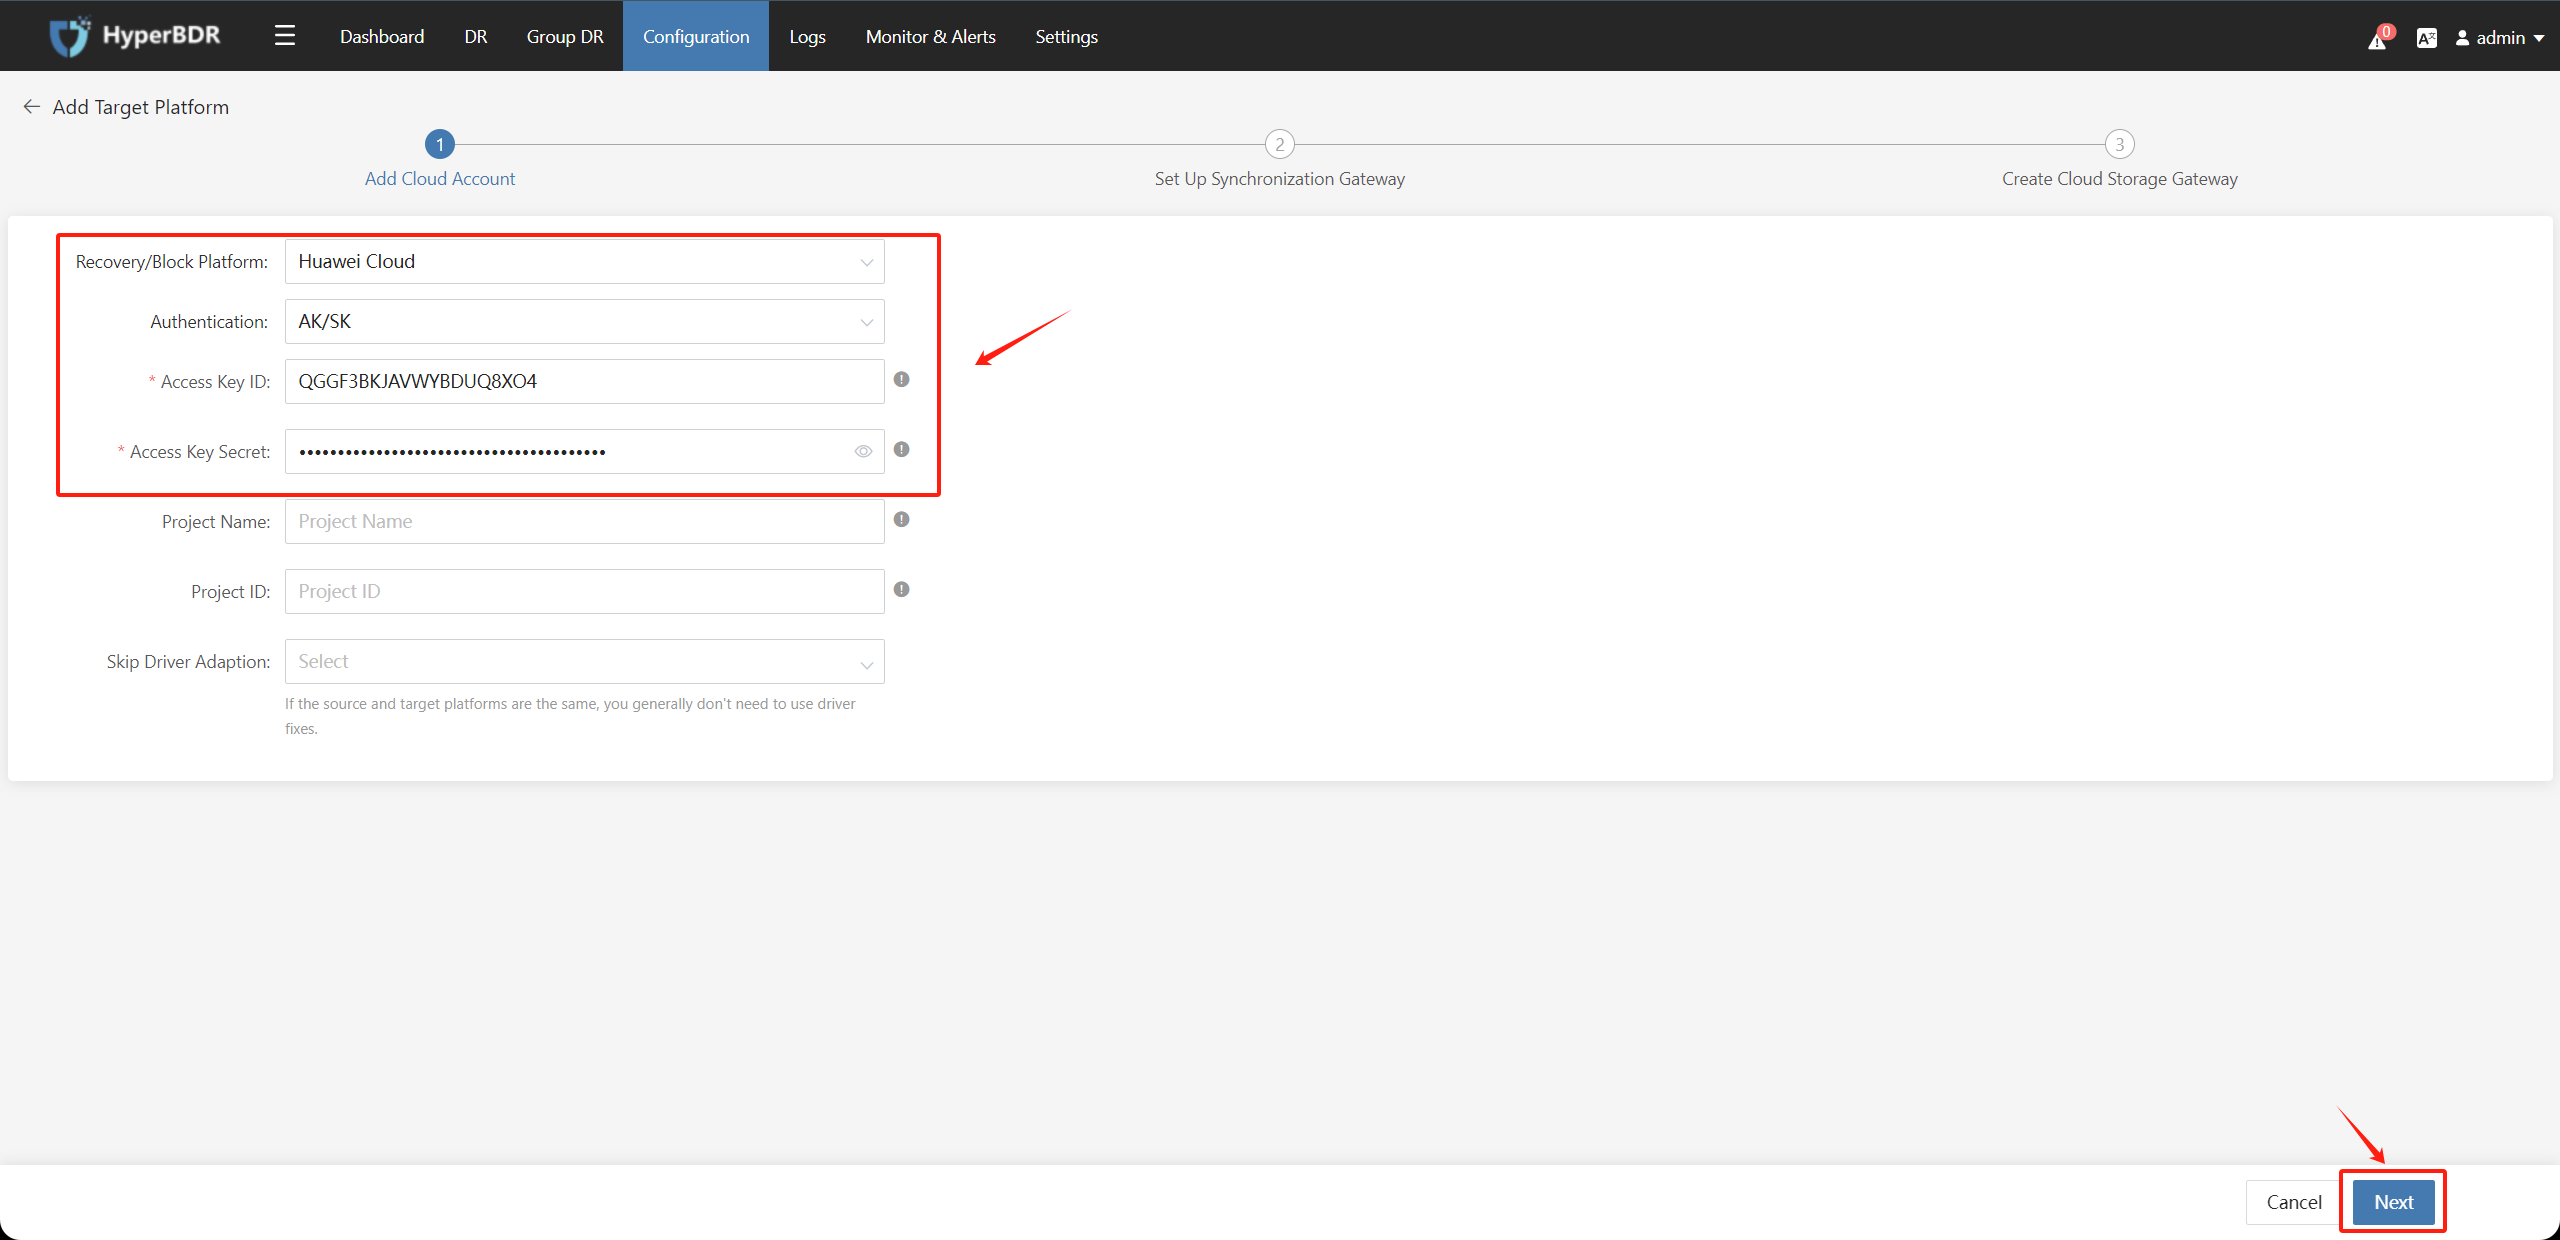
Step 2. Fill in the information as follows to add the cloud platform.
This step will automatically create a block storage recovery Cloud Sync Gateway under the Huawei Cloud authentication tenant after authentication.
Choose Huawei Cloud in the Recovery Platform.
Fill in the Huawei Cloud authentication information as shown in the image below when adding the target disaster recovery platform:
- Access Key ID: Huawei Cloud account Access Key ID
- Access Key Secret: Huawei Cloud account Access Key Secret
- Project: Optional, can be left blank
- Project ID: Optional, can be left blank
- Skip Driver Adaption: Optional
After confirming the filled information, click the "Next" button.
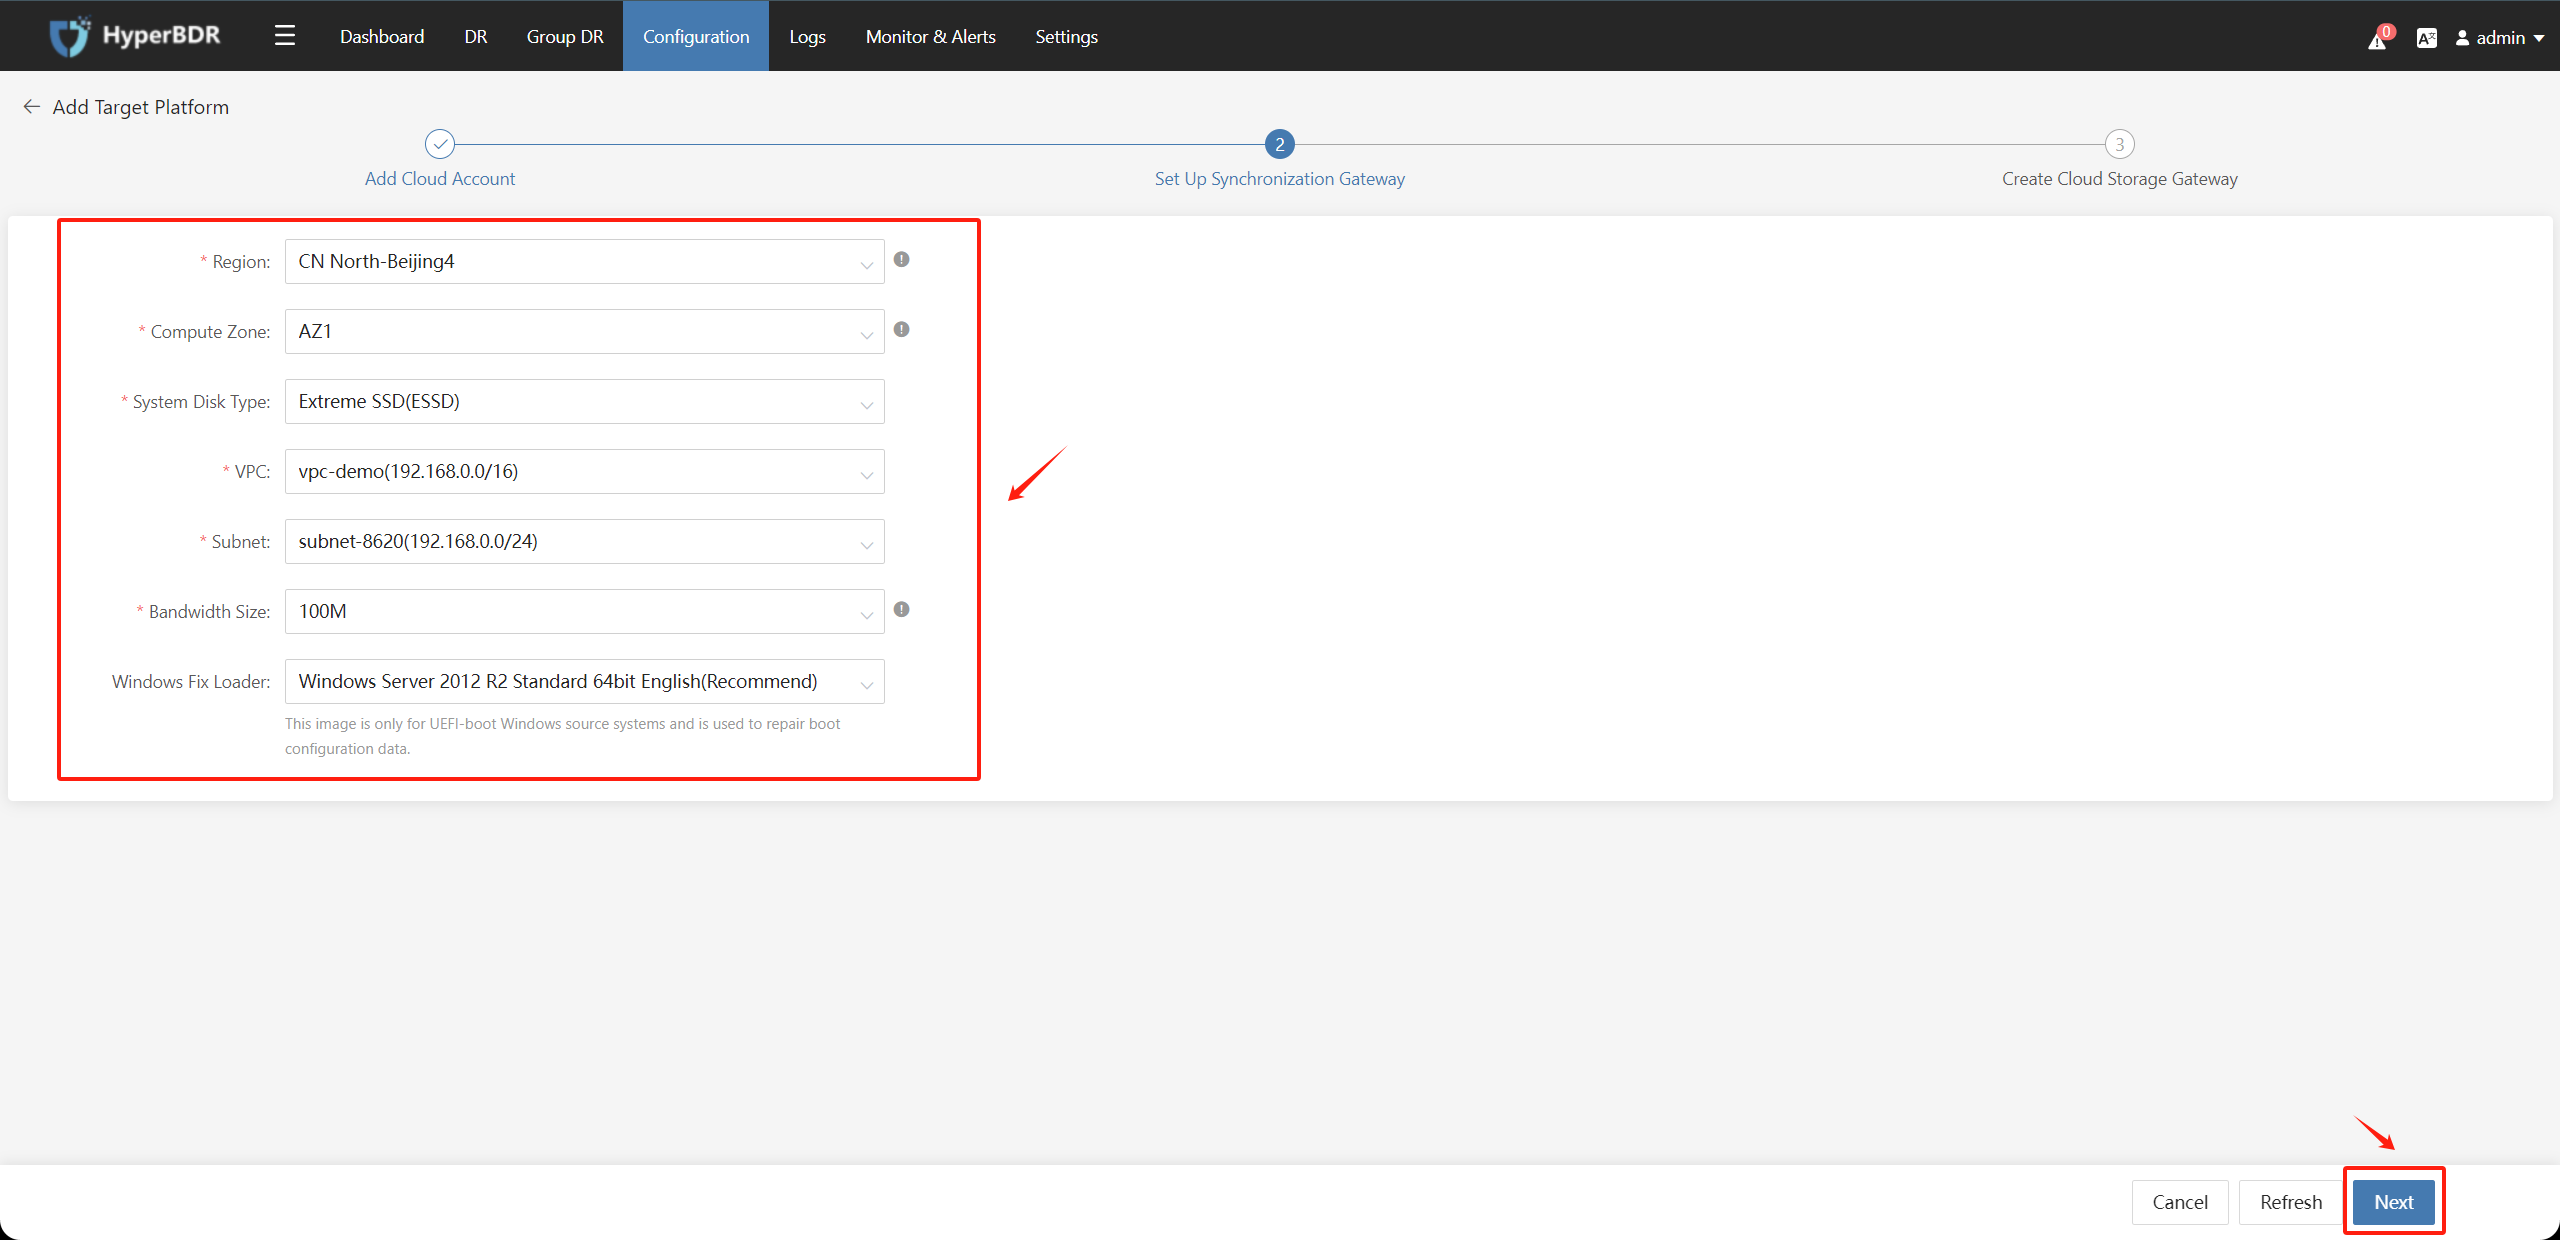
Choose the relevant information to create the Cloud Sync Gateway instance under the authentication tenant and click the "Next" button.
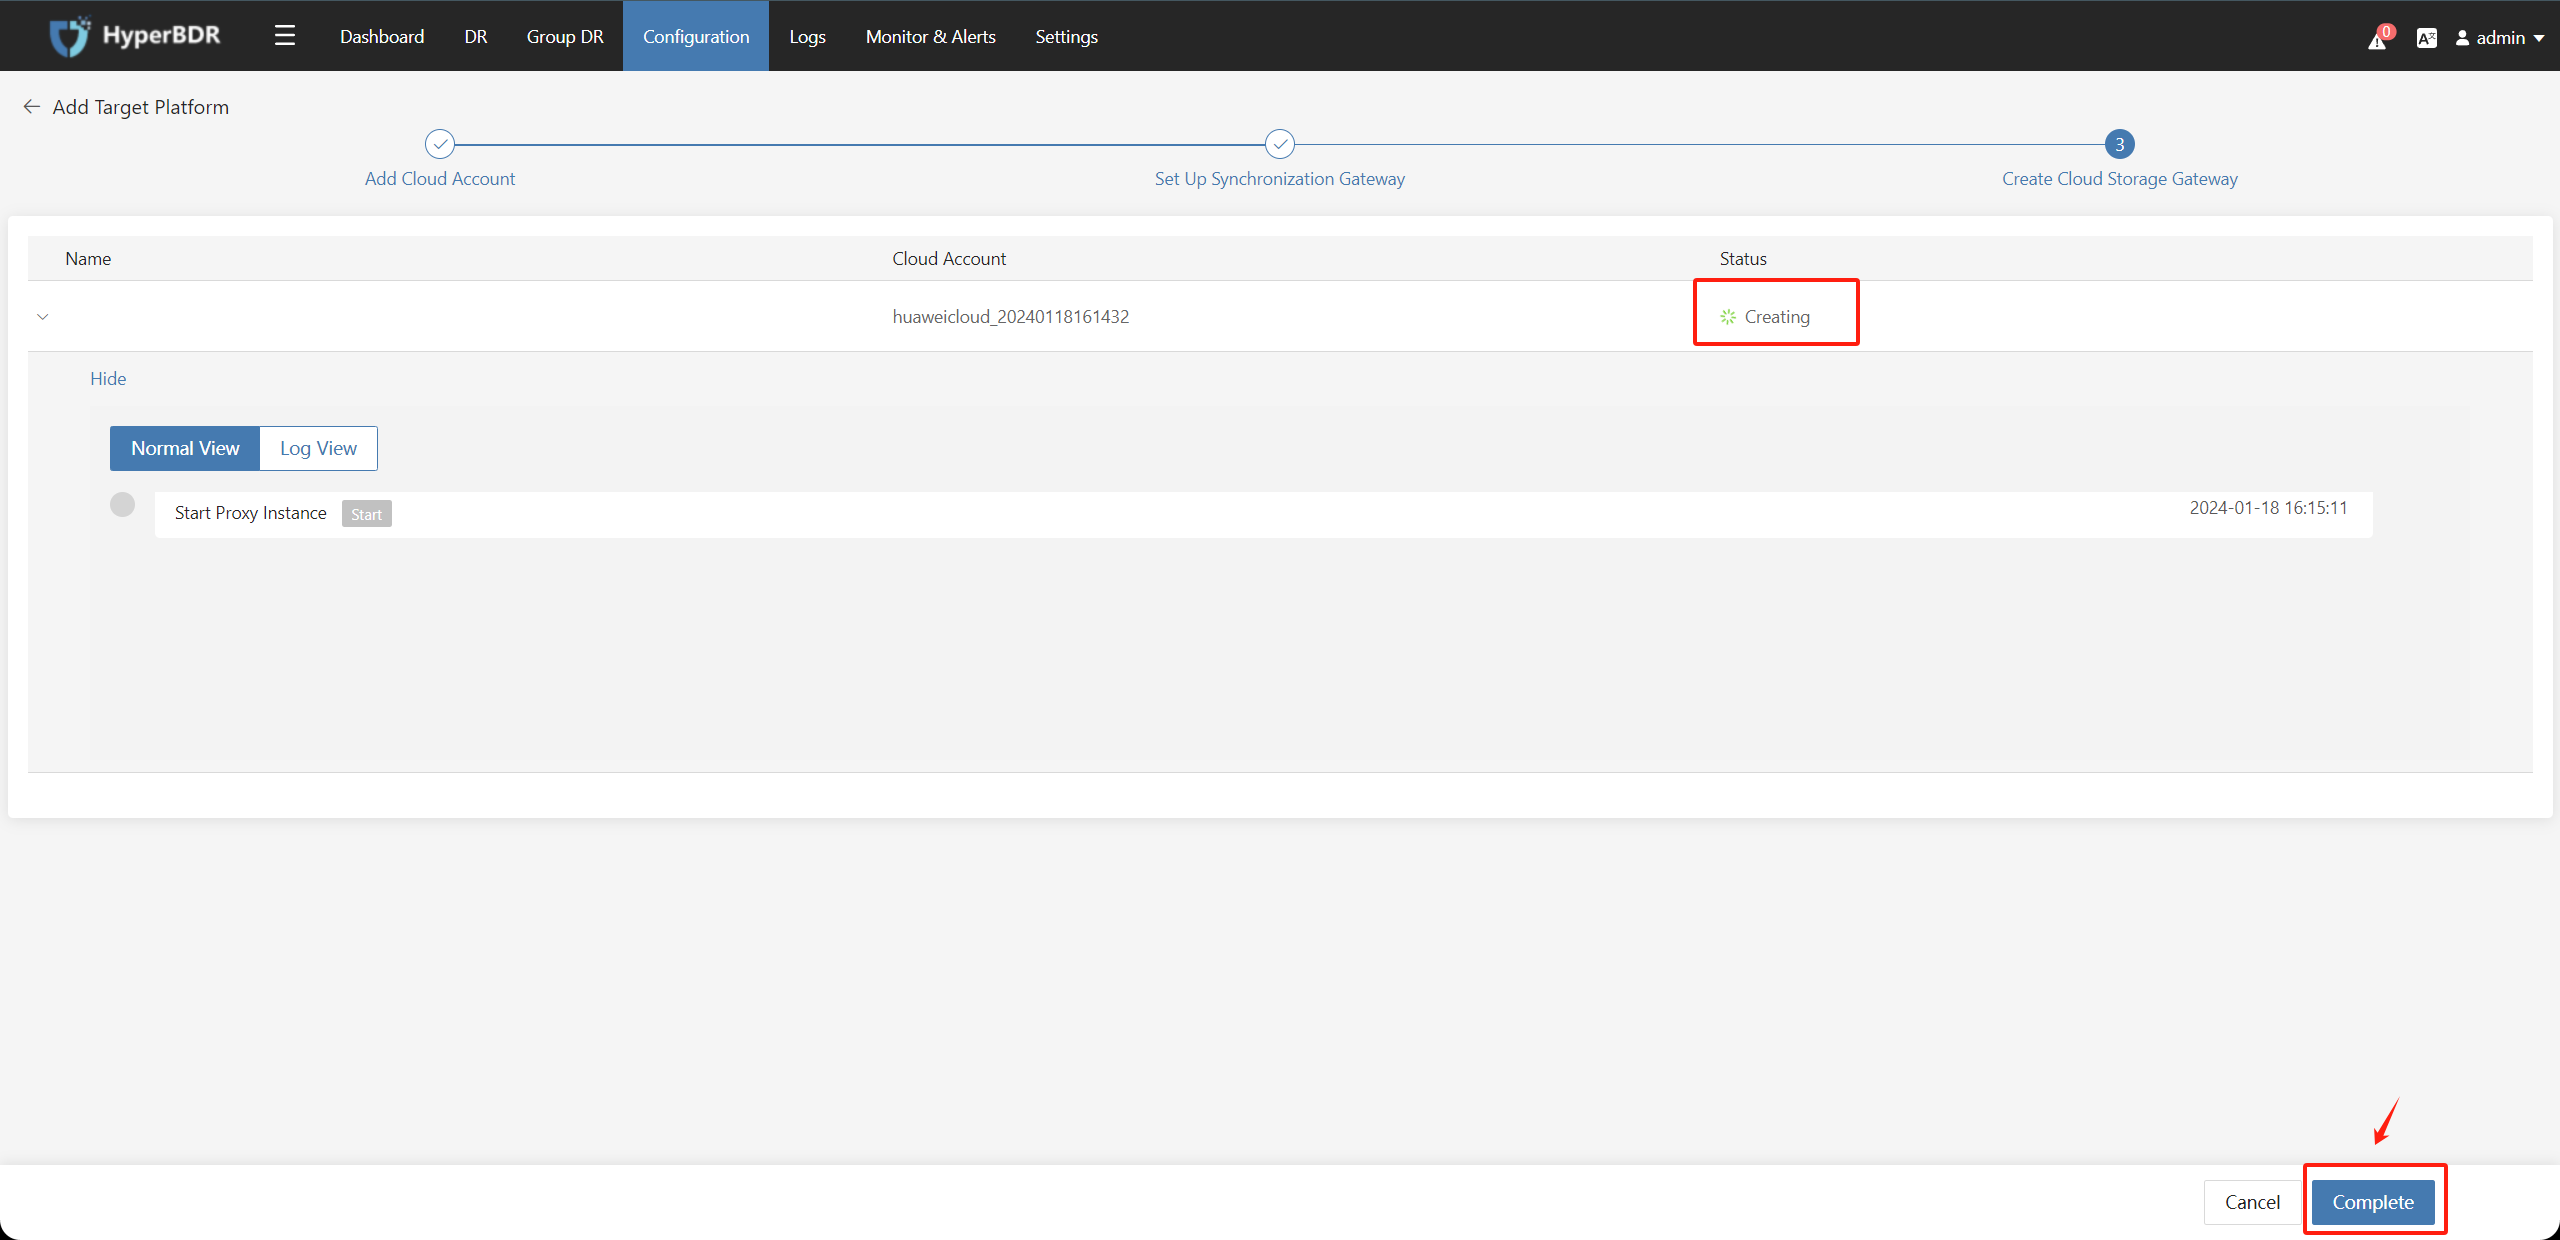
After the name and status are available, wait for the "Createing" process to complete, then click the "Complete" button.
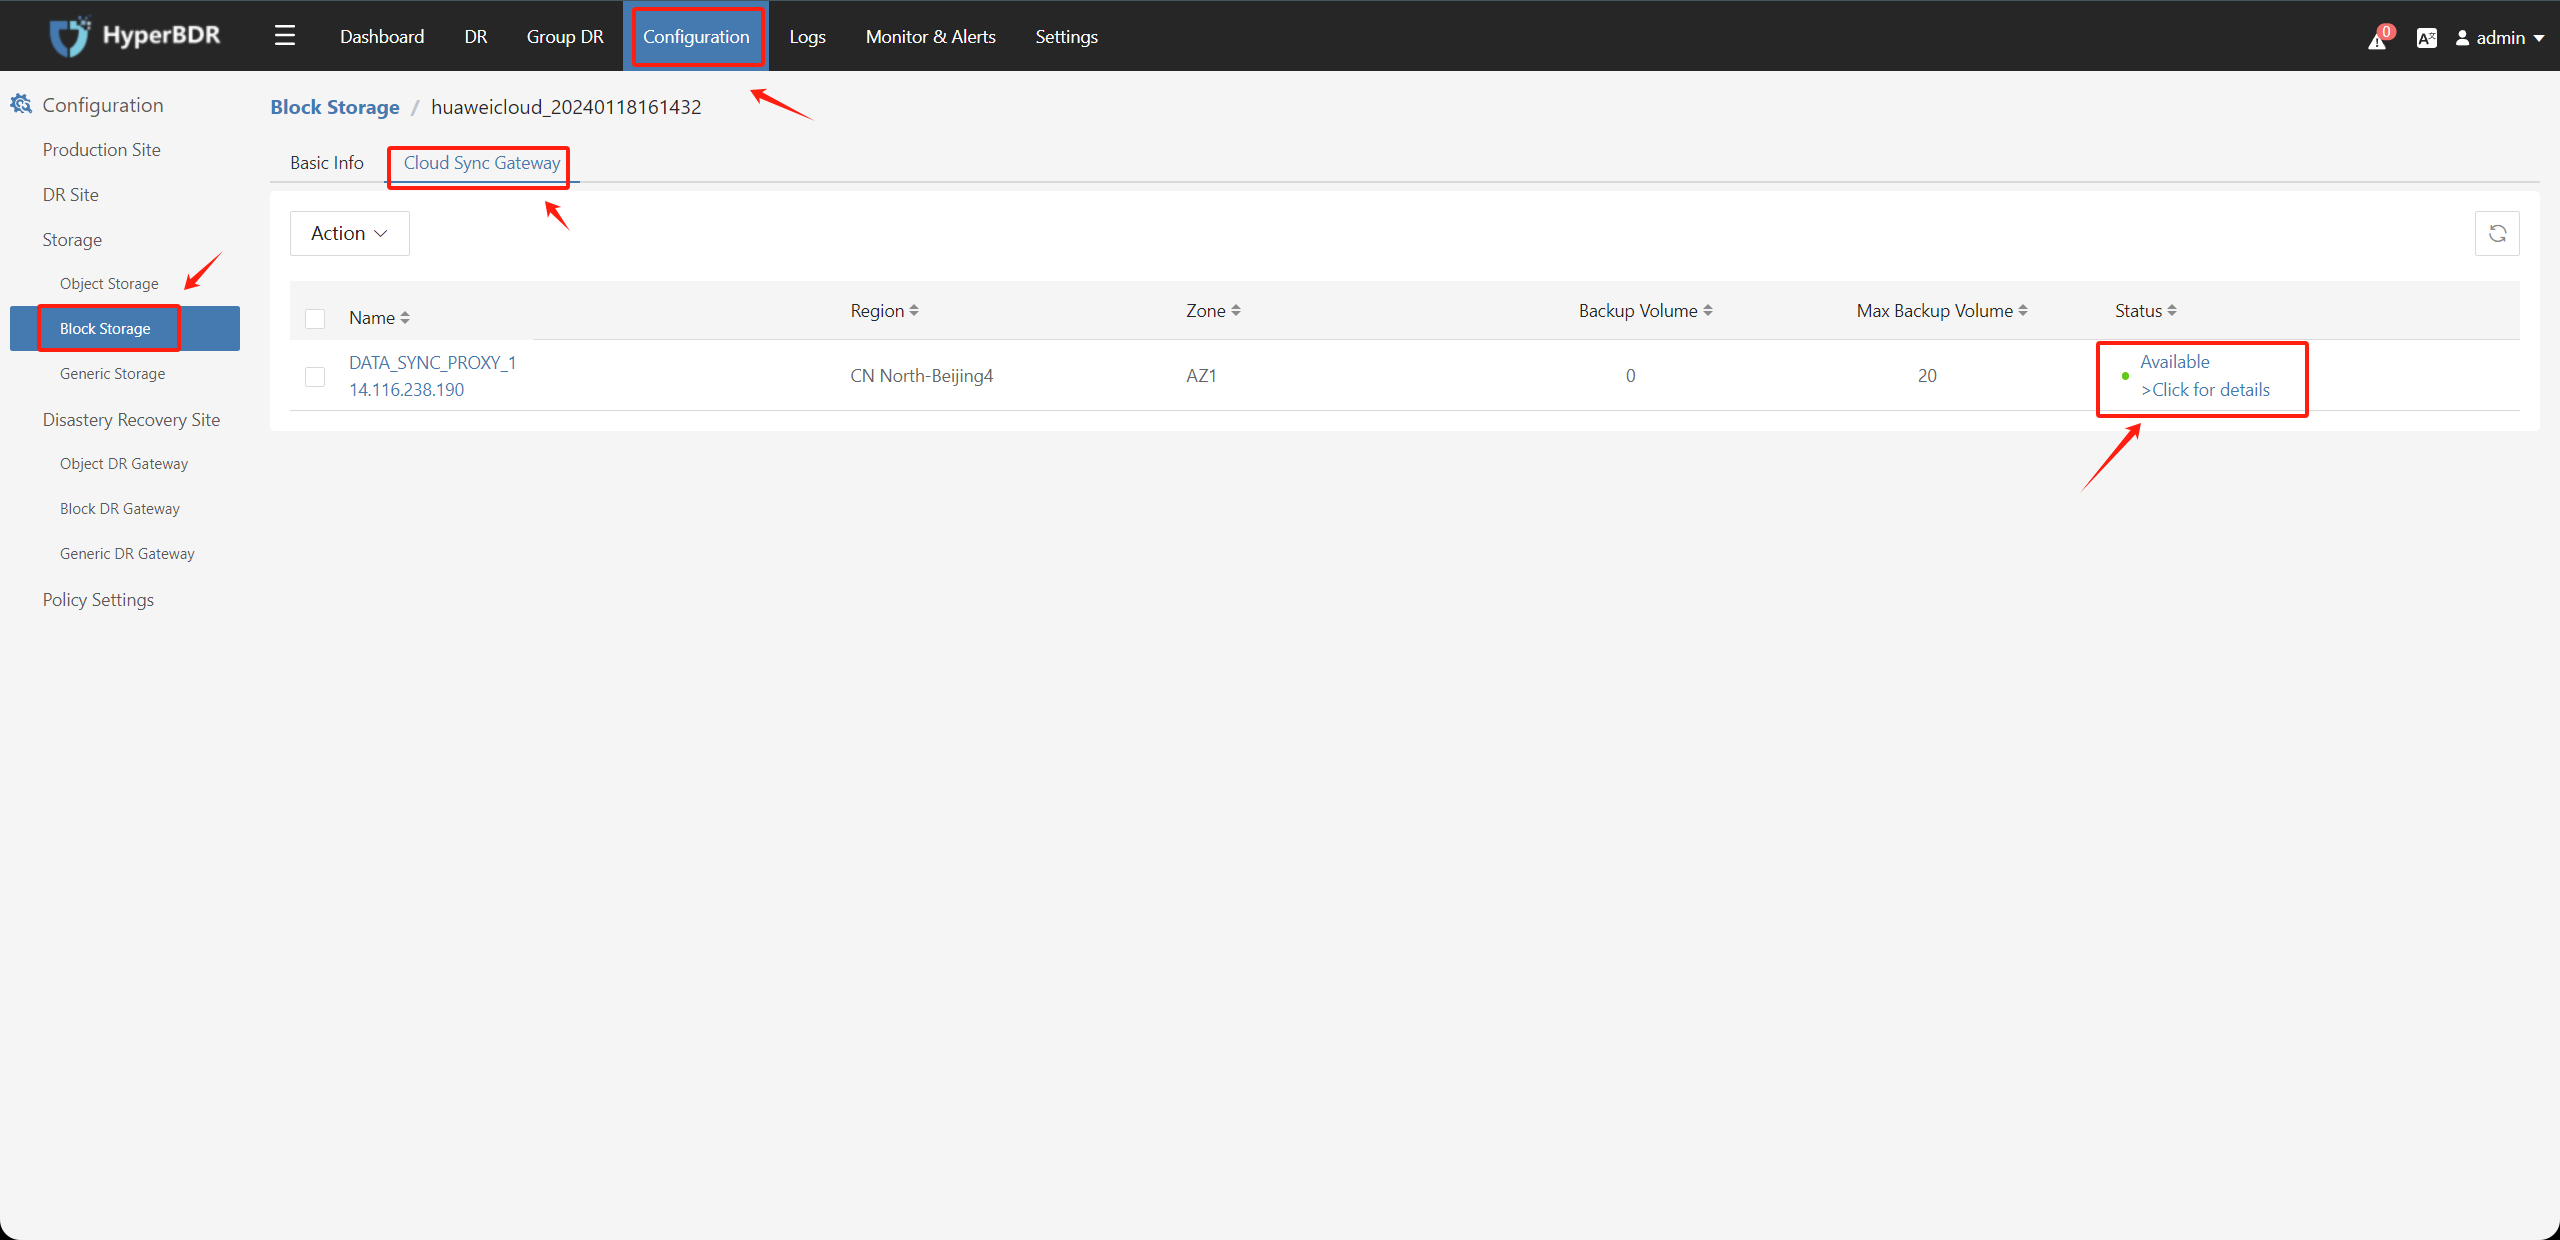
Check the "Block Storage" - "Cloud Sync Gateway" page, and the status should be "Available".
AWS Site Sync Proxy network configuration
Access an Amazon Web Services service using an interface VPC endpoint.
Tips
AWS Reference Documentation:
https://docs.amazonaws.cn/en_us/vpc/latest/privatelink/create-interface-endpoint.html#create-interface-endpoint-aws
Prerequisites
Tips
AWS Reference Documentation:
https://docs.amazonaws.cn/en_us/vpc/latest/privatelink/create-interface-endpoint.html#prerequisites-interface-endpoints
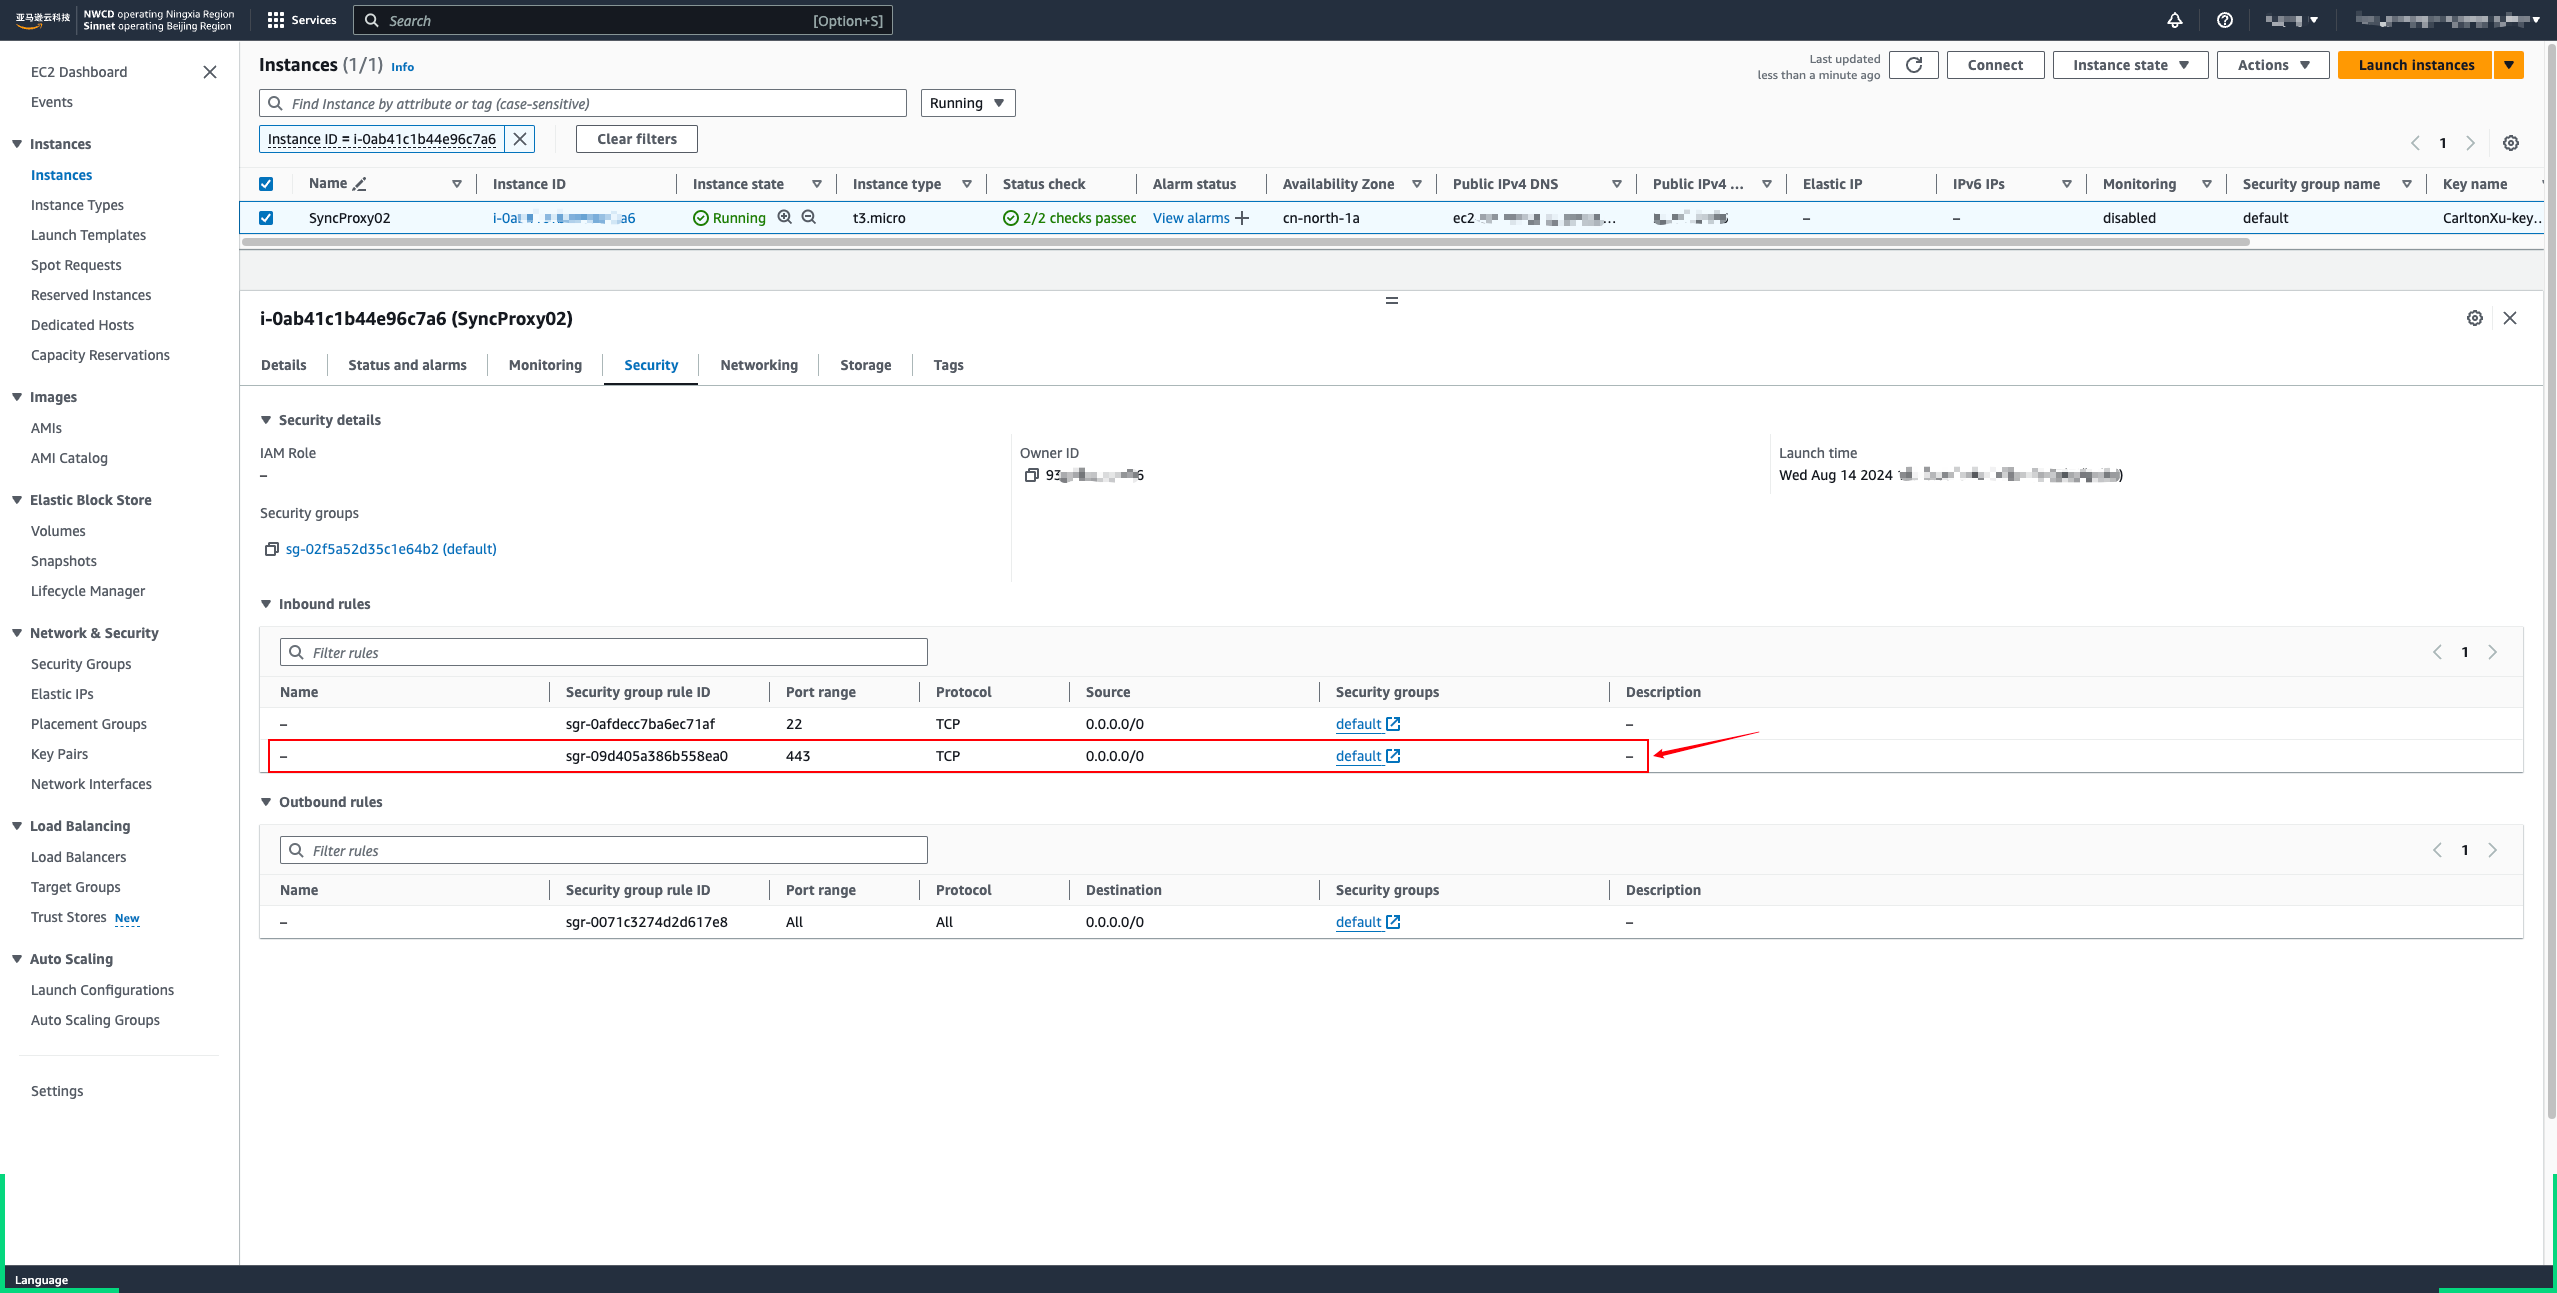
Create a security group for the endpoint network interface that allows the expected traffic from the resources in your VPC. For example, to ensure that the Amazon CLI can send HTTPS requests to the Amazon Web Services service, the security group must allow inbound HTTPS traffic.
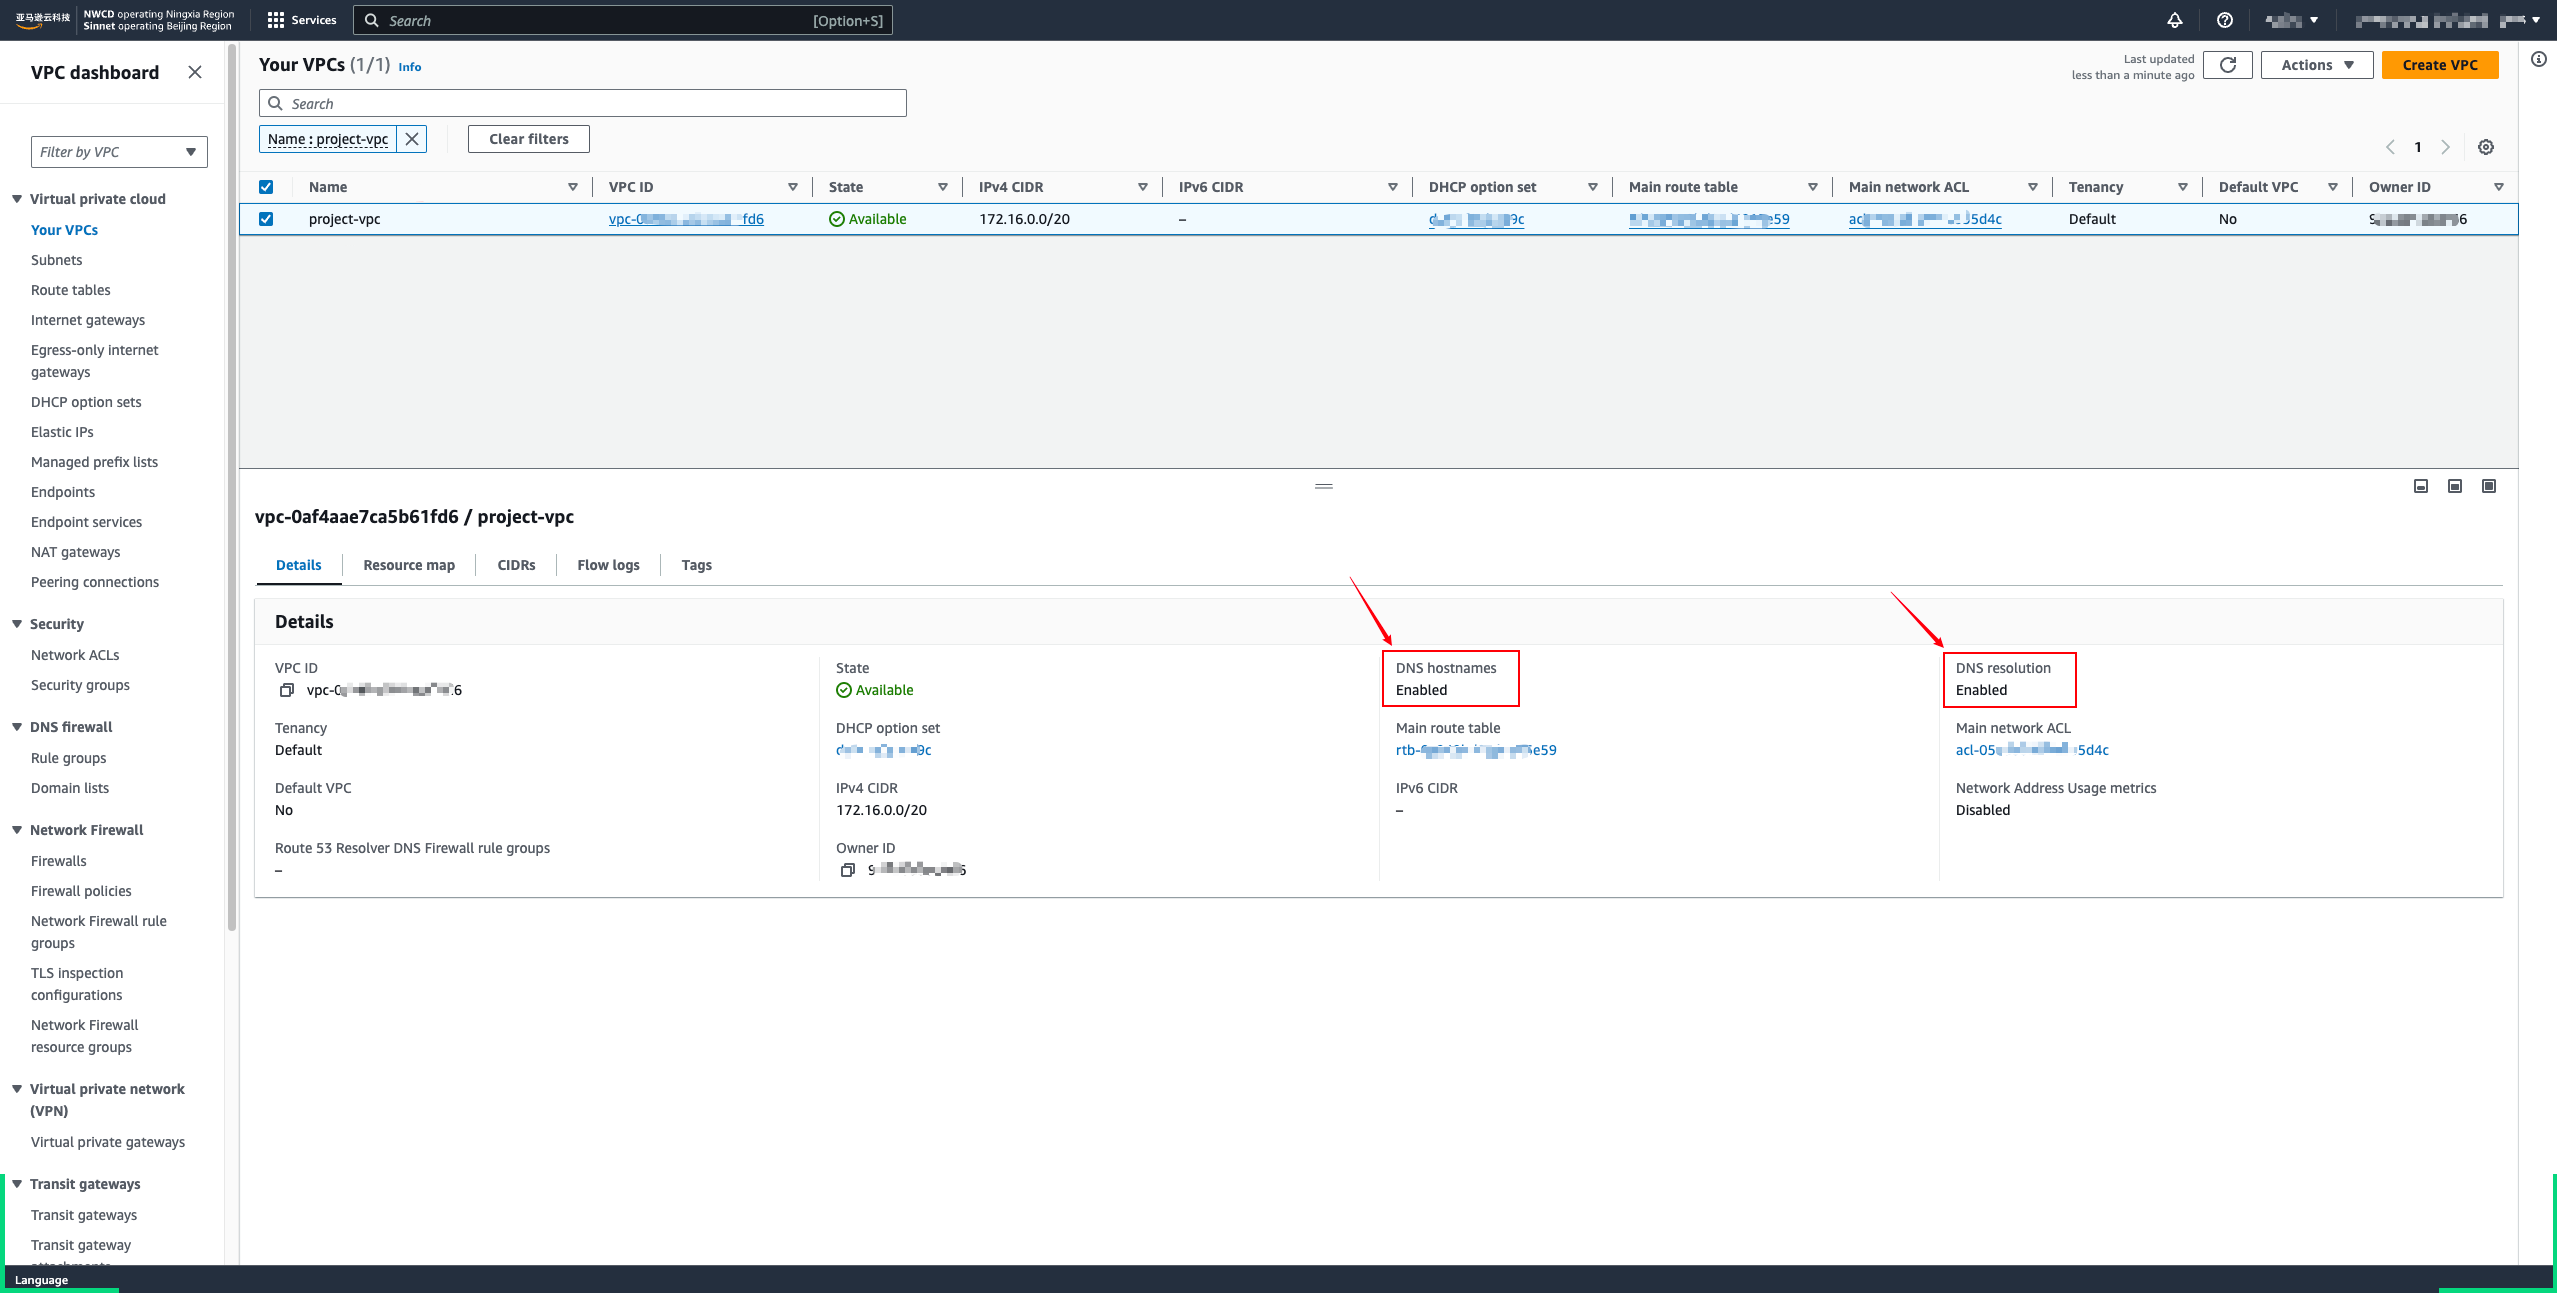
To use private DNS, you must enable DNS hostnames and DNS resolution for your VPC. For more information, see View and update DNS attributes in the Amazon VPC User Guide.
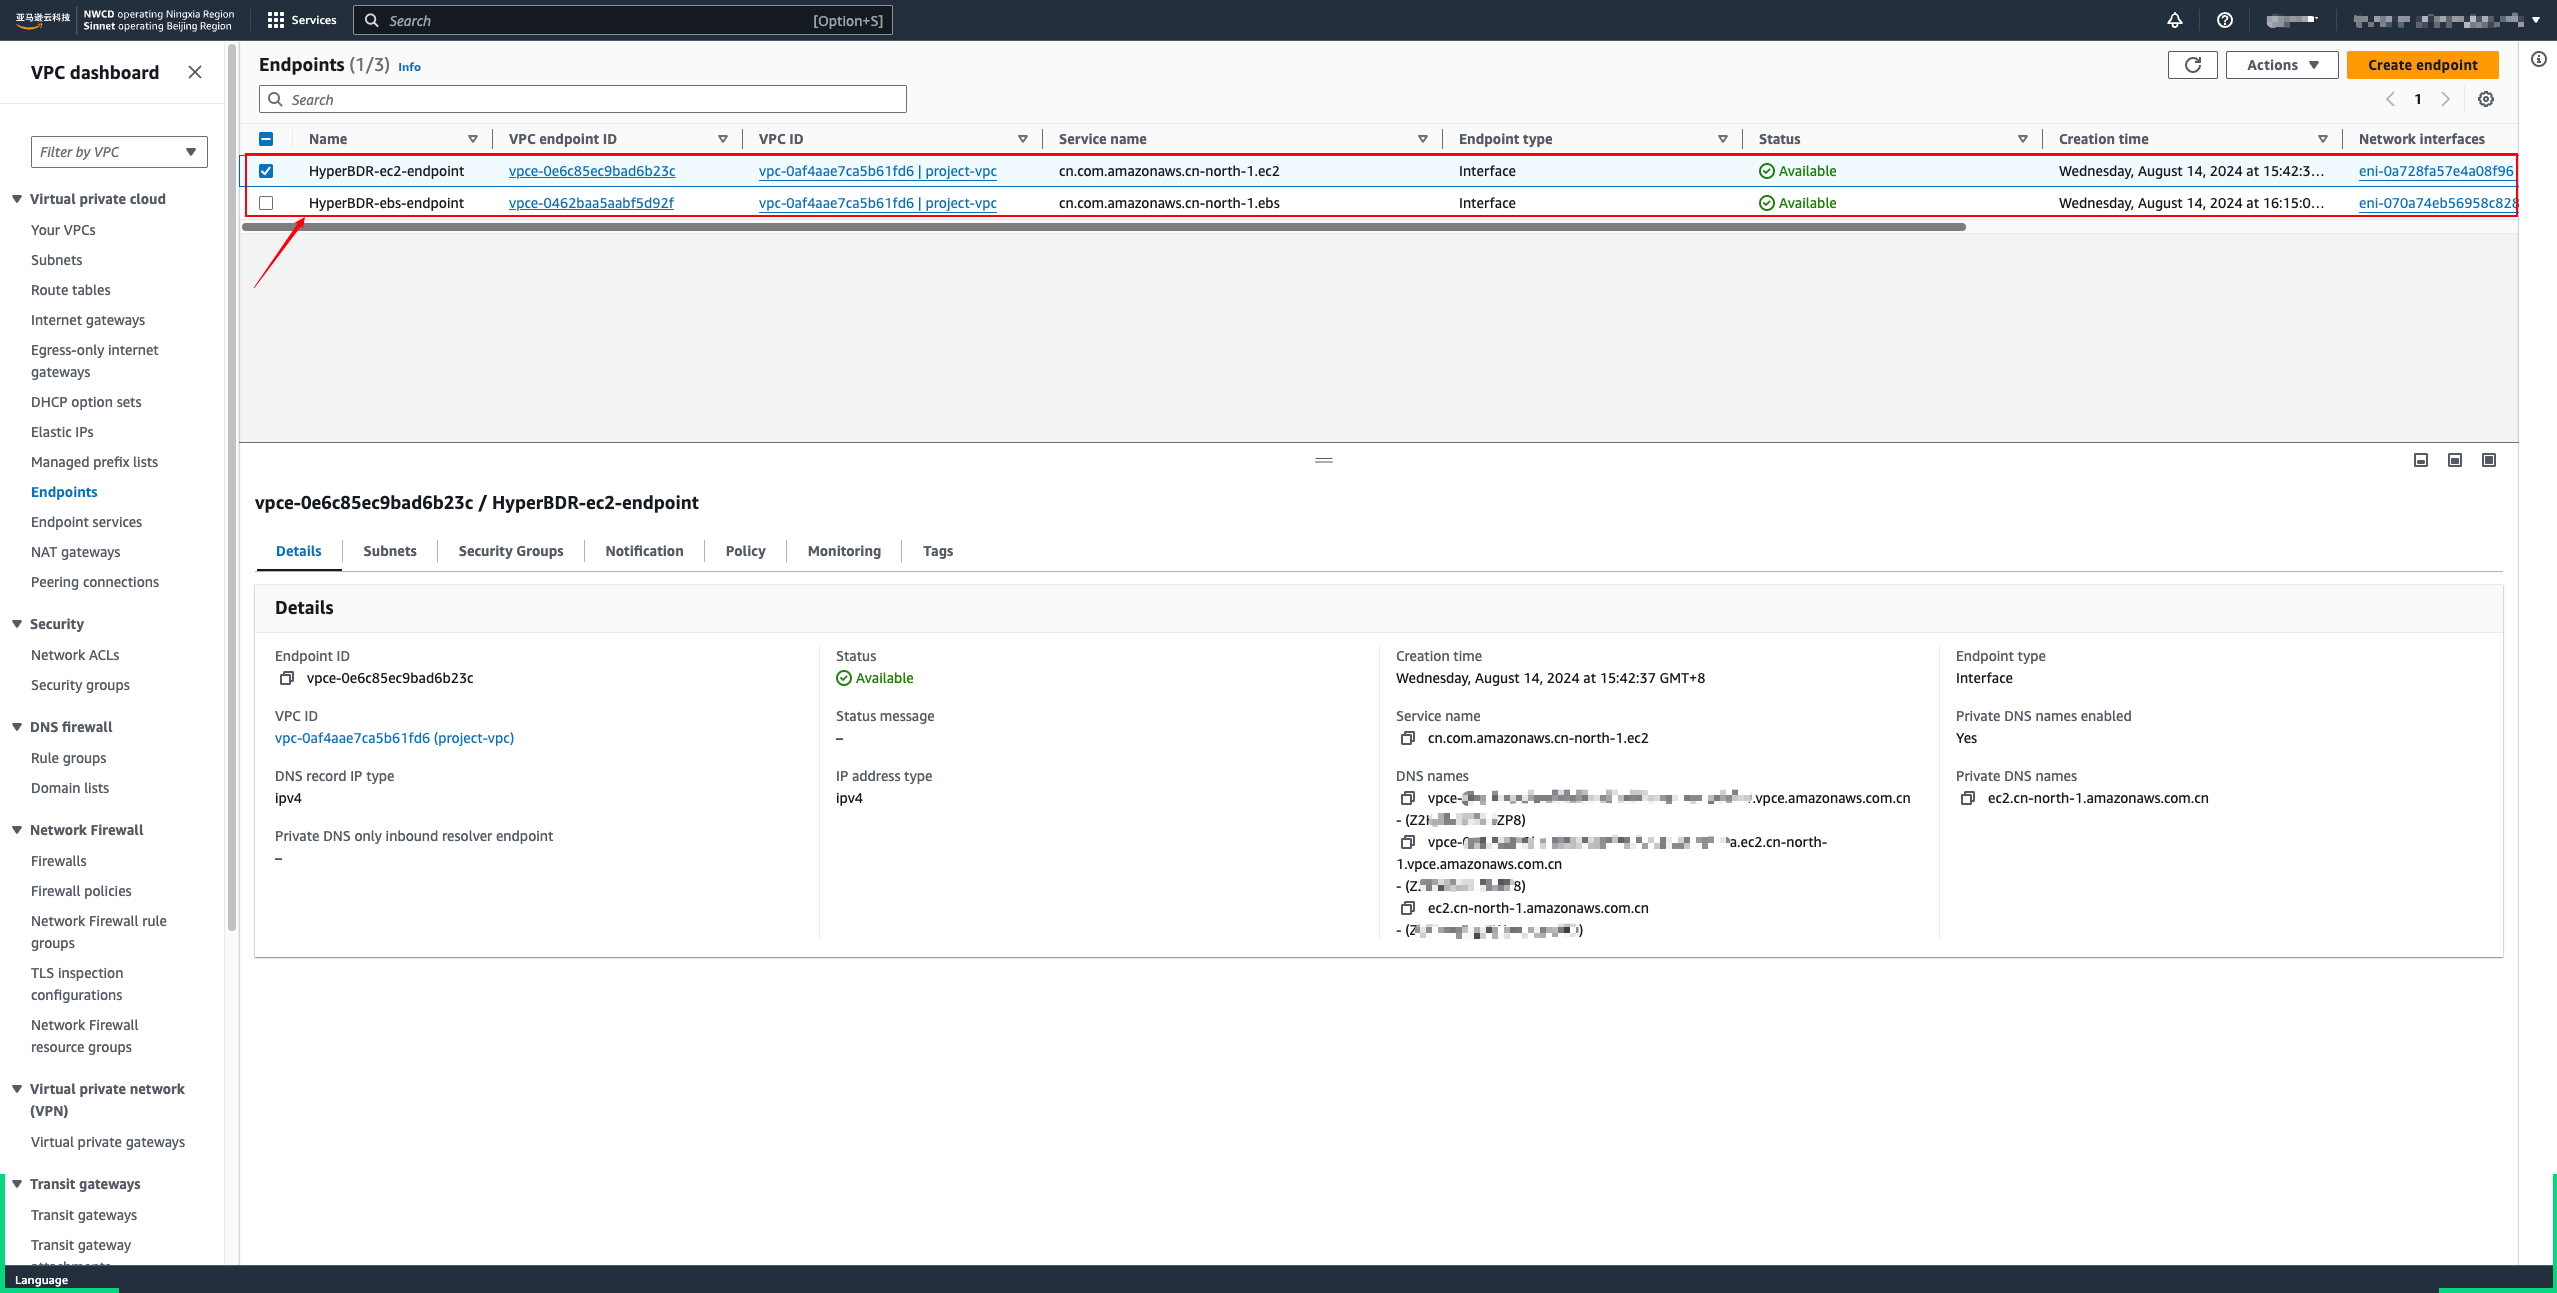
Create VPC Endpoints Step
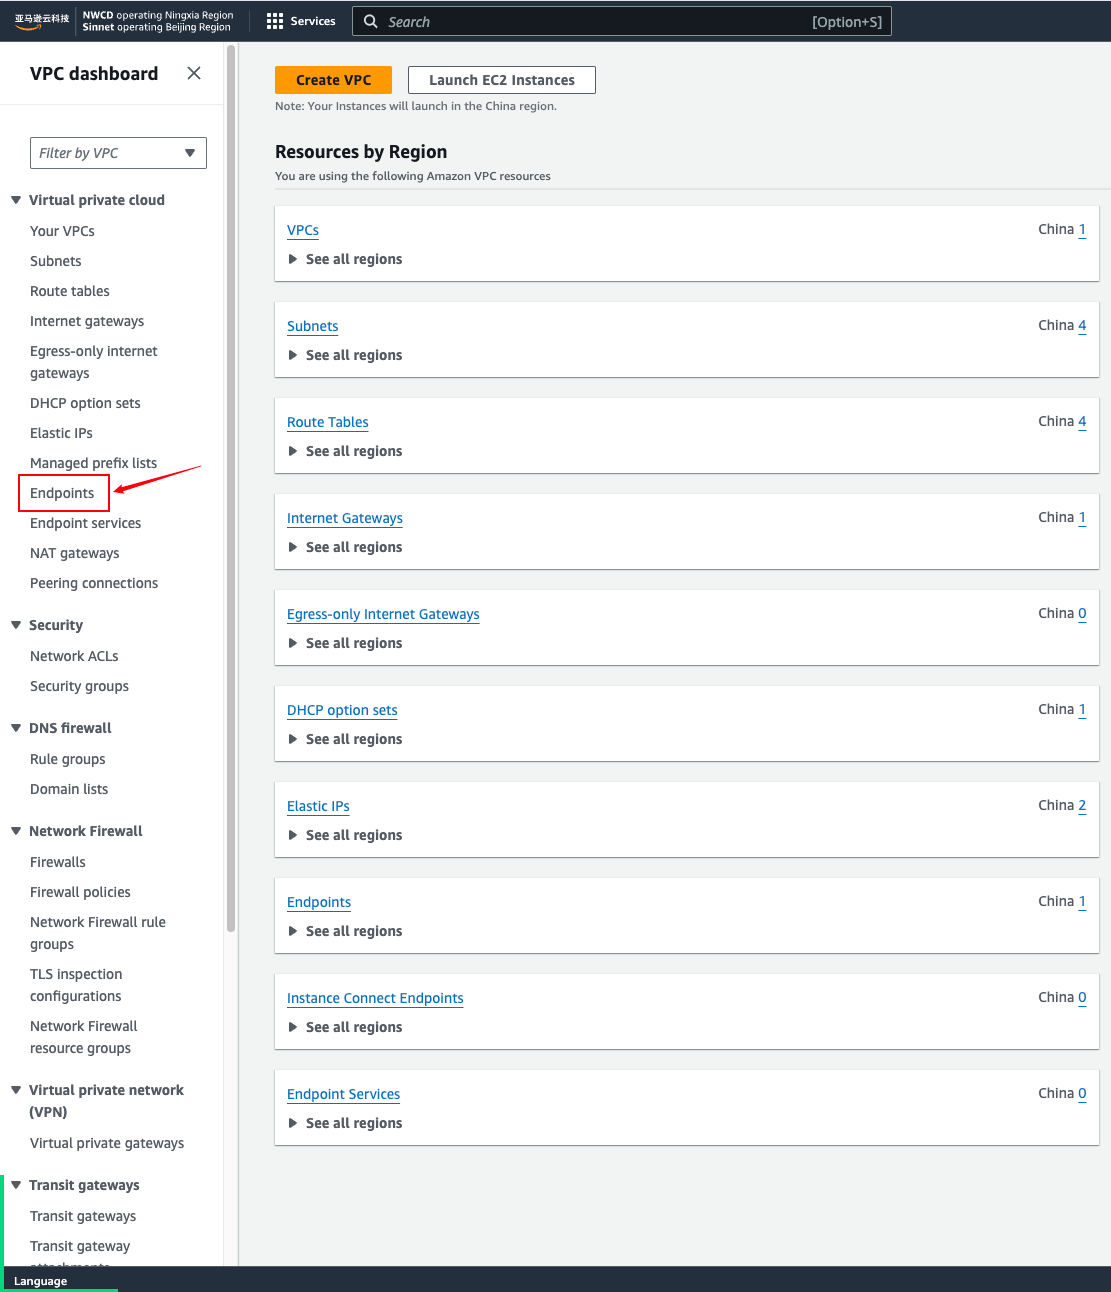
- Open the Amazon VPC console
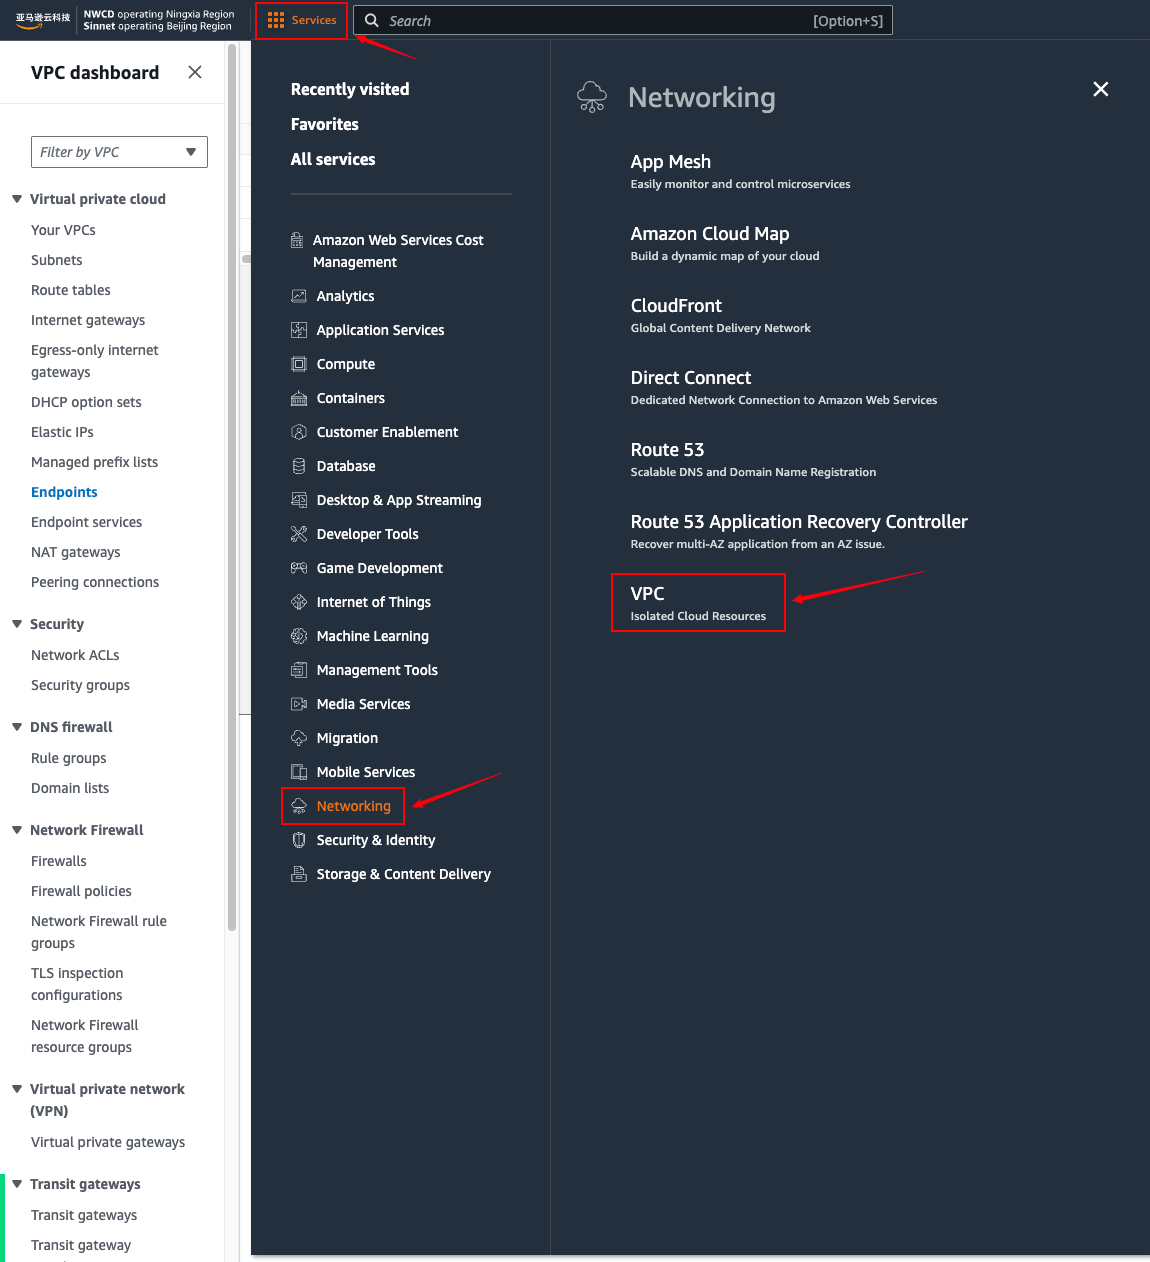
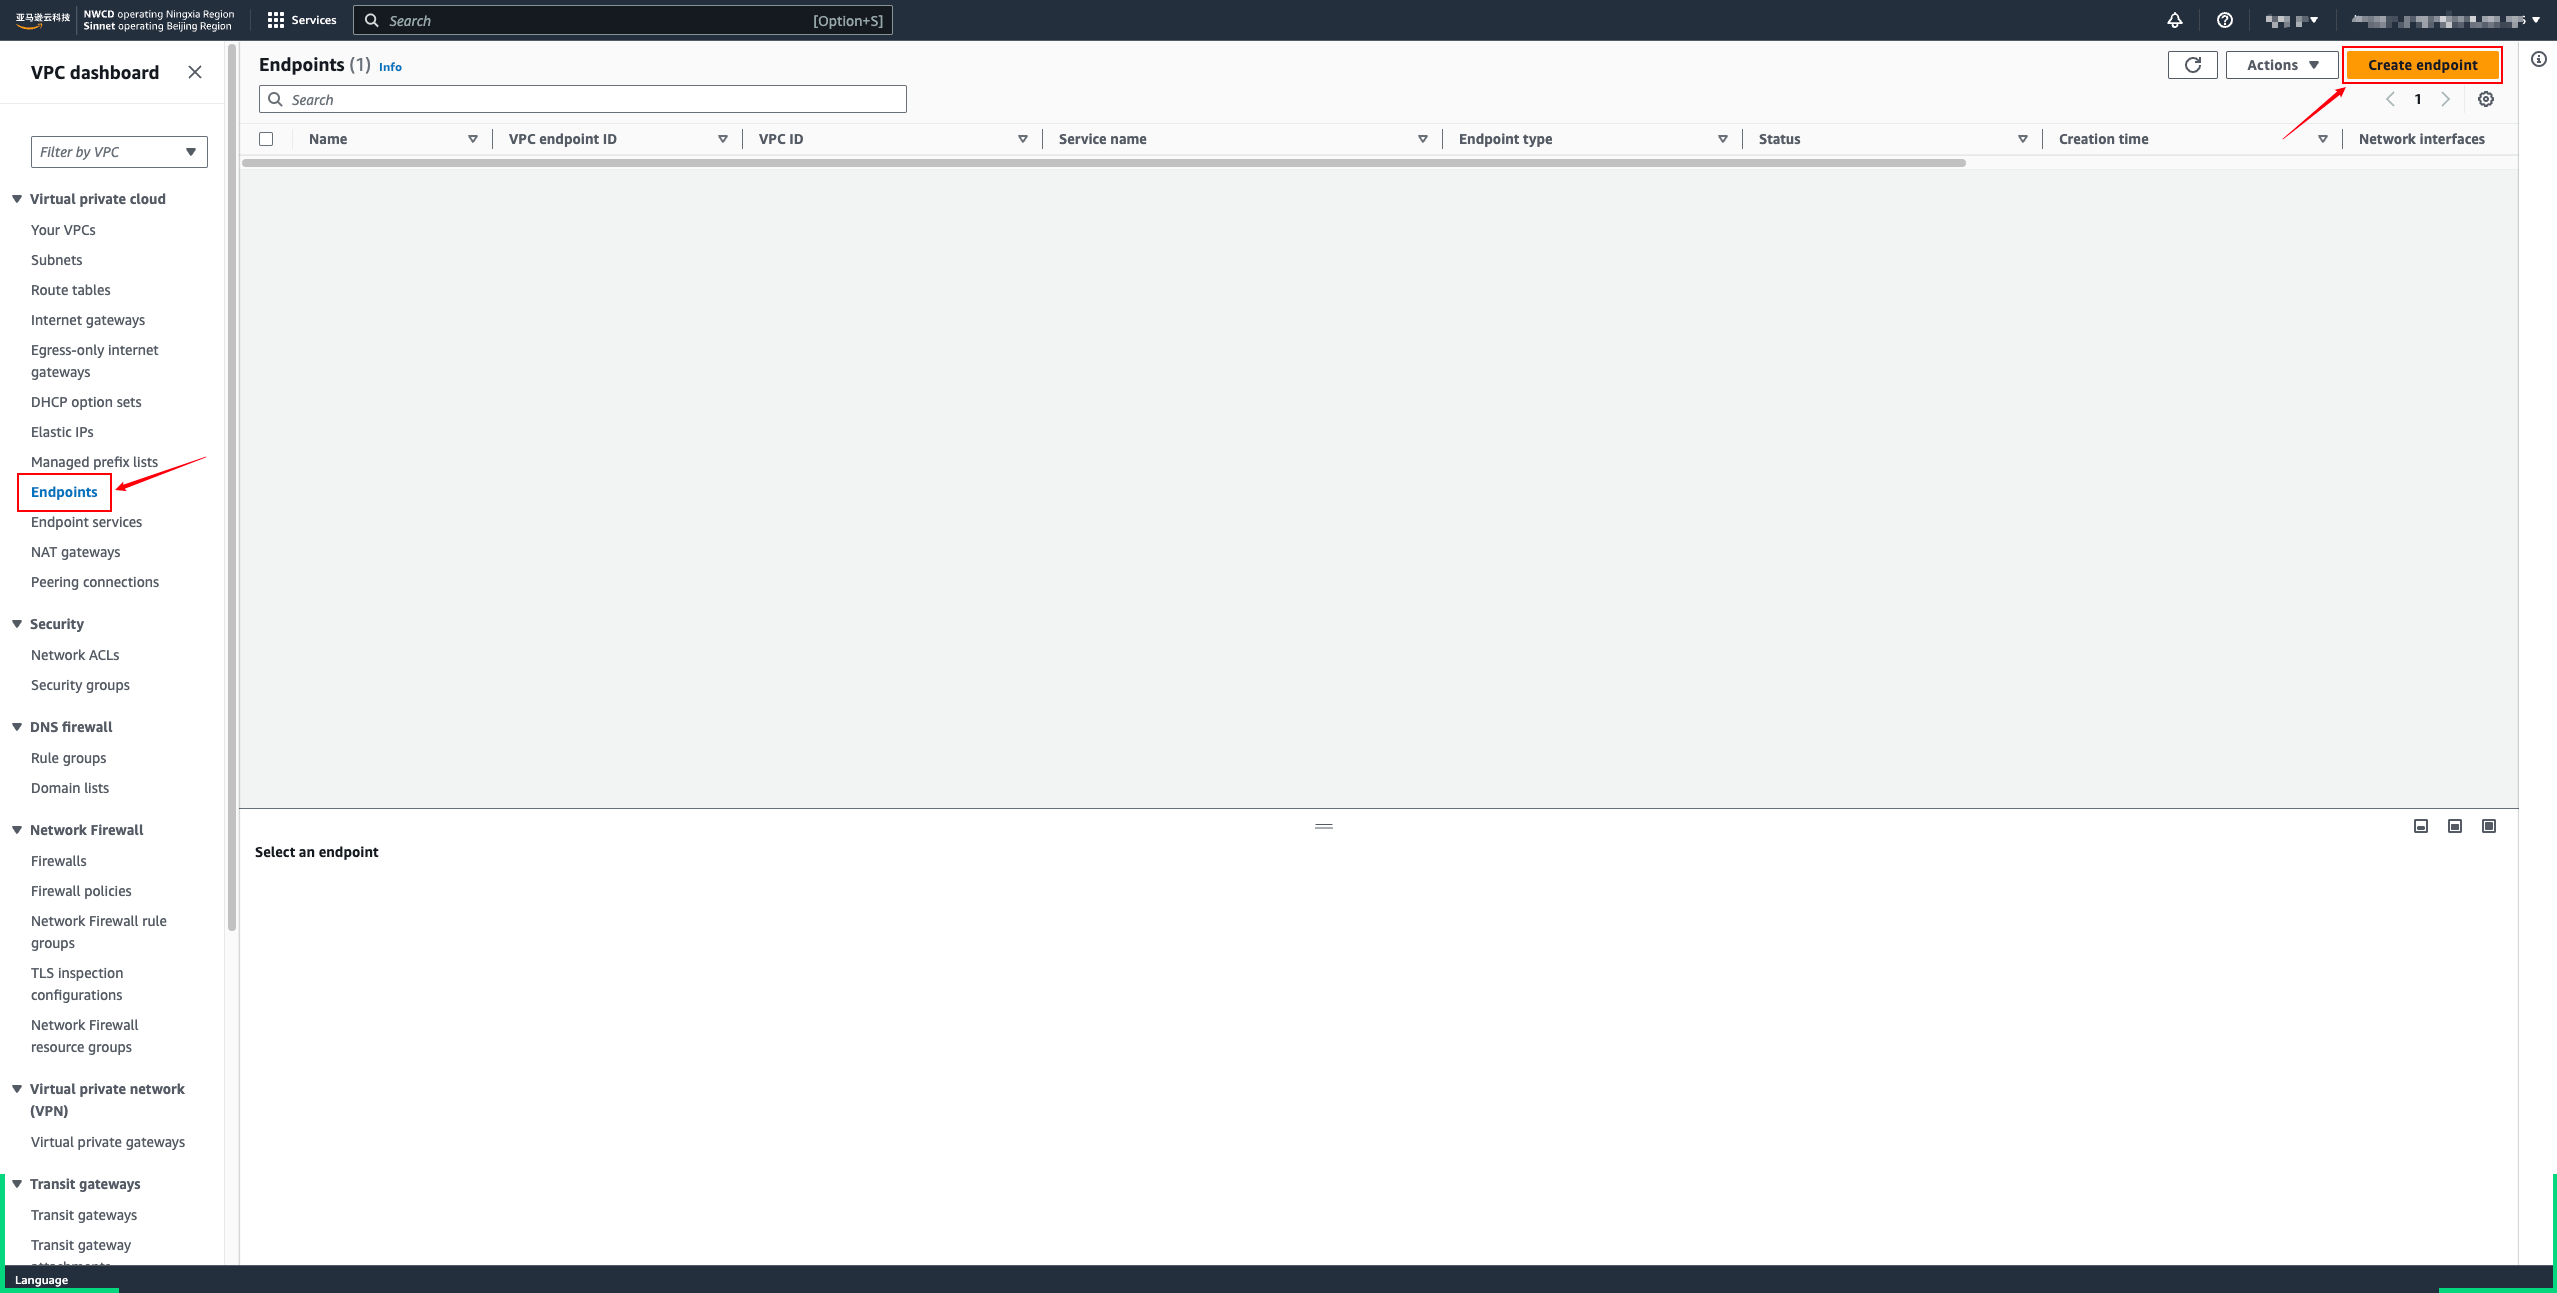
- In the navigation pane, choose Endpoints.
- Choose Create endpoint.
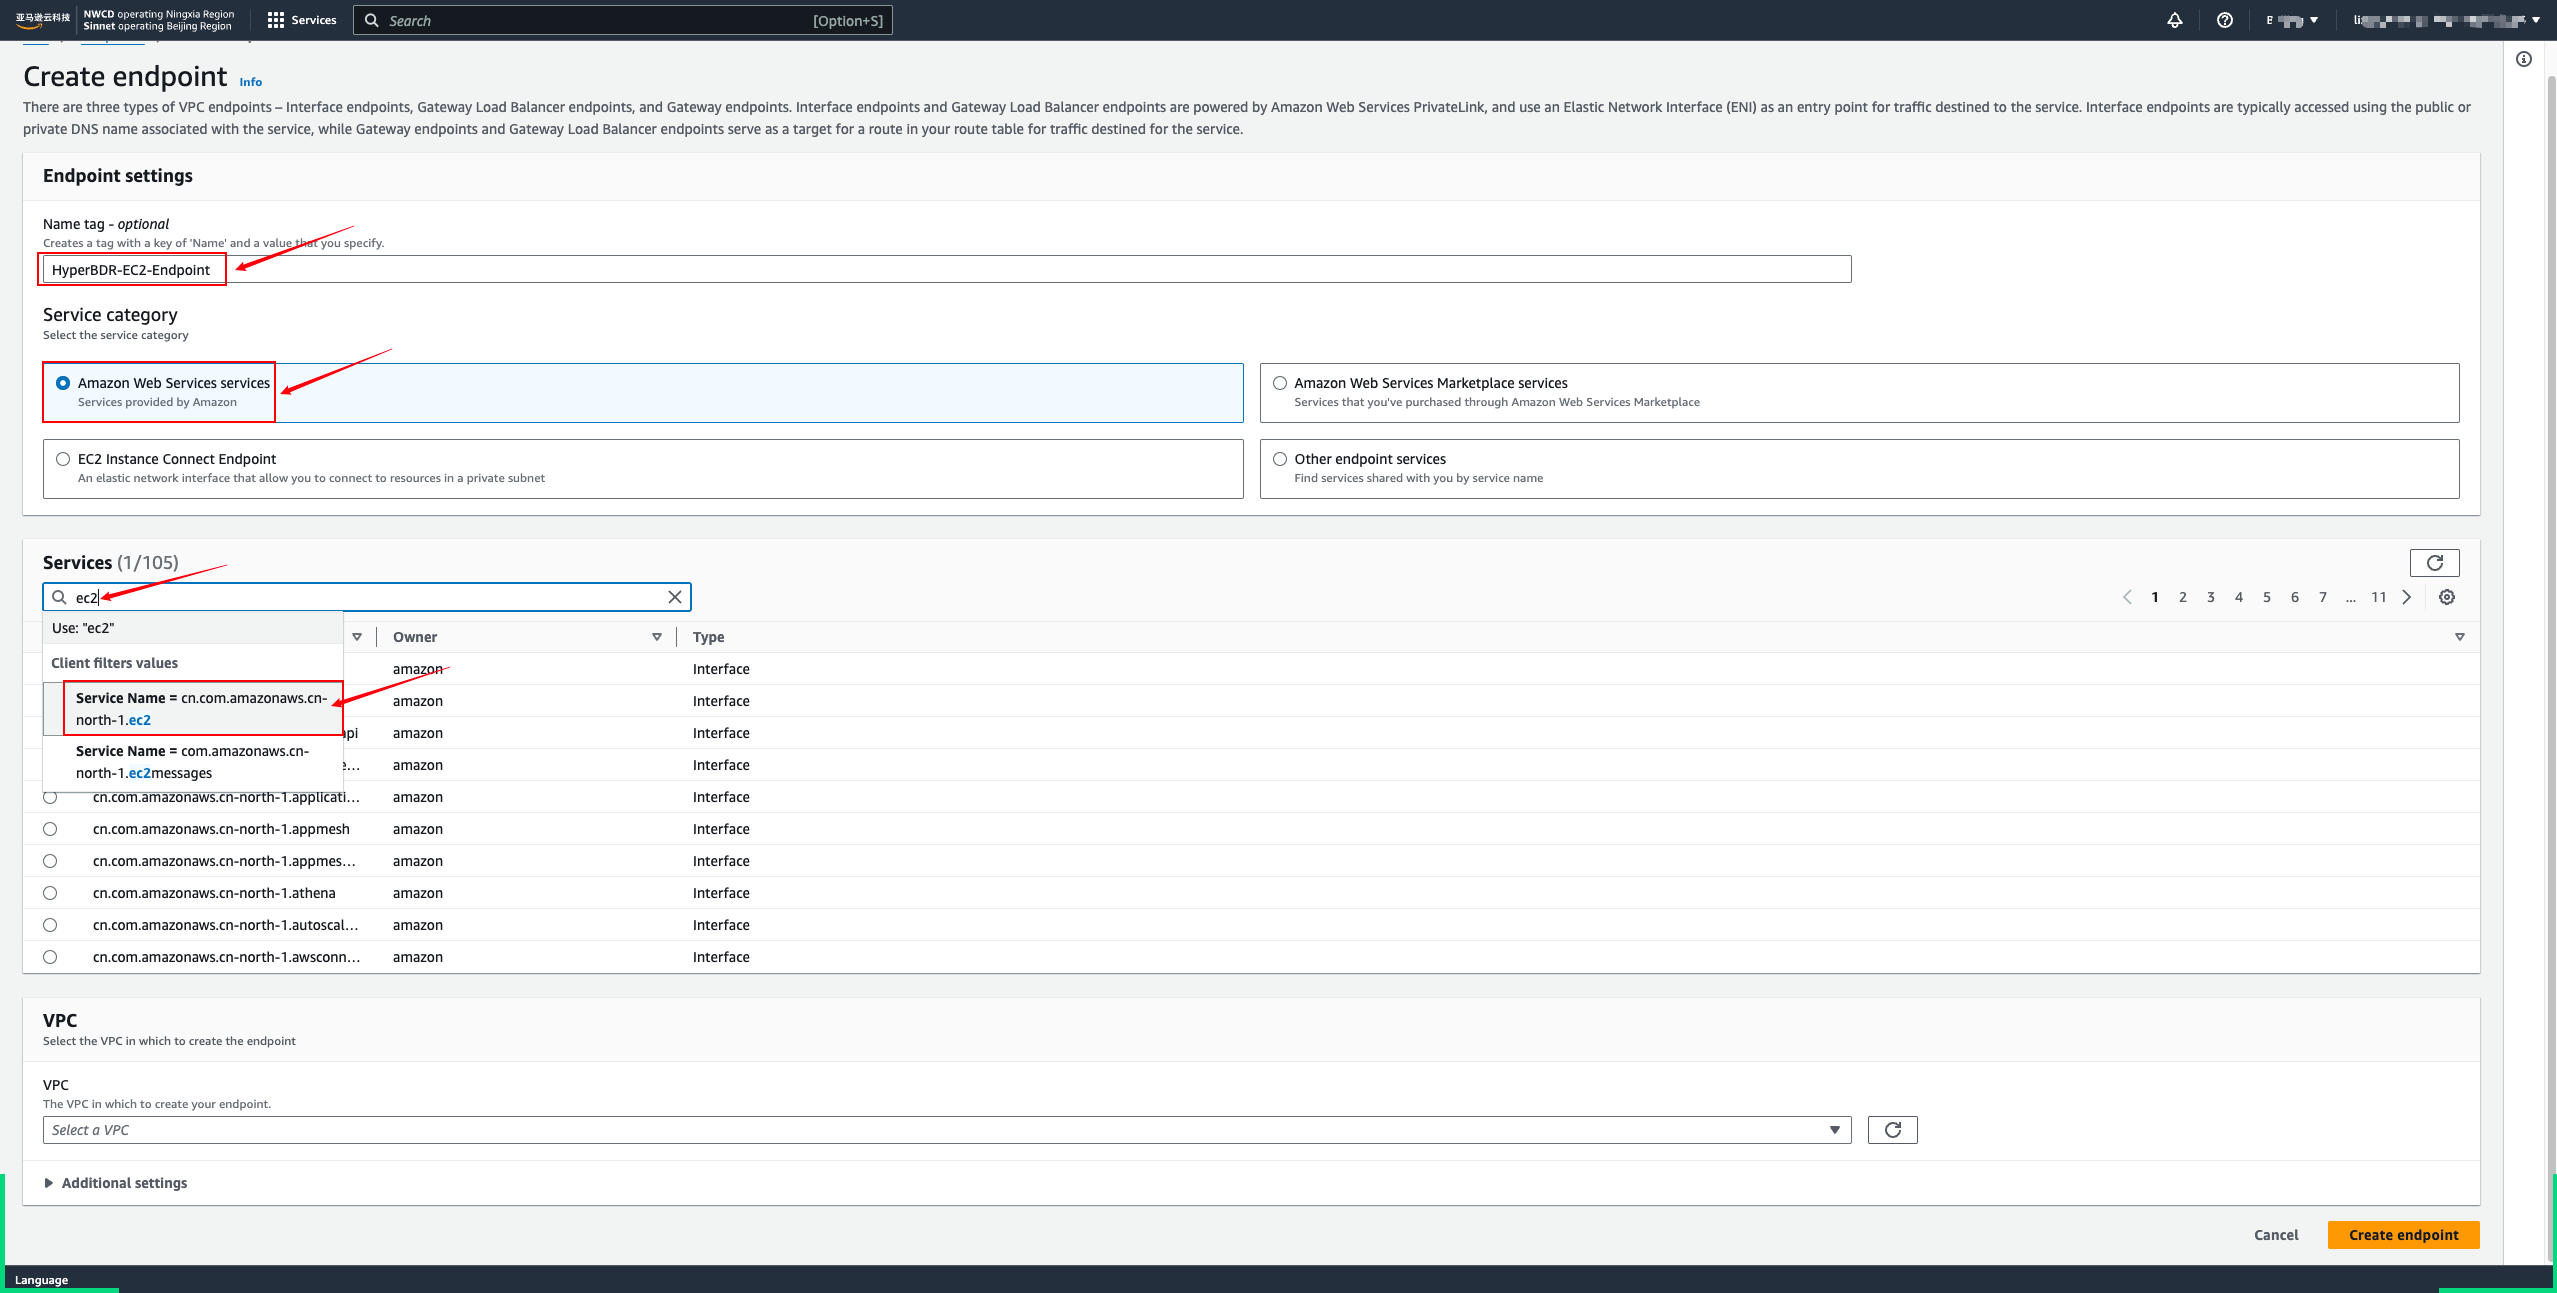
- To access the AWS API for EC2 and EBS services, create service endpoints for each.
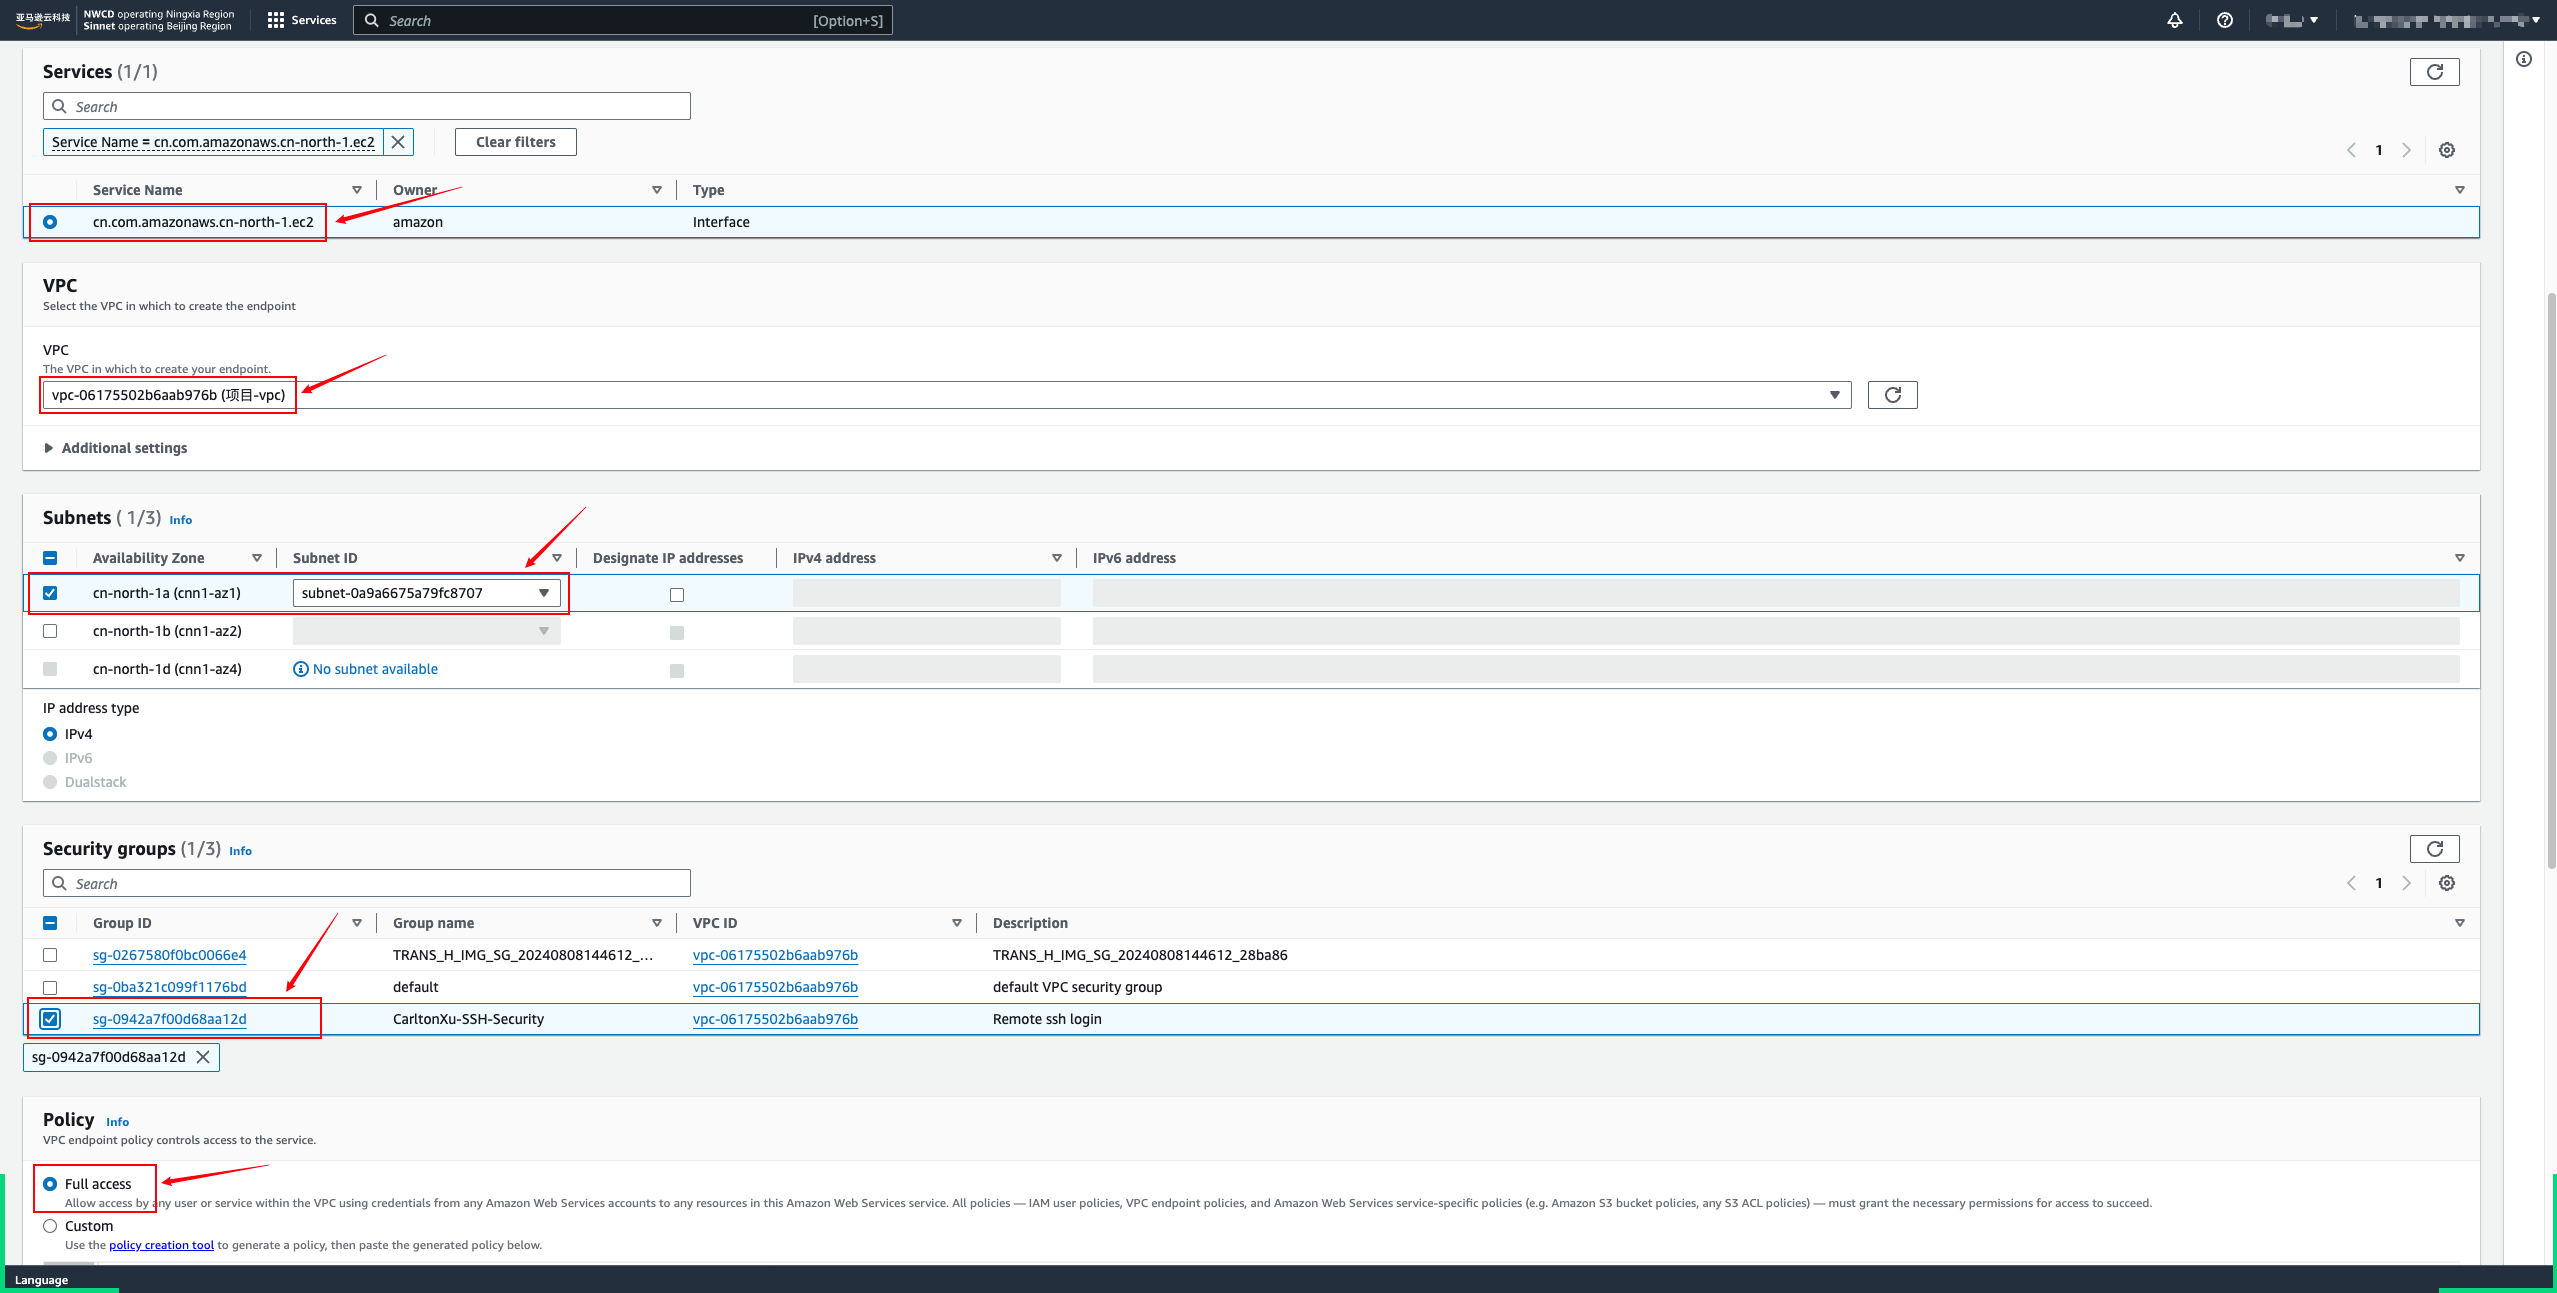
- Wait for the status to become available.
Test network connectivity of the Sync Proxy to AWS Service Endpoints
Tips
Find the Service endpoints based on the region you are using.
AWS International EC2 Service endpoints:
https://docs.aws.amazon.com/general/latest/gr/ec2-service.html#ec2_region
AWS International EBS Service endpoints:
https://docs.aws.amazon.com/general/latest/gr/ebs-service.html#ebs_region
AWS China Service endpoints:
https://docs.amazonaws.cn/aws/latest/userguide/endpoints-Beijing.html
https://docs.amazonaws.cn/aws/latest/userguide/endpoints-Ningxia.html
Test AWS API Connectivity
Tips
Log in to Sync Proxy EC2 by default.
Execute the following command on Sync Proxy:
## Please use the Service endpoints in the actual area.
ssh -v -p 443 ec2.cn-north-1.amazonaws.com.cn
ssh -v -p 443 ebs.cn-north-1.amazonaws.com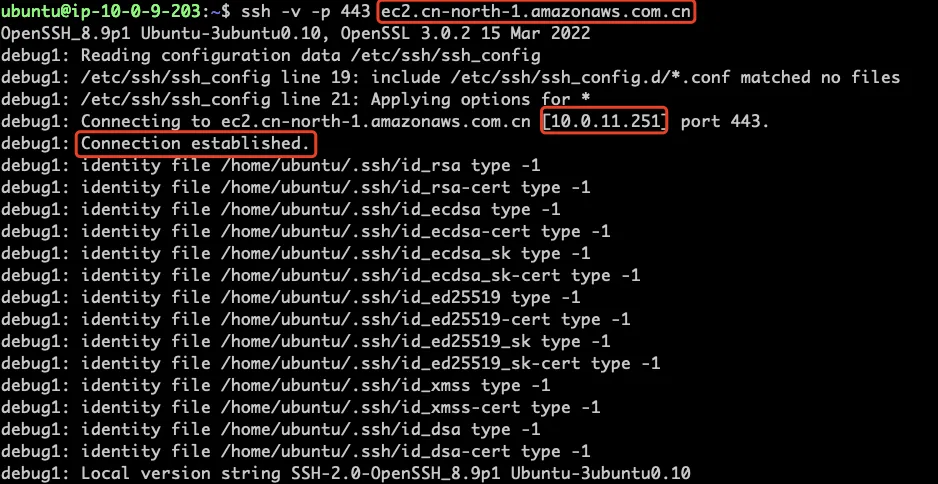
If it displays 'Connection established', it means the link port is normal. If your scenario uses VPN or dedicated line instead of EIP, the resolution address will be the intranet of the same subnet.