Admin Portal Manual
Admin Portal Manual
Login
Login
Login Entry
After the system is deployed, operations personnel can access the platform console via a web browser:
Operations Management Platform Address:
https://<IP>:30443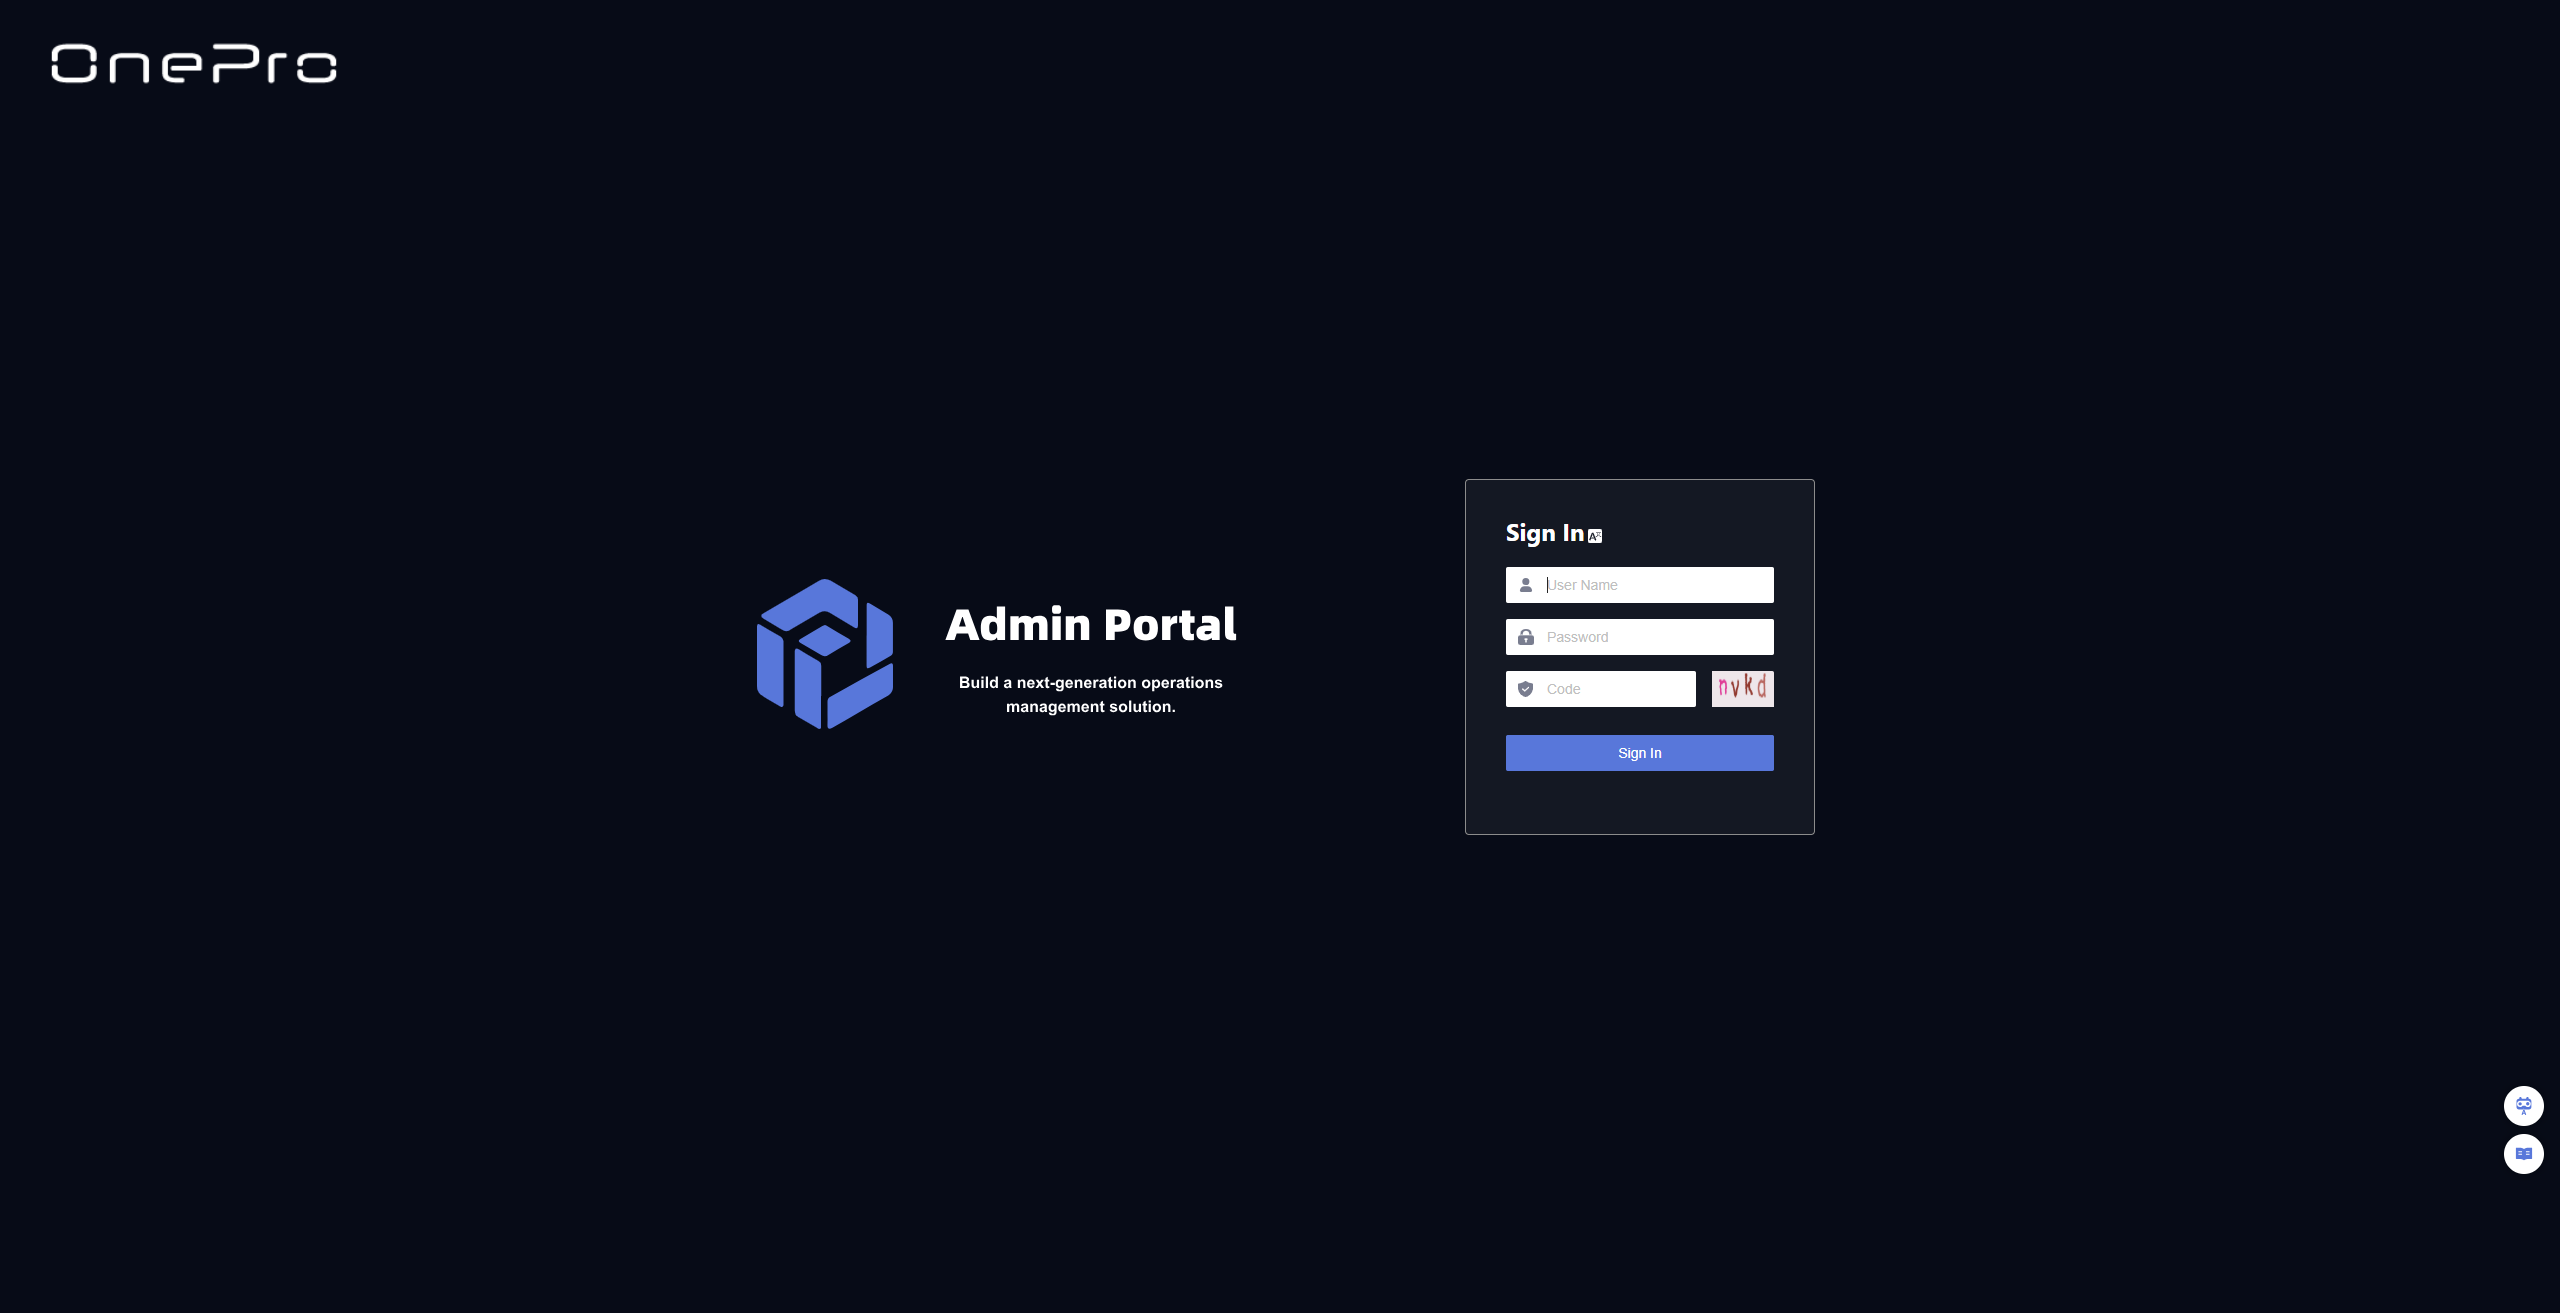
Enter the above address in the browser's address bar and press Enter to access the system and open the login page.
Login Information
On the login page, enter the assigned username and password to authenticate. The default administrator account credentials are:
- Username:
admin - Initial Password:
P@ssw0rd
⚠️ Security Notice: To ensure account security, please change the default password immediately after your first login.
Dashboard
Language Switch
The system currently supports the following languages:
简体中文
English
Español
To change the display language in the system interface:
Click the "Switch language" in the upper right corner to open the dropdown menu.
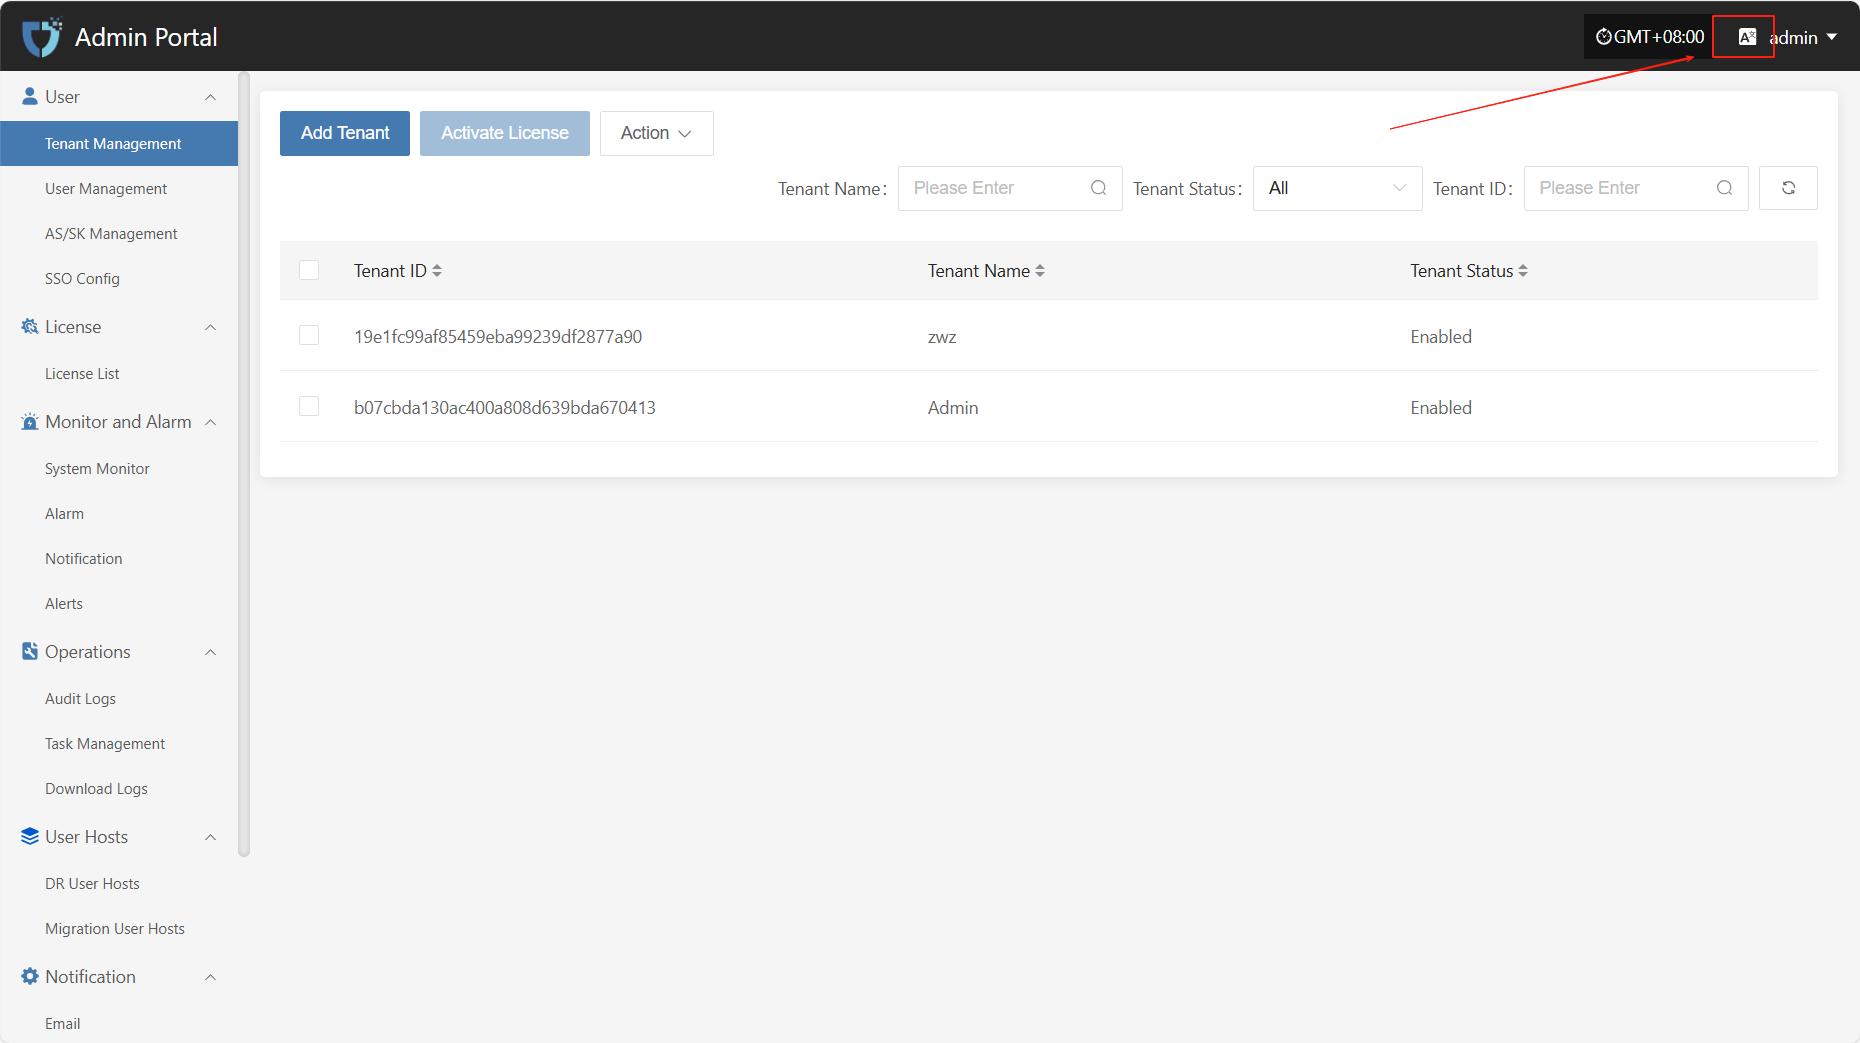
In the language list that appears, select your preferred language, such as "Simplified Chinese" or "English".
The default language is Simplified Chinese.
After switching, the system will automatically refresh and display the selected language.
Change Password
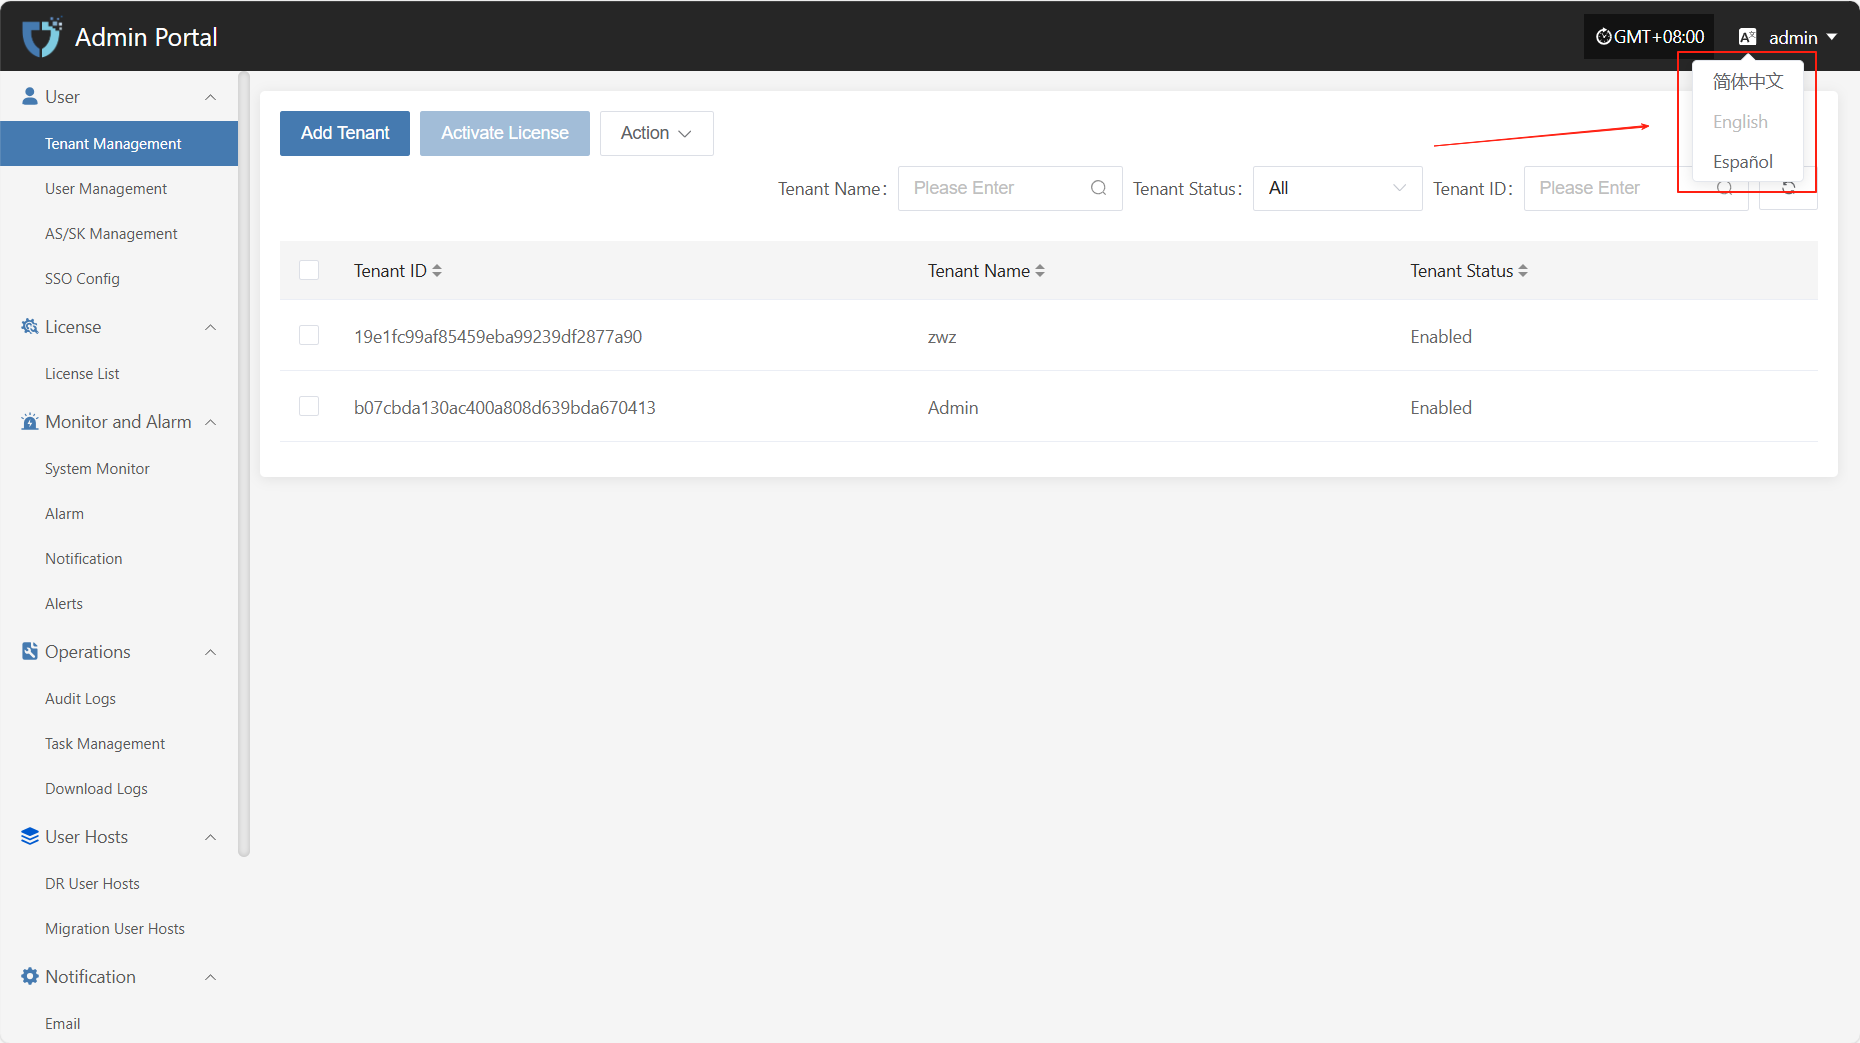
To protect the security of your account, we recommend that you change your password regularly, especially using a password with high security.
Click on the username in the top right corner of the page to expand the dropdown menu.
Click on the "Change Password" option to be redirected to a new page for password modification.
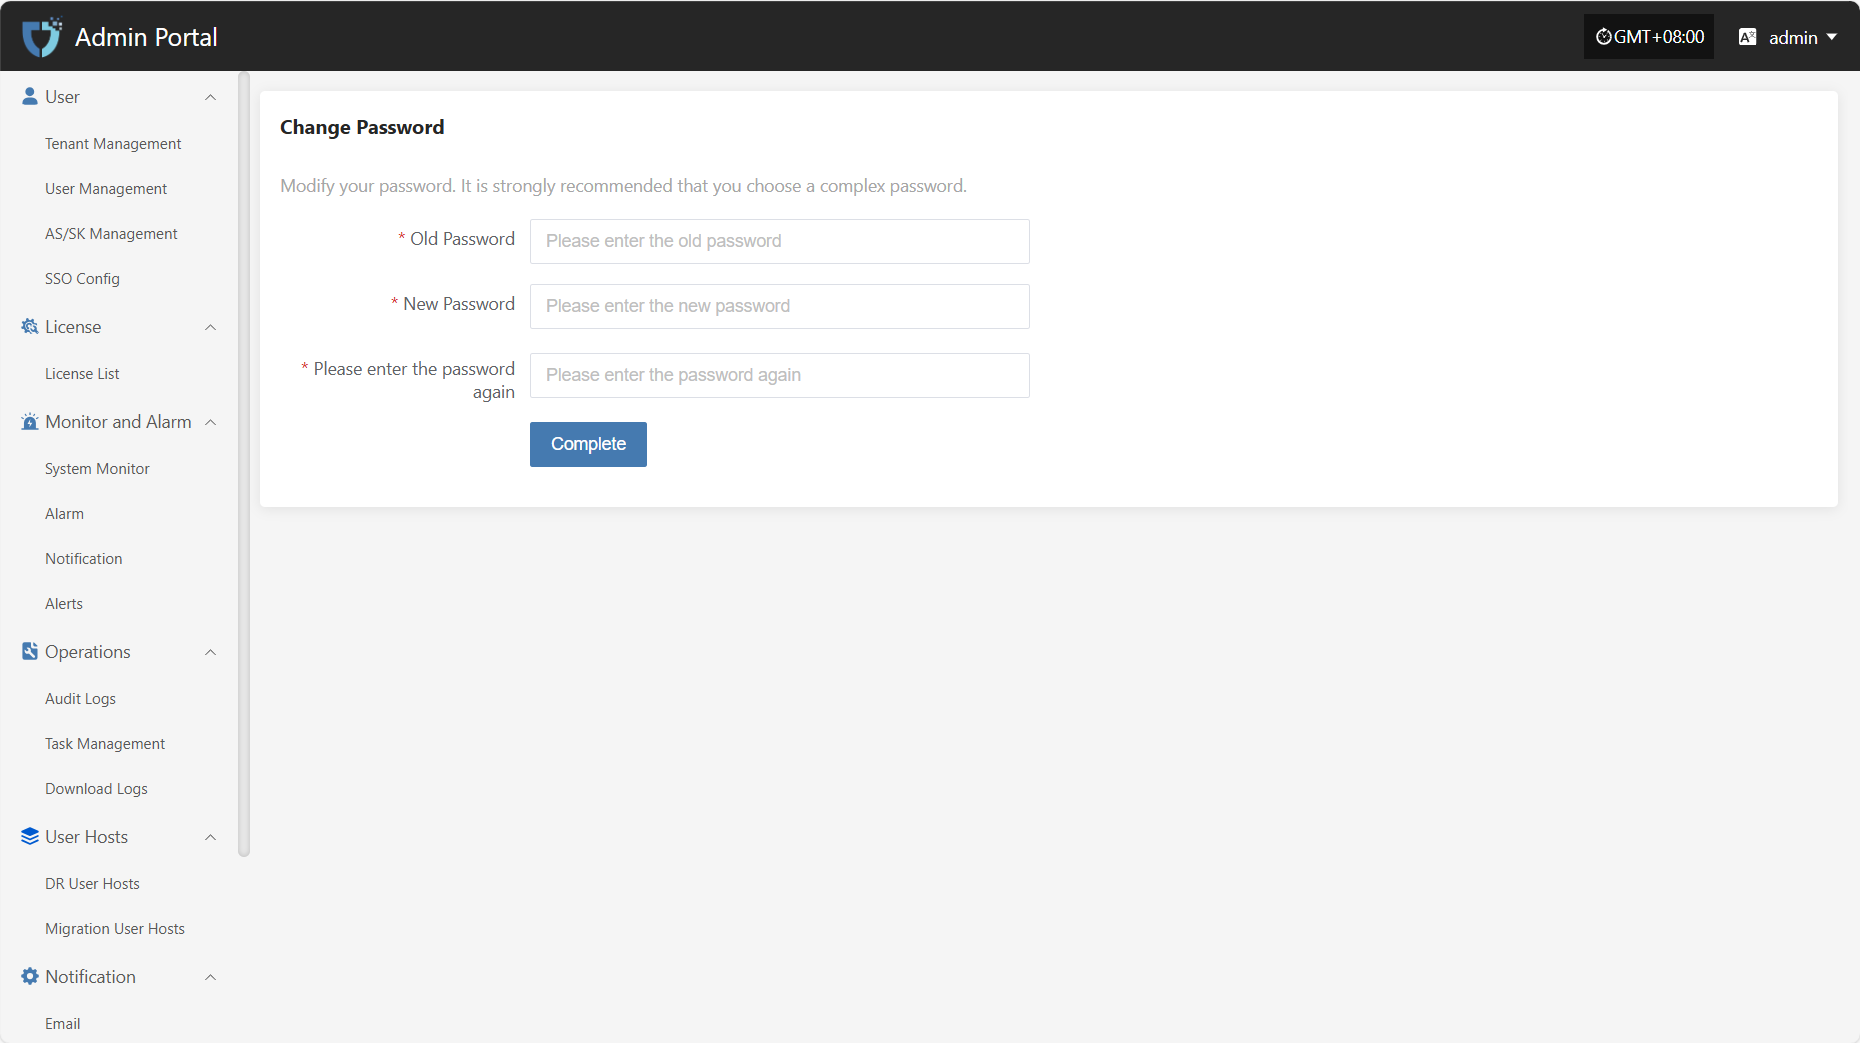
According to the page instructions, after entering the old password, the new password, and re-entering the new password, click "Complete" at the bottom to complete the password change.
Note: Your new password must be 8-20 characters long, contain both uppercase and lowercase letters and numbers, and may include special characters (except spaces). After changing your password, please remember it to avoid login issues. The password for the Operations Management Platform will also be updated.
Password Management Tips
- Change your password regularly, especially if you suspect your account security may be compromised.
- Avoid using the same password across multiple platforms. Use complex and unique passwords to enhance your account security.
Log Out
To safely log out of your account, follow these steps:
Click your username in the upper right corner of the page to open the dropdown menu.
Click the "Sign Out" option. You will be securely logged out and returned to the login page.
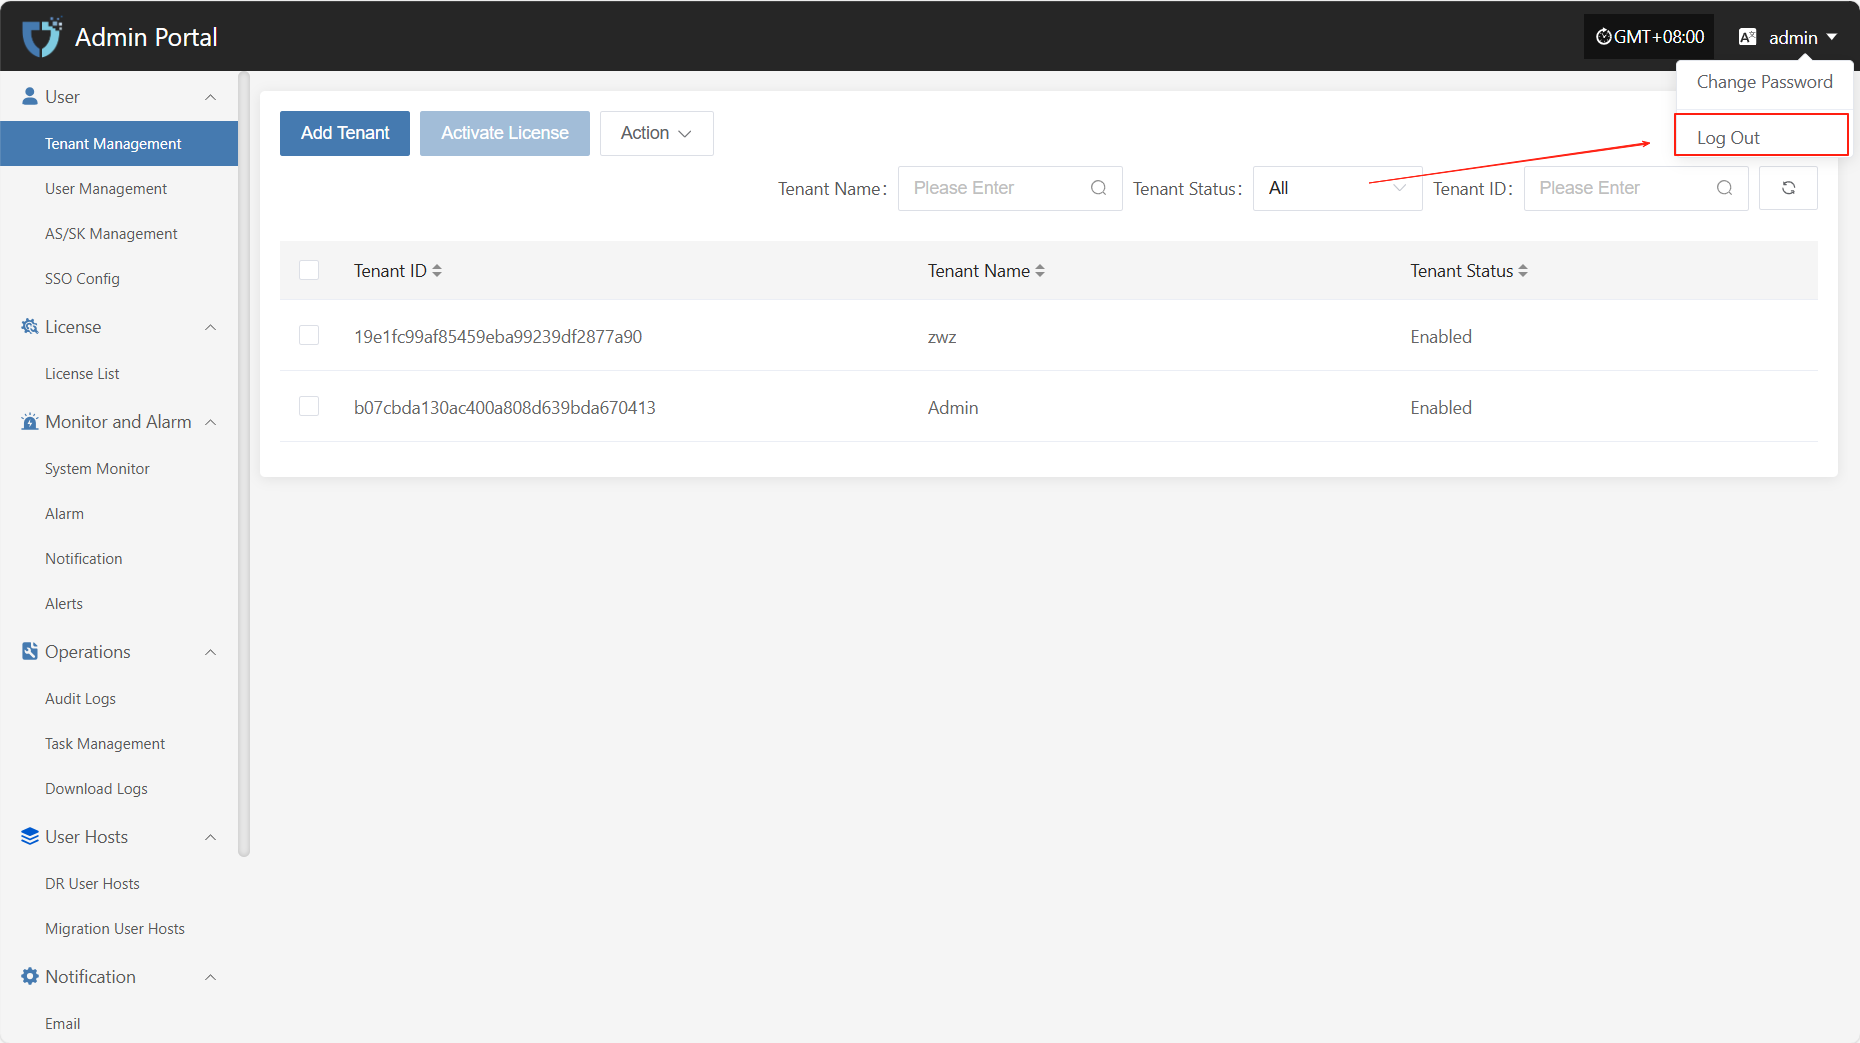
You will be securely logged out and redirected to the login page.
Note: Simply closing the browser window may not end your session. It is recommended to use the logout option above to prevent unauthorized access to your account and avoid unnecessary risks.
User
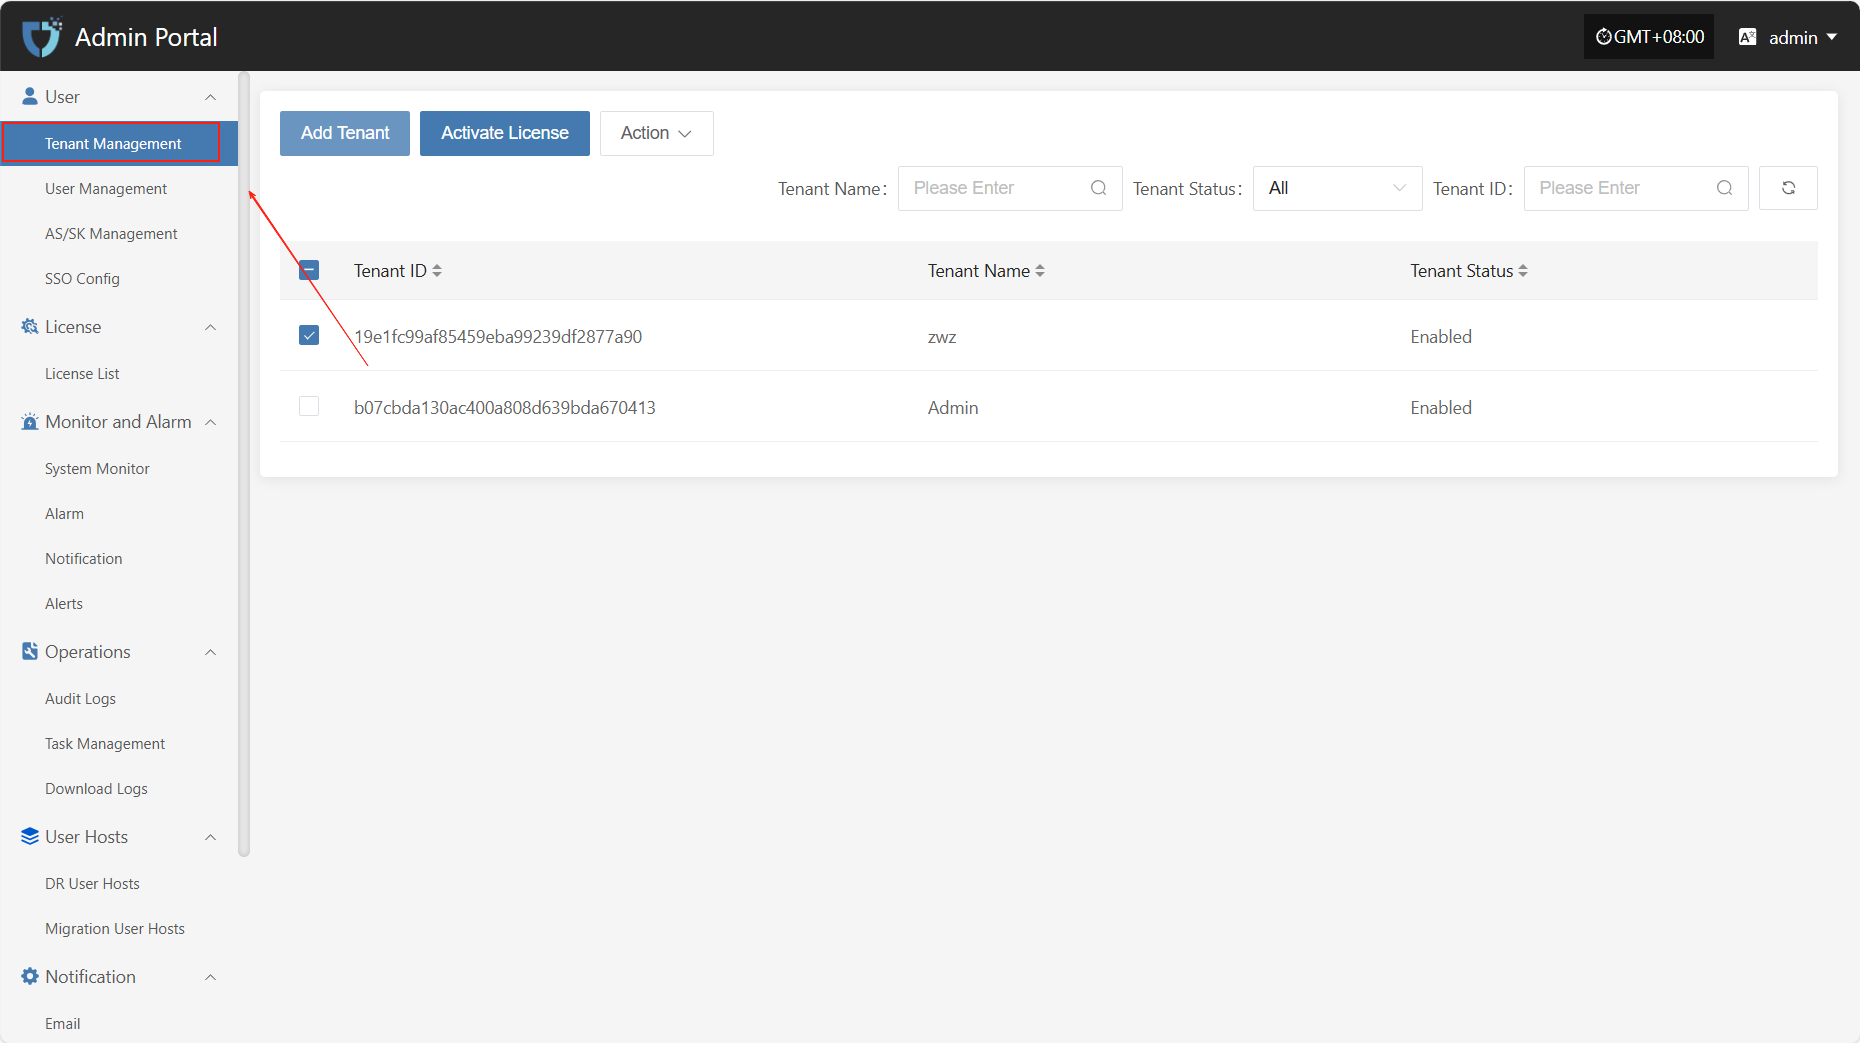
Tenant Management
The "Tenant Management" module is used to centrally manage tenant information in the system. Administrators can create, edit, view, and delete tenant accounts here, allocate resources, configure permissions and isolation policies for tenants, and achieve unified scheduling and access control in a multi-tenant environment.
You can use the search box on the right to filter by tenant name, status, or tenant ID.
Add Tenant
Click the "Add Tenant" button in the upper left corner to start creating a tenant.
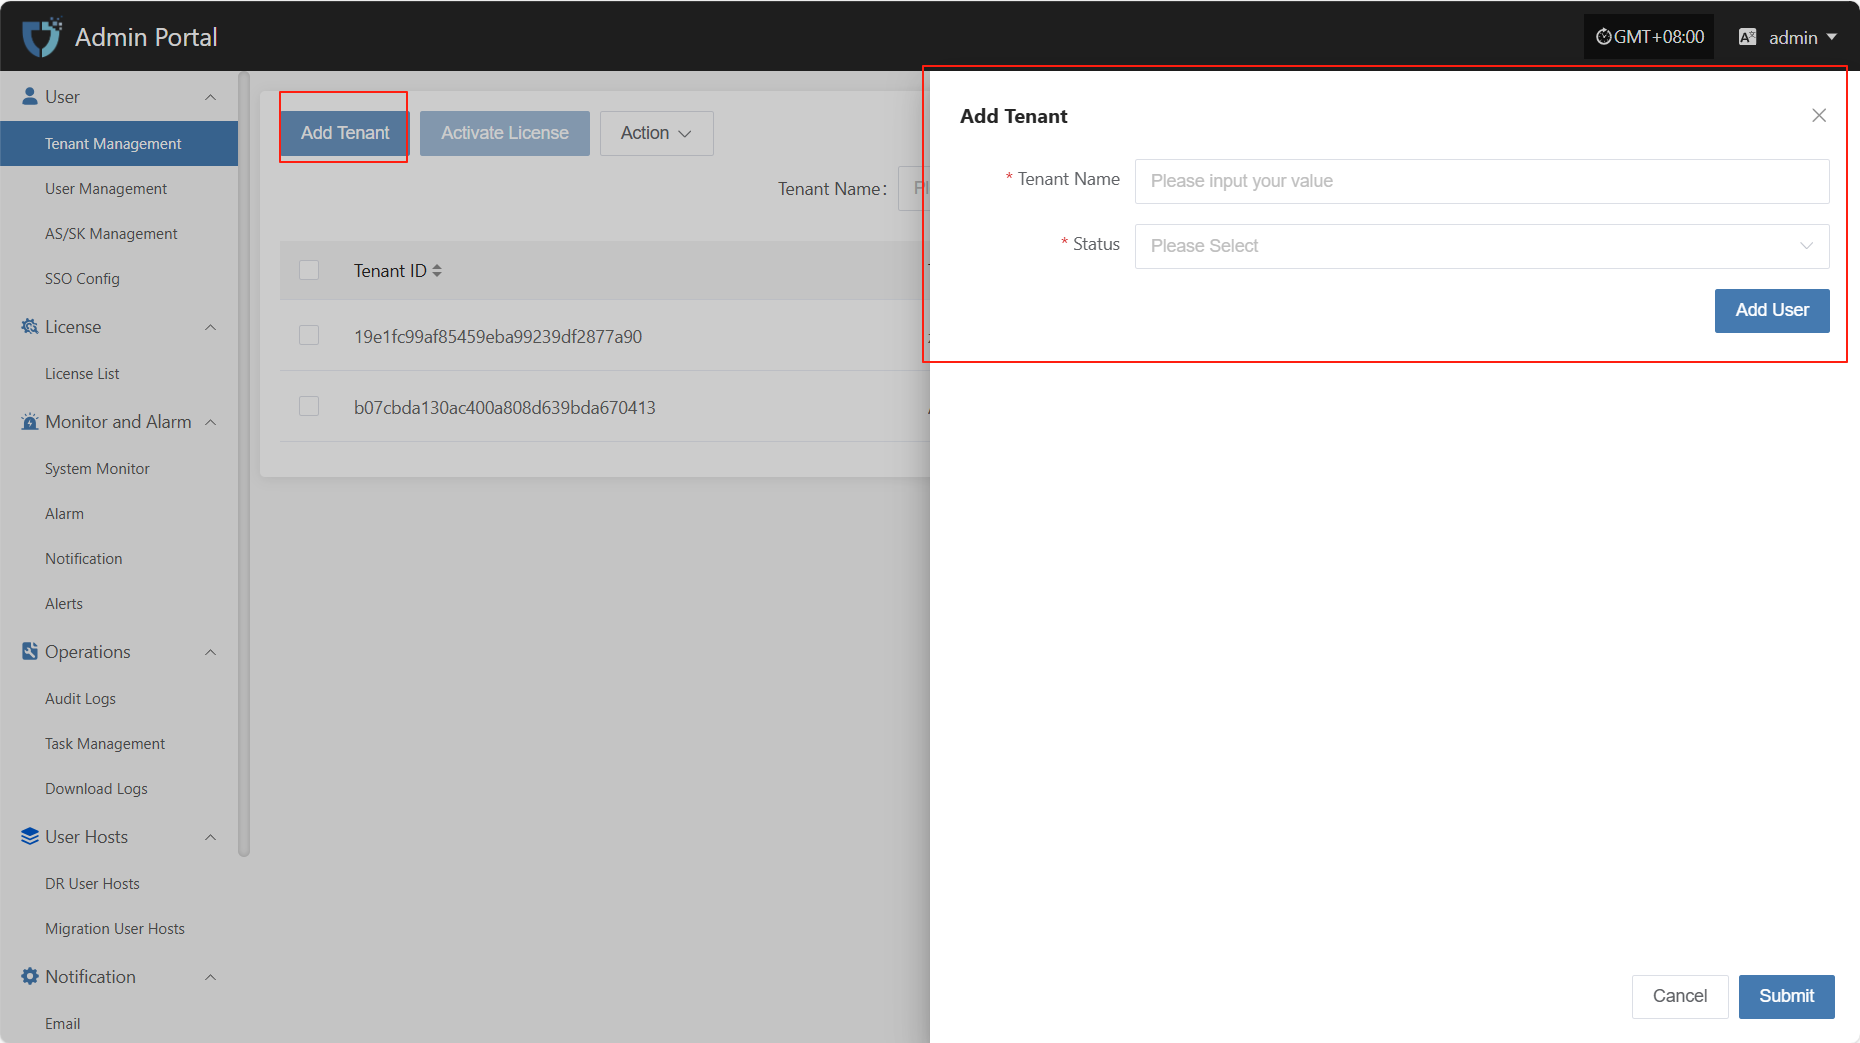
- Authentication Information Description
| Setting | Example Value | Description |
|---|---|---|
| Scene | Migration | Select the usage scenario for this tenant: ALL, Migration, or DR. |
| Tenant Name | test1 | The name used to identify the tenant in the system. It should be unique. |
| Status | Enable | Indicates the current status of the tenant. Can be set to enabled or disabled. |
After filling in the tenant authentication information, click "Submit" to create a new tenant. If you need to assign initial users to the tenant, you can click the "Add User" button below to complete user binding (multiple users are supported).
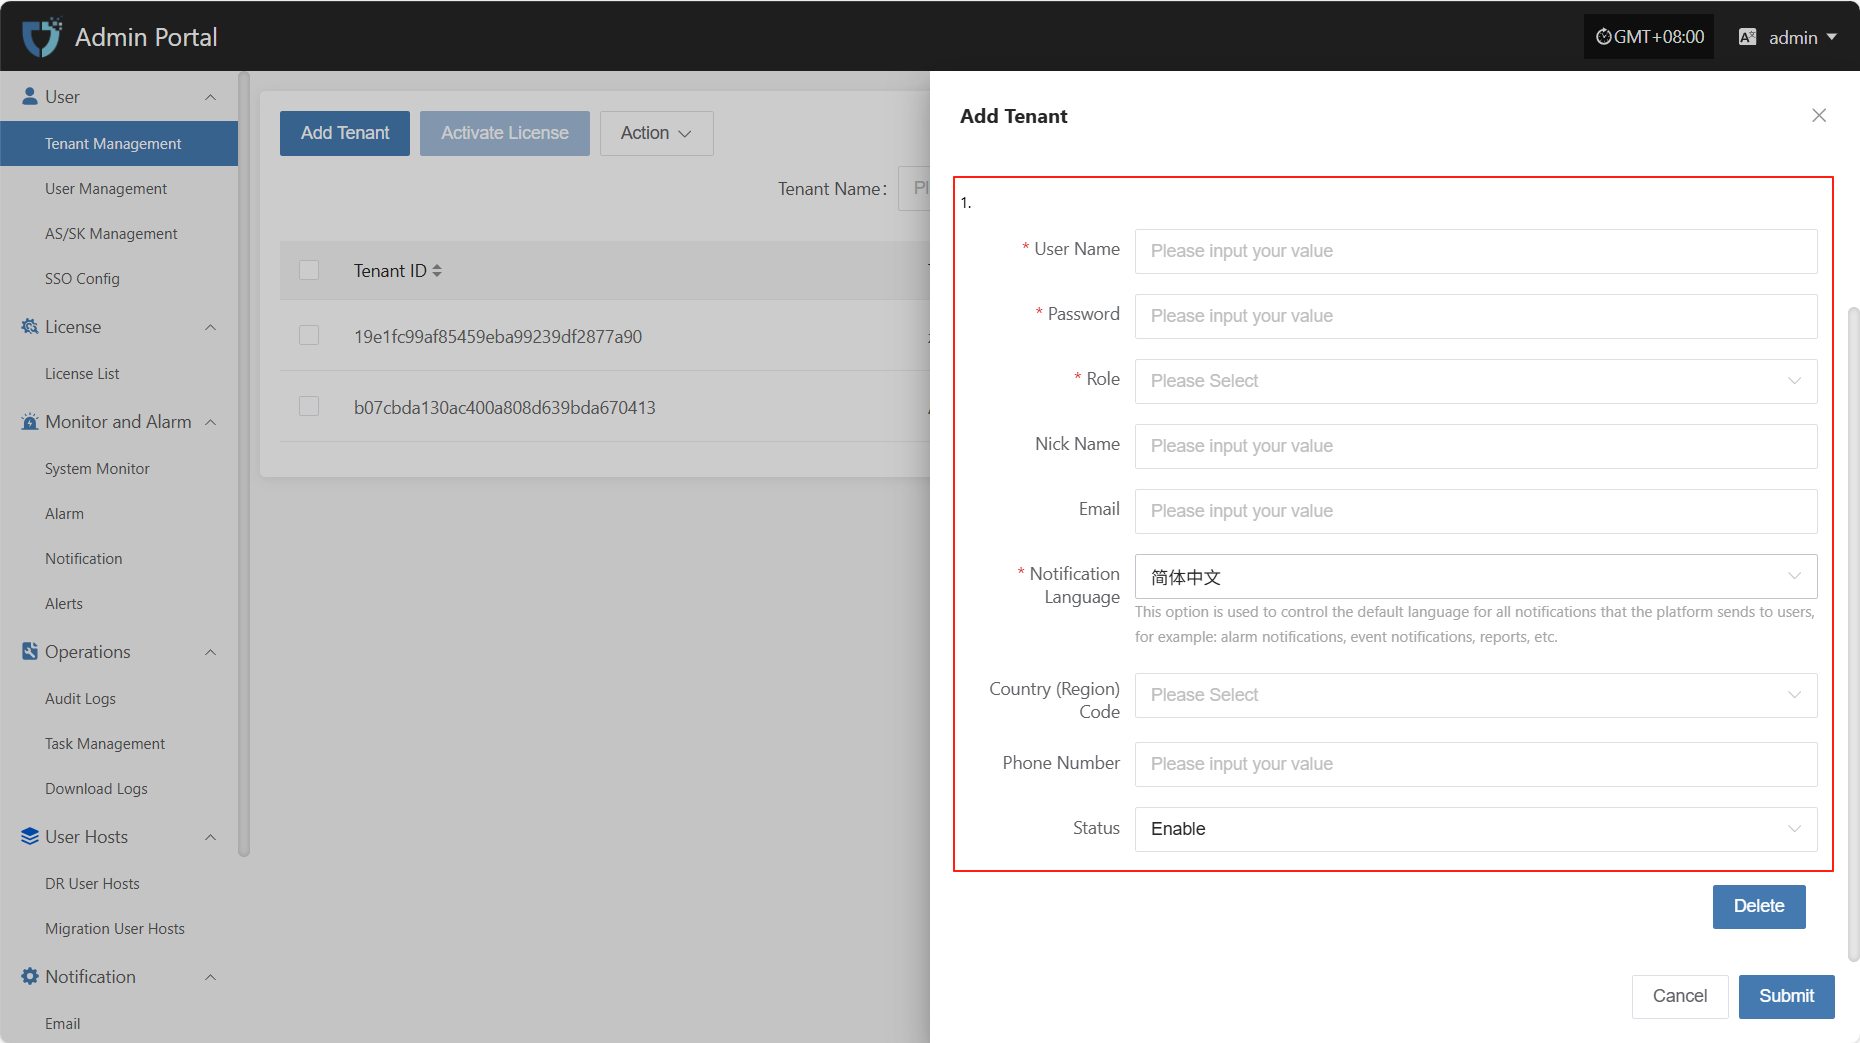
- Add User Description
| Field Name | Example/Default Value | Description |
|---|---|---|
| Username | dame1 | The unique username used to log in to the system. Cannot be duplicated. |
| Password | xxxxxxxxxx | Set the user's initial login password. It is recommended to include uppercase and lowercase letters and numbers. |
| Role | Platform Administrator | Assign the user's role in the platform. Different roles have different permission scopes. |
| Nick Name | dame1 | The name displayed for the user in the system. Can be in Chinese or English and is customizable. |
| xxx@163.com | Used to receive notifications, verification codes, and other system information. Please enter a valid email address. | |
| Notification Language | Simplified Chinese | Controls the default language for system notifications (such as alerts and events) received by the user. |
| Country/Region Code | China | Select the country or region for the mobile number. |
| Phone Number | 1766932xxxx | User's mobile number, used to receive SMS notifications and other services. |
| Status | Enable | Set the user's account status. When enabled, the user can log in to the system. If disabled, access is not allowed. |
After completing the tenant information configuration, click the "OK" button at the bottom right of the page. The system will create the new tenant and save the related settings.
Activate License
After selecting the tenant that needs to be activated from the list, click the "Activate License" button in the upper left corner of the page to enter the license activation process.
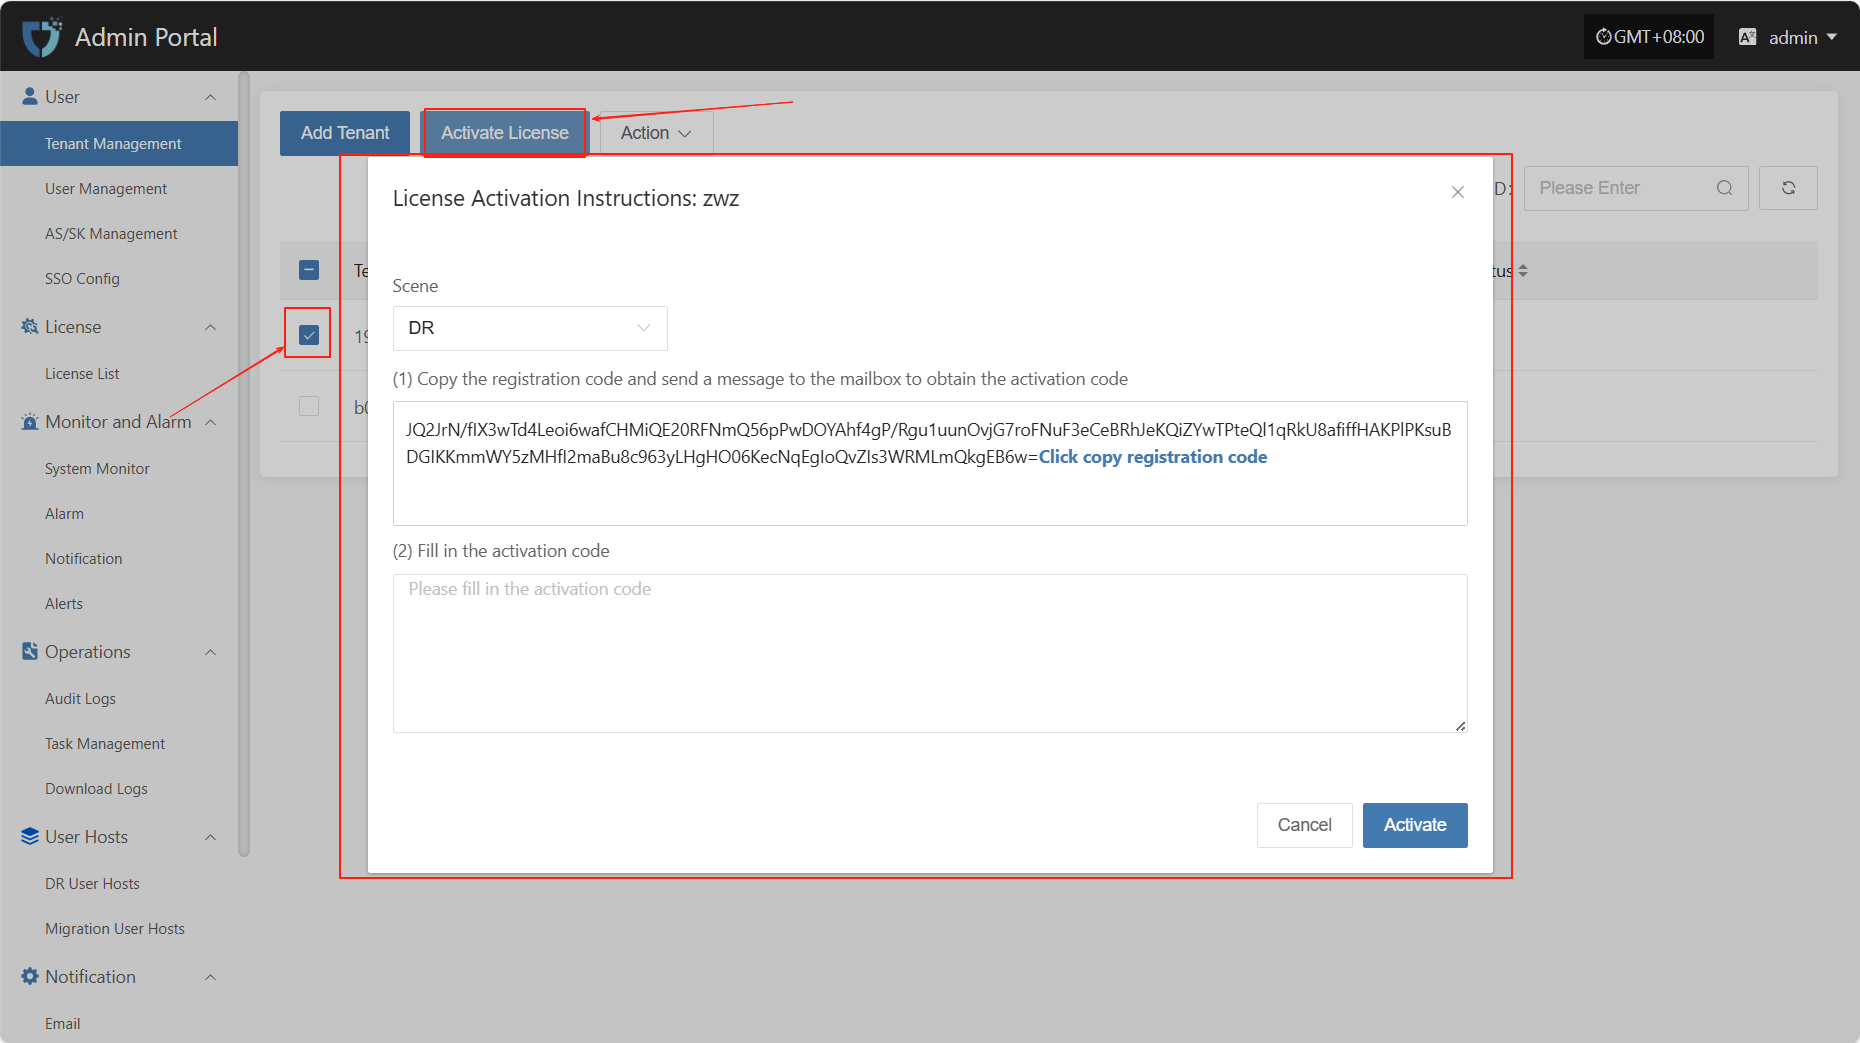
Select different scenarios to obtain the corresponding registration code according to actual usage requirements.
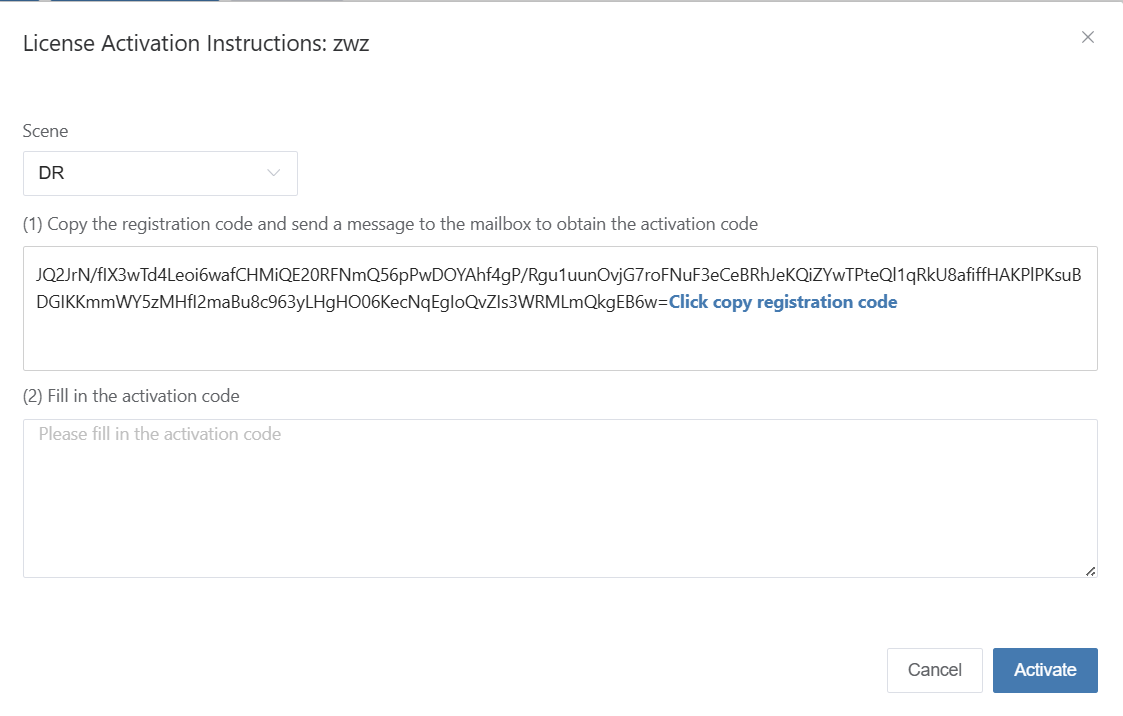
Click the link "Click to Apply" below to apply for the activation code online, or contact the corresponding account manager to obtain the activation code.Click to Apply
After receiving the activation code, please enter it into the designated input box and click the "Activate" button to complete the license activation.
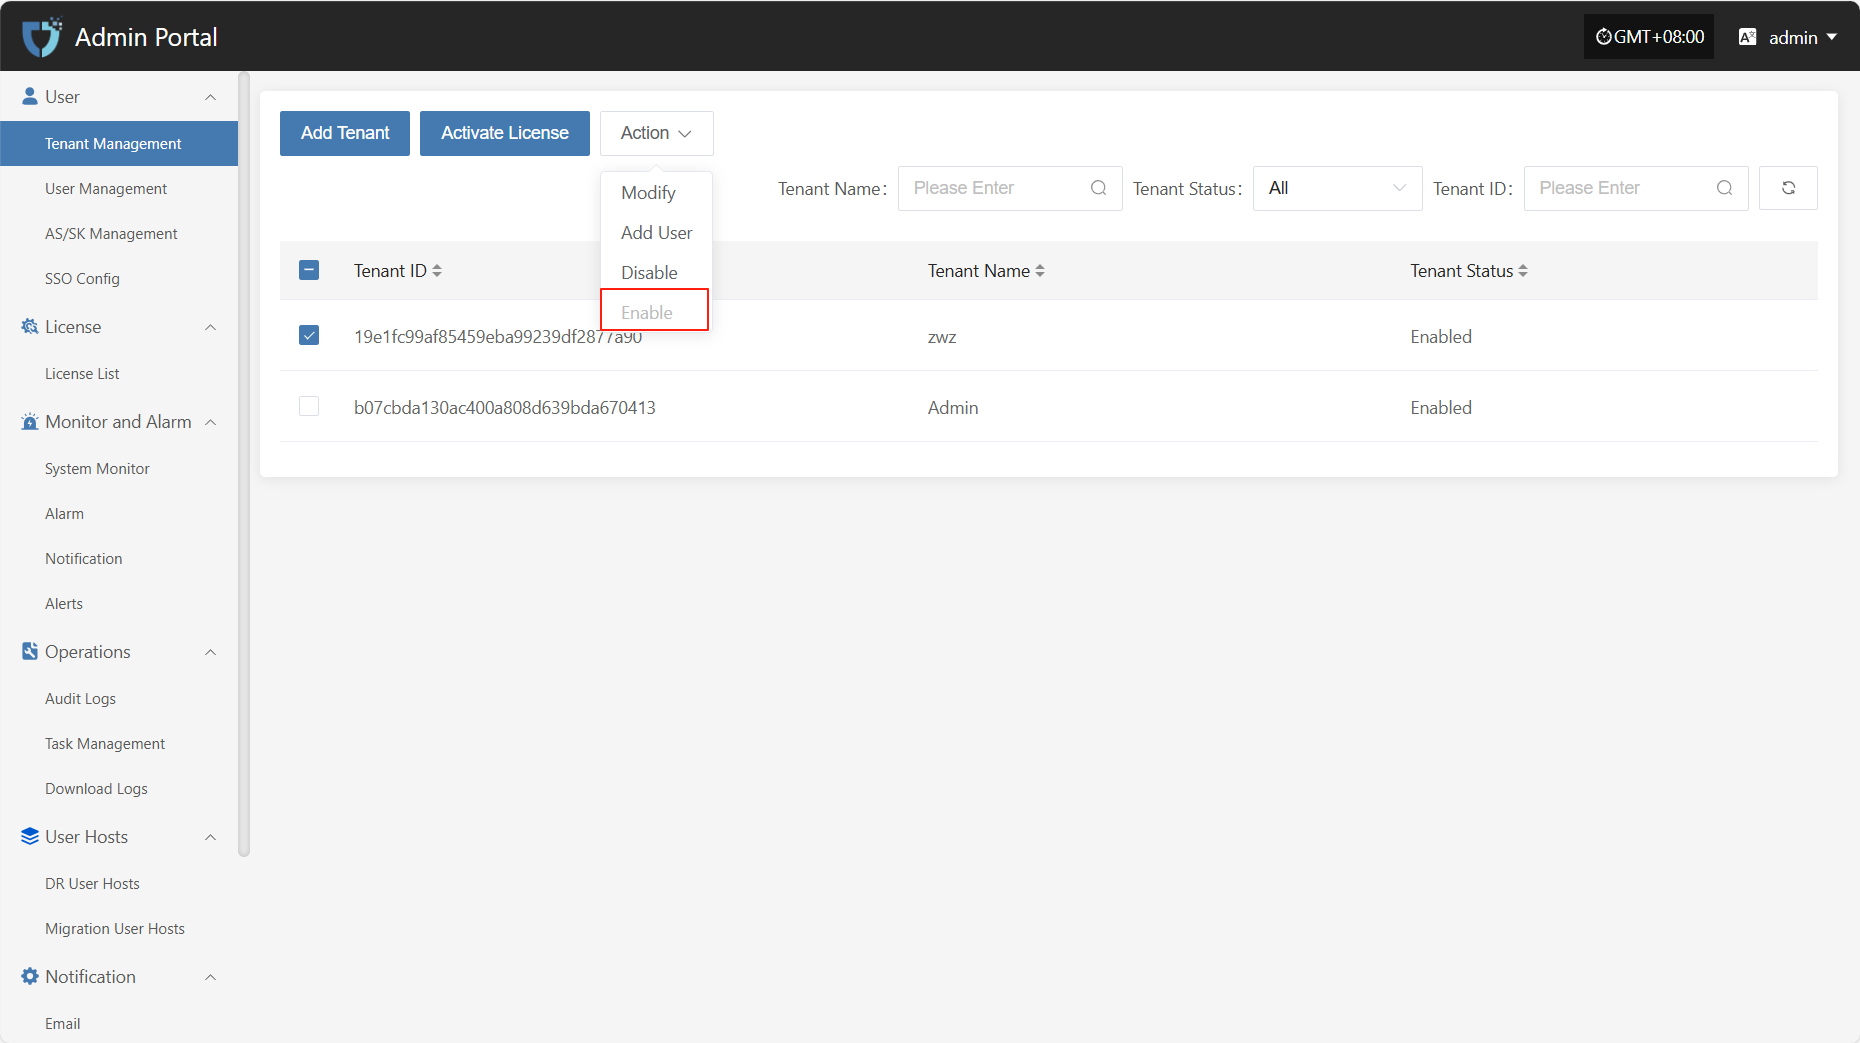
Action
Modify
Click "Modify" to edit the authentication information.
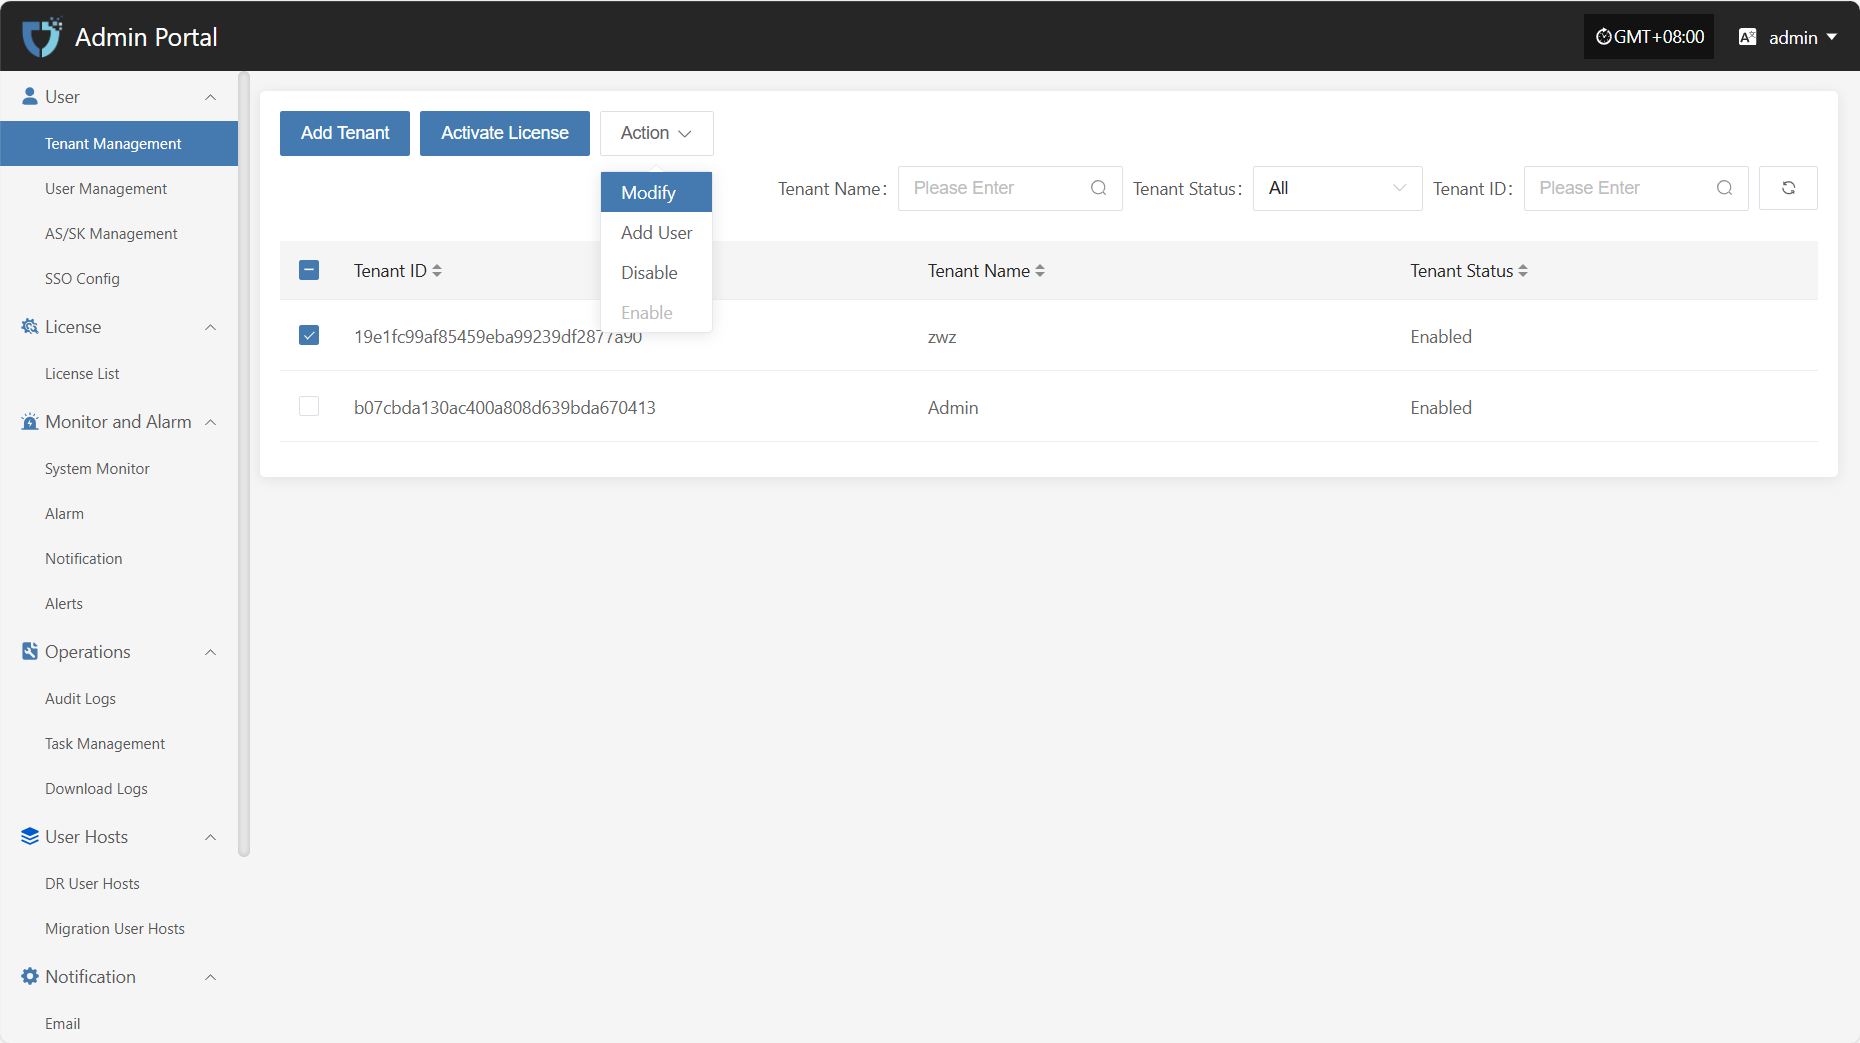
Add User
Click the "Add User" button to add and bind a new user to the current tenant.
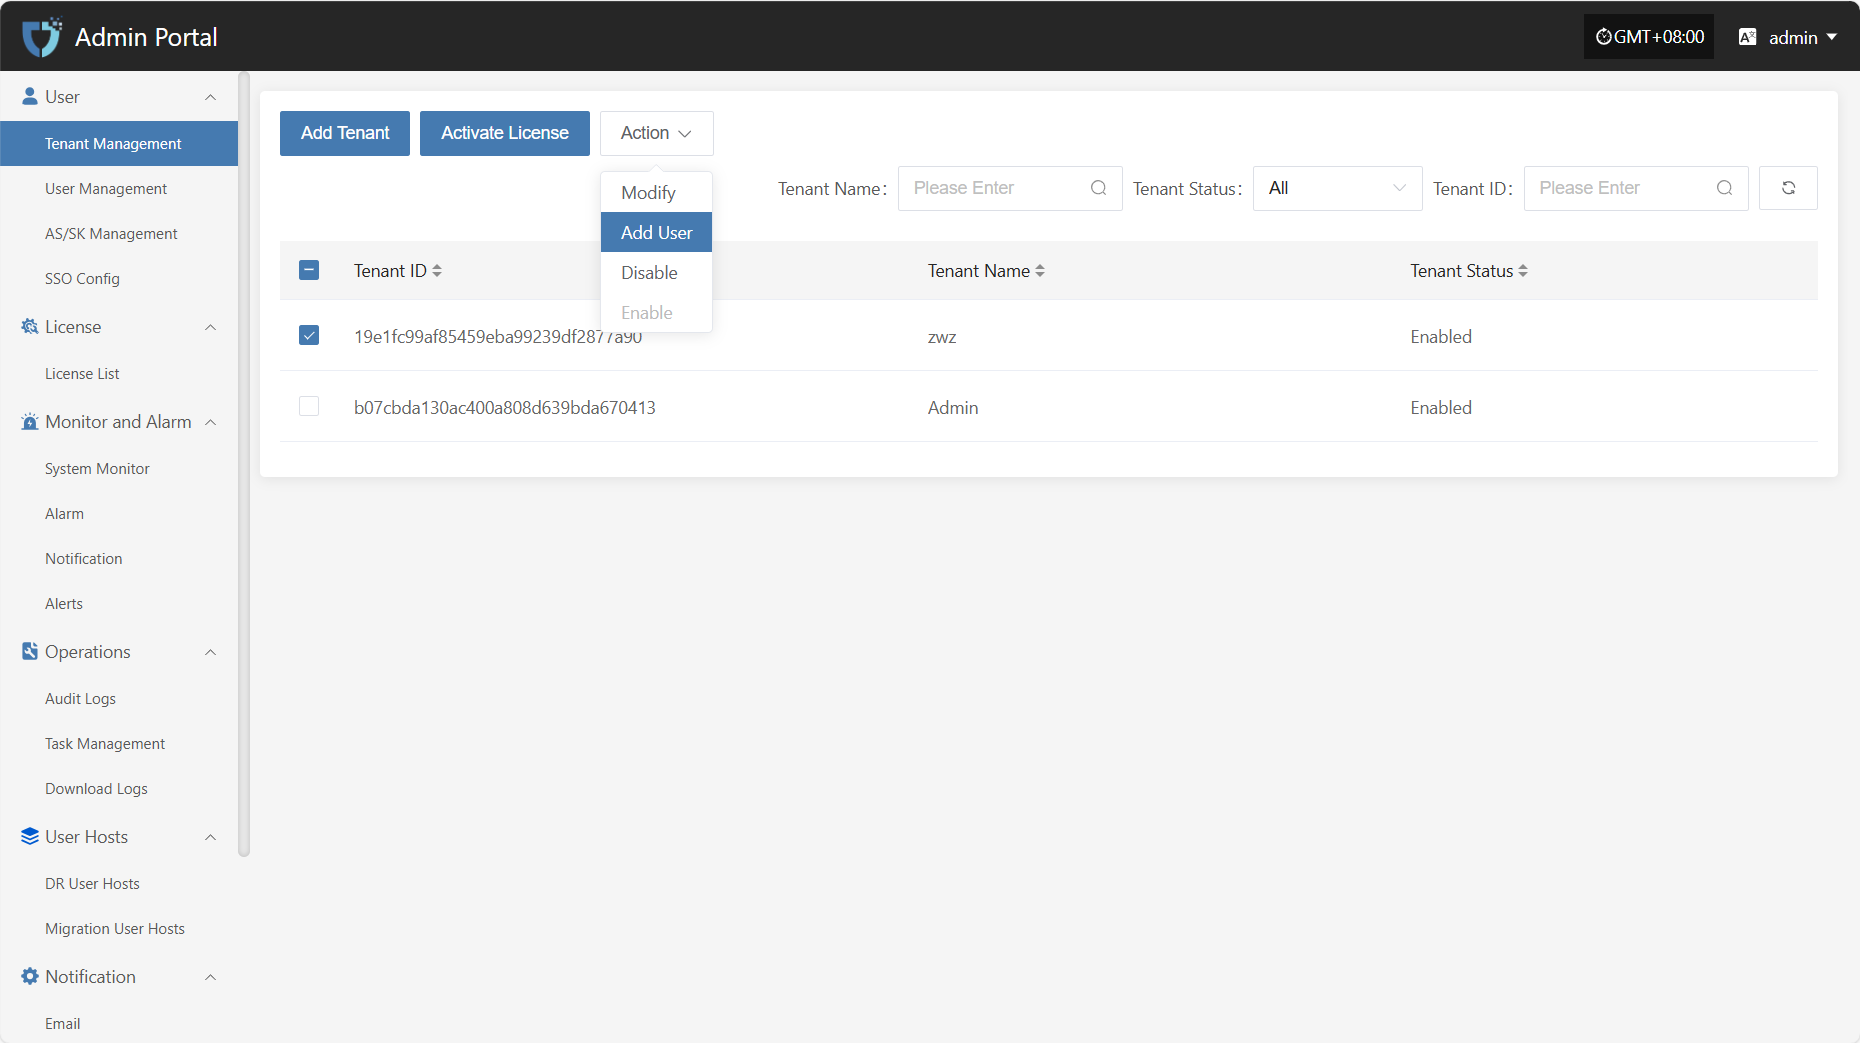
Disable
Click the "Disable" button to disable a tenant that is currently enabled.
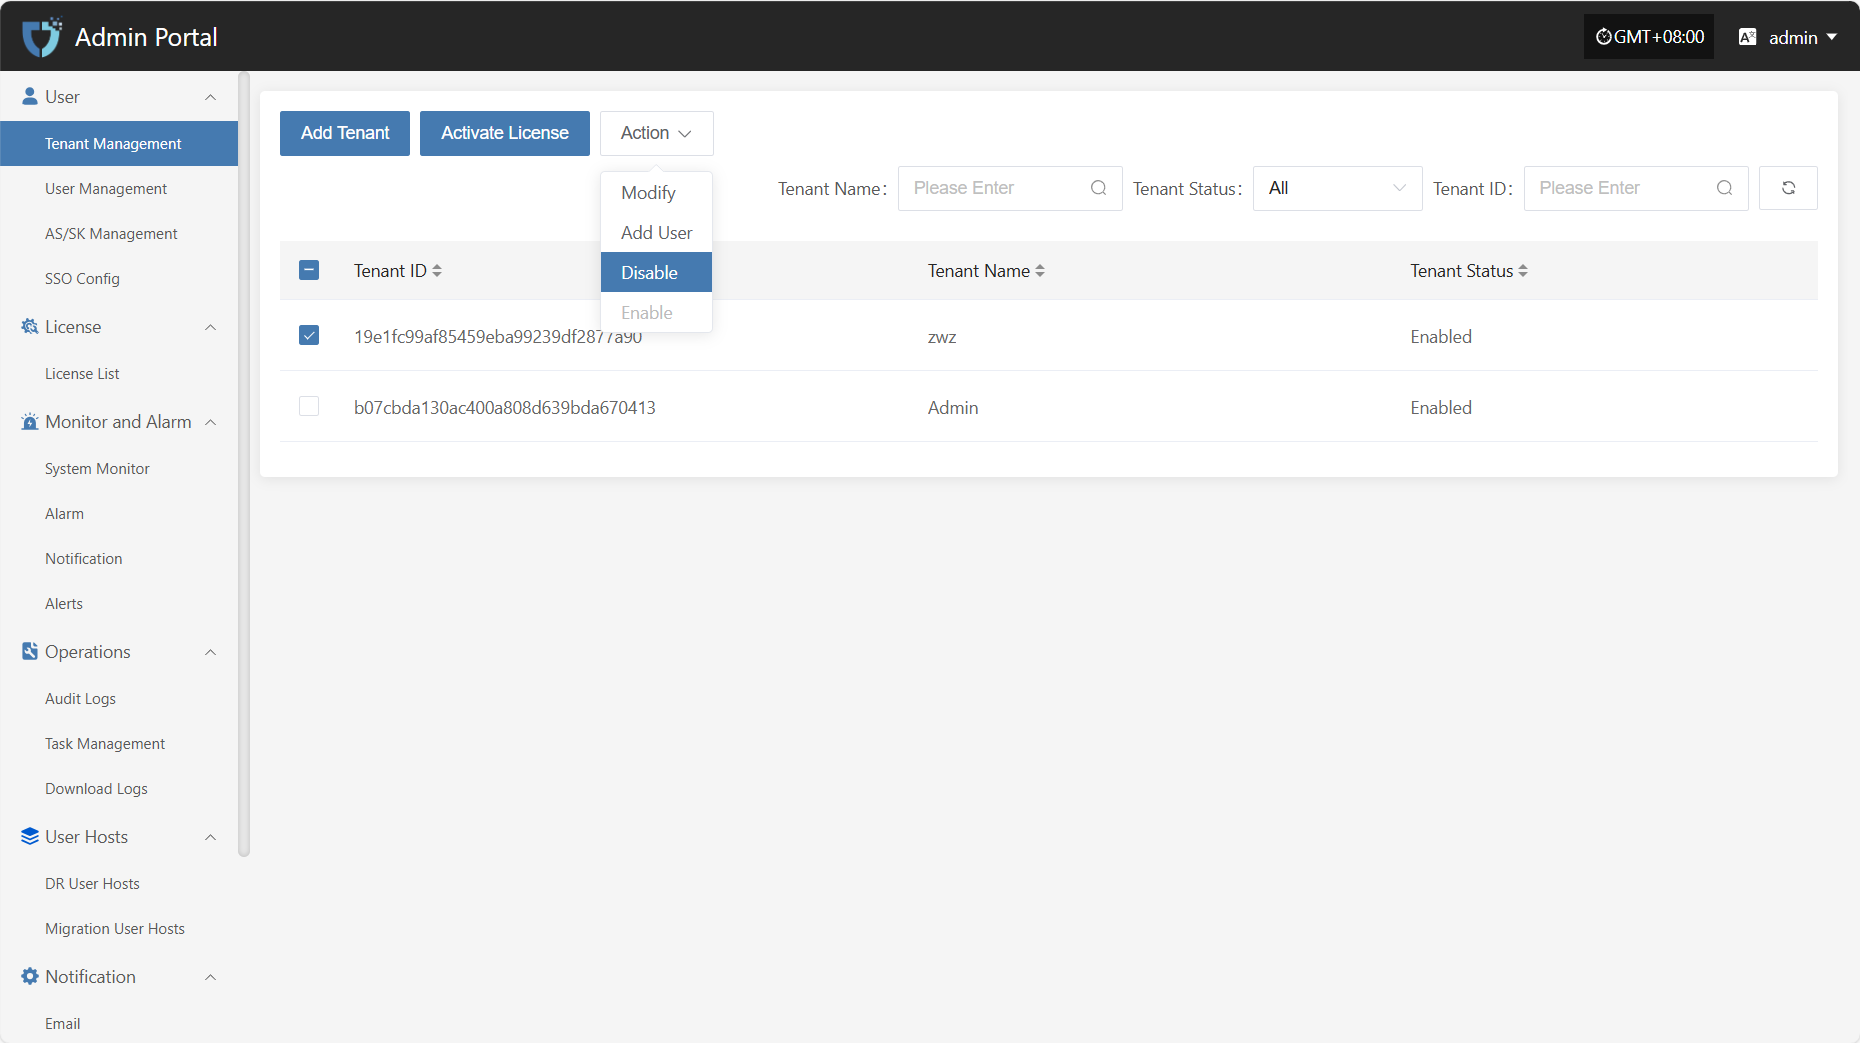
Enable
Click the "Enable" button to activate a tenant that is currently disabled.
User Management
The "User Management" module is used to centrally manage all user accounts in the system, including user editing, status control, and permission assignment. Through this module, administrators can centrally configure and manage users under different tenants, ensuring system security and standardized operations.
You can use the search box on the right to filter by role type, username, tenant name, or tenant ID.

Modify
After selecting the user to operate in the list, click "Modify" in the upper right to edit part of the user's authentication information.

- User Authentication Information Description
| Field Name | Example/Default Value | Description |
|---|---|---|
| User Name | dame1 | The username for logging into the HyperBDR/HyperMotion platform must be 2–60 characters long and can only include letters, numbers, underscores, and dots. |
| Role | Platform Admin | Assign the user's role in the platform. Different roles have different permission scopes. |
| Nick Name | dame1 | The name displayed for the user in the system. Can be in Chinese or English and is customizable. |
| xxx@163.com | Used to receive notifications, verification codes, and other system information. Please enter a valid email address. | |
| Notification Language | Chinese | Controls the default language for system notifications (such as alerts and events) received by the user. |
| Country (Region) Code | China | Select the country or region for the mobile number. |
| Phone Number | 1766932xxxx | User's mobile number, used to receive SMS notifications and other services. |
| Status | Enable | Set the user's account status. When enabled, the user can log in to the system. If disabled, access is not allowed. |
After modifying the user information, click the "Submit" button at the bottom right of the page to save the settings.
Action
Reset Password
Click the "Reset Password" button to reset the user's login password.
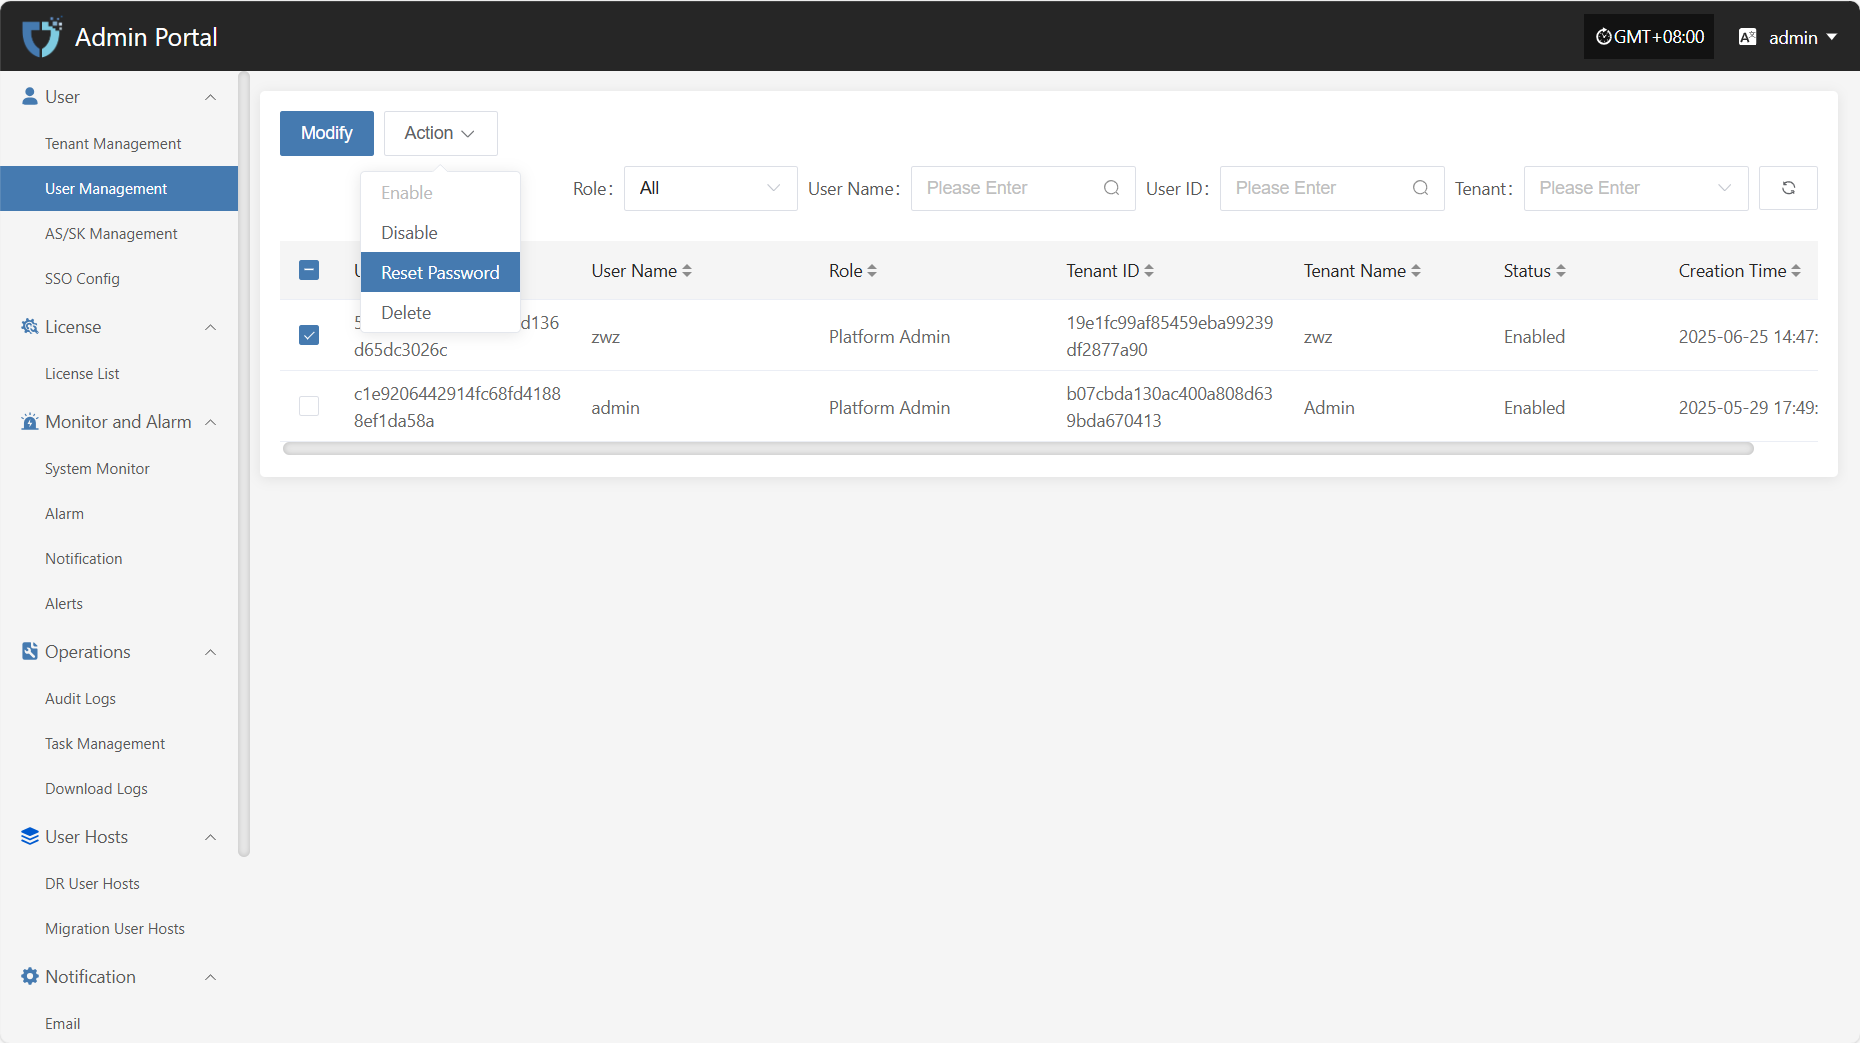
Enable
Click the "Enable" button to activate a disabled user.
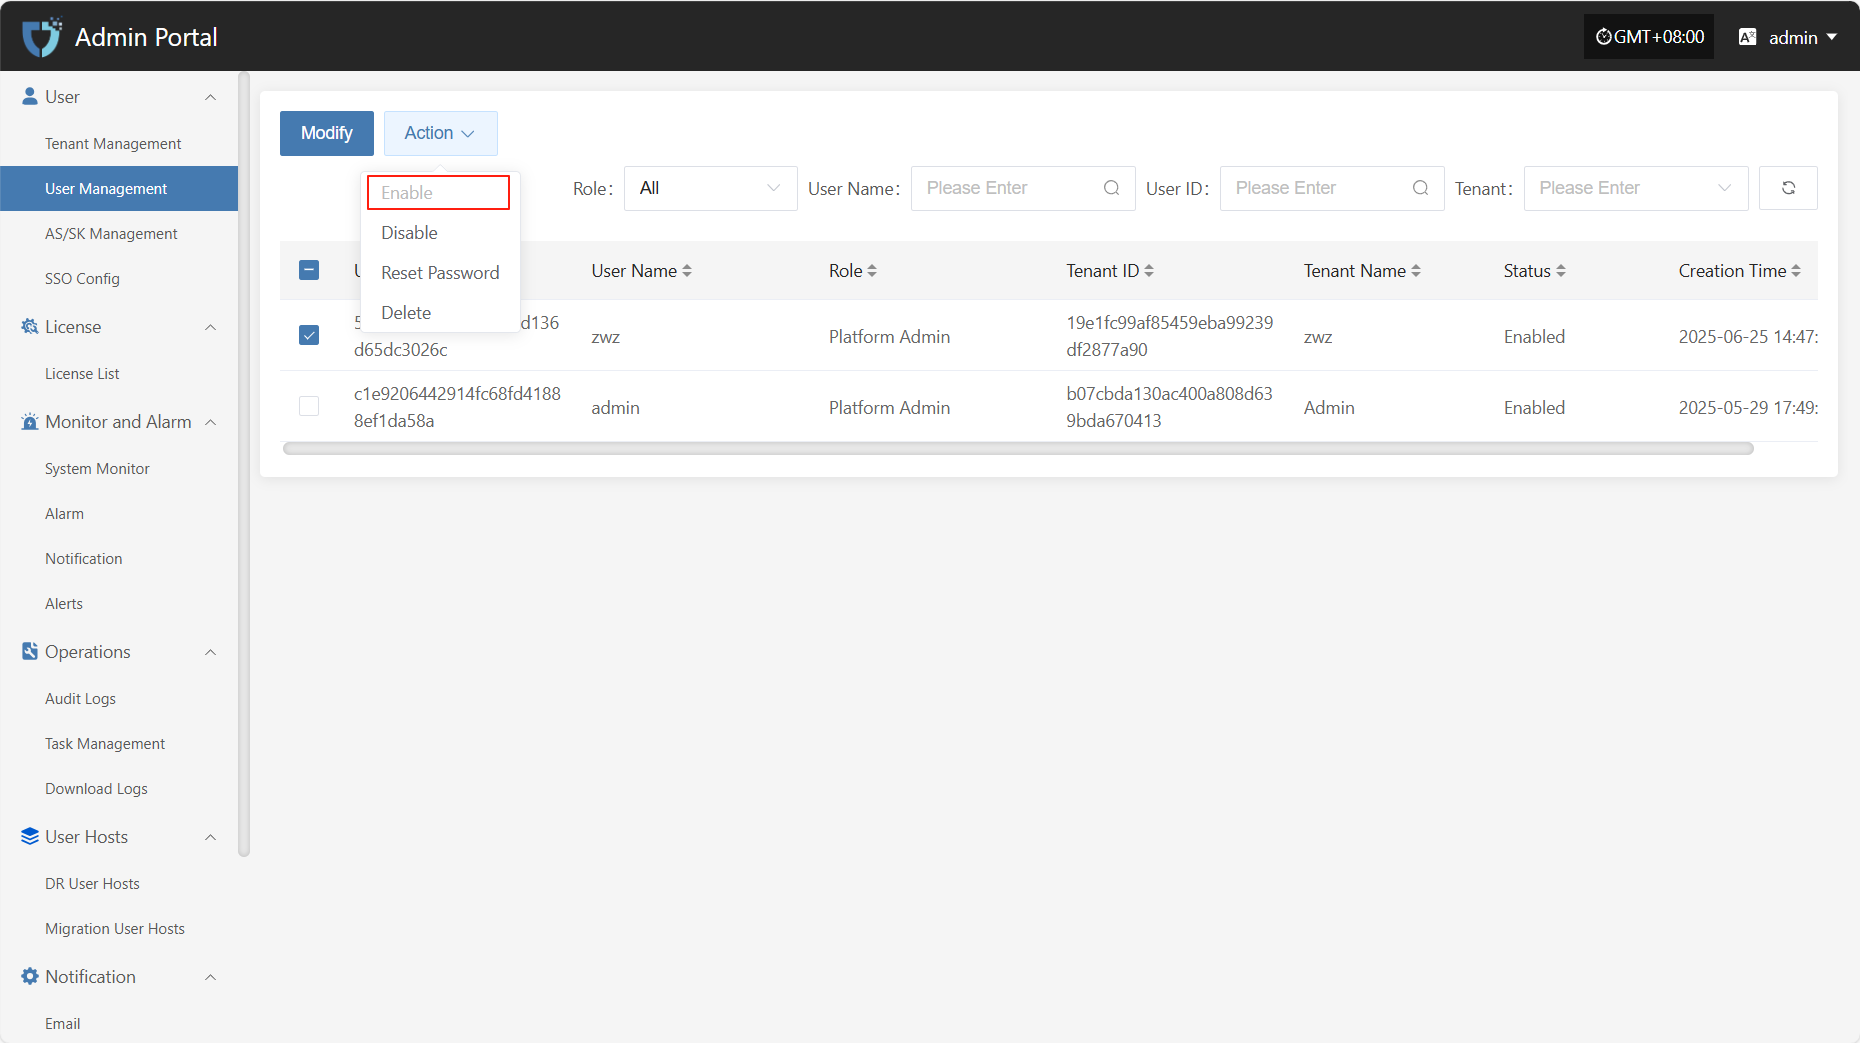
Disable
Click the "Disable" button to disable an enabled user.
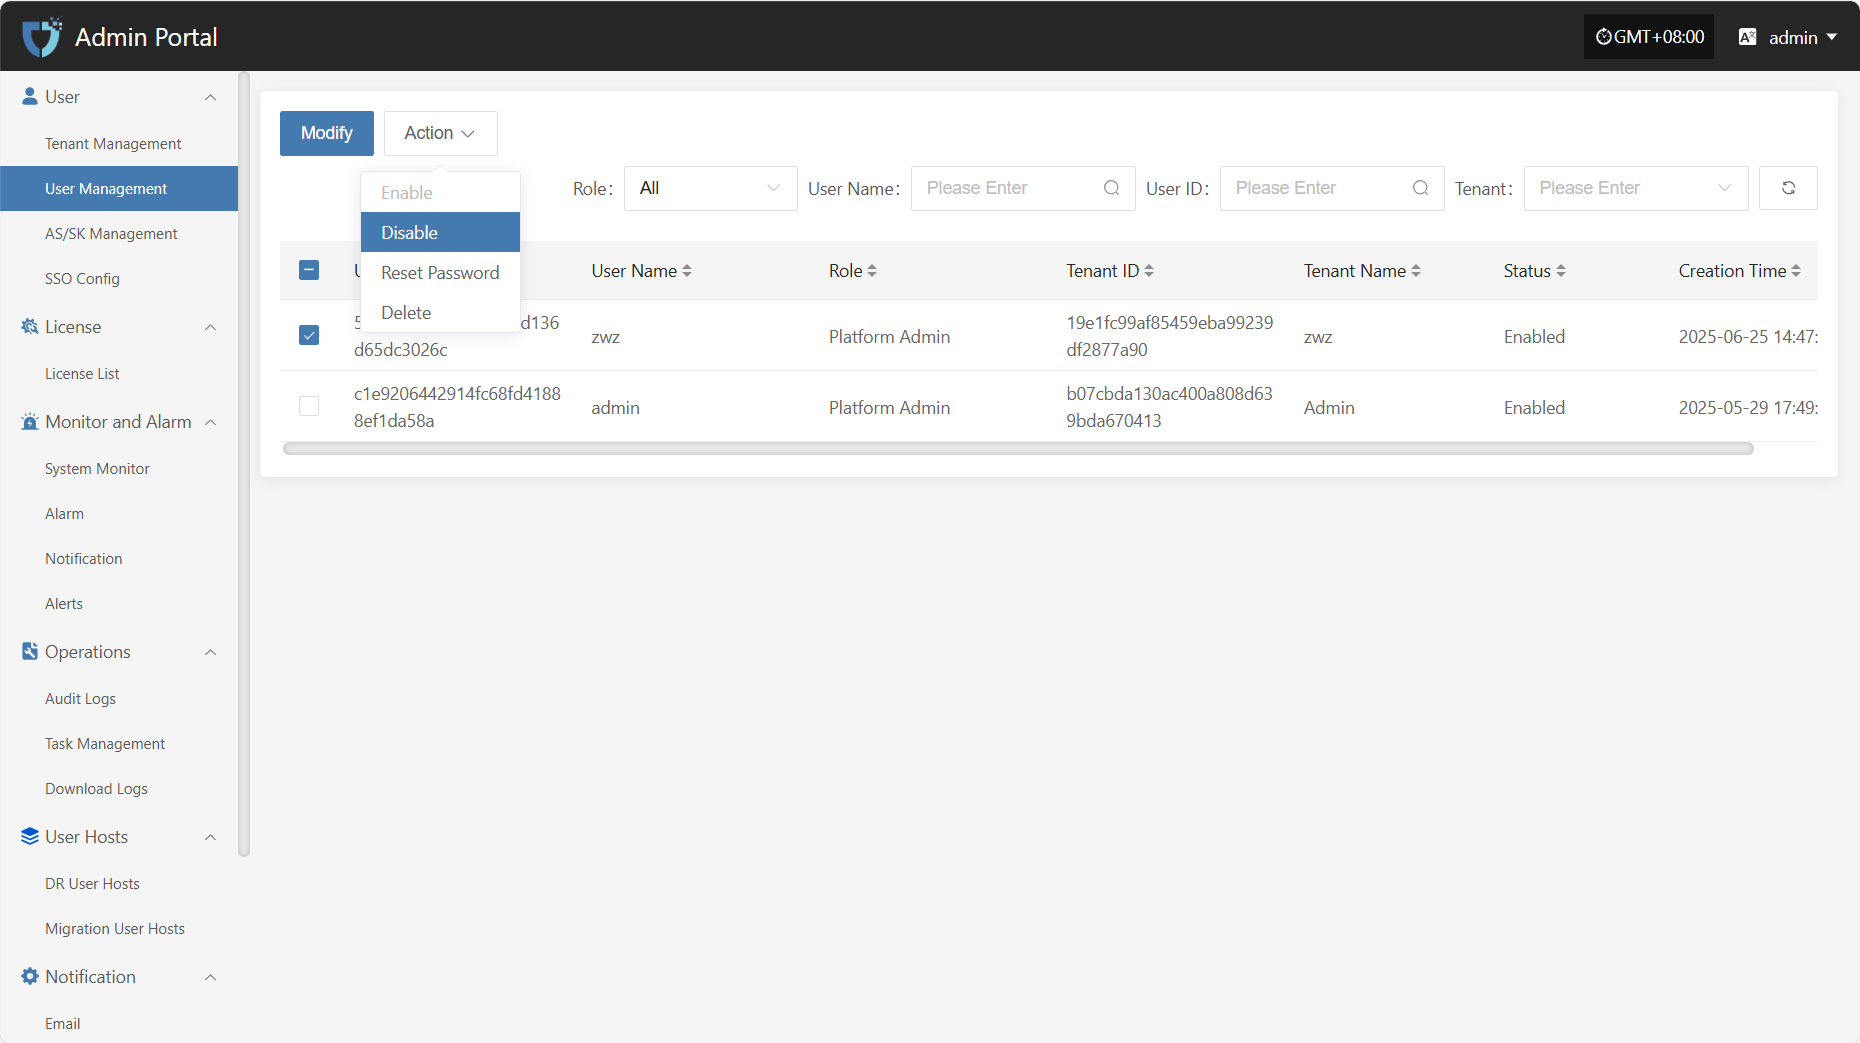
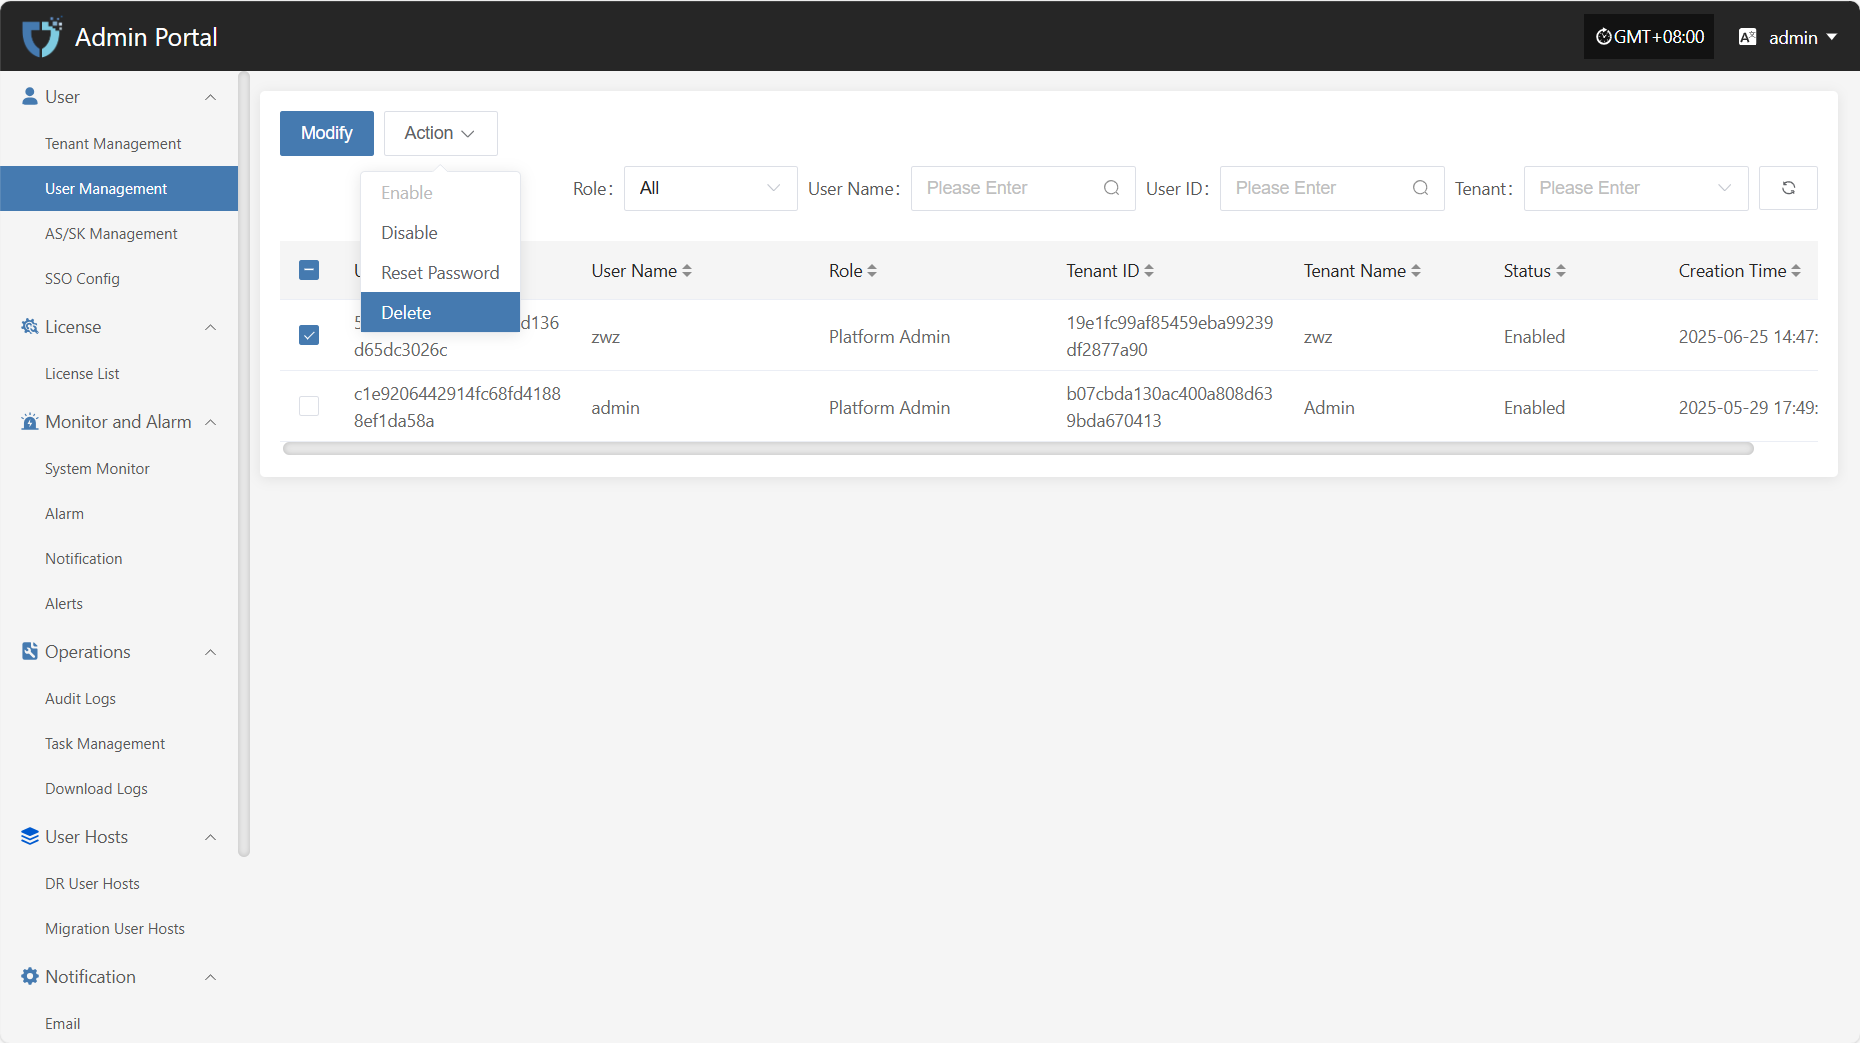
Delete
Click the "Delete" button to remove the user account.
AS/SK Management
The "AS/SK Management" module is used to generate and manage Access Keys (AK) and Secret Keys (SK) for users, supporting authentication and secure access to system interfaces. By assigning AK/SK, the system can identify and control the permissions of API users, which is essential for automation integration and third-party system connections.
You can use the search box on the right to filter by conditions.
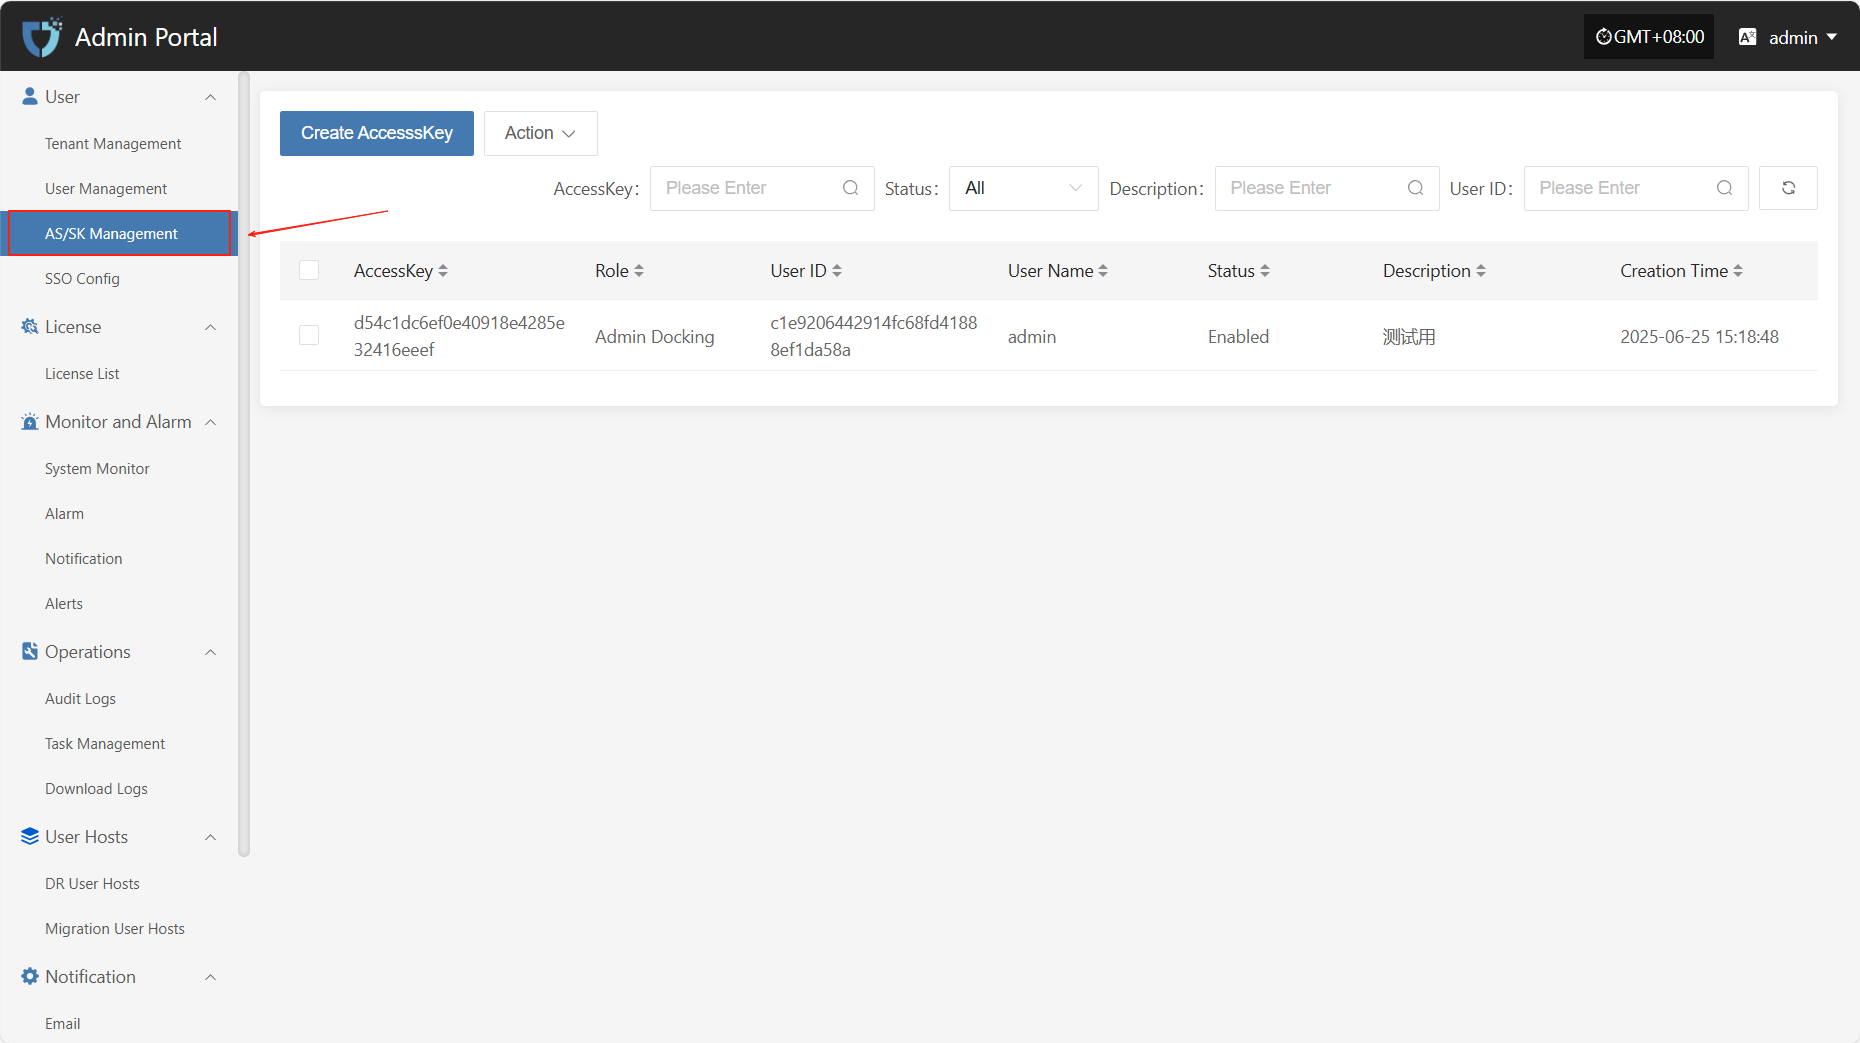
Create AccesssKey
Click the "Create AccesssKey" button in the upper left corner to start creating an AccesssKey.
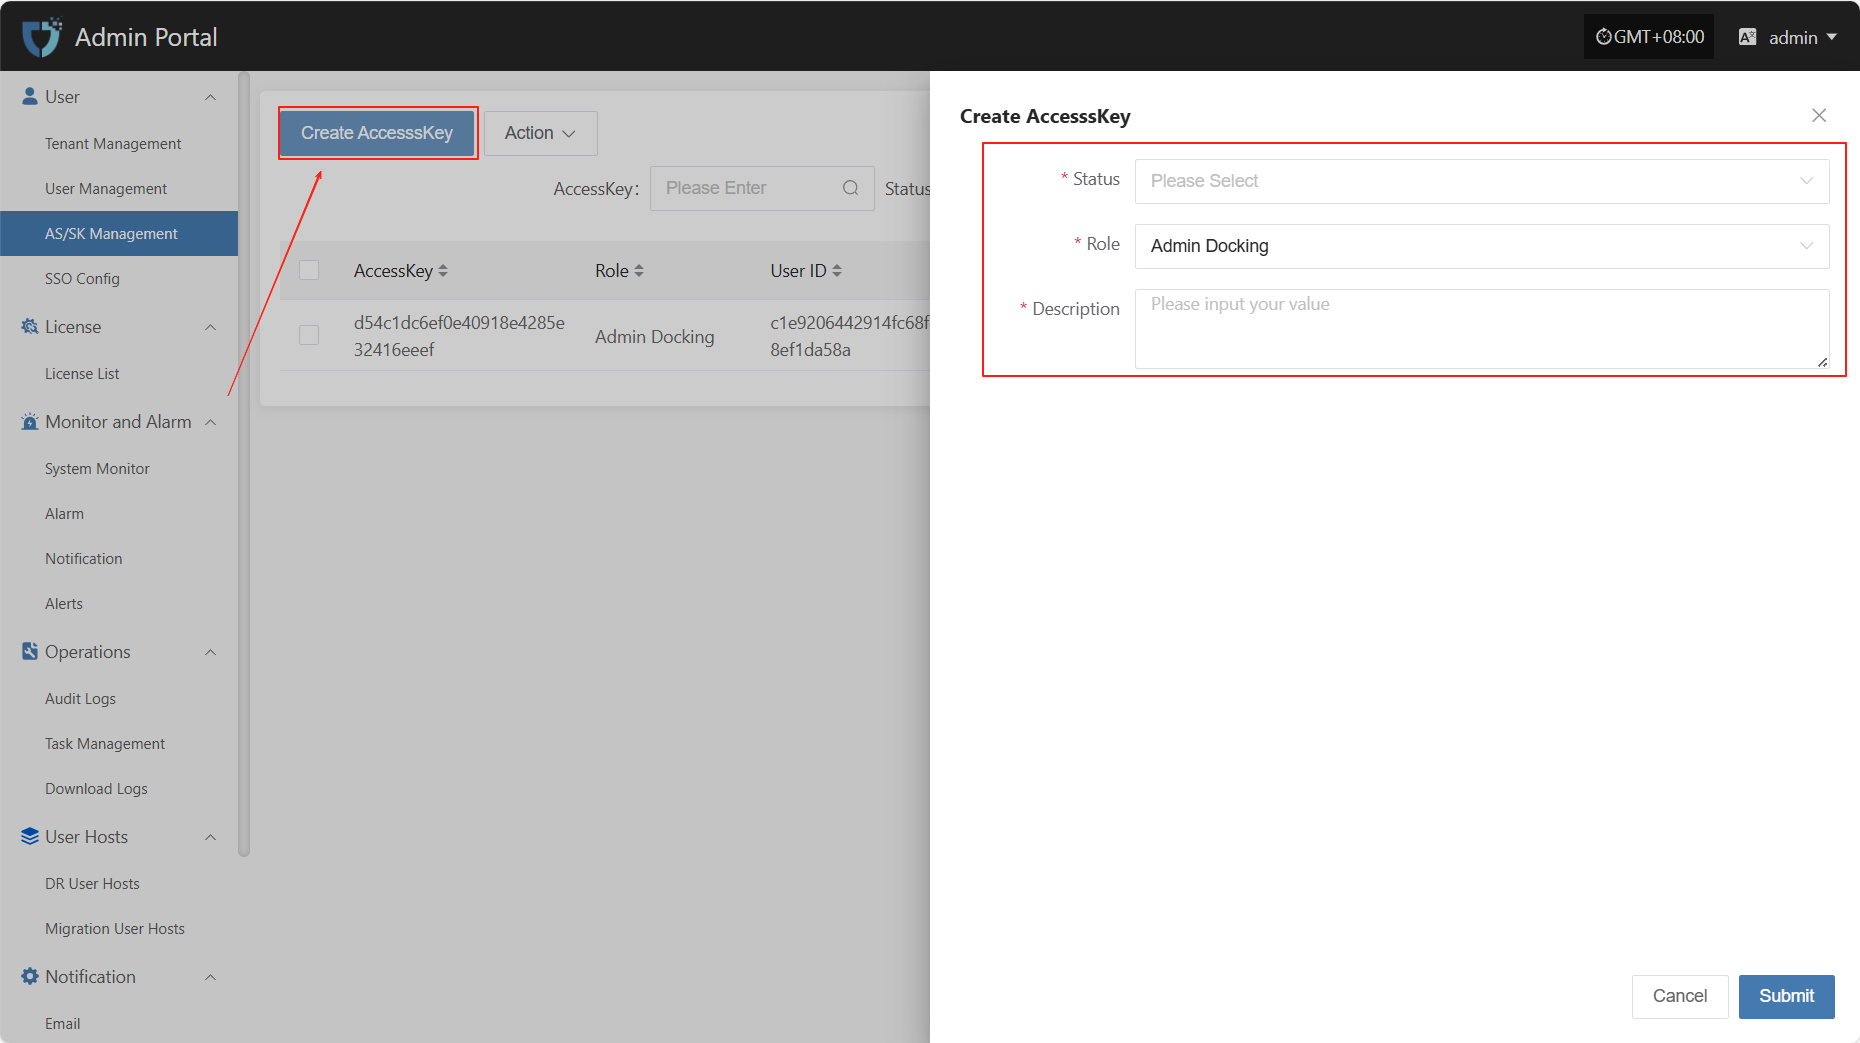
- Authentication Information Description
| Setting | Example Value | Description |
|---|---|---|
| Status | Enable | Indicates the current status of the key. Enable means it can be used for system access, disable means it is temporarily unavailable. |
| Role | Admin Docking | The role assigned to the key, used to define the permission scope of the AK/SK. |
| Description | test ak | A brief description of the key's purpose or background for easy identification and management. |
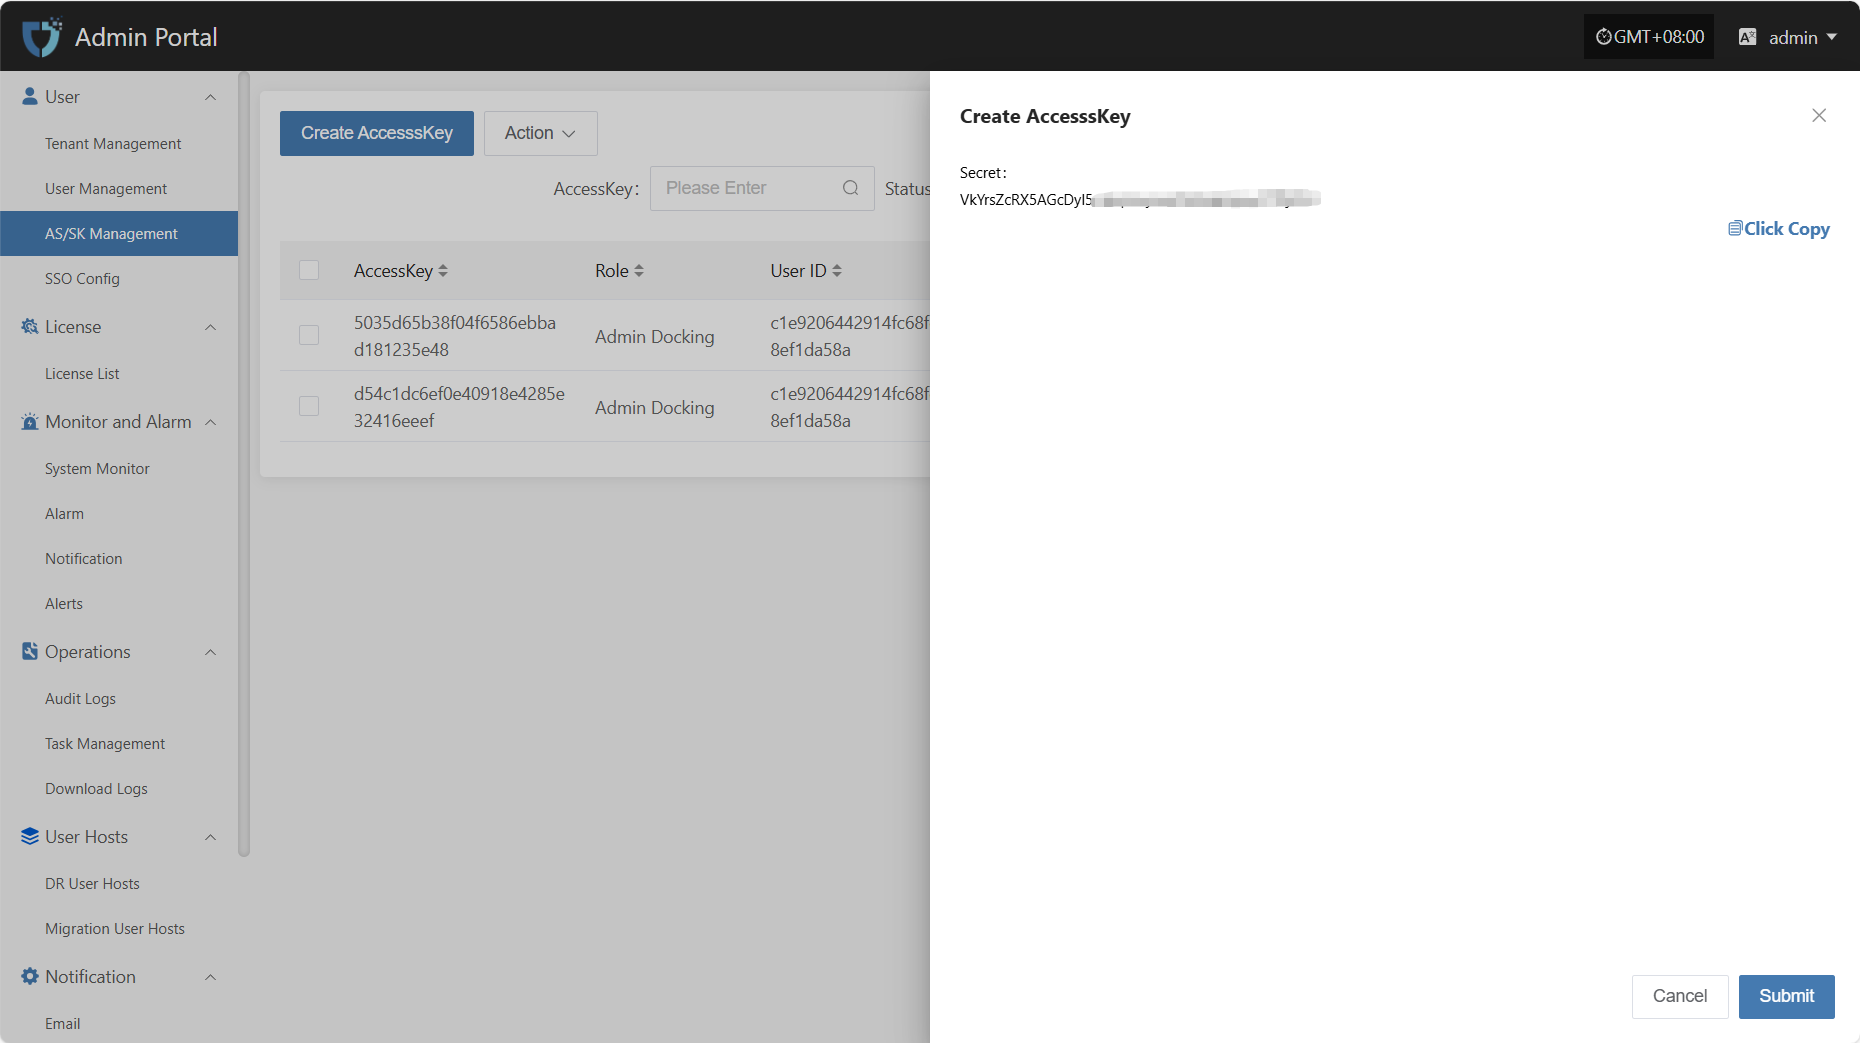
After filling in all configuration information, click "Submit" to complete key creation. The Secret value will be displayed immediately after successful creation, please keep it safe.
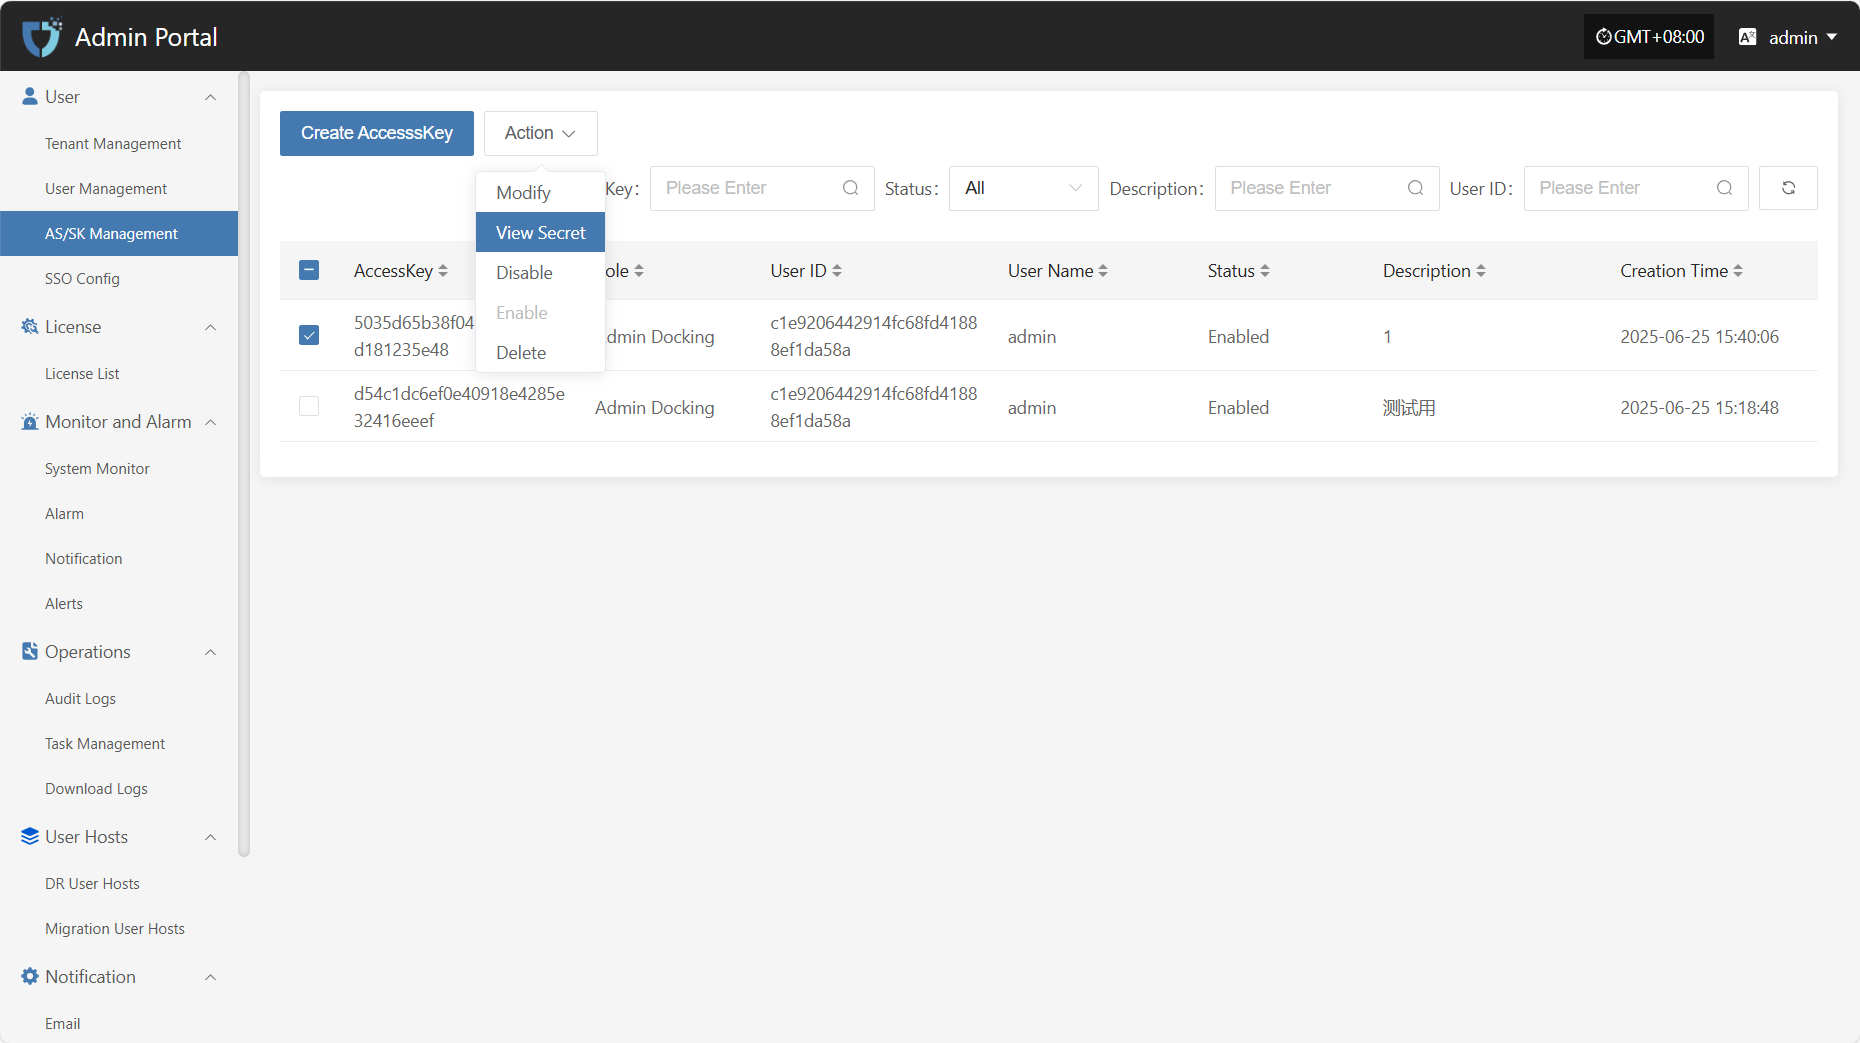
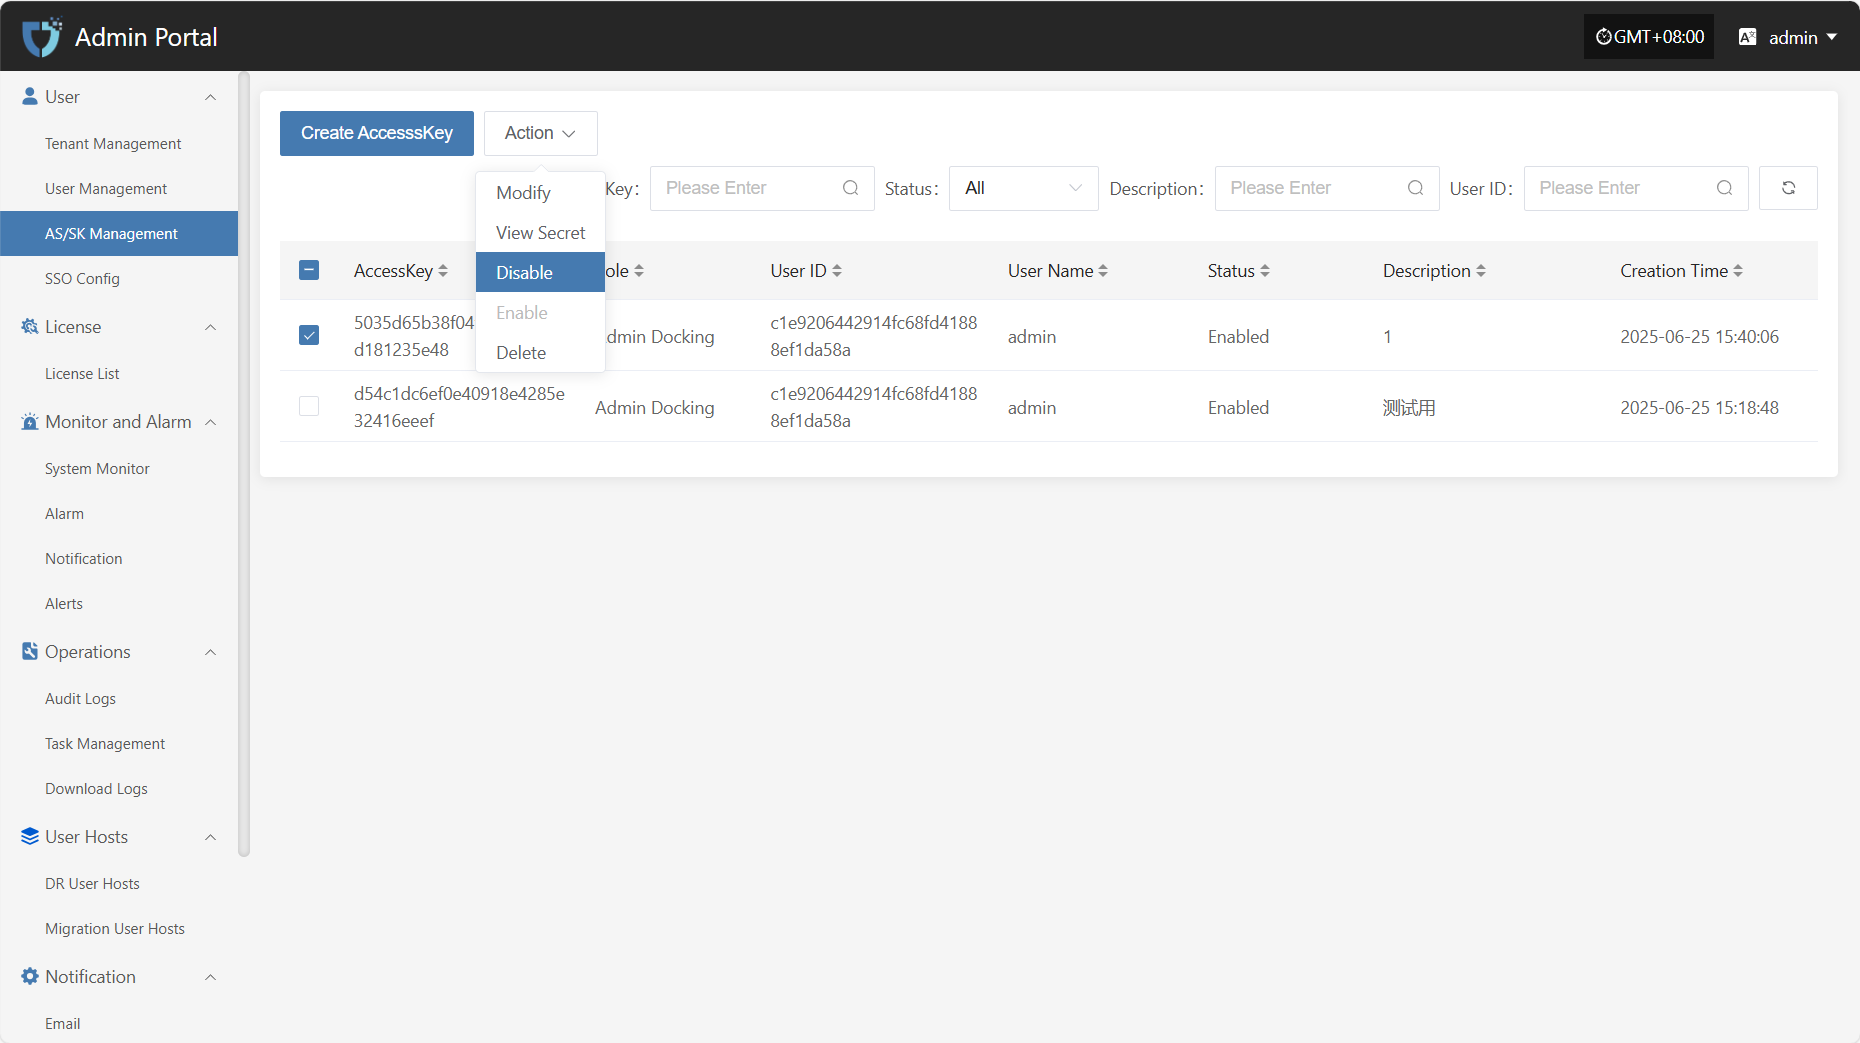
Action
Modify
After selecting the AK to operate in the list, click "Modify" to edit part of the authentication information.
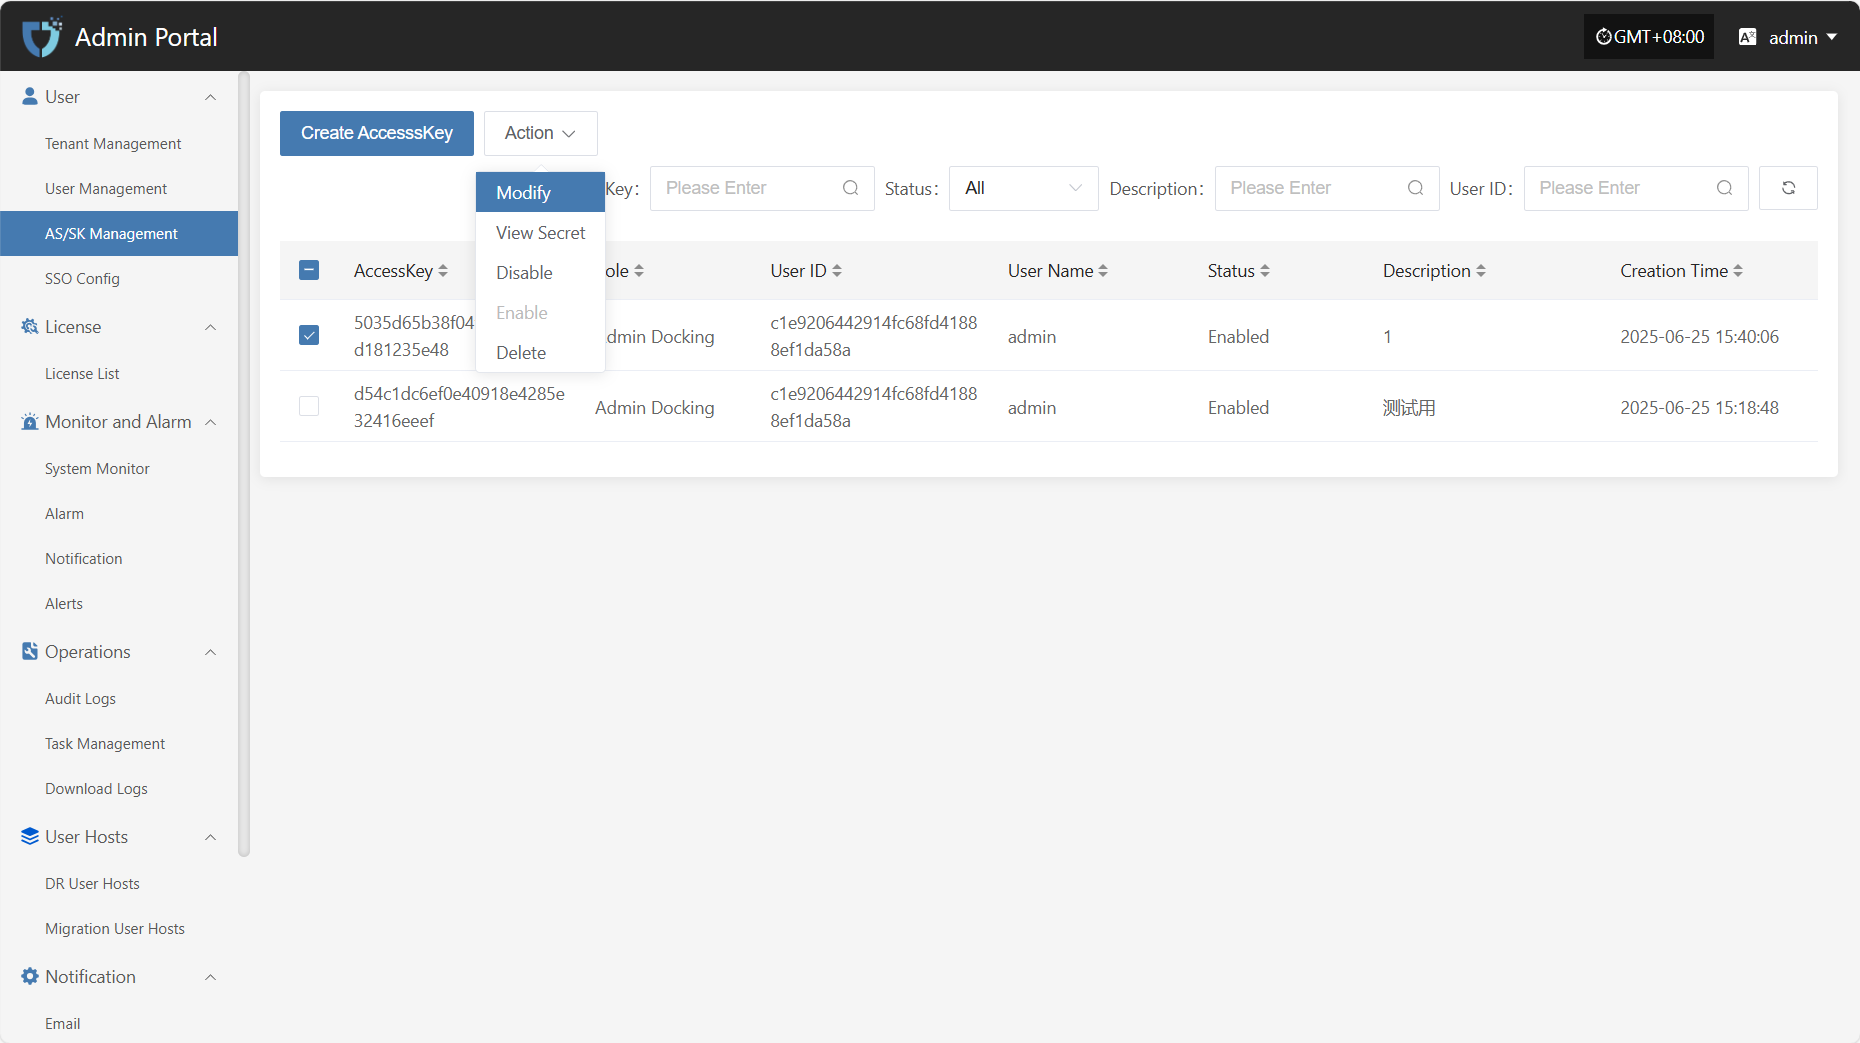
View Secret
Click "View Secret" to view the Secret value again.
Disable
Click the "Disable" button to disable an enabled AK.
Enable
Click the "Enable" button to activate a disabled AK.

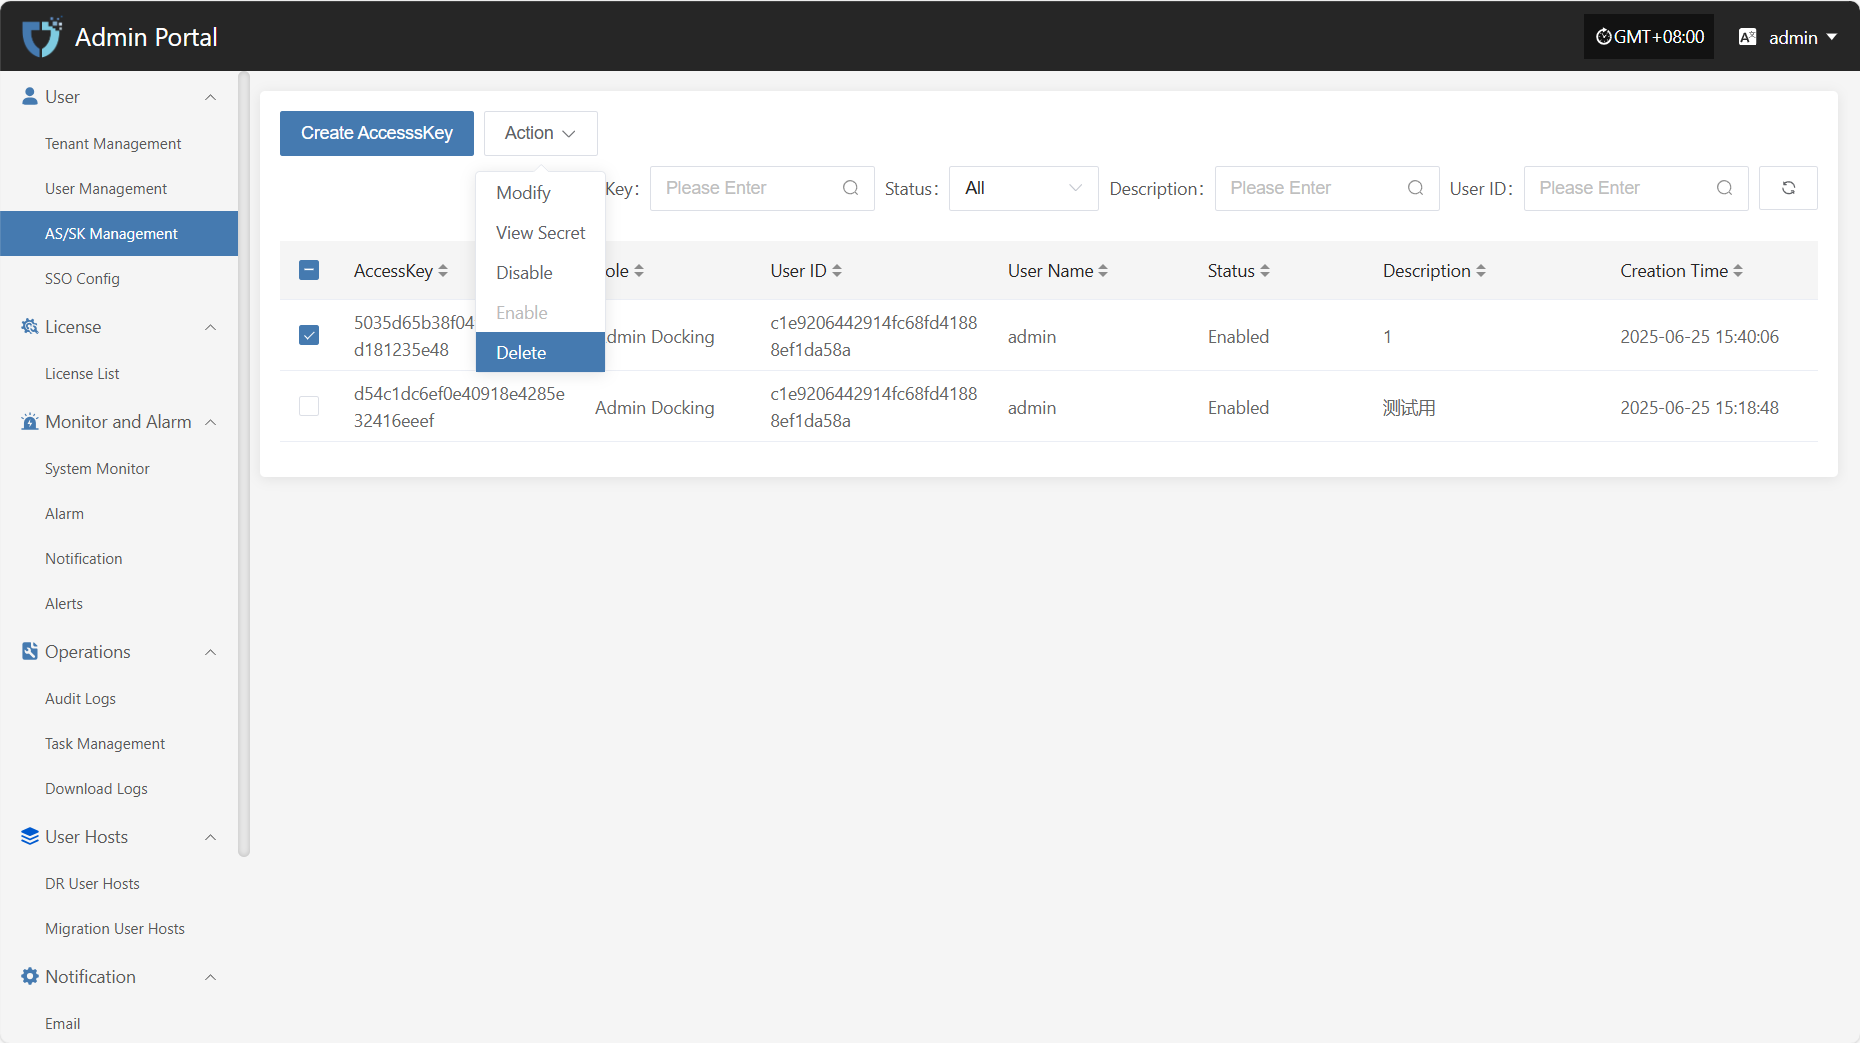
Delete
Click the "Delete" button to remove the AK.
SSO Config
The "SSO Config" module is used to connect to third-party identity authentication systems, enabling unified authentication and automatic login for users across multiple systems, improving system integration efficiency and user experience.

Add OAuth2
Click the "Add OAuth2" button in the upper left corner to start adding SSO.

- Authentication Information Description
| Setting | Example Value | Description |
|---|---|---|
| Configuration information | DingTalk | Currently supports DingTalk, Zhejiang Rural Credit, and BinaryOwl |
| Authentication Platform Redirection Address | https://example.com/callback | The address to which the third-party authentication platform redirects after authentication. Must be a valid callback address registered with the platform. |
| Address of the Third-Party Authentication Platform | https://login.dingtalk.com/oauth | The entry address for OAuth2.0 authentication with DingTalk. |
| Log Out and Log In to the Forward Address Again | https://example.com/login | The default login redirect address when users revisit the system after logging out. Usually the DR/Migration platform login page. |
| App Key | Please fill in | The App Key applied for on the DingTalk open platform, used to identify the third-party application. |
| Agent ID | Please fill in | The Agent ID corresponding to the DingTalk application, used to specify the micro application to connect. |
| App Secret | Please fill in | The secret paired with the App Key, used for signing and identity verification. Please keep it safe and avoid leakage. |
| Enable Status | Enable / Disable | Controls whether the current SSO configuration is effective. |
Note: When selecting Zhejiang Rural Credit or BinaryOwl, you only need to fill in the API Base URL and the login redirect address after logging out.
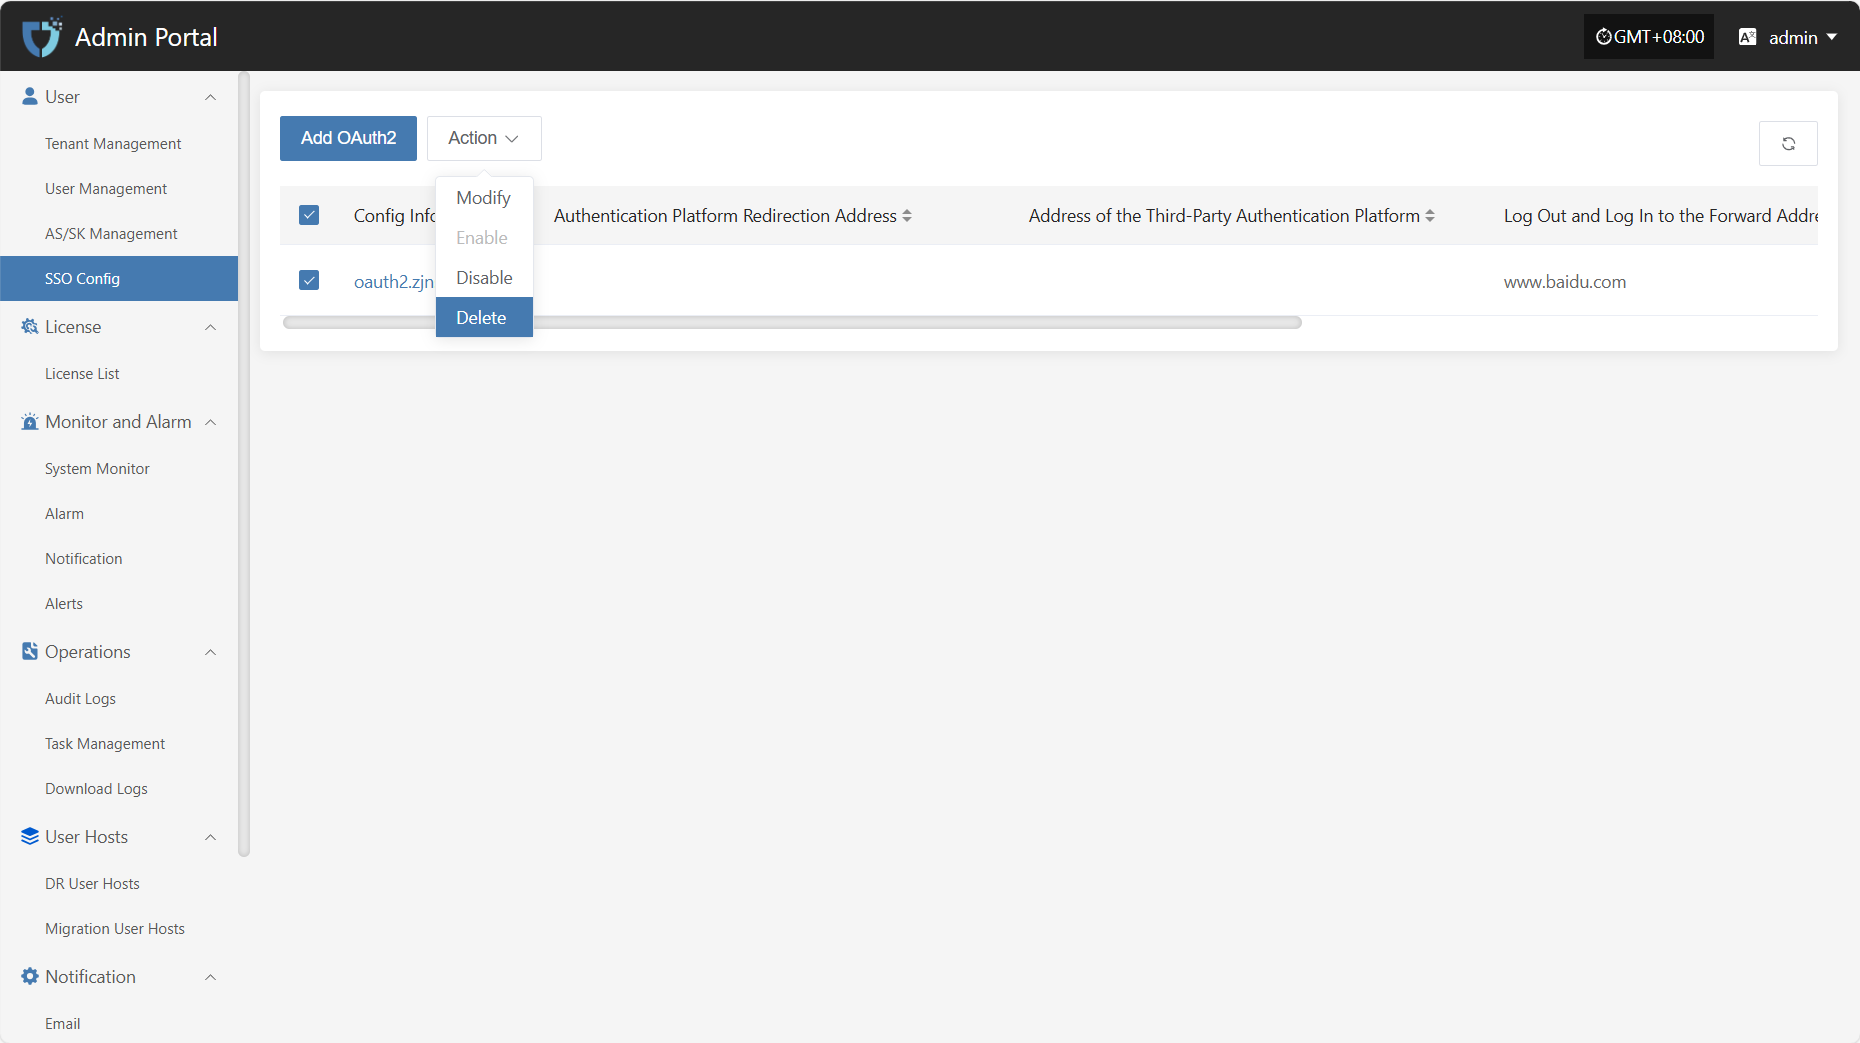
Action
Modify
After selecting the configuration to operate in the list, click "Modify" to edit part of the authentication information.
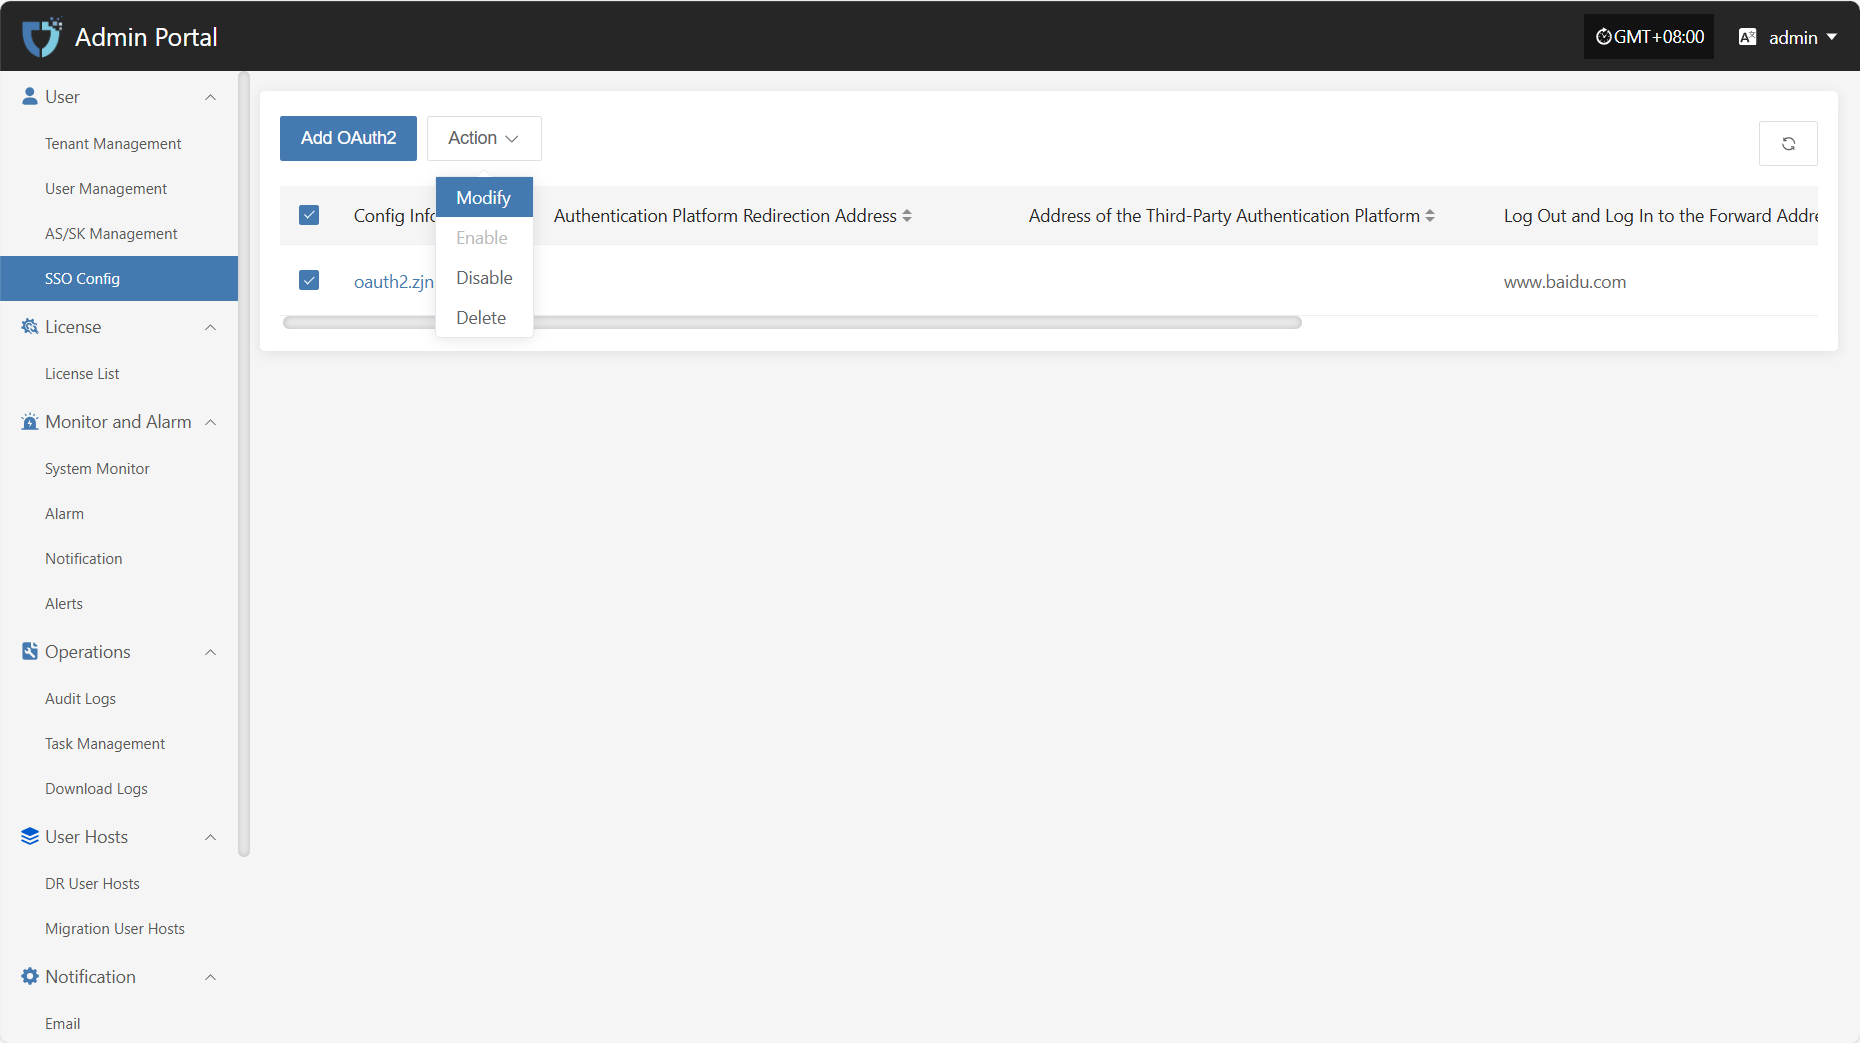
Enable
Click the "Enable" button to activate a disabled SSO configuration.

Disable
Click the "Disable" button to disable an enabled SSO configuration.
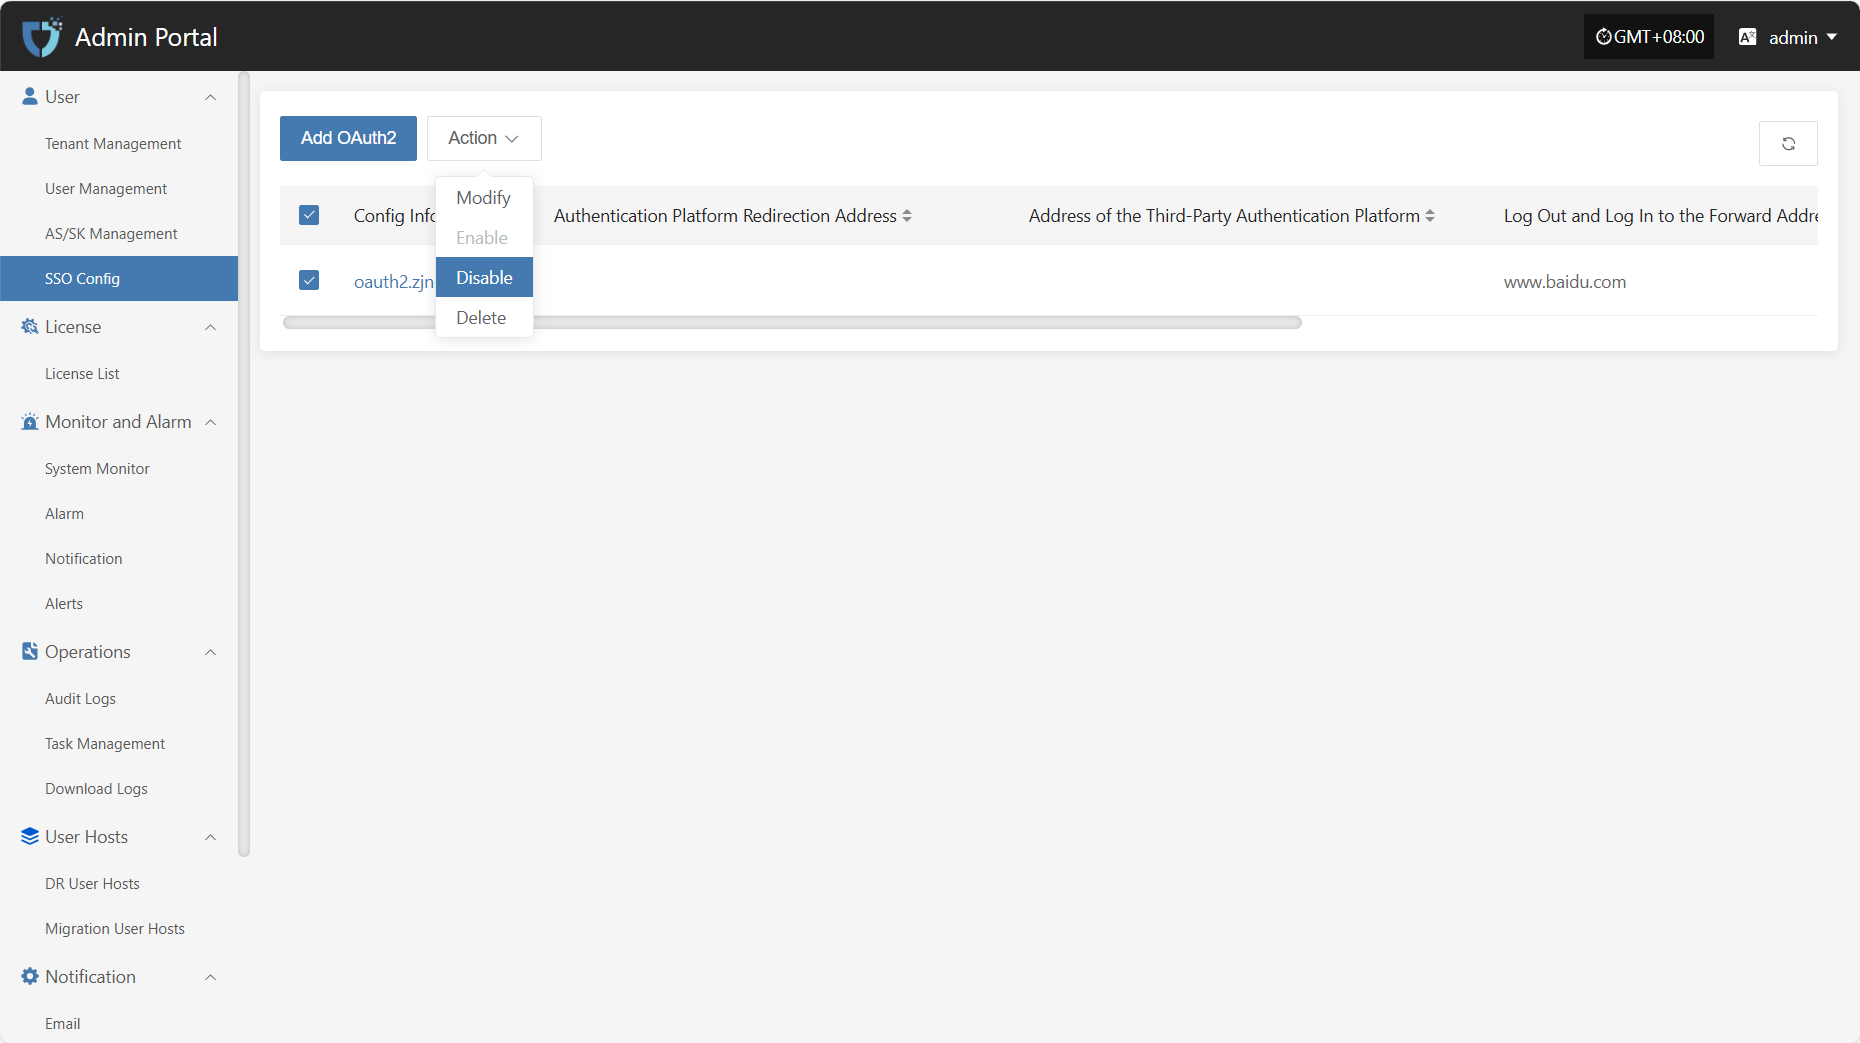
Delete
Click the "Delete" button to remove the SSO configuration.
License
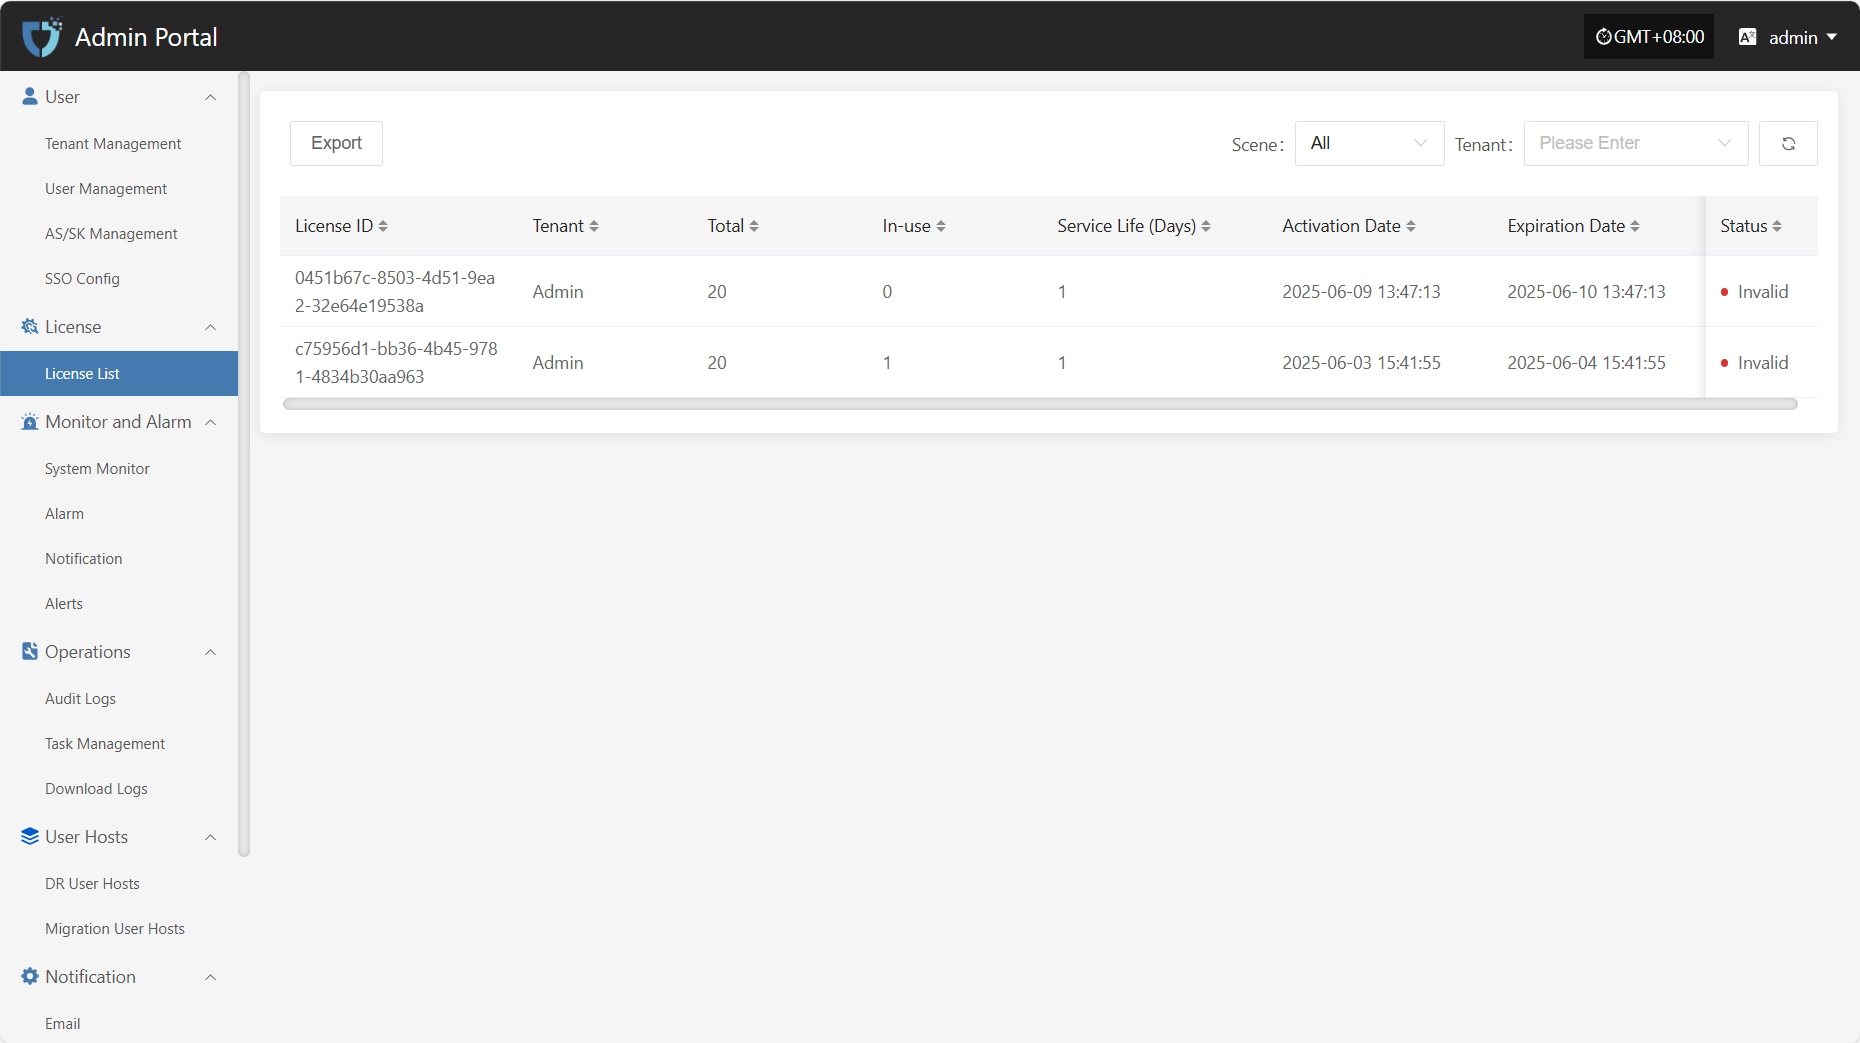
License List
The "License List" module is used to centrally display existing license records in the system, making it easy for administrators to view, audit, and manage resource access permissions. License information includes tenant, license scope, and status, helping to track permission allocation and ensure operational security and compliance.
On the license list page, click the "Export" button in the upper left corner to export the current license information as a file for local archiving or permission auditing.
Monitor and Alarm
System Monitor
The "System Monitor" module uses charts to display the real-time status and performance metrics of key platform components, helping administrators fully understand system health, quickly identify potential issues, and ensure stable and efficient platform operation.
Users can click the resource type dropdown list in the upper left corner to switch between monitoring information for hosts, RabbitMQ, and other resources.
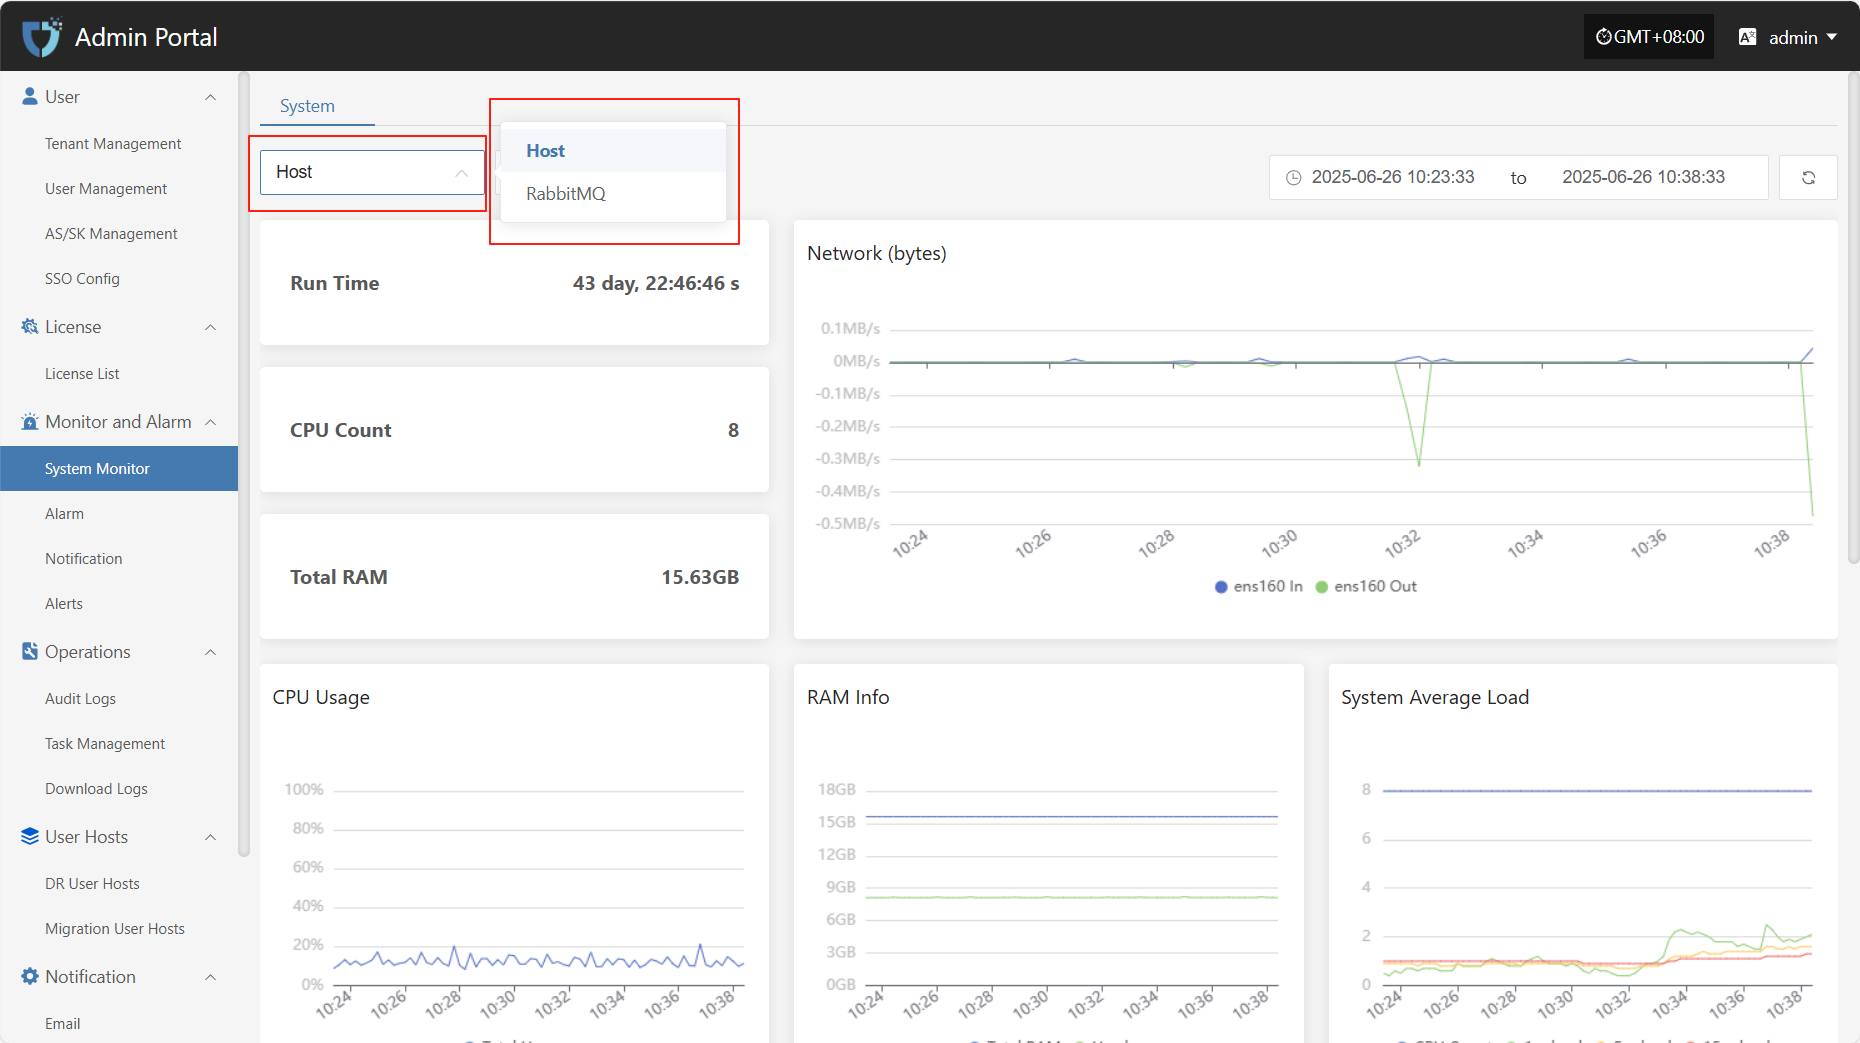
Host
Host monitoring displays the resource usage of selected hosts in real time, including key performance metrics such as CPU, memory, and disk, helping administrators keep track of system load.
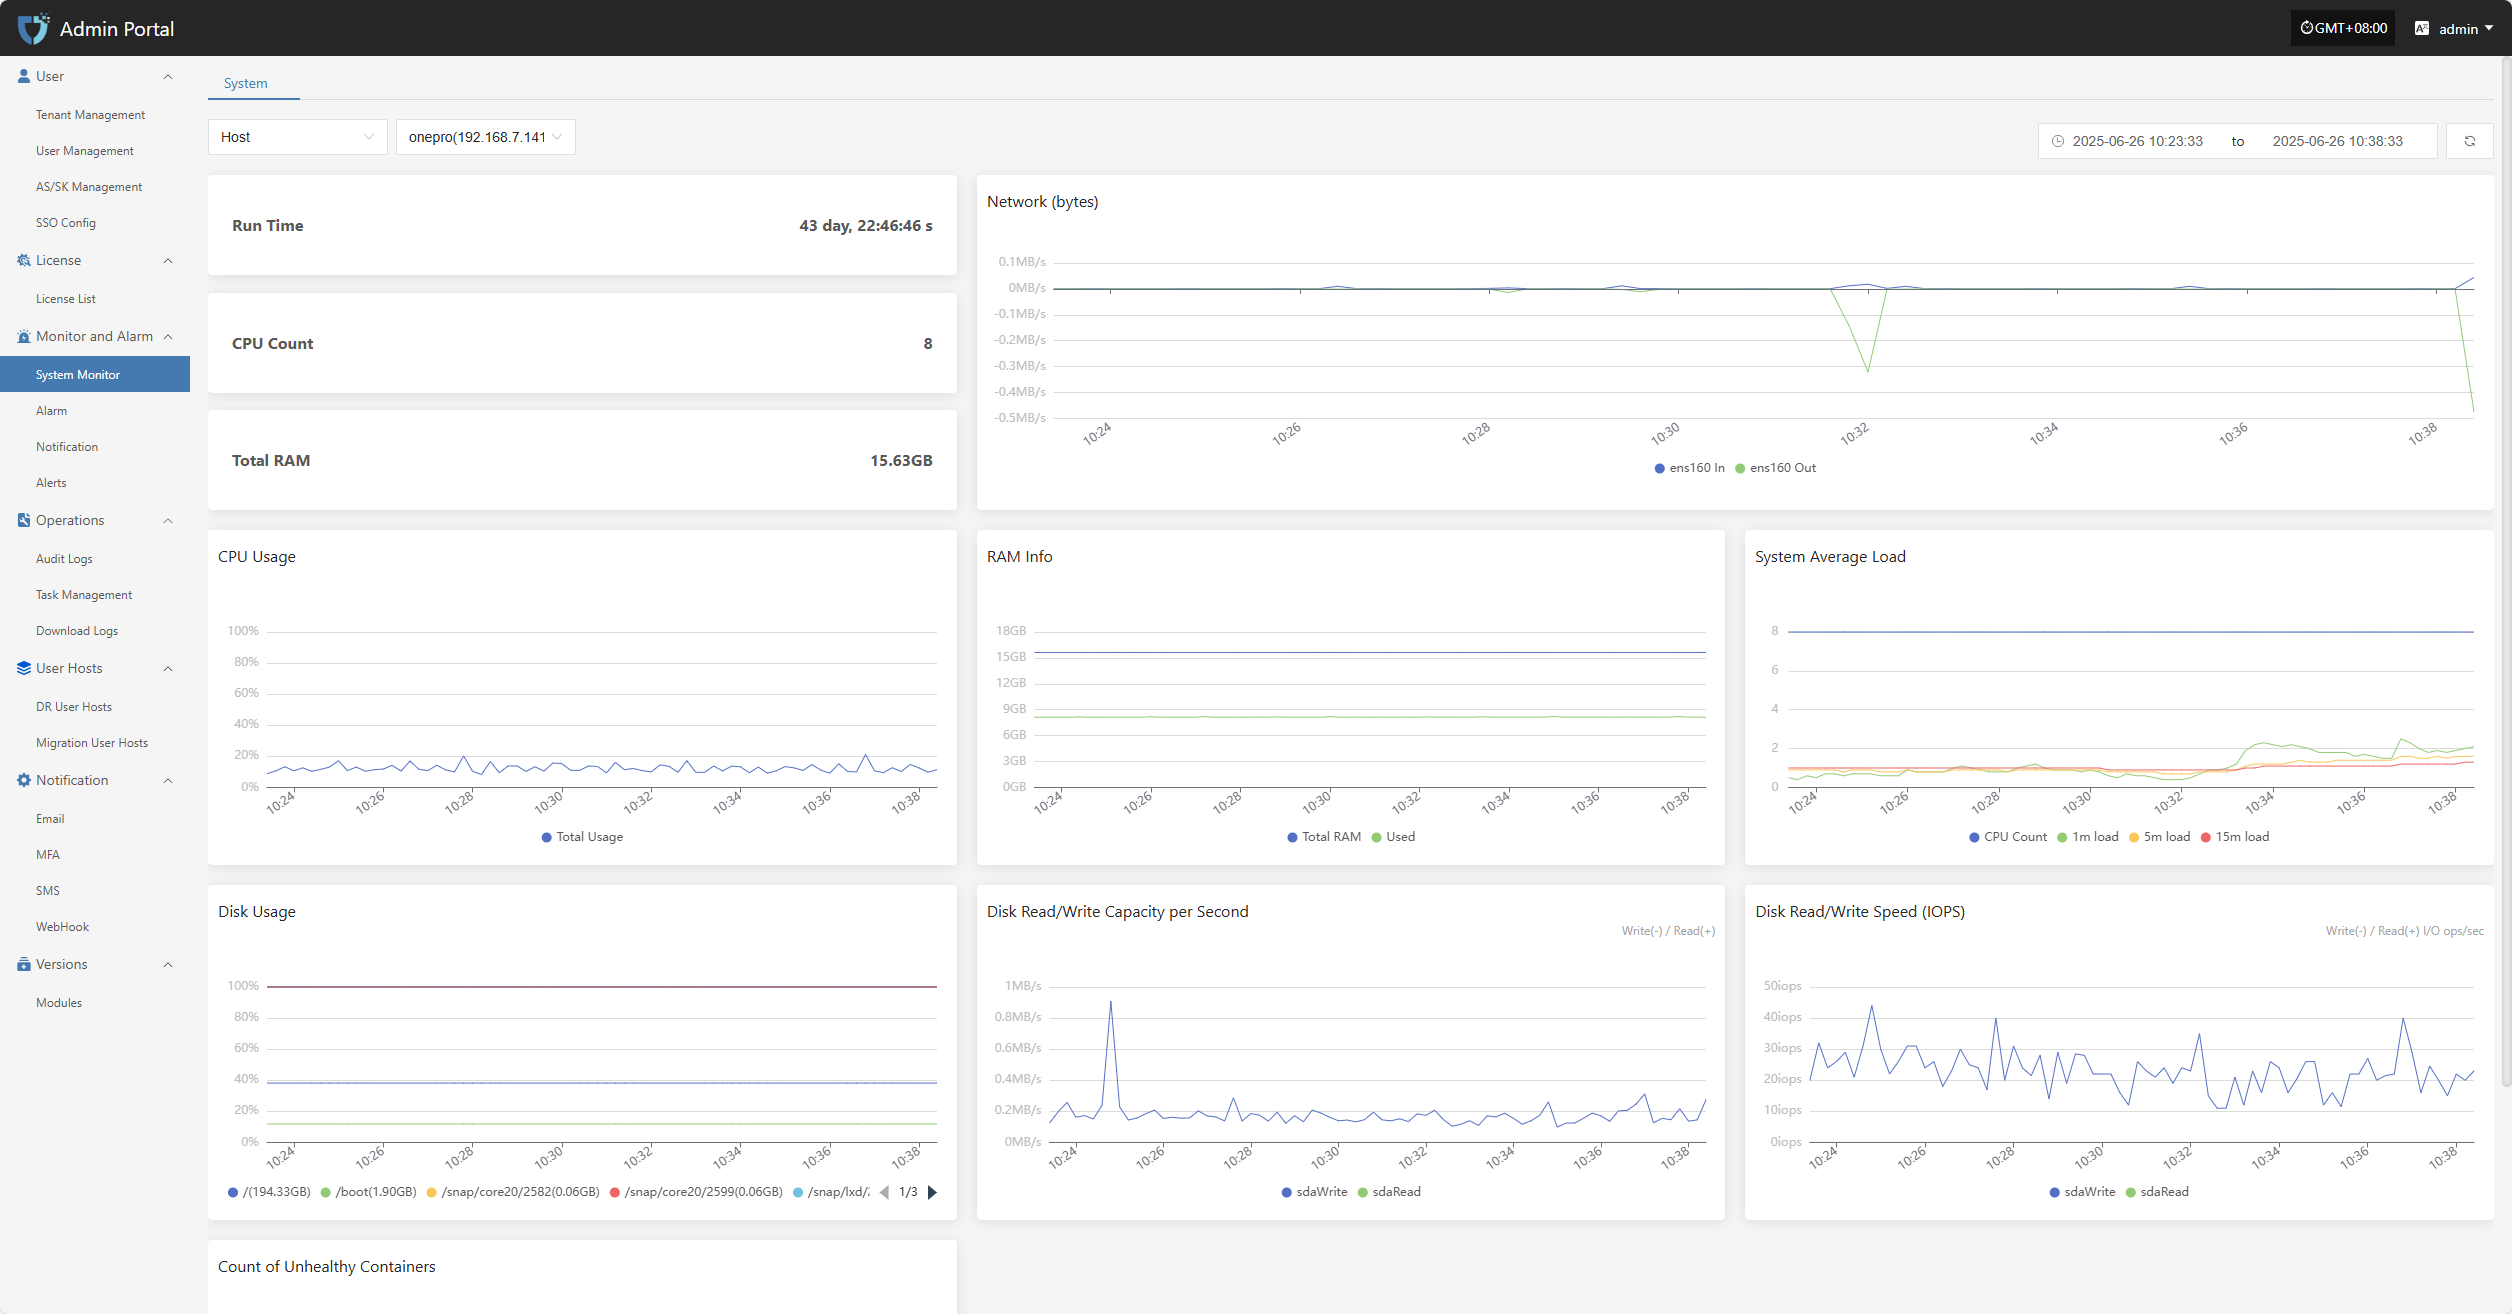
- The related monitoring items are as follows
| Metric | Description |
|---|---|
| Run Time | The total running time since the system or core component was started. |
| CPU Count | Number of available physical/logical CPU cores in the system. |
| Total RAM | Total available physical memory detected by the system. |
| Network (bytes) | Total amount of data sent and received by network interfaces, in bytes. |
| CPU Usage | Current CPU usage percentage, reflecting system load. |
| RAM Info | Detailed memory usage, including used, available, and cached memory. |
| System Average Load | Shows the average process load over the past 1, 5, and 15 minutes, reflecting overall processing capability. |
| Disk Usage | Current disk space usage, counted by mount point, usually shown as a percentage. |
| Disk Read/Write Capacity per Second | Amount of data written to and read from disk per second, in MB/s or KB/s. |
| Disk Read/Write Speed (IOPS) | Number of disk read/write operations per second (I/O ops/sec), used to assess disk performance. |
| Count of Unhealthy Containers | Number of containers currently in abnormal or non-running states, used to monitor the health of platform containers. |
RabbitMQ
RabbitMQ monitoring tracks metrics such as RabbitMQ name, version, and queue message count for the message queue service, ensuring stable task scheduling and message communication on the platform.

- The related monitoring items are as follows
| Field Name | Description |
|---|---|
| RabbitMQ Name | Displays the name and identifier of the monitored RabbitMQ node. |
| RabbitMQ Version | The version number of the currently running RabbitMQ service. |
| Message Count in RabbitMQ Queues | The total number of pending messages in all queues on the current node, used to assess message backlog. |
Docker Container
The Docker Container monitoring page gives you real-time visibility into your containerized production environment, helping admins keep a close eye on cluster health, resource usage, and network traffic—so everything runs smoothly and efficiently.
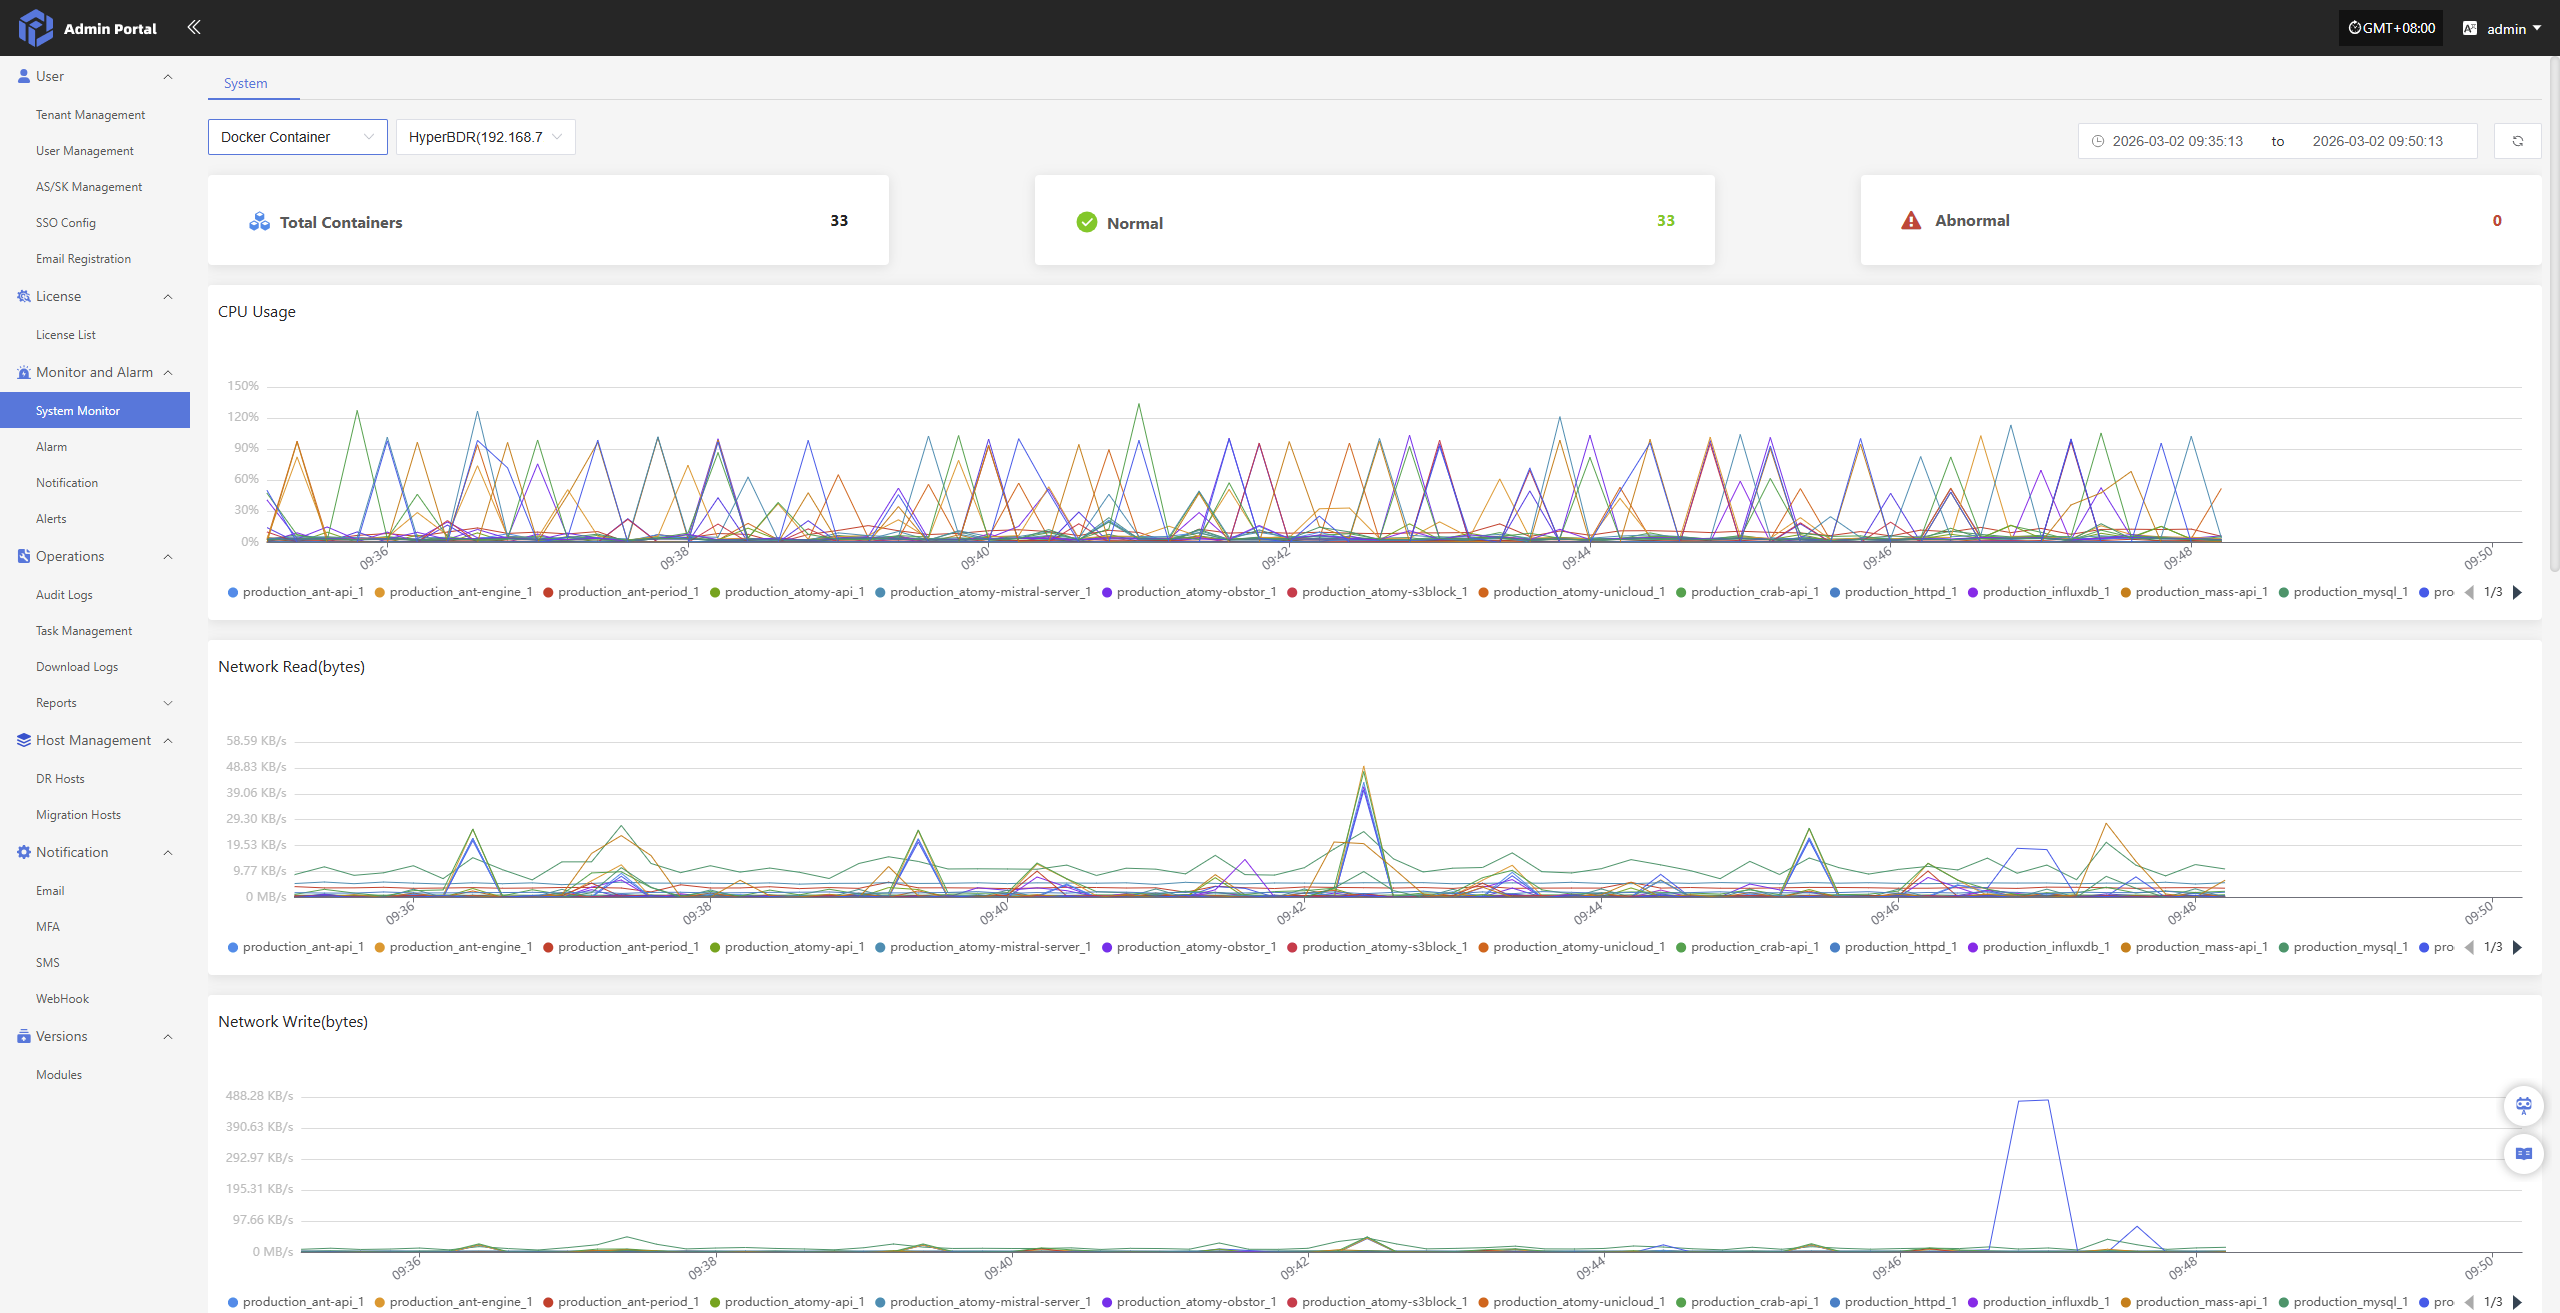
- Relevant monitoring items are as follows:
| Monitoring Item | Description |
|---|---|
| Total Containers | Total number of container instances currently running in the system. |
| Normal | Number of containers that are healthy and running normally. |
| Abnormal | Number of containers in an abnormal state (e.g., stopped, failed, unresponsive). |
| CPU Usage | Percentage of CPU resources used by the container or the system overall. |
| Network Read (bytes) | Total amount of data received from the network per unit of time (in bytes). |
| Network Write (bytes) | Total amount of data sent to the network per unit of time (in bytes). |
| RAM Info | Current memory usage, including used and available memory. |
| Disk Read (iops) | Number of disk read operations per unit of time (I/O operations per second). |
| Disk Write (iops) | Number of disk write operations per unit of time (I/O operations per second). |
| Disk Read (bytes) | Total amount of data read from disk per unit of time (in bytes). |
| Disk Write (bytes) | Total amount of data written to disk per unit of time (in bytes). |
MariaDB Database
The MariaDB Database monitoring feature gives you real-time insights into your database server’s performance. By closely tracking key metrics like connections, query load, and system cache, it helps admins evaluate performance and make sure data access stays stable and responsive.
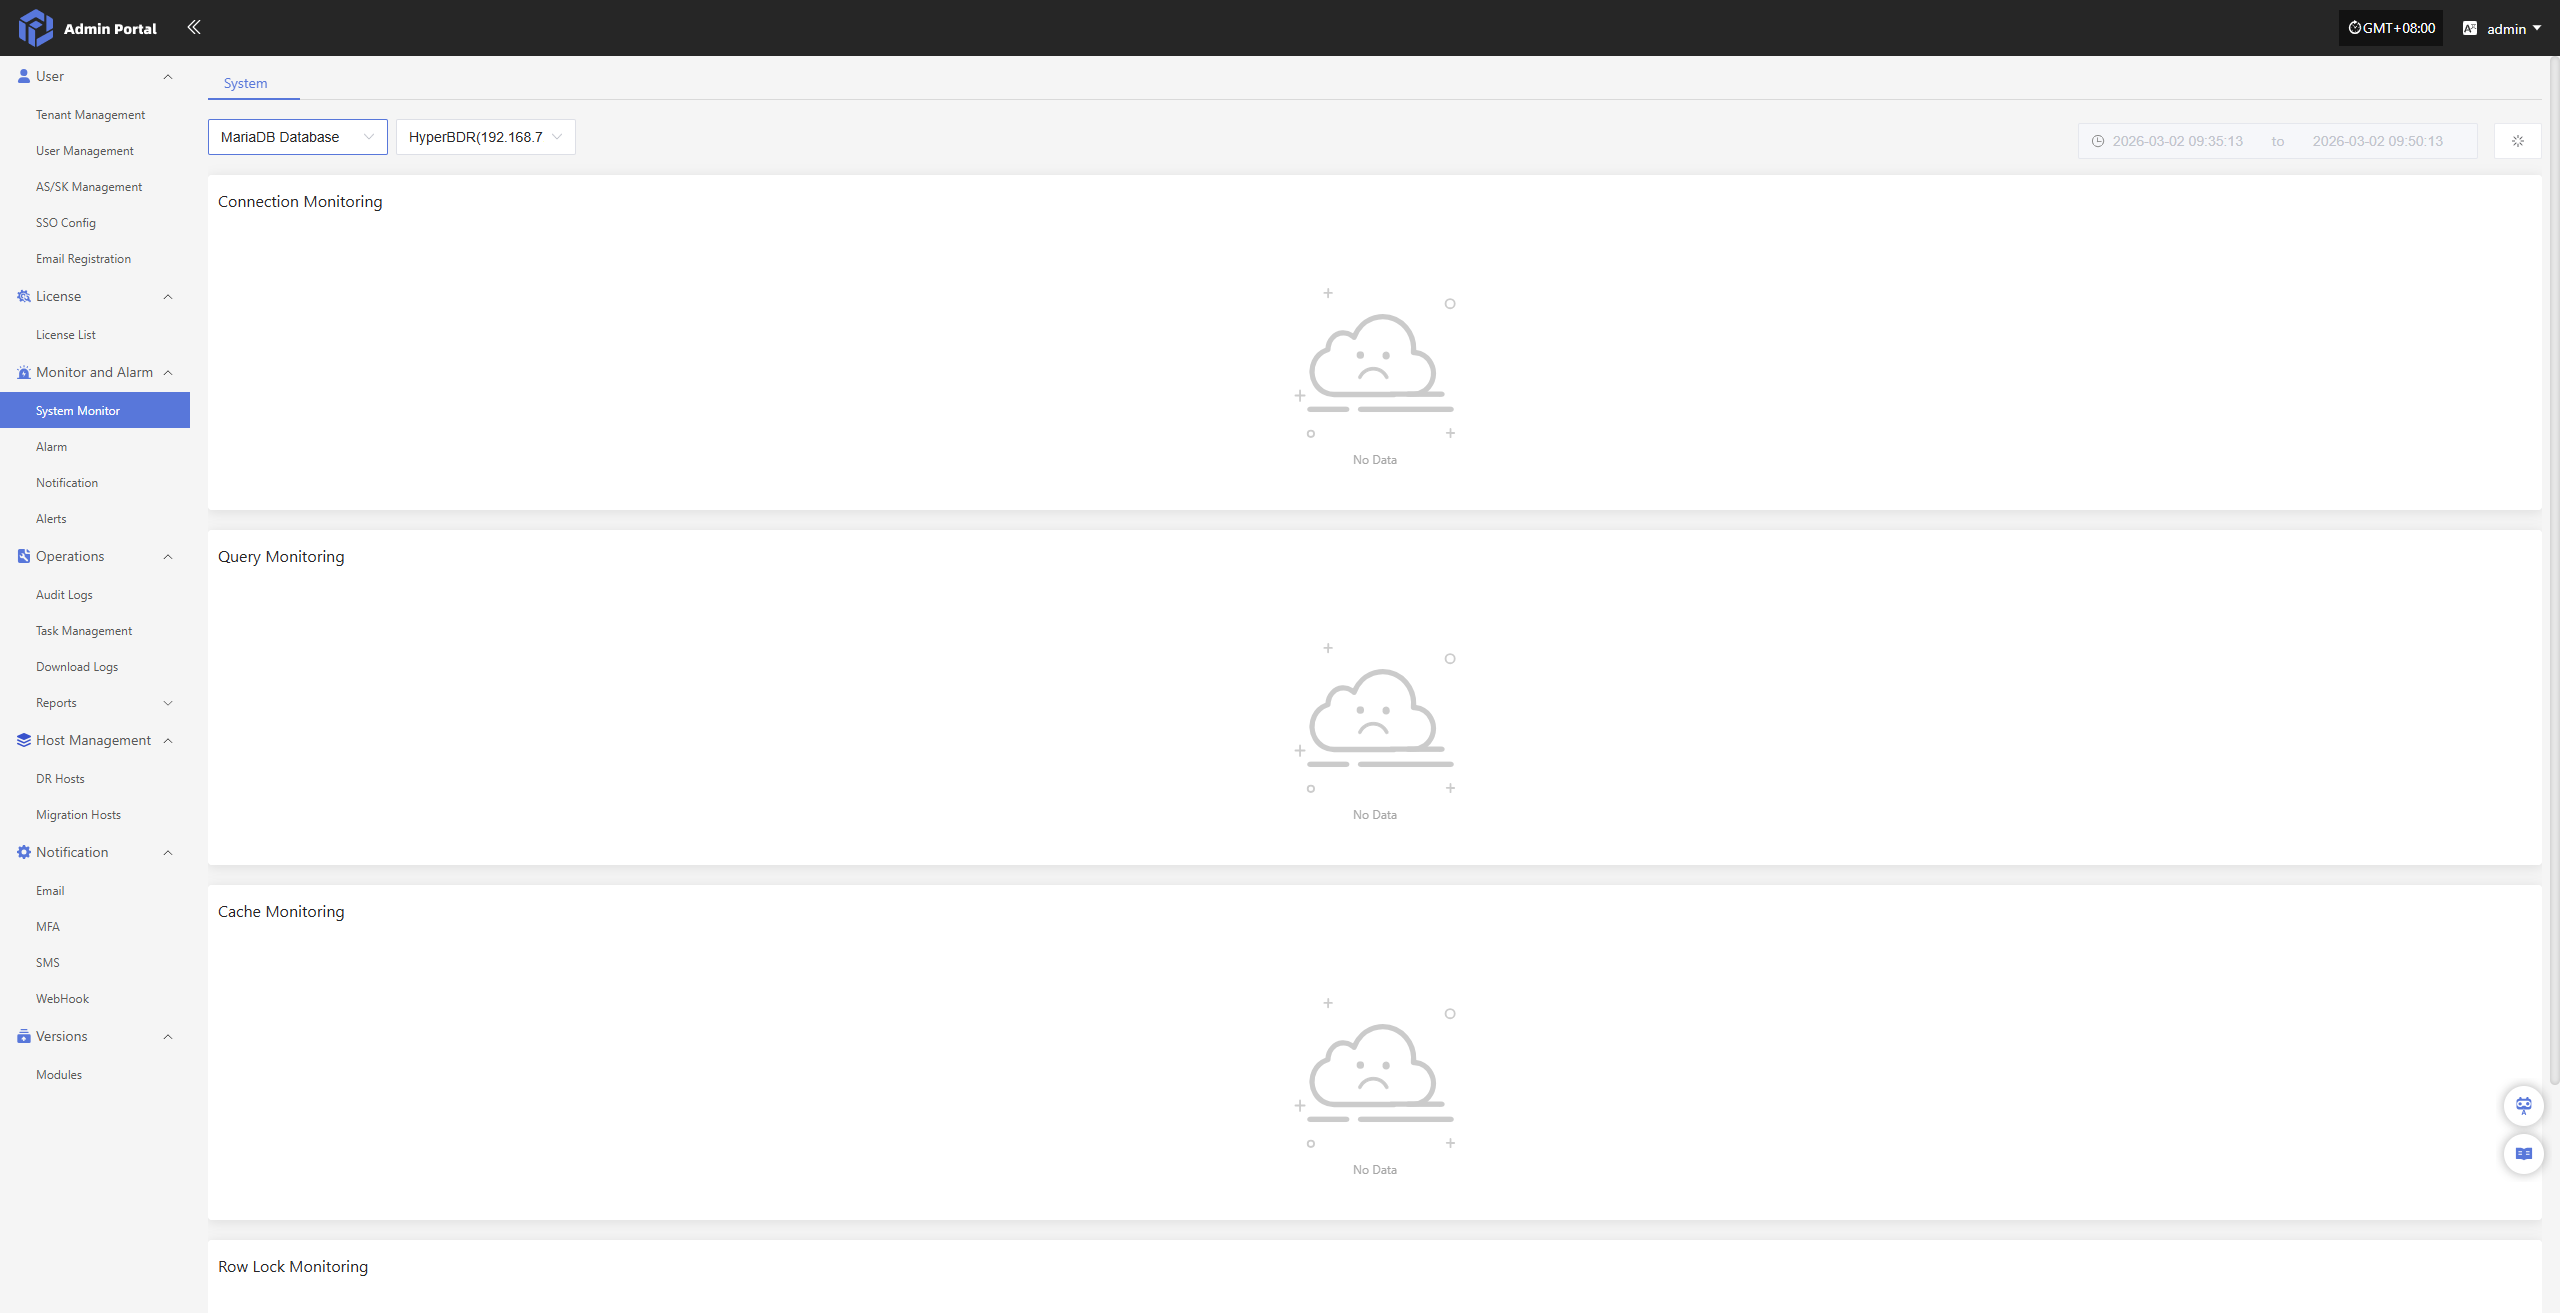
- Relevant monitoring items are as follows:
| Monitoring Item | Description |
|---|---|
| Connection Monitoring | Tracks current and active database connections and their usage, helping identify whether connection resources are sufficient or if there are abnormal connections. |
| Query Monitoring | Monitors database query execution, including query count, duration, and slow queries, to analyze performance bottlenecks. |
| Cache Monitoring | Monitors database cache usage, such as cache hit rate and occupancy, to evaluate cache efficiency. |
| Row Lock Monitoring | Tracks row-level locks, including lock waits and conflicts, to troubleshoot concurrency and transaction blocking issues. |
Alarm
The "Alarm" module is used to centrally manage all types of alert events triggered in the system. By monitoring abnormal behaviors, resource status, or system failures in real time, the alarm can immediately trigger notifications to help O&M personnel quickly respond, locate, and handle issues, ensuring stable platform operation.
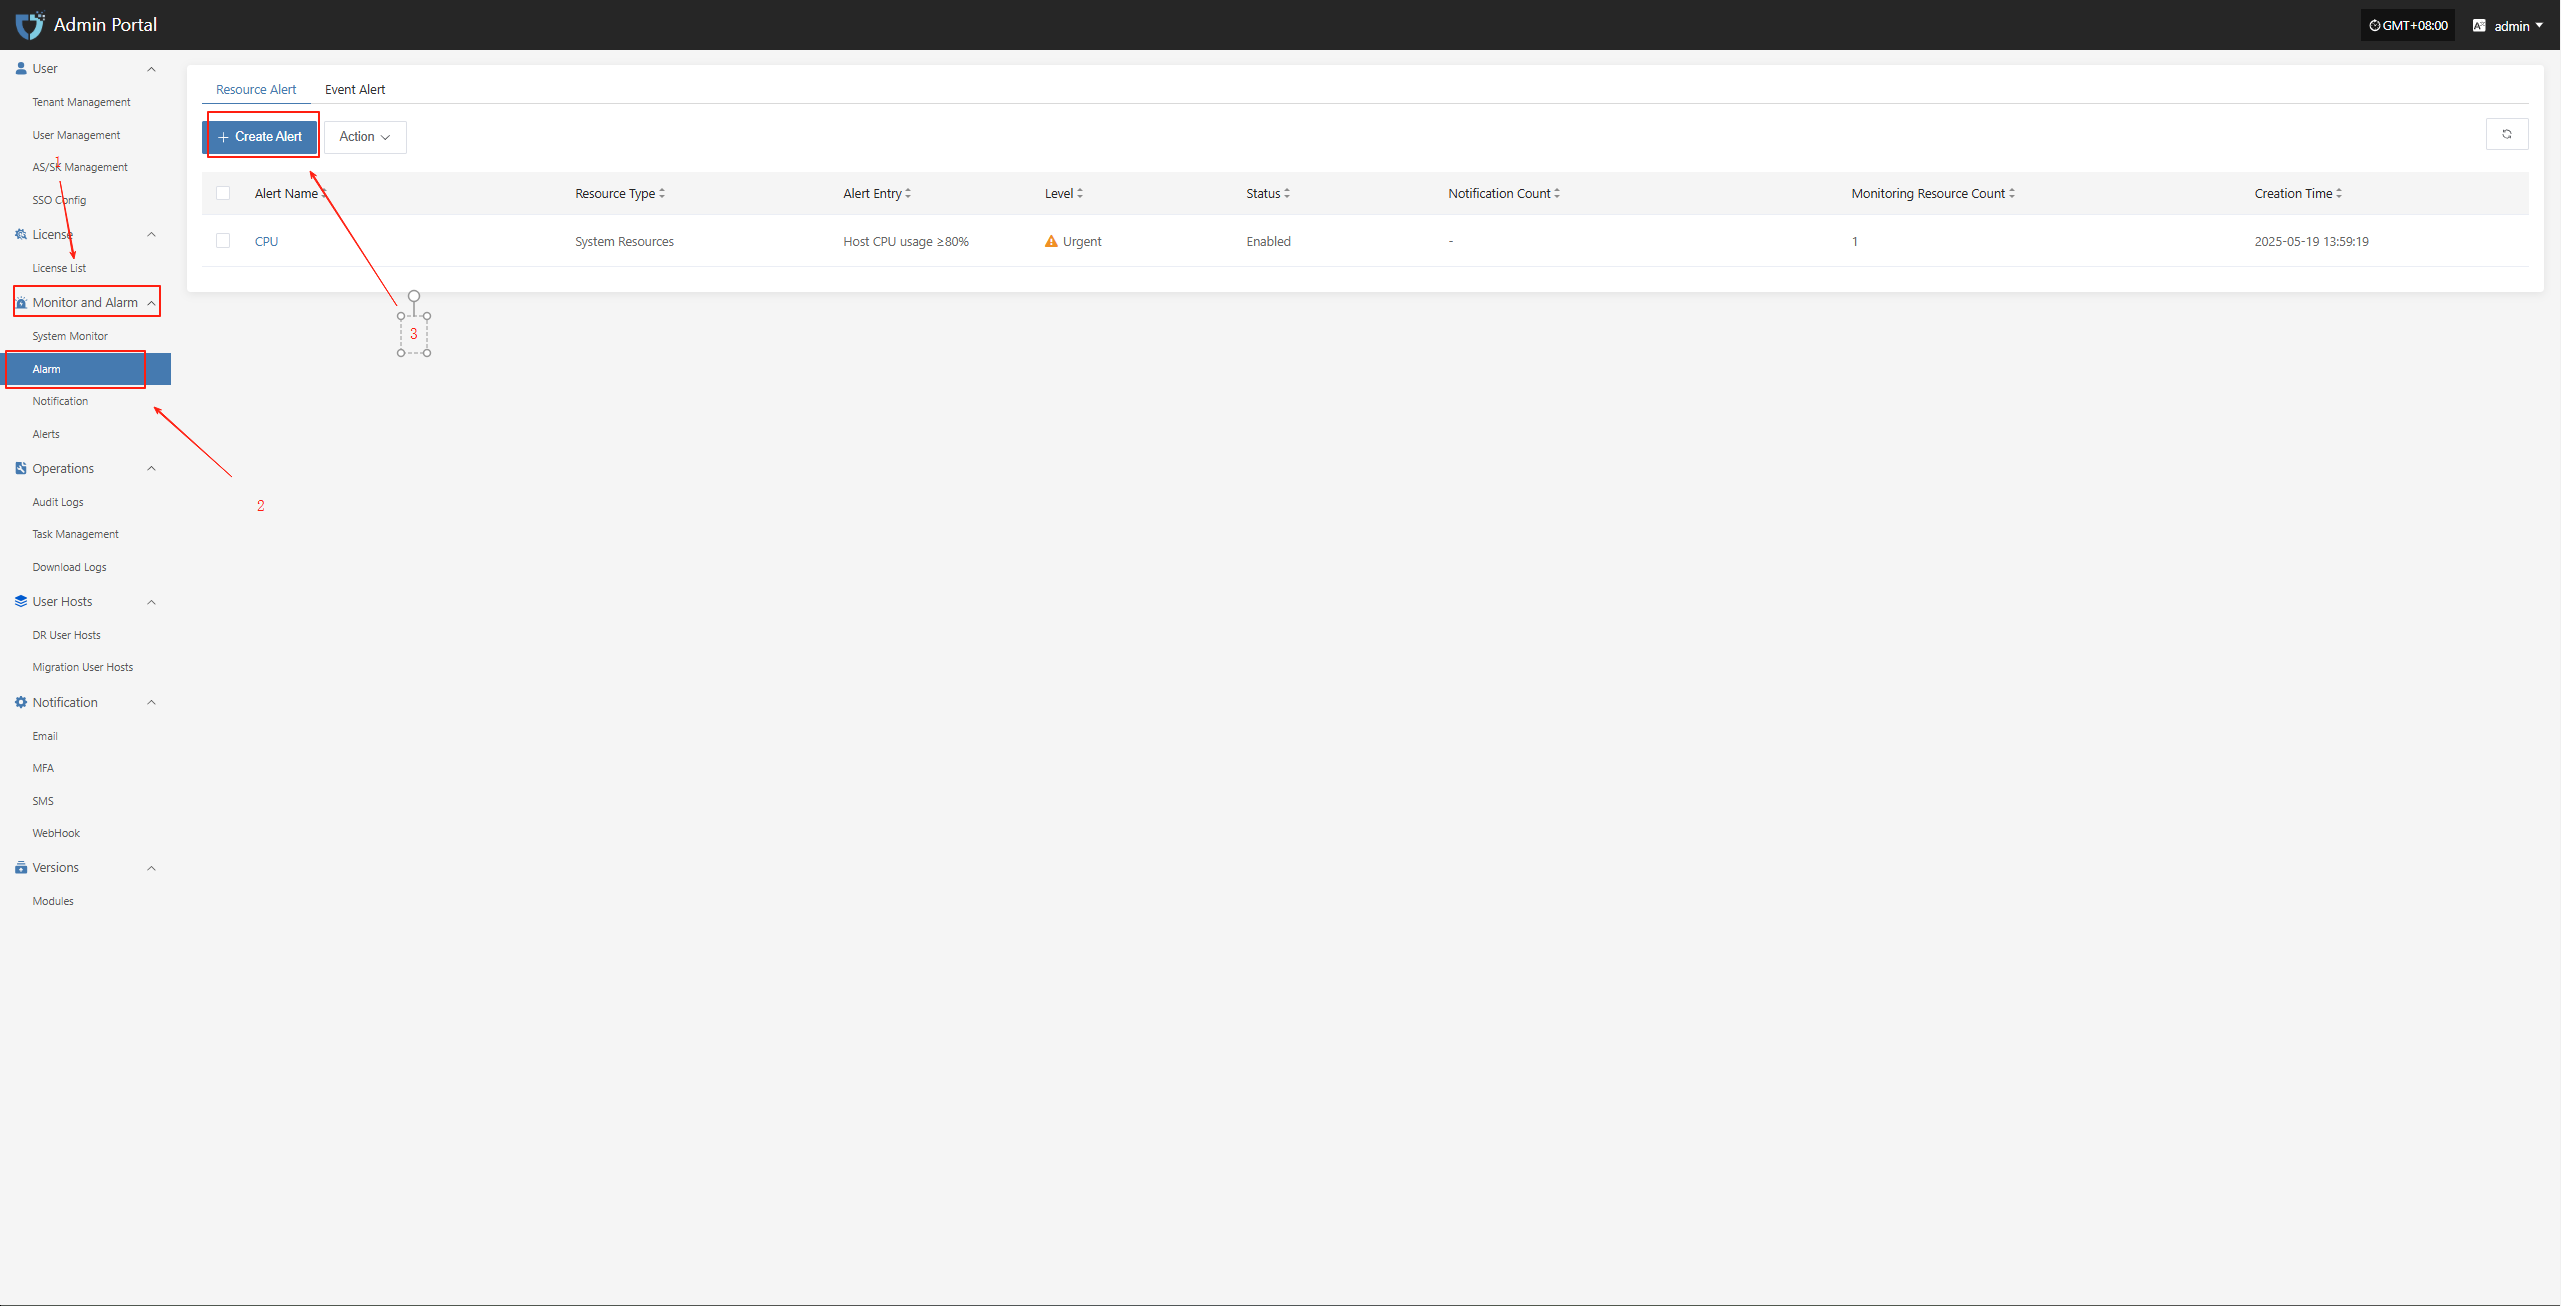
Resource Alert
To ensure system stability and controllable resource usage, basic alarm thresholds have been set for key resources such as CPU, memory, and disk. When resource usage exceeds the preset warning value, the system will automatically trigger an alarm notification, allowing O&M personnel to respond and handle it in time to avoid resource bottlenecks affecting business operations.
| Resource Type | Alarm Metric | Alarm Rule | Alarm Level | Note |
|---|---|---|---|---|
| Host | CPU Usage | ≥ 80%, sustained for 5 min | Critical | |
| Host | Memory Usage Percentage | ≥ 80%, sustained for 5 min | Critical | |
| Host | Root Disk Usage Percentage | ≥ 80%, sustained for 5 min | Critical | |
| Host | Number of Unhealthy Containers | ≥ 1, sustained for 5 min | Critical | |
| RabbitMQ | Queue Message Count | ≥ 10, sustained for 5 min | Critical |
Create Resource Alert
Configuration Example: CPU Resource Alert
- Click in sequence: Monitor and Alarm -- Alarm -- Resource Alert -- Create Resource Alert
- Configuration Details
| Field | Example | Description |
|---|---|---|
| Alert Type | Resource Alert | The category this alert belongs to. |
| Alert Name | HyperBDR-host-CPU | A unique name for the alert, used to distinguish it from other alert rules. |
| Level | Critical | The severity level once the alert is triggered, such as Info, Major, or Critical. |
| Status | Enabled | Whether the alert is currently active. Once enabled, it monitors and triggers alerts based on the configured rules. |
| Resource Type | System Resource | The category of the resource being monitored. |
| Monitoring Resources | HyperBDR | Supports three resource types: host, RabbitMQ, and MariaDB. Admins can switch between resource types as needed and select the corresponding monitoring targets. |
| Alert Entry | CPU Usage | The specific metric being monitored, such as CPU usage or memory usage. |
| Alert Trigger Rule | > 80% for 5 minutes | Defines when the alert is triggered, for example when a metric exceeds a threshold for a certain period of time. |
| Cycle | 5 minutes | The monitoring frequency or evaluation interval for the metric. |
| Notification | Email Notification Object - test | The recipient of the alert notification, which can be email, SMS, or another notification group. |
| Description | Sample configuration for CPU resource alert | Additional notes about the purpose or setup of this alert. |
Fill in the appropriate severity level based on your actual needs, and define the monitoring scope according to the table above.

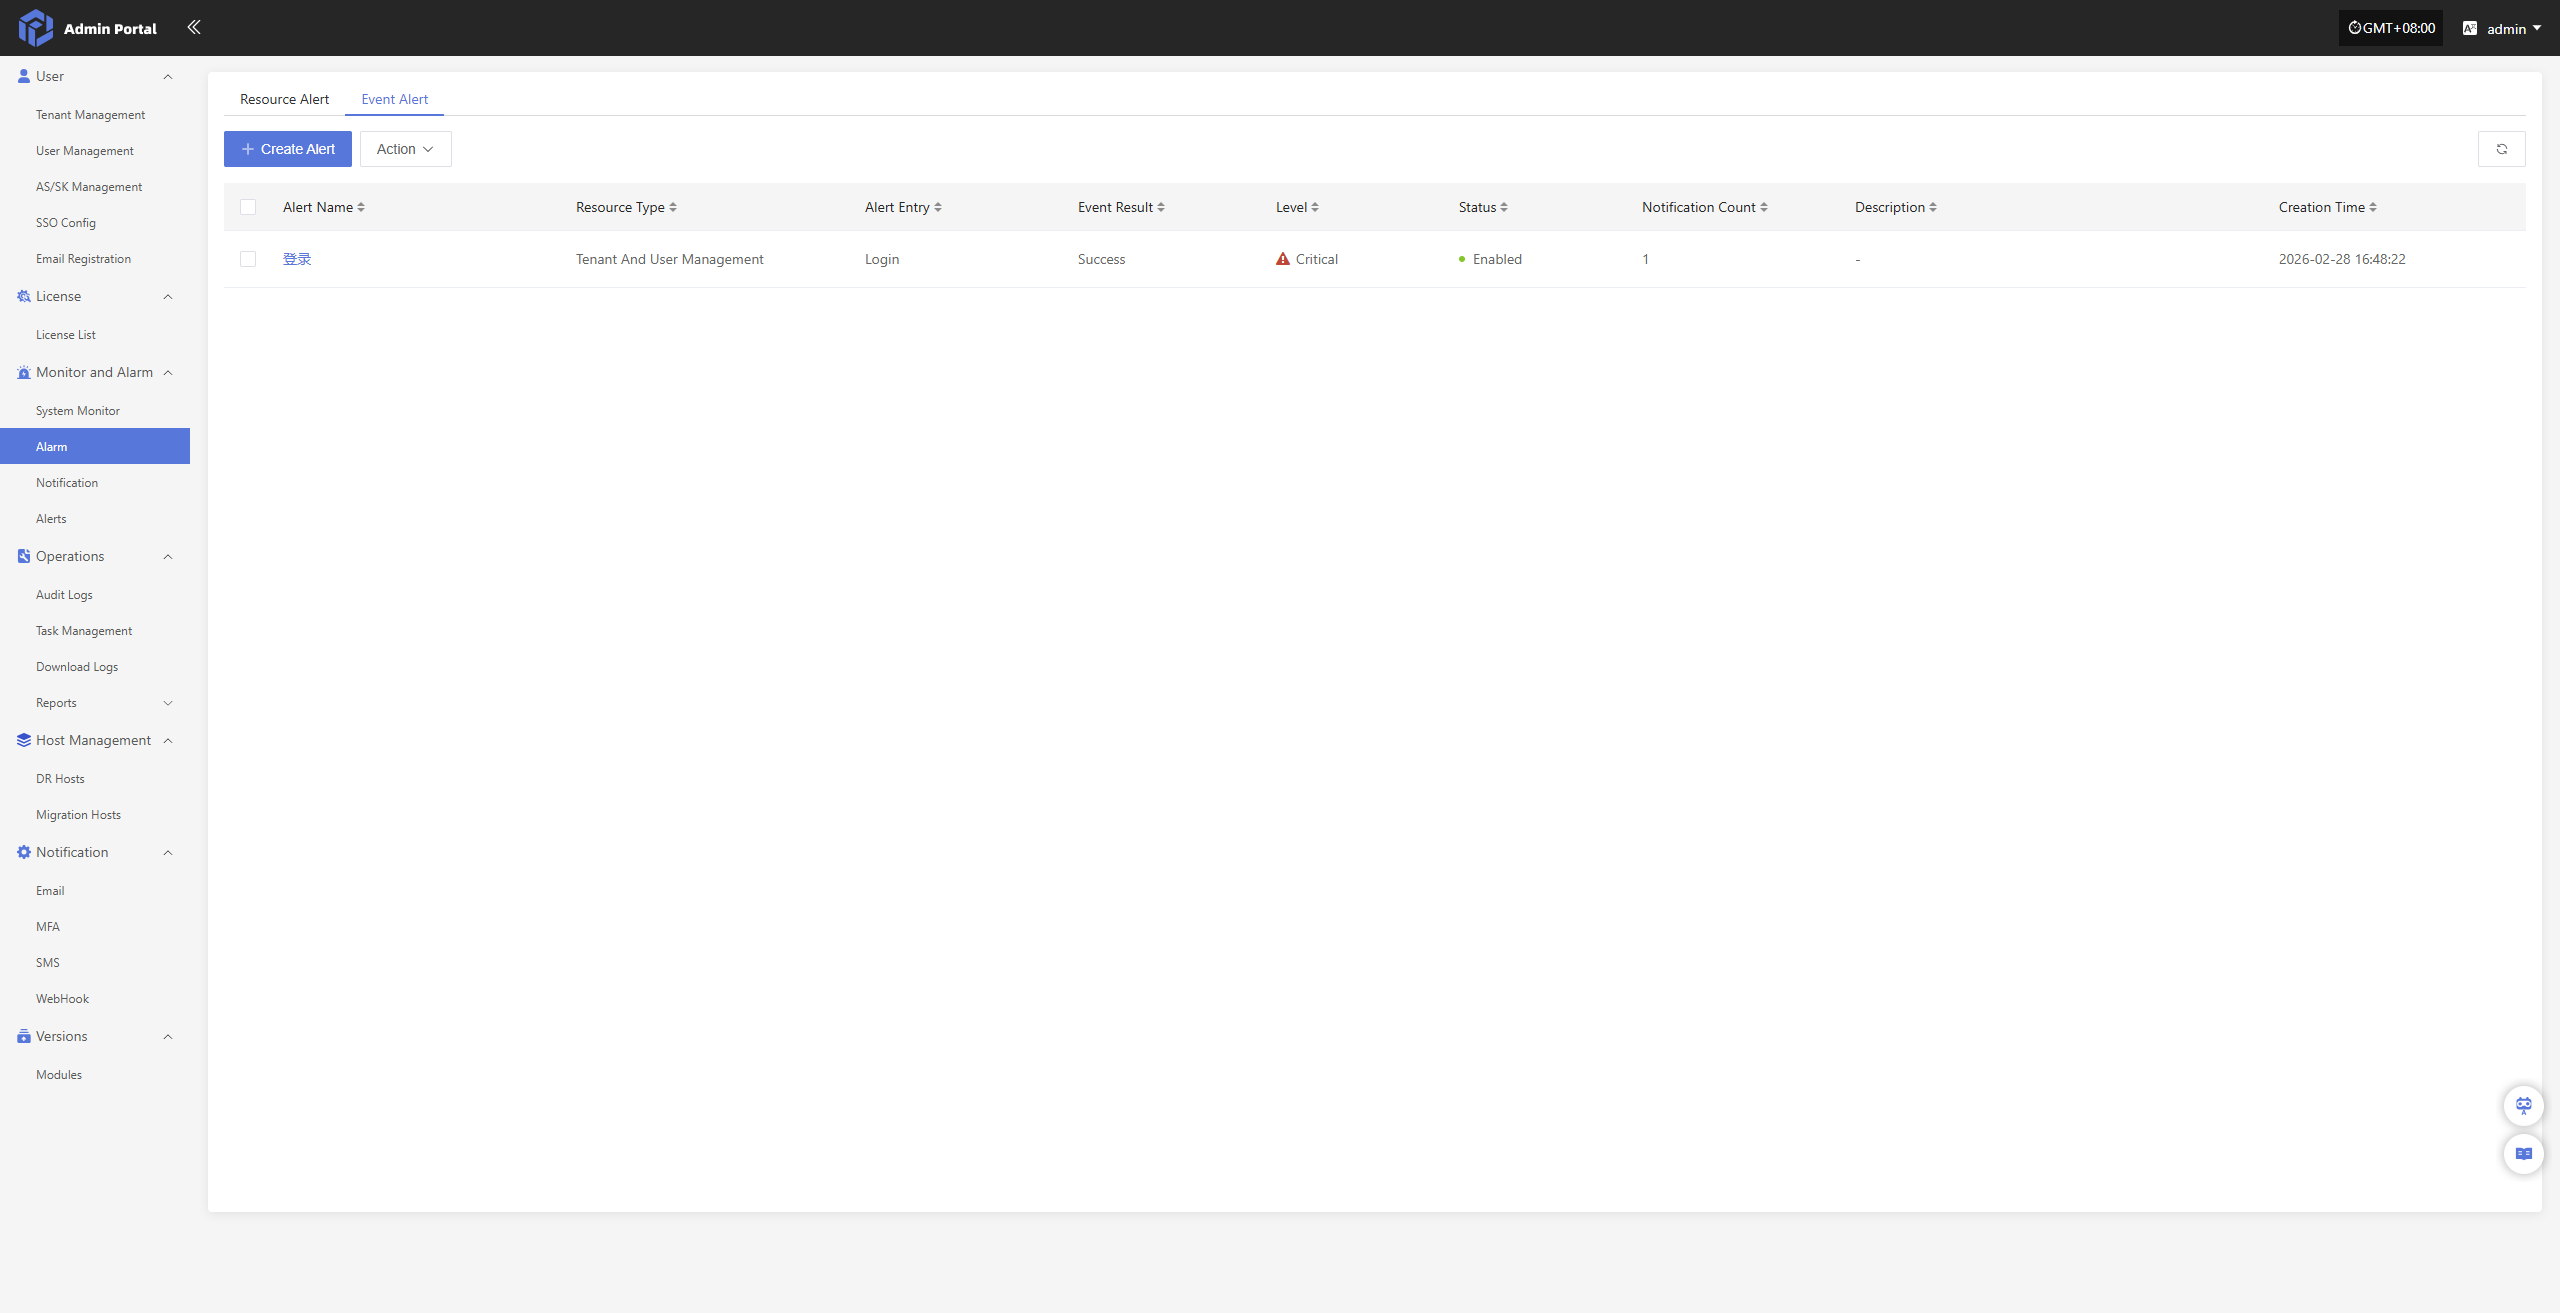
Event Alert
To keep the system secure and fully observable, you can set up event alerts for critical management actions—like changes to tenant user permissions, AK/SK credential security, or alert policy updates. This helps build a complete visibility framework from action auditing to anomaly response, making sure your operations stay compliant and the system runs smoothly and reliably.
| Monitored Resource | Event Type | Event Result | Alert Level |
|---|---|---|---|
| Event | Password Change | Success | Major |
| Event | Delete Tenant | Success | Major |
| Event | Login | Failure | Major |
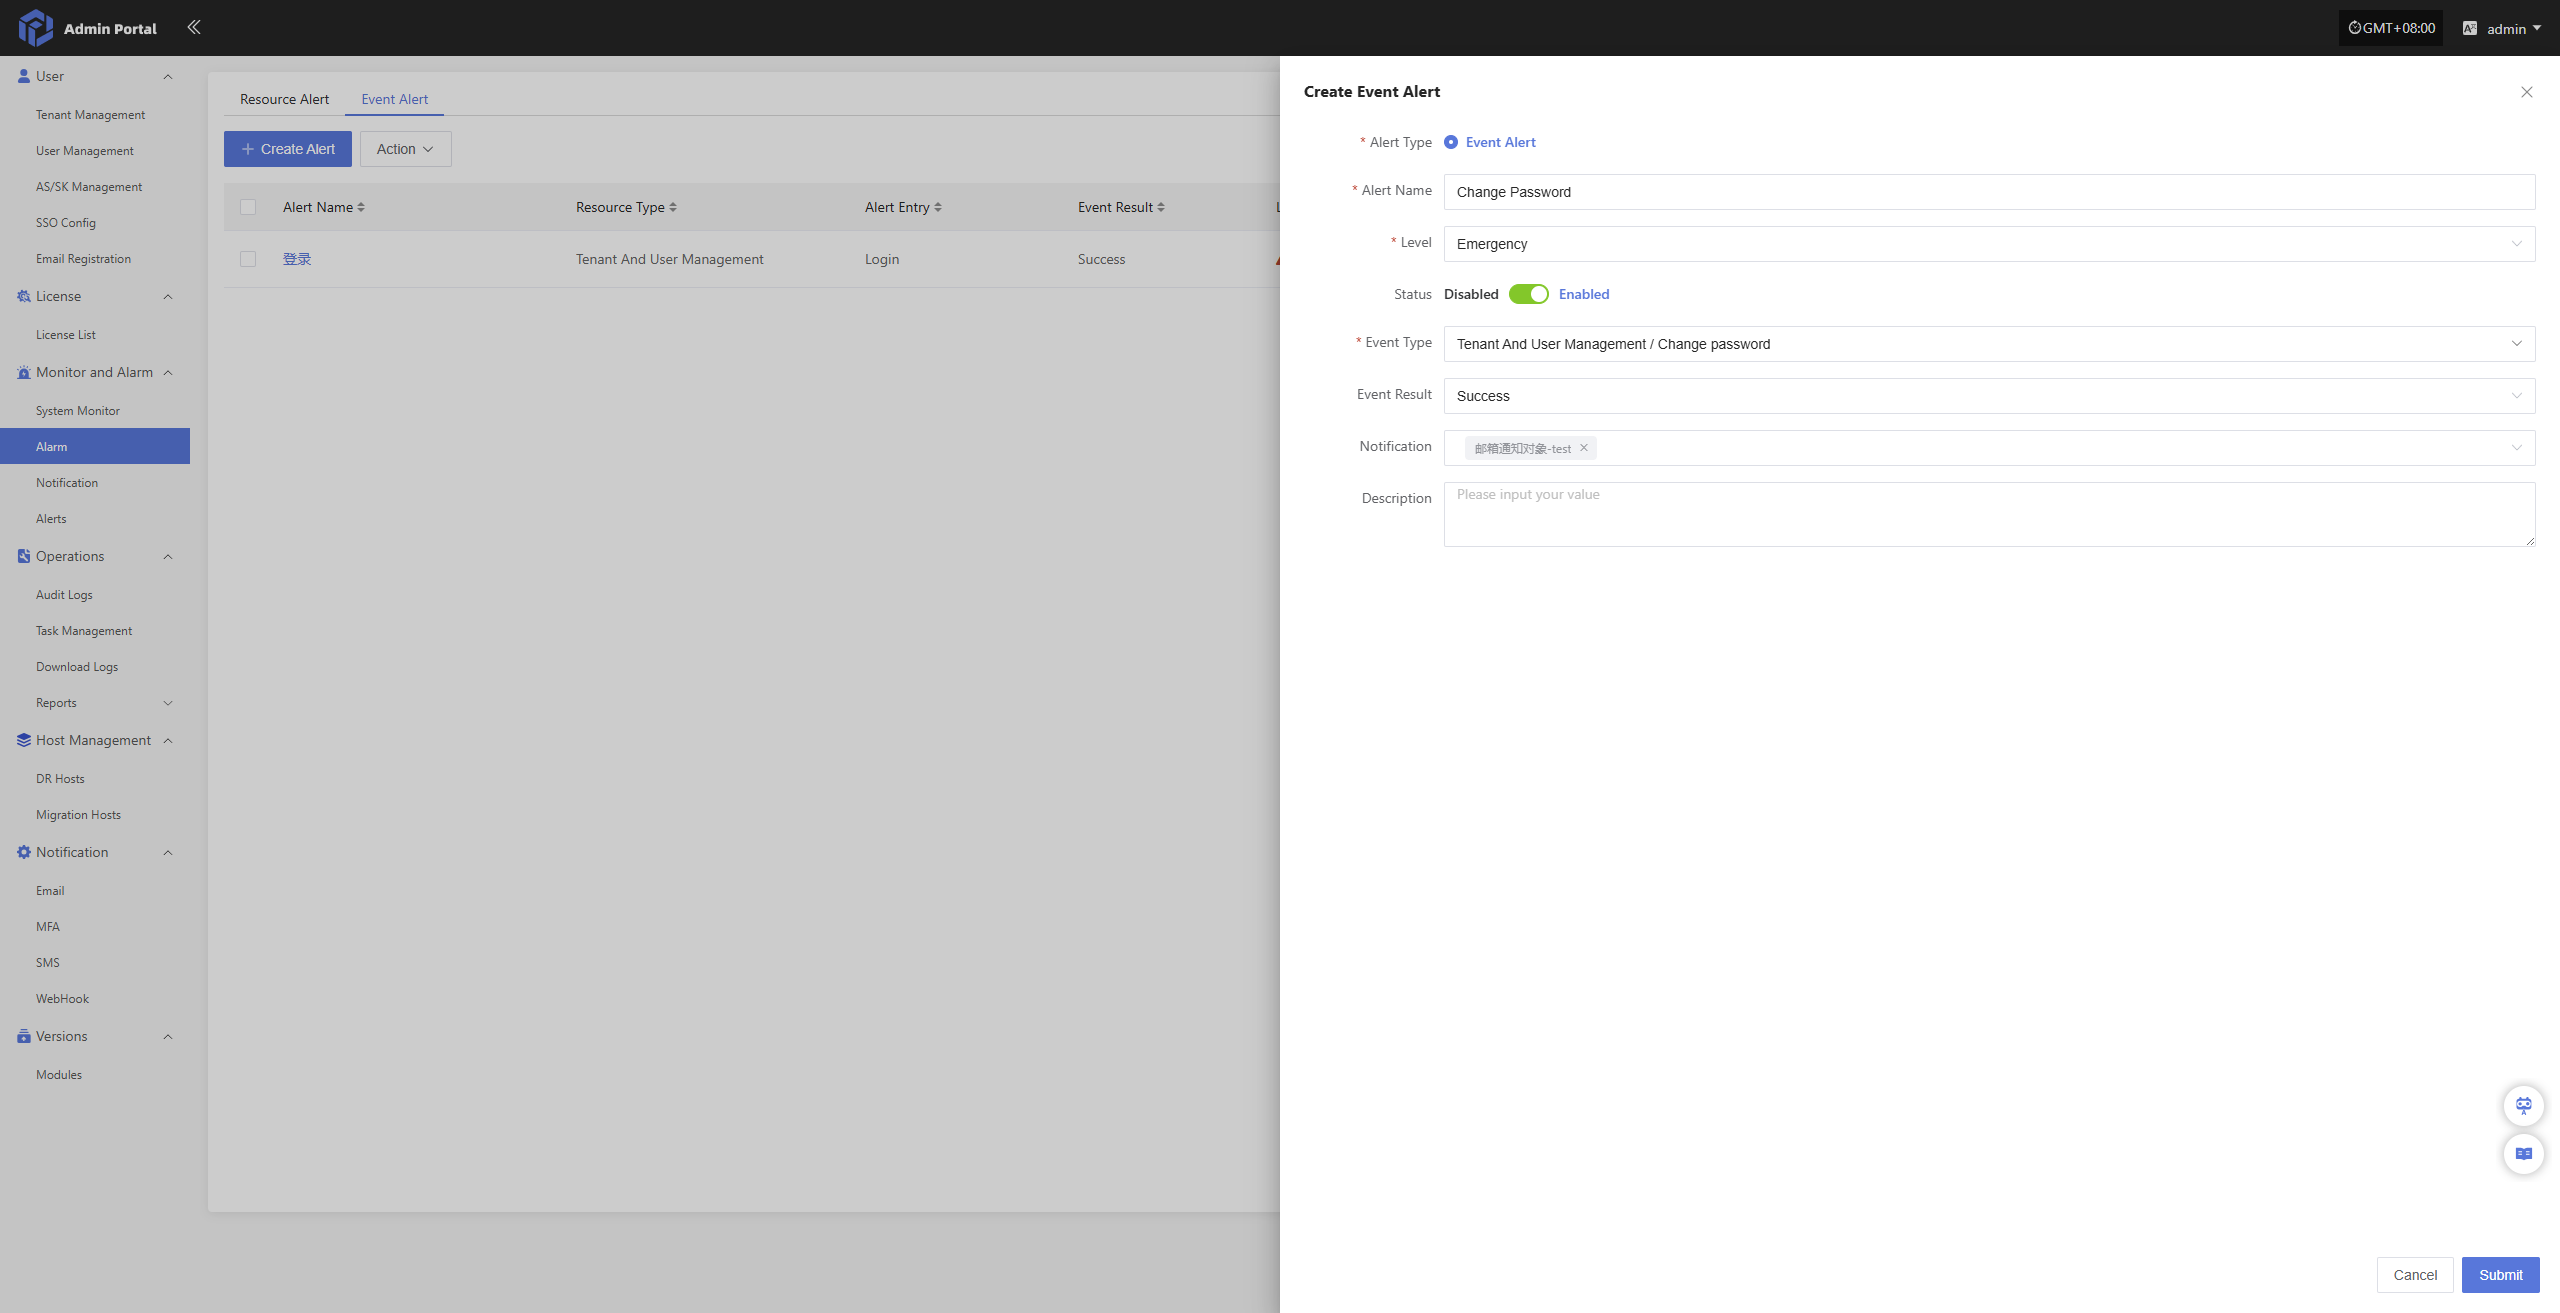
Create Event Alert
Configuration Example:Password Change Event Alert
Click in sequence: Monitor and Alarm -- Alarm -- Event Alert -- Create Event Alert
- Configuration Details
| Field | Example | Description |
|---|---|---|
| Alert Type | Event Alert | The category this alert belongs to. |
| Alert Name | Password Change | A unique name for the alert, used to distinguish it from other alert rules. |
| Level | Major | The severity level once the alert is triggered, such as Info, Major, or Critical. |
| Status | Enabled | Whether the alert is currently active. Once enabled, it will trigger when the conditions are met. |
| Event Type | Password Change | The specific type of event being monitored, such as login, password change, or permission updates. |
| Event Result | Success | The result condition for the event, such as success or failure. The alert will only trigger when this result is met. |
| Notification | Email Notification Object - test | The recipient of the alert notification, which can be email, SMS, or another notification group. |
| Description | Sample configuration for a successful password change alert | Additional notes about the purpose or setup of this alert. |
Select the appropriate event type to monitor based on your actual needs.
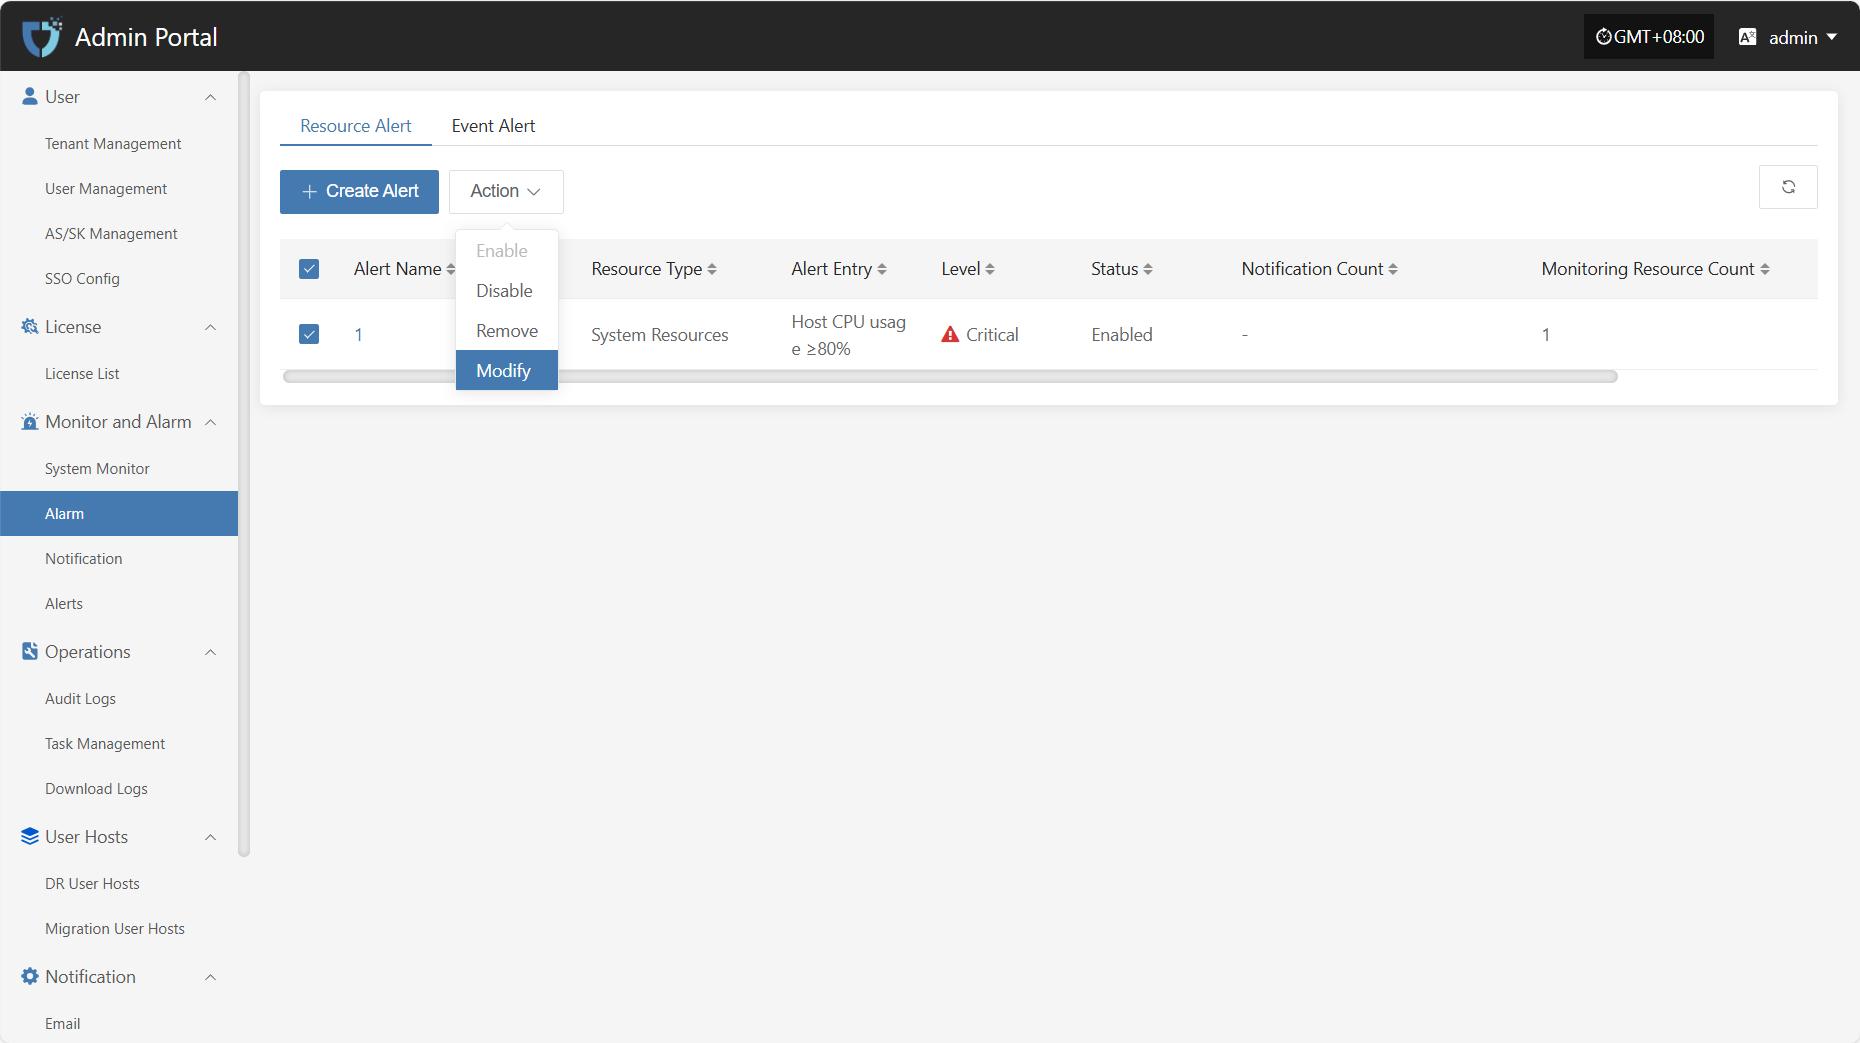
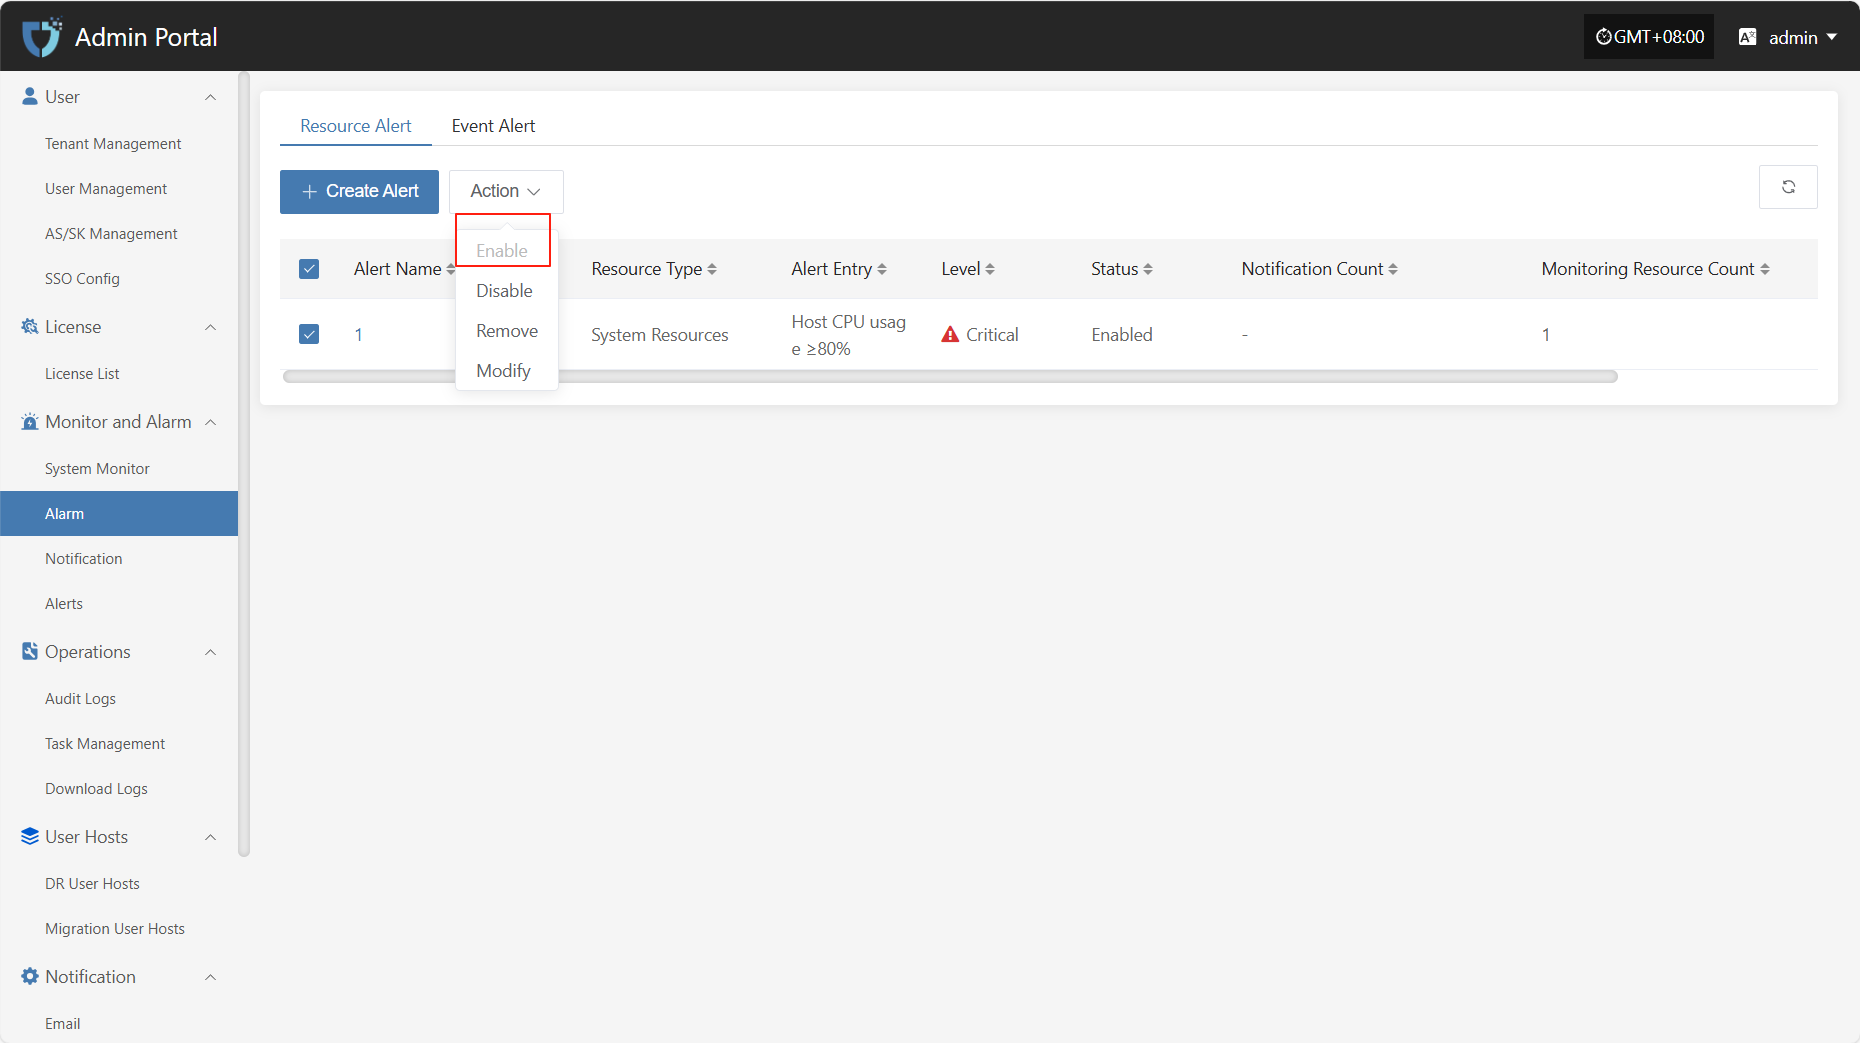
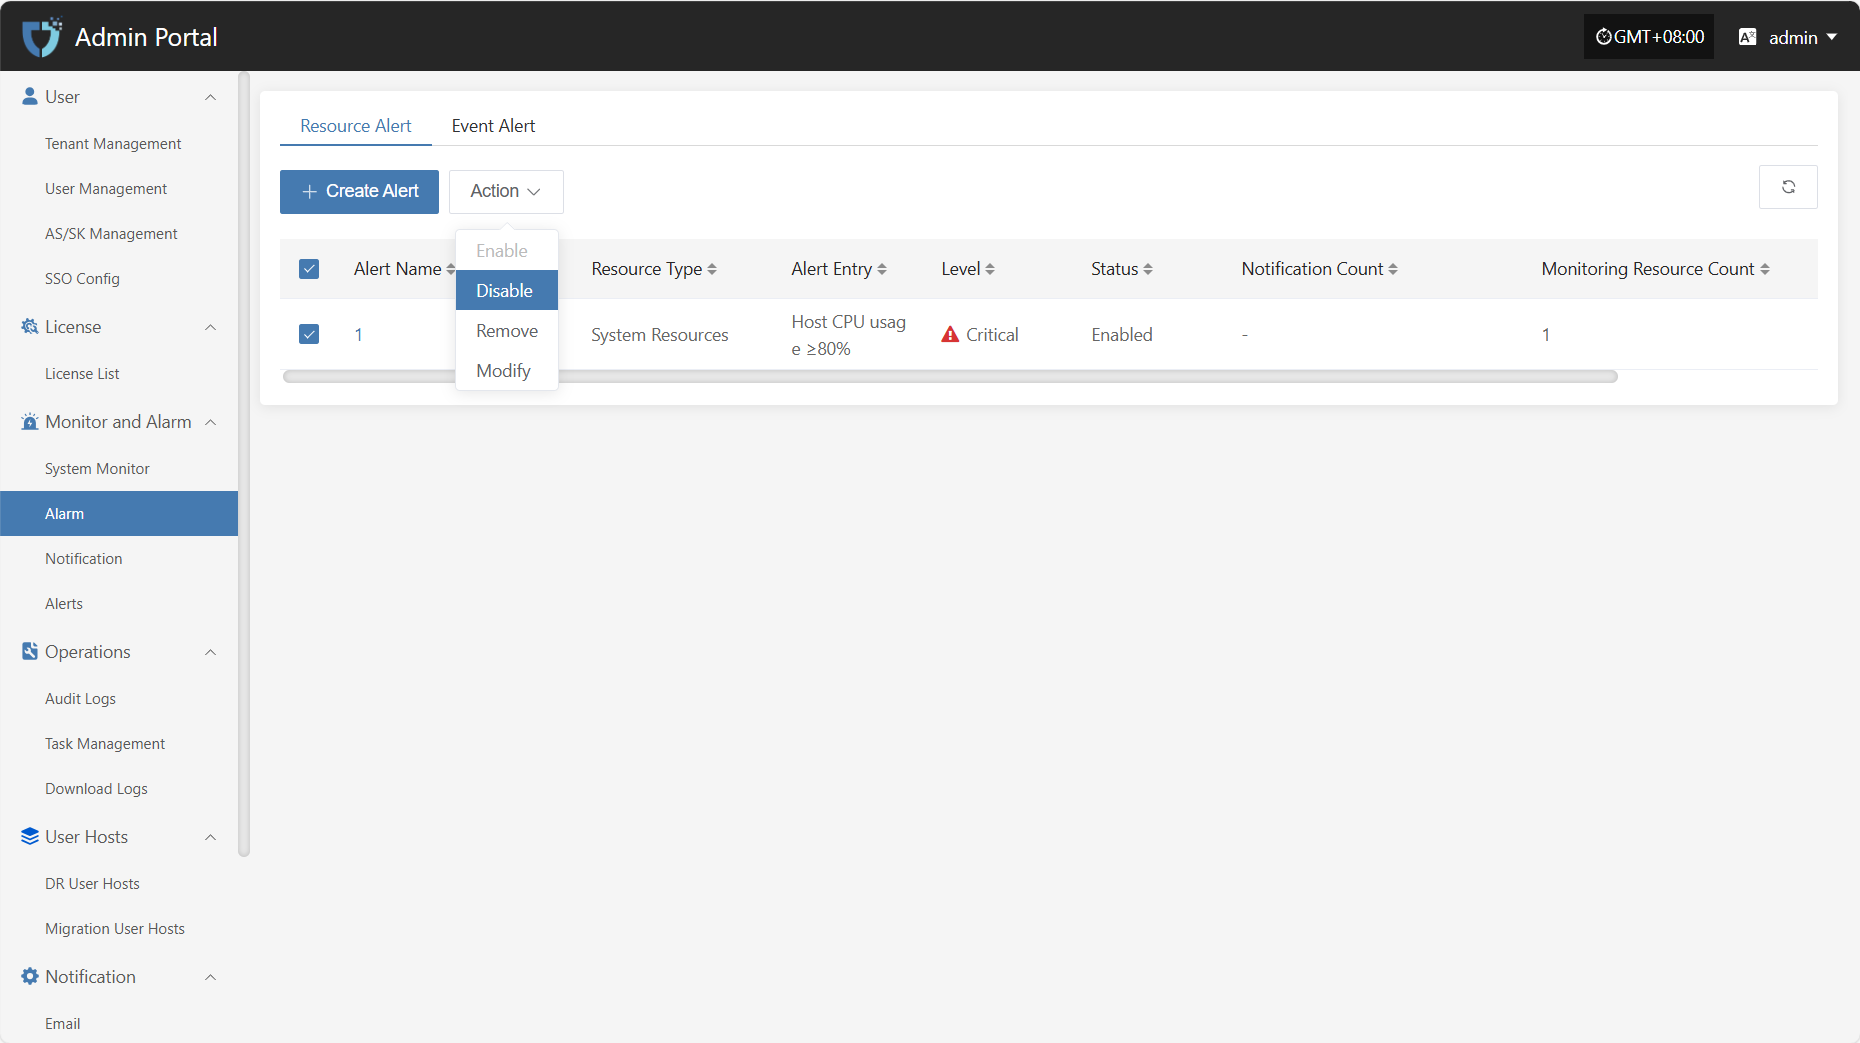
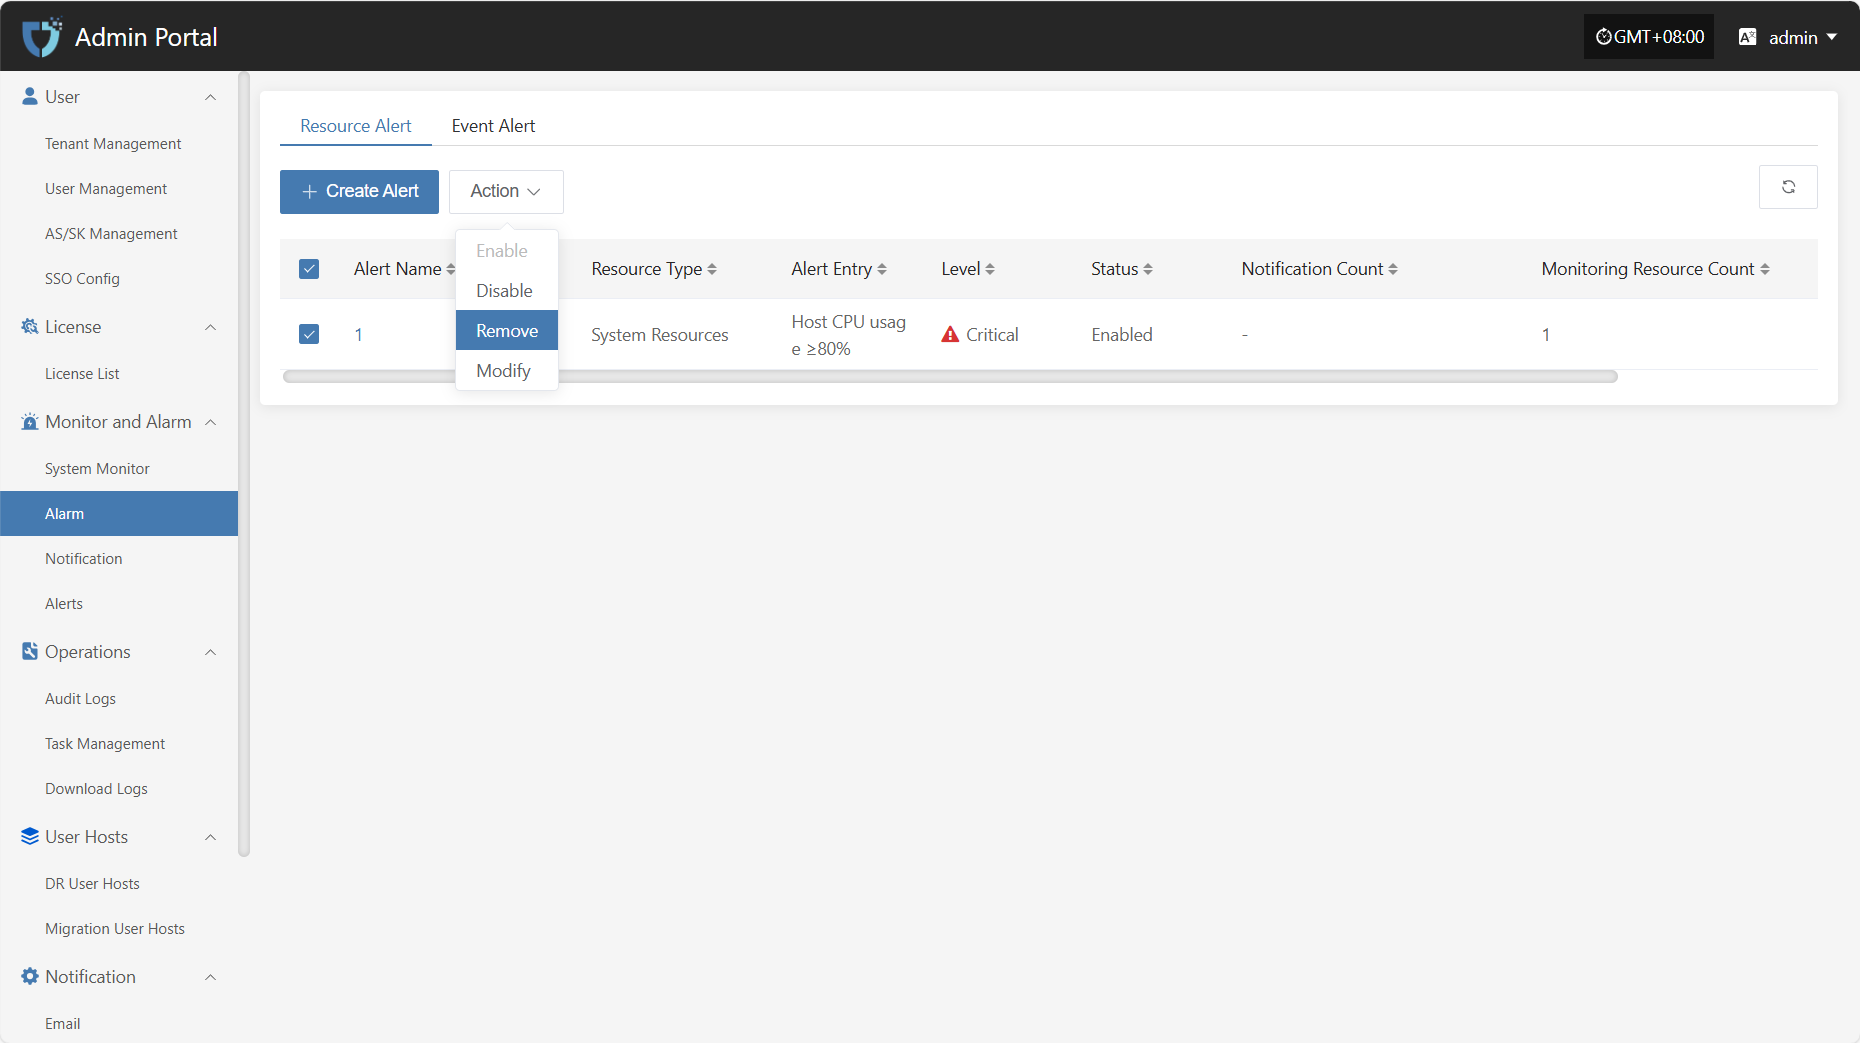
Action
Modify
After selecting the alarm to operate in the list, click "Modify" to edit part of the authentication information.
Enable
Click the "Enable" button to activate a disabled alarm.
Disable
Click the "Disable" button to disable an enabled alarm.
Remove
Click the "Remove" button to delete the alarm.
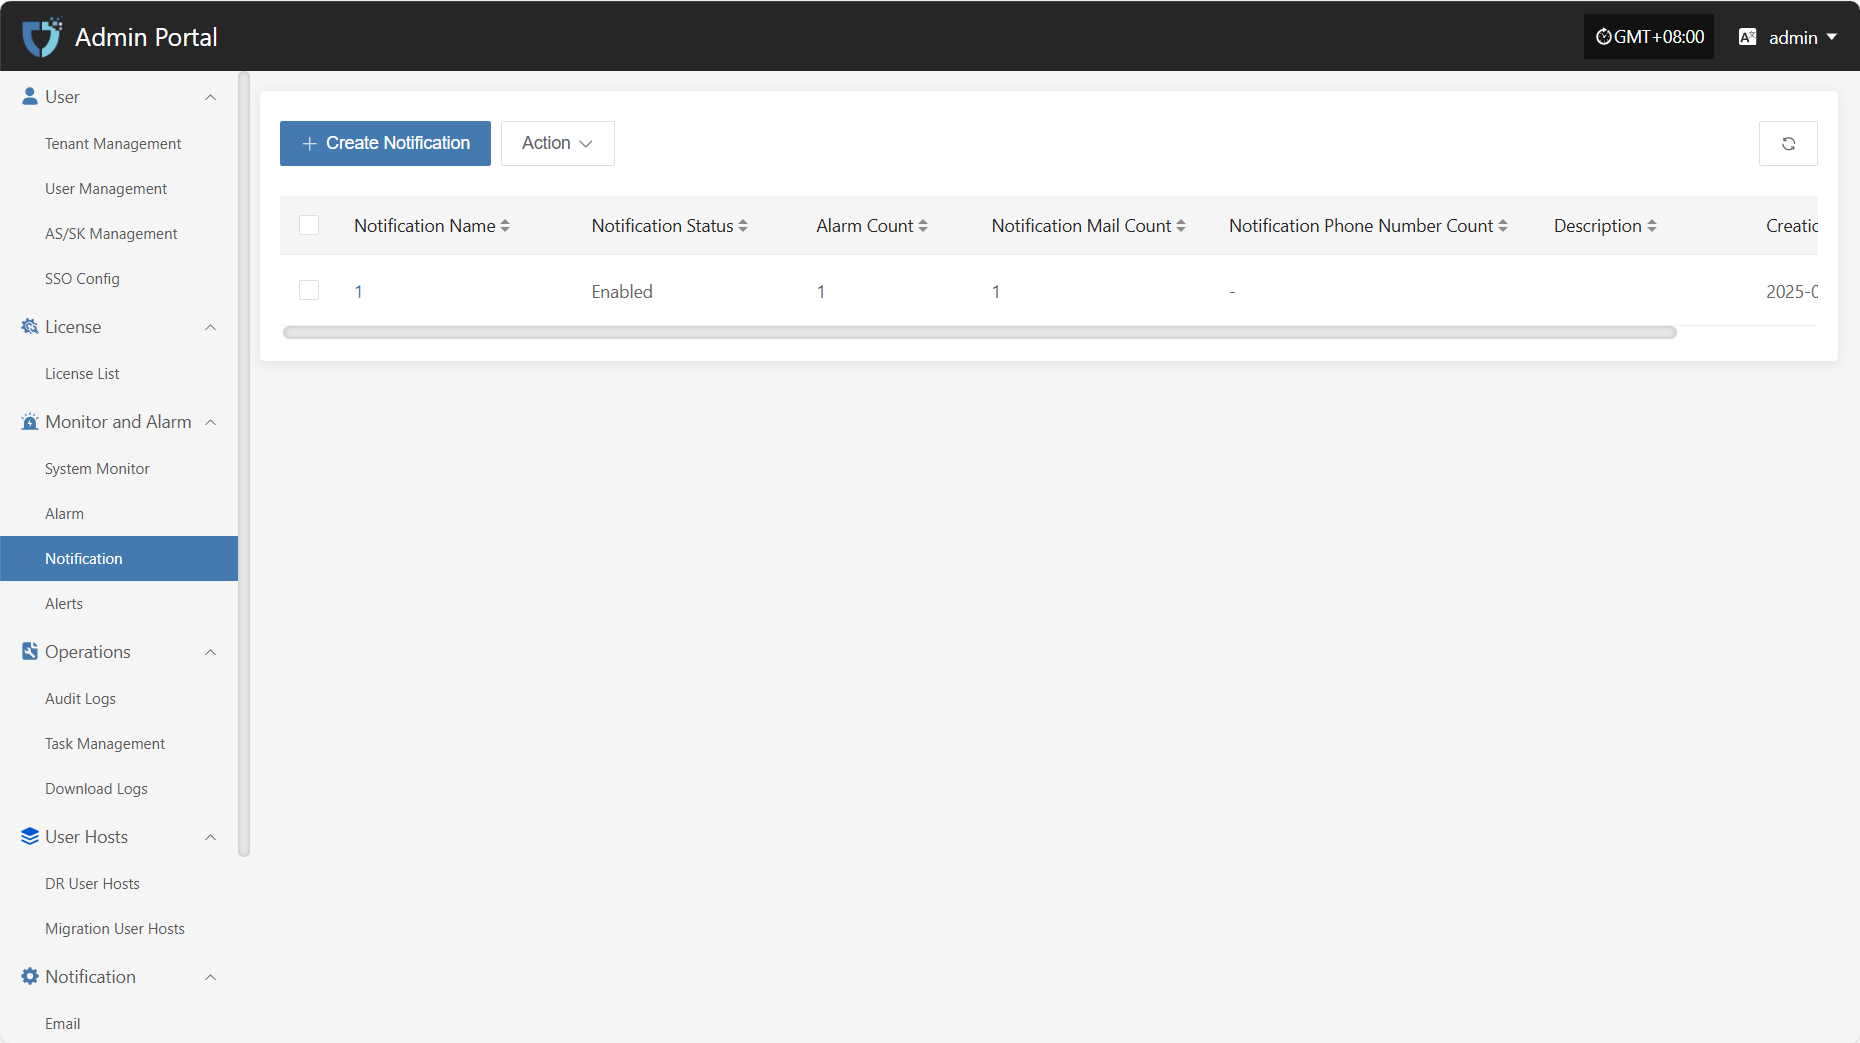
Notification
The "Notification" module is used to define target users who receive alert notifications or system messages. By configuring notification objects, administrators can push alert information, event notifications, or other important messages to designated personnel to ensure timely response and handling.
Create Notification
Click the "Create Notification" button in the upper left corner to start creating a notification object.
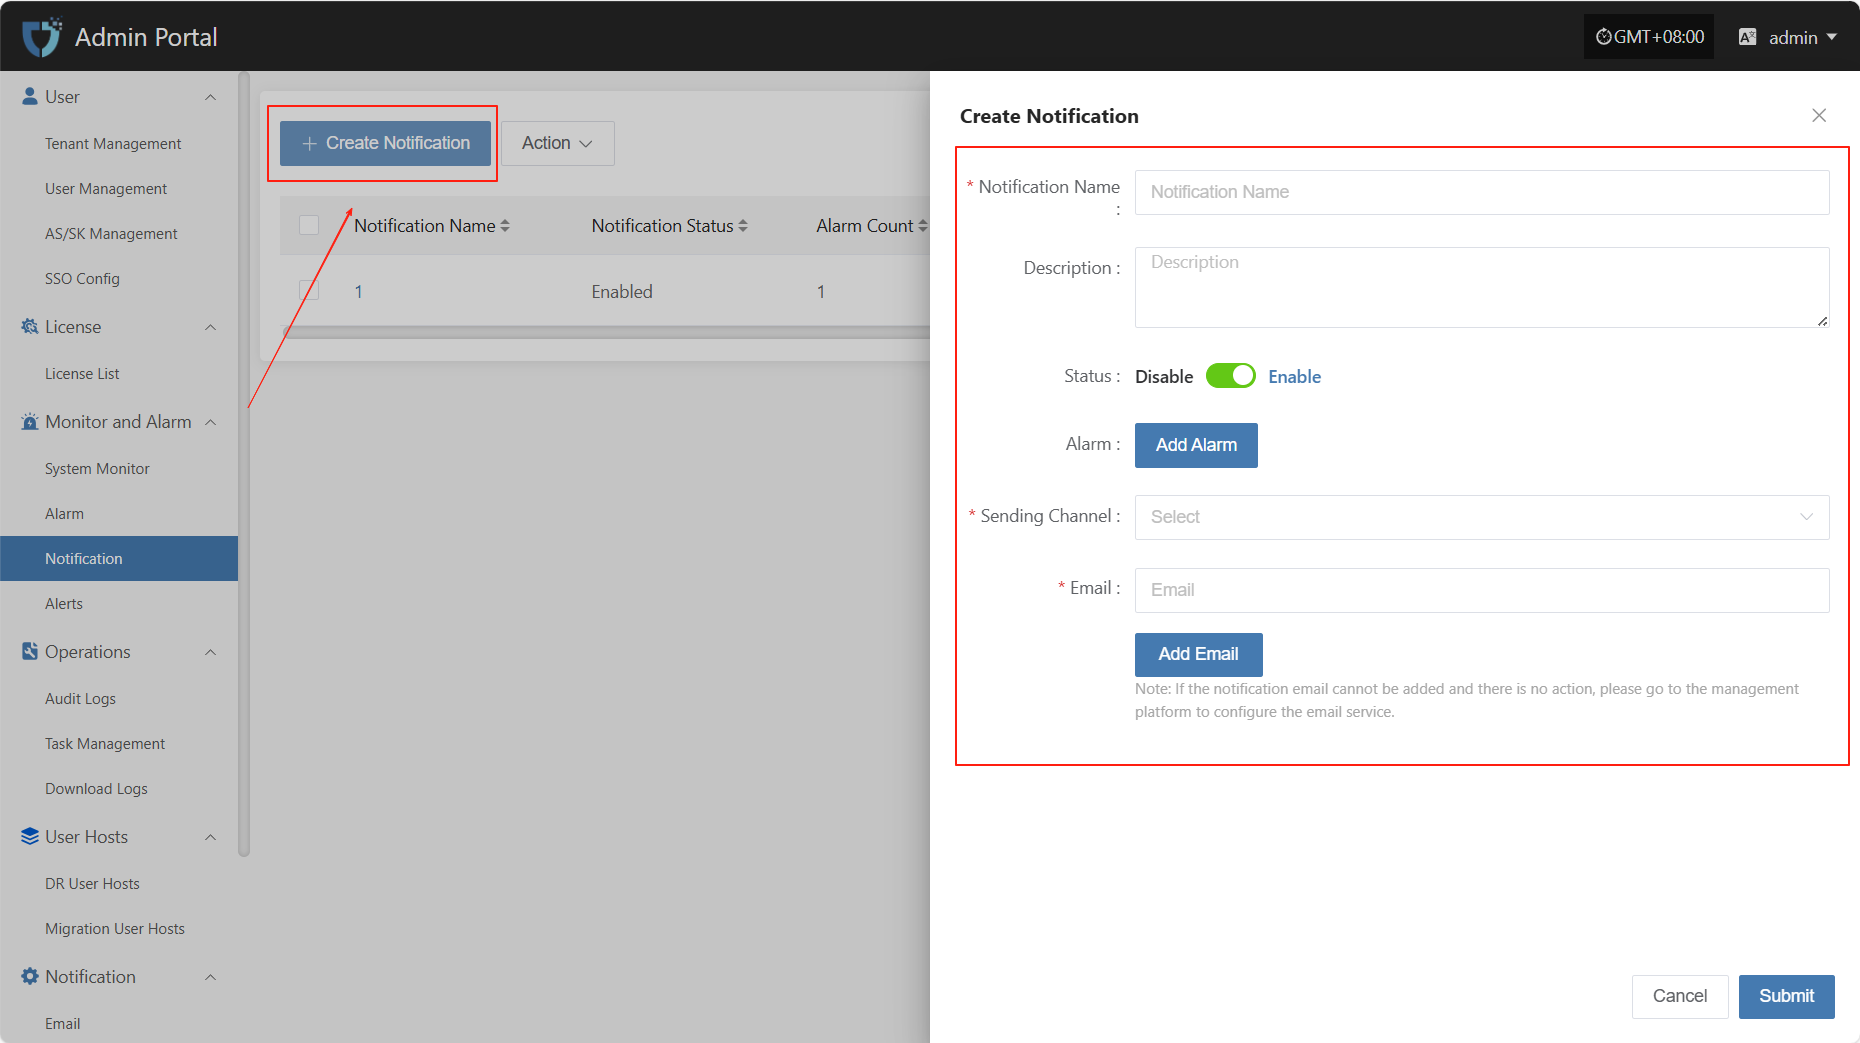
- Authentication Information Description
| Setting | Example Value | Description |
|---|---|---|
| Notification Name | Operations Team | Custom name for the notification target object. It is recommended to use an identifiable field for easy management. |
| Description | Responsible for system monitoring and maintenance | Briefly describe the function or responsibility of this notification object to help understand its purpose. |
| Status | Enable / Disable | Set the status of the notification object. When enabled, it will receive related notifications; when disabled, it will not receive any notifications. |
| Alarm | Select alarm name | Select the alarm associated with this notification object. You can create alarms View here |
| Sending Channel | xxx@163.com | Set the sending method for this notification object. You can choose email notification. If no sending channel is configured, click the link to view the configuration View here |
| ops@example.com | Configure the email address to receive notifications. Suitable for objects receiving notifications by email. Multiple addresses can be configured. |
After completing the authentication information configuration, click the "Submit" button at the bottom right of the page. The system will create the notification object and save the related settings.
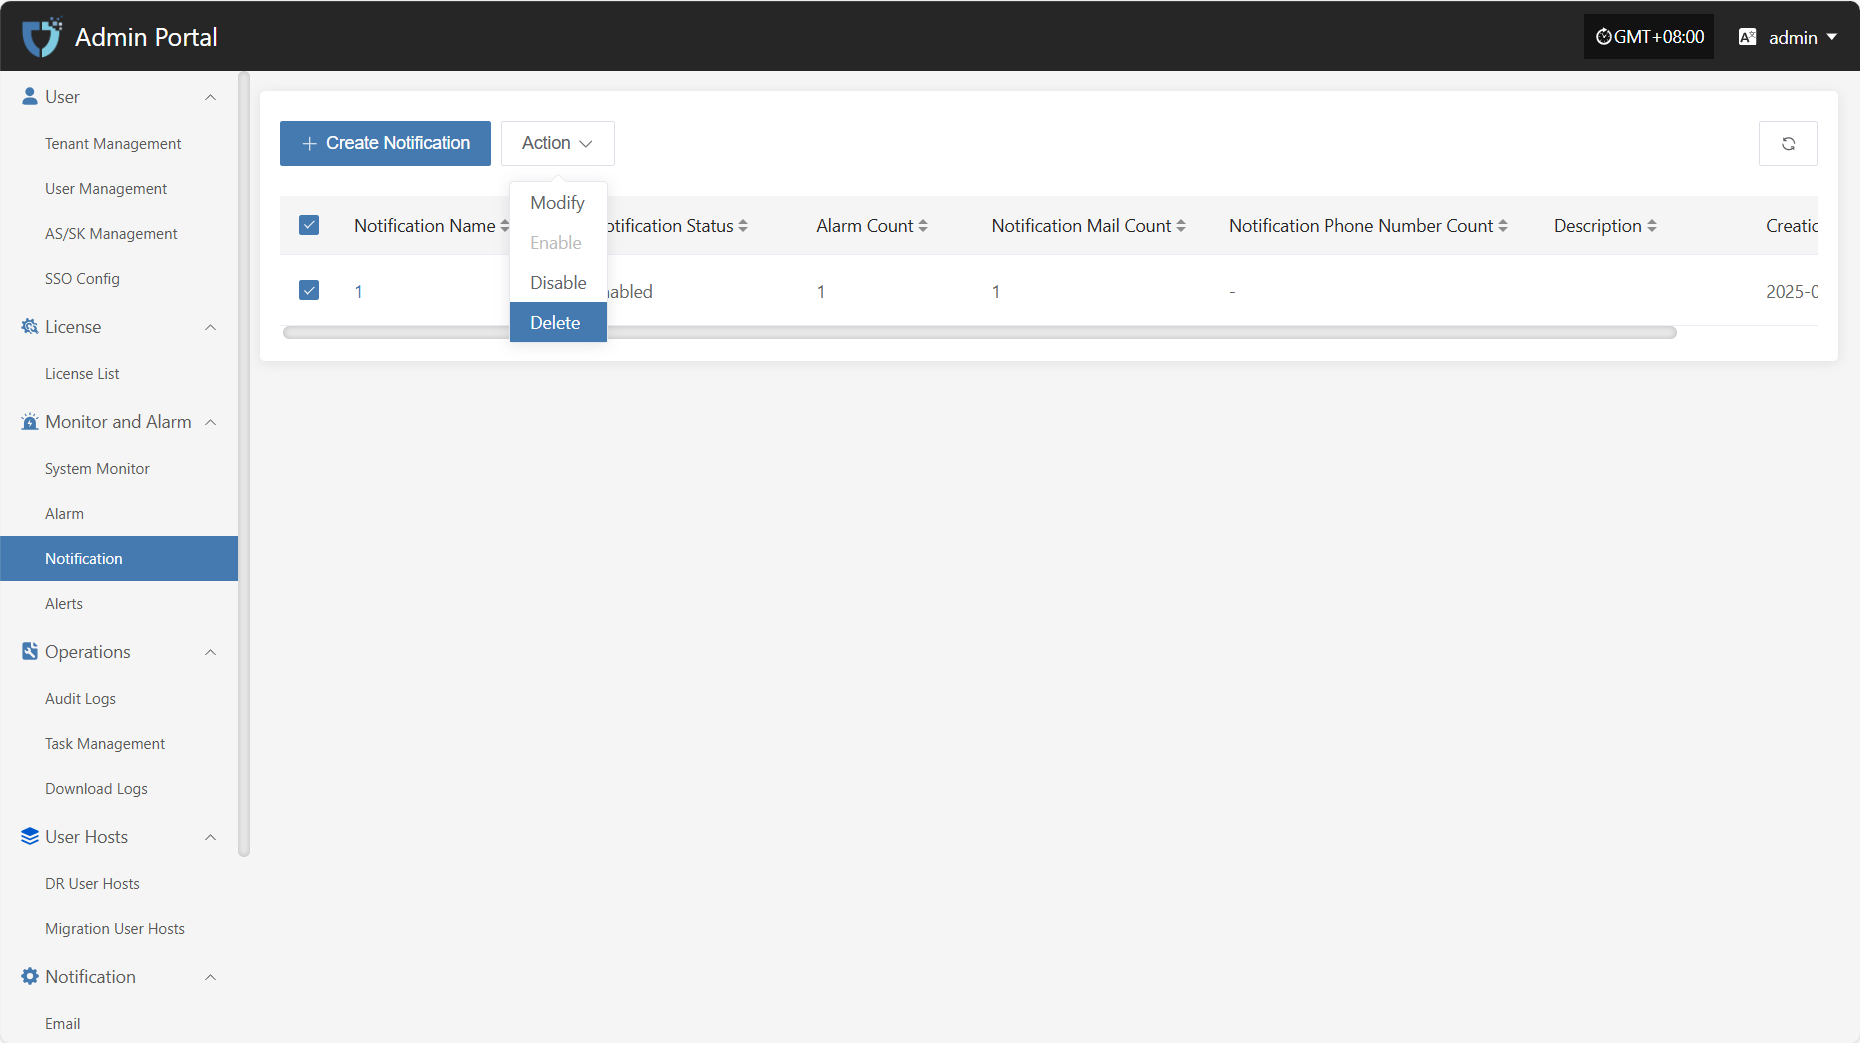
Action
Modify
After selecting the notification object to operate in the list, click "Modify" to edit part of the authentication information.
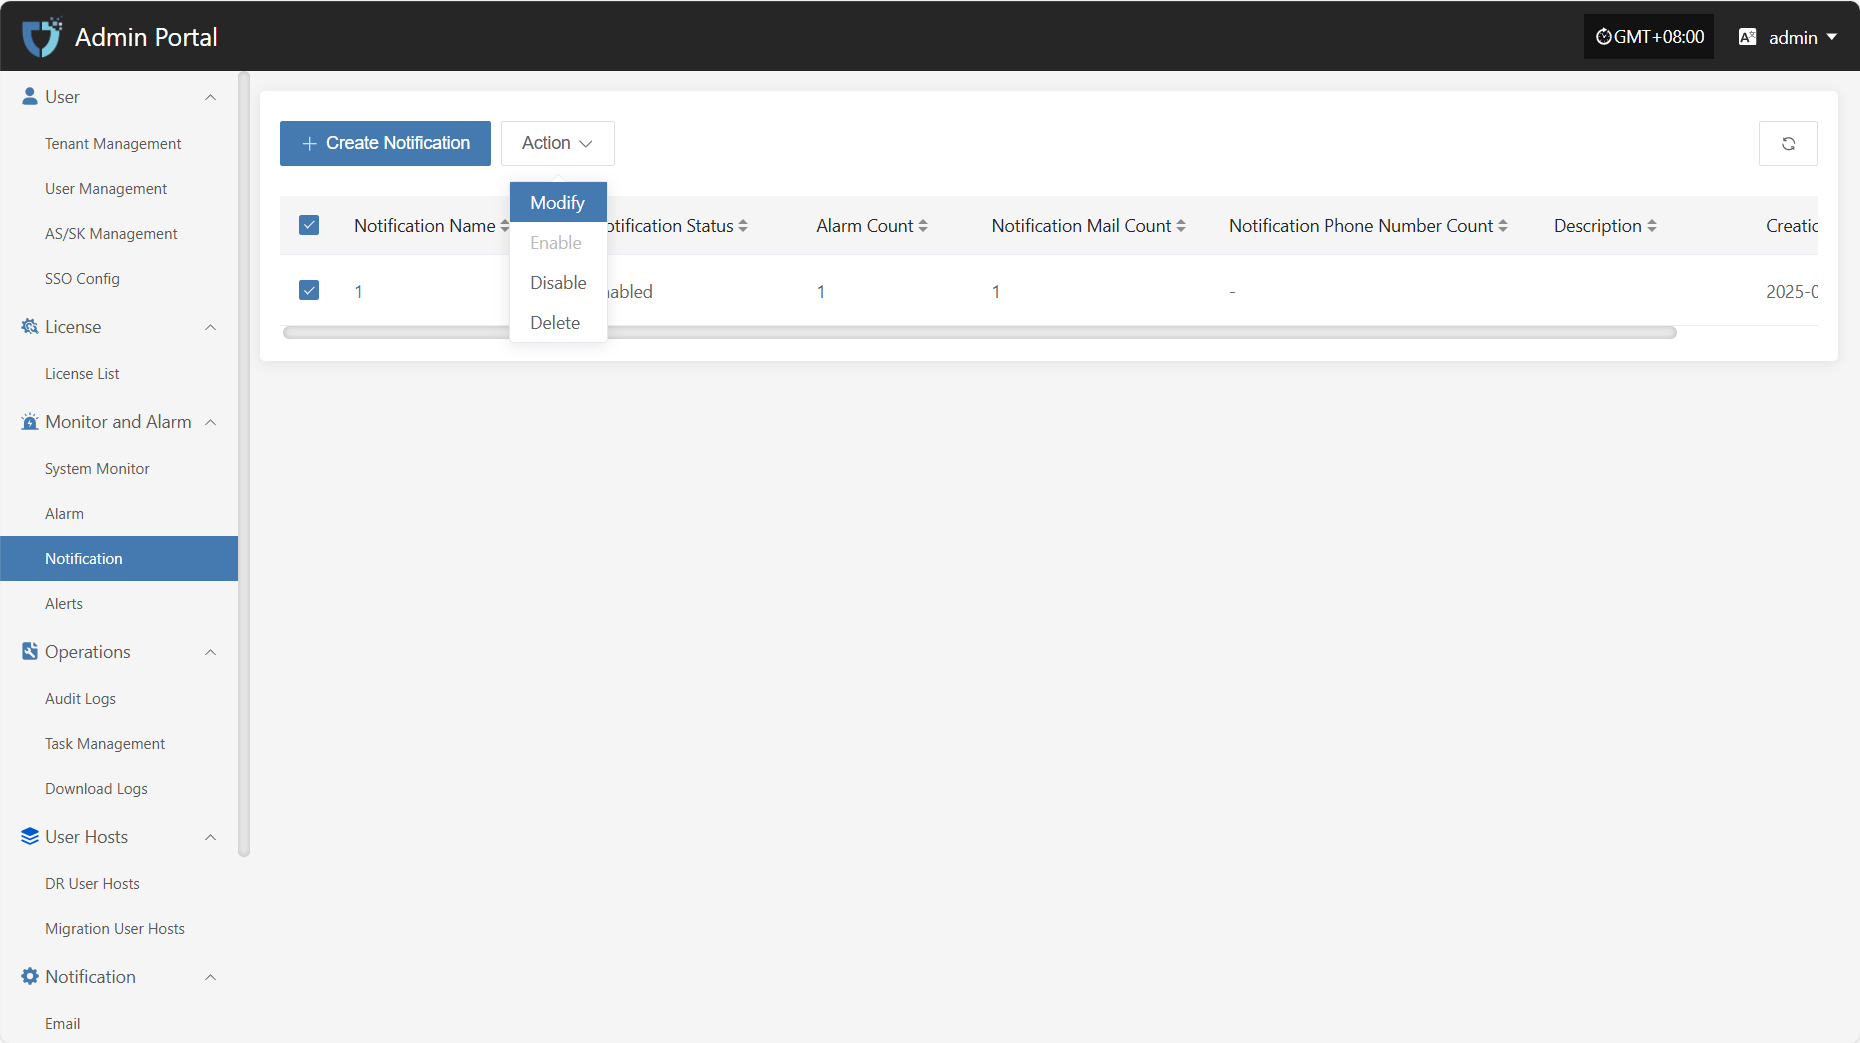
Enable
Click the "Enable" button to activate a disabled notification object.

Disable
Click the "Disable" button to disable an enabled notification object.
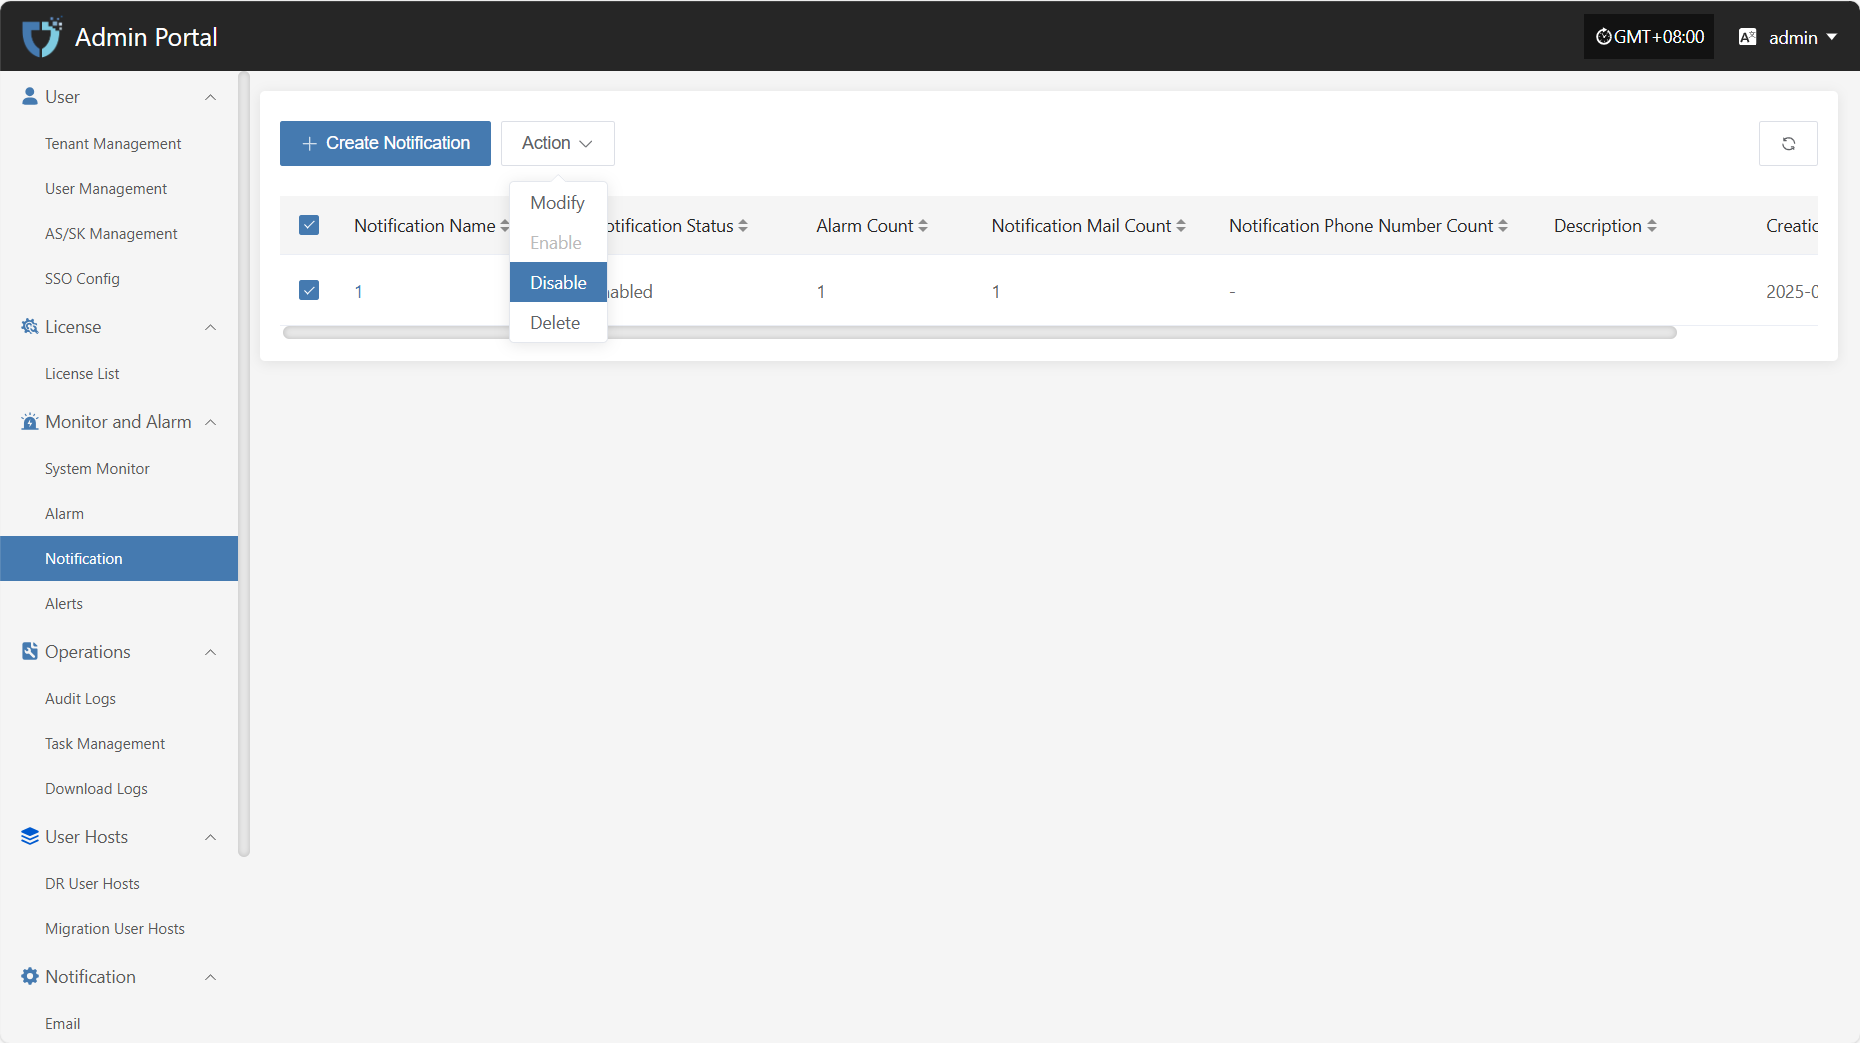
Delete
Click the "Delete" button to remove the notification object.
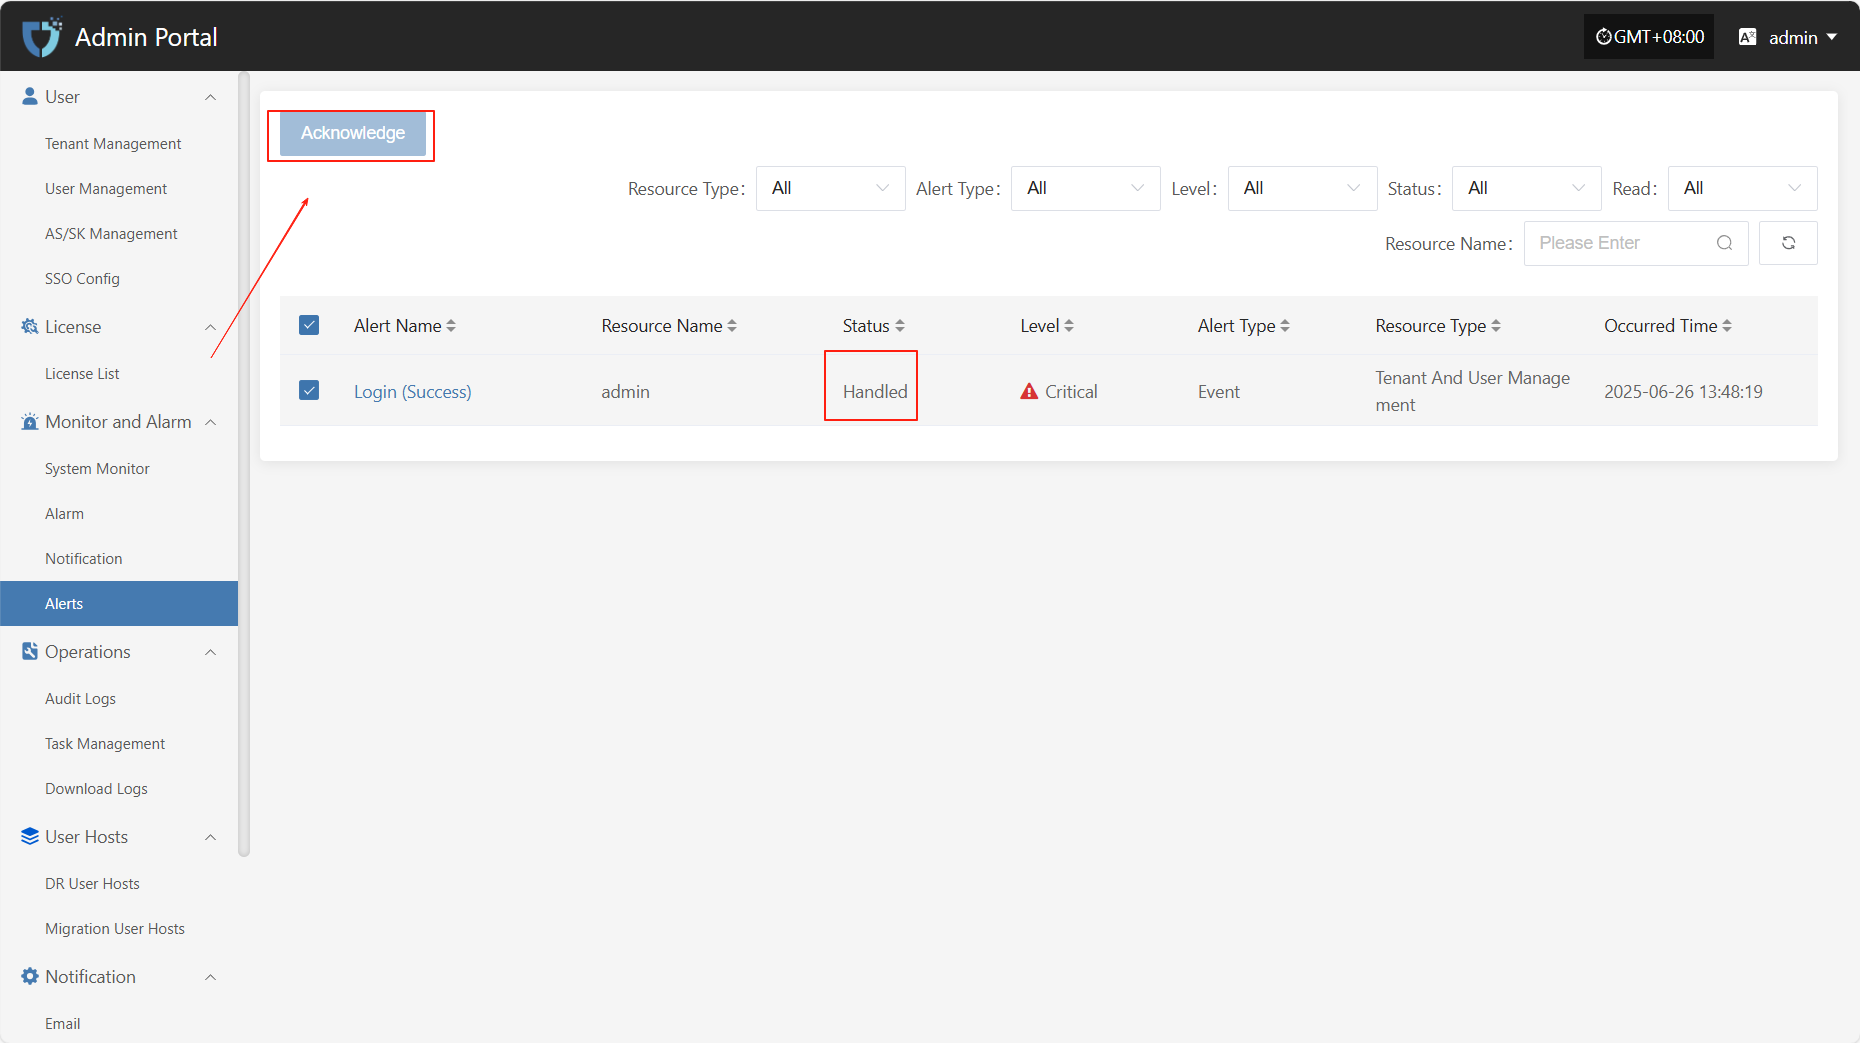
Alerts
The "Alerts" module is used to centrally display various alert messages triggered by the alarm system, helping users quickly understand abnormal events that occur during system operation. This module only provides visual display of alert results. Through a unified alert message view, users can clearly see the alert level, source, content, and handling status, making it easy to respond promptly and for later auditing.
At the top of the "Alert Messages" page, you can filter alert records by multiple criteria such as Resource Type, Alert Type, and Level, making it easy for users to efficiently search and manage alerts.
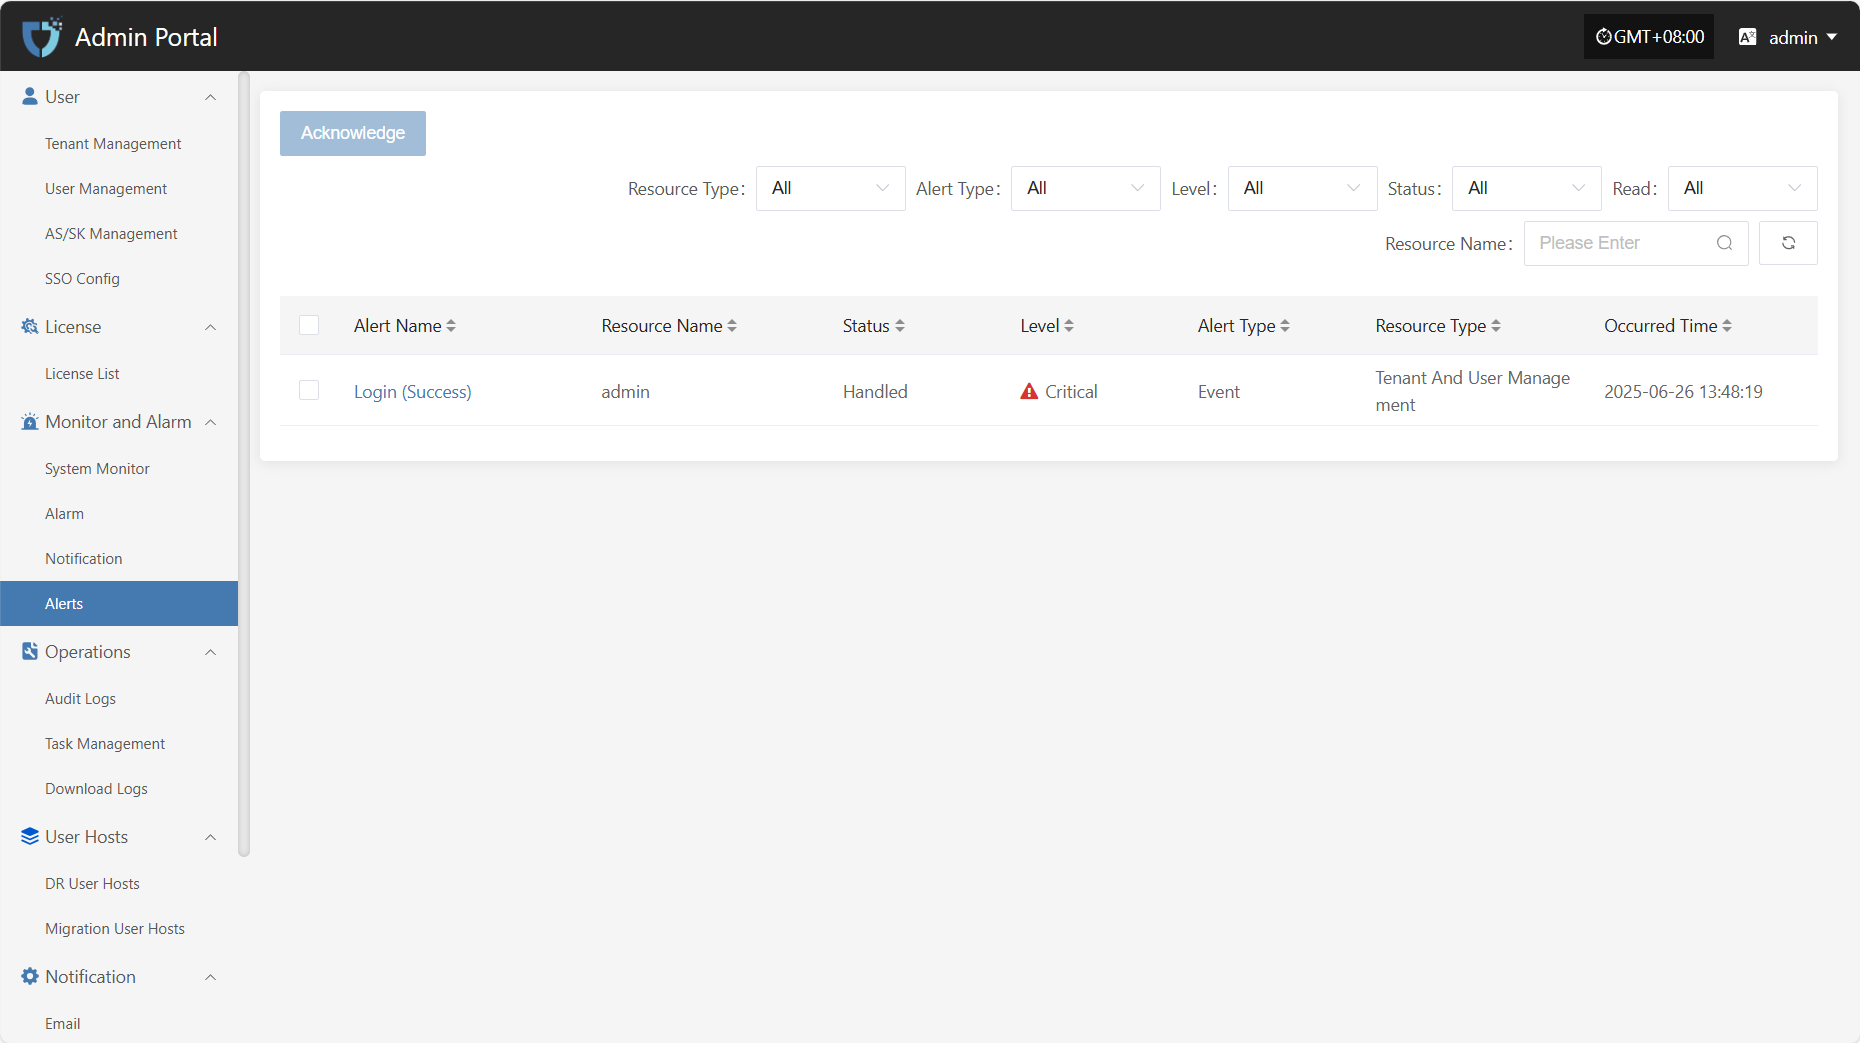
After selecting the corresponding alert message, click the "Acknowledge" button in the upper right corner to change its handling status for easier management and tracking.
Operations
Audit Logs
The "Audit Logs" module is used to record and display all important operations on the platform, providing detailed operation history. Through audit logs, administrators can track system usage, permission changes, user actions, etc., ensuring transparency and security of system operations, and making it easier for post-event review, troubleshooting, and compliance auditing.
At the top of the page, you can filter and manage audit records efficiently by scenario, resource type, tenant, and other criteria.
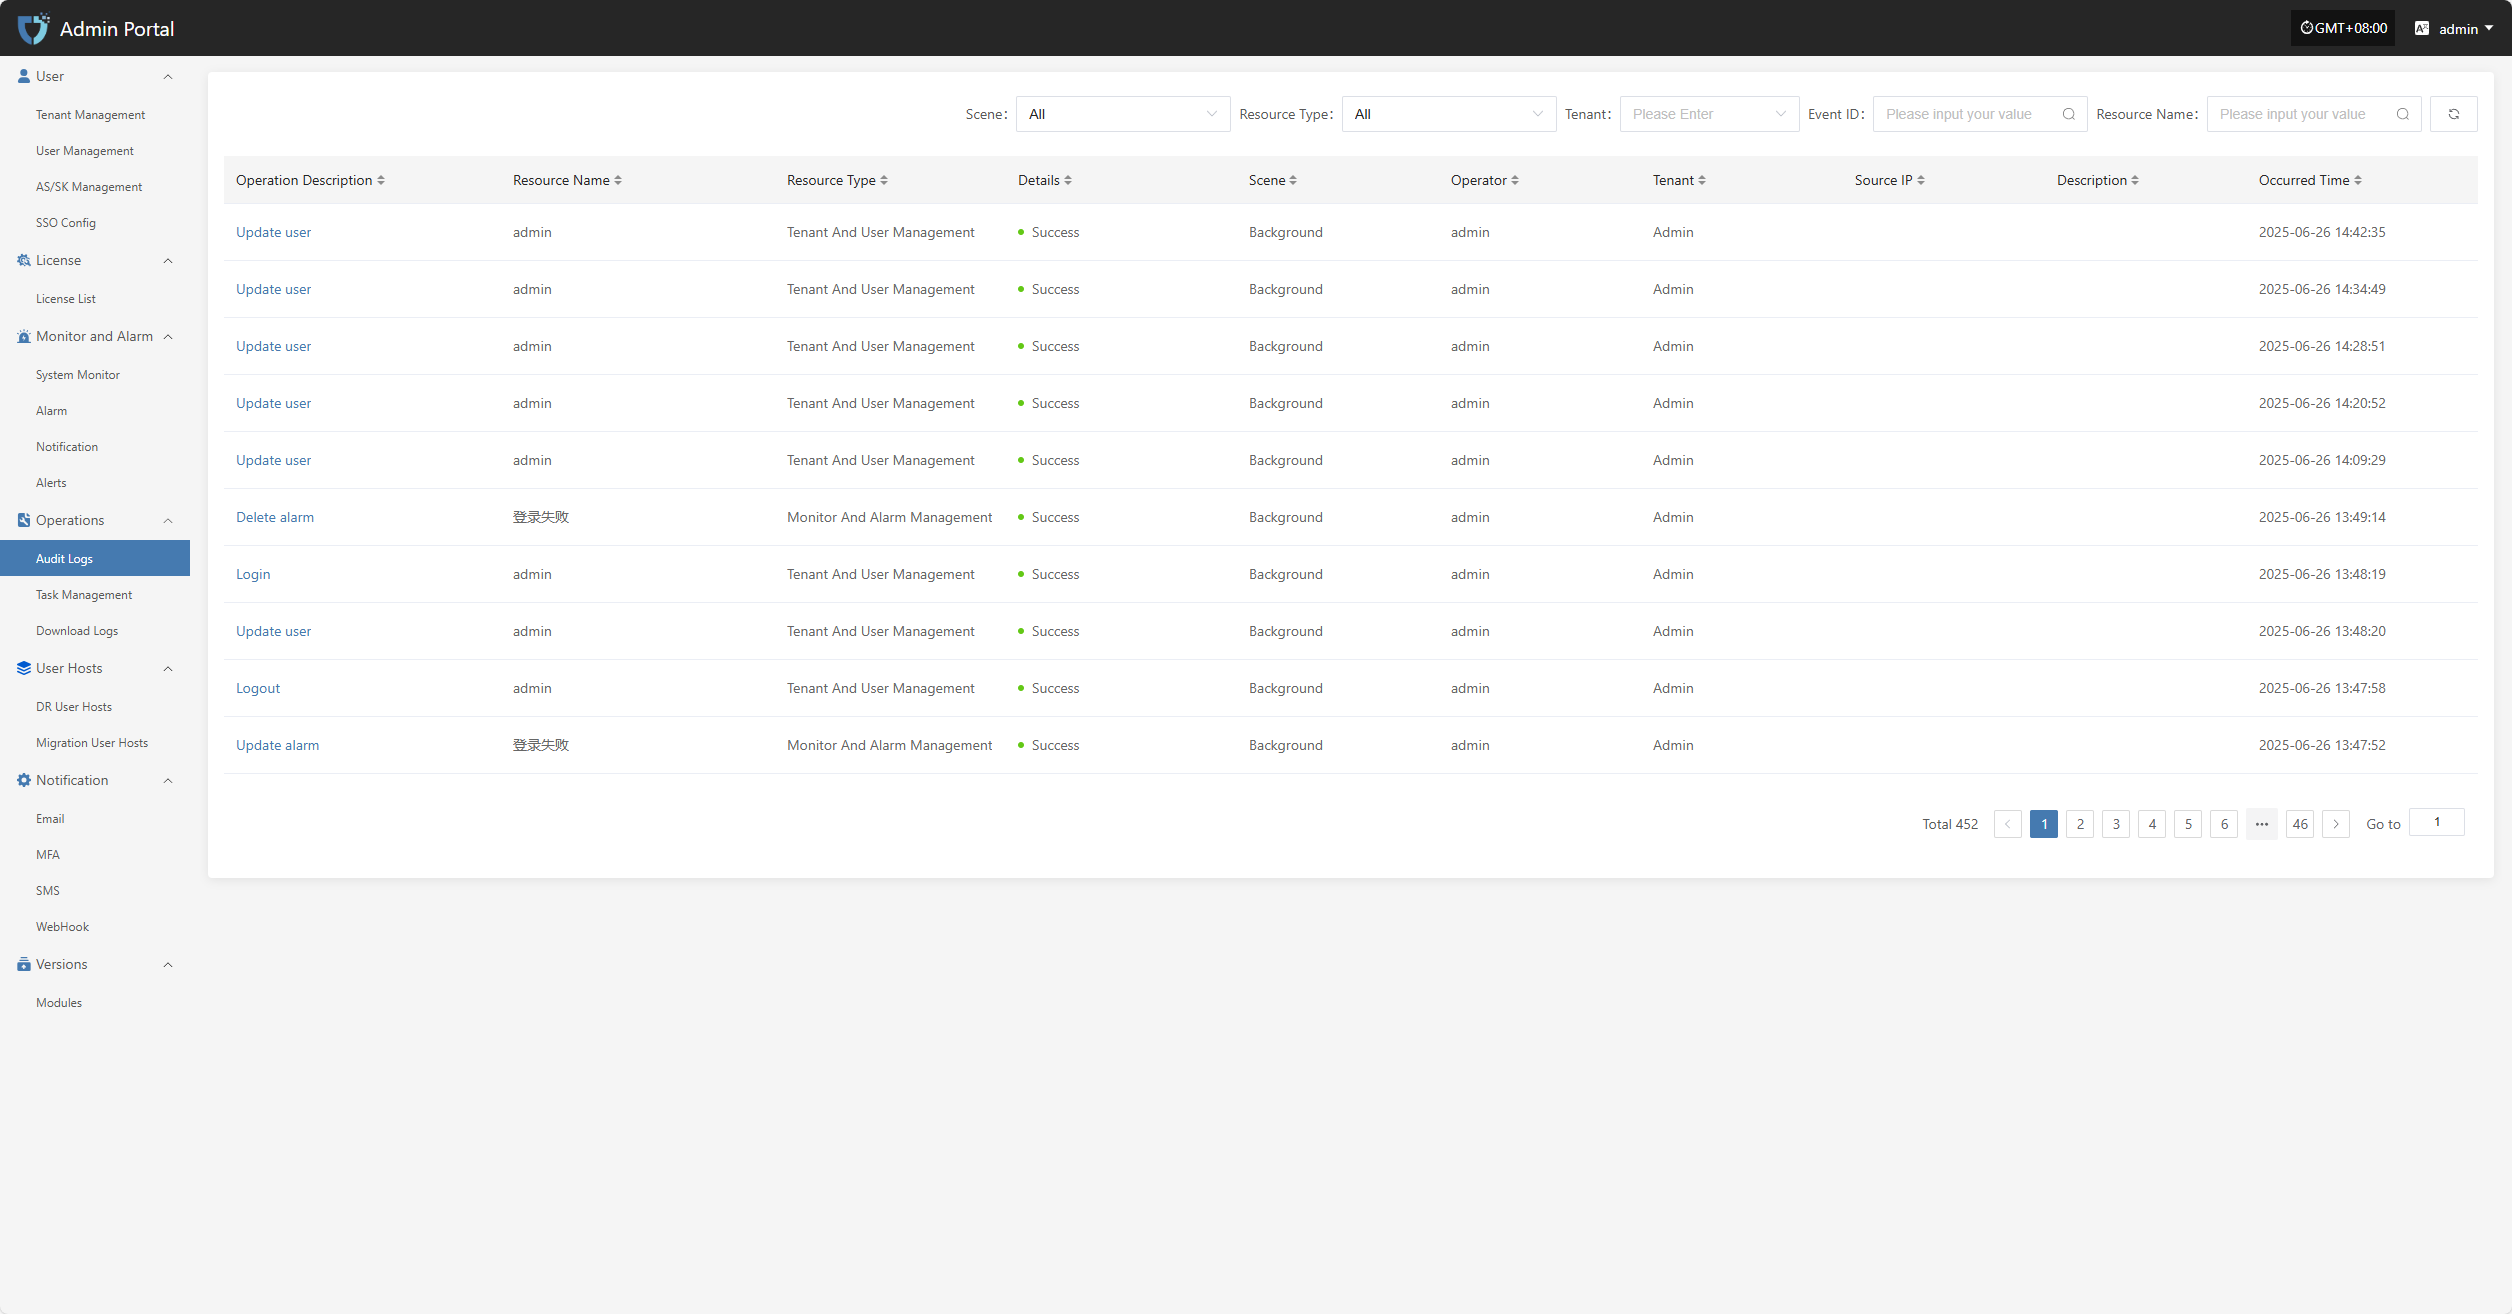
In the audit log list, click the "Operation Description" field of any log to view the details of that operation, including specific changes and execution parameters.

Task Management
The "Task Management" module is used to centrally display the execution records and status details of various tasks on the platform, helping users understand the execution process, duration, and executor information of tasks. Users can click on a task record to view the complete execution details for troubleshooting and result confirmation.
At the top of the page, you can filter and manage task records efficiently by scenario, resource type, tenant, and other criteria.
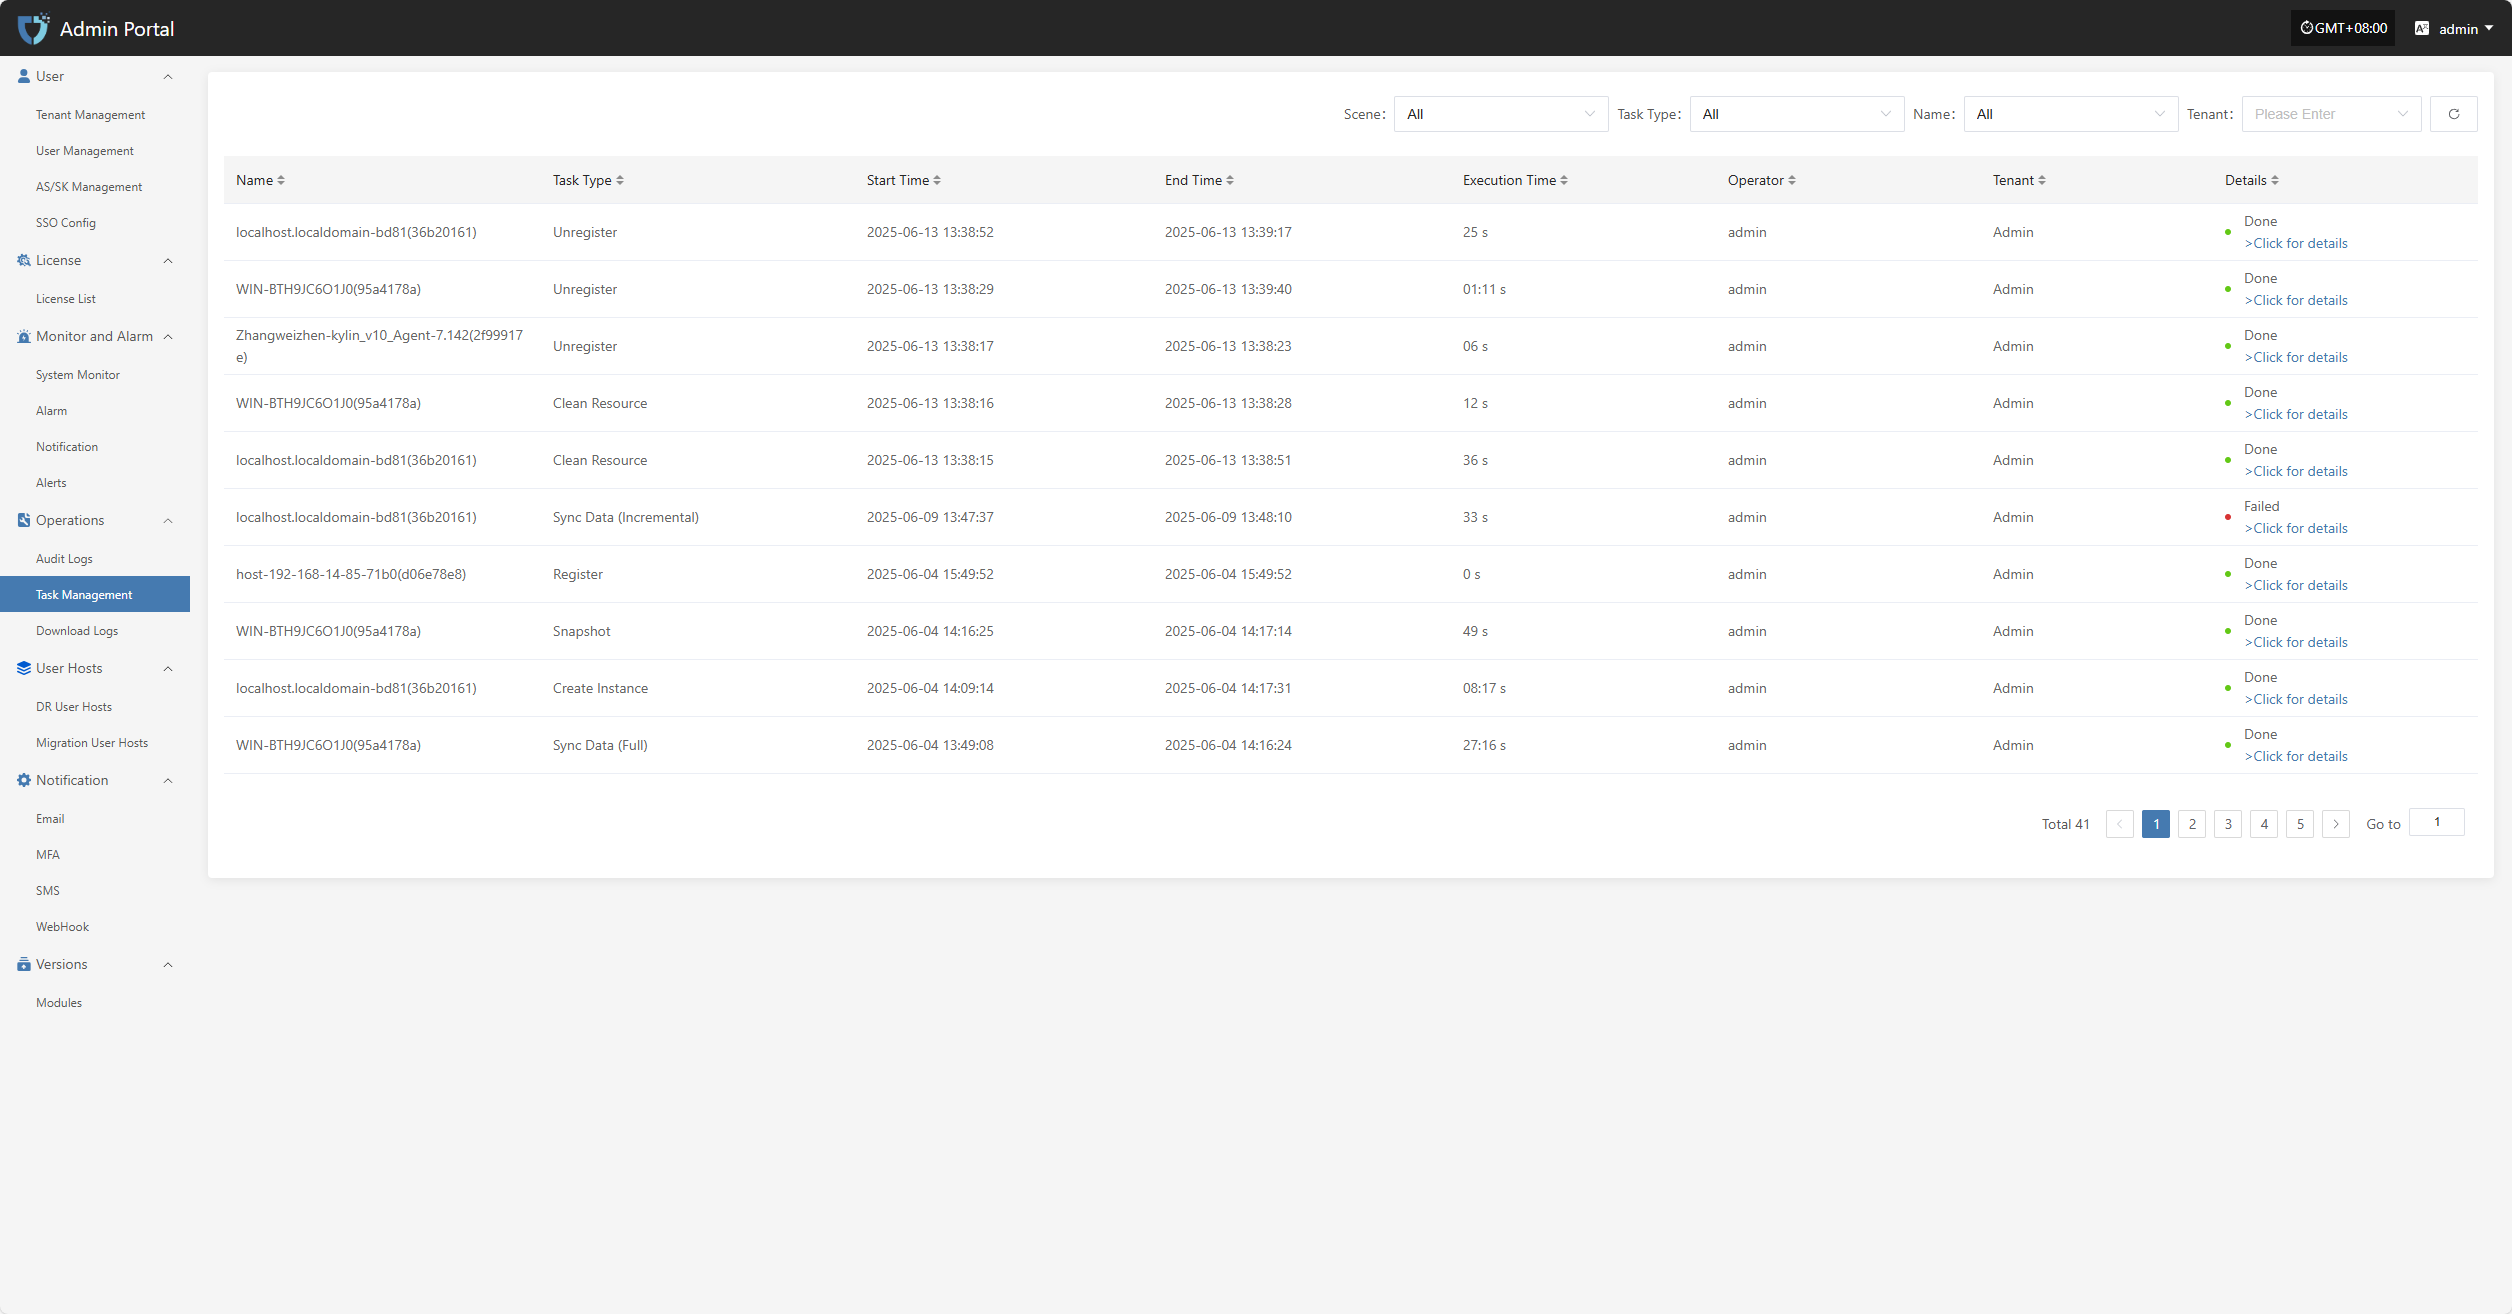
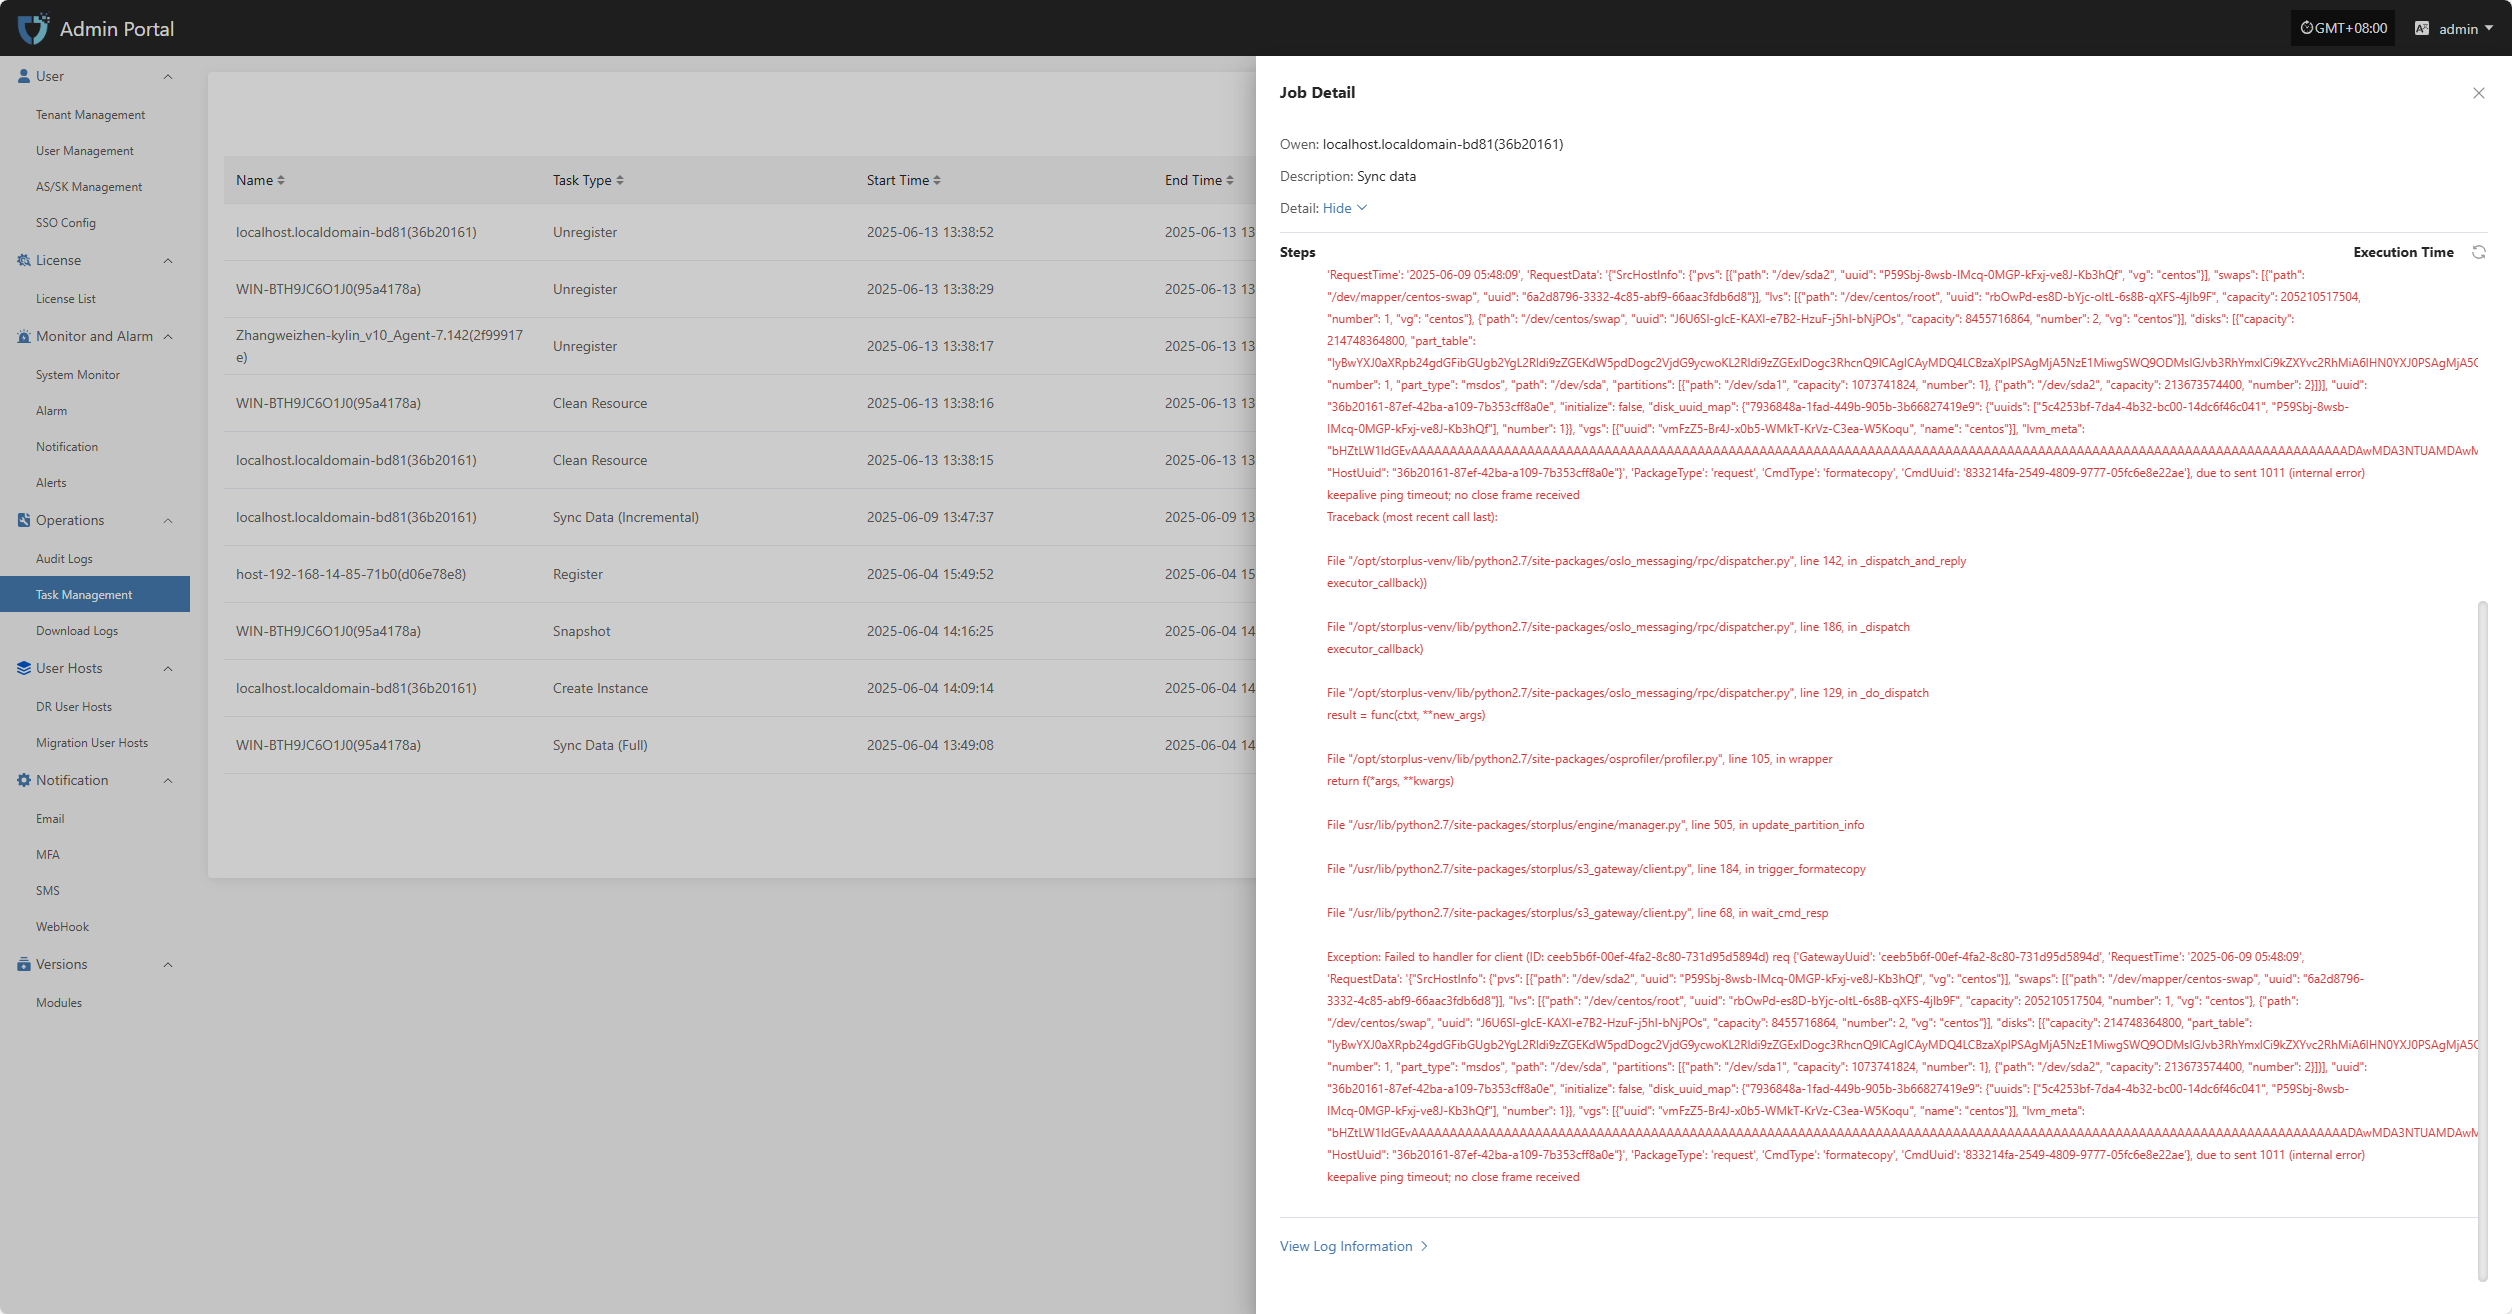
In the task management list, users can click the "> Click for details" link in the operation result field to view the complete execution log for that task, making it easier to troubleshoot and confirm results.
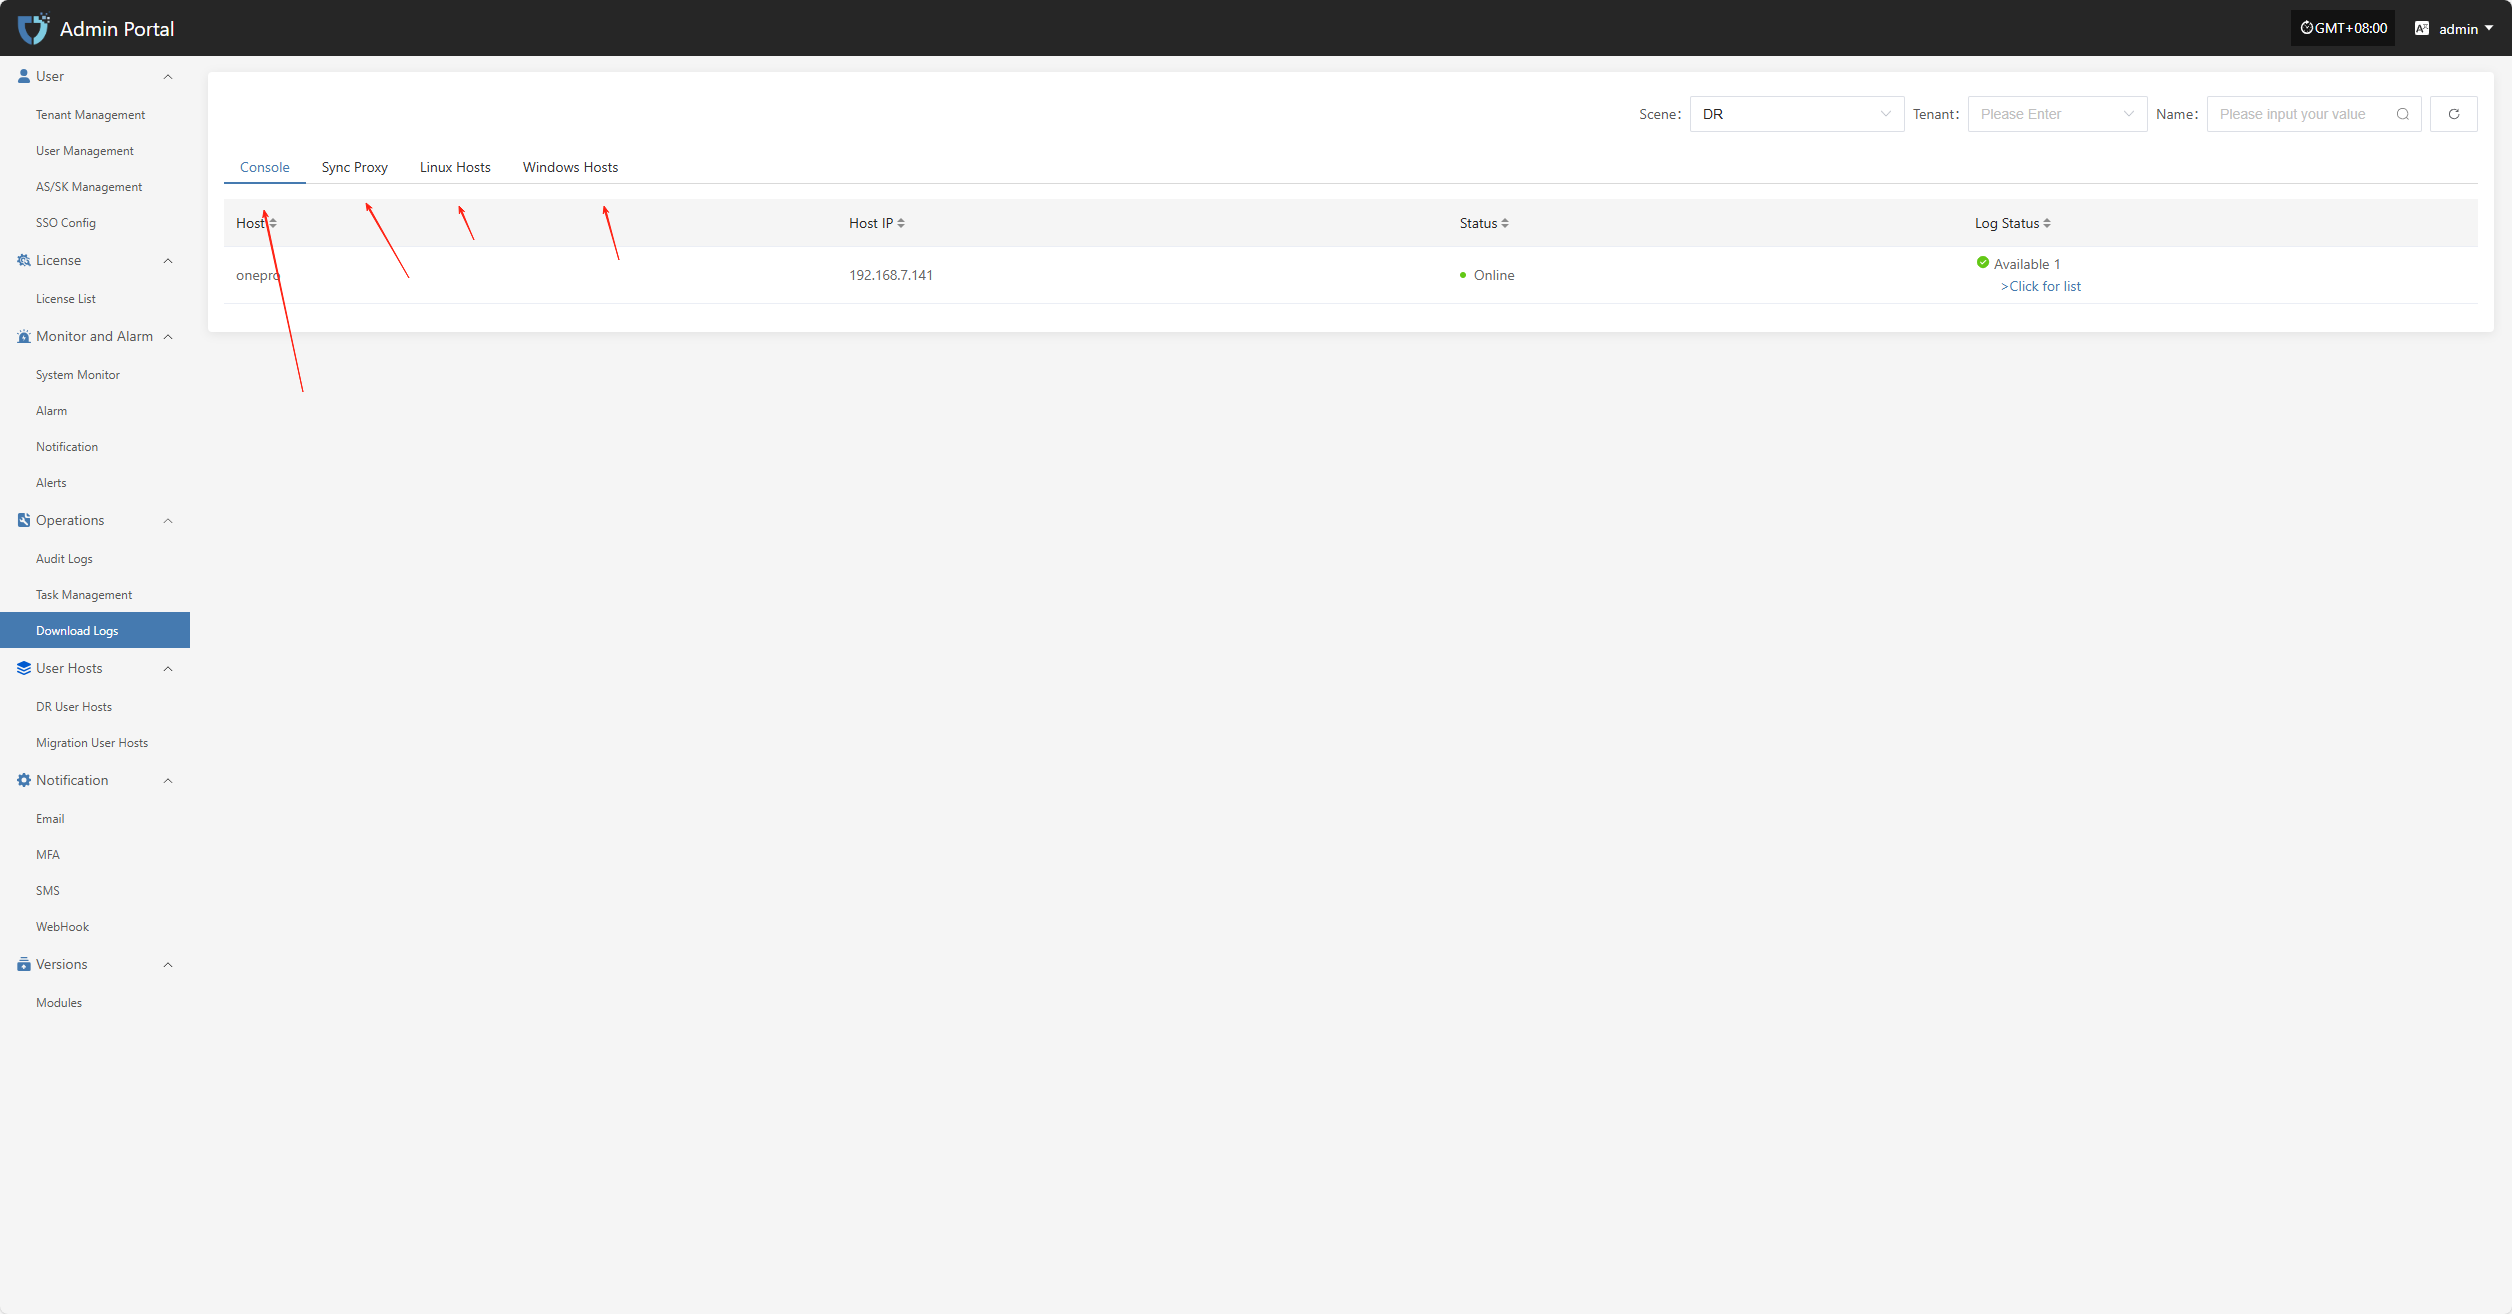
Download Logs
The "Download Logs" module is used to view and manage host log information on the platform, supporting classification by host type (such as Sync Proxy, Linux host, Windows host). Users can quickly locate target hosts using the filter function, view their log status, download log files, or view log details, making troubleshooting and system auditing easier.
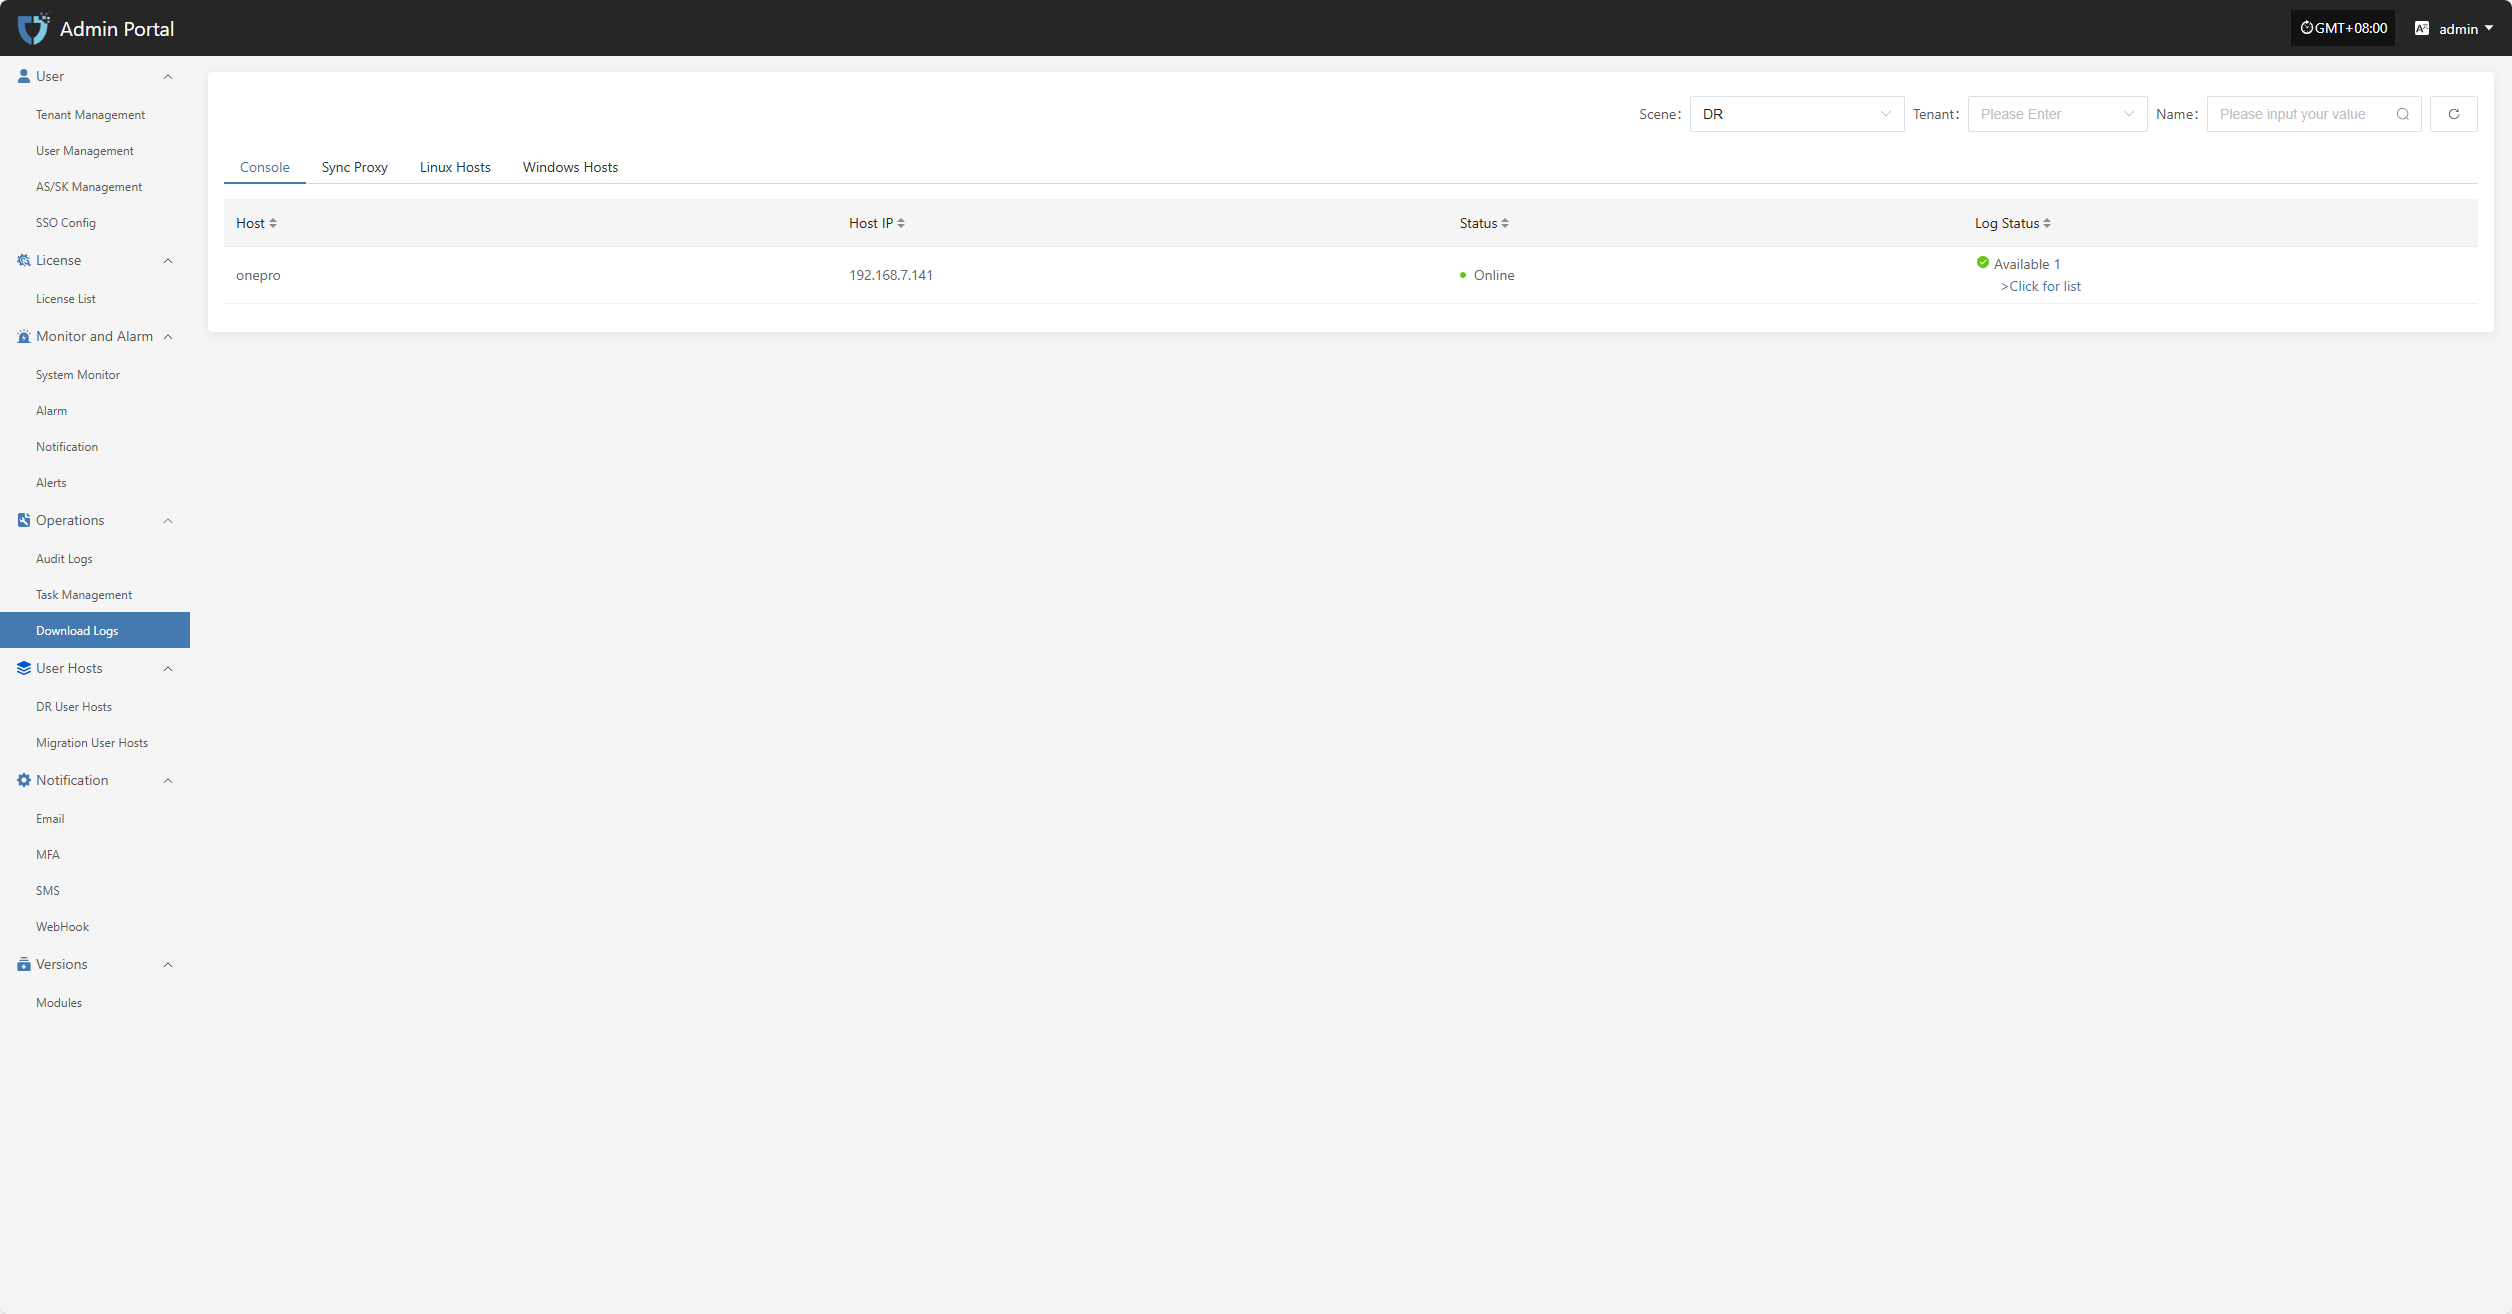
To make it easier to view log information for different hosts or components, the top of the page provides type tabs such as "Console", "Sync Proxy", etc. Click to switch the log list content.
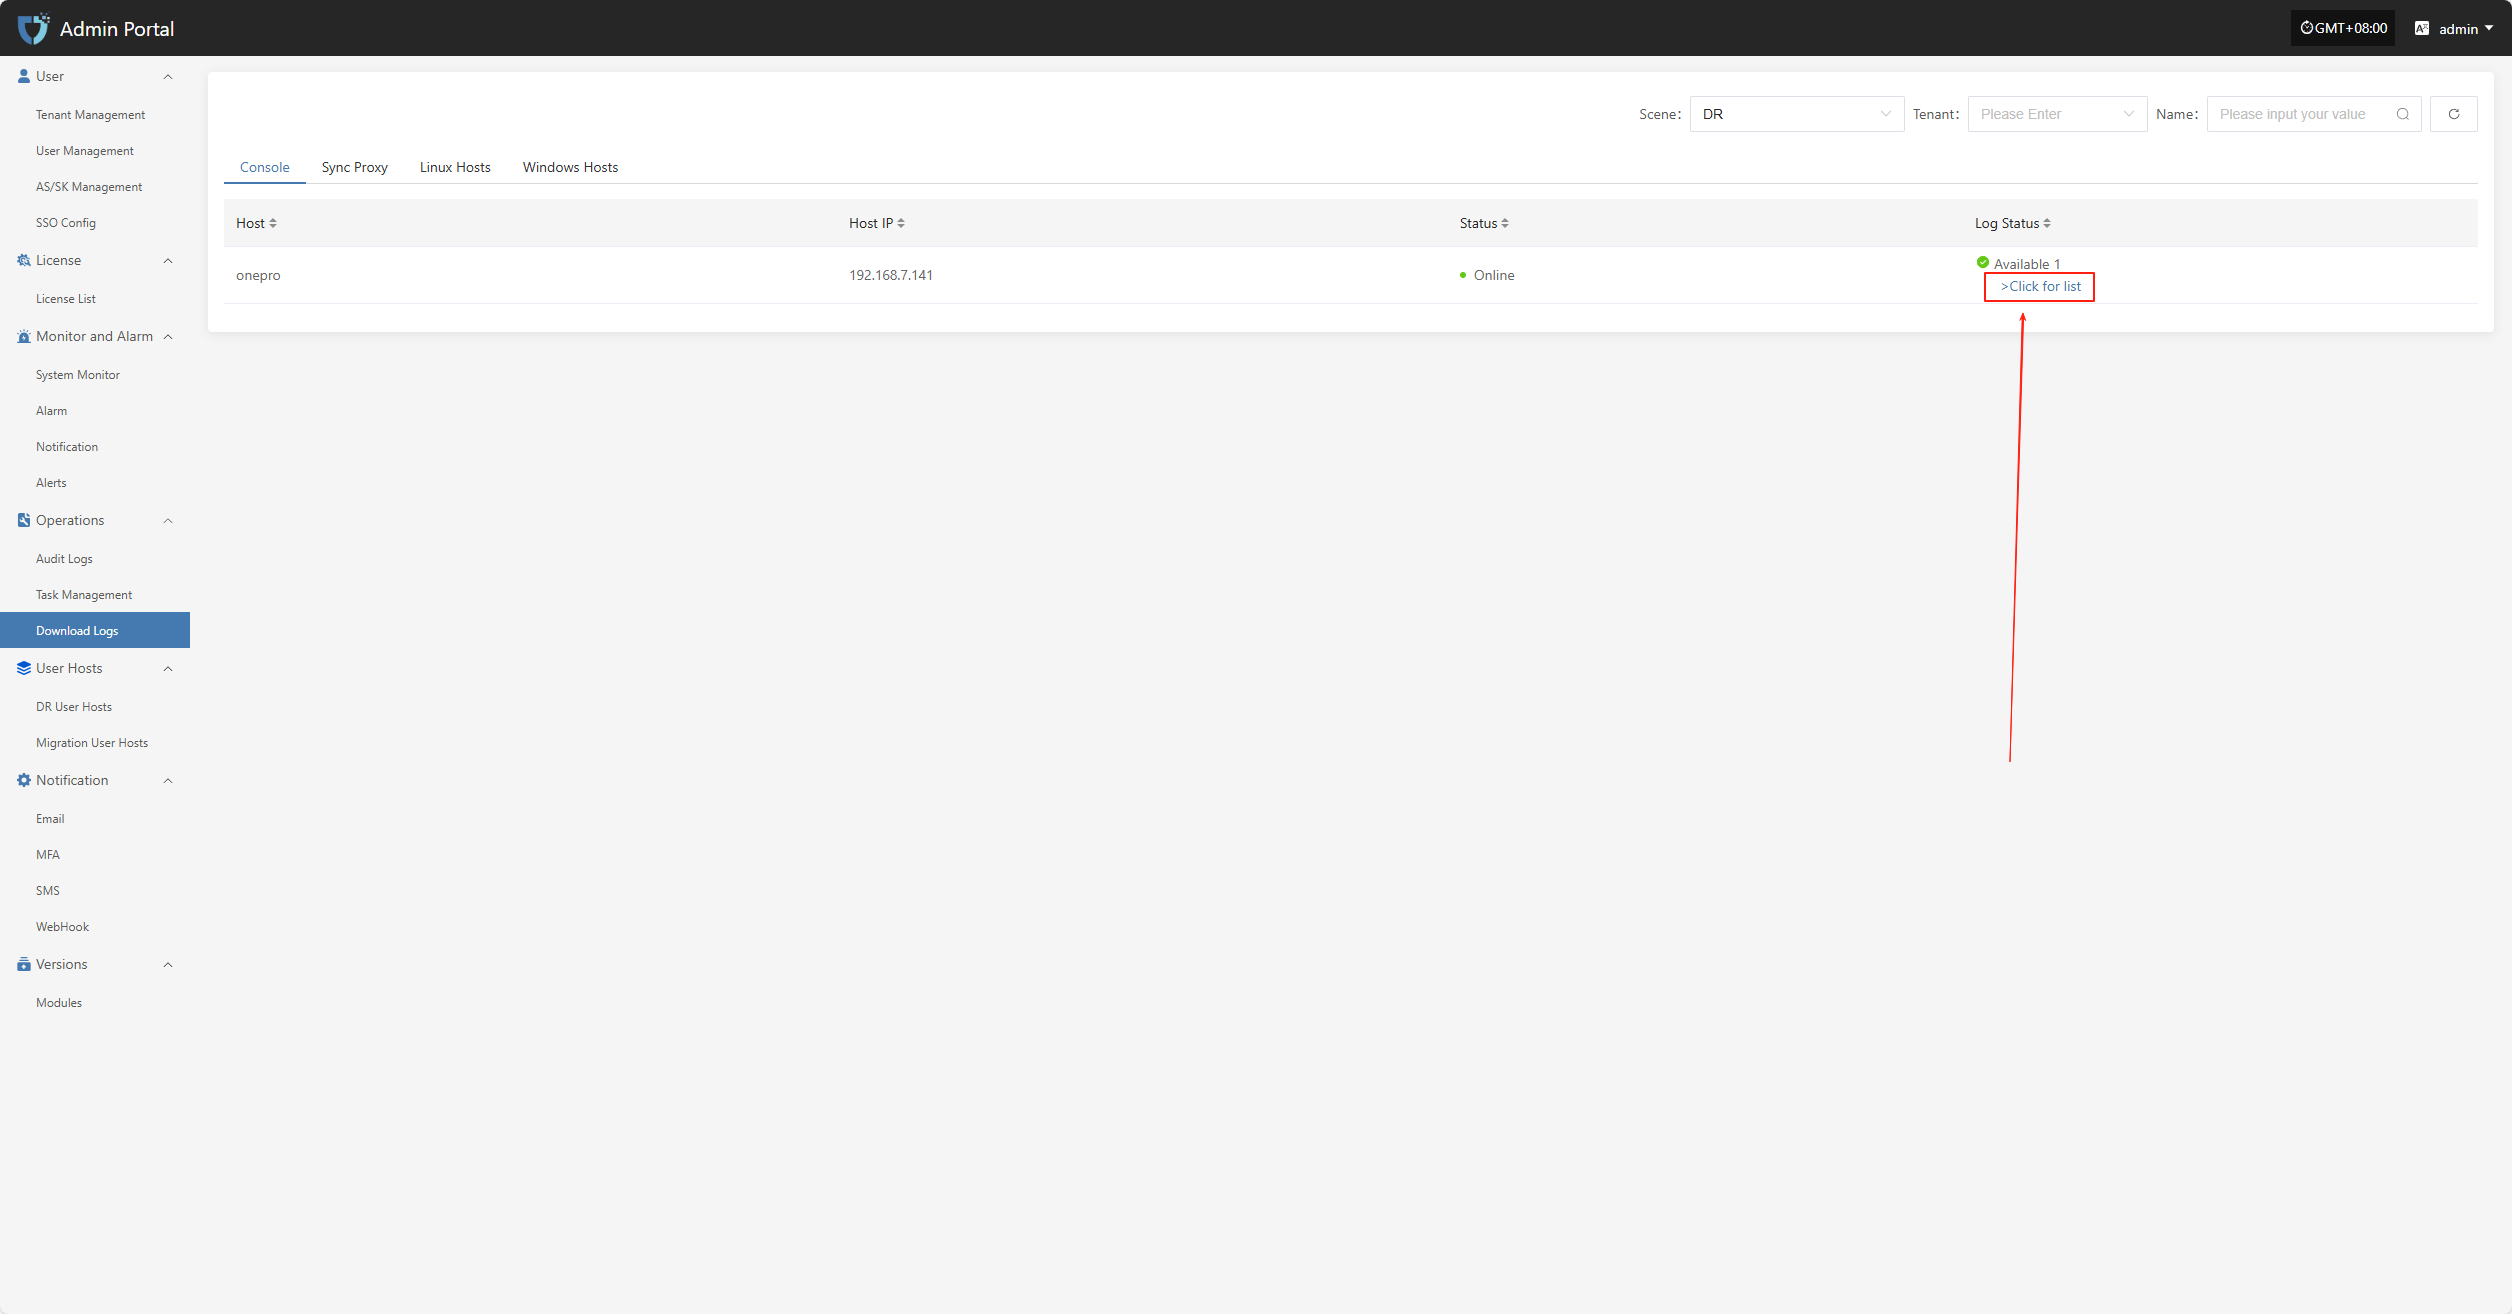
Log Download
Click "> Click for list" to enter the log details page, where you can view the detailed log list for the corresponding host. The system displays various log files in chronological order and supports download operations.
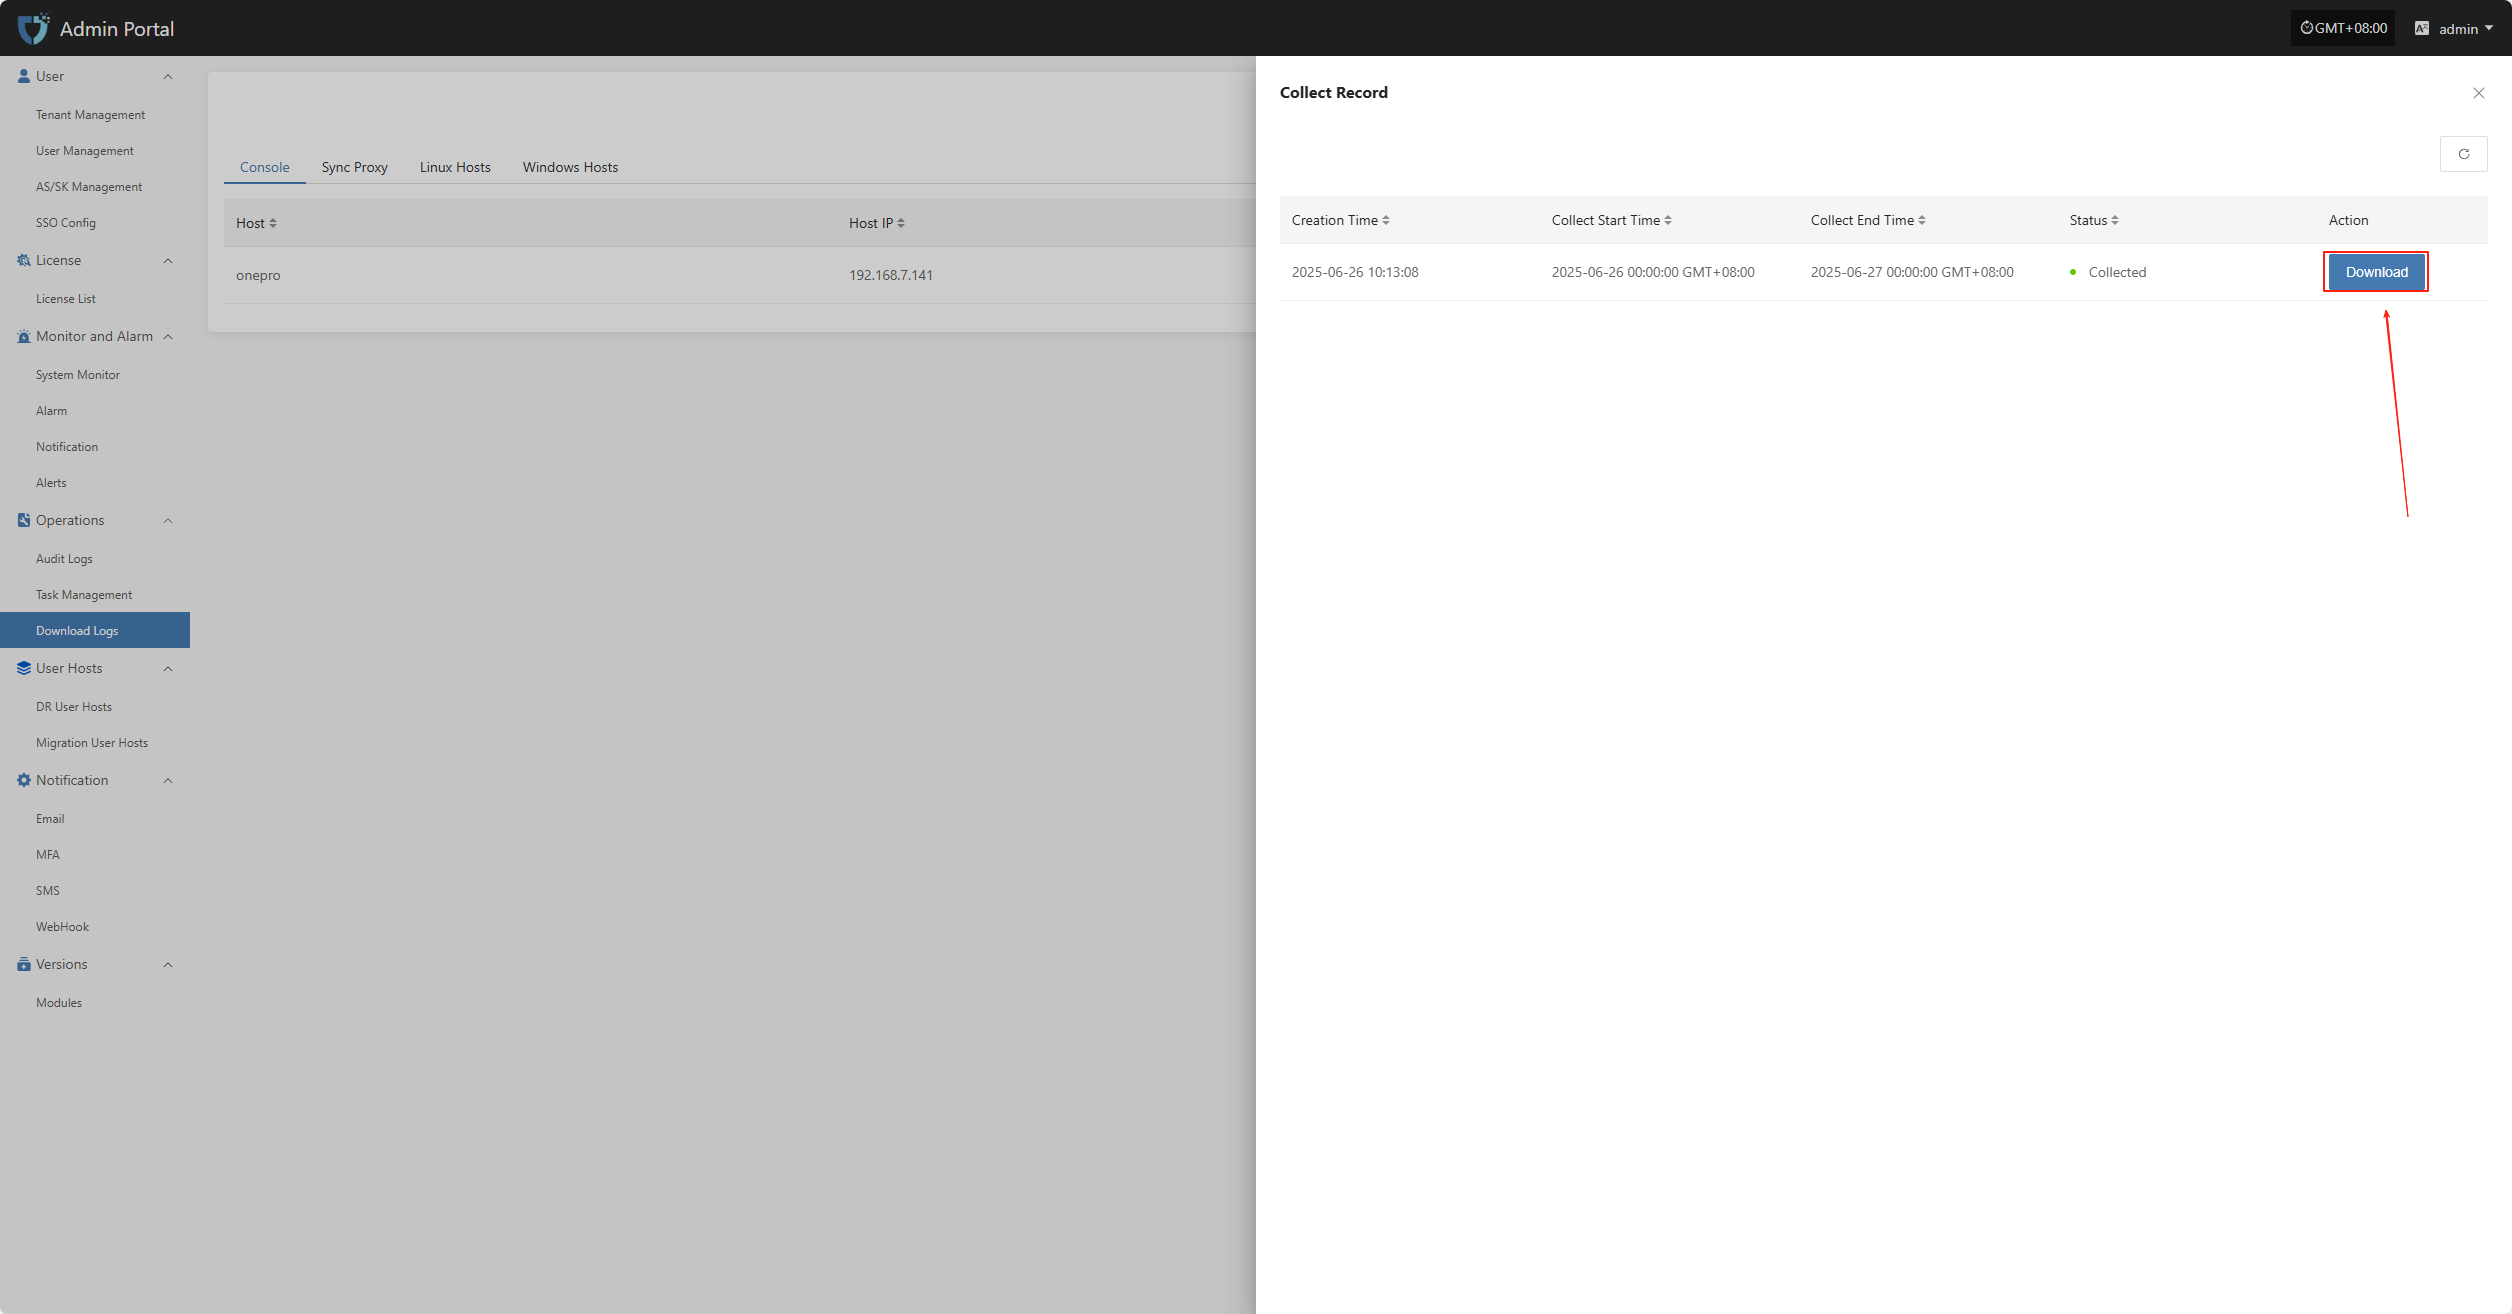
On the log details page, click the "Download" button for the corresponding log entry to download the log file to your local device for offline viewing and troubleshooting.
Note: Log files can only be viewed or downloaded after collection is complete. If the current host has not performed log collection, please collect logs first. View Guide
User Hosts
DR User Hosts
The "DR User Hosts" module displays the disaster recovery host resources for each tenant. Users can select different tenants to view their corresponding host information, making unified management and status monitoring easier.
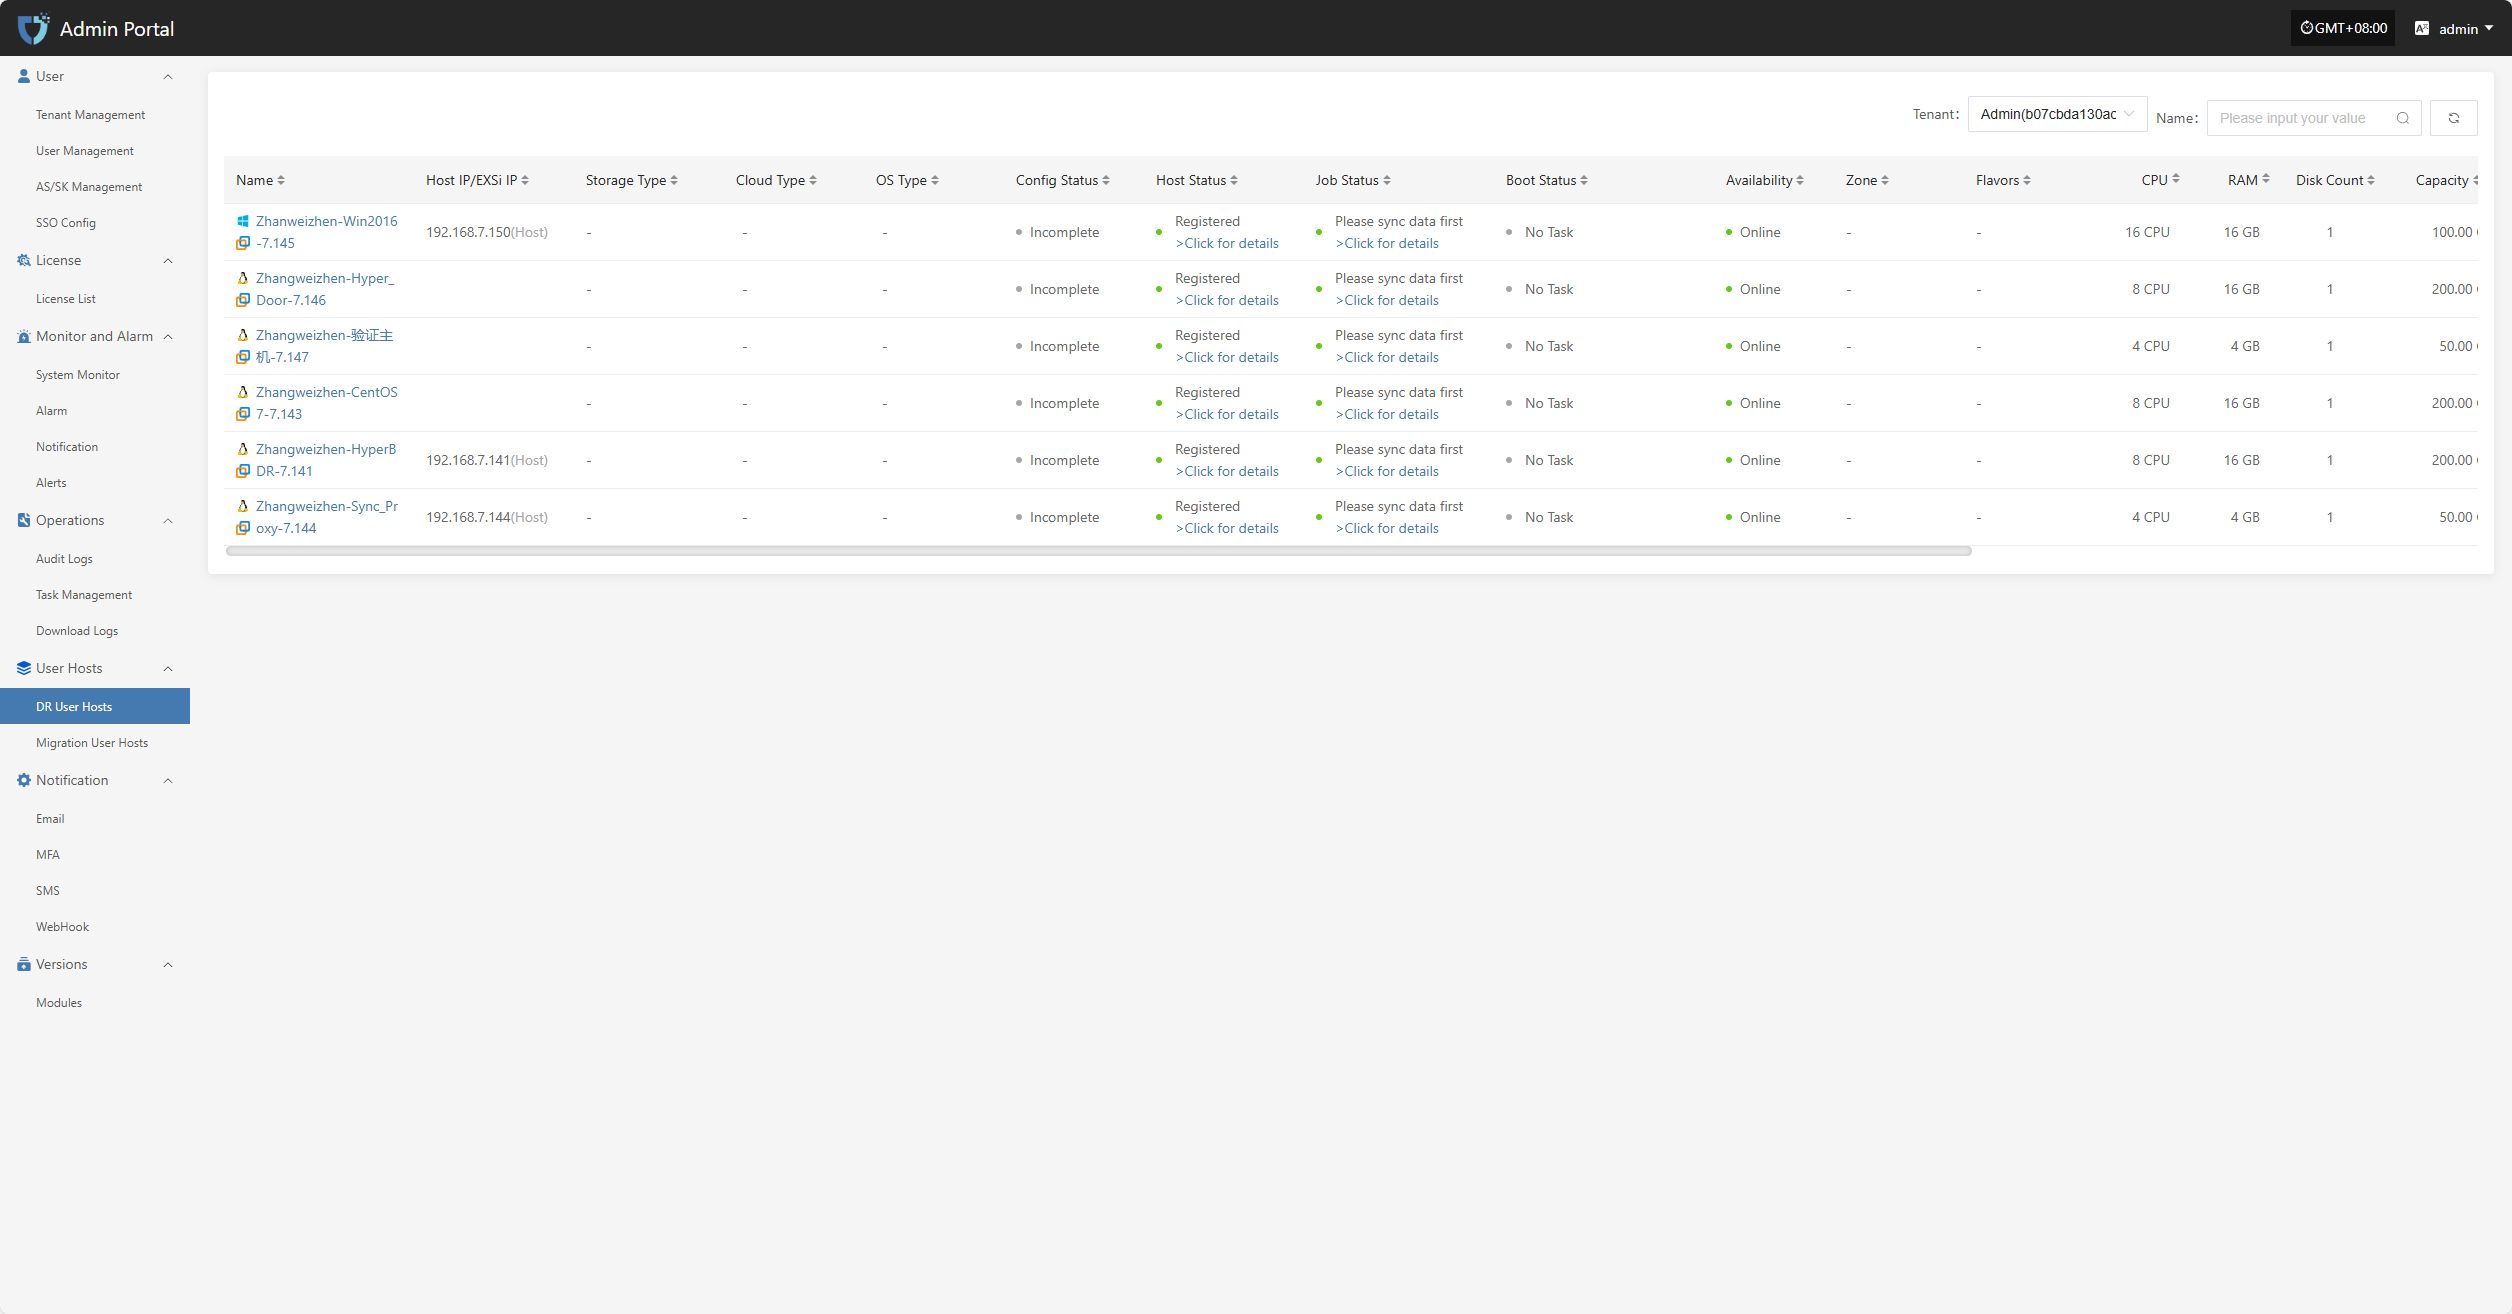
Users can click the dropdown list next to the tenant name in the upper right corner of the page to select different tenants and view their disaster recovery host information.
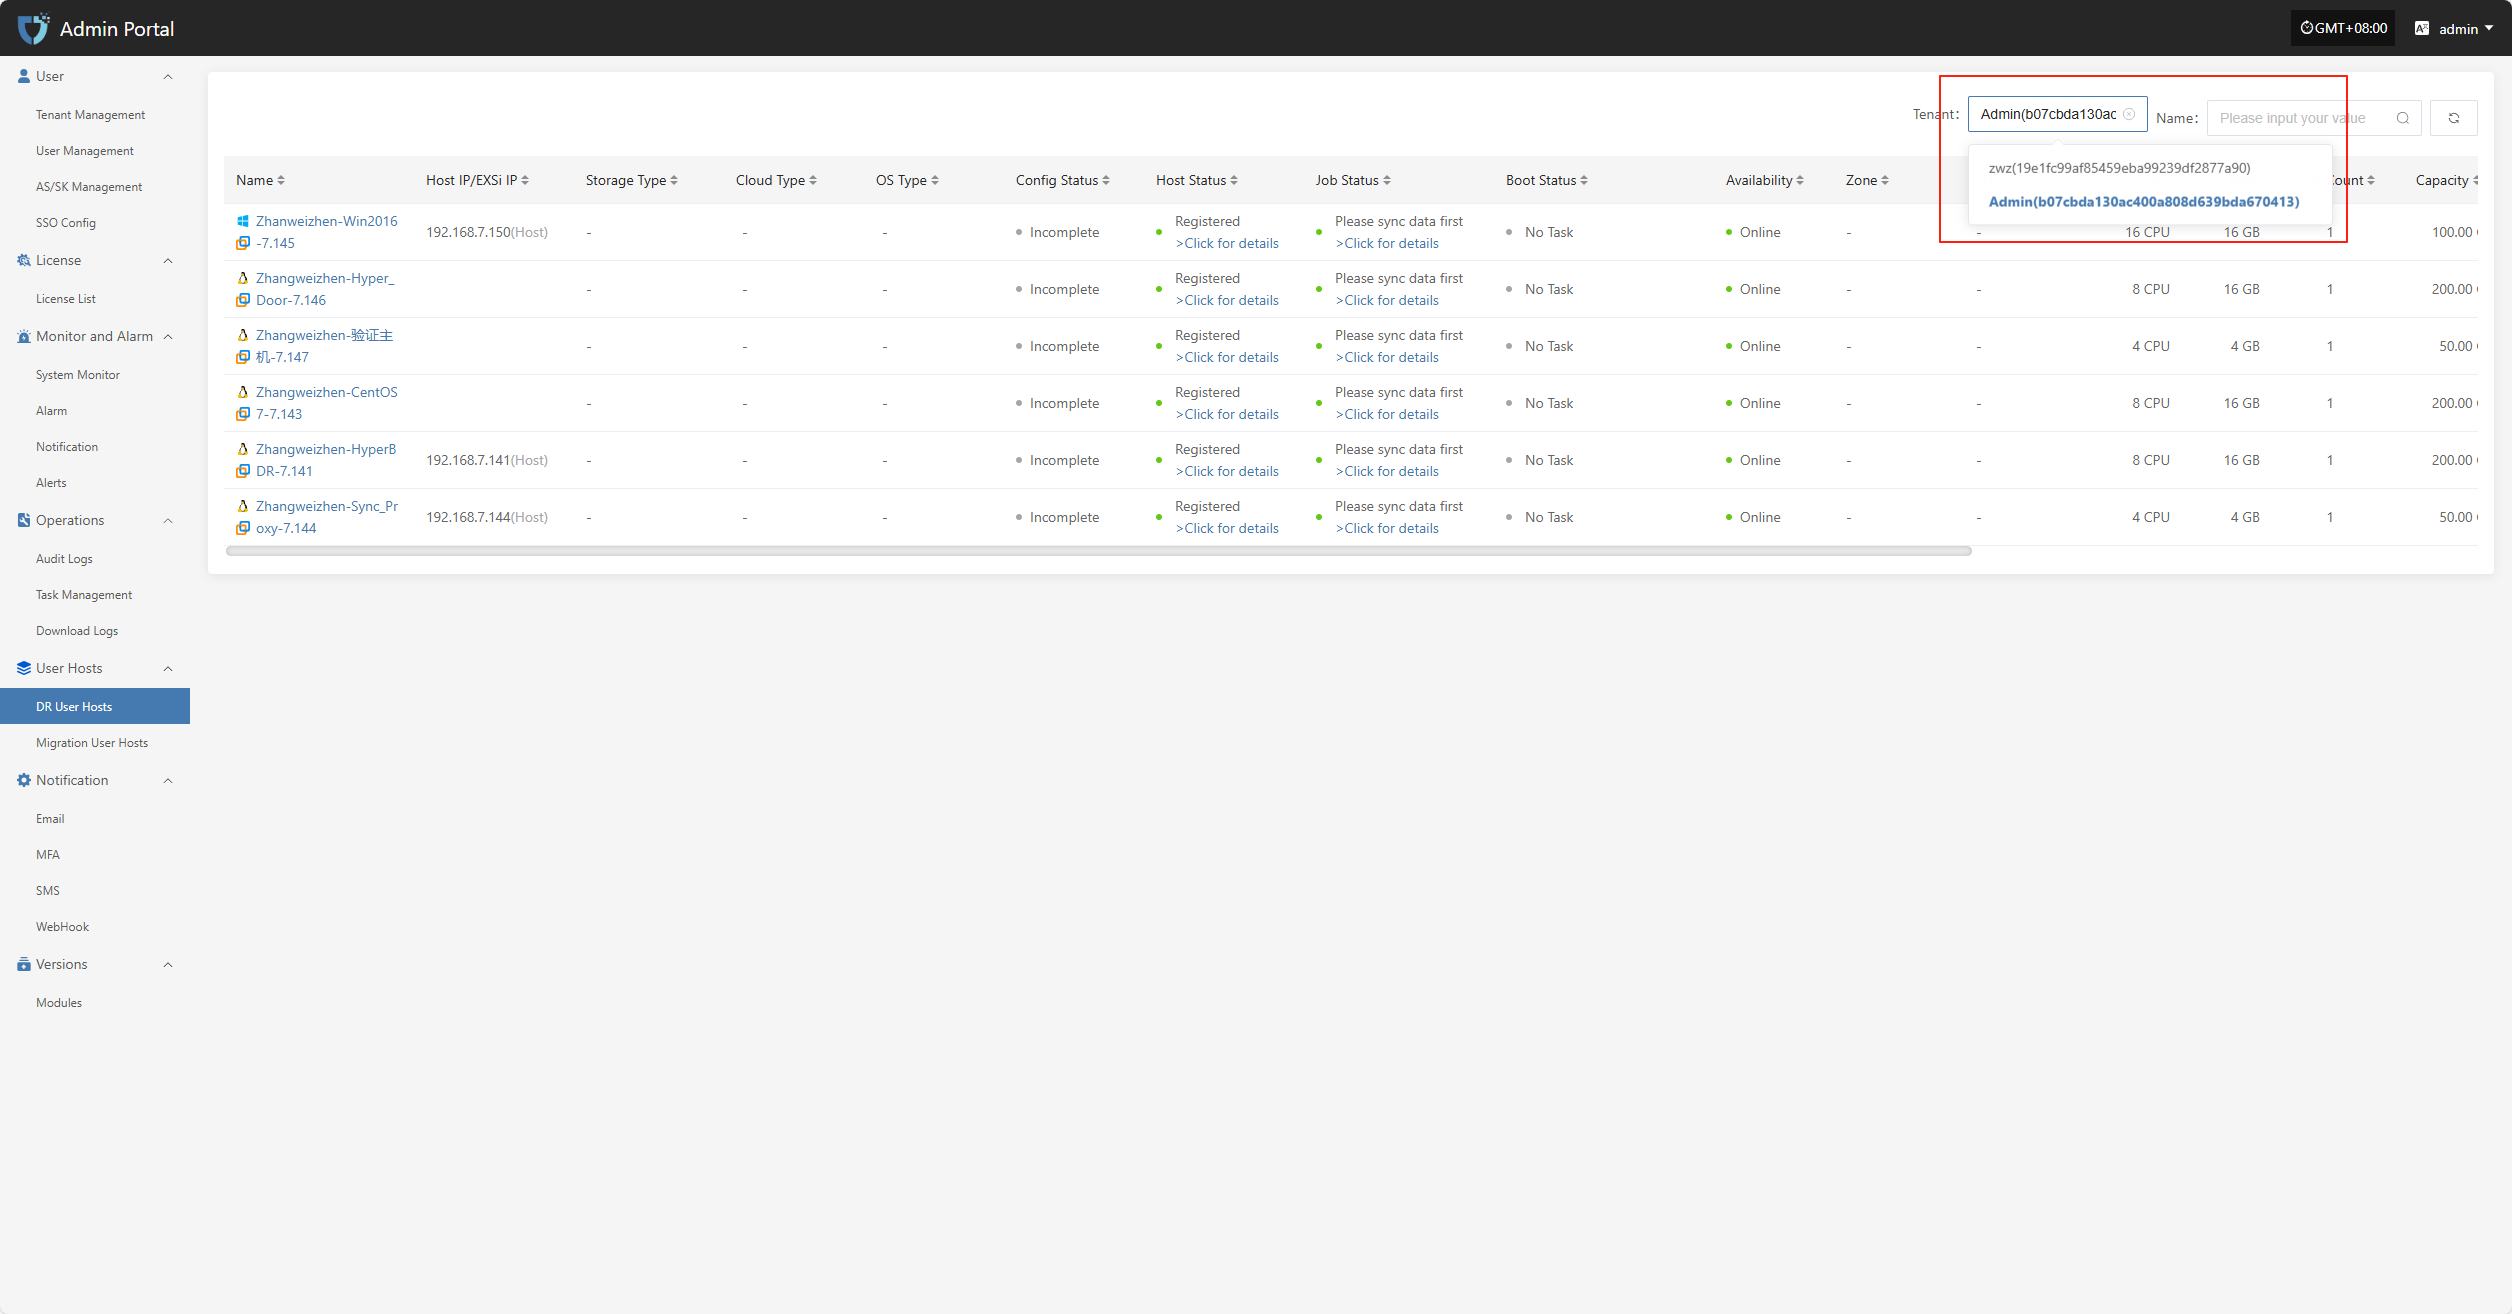
Click the host name in the host list to go to the details page for that host, where you can view detailed data including basic information, running status, and resource allocation.
Migration User Hosts
The "Migration User Hosts" module displays the migration host resources for each tenant. Users can select different tenants to view their corresponding host information, making unified management and status monitoring easier.
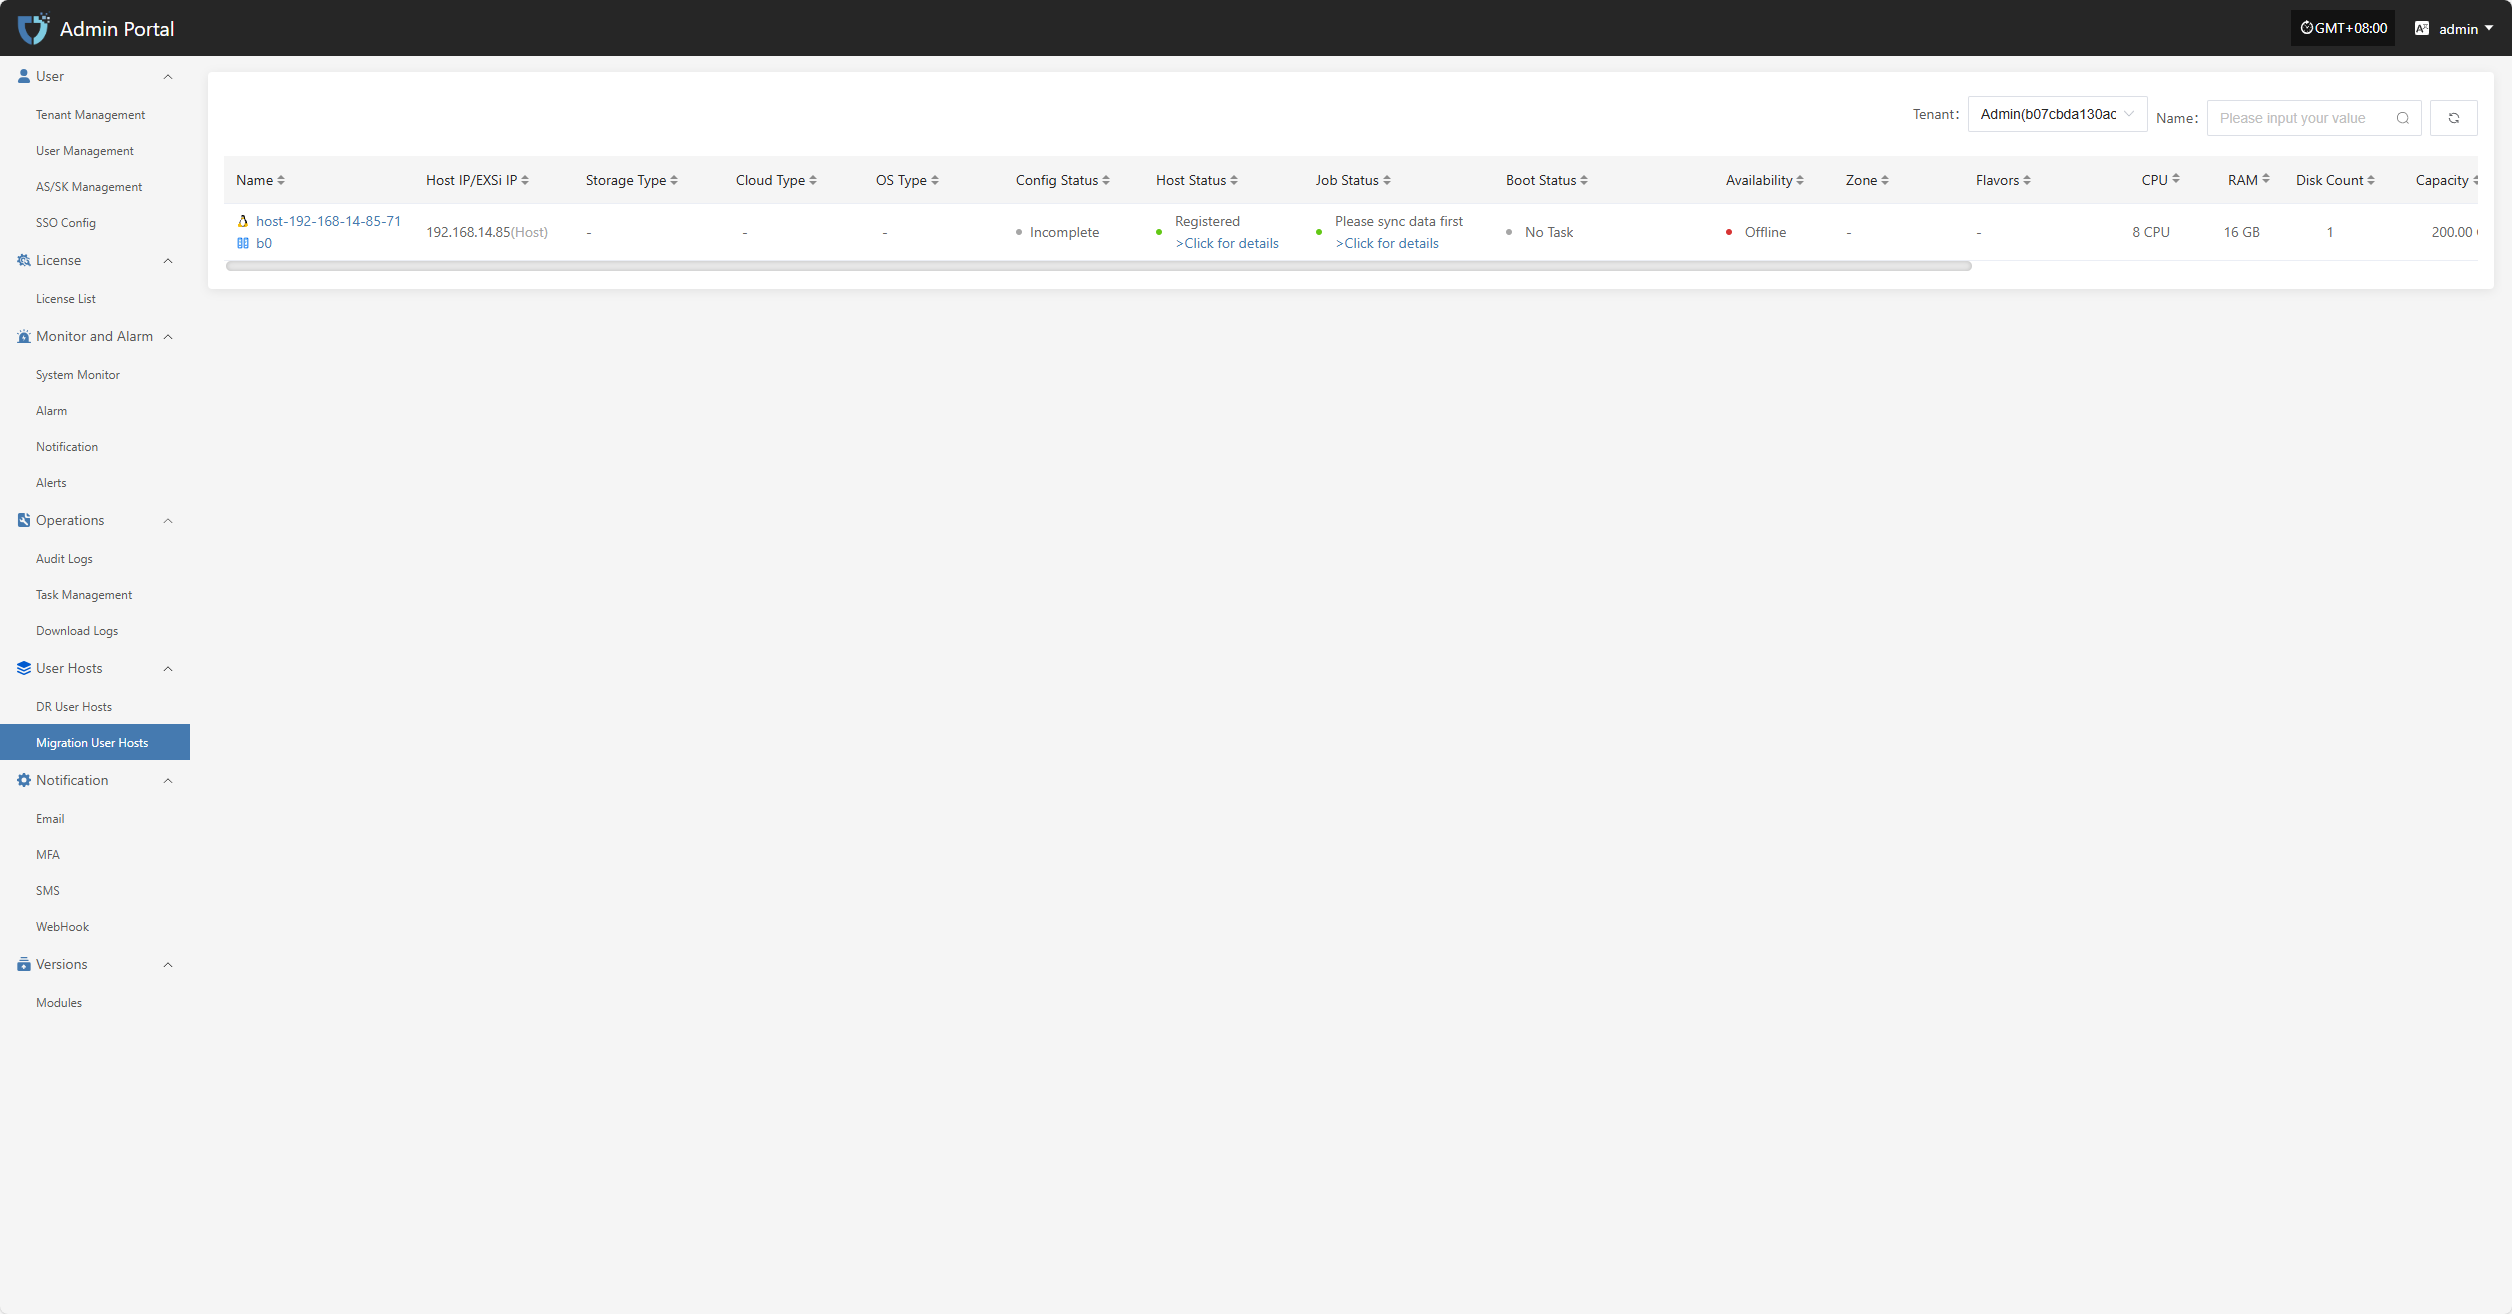
Users can click the dropdown list next to the tenant name in the upper right corner of the page to select different tenants and view their migration host information.
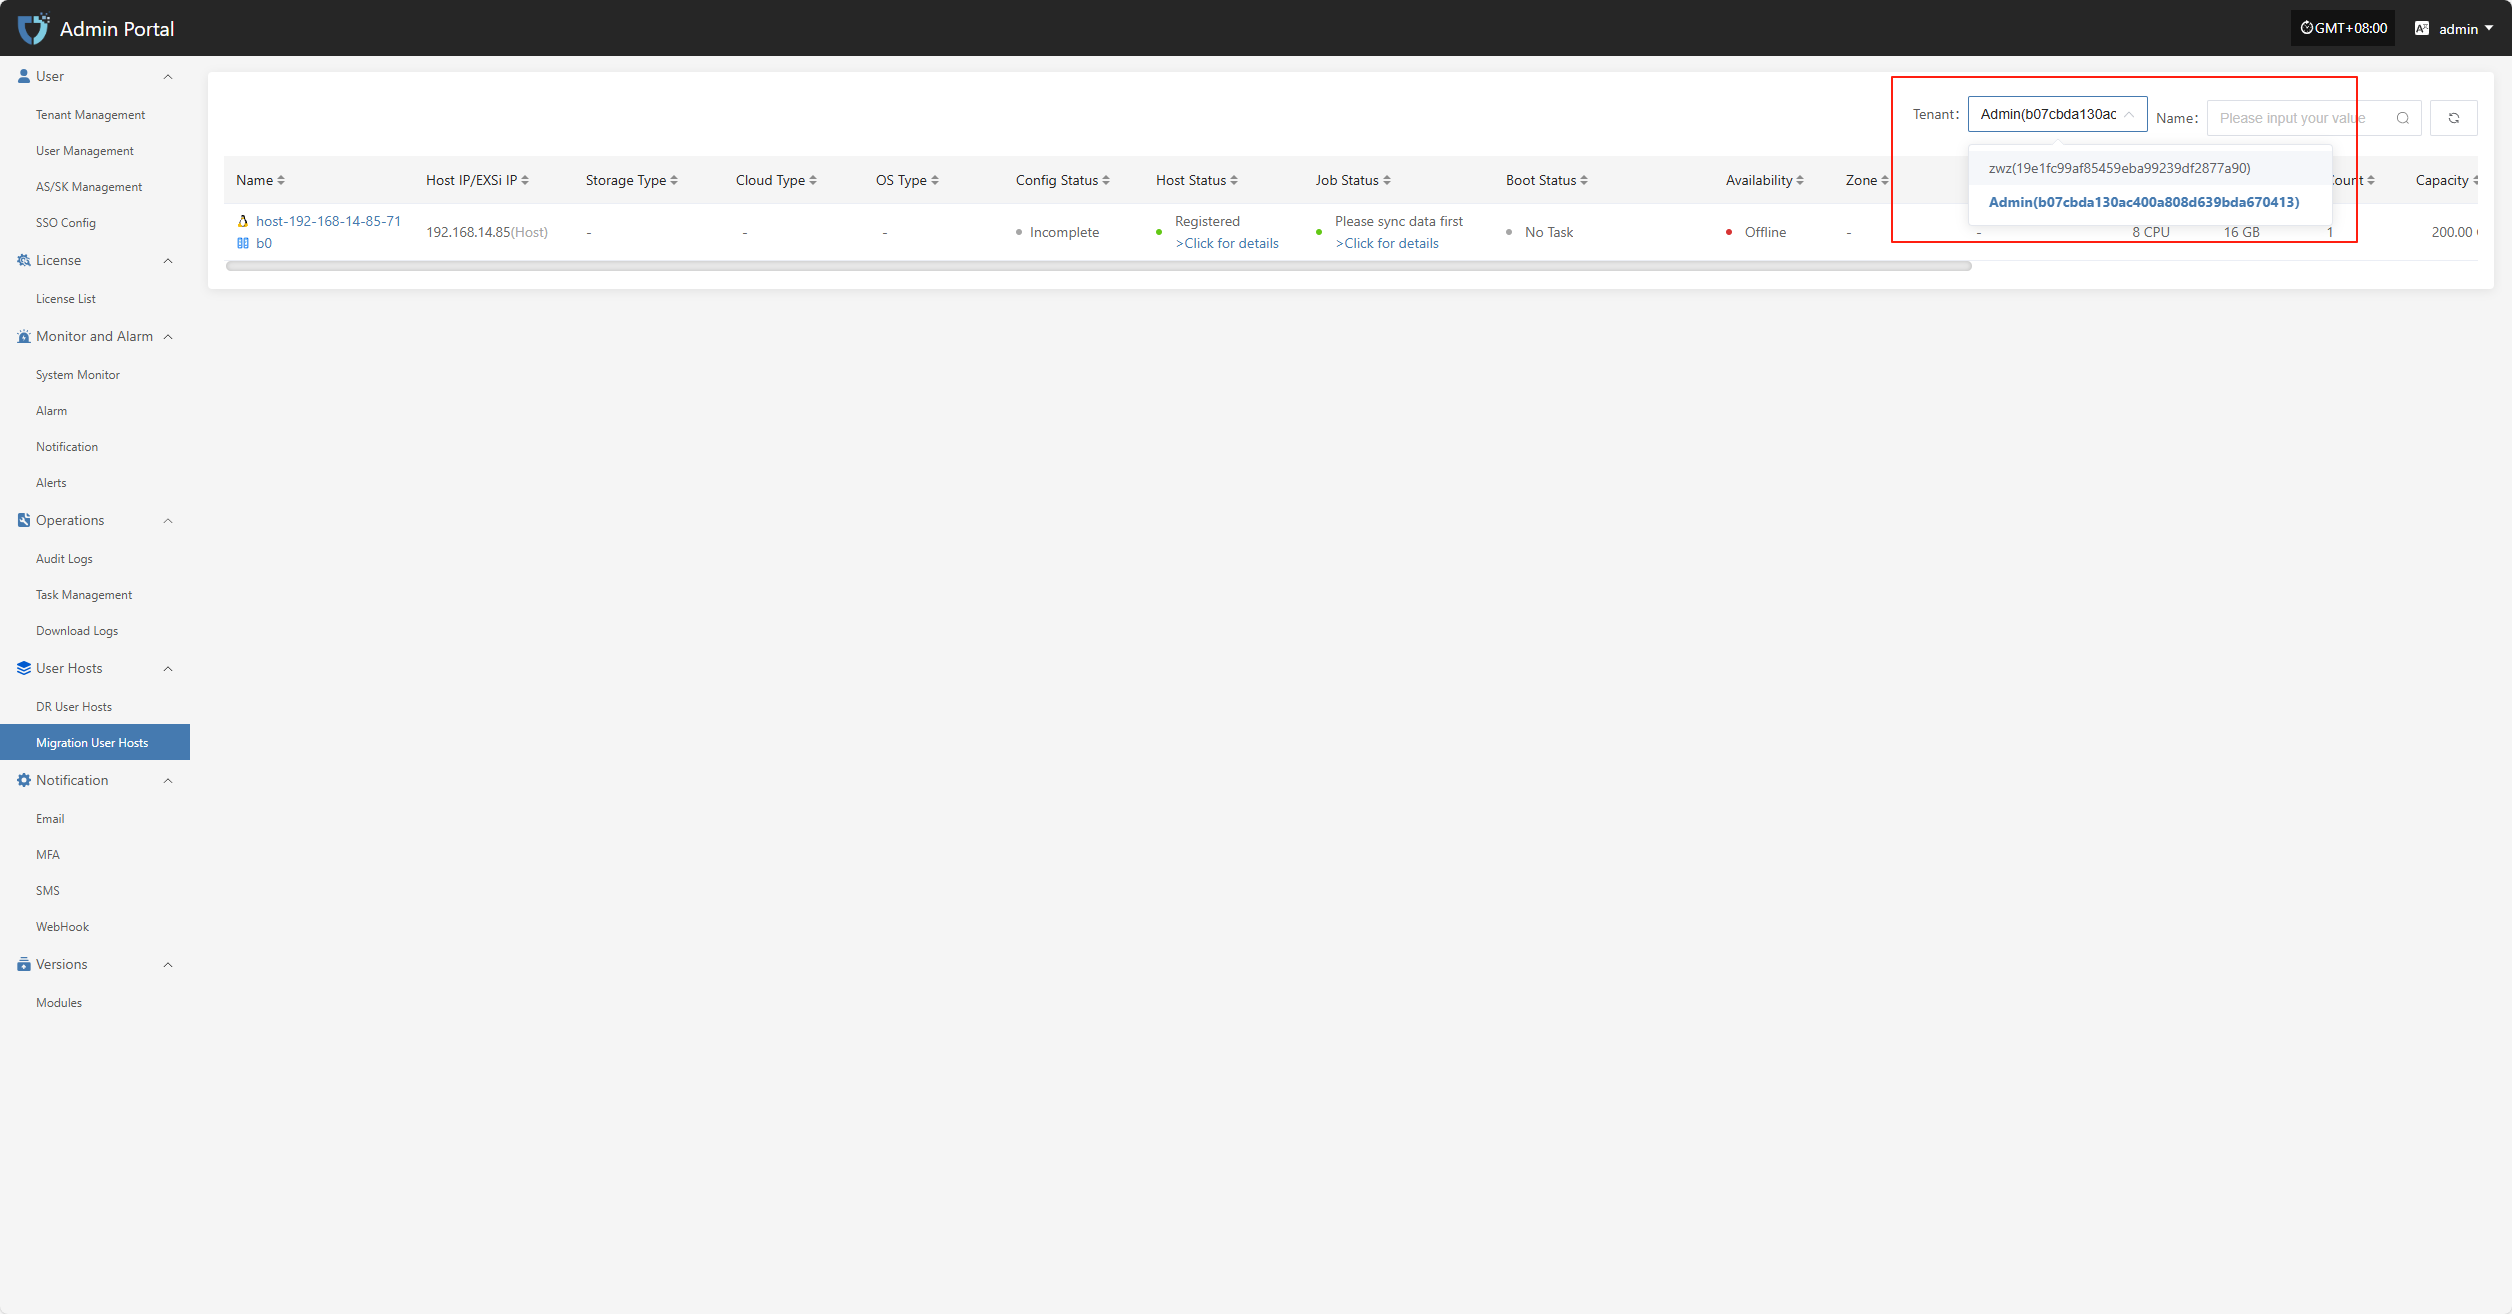
Click the host name in the host list to go to the details page for that host, where you can view detailed data including basic information, running status, and resource allocation.
Notification
The "Email Configuration" module is used to set parameters related to system email notifications. By configuring the SMTP server address, port, sender email, and authentication information, the system can send email notifications for alerts, task status, system events, etc., ensuring timely and reliable notifications and helping users stay informed about system status in real time.
In the left navigation bar, click "Notification", then select "Email" to enter the email notification settings page.
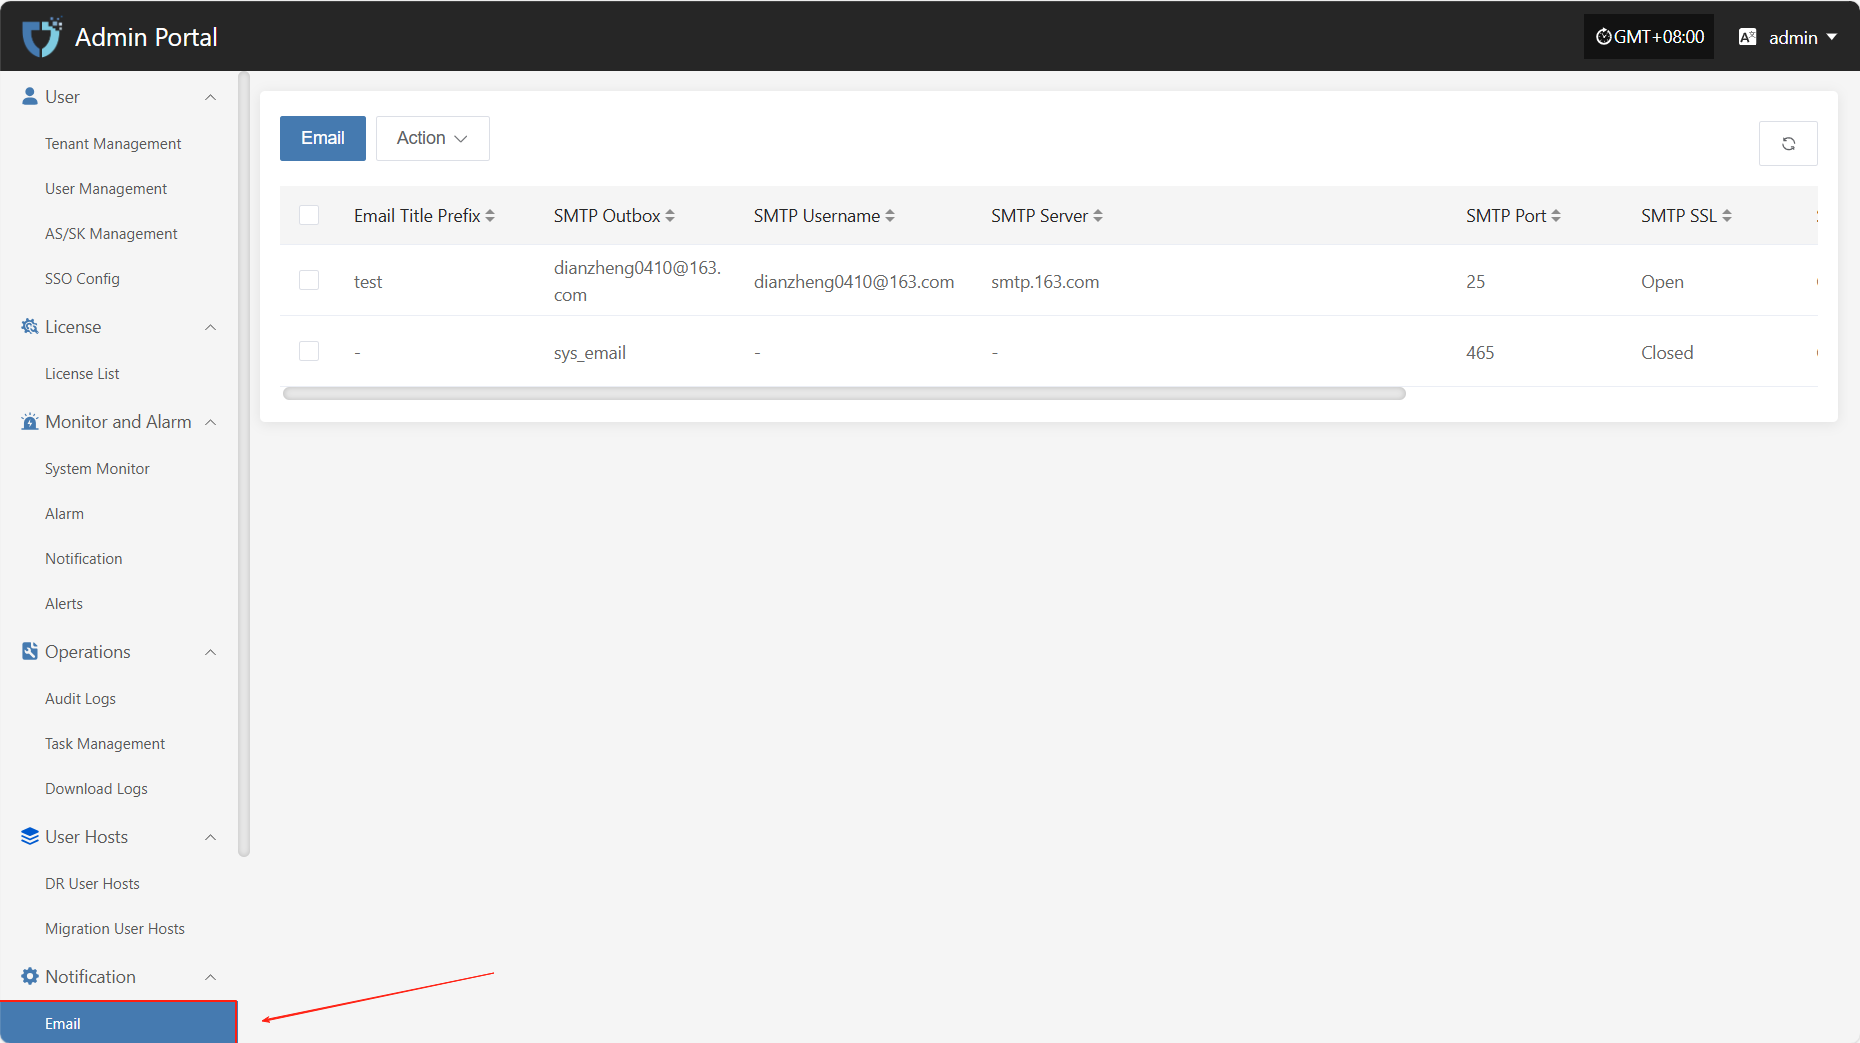
Click the "Email" button in the upper left corner to start setting up email authentication information.
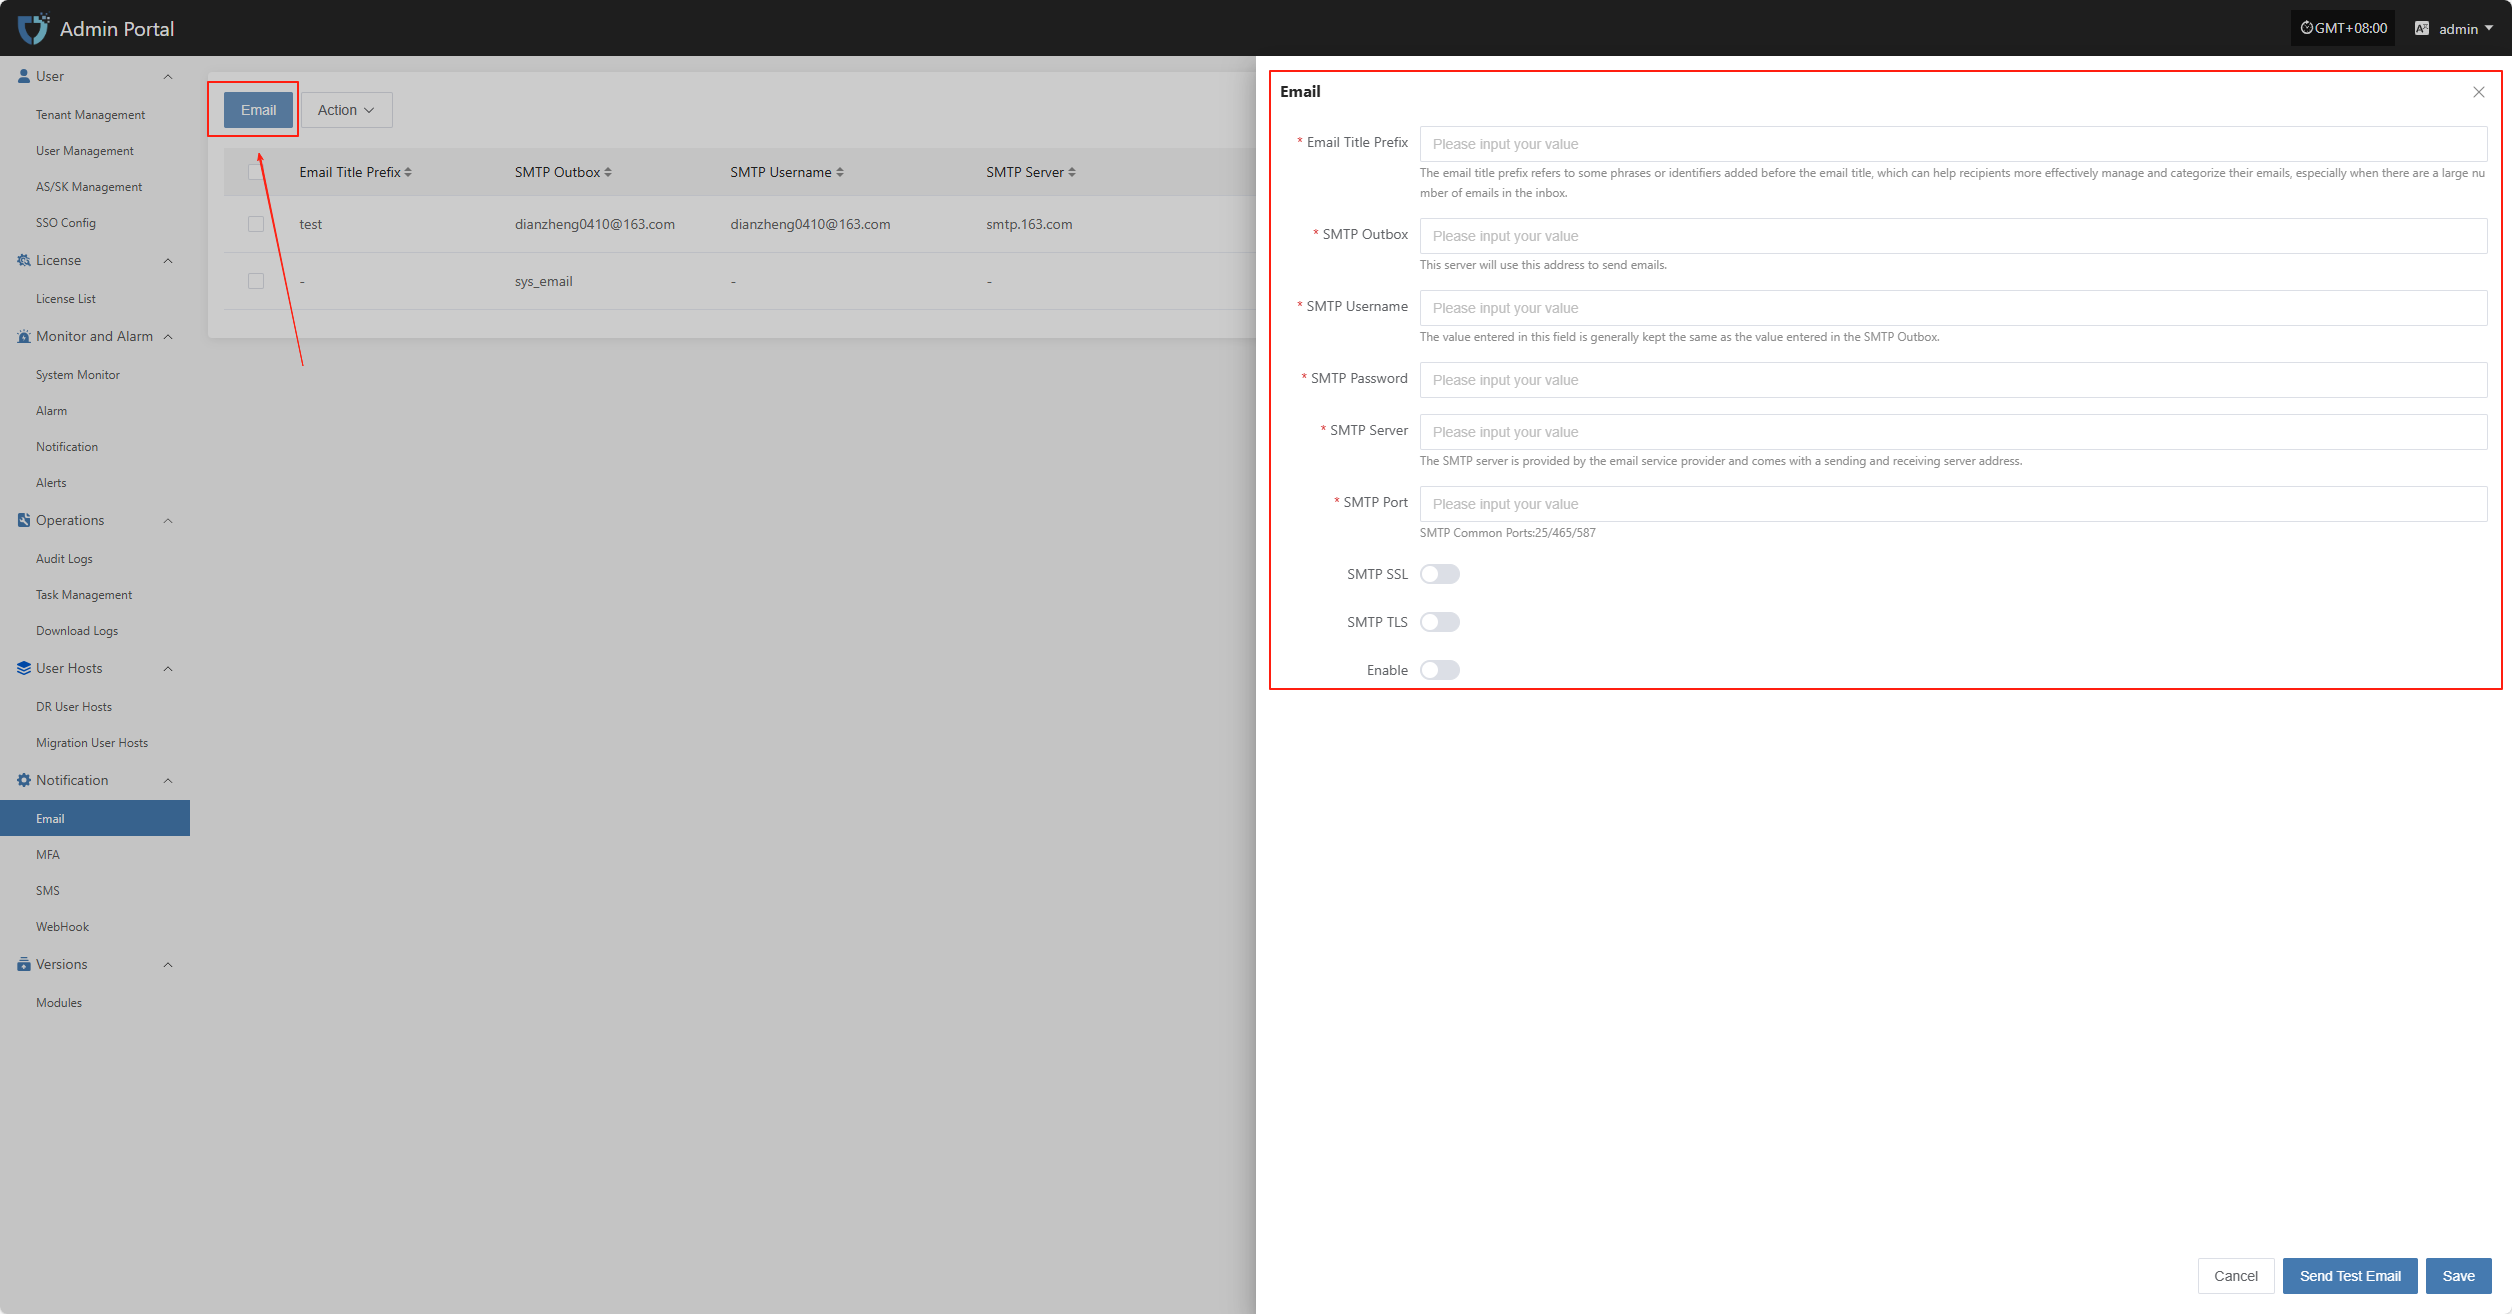
- Authentication Information Description
| Configuration Item | Example Value | Description |
|---|---|---|
| Email Title Prefix | HyperBDR | The email title prefix refers to some phrases or identifiers added before the email title, which can help recipients more effectively manage and categorize their emails, especially when there are a large number of emails in the inbox. |
| SMTP Outbox | no-reply@oneprocloud.com | This server will use this address to send emails. |
| SMTP Username | no-reply@oneprocloud.com | The value entered in this field is generally kept the same as the value entered in the SMTP Outbox. |
| SMTP Password | ******** | The password required for SMTP server authentication (obtain from the email service provider). |
| SMTP Server | smtp.qq.com | The SMTP server is provided by the email service provider and comes with a sending and receiving server address. |
| SMTP Port | 465 | The port number used for SMTP communication. Common ports include 25 (unencrypted), 465 (SSL), 587 (TLS). |
| SMTP SSL | Enable | Whether to enable SSL encryption. If enabled, emails will be sent via SSL for improved security. |
| SMTP TLS | Disable | Whether to enable TLS encryption. Some SMTP services require this option to be enabled. |
| Enable | Enable | Whether to enable the current email configuration. If enabled, the system will use this configuration to send notification emails; if disabled, notifications will not be sent via email. |
After filling in the authentication information, you can click the "Send Test Email" button below to verify if email sending works properly. After the test passes, click the "Save" button in the lower right corner to complete the email configuration.
Note: After clicking "Cancel", all unsaved email authentication information will be cleared. Please make sure to save before leaving the page.
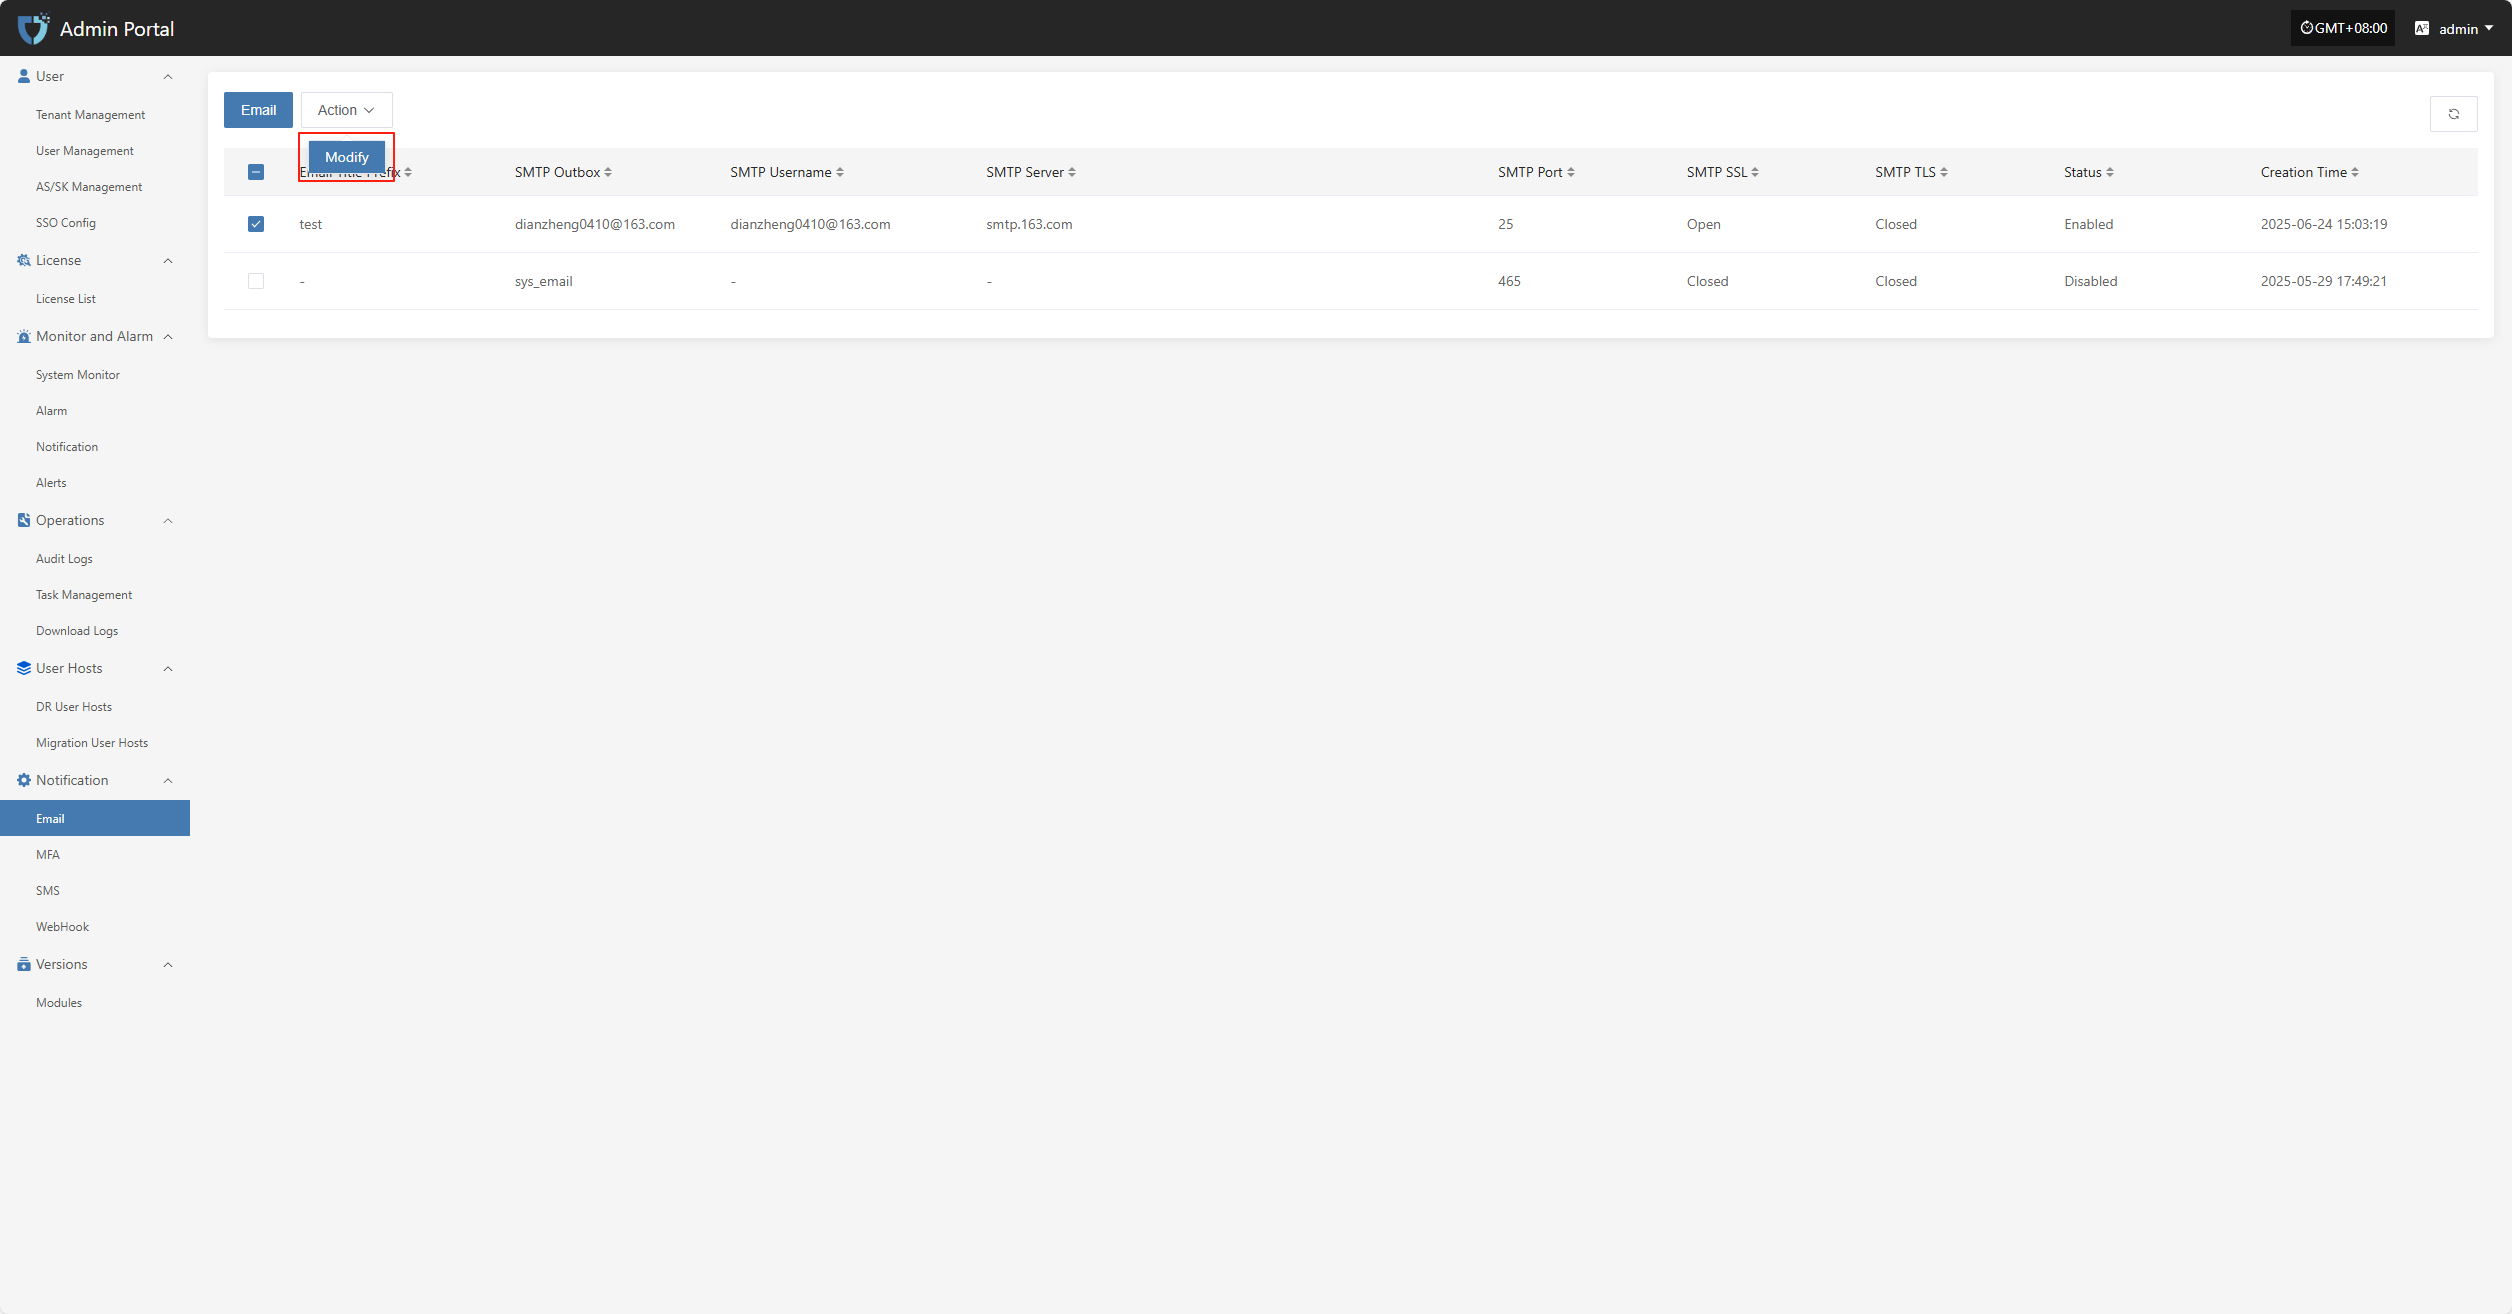
Action
Modify
Click "Modify" to edit the authentication information.
MFA
The "MFA" module is used to enable and manage Multi-Factor Authentication, enhancing the security of system accounts. By configuring MFA, users need to enter a dynamic verification code in addition to their username and password when logging in, effectively preventing account theft or unauthorized access.
After enabling MFA, it strengthens login authentication and better safeguards your account. To receive verification messages via email, bind your user email in user management.
Note: After enabling MFA, please make sure users have correctly bound their email addresses, otherwise they will not be able to log in to the system.
Click "Notification" in the left navigation bar, then select "MFA" to enter the MFA settings page.
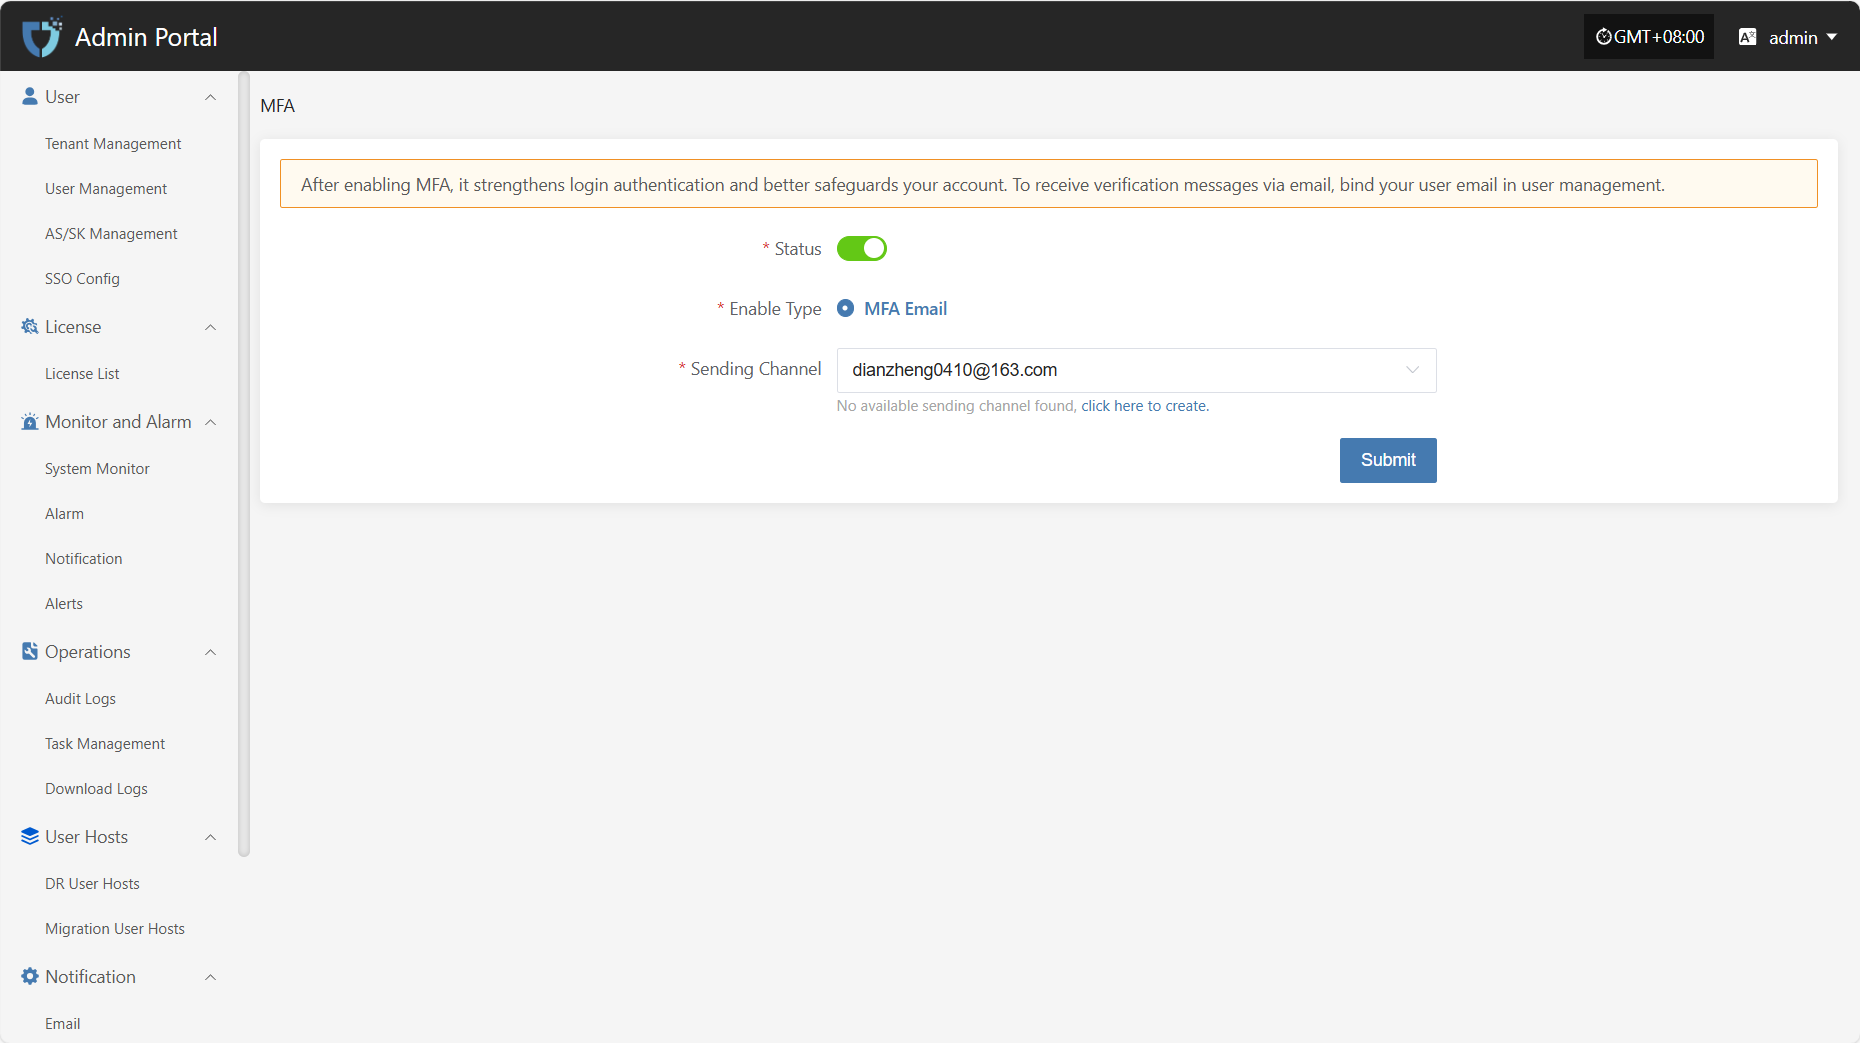
- Configuration Instructions
| Setting | Example Value | Description |
|---|---|---|
| Status | Yes / No | Use the button on the page to enable or disable MFA. When enabled, users must complete identity verification with an email code when logging in. |
| Enable Type | MFA Email | Supported verification type. The system currently supports MFA via email. |
| Sending Channel | 163**@163.com | Specify the email account used to send verification codes. If no available channel is found, please go to the "Email Configuration" module to add and enable a sender email. |
After completing all configuration items, click the "Submit" button at the bottom right of the page to save the current MFA settings.
SMS
The "SMS" module is used to set up the system's SMS notification sending channel. By connecting to an SMS service provider platform and configuring the required access keys, signatures, templates, and other information, the system can send SMS notifications for login verification, alert notifications, task status, and more. This feature helps users receive key system events promptly, improving system response efficiency and security.
Click "Notification" in the left navigation bar, then select "SMS" to enter the SMS notification settings page.
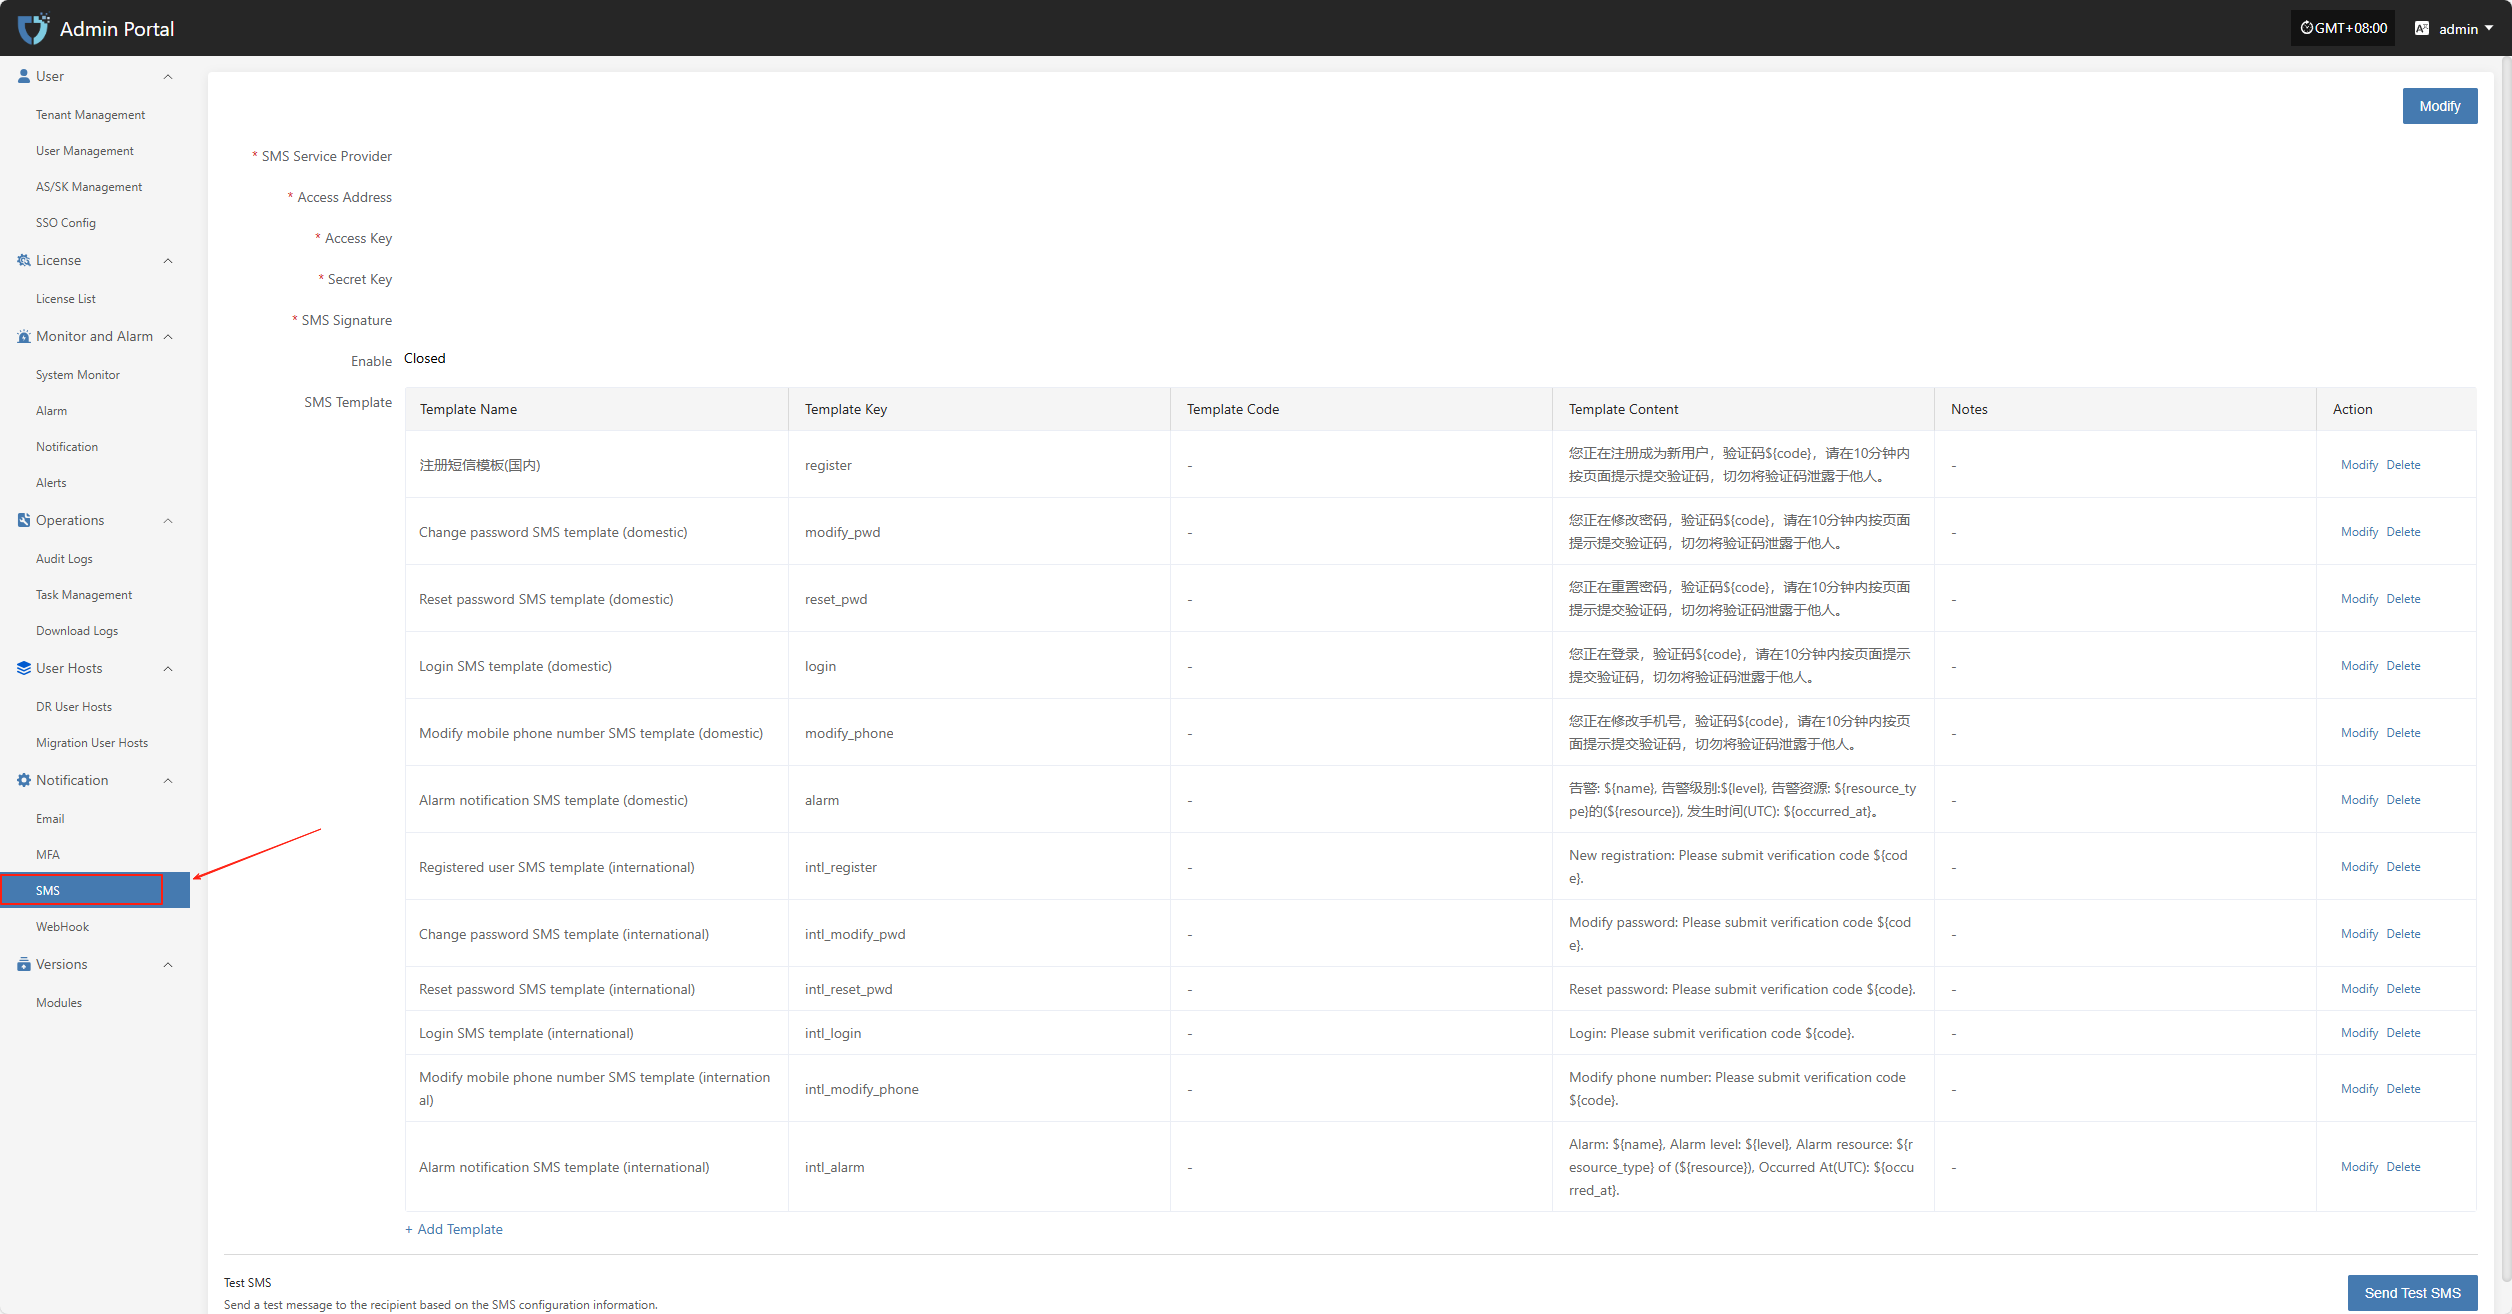
Modify
Click the "Modify" button in the upper right corner to start setting up SMS authentication information.
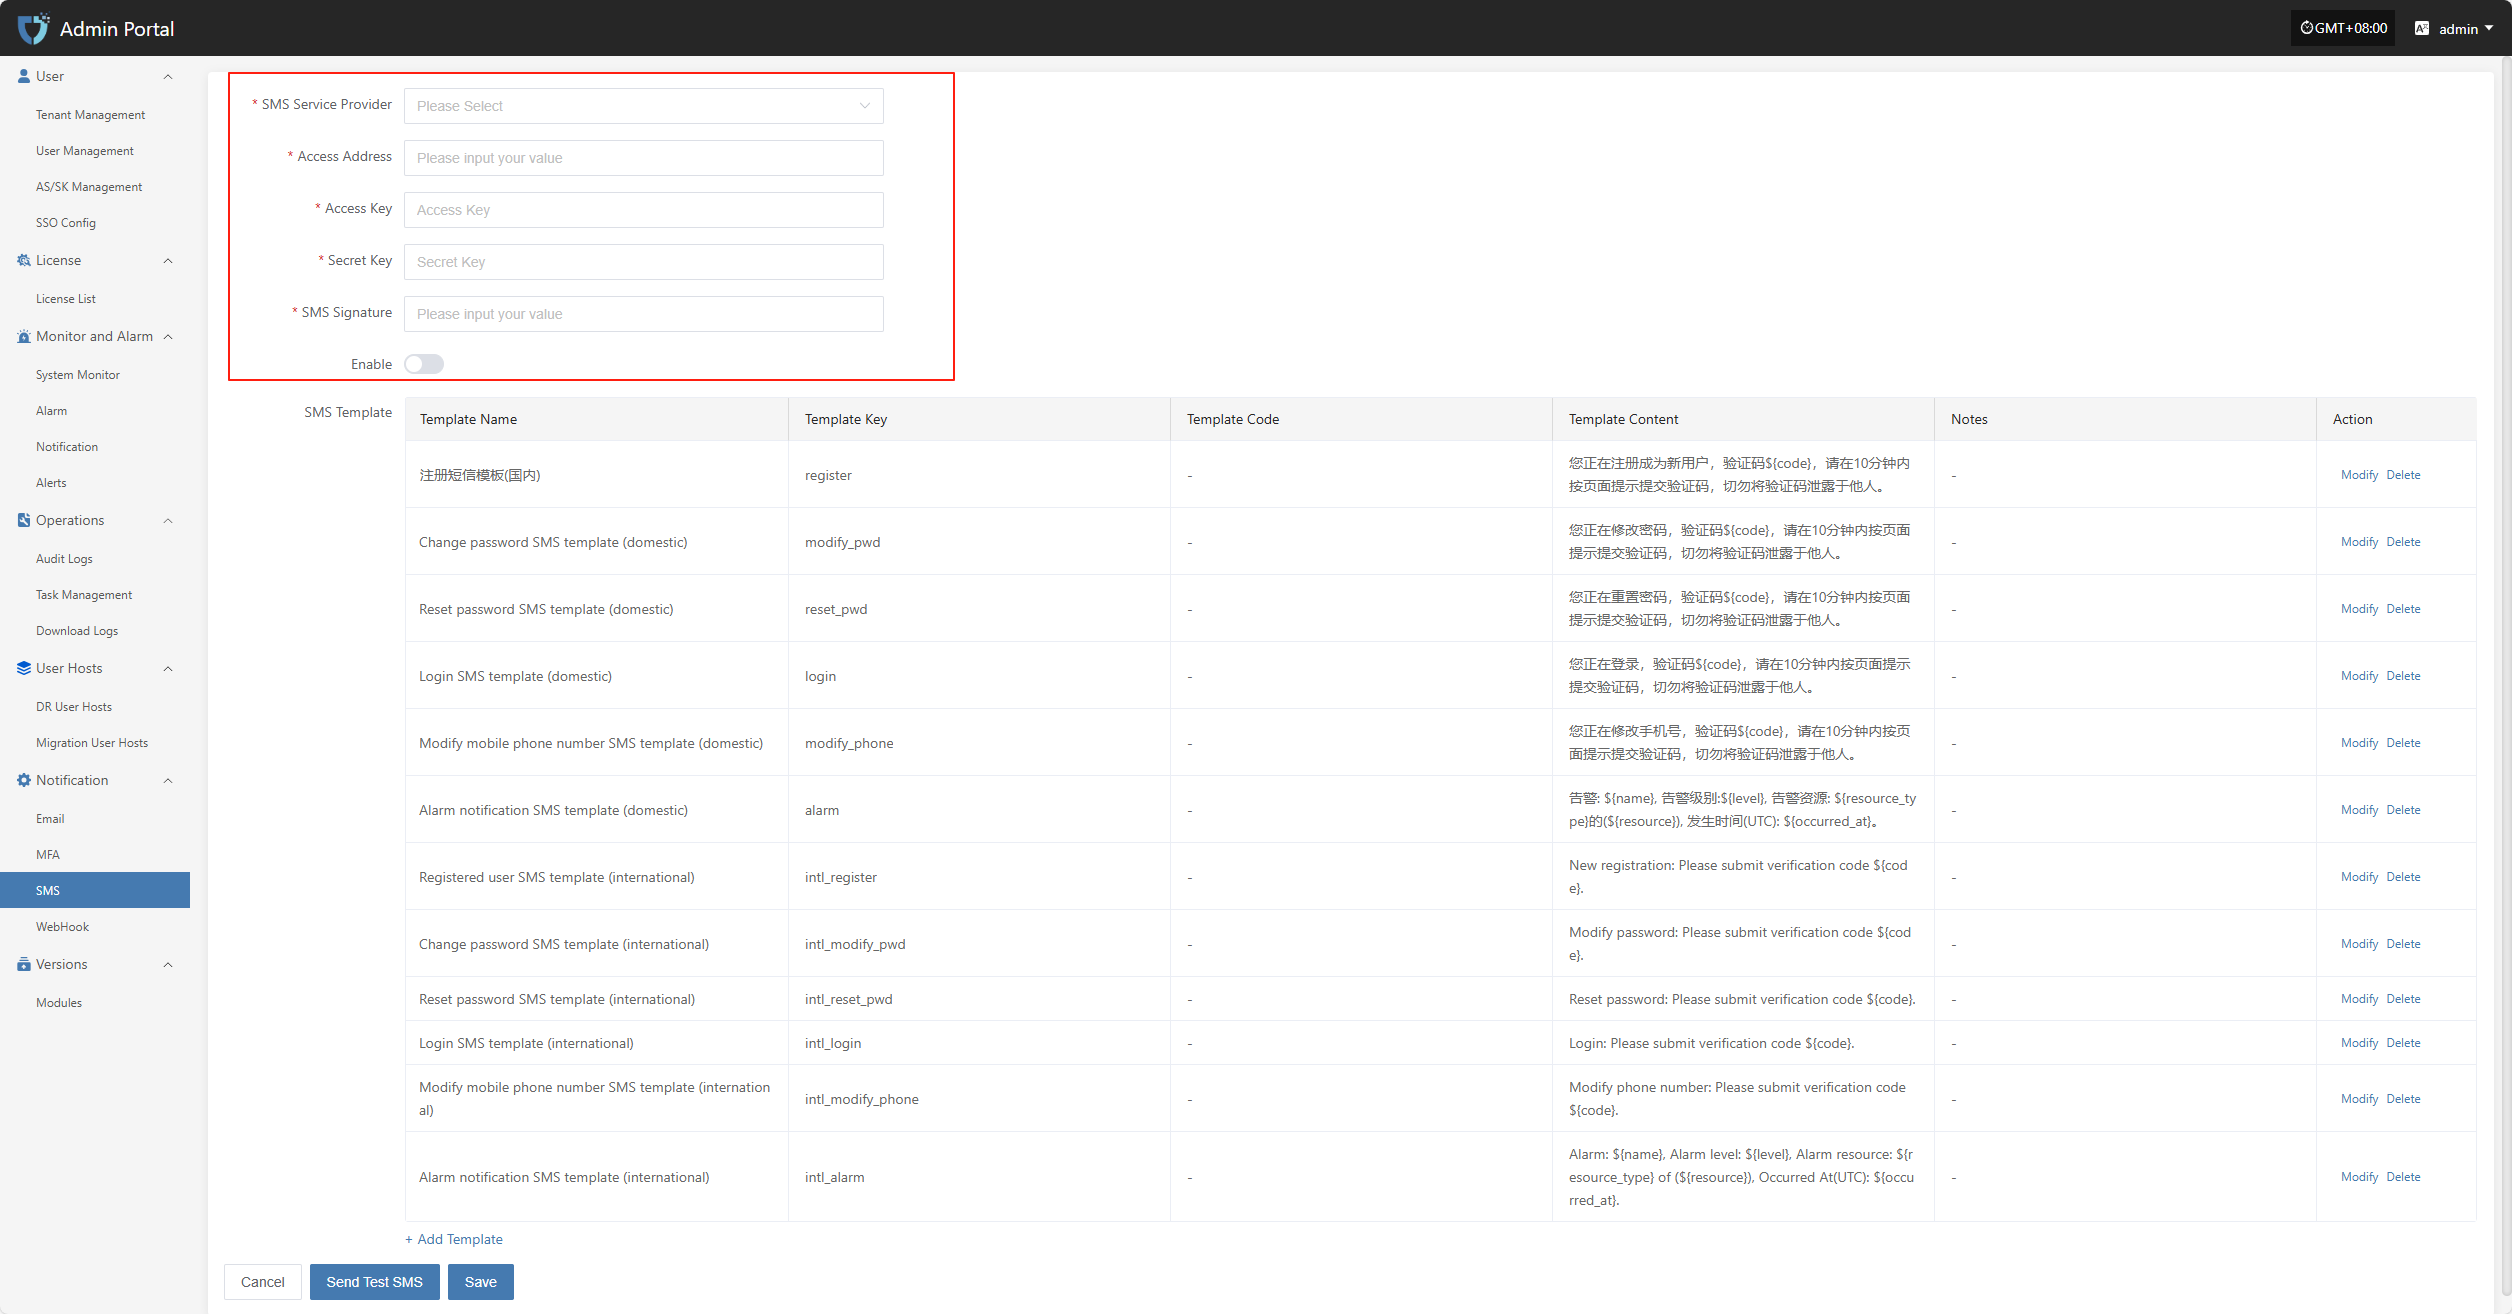
- Configuration Instructions
| Setting | Example Value | Description |
|---|---|---|
| SMS Service Provider | Alibaba Cloud | Select the SMS service provider to connect with the system. Make sure you have enabled SMS service and obtained the necessary credentials from the provider. |
| Access Address | https://dysmsapi.aliyuncs.com | The SMS API endpoint provided by the service provider. The address may vary by provider. |
| Access Key | AKIDEXAMPL************* | Access Key ID for authentication, provided by the SMS service provider. |
| Secret Key | wJalrXUtnFE************** | Secret Key used together with the Access Key for secure authentication. Please keep it safe. |
| SMS Signature | OnePro | The signature registered with the SMS service platform, shown at the beginning of the SMS content. |
| Enable | Enable / Closed | Whether to enable the current SMS configuration. When enabled, the system will send SMS notifications using this configuration. If closed, SMS will not be sent. |
After filling in the authentication information, you can click the "Send Test SMS" button below to verify if SMS sending works properly. After a successful test, click the "Save" button at the bottom right of the page to complete the SMS configuration.
Note: After clicking "Cancel", all unsaved SMS authentication configuration information will be cleared. Please make sure to save before leaving the page.
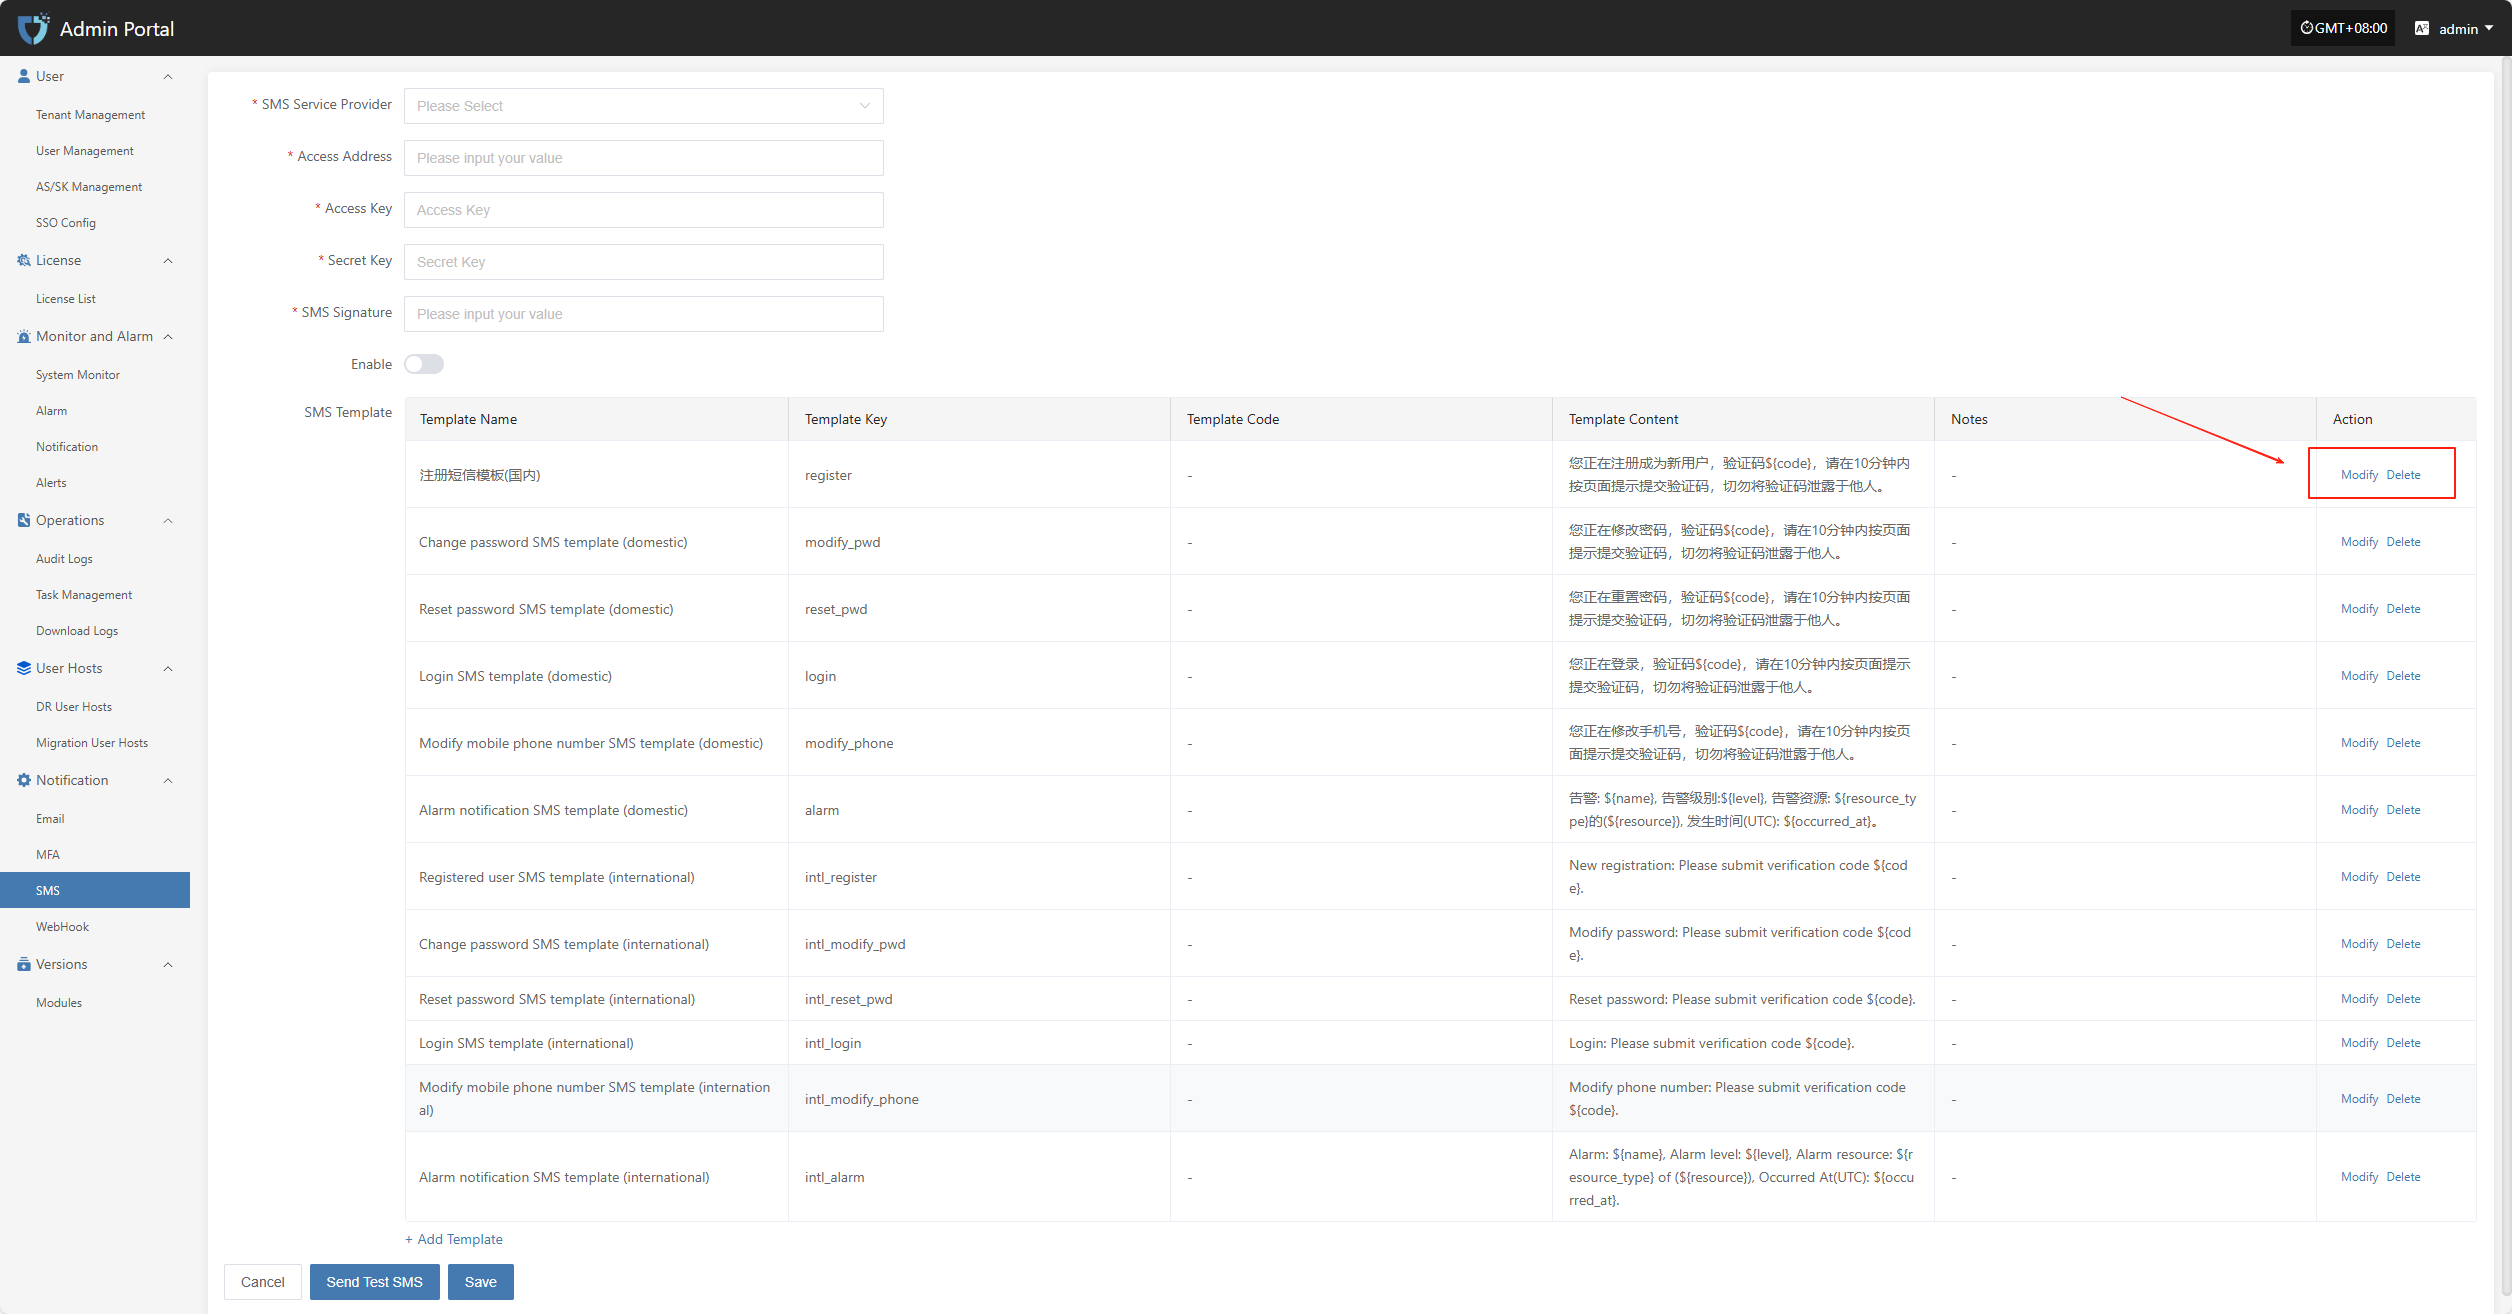
SMS Template
Used to configure the content template for system notification SMS. Each SMS template includes a template ID, content format, and variable parameters, which help standardize SMS notification formats and improve consistency and recognition. SMS templates must be created and approved on the SMS service provider platform before they can be used in the system.
Modify/Delete
On the template list page, click the "Modify" or "Delete" button on the right side of the corresponding template to edit or remove the SMS template.
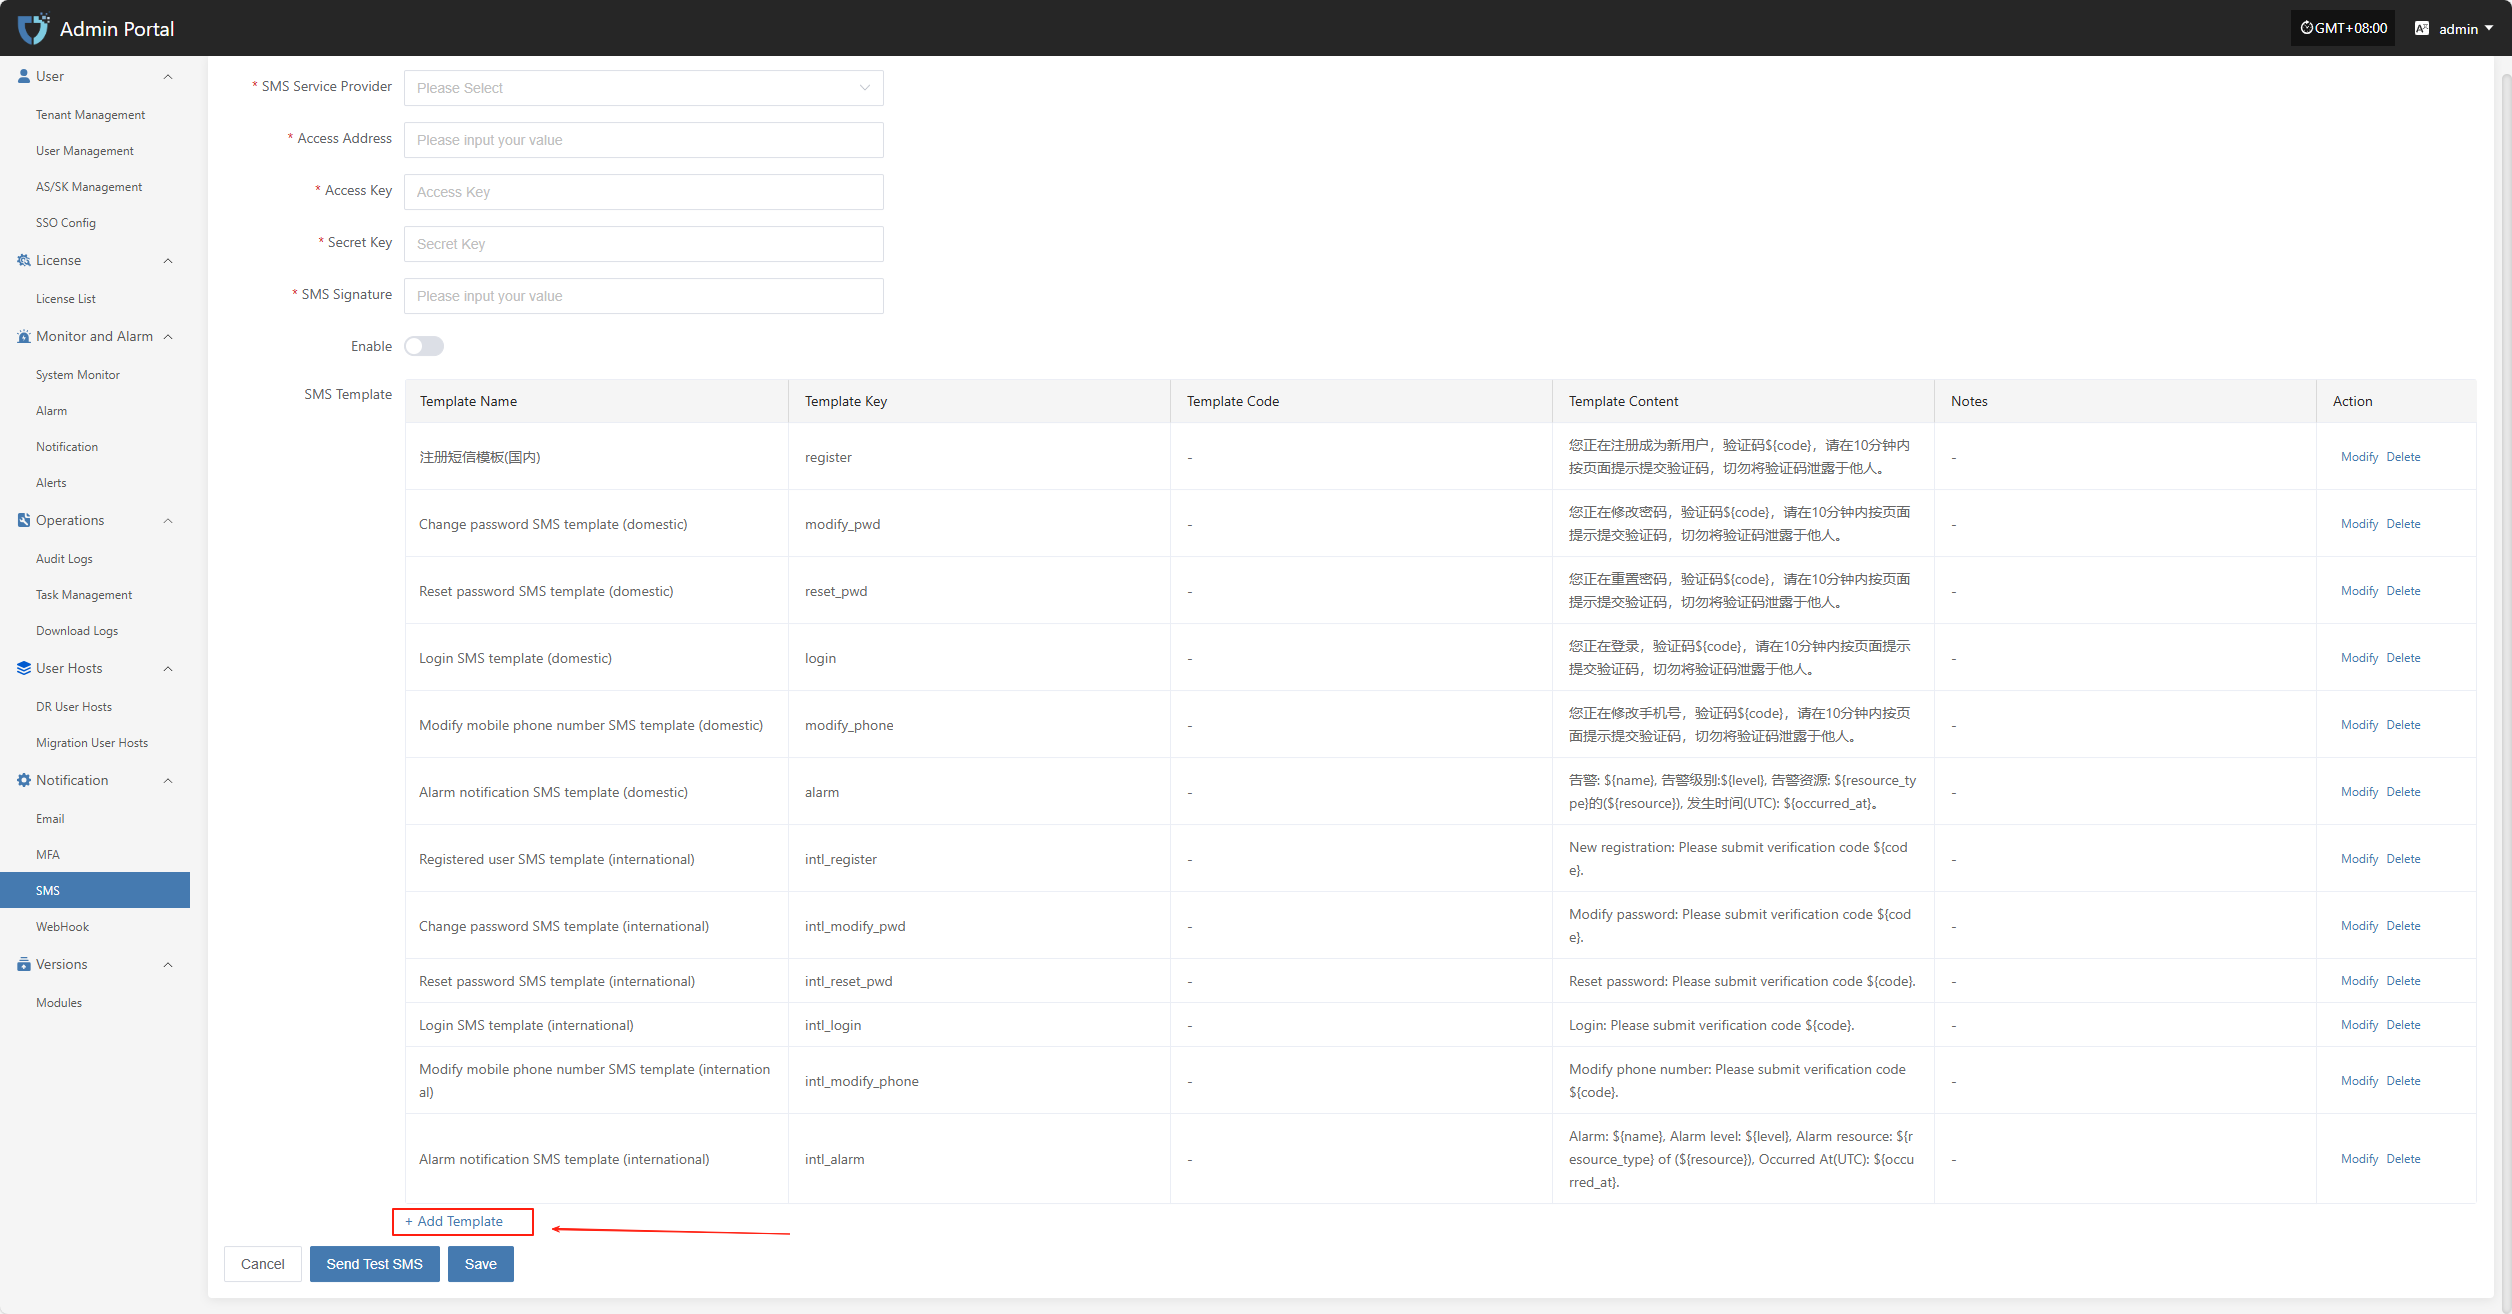
Add Template
If the default SMS templates do not meet your business needs, you can click the "Add Template" button on the page to customize and add new SMS templates for different scenarios.
WebHook
"WebHook" is used for real-time notification and data push of system events. When a specified event occurs, the system sends an HTTP request to the pre-configured URL, pushing event information to third-party services or custom applications, enabling integration and automated notifications between the system and external platforms.
Click "Notification" in the left navigation bar, then select "WebHook" to enter the WebHook notification settings page.
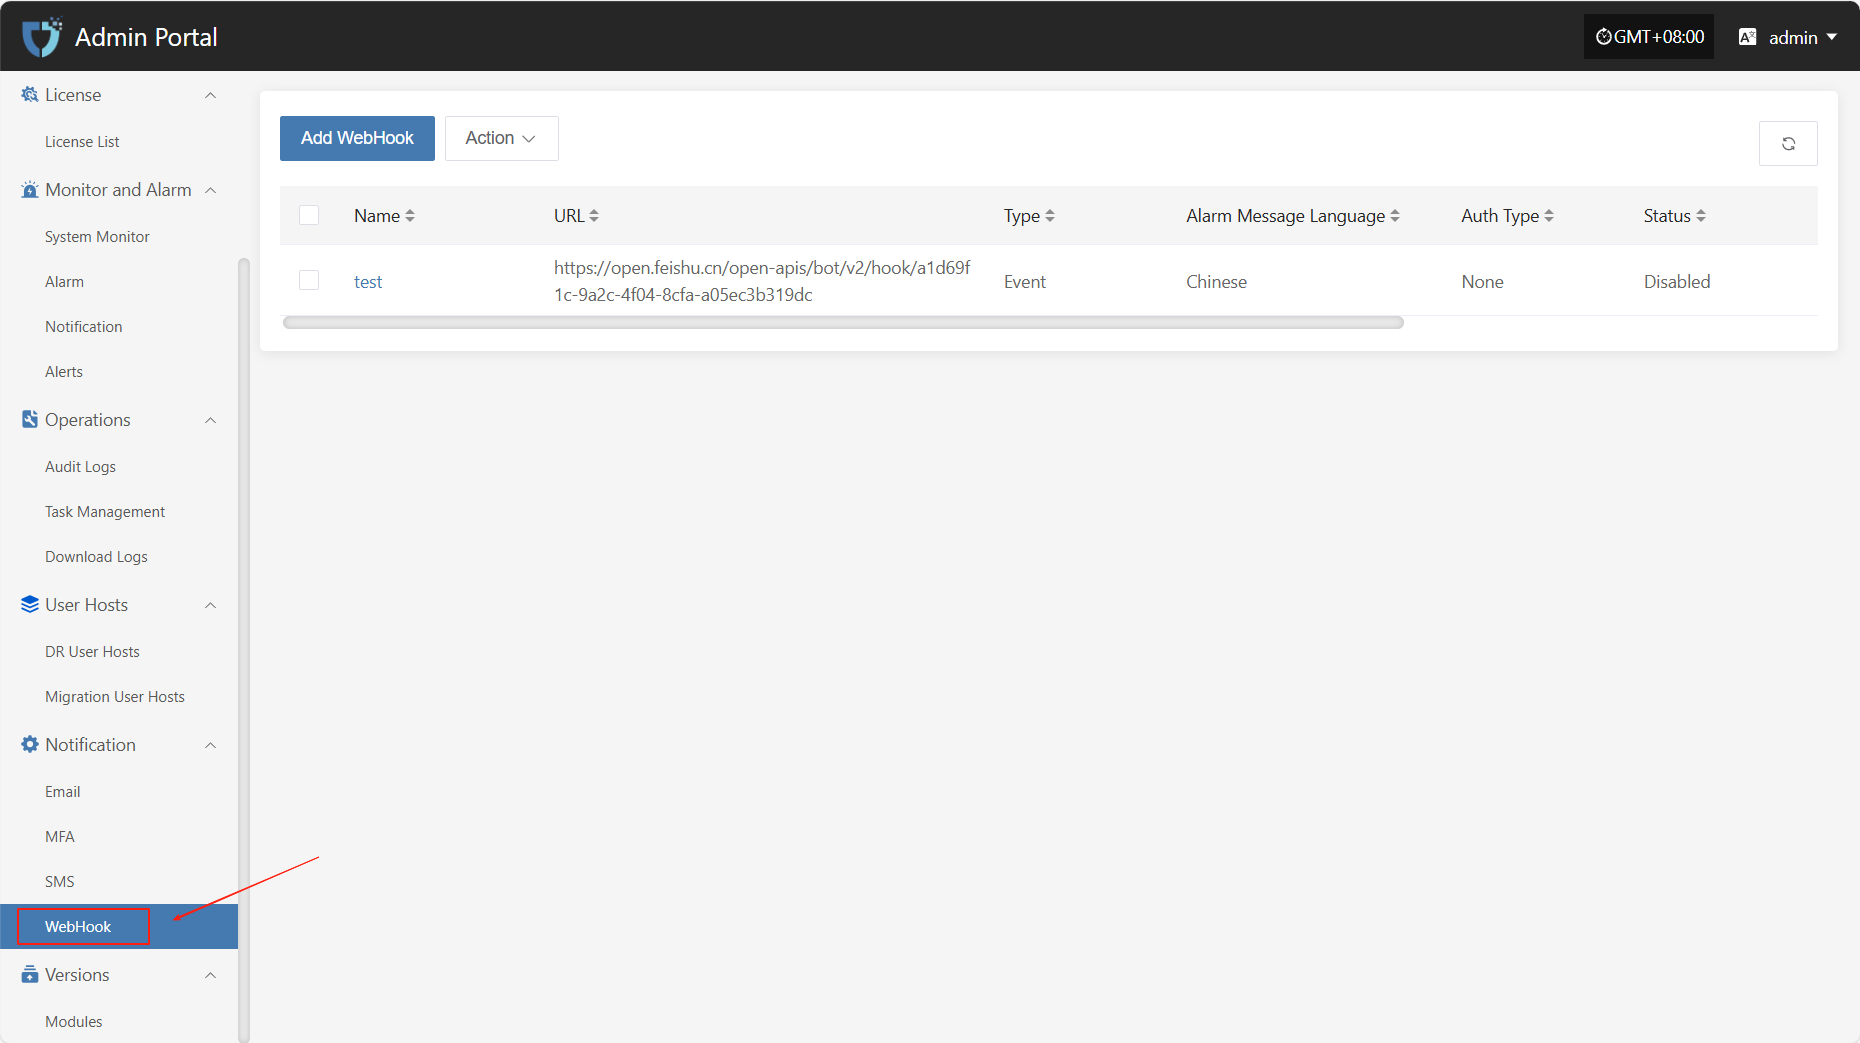
Add WebHook
Click the "Add WebHook" button in the upper left corner to start setting up WebHook authentication information.
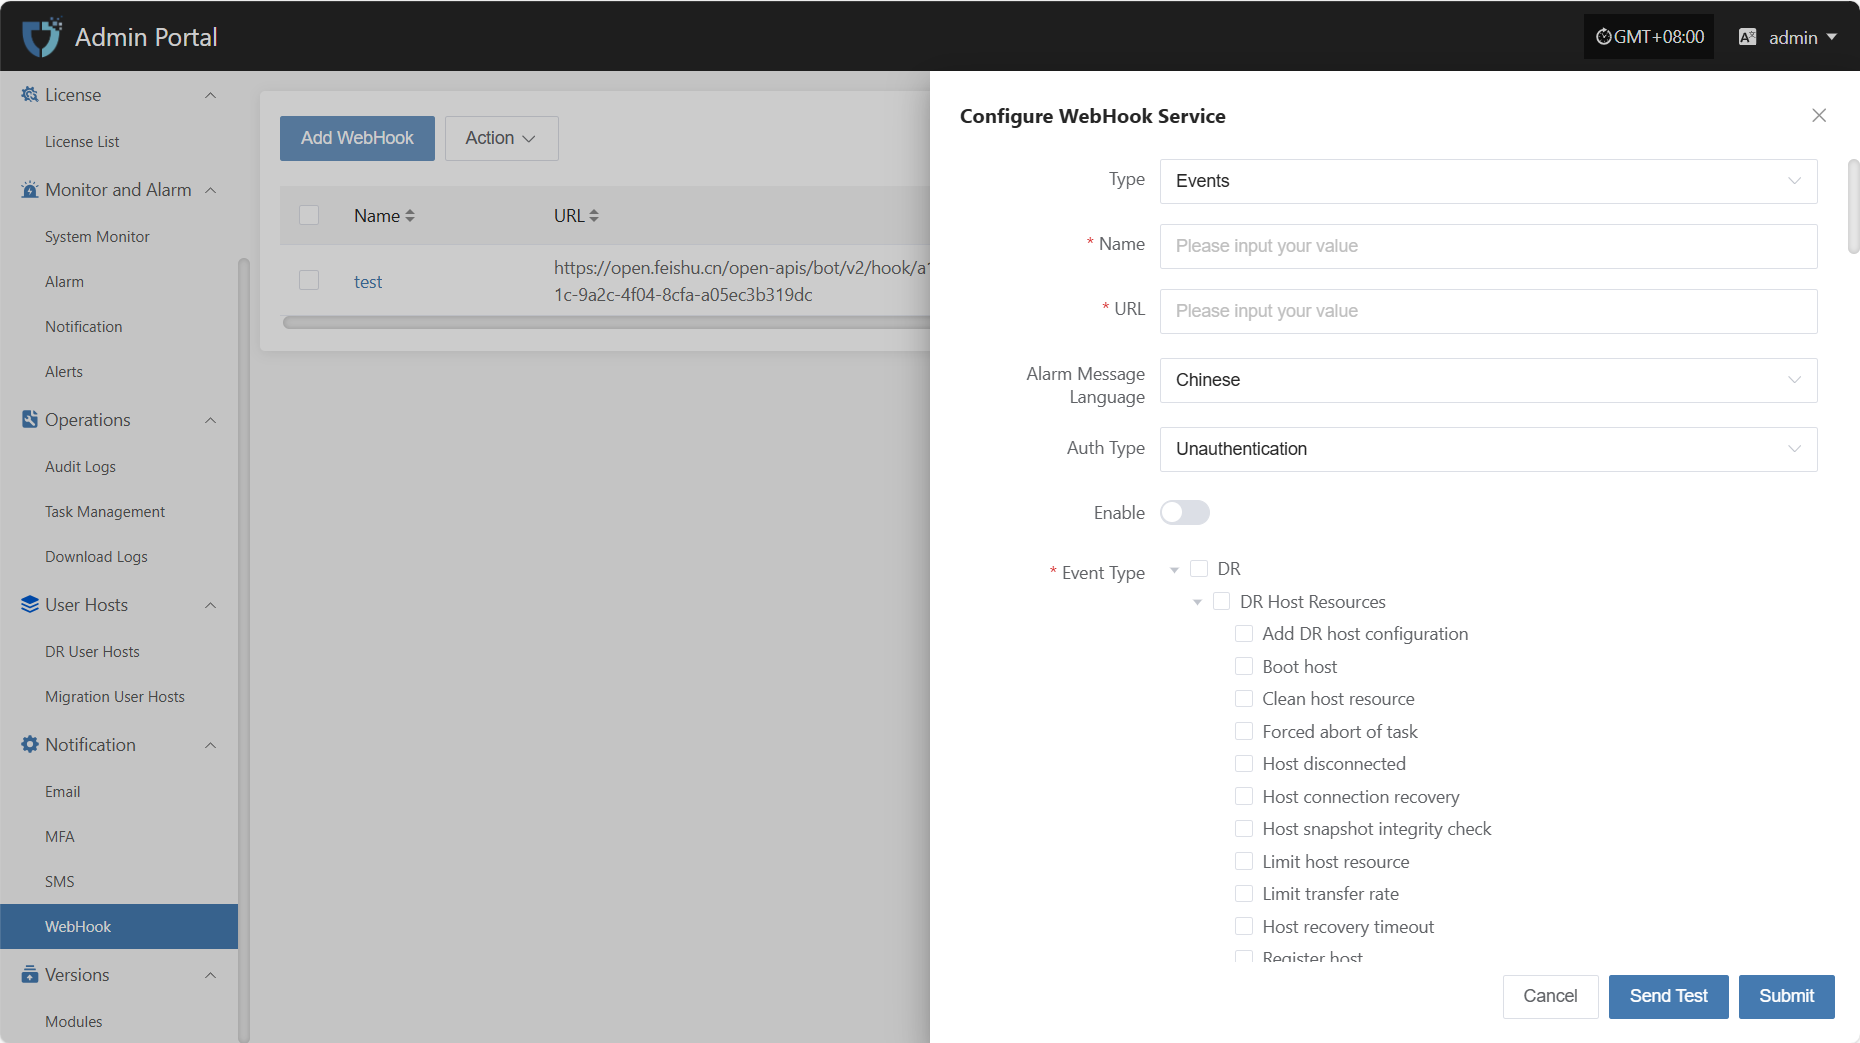
- Authentication Information Description
| Setting | Example Value | Description |
|---|---|---|
| Type | Events / Alarms | The category of the Webhook, distinguishing different push purposes such as system events or alarm notifications. |
| Name | test | The name used to identify this Webhook configuration for easy management and distinction. |
| URL | https://example.com/webhook | The target address to receive event pushes. The system will send HTTP requests to this URL. |
| Alarm Message Language | Chinese | The language of the push message. You can select the required language version as needed. |
| Auth Type | Unauthentication | Select the authentication method for the Webhook request. |
| Enable | Enable / Disable | Whether to enable this configuration. When enabled, the system will push notifications according to the set event types. |
| Event Type | Host recovery timeout | The specific event types that trigger WebHook pushes, such as host lost connection, host recovery timeout, etc. Multiple selections are supported. |
After filling in the authentication information, you can click the "Send Test" button below to verify if the WebHook service is working properly. After a successful test, click the "Submit" button at the bottom right of the page to complete the WebHook configuration.
Note: After clicking "Cancel", all unsaved WebHook authentication configuration information will be cleared. Please make sure to save before leaving the page.
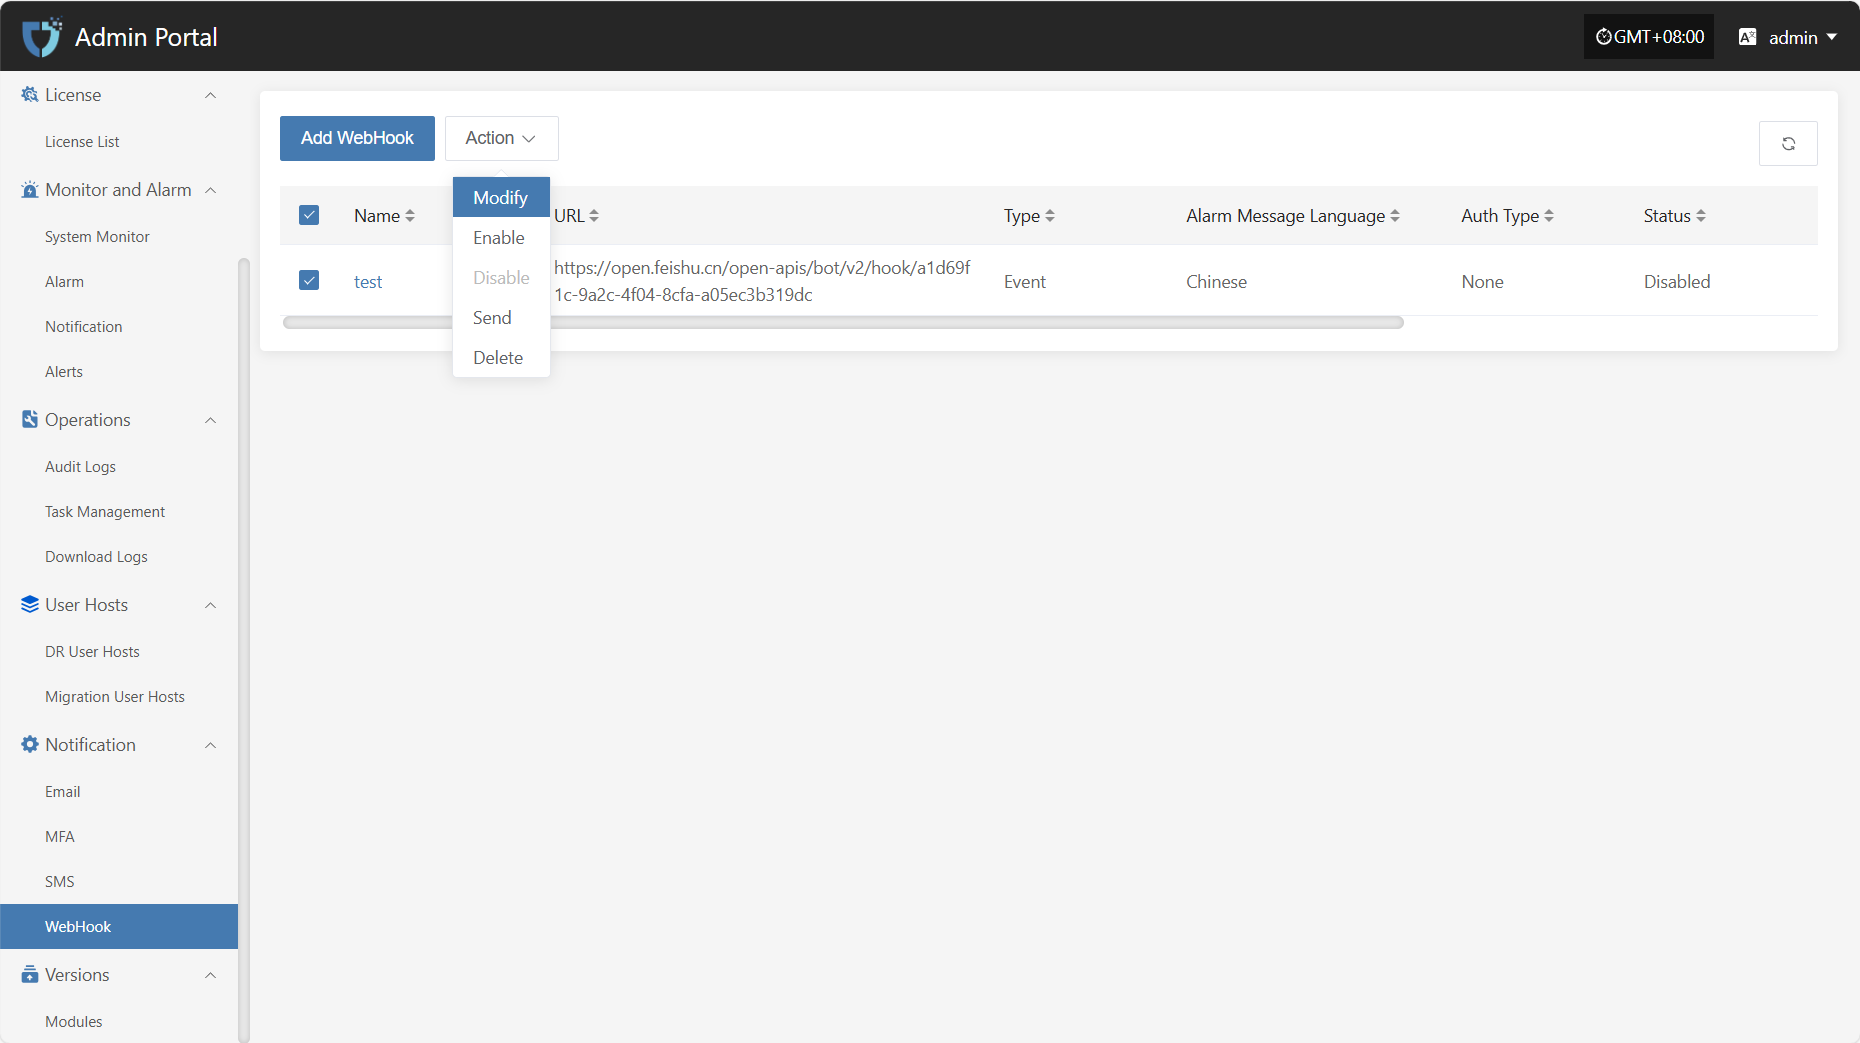
Action
Modify
Click "Modify" to edit the authentication information.
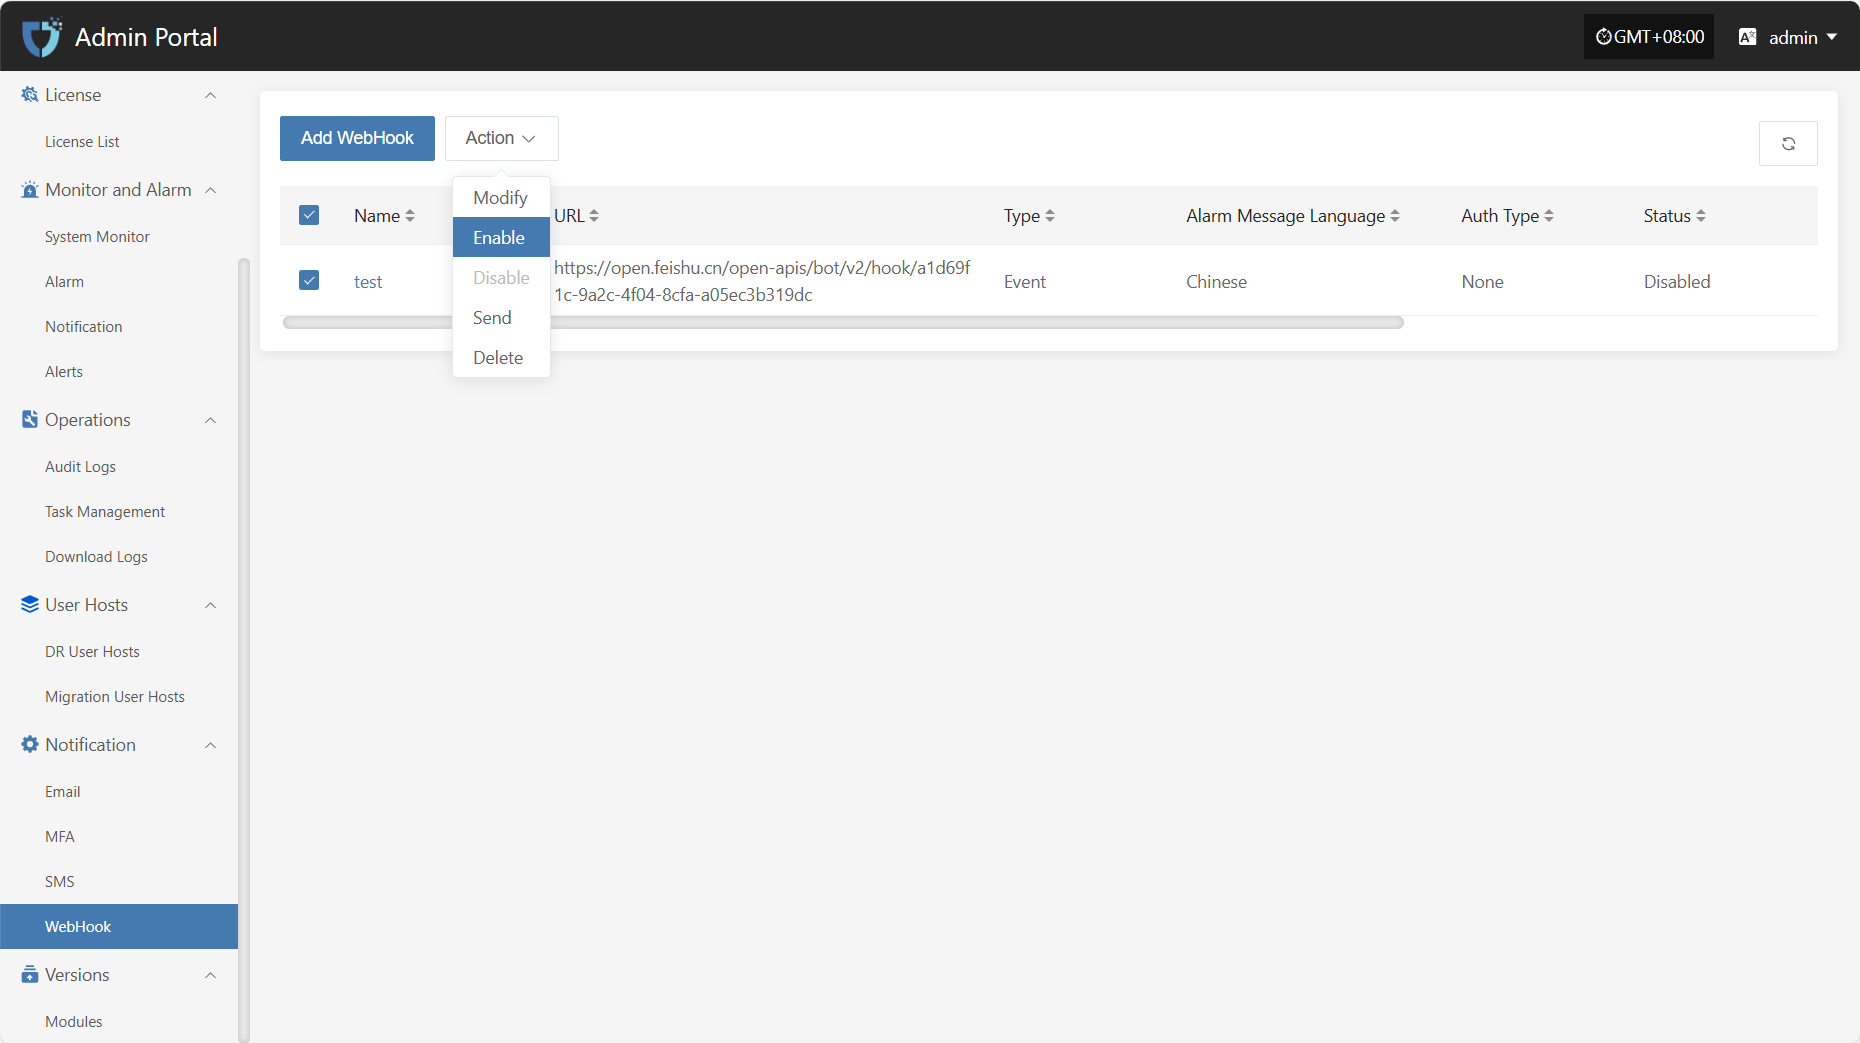
Enable
Click the "Enable" button to activate a disabled Webhook.
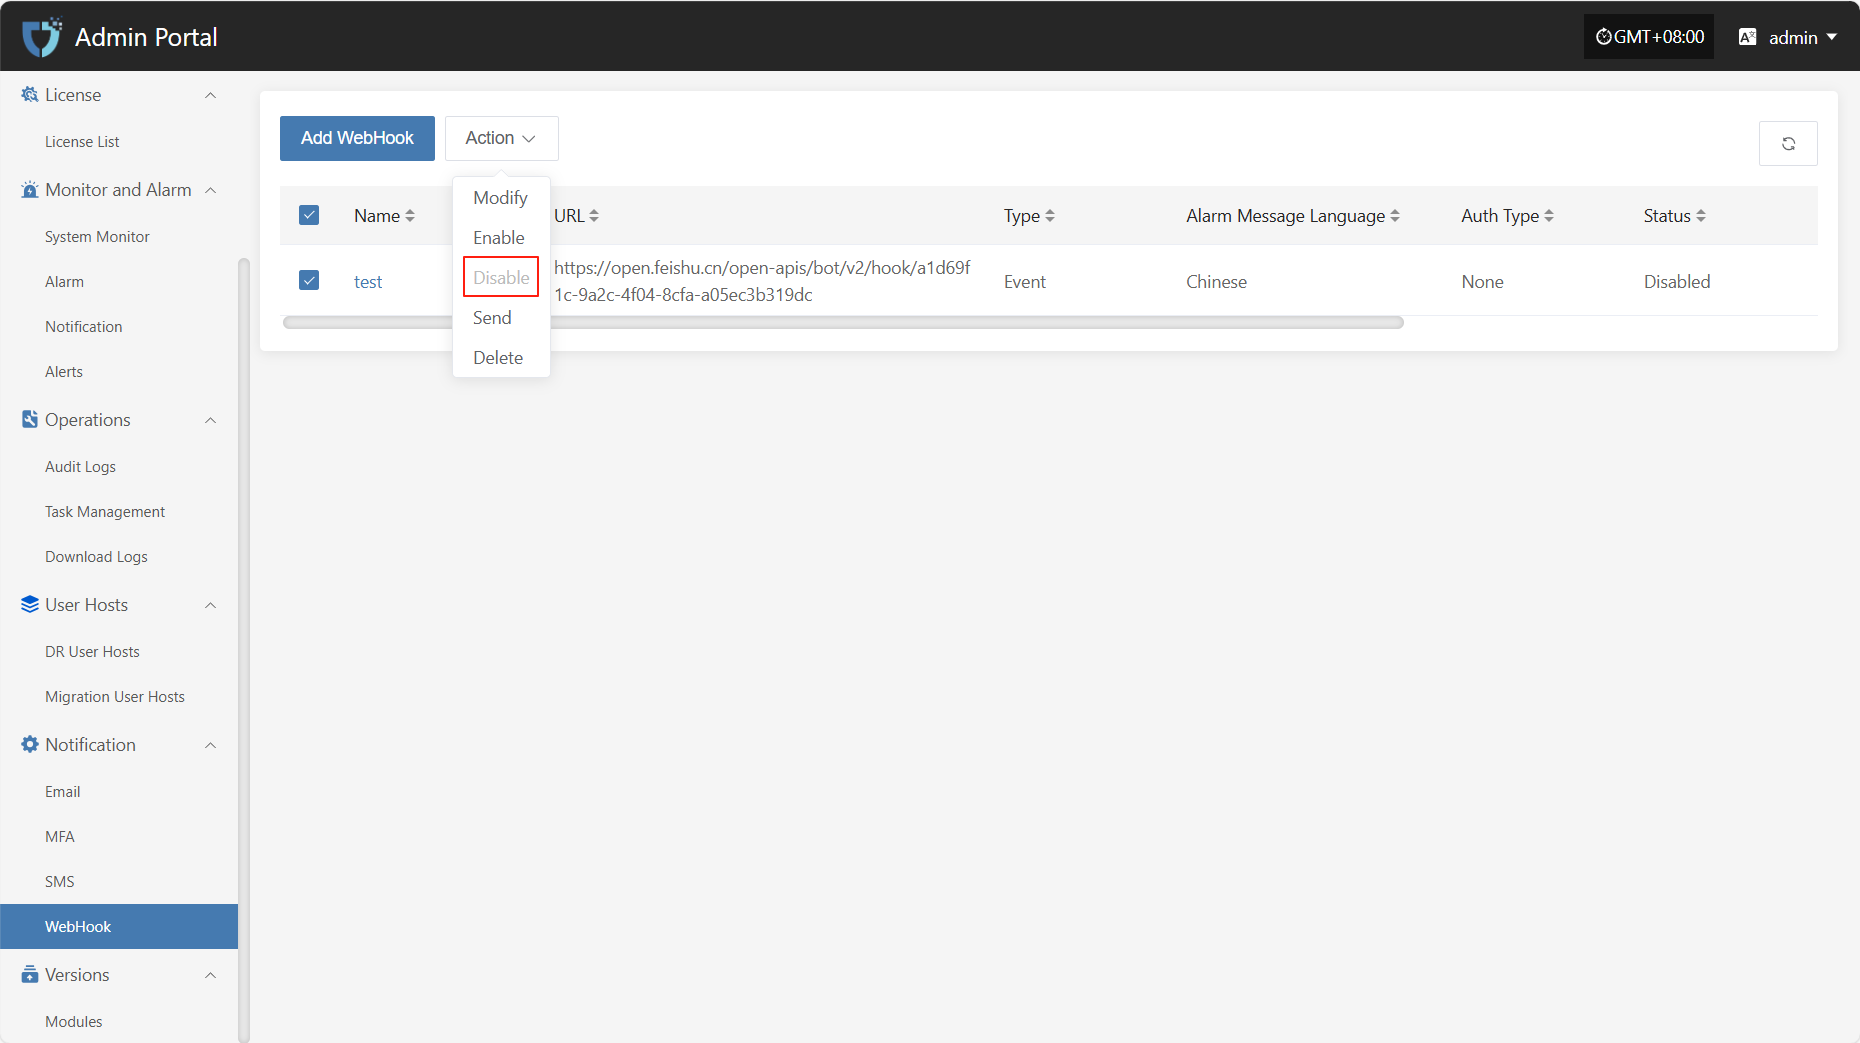
Disable
Click the "Disable" button to disable an enabled Webhook.
Send
Click the "Send" button and the system will send a test message to the configured target address to verify if the Webhook settings are correct.
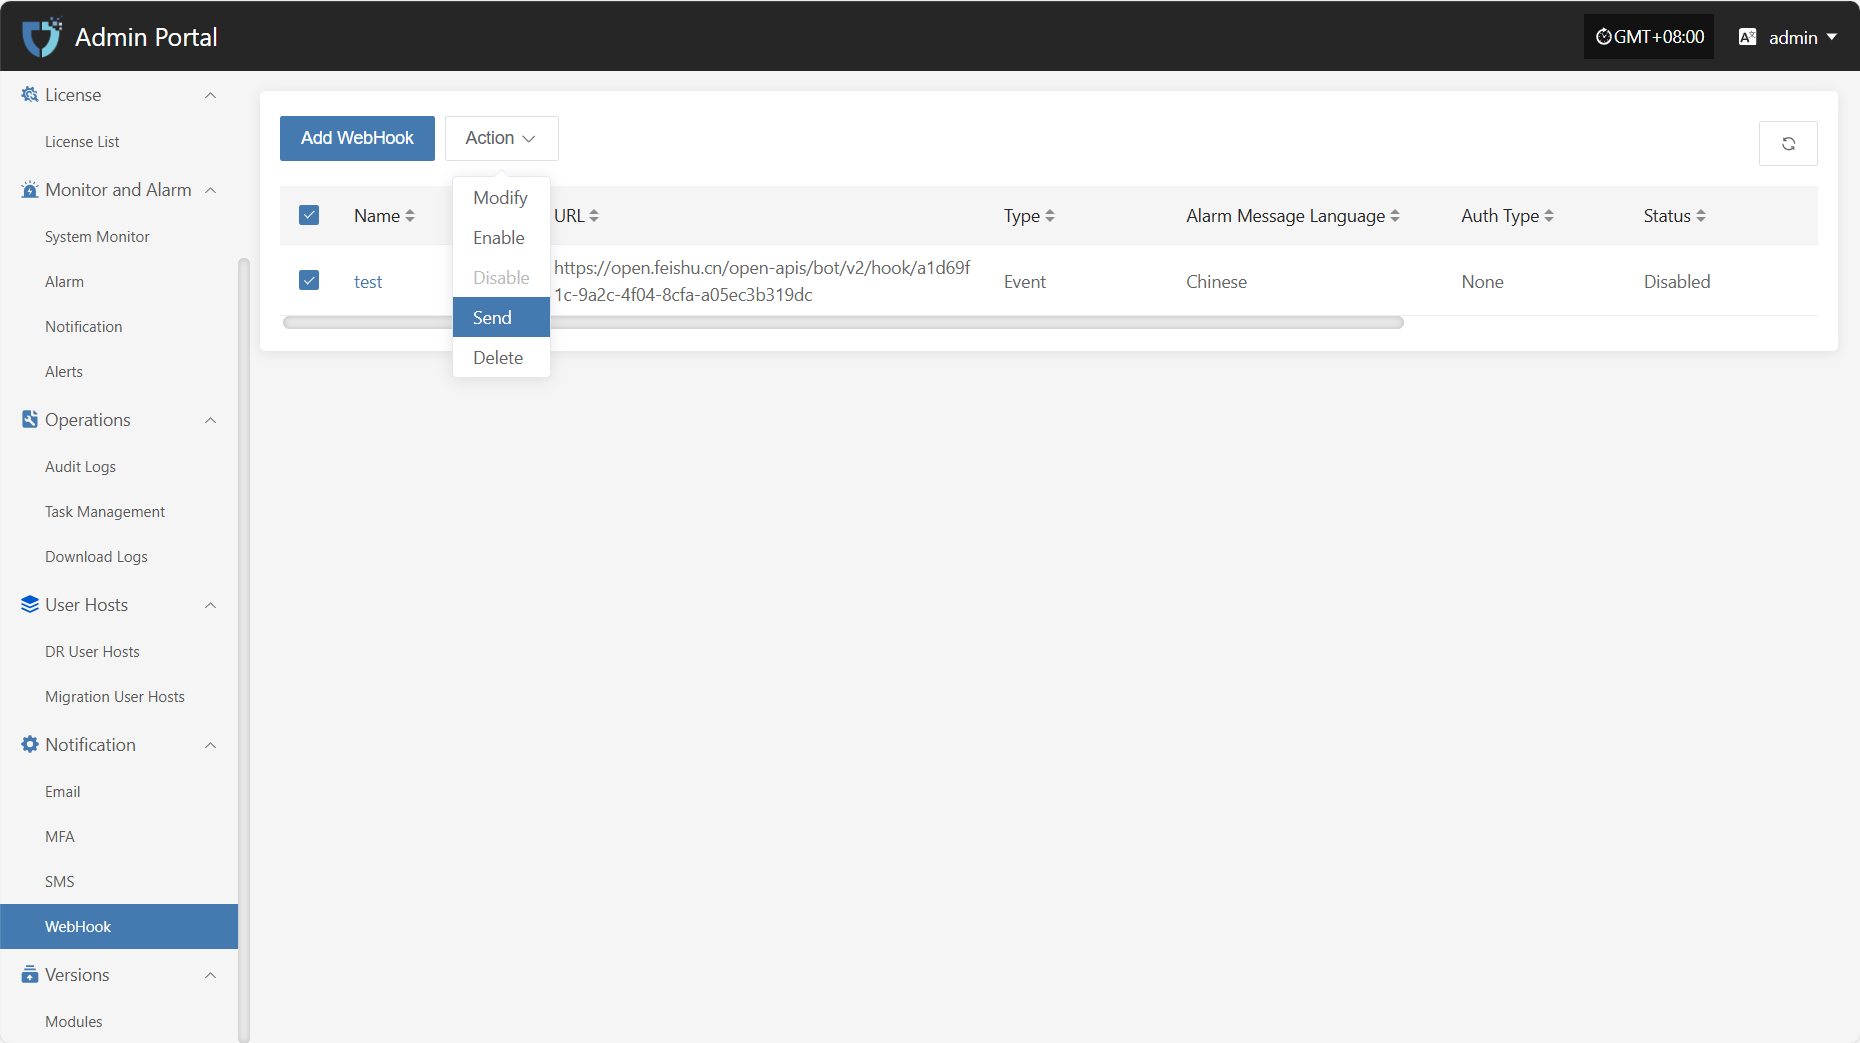
Delete
Click the "Delete" button to remove the selected configuration. This action cannot be undone, please confirm carefully.

Versions
Modules
"Modules" displays all functional modules in the current system that are under version management. Users can view basic information and current version status of each module here, making it easy to quickly locate and manage module updates. This list provides basic support for version control, rollback, and change review, and is an important tool for continuous optimization and stable operation of the system.
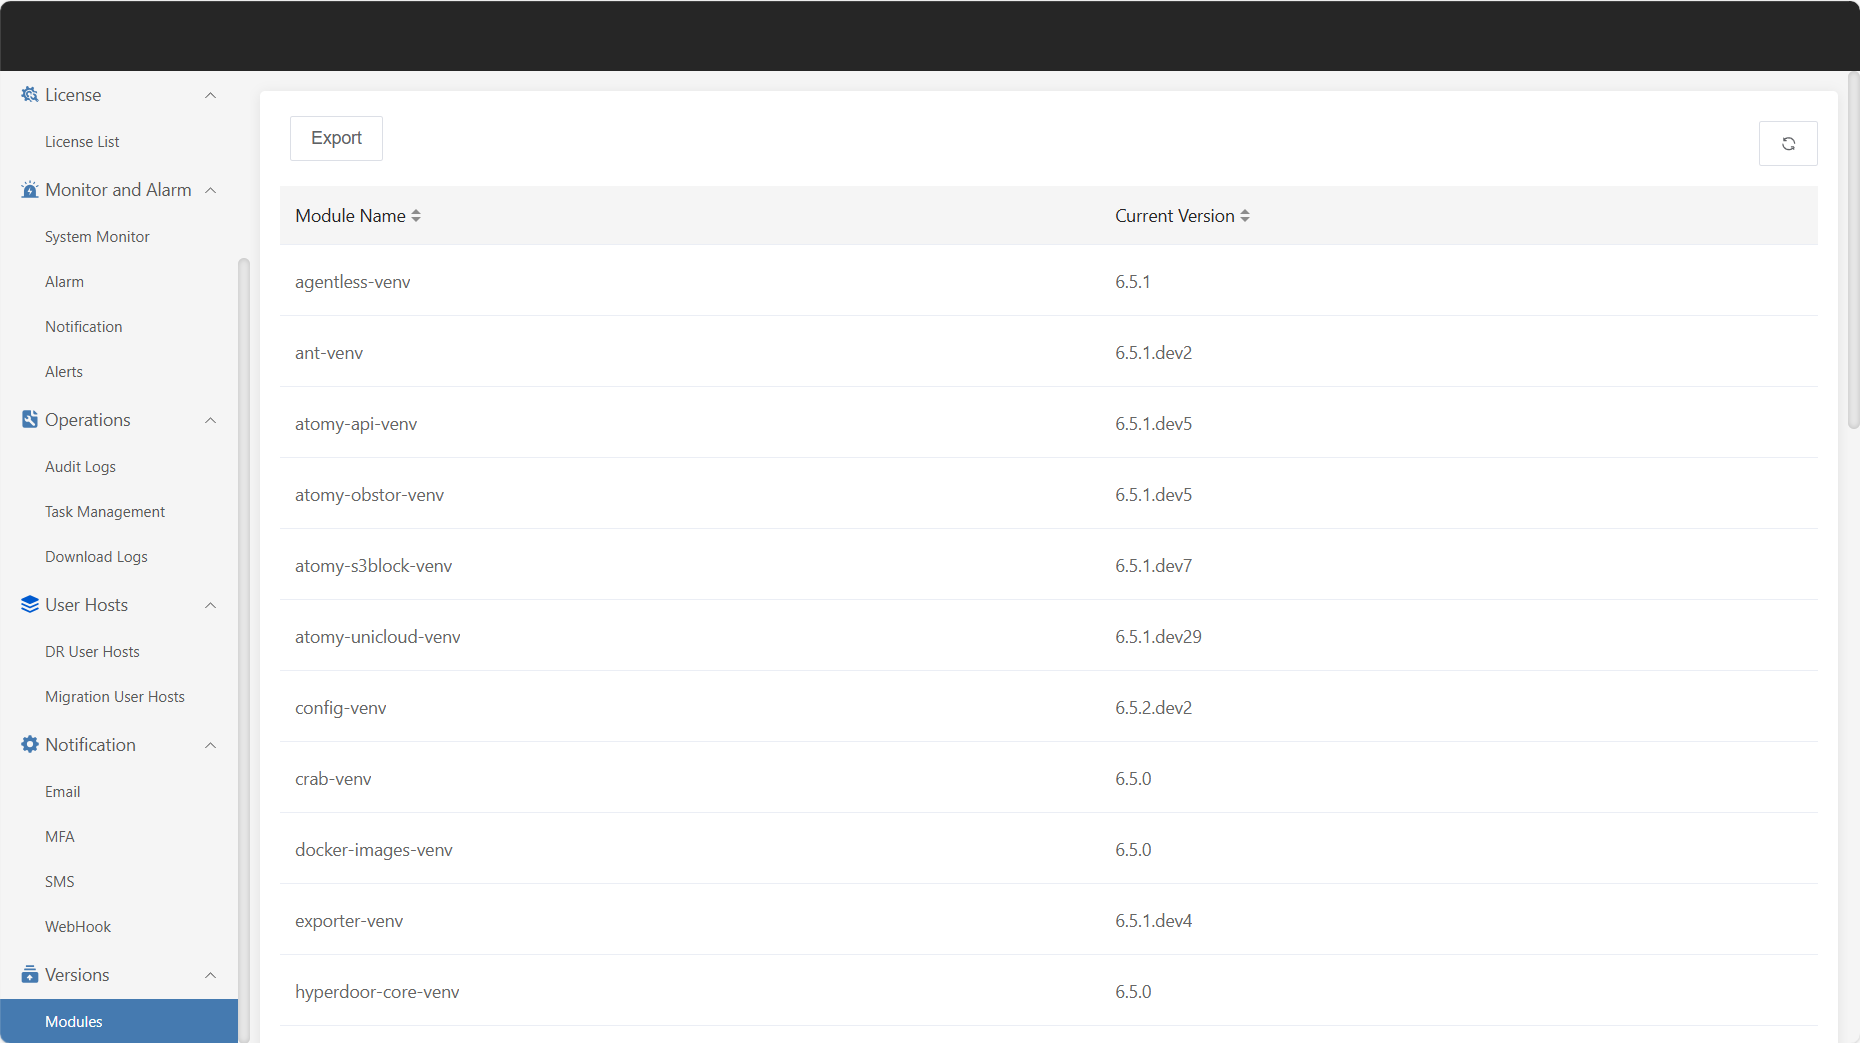
Click "Export" in the upper left corner of the page to generate and download the version information of the current modules.