HyperBDR Manual
HyperBDR Manual
Register
Register
The registration function allows new users to create a platform account for future login, use, and receiving system notifications. During registration, users need to provide required identity information and contact details. The platform will verify user identity through the configured verification method to ensure account security.
Start Registration
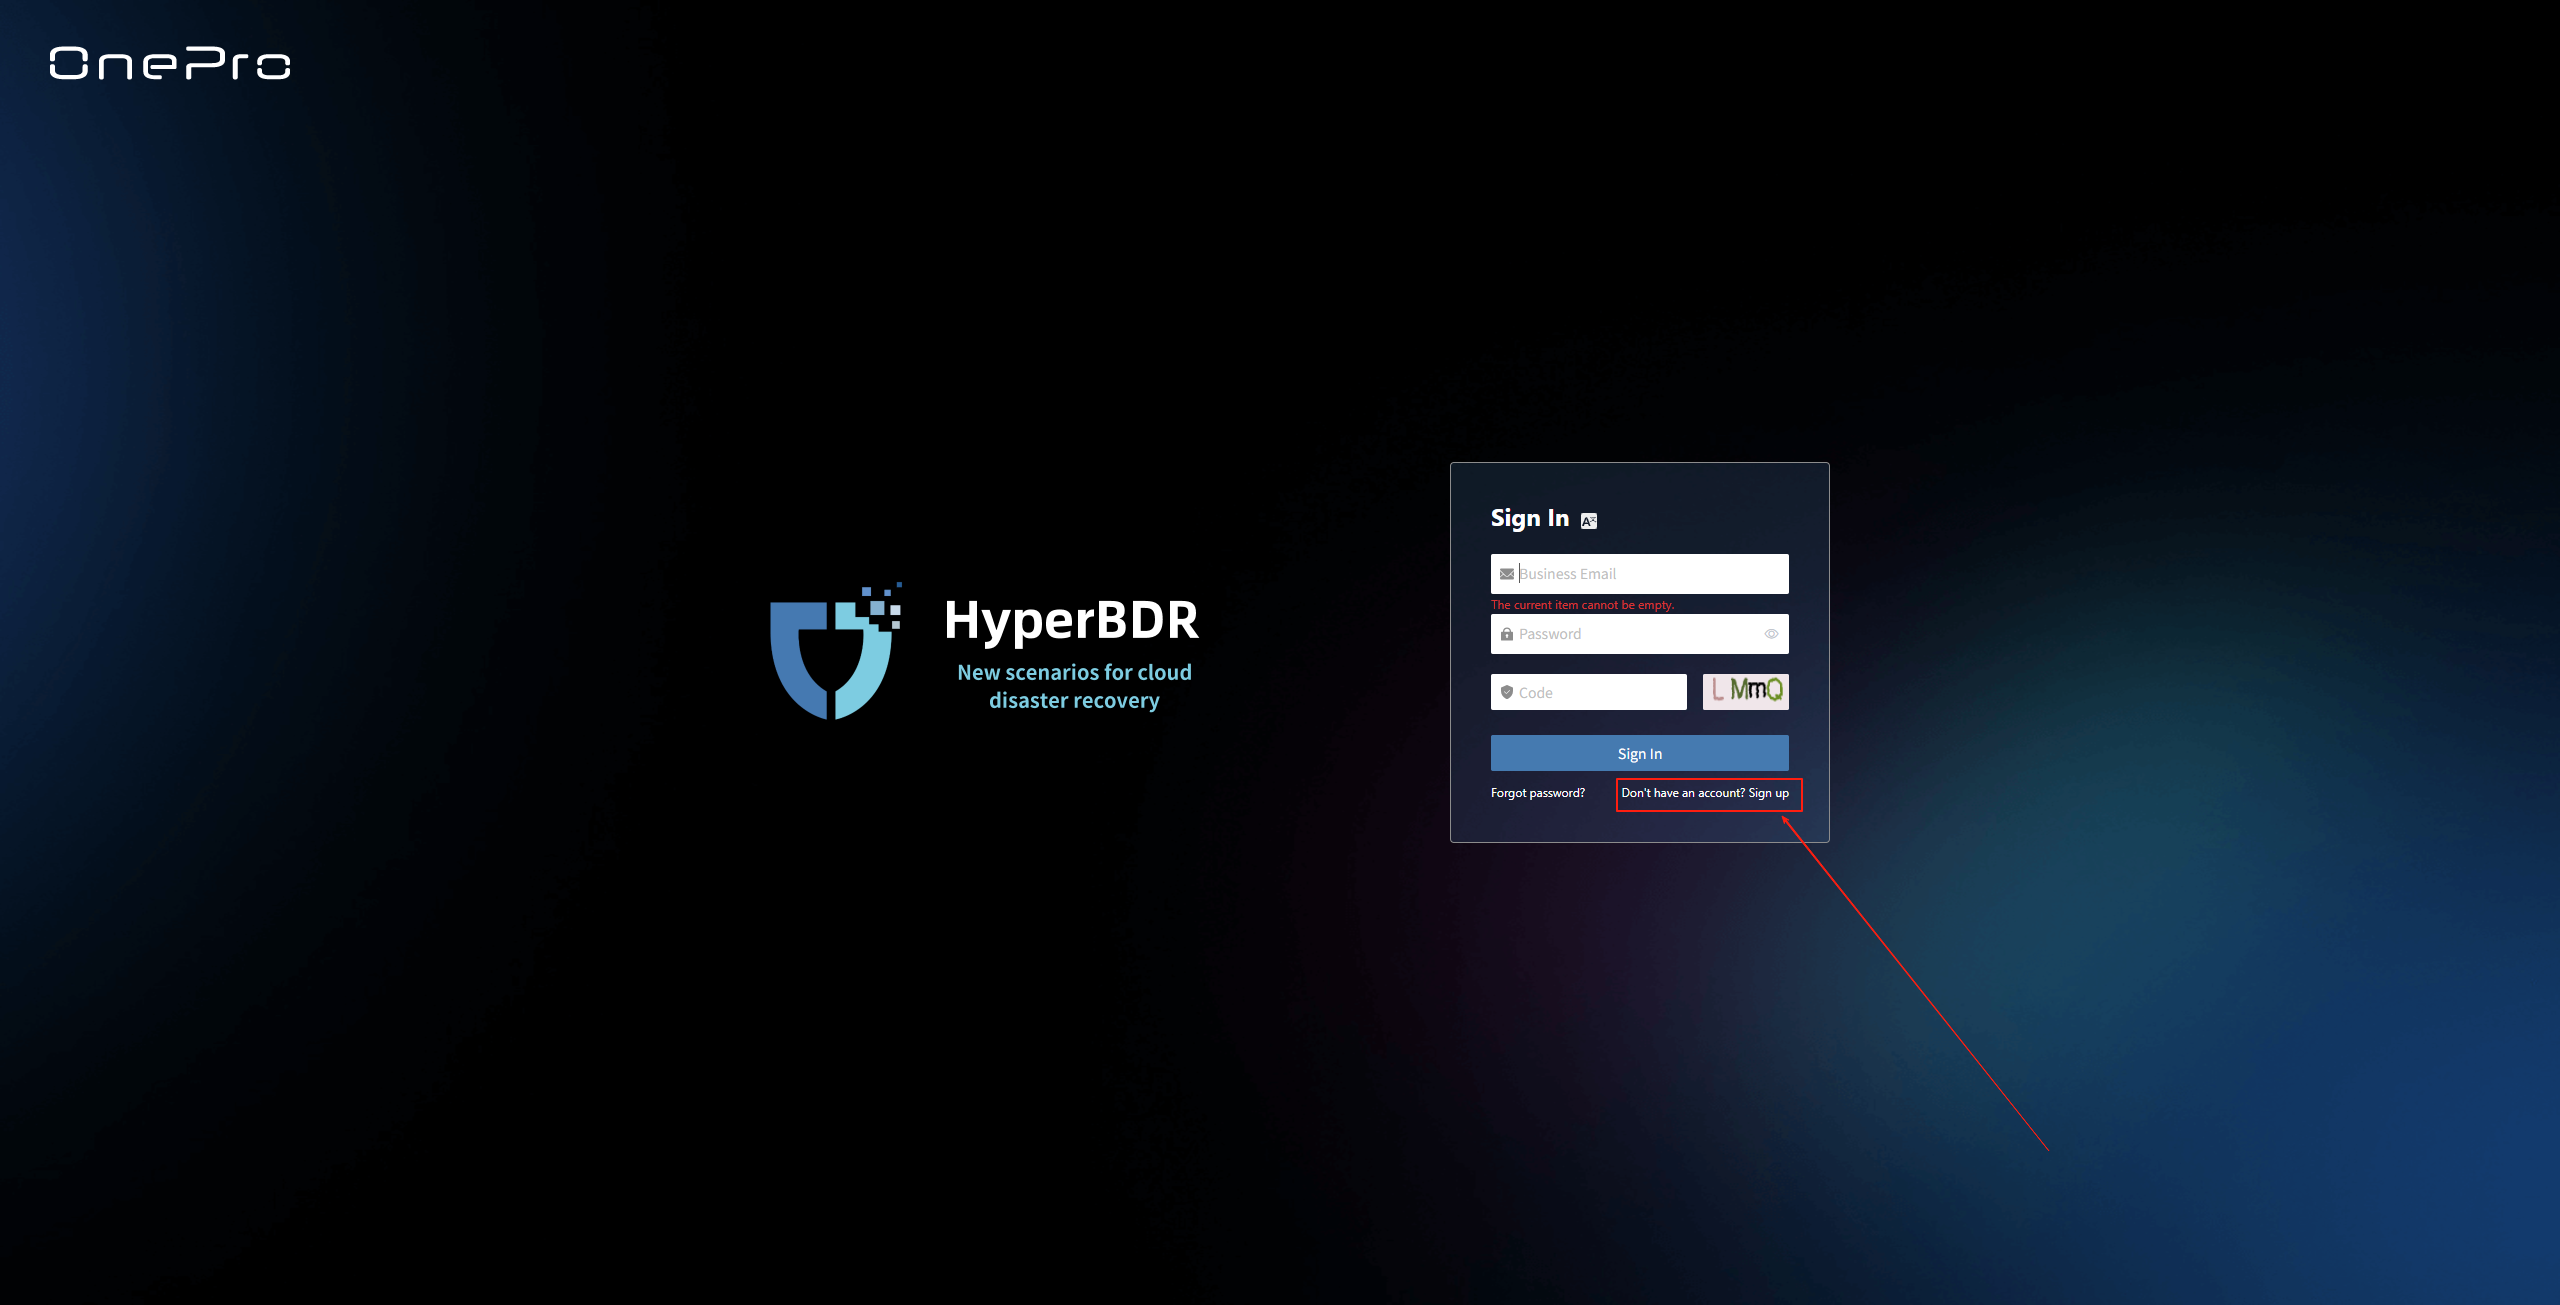
Access the Registration Page
Open the login page and click "Don't have an account? Sign up" to enter the account registration page.
Fill in Registration Information
Enter the required information, including: first name, last name, company name, country/region, email, and other authentication details.
The email address must be valid and accessible to receive system verification codes and notifications.
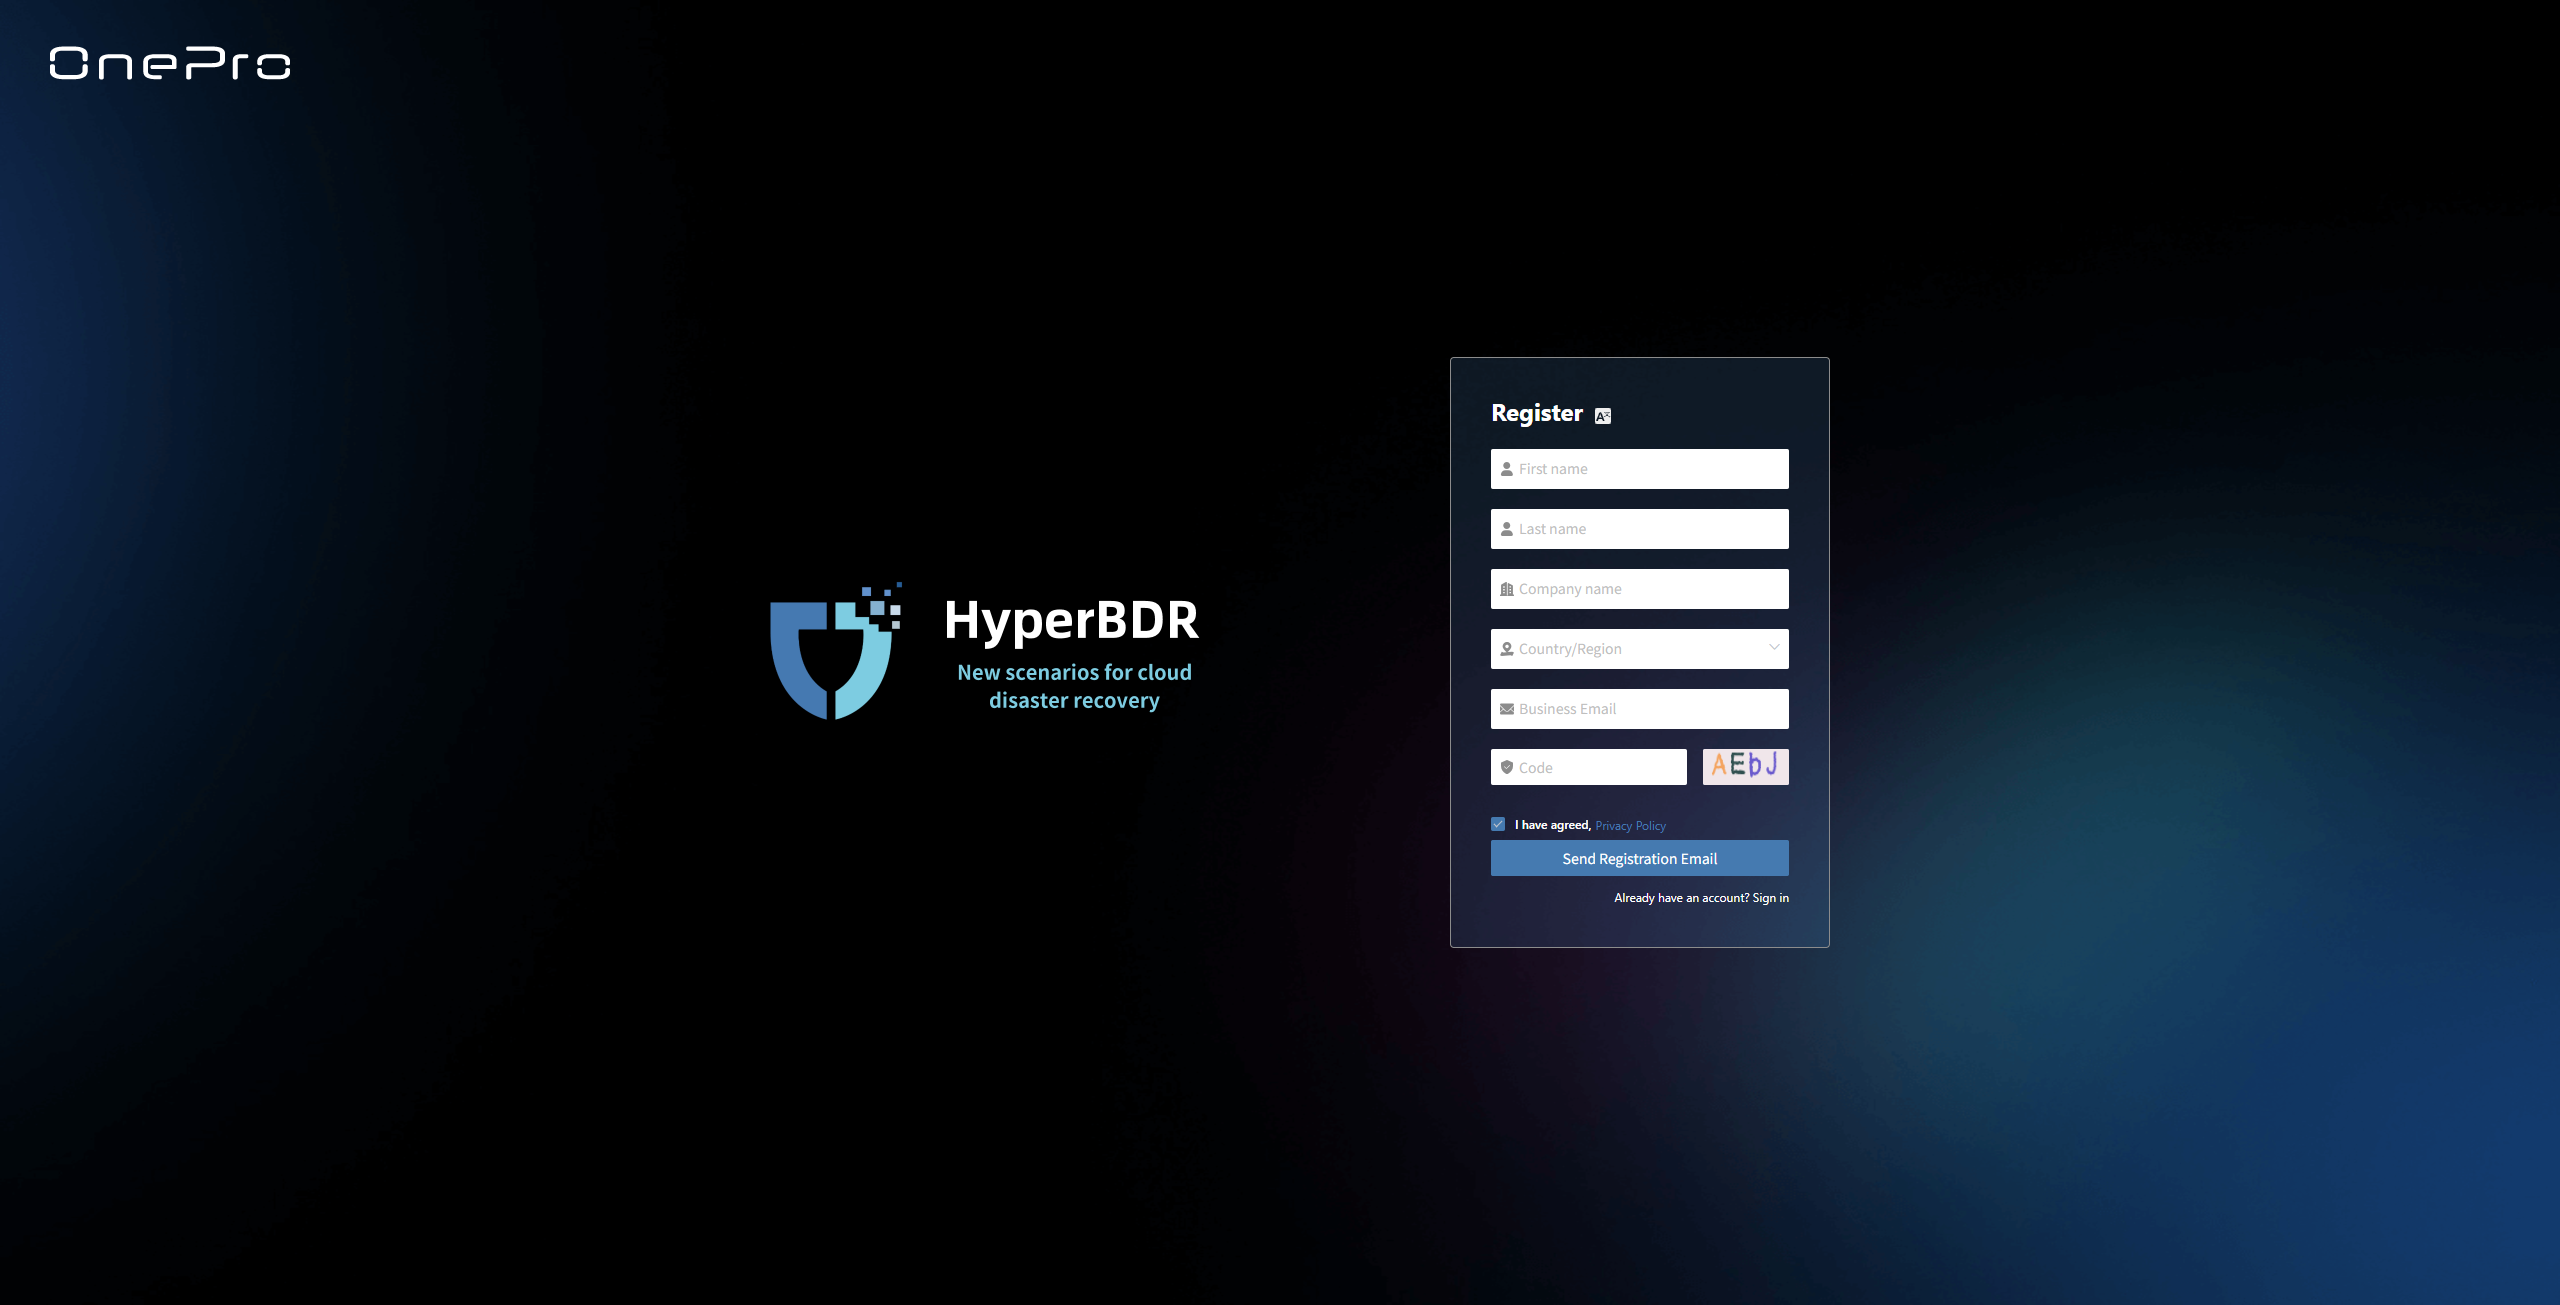
Submit Registration Application
After filling in the authentication information, click "Send Registration Email". The system will send a verification email.
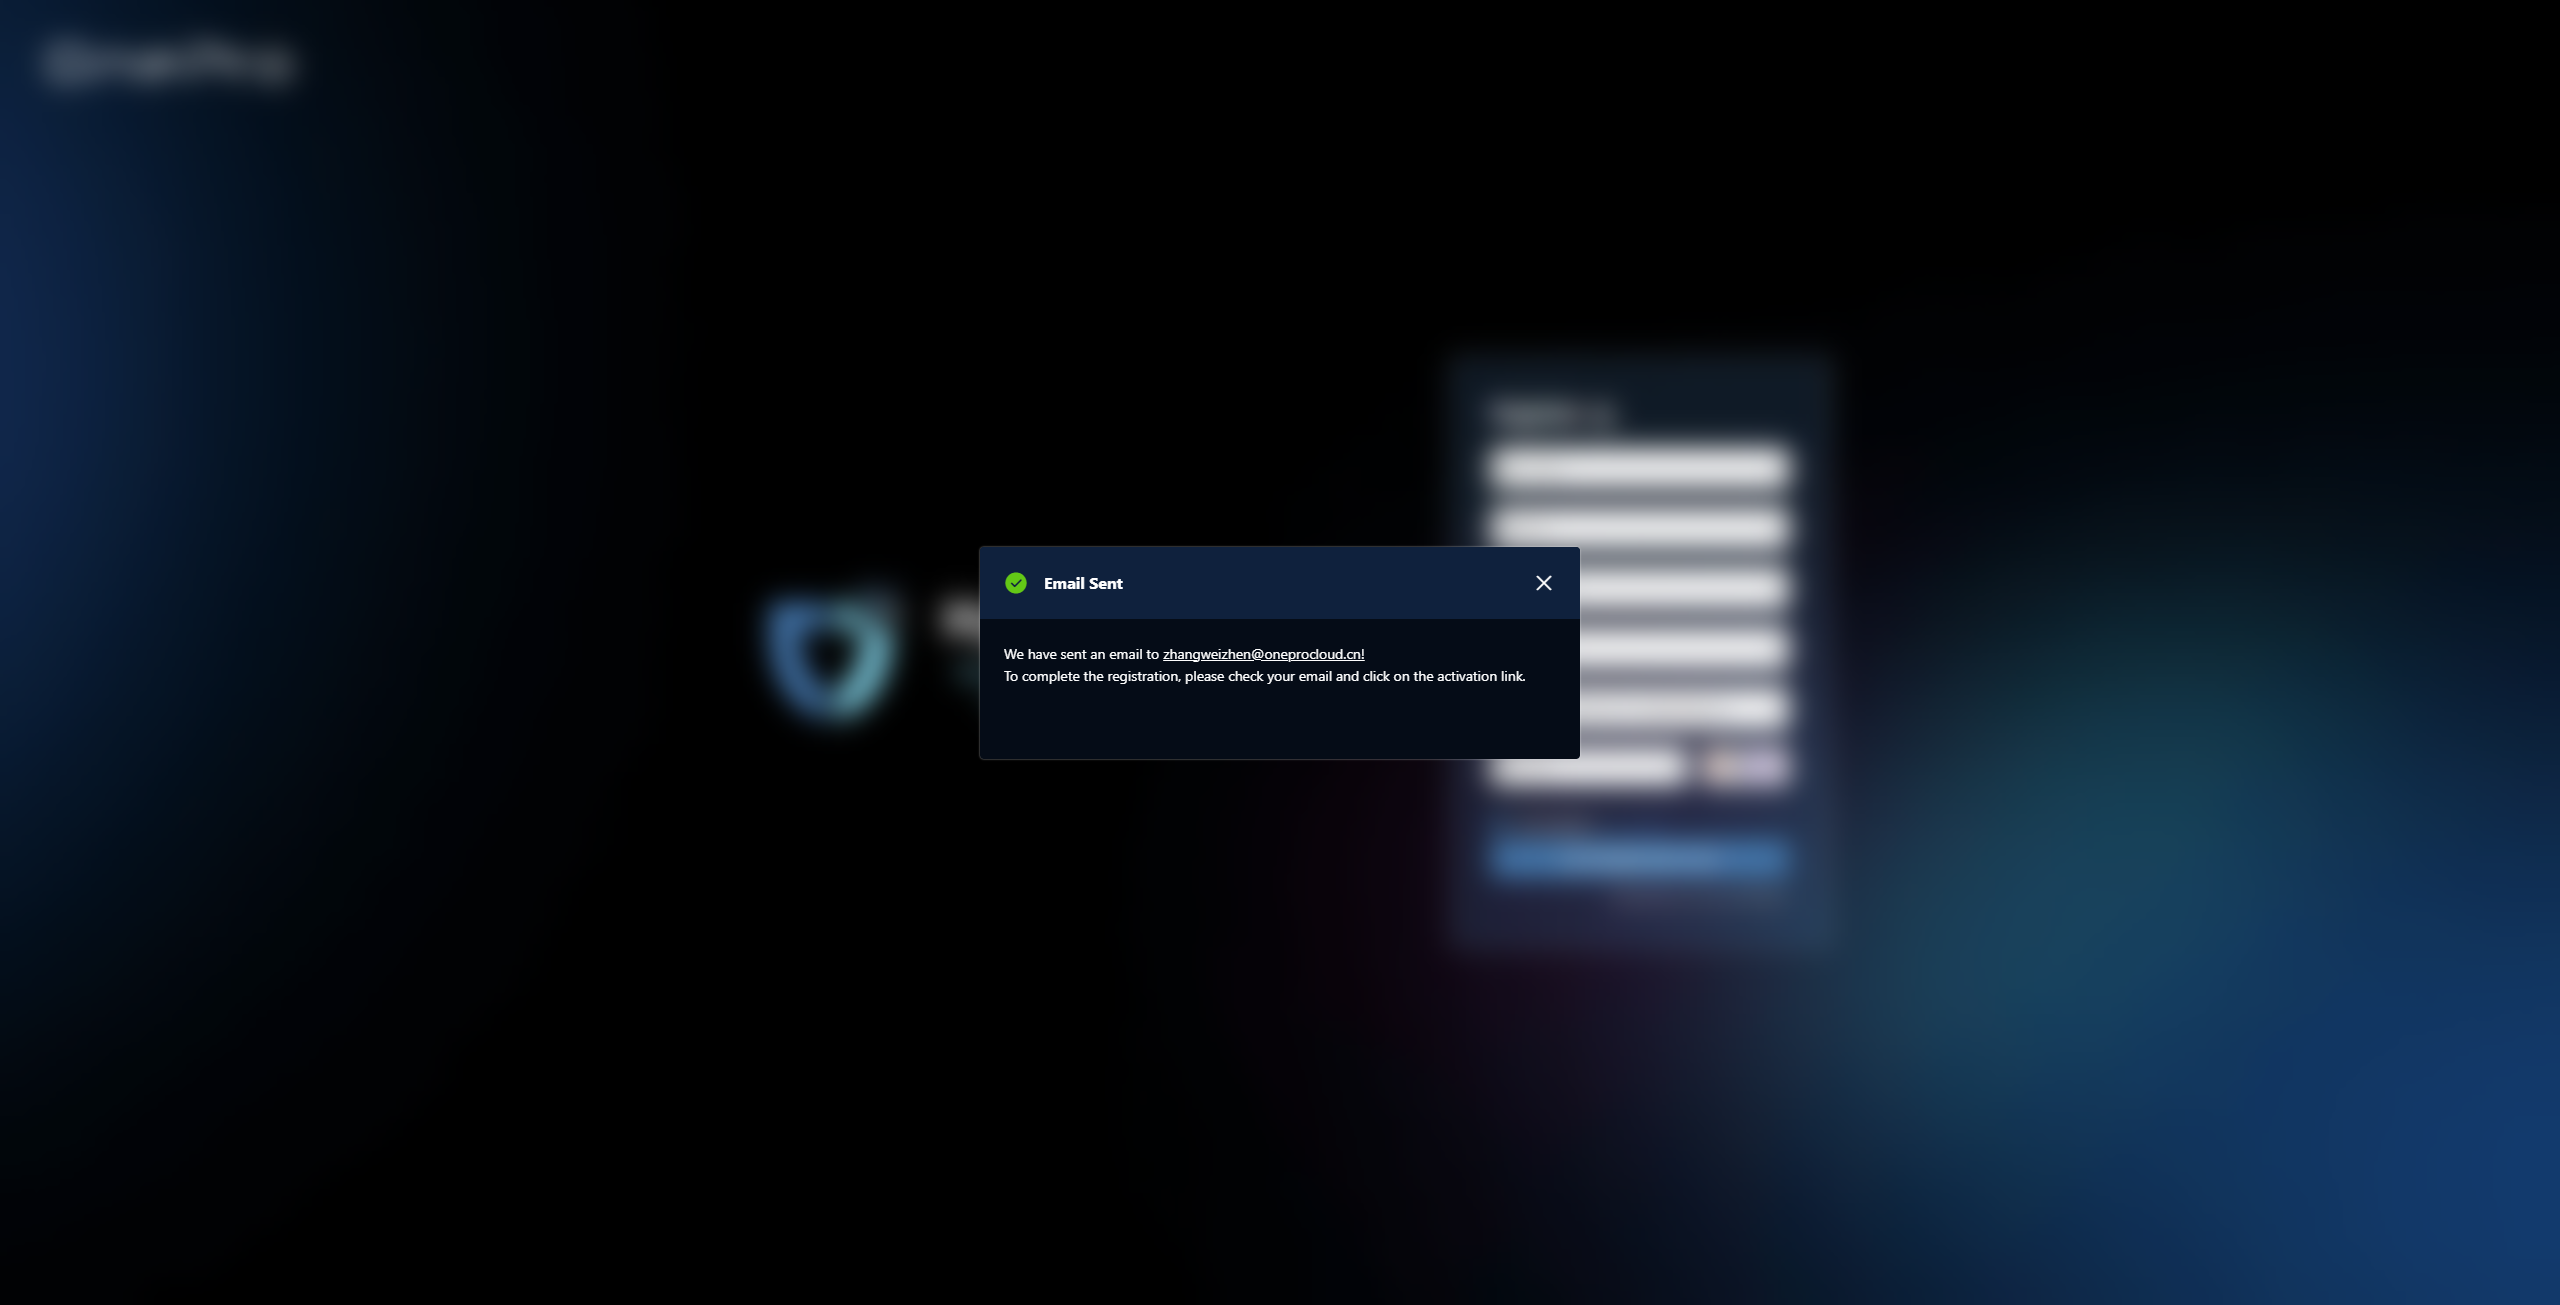
Activation Confirmation
Please check your registration email inbox, click "Activate Registration" in the email to complete the verification. Your account will be activated and the system will redirect you to the "Set Password" page.

Set Password
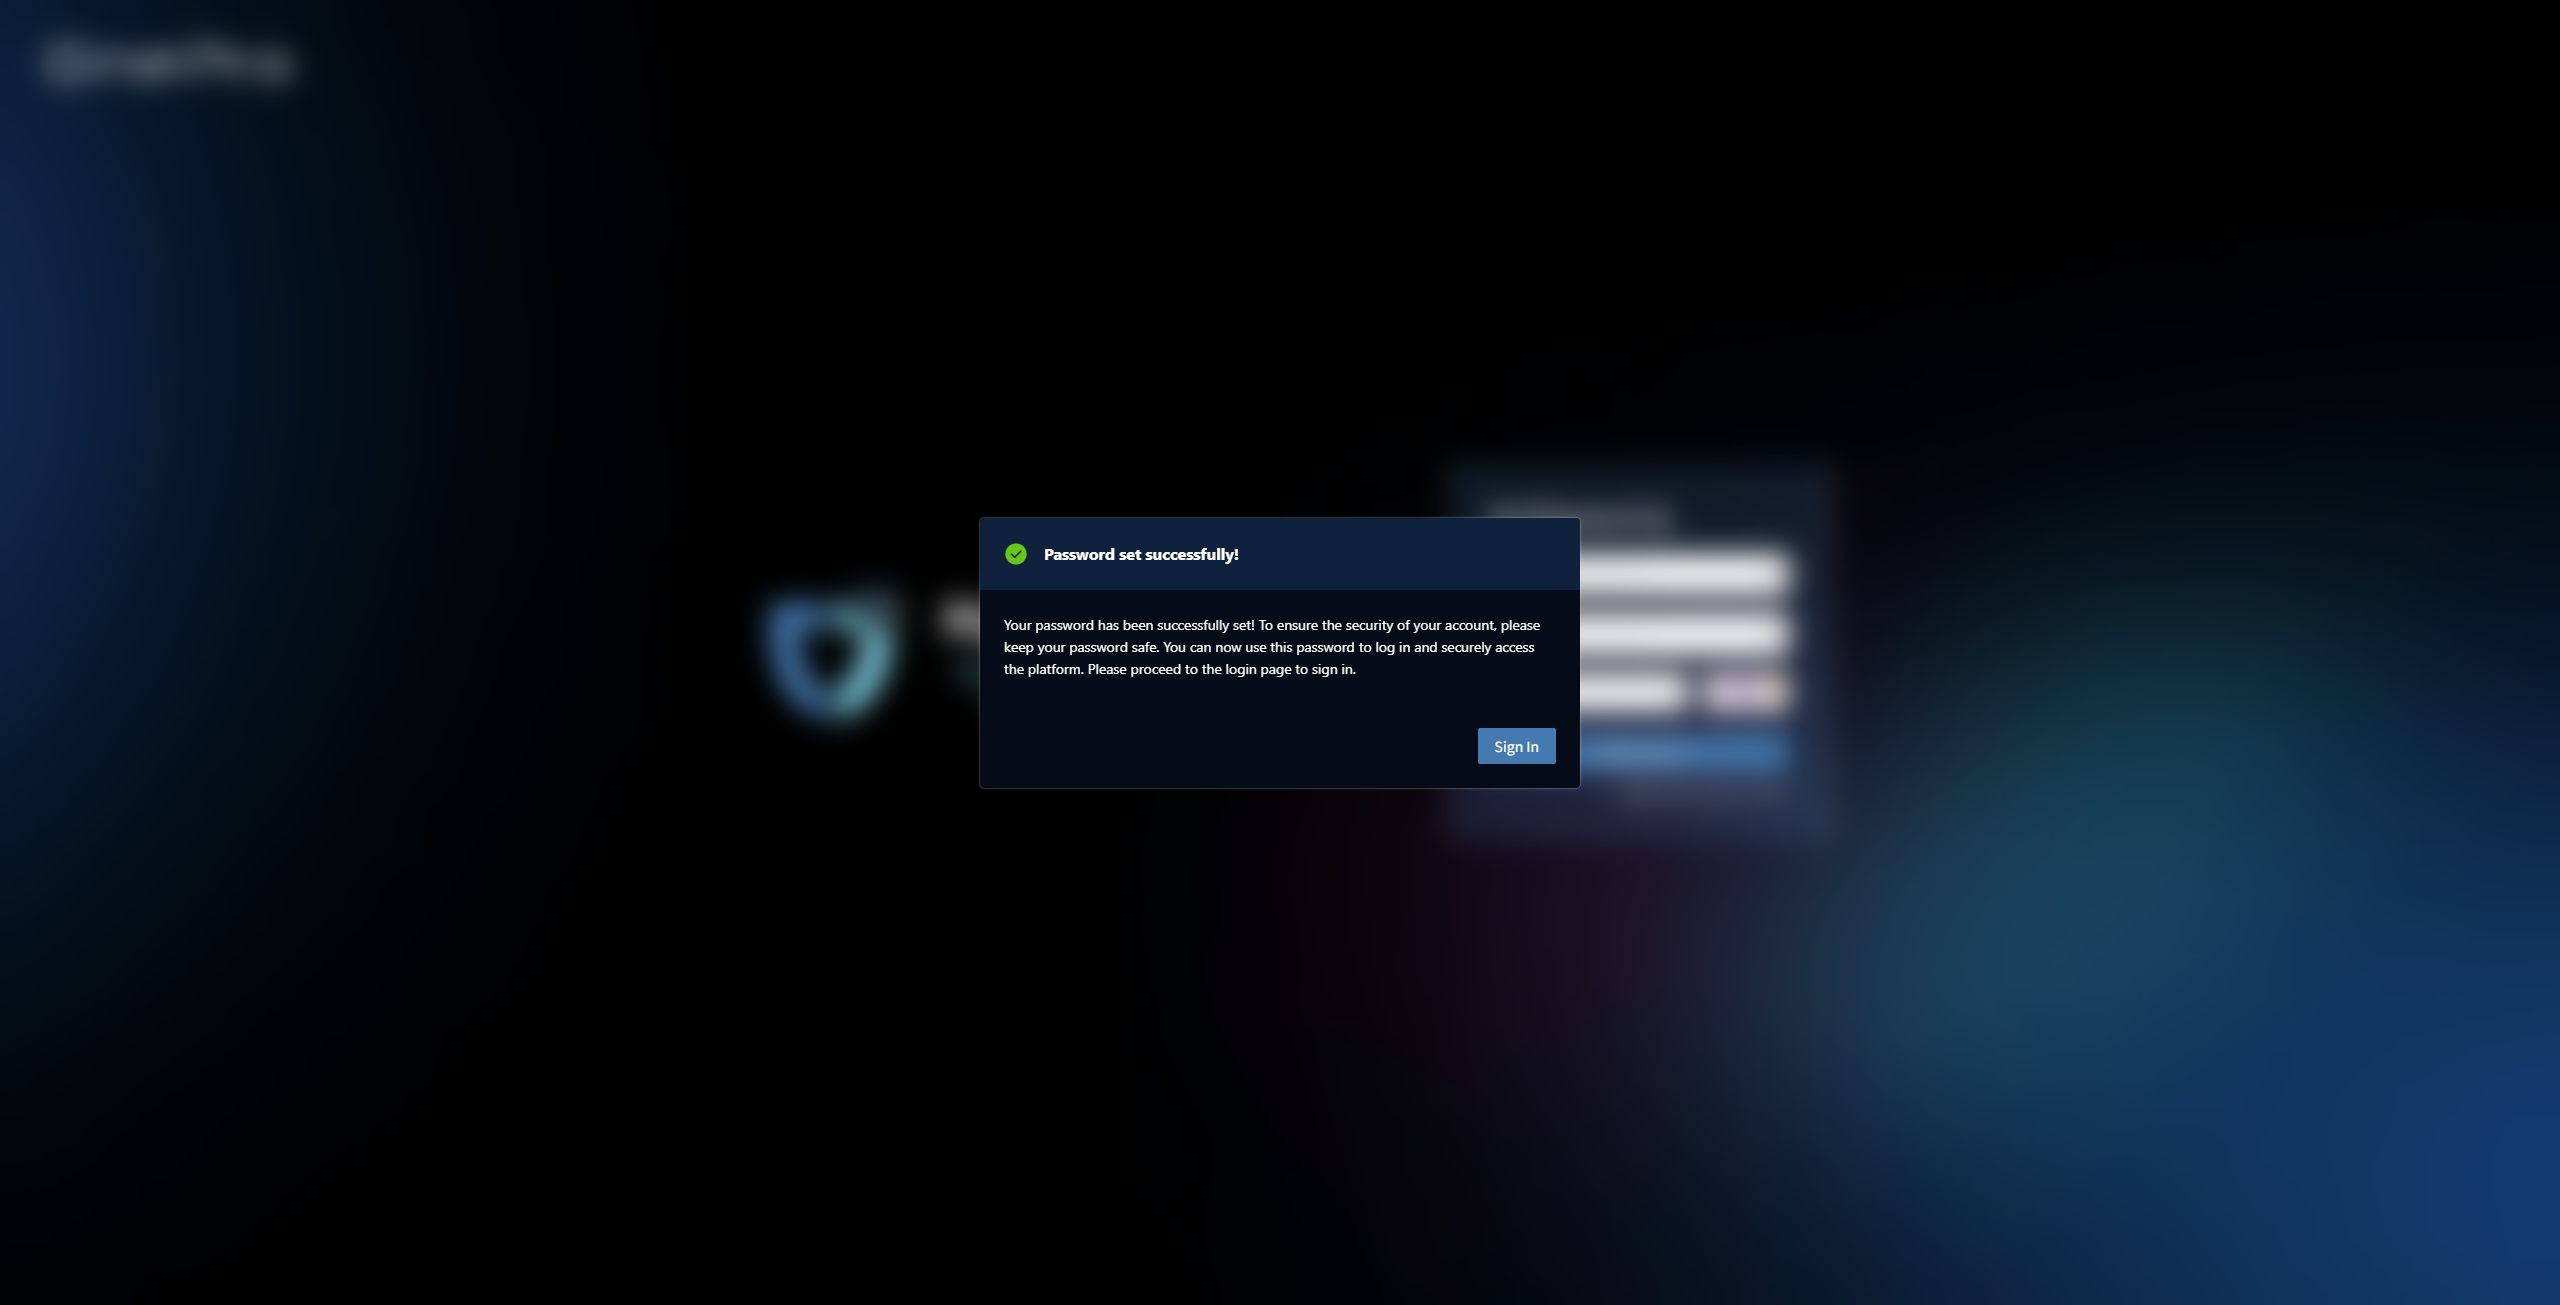
After account activation, you need to enter and confirm a new password to complete the registration process.
The password must meet the platform's complexity requirements. It is recommended to include uppercase and lowercase letters, numbers, and special characters. Please keep your password safe to ensure account security.

After setting the password, you can now use it to log in and securely access the platform. Please go to the login page to sign in.
Forgot Password
Access Password Recovery
Open the login page and click "Forgot password?" to enter the password recovery page.

Fill in Recovery Information
Enter your registered email address. The system will send a password reset email to start the reset process.
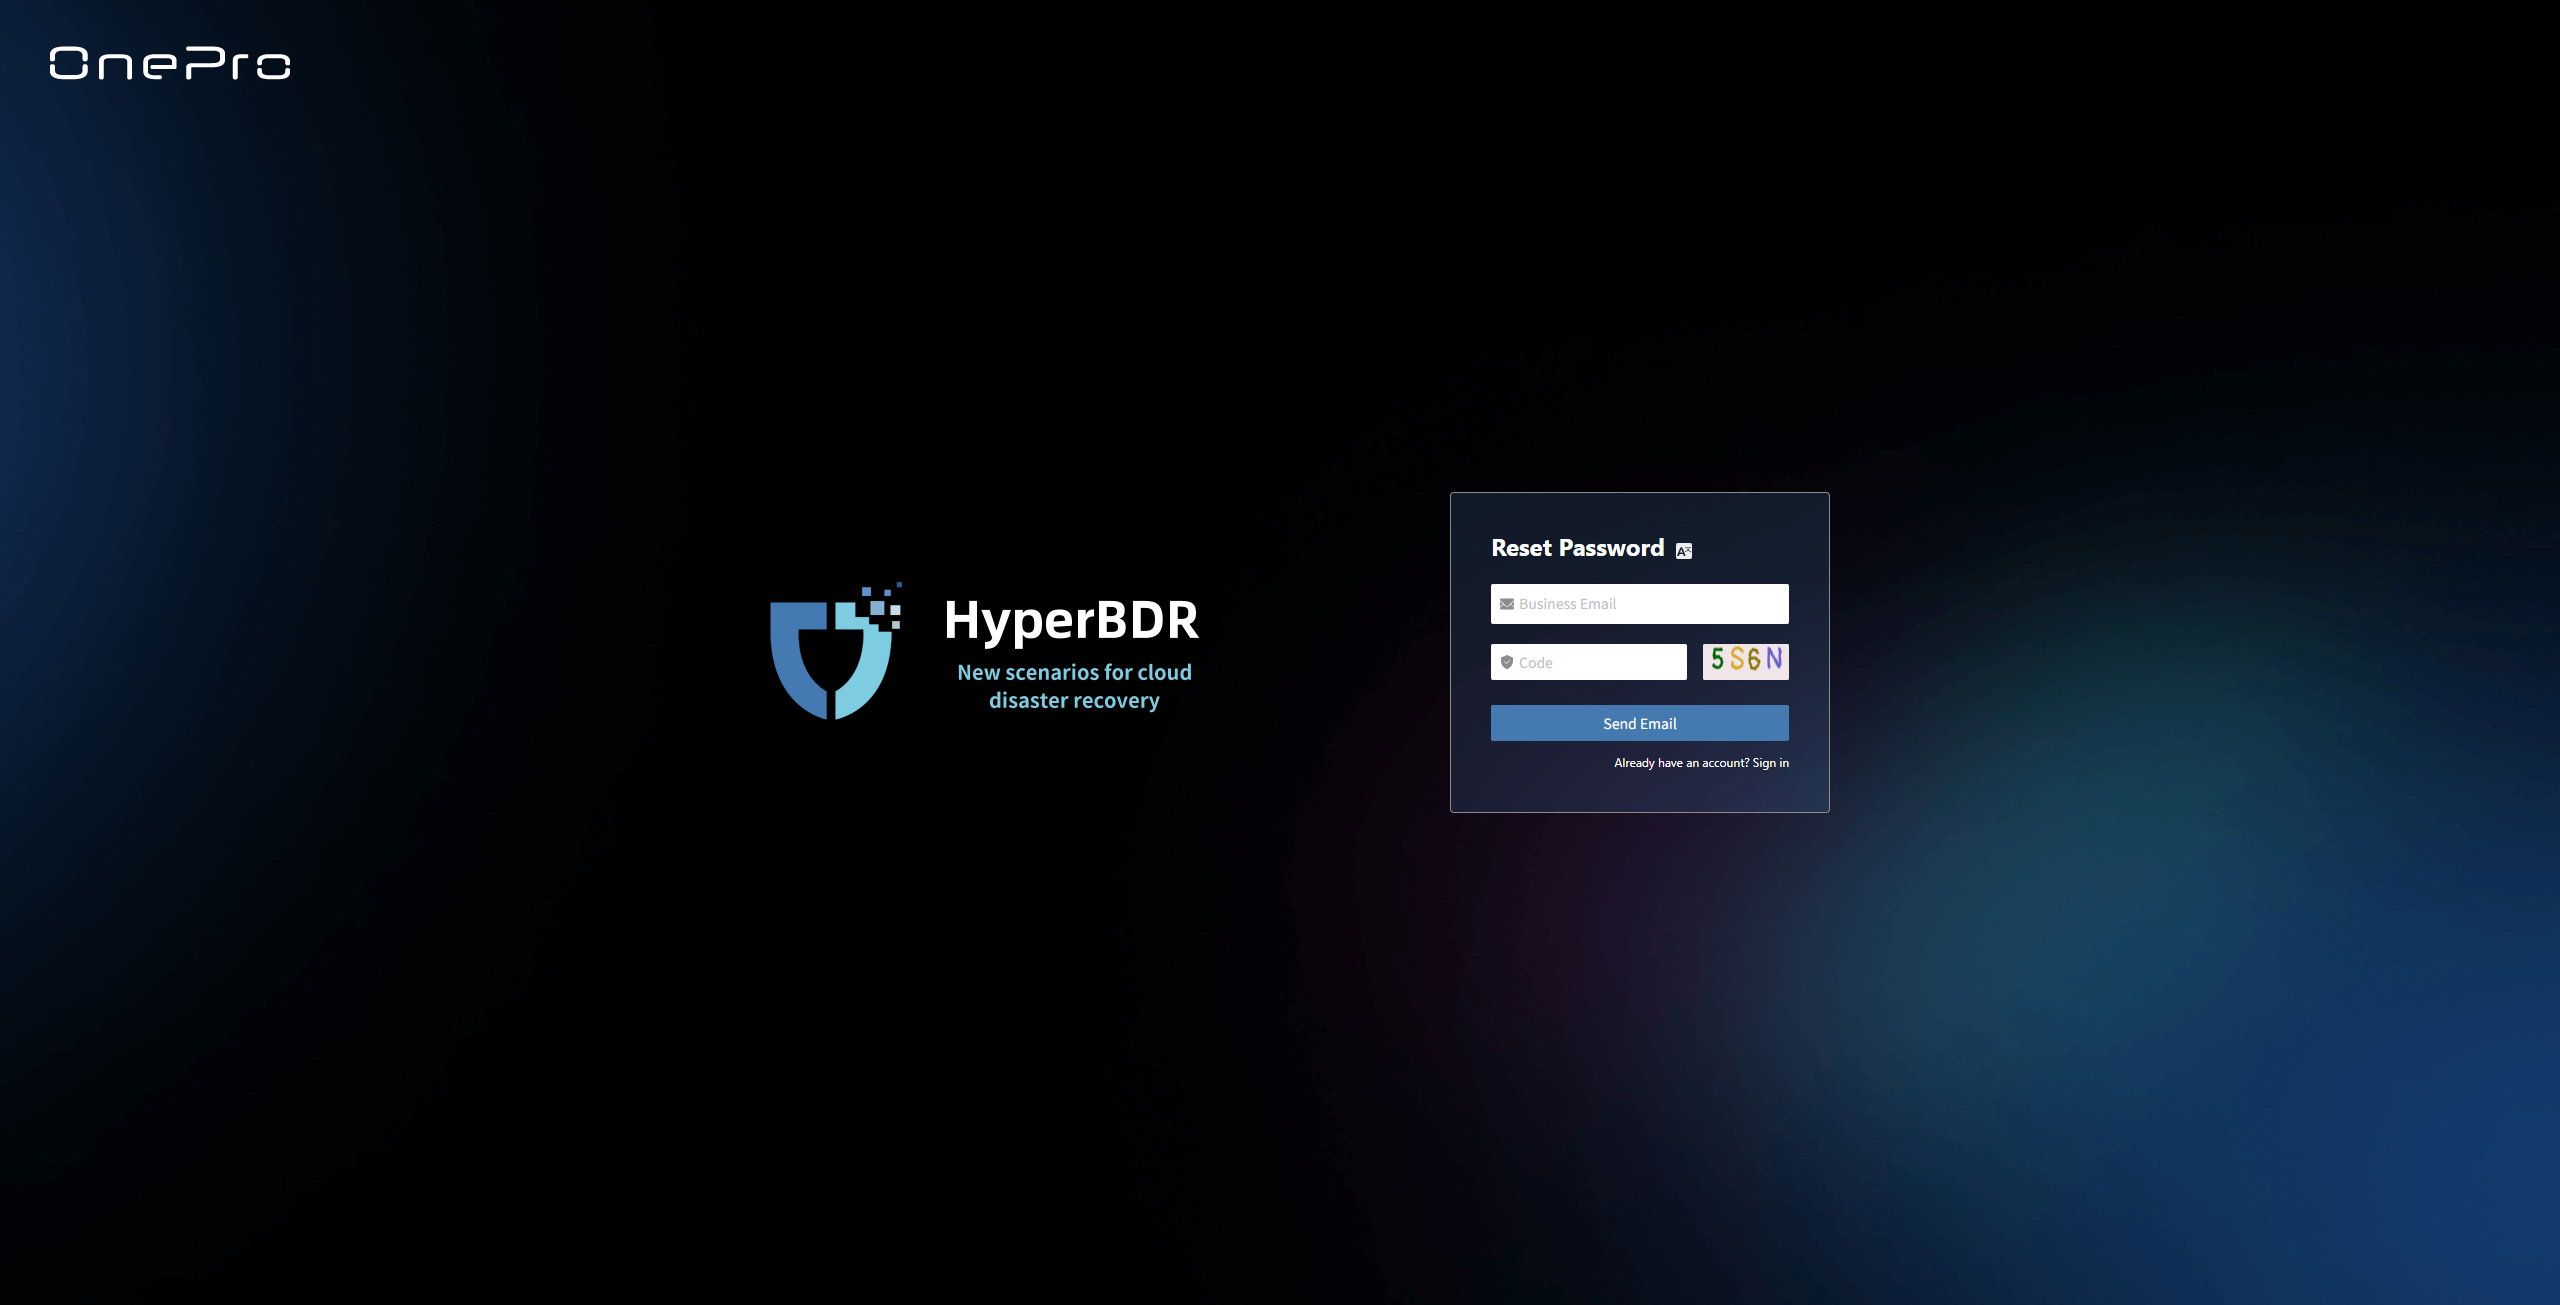
Submit Reset Request
After entering the required information, click "Send Email". The system will send a verification email.
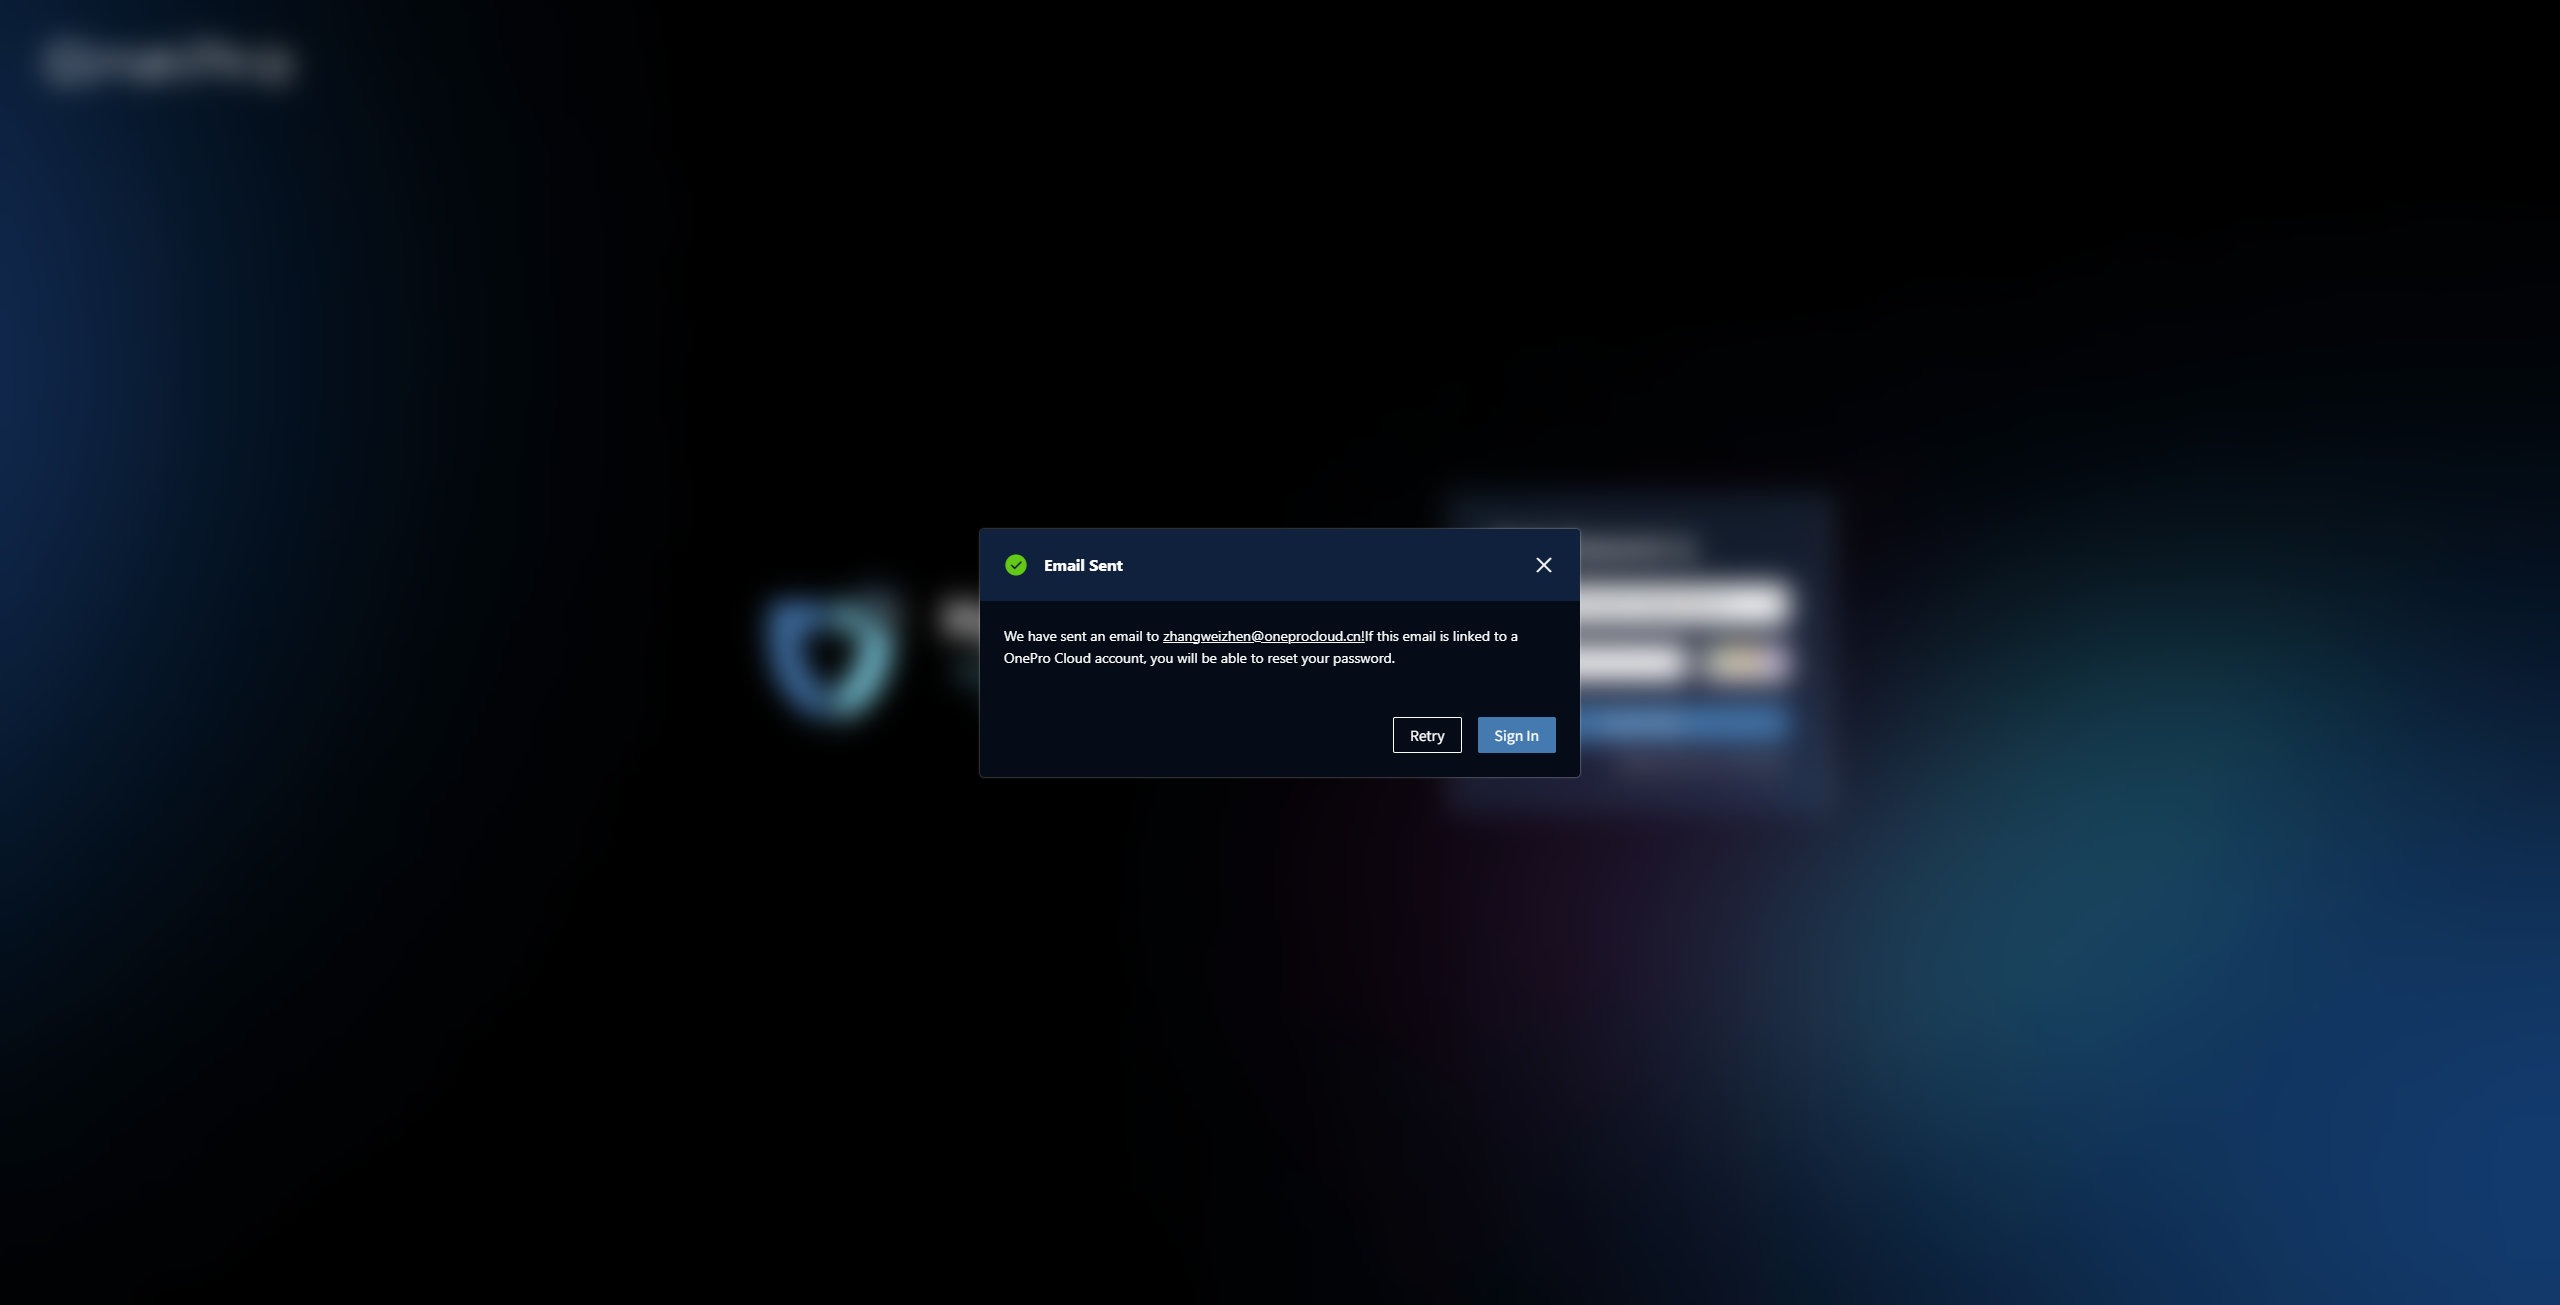
Reset Confirmation
Please check your registered email inbox, click "Reset Password" in the email to complete the verification. The system will redirect you to the "Reset Password" page.

Set Password
After setting the password, you can use it to log in and securely access the platform. Please go to the login page to sign in.
The password must meet the platform's complexity requirements. It is recommended to include uppercase and lowercase letters, numbers, and special characters. Please keep your password safe to ensure account security.

Login
Login
Login Entry
After the system is deployed, operations personnel can access the platform console via a web browser:
Console Address:
https://<IP>:10443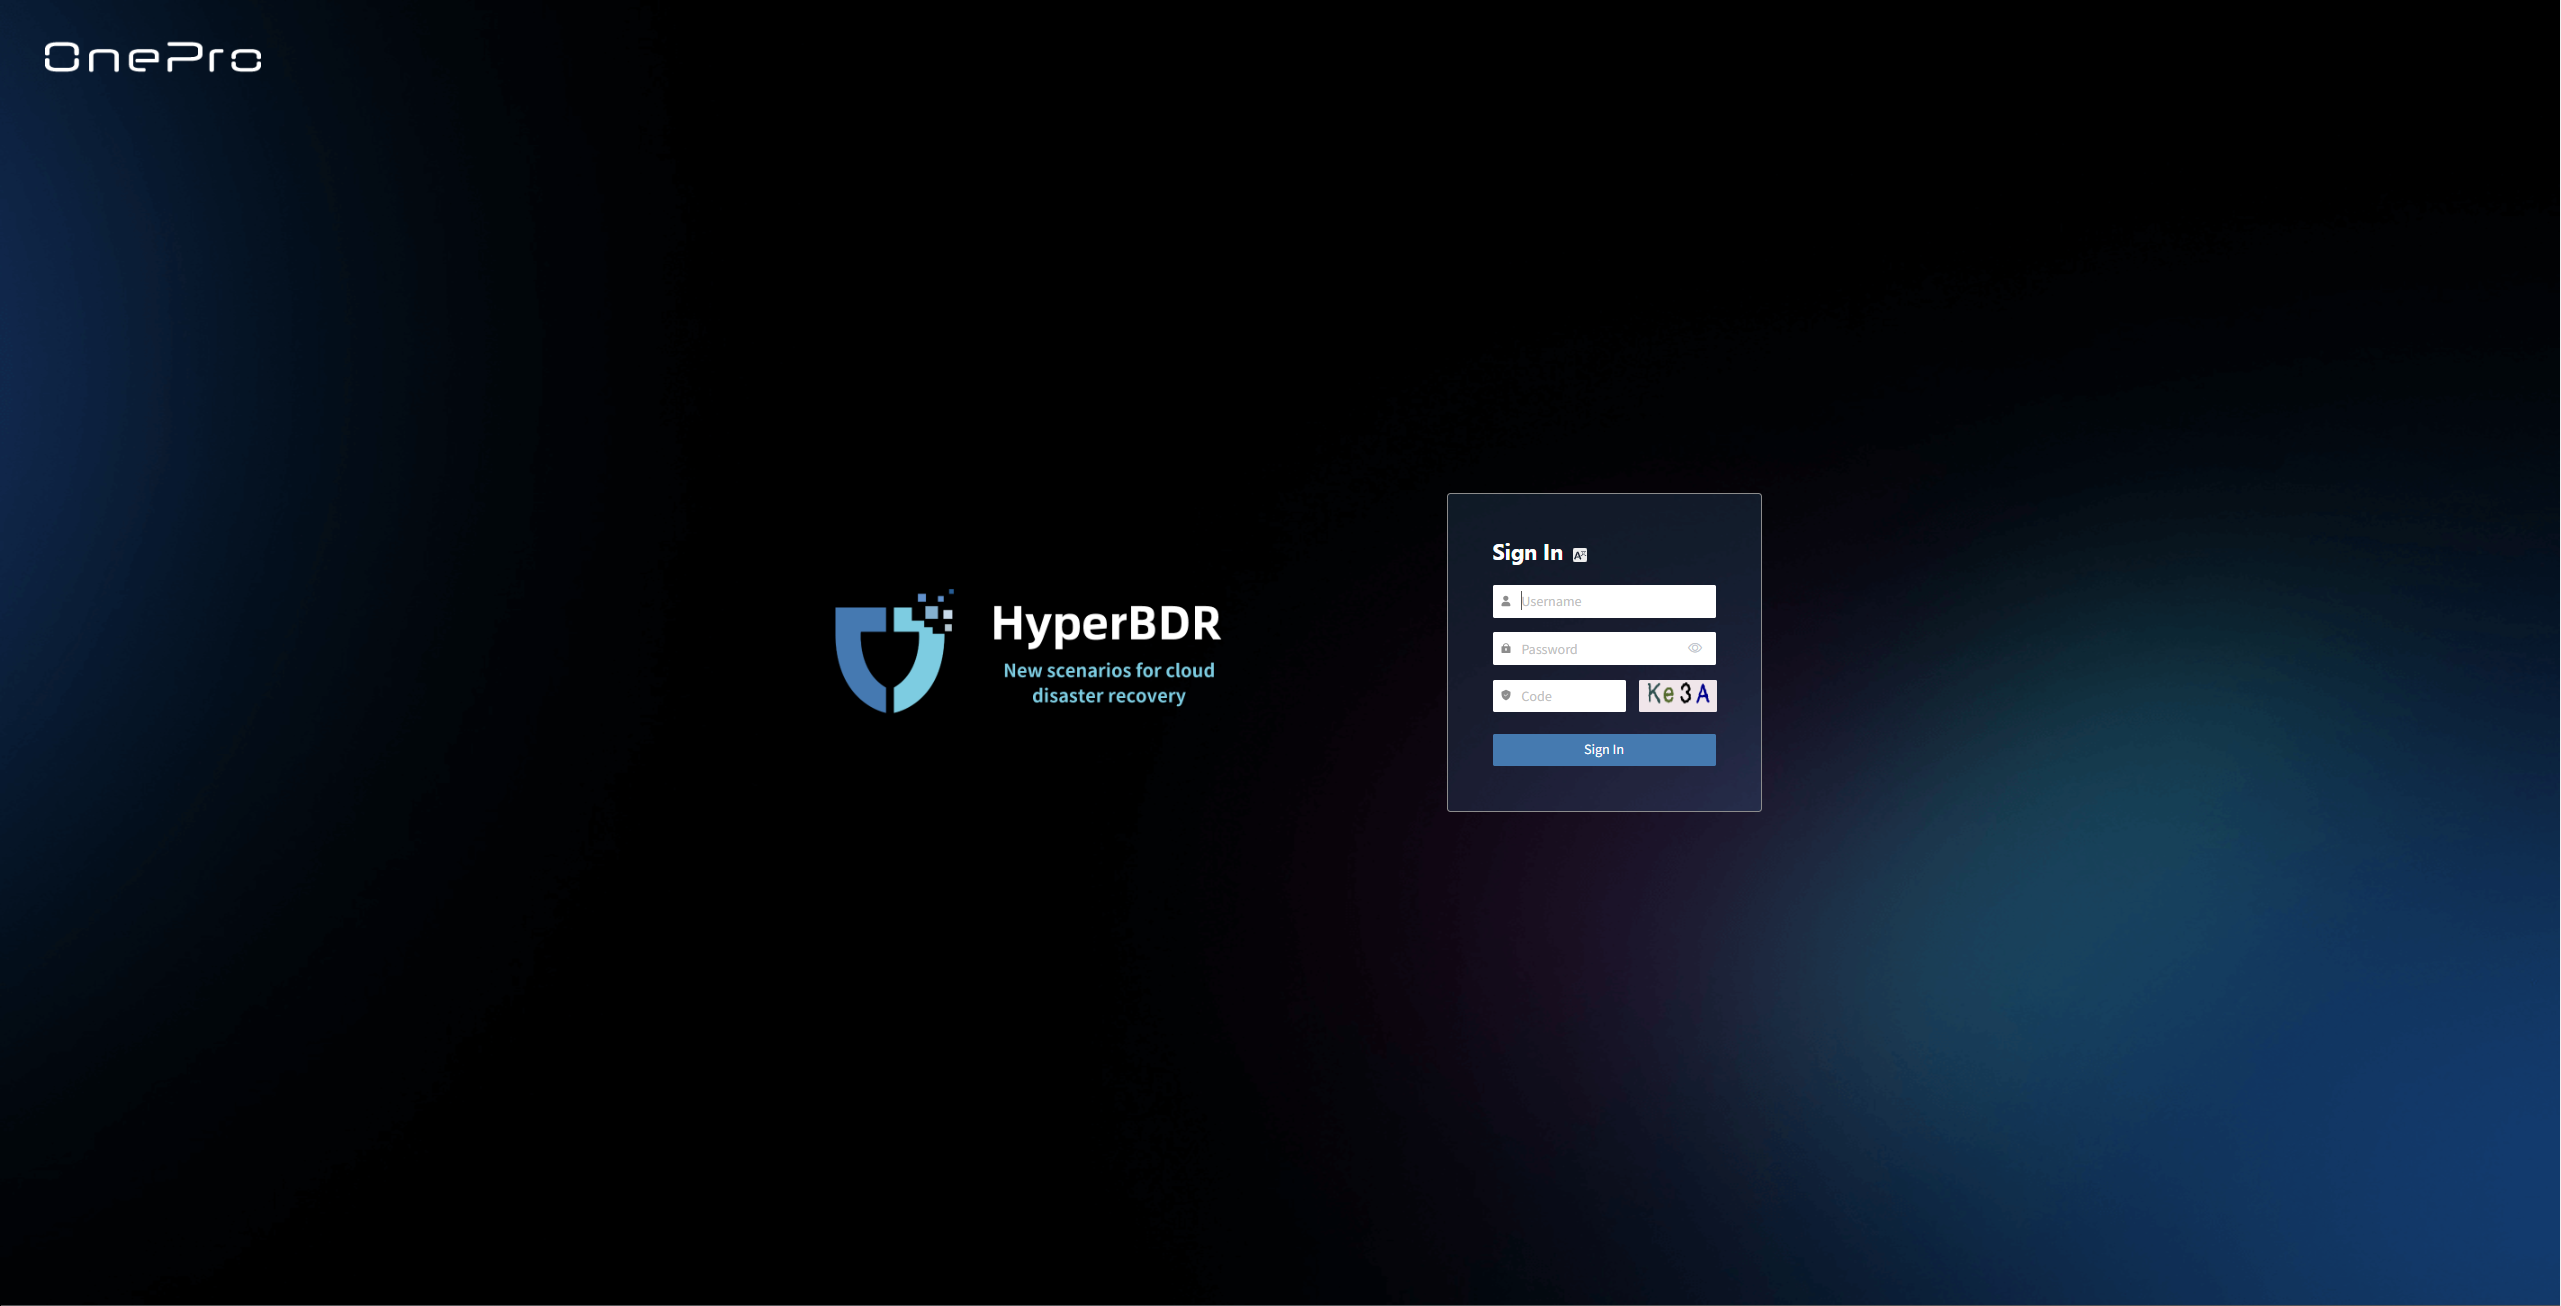
Operations Management Platform Address:
https://<IP>:30443
Enter the above address in the browser's address bar and press Enter to access the system and open the login page.
Login Information
On the login page, enter the assigned username and password to authenticate. The default administrator account credentials are:
- Username:
admin - Initial Password:
P@ssw0rd
⚠️ Security Notice: To ensure account security, please change the default password immediately after your first login.
Dashboard
Dashboard Overview
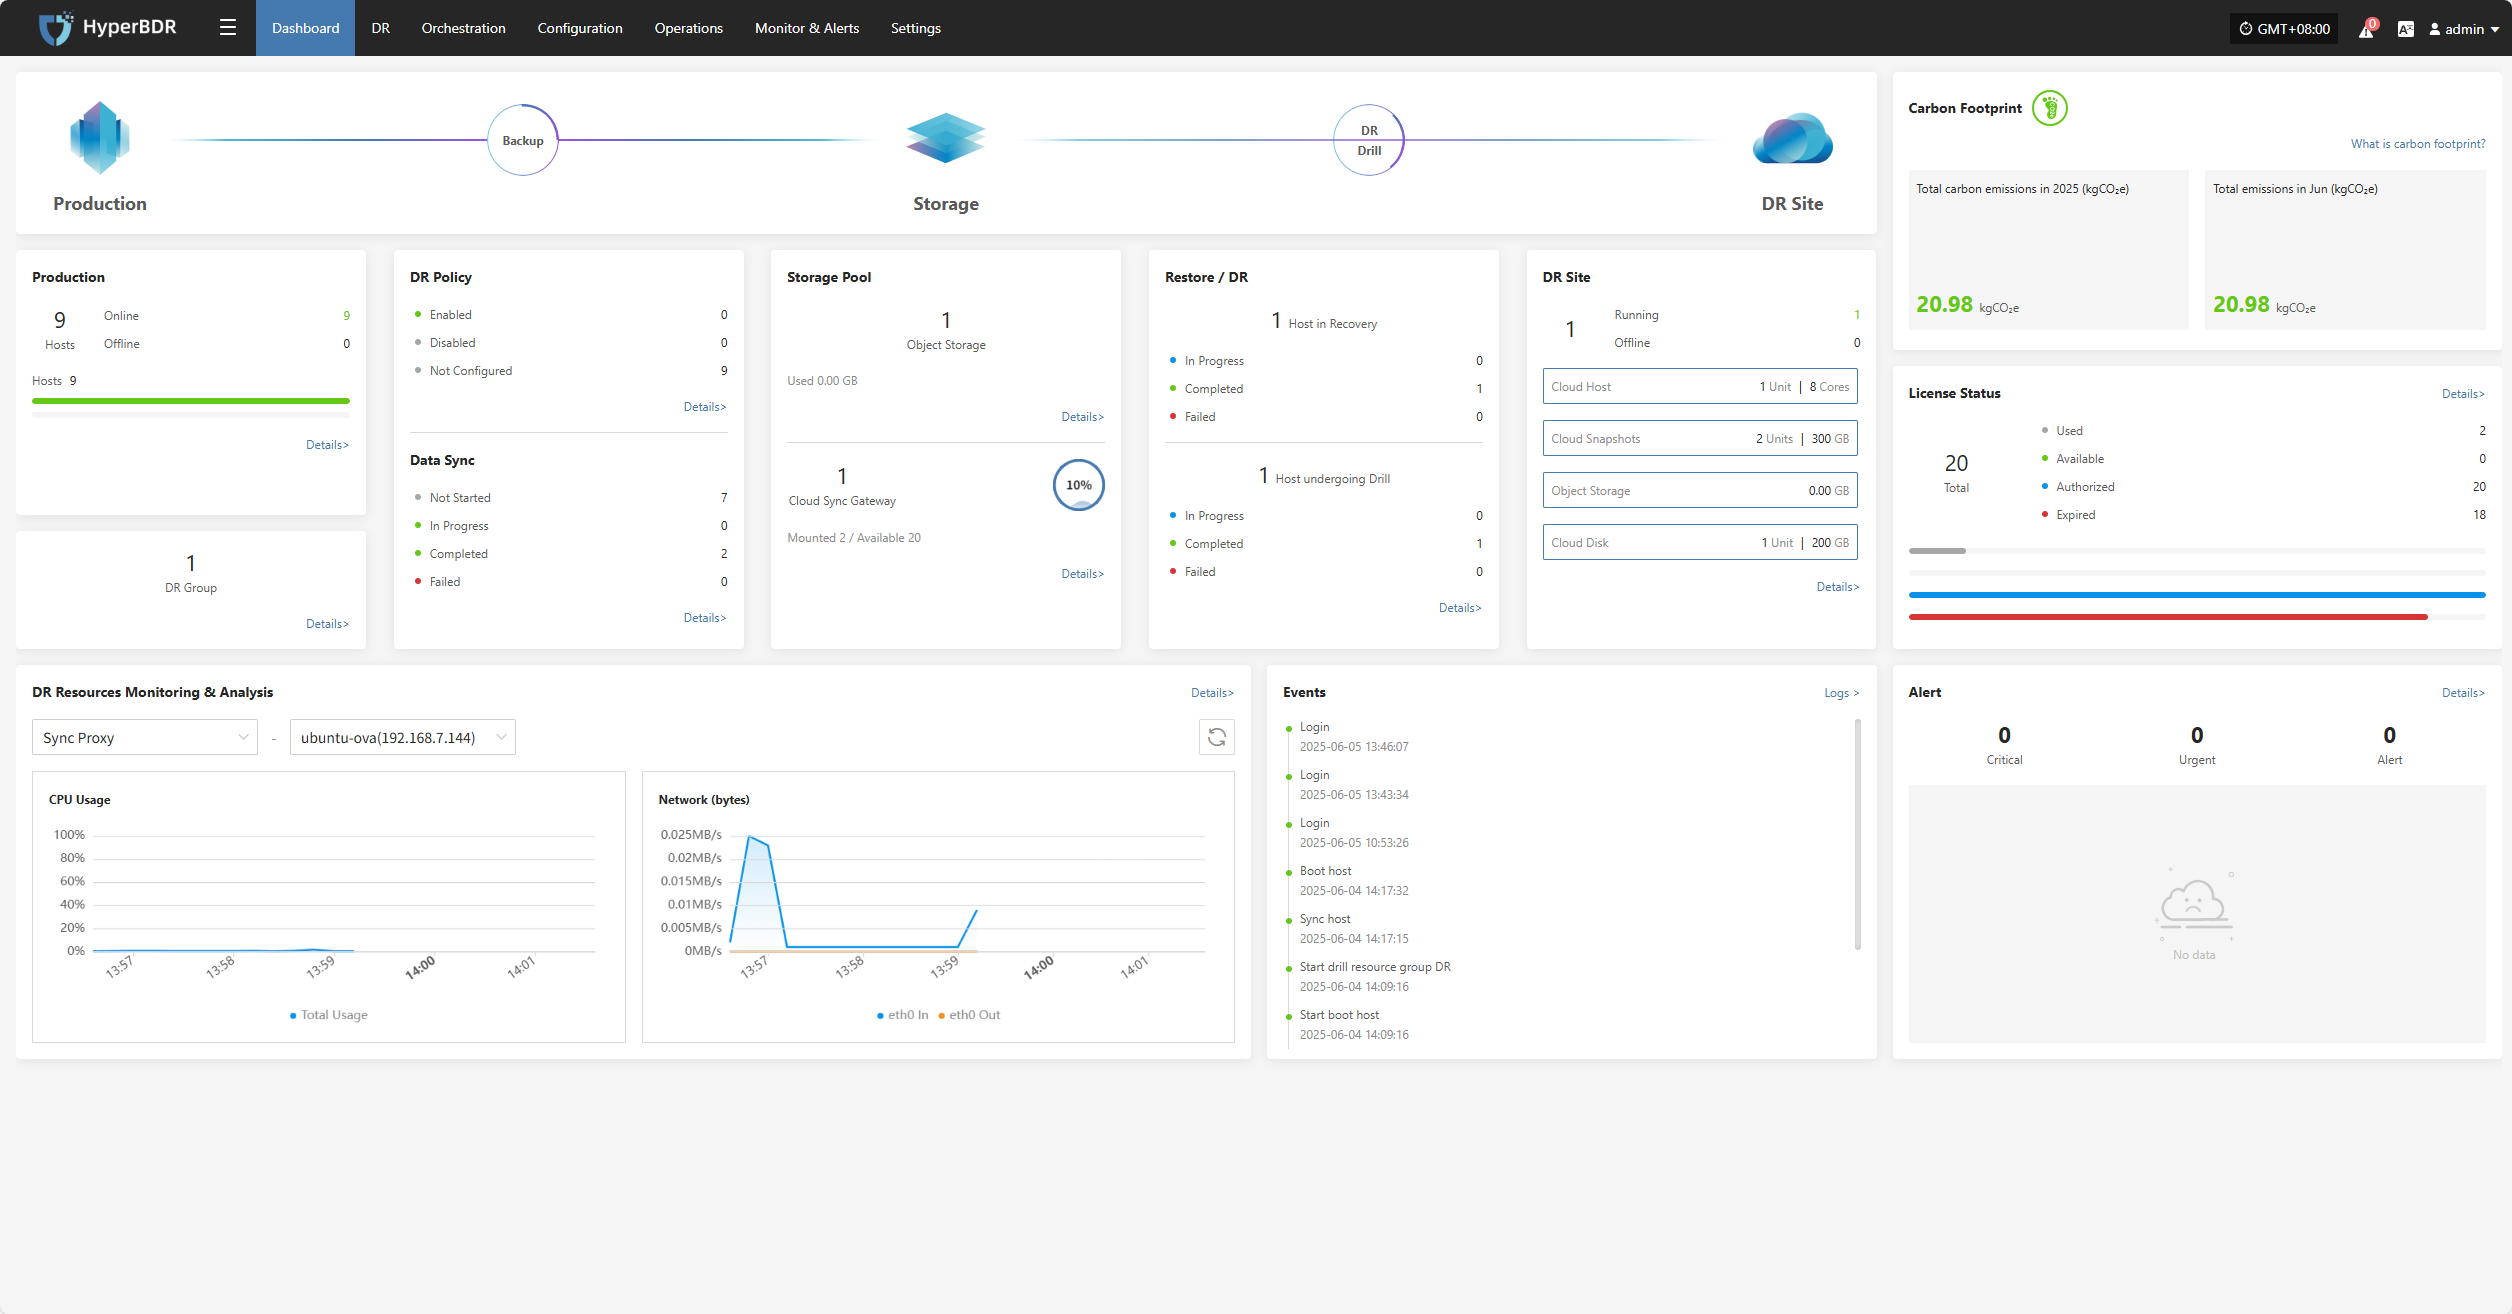
The dashboard provides an overview of the production platform, data storage, and disaster recovery (DR) platform in the current environment. It helps users quickly understand the status of system resources, sync progress, task results, alert events, and other key information, supporting unified monitoring and decision-making for administrators.
Page Structure and Function Description
This section helps users quickly understand the purpose and navigation of each module. By explaining each area of the page, users can fully grasp the system's entry points and core resource status, providing guidance for further operations and management.
Top Navigation Bar
The top navigation bar provides quick access to the main system modules, including: Dashboard, DR, Orchestration, Configuration, Operations, Monitor & Alerts, Settings.
The upper right area displays the current logged-in user, system time (with time zone), and language settings for easy viewing and personalization.
Core System Structure Overview
Shows the three core components of the system architecture: Production → Storage → DR Site
Section Descriptions
The dashboard displays the current status and operational data of various resources, including production platform, DR policies, sync progress, storage configuration, resource recovery drills, and alert events. Each section supports navigation to the corresponding module page for more details and actions.
Production
Displays an overview of production resources connected to the system, including the total number of hosts and their running status, helping users quickly understand the overall load of the production environment.
Click the Details button in the lower right to go to the DR resources page for detailed host information and DR configuration status.
DR Group
Shows the number of DR groups configured in the system, helping users understand the DR configuration status of resource groups.
Click the Details button in the lower right to go to the DR group page for detailed configuration and DR status of each group.
DR Policy
Displays the DR policy configuration status for production hosts, helping users quickly identify how many hosts are protected by DR.
Click the Details button in the lower right to go to the "Start DR" page, where you can select target hosts and associate policies.
Data Sync
Shows the overall progress of data synchronization from source hosts, which is an important indicator of DR readiness.
Click the Details button in the lower right to go to the "Start DR" page, where you can select hosts and perform immediate sync operations.
Storage Pool
Object Storage
Displays the number of configured object storage pools and their capacity usage, helping users understand overall storage resource usage.
Click the Details button in the lower right to go to the storage configuration page for object storage management.
Cloud Sync Gateway
Click the Details button in the lower right to go to the storage configuration page for block storage management.
Restore / DR
The "Restore / Drill" area shows the recovery status of DR resources on the platform, helping users quickly understand resource protection and drill status.
Restore
Shows the number of resources under "Restore" management, as well as the number of resources in restoring, restored, and failed states.
DR
Shows the number of resources under "Drill" management, as well as the number of resources in drilling, drill success, and drill failure states.
Click the Details button in the lower right to go to the "Start DR" page for drill and takeover operations on hosts.

DR Site
Displays the number of successfully and unsuccessfully connected DR sites, as well as detailed configuration information.
Click the Details button to go to the "Start DR" page for related operations.
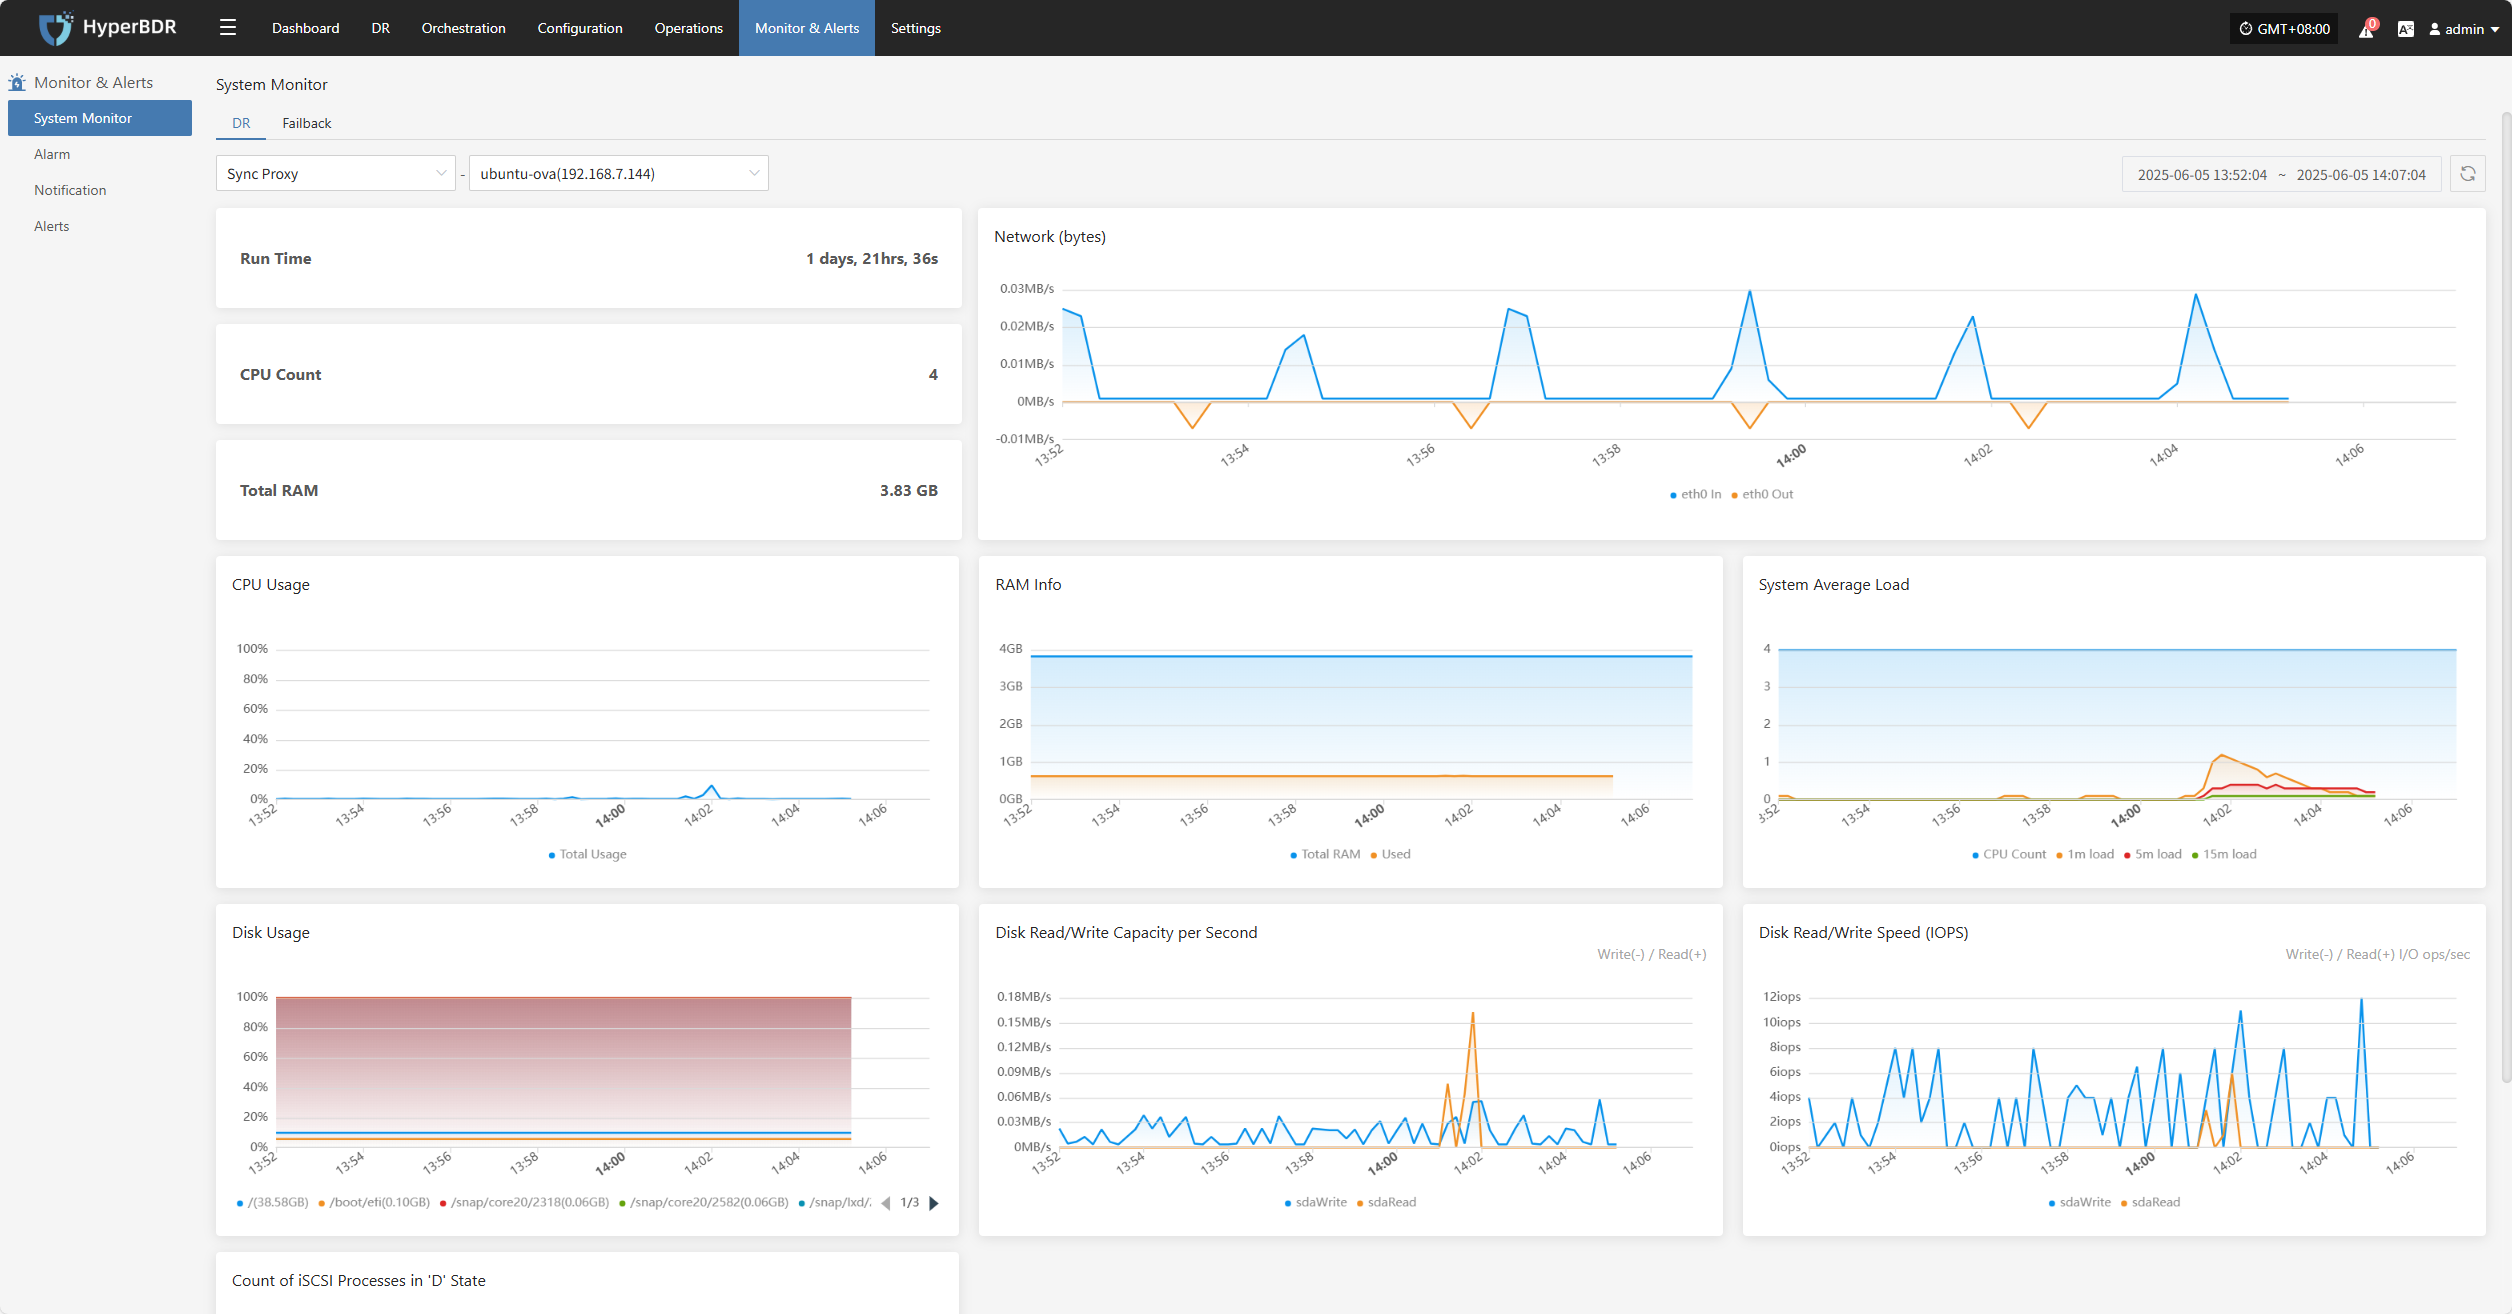
DR Resources Monitoring & Analysis
This module provides real-time statistics and visualizations of the overall health, configuration, and usage of key DR resources, helping users quickly understand the stability of the DR system.
Users can select different monitoring resources from the dropdown list. Supported resource types and monitoring metrics include:
| Resource Type | Monitoring Metrics |
|---|---|
| Sync Proxy | CPU Usage, Network (bytes) |
| Cloud Sync Gateway | CPU Usage, Network (bytes) |
| Linux Agent | CPU Usage, Network (bytes) |
| Windows Agent | CPU Usage, Network (bytes) |
Click the Details button in the upper right to go to the system monitoring page for more information.
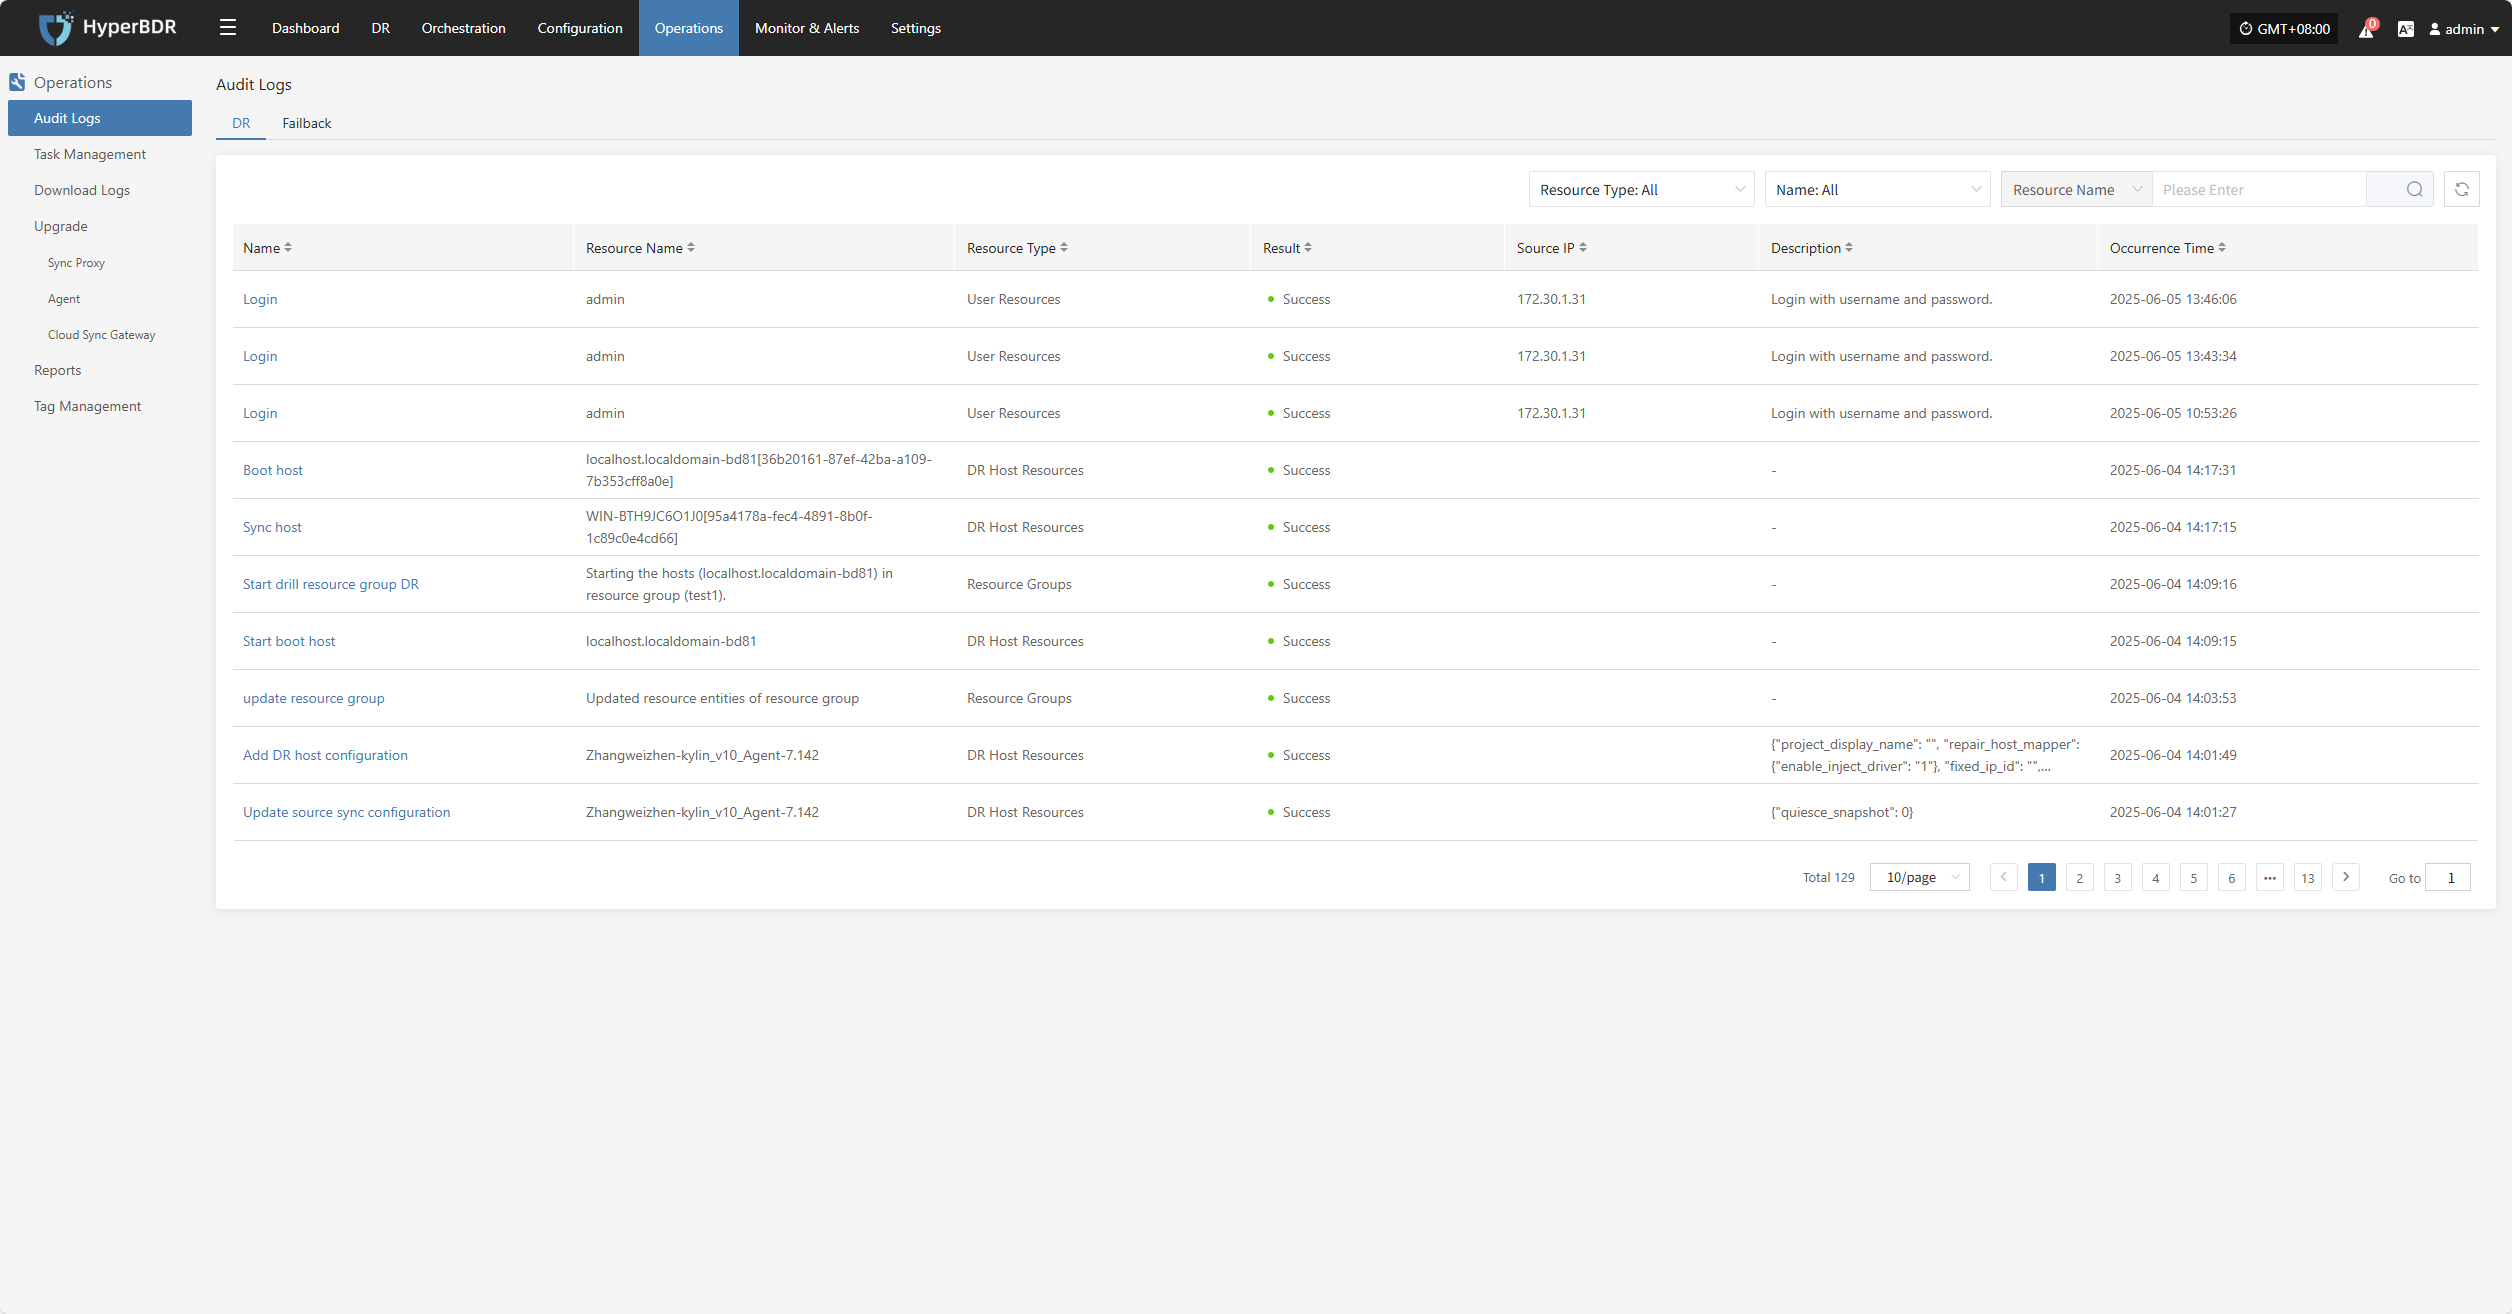
Events
This module displays key dynamic information related to the user, helping users quickly understand system status and task progress through real-time event aggregation and classification.
Click the Operation Log button in the upper right to go to the audit log page for detailed event logs.
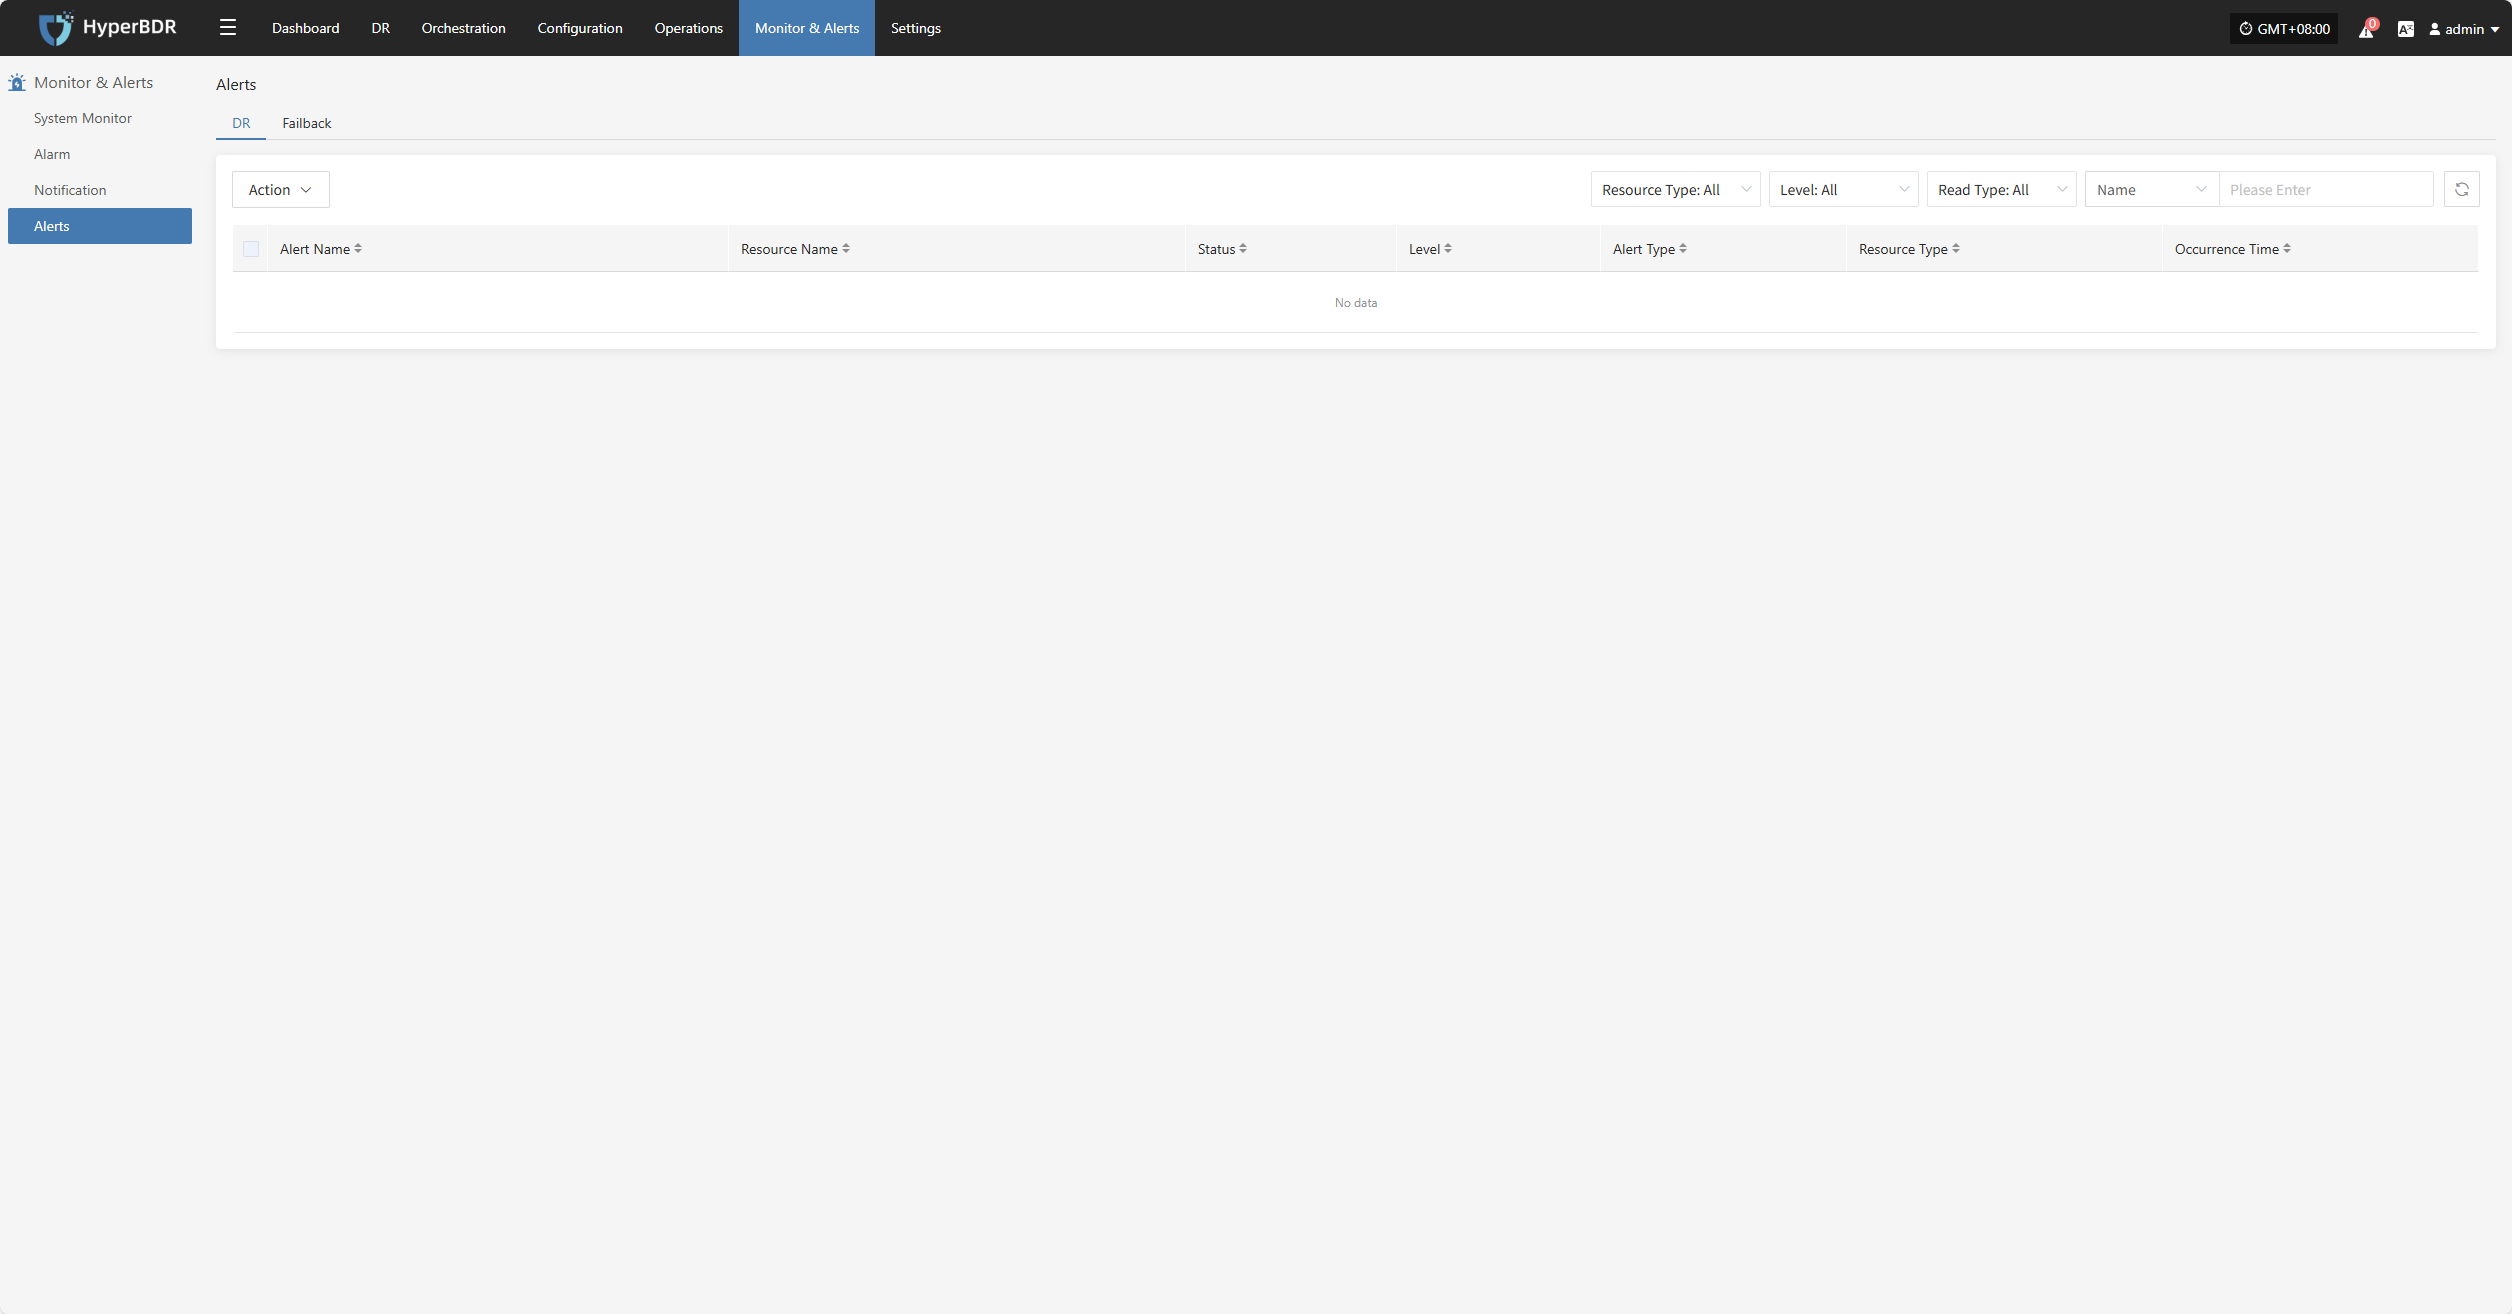
Alert
Displays alert messages triggered by the alarm system, helping users stay informed of system exceptions.
Click the Details button in the upper right to go to the alert messages page for more information.
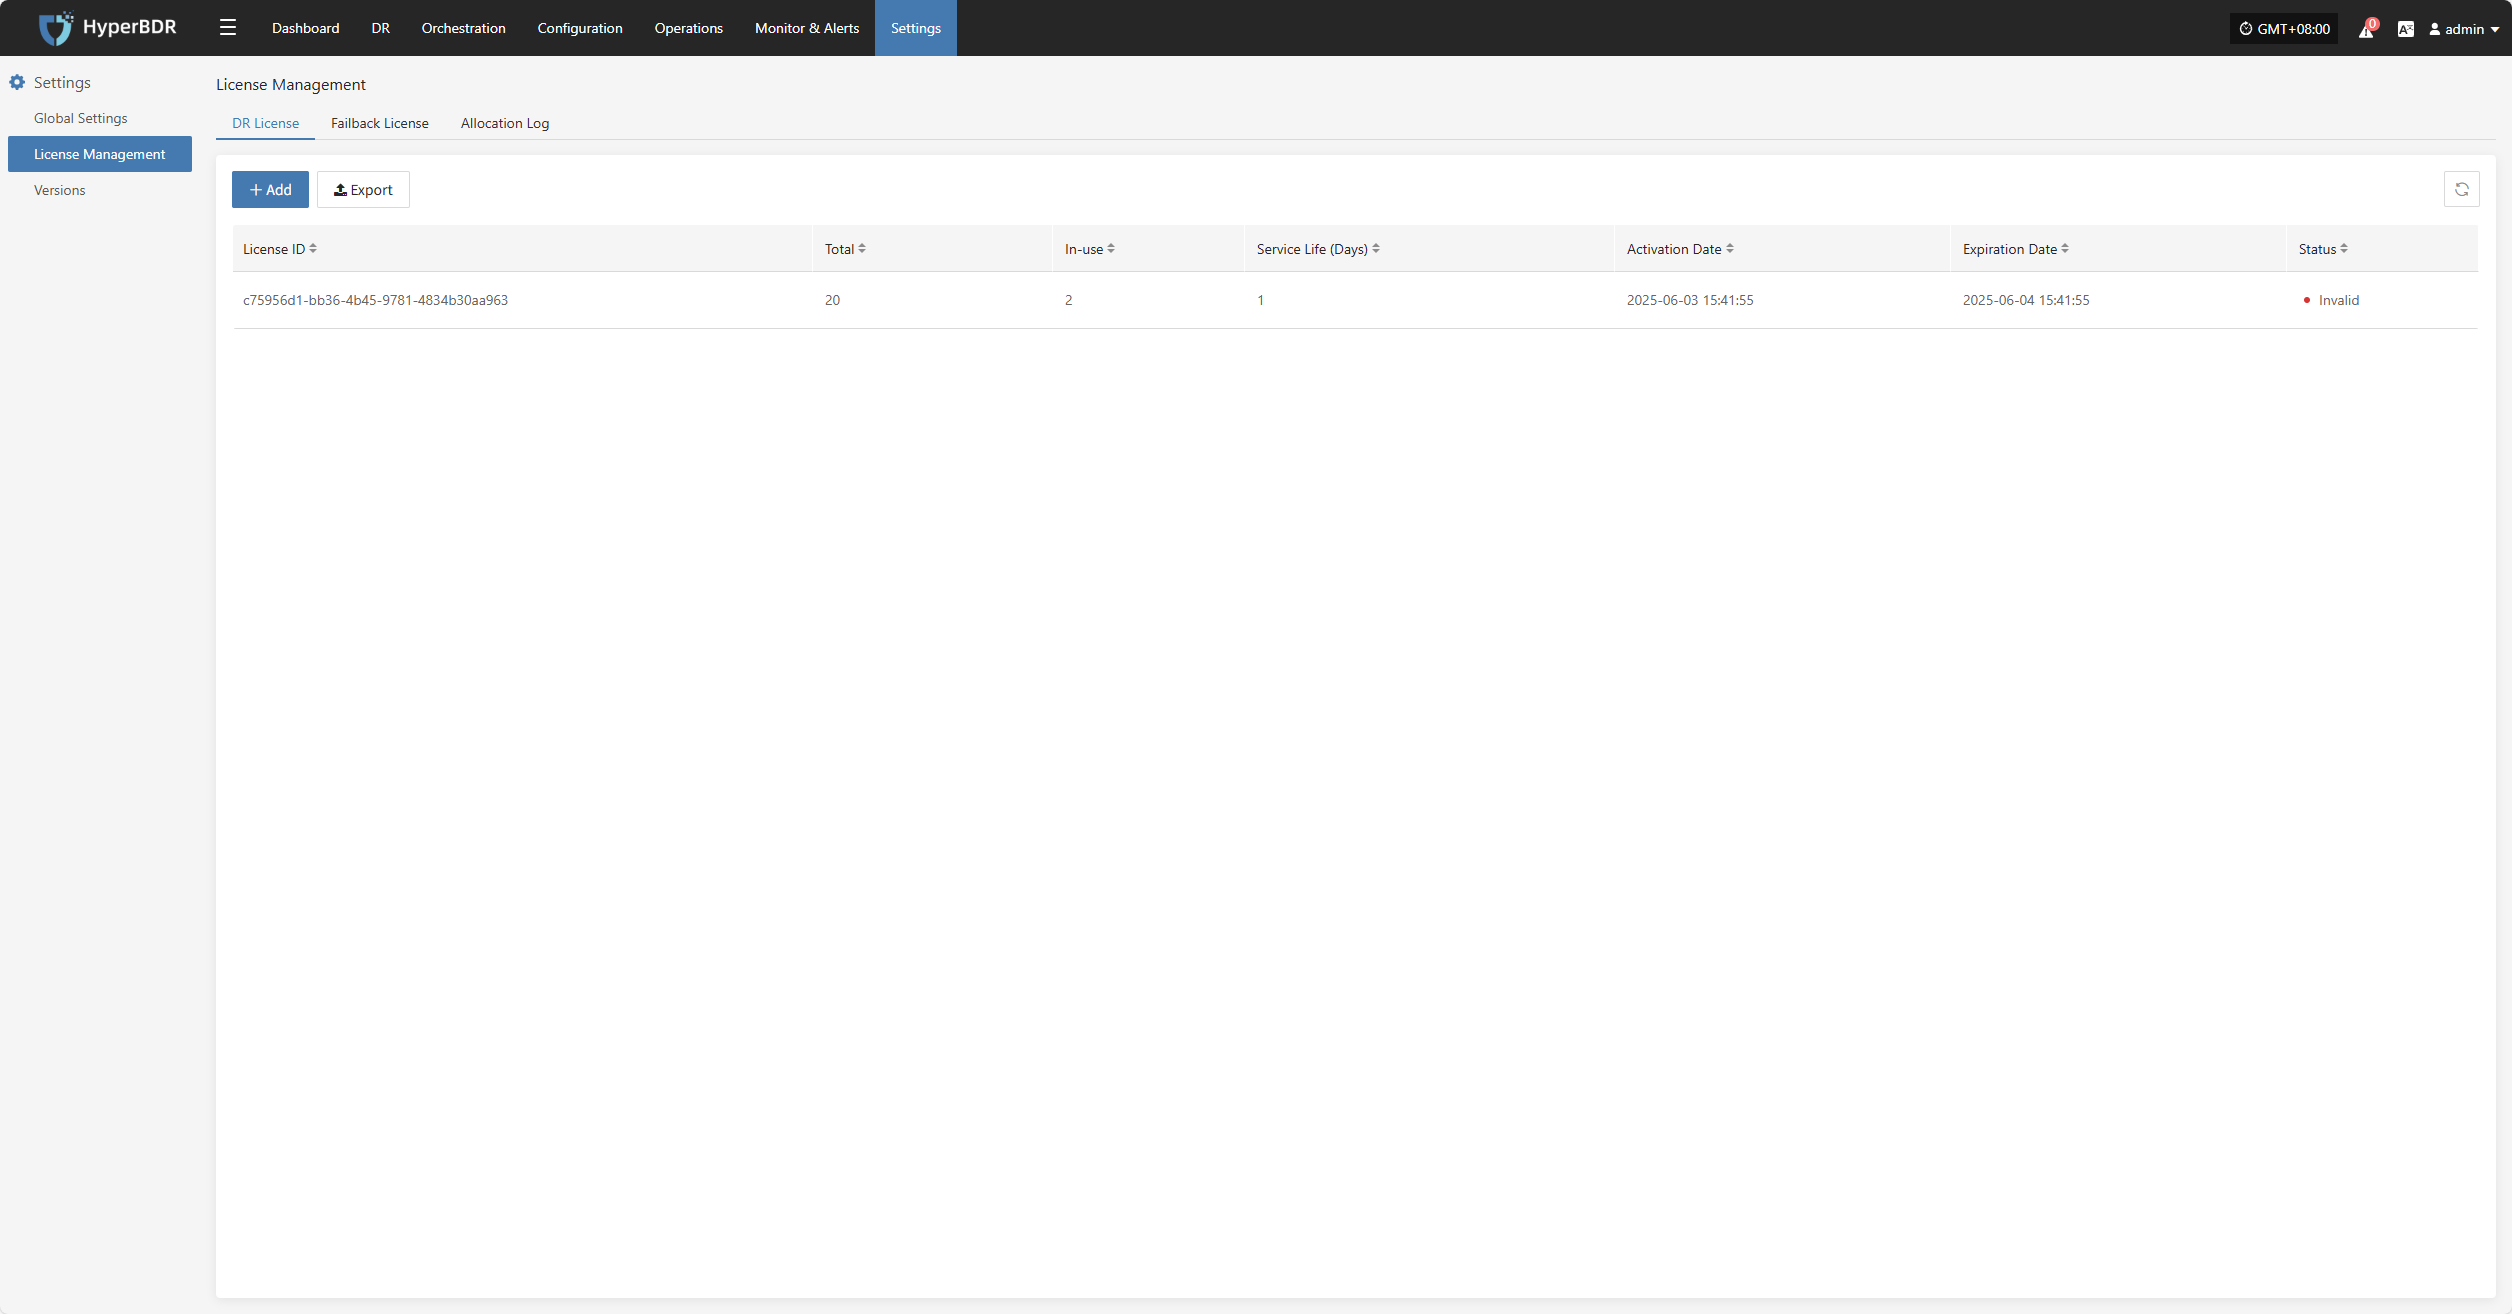
License Status
Shows the number, usage status, and validity of activation codes, helping administrators efficiently manage license resources.
Click the Details button in the upper right to go to the license management page for more information and to add or export licenses.
Carbon Footprint
User's carbon emission data is calculated based on the usage of cloud resources. When calculating the carbon emissions data for cloud products, factors such as Power Usage Effectiveness (PUE) of different cloud data centers in different countries or regions, resource sales, the proportion of renewable energy usage, and technological carbon reduction measures are taken into account. Therefore, the calculated carbon emissions data may vary for different regions or within different months, which is considered normal.
The cloud product carbon footprint covers various cloud products, including computing, storage, networking, databases, CDN, etc. During the calculation process, only the resources generated in actual business scenarios are taken into account.
Profile
Our system provides comprehensive account management features, allowing you to easily view, update, and manage your account details while ensuring security.
Account
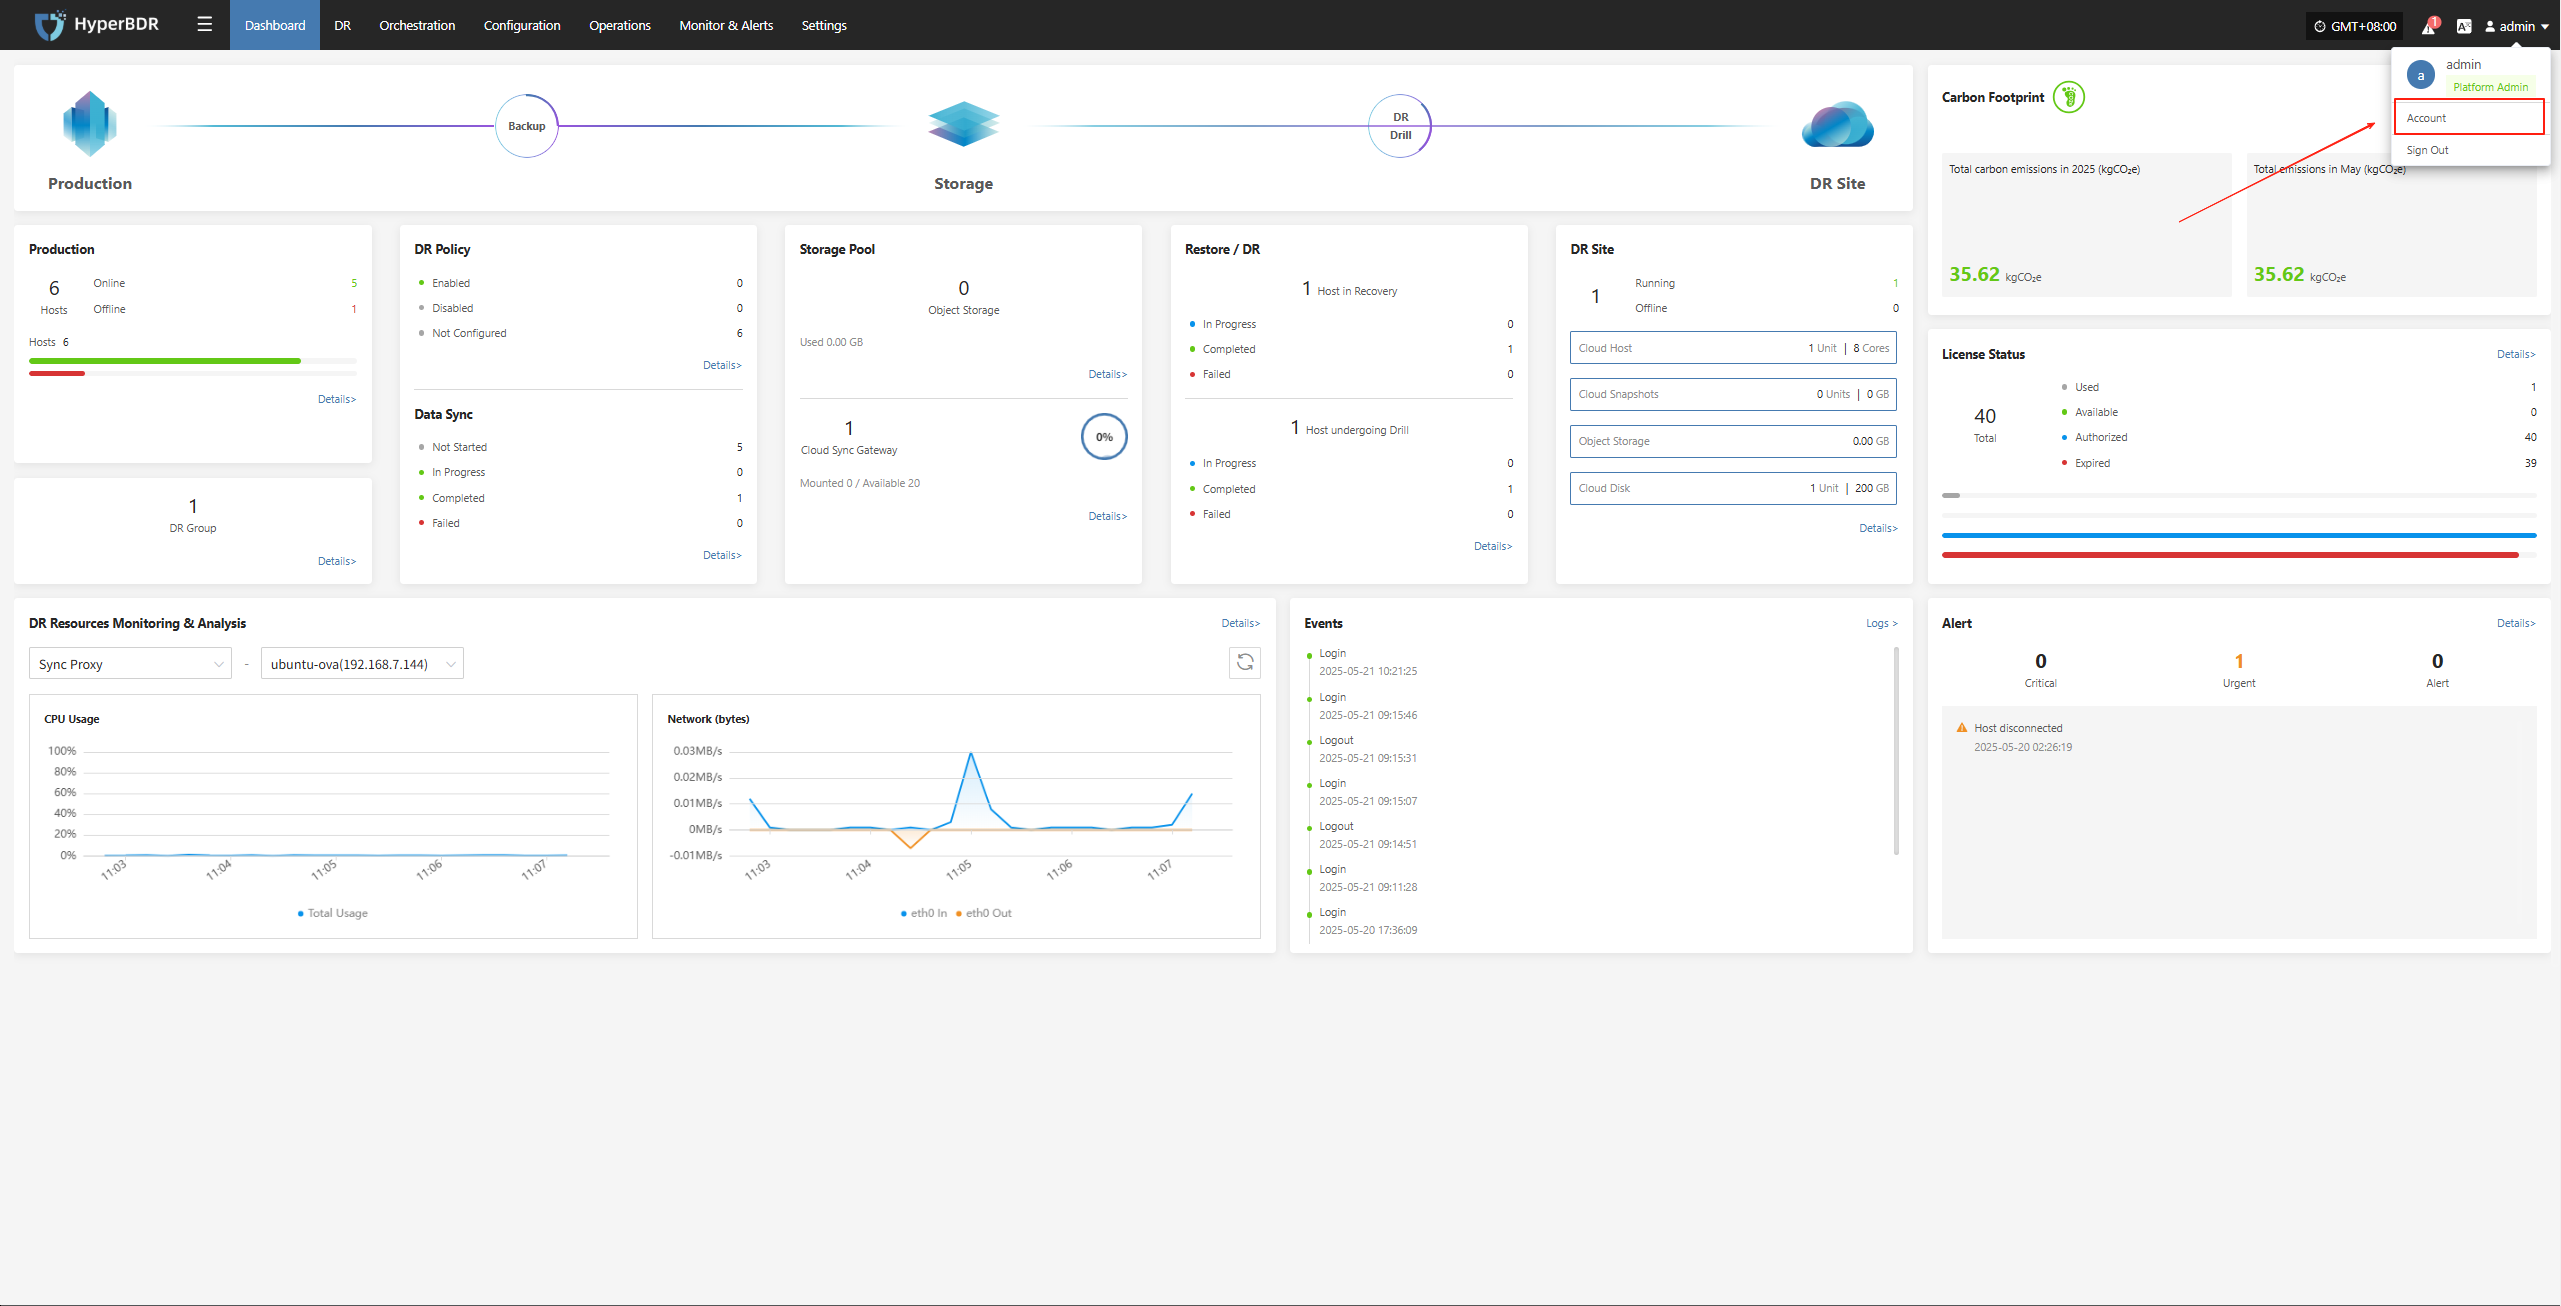
After logging in, click your username at the top right corner and select "Account" from the dropdown menu to view your account details.
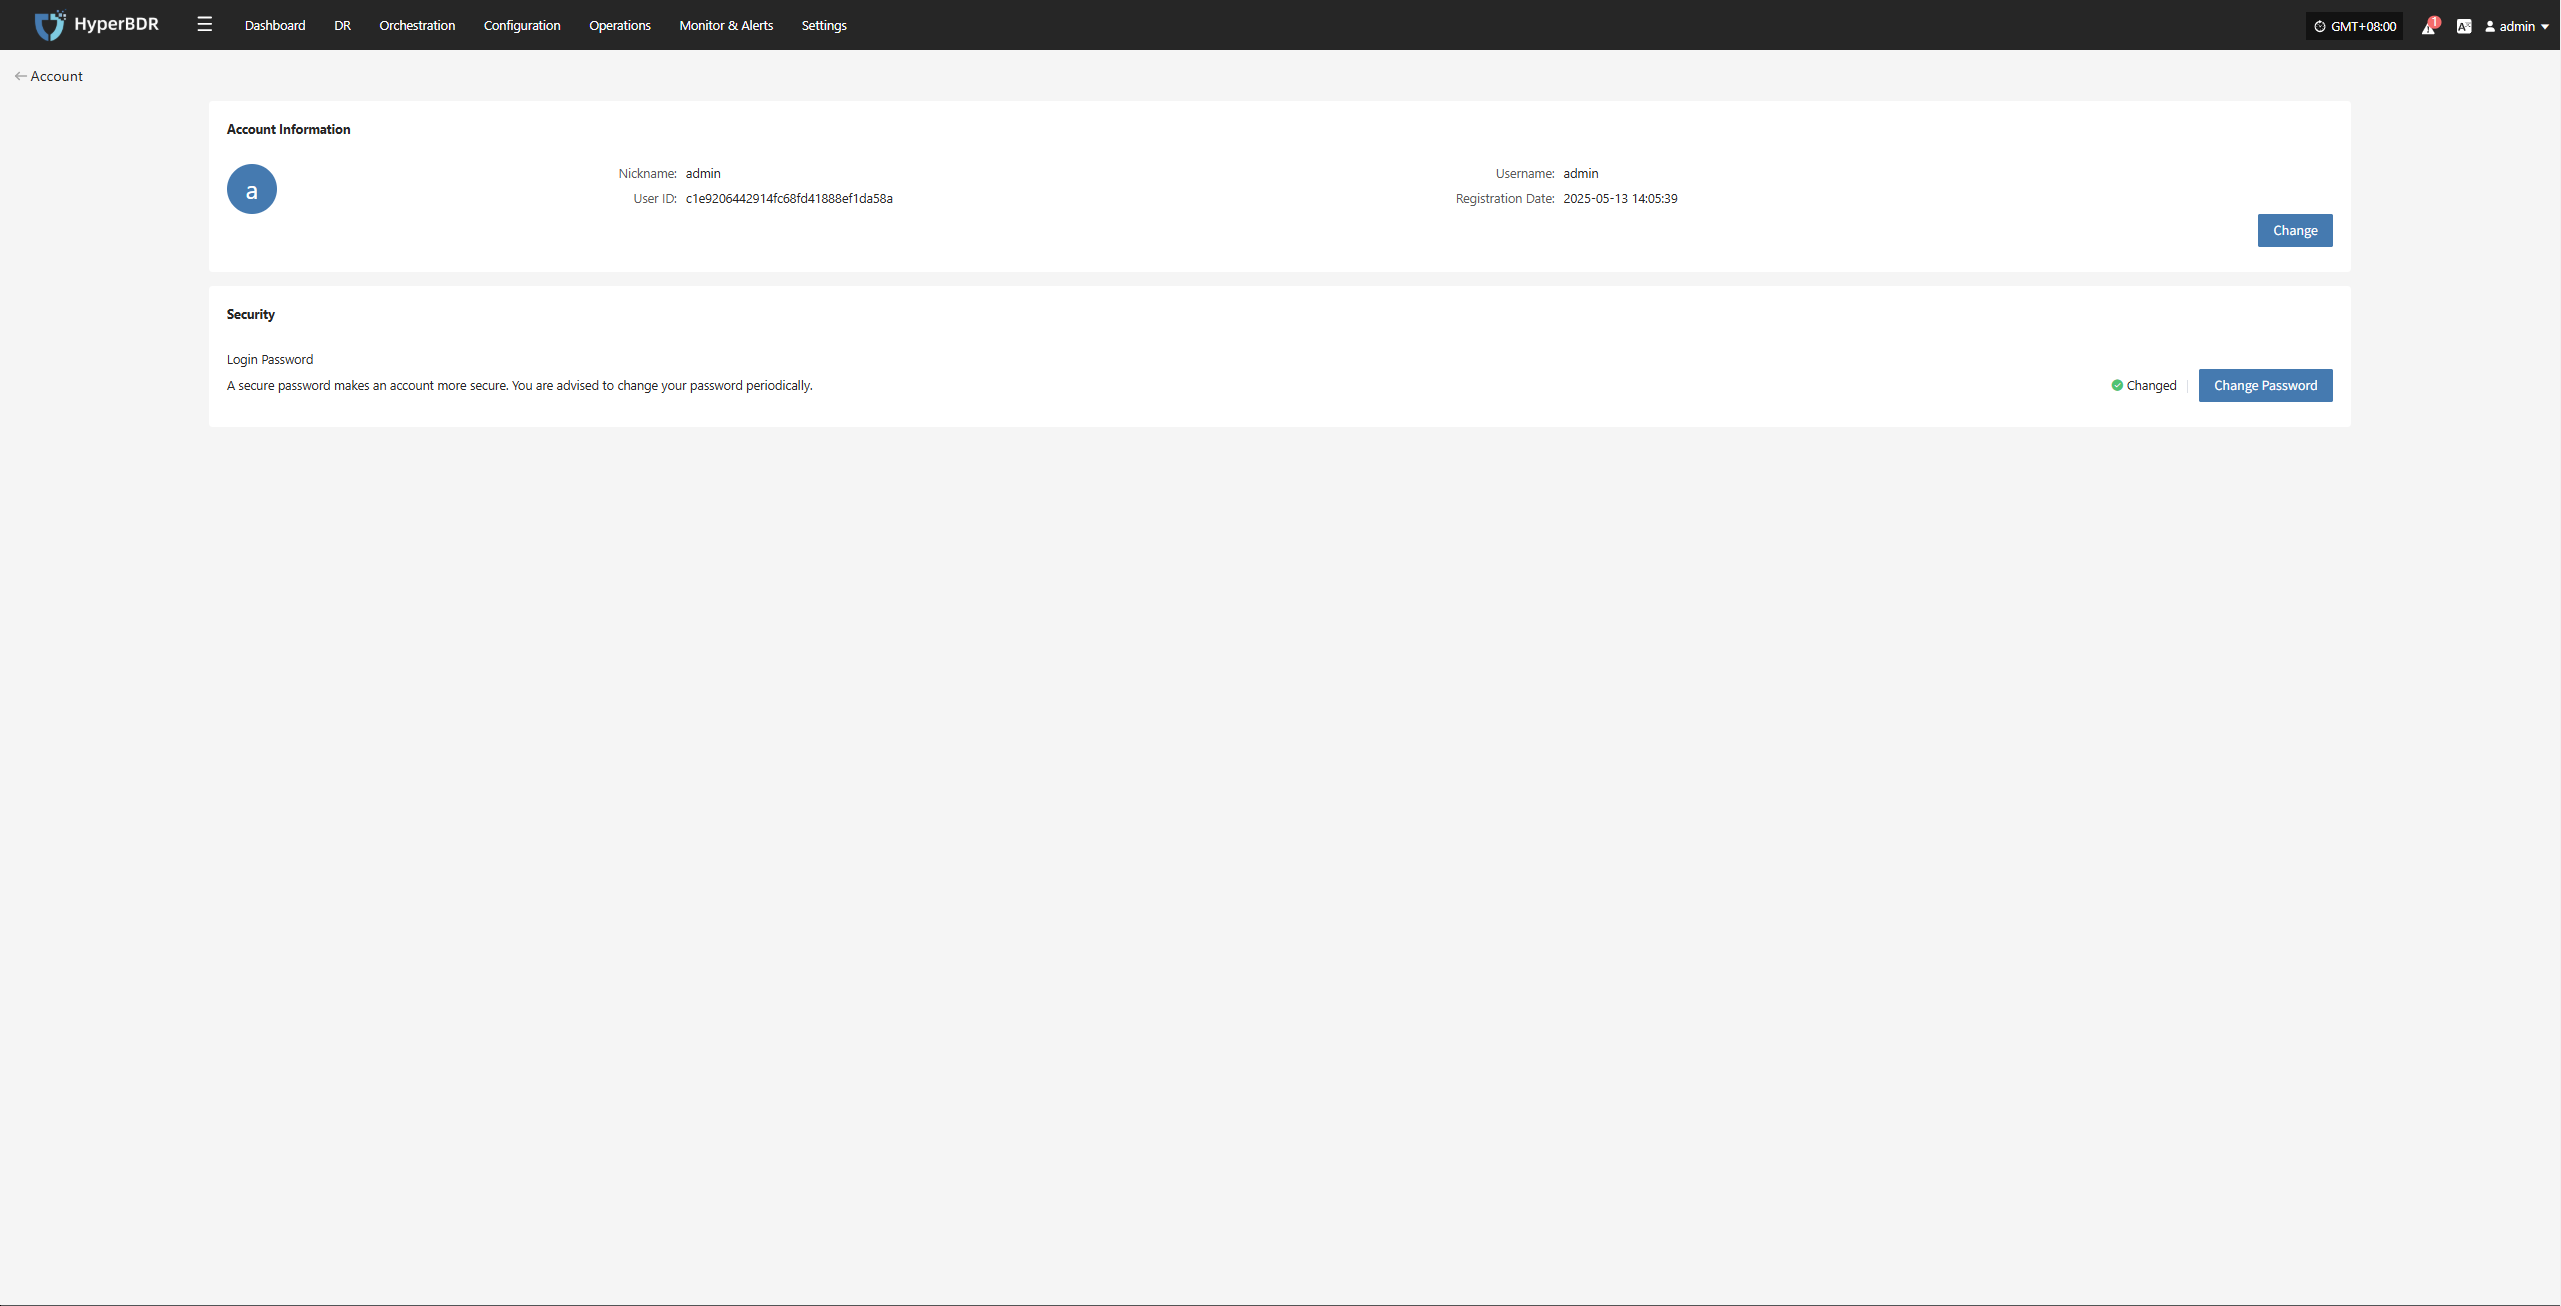
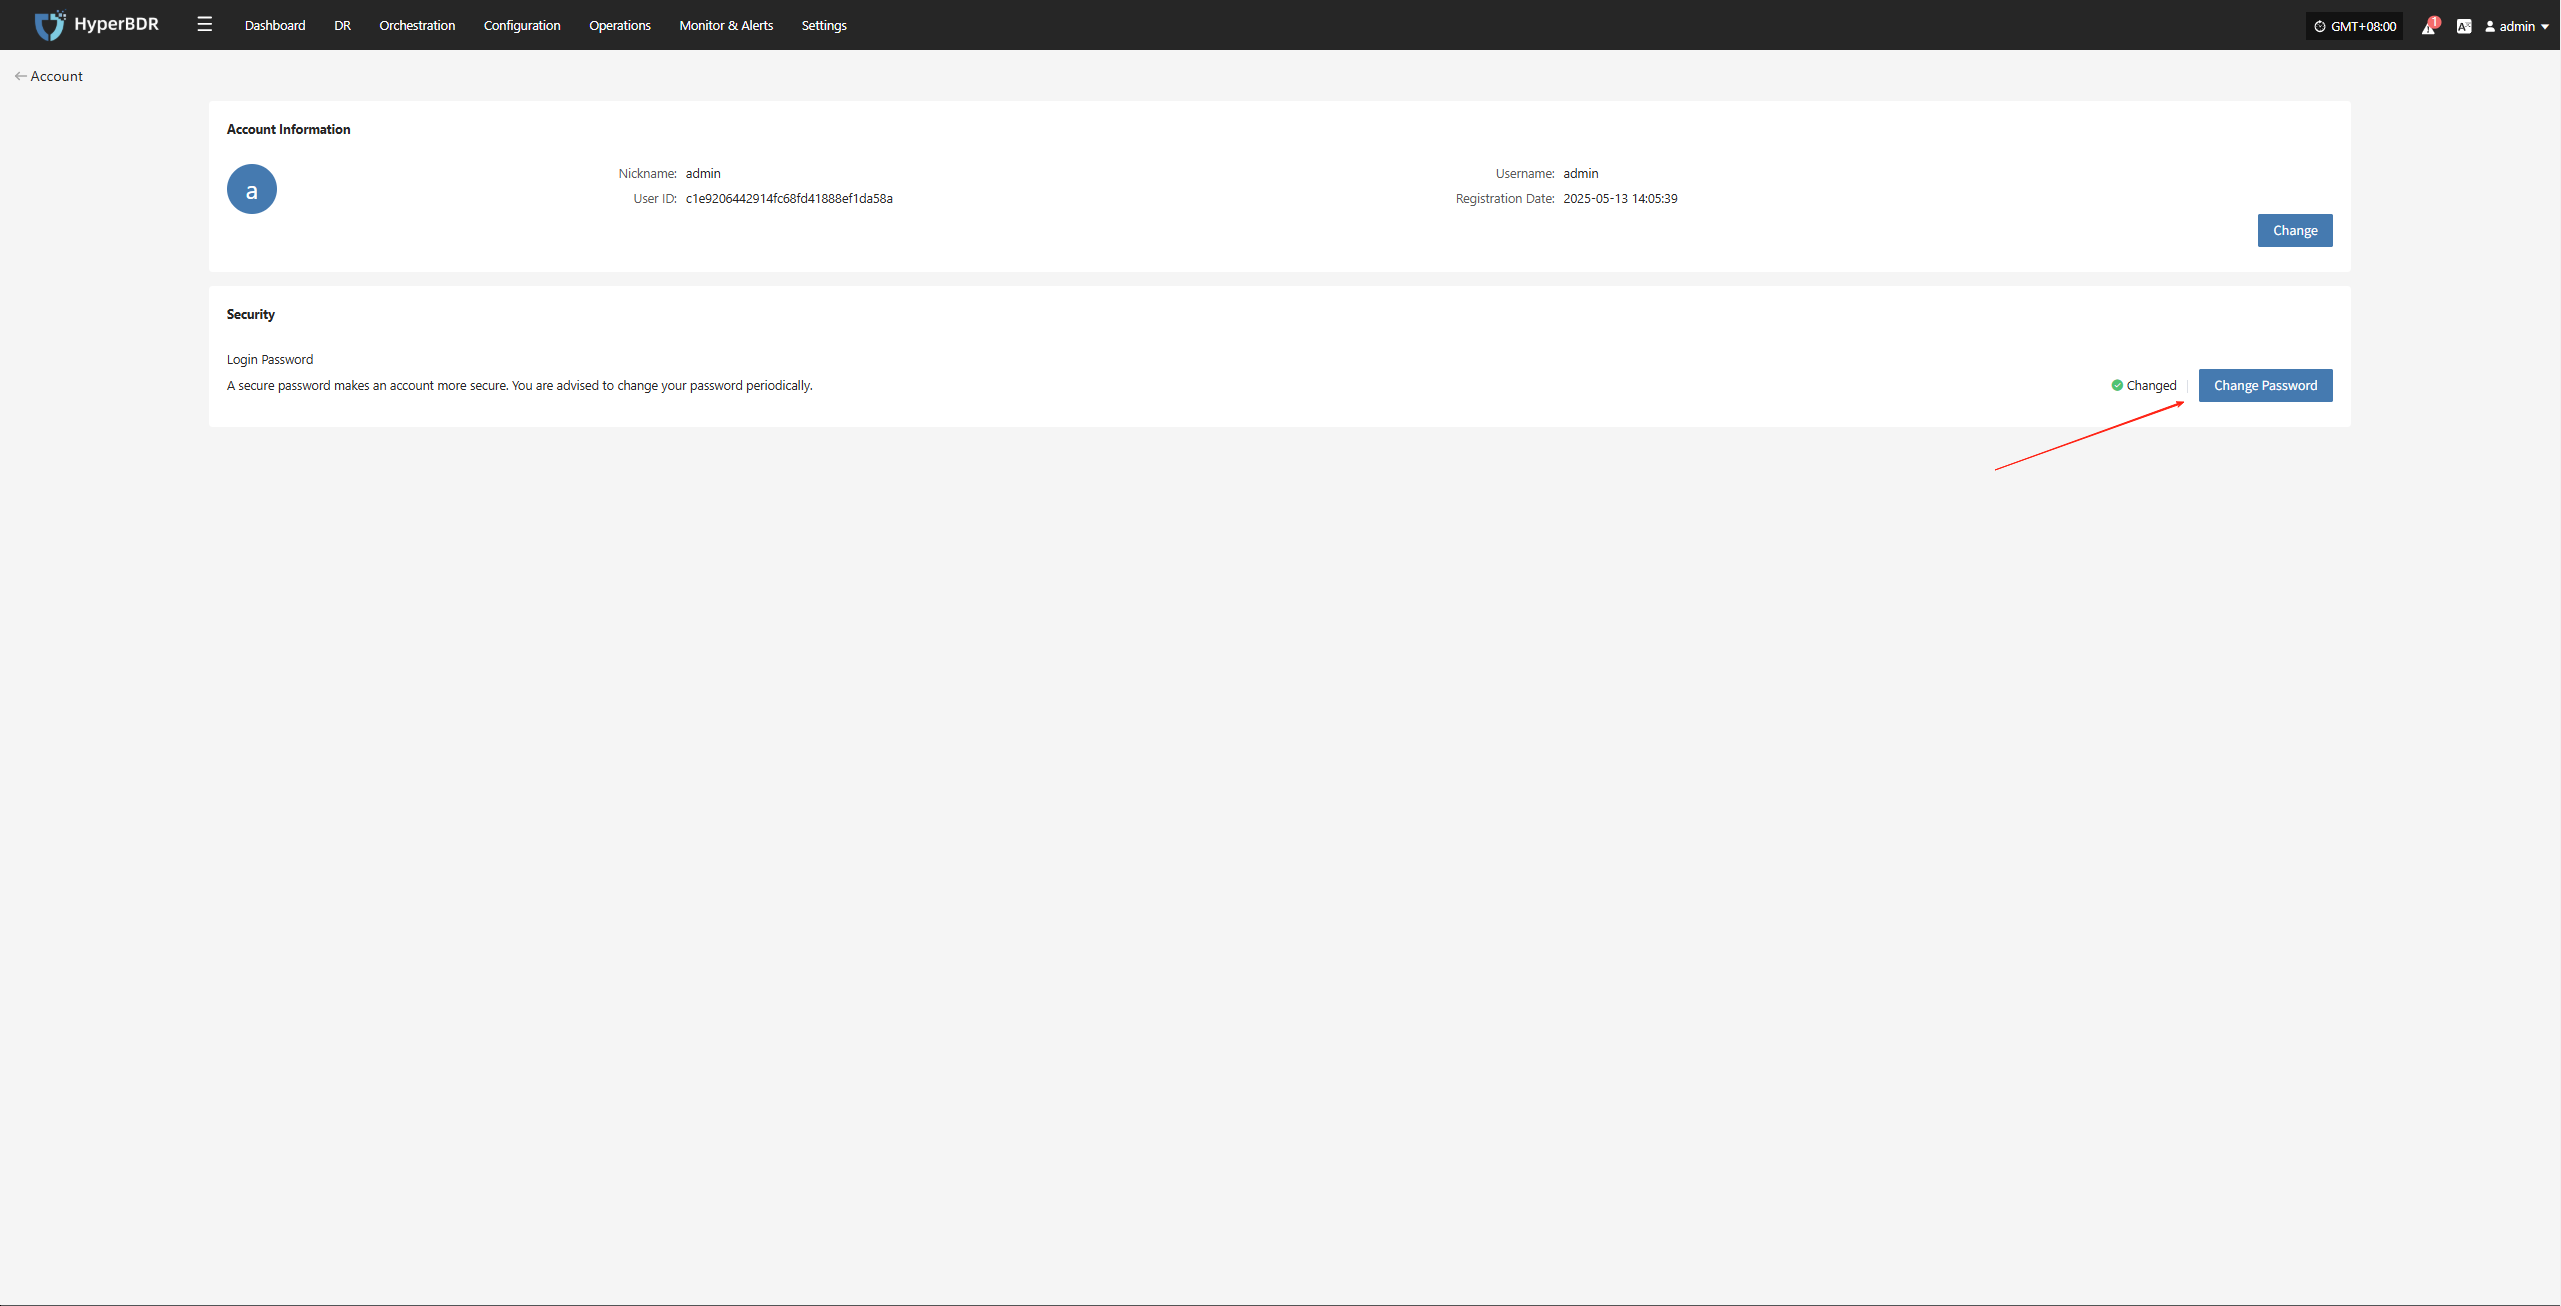
The basic information page displays the following account details:
- Nickname: admin
- Username: admin
- User ID: c1e9206442914-XXXXXXXXXXXXX
- Registration Date: 2025-05-13 14:05:39
Security:
- Login Password: Set
Tip: Using a strong password significantly improves your account security. We recommend updating your password regularly.
Change Account Information
Your account information includes basic details such as username and registration time. If you need to update certain information, please follow the system instructions.
On the "Account" page, click the "Edit" button to modify your username and nickname.
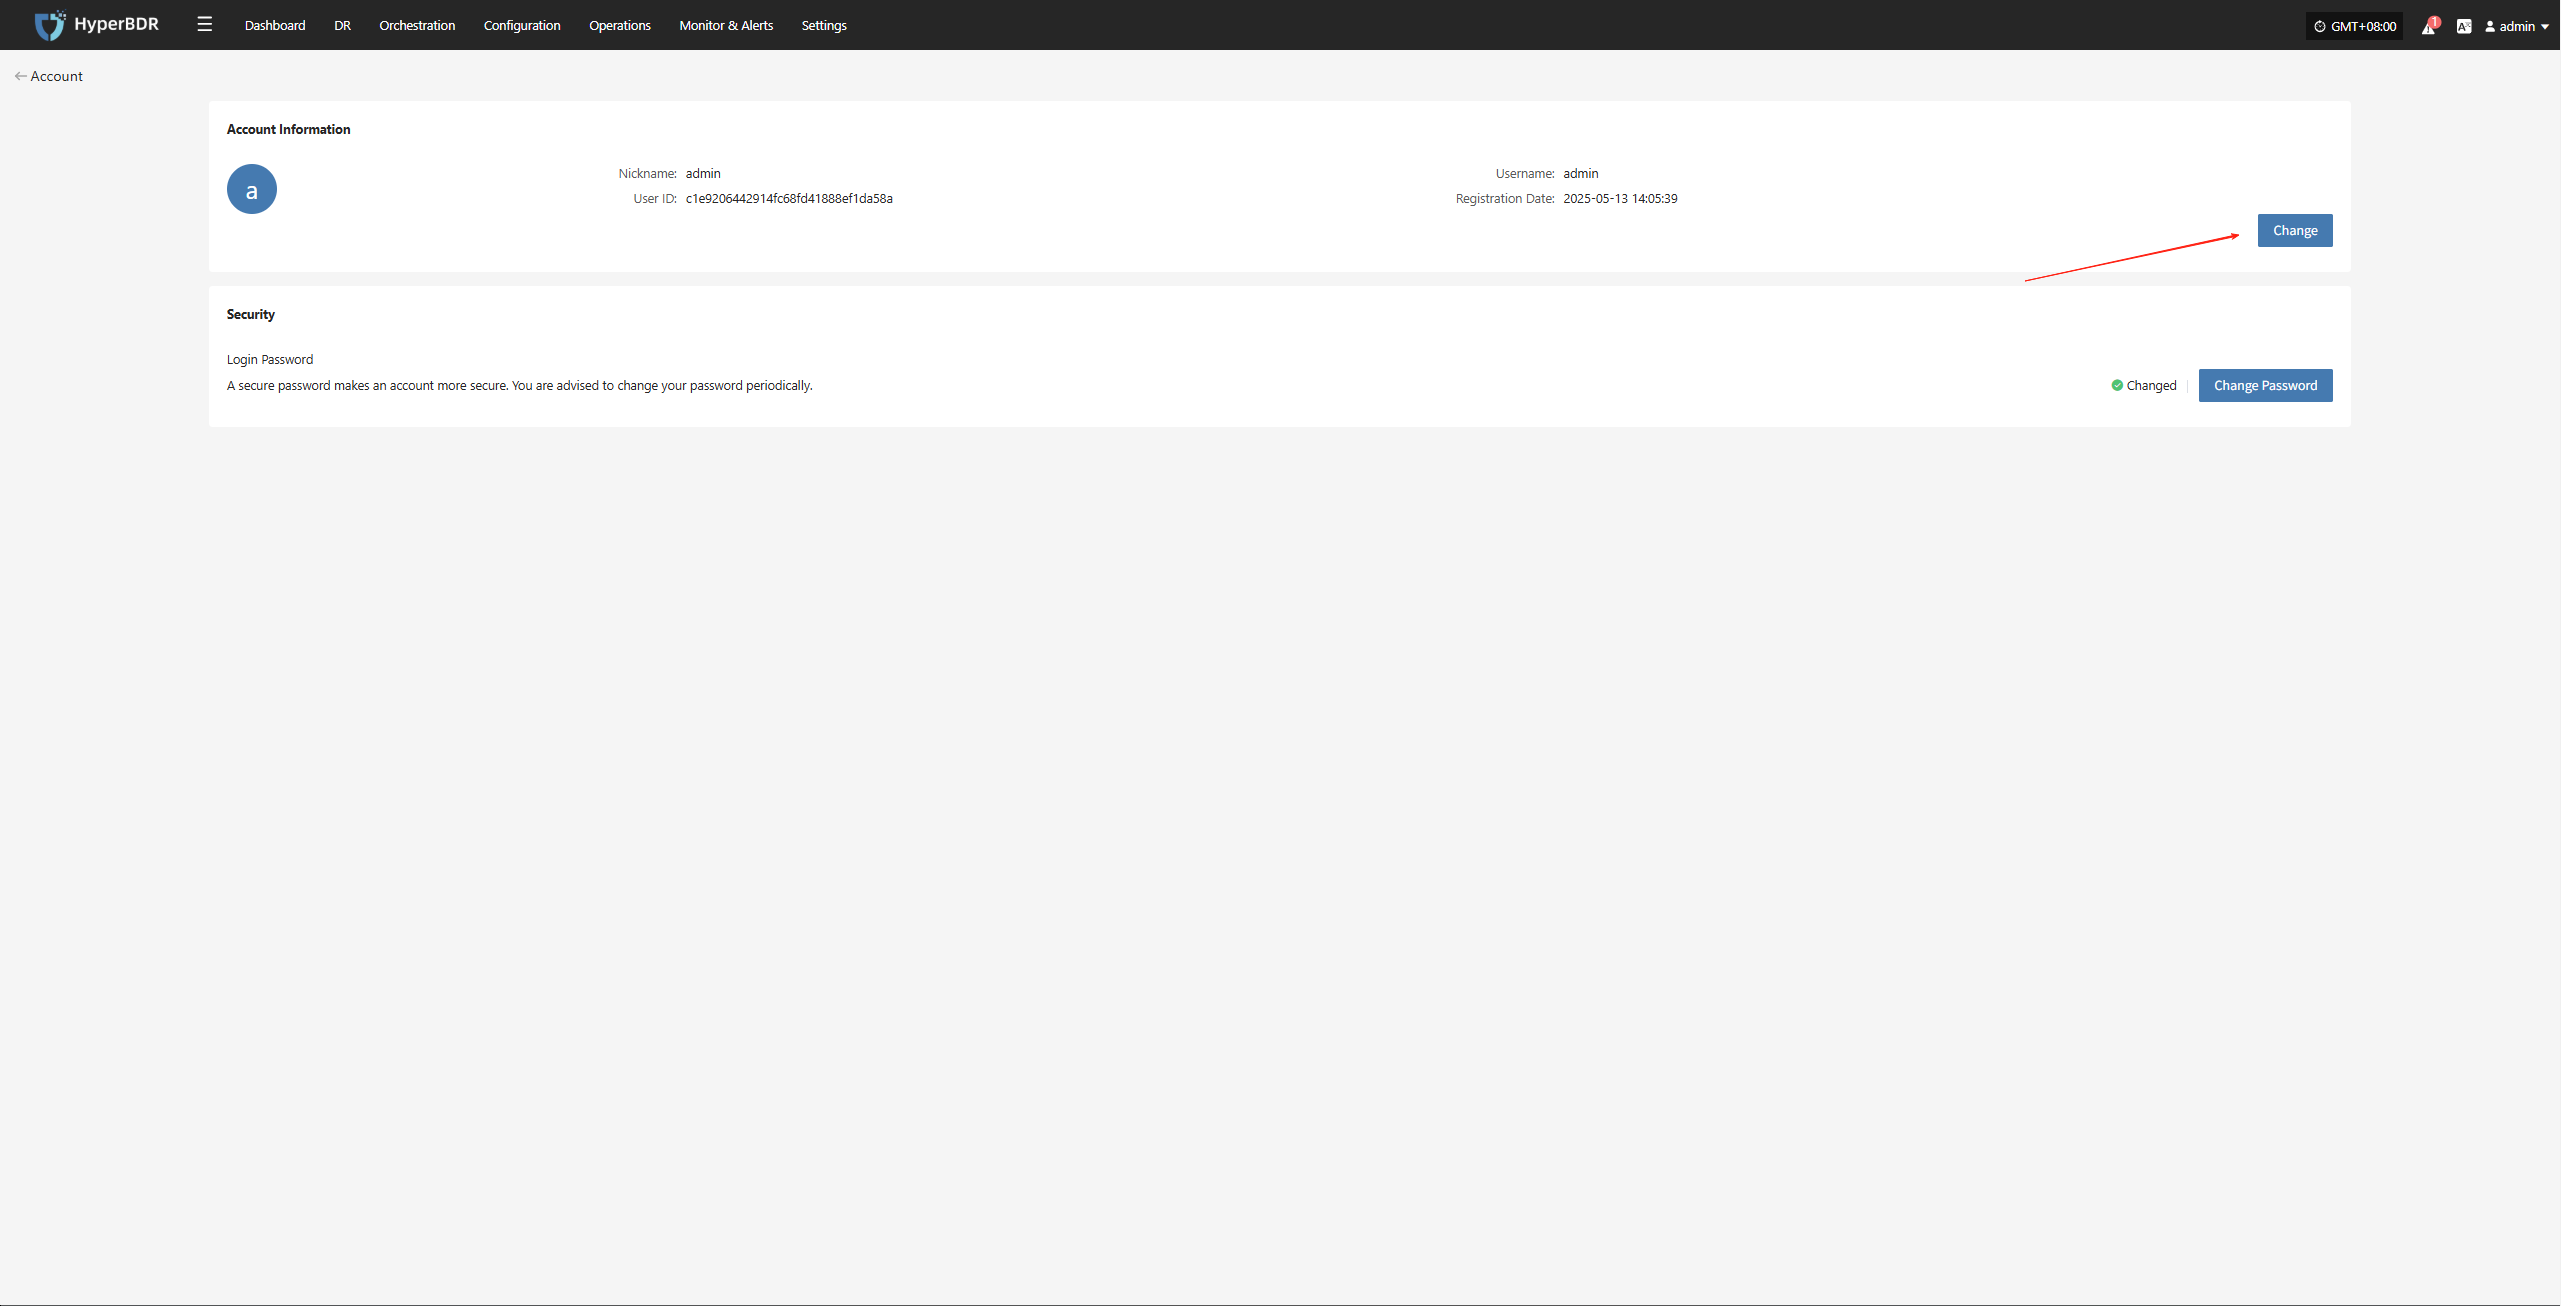
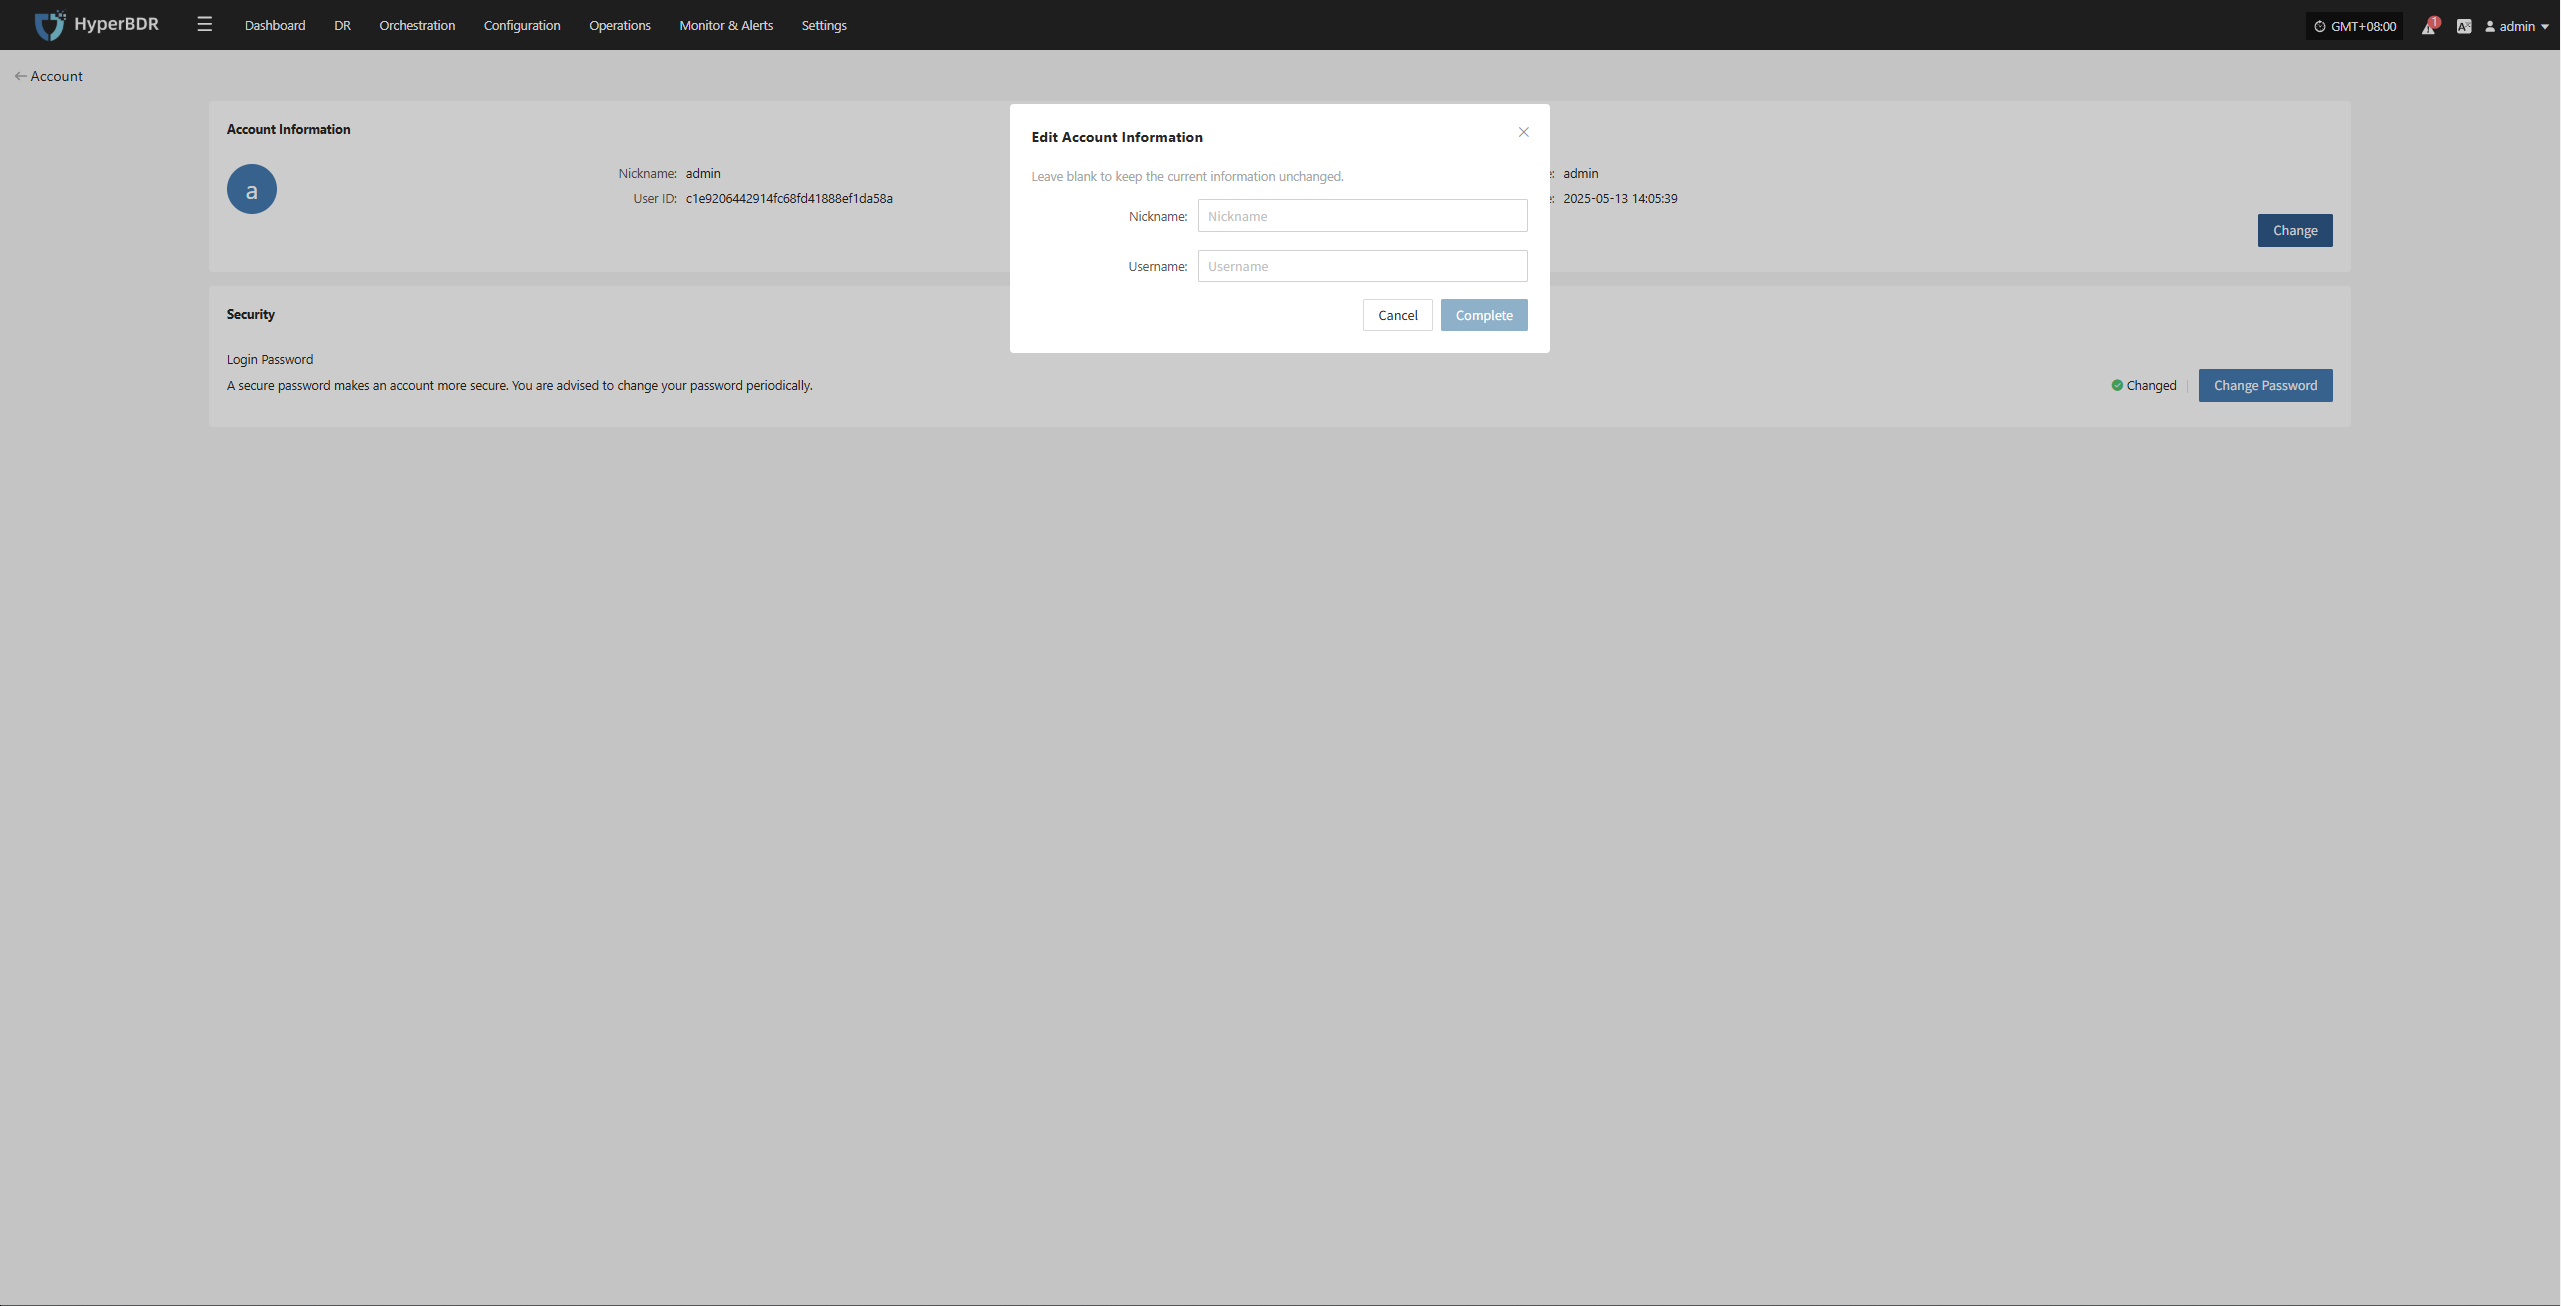
- Nickname: Used for display purposes only and does not affect login.
- Username: The unique identifier for logging into the system. After changing it, please use the new username for future logins.
Note: After changing your username, make sure to remember your new login name to avoid access issues. The login account for the Operations Management Platform will also be updated accordingly.
Change Password
To keep your account secure, we recommend changing your password regularly, especially using a strong and unique password.
On the "Account" page, click the "Change Password" button to start the password update process.
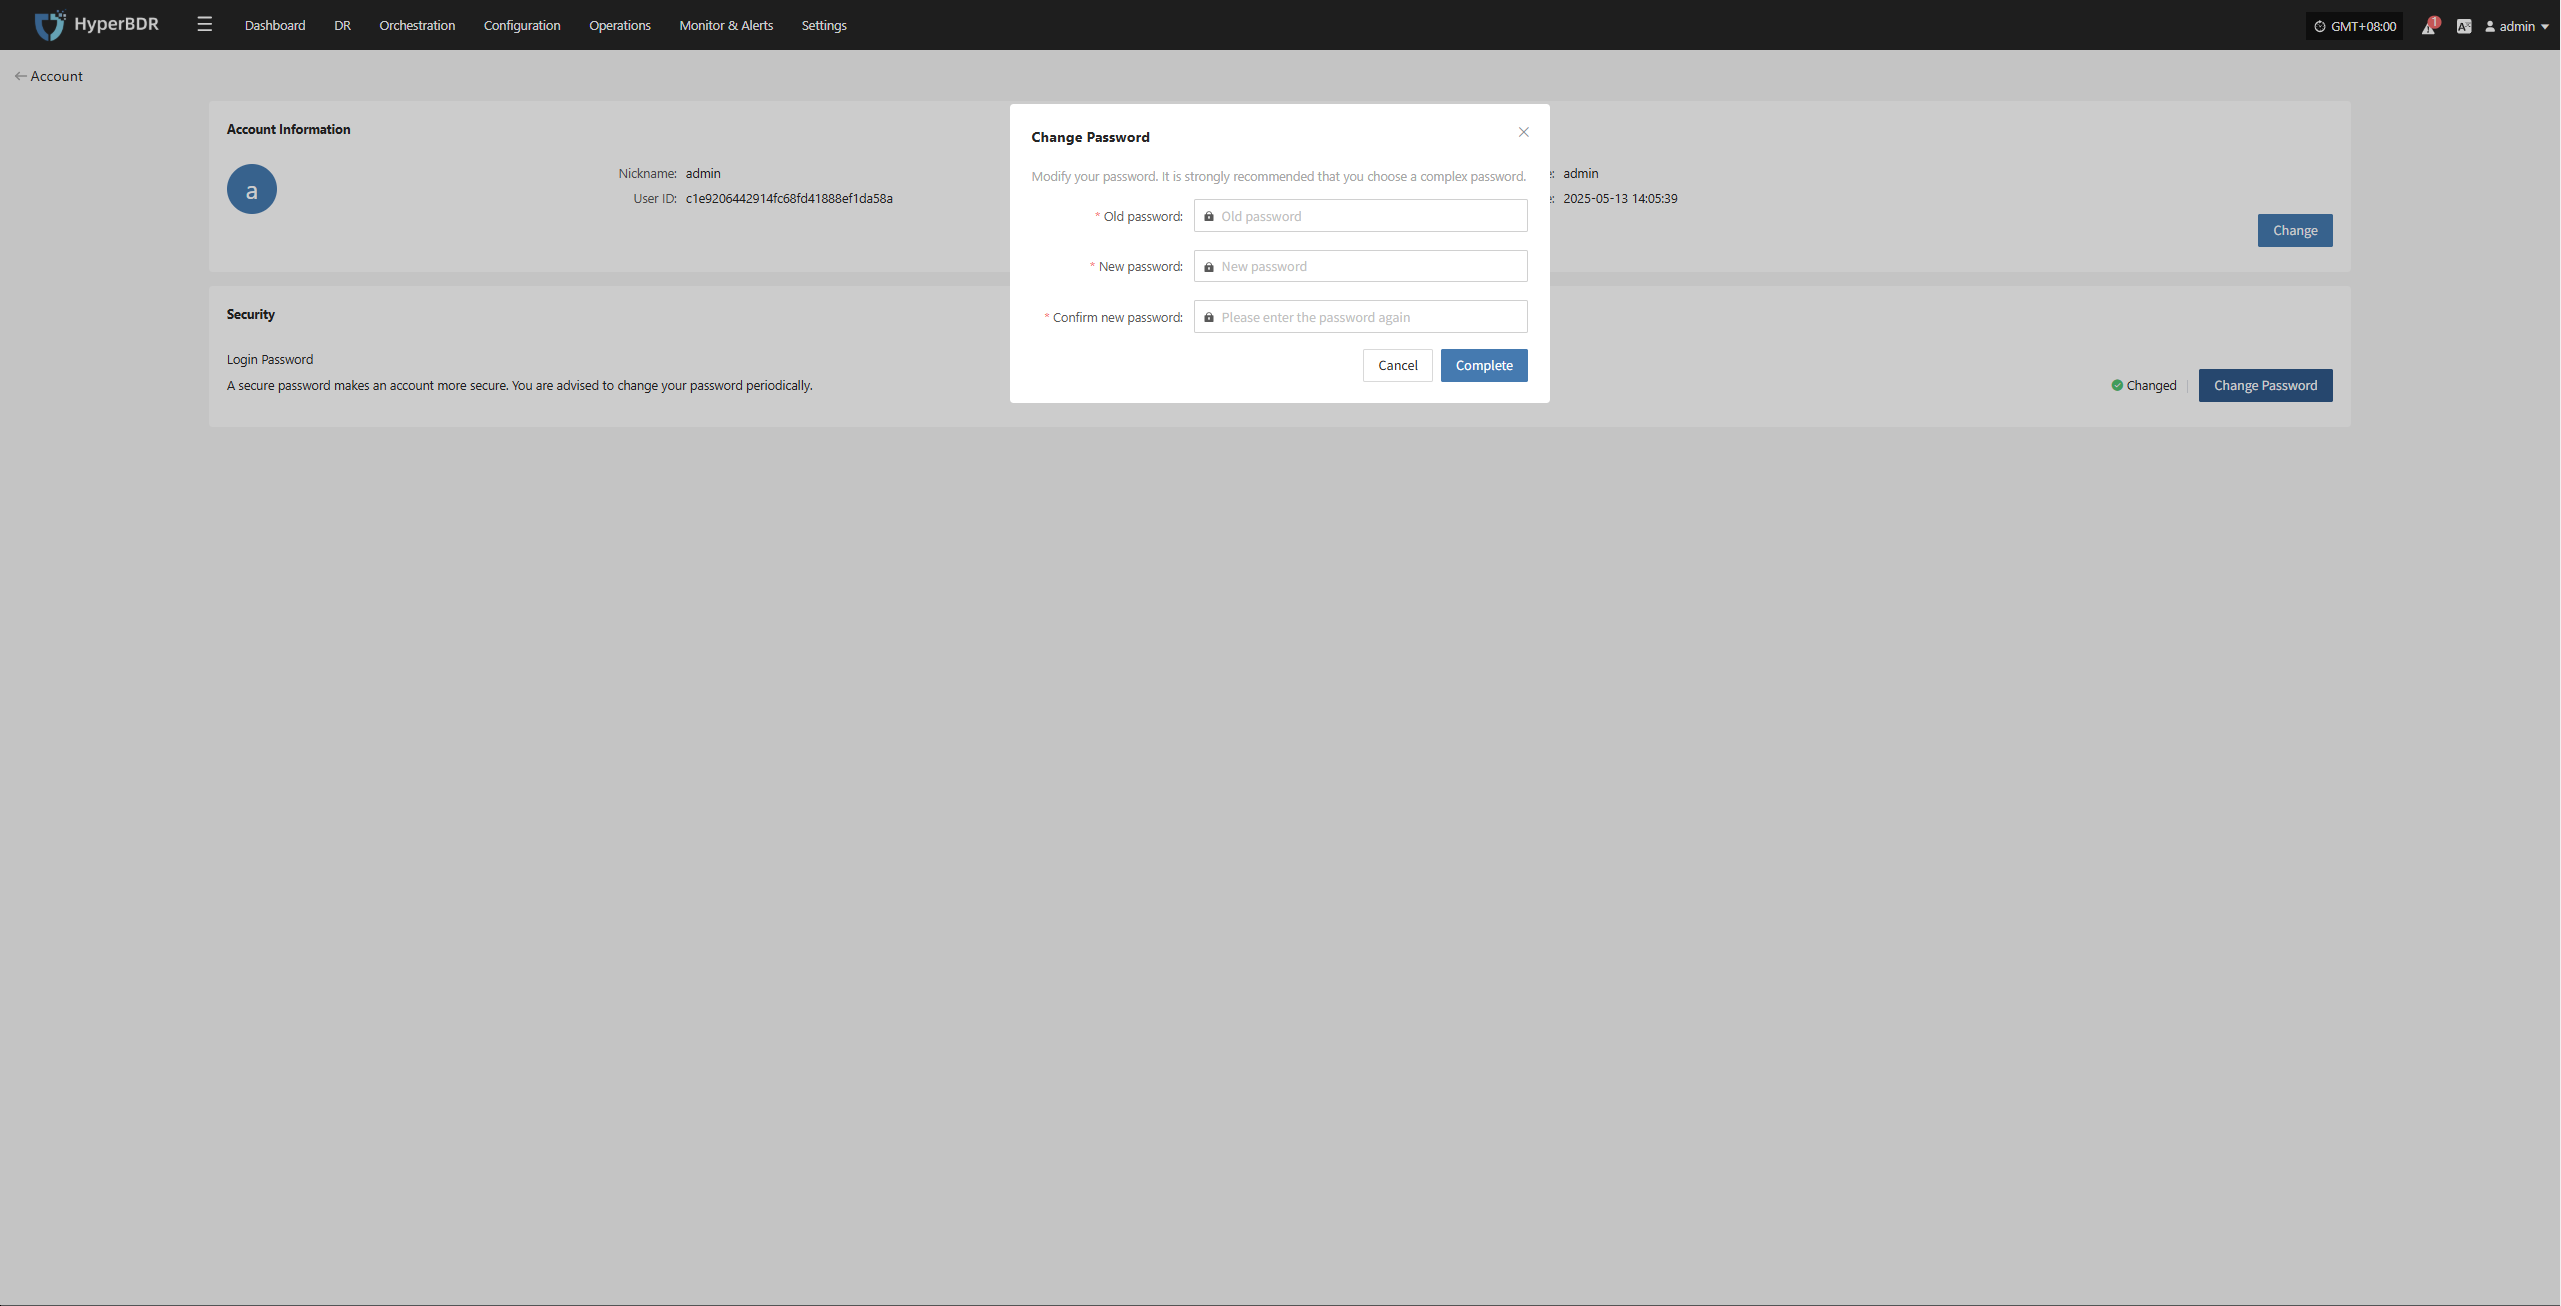
Note: Your new password must be 8-20 characters long, contain both uppercase and lowercase letters and numbers, and may include special characters (except spaces). After changing your password, please remember it to avoid login issues. The password for the Operations Management Platform will also be updated.
Password Management Tips
- Change your password regularly, especially if you suspect your account security may be compromised.
- Avoid using the same password across multiple platforms. Use complex and unique passwords to enhance your account security.
Logout
To safely log out of your account, follow these steps:
Click your username in the upper right corner of the page to open the dropdown menu.
Click the "Sign Out" option. You will be securely logged out and returned to the login page.
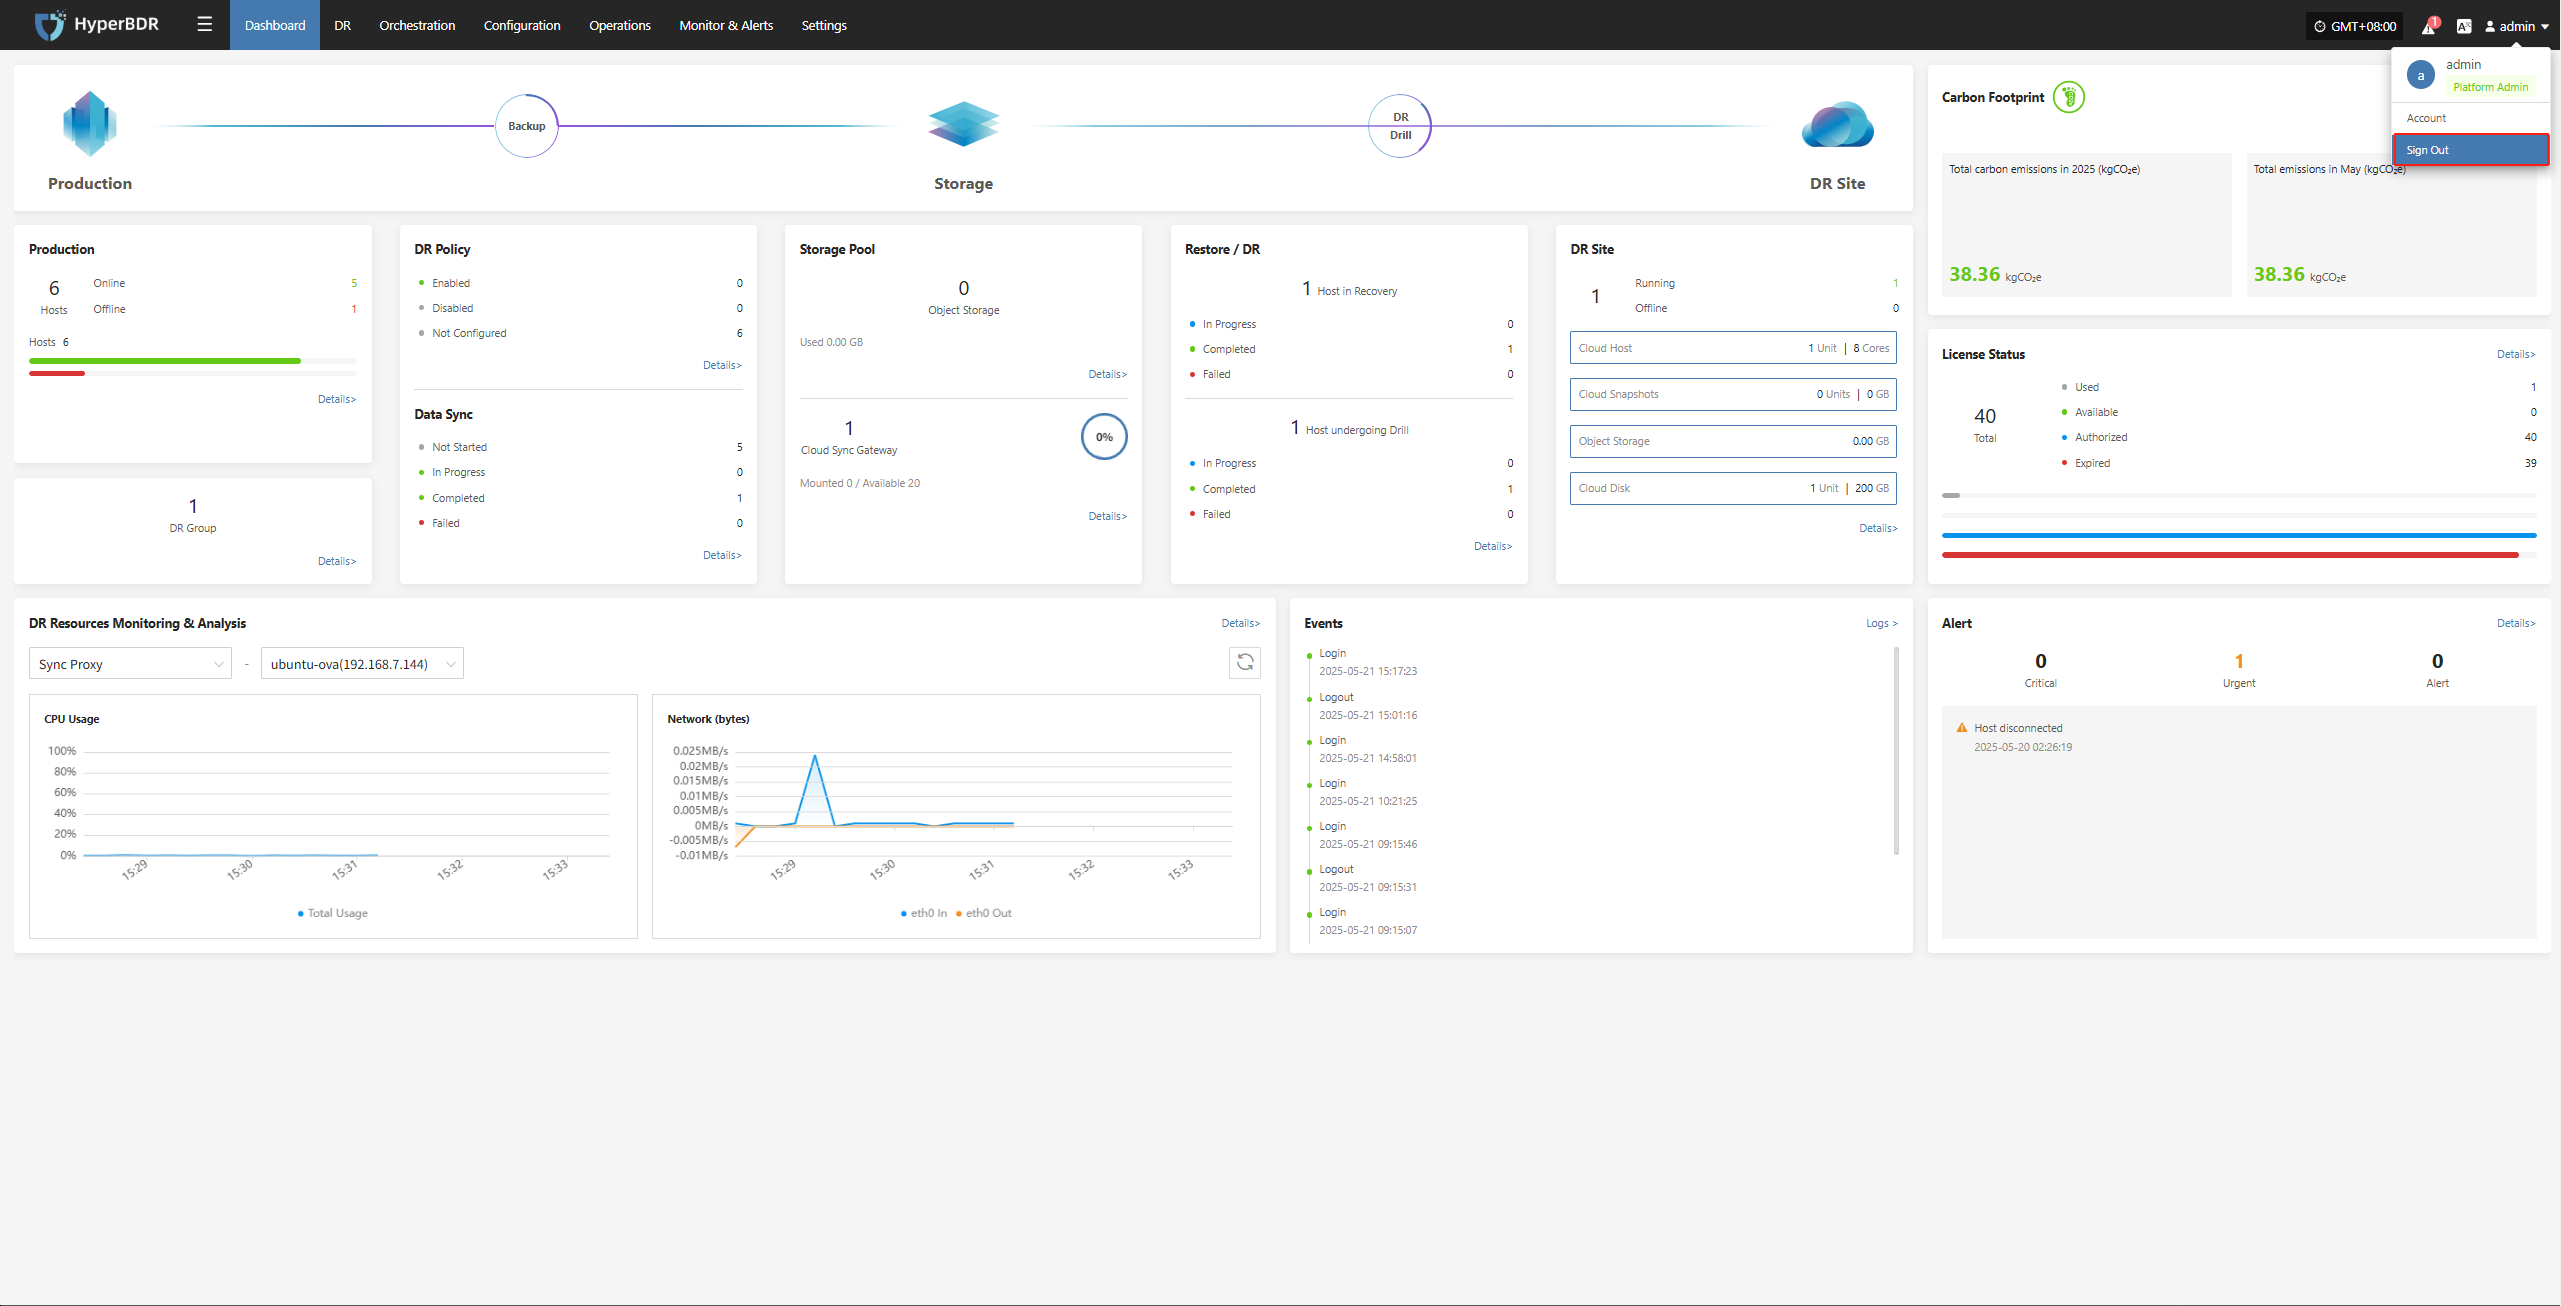
You will be securely logged out and redirected to the login page.
Note: Simply closing the browser window may not end your session. It is recommended to use the logout option above to prevent unauthorized access to your account and avoid unnecessary risks.
Language Switch
The system currently supports the following languages:
简体中文
English
Español
To change the display language in the system interface:
Click the "A icon" in the upper right corner to open the dropdown menu.
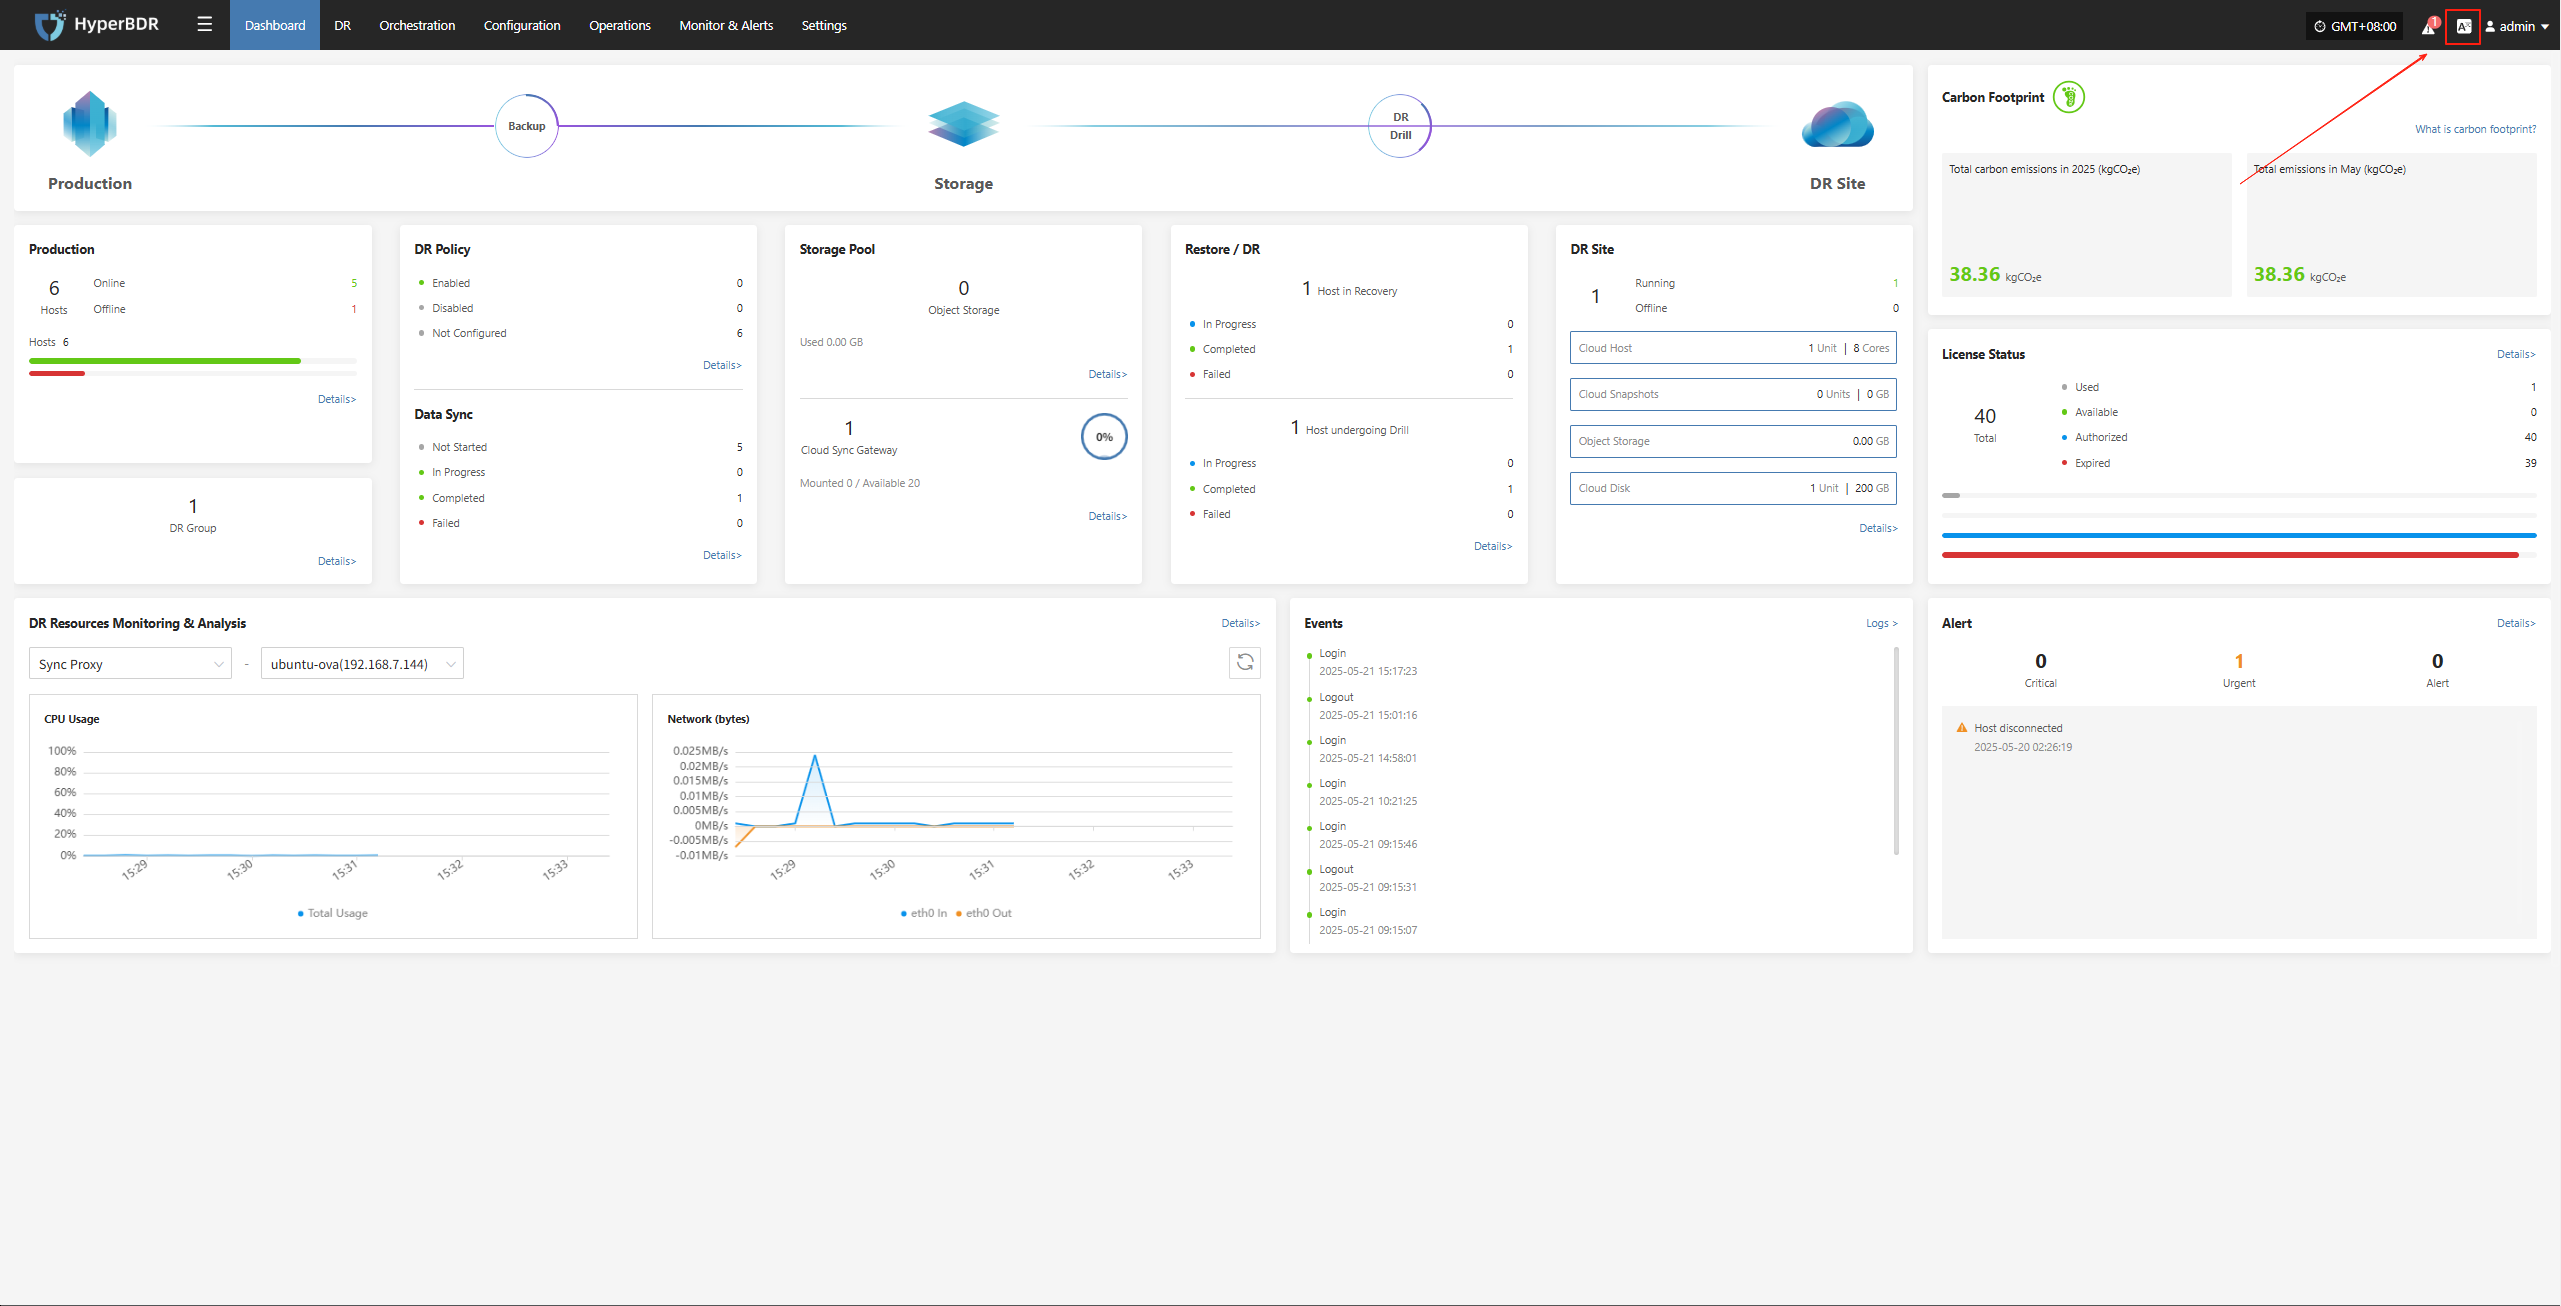
In the language list that appears, select your preferred language, such as "Simplified Chinese" or "English".
The default language is Simplified Chinese.

After switching, the system will automatically refresh and display the selected language.
DR
Host DR
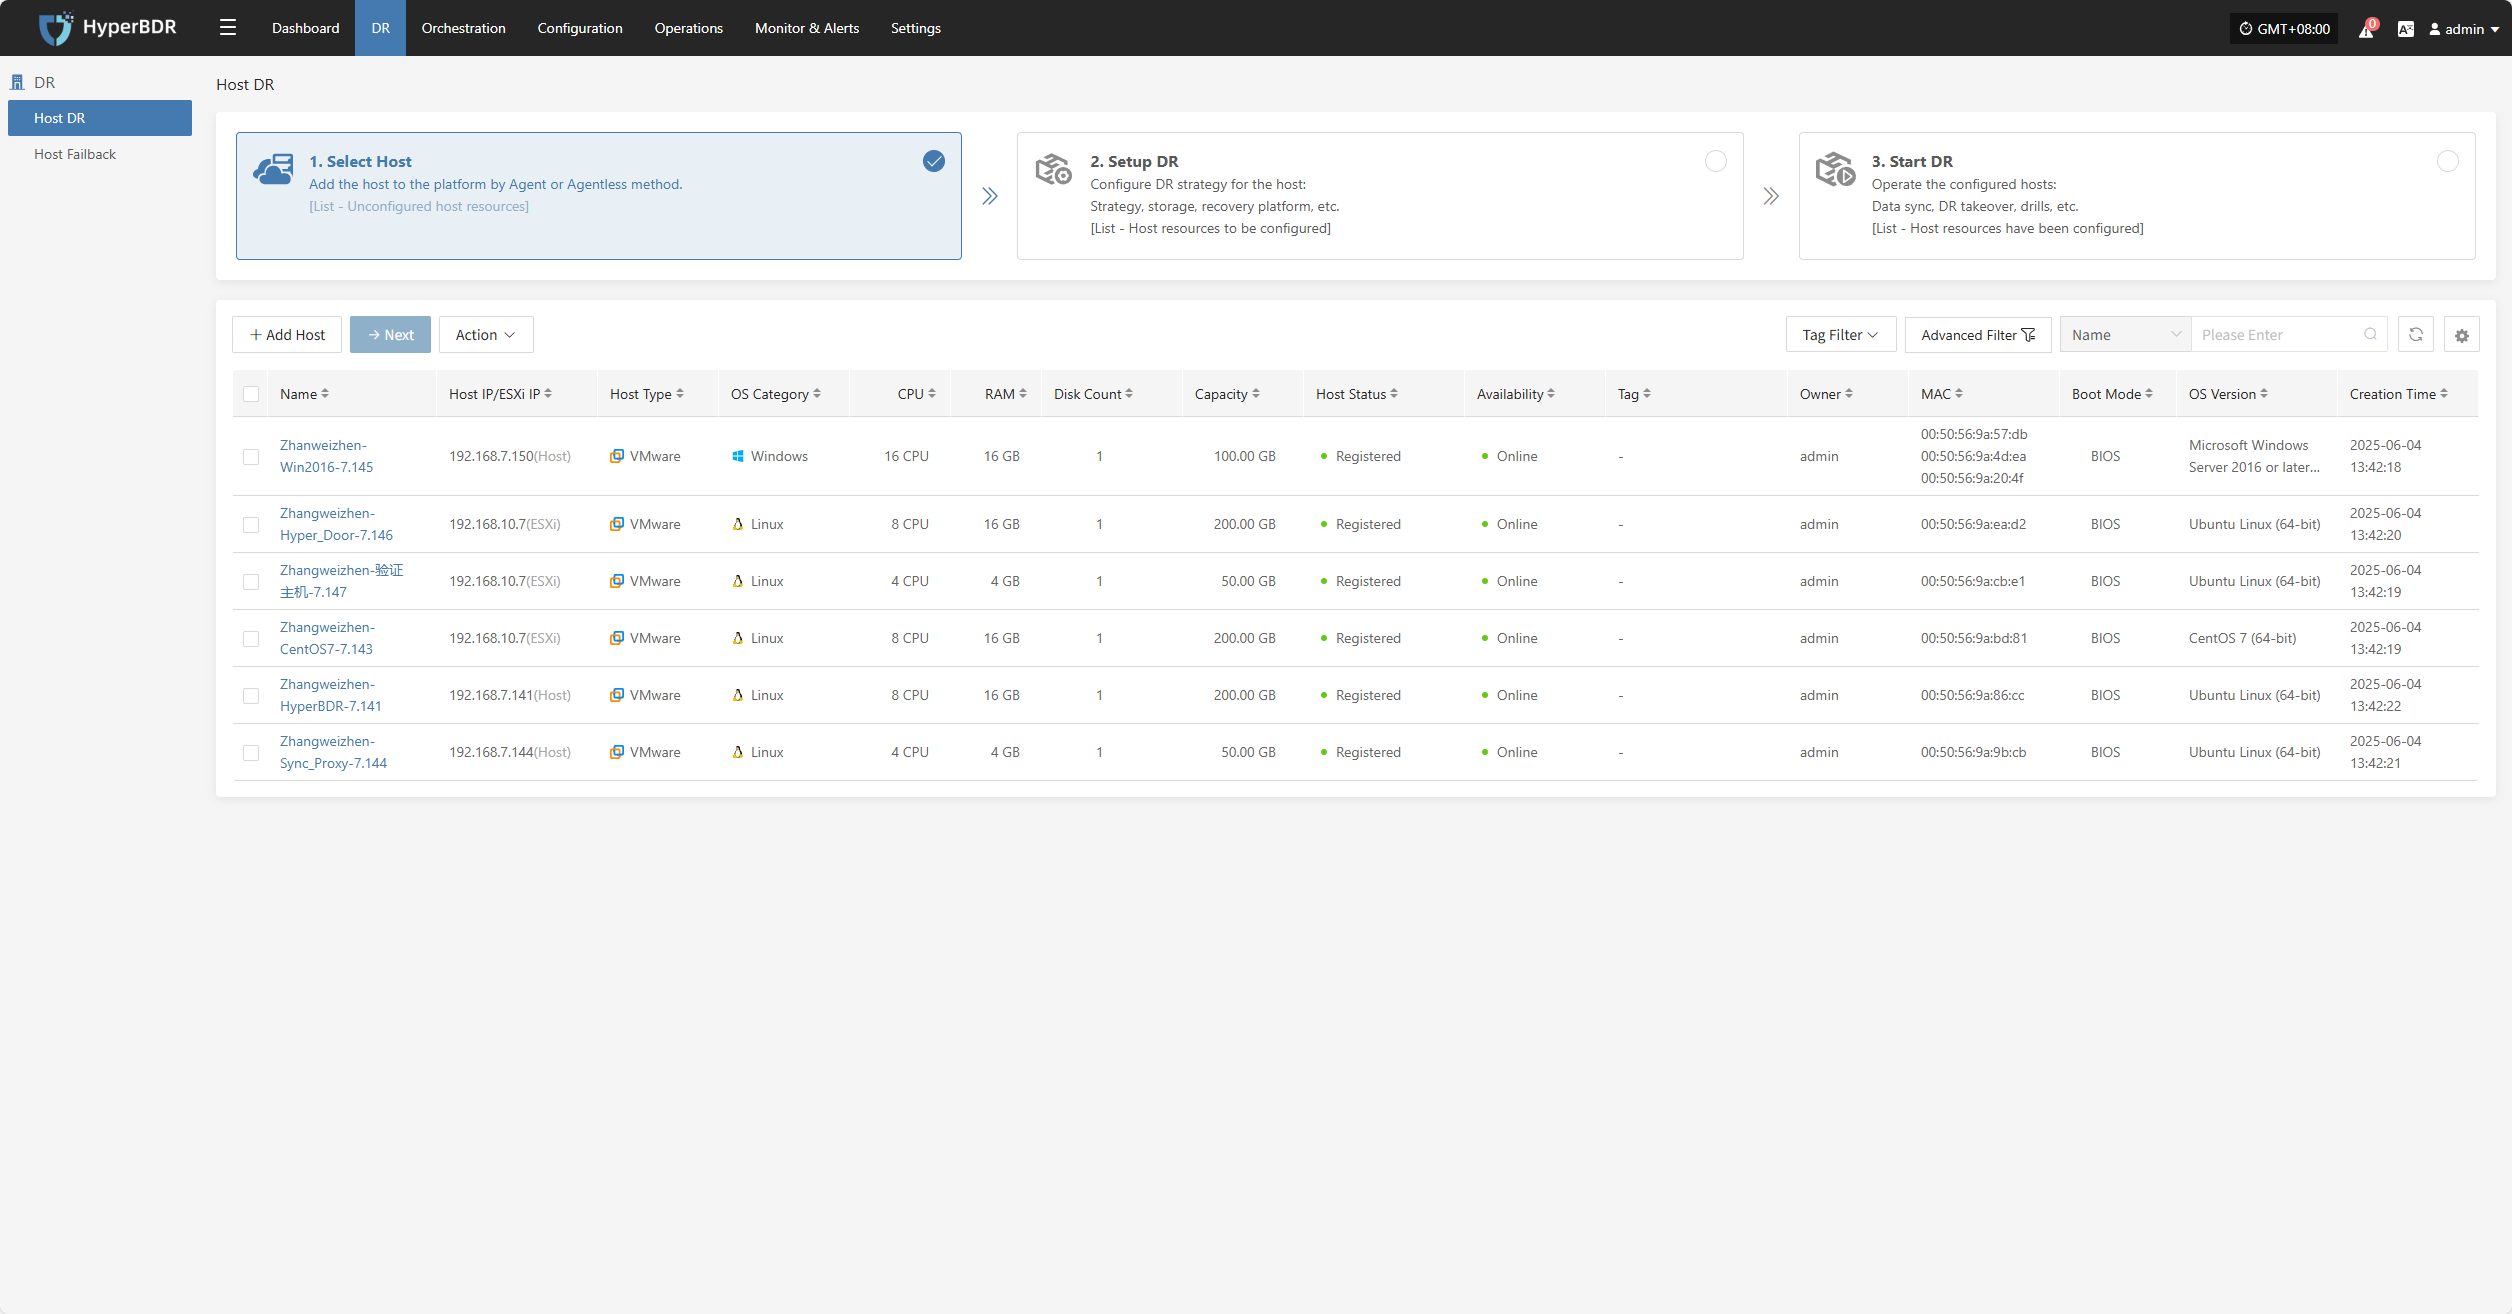
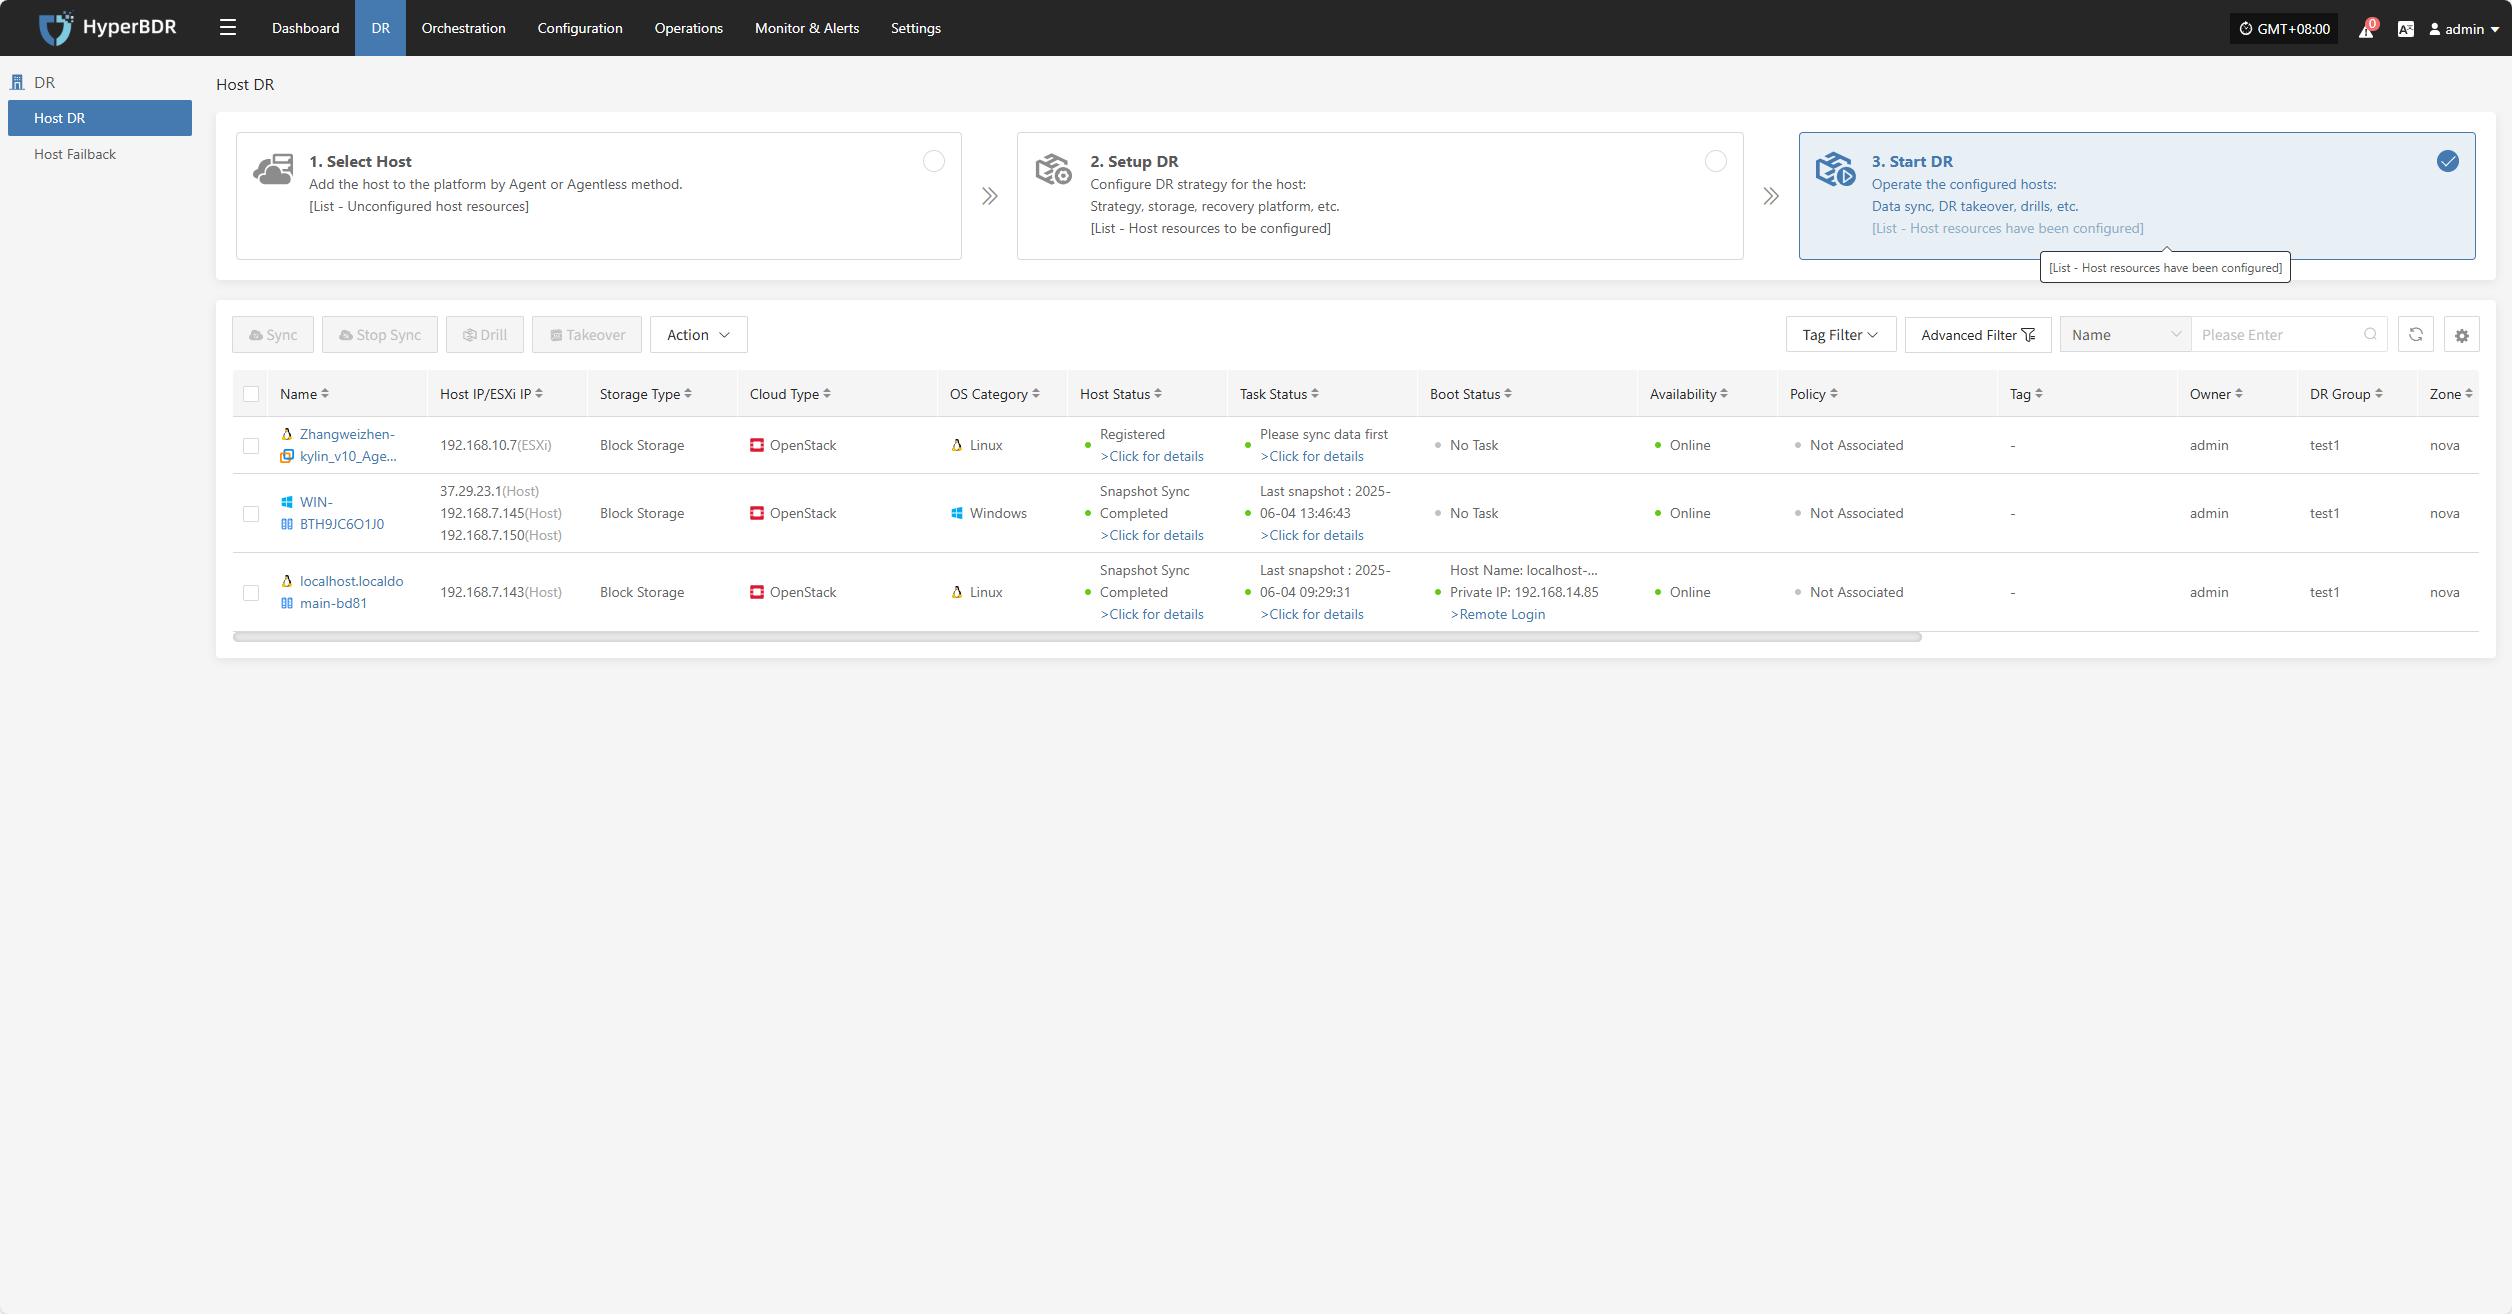
Resource Disaster Recovery is the main workflow guide page for HyperBDR disaster recovery. All DR operations are completed on this page, including both forward host DR and host failback processes.
The host DR process consists of three main steps: Select Host, Setup DR, and Start DR. You can follow these three steps to complete the full cycle from host disaster recovery to DR drill/takeover.
Click the top "DR" navigation bar, then click the left "Host DR" navigation bar to perform the main host DR workflow.
Operation Process
| Step | Description |
|---|---|
| Preparation | Register HyperBDR user and add HyperBDR product license |
| Step 1 Select Host | Click the top "DR" navigation bar, click the left "Host DR", then click "Select Host" to start the host selection step |
| Step 2 Setup DR | Click the top "DR" navigation bar, click the left "Host DR", then click "Setup DR" to start the DR configuration step |
| Step 3 Start DR | Click the top "DR" navigation bar, click the left "Host DR", then click "Start DR" to start the DR process step |
Preparation
Register HyperBDR User
Before adding a disaster recovery host, make sure you have created at least one disaster recovery account on the platform. The platform is built with a multi-tenant architecture, allowing you to manage accounts and permissions independently for different teams or projects.
Click here to learn how to create a new disaster recovery account
If you already have an account, please skip this step.
Add HyperBDR Product License
Before using the disaster recovery service, you need to request a product license. Please contact your project manager or email support@oneprocloud.com to obtain a valid license.
Click here to view the step-by-step guide for applying for a license
If you have already added a license, please skip this step.
Complete Production Site Configuration
This step is for agentless mode on the source production platform, including five types: VMware, OpenStack, AWS, FusionCompute, and Oracle.
- Add VMware production site
- Add OpenStack production site
- Add AWS production site
- Add FusionCompute production site
- Add Oracle production site
If your source is in Agent or you have already completed the production site configuration, please skip this step.
Complete Disaster Recovery Target Configuration
This step applies when the disaster recovery (DR) target platform has already been automated and integrated. You need to complete the DR target configuration in advance.
If you have not configured it yet, please first go to (Disaster Recovery Target Platform Configuration) to add a DR recovery platform.
If you are using object storage mode, you can skip this step.
Network Policy Activation
When performing Select Host, DR Configuration, and Start DR steps, you must activate network access from the source production platform to the HyperBDR DR console and the DR target. This ensures the source production platform can be properly added, registered, and can synchronize data. Without this, adding hosts will fail.
(Network architecture and policies for agentless mode)
(Network architecture and policies for agent-based mode)
Plan VPC, Subnets, and Other Network Resources for the DR Target Platform
During DR configuration, you need to assign target resources for the backup hosts. This requires selecting pre-planned VPCs, subnets, security groups, and other network settings. If these resources have not been created and planned ahead, subsequent steps cannot proceed.
You must ensure there is at least one usable VPC, subnet, and security group under the DR target cloud account.
This step is applicable for DR targets using automated block storage mode or object storage automated recovery mode. Other common methods can ignore this step.
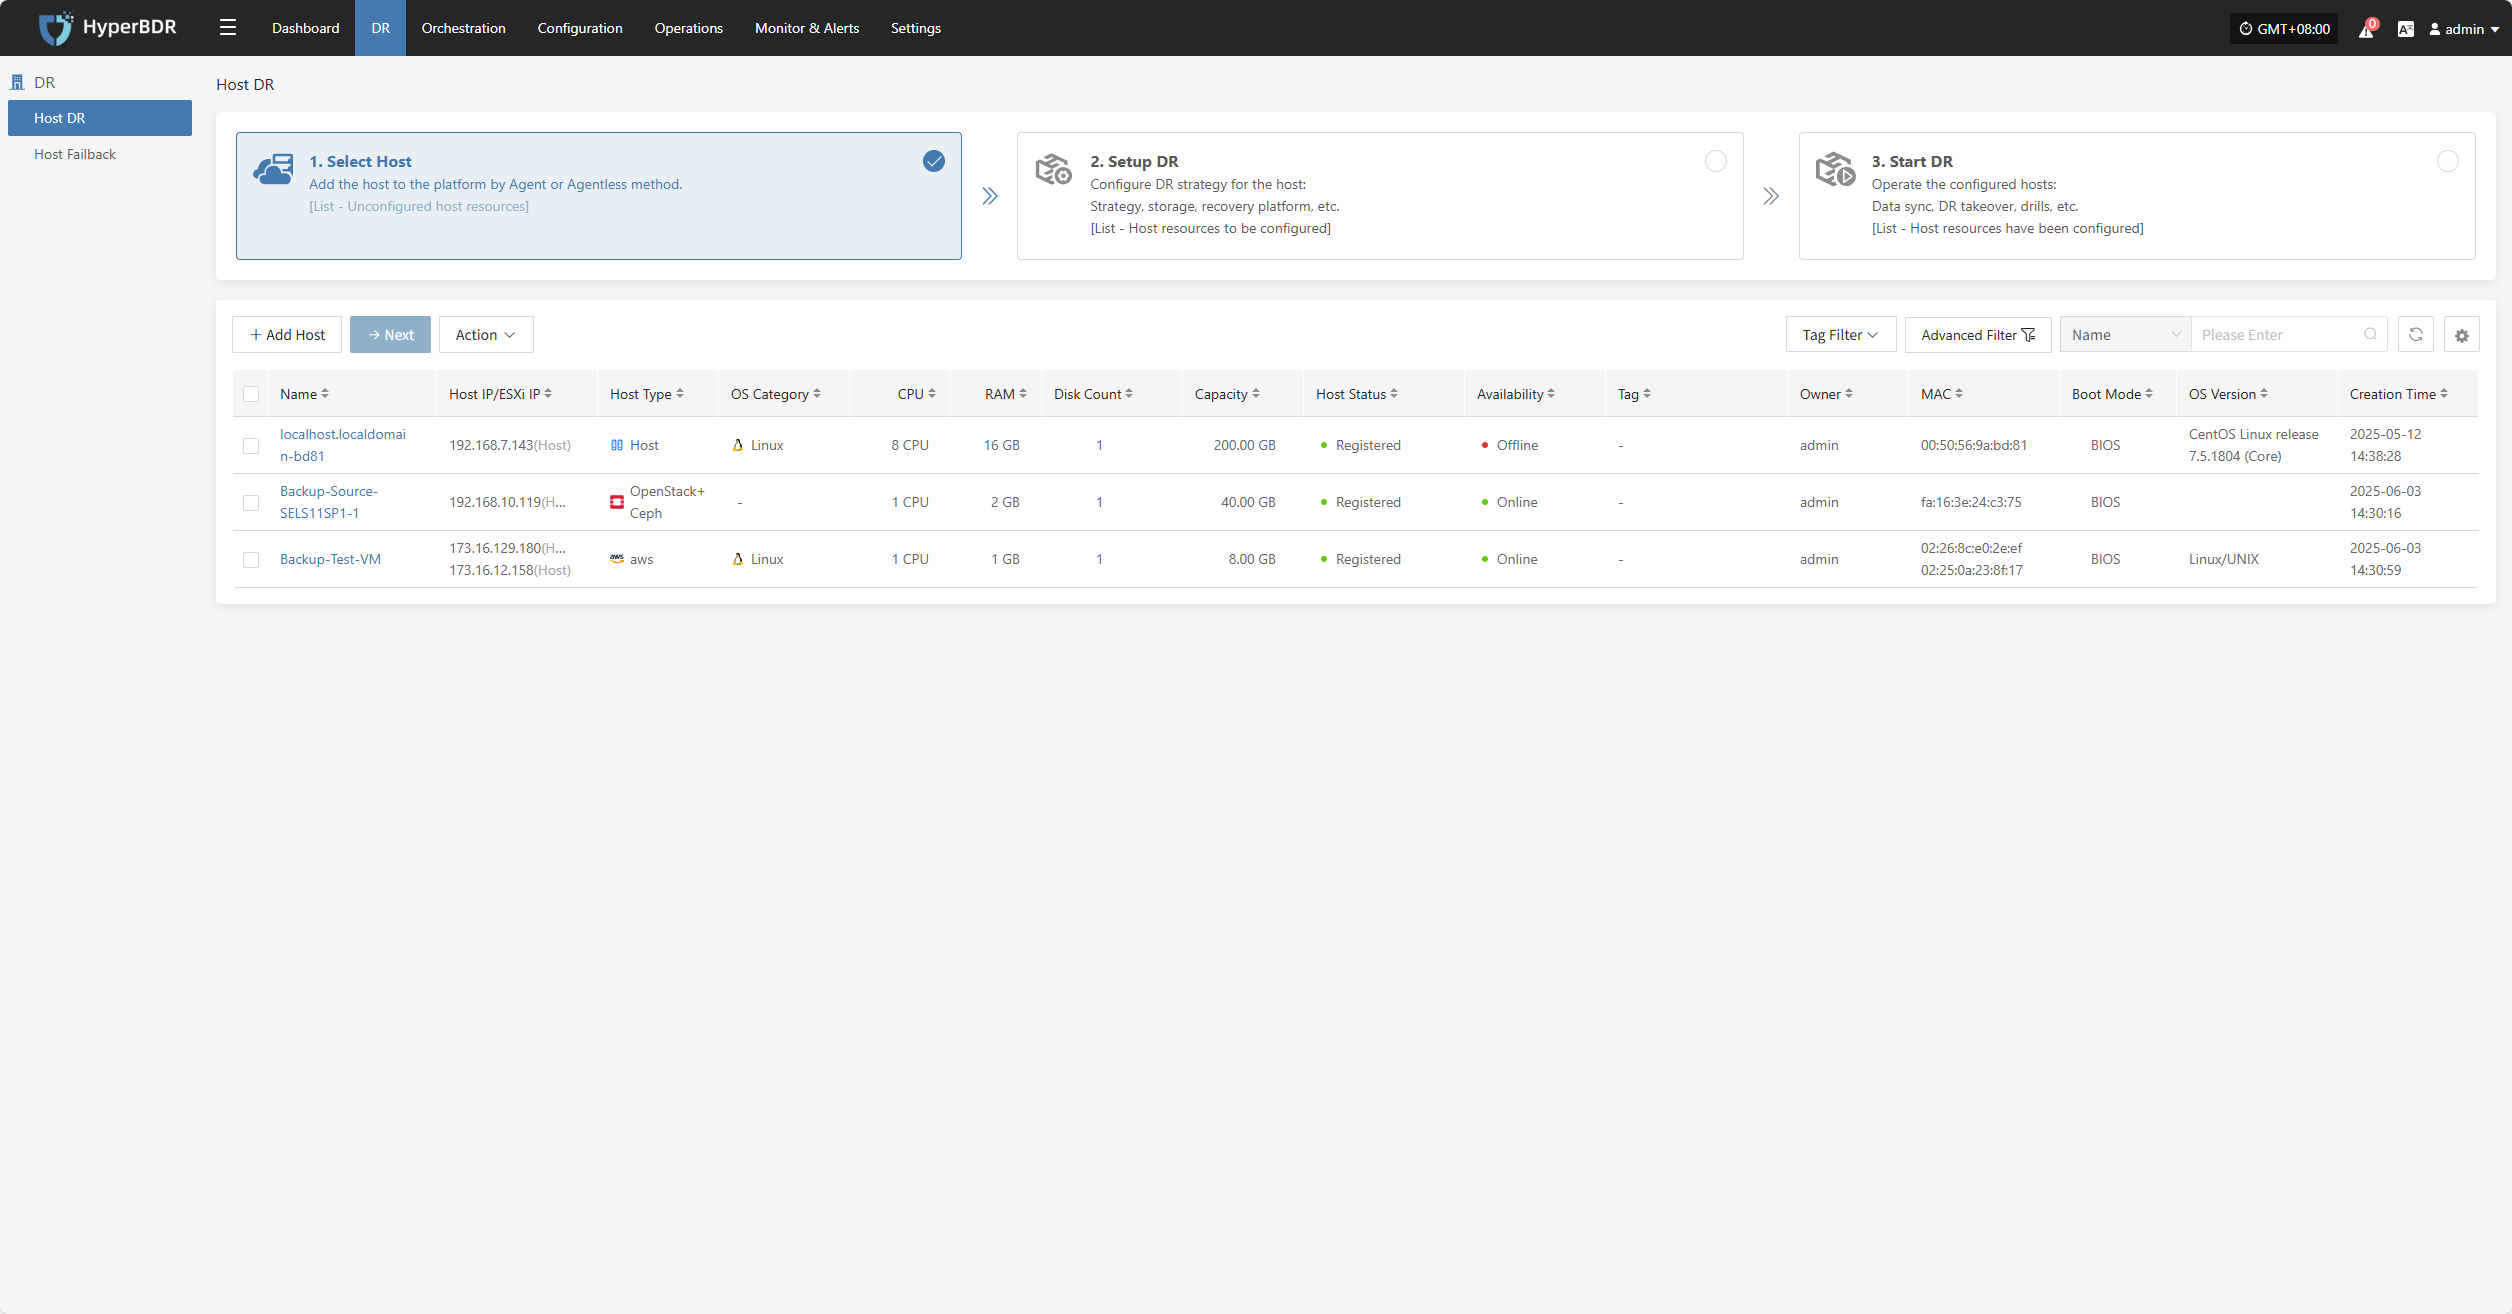
Select Host
Log in to the console, click the top "DR" navigation bar, then click "Host DR" on the left sidebar. Next, click the "Select Host" menu, and click the "Add Host" button to add production hosts for disaster recovery.

On the add host page, you can select the production platform type: source side agentless mode or source side agent mode.
| Production Platform Type | Supported Resources | Description |
|---|---|---|
| Agentless | VMware OpenStack AWS FusionCompute Oracle | When the production source platform is VMware, OpenStack, AWS, FusionCompute, or Oracle, backup can be performed in agentless mode. |
| Agent | Linux Windows | Agent program for the production source, applicable to all source Linux and Windows hosts, provided the operating system is within the supported range. Operating System Support Matrix (Agentless): View Here Operating System Support Matrix (Agent): View Here |
Agentless
The source-side agentless mode supports five types of production platforms: VMware, OpenStack, AWS, FusionCompute, and Oracle.
Agentless mode requires deploying one or more Sync Proxy agents on the source side. The Sync Proxy agents centrally connect and call the source production API interfaces to obtain data, so prior network planning and configuration is necessary.
- VMware Platform Sync Proxy VM Creation
You can directly download the OVA template and import it into VMware to create a Sync Proxy VM for use.
OVA download link: Download Here
- Sync Proxy VM Creation for Other Platforms
For other platforms, you can create a virtual machine with Ubuntu 24.04 OS. For OpenStack or other KVM virtualization platforms, you can download the standard Ubuntu 24.04 QCOW image and import it for use.
QCOW image download link: Download Here
Note: This Ubuntu 24.04 image has no default login password. It includes the cloud-init service inside the image, so the cloud platform you import it into must support password injection via cloud-init, otherwise this image cannot be used.
- Prerequisites
| Production Platform | Prerequisites | Documentation |
|---|---|---|
| VMware | Complete the deployment and installation of the Sync Proxy agent, then add the source VMware production platform. | Add VMware Production Platform |
| OpenStack | Complete the deployment and installation of the Sync Proxy agent, then add the source OpenStack Ceph production platform. | Add OpenStack Production Platform |
| AWS | Complete the deployment and installation of the Sync Proxy agent, then add the source AWS production platform. | Add AWS Production Platform |
| FusionCompute | Complete the deployment and installation of the Sync Proxy agent, then add the source FusionCompute production platform. | Add FusionCompute Production Platform |
| Oracle | Complete the deployment and installation of the Sync Proxy agent, then add the source Oracle production platform. | Add Oracle Production Platform |
VMware
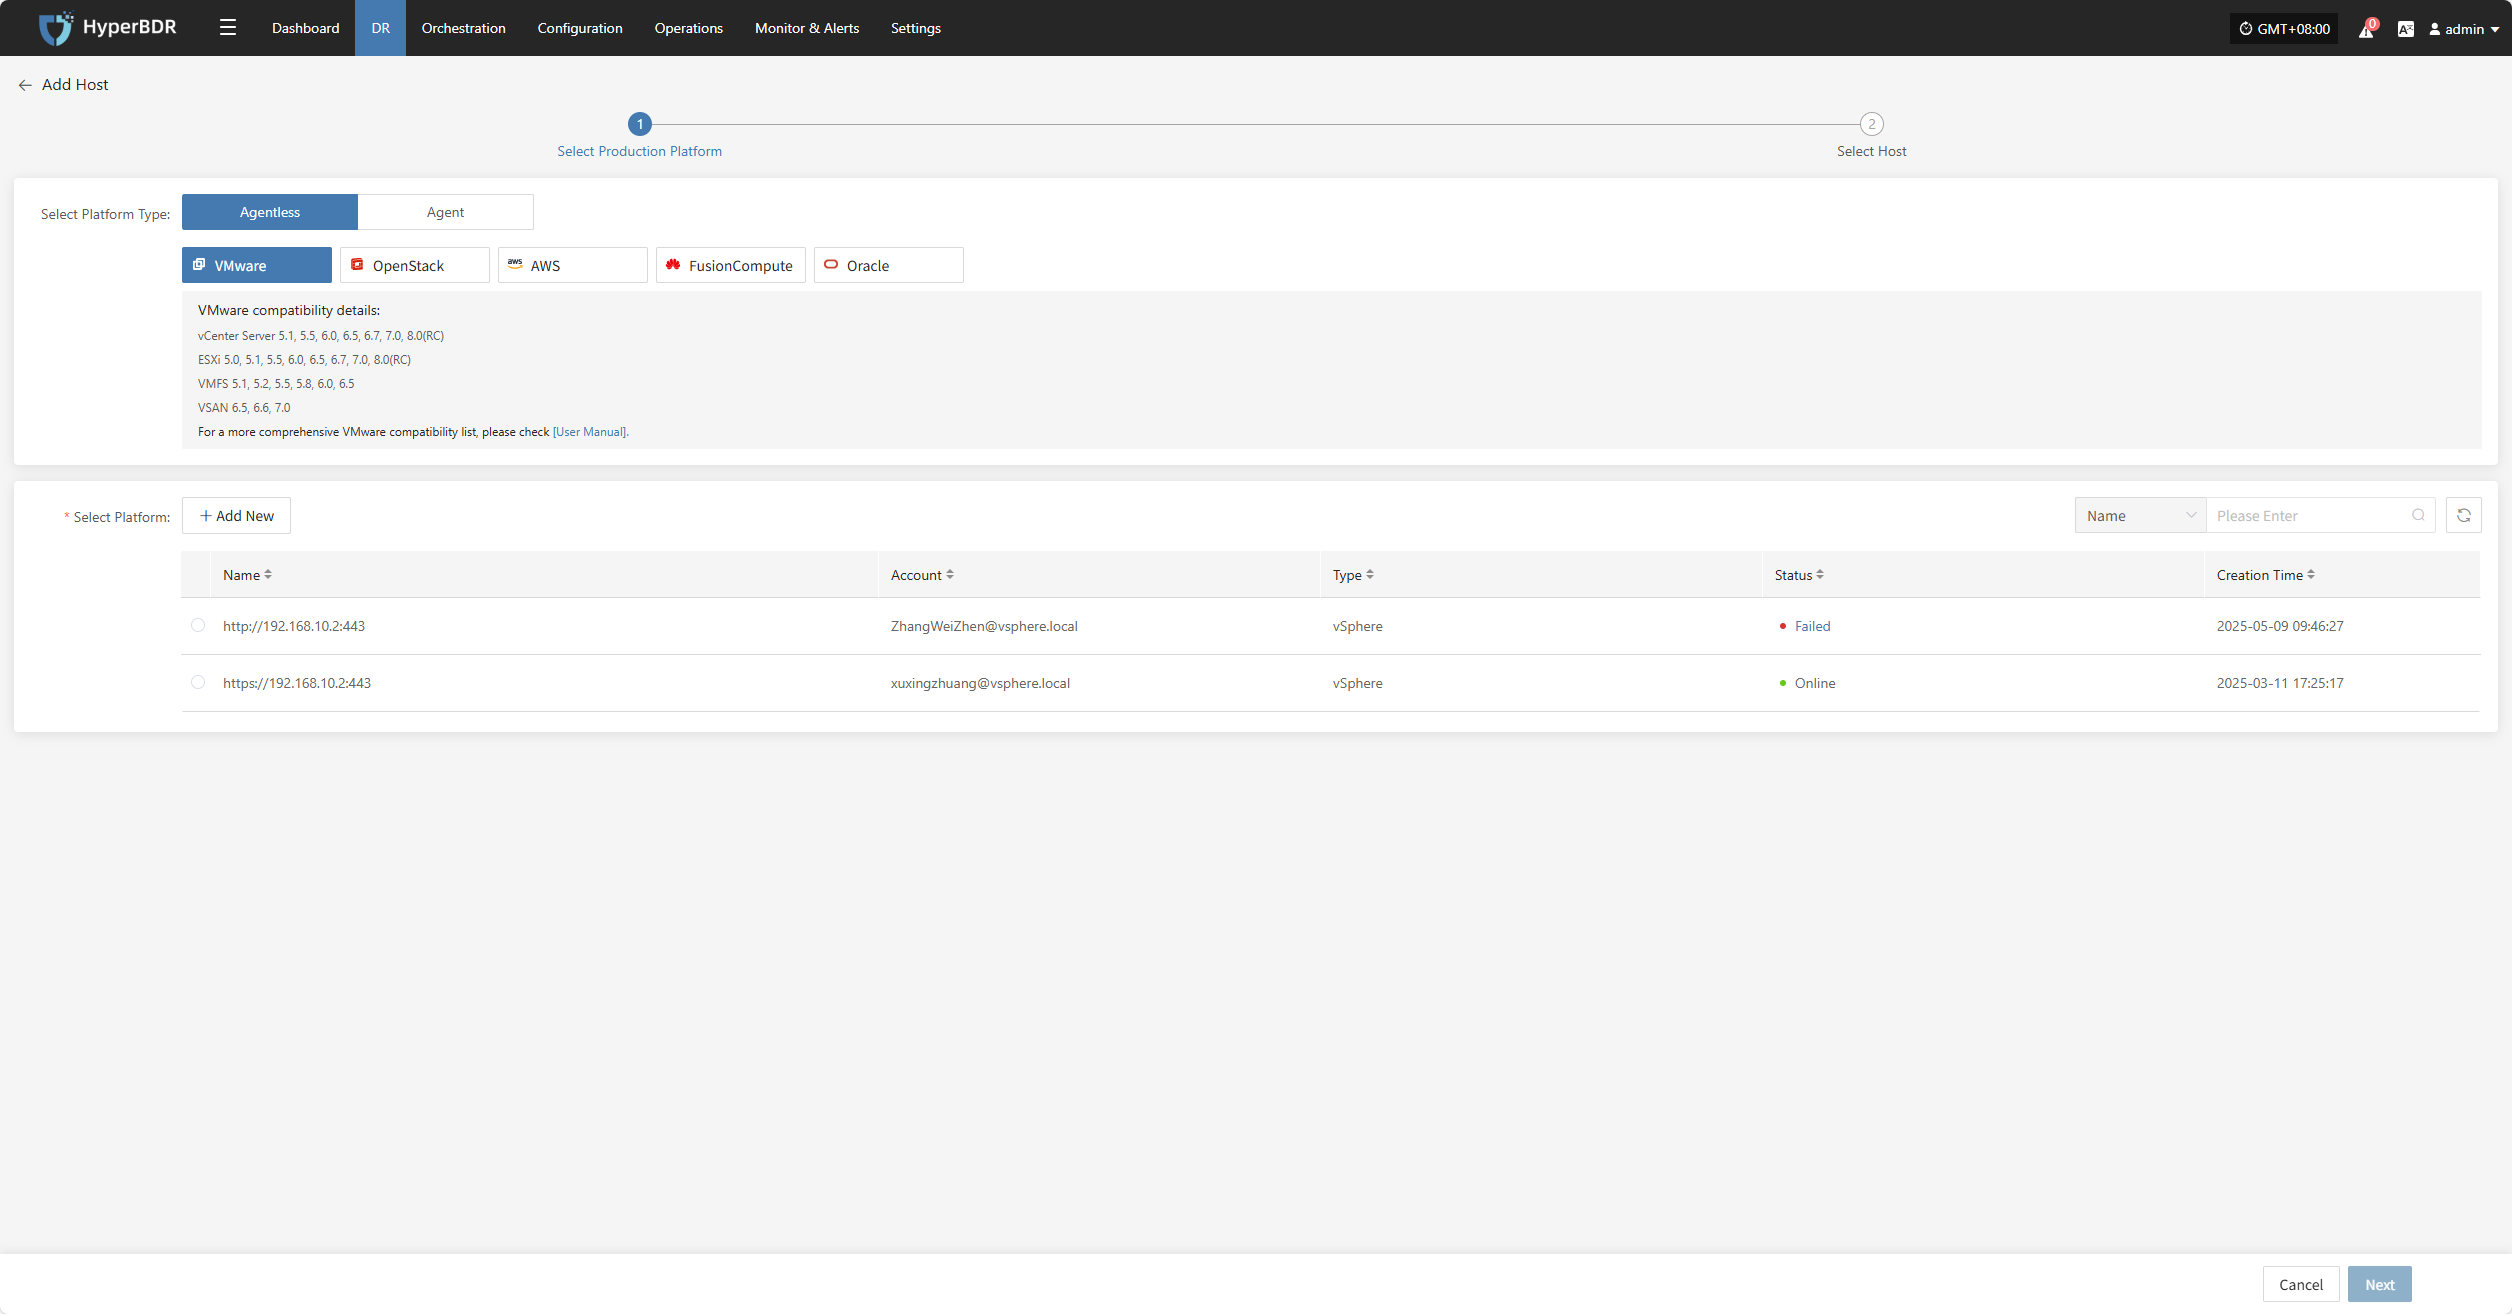
Click the "Select Host" menu, then click the "Add Host" button to add a host. Choose the production platform type, select "Agentless", and select "VMware" platform. In the production platform, choose the already added VMware platform link, then click "Next" to proceed to select the VMware hosts for disaster recovery.
If you have not added a production platform yet, you can click the "Add New" button to add a new VMware production platform. Refer to the steps here: Add VMware Platform
From the current VMware platform, check the virtual machines that need disaster recovery backup. You can flip pages to manually select in batches, or use the search function to find hosts by name or system type for backup.
When selecting backup hosts, you can refer to the number of host disks and source synchronization agent information. Currently, the number of source synchronization agents, maximum mounted disks, mounted disks, and remaining mountable disks can be seen. This information helps you expand the specs and quantity of source synchronization agents to support large-scale backups.
You can view a list of all virtual machines including their operating system, number of disks, total disk capacity, support for synchronization, and incremental backup support.
The "Reload Virtual Machines" feature allows you to reload any new hosts that do not appear in the list after being created on the platform. Click the "Reload Virtual Machines" button to refresh the list.

After selecting the virtual machines, click the "Submit" button to add the backup virtual machines to the platform.
Once added, you can check the virtual machines to be backed up, then click the "Submit" button to move the backup hosts to the second step for further disaster recovery configuration.
OpenStack
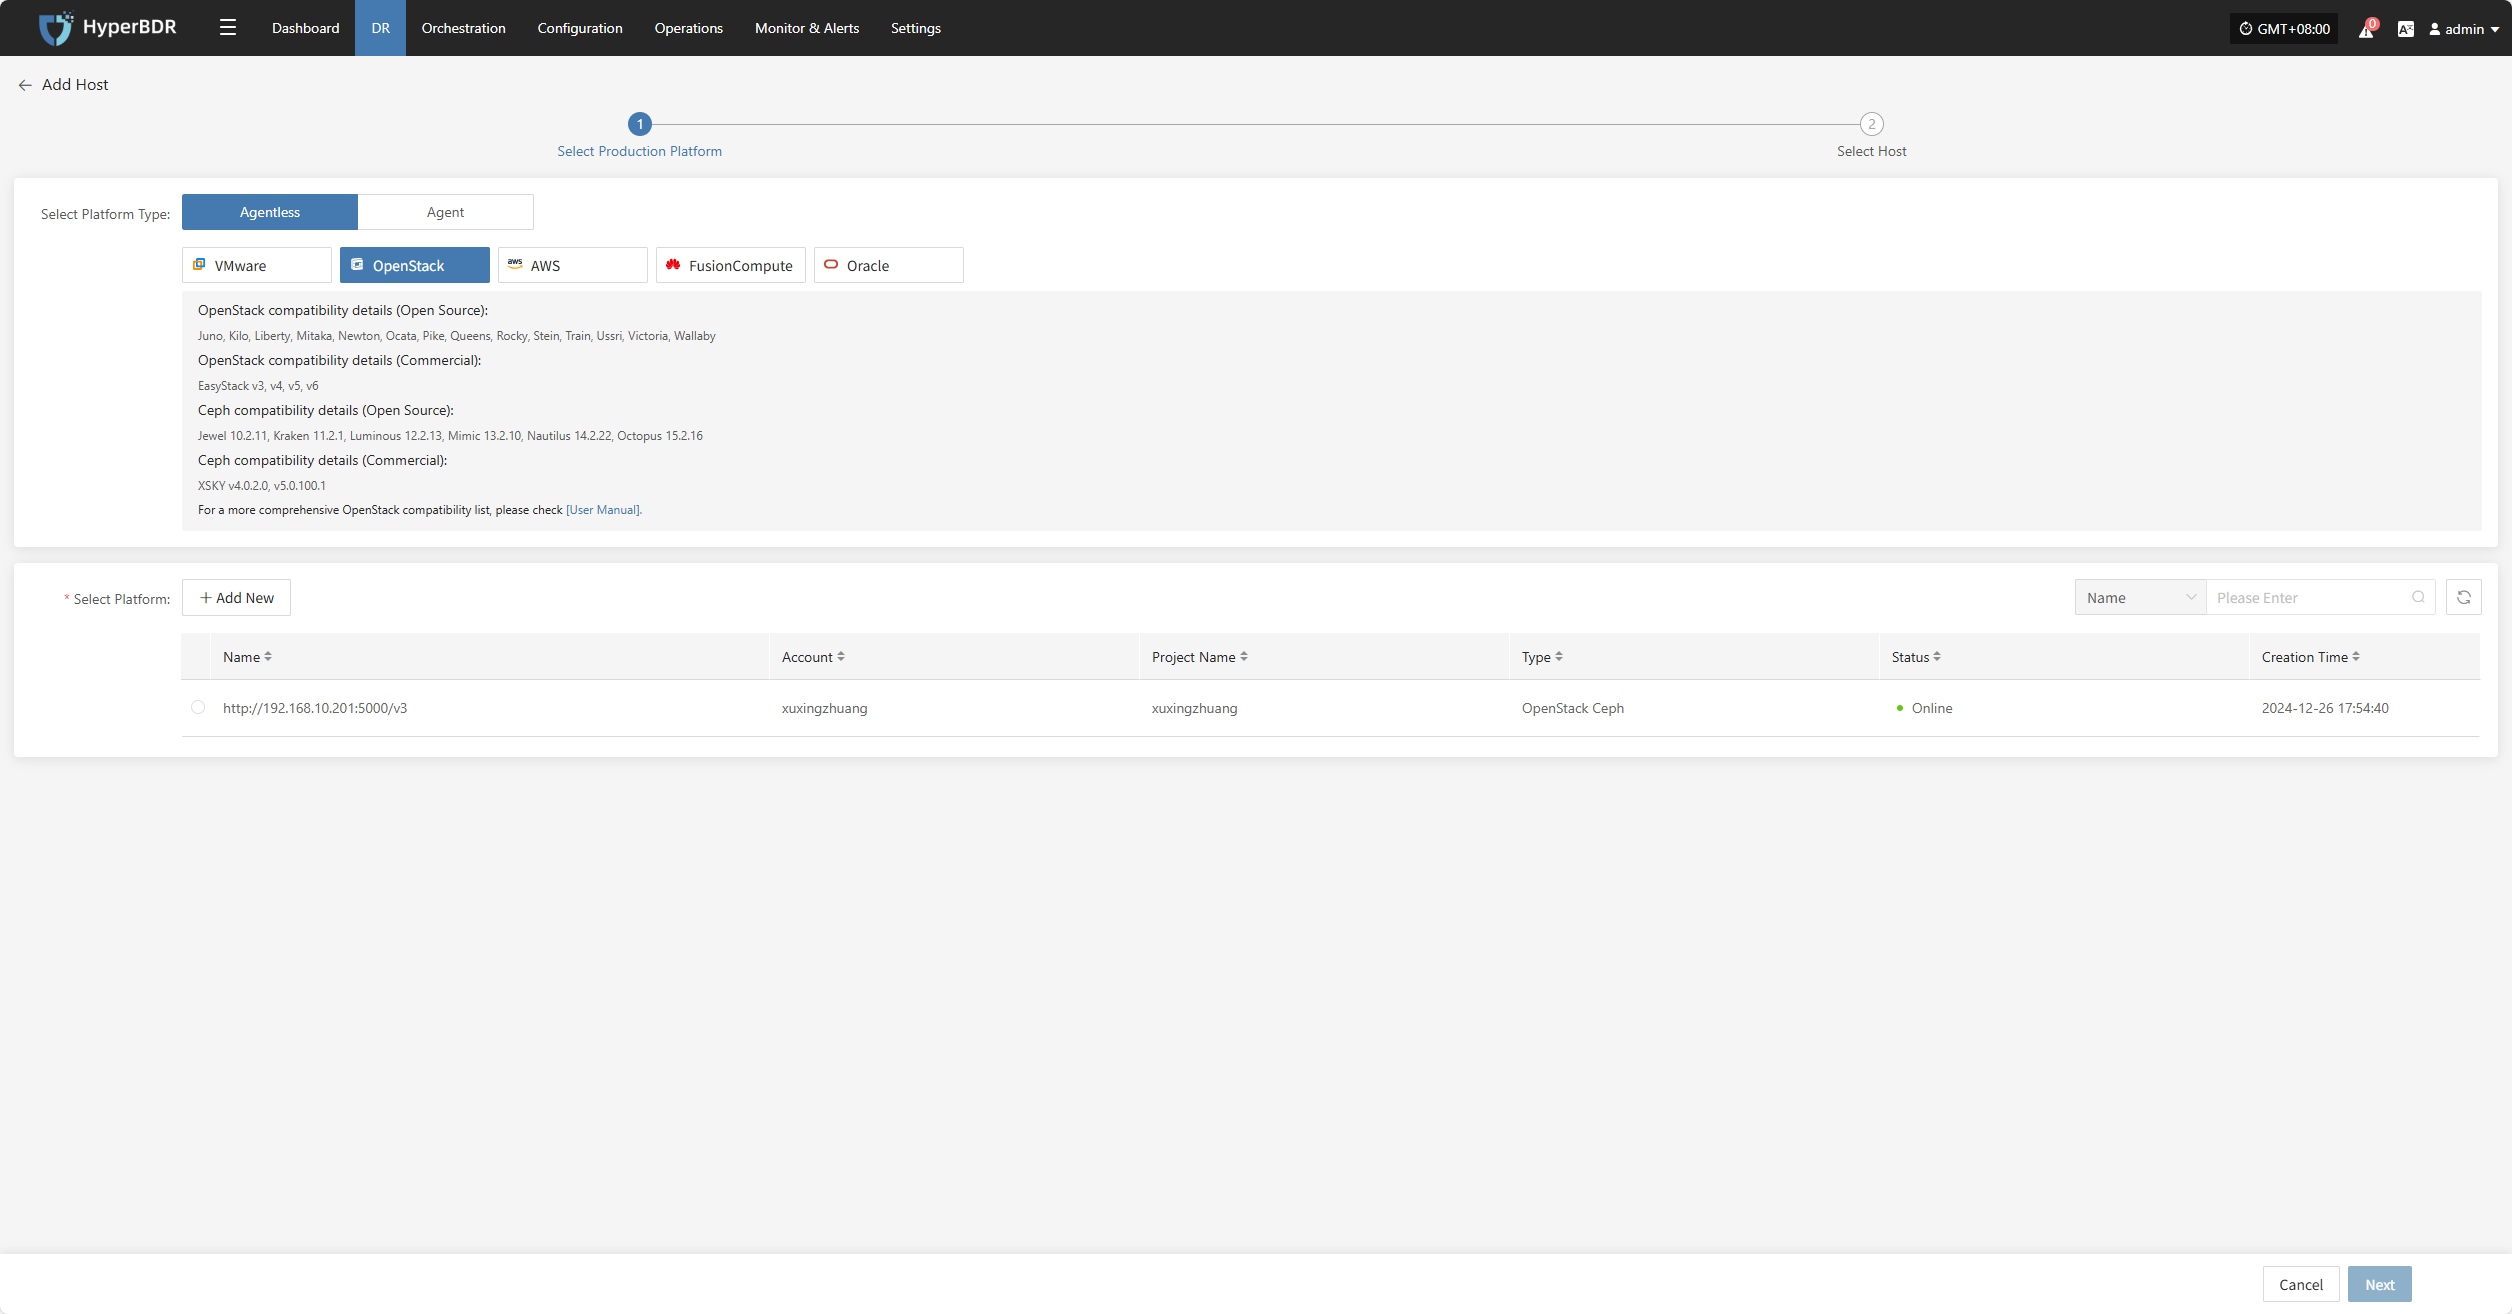
Click the "Select Host" menu, then click the "Add Host" button to add a host. Choose the production platform type, select "Agentless", and select the "OpenStack" platform. In the production platform section, choose the already added OpenStack platform link, then click "Next" to proceed to select the OpenStack hosts for disaster recovery.
If you have not added a production platform yet, you can click the "Add New" button to add a new OpenStack production platform. Refer to the steps here: Add OpenStack Production Platform
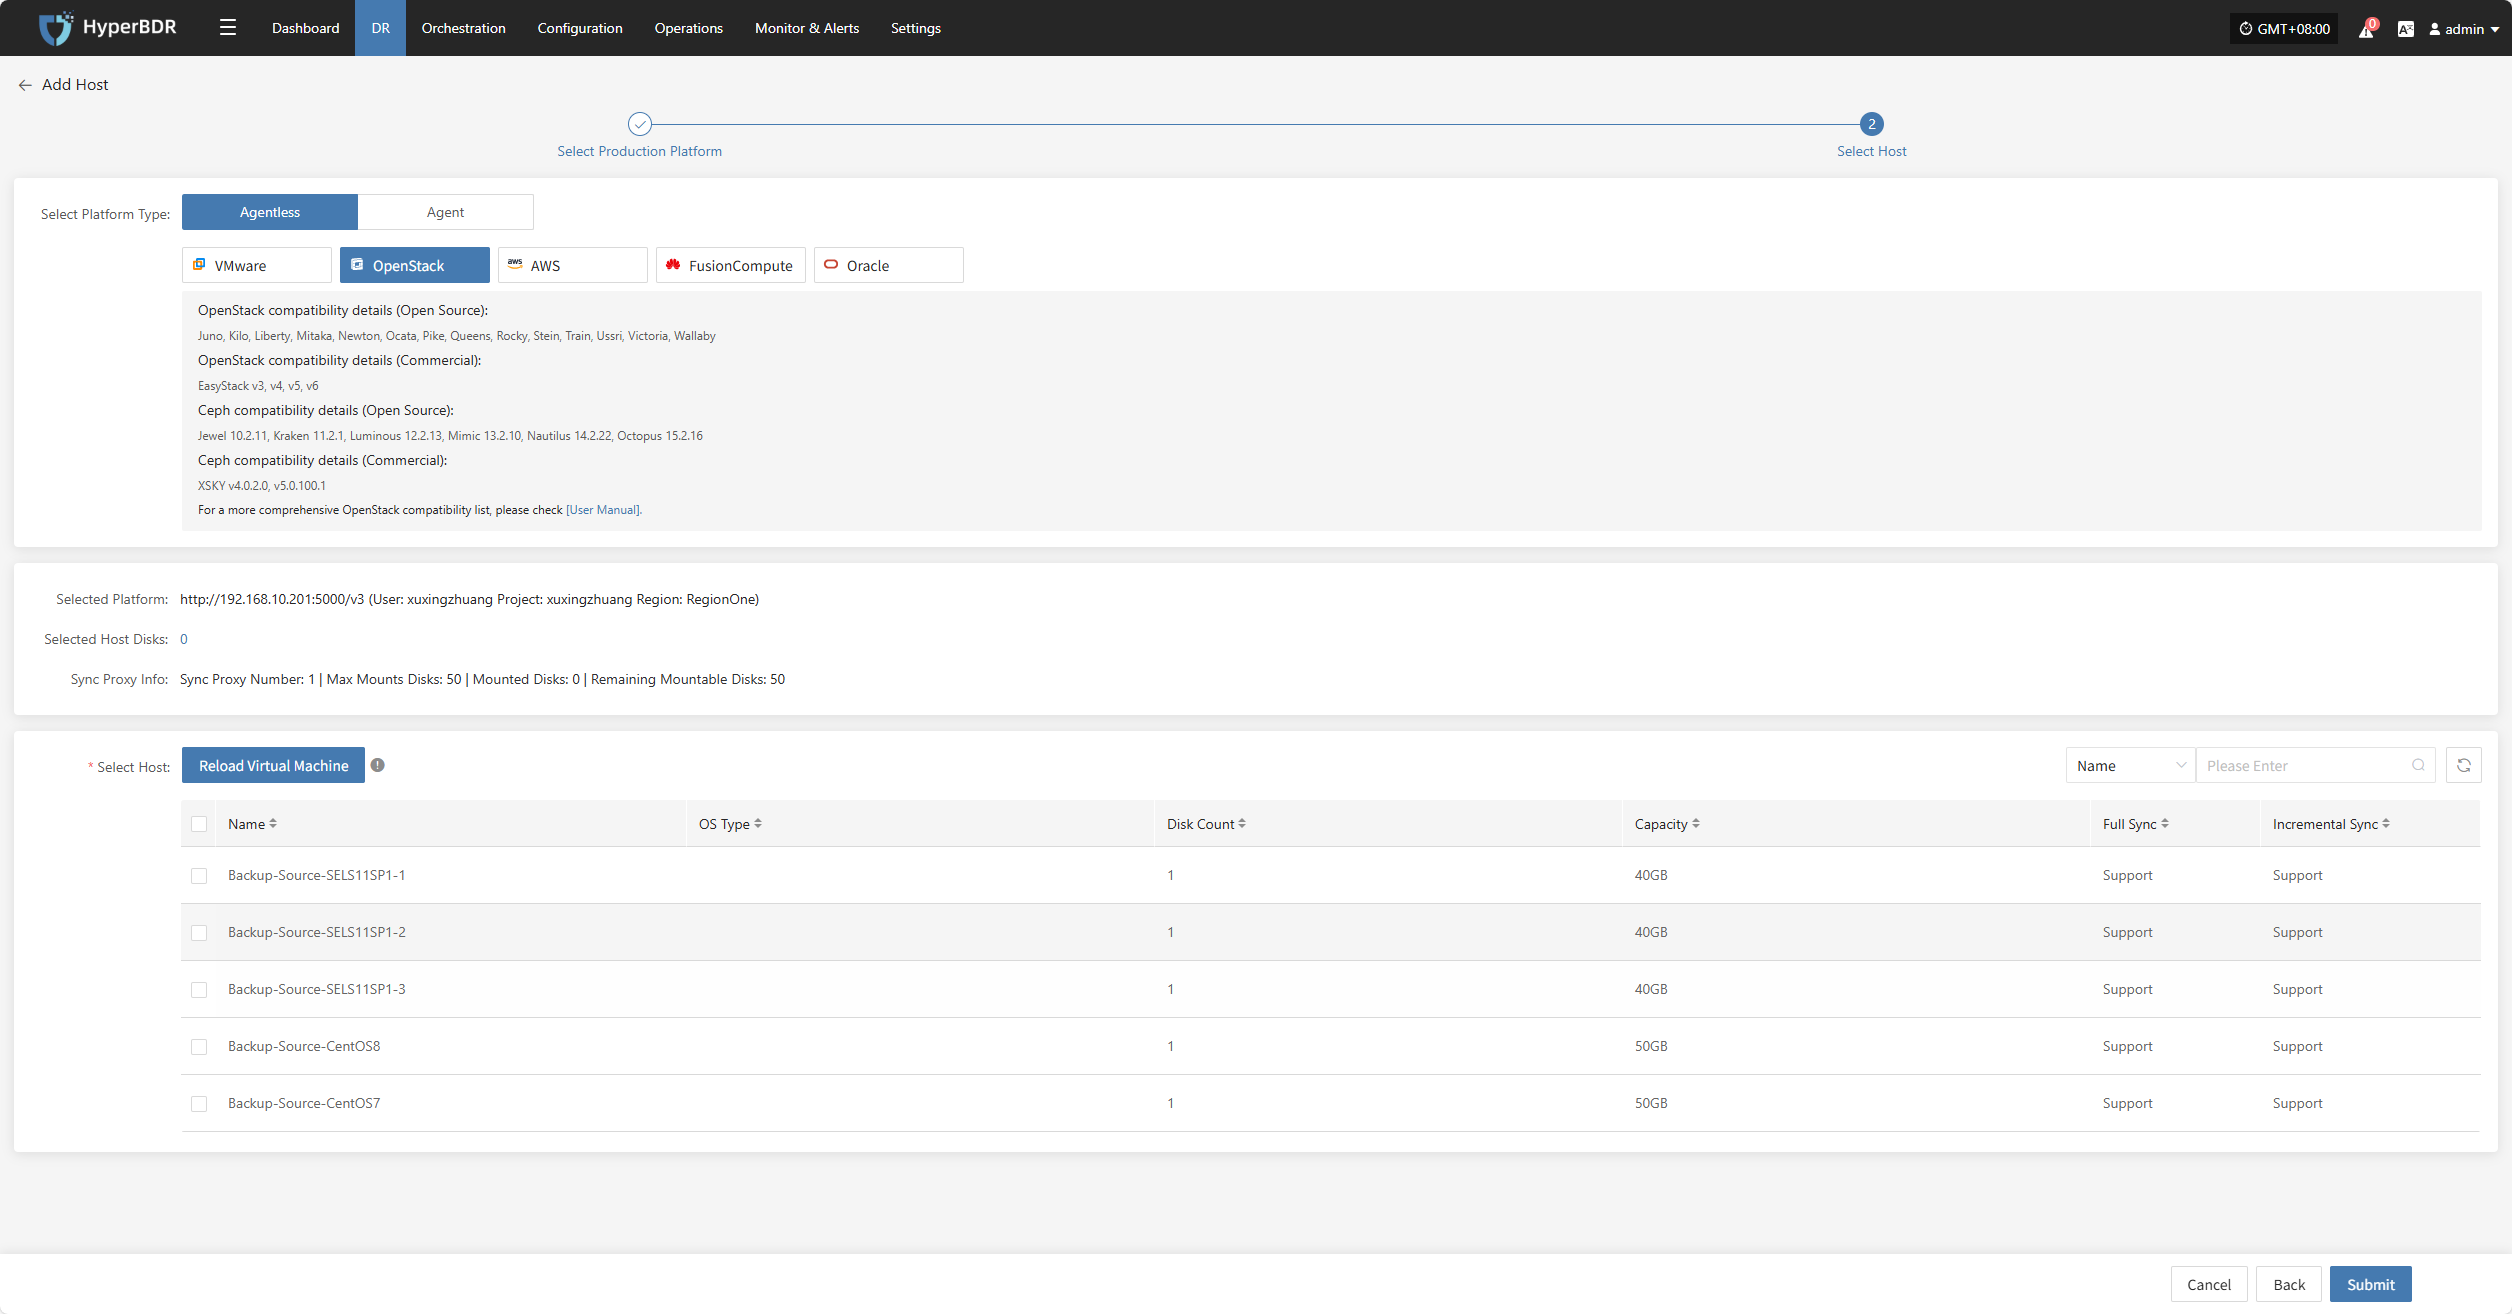
From the current OpenStack platform, check the virtual machines that need disaster recovery backup. You can flip pages to manually select in batches, or use the search function to find hosts by name or system type for backup.
When selecting backup hosts, you can refer to the number of host disks and source synchronization agent information. Currently, the number of source synchronization agents, maximum mounted disks, mounted disks, and remaining mountable disks can be seen. This information helps you expand the specs and quantity of source synchronization agents to support large-scale backups.
You can view a list of all virtual machines including their system type, number of disks, total disk capacity, support for synchronization, and incremental backup support.
The "Reload Virtual Machines" feature allows you to reload any new hosts that do not appear in the list after being created on the platform. Click the "Reload Virtual Machines" button to refresh the list.
After selecting the virtual machines, click the "Submit" button to add the backup virtual machines to the platform.

Once added, you can check the virtual machines to be backed up, then click the "Submit" button to move the backup hosts to the second step for further disaster recovery configuration.
AWS
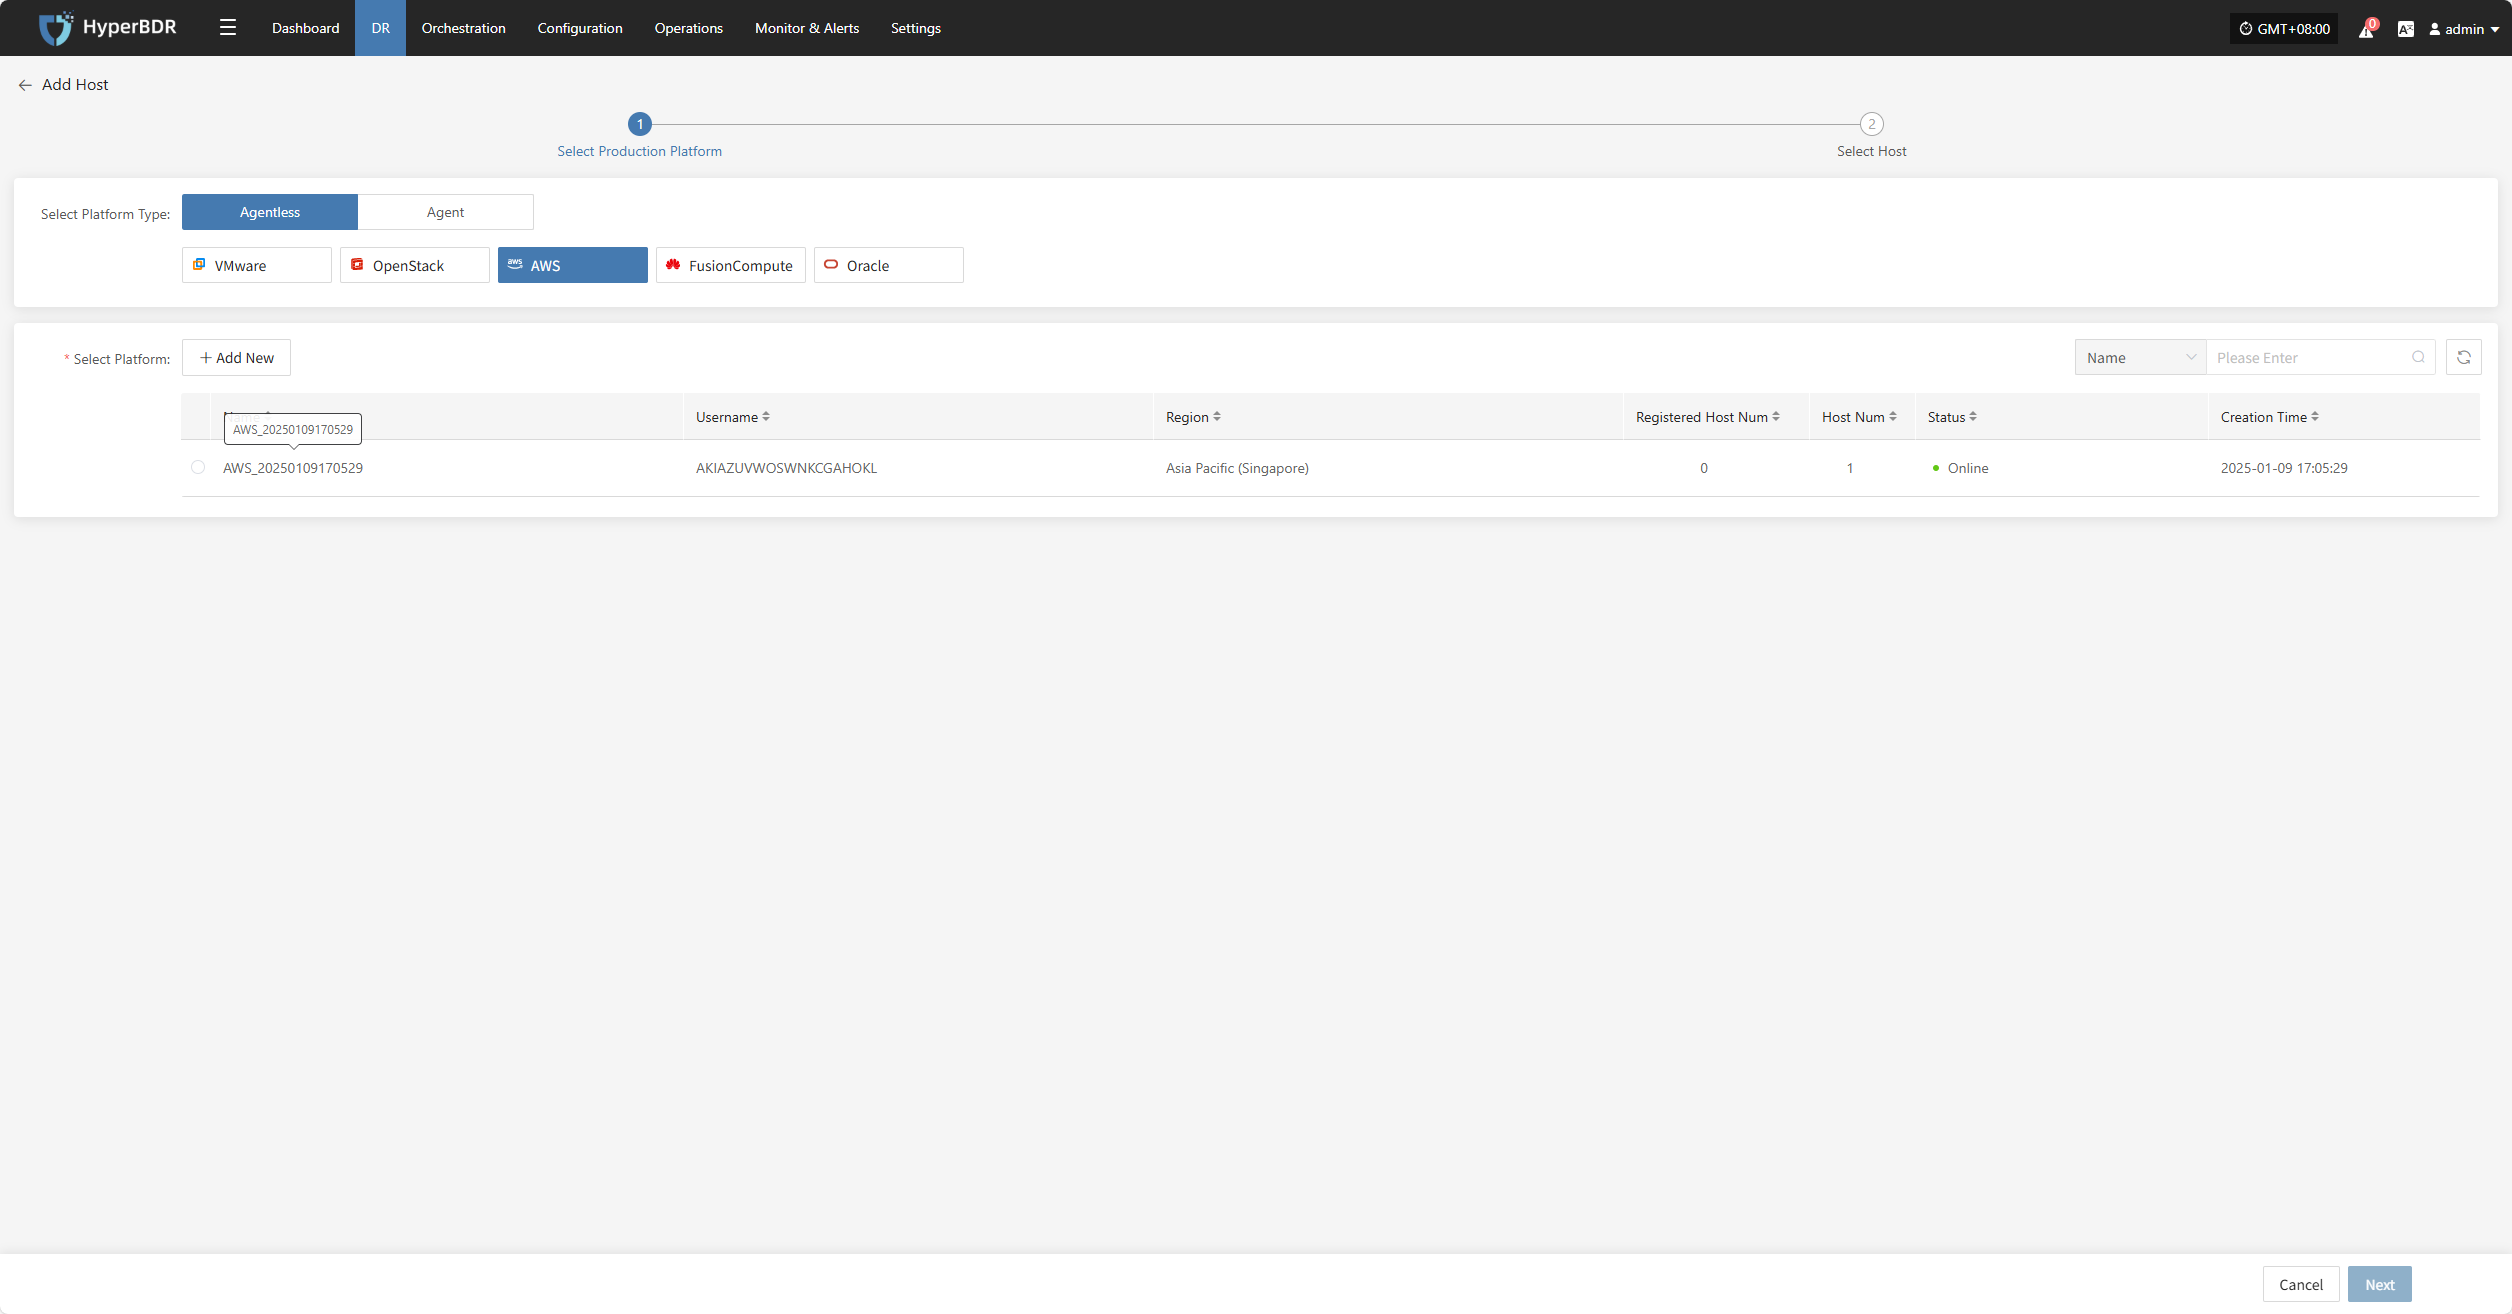
Click the "Select Host" menu, then click the "+ Add Host" button to add a host. Choose the production platform type, select "Agentless", and select the "AWS" platform. In the production platform section, choose the already added AWS platform link, then click "Next" to proceed to select the AWS hosts for disaster recovery.
If you have not added a production platform yet, you can click the "Add New" button to add a new AWS production platform. Refer to the steps here: Add AWS Production Platform
From the current AWS platform, check the virtual machines that need disaster recovery backup. You can flip pages to manually select in batches, or use the search function to find hosts by name or system type for backup.
When selecting backup hosts, you can refer to the number of host disks and source synchronization agent information. Currently, the number of source synchronization agents, maximum mounted disks, mounted disks, and remaining mountable disks can be seen. This information helps you expand the specs and quantity of source synchronization agents to support large-scale backups.
You can view a list of all virtual machines including their operating system, number of disks, total disk capacity, support for synchronization, and incremental backup support.
The "Reload Virtual Machines" feature allows you to reload any new hosts that do not appear in the list after being created on the platform. Click the "Reload Virtual Machines" button to refresh the list.
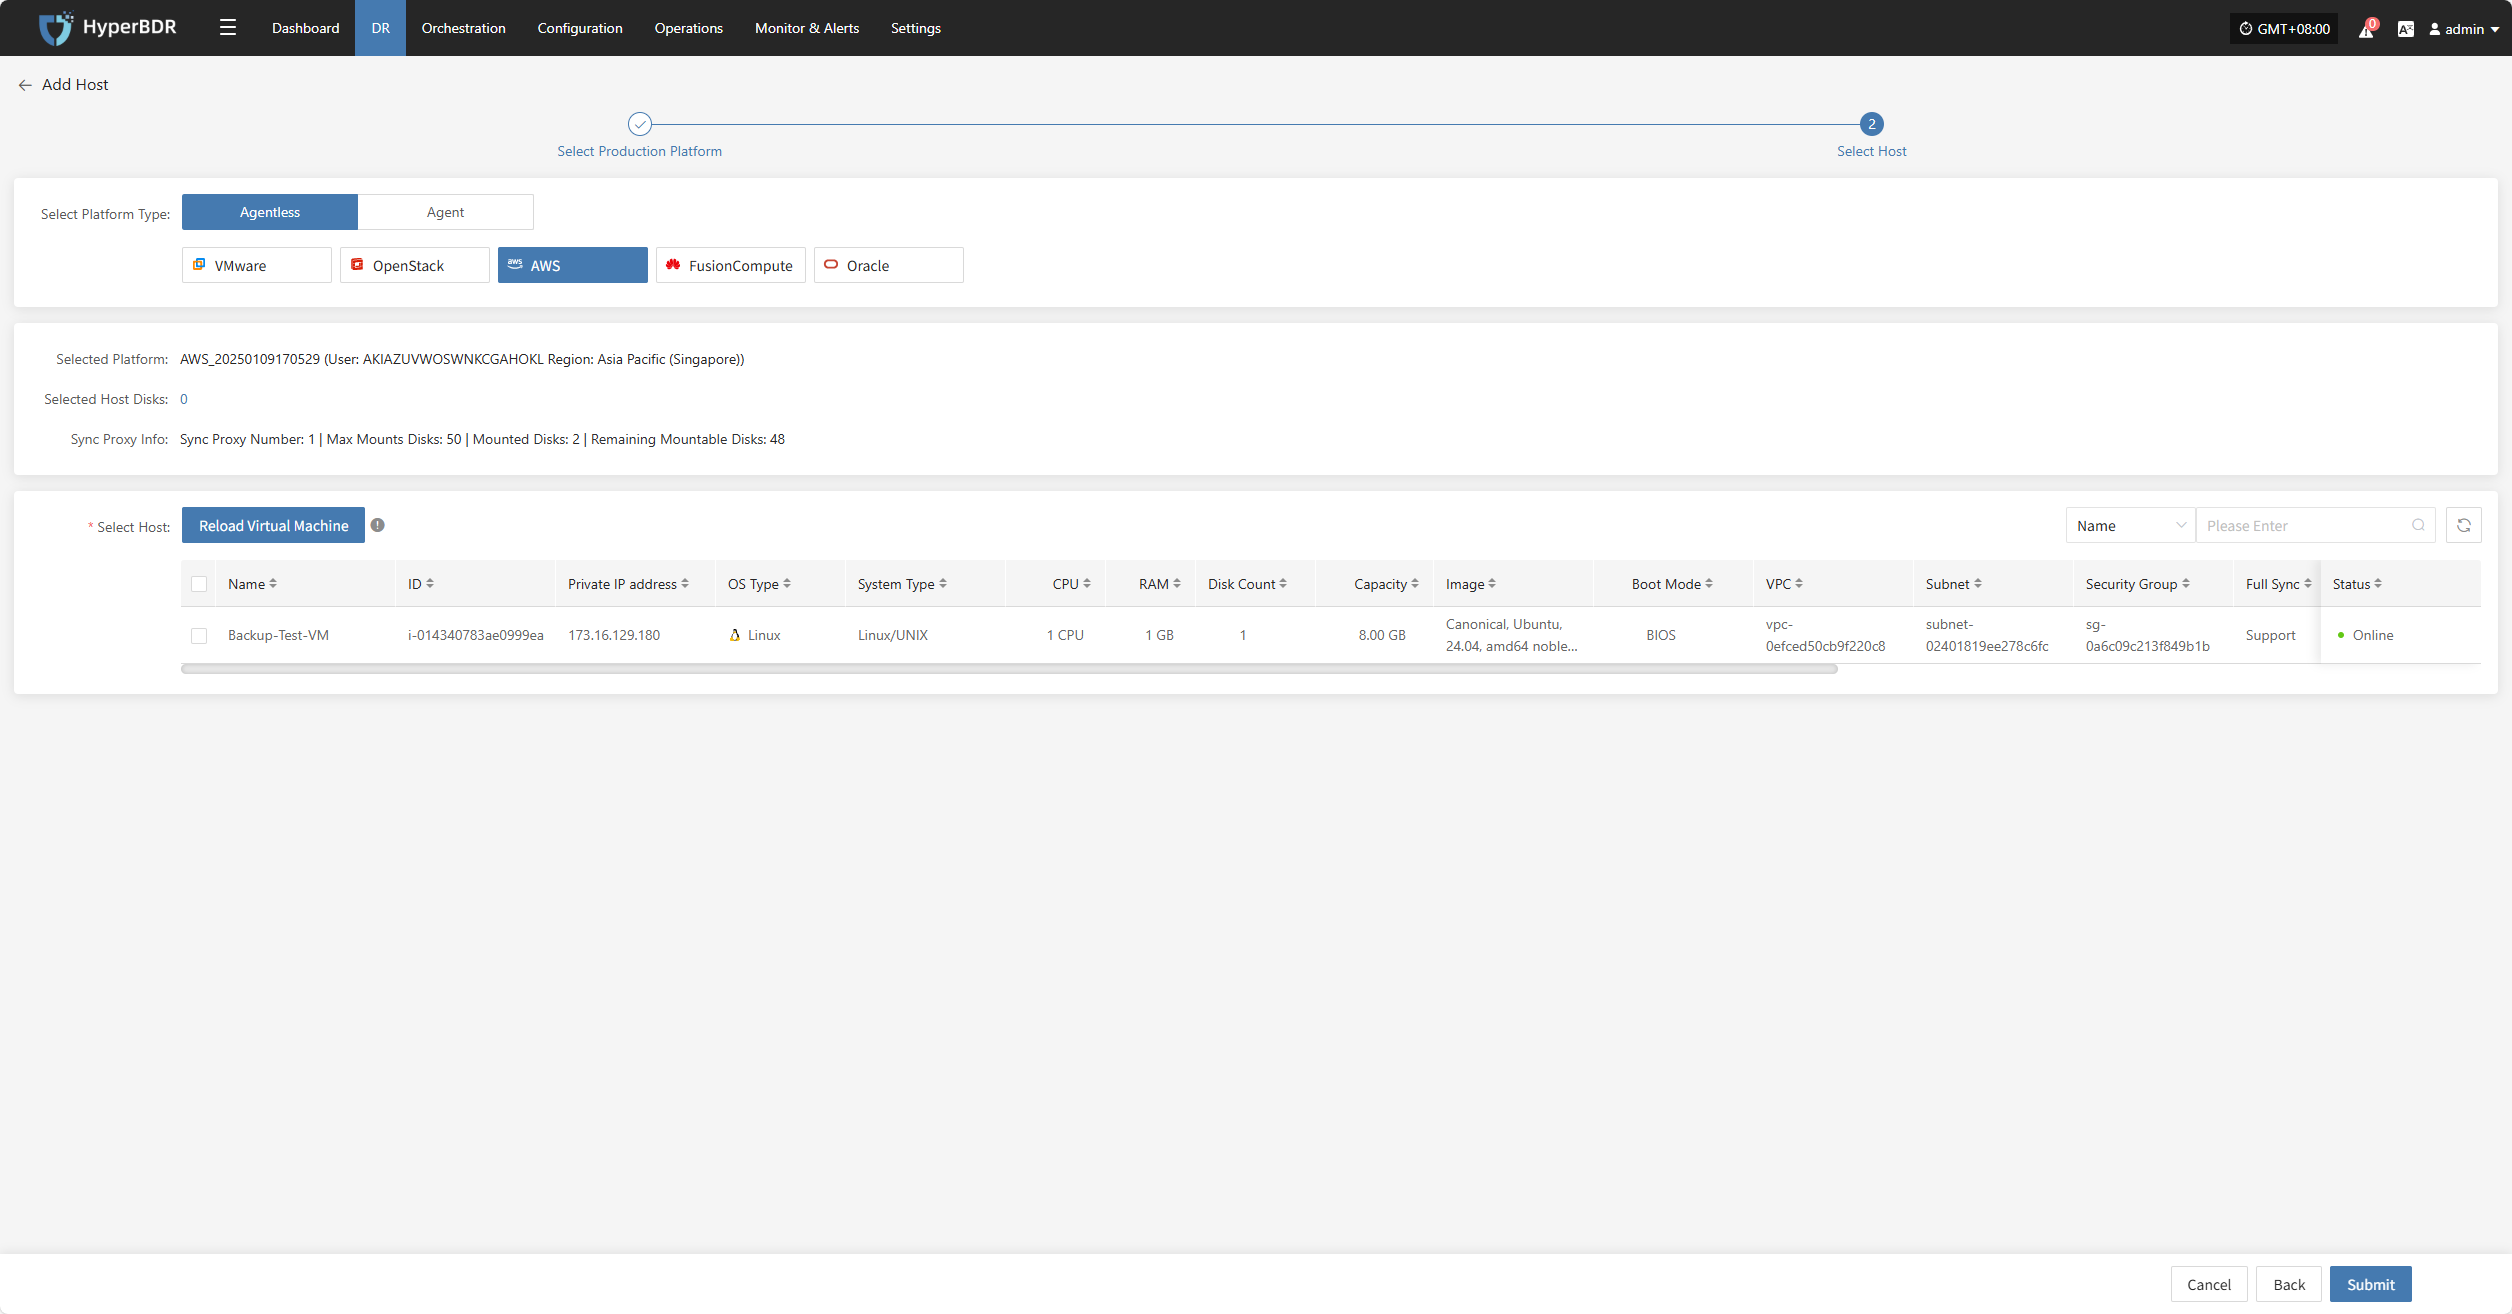
After selecting the virtual machines, click the "Submit" button to add the backup virtual machines to the platform.
Once added, you can check the virtual machines to be backed up, then click the "Submit" button to move the backup hosts to the second step for further disaster recovery configuration.
FusionCompute
Click the "Select Host" menu, then click the "+ Add Host" button to add a host.
Select the production platform type, choose "Agentless", and select the "FusionCompute" platform.
In the production platform list, select the already added FusionCompute platform link, then click "Next" to proceed to the list of FusionCompute disaster recovery hosts.
If you have not added a production platform, click the "Add New" button to add a new FusionCompute production platform. Refer to the guide: Add FusionCompute Production Platform
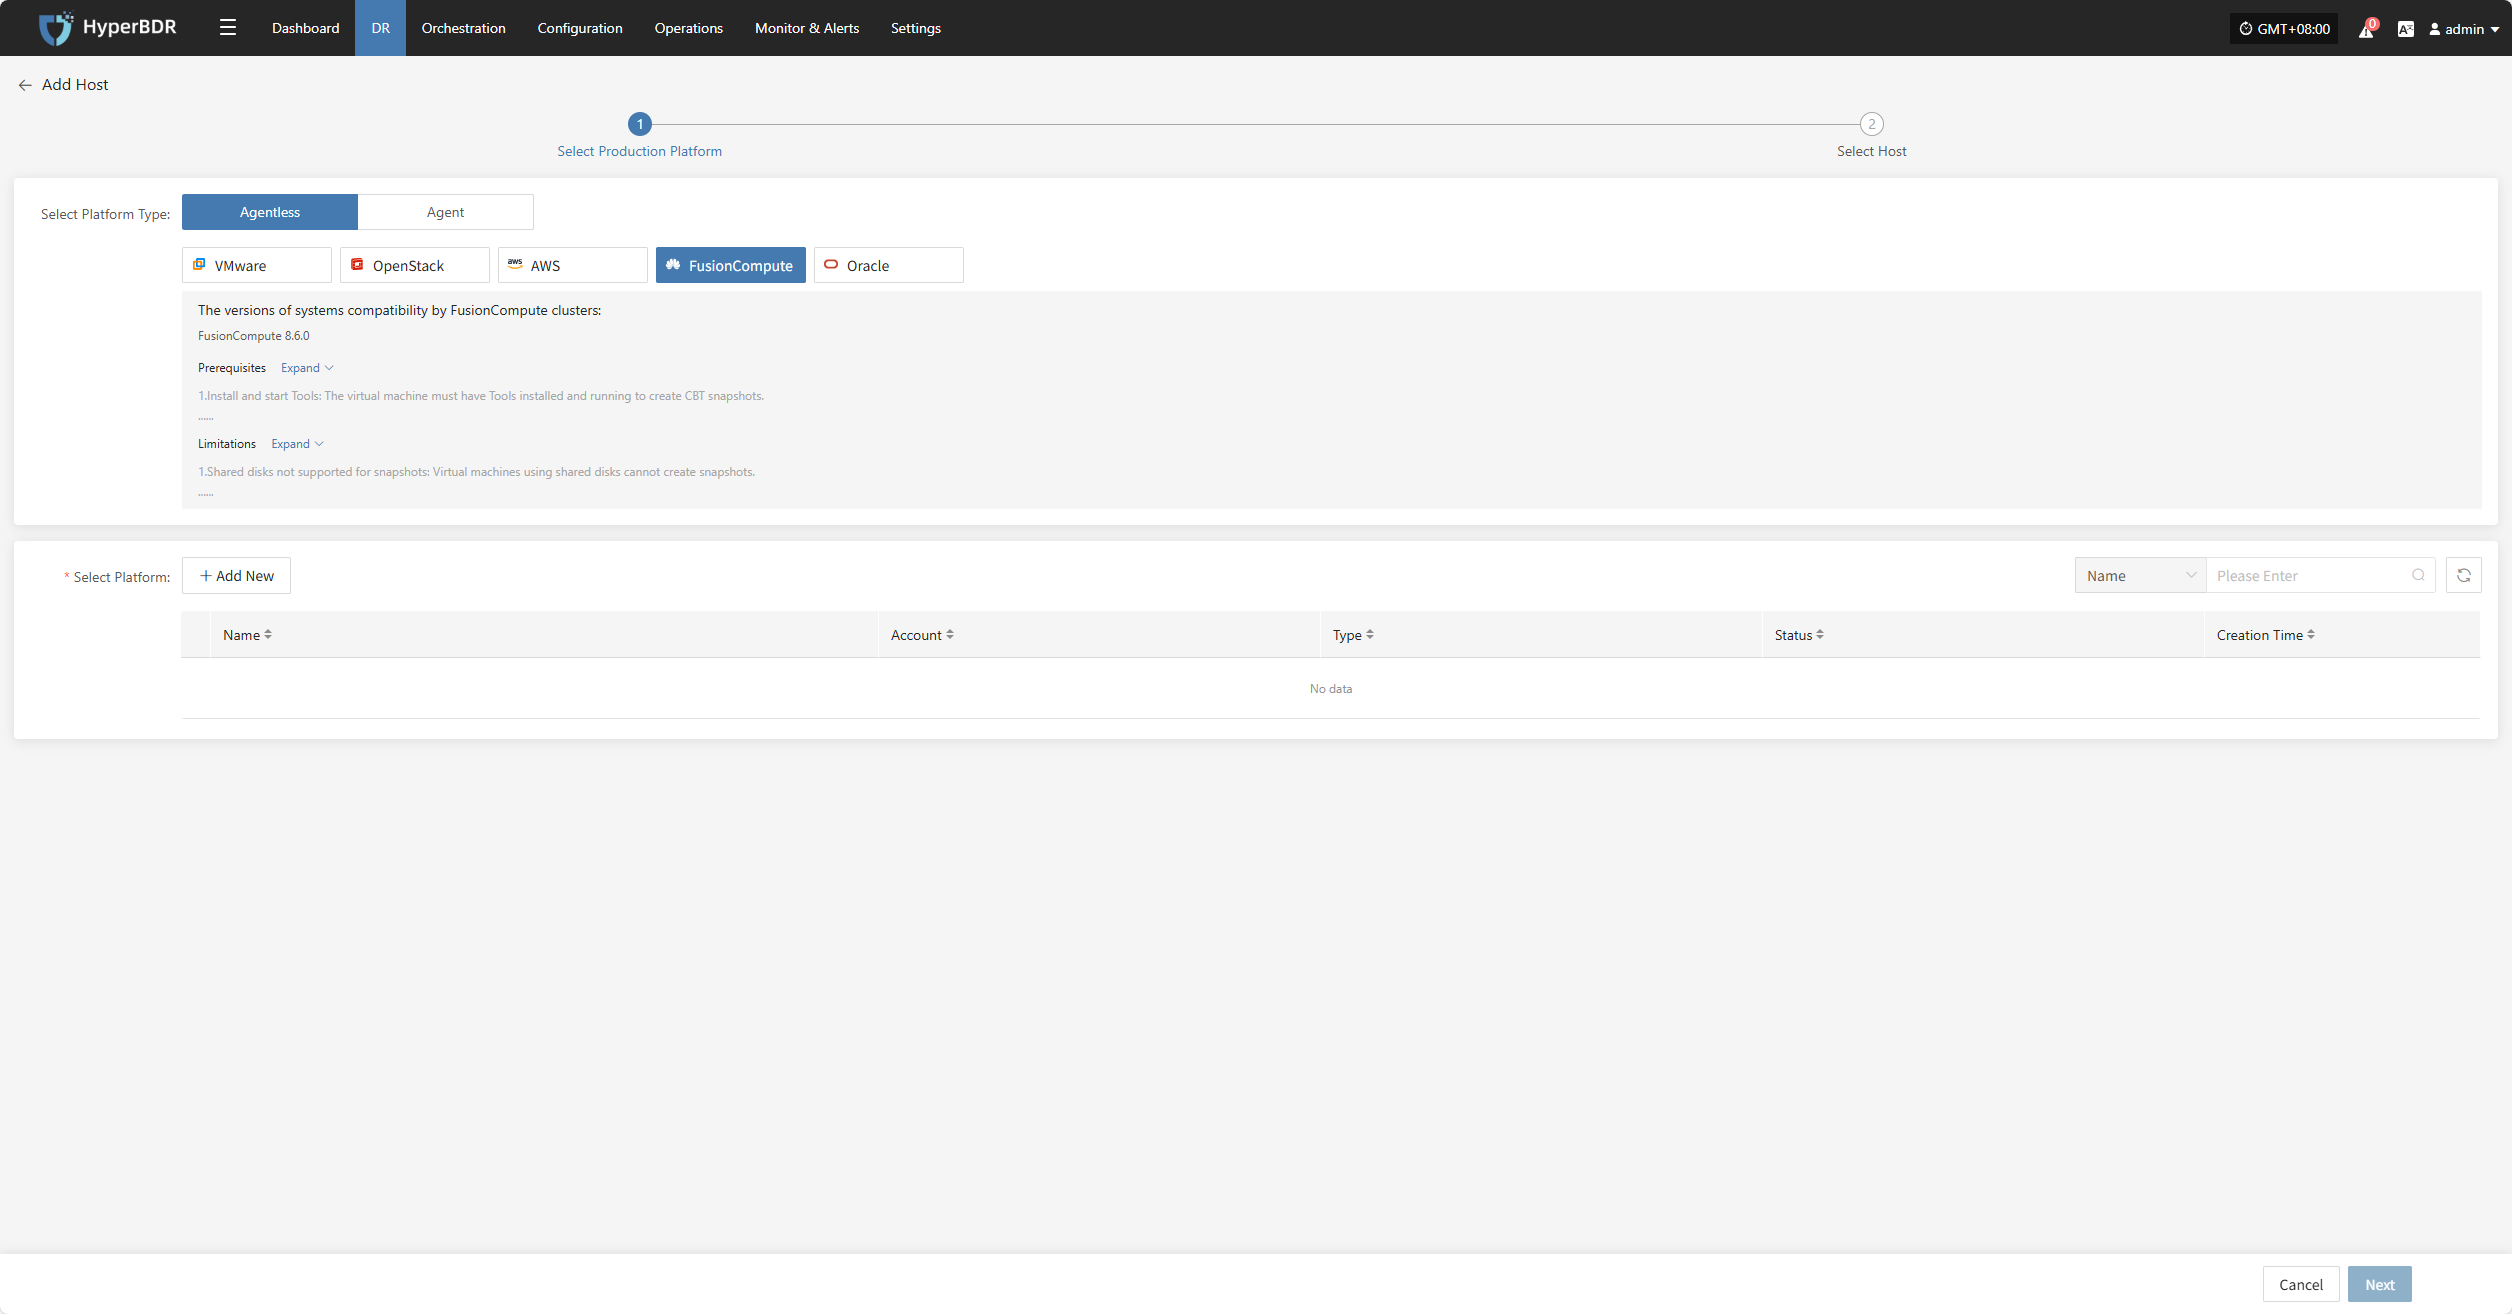
Select the virtual machines to be backed up from the current FusionCompute platform. You can select them manually page by page or use the search function to find hosts by name or operating system.
When selecting backup hosts, refer to the host disk count and source sync agent information. The current number of sync agents, maximum mountable disks, mounted disks, and remaining mountable disks are displayed. You can scale the specifications and quantity of source sync agents anytime to support large-scale backups.
The list shows all virtual machines including operating system, disk count, total disk capacity, and support for sync and incremental backup.
The "Reload Virtual Machines" function: if newly created hosts on the platform do not appear in the list, click the "Reload Virtual Machines" button to refresh the list.
Oracle
Click the "Select Host" menu, then click the "Add Host" button to add a host.
Select the production platform type, choose "Agentless", and select the "Oracle" platform.
In the production platform list, select the already added Oracle platform link, then click "Next" to proceed to the Oracle disaster recovery host list.
If you have not added a production platform, click the "Add New" button to add a new Oracle production platform. Refer to the guide: Add Oracle Production Platform
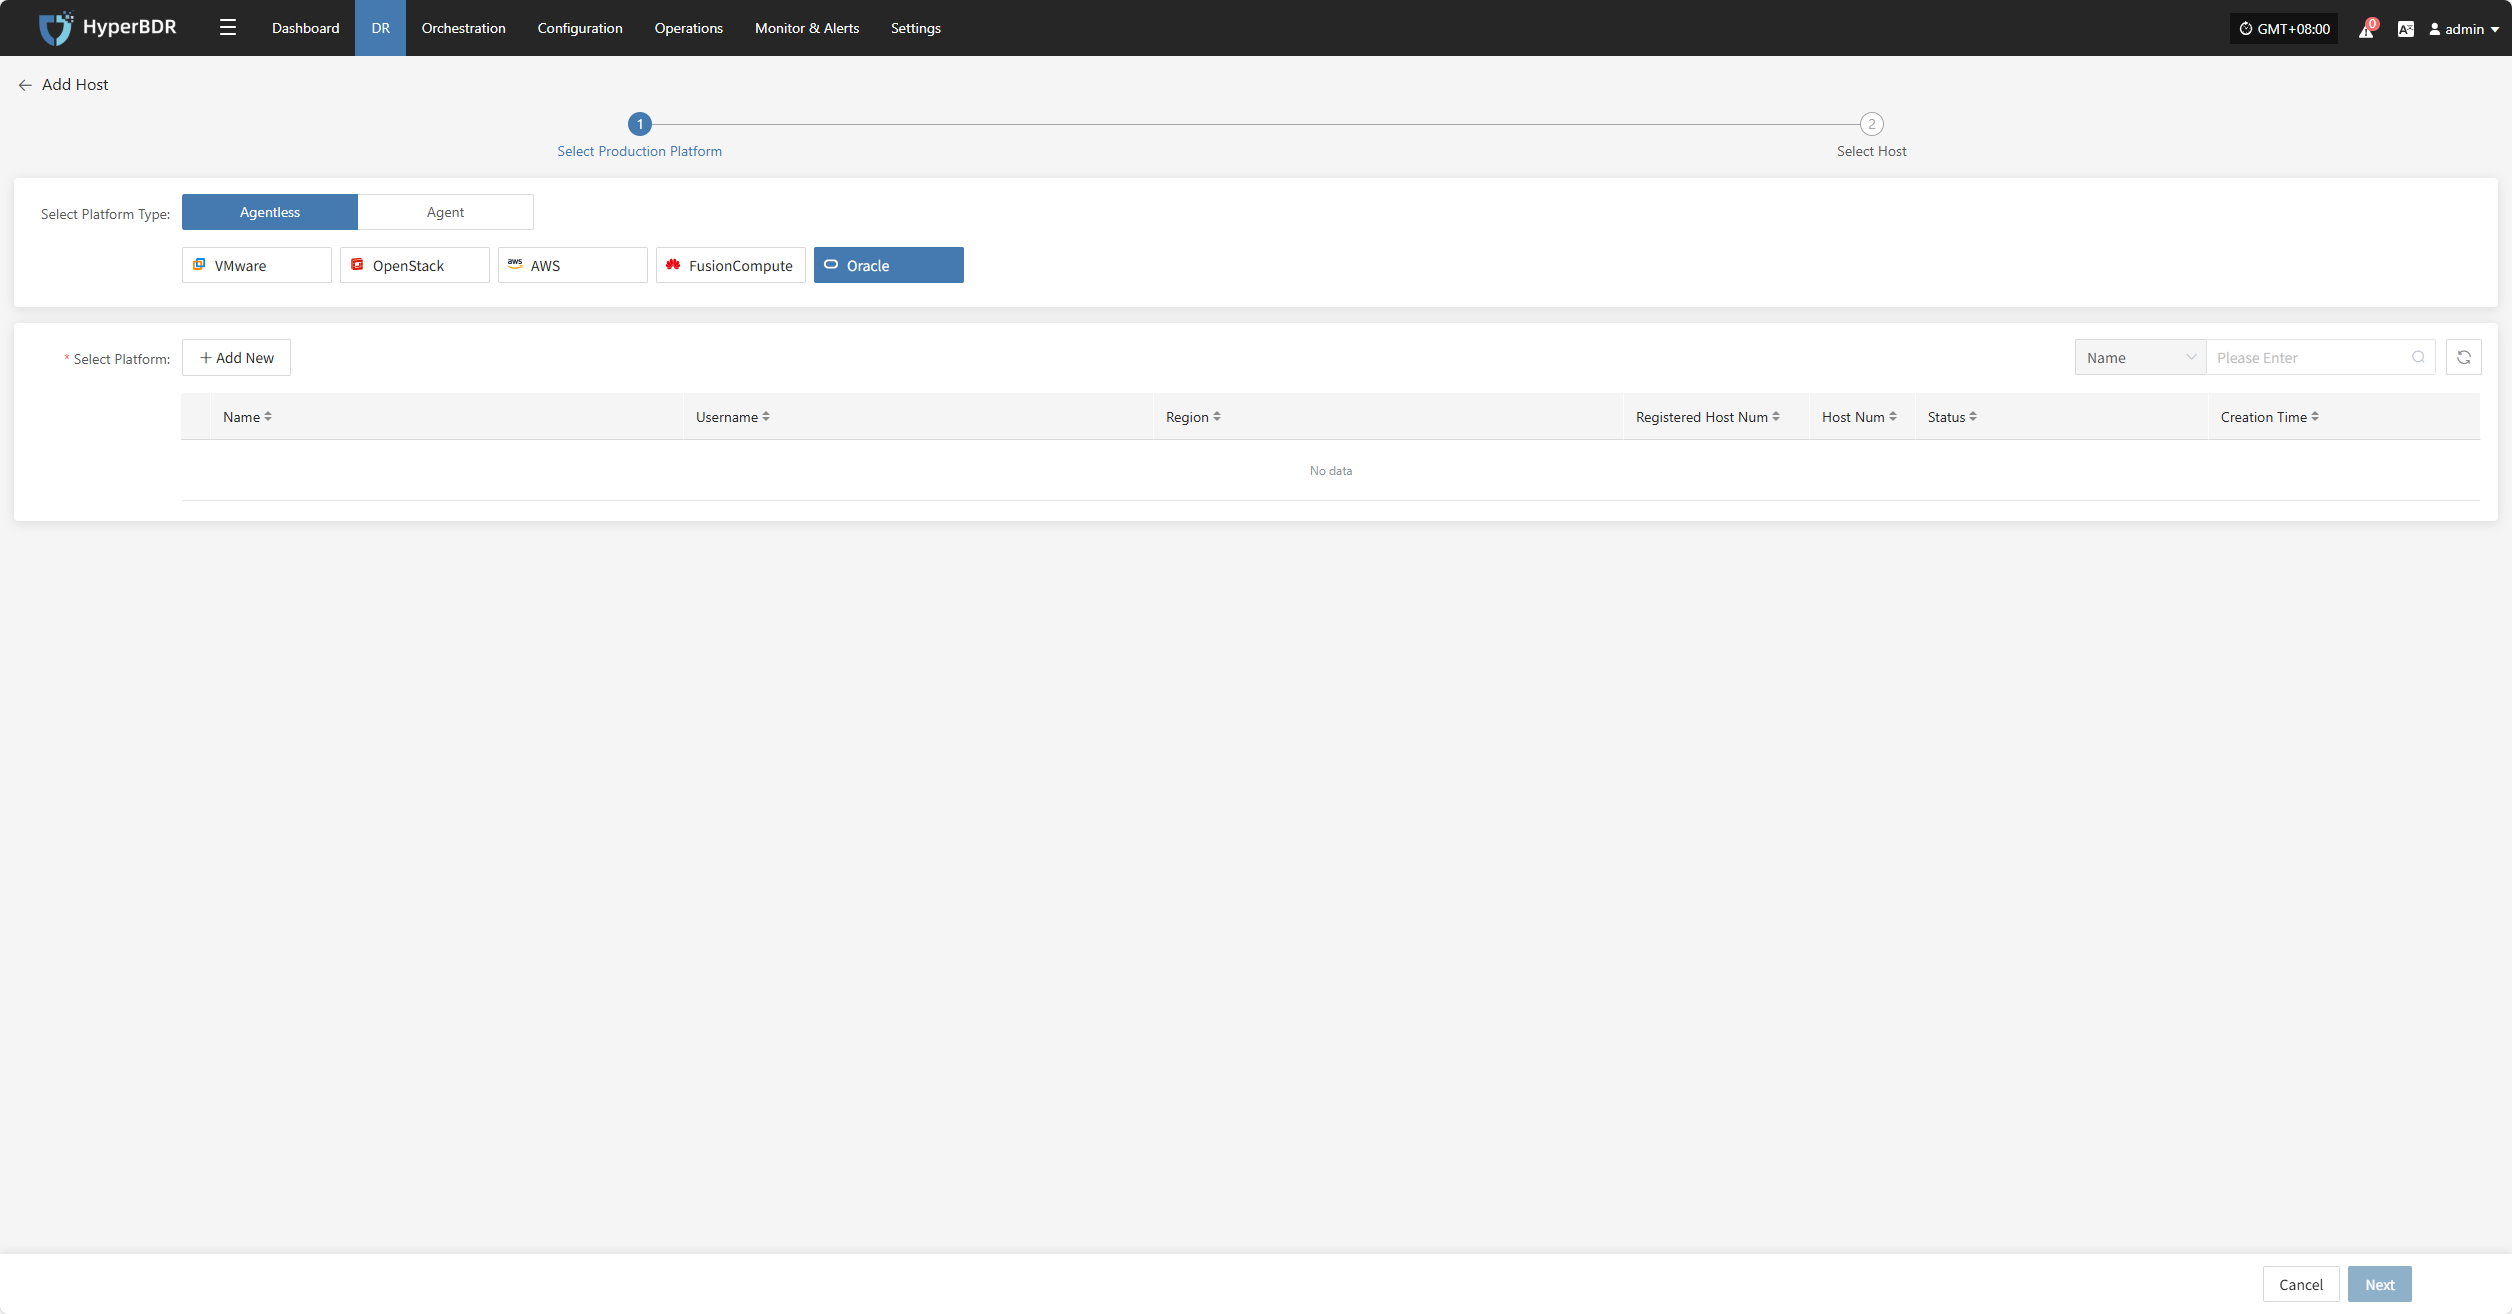
Select the virtual machines to be backed up from the current Oracle platform. You can select them manually page by page or use the search function to find hosts by name or operating system.
When selecting backup hosts, refer to the host disk count and source sync agent information. The current number of sync agents, maximum mountable disks, mounted disks, and remaining mountable disks are displayed. You can scale the specifications and quantity of source sync agents anytime to support large-scale backups.
The list shows all virtual machines including operating system, disk count, total disk capacity, and support for sync and incremental backup.
The "Reload Virtual Machines" function: if newly created hosts on the platform do not appear in the list, click the "Reload Virtual Machines" button to refresh the list.
Agent
Linux
Click the "Select Host" menu, then click the "Add Host" button to add a host.
Select the production platform type, choose "Agent", and select the "Linux" platform.
Refer to the Linux host compatibility details to choose which hosts are supported for disaster recovery.
Click the installation command below and run it on the source Linux host terminal to complete adding the Linux backup host.
For detailed installation steps, refer to: Click here to view
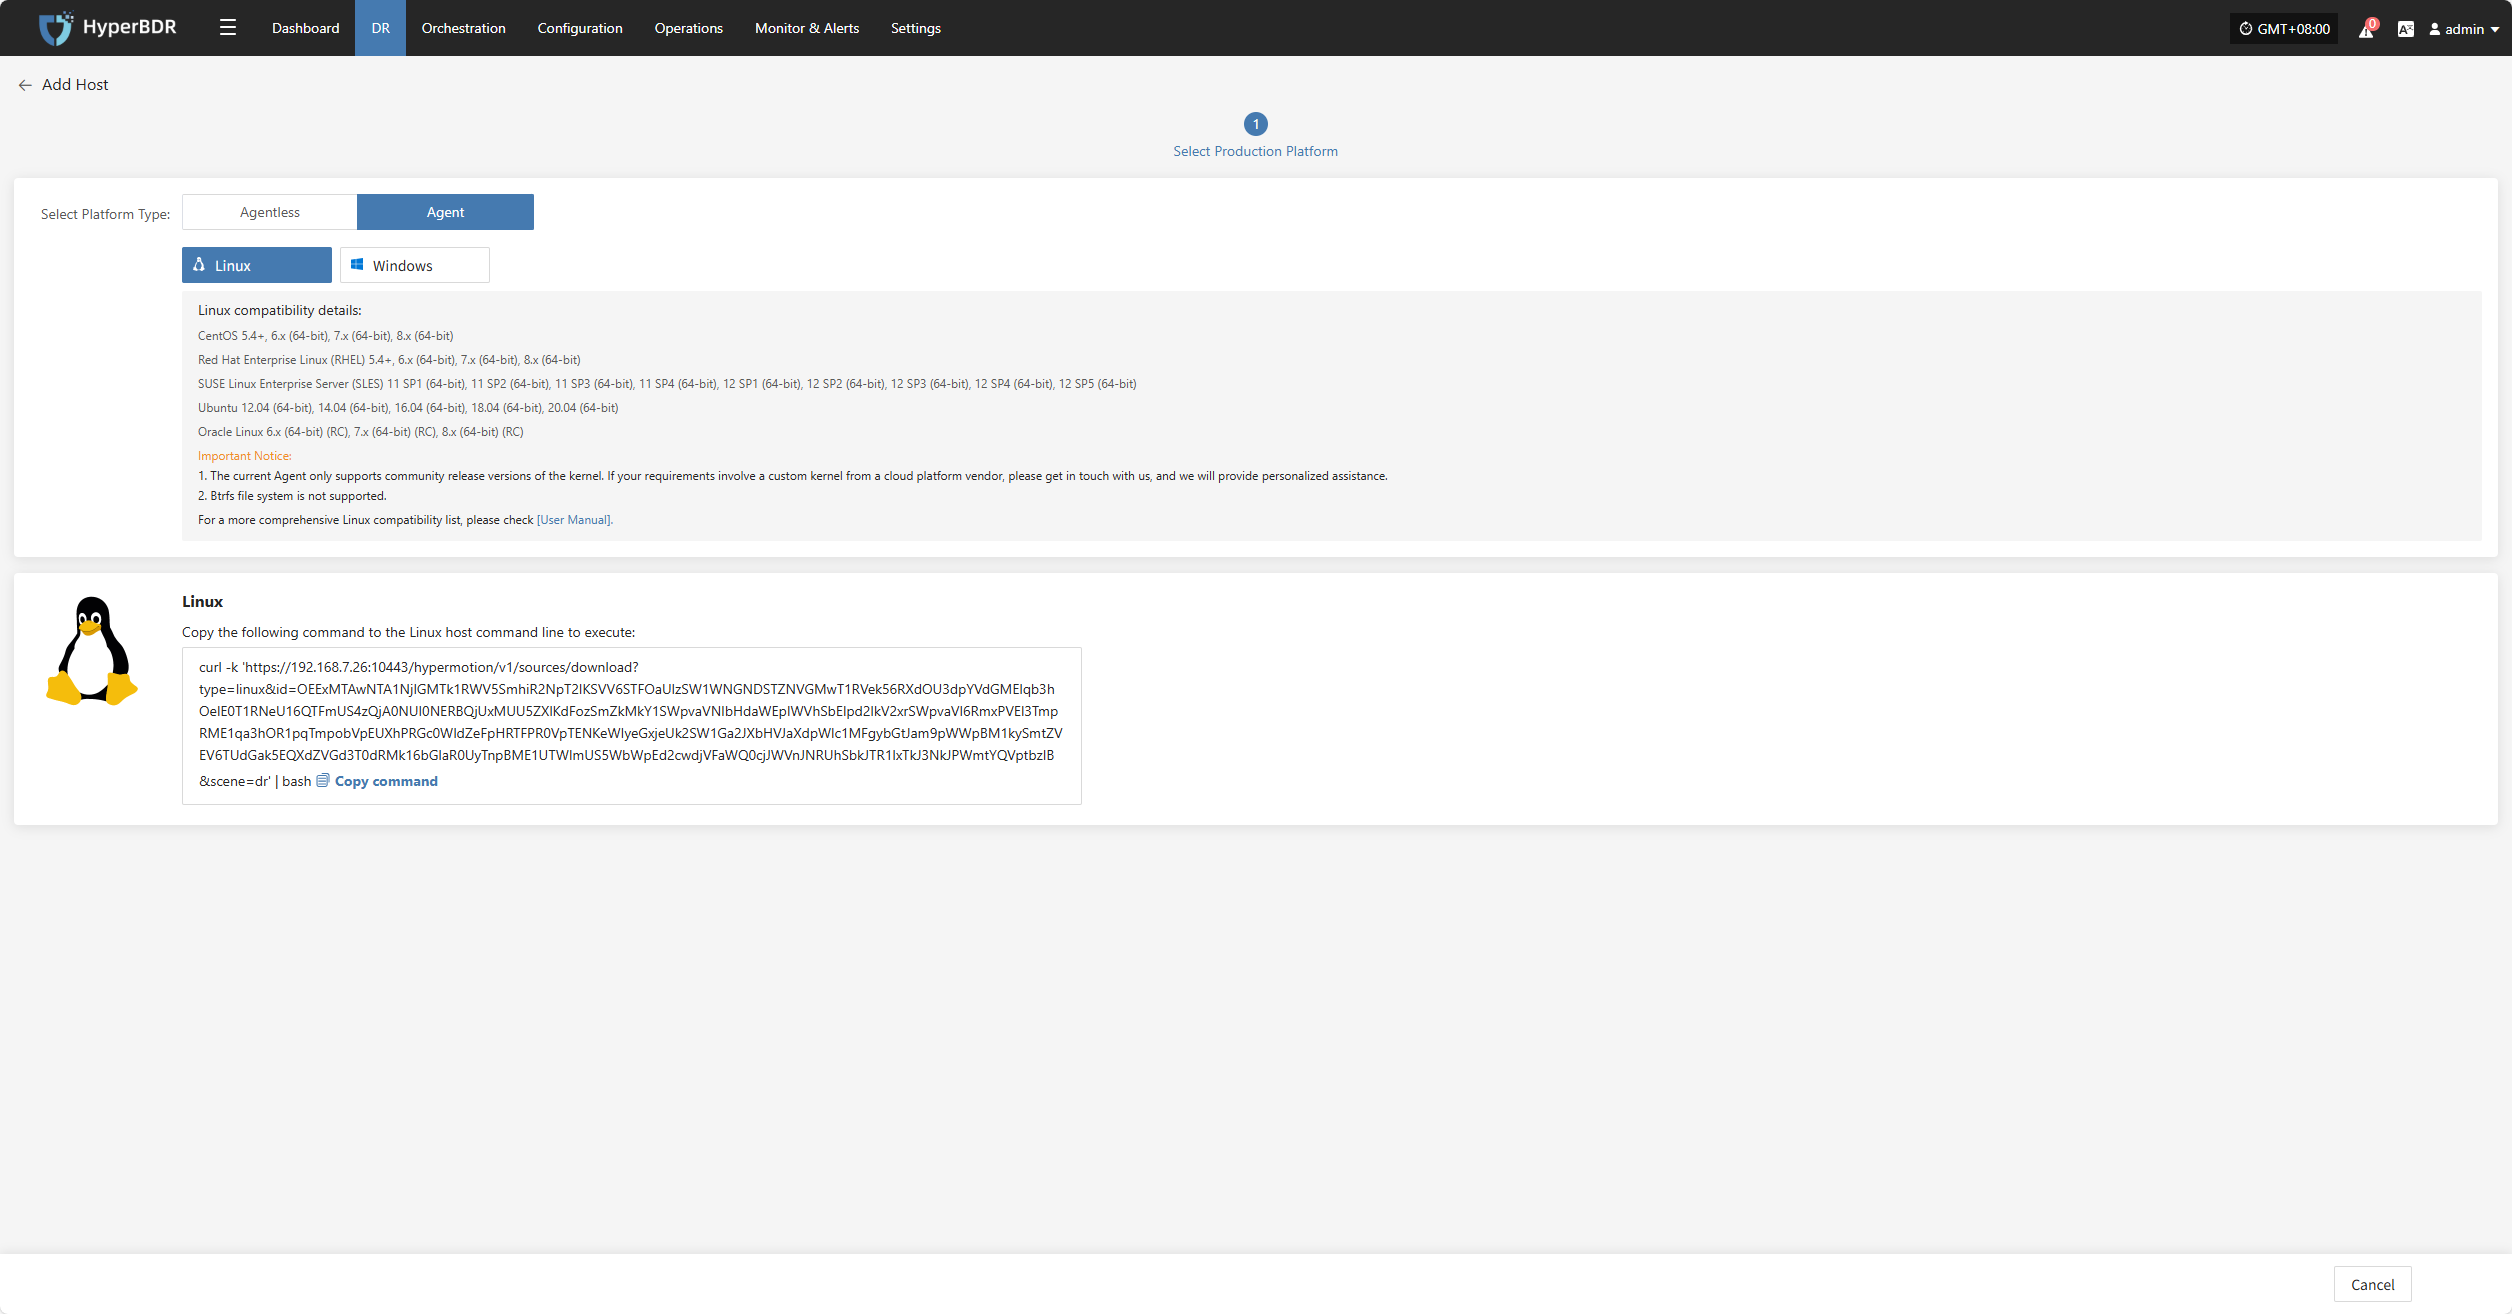
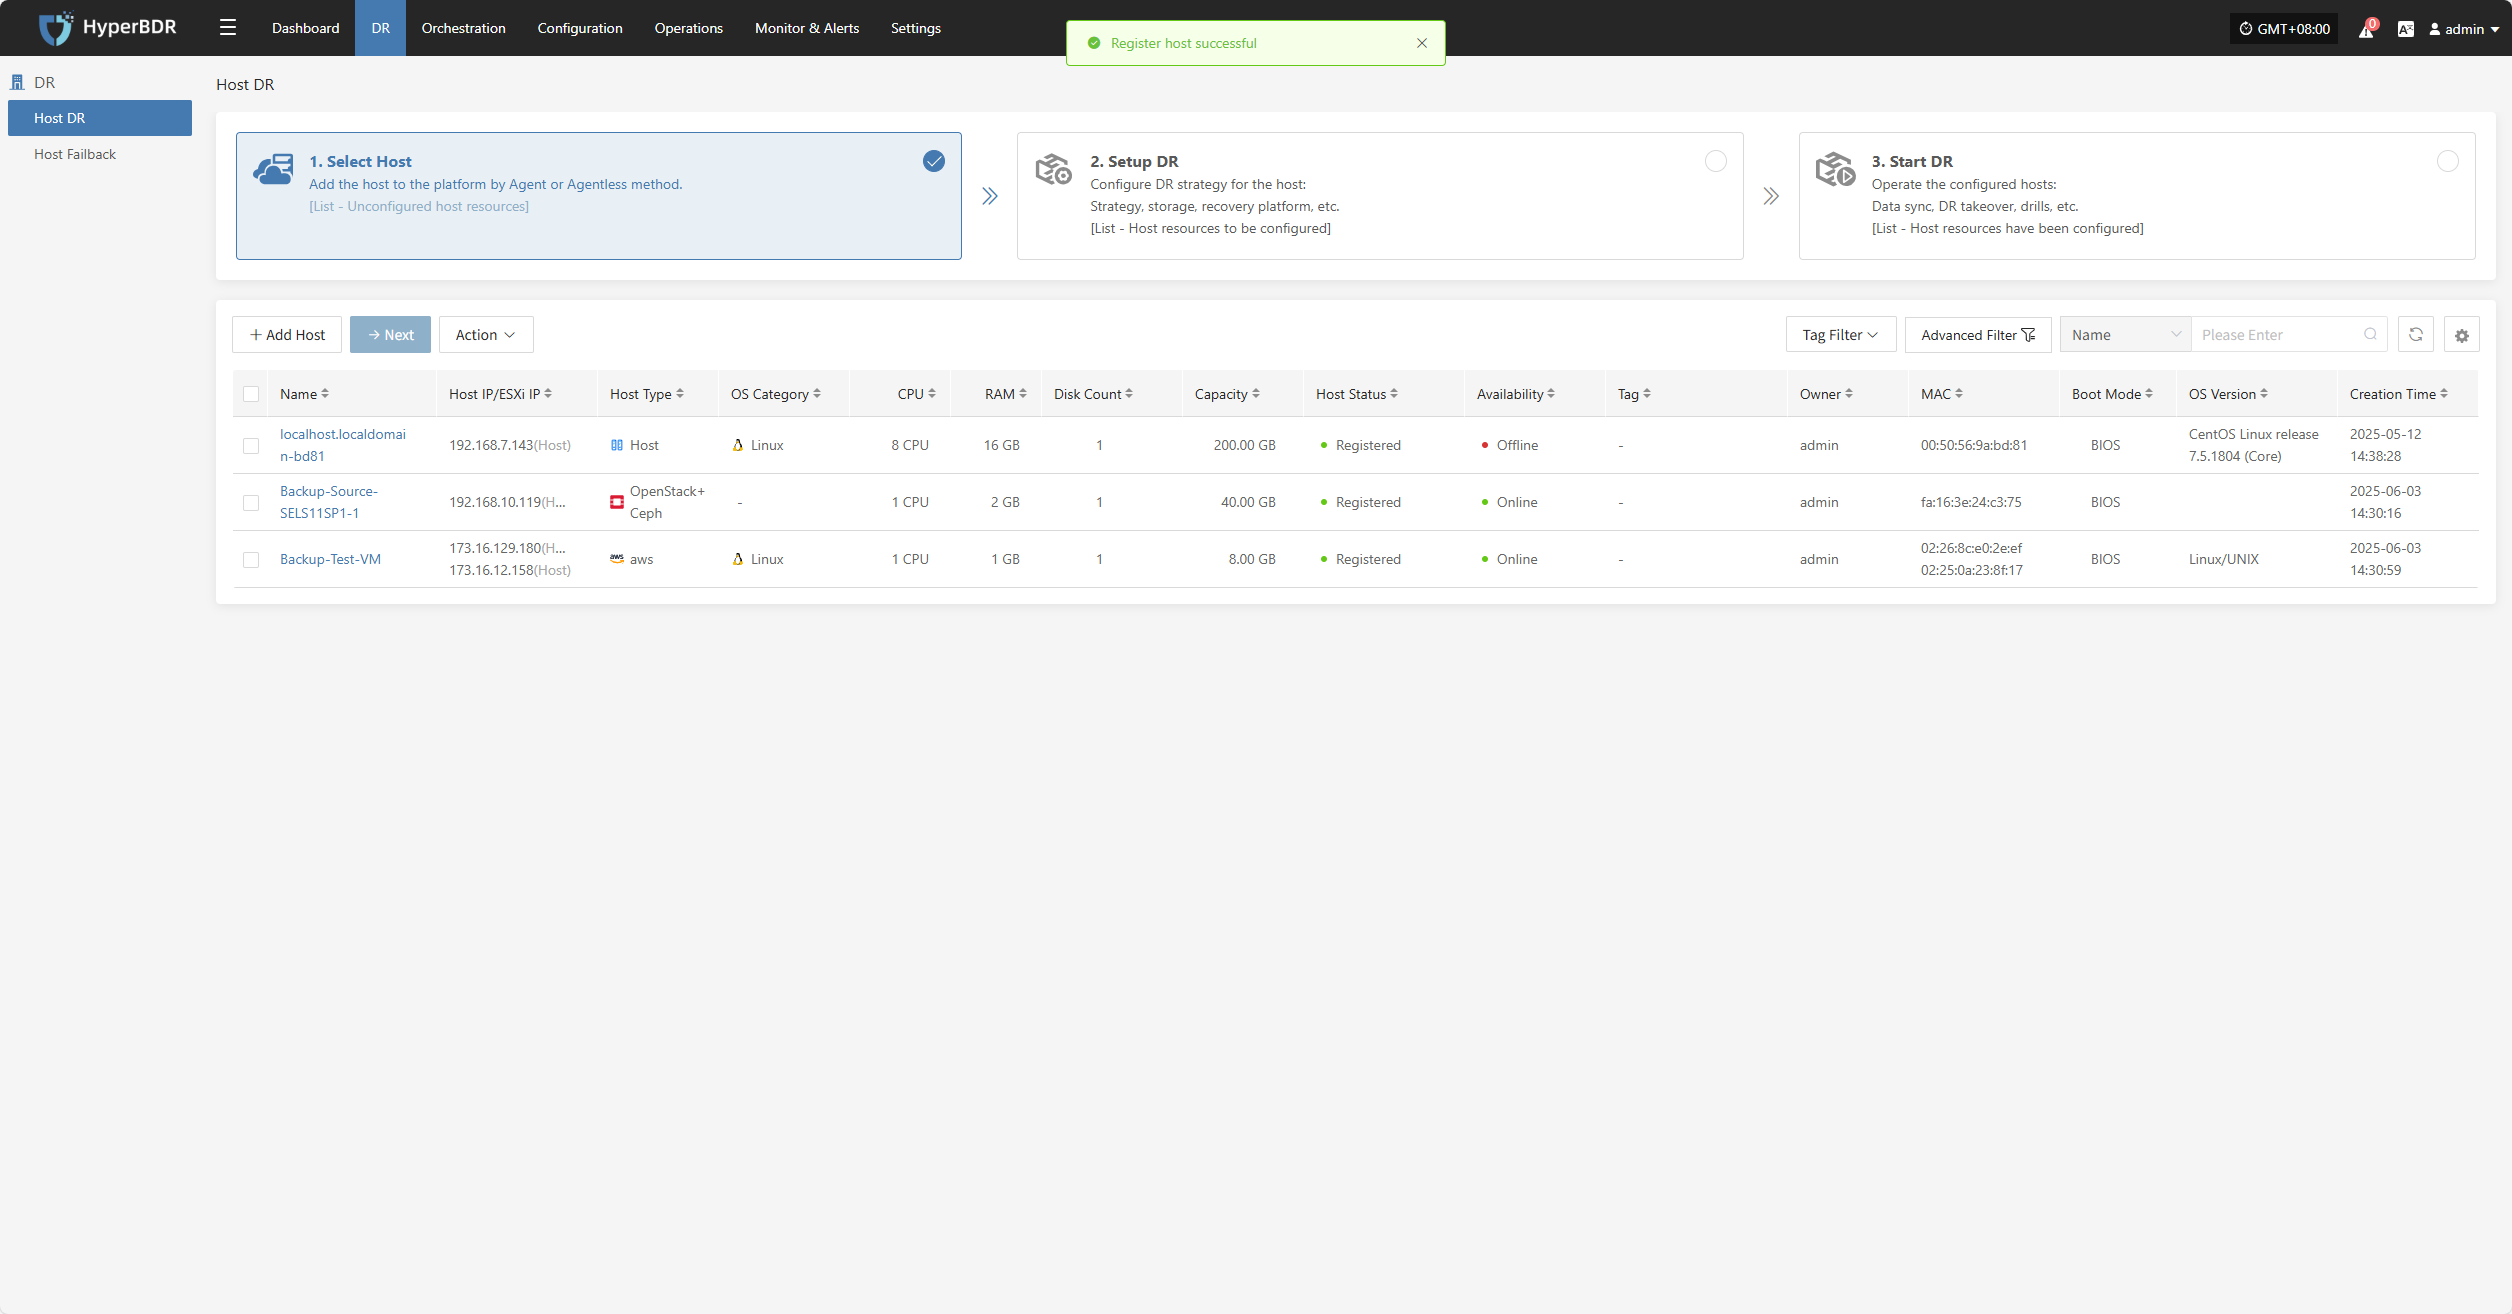
After installation completes, the source host will automatically register to the platform. You can check the status of the registered host.
Windows
Click the "Select Host" menu, then click the "Add Host" button to add a host.
Select the production platform type, choose "Agent", and select the "Windows" platform.
Refer to the Windows host compatibility details to determine if the host supports disaster recovery.
Click "Download Now" according to the operating system version to download the Windows Agent installation package, then upload the package to the Windows host for installation.
For detailed installation steps, refer to: Click here to view
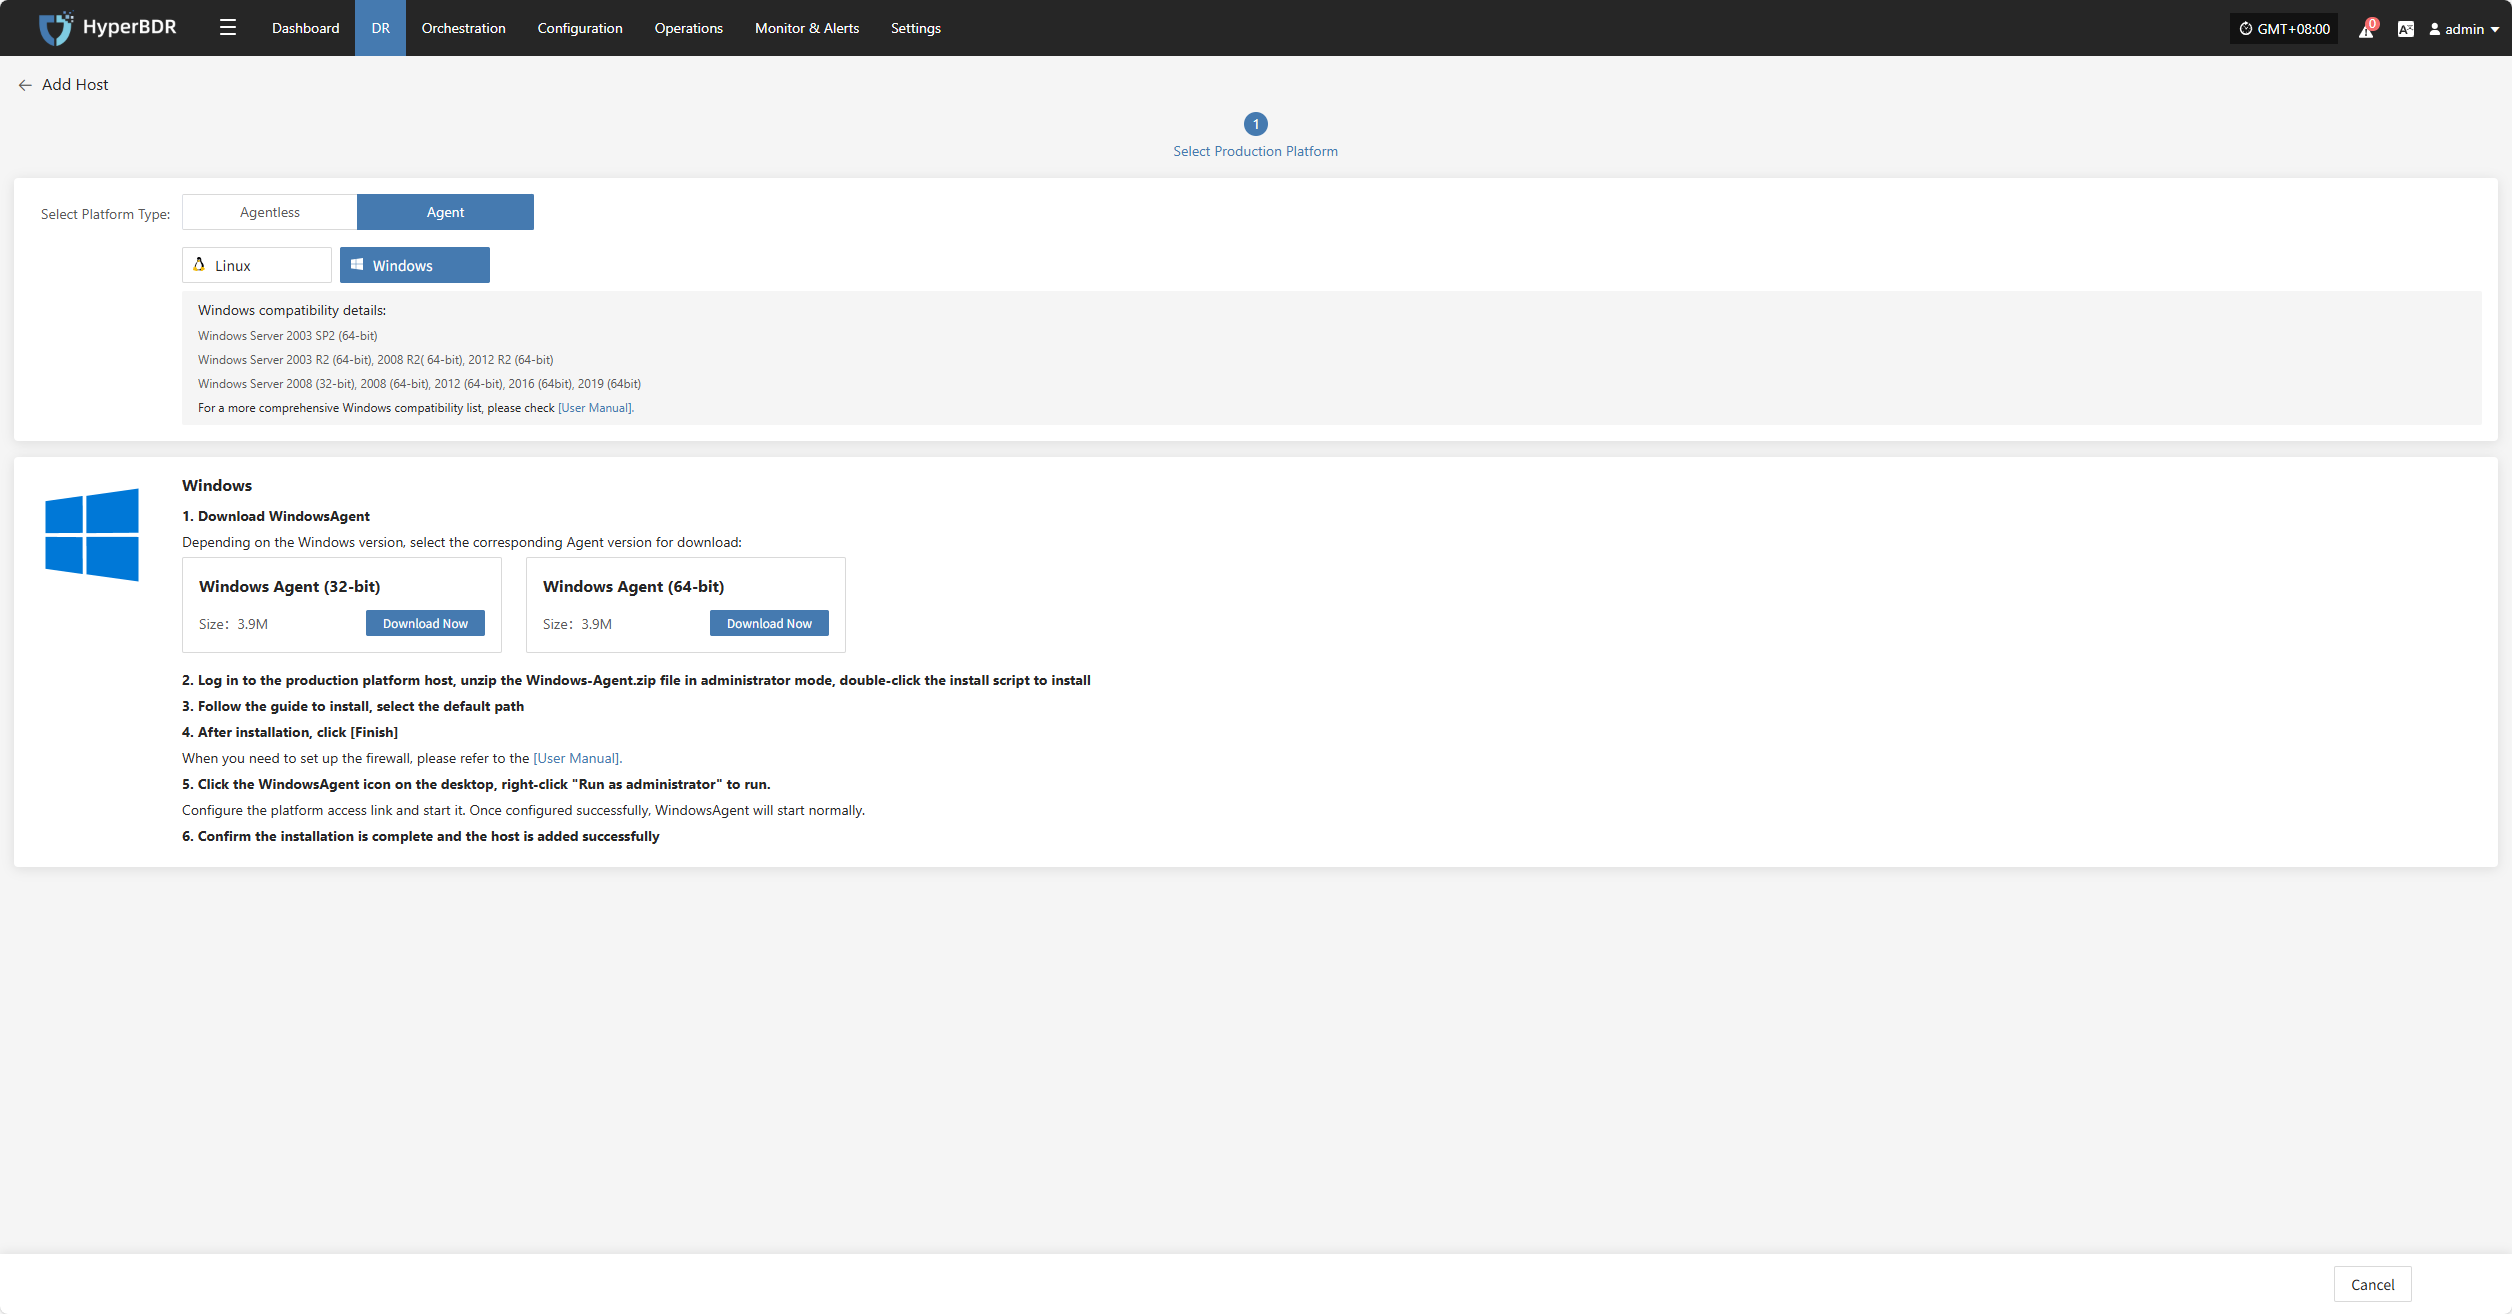
After installation completes, the source host will automatically register to the platform. You can check the status of the registered host.

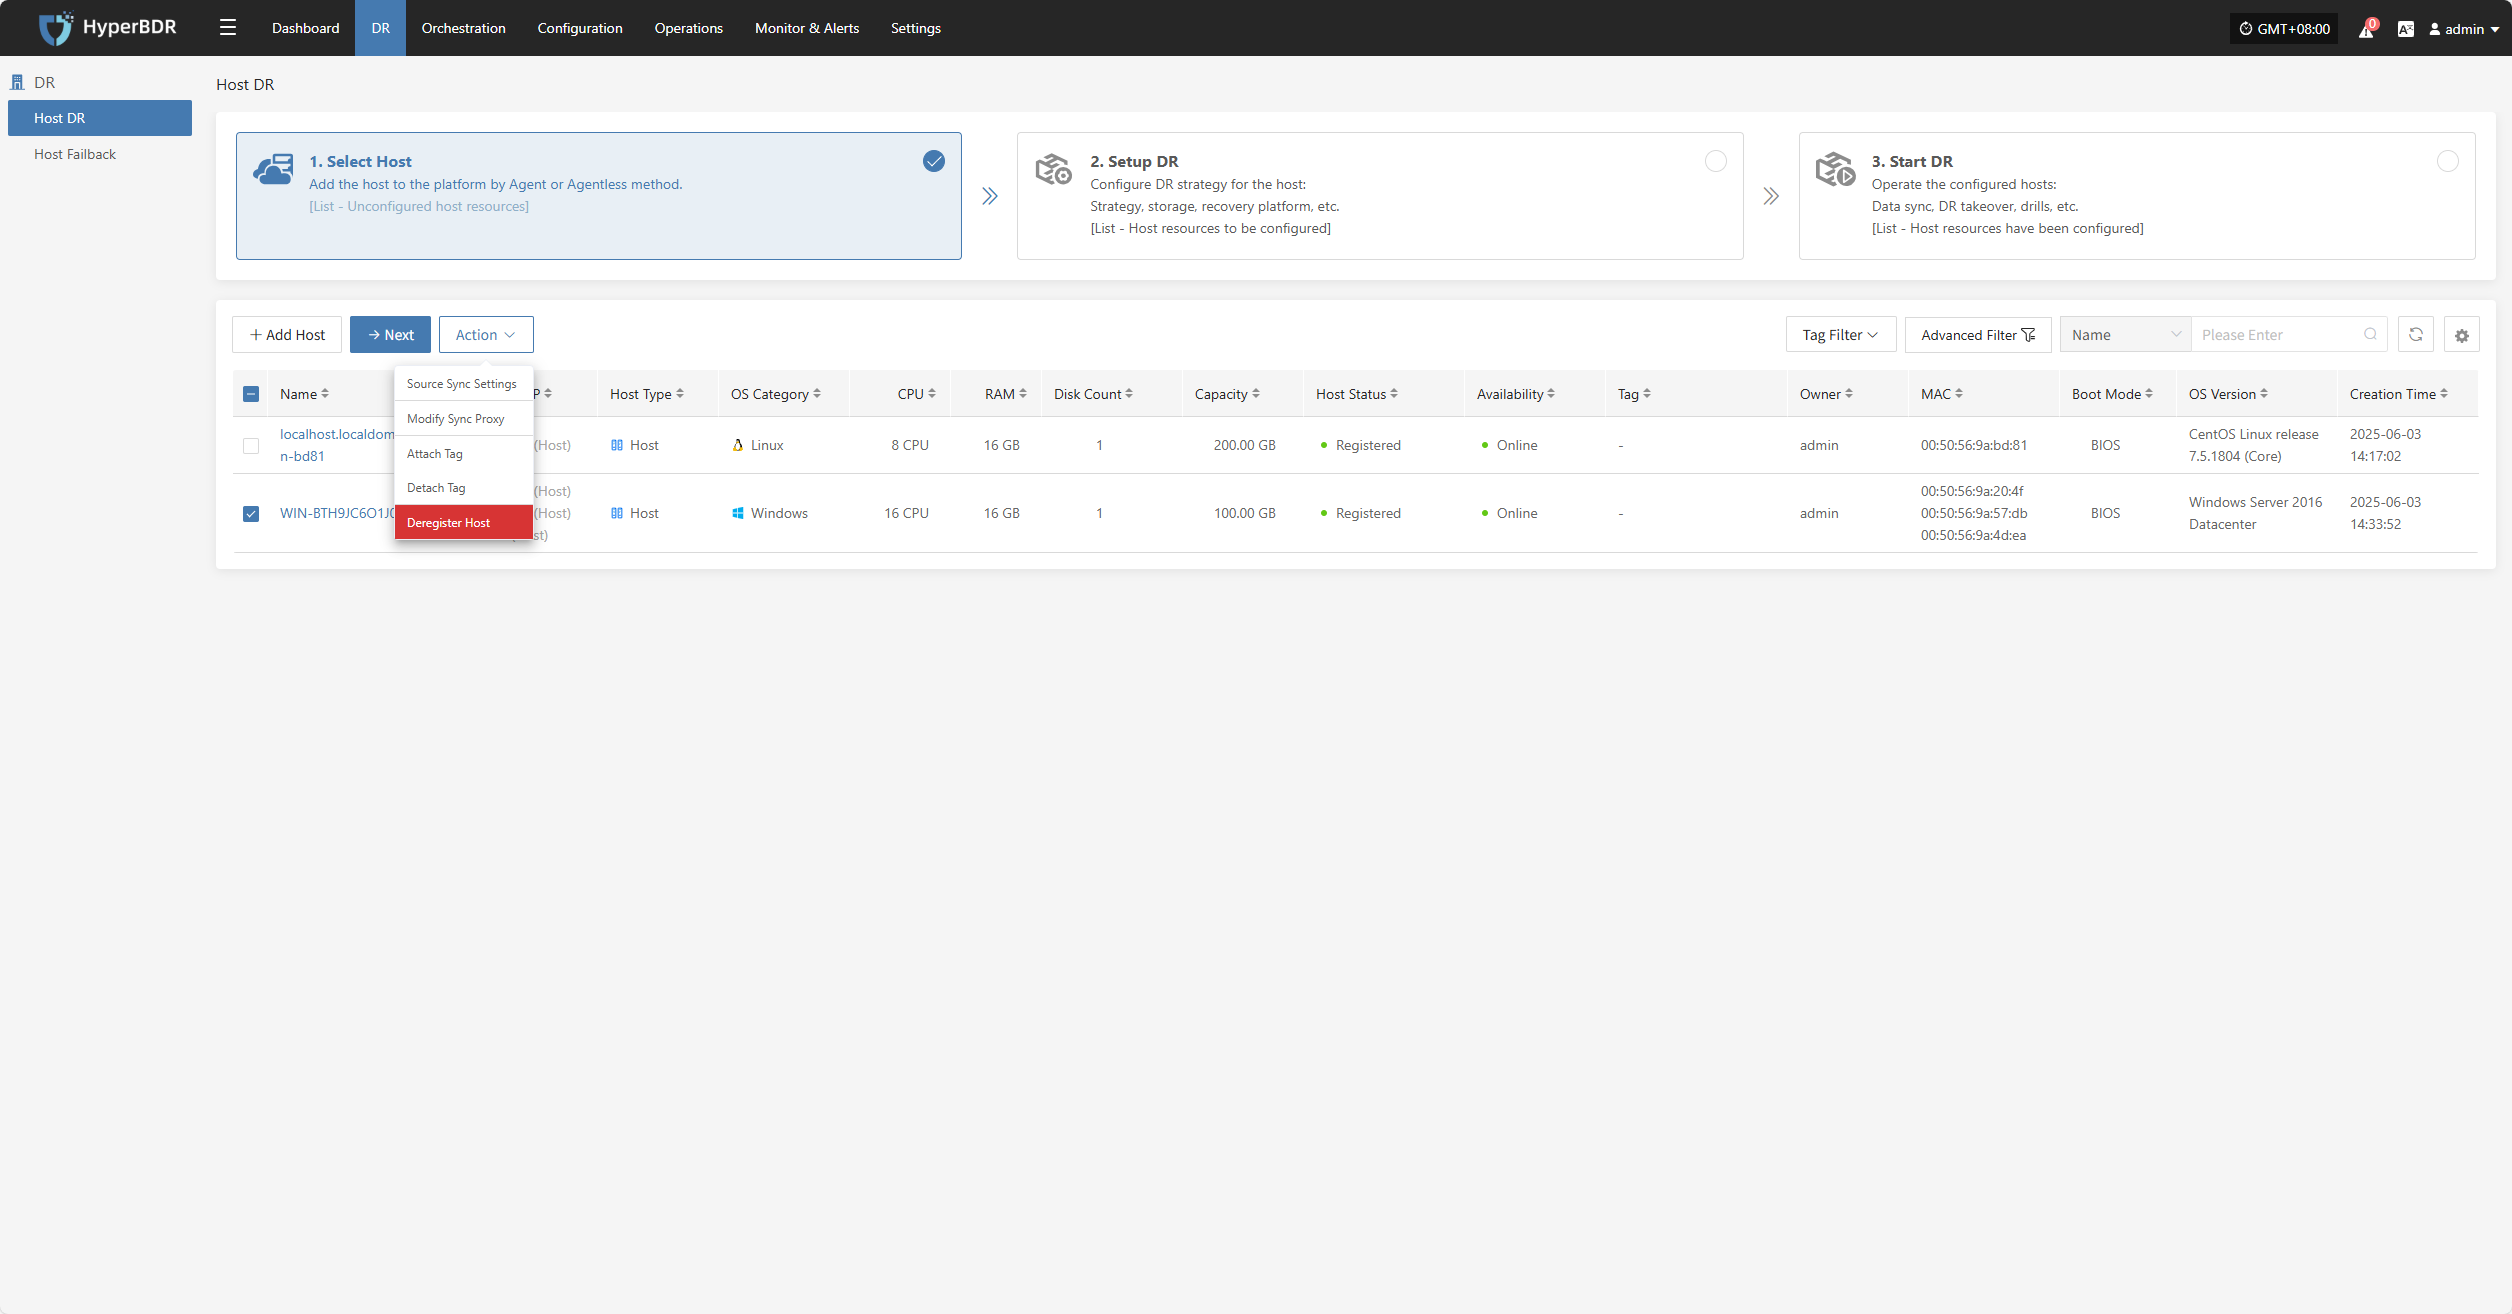
Action
Source Sync Settings
Source-side parameter configuration for backup hosts.

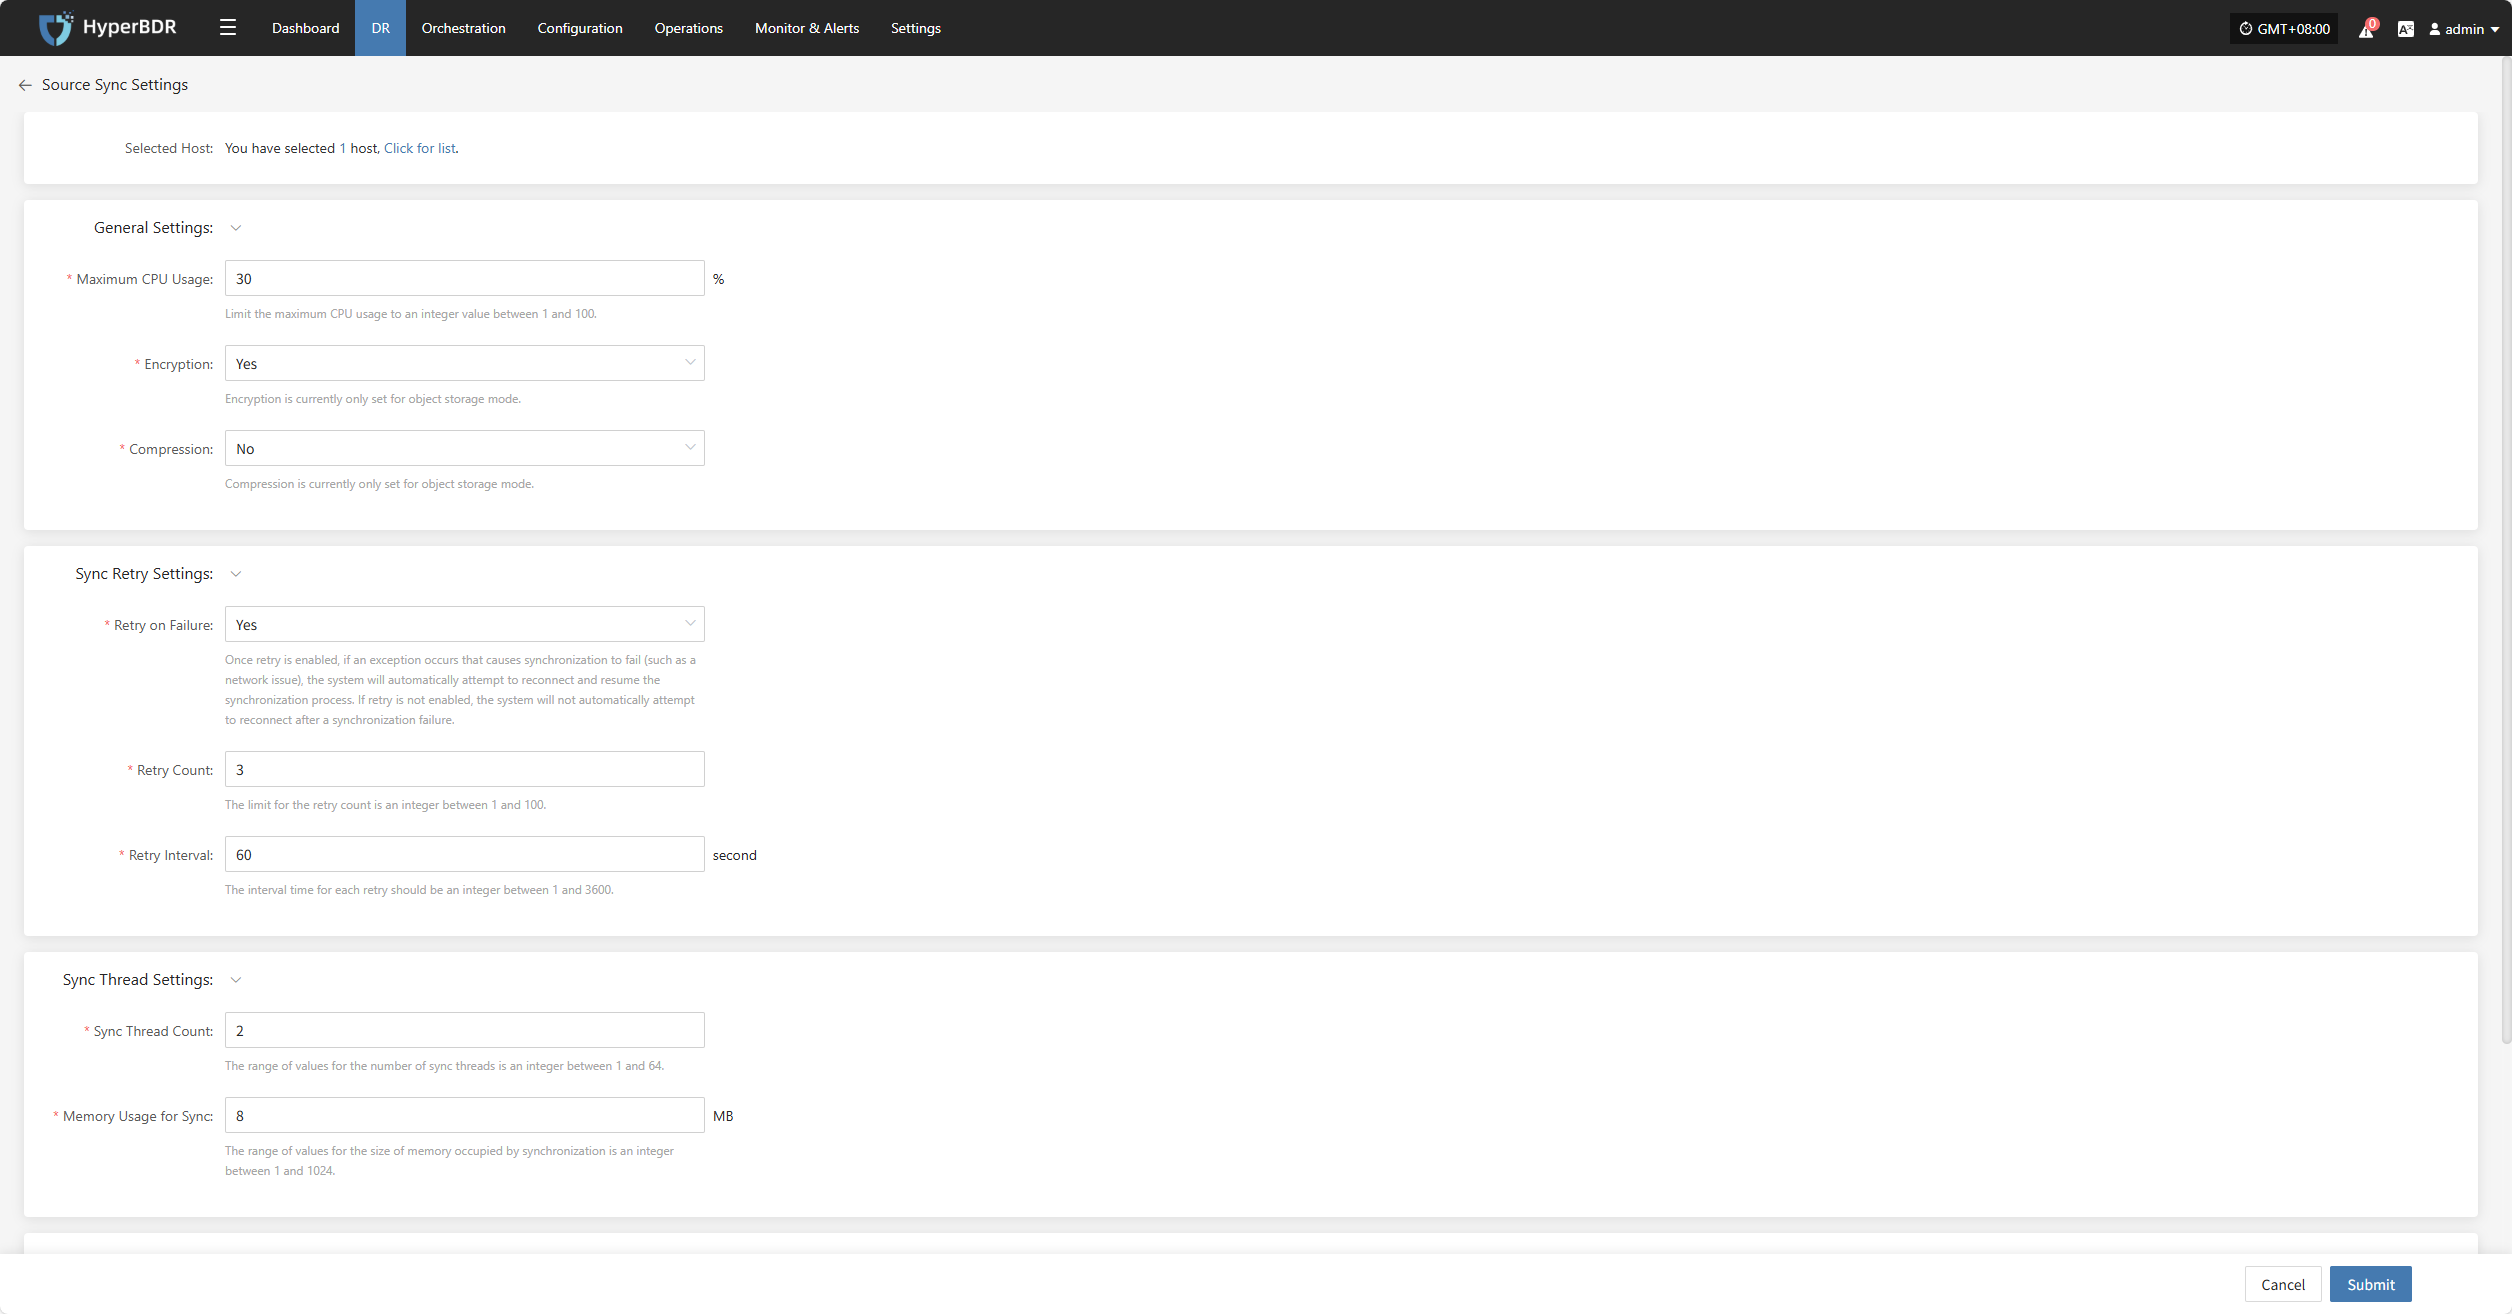
General Settings
| Parameter | Setting | Description |
|---|---|---|
| Maximum CPU Usage | 1–100 | Specifies the percentage of system CPU resources the source host can use during backup. Setting this too low may reduce backup efficiency. |
| Encryption | Yes No | Applies only to object storage mode. Note: Enabling this will consume more CPU for encryption. |
| Compression | Yes No | Applies only to object storage mode. Note: Enabling this will consume more CPU for compression. |
Sync Thread Settings
| Parameter | Setting | Description |
|---|---|---|
| VMware Quiesce Snapshot | Yes / No | Quiesce snapshot is only effective for VMware hosts with VMware-tools installed. |
| Reading Thread | Automatic Adaptation / Custom | Sets the number of reading threads for a single host. Automatic adaptation adjusts the thread count based on the Sync Proxy's resource configuration and the number of disks on the host to be synchronized, within a range of 1 to 10 threads. For specific needs, use the custom option (an integer between 1 and 100). It is recommended to keep the thread count within 30. If the network environment is 10 Gigabit Ethernet or higher, increasing the Sync Proxy's CPU and memory (e.g., 8 cores, 16GB or more) before setting the thread count to 50 or 100 can improve synchronization performance. |
| Writing Thread | Automatic Adaptation / Custom | Sets the number of writing threads for a single host. Automatic adaptation adjusts the thread count based on the Sync Proxy's resource configuration and the number of disks on the host to be synchronized, within a range of 1 to 10 threads. For specific needs, use the custom option (an integer between 1 and 100). It is recommended to keep the thread count within 30. If the network environment is 10 Gigabit Ethernet or higher, increasing the Sync Proxy's CPU and memory (e.g., 8 cores, 16GB or more) before setting the thread count to 50 or 100 can improve synchronization performance. |
| Concurrent Multi-Disk Read and Write | Yes / No | Indicates whether all disks on the synchronized host are synchronized concurrently. |
Sync Retry Settings
| Parameter | Setting | Description |
|---|---|---|
| Retry on Failure | Yes / No | When enabled, the system will automatically attempt to reconnect and resume synchronization if an exception (e.g., network error) causes synchronization failure. If disabled, the system will not retry after a failure. |
| Retry Count | 1-100 | Sets the maximum number of retry attempts. |
| Retry Interval | 1-3600 | The wait time in seconds between each retry attempt. |
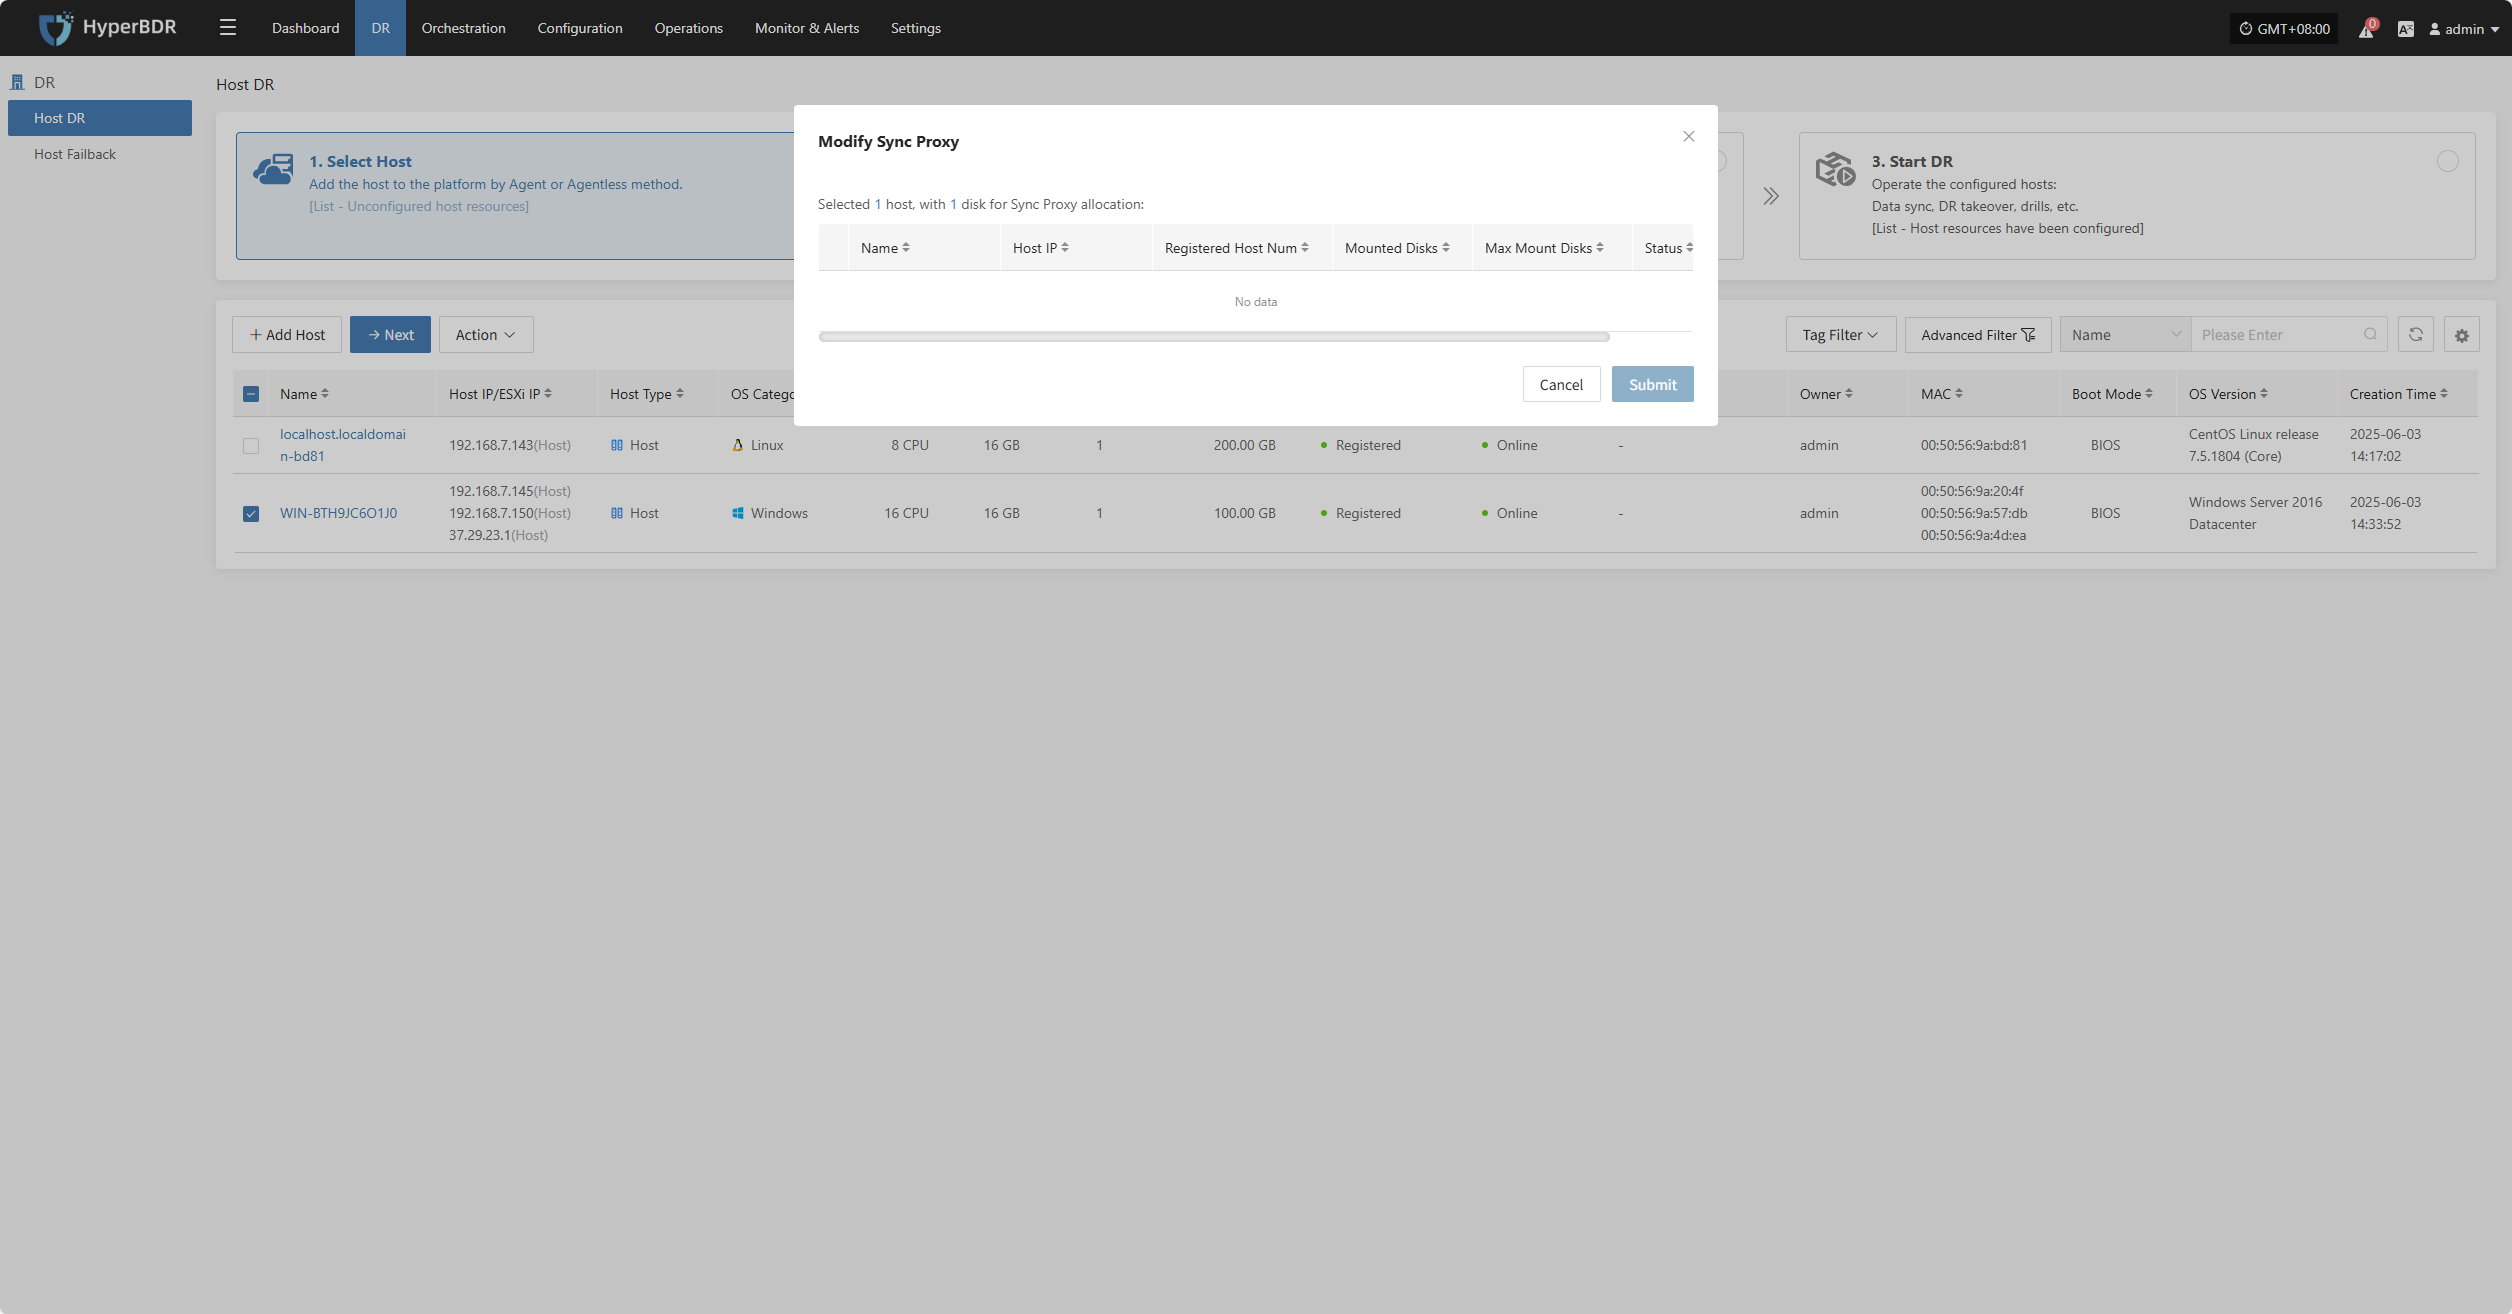
Modify Sync Proxy
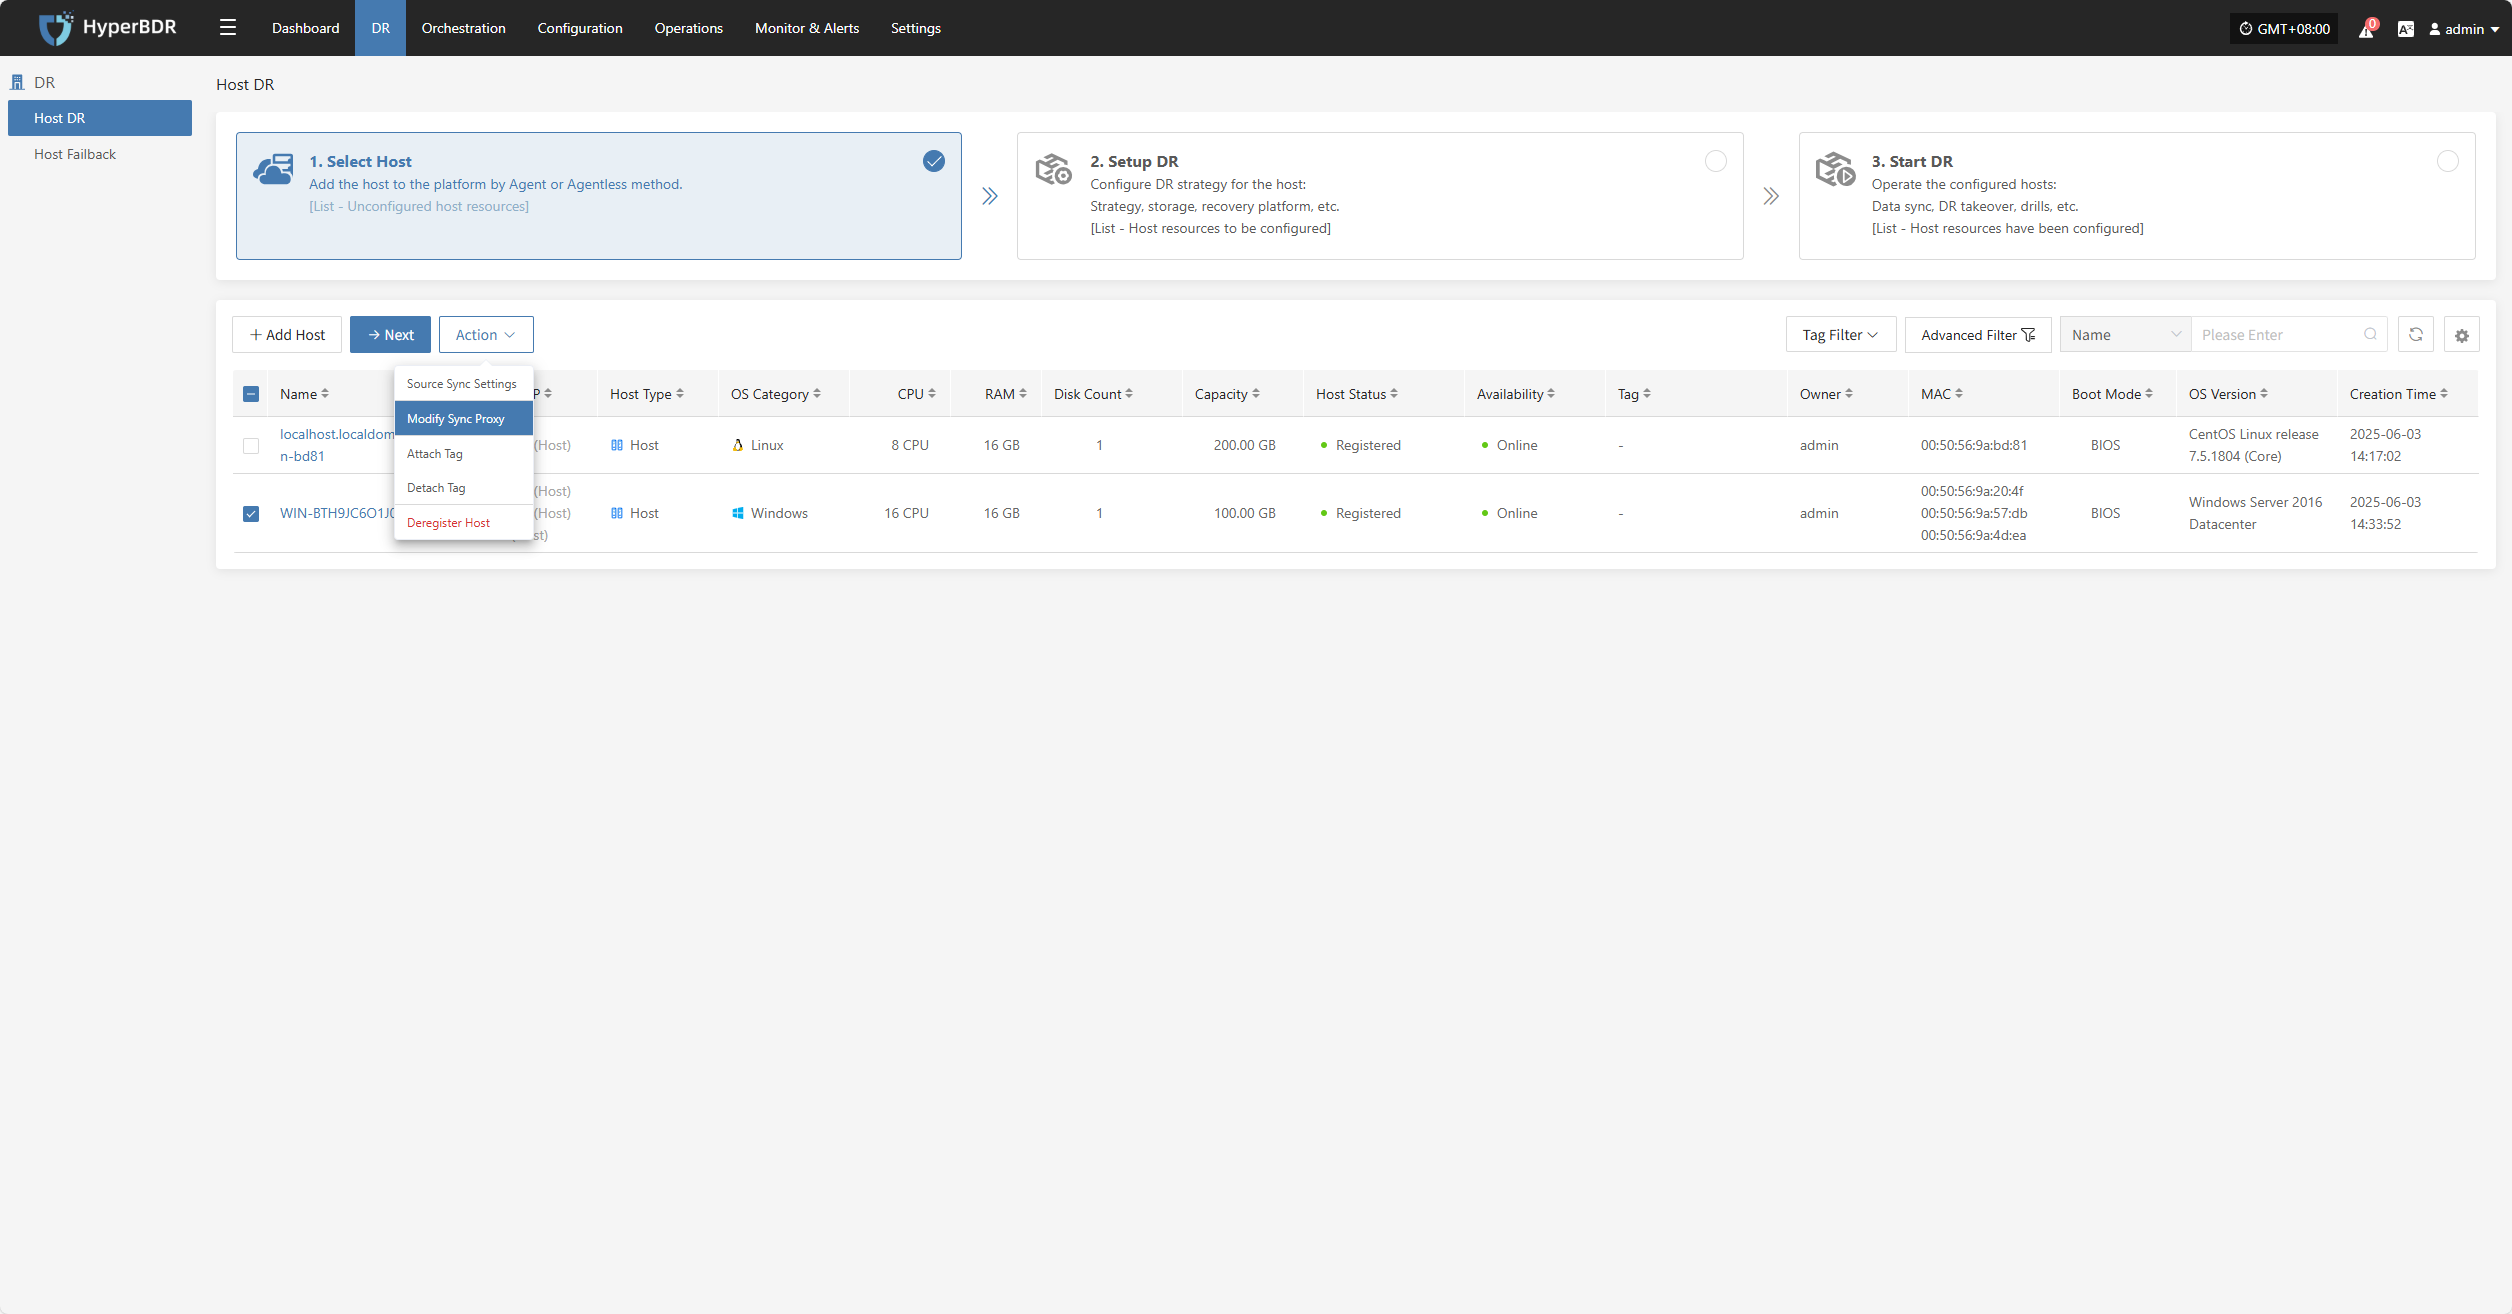
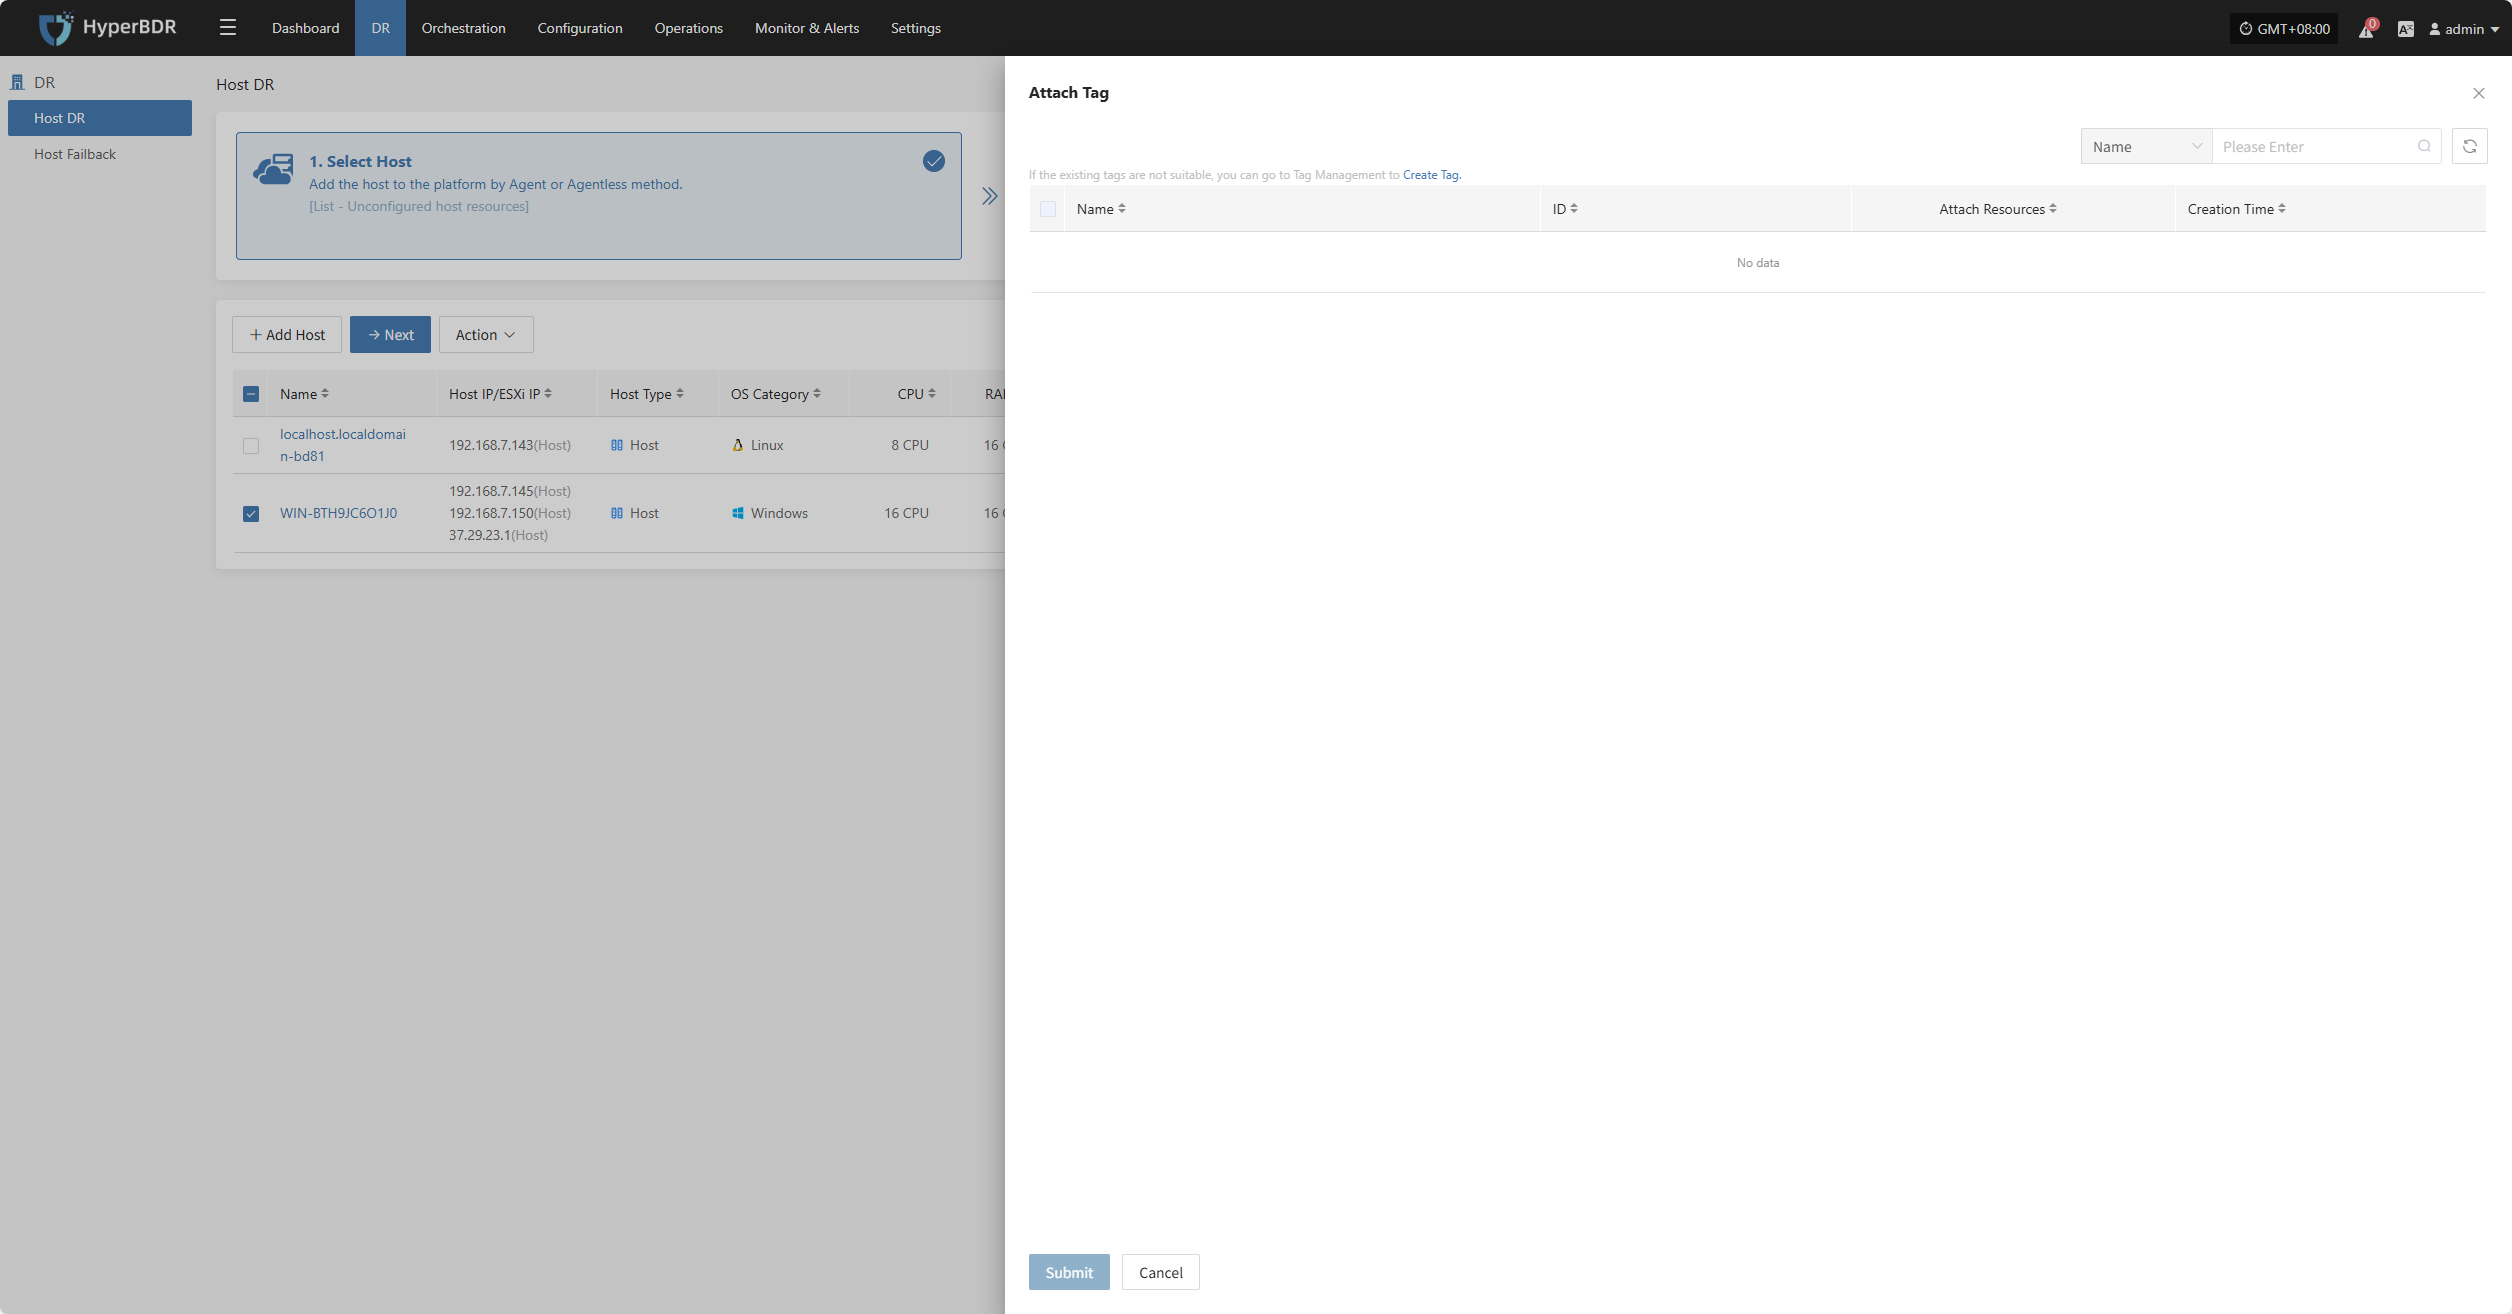
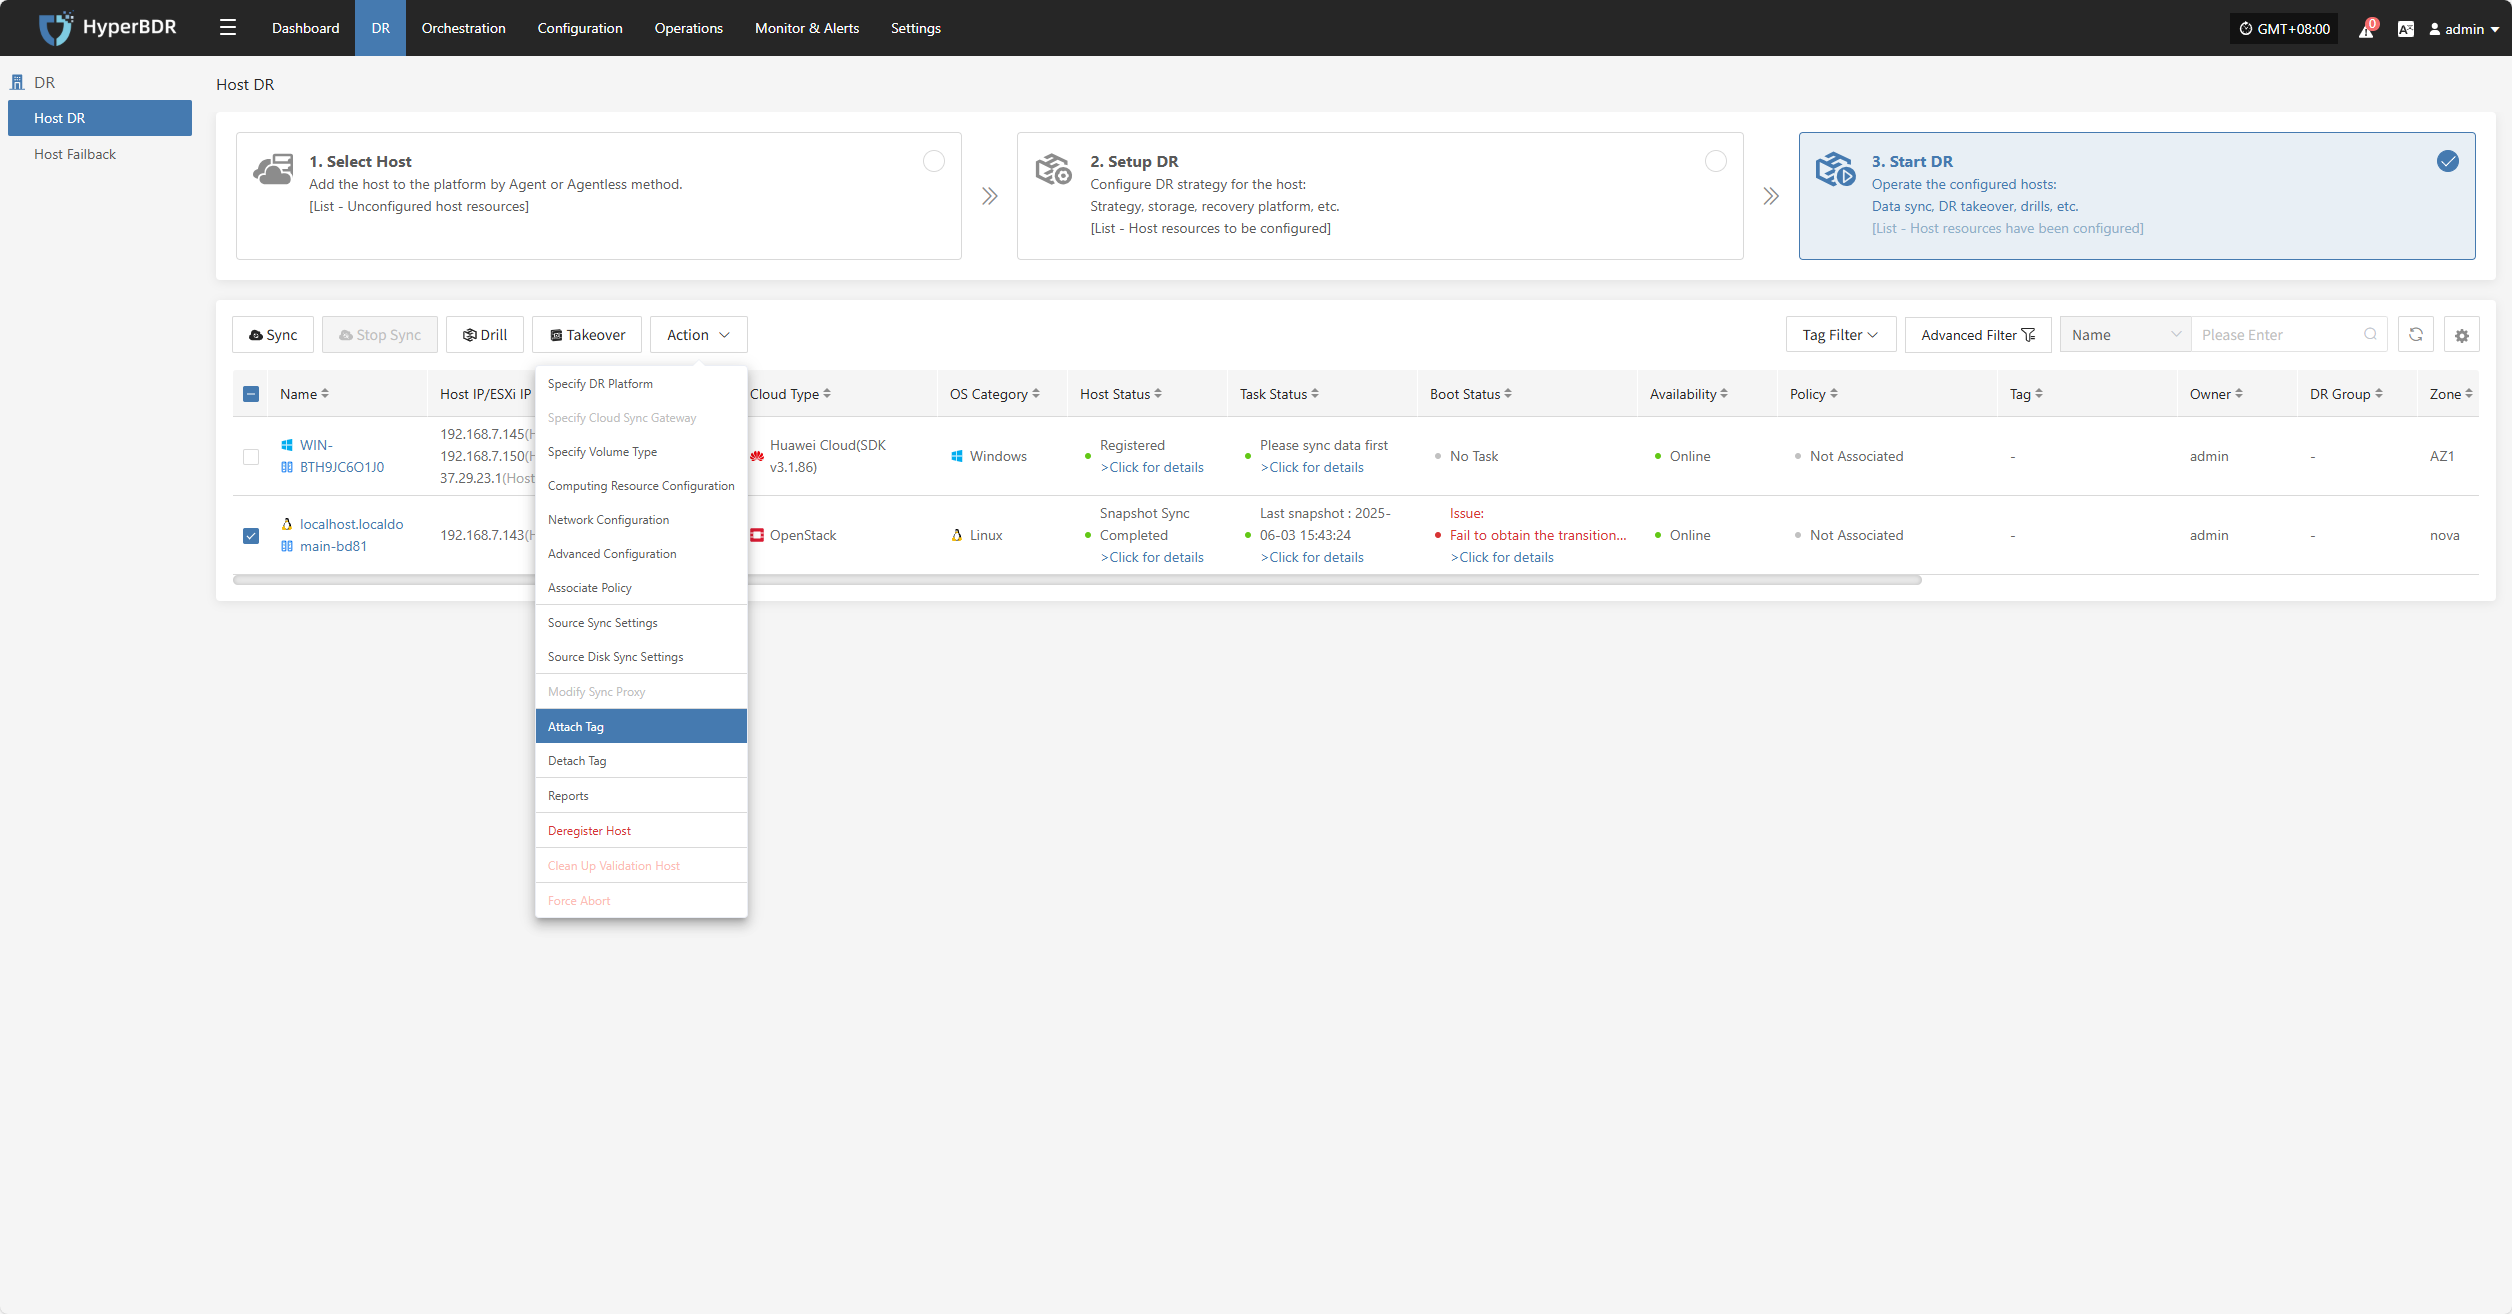
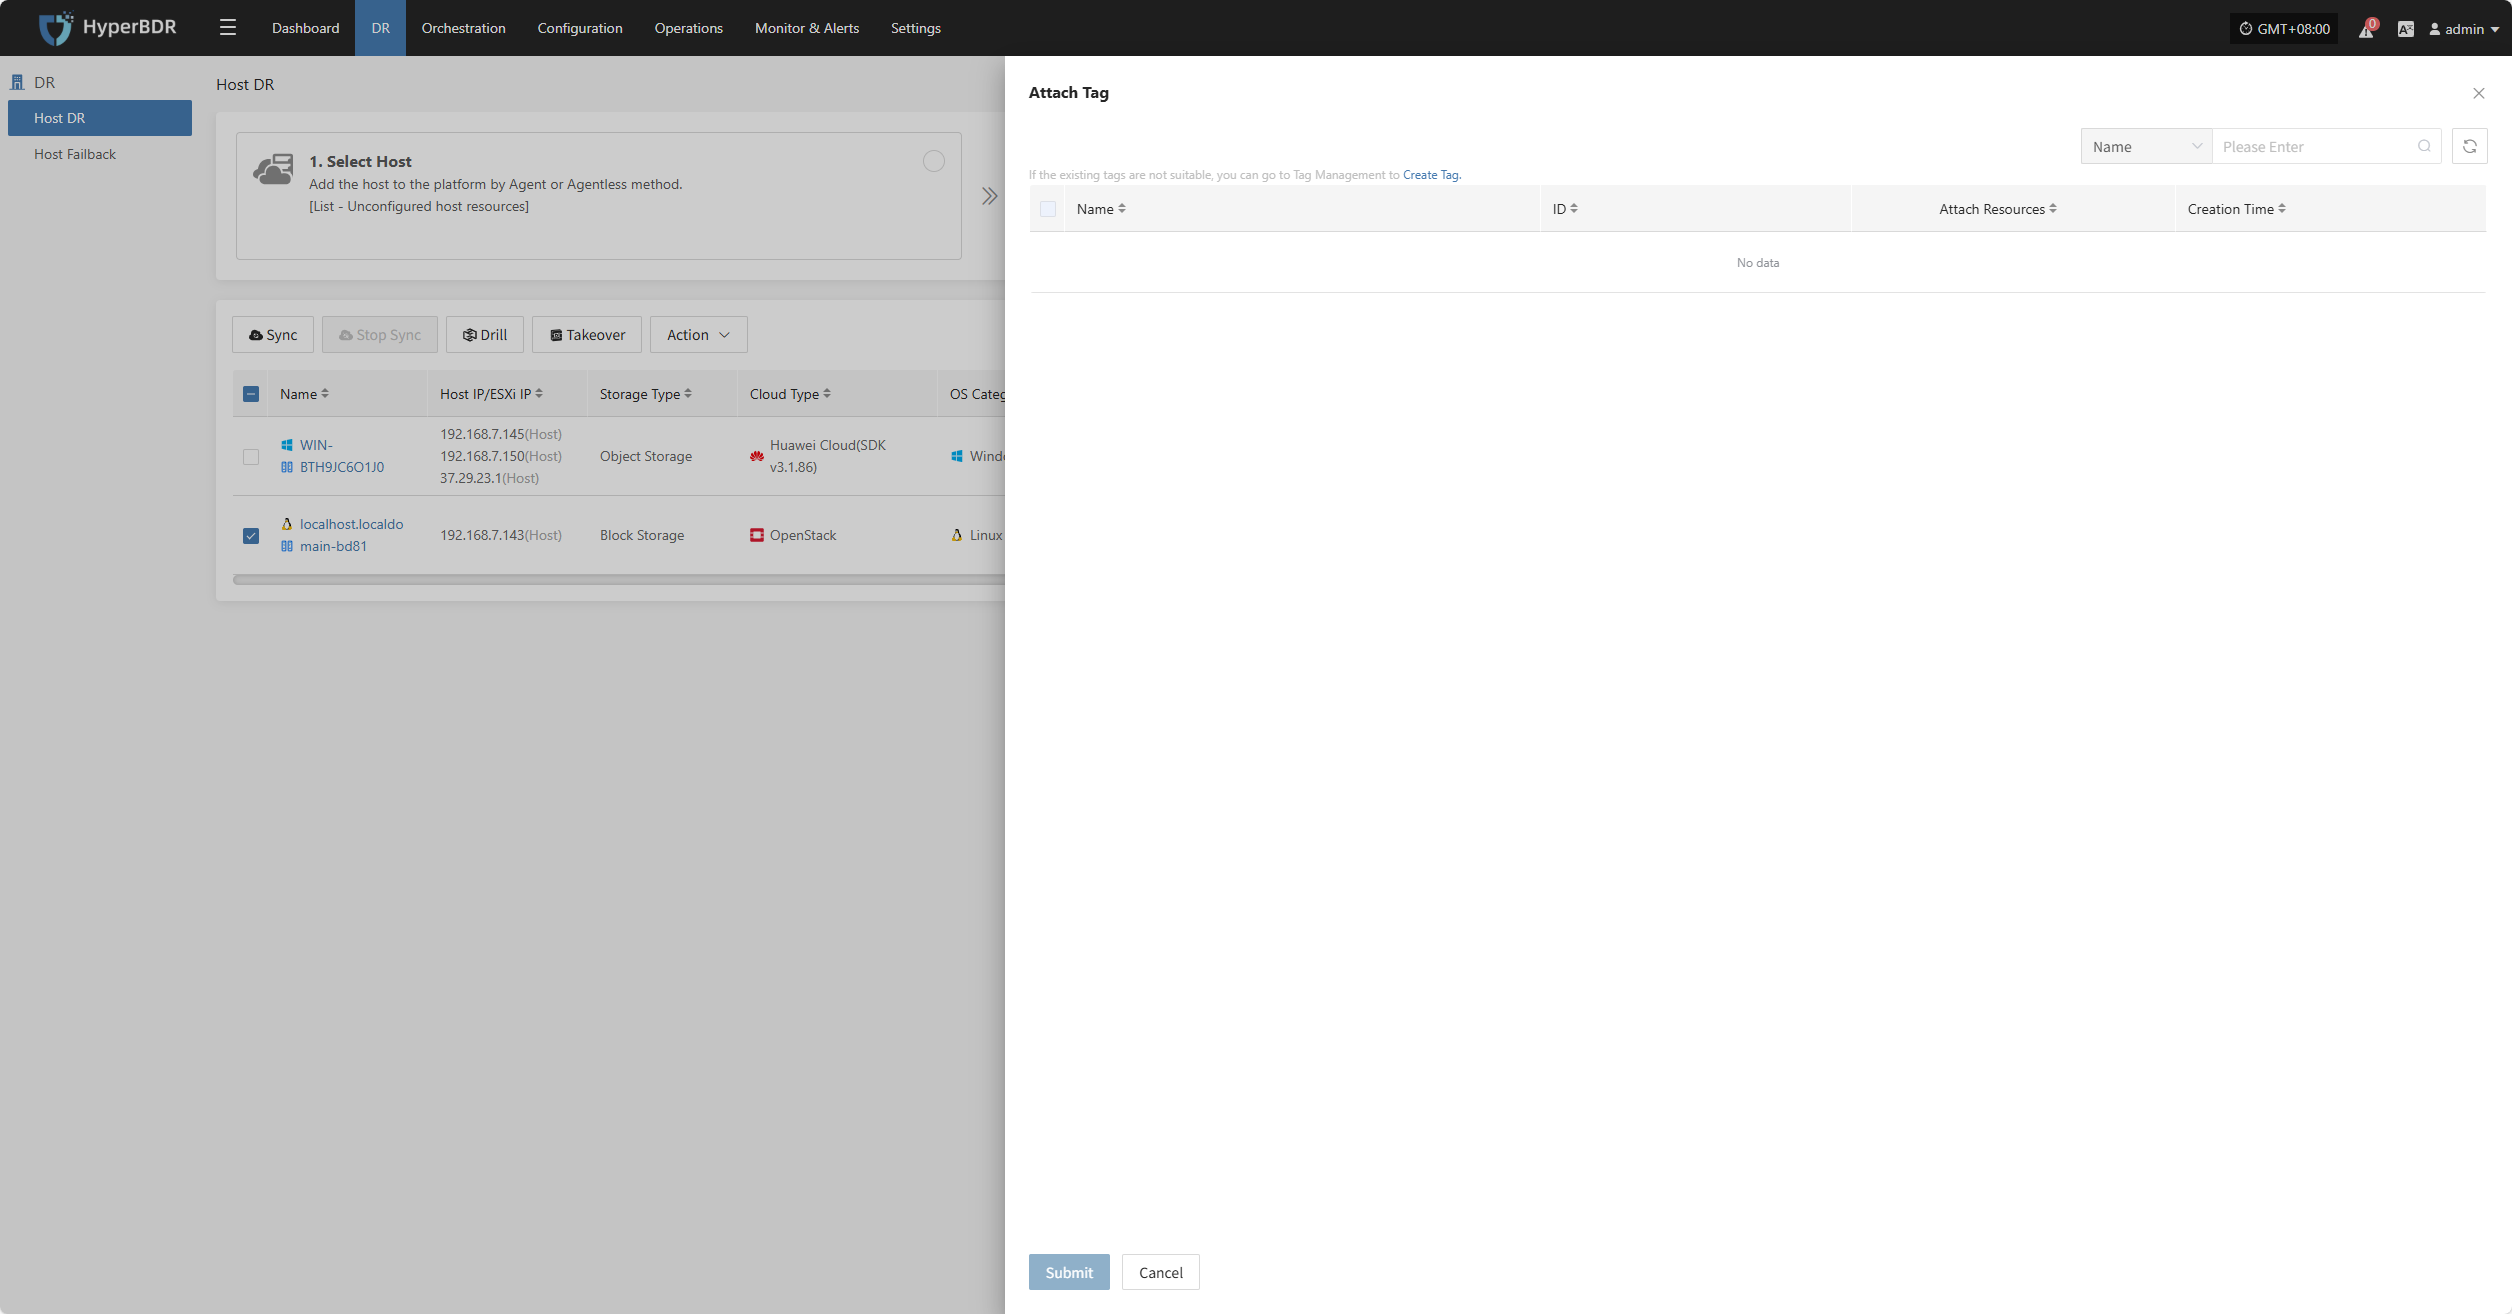
Attach Tag

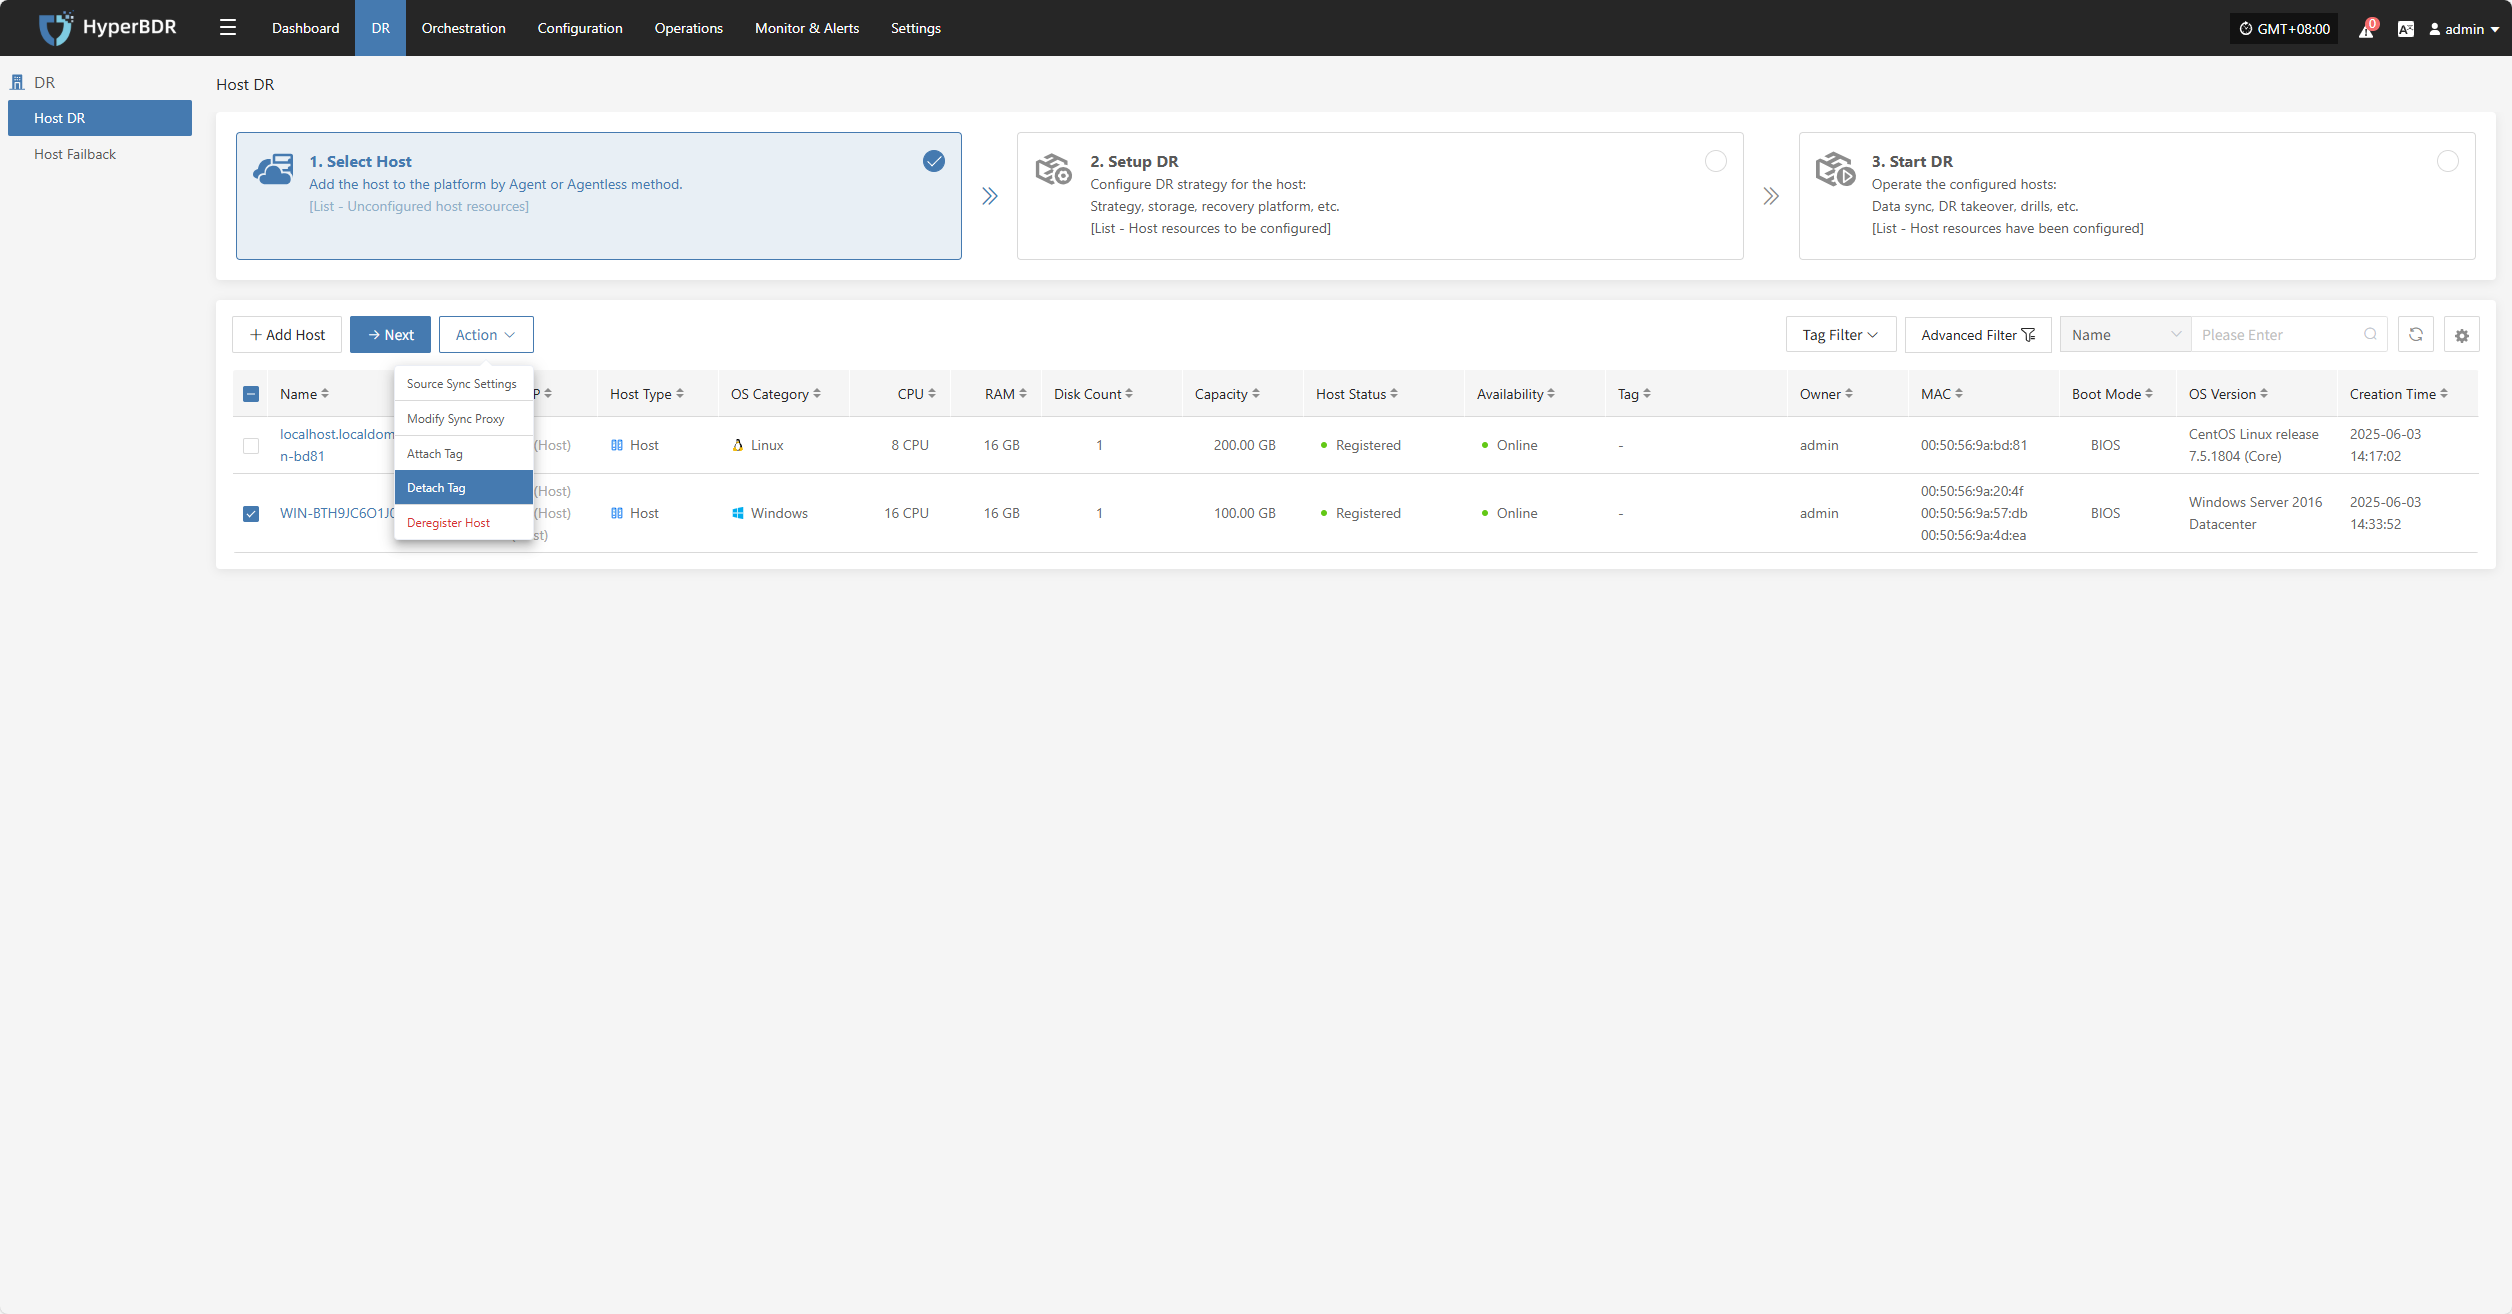
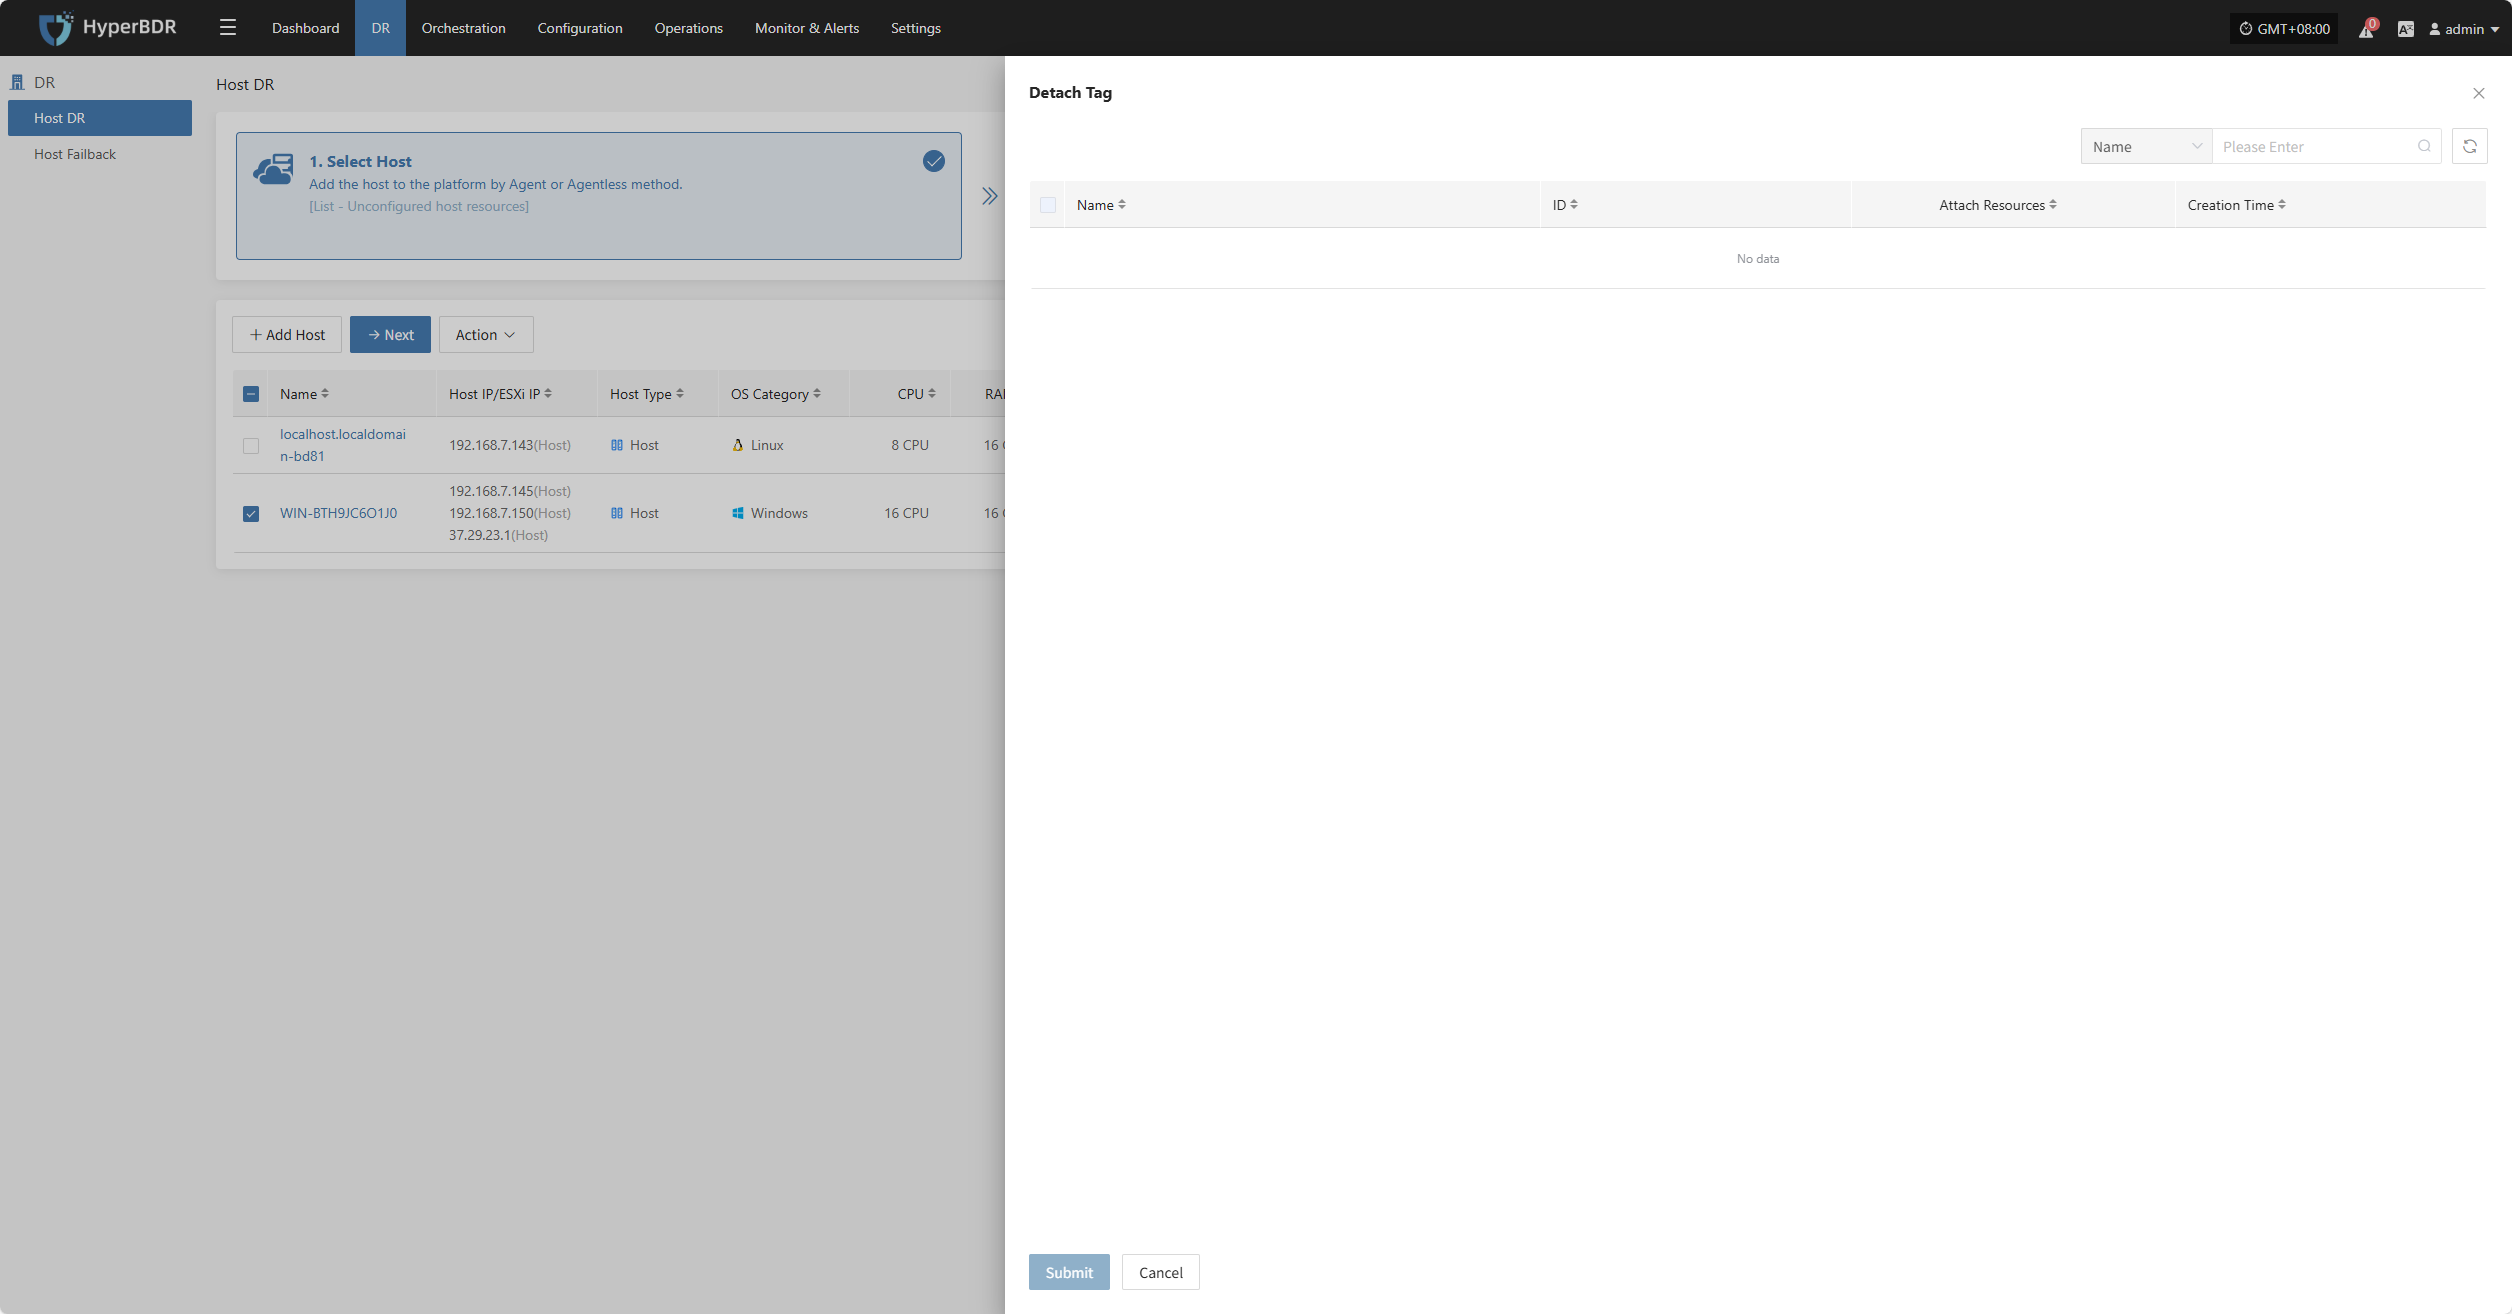
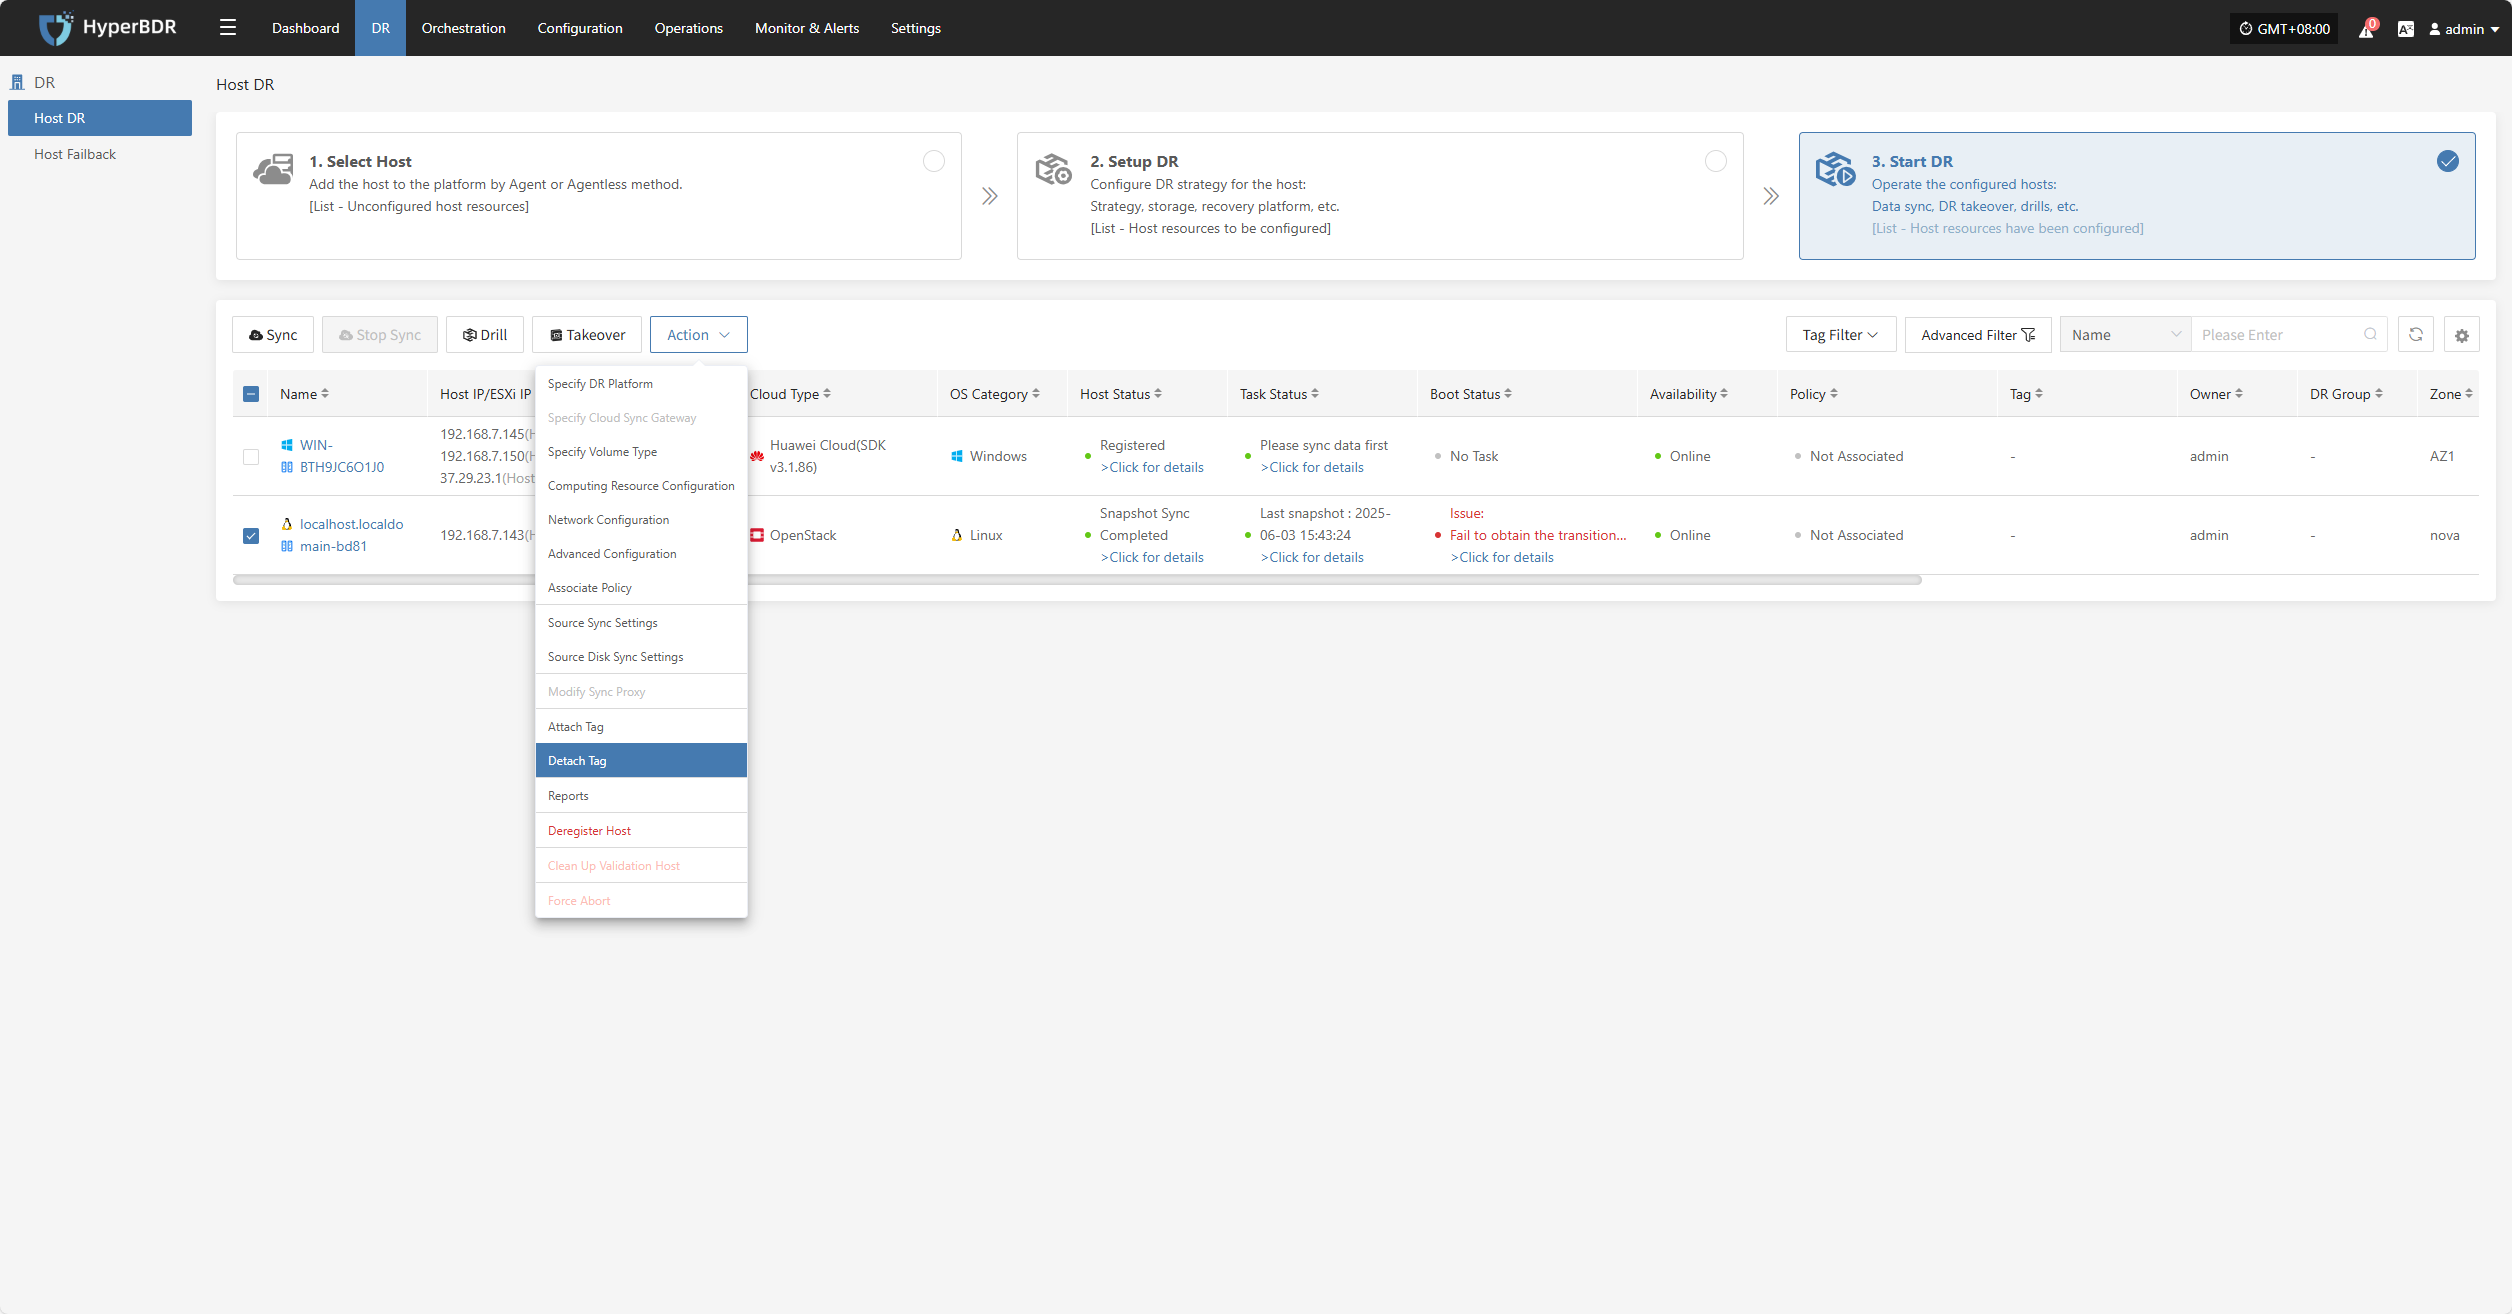
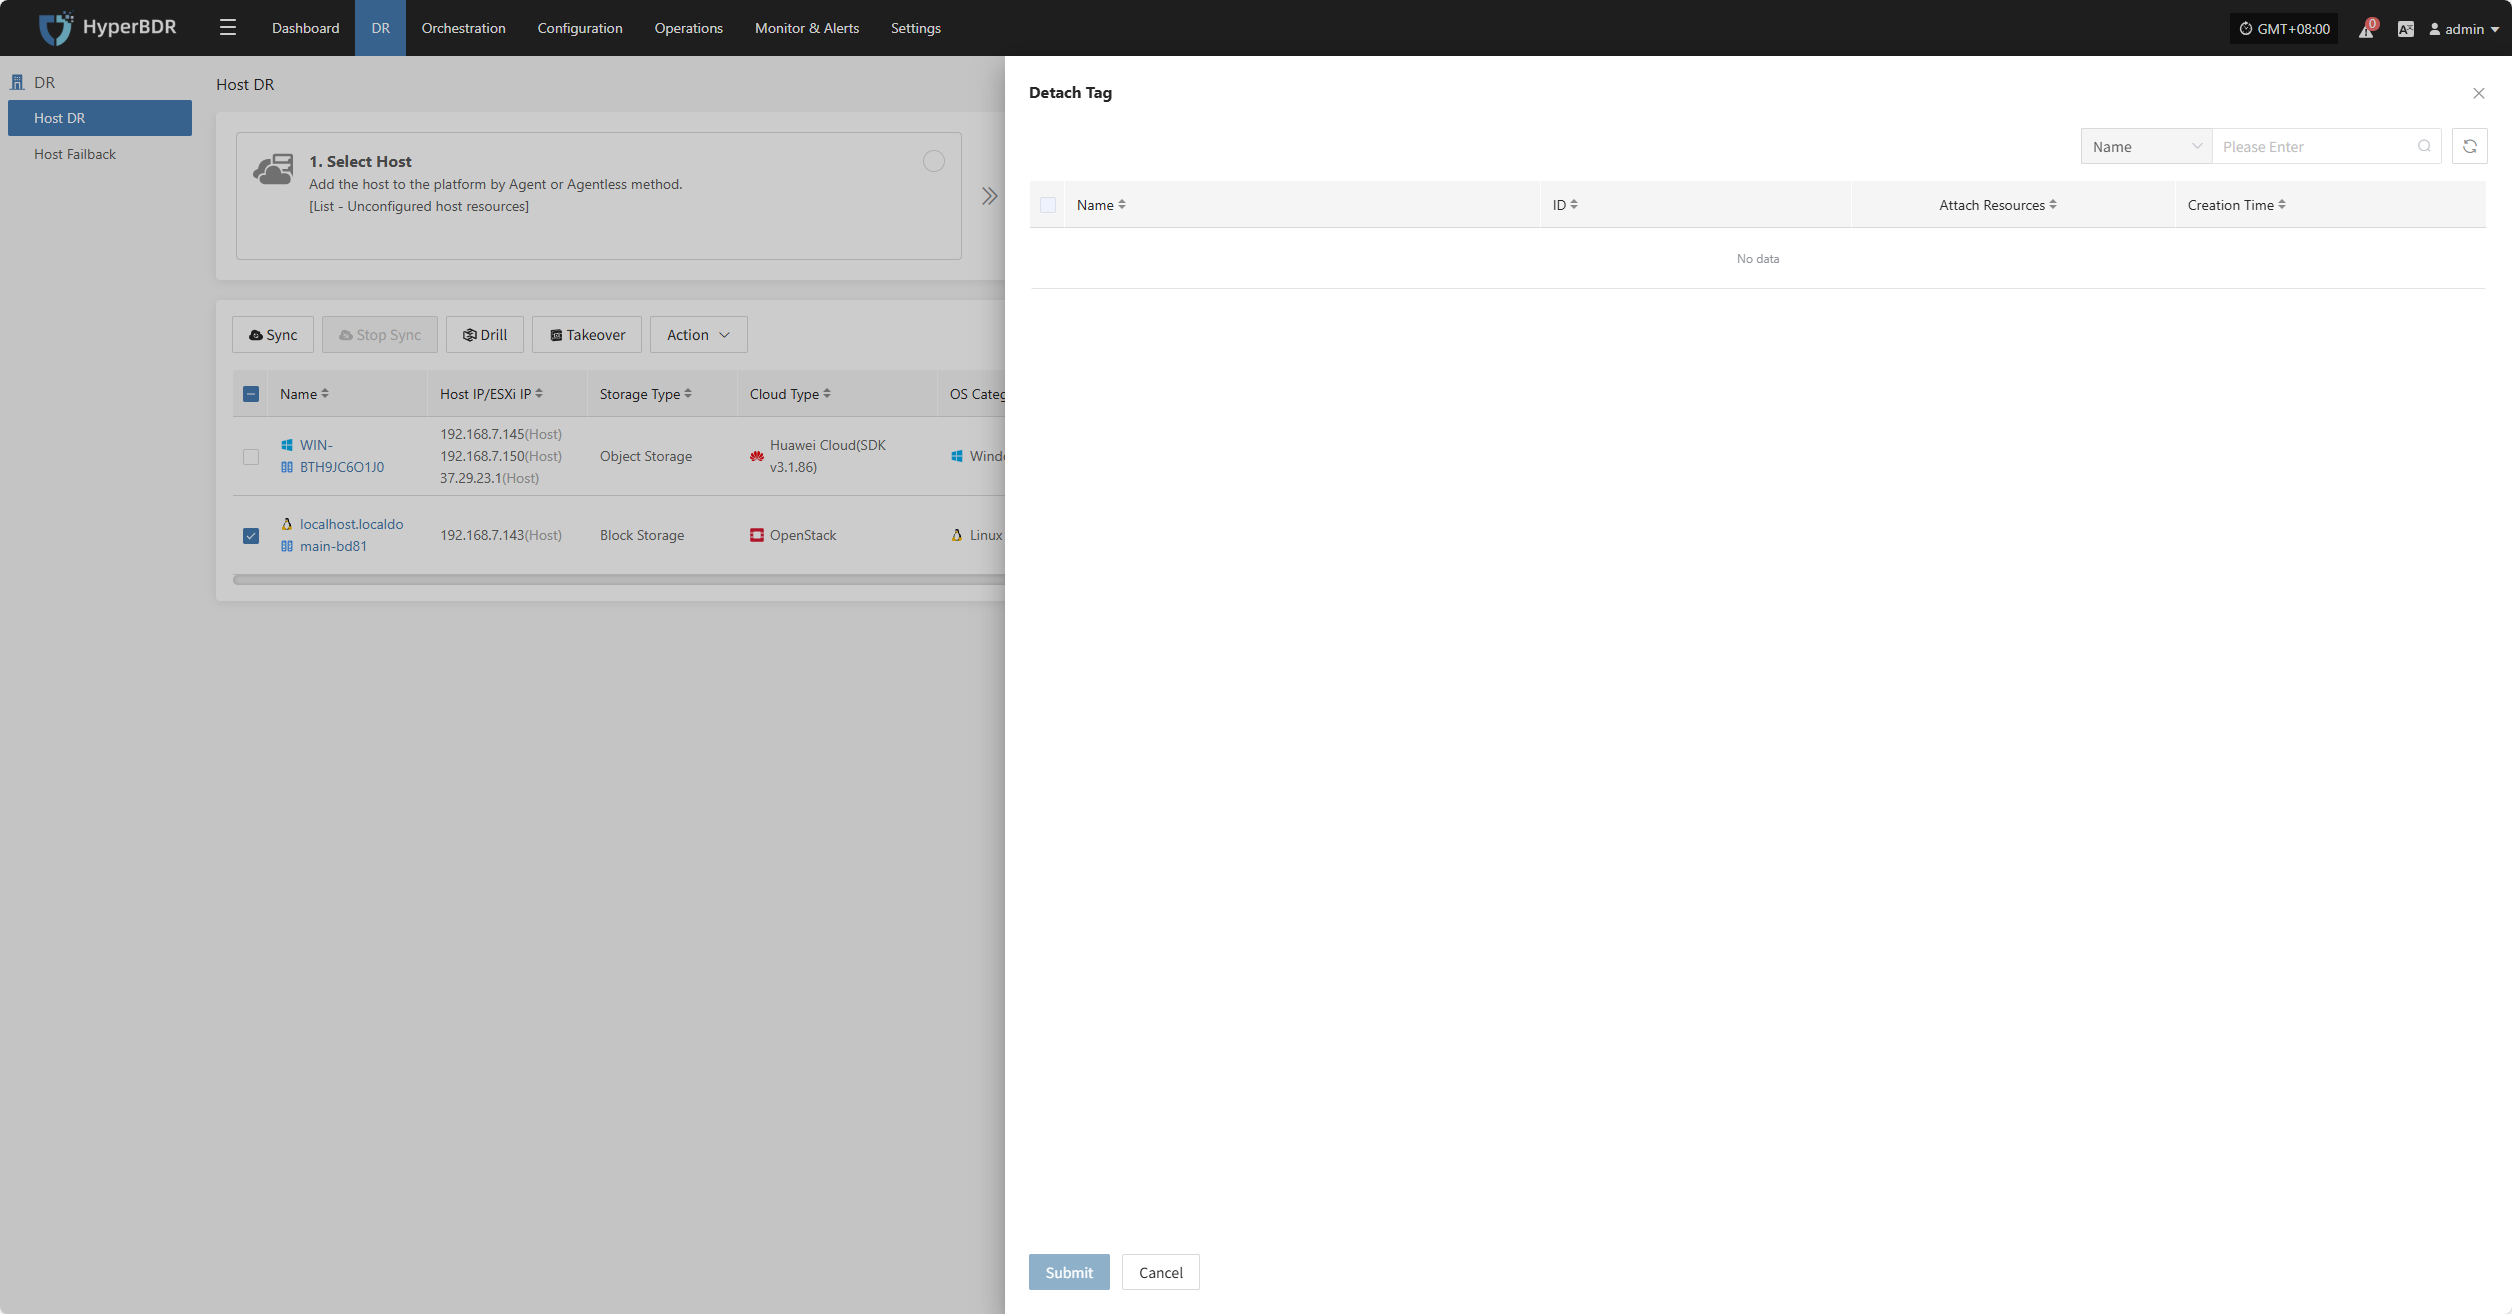
Detach Tag
Deregister Host
Deregister the backup host from the disaster recovery management platform.
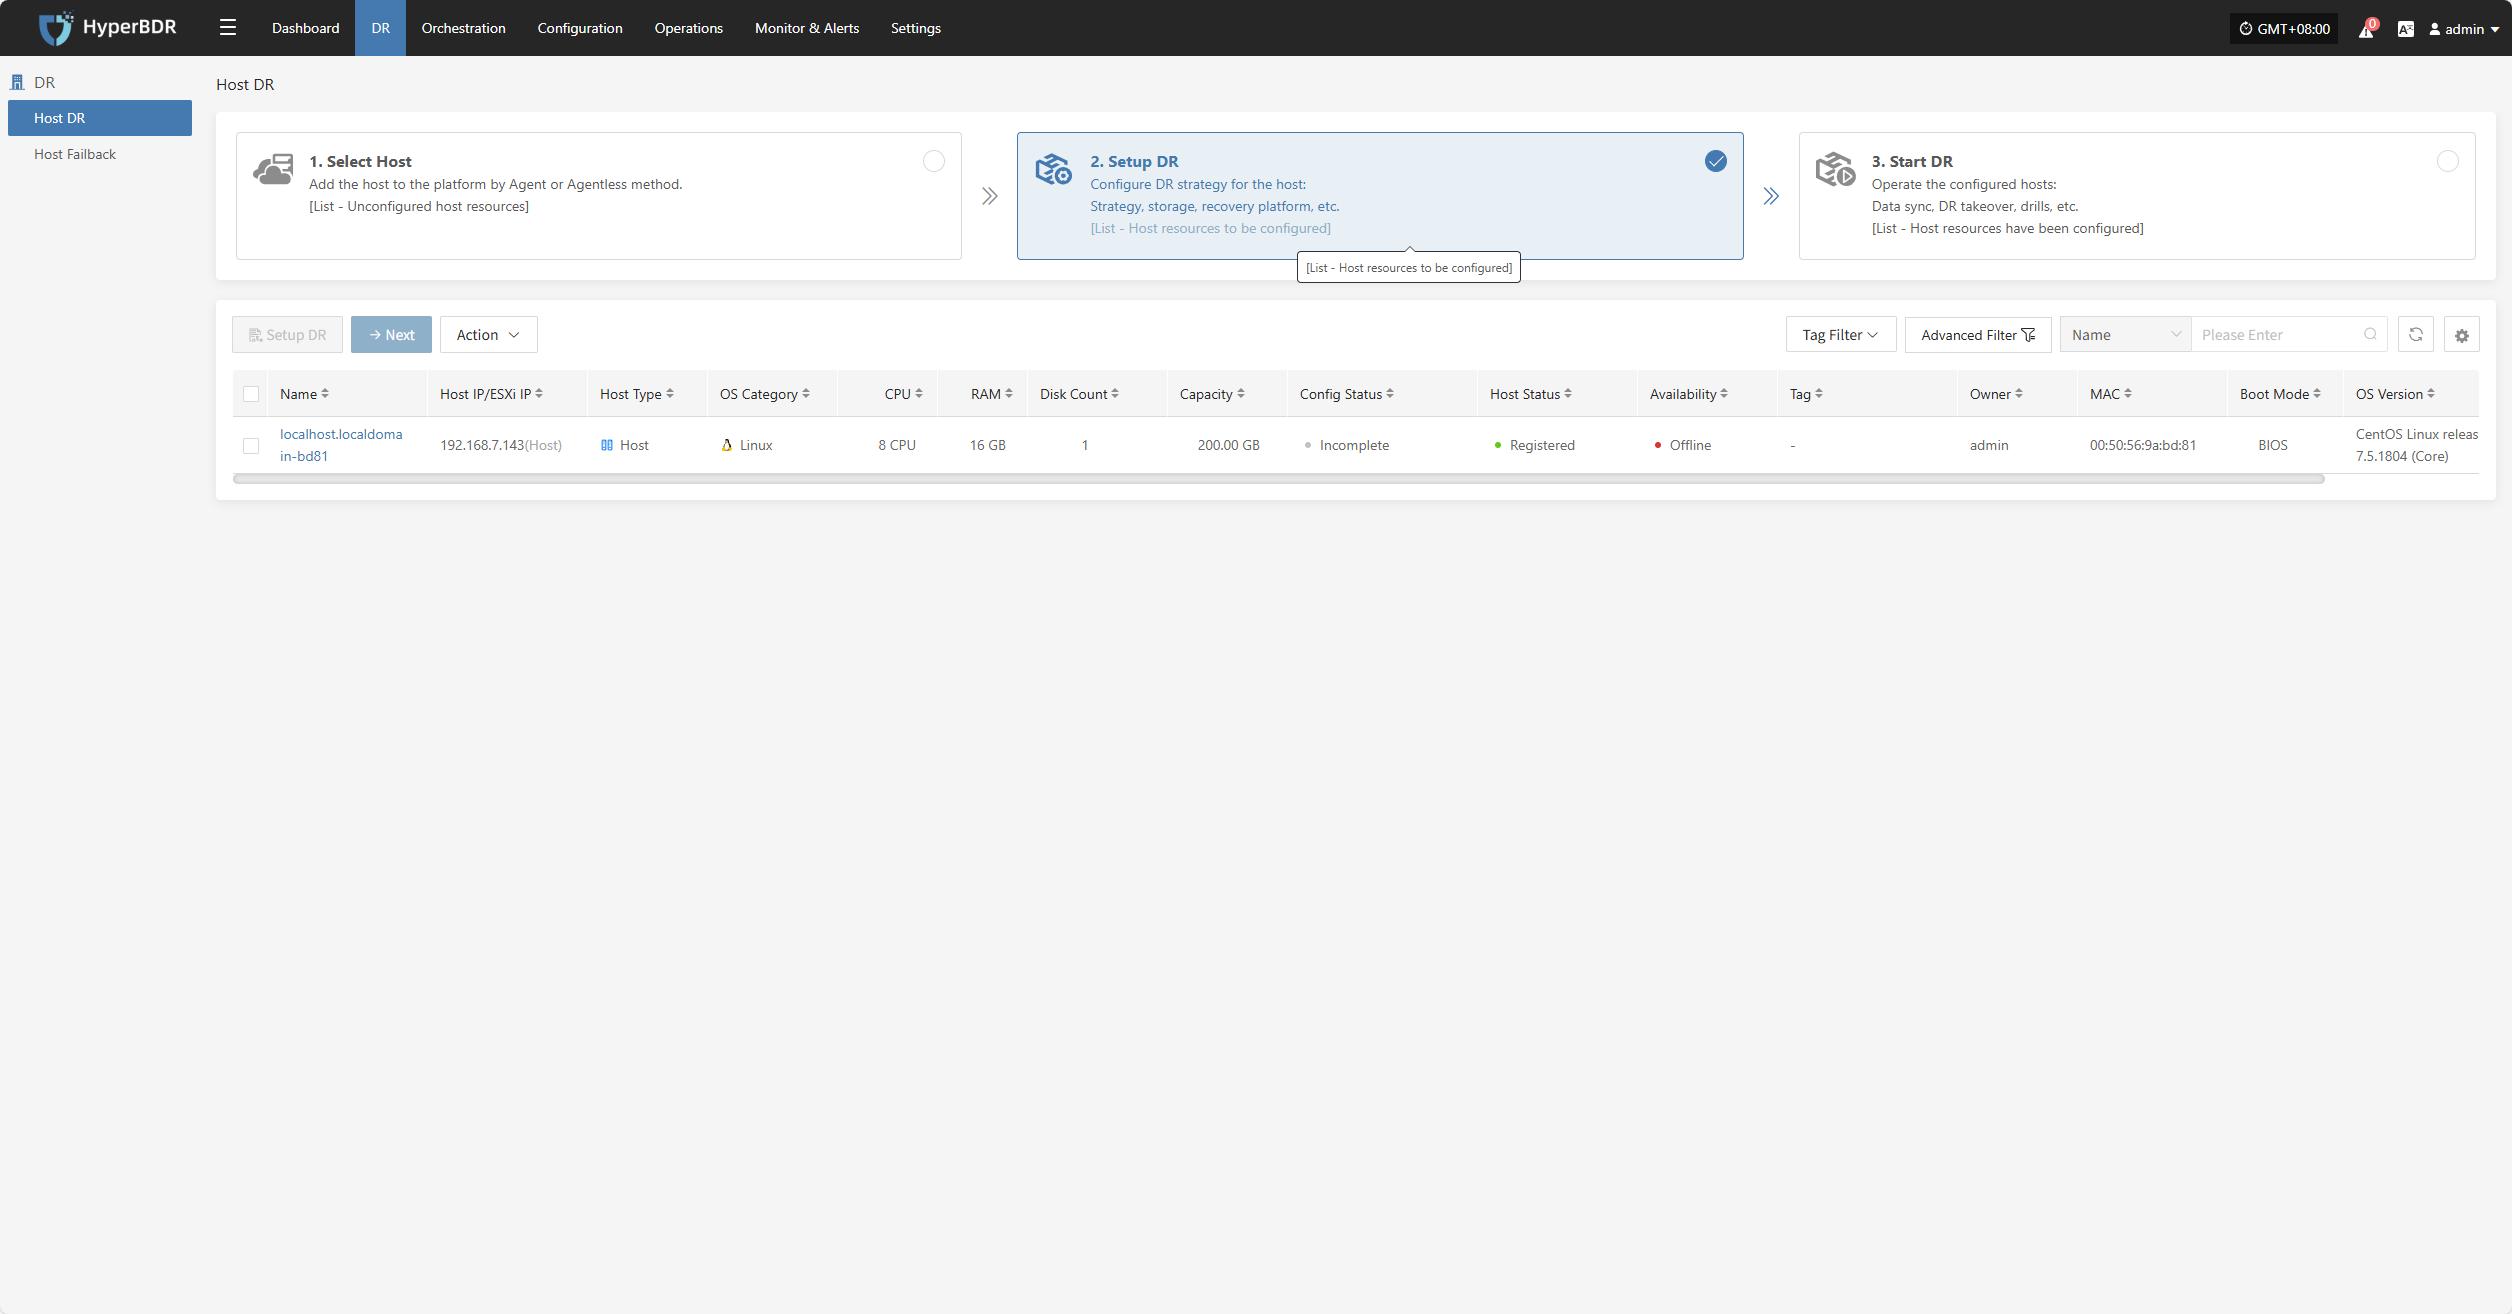
Setup DR
Log in to the console, click the top "DR" navigation bar, then click "Host DR" on the left. Click the "Setup DR" menu, select one or multiple hosts, and click the "Setup DR" button to configure disaster recovery.
Tips
The sequence of steps in the disaster recovery configuration process may vary slightly across different cloud platforms. For example, some platforms require volume type configuration before setting up compute resources, while others do the opposite. It is recommended to follow the interface guidance of the specific cloud platform and adjust the configuration order accordingly to ensure a smooth setup.
Block Storage
Select the storage type as "Block Storage," and follow the selected information to complete the block storage step configuration and finish the disaster recovery setup.

Specify DR Platform
Specify the backup host to use the "Block Storage" type for backup, and select the configuration parameter information.

Storage Configuration
| Parameter | Configuration | Description |
|---|---|---|
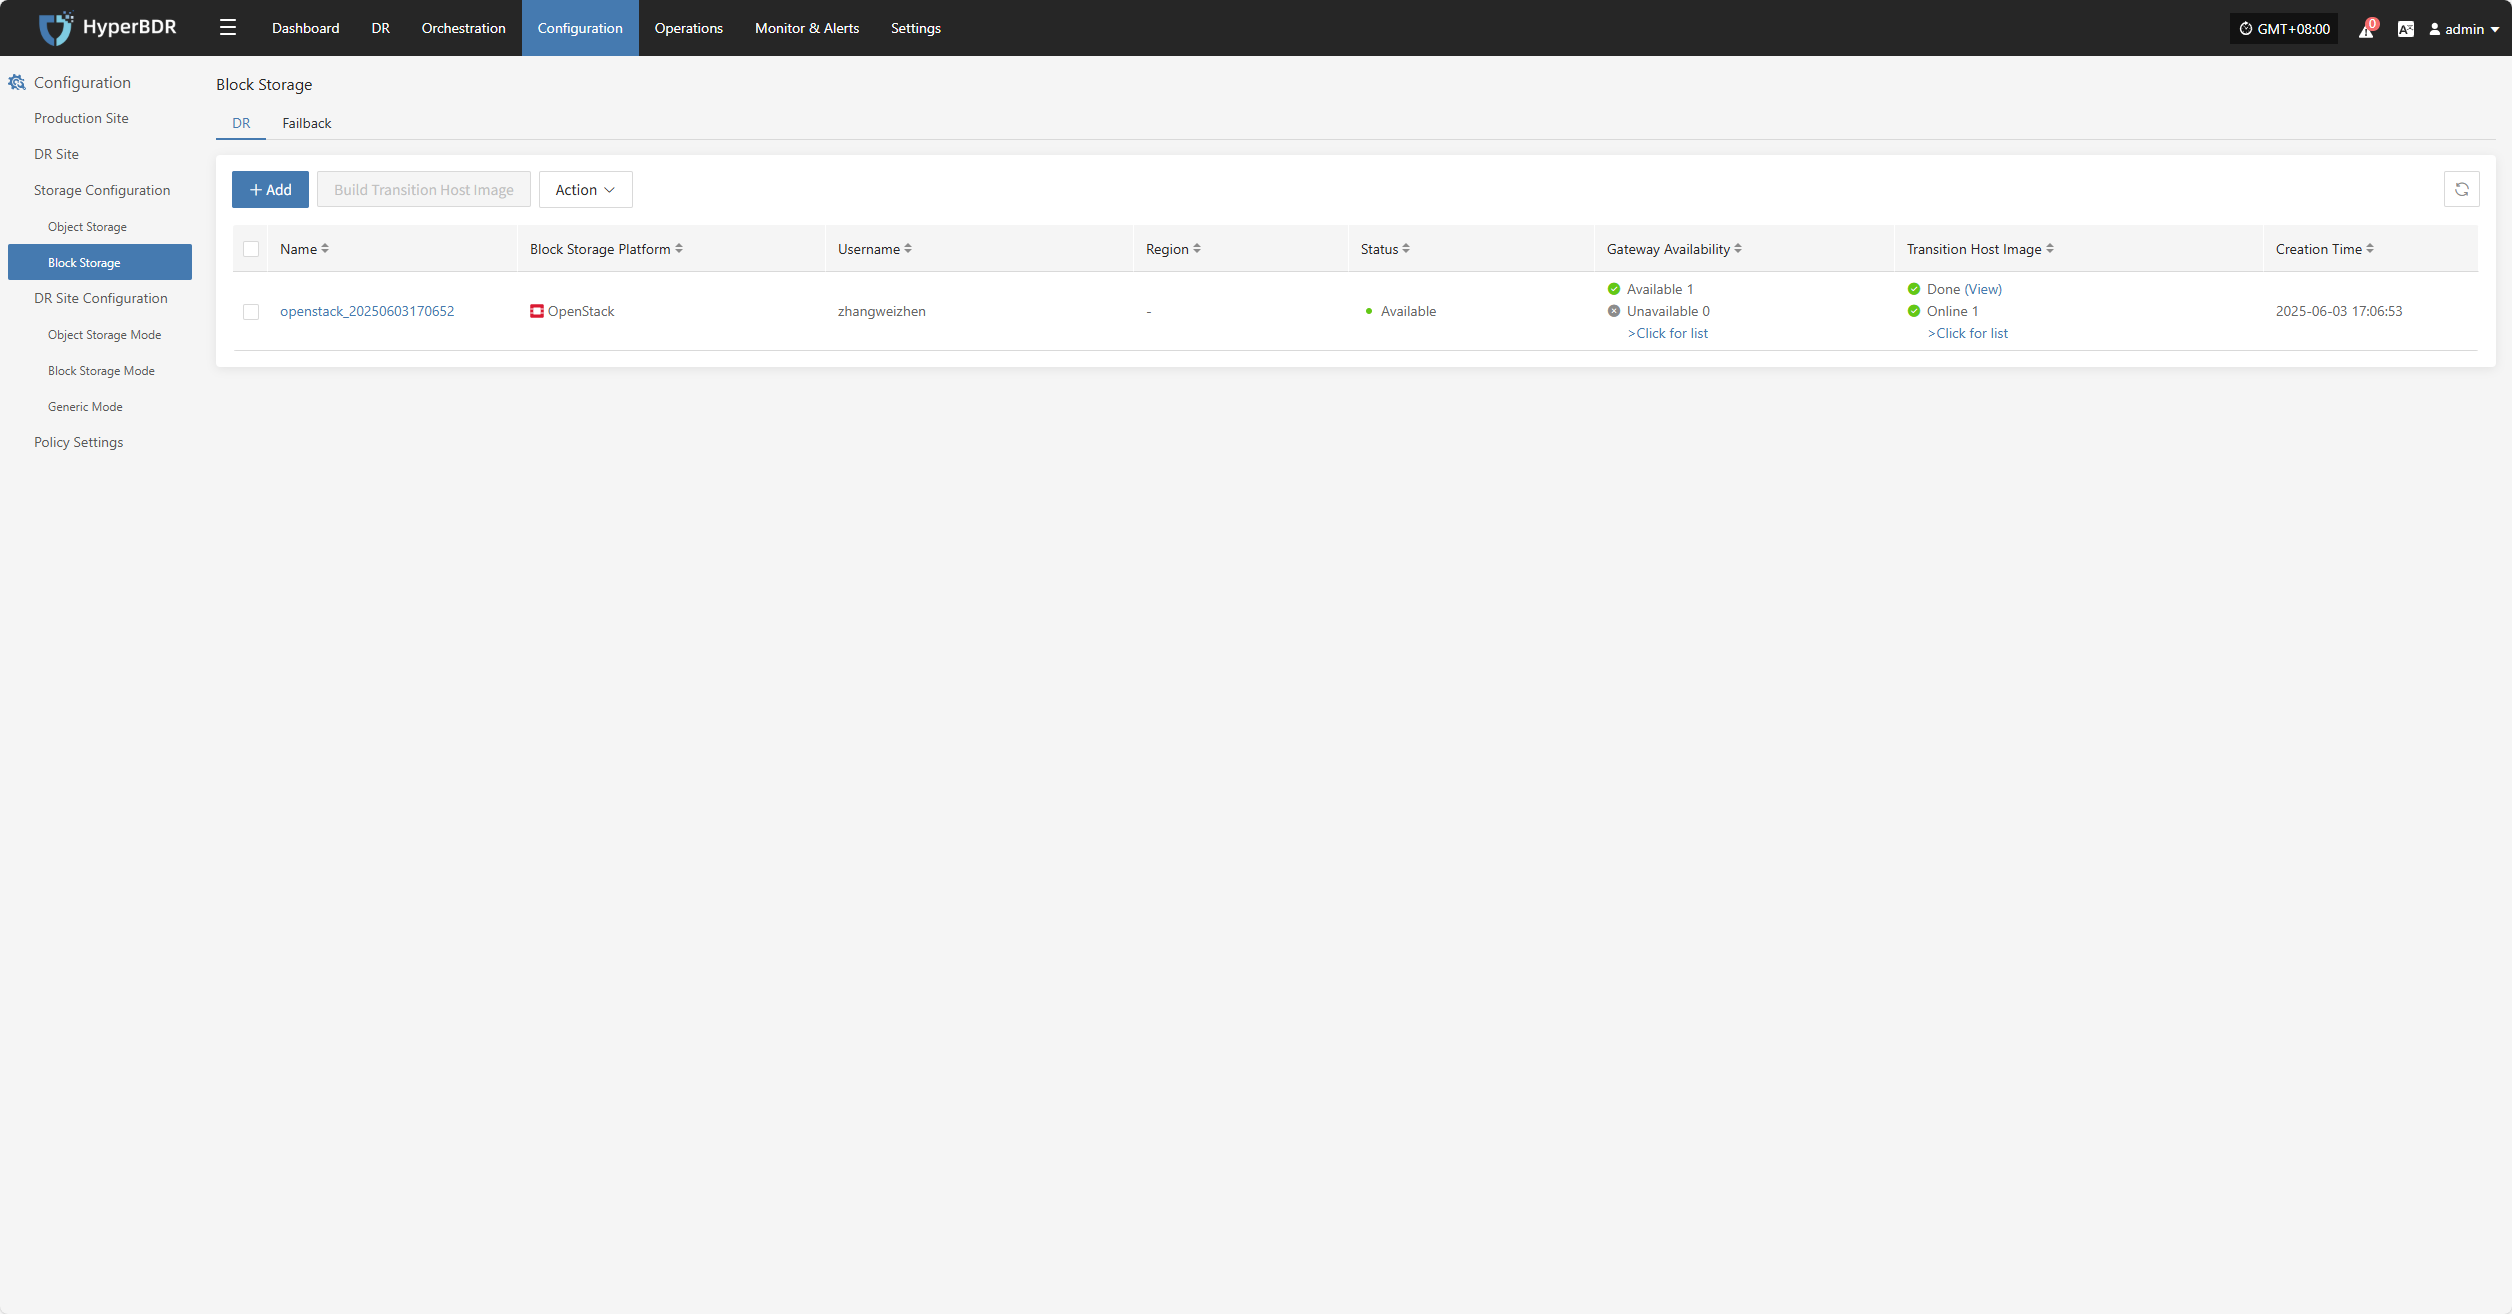
| Select Storage Type | Block Storage | Prerequisite: Block storage must be pre-configured; select the configured block storage for DR backup |
| Select Storage Platform | (Supported Storage Types) | Before proceeding with the configuration, please complete the block storage setup. Fill in the authentication details for the respective cloud provider according to your situation. For detailed configuration, please refer to the following:👉 Click here to see the supported storage types |
Source Sync Settings
| Parameter | Configuration | Description |
|---|---|---|
| VMware Quiesce Snapshot | Yes/No | Quiesce snapshot currently only effective for VMware hosts with VMware-tools installed. |
After completing the block storage setup, you can select the corresponding block storage platform from the dropdown list,After completing Specify DR Platform, click "Next" to start Specify Cloud Sync Gateway.
Specify Cloud Sync Gateway
Select the virtual machines that require disaster recovery backup from the current DR platform, assign the corresponding disaster recovery host disks, and complete the configuration of the sync gateway for the respective cloud platform.
Note: The cloud sync gateway will be automatically created when adding the DR platform configuration, no manual configuration is needed. For details, refer to: Storage Configuration -- Block Storage Configuration -- Find your corresponding cloud vendor configuration method 👉Click here to view
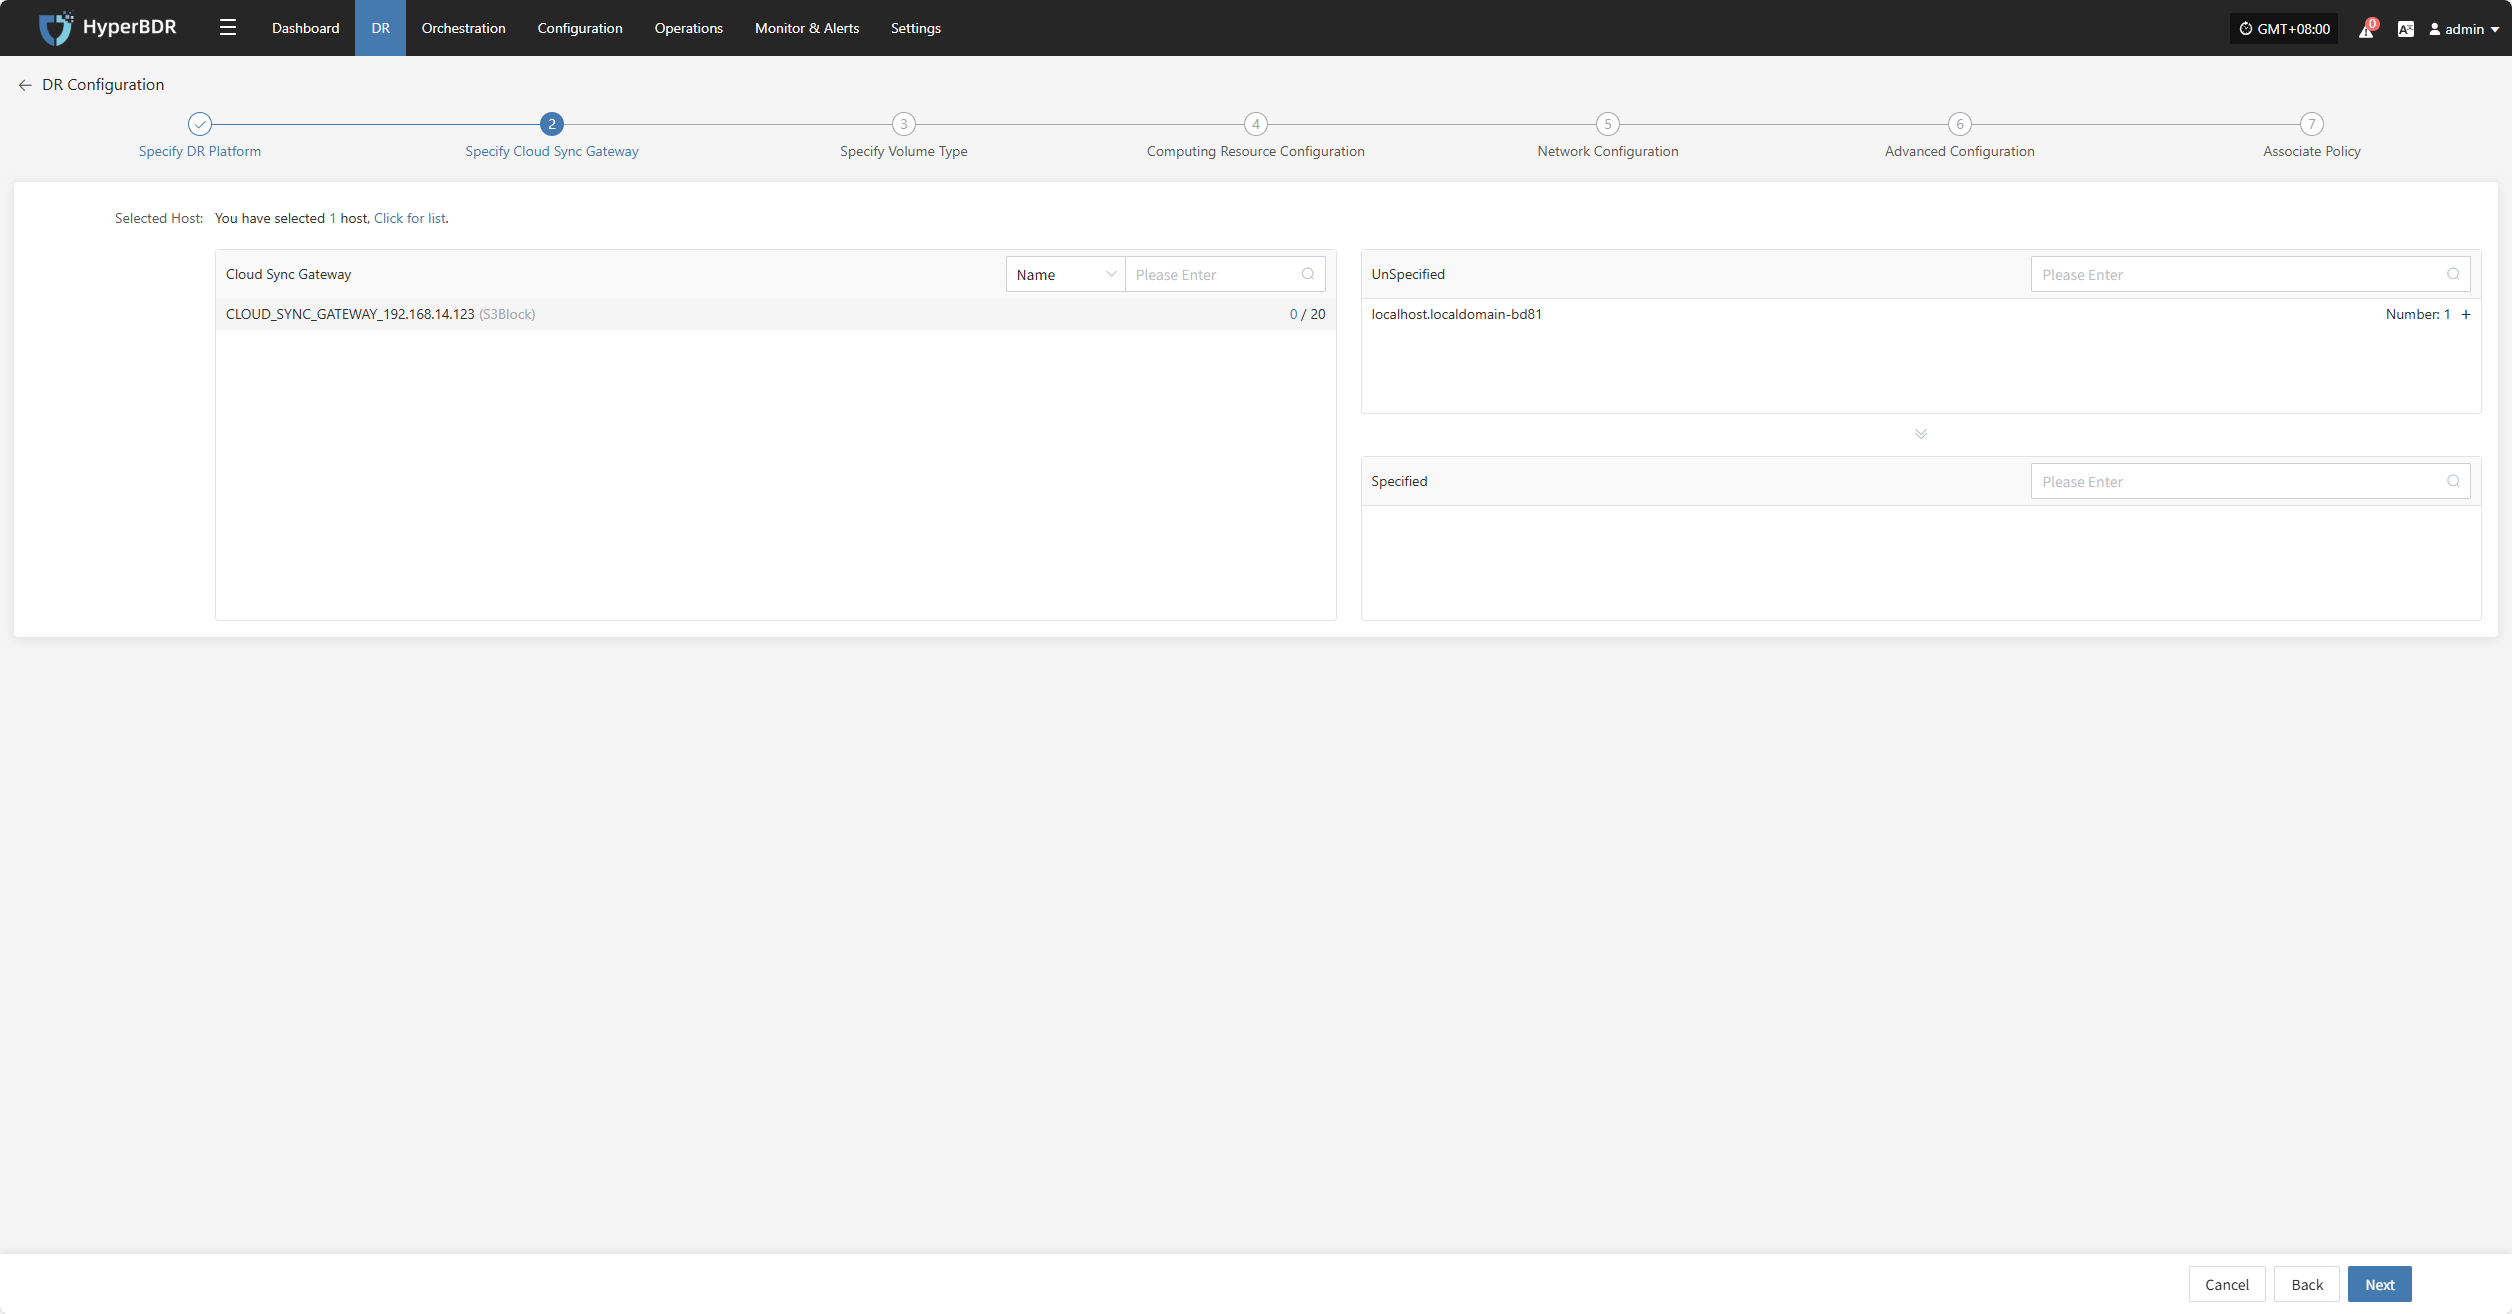
Click the "+" next to the corresponding disaster recovery host to assign the DR host.
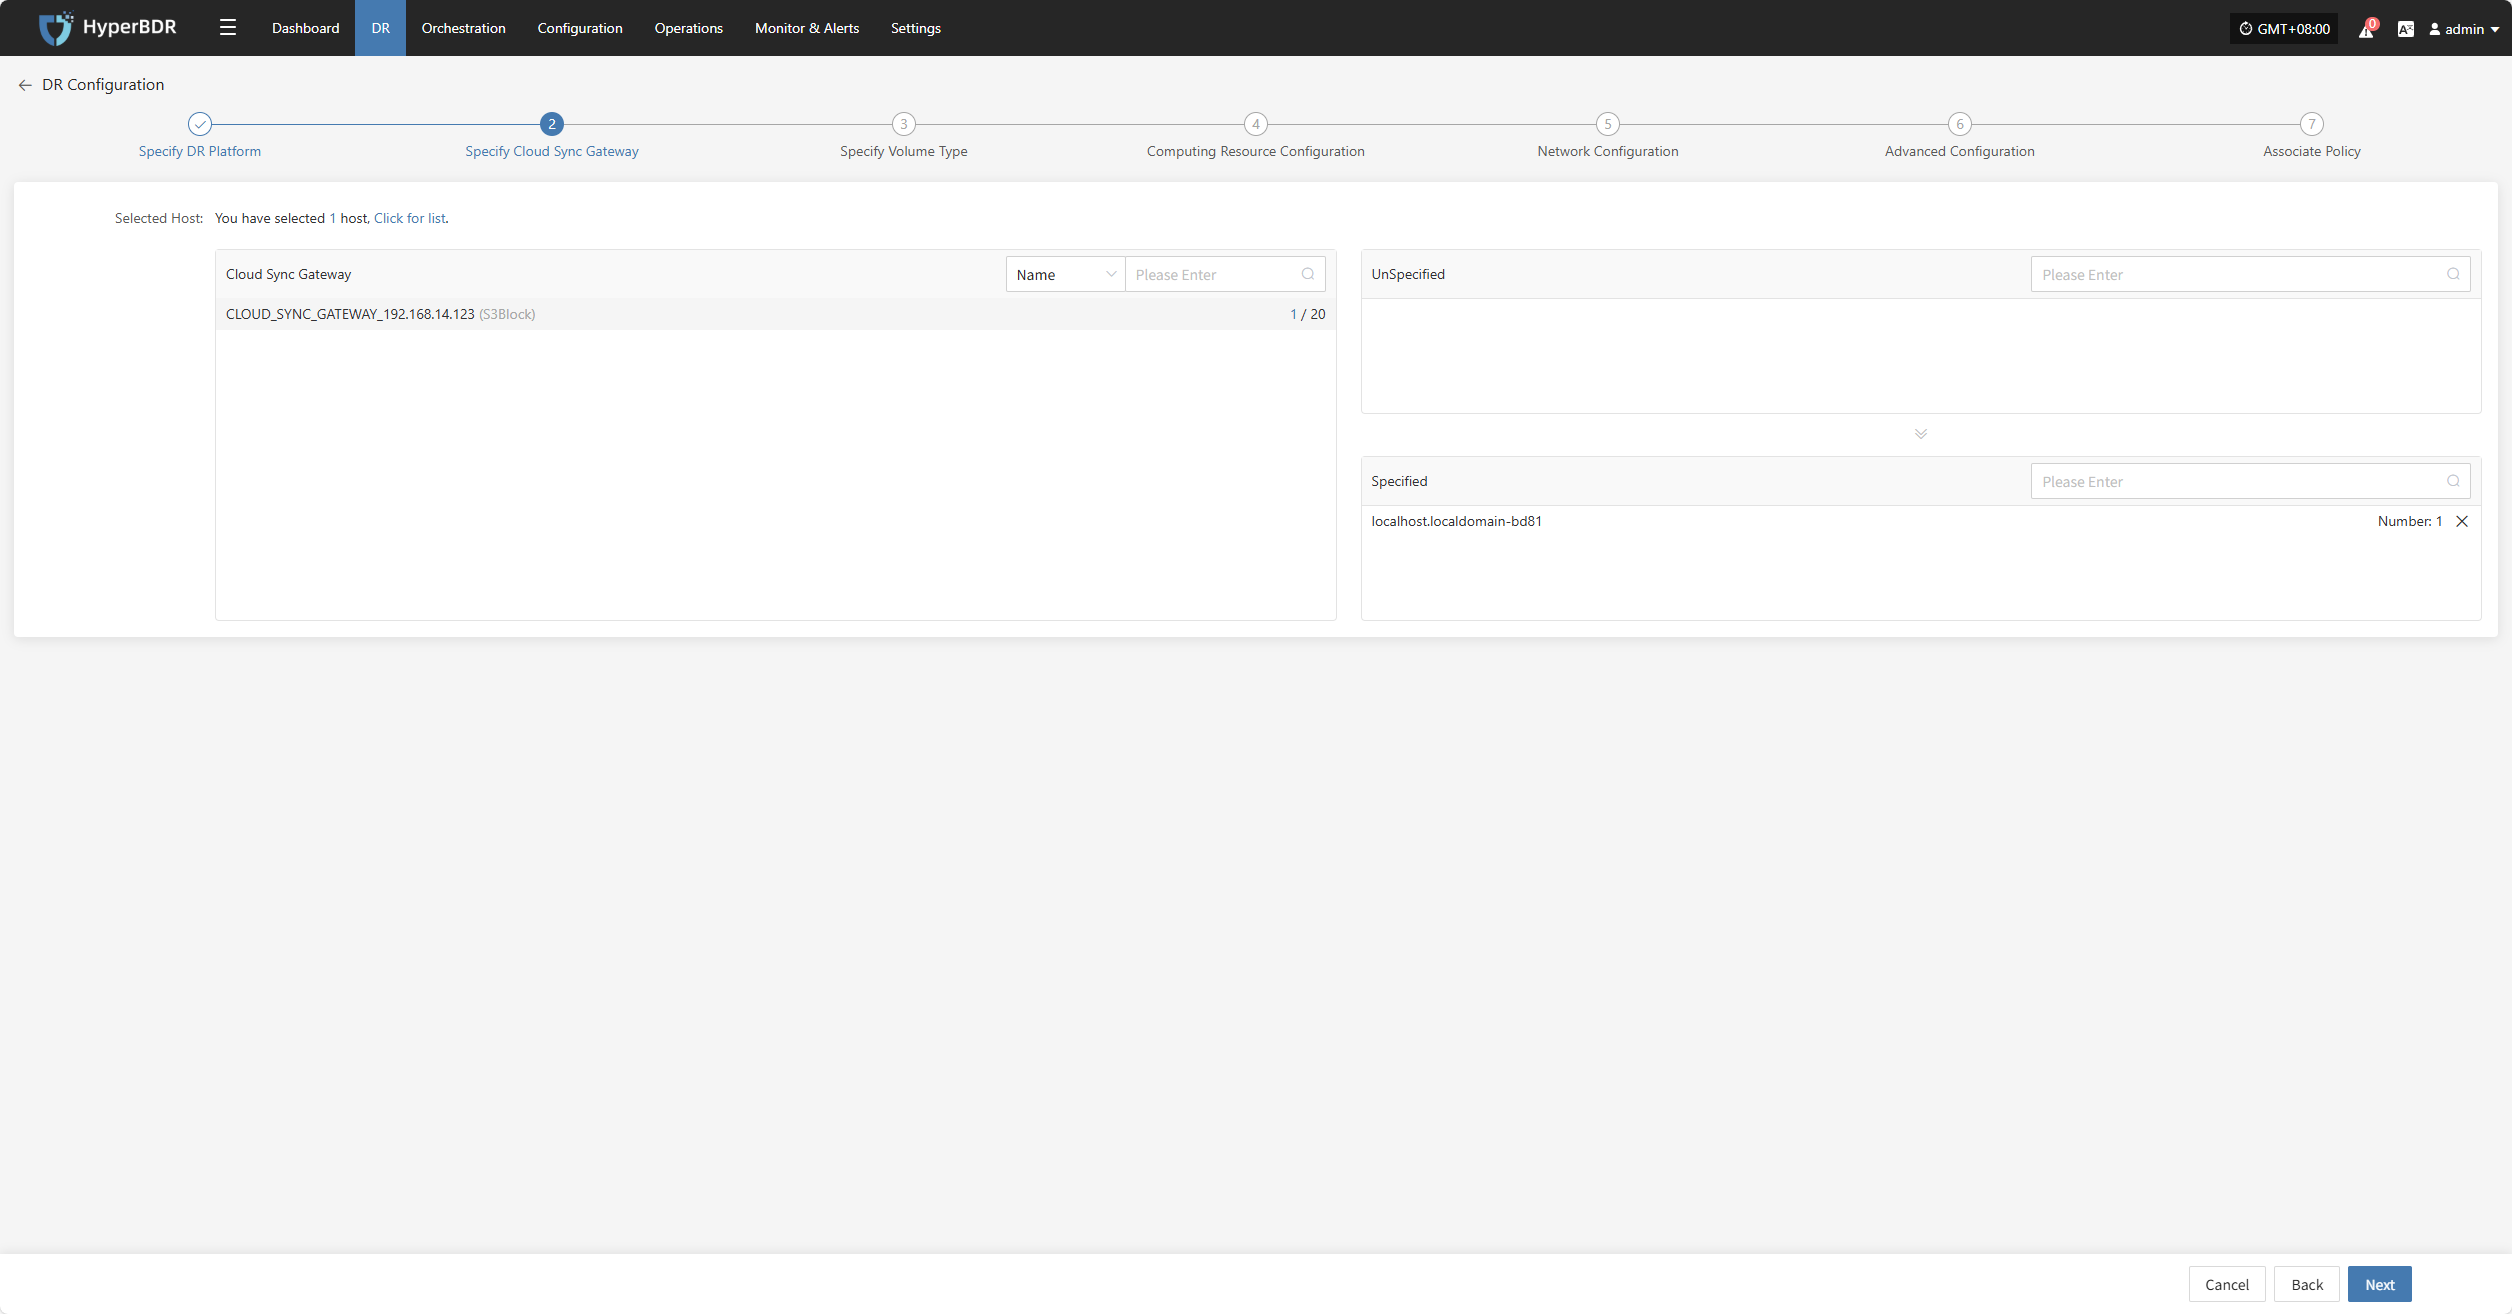
After completing Specify Cloud Sync Gateway, click "Next" to start Specify Volume Type.
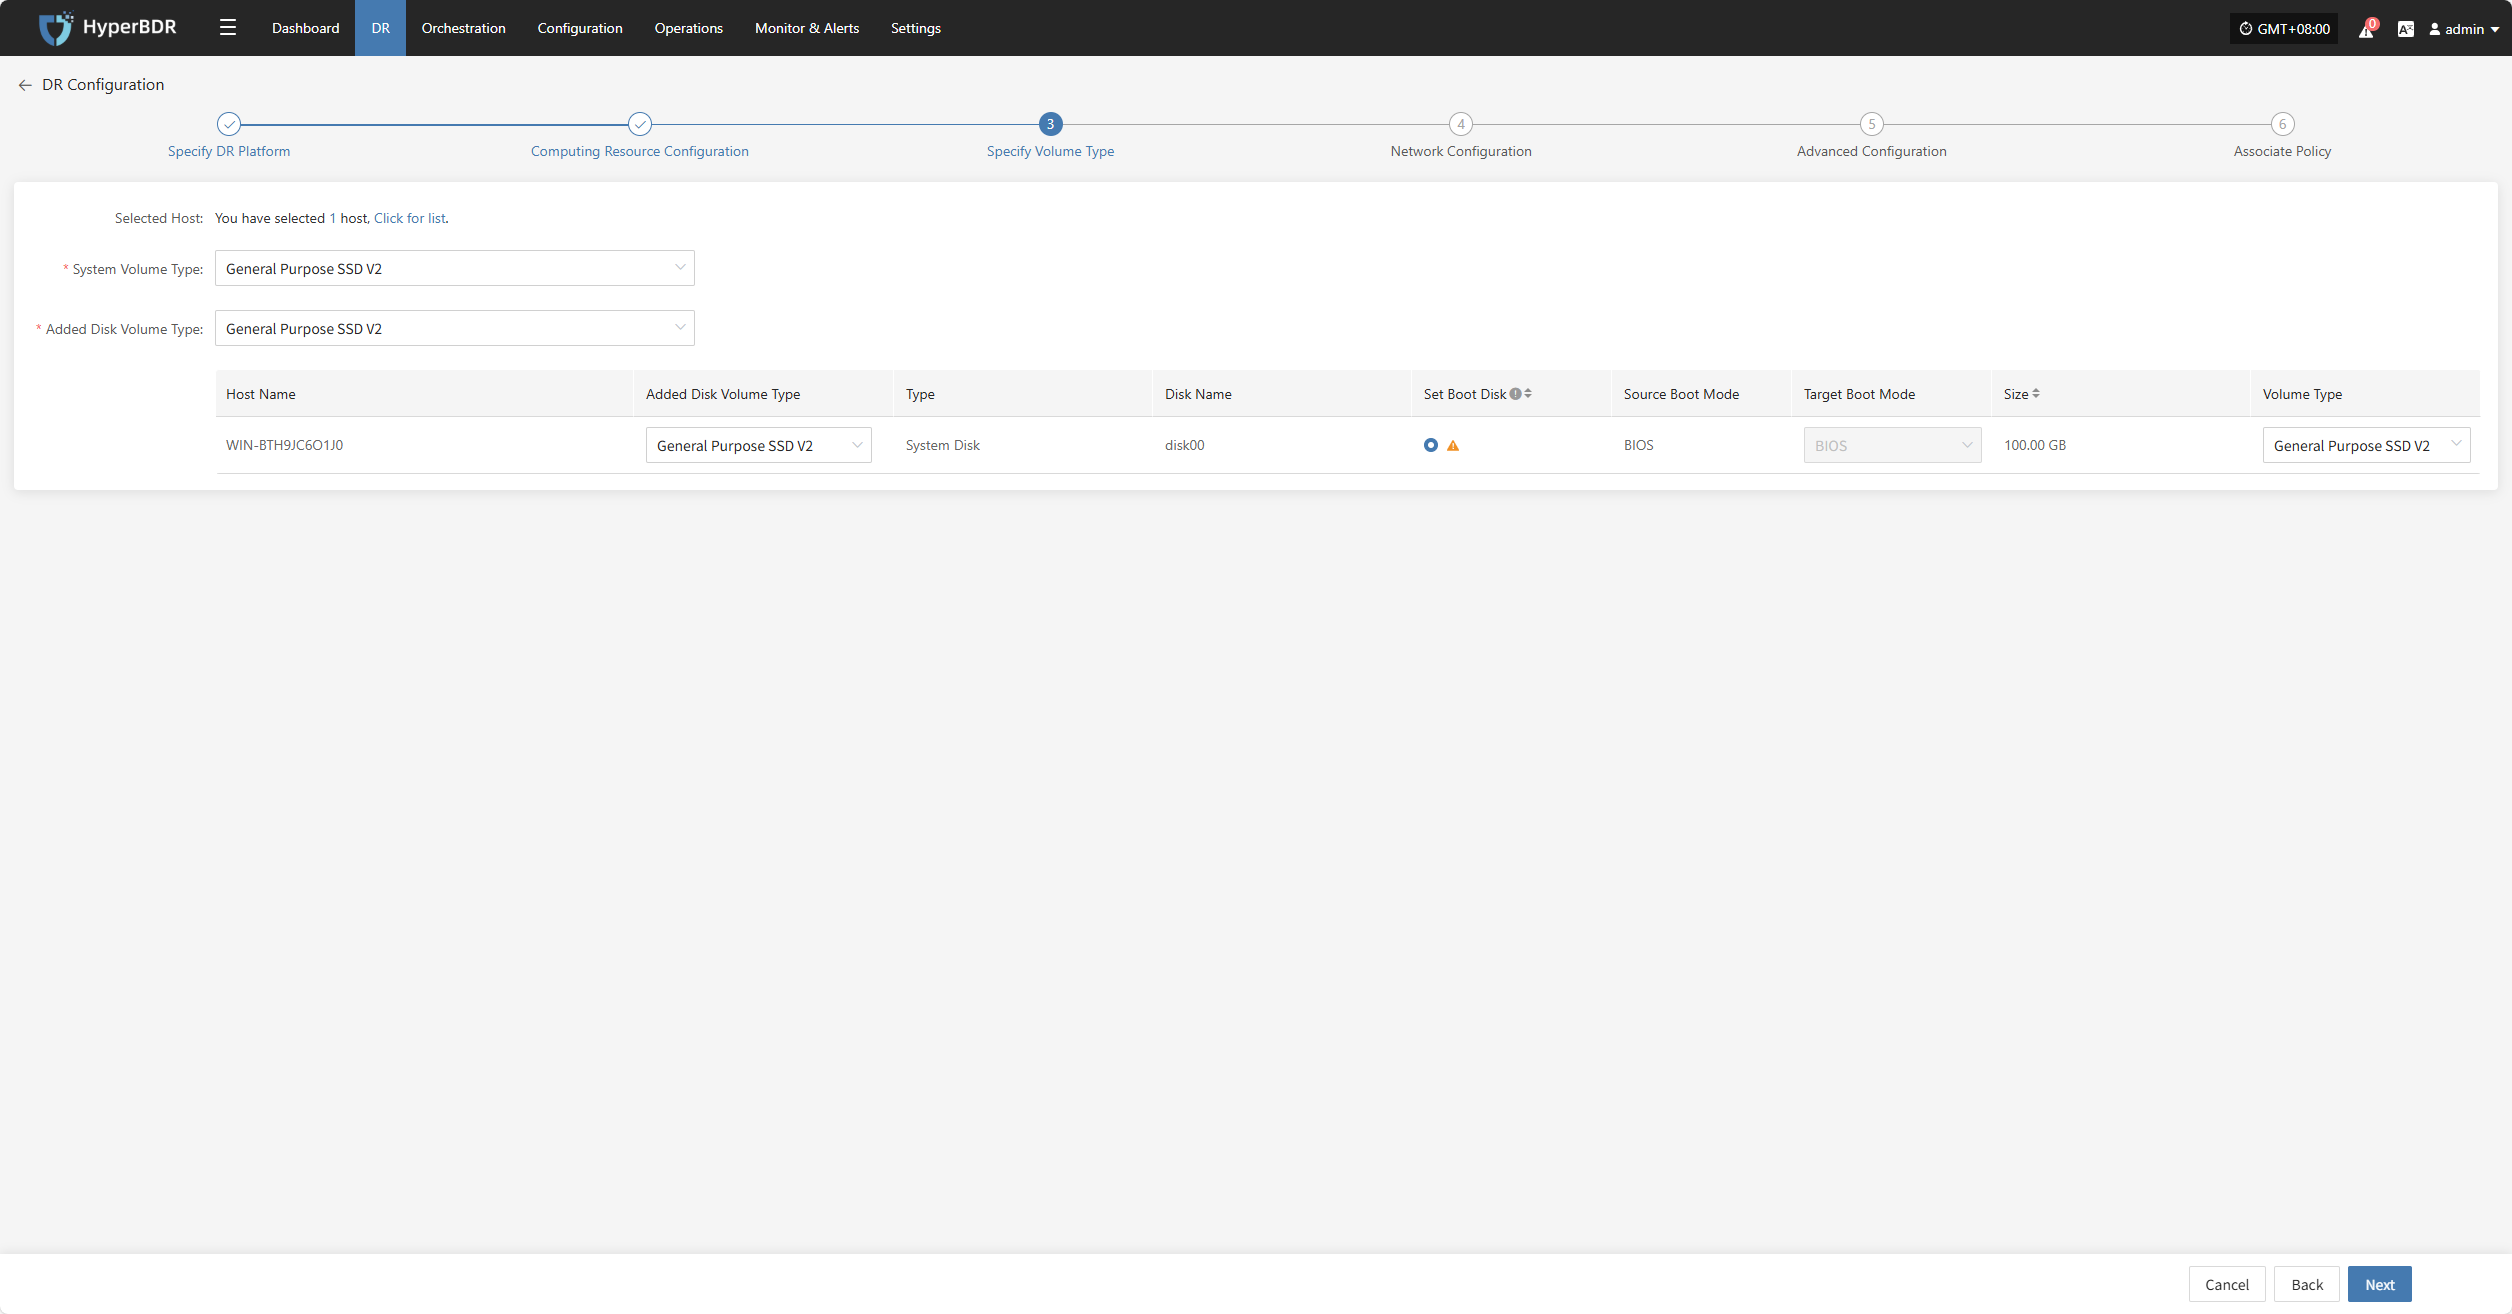
Specify Volume Type
Users must specify the corresponding disk types (volume types) on the target cloud platform for each disk of the selected virtual machine, to ensure accurate resource mapping and successful mounting during the disaster recovery process.
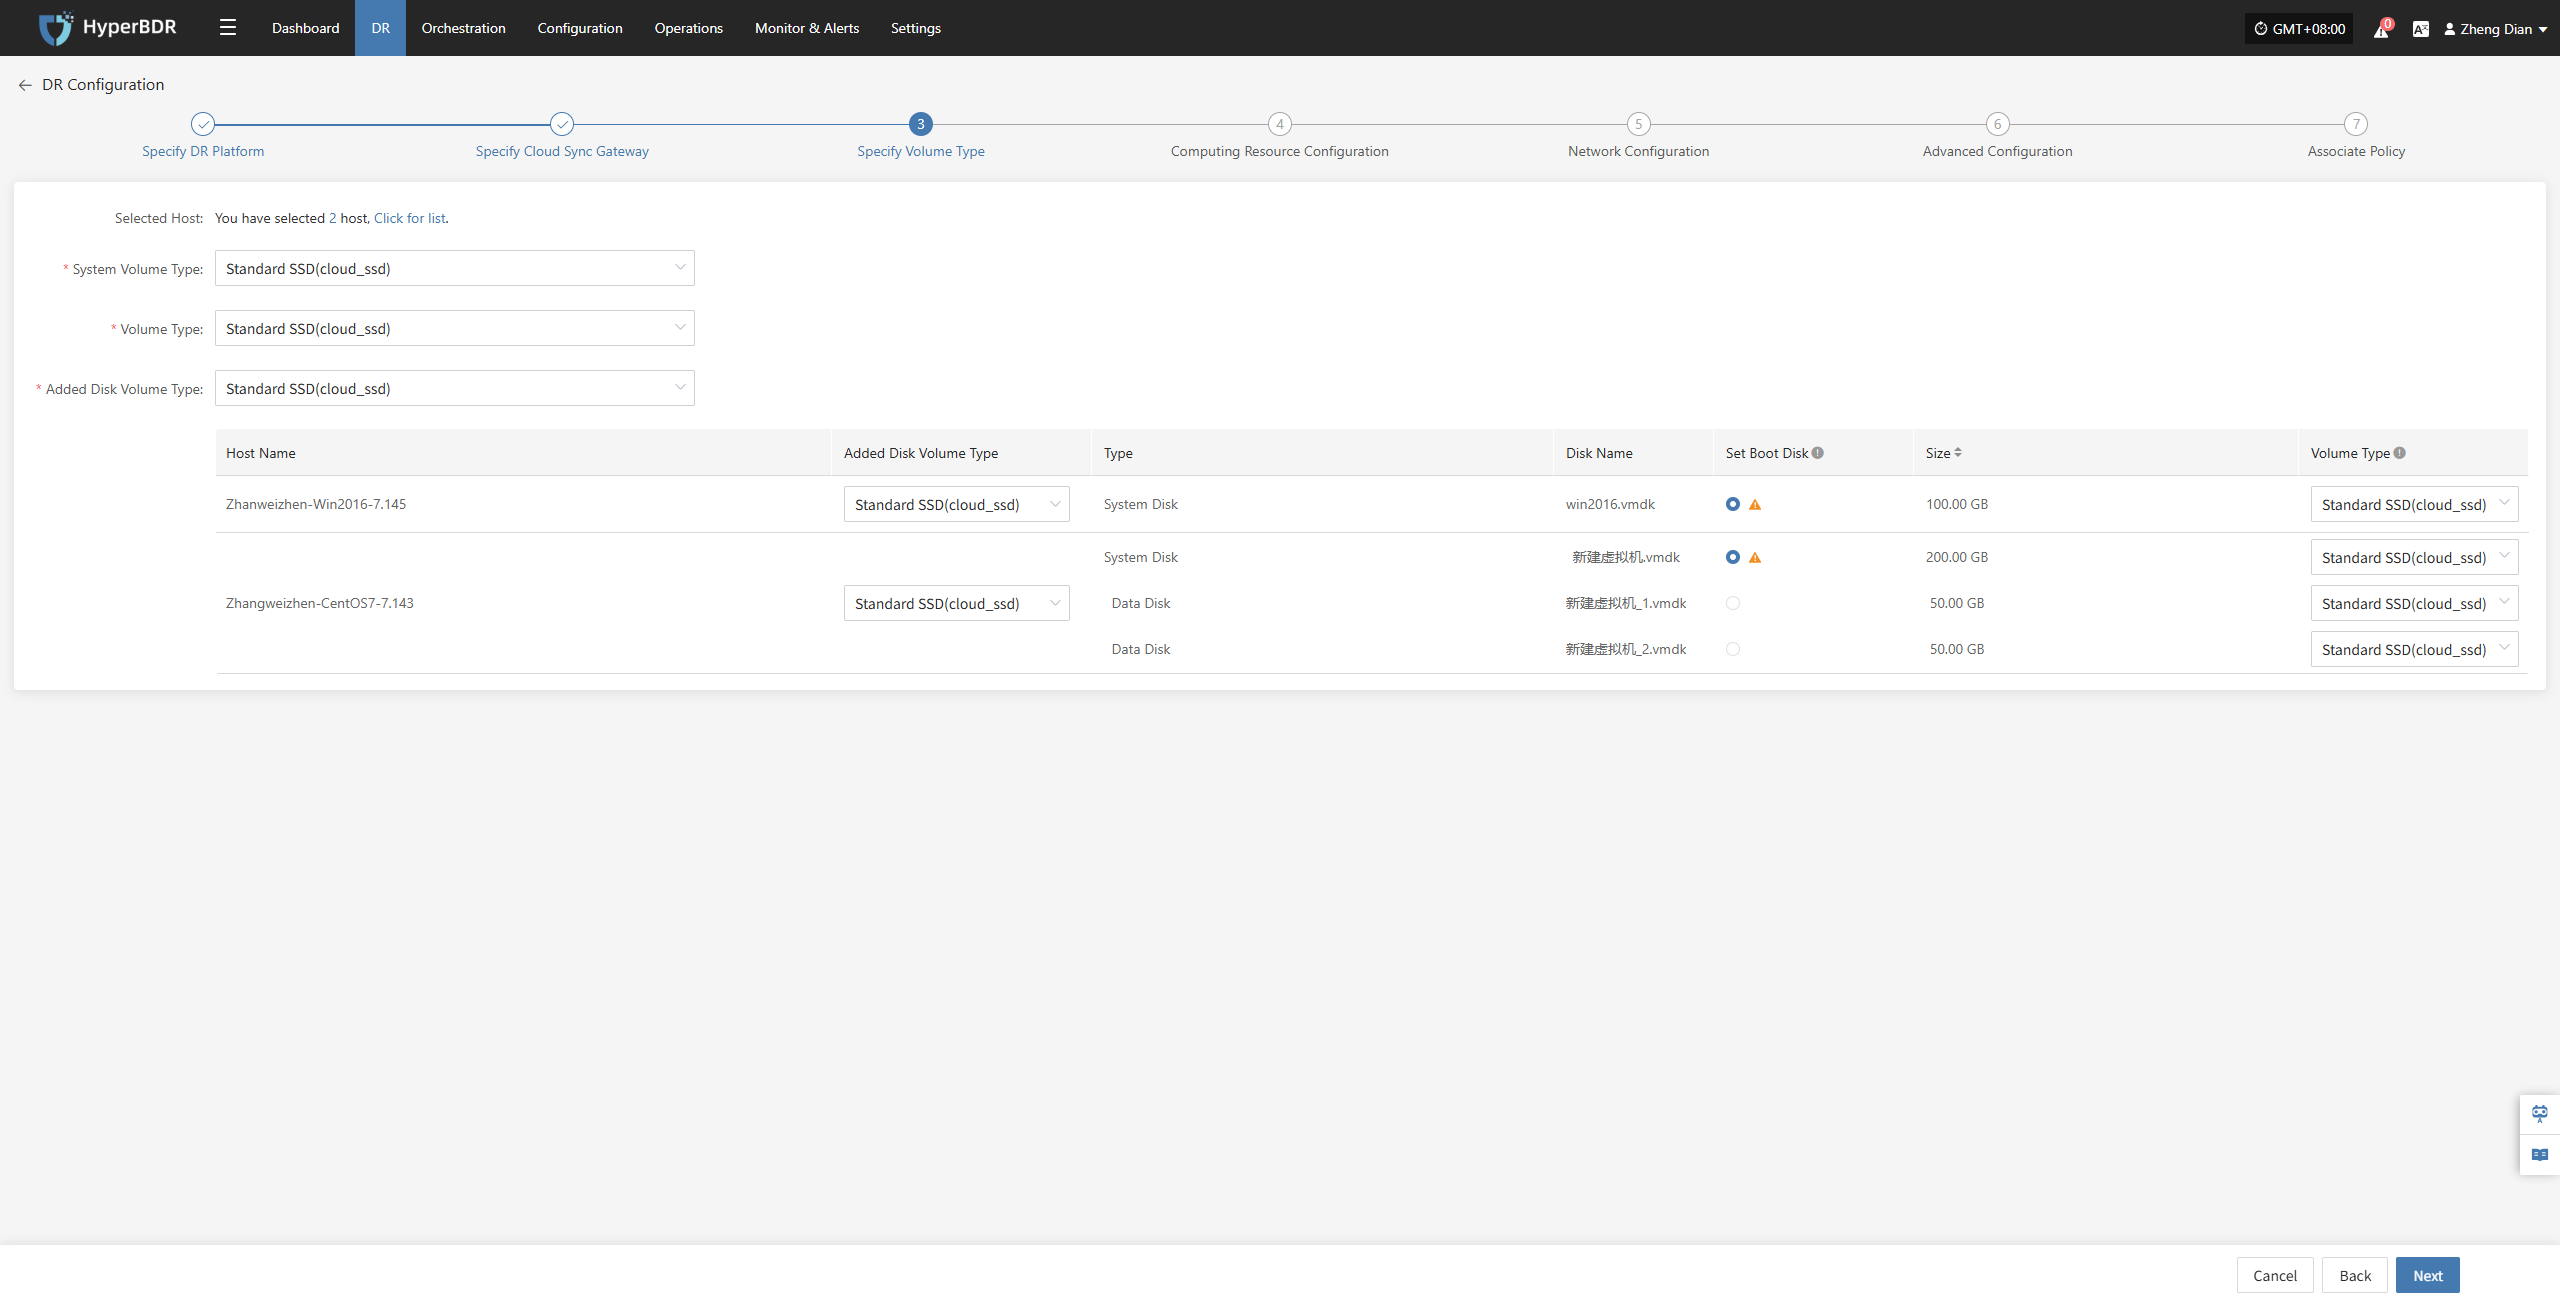
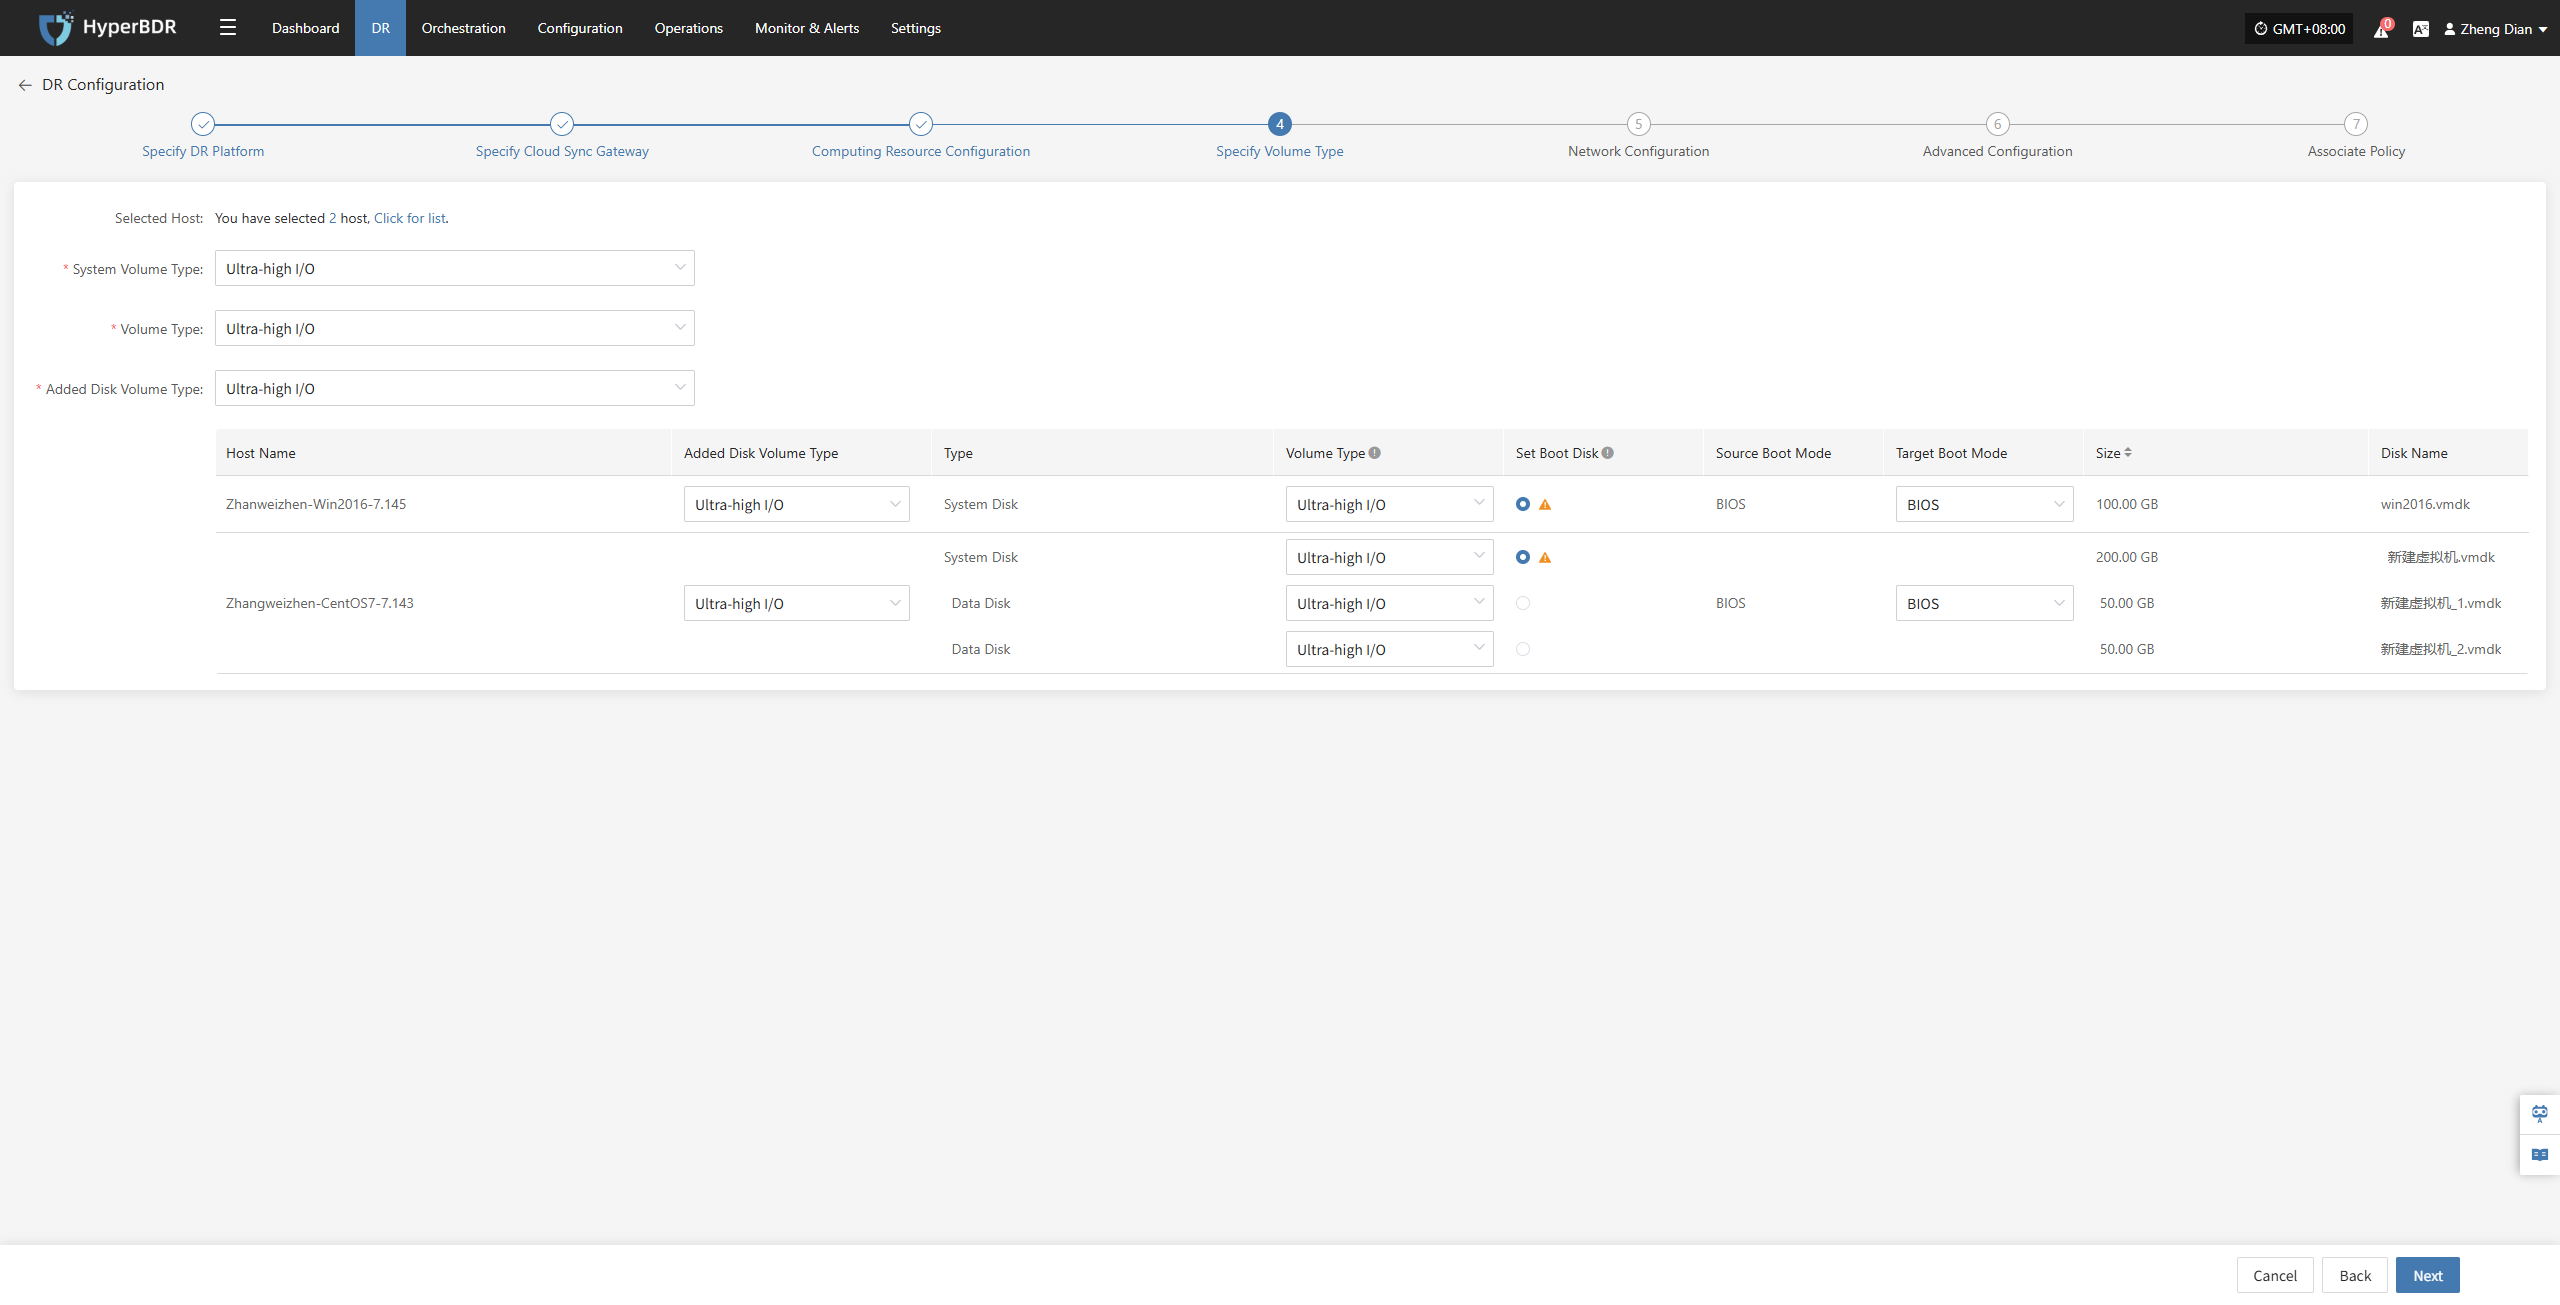
Configure and select the target volume types for the virtual machine disks that require disaster recovery backup, ensuring proper creation and mounting of resources during the recovery process.
| Item | Example Value | Description |
|---|---|---|
| System Volume Type | Ultra-high / IO | You can configure the target volume type for the system disk in bulk via the list above, or individually per host in the host list. |
| Volume Type | Ultra-high / IO | You can configure the target volume type for the data disk in bulk via the list above, or individually per host in the host list. |
| Added Disk Volume Type | Ultra-high / IO | You can configure the target volume type for added disks in bulk via the list above, or individually per host in the host list. |
In multi-disk scenarios, be sure to manually select and set the boot disk for each host in the “Set Boot Disk” column to ensure the system can boot properly after disaster recovery.
After completing Specify Volume Type, click "Next" to start Computing Resource Configuration.
Computing Resource Configuration
You need to configure computing resource parameters for the disaster recovery hosts, including CPU, operating system type, etc., to ensure the recovered virtual machines can run properly in the target environment.
Select the virtual machines requiring disaster recovery backup. You can manually select in batches by paging through, configure CPU, operating system type, etc., or use the page buttons for batch configuration. After choosing the appropriate target boot mode, complete the setup.
Note: When the source host uses UEFI boot mode, you can select BIOS or UEFI to boot the system disk. Disks larger than 2TB cannot use BIOS boot mode.

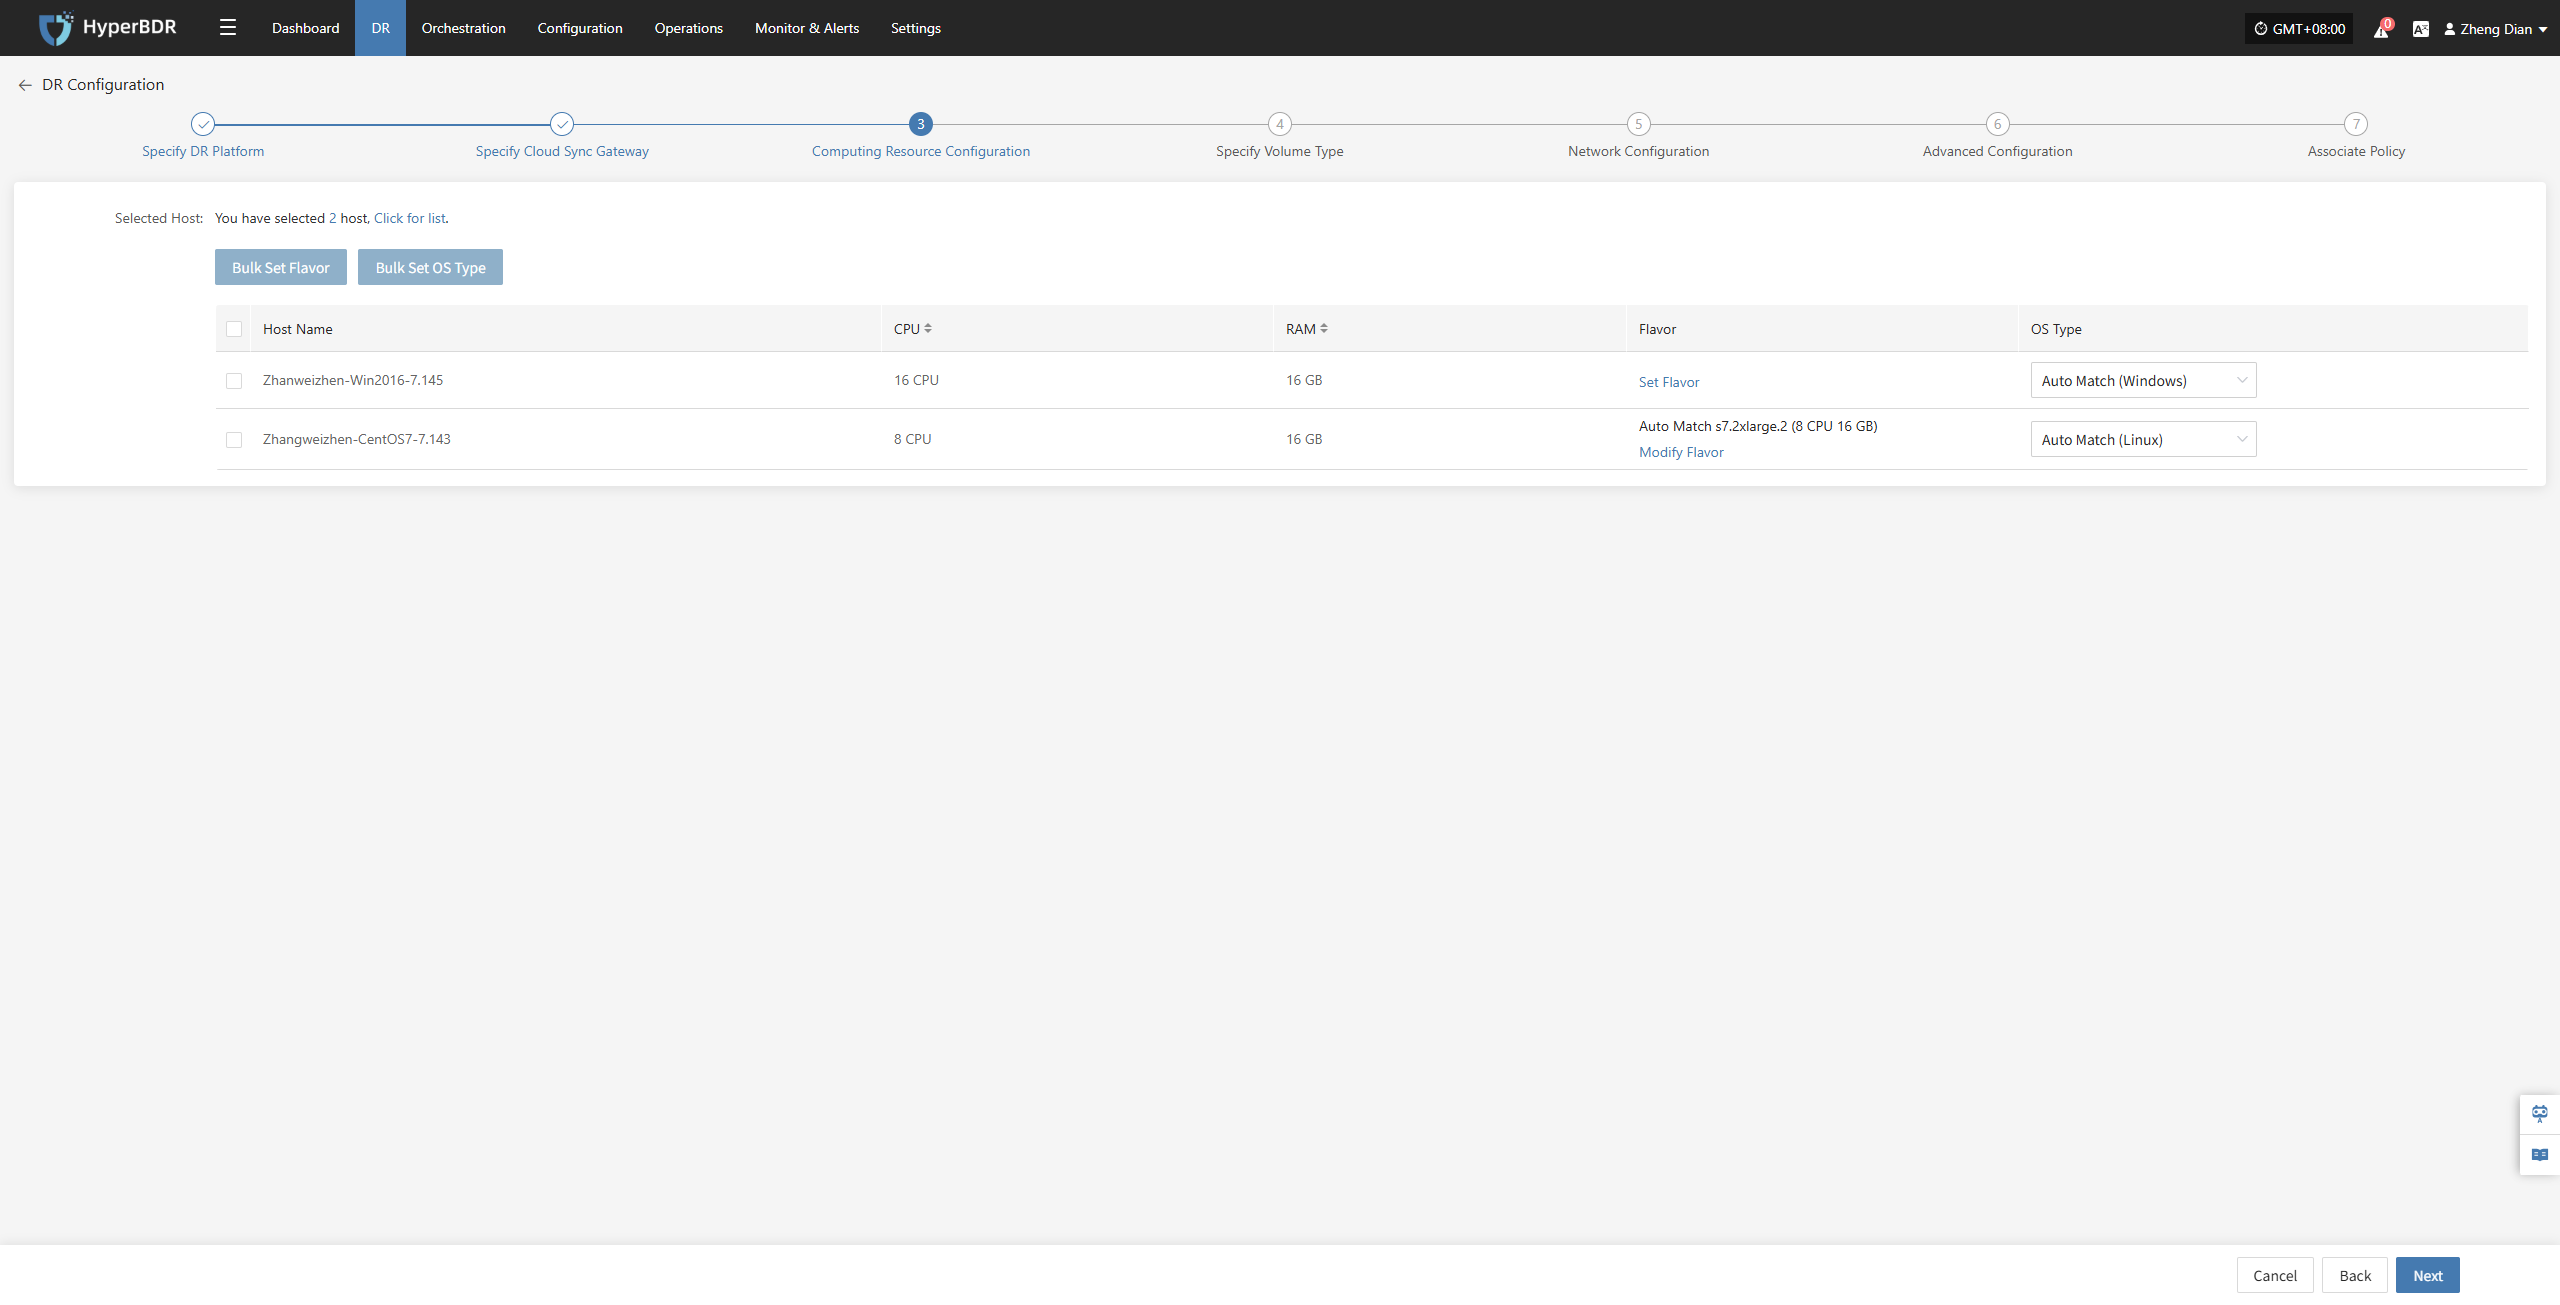
If there is a preset template matching the resource type, the system will auto-match; otherwise, manual selection is required.
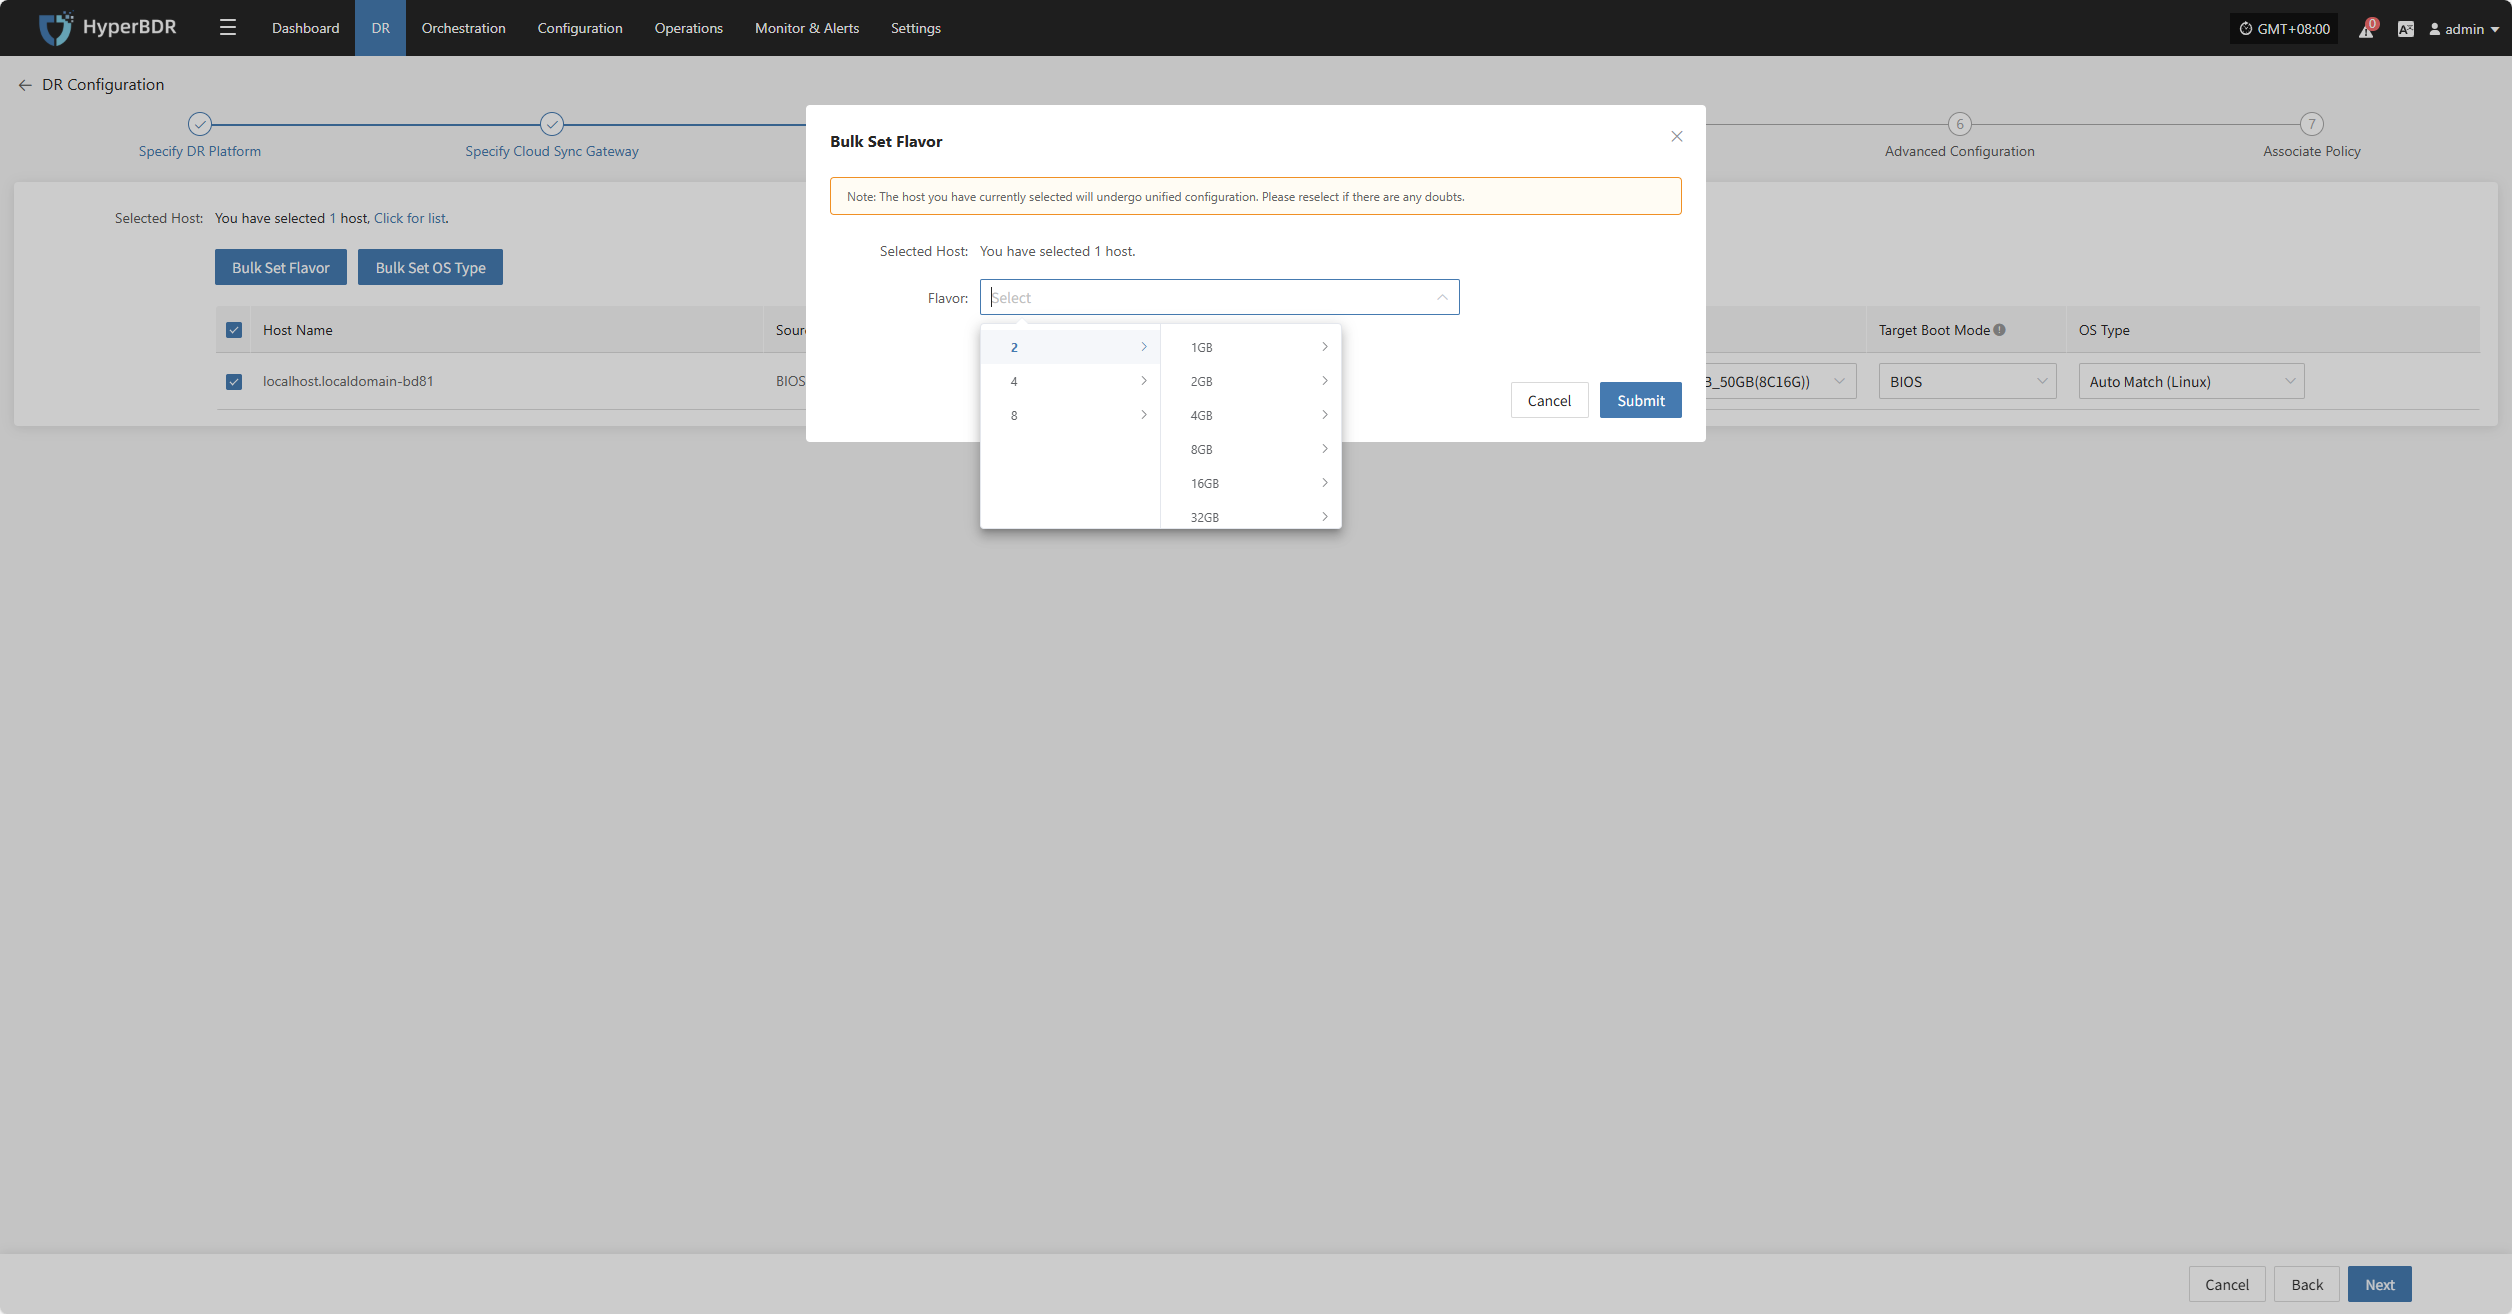
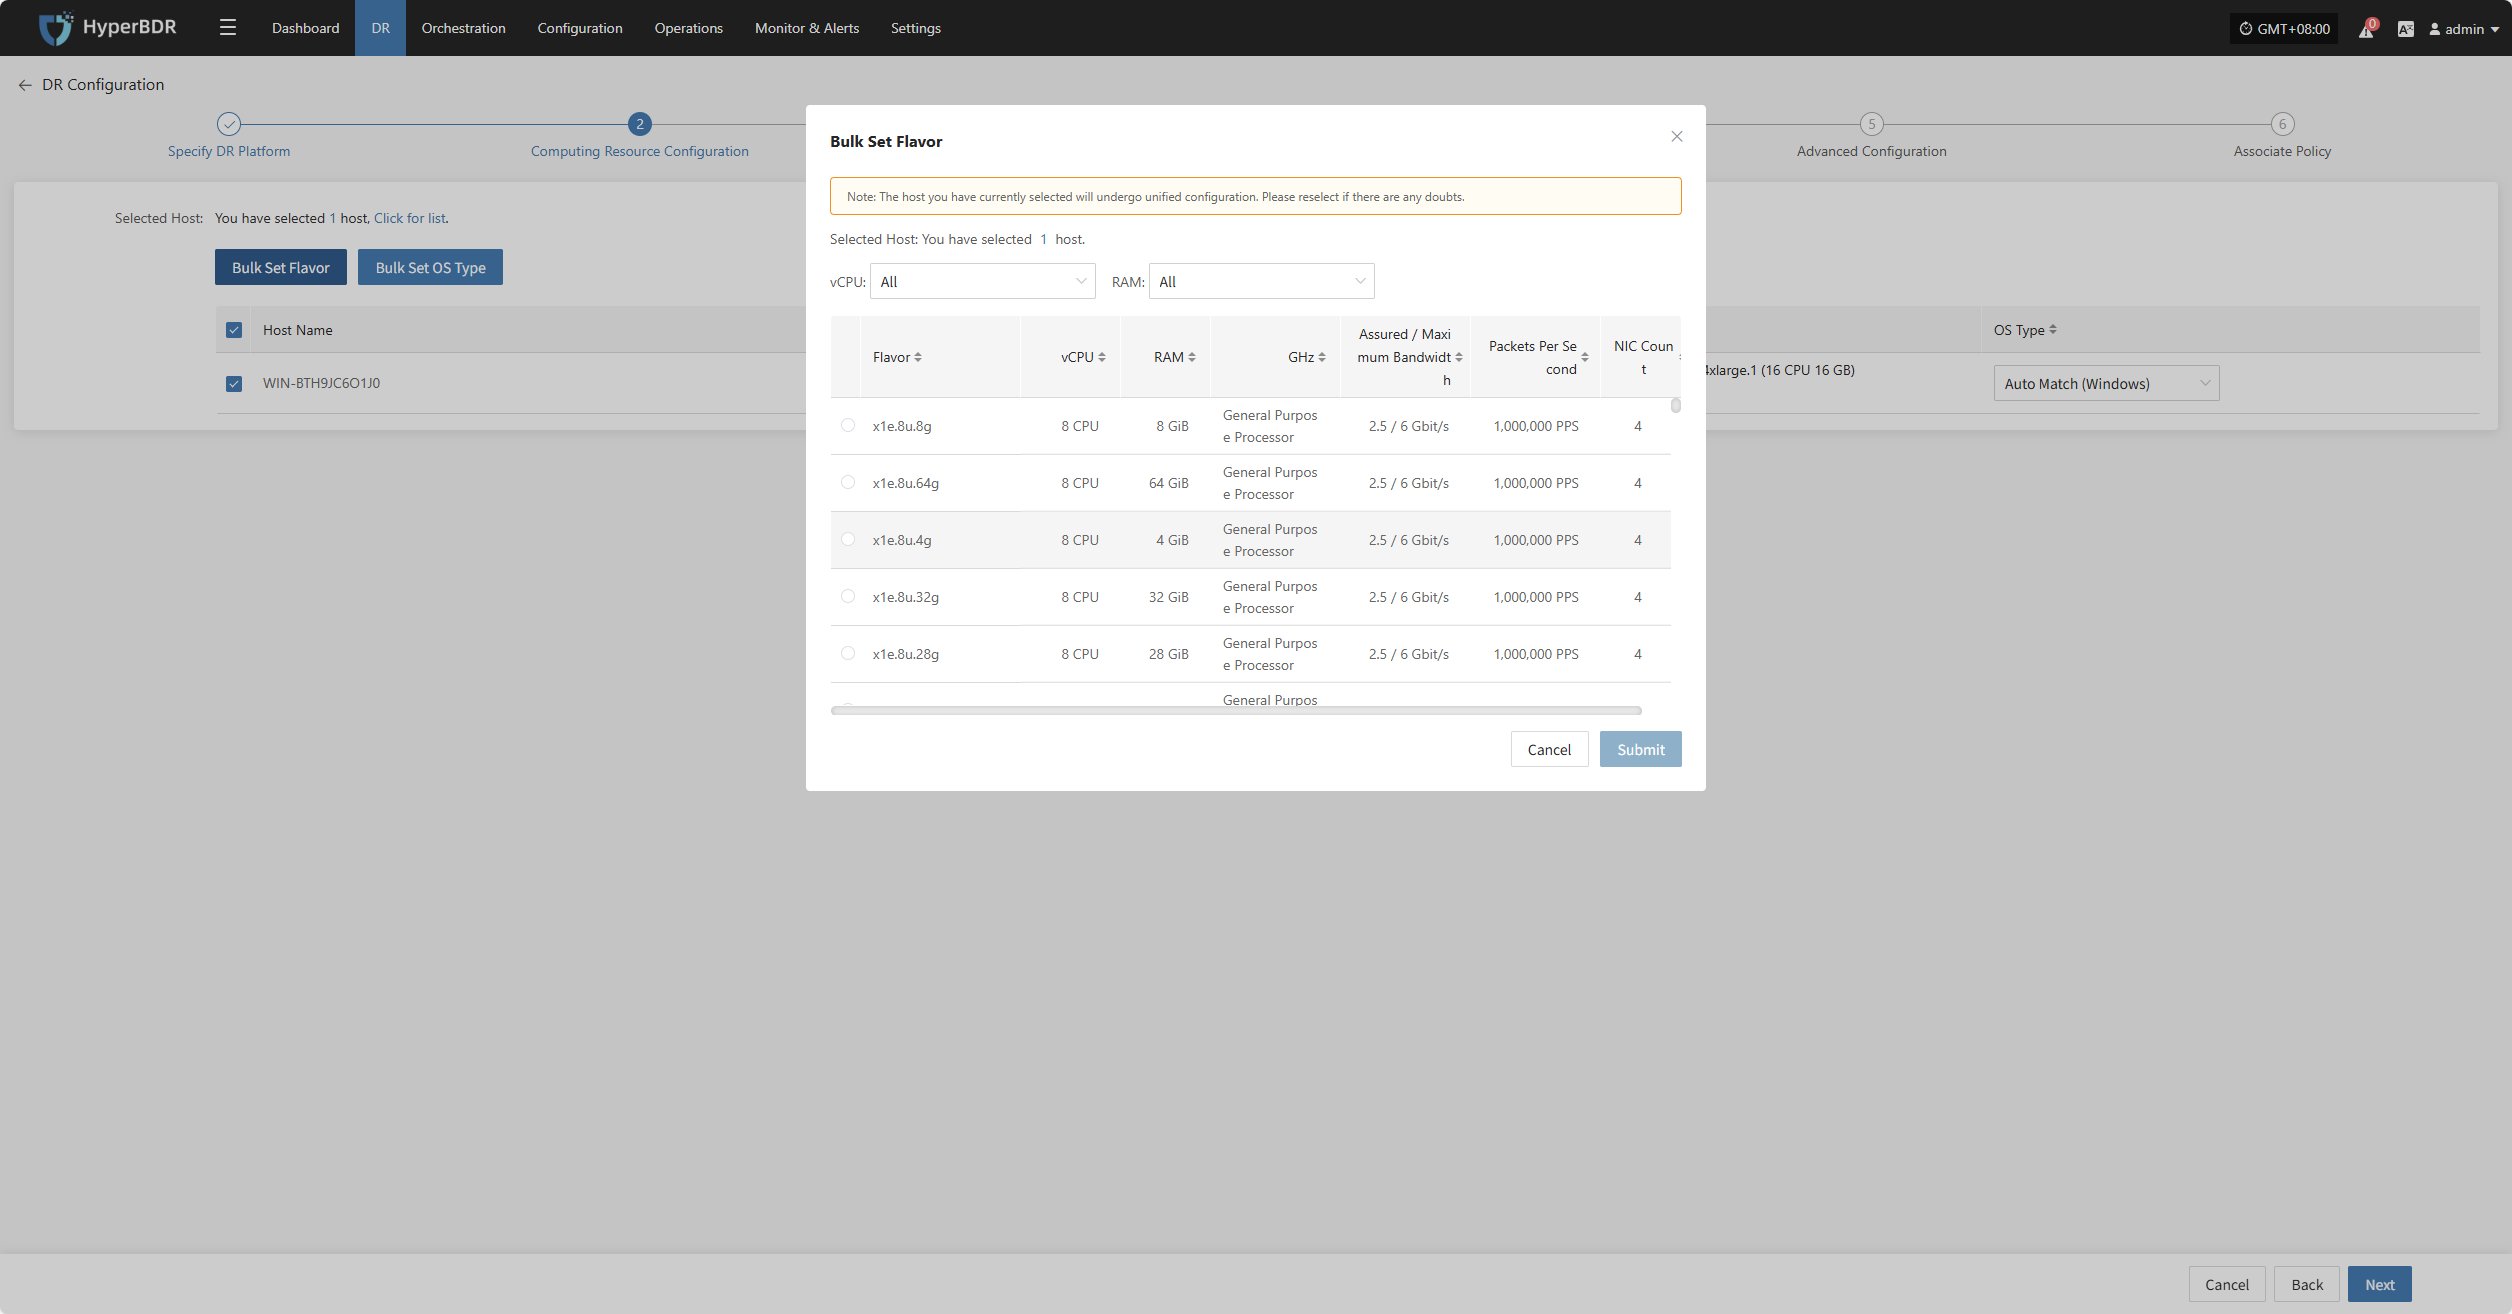
Bulk Set Flavor
Select the required hosts, then click the "Bulk Set Flavor" button on the page to start batch configuration of host specifications.
Note: The currently selected hosts will be set uniformly. If unsure, please reselect.
In the popup dialog, select and confirm according to the preset configuration.
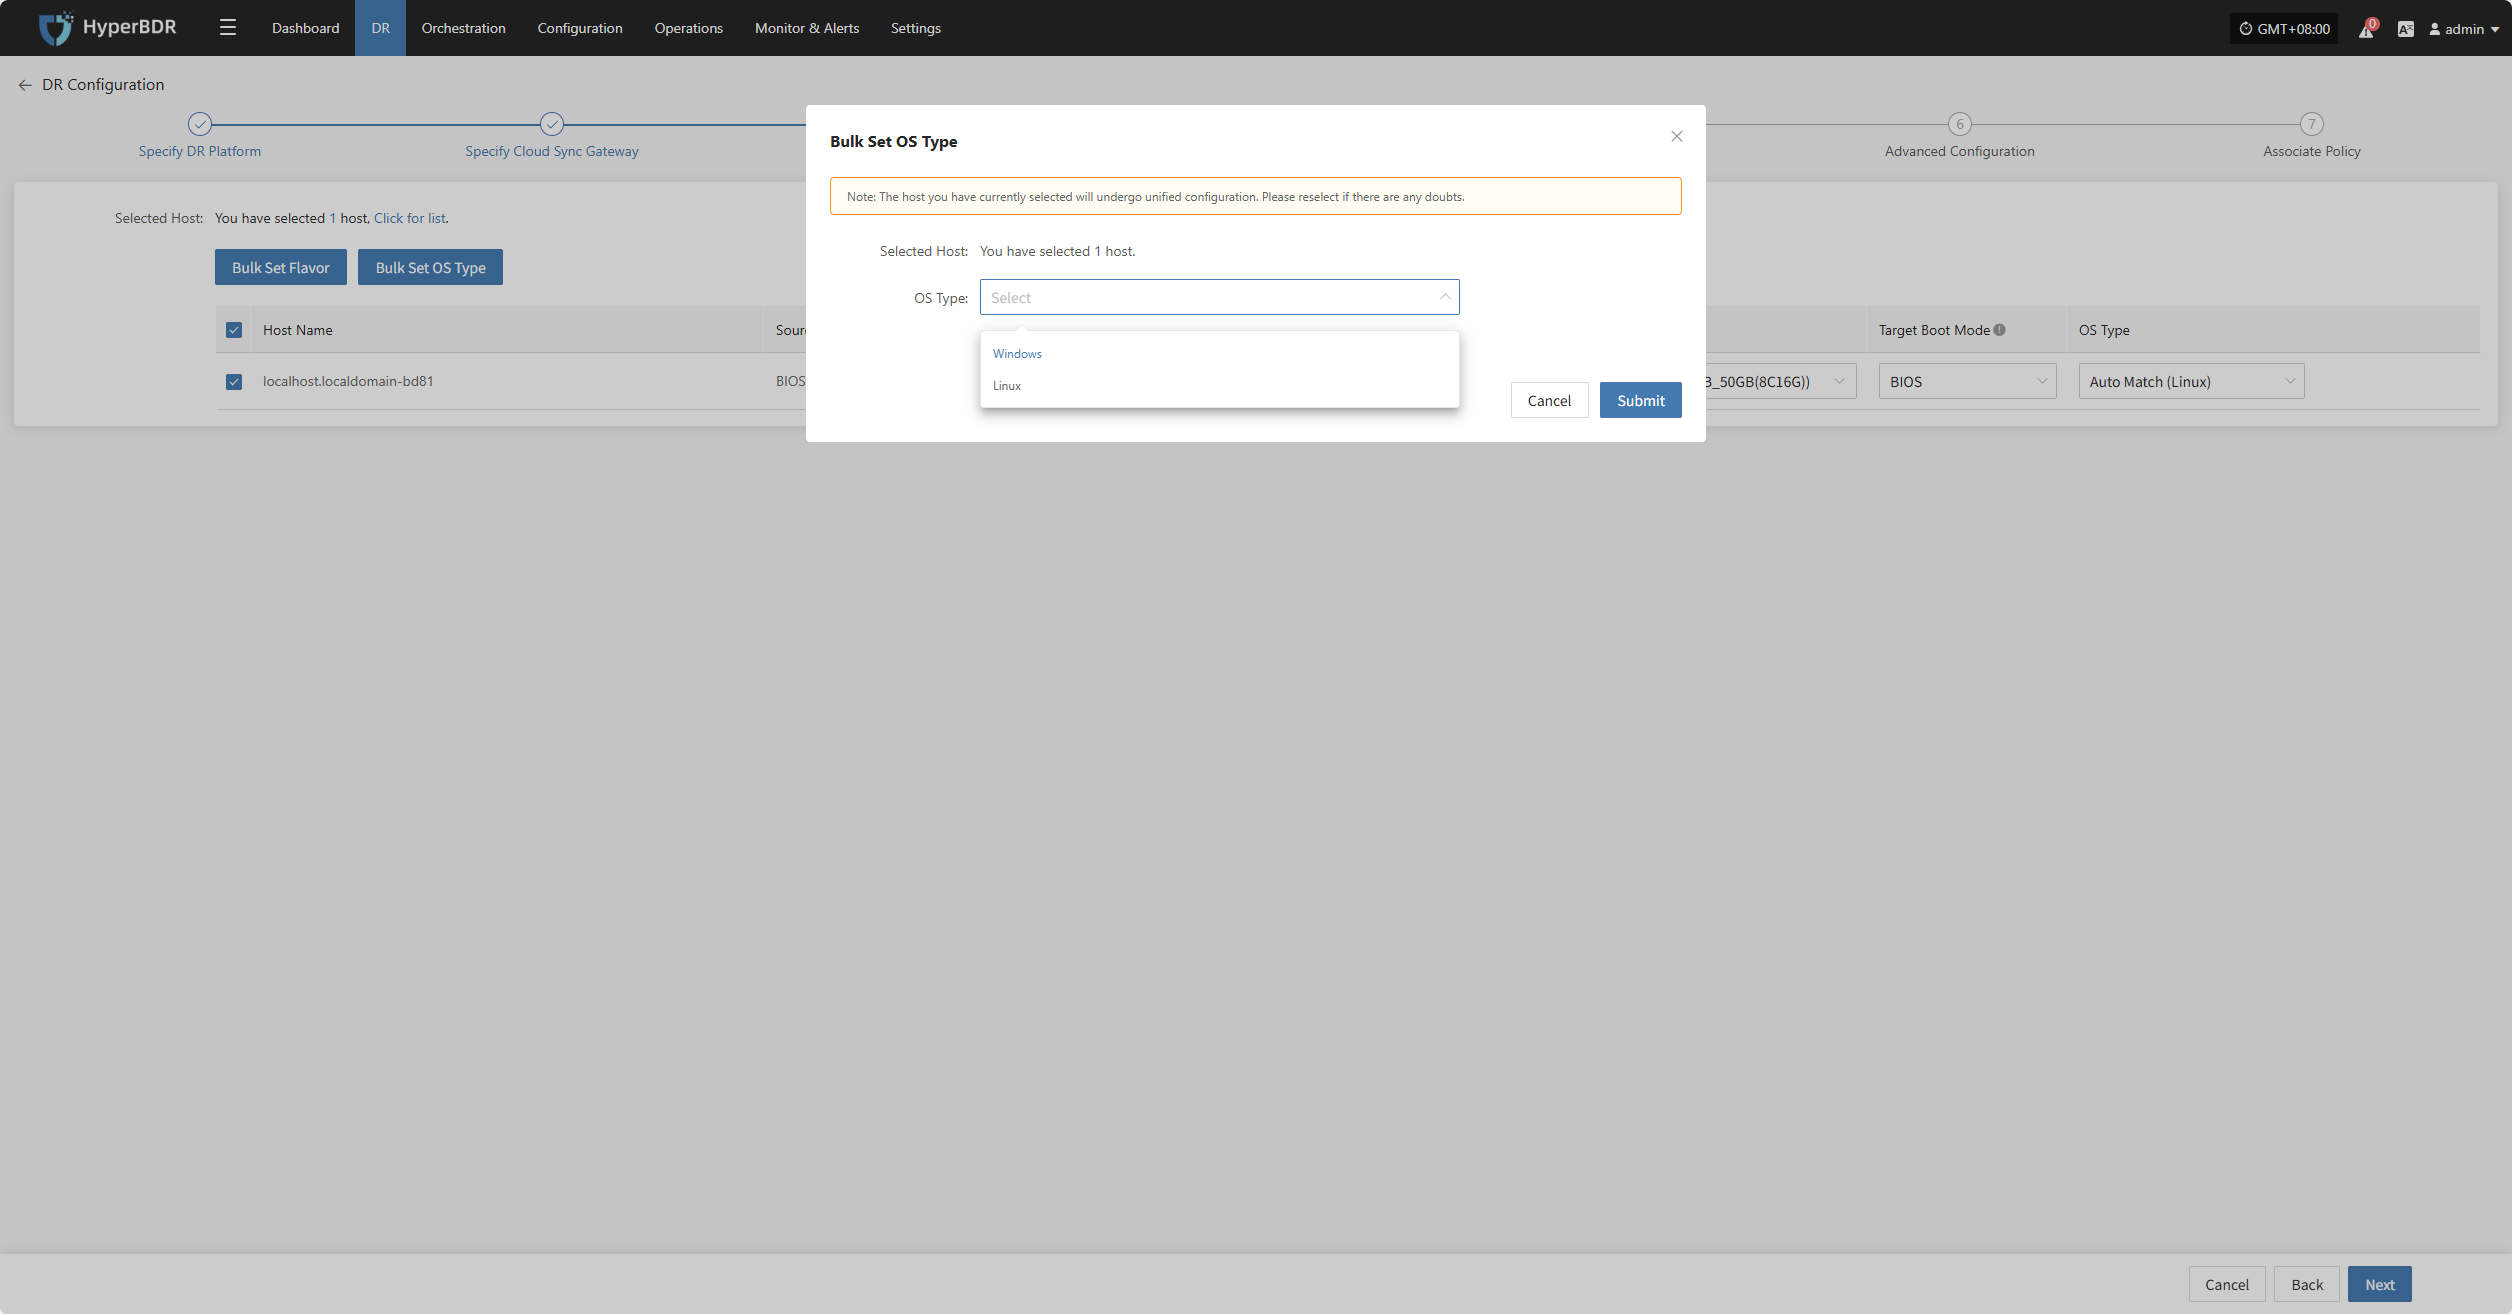
Bulk Set OS Type
Select the required hosts, then click the "Bulk Set OS Type" button on the page to start batch configuration of host operating system types.
Note: The currently selected hosts will be set uniformly. If unsure, please reselect.
In the popup dialog, choose your host operating system type.
After completing Computing Resource Configuration, click "Next" to start Network Configuration.
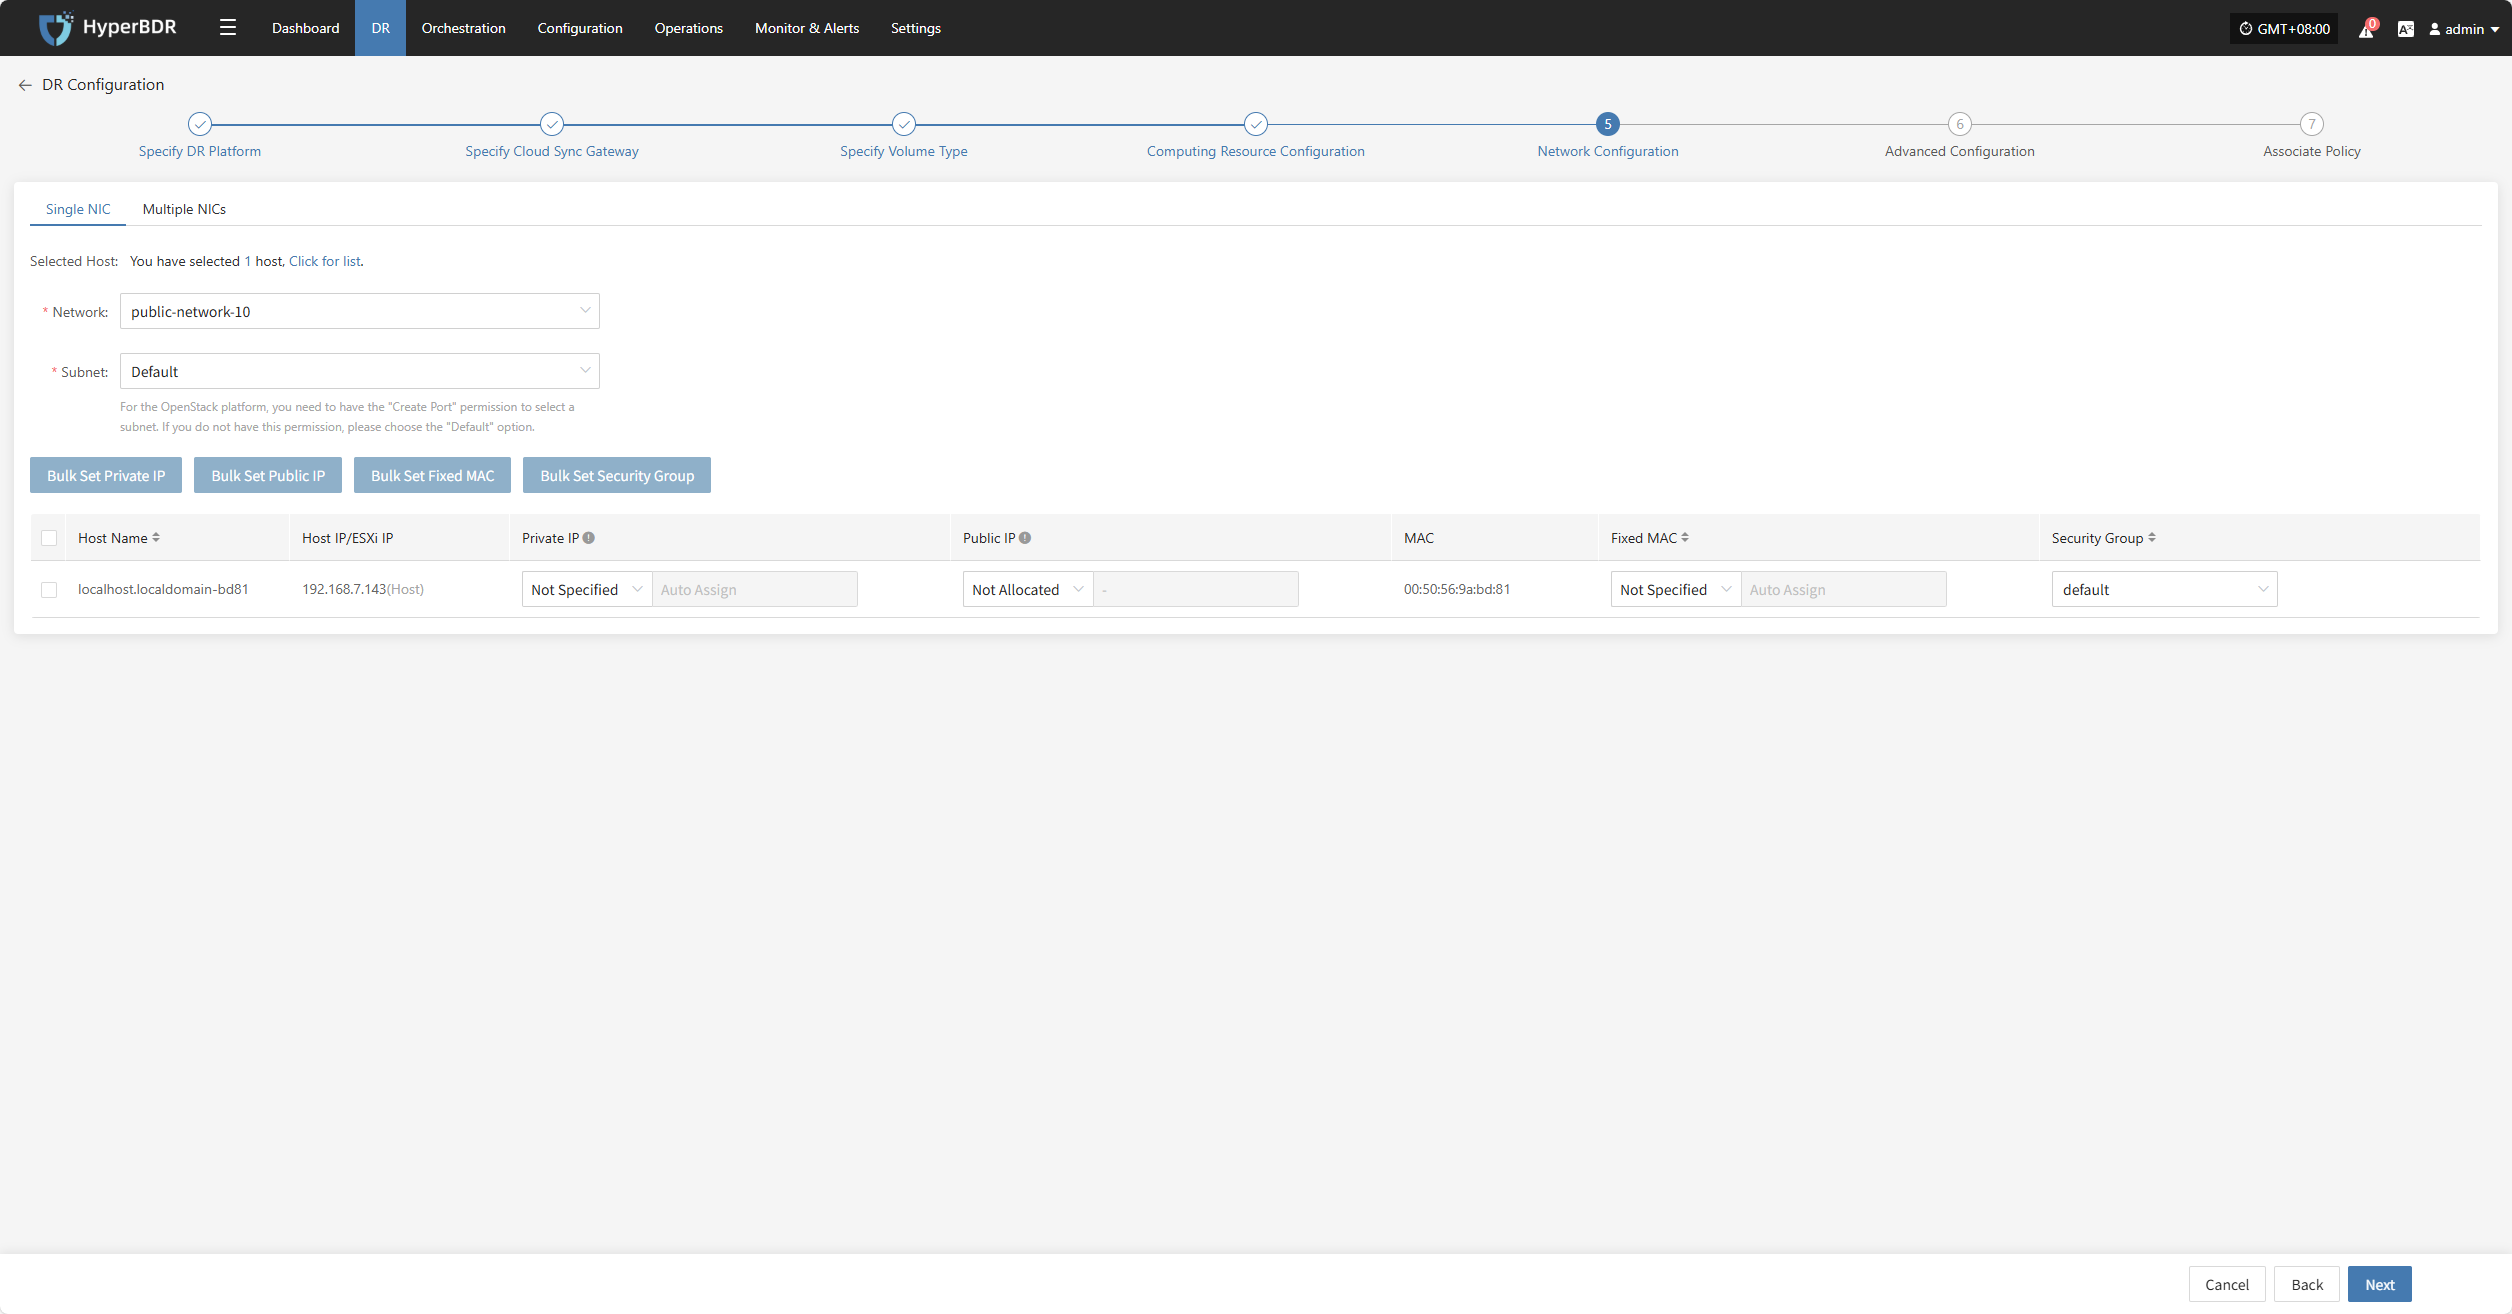
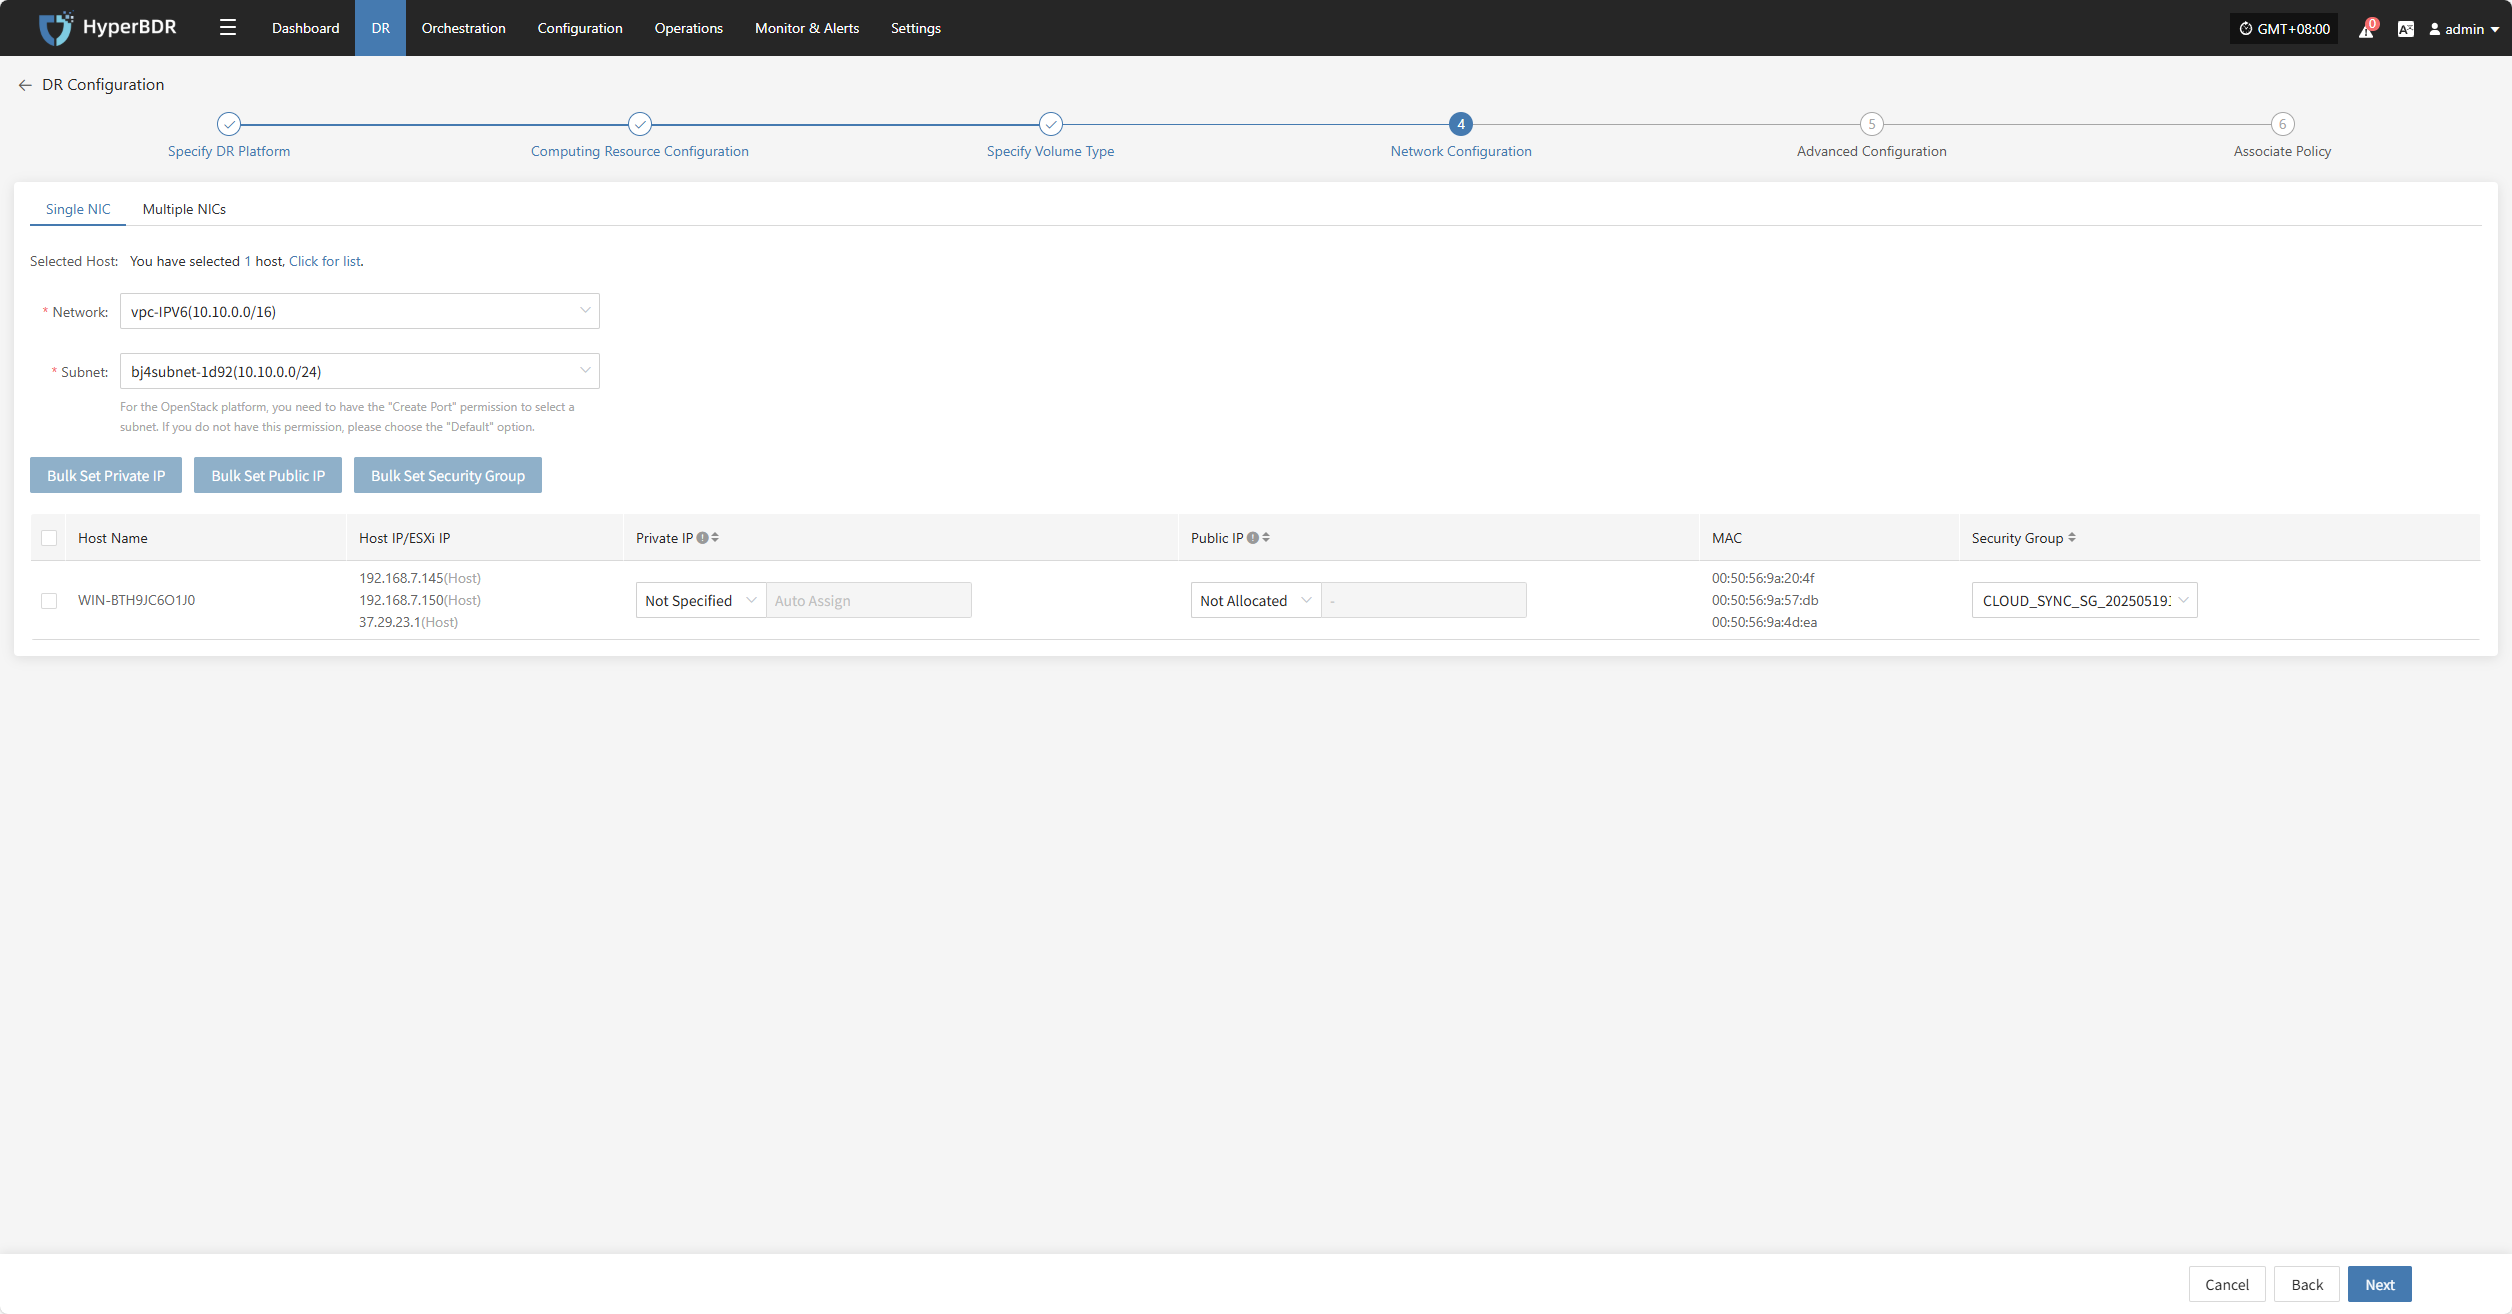
Network Configuration
You need to configure the target network environment for the disaster recovery hosts, including private IP, public IP, security groups, MAC address, and other key parameters to ensure proper communication and access on the target platform.
The system supports both IPv4 and IPv6 networks. Please select the corresponding network and subnet types according to the deployment requirements of the DR hosts.
After selection, configure related parameters such as private IP, public IP, security groups, MAC address, etc., based on actual needs.
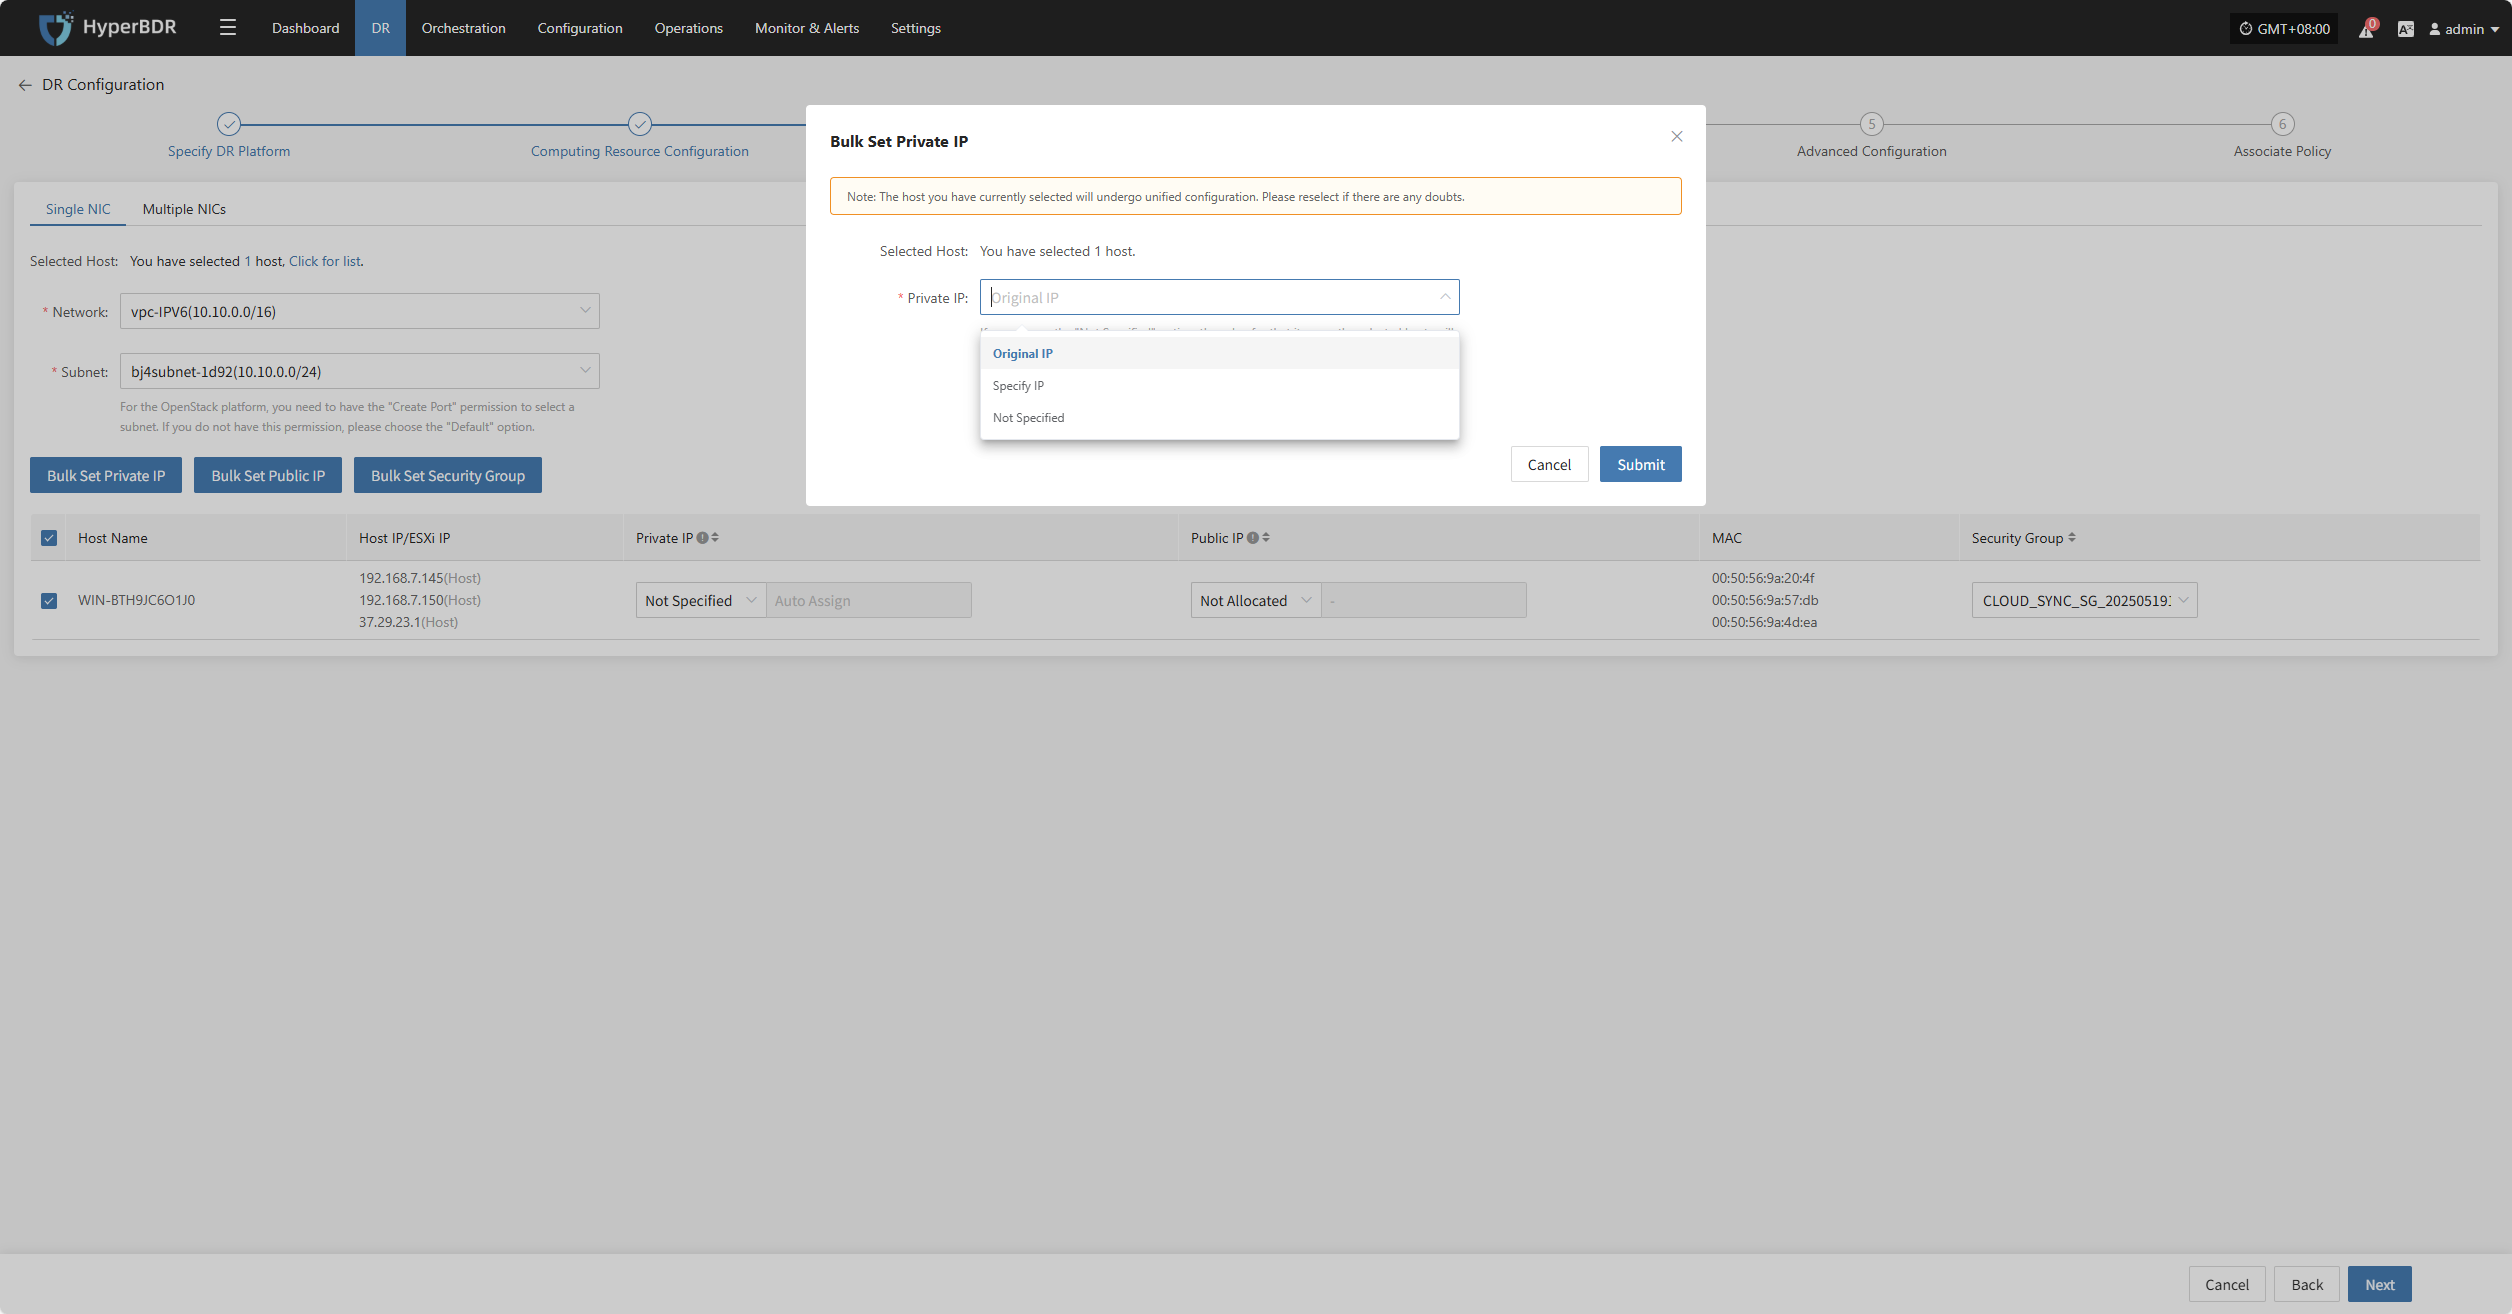
IP Setting Rules
| Parameter | Options | Description |
|---|---|---|
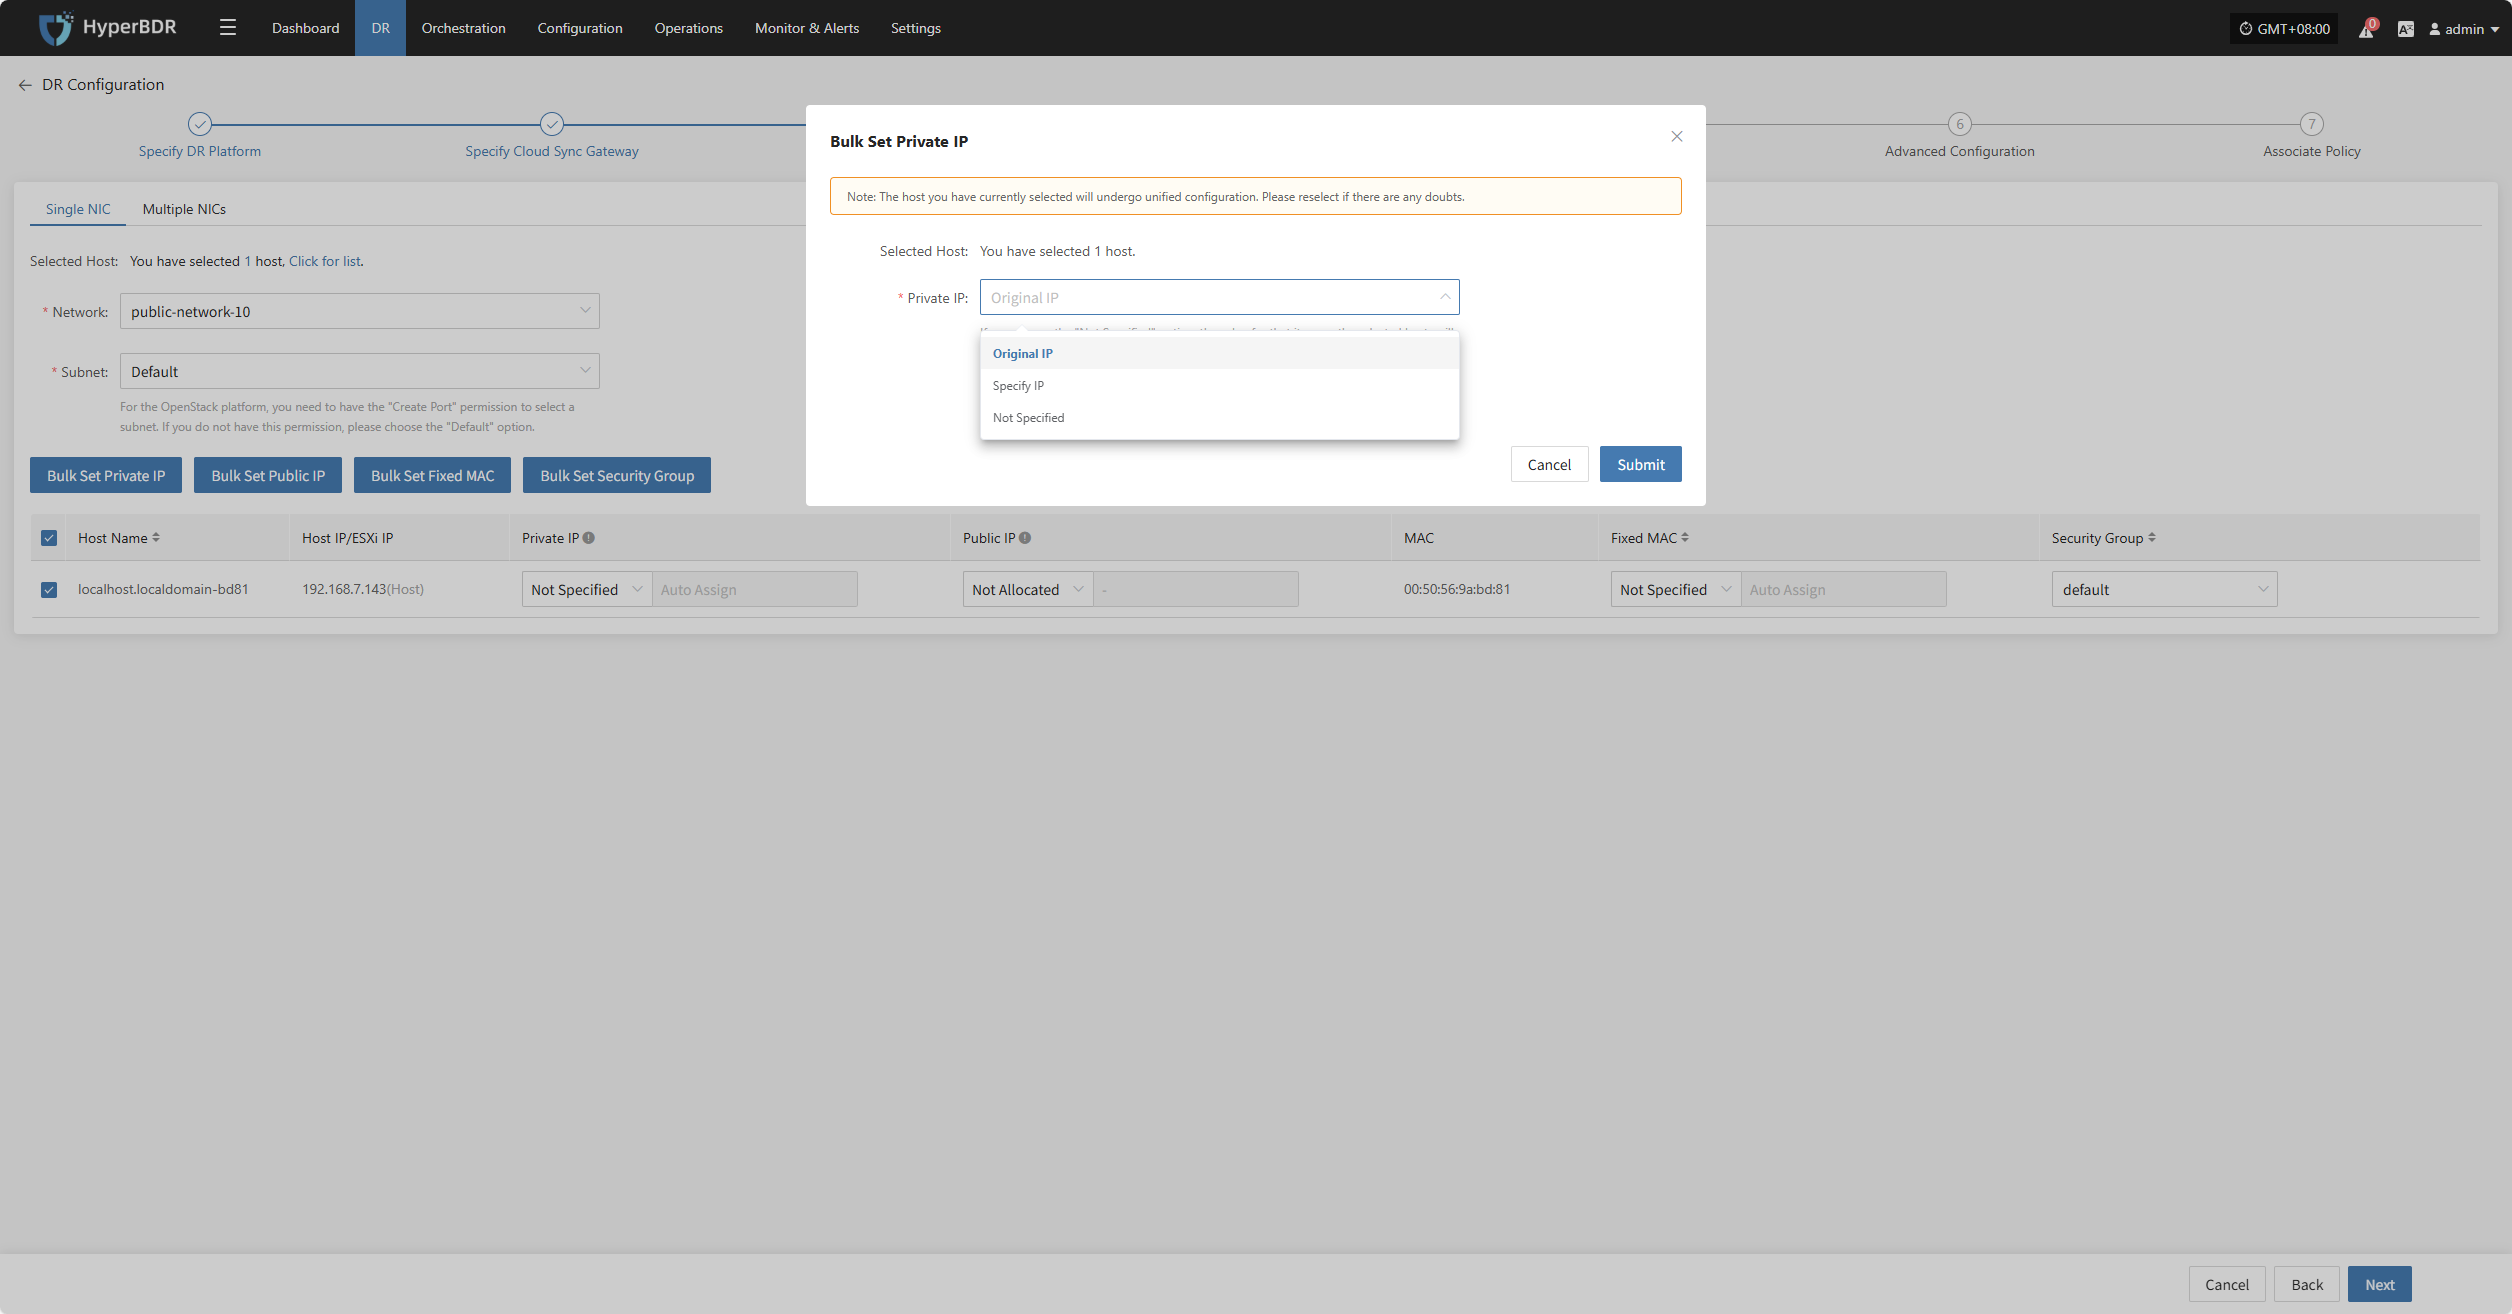
| Private IP | Original IP / Specified IP / Not Specified | Original IP: system auto-recognizes NIC and assigns source host IP via DHCP. Specified IP: manually enter IP (same subnet as target subnet, immutable), system assigns via DHCP. Not Specified: system uses DHCP to auto-Allocate lP randomly. Note: If DHCP is unavailable, system cannot auto-configure IP. |
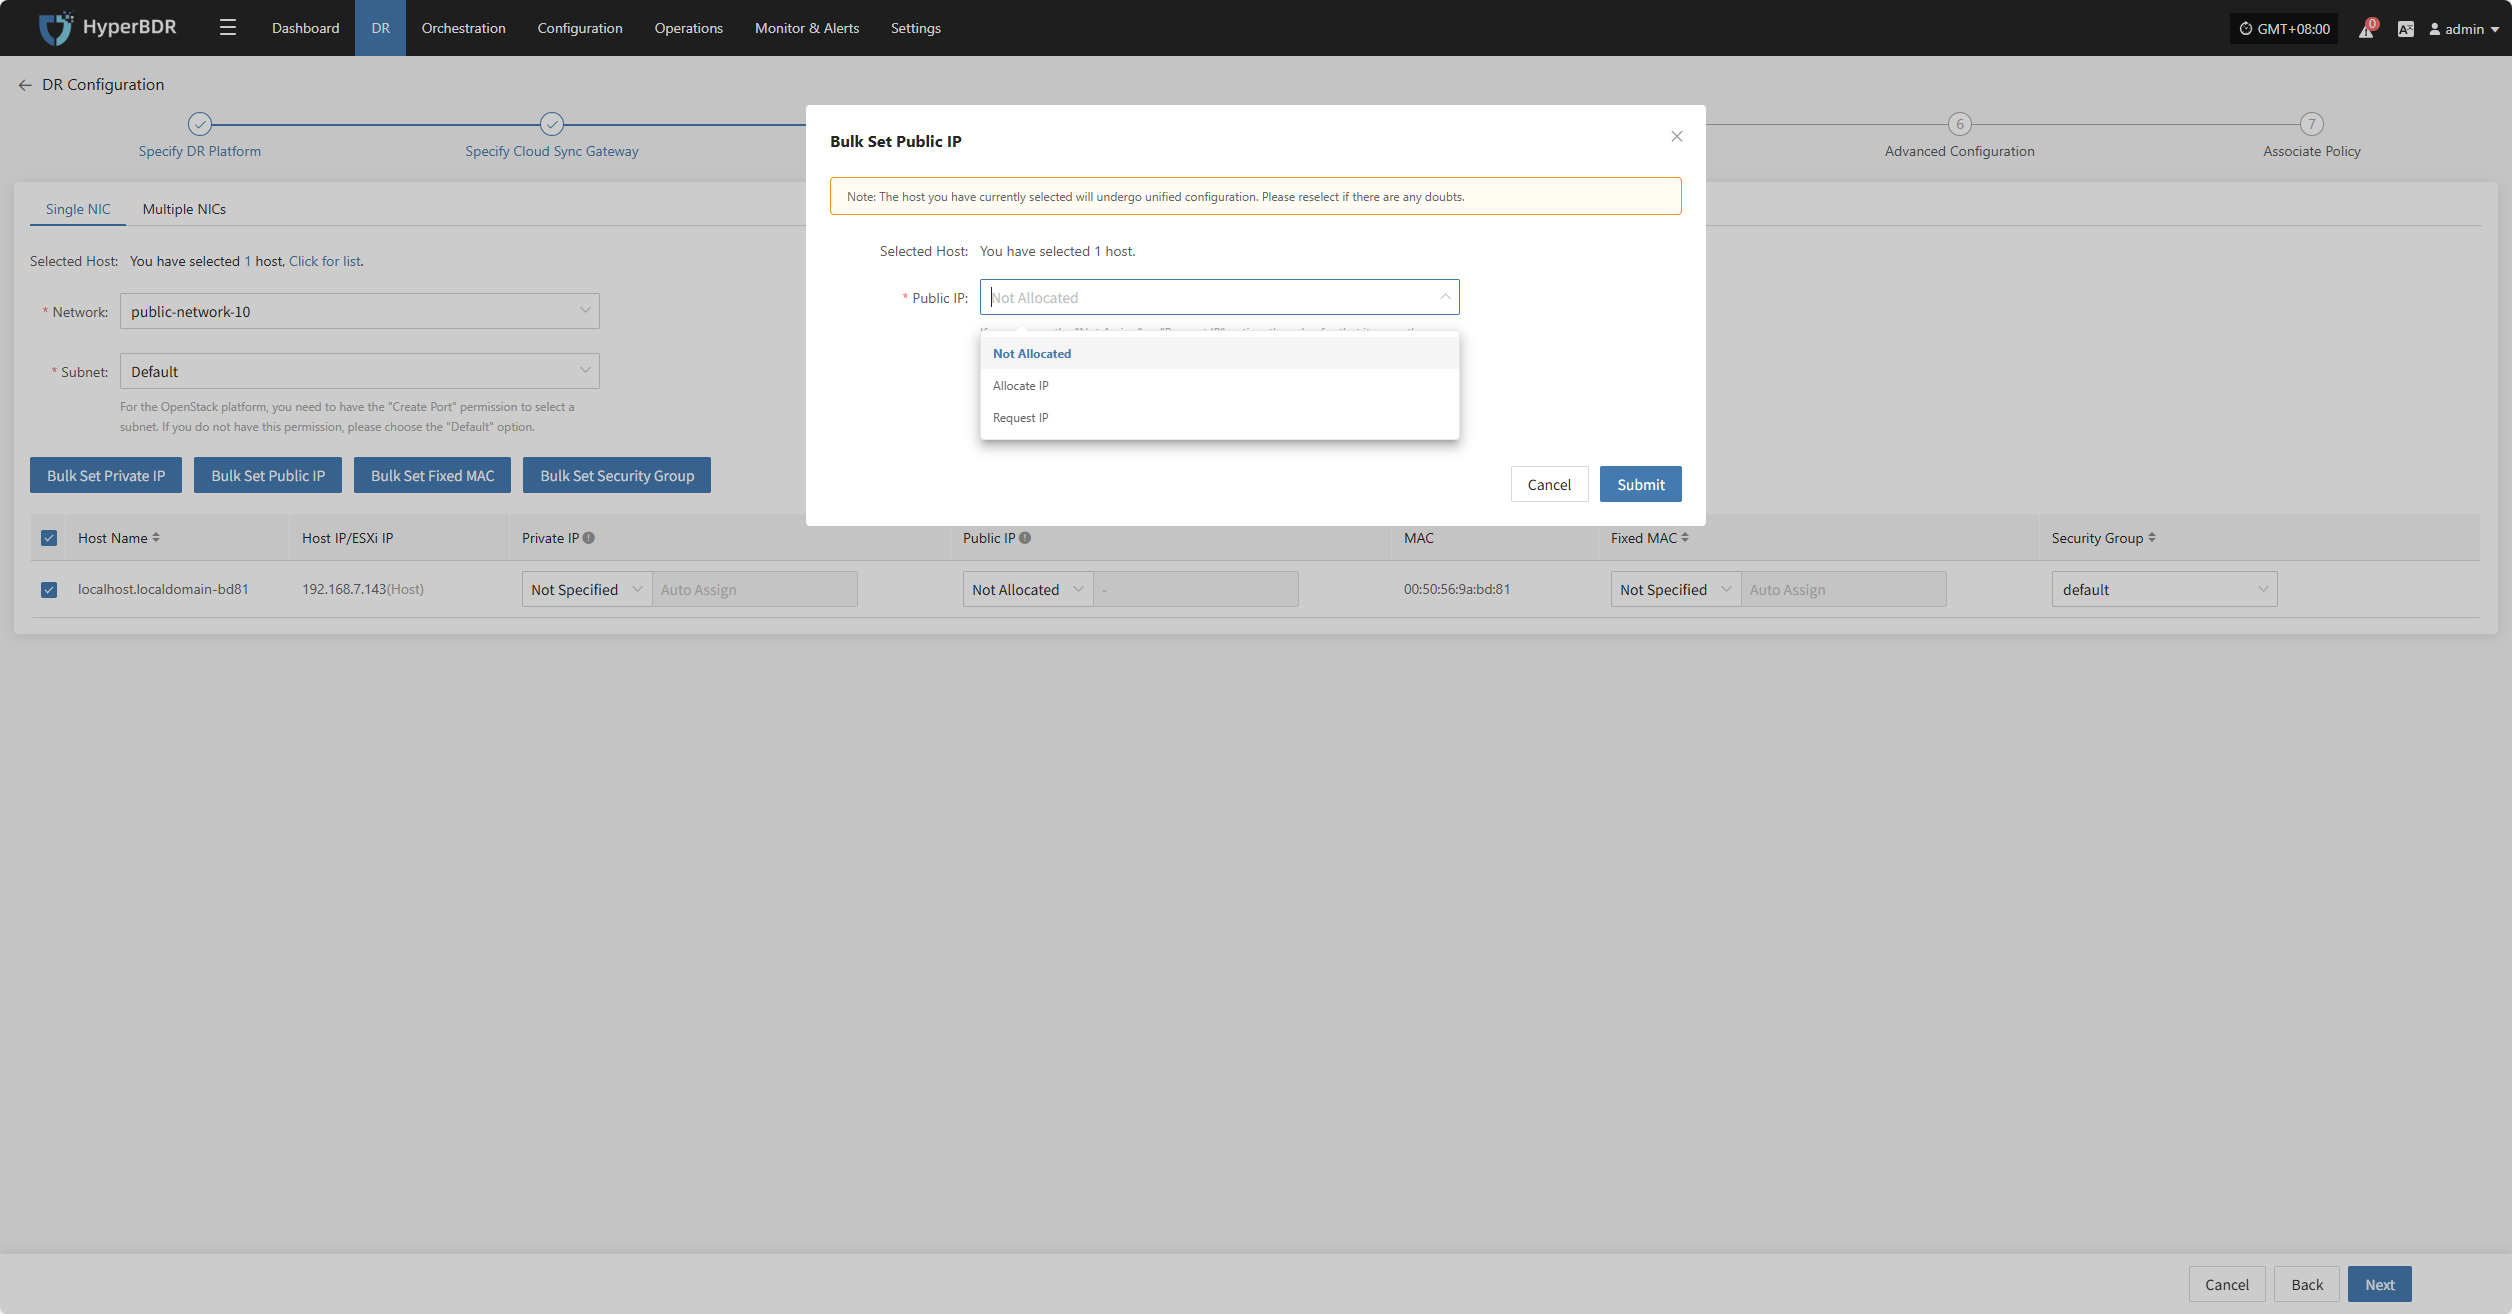
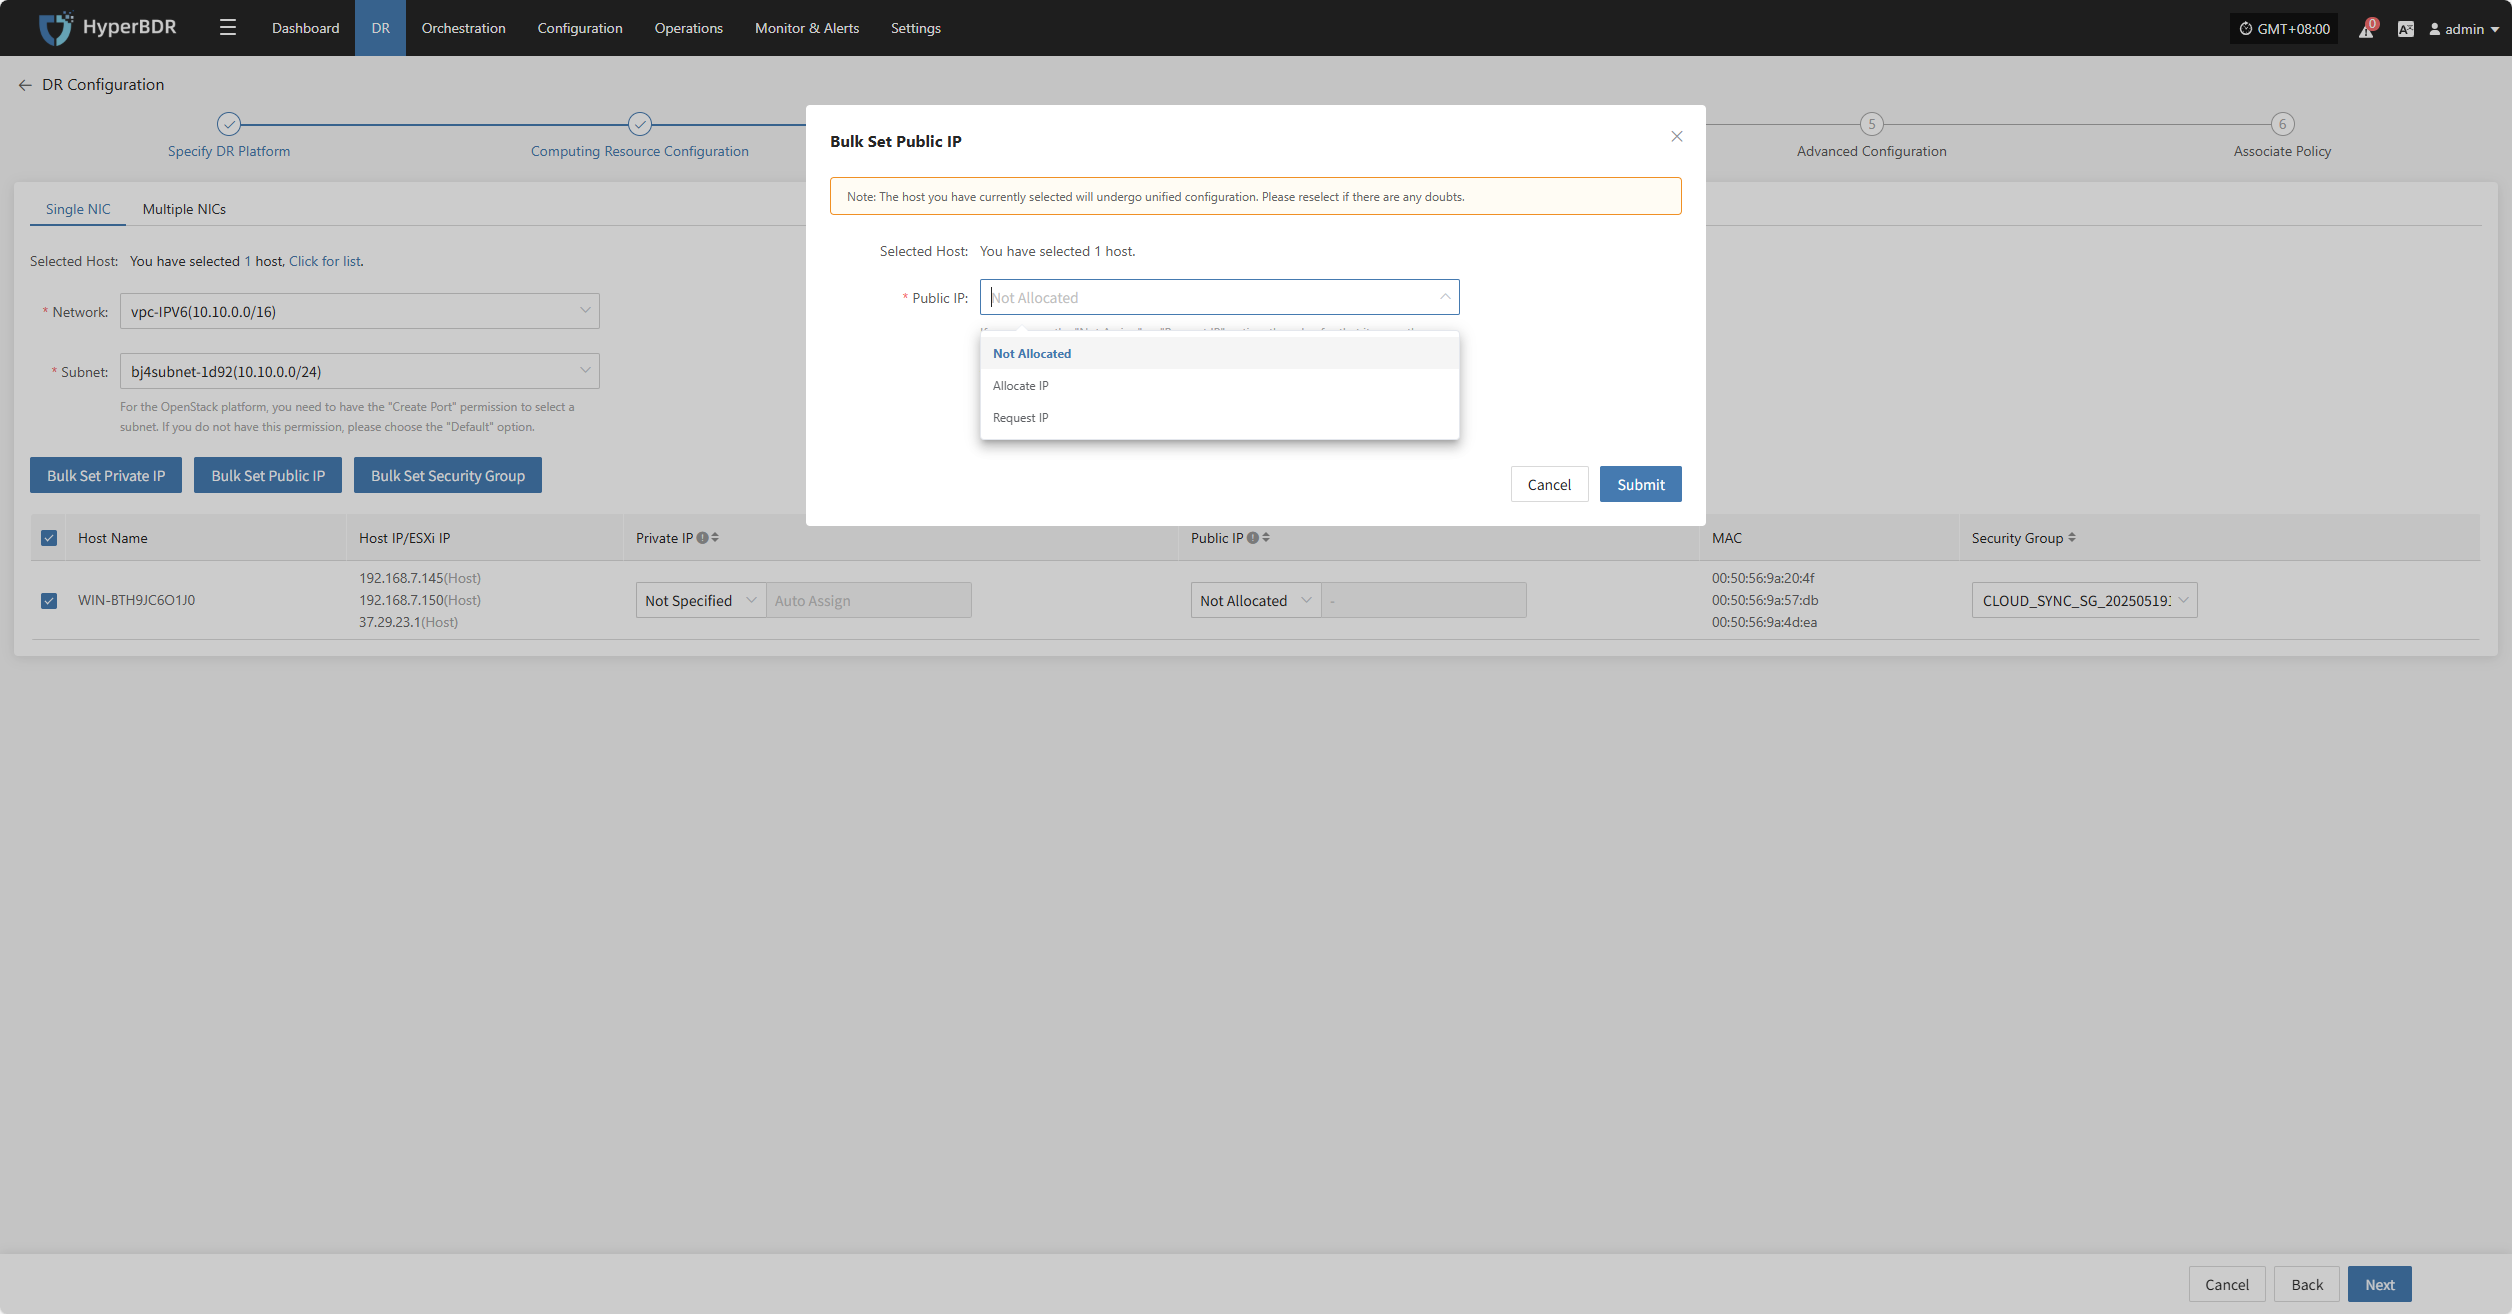
| Public IP | Not Specified / Allocate lP / Request lP (subject to actual cloud vendor) | Not Specified: host without elastic public IP cannot access the internet, used only in private networks or clusters. Allocate lP: assign an existing elastic public IP to the host. Request lP: automatically assign an elastic public IP with dedicated bandwidth to each host. |
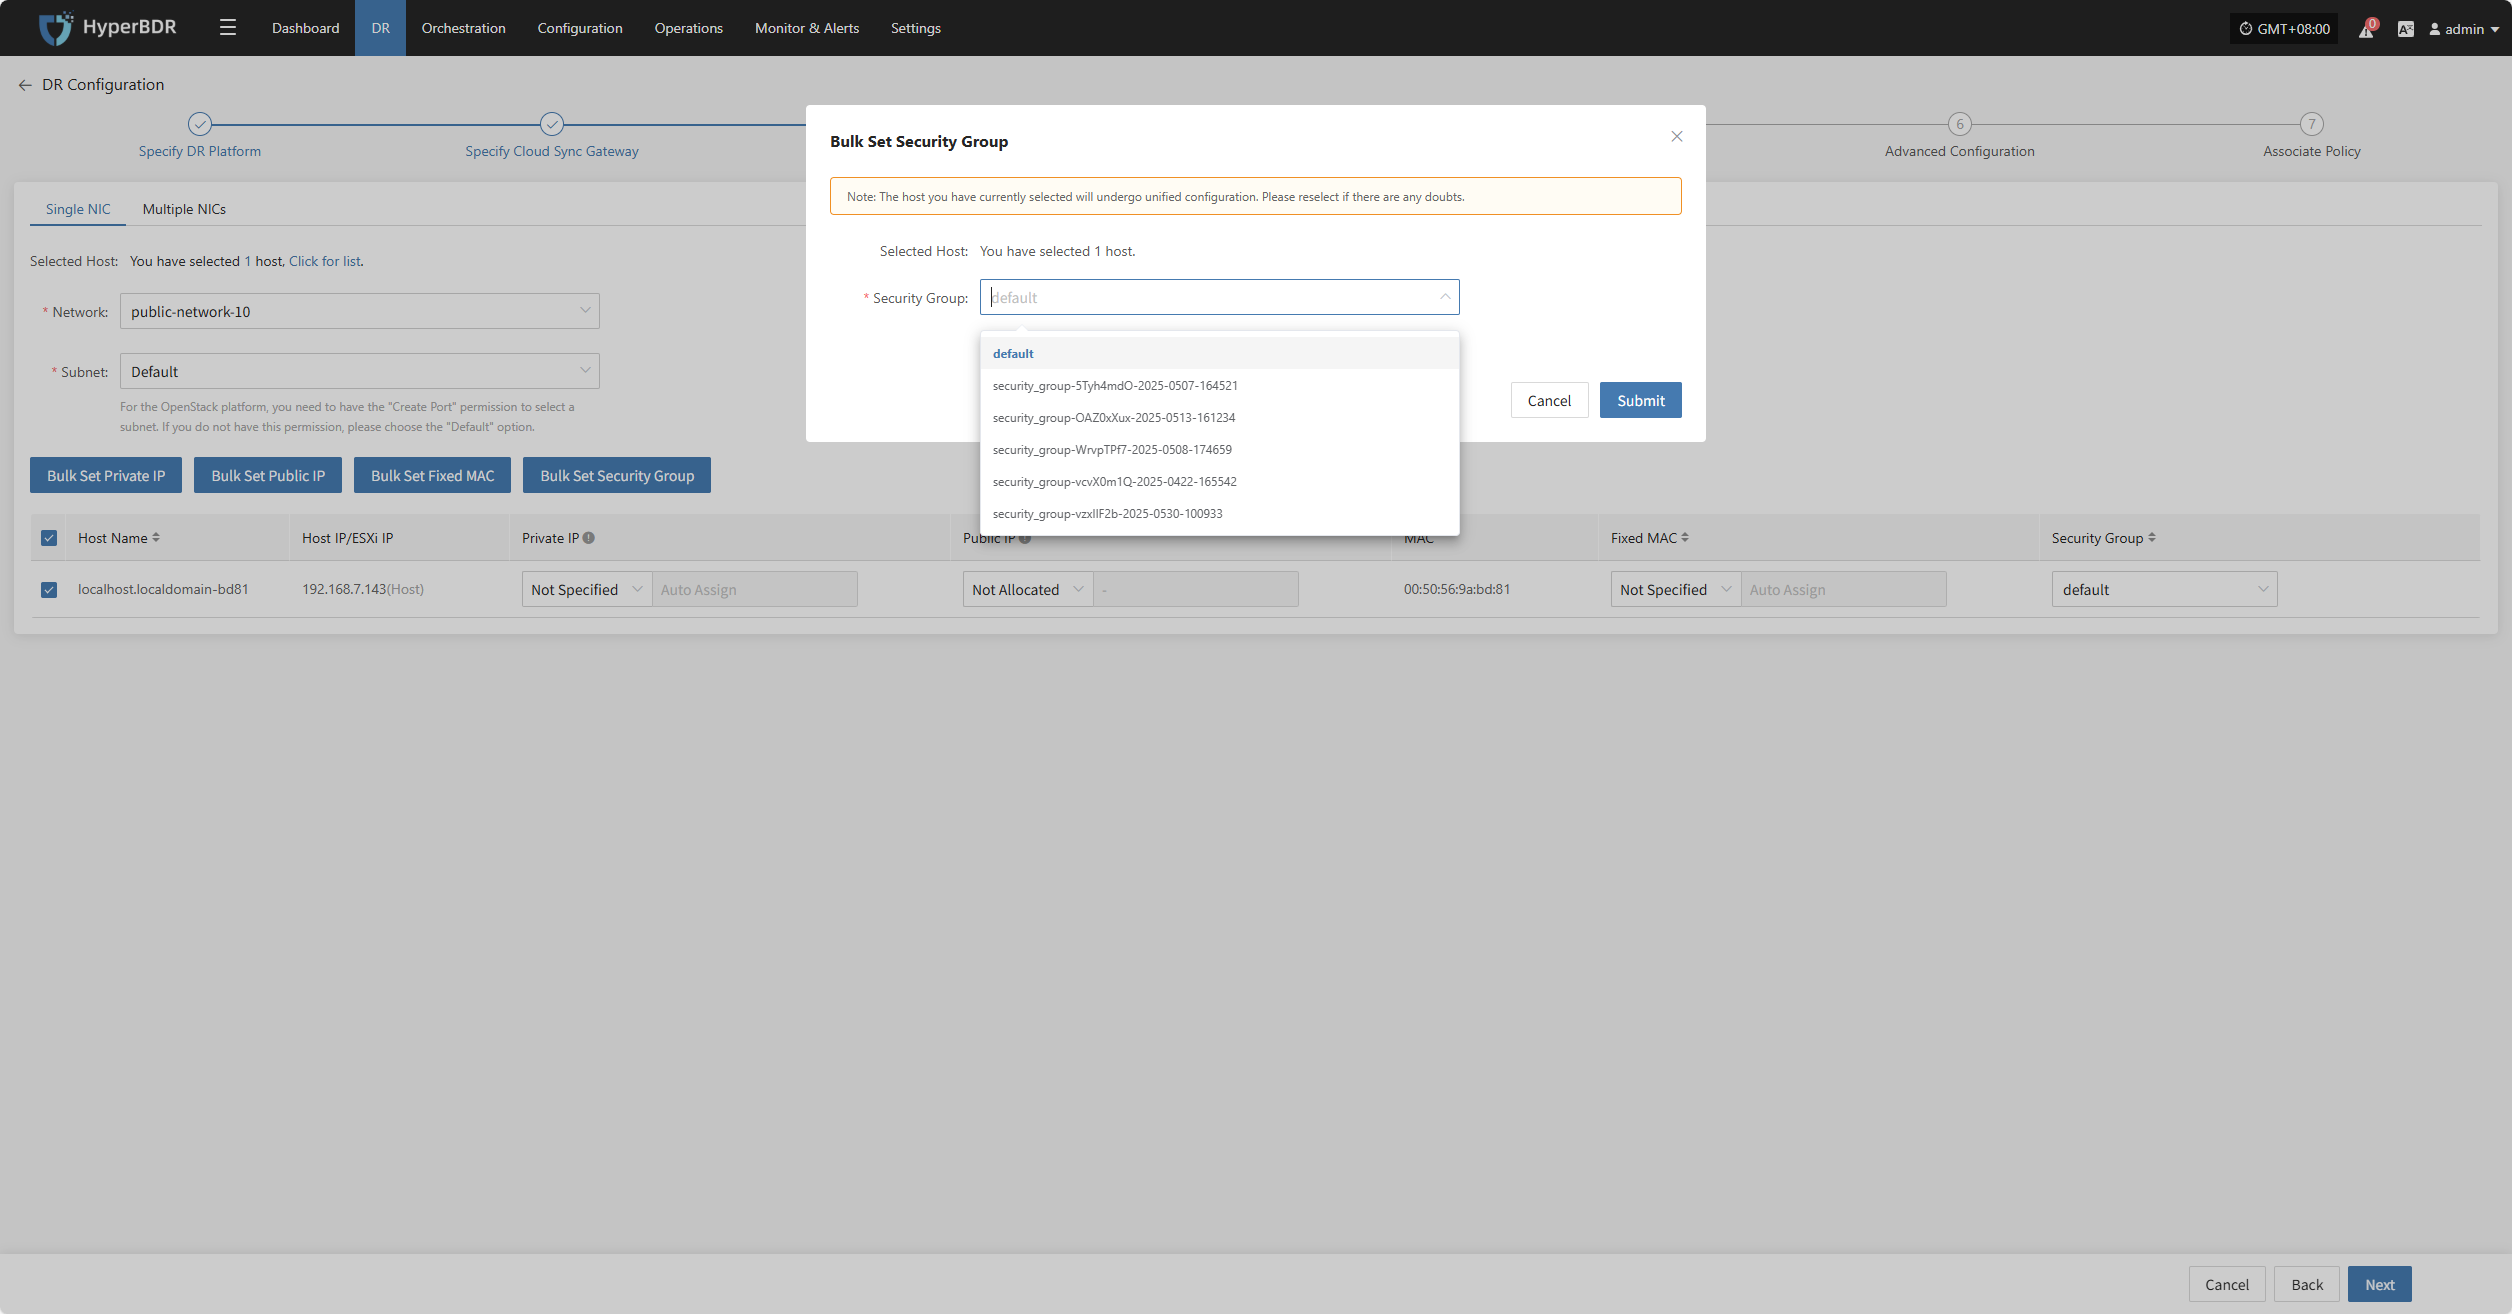
| Security Group | (According to target network configuration) | Multiple security group options based on target network configuration; subject to actual conditions. |
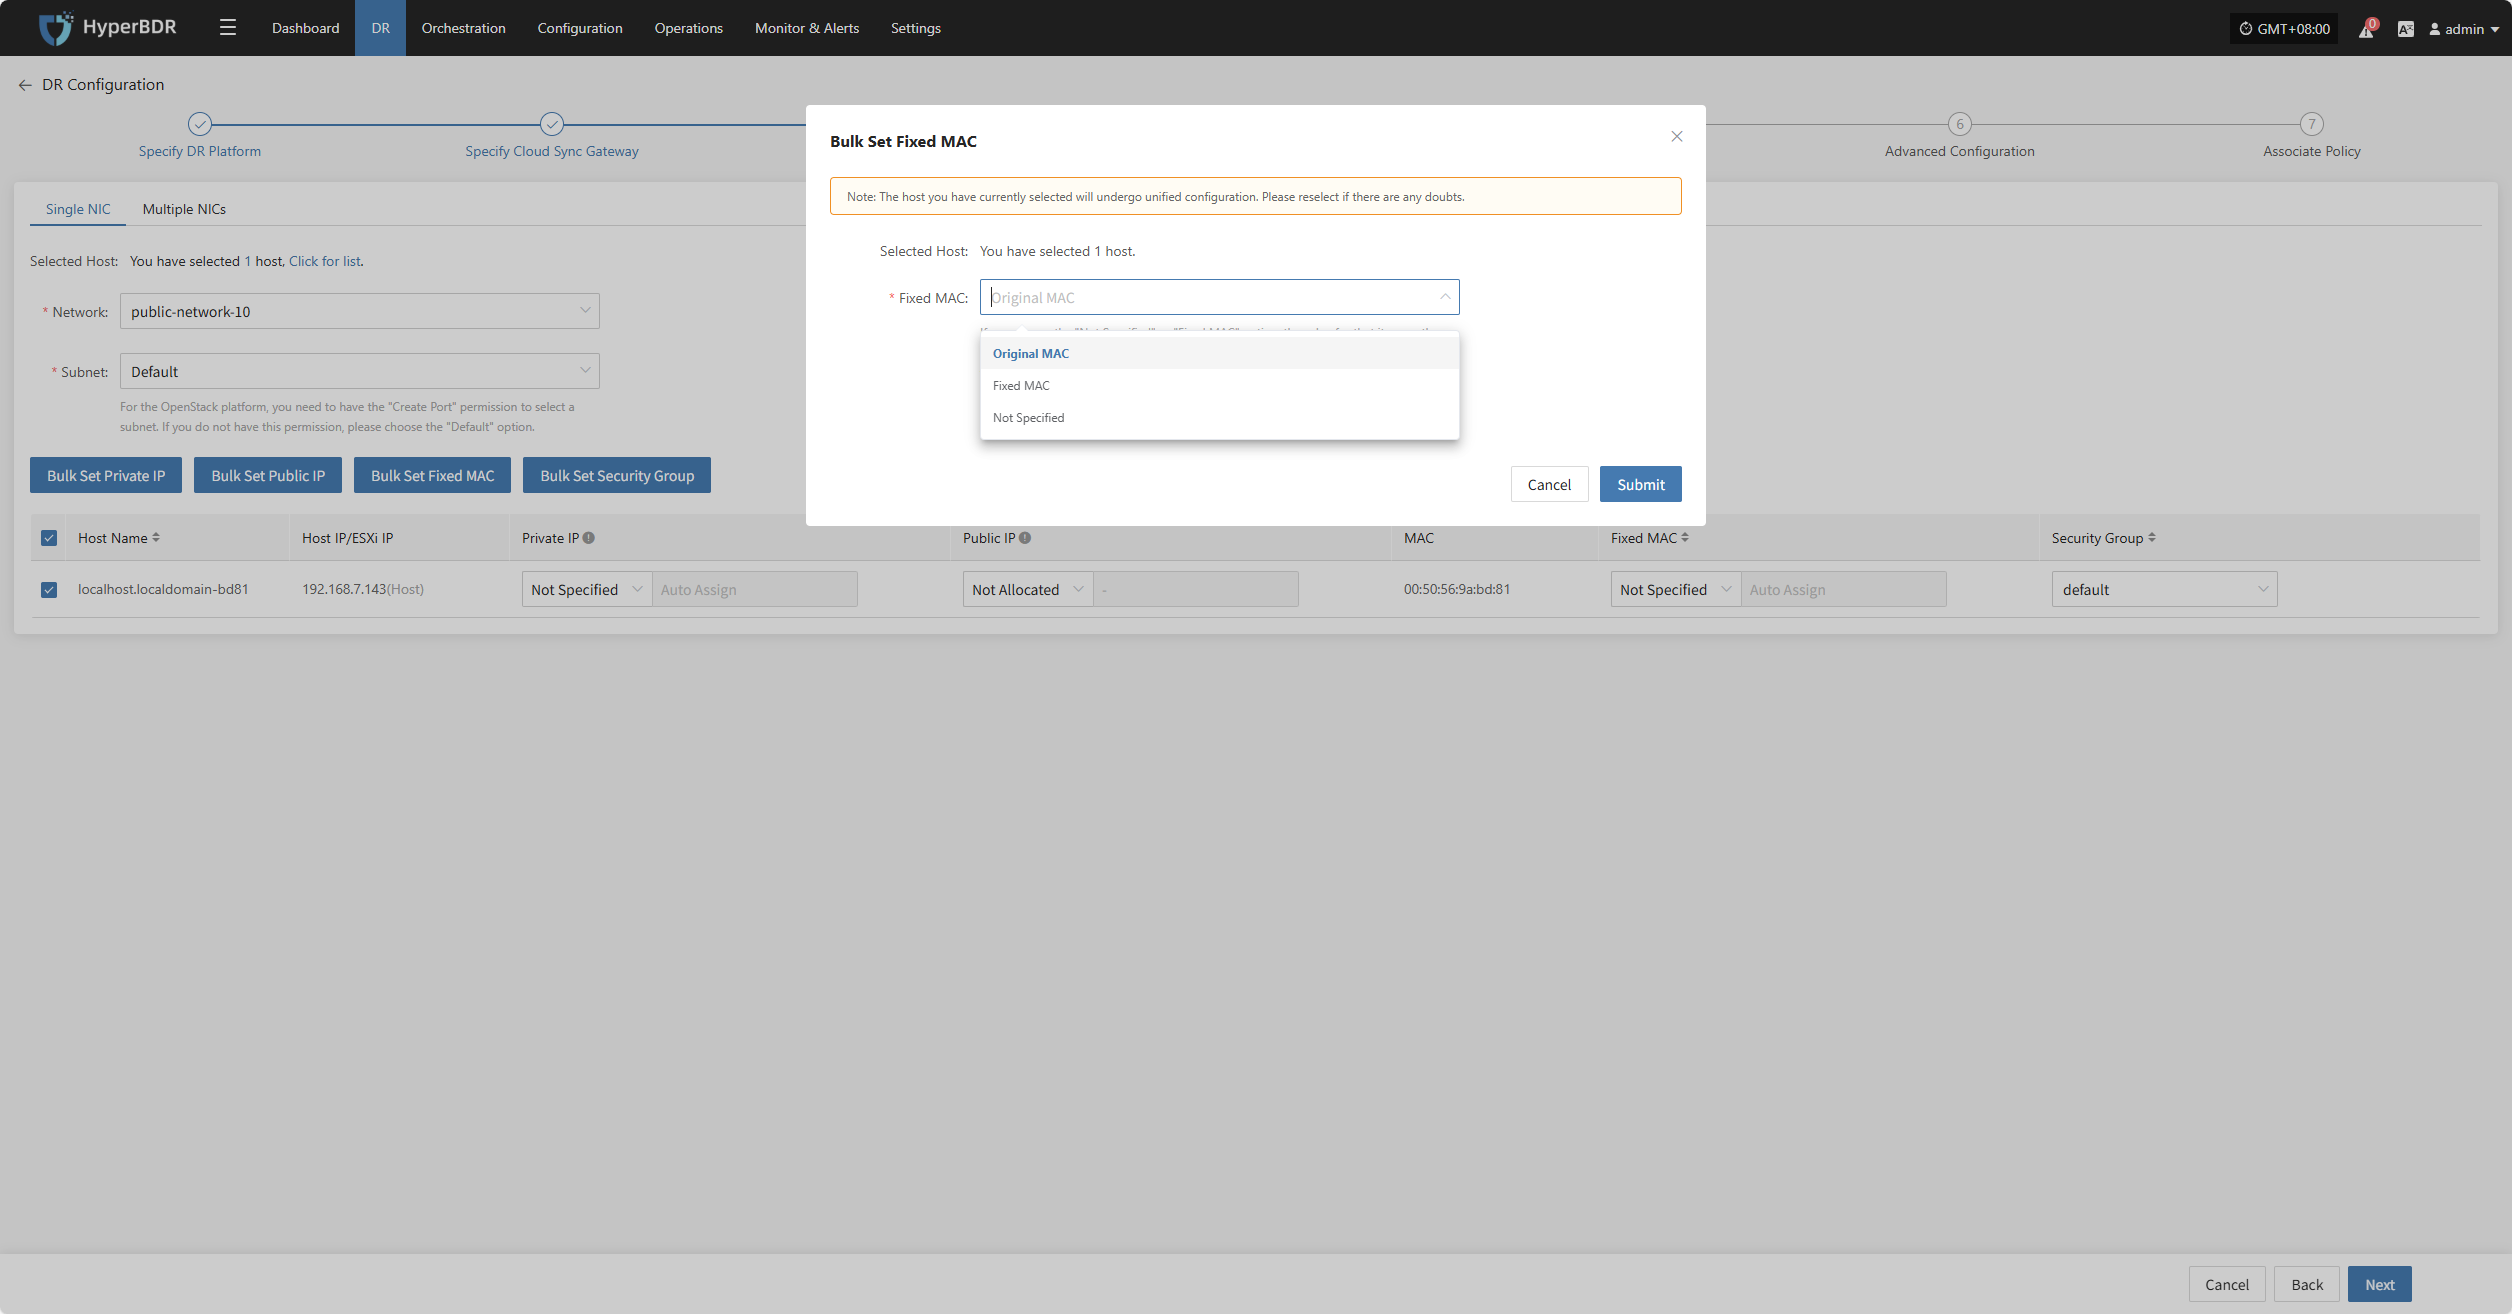
| Fixed MAC | Original MAC / Fixed MAC / Not Specified | Note: MAC address modification is not supported when using cloud services. |
Single NIC
| Parameter | Configuration | Description |
|---|---|---|
| Network | Target DR network name | Specify the target network connected to the DR host for recovery communication. |
| Subnet | Target associated subnet | Specify the subnet within the target network through which the DR host connects. |
Bulk Set Private IP
Select the desired hosts and click the “Bulk Set Private IP” button on the page to start batch setting private IPs.
In the pop-up dialog, choose your private IP allocation type.
Bulk Set Public IP
Select the desired hosts and click the “Bulk Set Public IP” button on the page to start batch setting public IPs.
In the pop-up dialog, choose your public IP allocation type.
Bulk Set Fixed MAC
Select the desired hosts and click the “Bulk Set Fixed MAC” button on the page to start batch setting MAC addresses.
In the pop-up dialog, choose your MAC address allocation type.
Bulk Set Security Group
Select the desired hosts and click the “Bulk Set Security Group” button on the page to start batch setting security groups.
In the pop-up dialog, select your security group.
Multiple NlCs
When a host has multiple network interface cards (NICs) that require specific configurations, you can use the multi-NIC mode for binding.
Due to cloud platform limitations, the maximum number of target NICs is 5. The first NIC is designated as the primary by default and cannot be deleted.
+ Add NIC
After selecting the host, click the "+ Add NIC" button on the page to add a new NIC, ensuring it corresponds to the source NIC.
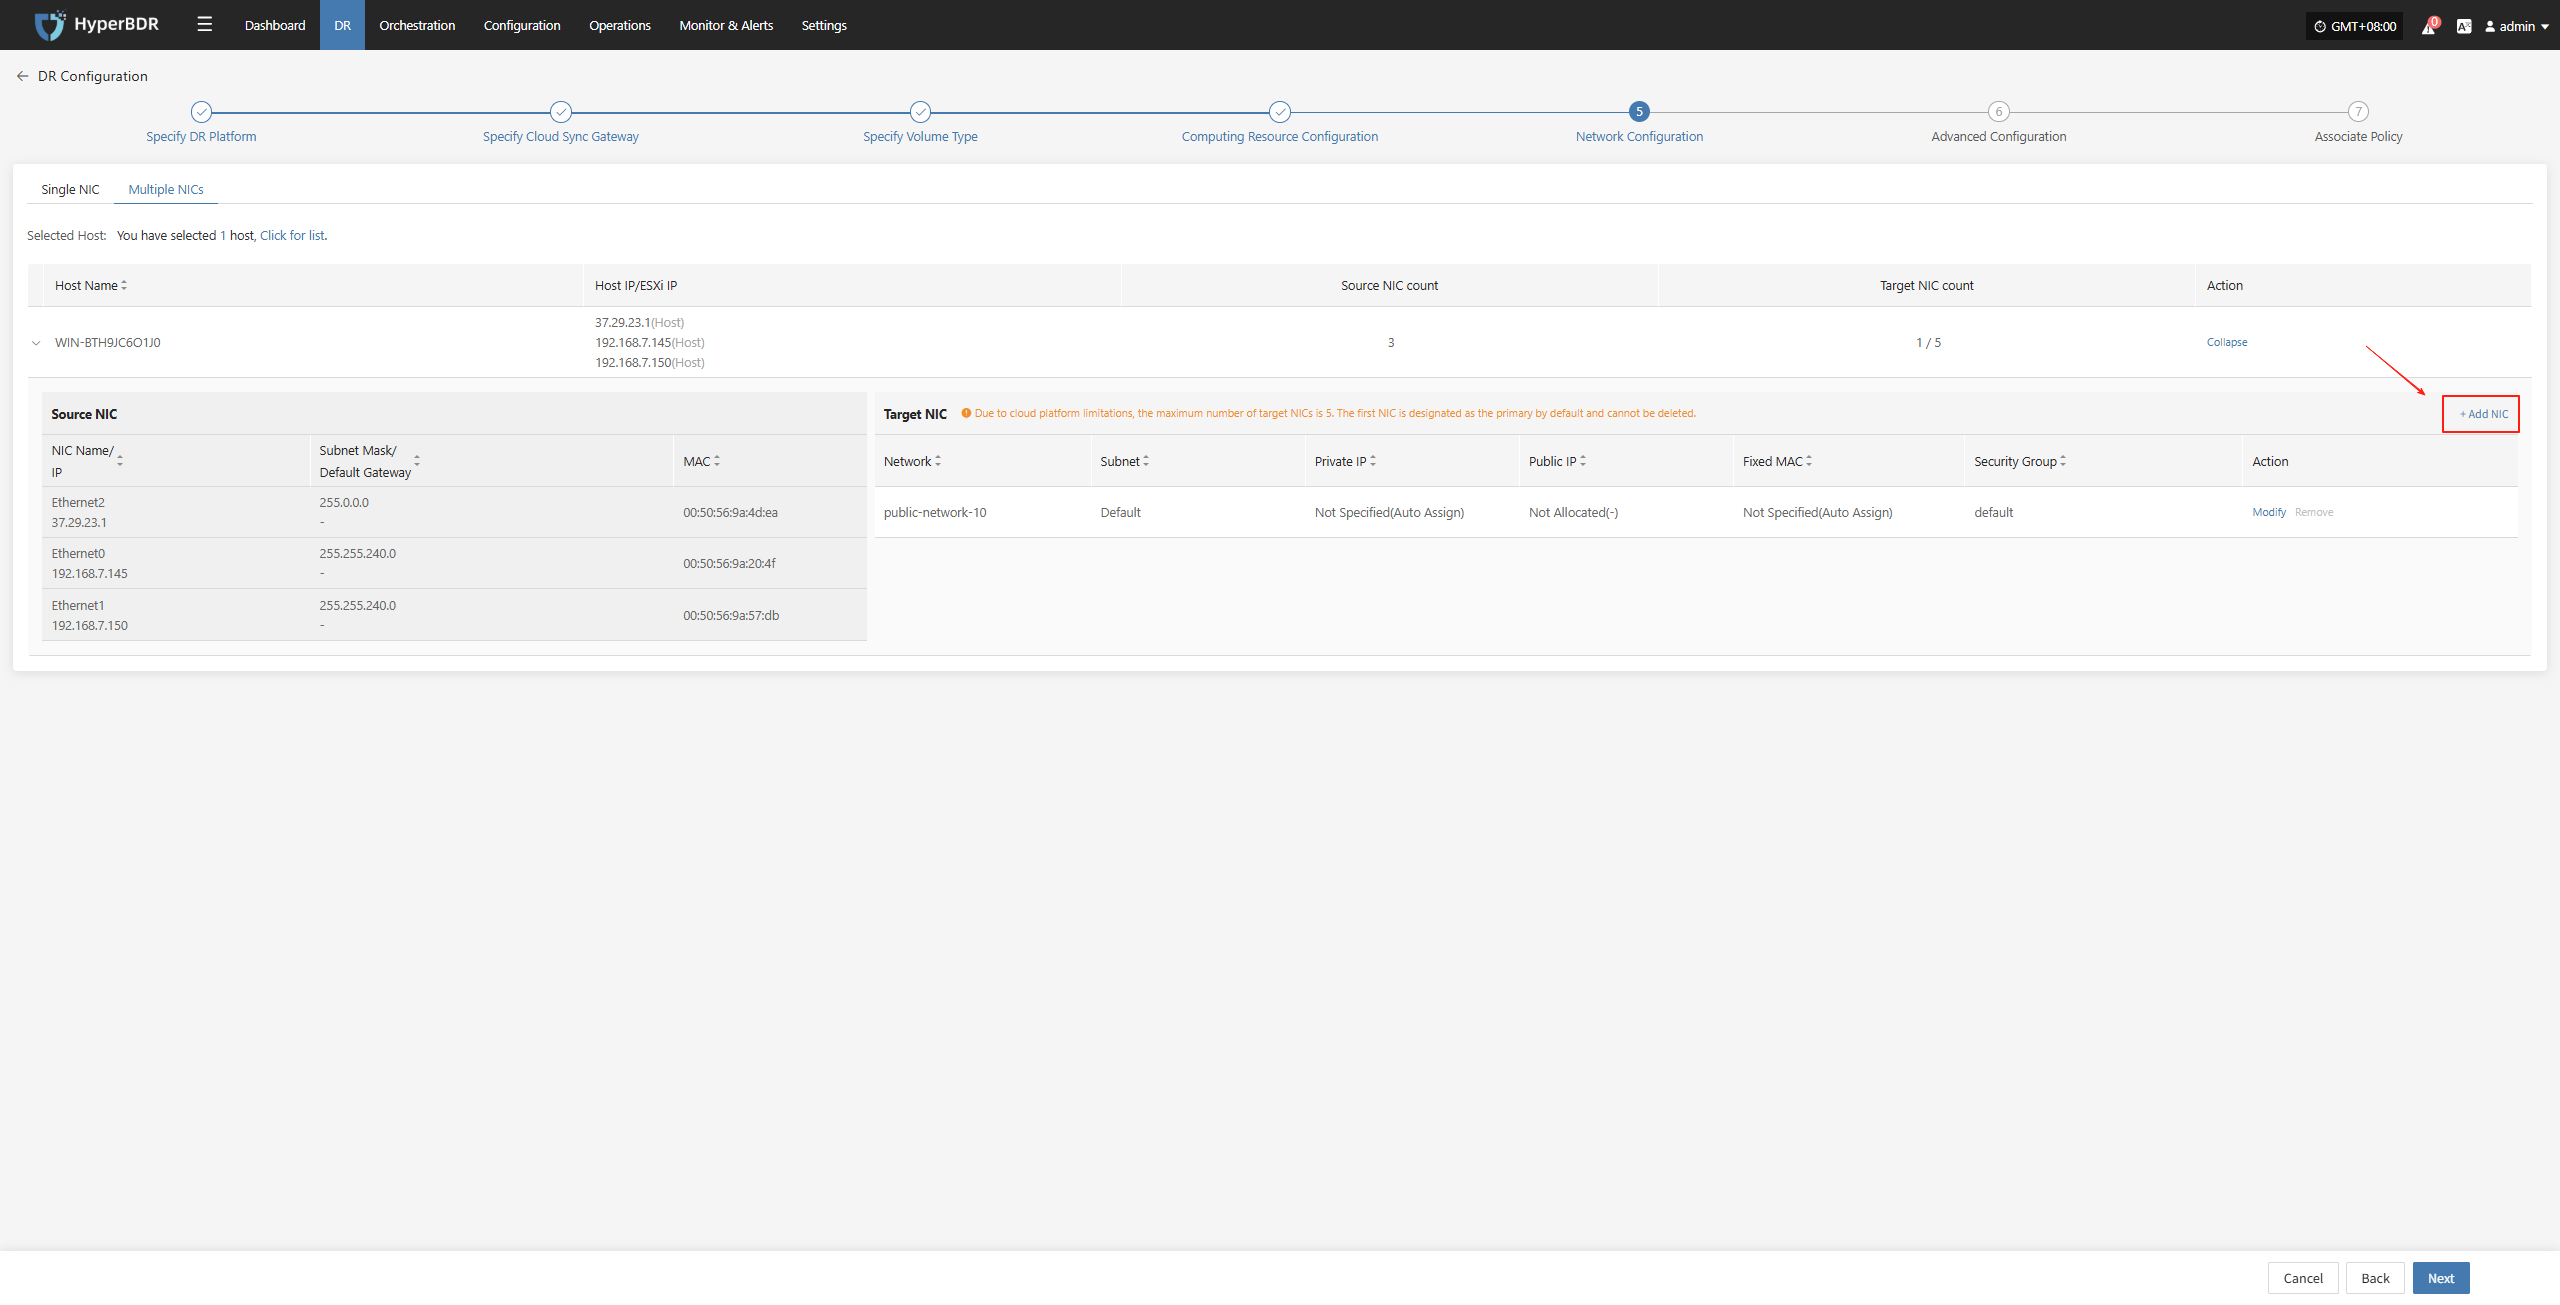
Modify
After selecting the corresponding NIC, you can configure settings such as network, subnet, private IP, public IP, specified MAC address, and security group for each NIC individually based on actual requirements.
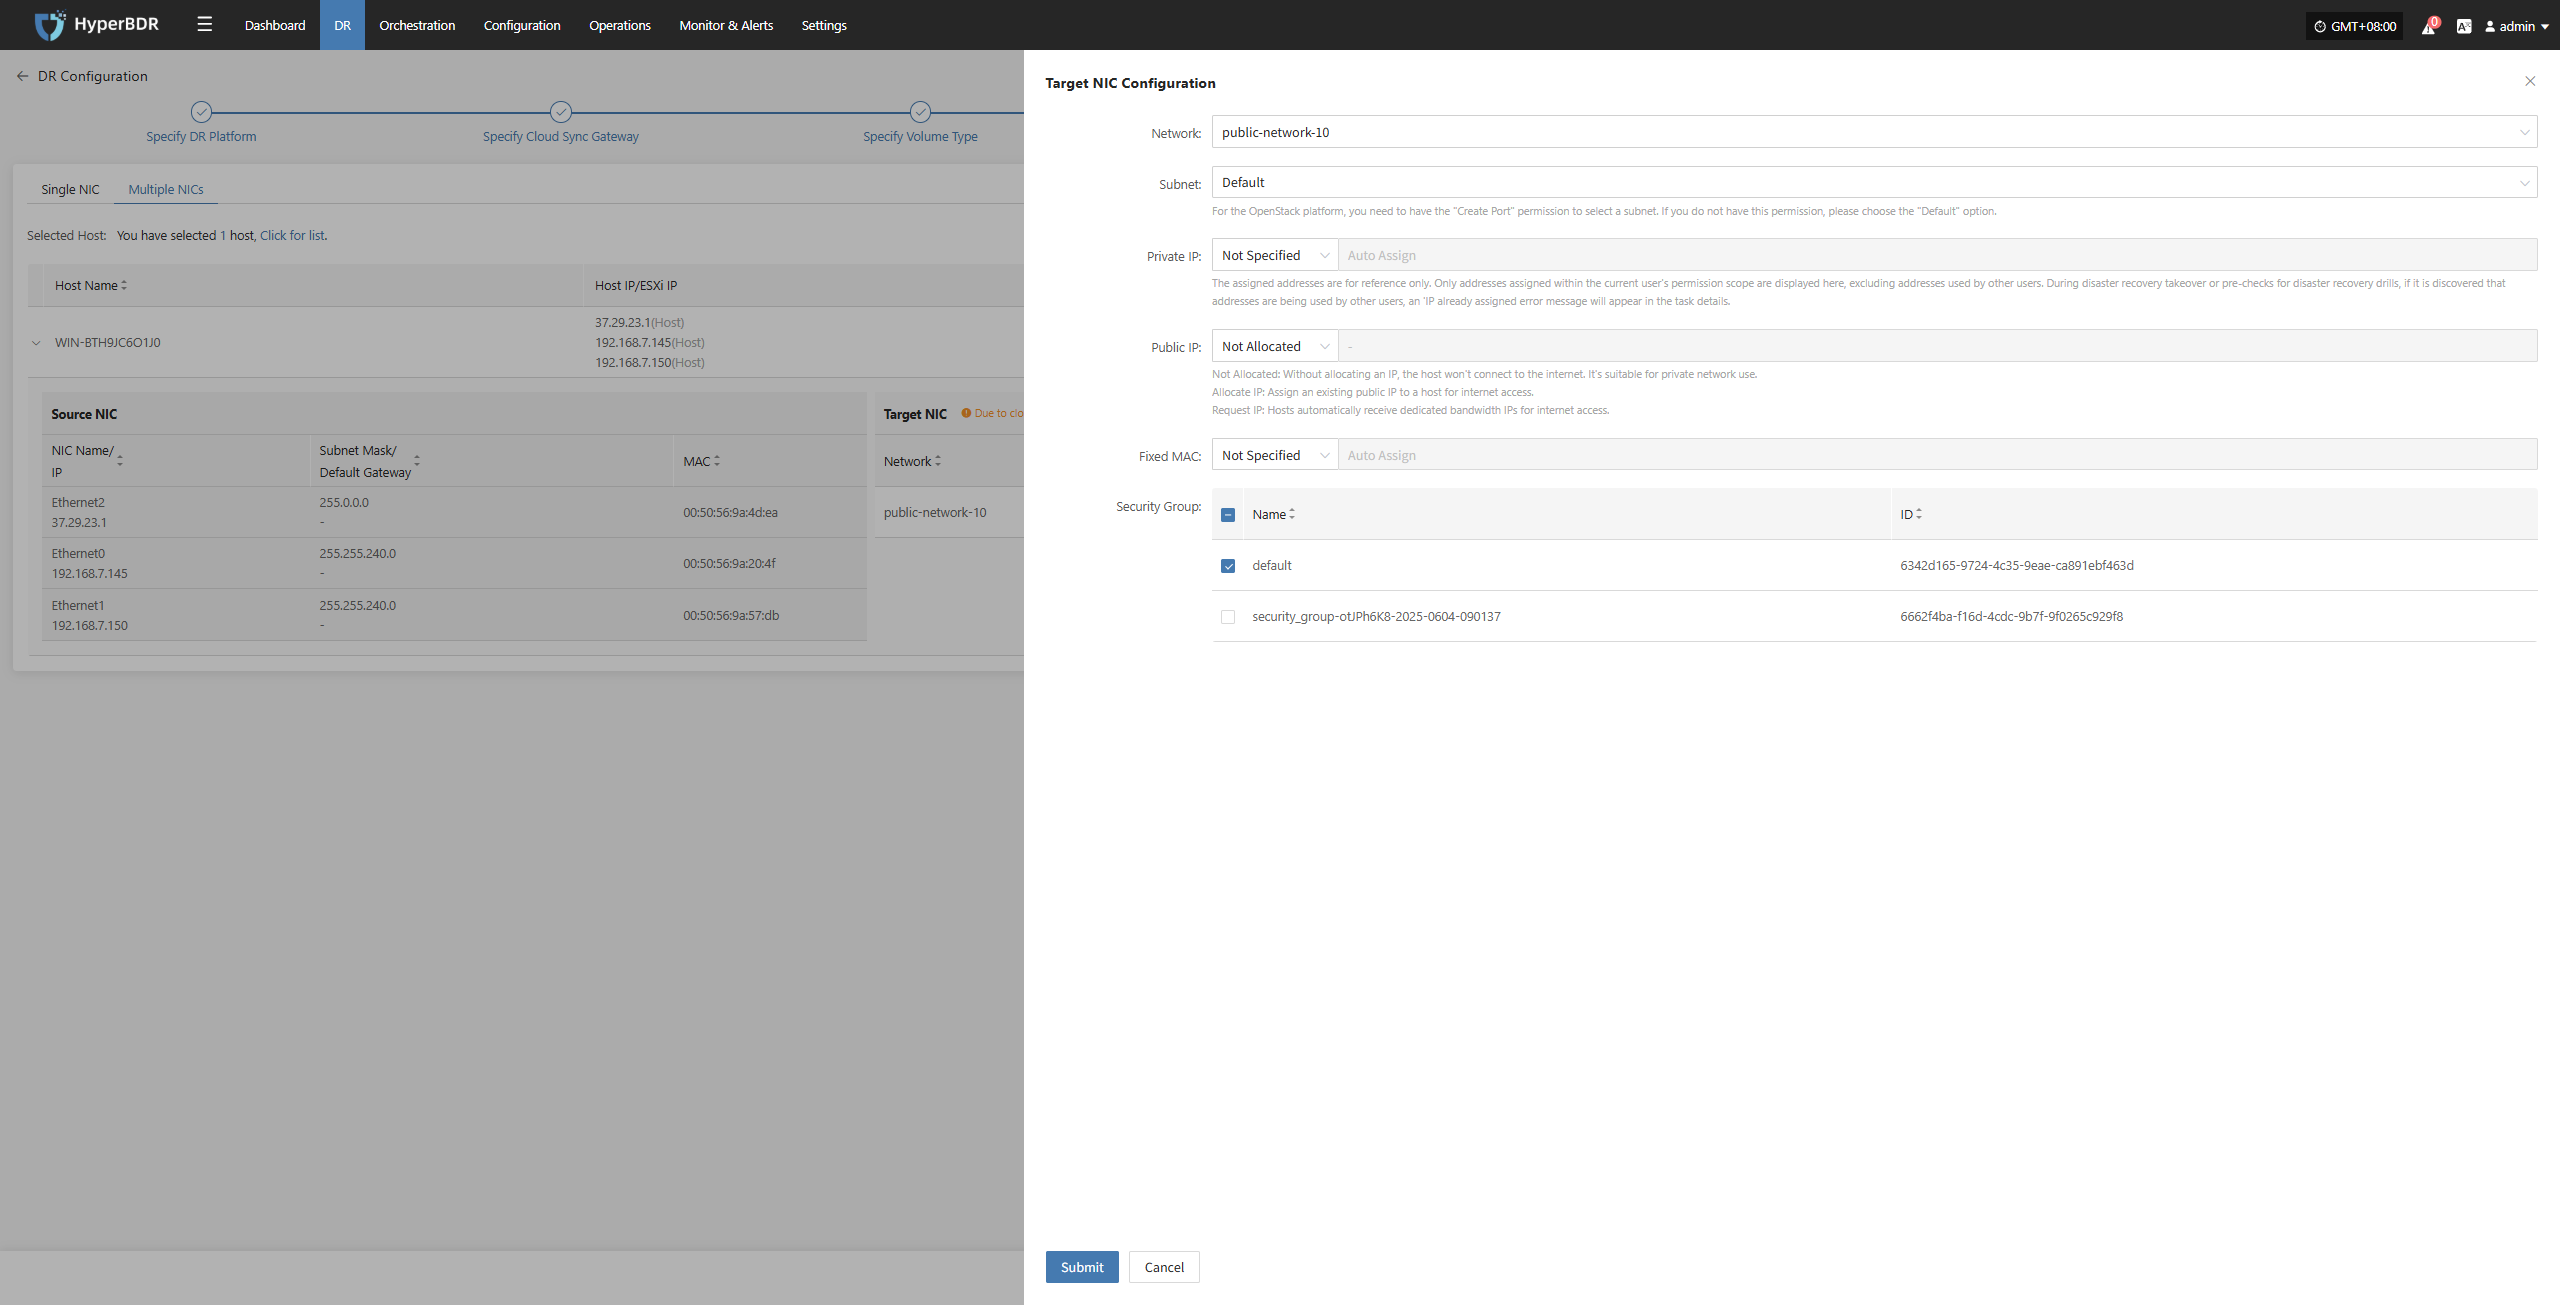
Network Configuration complete, click “Next” to start Advanced Configuration.
Advanced Configuration
This section supports user-defined script execution and driver adaptation settings, to meet personalized needs and hardware compatibility tuning in complex environments (the script section can be left blank).
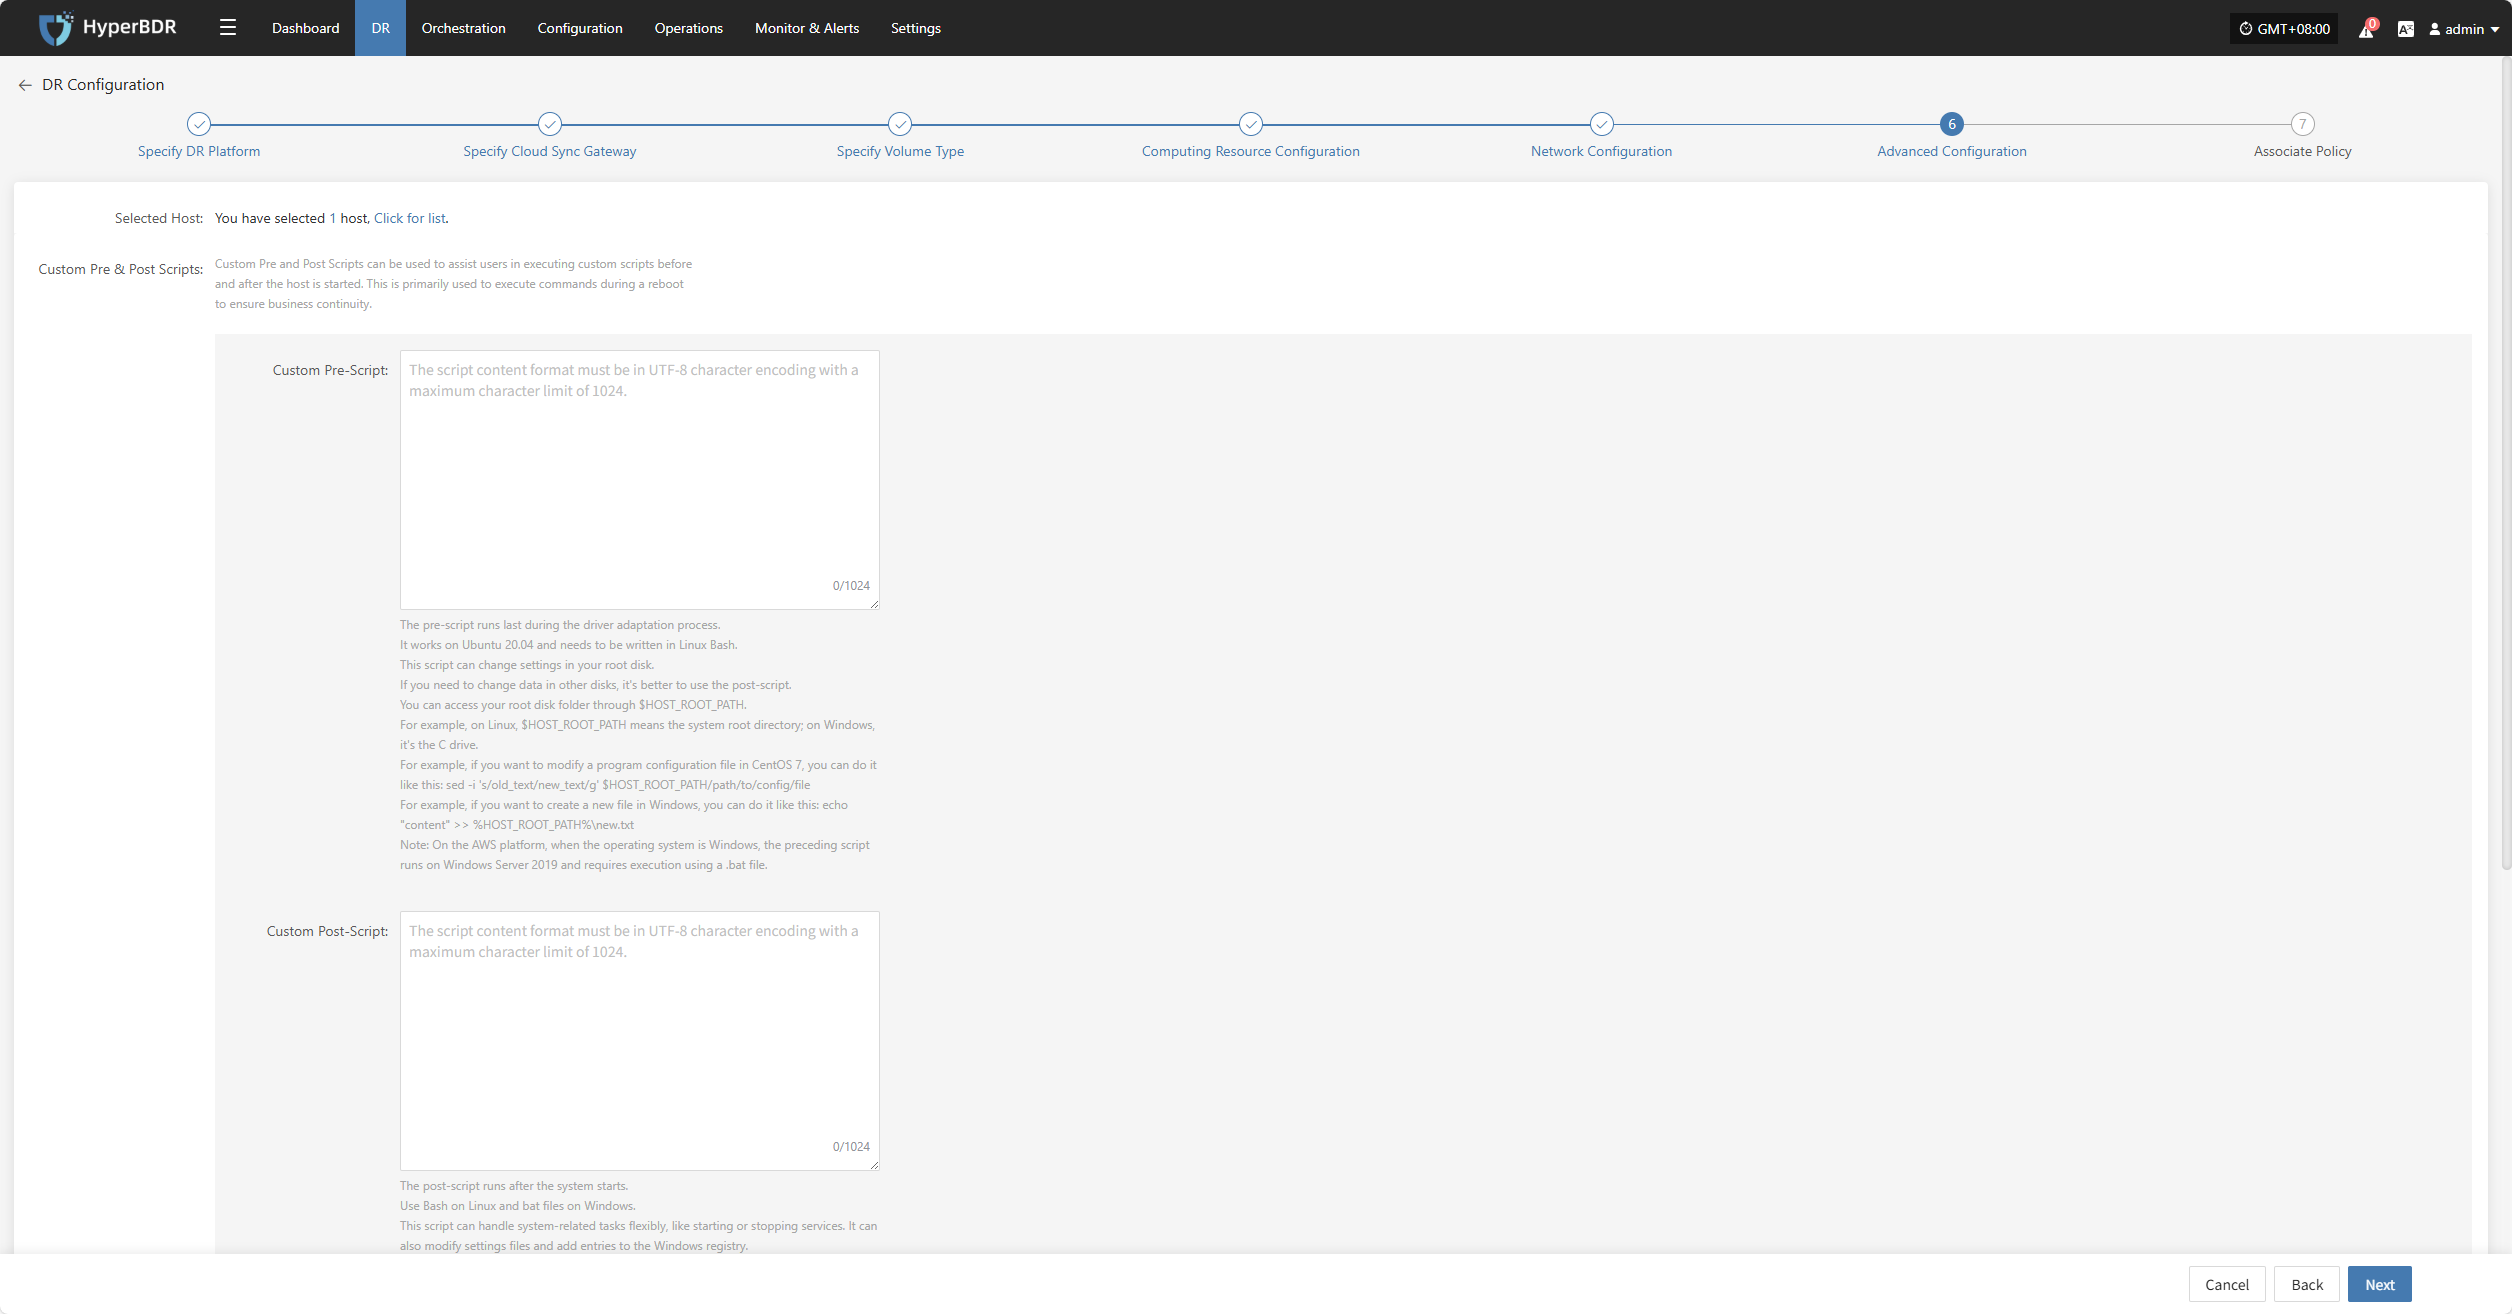
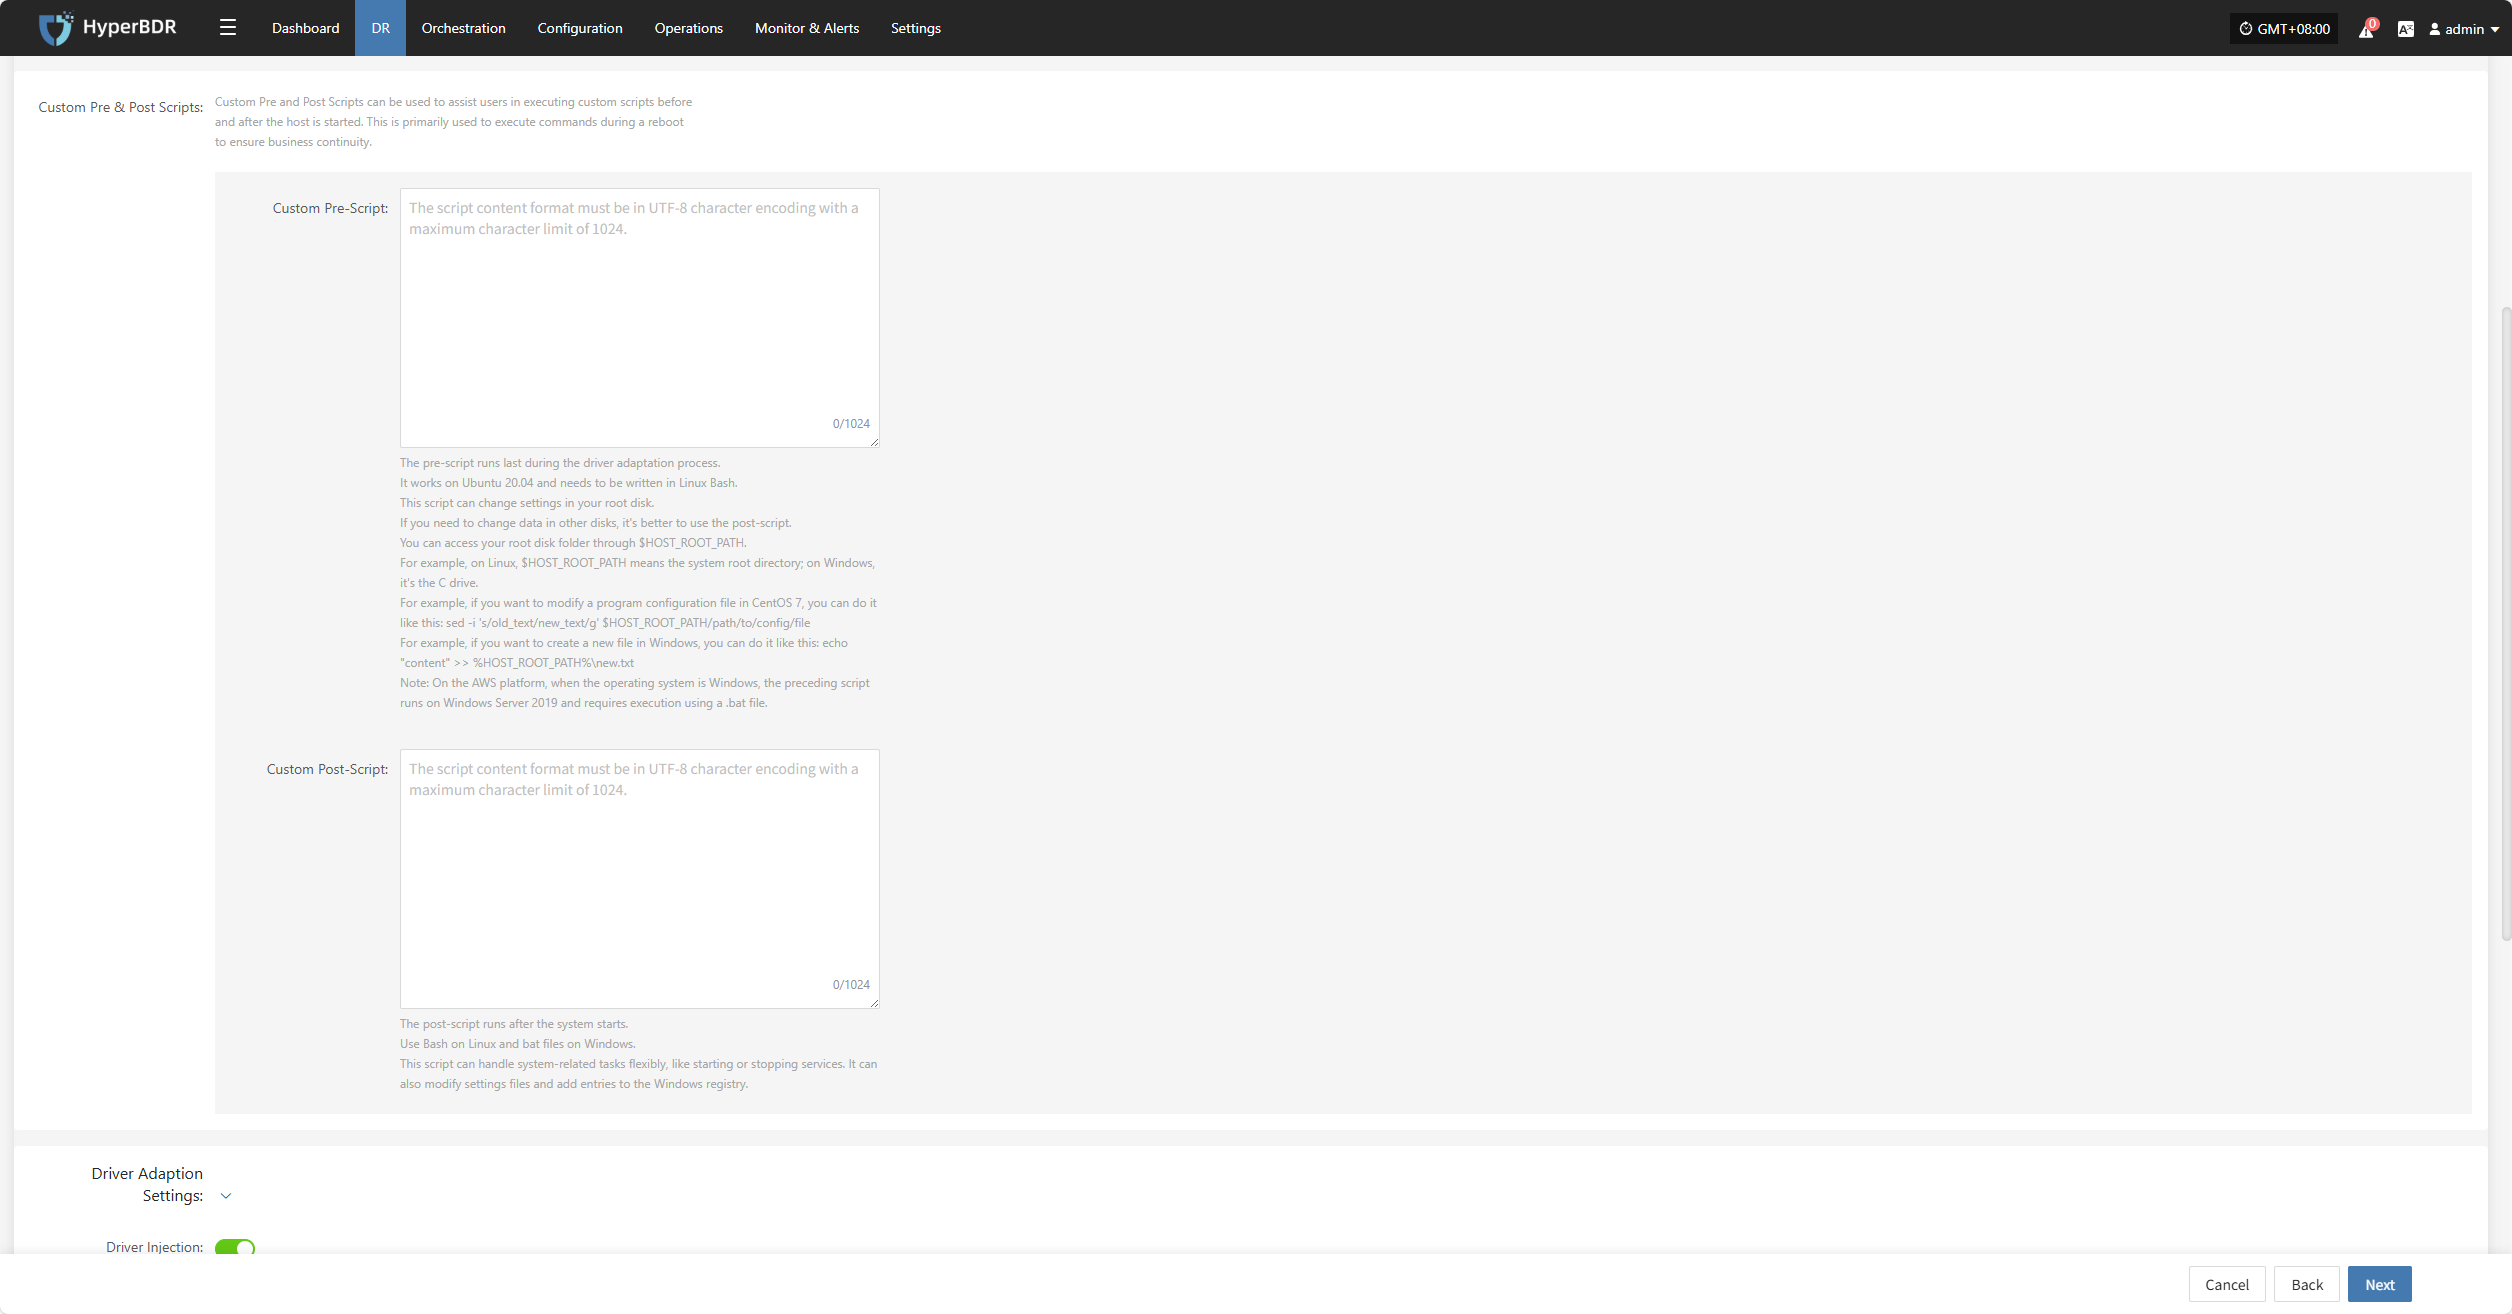
Custom Pre & Post Scripts
Custom Pre and Post Scripts can be used to assist users in executing custom scripts before and after the host is started. This is primarily used to execute commands during a reboot to ensure business continuity.
Custom Pre-Script:
The pre-script runs last during the driver adaptation process.
It works on Ubuntu 20.04 and needs to be written in Linux Bash.
This script can change settings in your root disk.
If you need to change data in other disks, it's better to use the post-script.
You can access your root disk folder through $HOST_ROOT_PATH.
For example, on Linux, $HOST_ROOT_PATH means the system root directory; on Windows, it's the C drive.
For example, if you want to modify a program configuration file in CentOS 7, you can do it like this: sed -i 's/old_text/new_text/g' $HOST_ROOT_PATH/path/to/config/file
For example, if you want to create a new file in Windows, you can do it like this: echo "content" >> %HOST_ROOT_PATH%\new.txt
Note: On the AWS platform, when the operating system is Windows, the preceding script runs on Windows Server 2019 and requires execution using a .bat file.
Custom Post-Script:
The post-script runs after the system starts.
Use Bash on Linux and bat files on Windows.
This script can handle system-related tasks flexibly, like starting or stopping services. It can also modify settings files and add entries to the Windows registry.
Driver Adaptation Settings
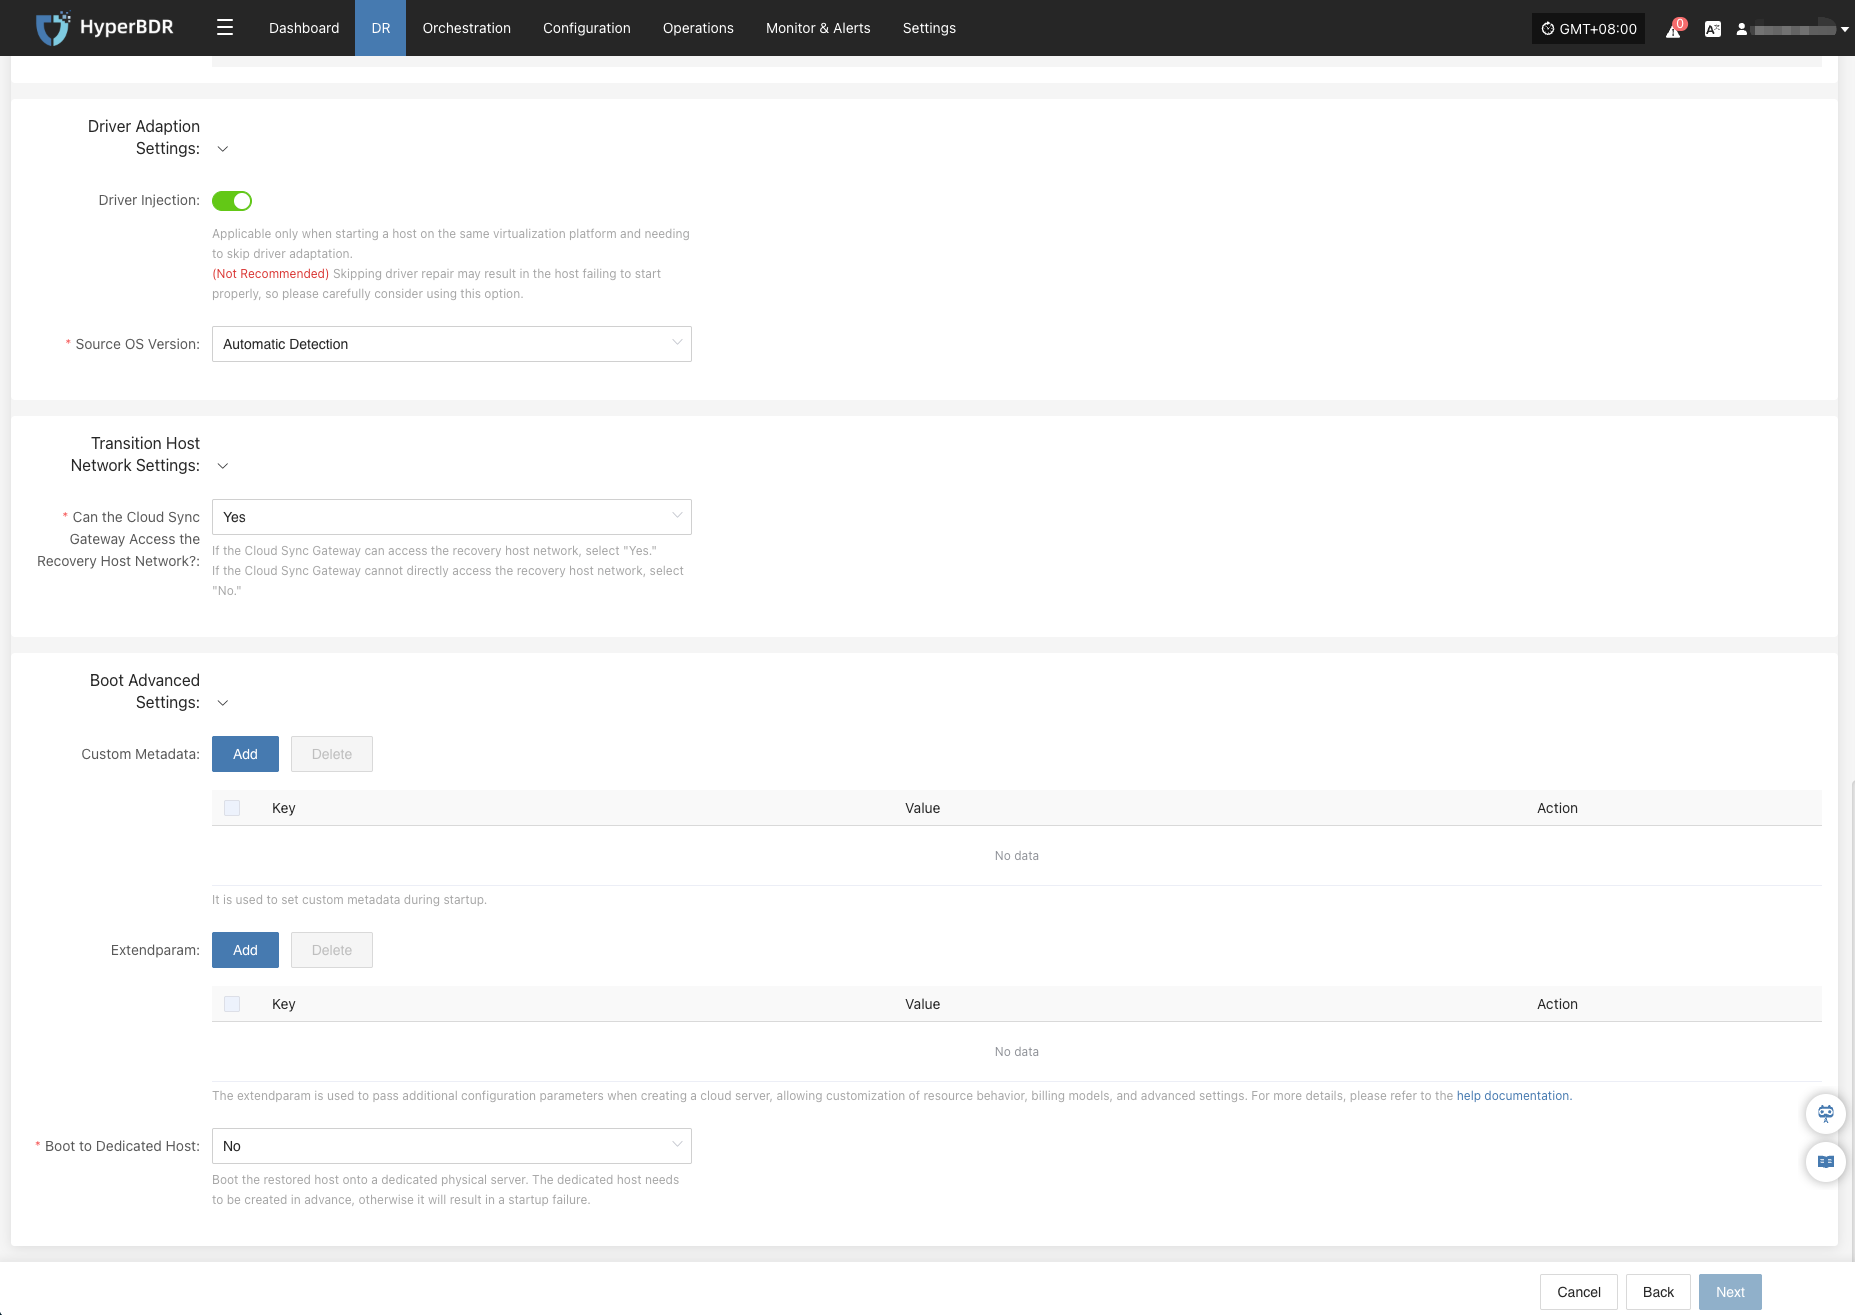
| Parameter | Option | Description |
|---|---|---|
| Driver Injection | Enable Driver Injection | Only applicable when starting the host on the same virtualization platform, skipping driver adaptation. (Not recommended) Skipping driver adaptation may cause the host to fail to start properly, use with caution. |
| Source OS Version | Automatic Detection | The system will automatically select the appropriate driver based on the source OS to repair the host’s operating system version. By default, it detects and adapts automatically, covering the vast majority of use cases without requiring manual intervention. |
Transition HostNetwork Settings
| Parameter | Option | Description |
|---|---|---|
| Can the Cloud Sync Gateway Access the Recovery Host Network? | Yes/No | If the Cloud Sync Gateway can access the recovery host network, select "Yes",lf the Cloud Sync Gateway cannot directly access the recovery host network, selec"No". |
Boot Advanced Settings
When the target platform is Huawei Cloud, OTC, HCSO, OpenStack, or HCS, you can enable Boot Advanced Settings to configure custom metadata for the instance. Keys and Values can be defined based on your business needs.
| Parameter | Option | Description |
|---|---|---|
| Custom Metadata | Add | It is used to set custom metadata during startup. After clicking Add, enter the required Key and Value in the list, then click Save to complete the setup. |
| Extendparam | Add | It is used to set custom metadata during startup. After clicking Add, enter the required Key and Value in the list, then click Save to complete the setup. The extendparam is used to pass additional configuration parameters when creating a cloud server, allowing customization of resource behavior, billing models, and advanced settings. For more details, please refer to the help documentation |
| Boot to Dedicated Host | No/Yes | Boot the restored host onto a dedicated physical server. The dedicated host needs to be created in advance, otherwise it will result in a startup failure. |
After completing Advanced Configuration, click "Next" to prompt: Before starting policy configuration, hosts already configured will automatically enter "Start Disaster Recovery". Then begin associating policies.
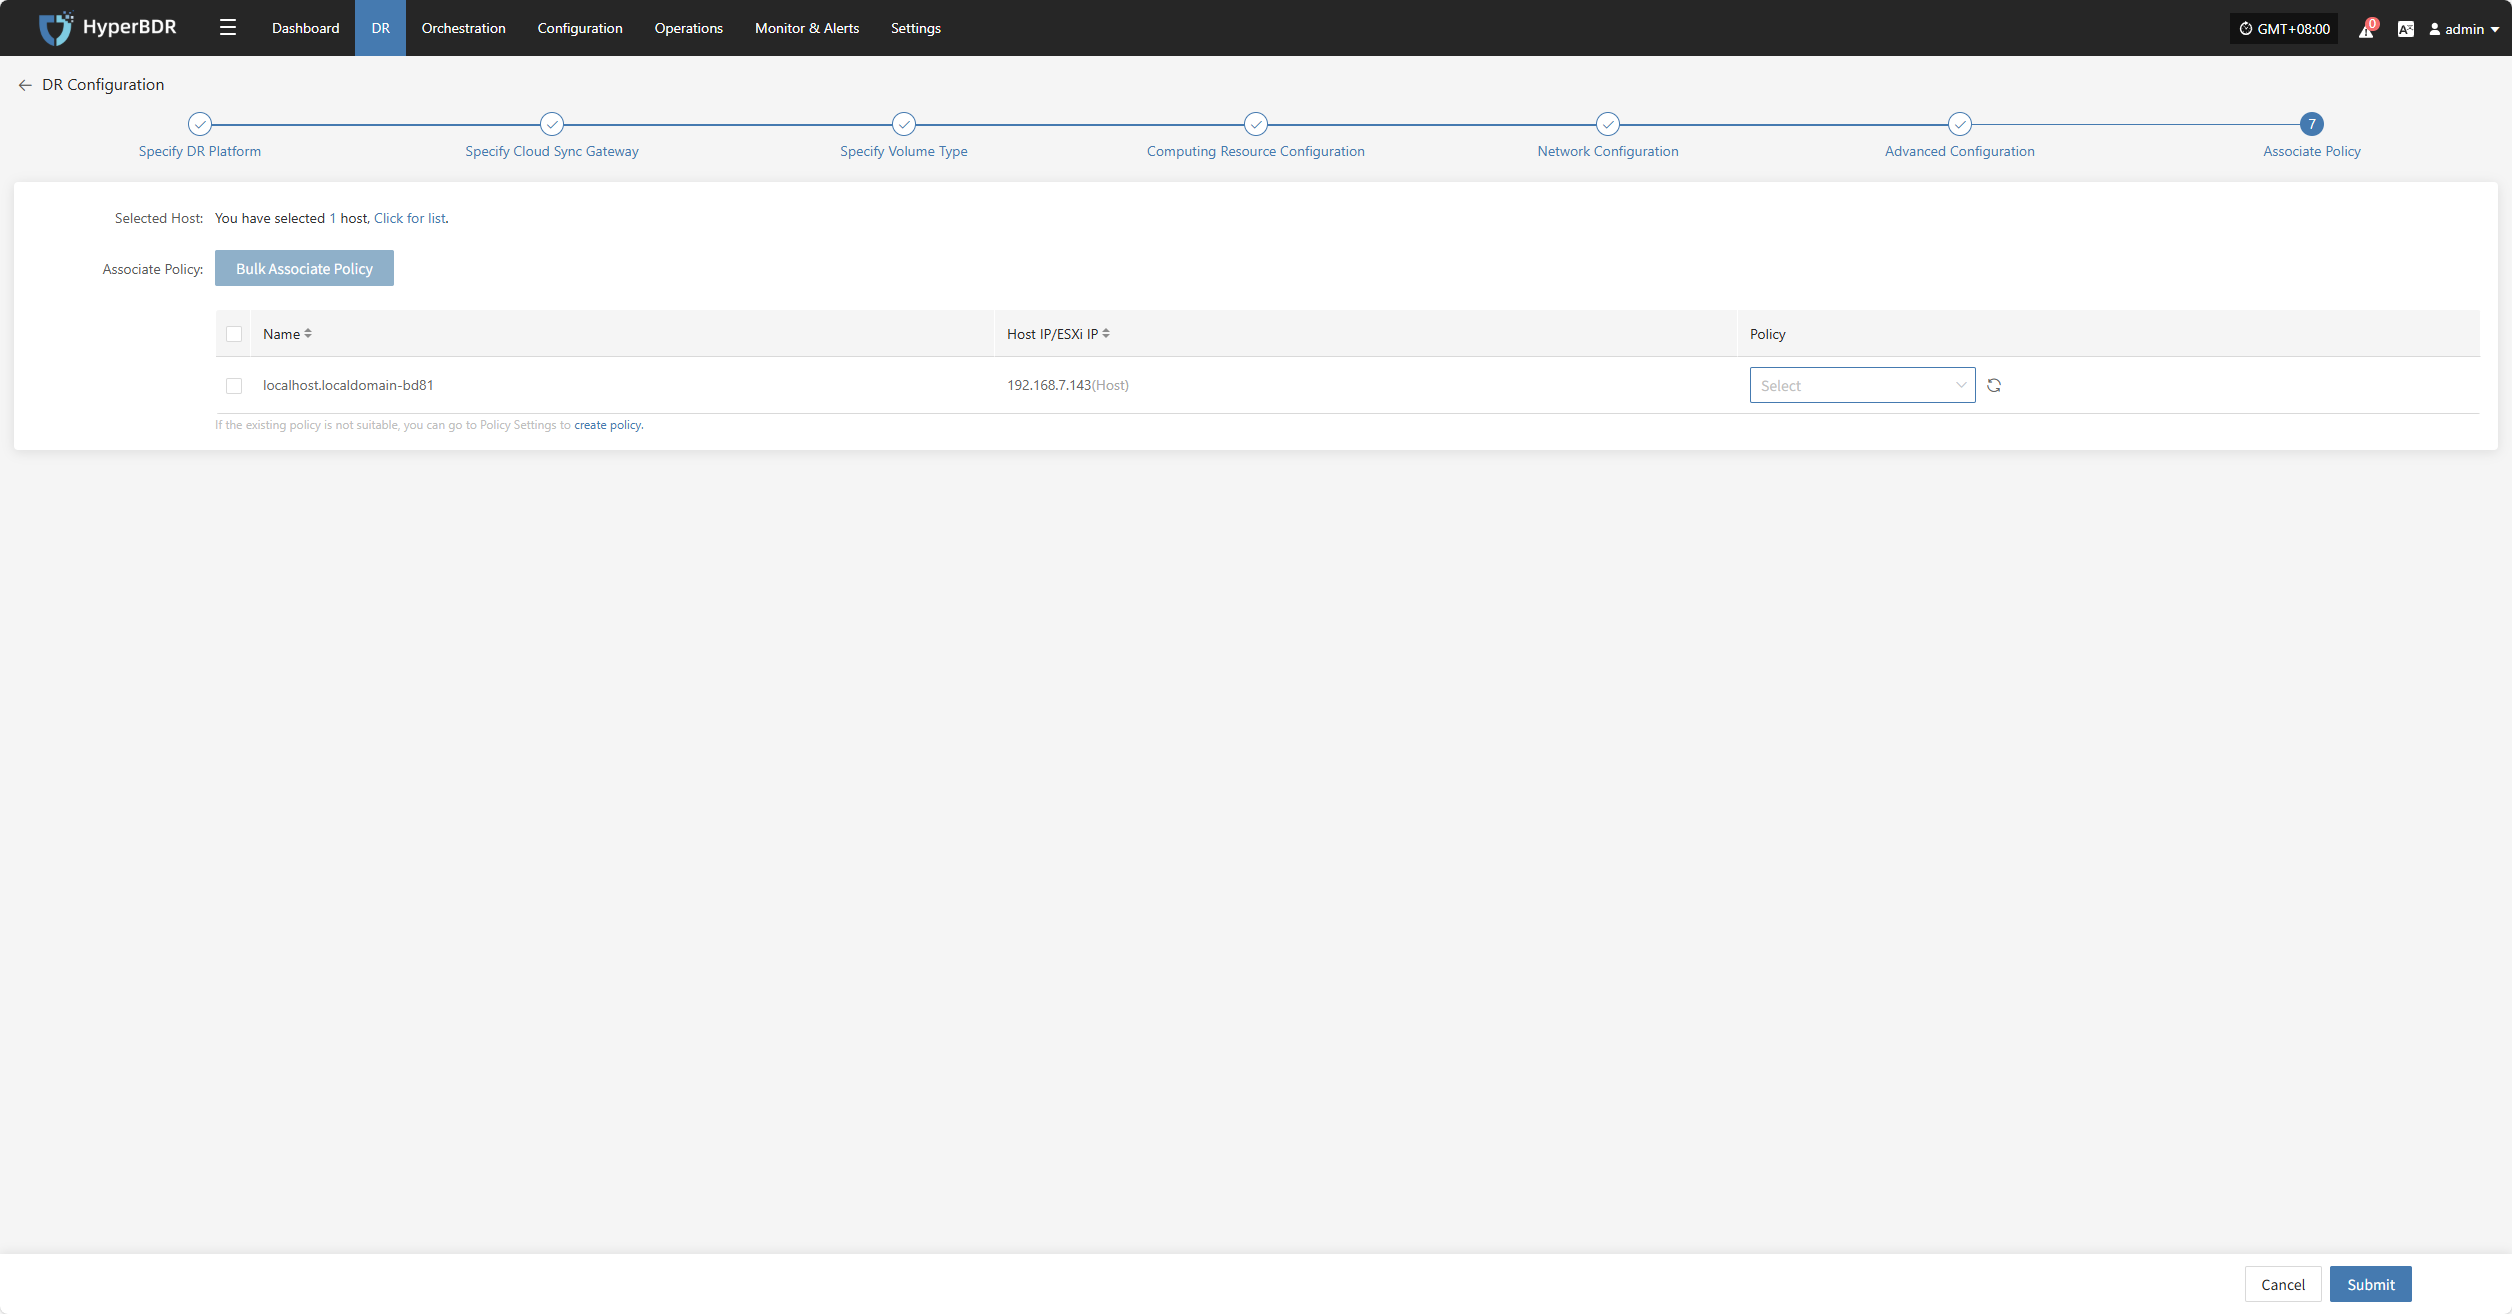
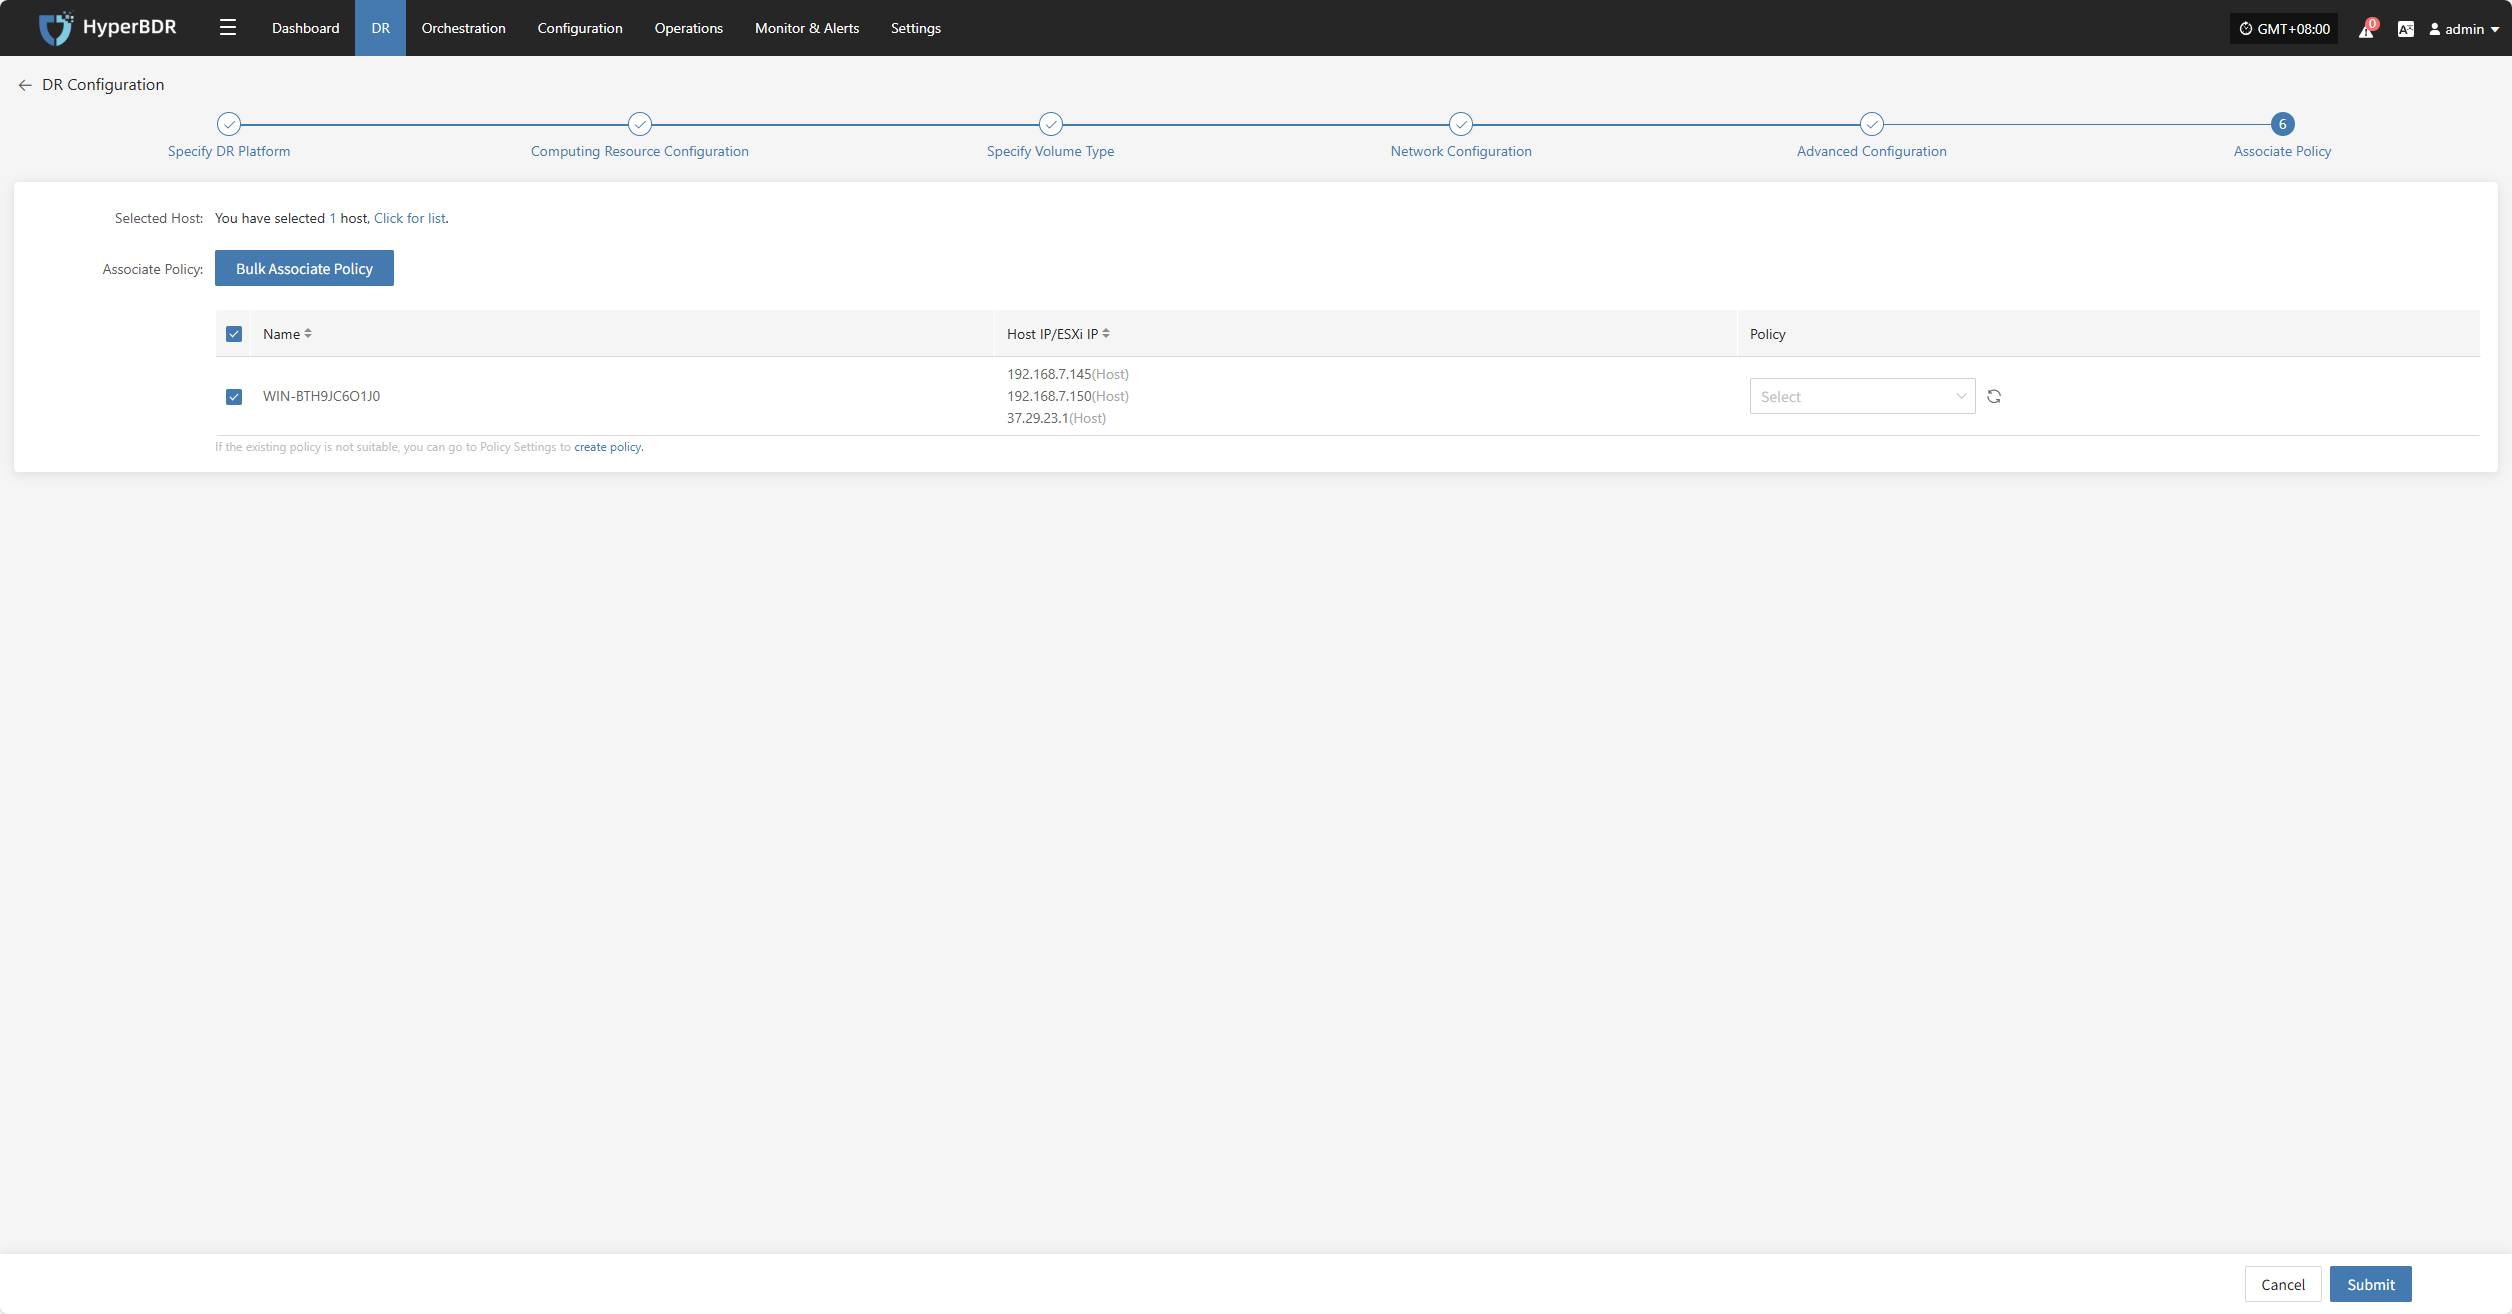
Associate Policy
Note: This is an optional configuration. Not selecting it will not affect the normal execution of the disaster recovery operation. Policy association can also be completed later through Policy Settings.
Associating policies allows flexible control over host backup, recovery, and failover behaviors.
Before using association policies, you need to create the corresponding policies. If no policies exist in the system, selection is unavailable. Policy creation reference: Click here to view
Policies can be configured for individual hosts or batch-associated for multiple hosts via the page.
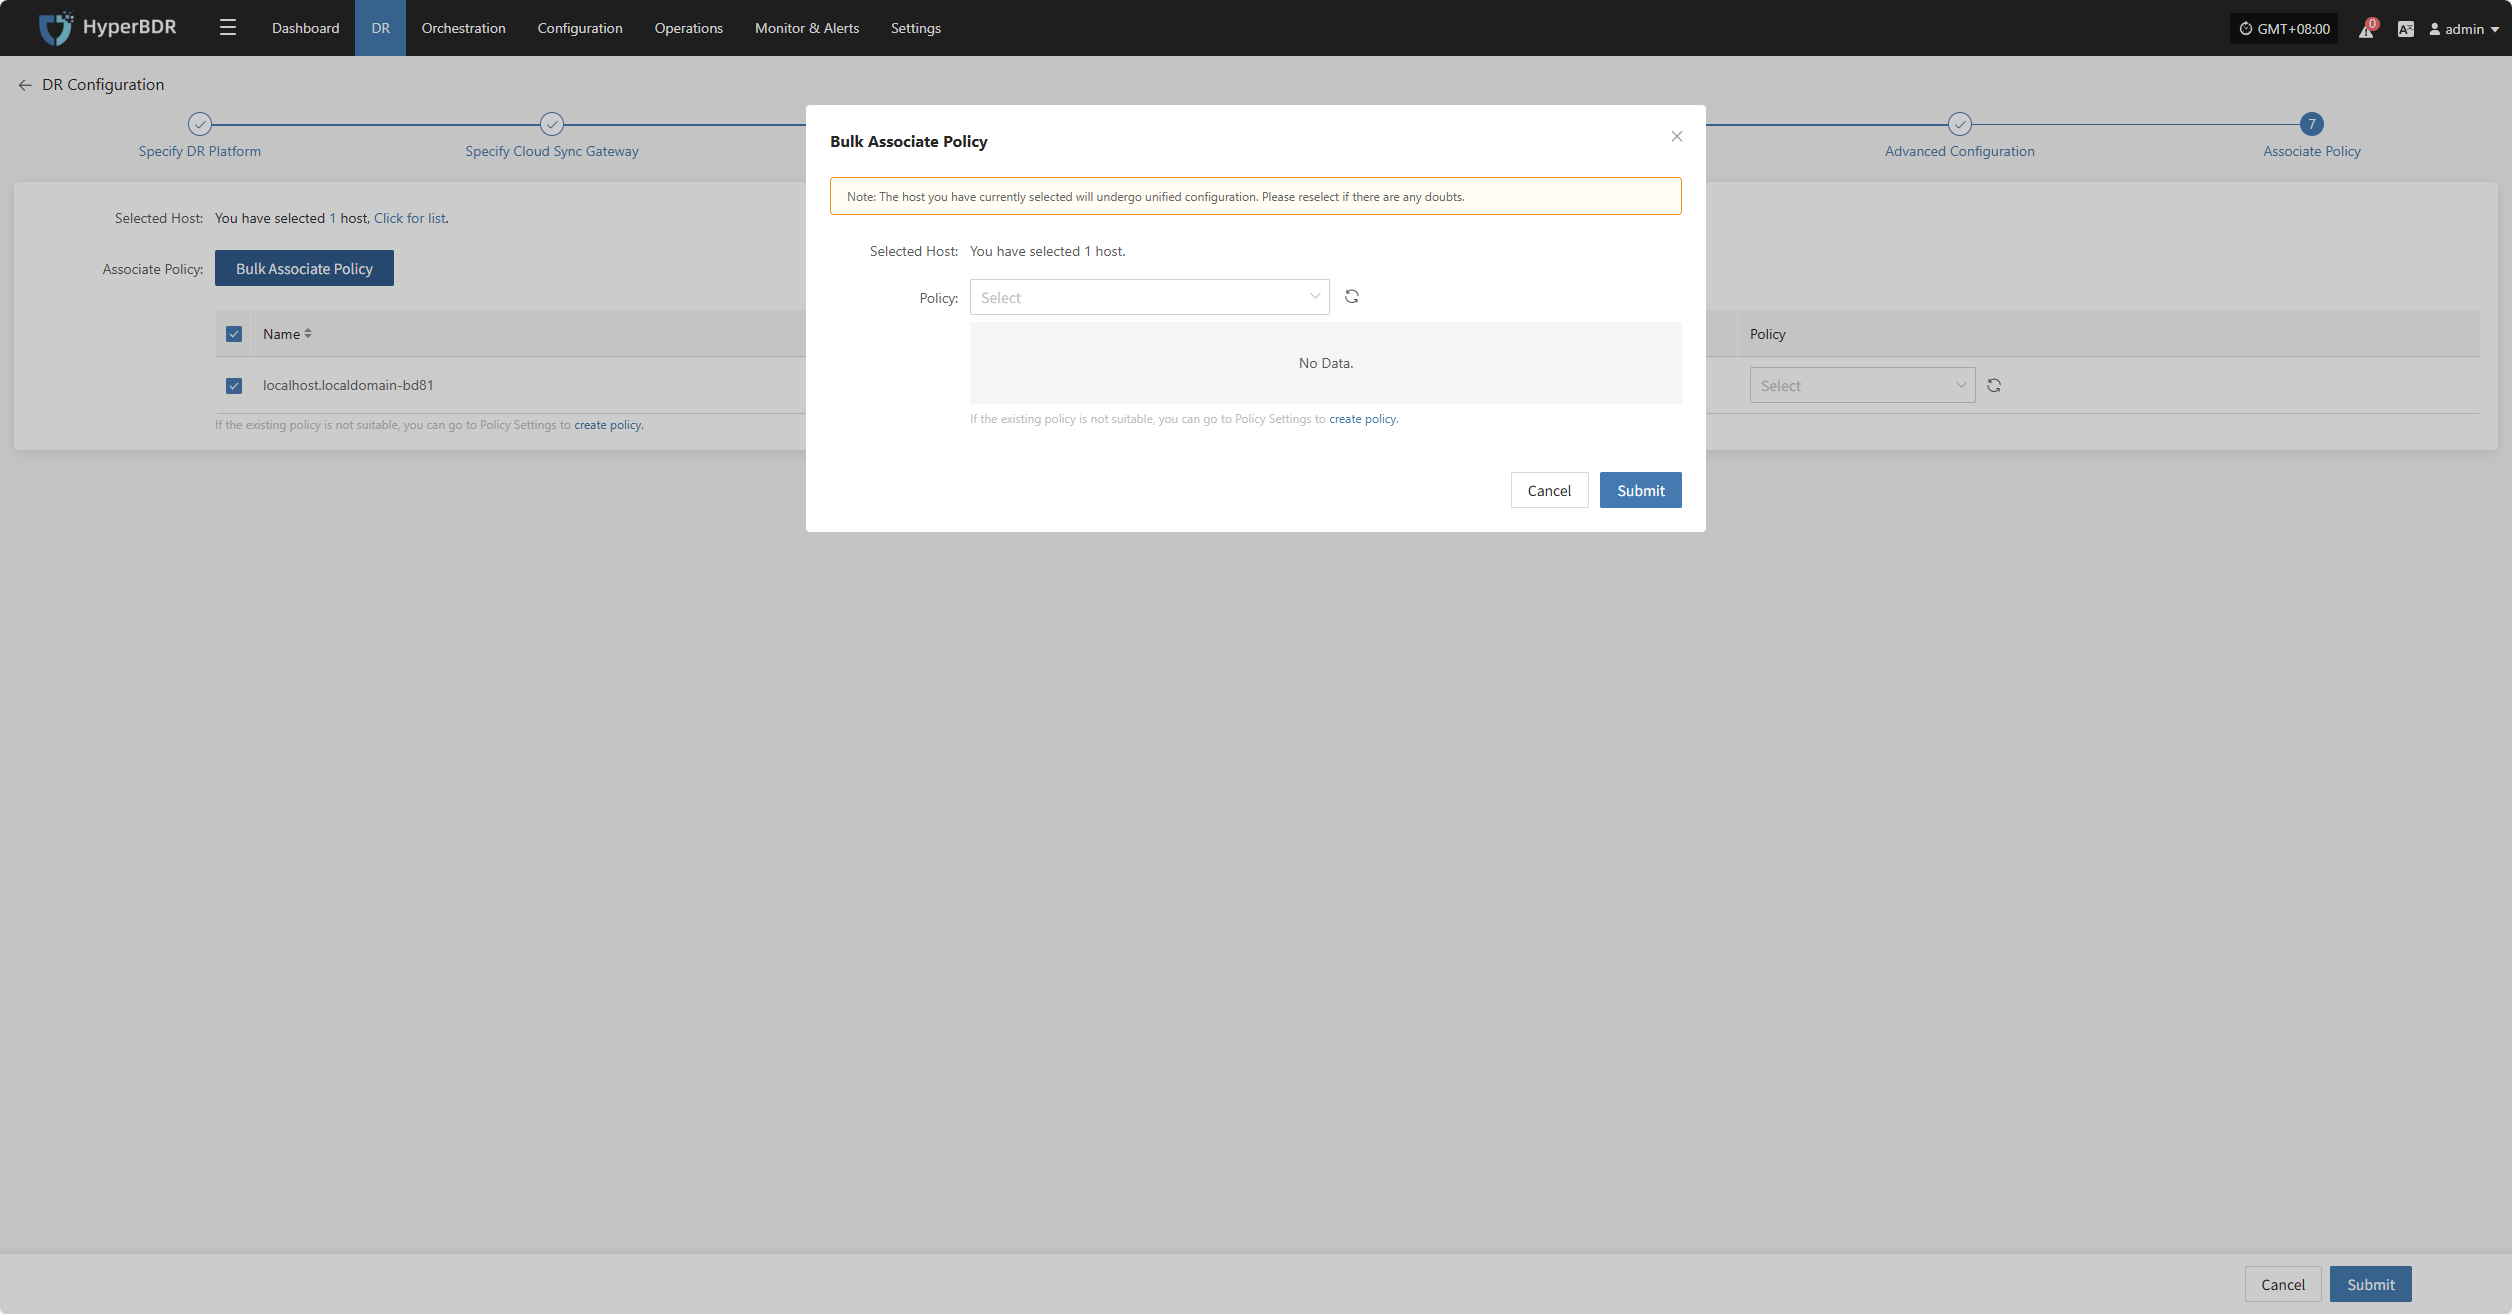
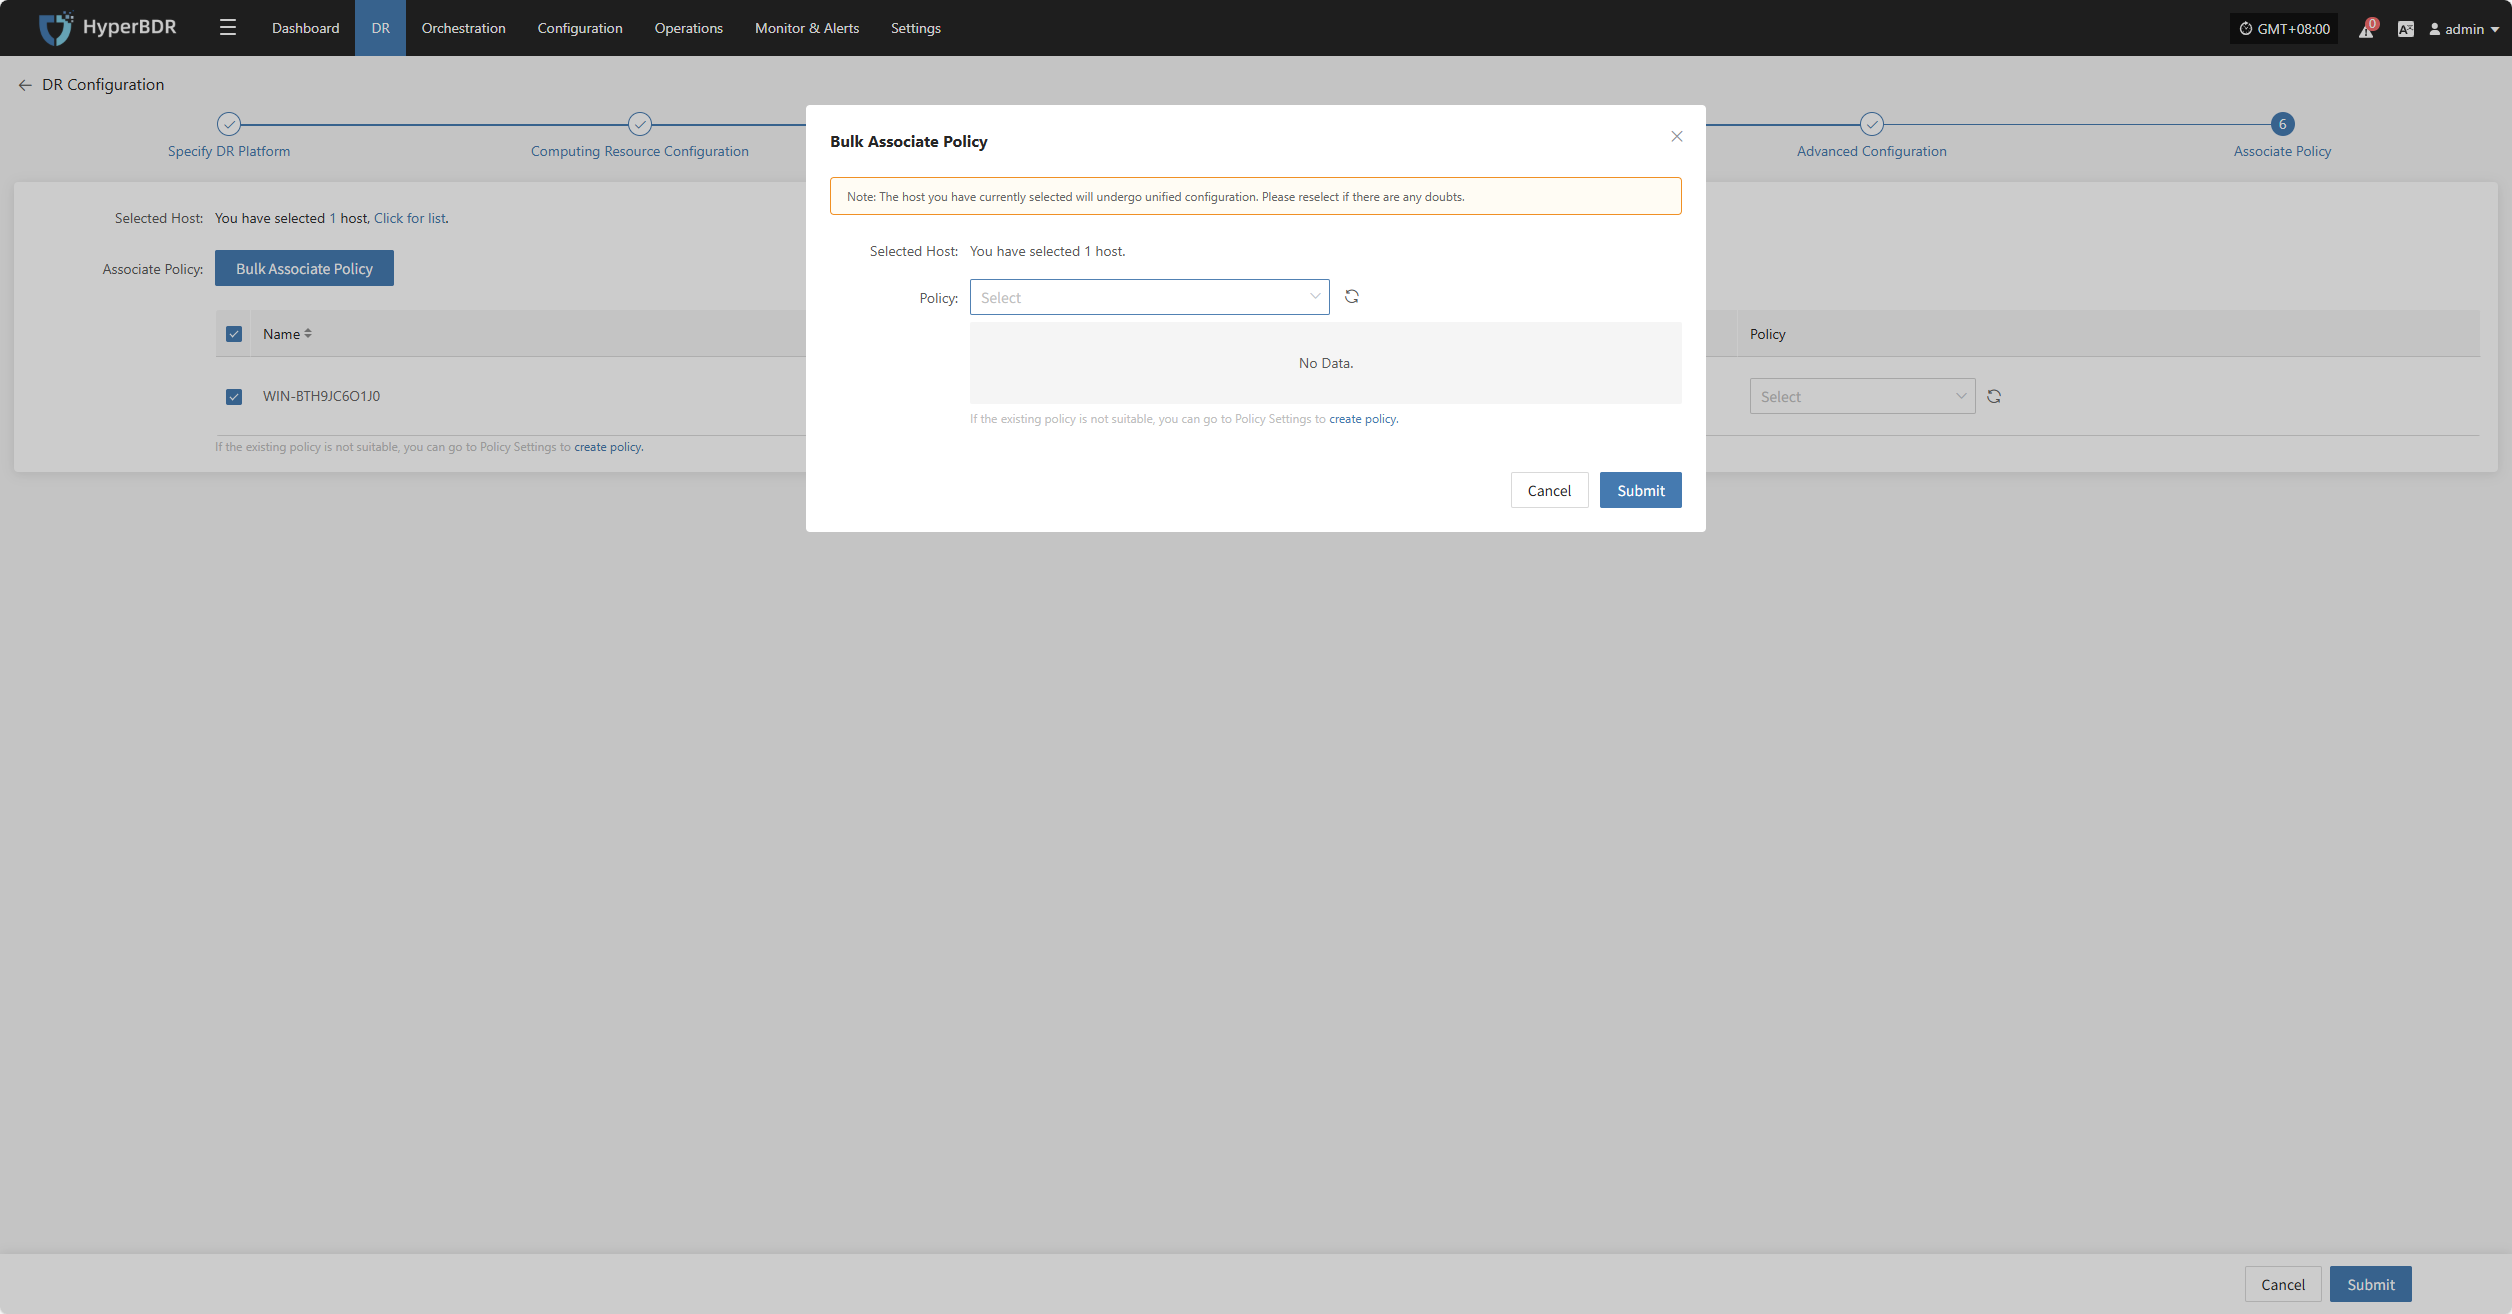
Bulk Associate Policy
Select the desired hosts and click the "Batch Associate Policy" button on the page to start batch association.
In the pop-up dialog, select your policy to associate
After Associating Policy, click "Confirm", Before configuring the policy, the pre-configured hosts will automatically enter the "Start DR" phase.
Object Storage
Select "Object Storage" as the storage type, then configure the block storage steps according to the selected information to complete the disaster recovery setup.

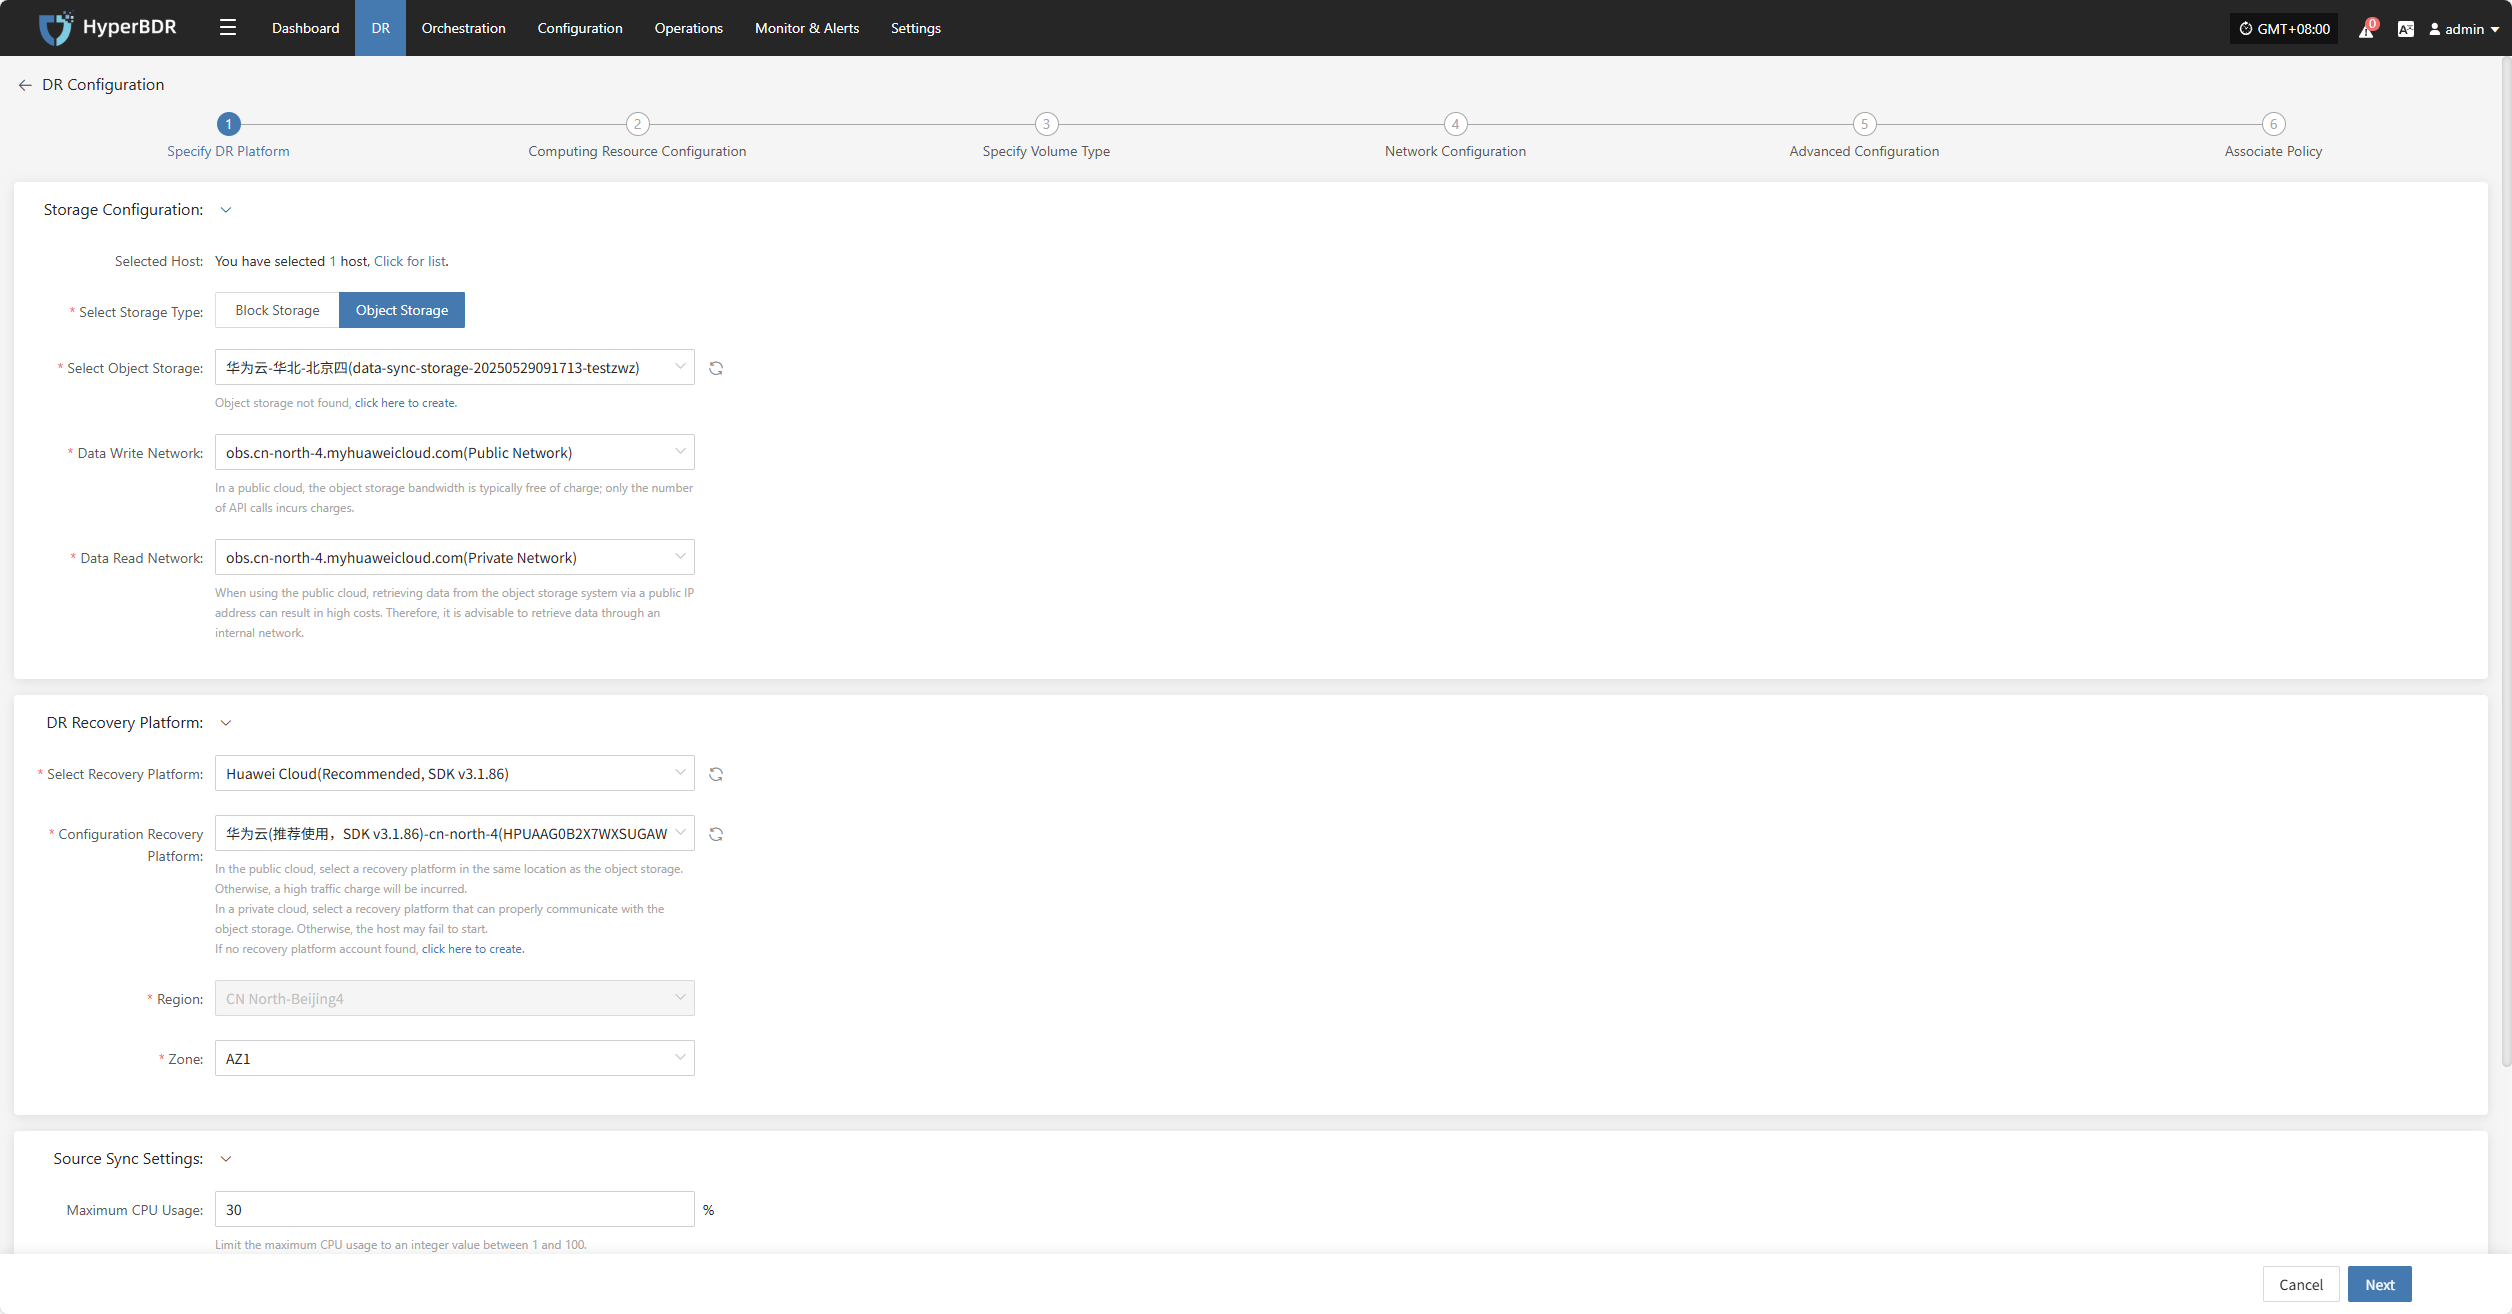
Specify DR Platform
Assign the backup host to use the "Object Storage" type for backup and select the configuration parameters.
Supported Storage Types
Click to View Object Storage Configuration
Storage Configuration
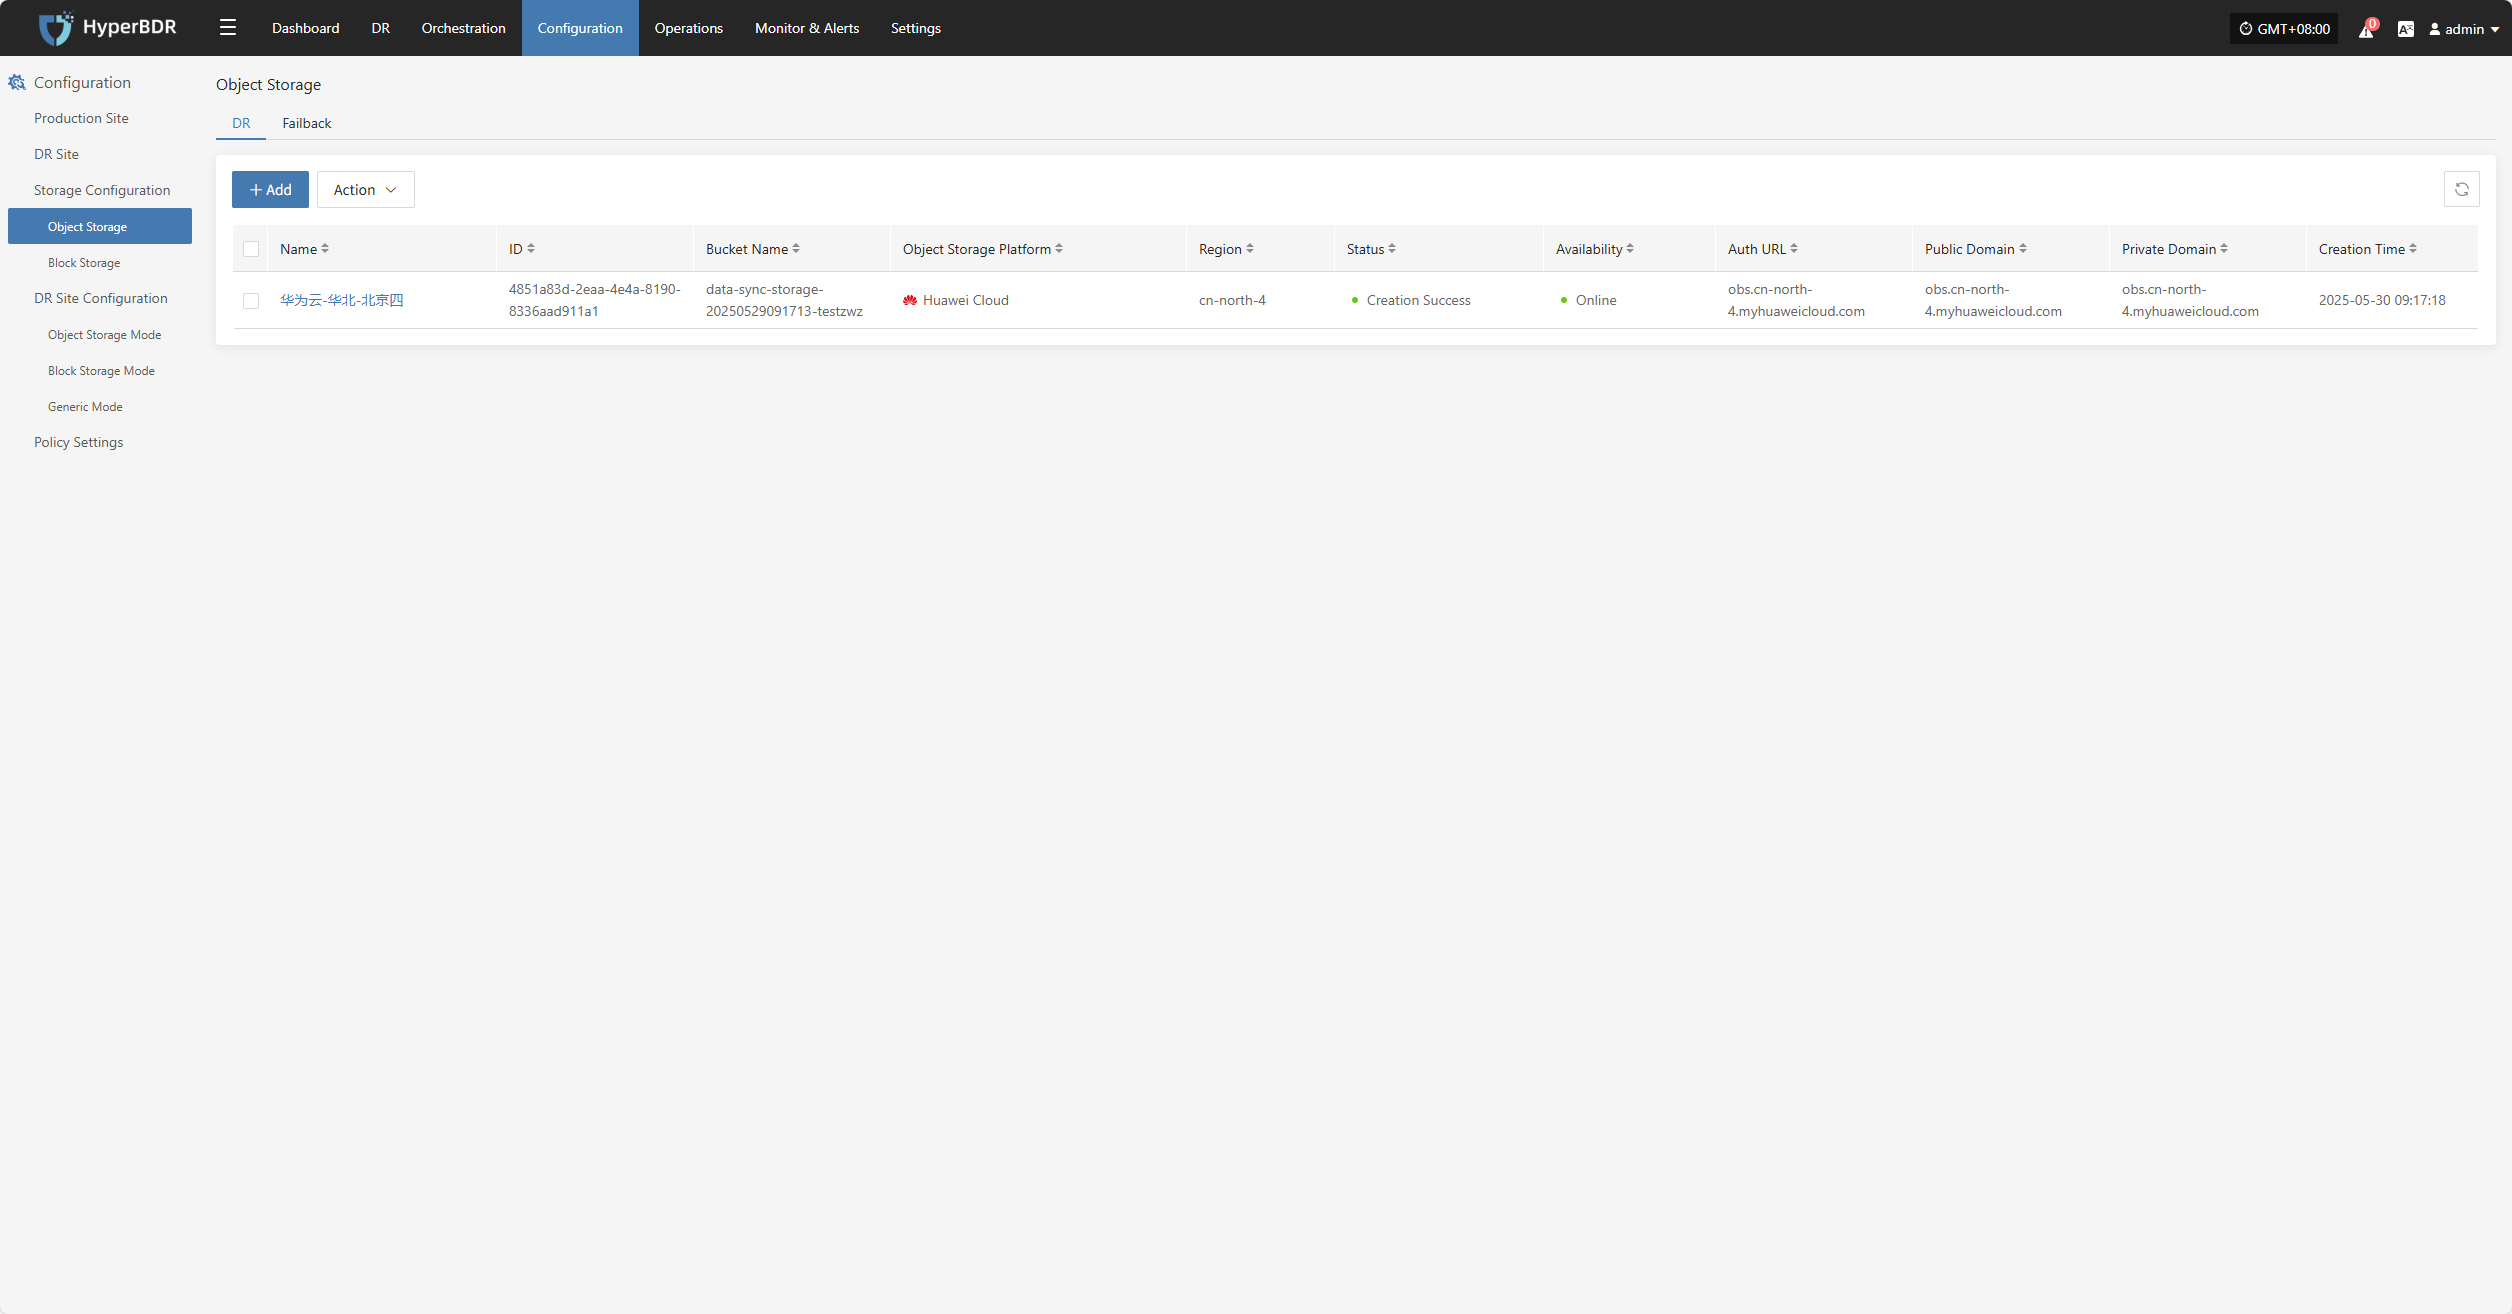
Prerequisite: Object storage must be configured in advance. For instructions on how to add object storage, refer to:Click to View Object Storage Configuration
| Parameter | Configuration | Description |
|---|---|---|
| Select Storage Type | Object Storage | Choose to use an already configured object storage for disaster recovery backup |
| Select Object Storage | Added Object Storage | Object storage configuration must be completed first |
| Data Write Network | Selected Object Storage Network | Network used for writing backup data into object storage |
| Data Read Network | Selected Object Storage Network | Network used for reading data from object storage |
DR Recovery Platform
Prerequisite: The disaster recovery platform must be configured in advance. For instructions on adding object storage, refer to:Click to View Object Storage Configuration
| Parameter | Configuration | Description |
|---|---|---|
| Select Recovery Platform | (Supported storage types) | Based on actual configured parameters |
| Configure Recovery Platform | Configured cloud provider info | Based on actual configured parameters |
| Region | Configured cloud provider info | Cannot be changed |
| Zone | Configured cloud provider info |
Source Synchronization Settings
| Parameter | Configuration | Description |
|---|---|---|
| Maximum CPU Usage | 1-100 | Configure the max CPU usage on the source host during backup. Setting too low may reduce backup efficiency. |
| Encryption | Yes No | Applies only to object storage mode. Note: Enabling will consume more CPU for encryption. |
| Compression | Yes No | Applies only to object storage mode. Note: Enabling will consume more CPU for compression. |
| VMware Silent Snapshot | Yes No | Silent snapshot currently effective only on VMware hosts with VMware-tools installed. |
After selecting the storage platform configuration, click “Next” to start Computing Resource Configuration.
Computing Resource Configuration
You need to configure computing resource parameters for the recovered hosts, including CPU and operating system type, to ensure the restored virtual machines can run normally in the target environment.
Select the virtual machines to be disaster backed up. You can manually select in batches by paging through, configure CPU, OS type, or use the page buttons for batch settings. After choosing the suitable boot method, complete the configuration.

If a preset template with matching resource types exists, the system will auto-match; otherwise, manual selection is required.
Bulk Set Flavor
Select the desired hosts, then click the “Bulk Set Flavor” button on the page to start batch configuring host specifications.
Note: The currently selected hosts will be set uniformly. Please reselect if there is any doubt.
In the popup dialog, select and confirm based on the preset configuration information.
Bulk Set OS Type
Select the desired hosts, then click the “Bulk Set OS Type” button on the page to start batch configuring host system types.
Note: The currently selected hosts will be set uniformly. Please reselect if there is any doubt.
In the popup dialog, select your host operating system type.

After completing Computing Resource Configuration, click “Next” to start Specify Volume Type.
Specify Volume Type
Users need to specify the disk type (volume type) on the target cloud platform for each disk of the selected virtual machines to ensure correct resource mapping during disaster recovery.
Set the disk type for the virtual machine disks to be disaster backed up.
You can select the system volume type from the dropdown list. Actual options depend on cloud provider support. Below is a sample configuration for reference:
| Parameter | Description |
|---|---|
| General Purpose SSD V2 | Suitable for most general scenarios, offering good performance and cost-effectiveness, recommended as the default choice. |
| Extreme SSD | Provides extremely high random read/write performance, suitable for core applications with very high storage performance requirements. |
| General Purpose SSD | Balanced performance and cost, suitable for small to medium databases, application servers, and similar workloads. |
| High I/O | Offers higher IOPS and throughput, suitable for medium to high-load databases or business systems. |
| Ultra-high I/O | Provides ultra-high IOPS and very low latency, ideal for critical workloads such as financial trading systems and large databases. |
After specifying the Volume Type, click “Next” to start Network Configuration.
Network Configuration
You need to configure the target network environment for the recovered hosts, including private IP, public IP, security groups, MAC address, and other key parameters, to ensure normal communication and access on the target platform.
The system supports both IPv4 and IPv6 network environments. Please select the appropriate network and subnet types according to the disaster recovery host deployment requirements.
After selection, configure related parameters such as private IP, public IP, security groups, and MAC address based on actual needs.
- Configuration Description
| Parameter | Configuration | Description |
|---|---|---|
| Network | Disaster recovery target network name | Specifies the target network the disaster recovery host connects to, used for network communication during data recovery. |
| Subnet | Associated subnet name in the target network | Specifies the subnet within the target network, through which the disaster recovery host connects. |
IP Configuration Rules
| Parameter | Configuration Options | Description |
|---|---|---|
| Private IP | Original IP / Specified IP / None | Original IP: The system automatically identifies the NIC and assigns the source host IP via DHCP. Specified IP: You must manually enter an IP address (must match the subnet segment and cannot be changed); the system assigns it via DHCP. None: The system assigns a random IP via DHCP based on the target network. Note: If DHCP is unavailable, the system will not be able to configure the IP automatically. |
| Public IP | Original IP / Specified IP / Apply for IP | Same as above. |
| Security Group | (Depends on target network configuration) | Multiple options are available based on the target network's configuration; refer to actual settings. |
Bulk Set Private IP
Select the desired hosts, then click the “Bulk Set Private IP” button on the page to start batch configuration.
In the pop-up dialog box, choose your private IP allocation type.
Bulk Set Public IP
Select the desired hosts, then click the “Bulk Set Public IP” button on the page to start batch configuration.
In the pop-up dialog box, choose your public IP allocation type.
Bulk Set Security Group
Select the desired hosts, then click the “Bulk Set Security Group” button on the page to start batch configuration.
In the pop-up dialog box, choose your security group.

Once Network Configuration is complete, click “Next” to proceed to Advanced Configuration.
Advanced Configuration
This section supports user-defined script execution and driver adaptation settings, allowing for personalized adjustments and hardware compatibility tuning in complex environments. (The script field can be left blank.)
Custom Pre & Post Scripts
Custom Pre and Post Scripts can be used to assist users in executing custom scripts before and after the host is started. This is primarily used to execute commands during a reboot to ensure business continuity.
Custom Pre-Script
The pre-script runs last during the driver adaptation process. It works on Ubuntu 20.04 and needs to be written in Linux Bash. This script can change settings in your root disk. If you need to change data in other disks, it's better to use the post-script. You can access your root disk folder through $HOST_ROOT_PATH. For example, on Linux, $HOST_ROOT_PATH means the system root directory; on Windows, it's the C drive. For example, if you want to modify a program configuration file in CentOS 7, you can do it like this: sed -i 's/old_text/new_text/g' $HOST_ROOT_PATH/path/to/config/file For example, if you want to create a new file in Windows, you can do it like this: echo "content" >> %HOST_ROOT_PATH%\new.txt Note: On the AWS platform, when the operating system is Windows, the preceding script runs on Windows Server 2019 and requires execution using a .bat file.
Custom Post-Script
The post-script runs after the system starts. Use Bash on Linux and bat files on Windows. This script can handle system-related tasks flexibly, like starting or stopping services. It can also modify settings files and add entries to the Windows registry.
Driver Adaptation Settings
| Parameter | Configuration Option | Description |
|---|---|---|
| Driver Injection | Enable Driver Injection | Applicable only when starting the host on the same virtualization platform. Skipping driver adaptation is not recommended as it may cause the host to fail to boot properly. Use with caution. |
After completing Advanced Configuration, click “Next”. The system will then prompt: Before configuring policies, already configured hosts will automatically enter the "Start Disaster Recovery" process. Proceed to Associate Policy.
Associate Policy
Note: This configuration is optional. Leaving it unselected will not affect the normal execution of the current disaster recovery operation. You can also associate policies later through Policy Settings.
By associating policies, you can flexibly control host behaviors such as backup, recovery, and failover.
Before using an associated policy, you need to create the corresponding policy first. If there are no policies in the system, selection will not be available. For guidance on creating policies, please refer to:Click here to view
Policies can be associated with individual hosts or applied in bulk using the batch operation feature on the interface.
Bulk Associate Policy
Select the desired hosts and click the “Bulk Associate Policy” button to begin batch configuration.
In the pop-up dialog box, select your policy to associate.
After completing Policy Association, click "Confirm". The backup host will proceed to Step 3 to continue with the "Start DR" operation.
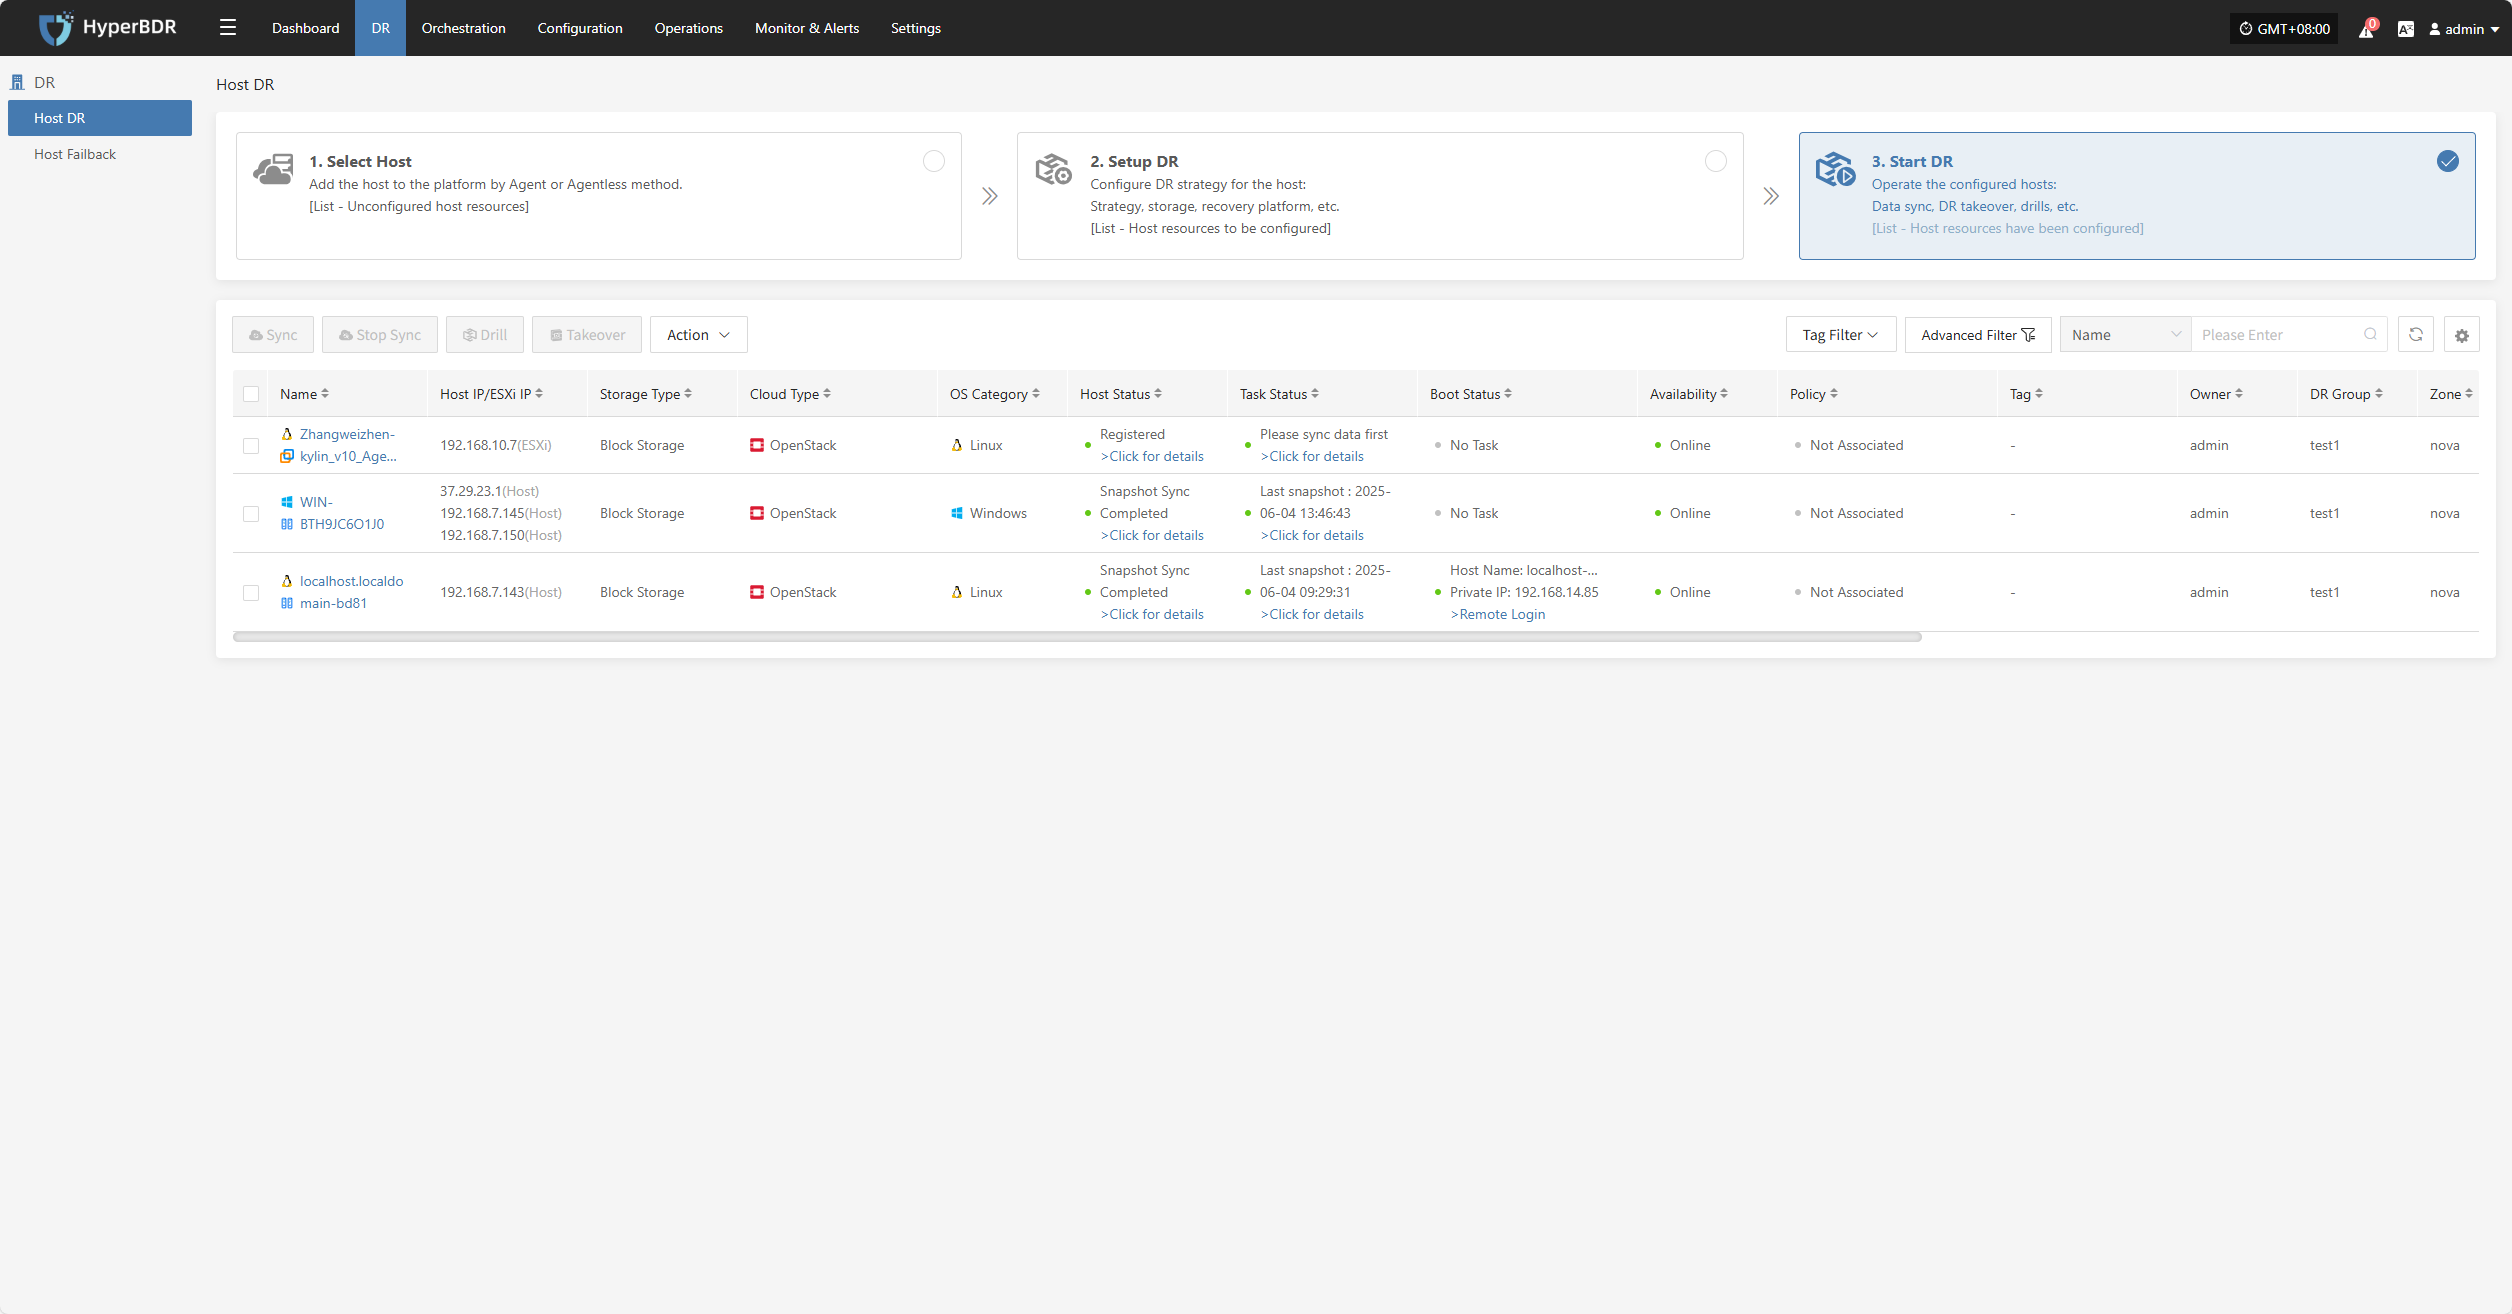
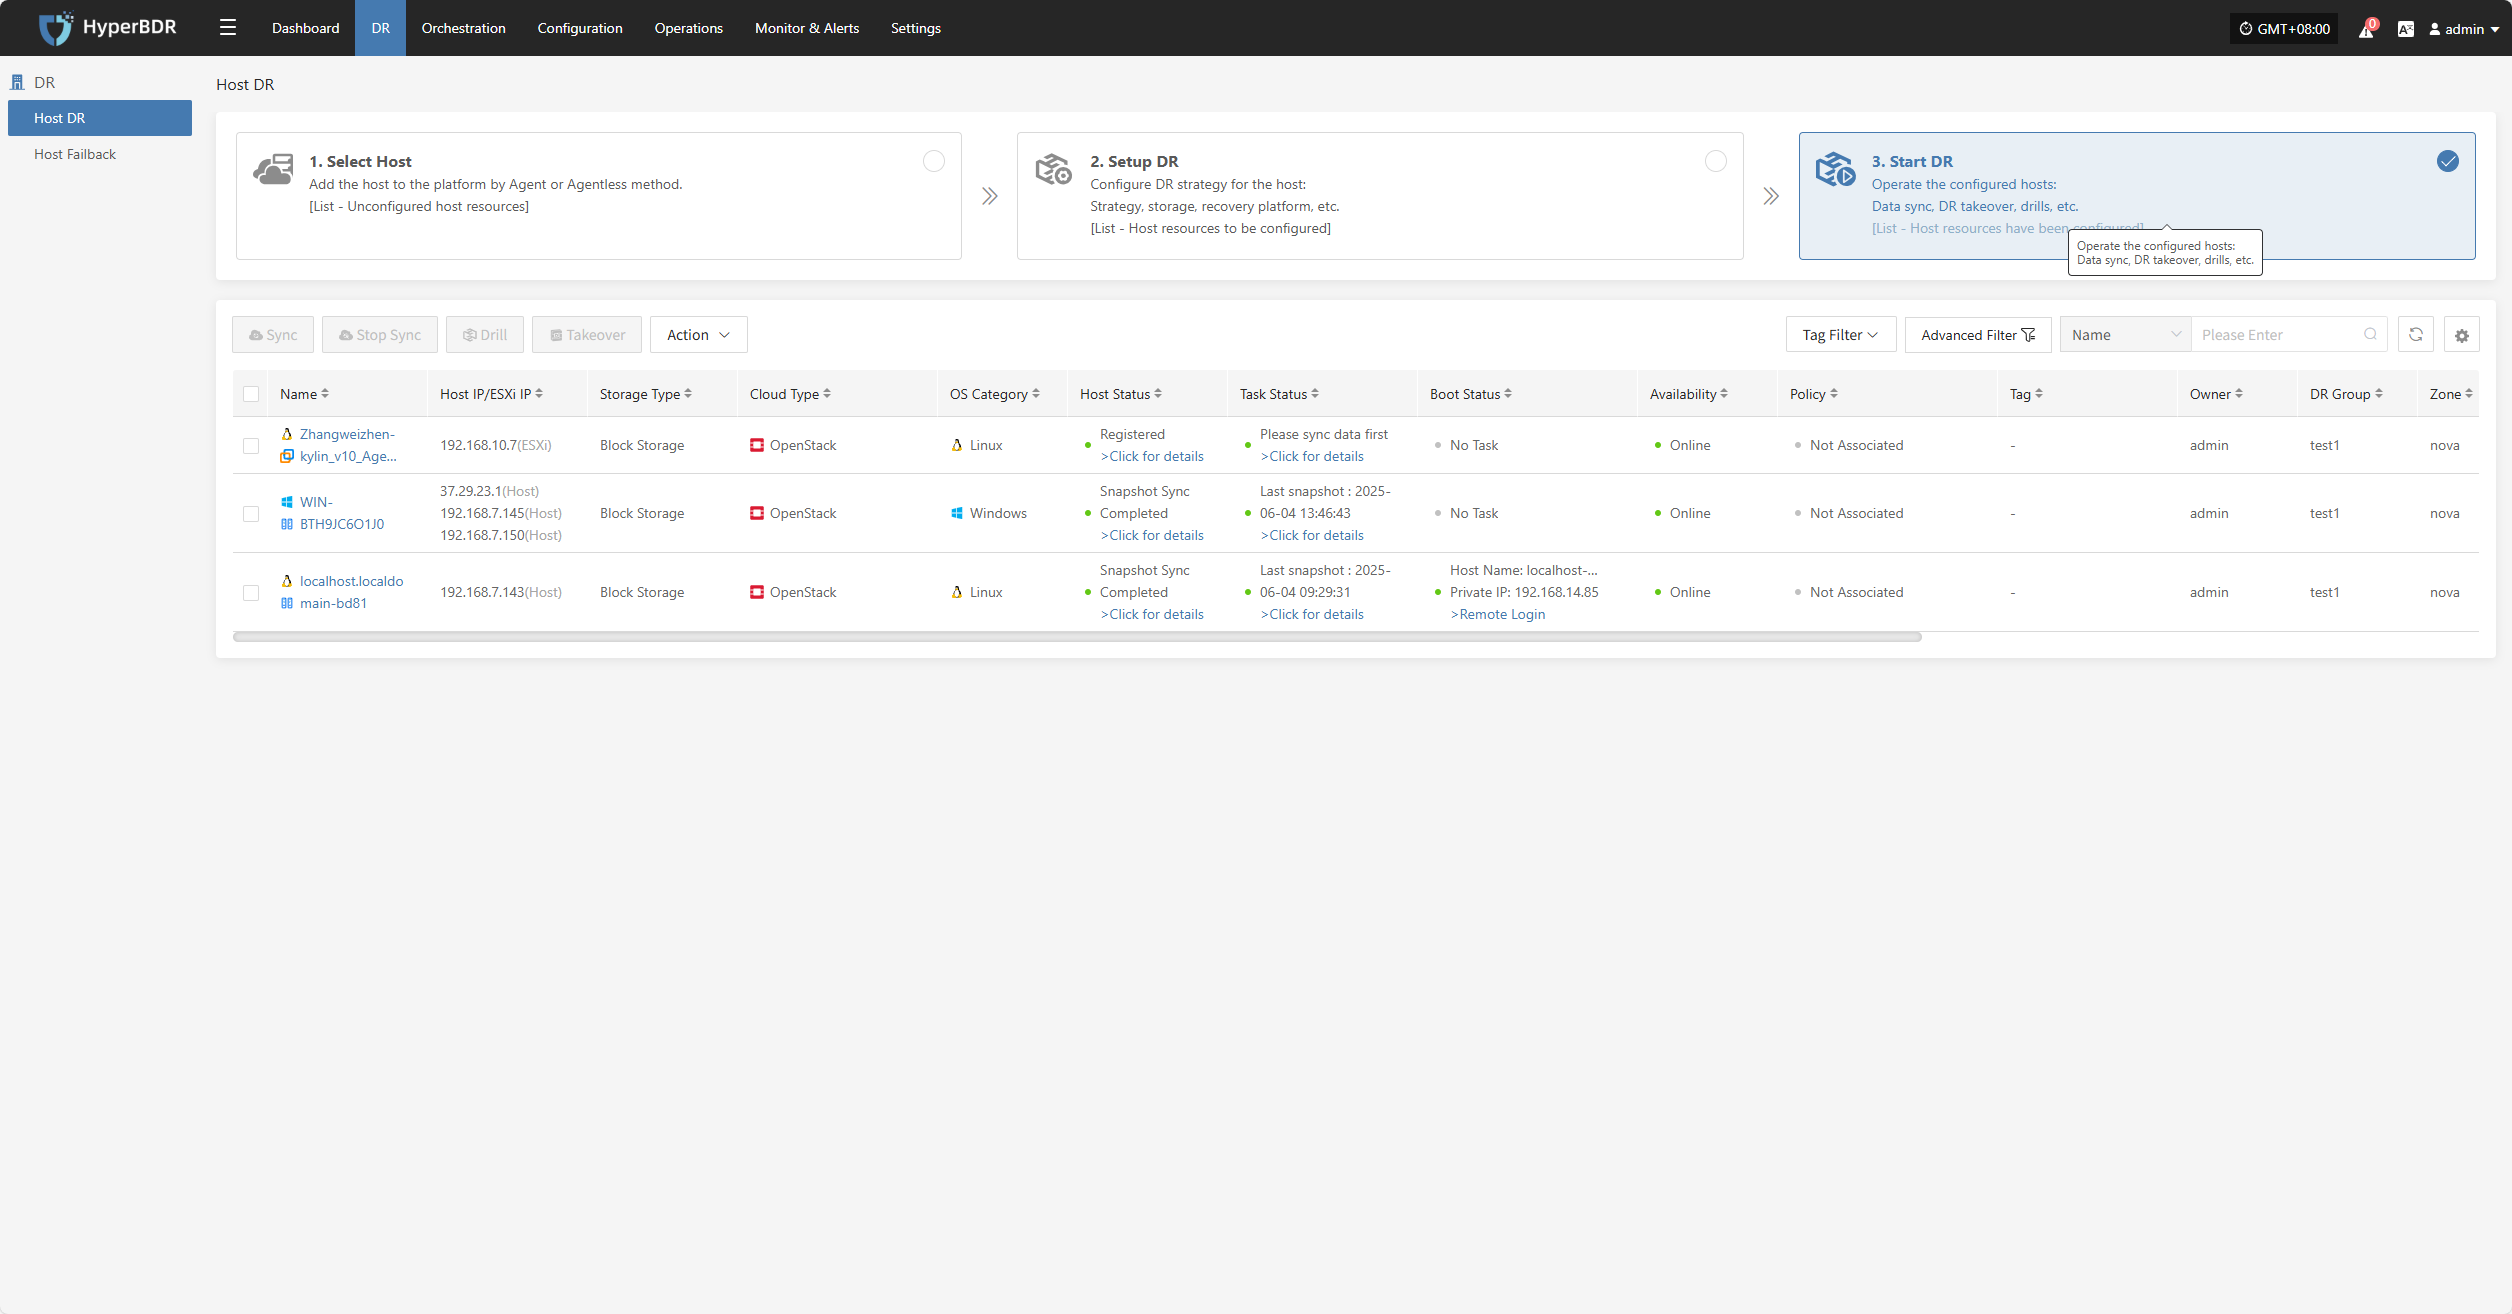
Start DR
Log in to the console, click the top navigation "Disaster Recovery", then click "Host DR" on the left panel. Click "Start DR", select one or multiple hosts, and click "Sync Now" to initiate the disaster recovery process.
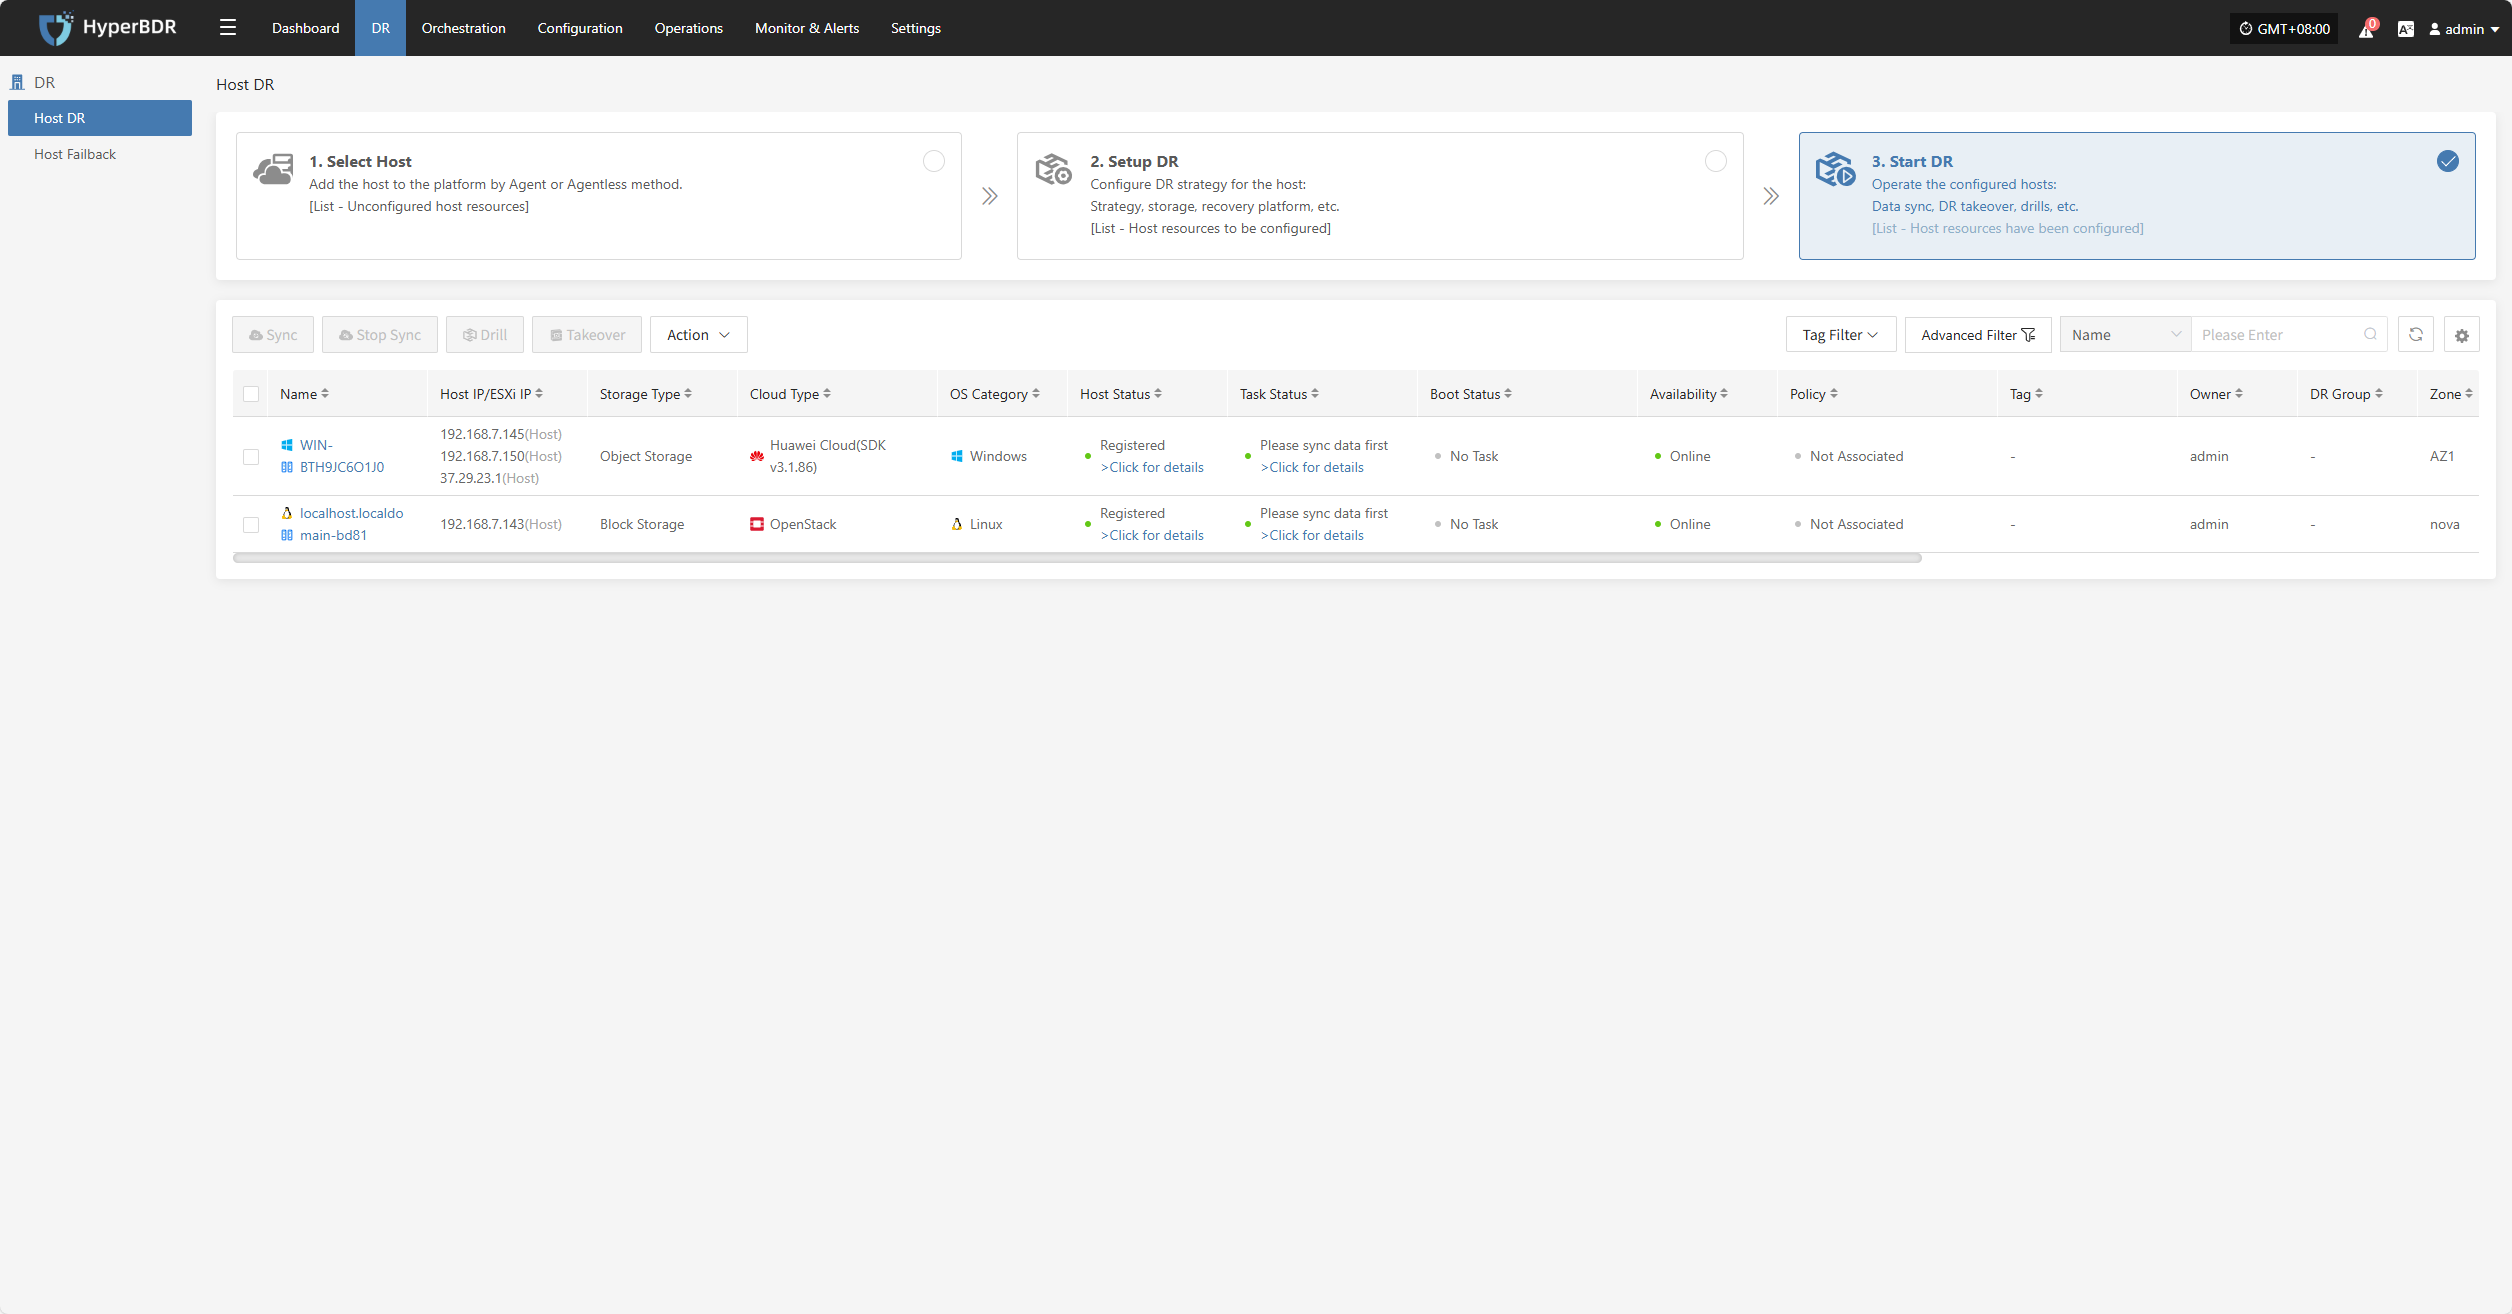
Note: Data must be synced before proceeding to the next steps.
Sync
After selecting the hosts for disaster recovery, click "Sync Now" on the page to start the initial full data sync.
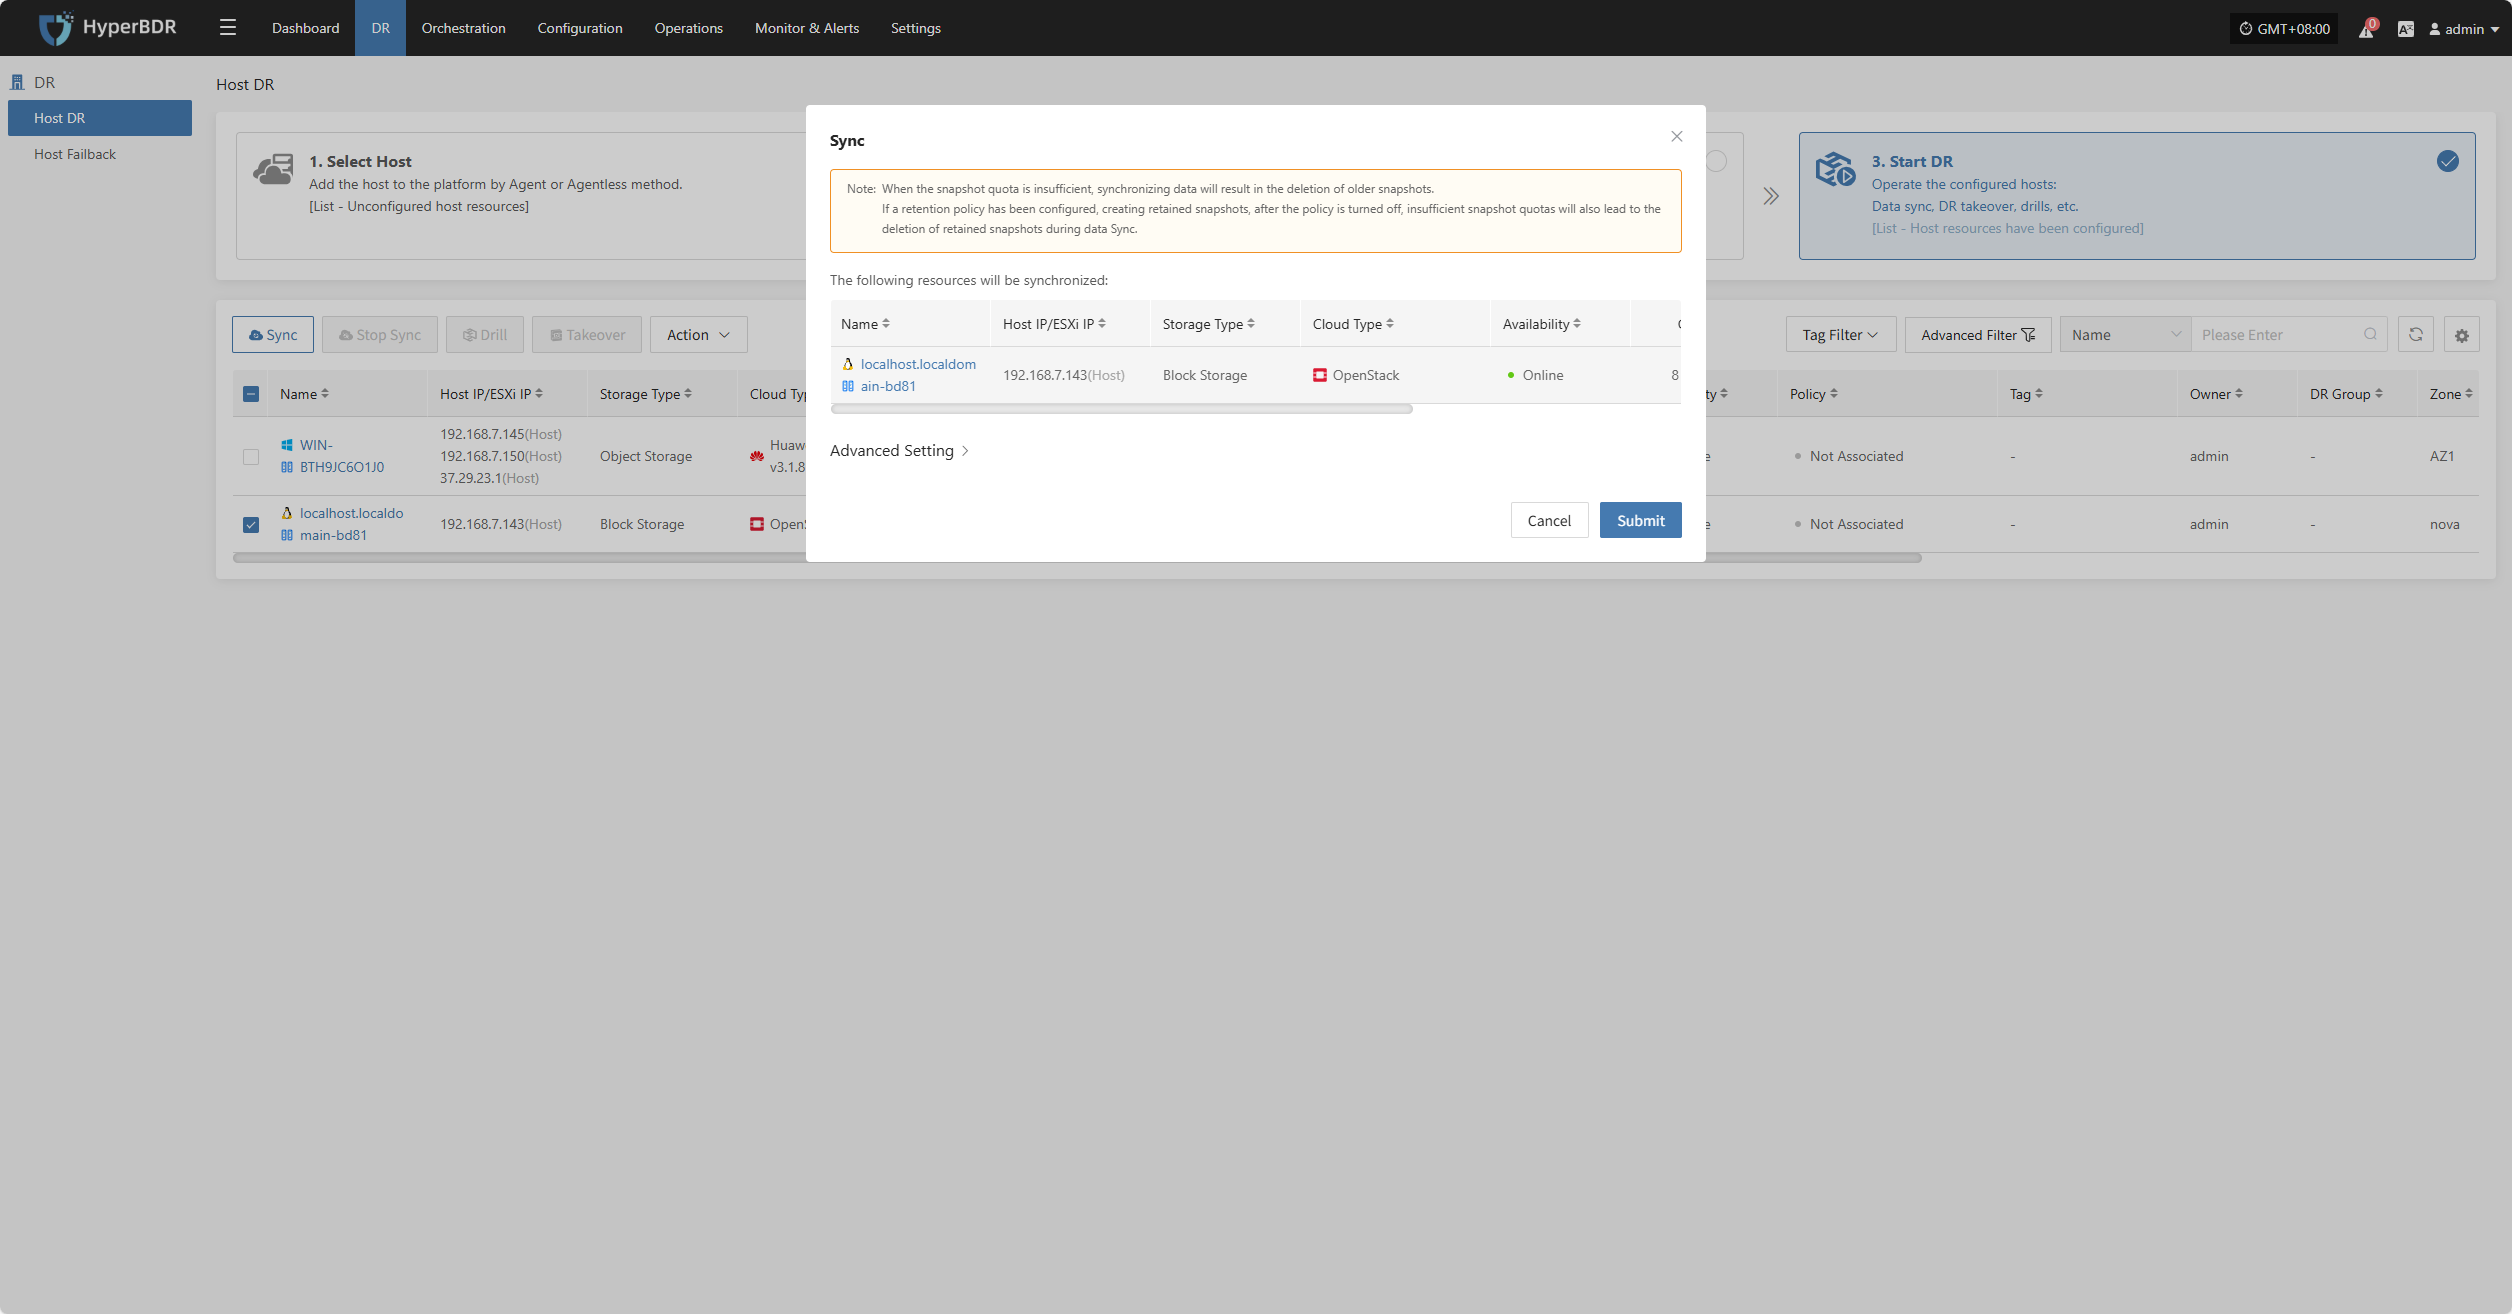
Click "Confirm" to begin syncing.
 Wait for the sync process to complete before proceeding to the next operation.
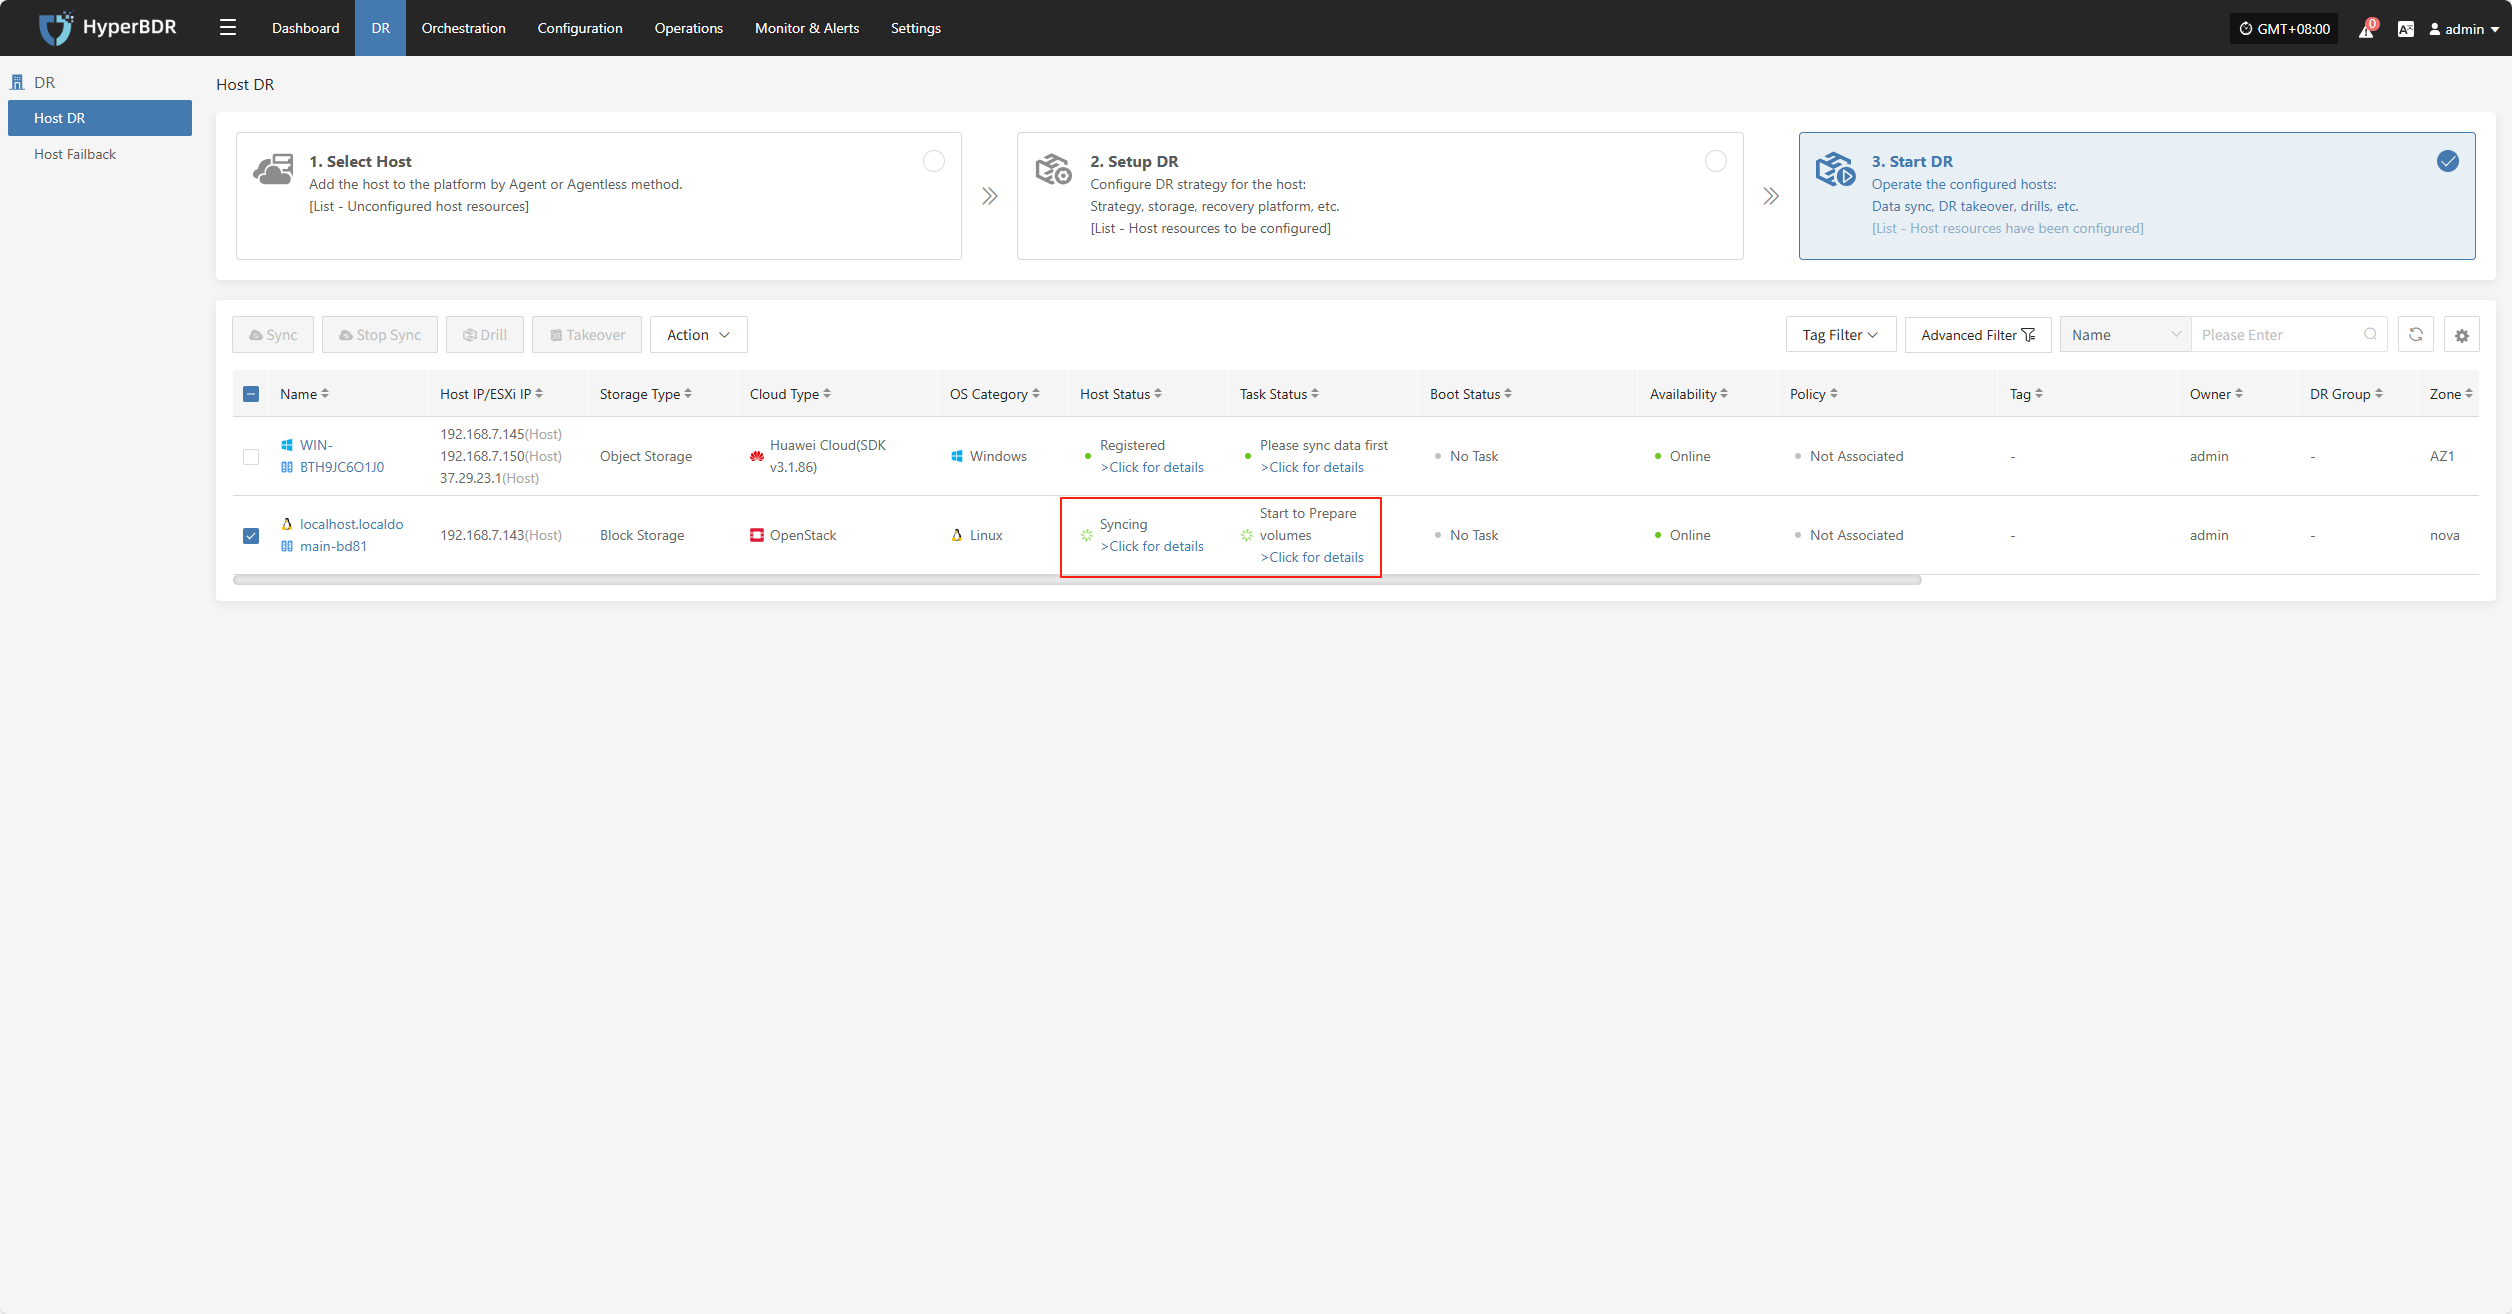
Click for details
Host Status
In the Host Status bar, click the "Click for details" button to view detailed host information, including running status, sync progress, and more.
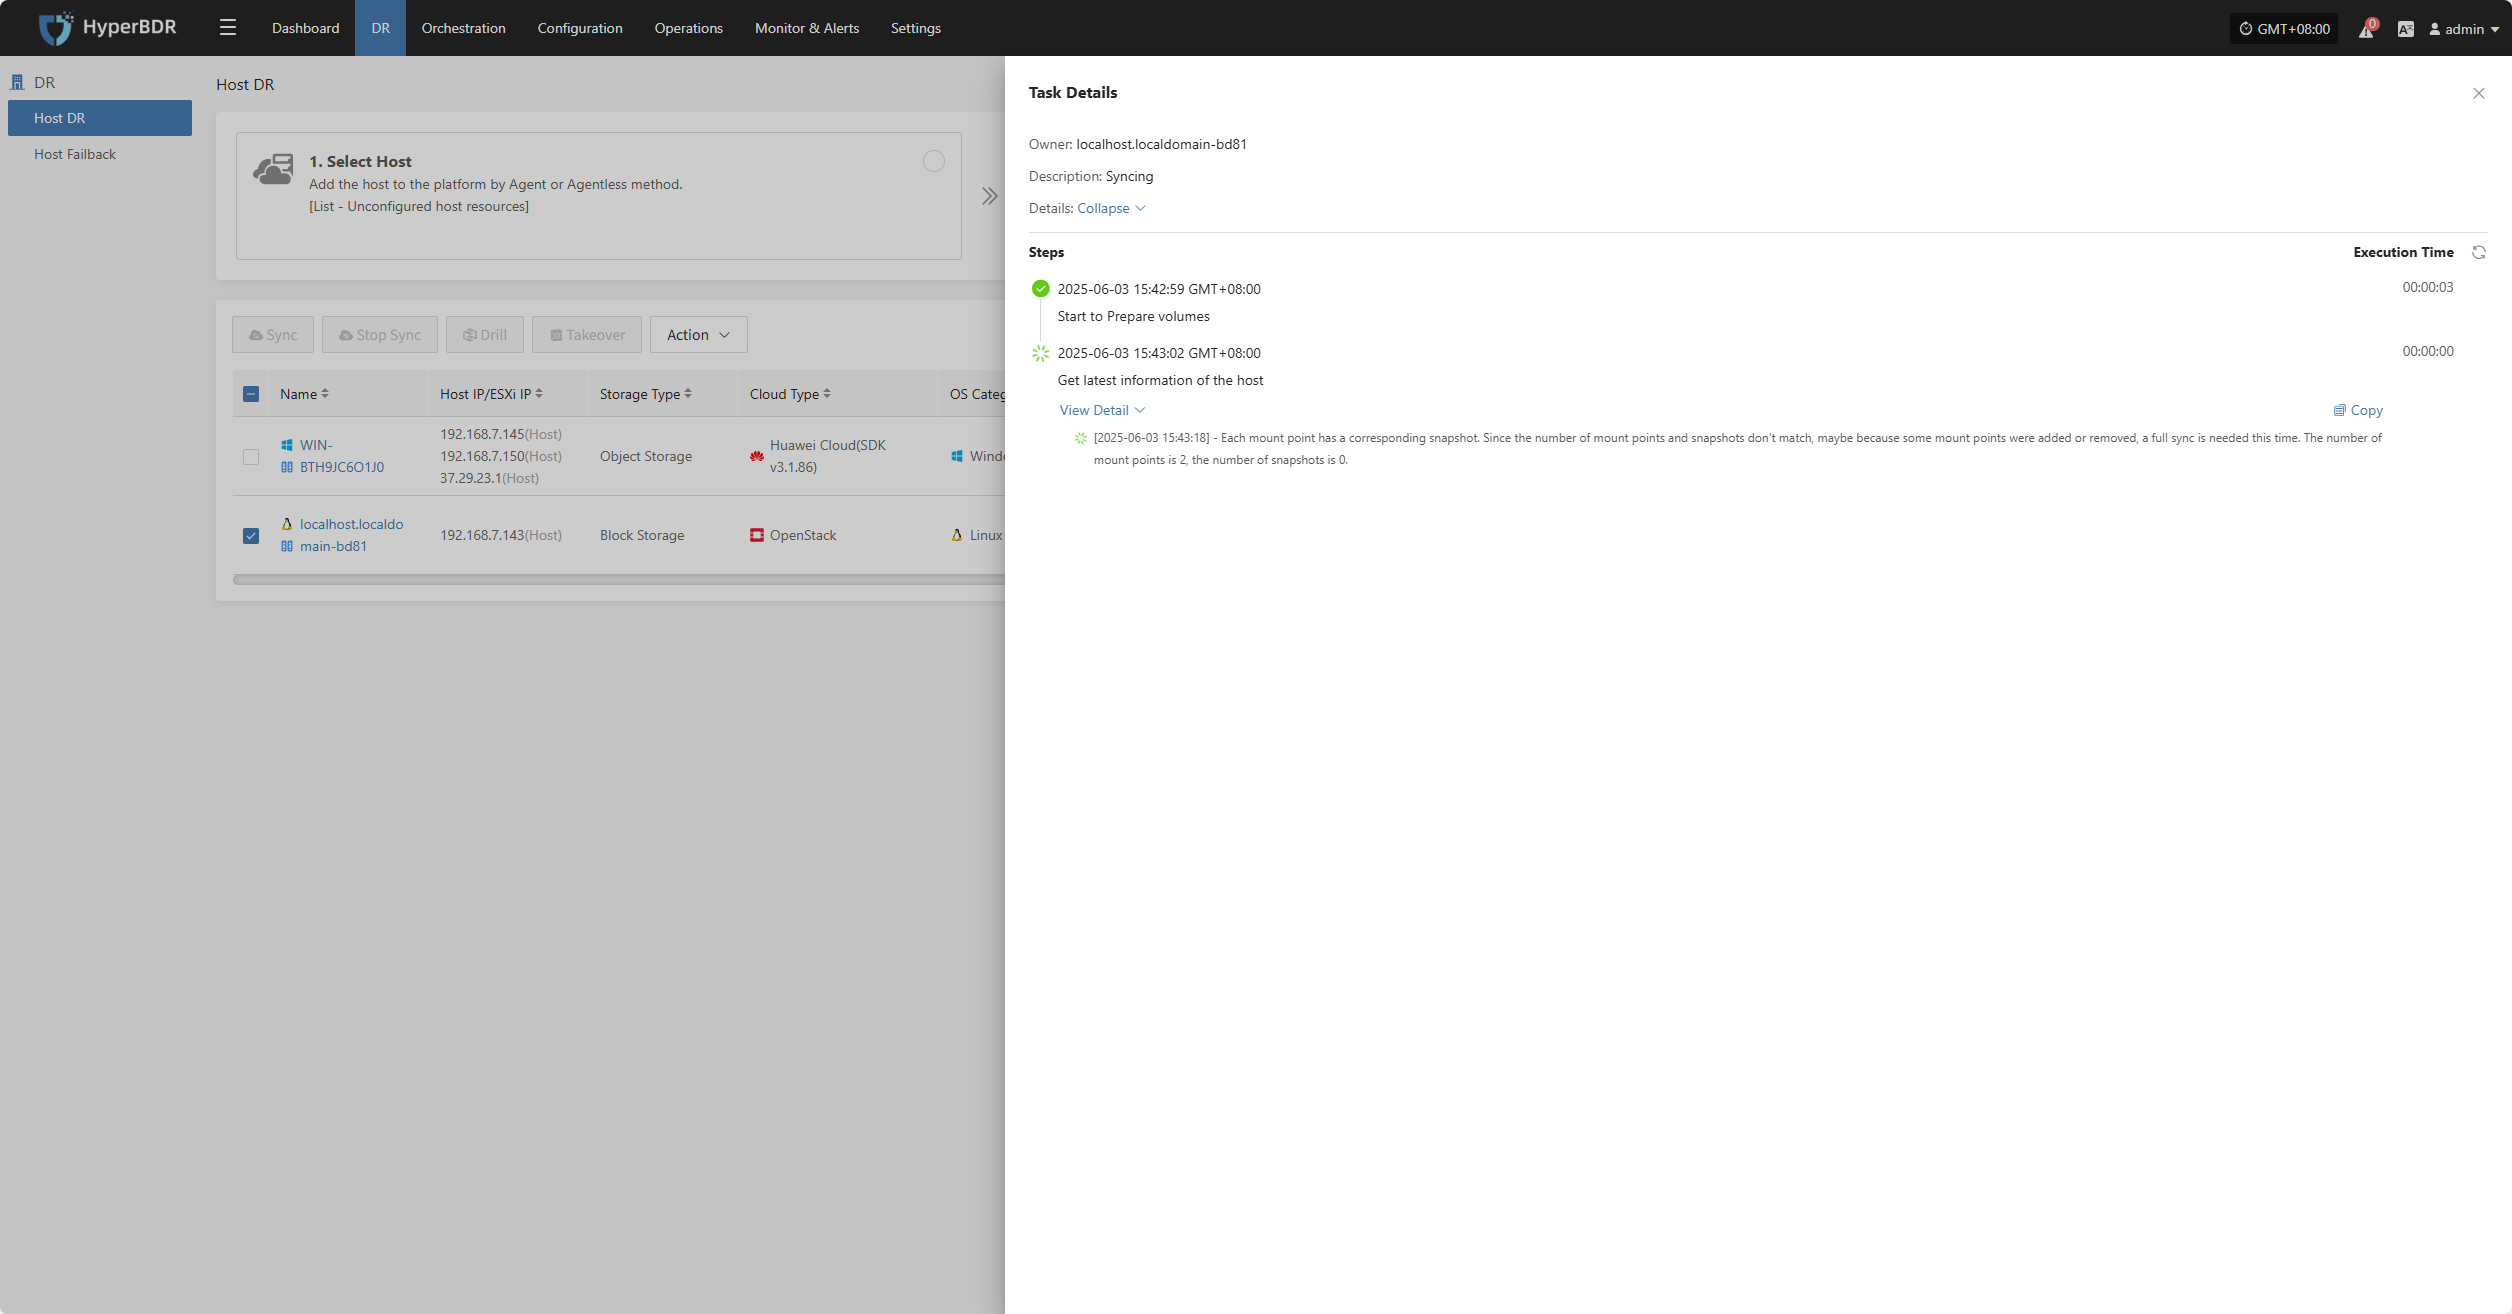
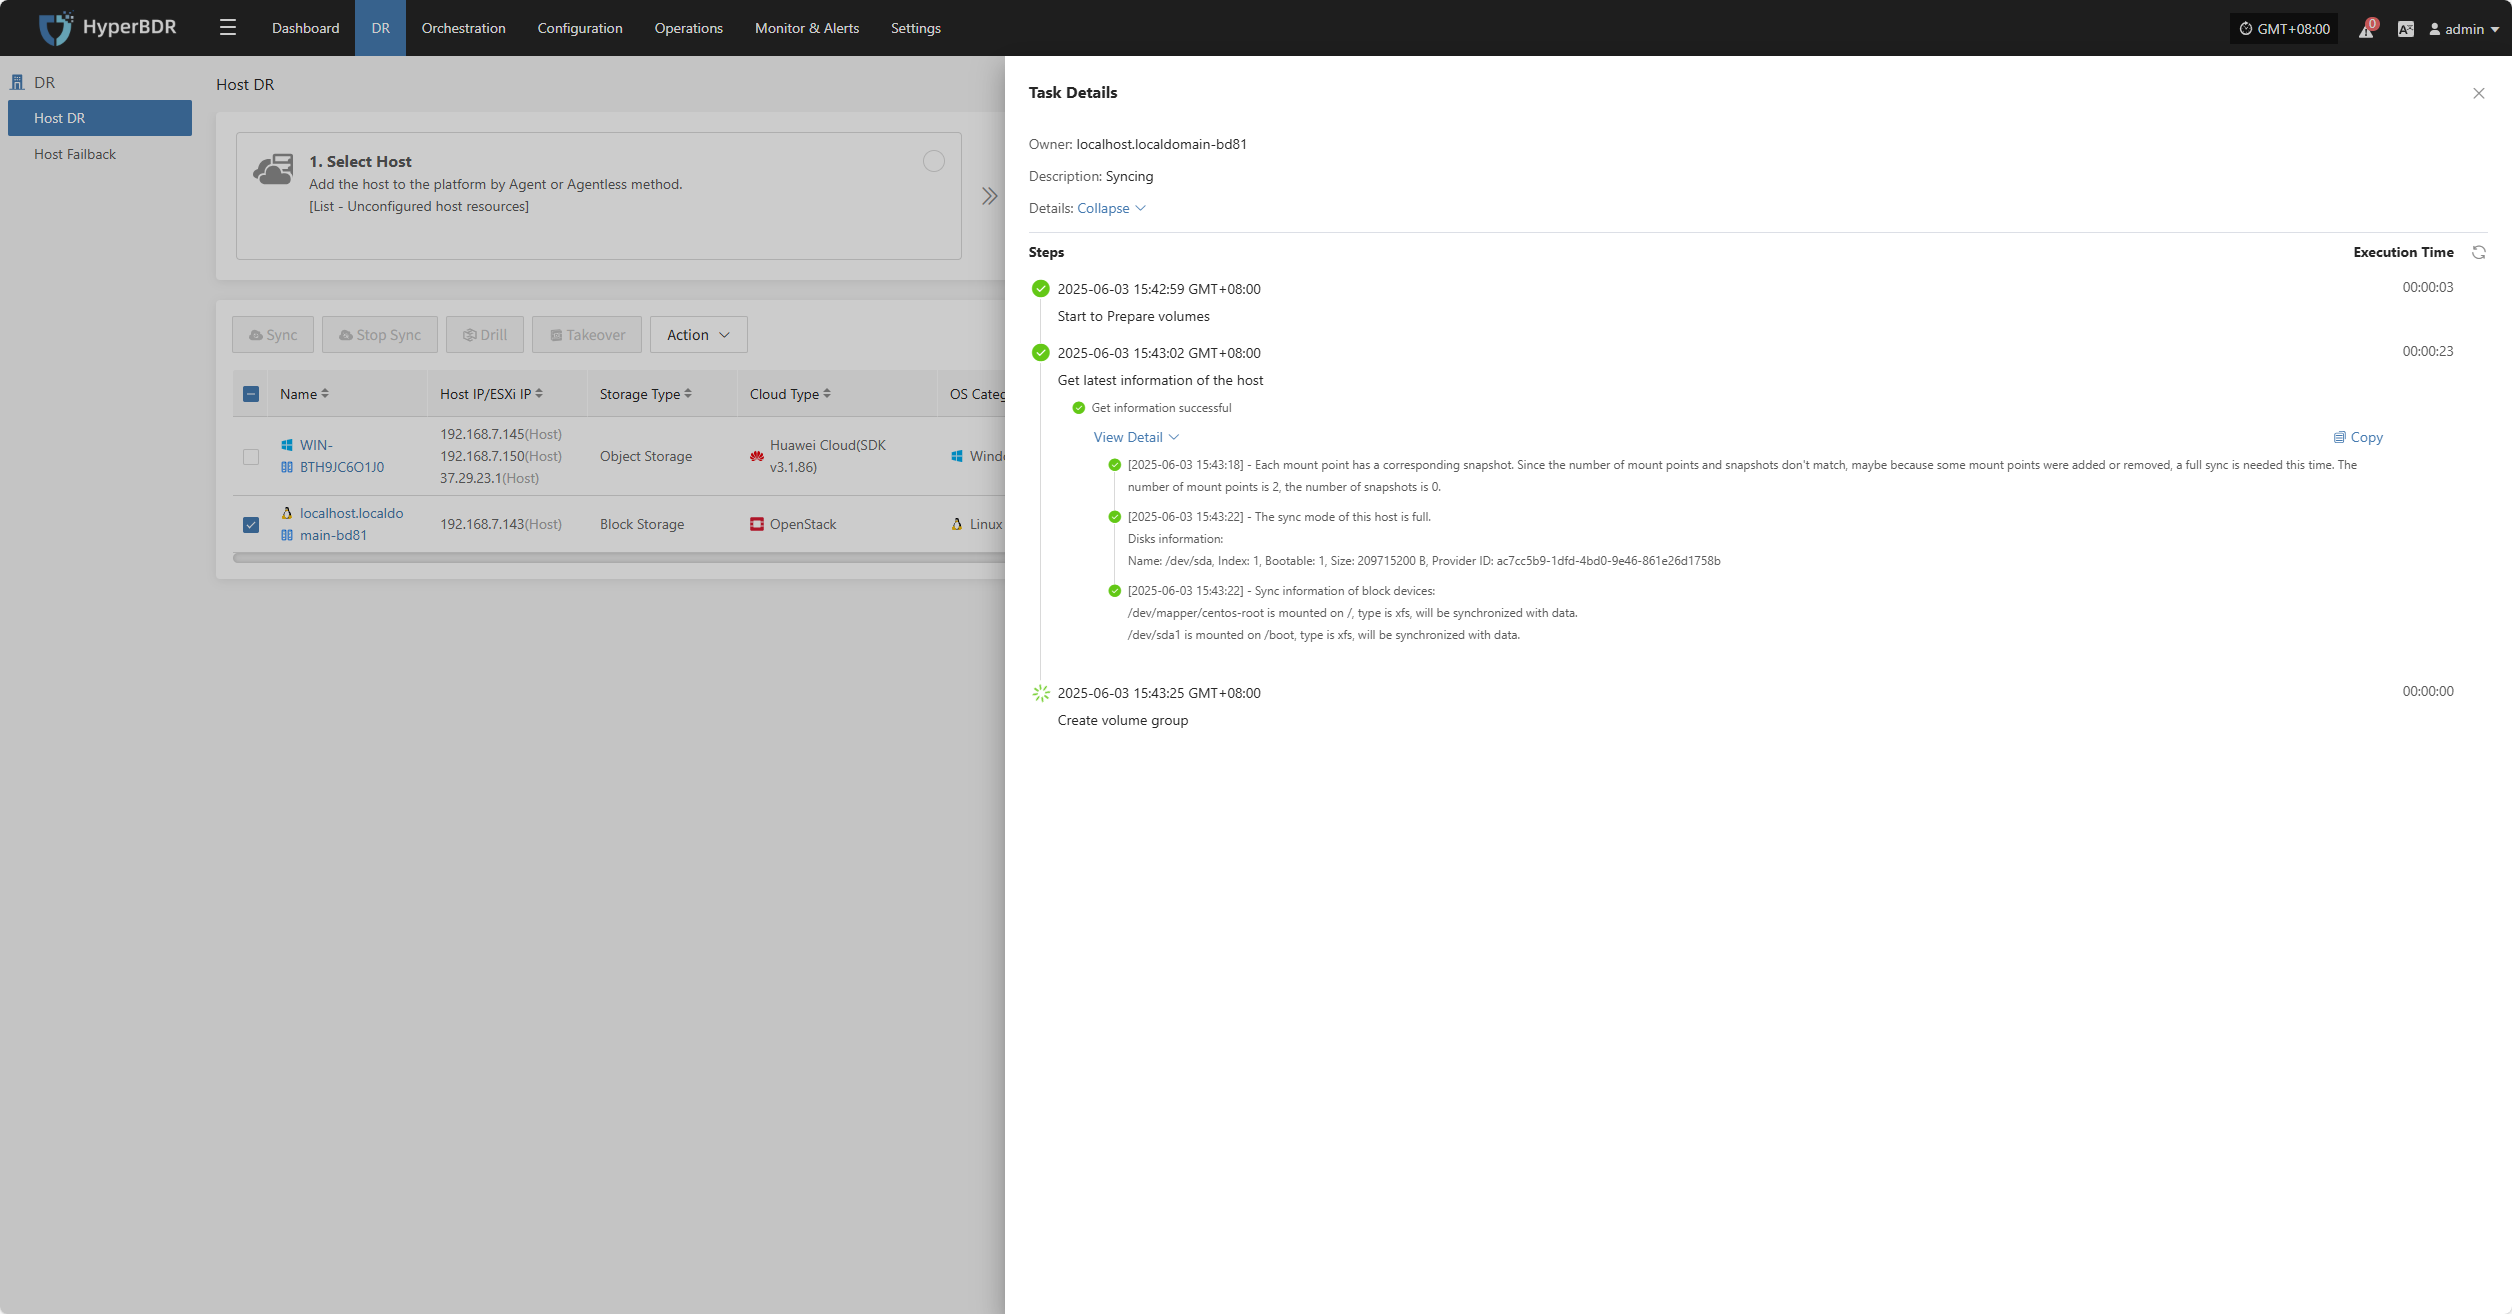
Task Status
In the Task Status bar, click the "Click for details" button to view task details, including runtime information and sync progress.
Stop Sync
During syncing, after the volume is prepared, you can click the “Stop Sync” button on the page to cancel the sync process.
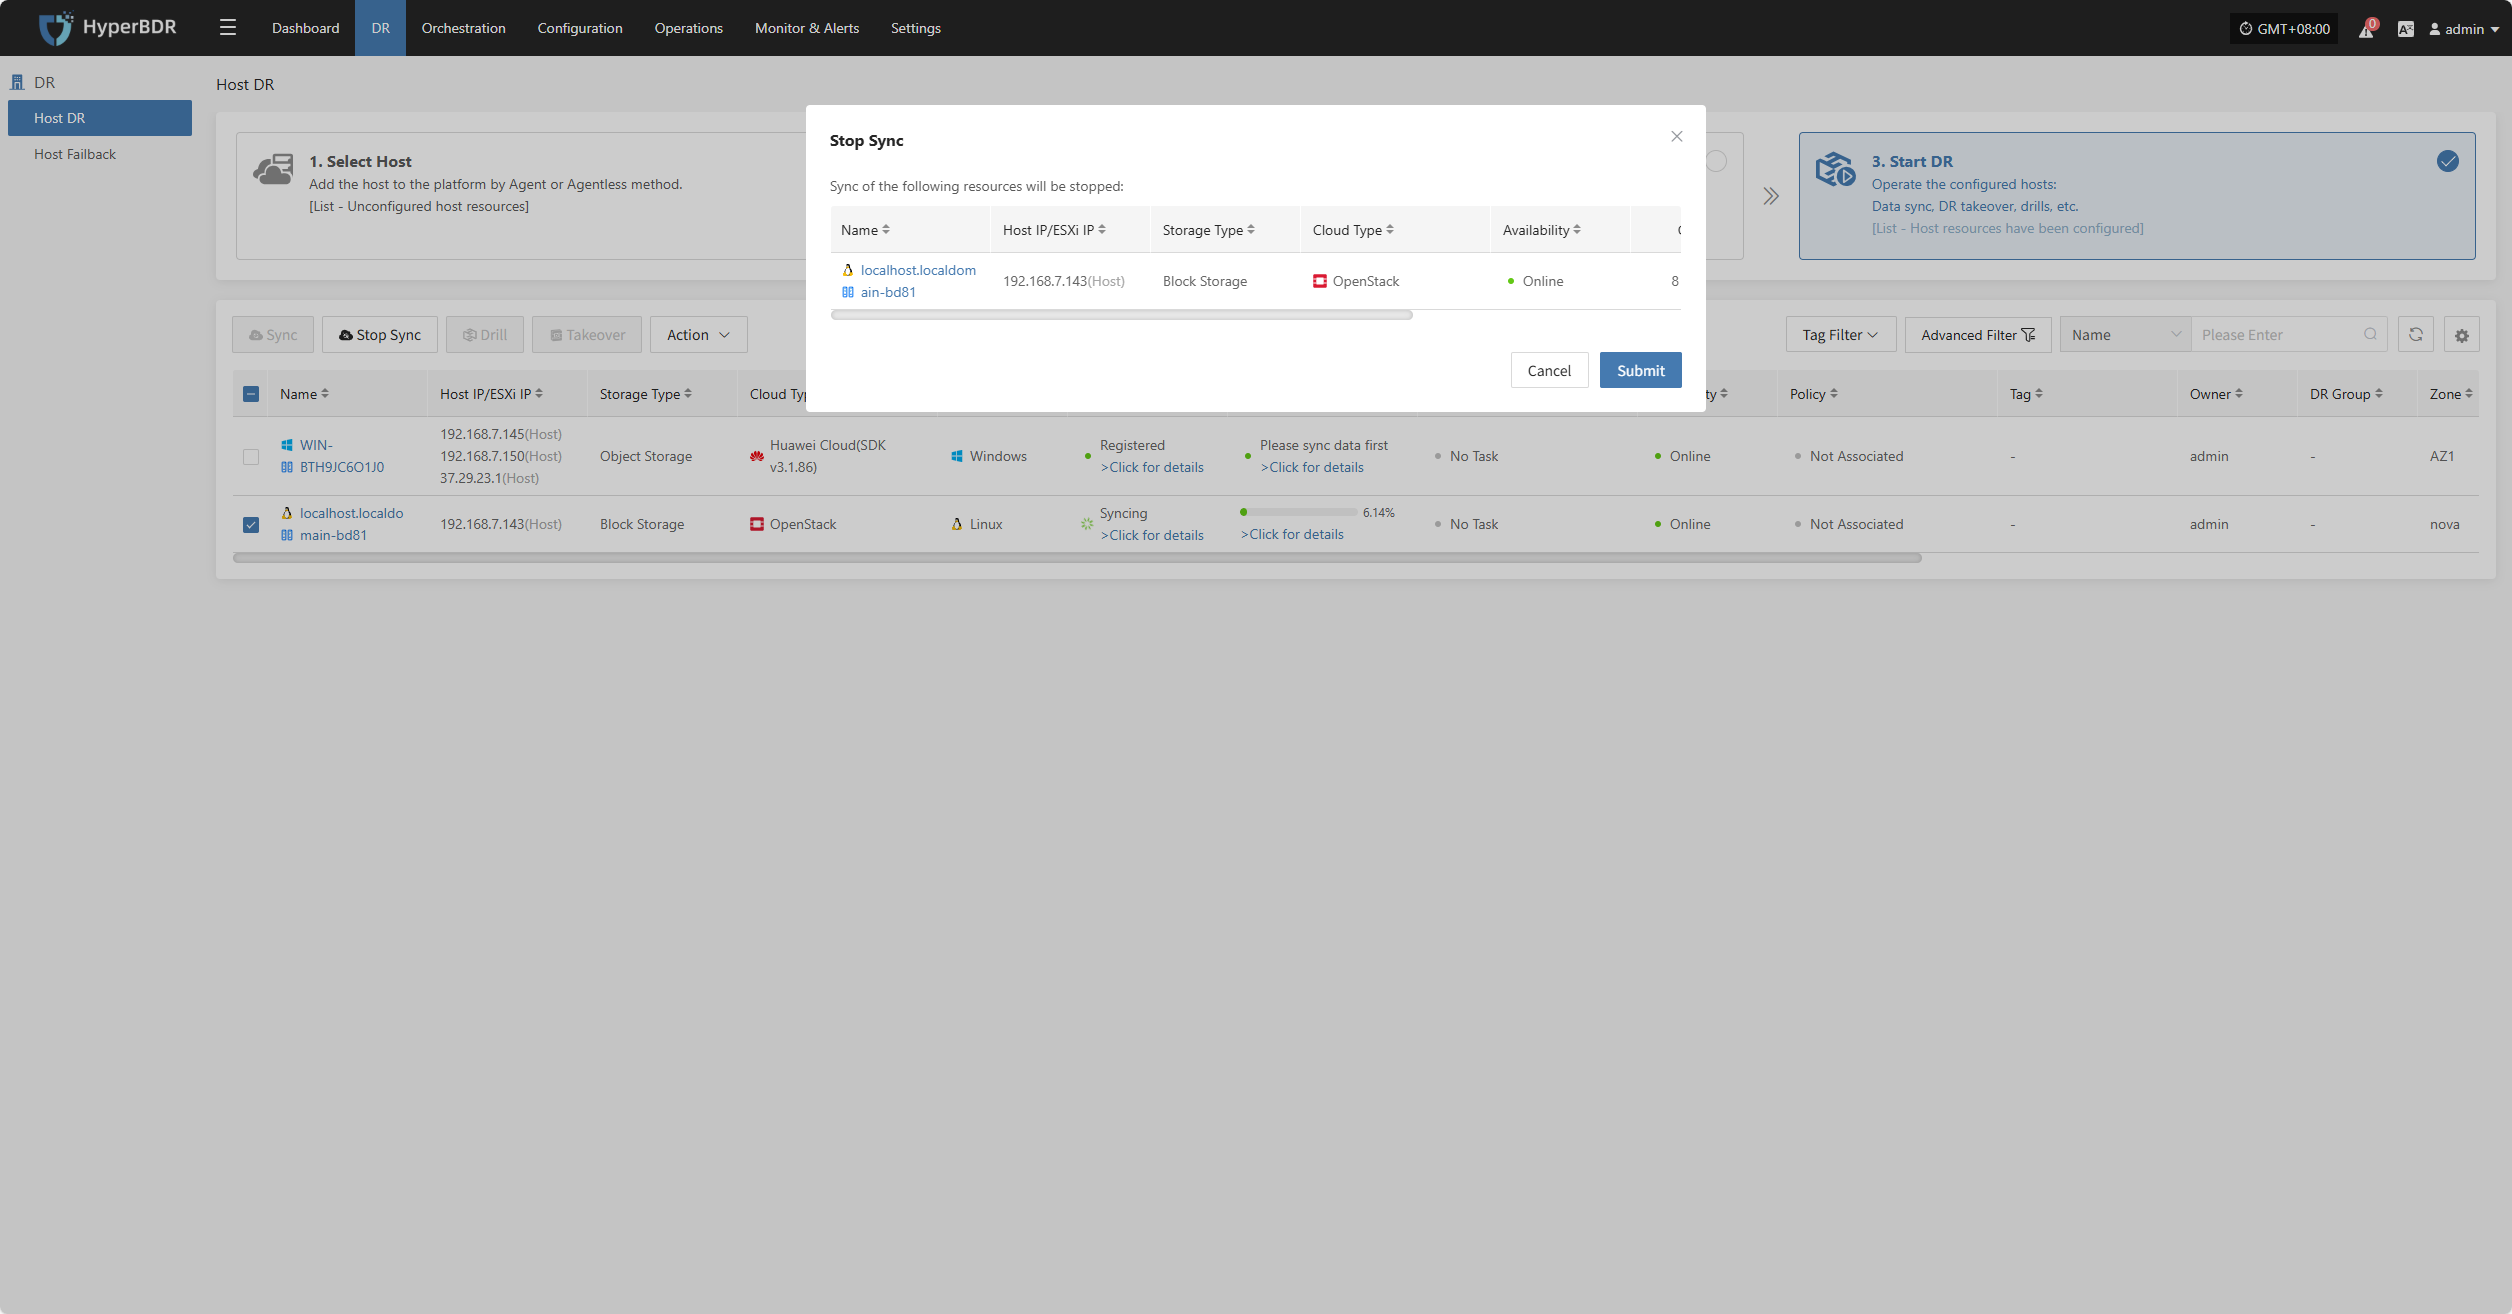
Hosts not in syncing state or already completed sync do not support the stop sync operation.
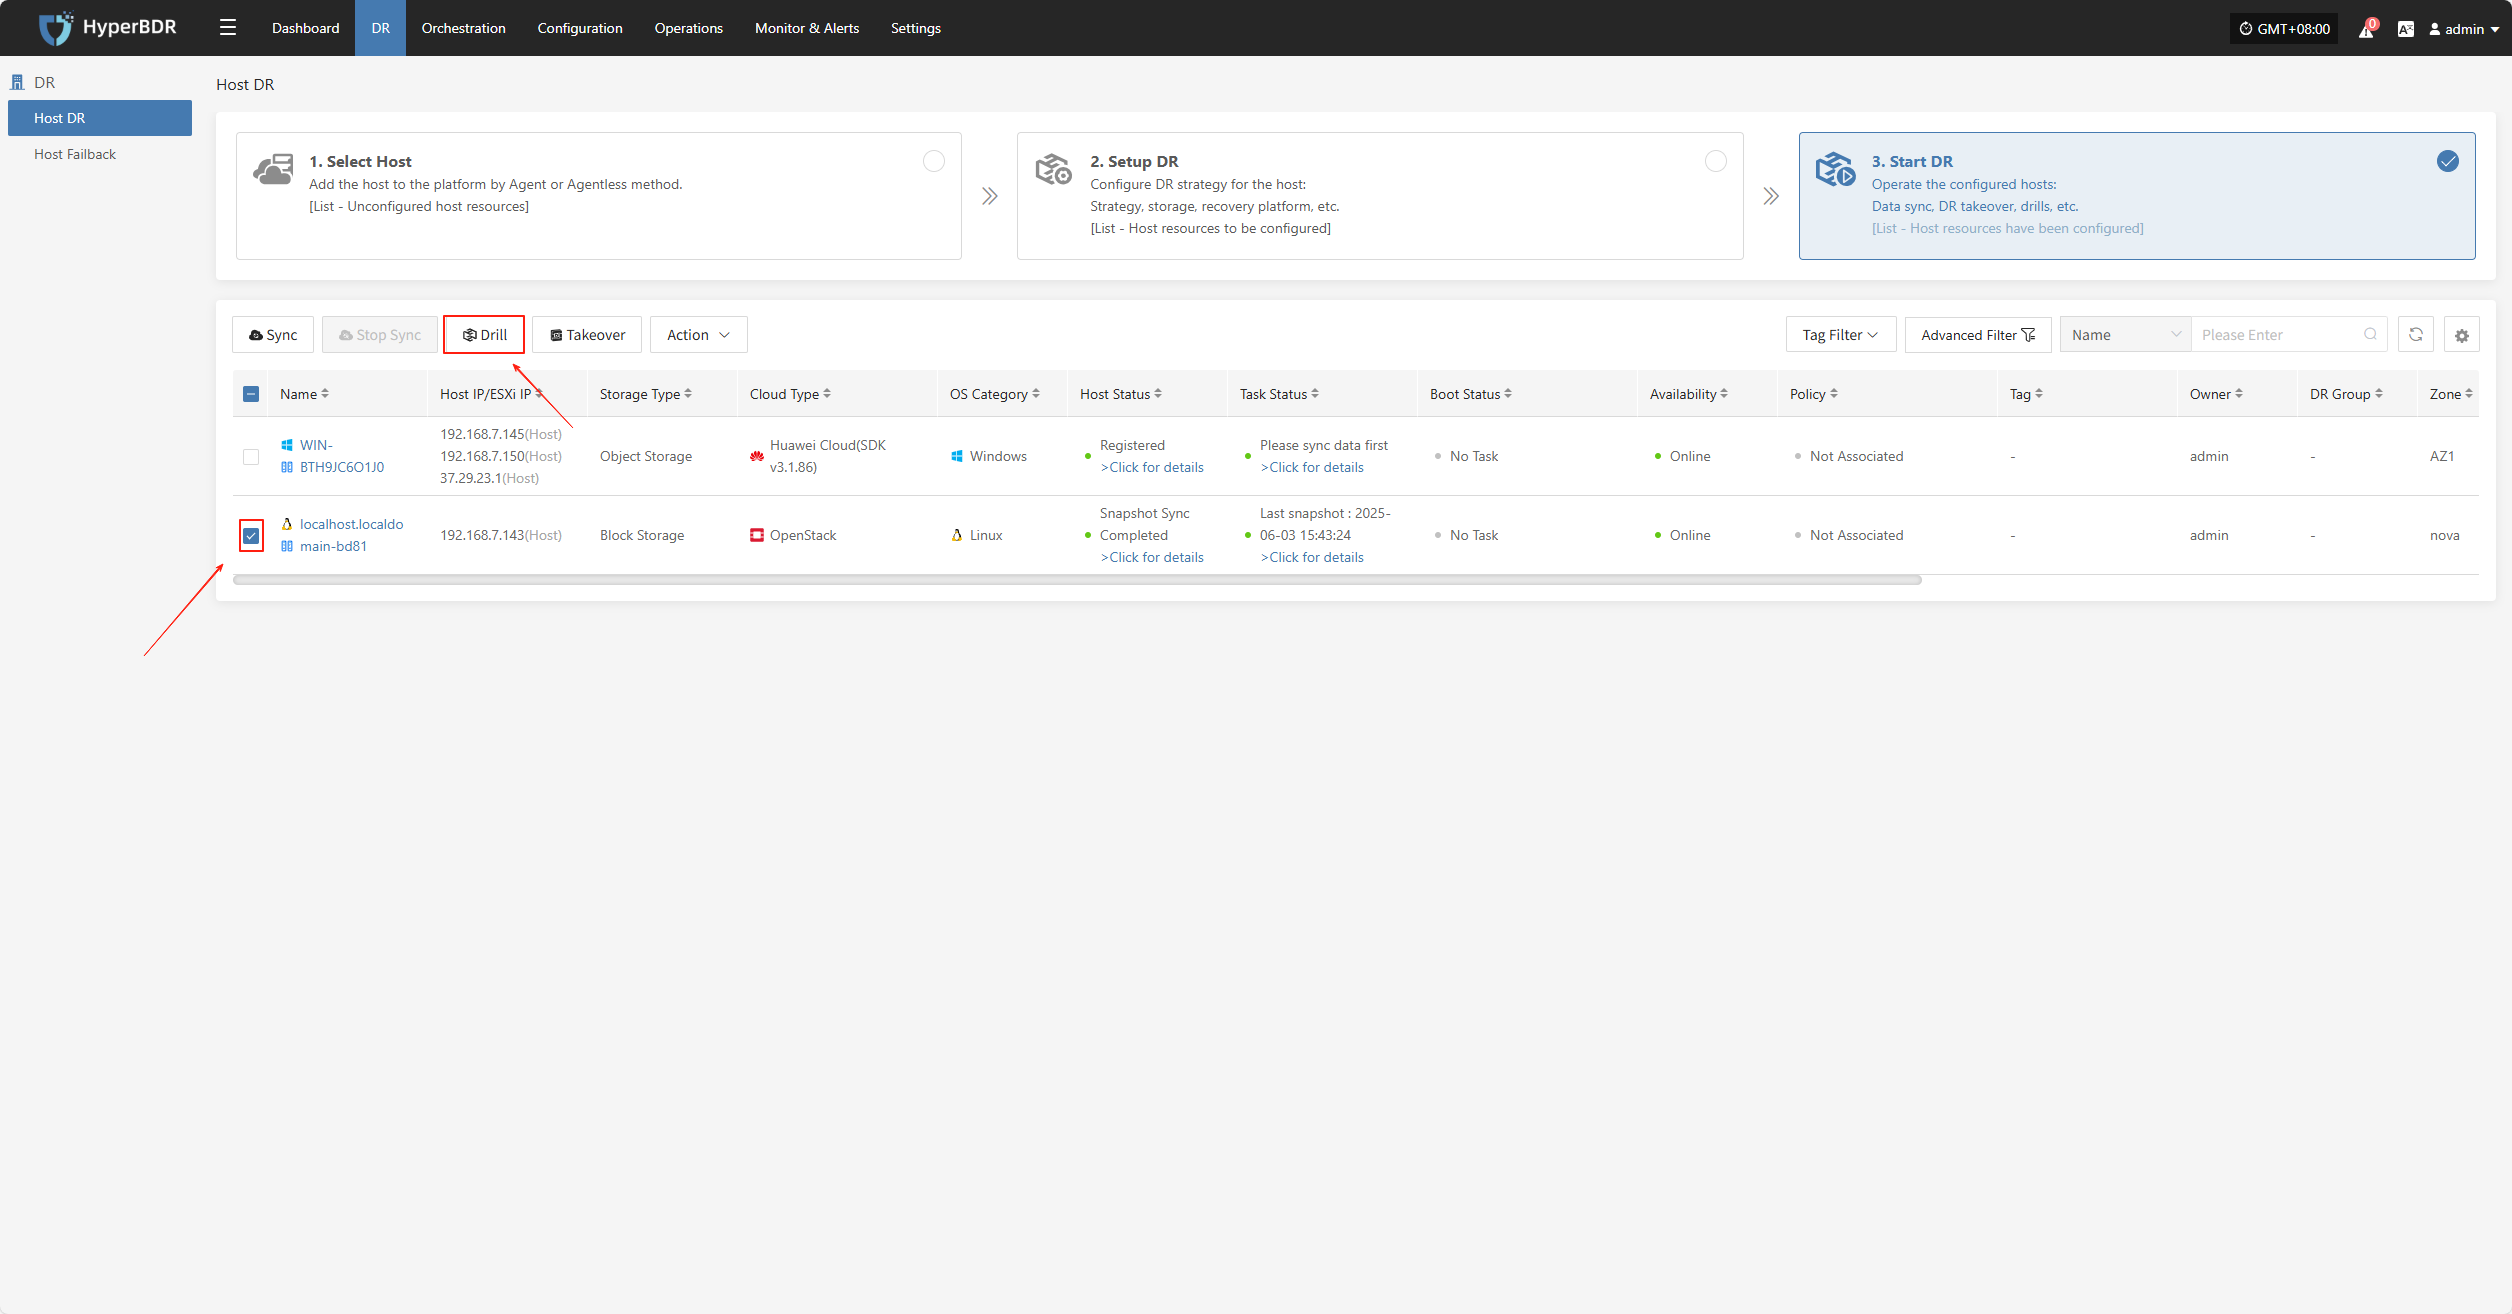
Drill
Select the disaster recovery host, click “Drill”, choose a recovery point, and restore the DR host to the target environment with one click.
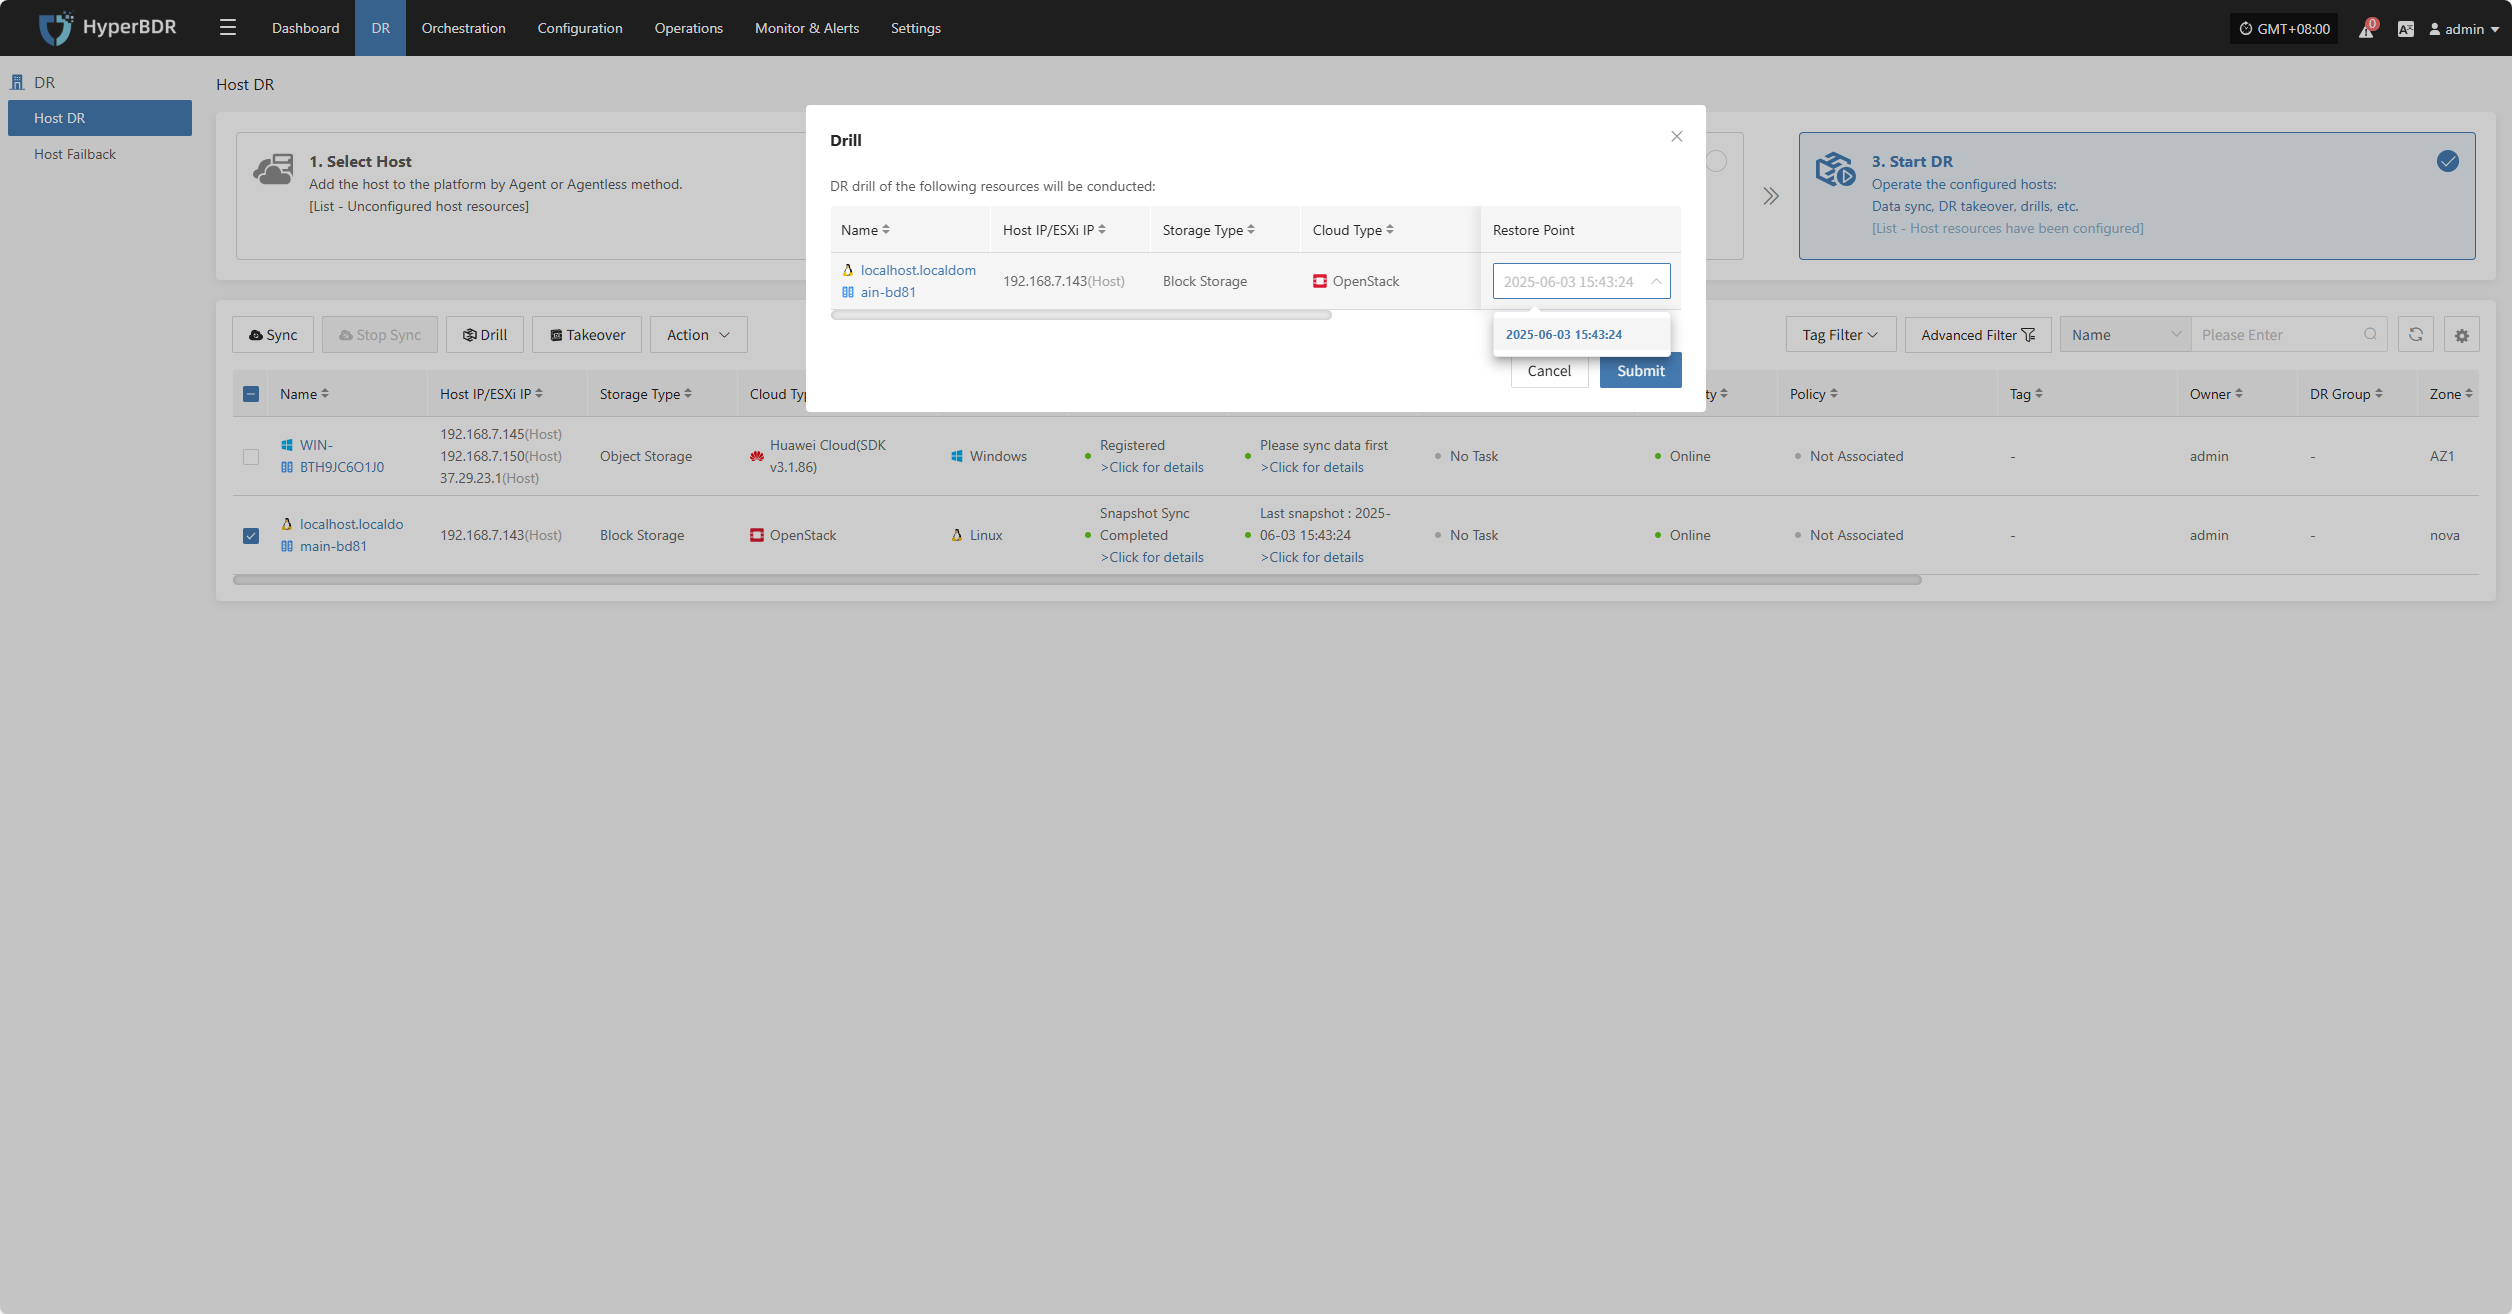
The system will automatically create or start the target instance according to the pre-configured resource orchestration (compute, storage, network, etc.). Once the instance is started, you can log in to the target platform to verify configurations and perform service testing.
After recovery is complete, check whether application services, databases, and load balancing are functioning normally.
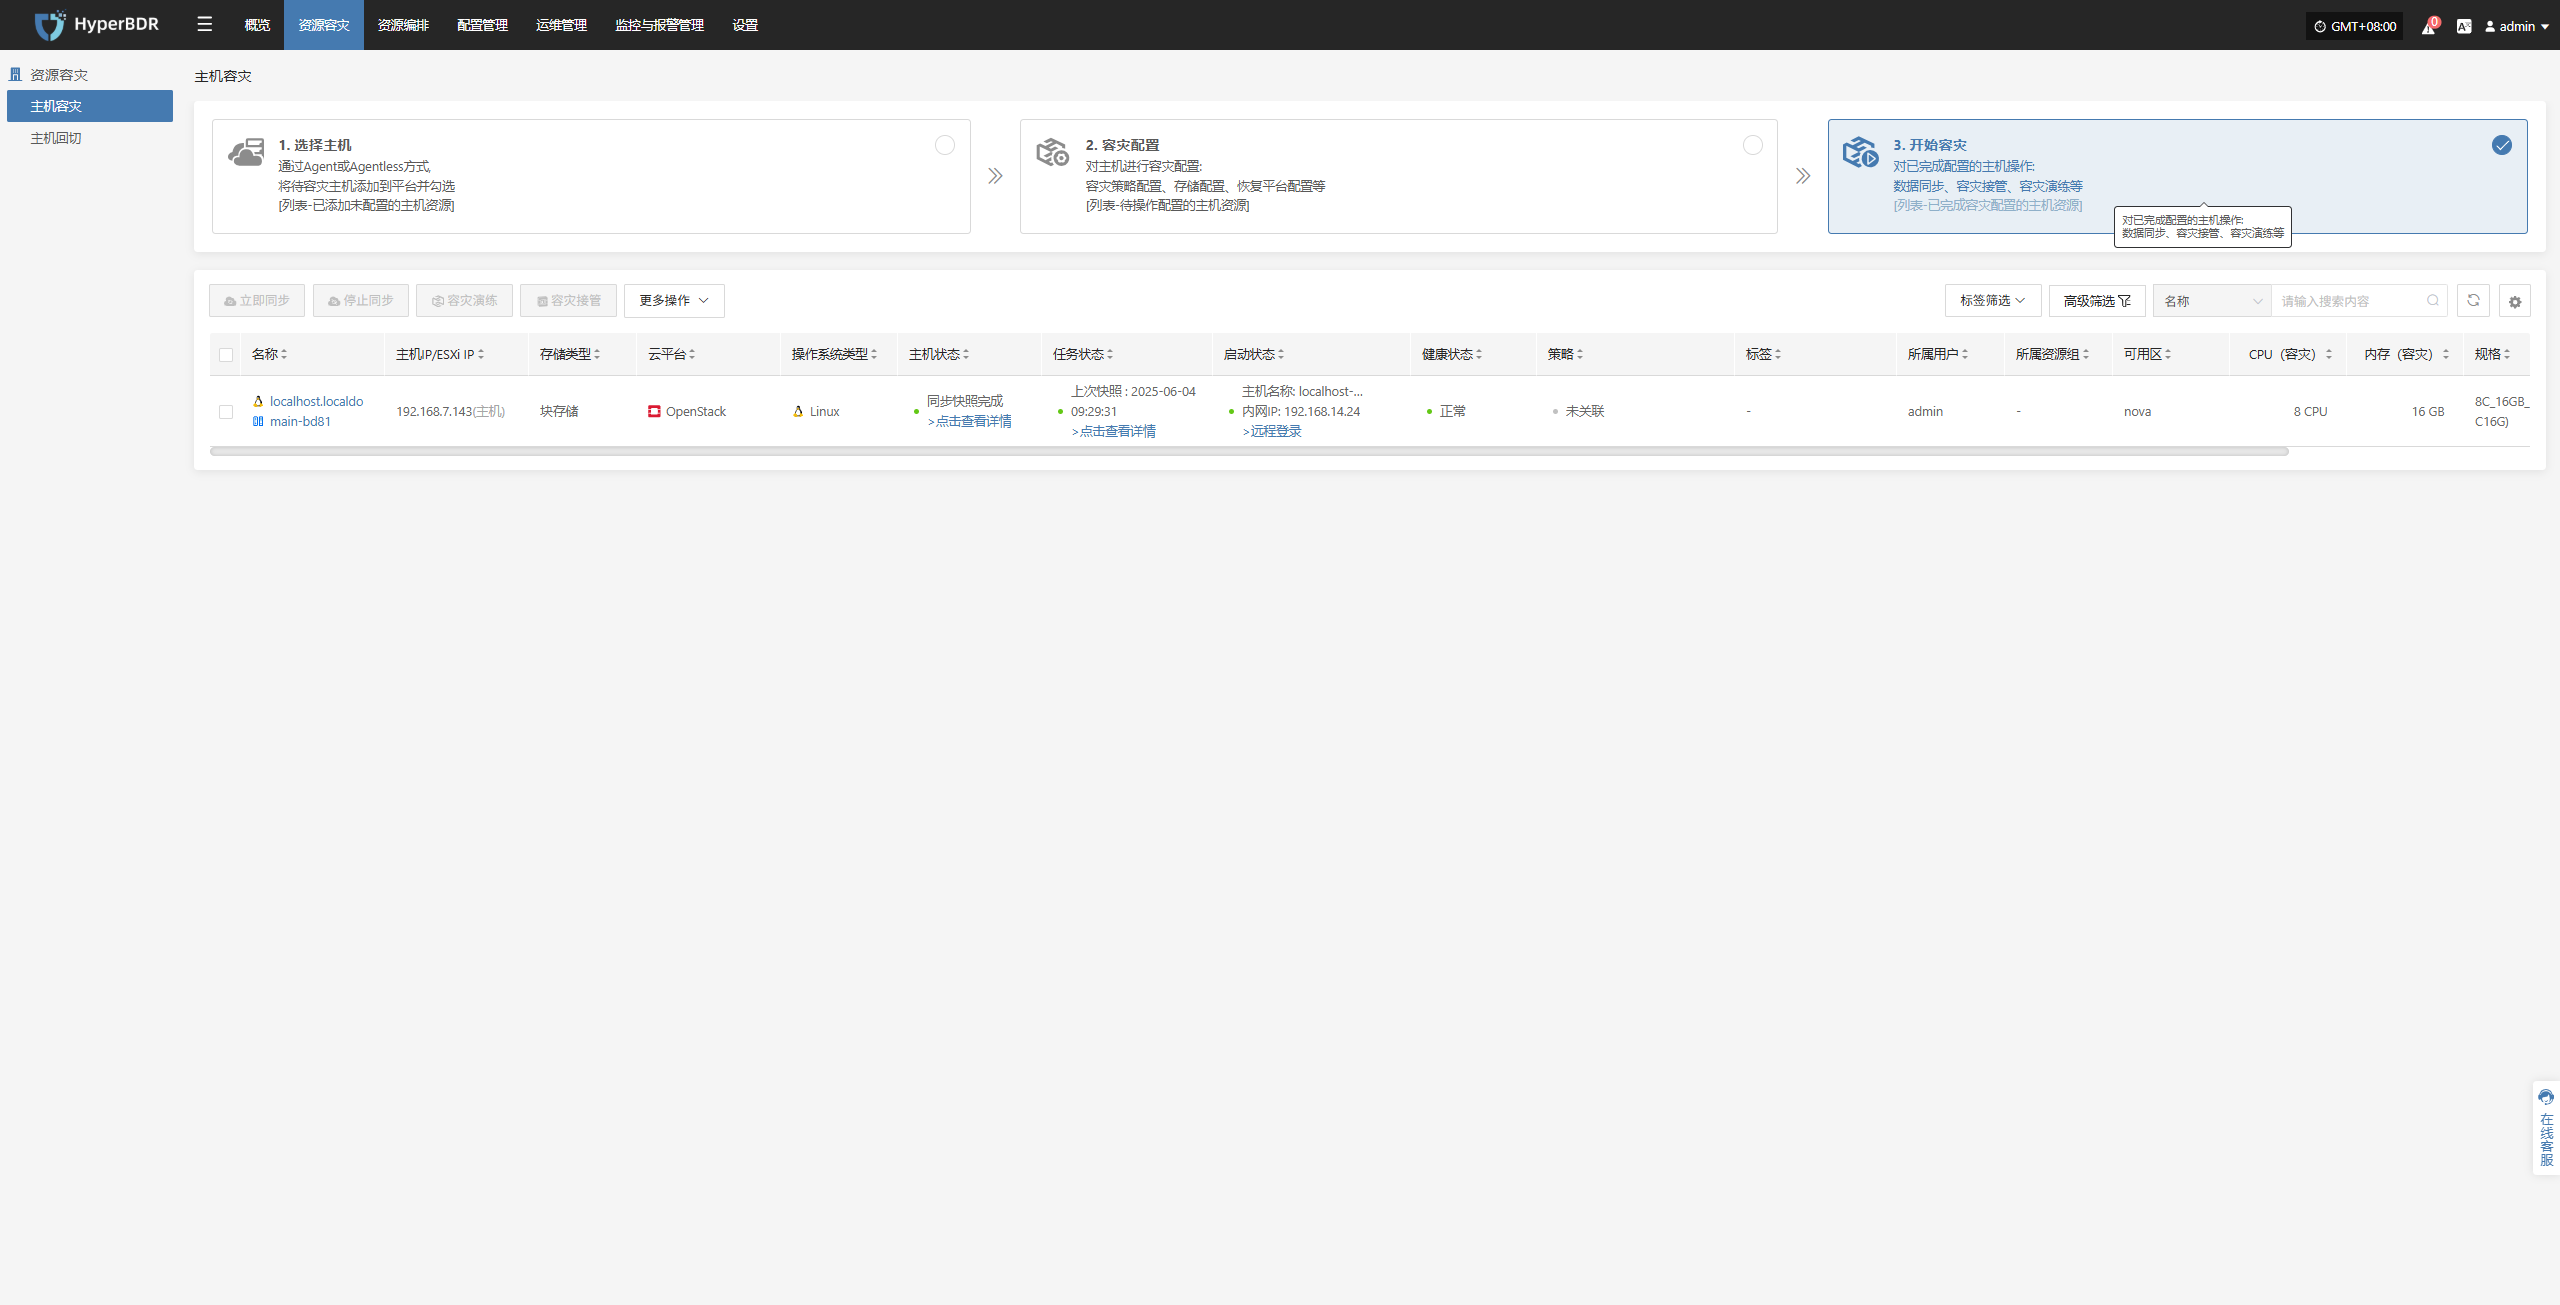
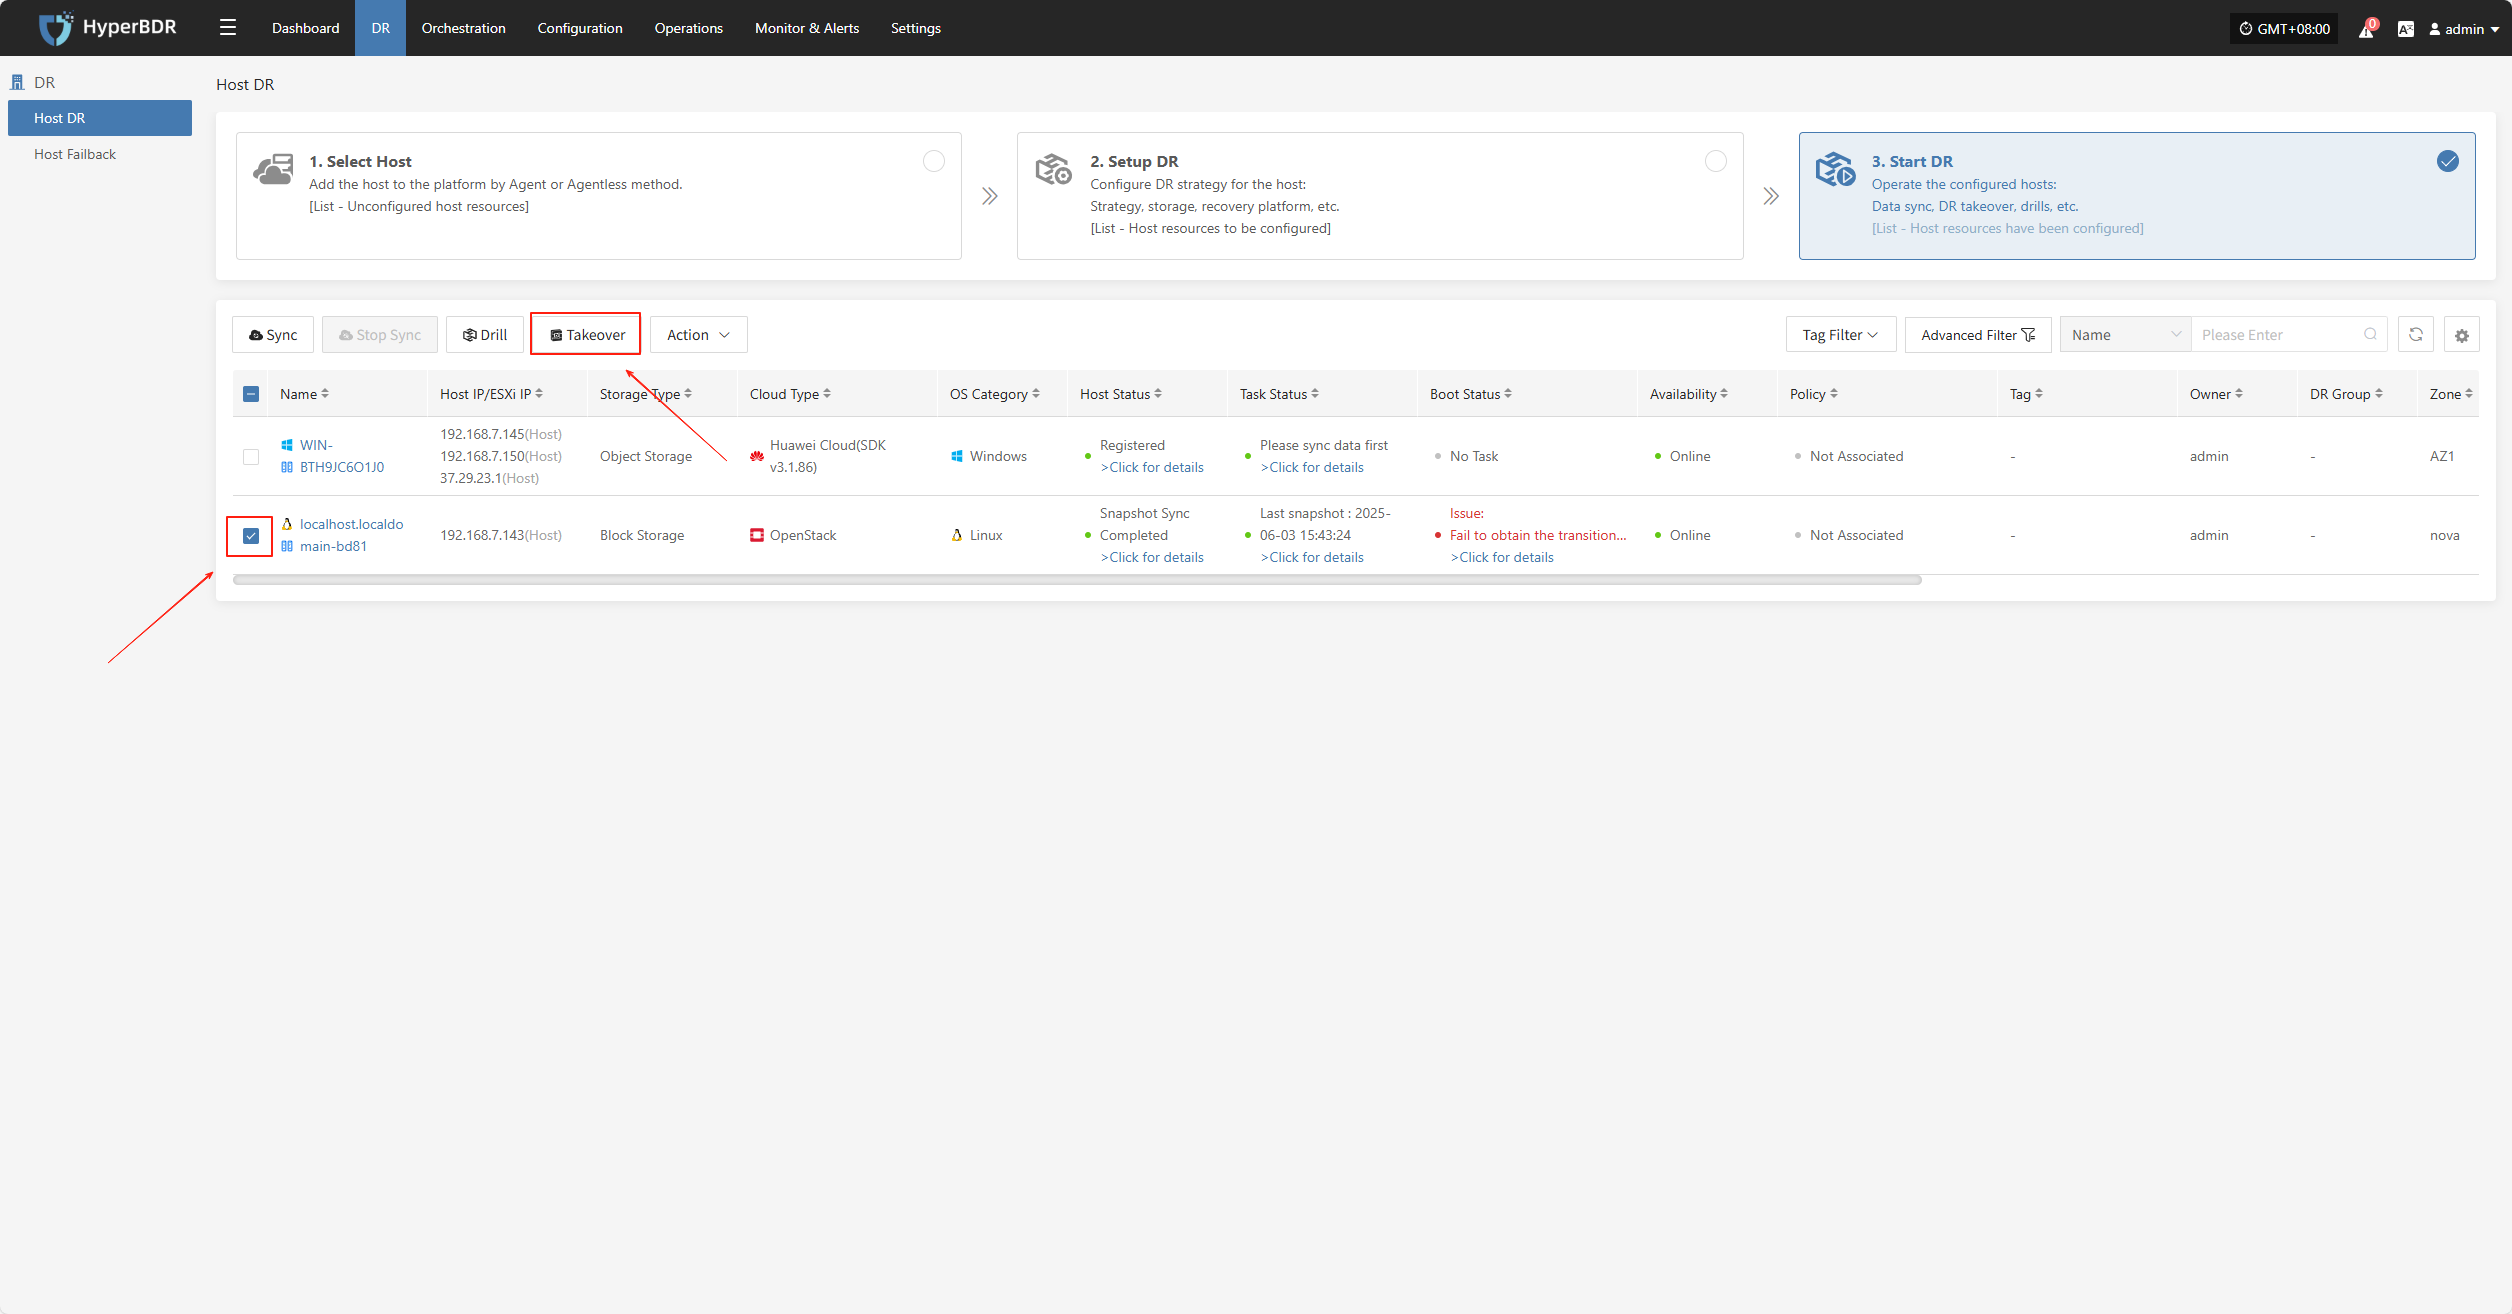
Takeover
Select the "Takeover" function for the business host, choose the recovery snapshot point as needed, and click Confirm.
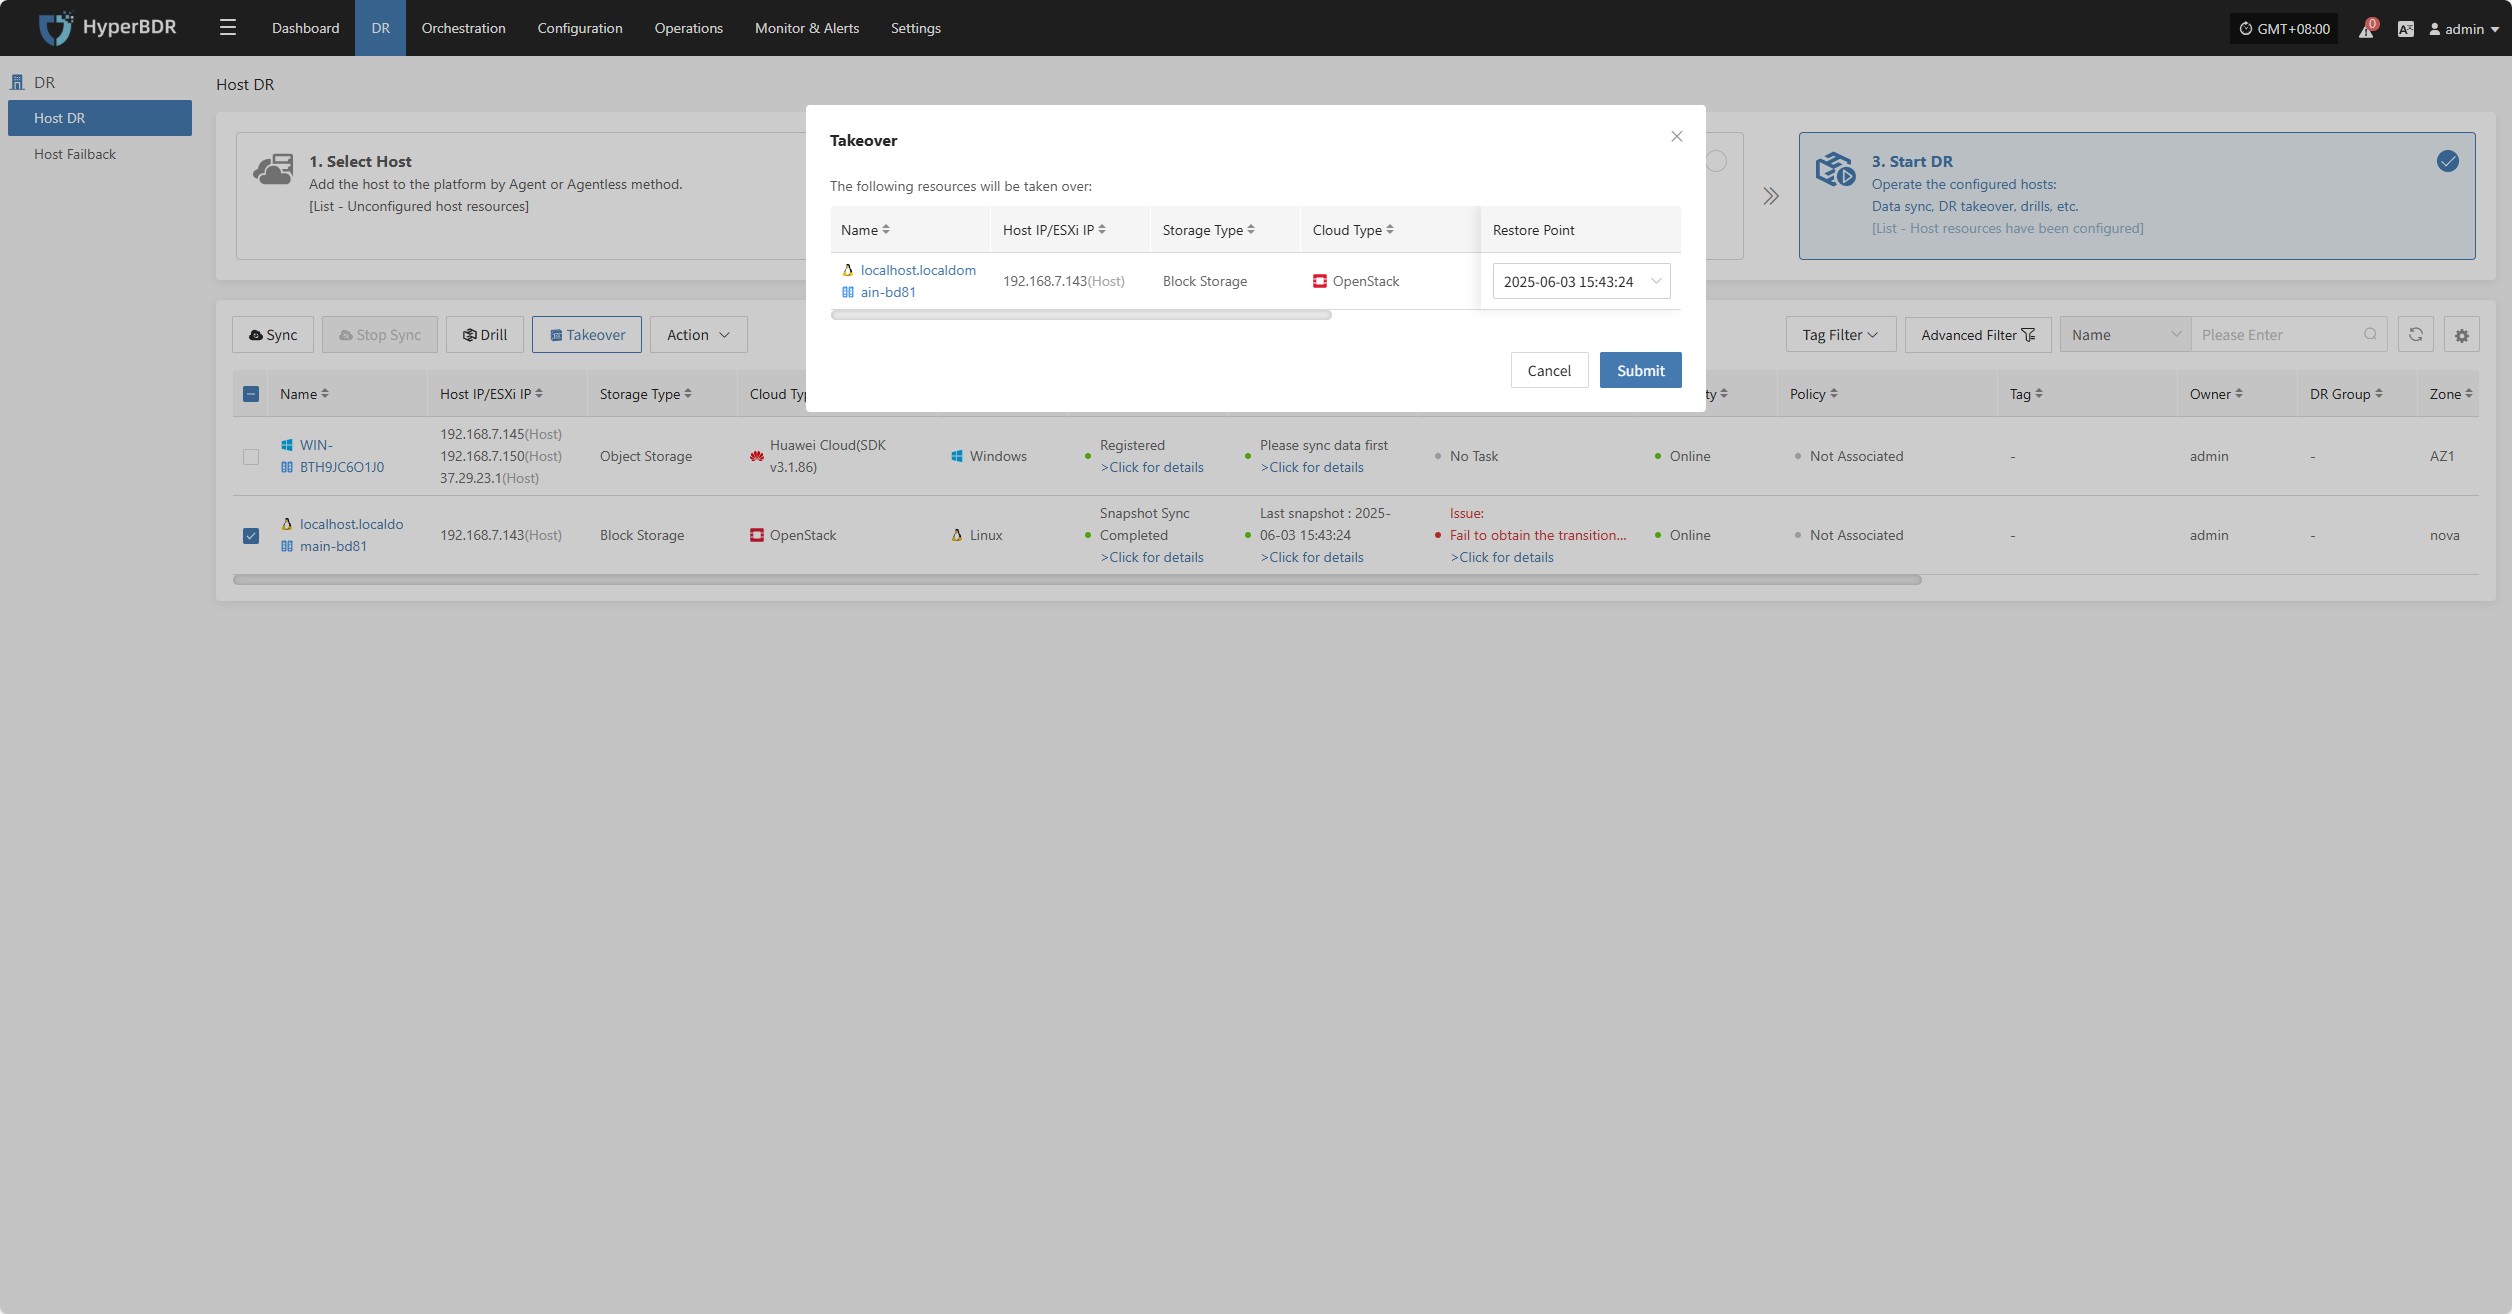
The system will automatically create or start the target instance based on the pre-configured resource orchestration (compute, storage, network, etc.). Once the instance has started, you can log in to the target platform to verify the configuration and take over business operations.
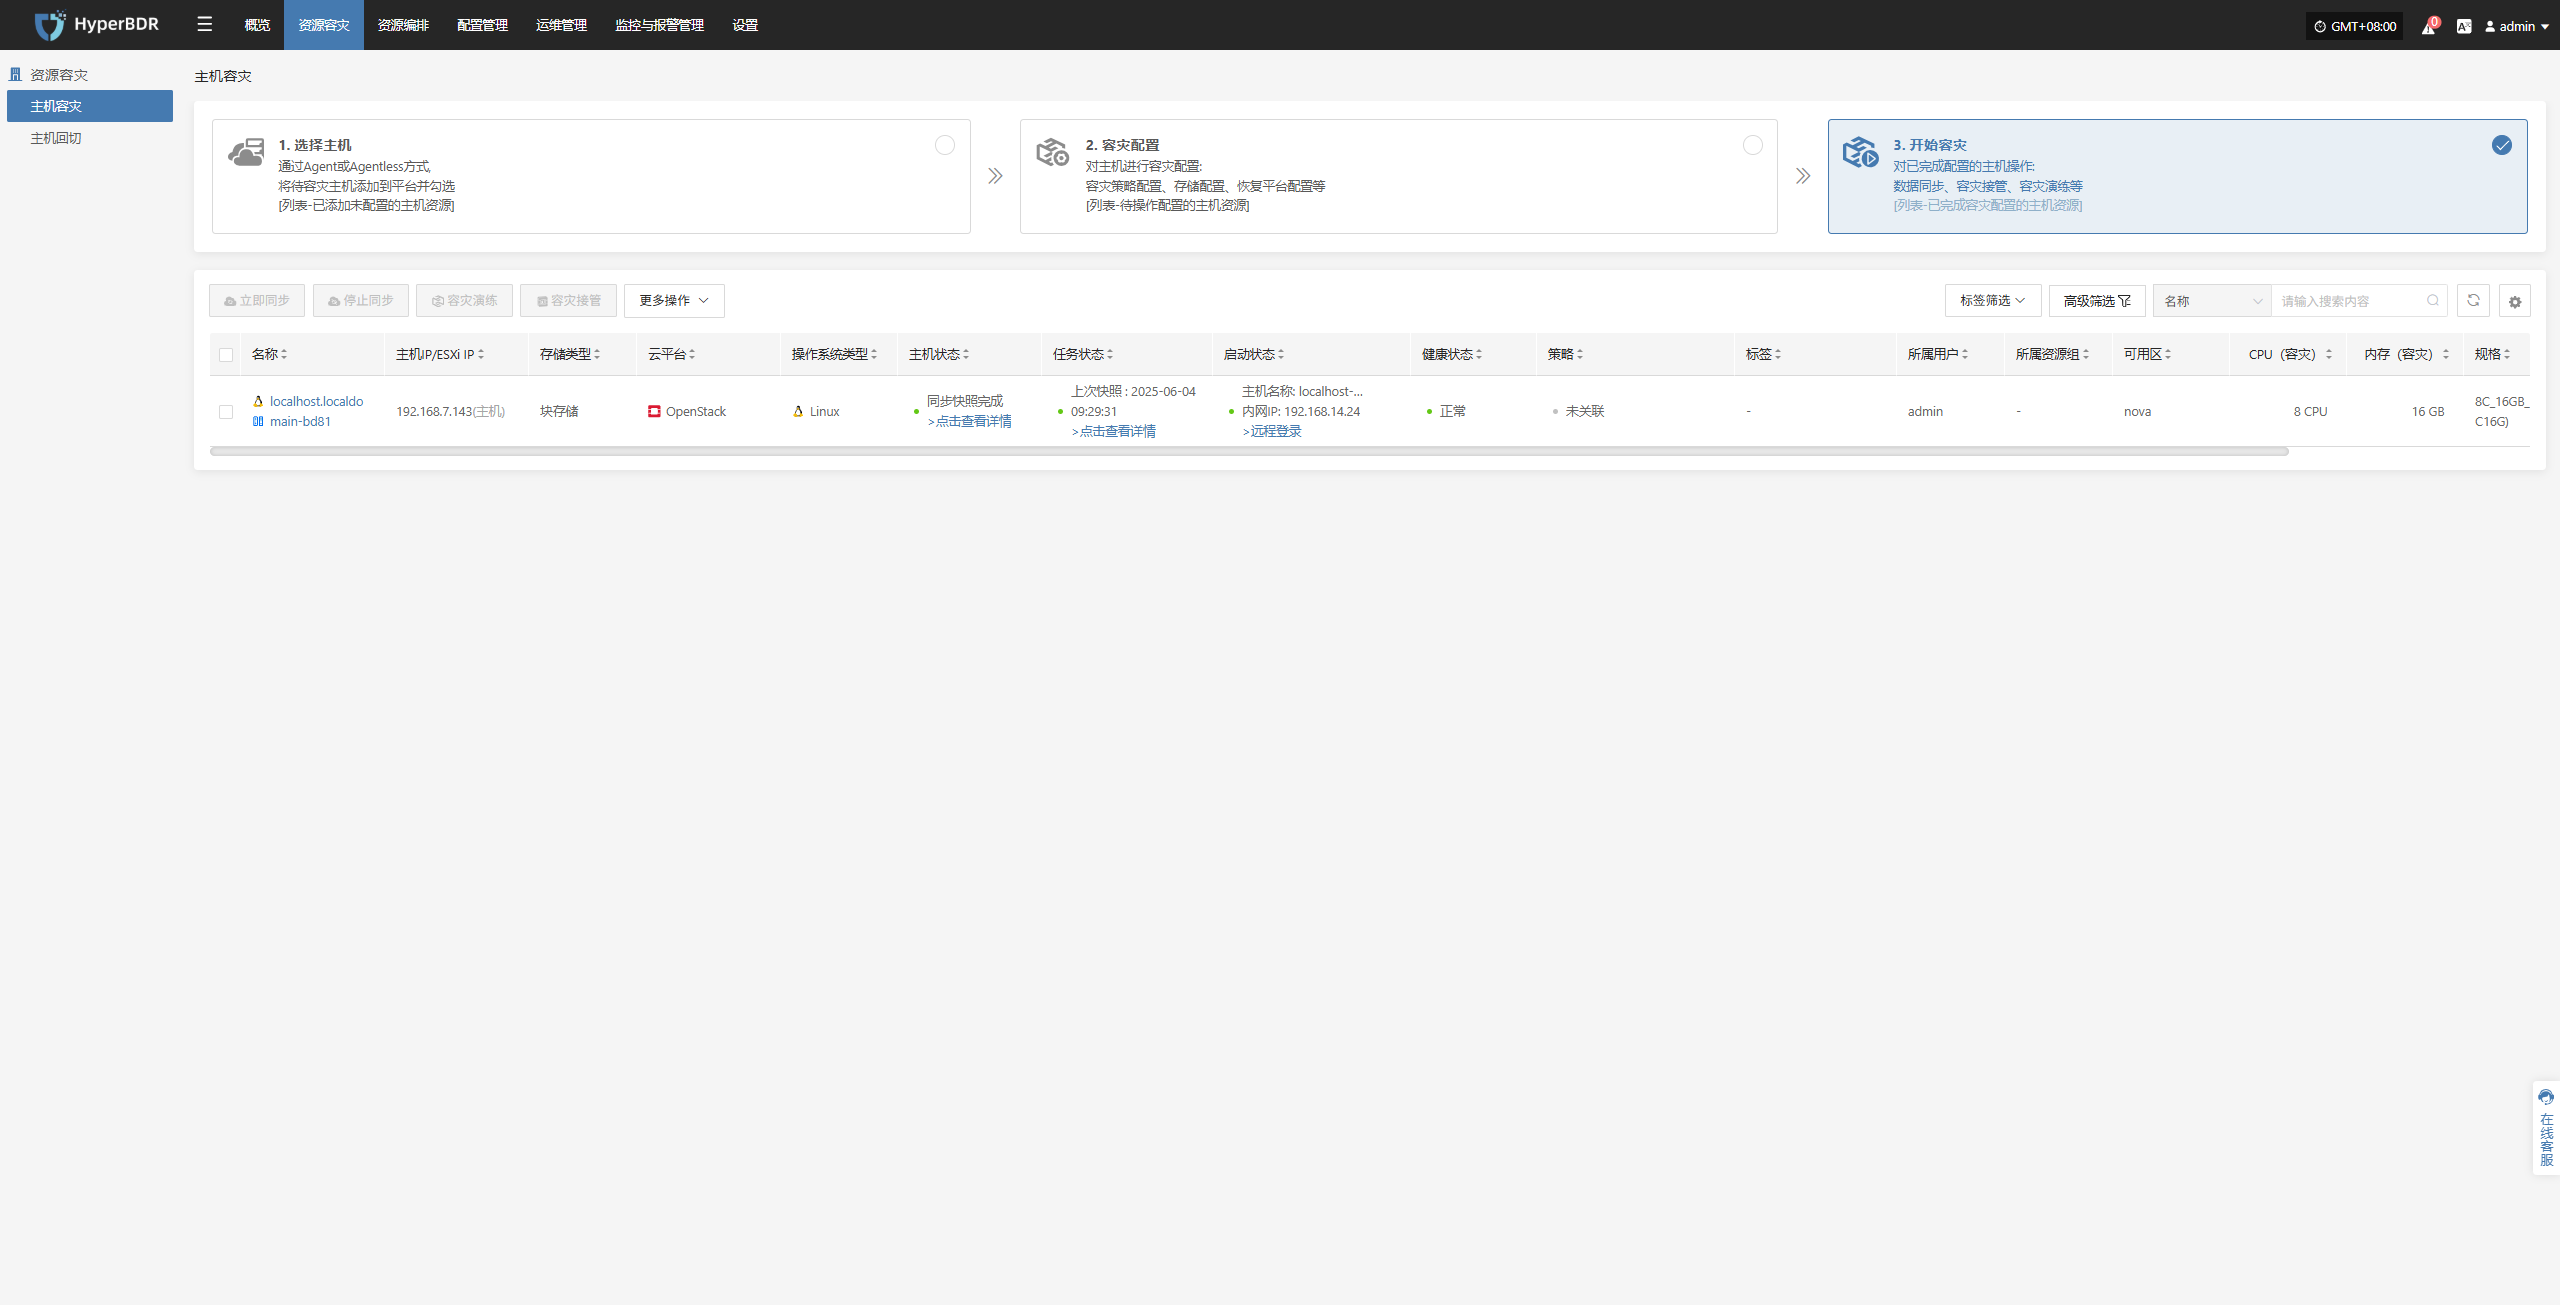
At this point, the disaster recovery process for the host is complete. After services are started, check whether the database version, application service configurations, and dependent services (e.g., cache, message queues) are functioning properly.
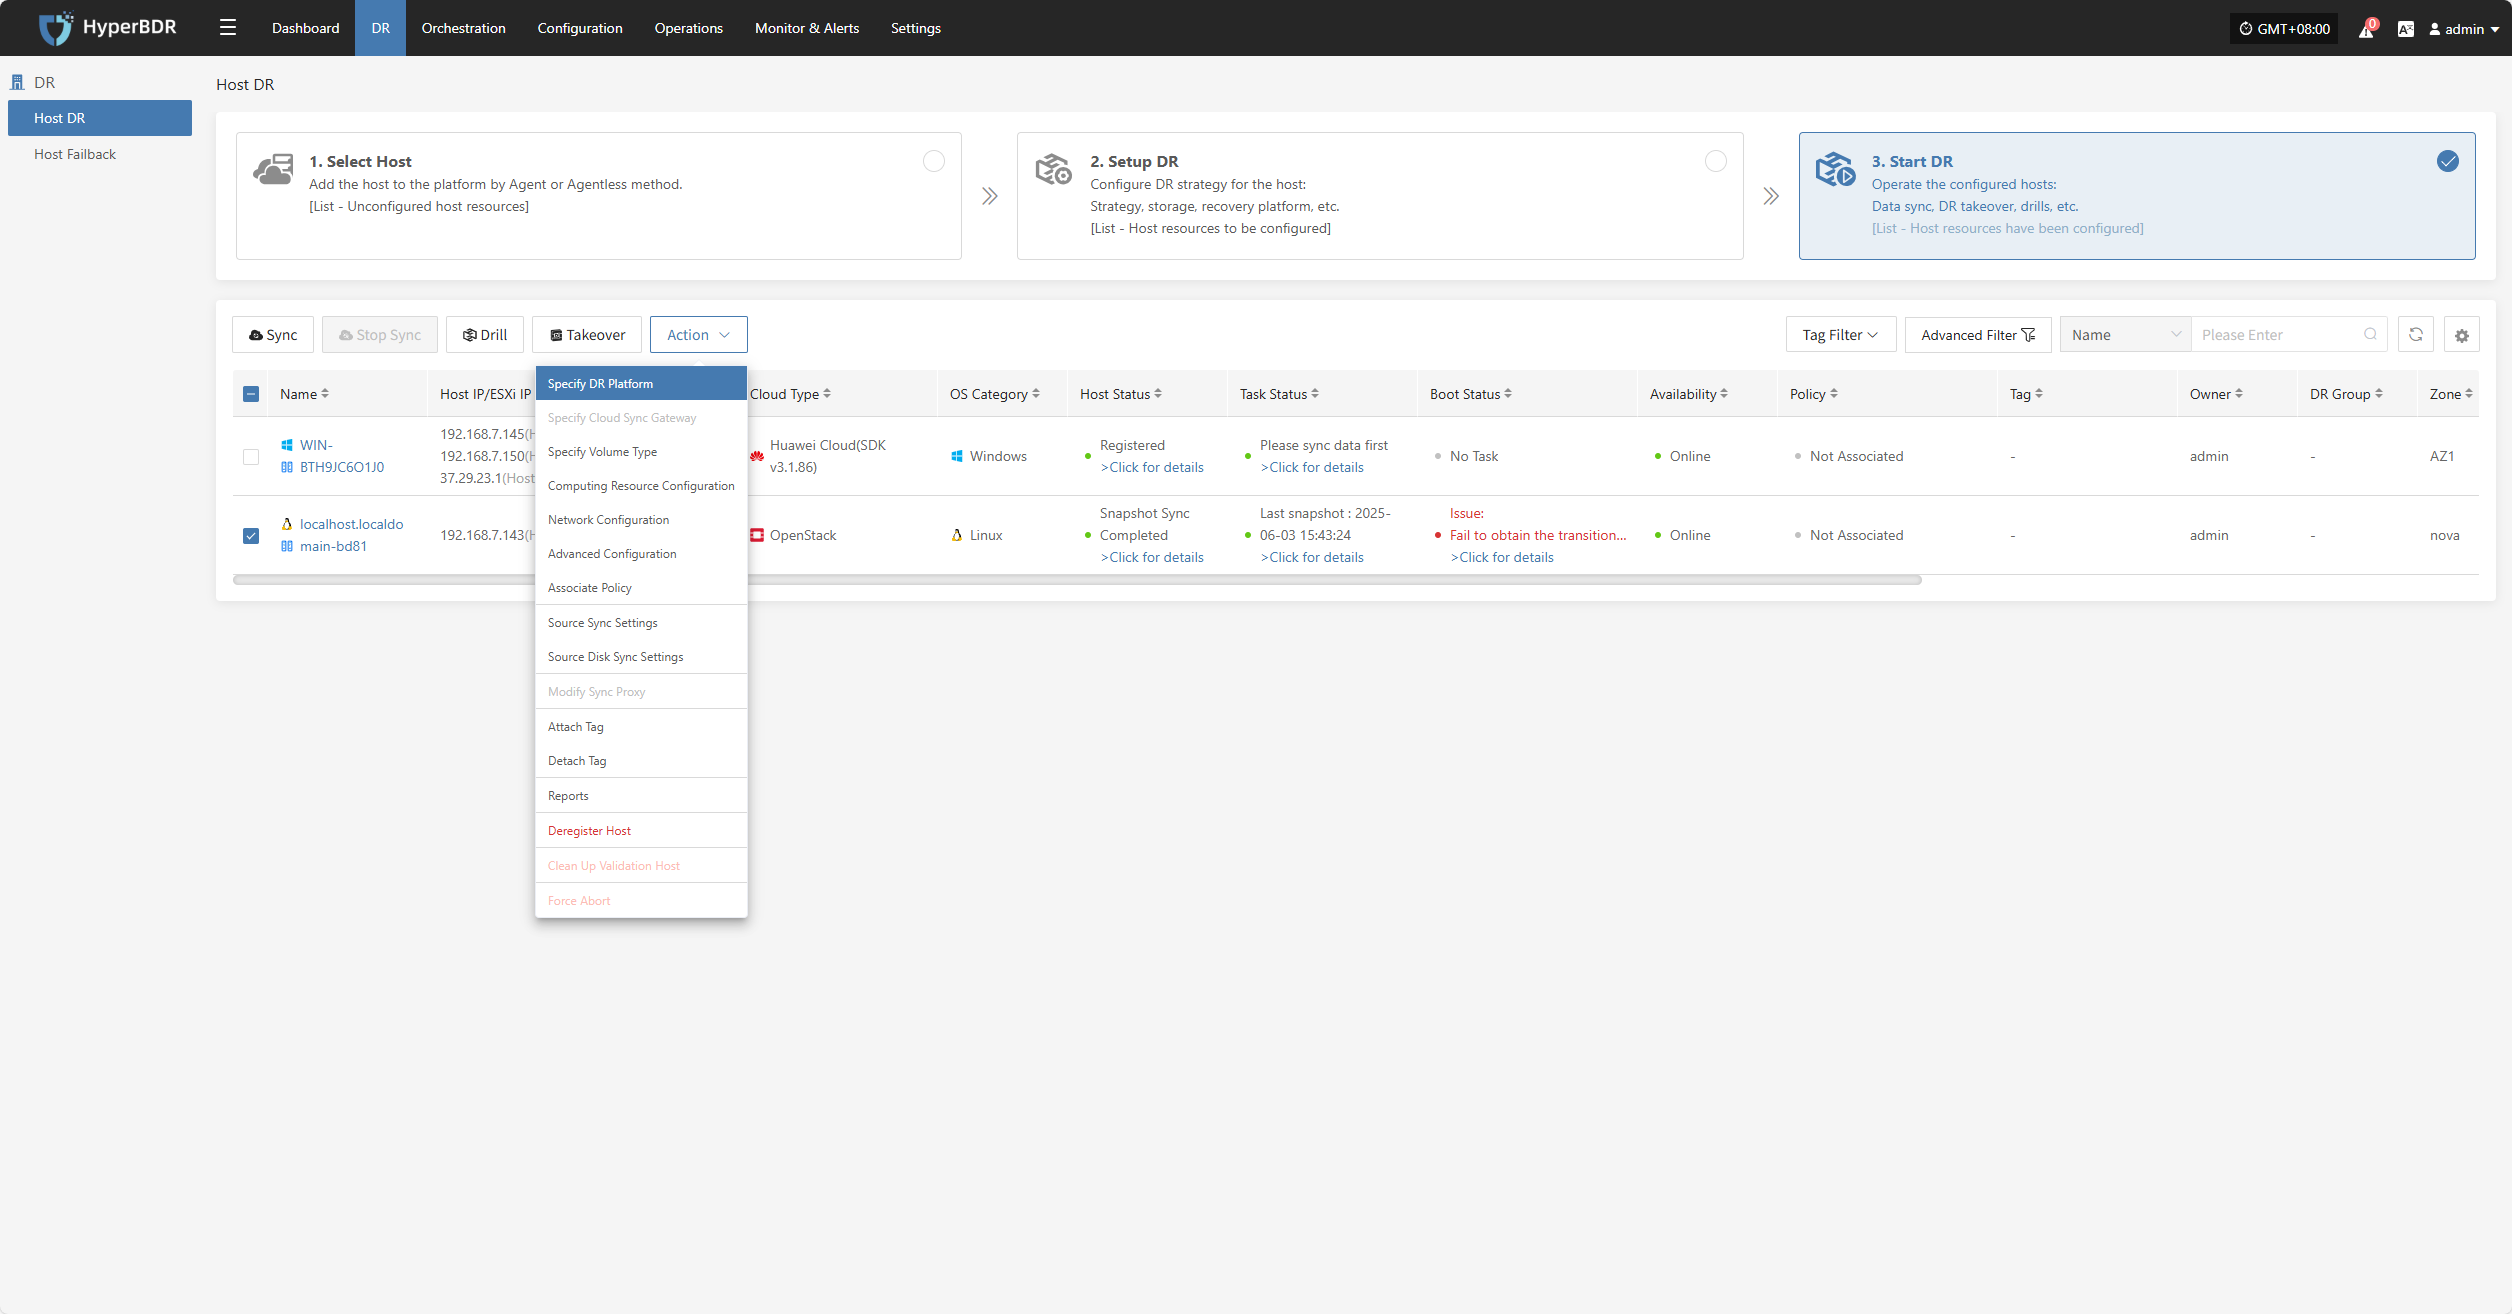
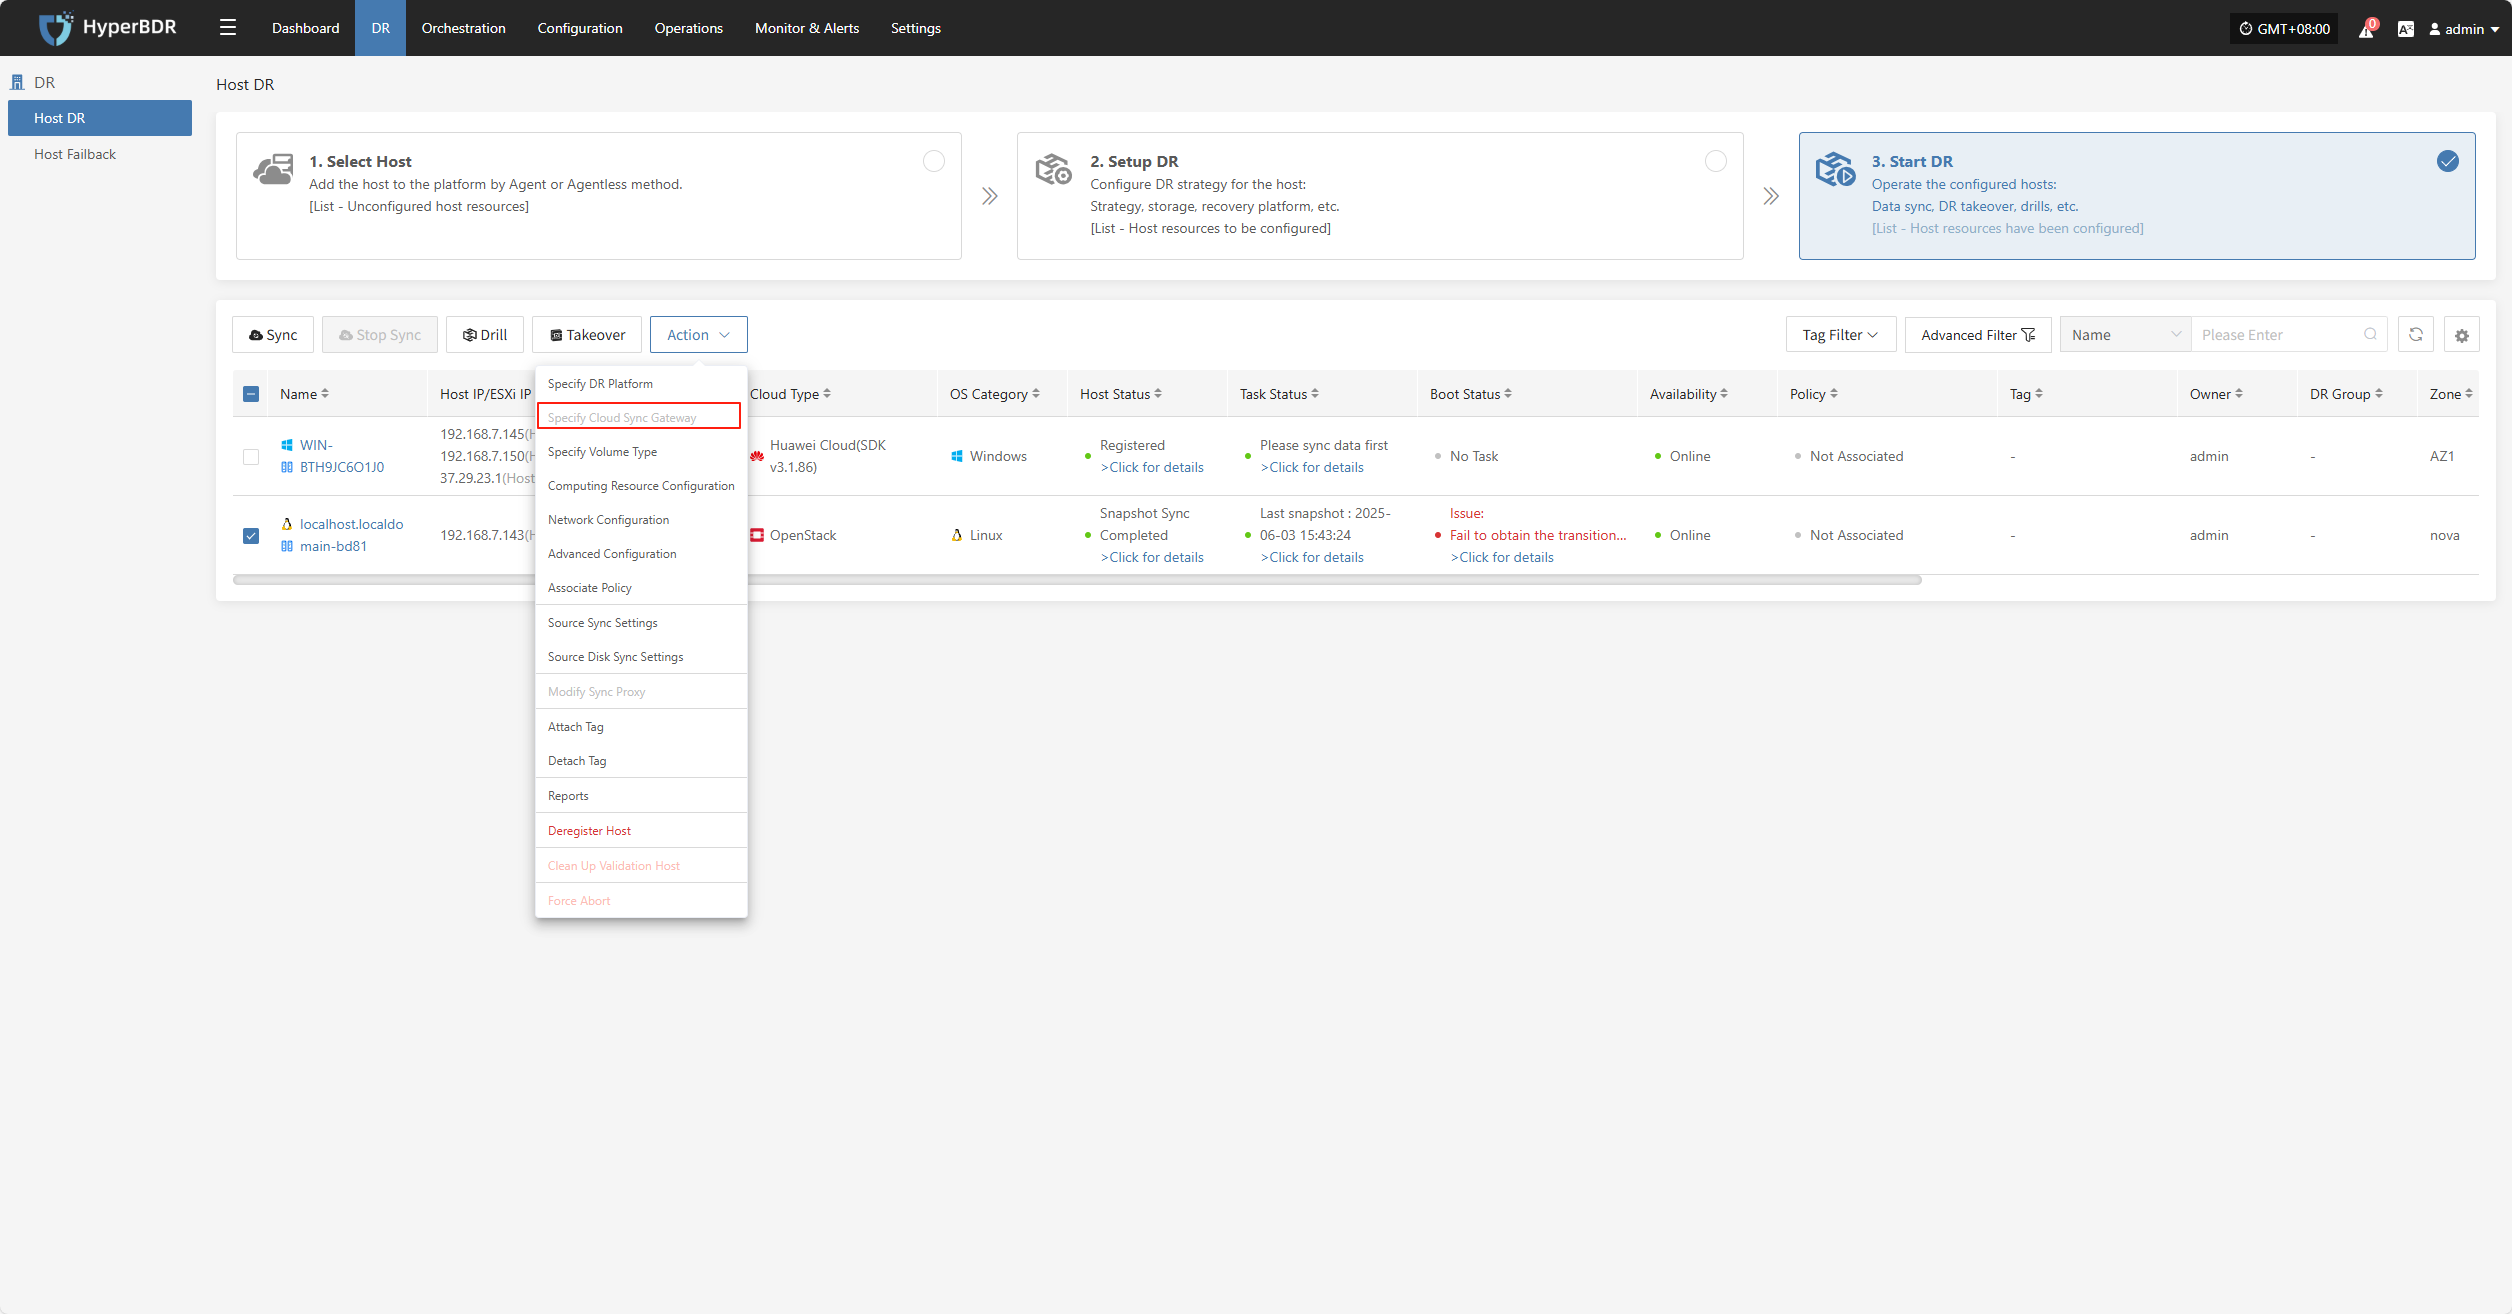
Action
Click "Actions" to modify a host that has already been configured.
Specify DR Platform
Note: Hosts that have completed data synchronization cannot be modified.
Click "Specify DR Platform" to modify the DR platform. For details, refer to:
Block Storage: Click to View
Object Storage: Click to View
Specify Cloud Sync Gateway
Note: Hosts that have completed data synchronization cannot be modified.
Click "Specify Cloud Sync Gateway" to modify the DR platform. For details, refer to:
Block Storage: Click to View
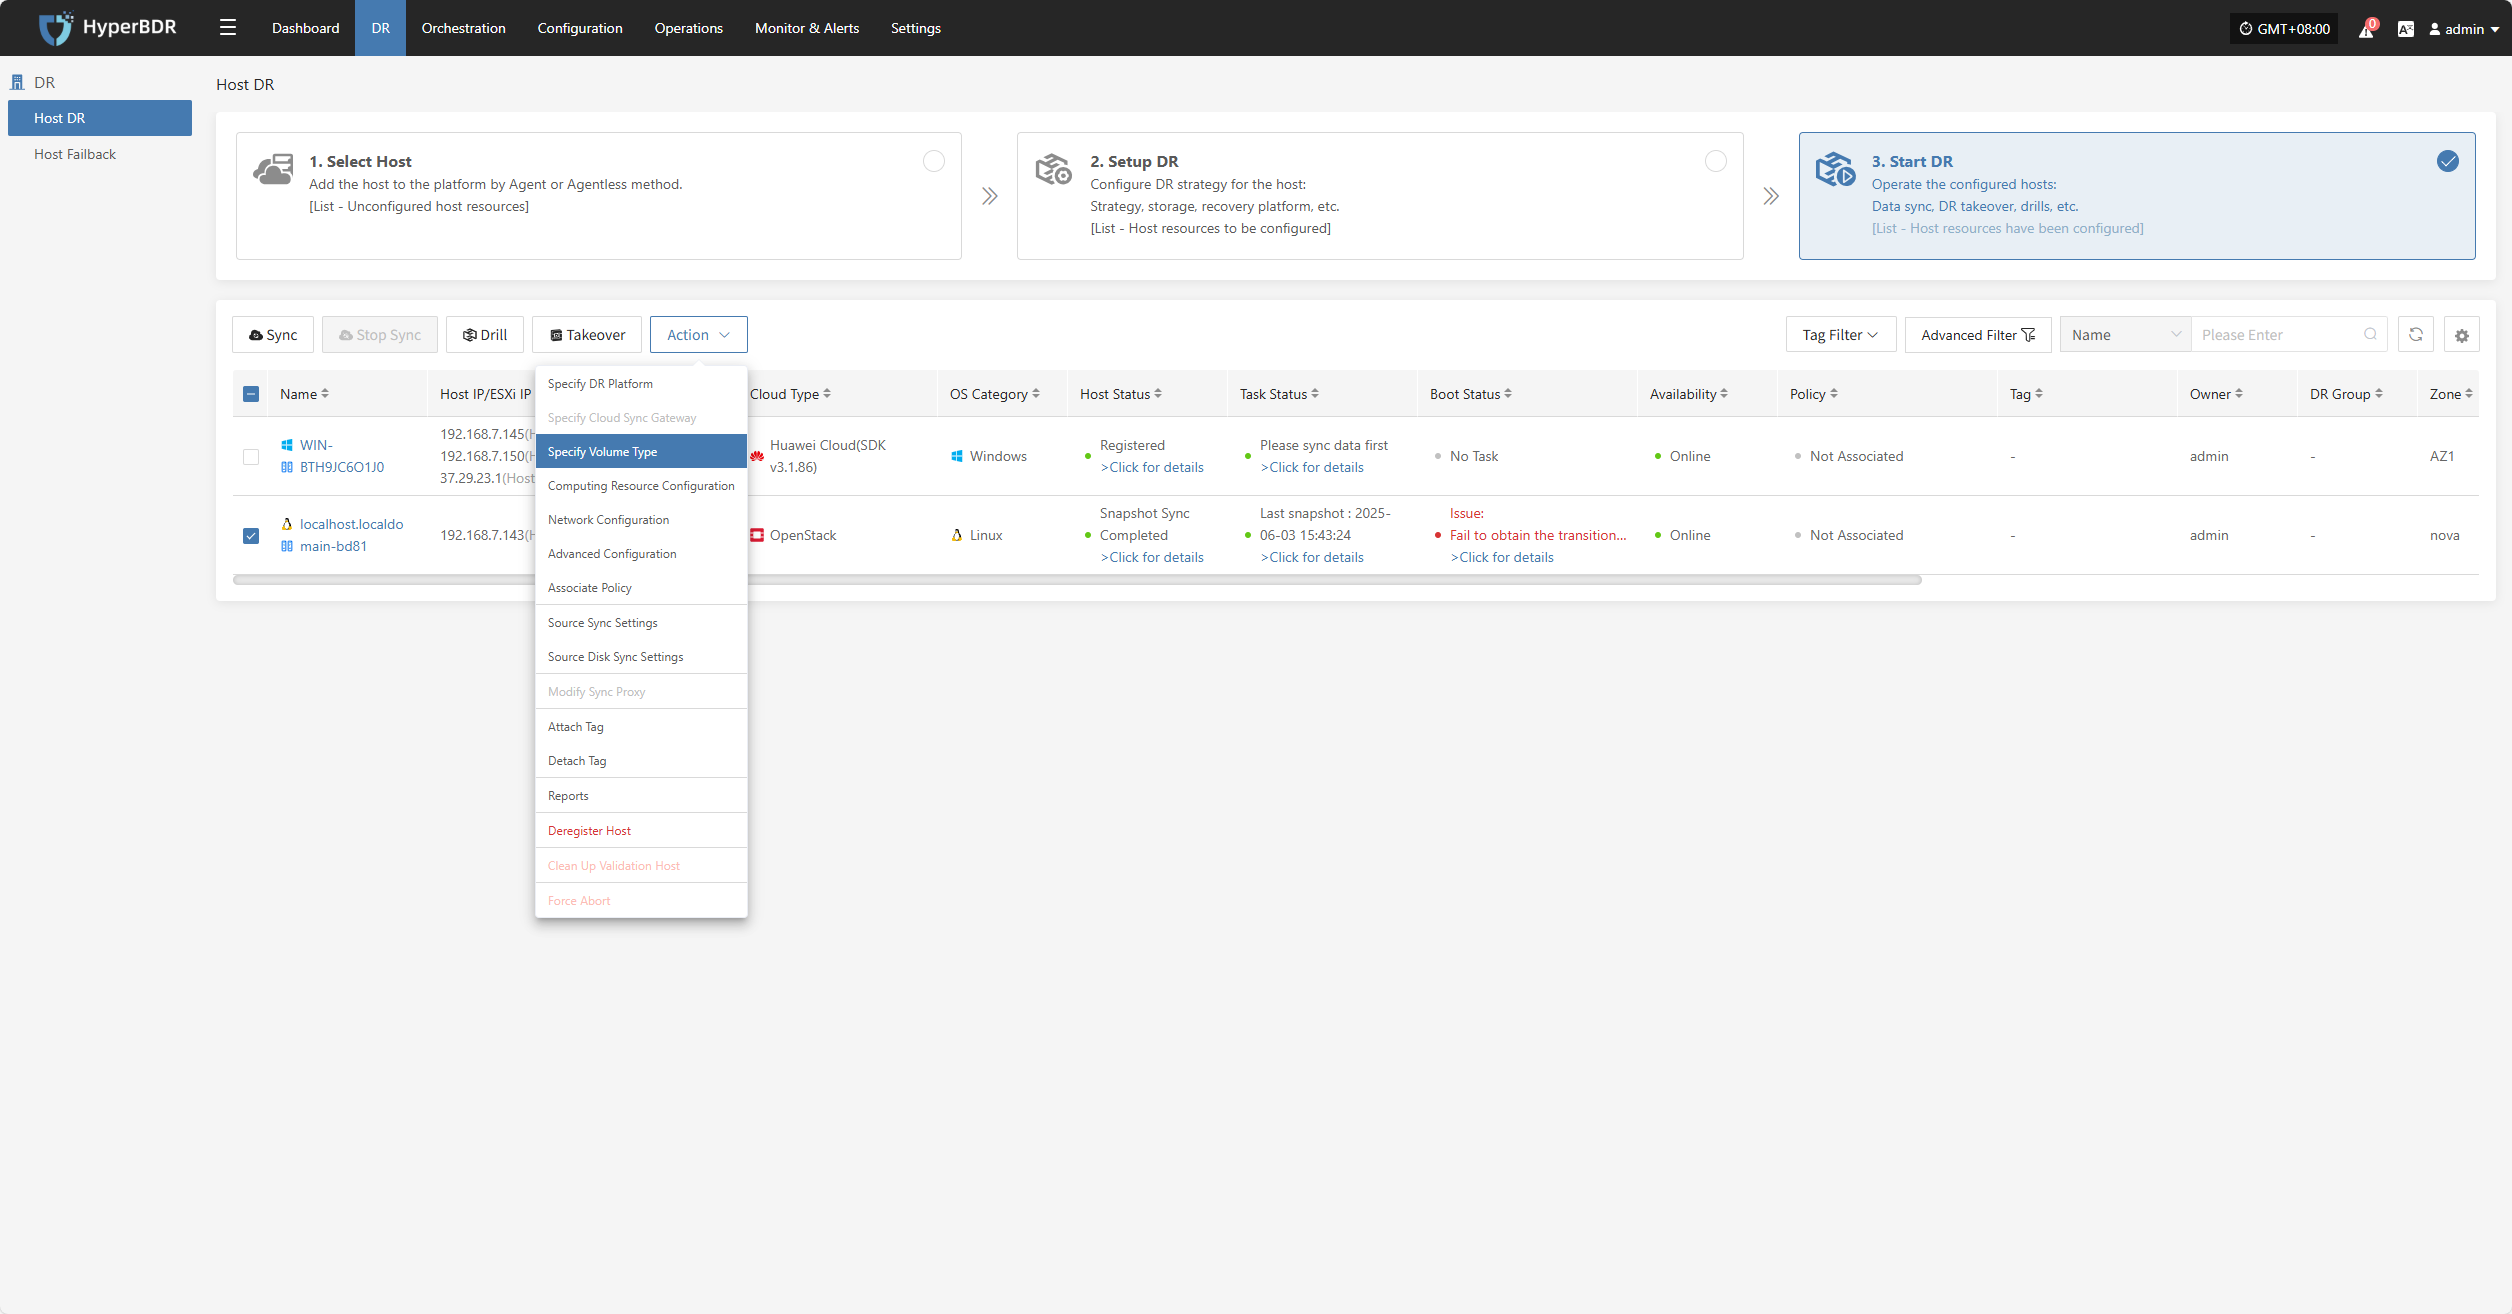
Specify Volume Type
Note: Hosts that have completed data synchronization cannot be modified.
Click "Specify Volume Type" to modify the DR platform. For details, refer to:
Block Storage: Click to View
Object Storage: Click to View
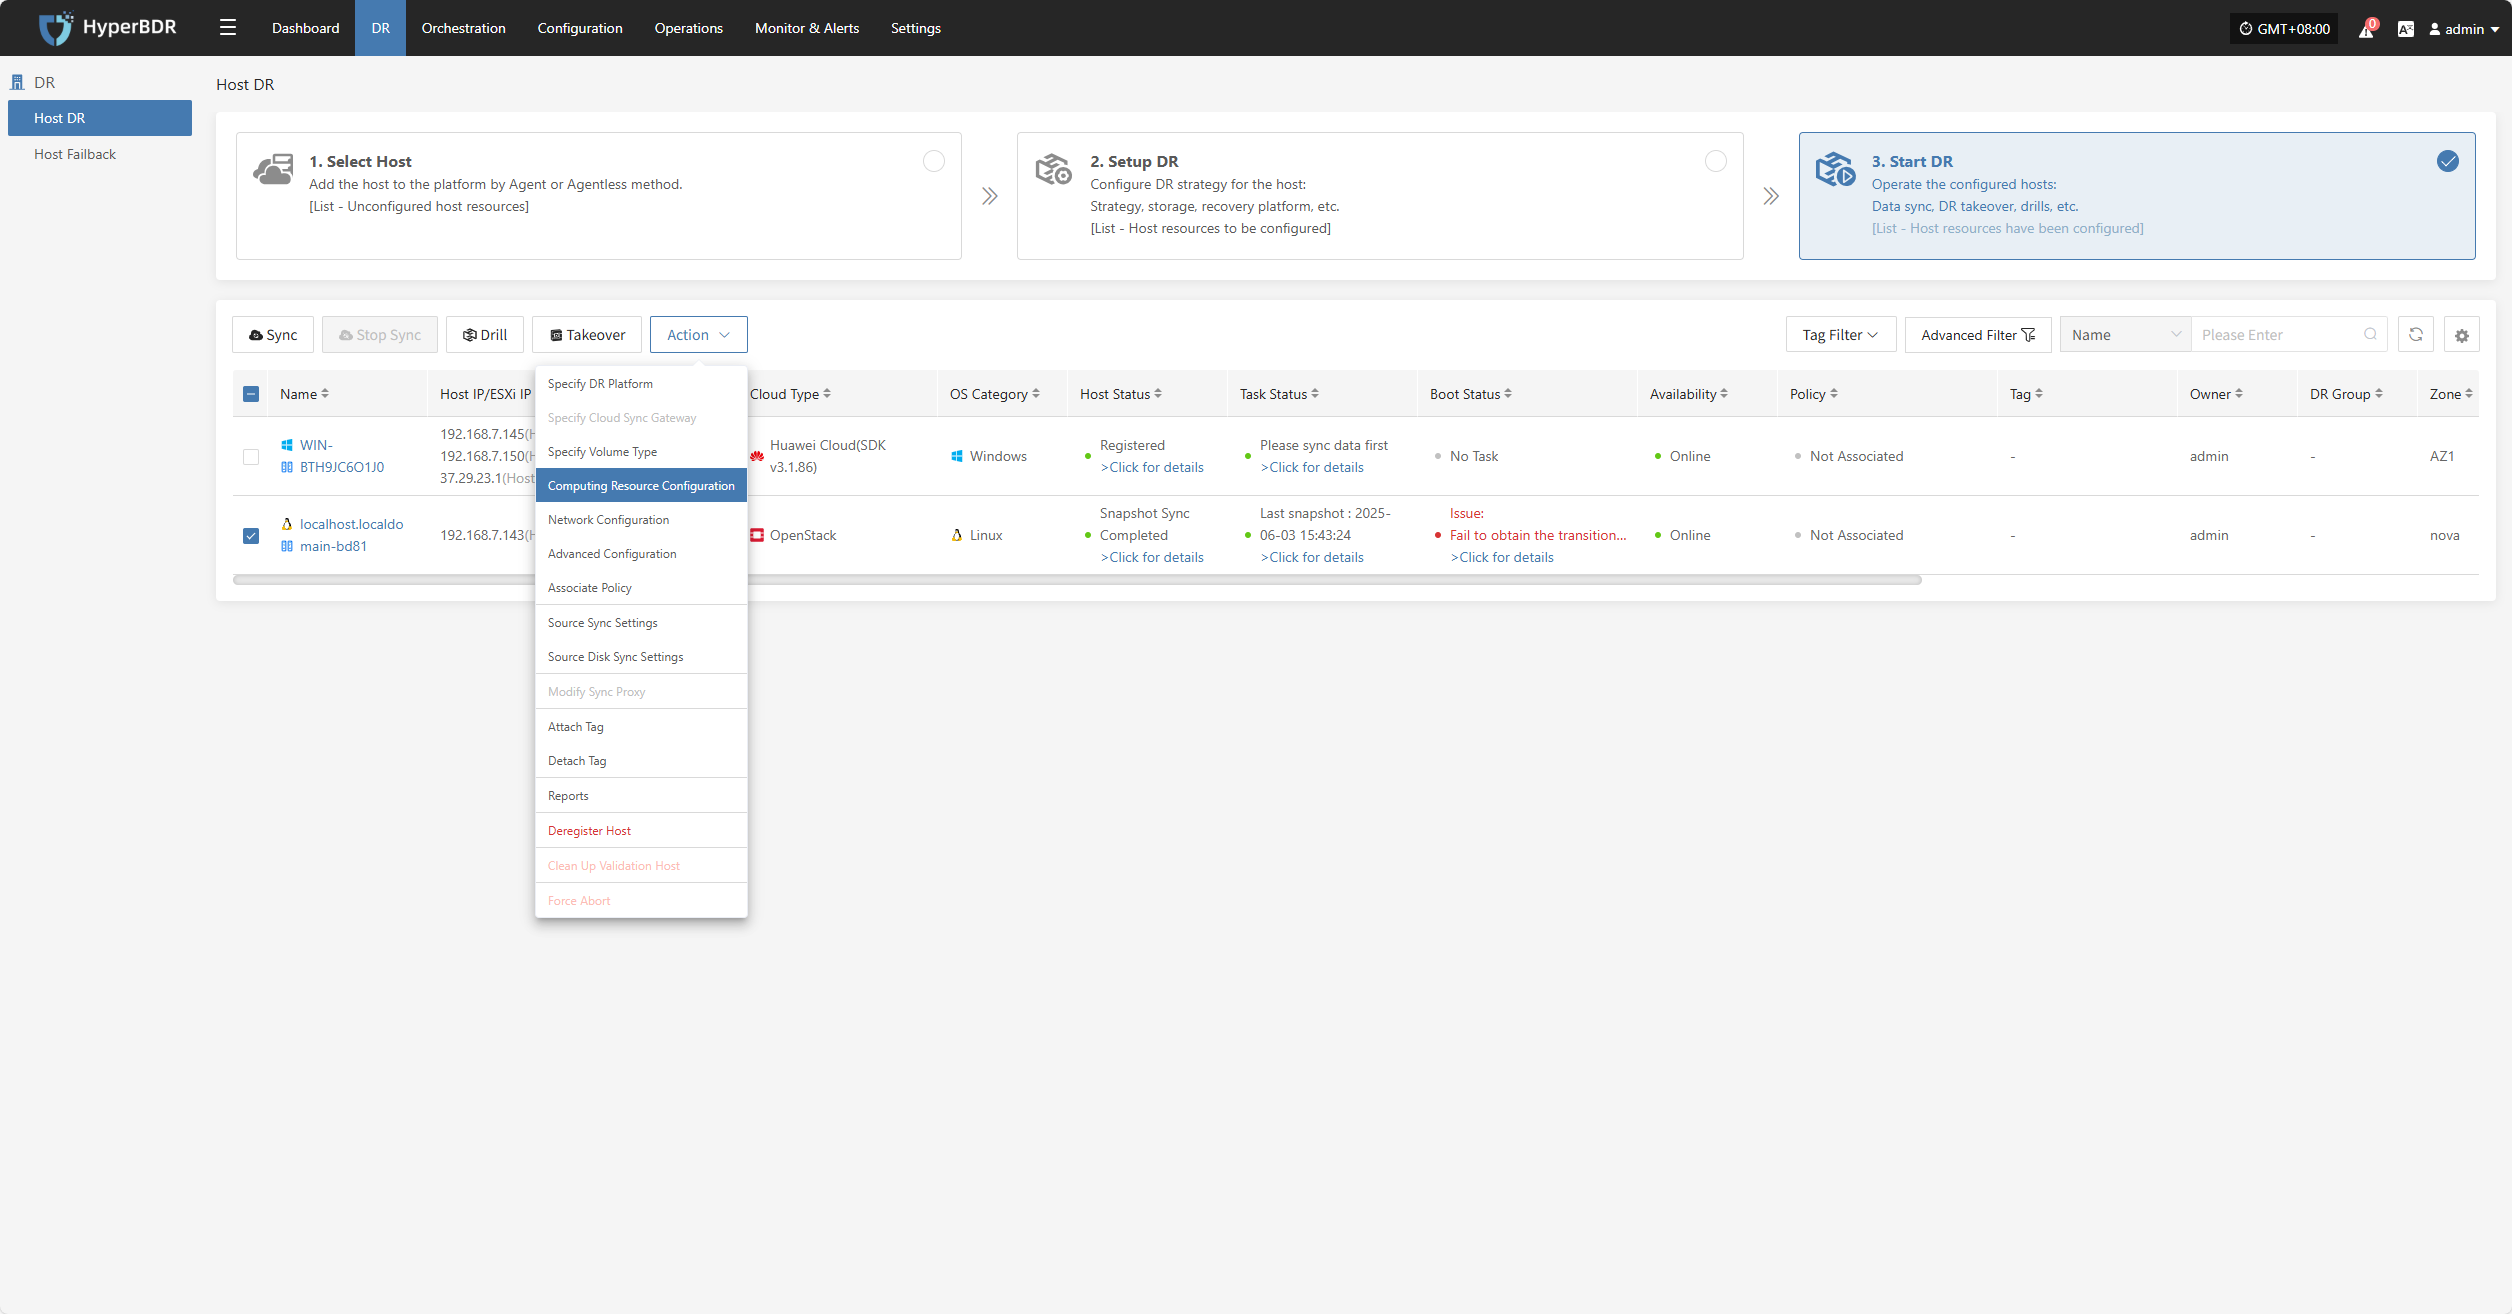
Computing Resource Configuration
Note: Hosts that have completed data synchronization cannot be modified.
Click "Computing Resource Configuration" to modify the DR platform. For details, refer to:
Block Storage: Click to View
Object Storage: Click to View
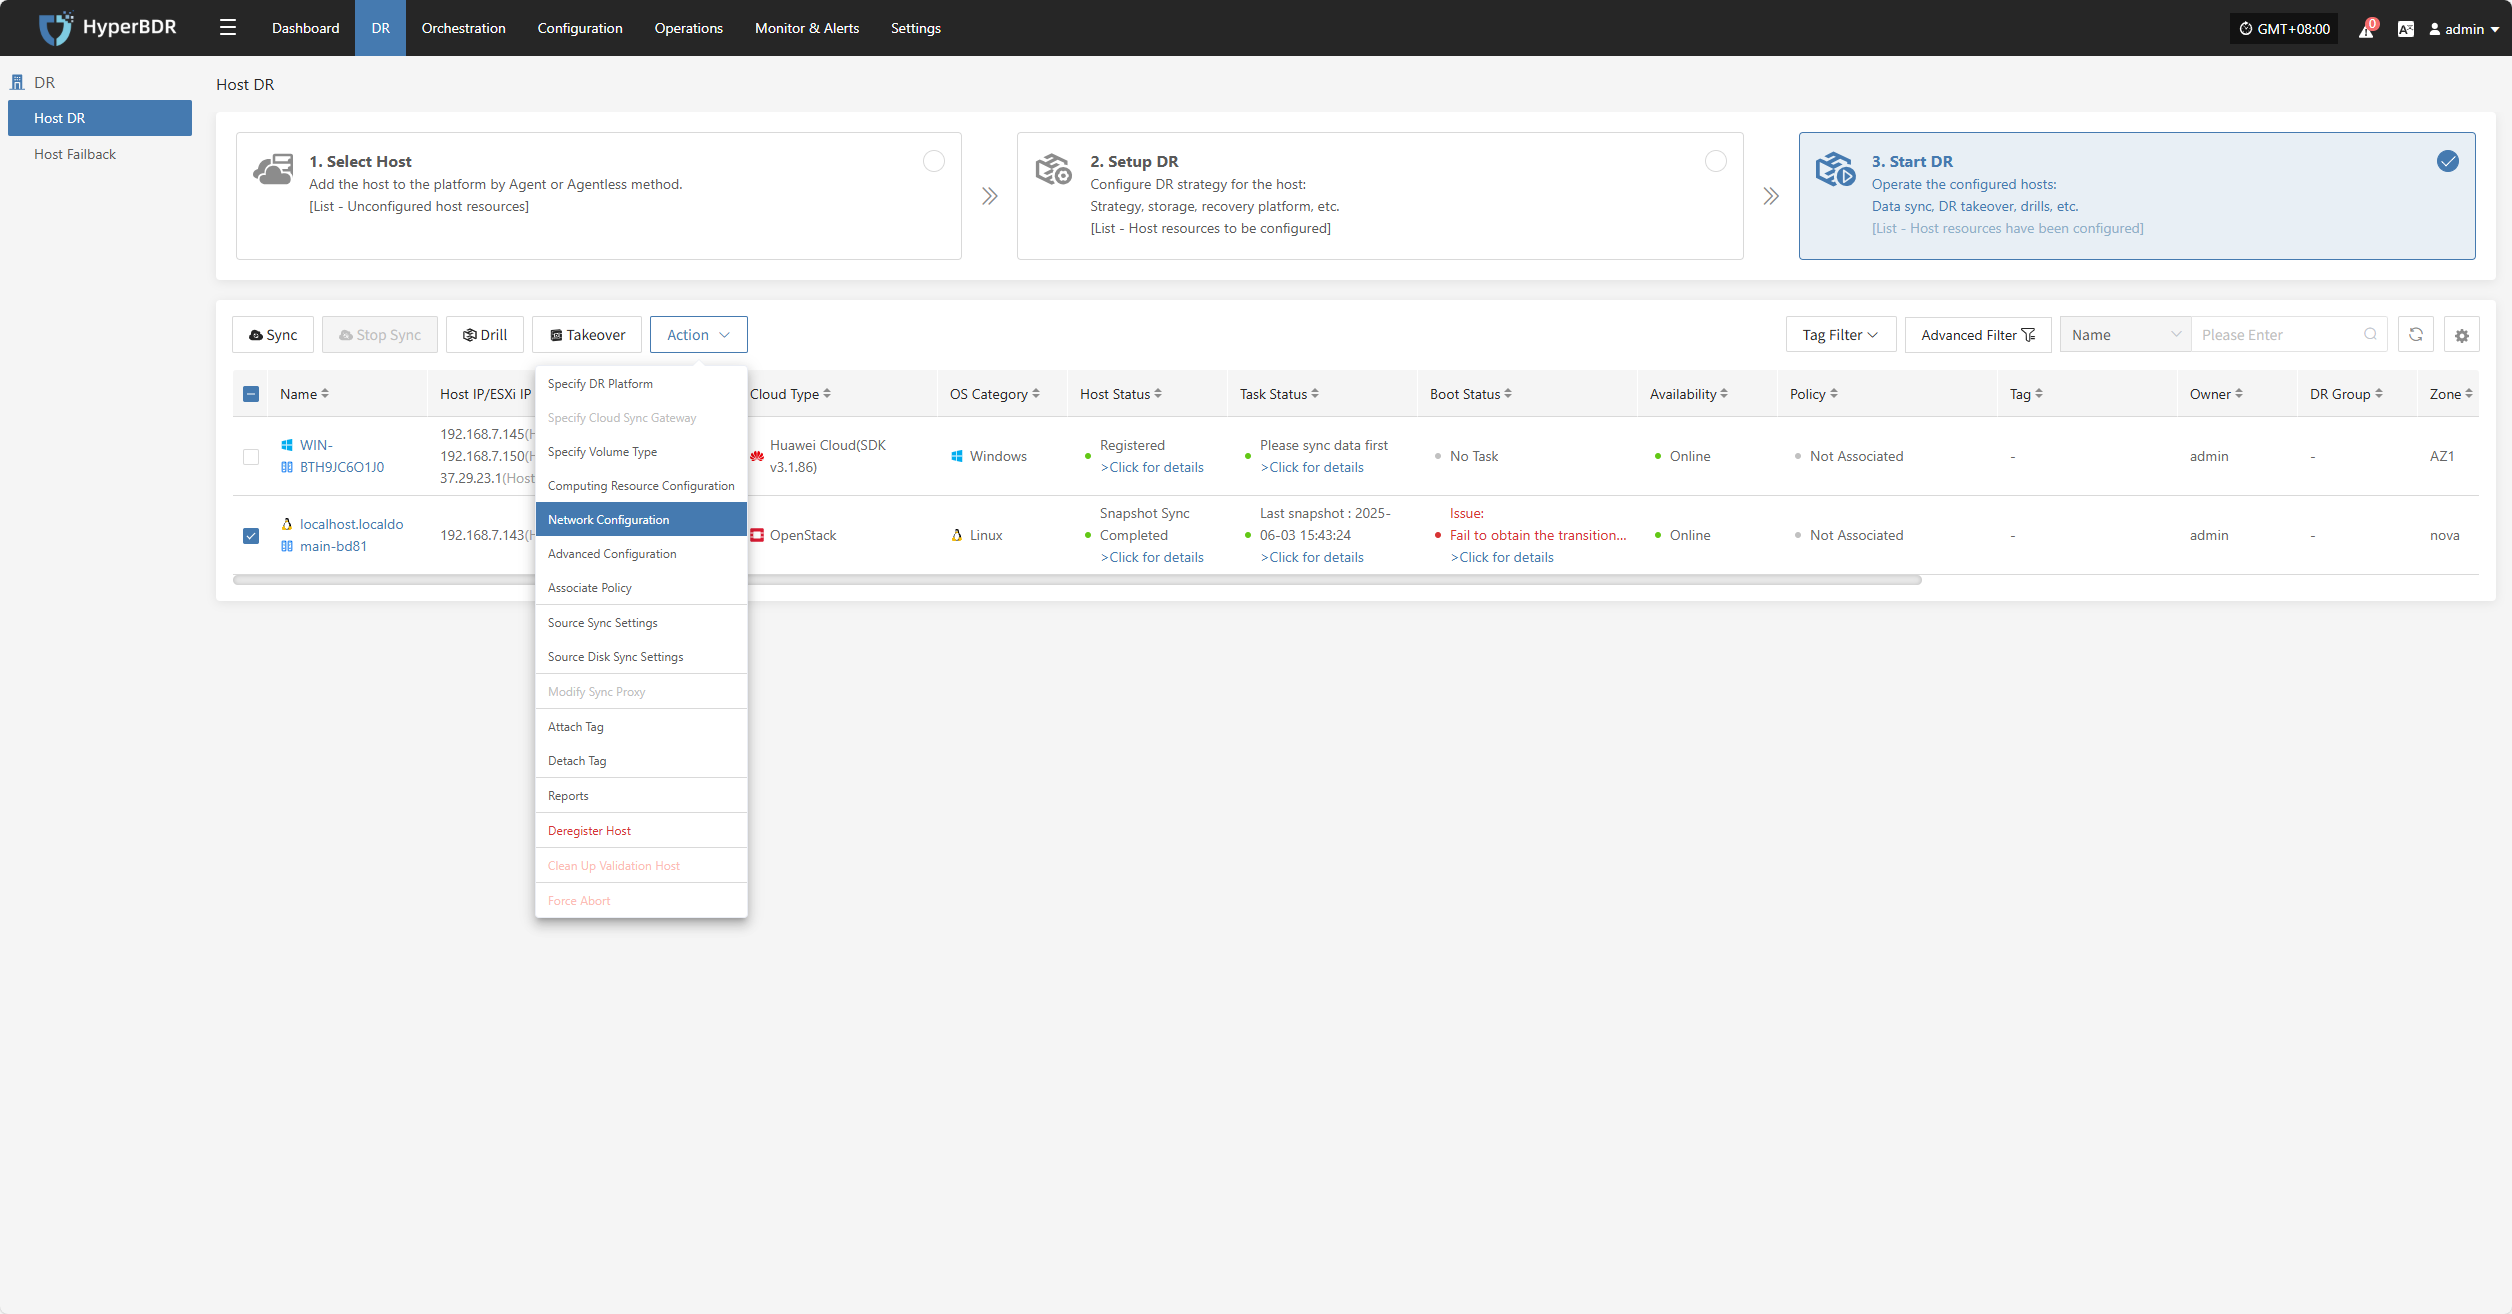
Network Configuration
Note: Hosts that have completed data synchronization cannot be modified.
Click "Network Configuration" to modify the DR platform. For details, refer to:
Block Storage: Click to View
Object Storage: Click to View
Advanced Configuration
Click "Advanced Configuration" to modify the DR platform. For details, refer to:
Block Storage: Click to View
Object Storage: Click to View
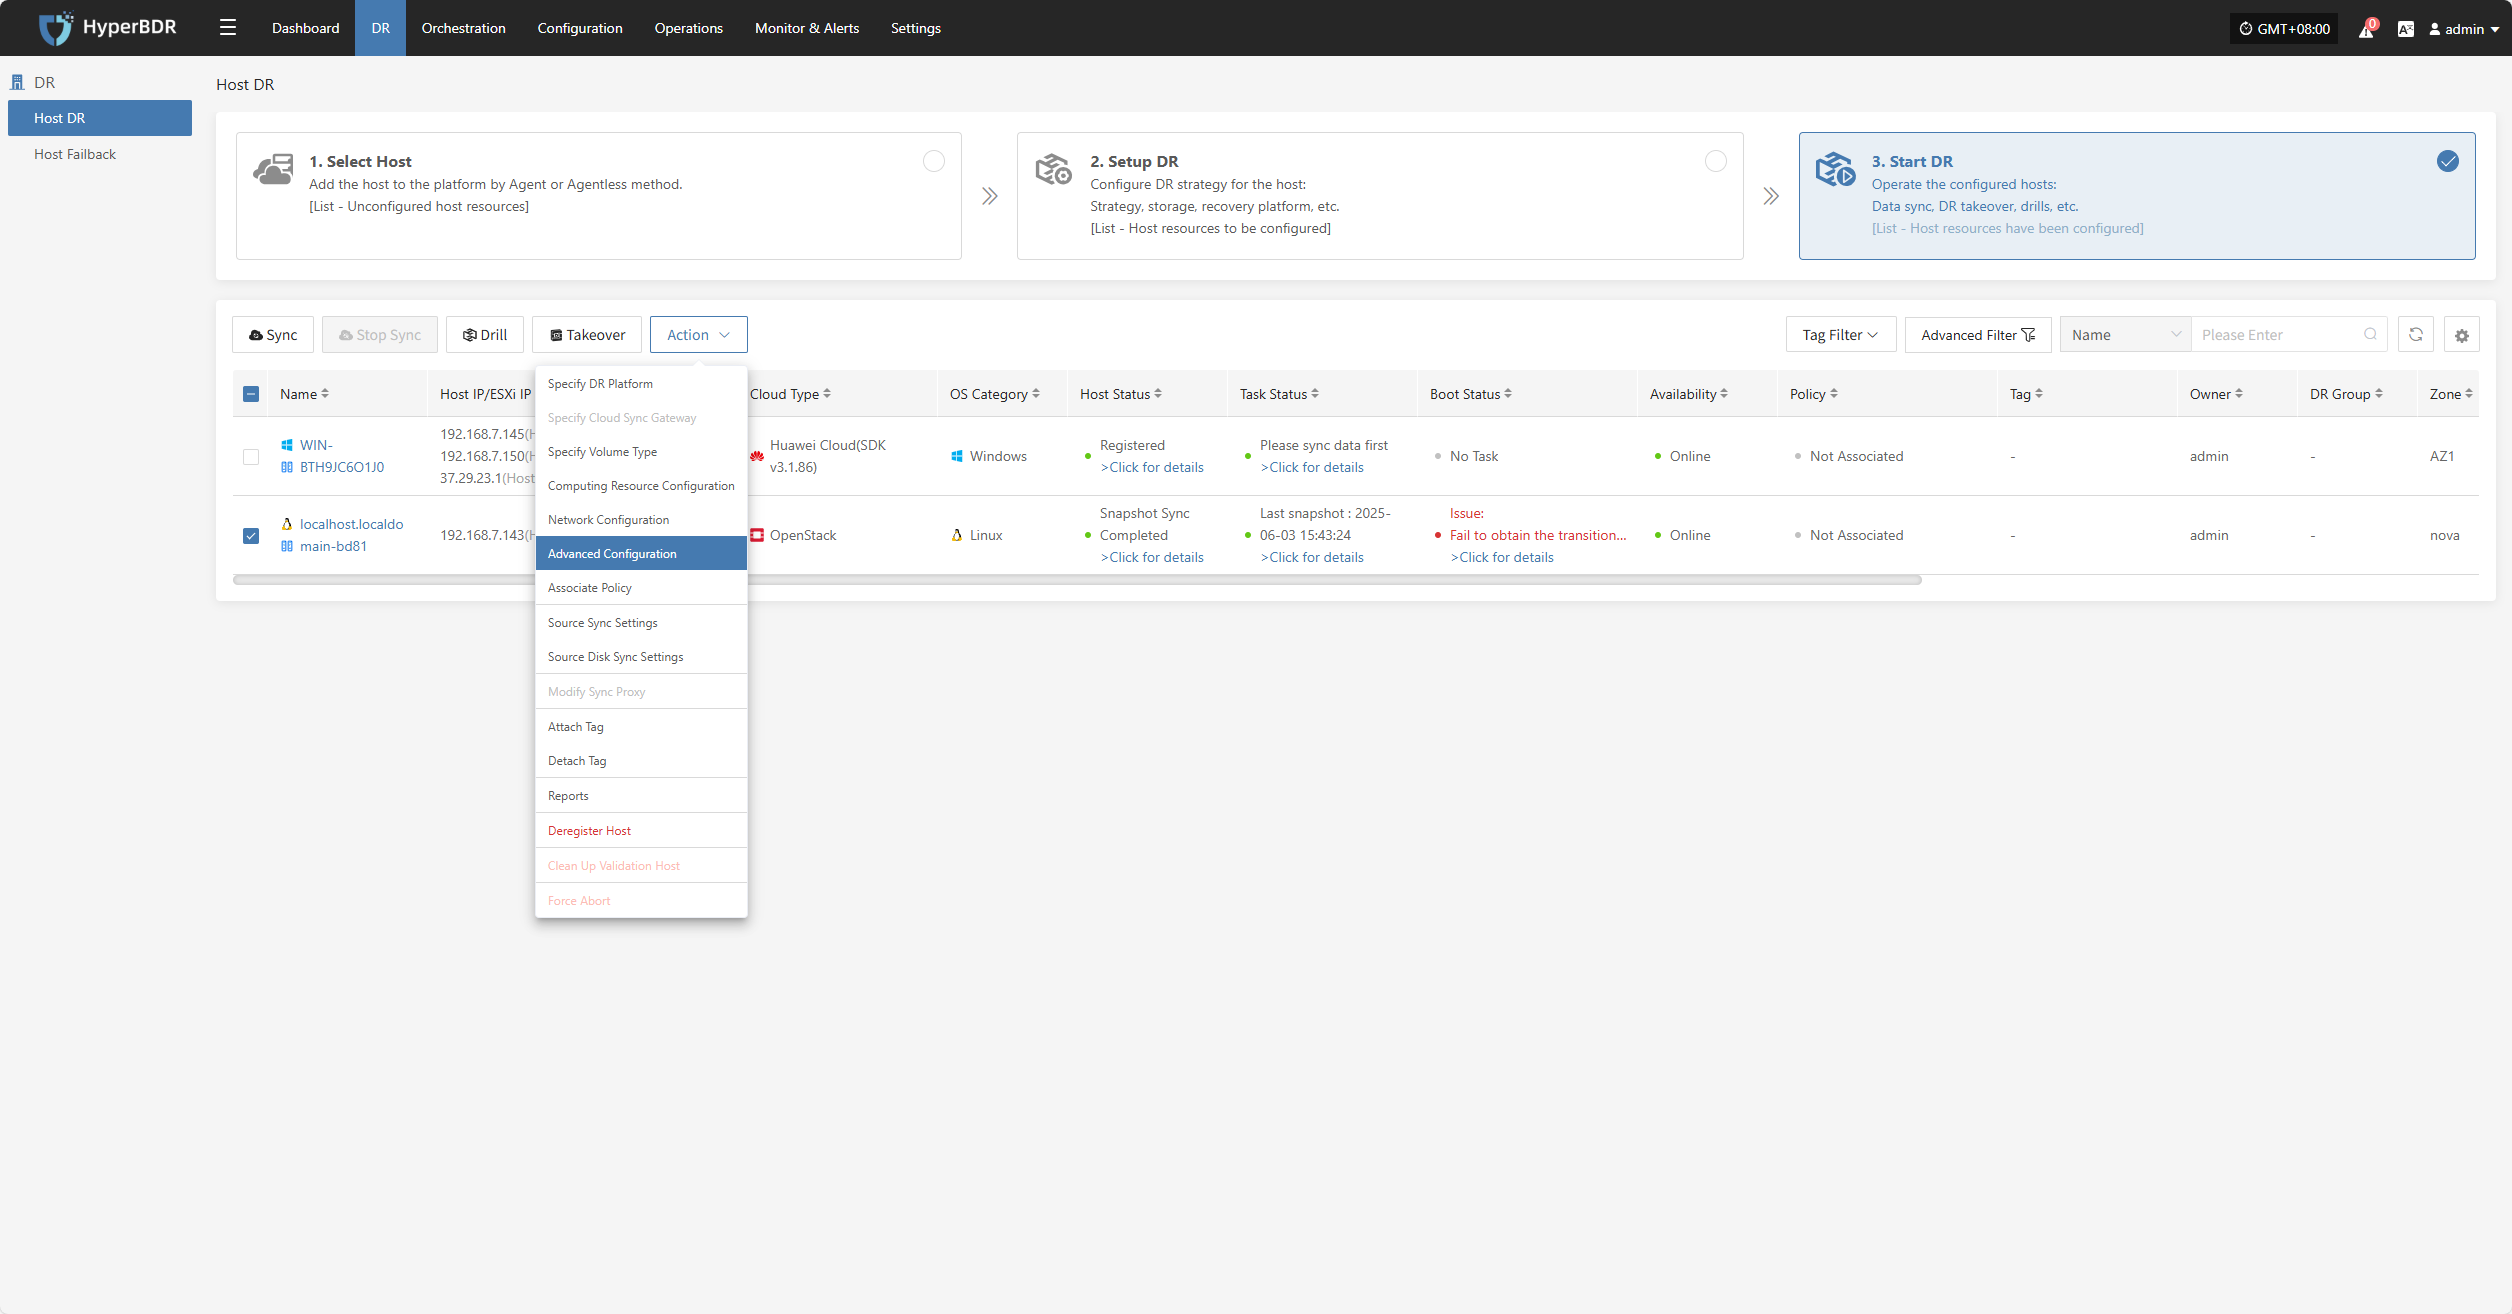
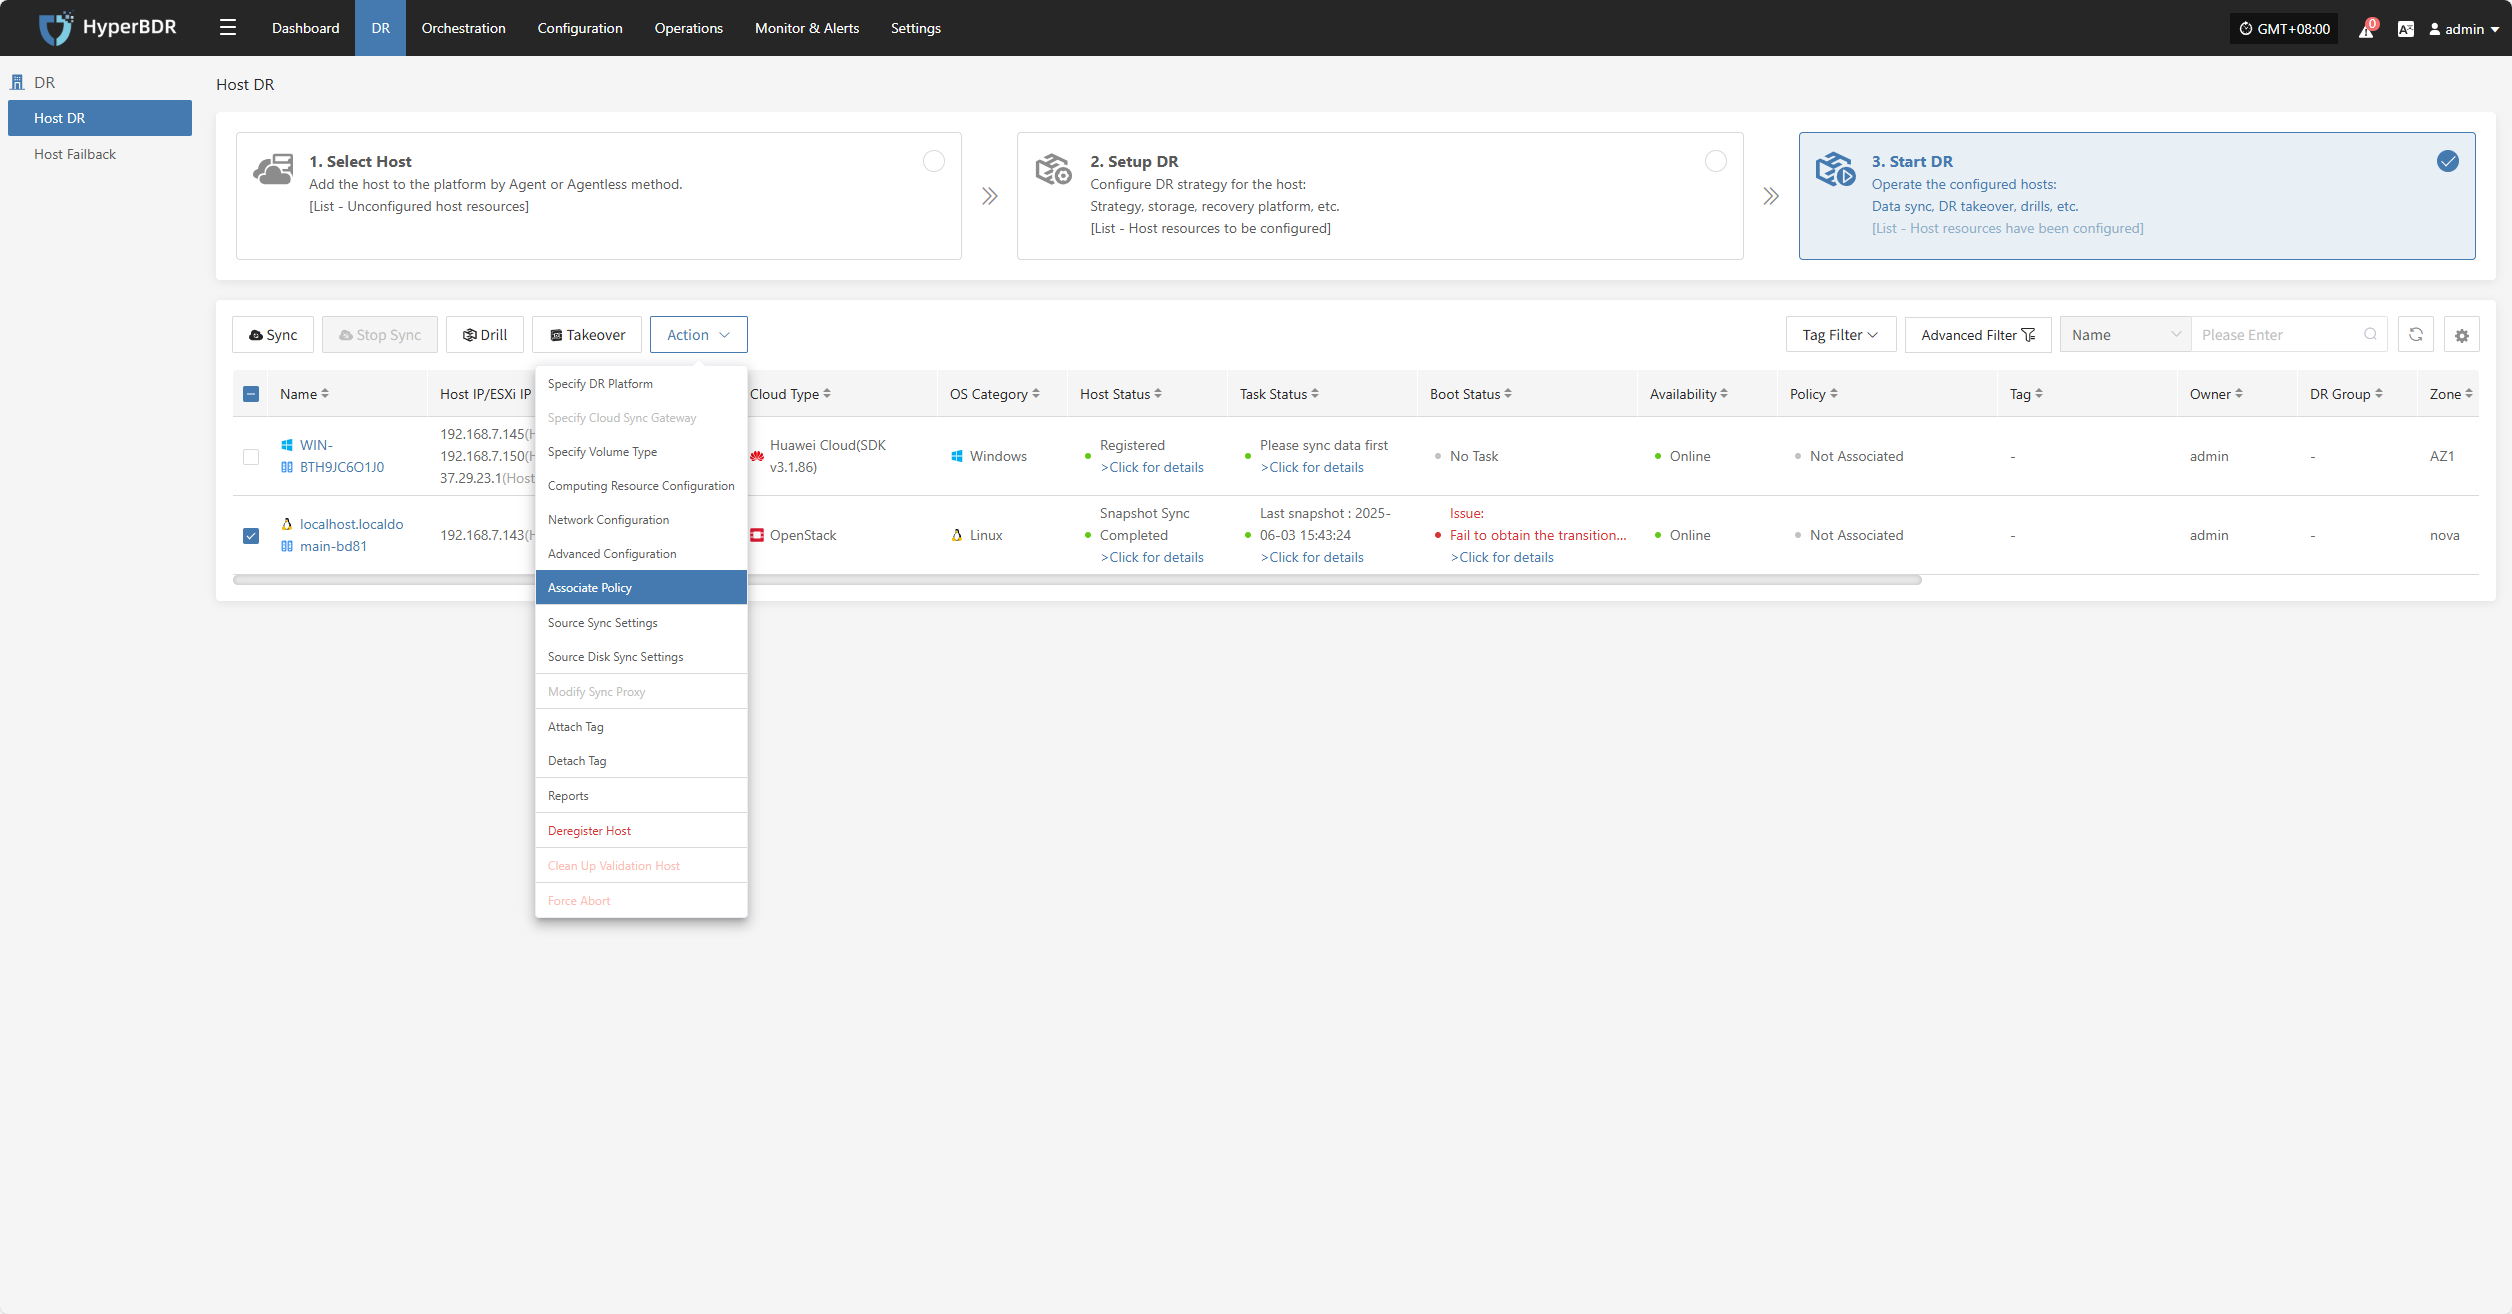
Associate Policy
Click "Associate Policy" to modify the DR platform. For details, refer to:
Block Storage: Click to View
Object Storage: Click to View
Source Sync Settings
Click "Source Sync Settings" to configure source-side parameters for backup hosts.

General Settings
| Parameter | Options | Description |
|---|---|---|
| Maximum CPU Usage | 1–100 | Sets the maximum CPU usage on the source host during backup. Avoid setting it too low to ensure backup efficiency. |
| Encryption | Yes / No | Applies only to Object Storage mode. Note: Enabling this option increases CPU usage for encryption processing. |
| Compression | Yes / No | Applies only to Object Storage mode. Note: Enabling this option increases CPU usage for compression processing. |
Agentless Mode
| Parameter | Options | Description |
|---|---|---|
| VMware Quiesced Snapshot | Yes / No | Currently supported only on VMware hosts with VMware Tools installed. |
| Read Threads | Auto / Custom | Sets the number of read threads per host. "Auto" adjusts the threads based on the sync proxy's resources and the number of disks on the host (1–10). Use "Custom" (1–100) if needed; it's recommended to keep under 30. For 10Gb+ networks, increasing proxy resources (e.g., 8 cores, 16 GB RAM or more) allows setting to 50 or 100 for better performance. |
| Writing Thread | Auto / Custom | Sets the number of write threads per host. "Auto" adjusts based on proxy resources and disk count (1–10). Use "Custom" (1–100) if needed; recommended max is 30. For 10Gb+ networks, increase proxy resources before setting to 50 or 100. |
| Concurrent Multi-Disk Read and Write | Yes / No | Determines whether all disks on a host are synchronized concurrently. |
Sync Retry Settings
| Parameter | Options | Description |
|---|---|---|
| Retry on Failure | Yes / No | If enabled, the system will retry automatically after a failure (e.g., network issues). |
| Retry Count | 1–100 | Maximum number of retry attempts. |
| Retry Interval | 1–3600 | Wait time (in seconds) between retries. |
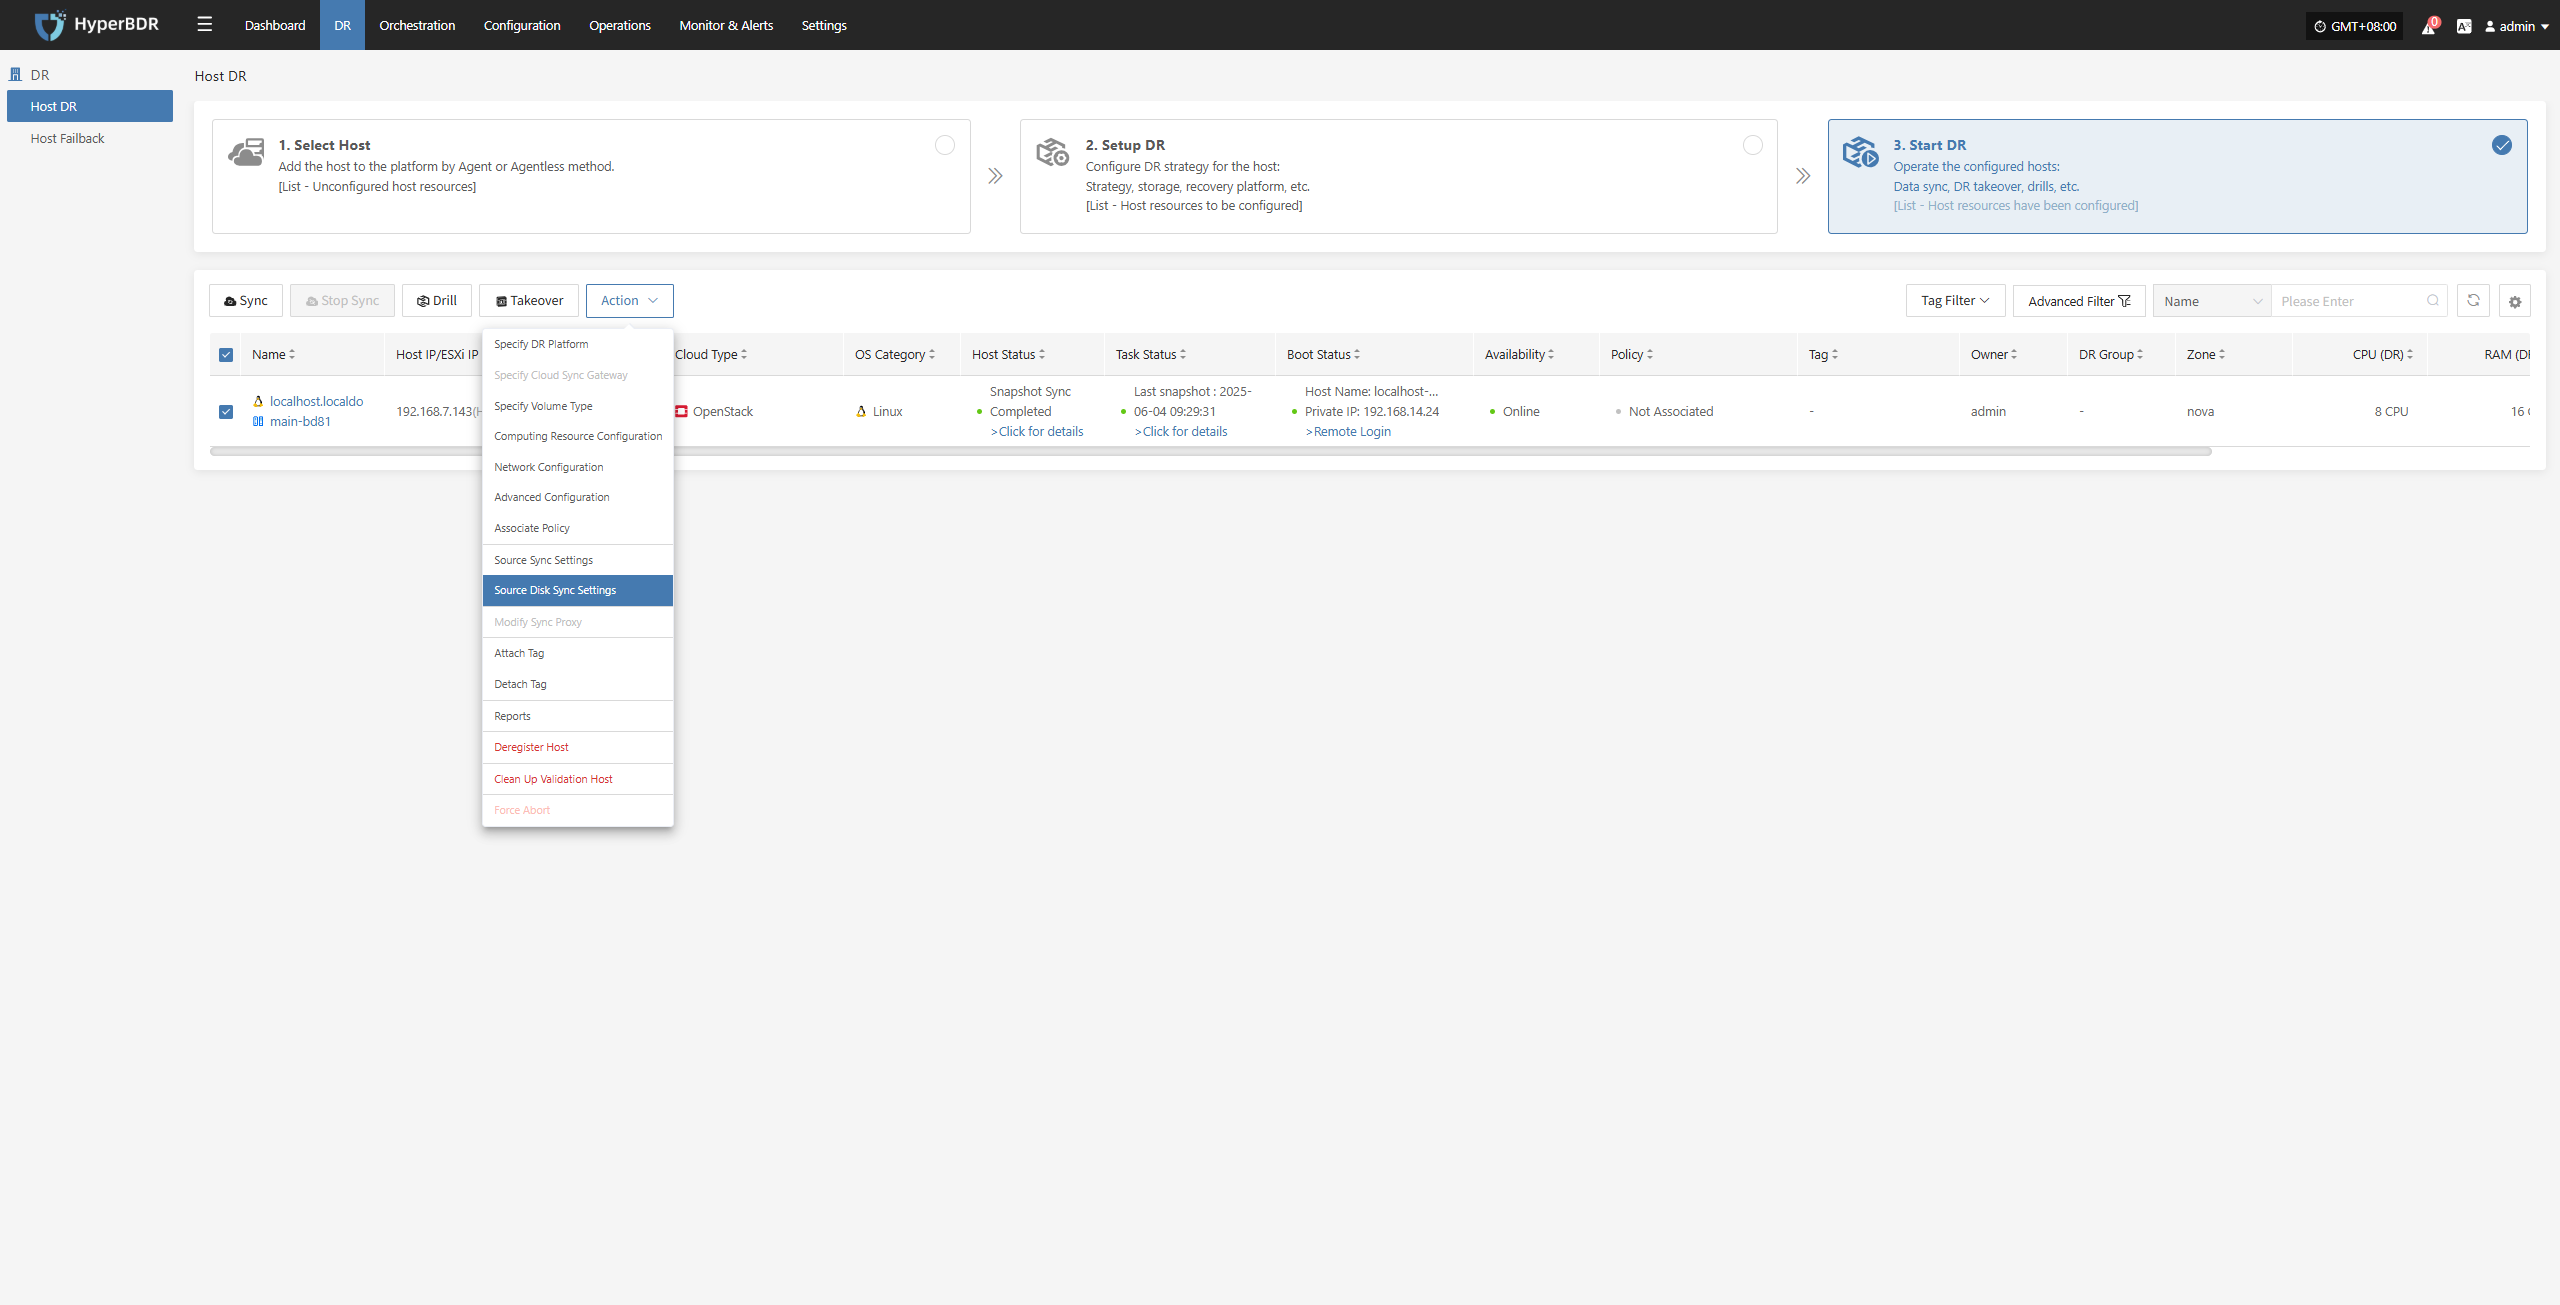
Source Disk Sync Settings
Click “Source Disk Sync Settings” to configure the source disk synchronization policy. When multiple disks are present, you can choose whether each disk participates in the synchronization individually.
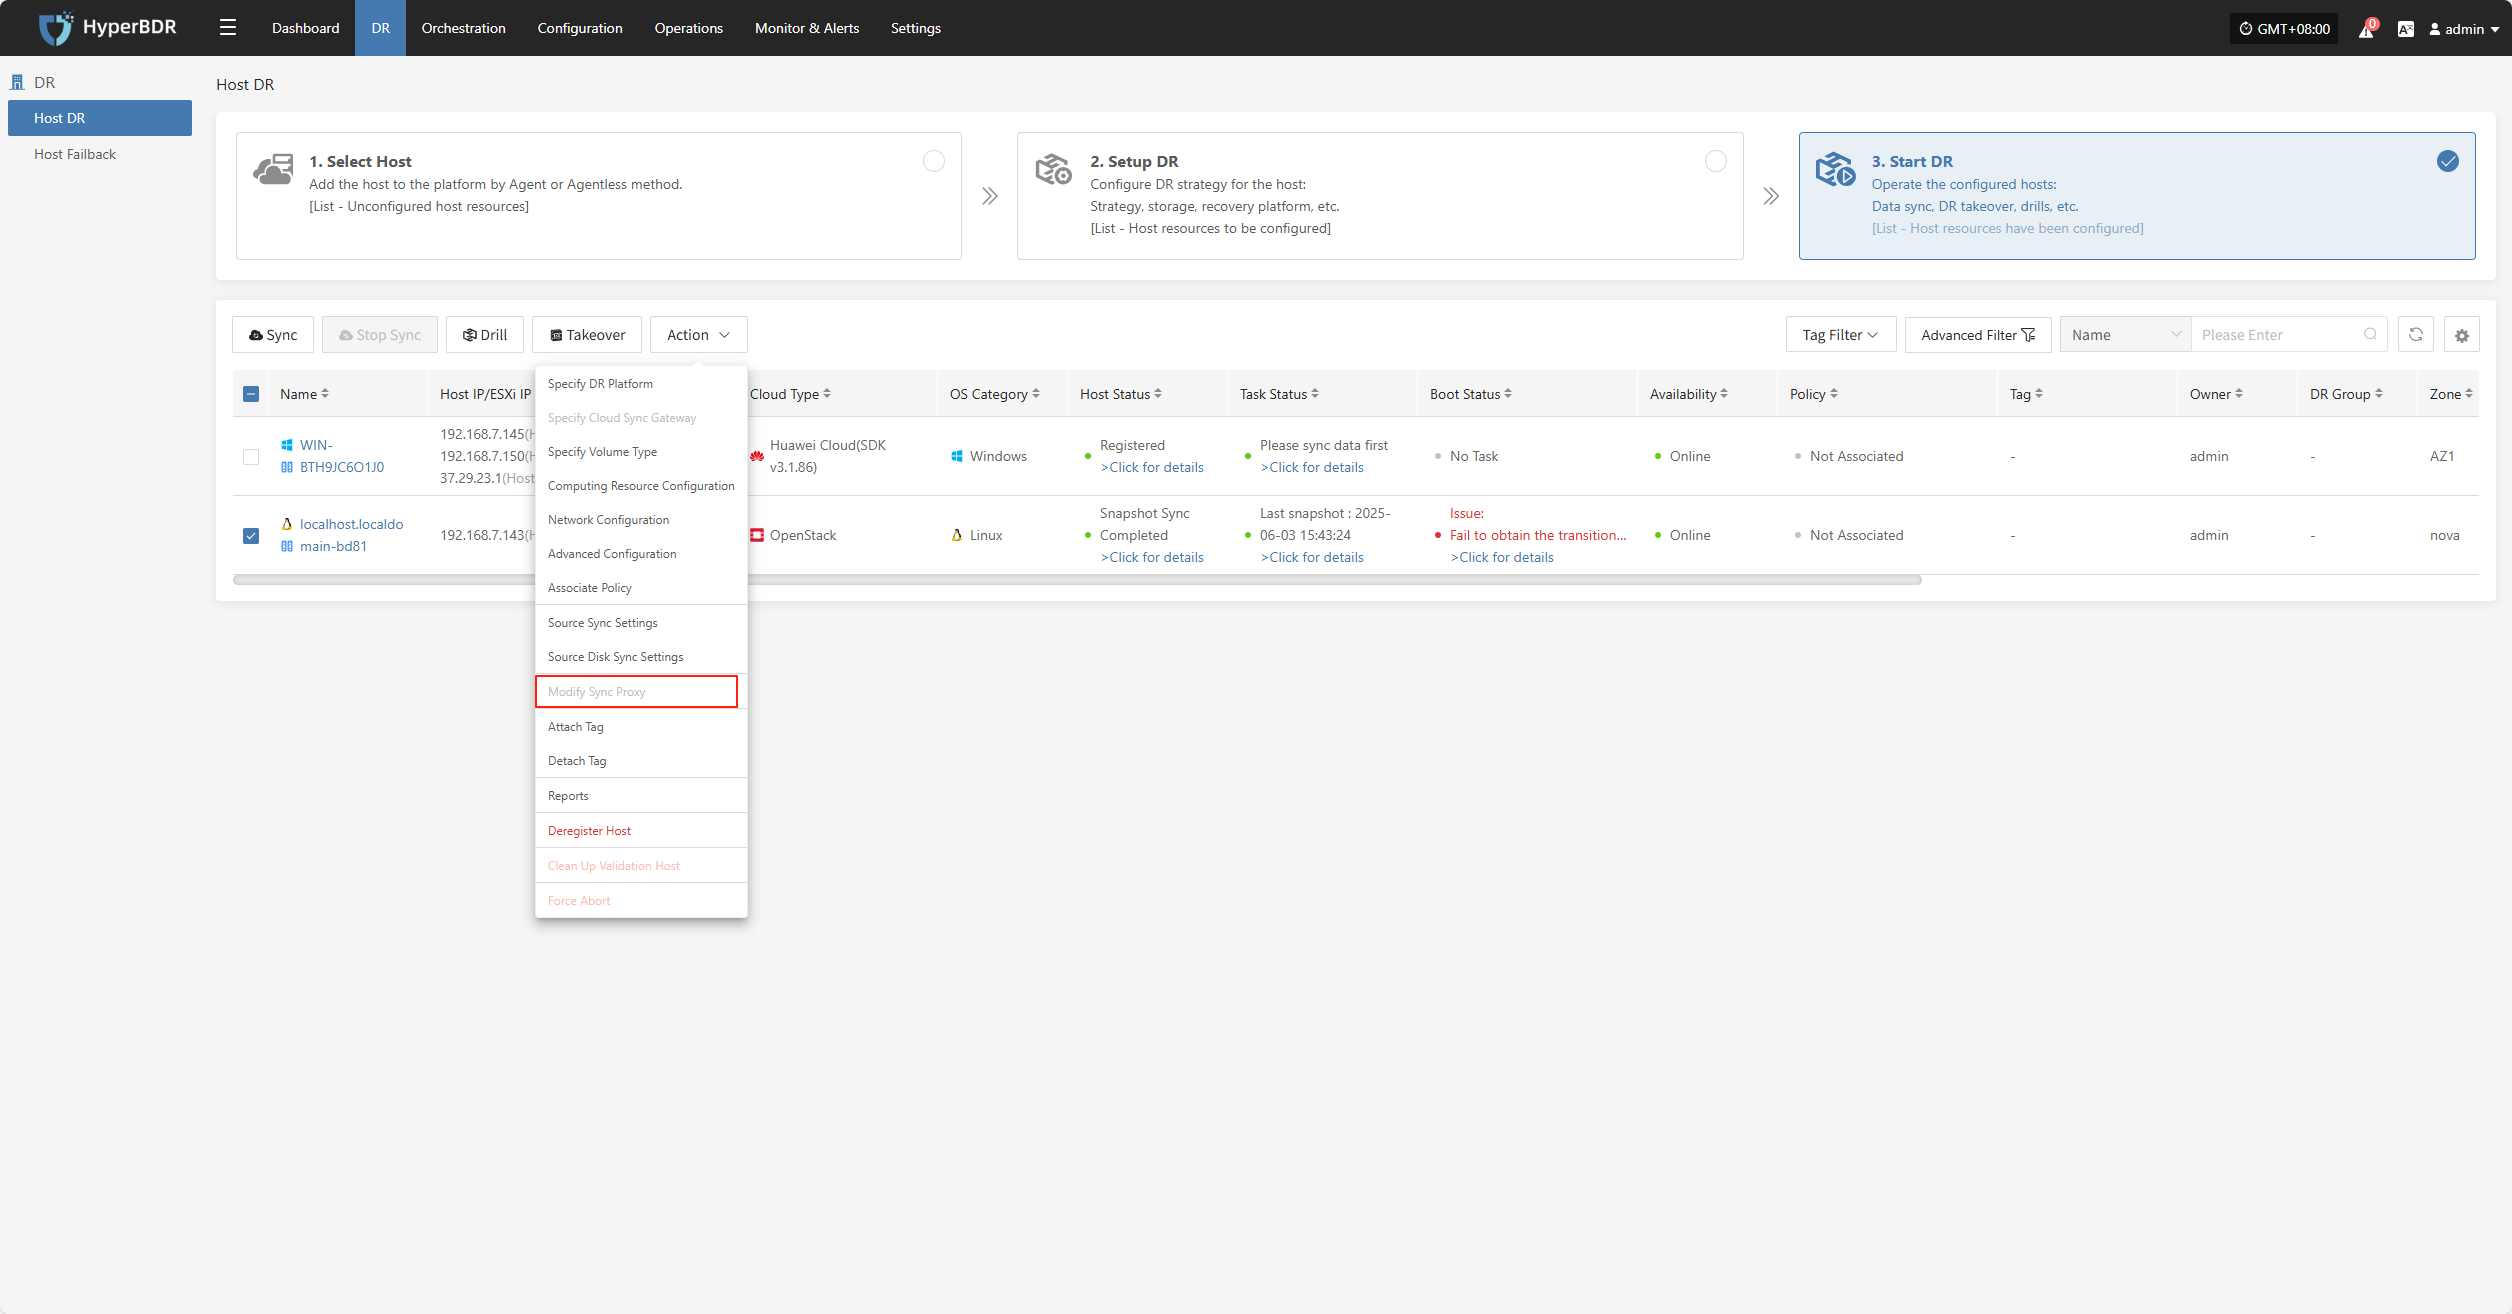
Modify Sync Proxy
Note: Hosts with completed data sync cannot change the sync proxy.
Click "Modify Sync Proxy" to update the source sync proxy.
Attach Tag
Click "Attach Tag" to open a sidebar where you can assign tags to the selected host.
Detach Tag
Click "Detach Tag" to open a sidebar where you can remove tags from the selected host.
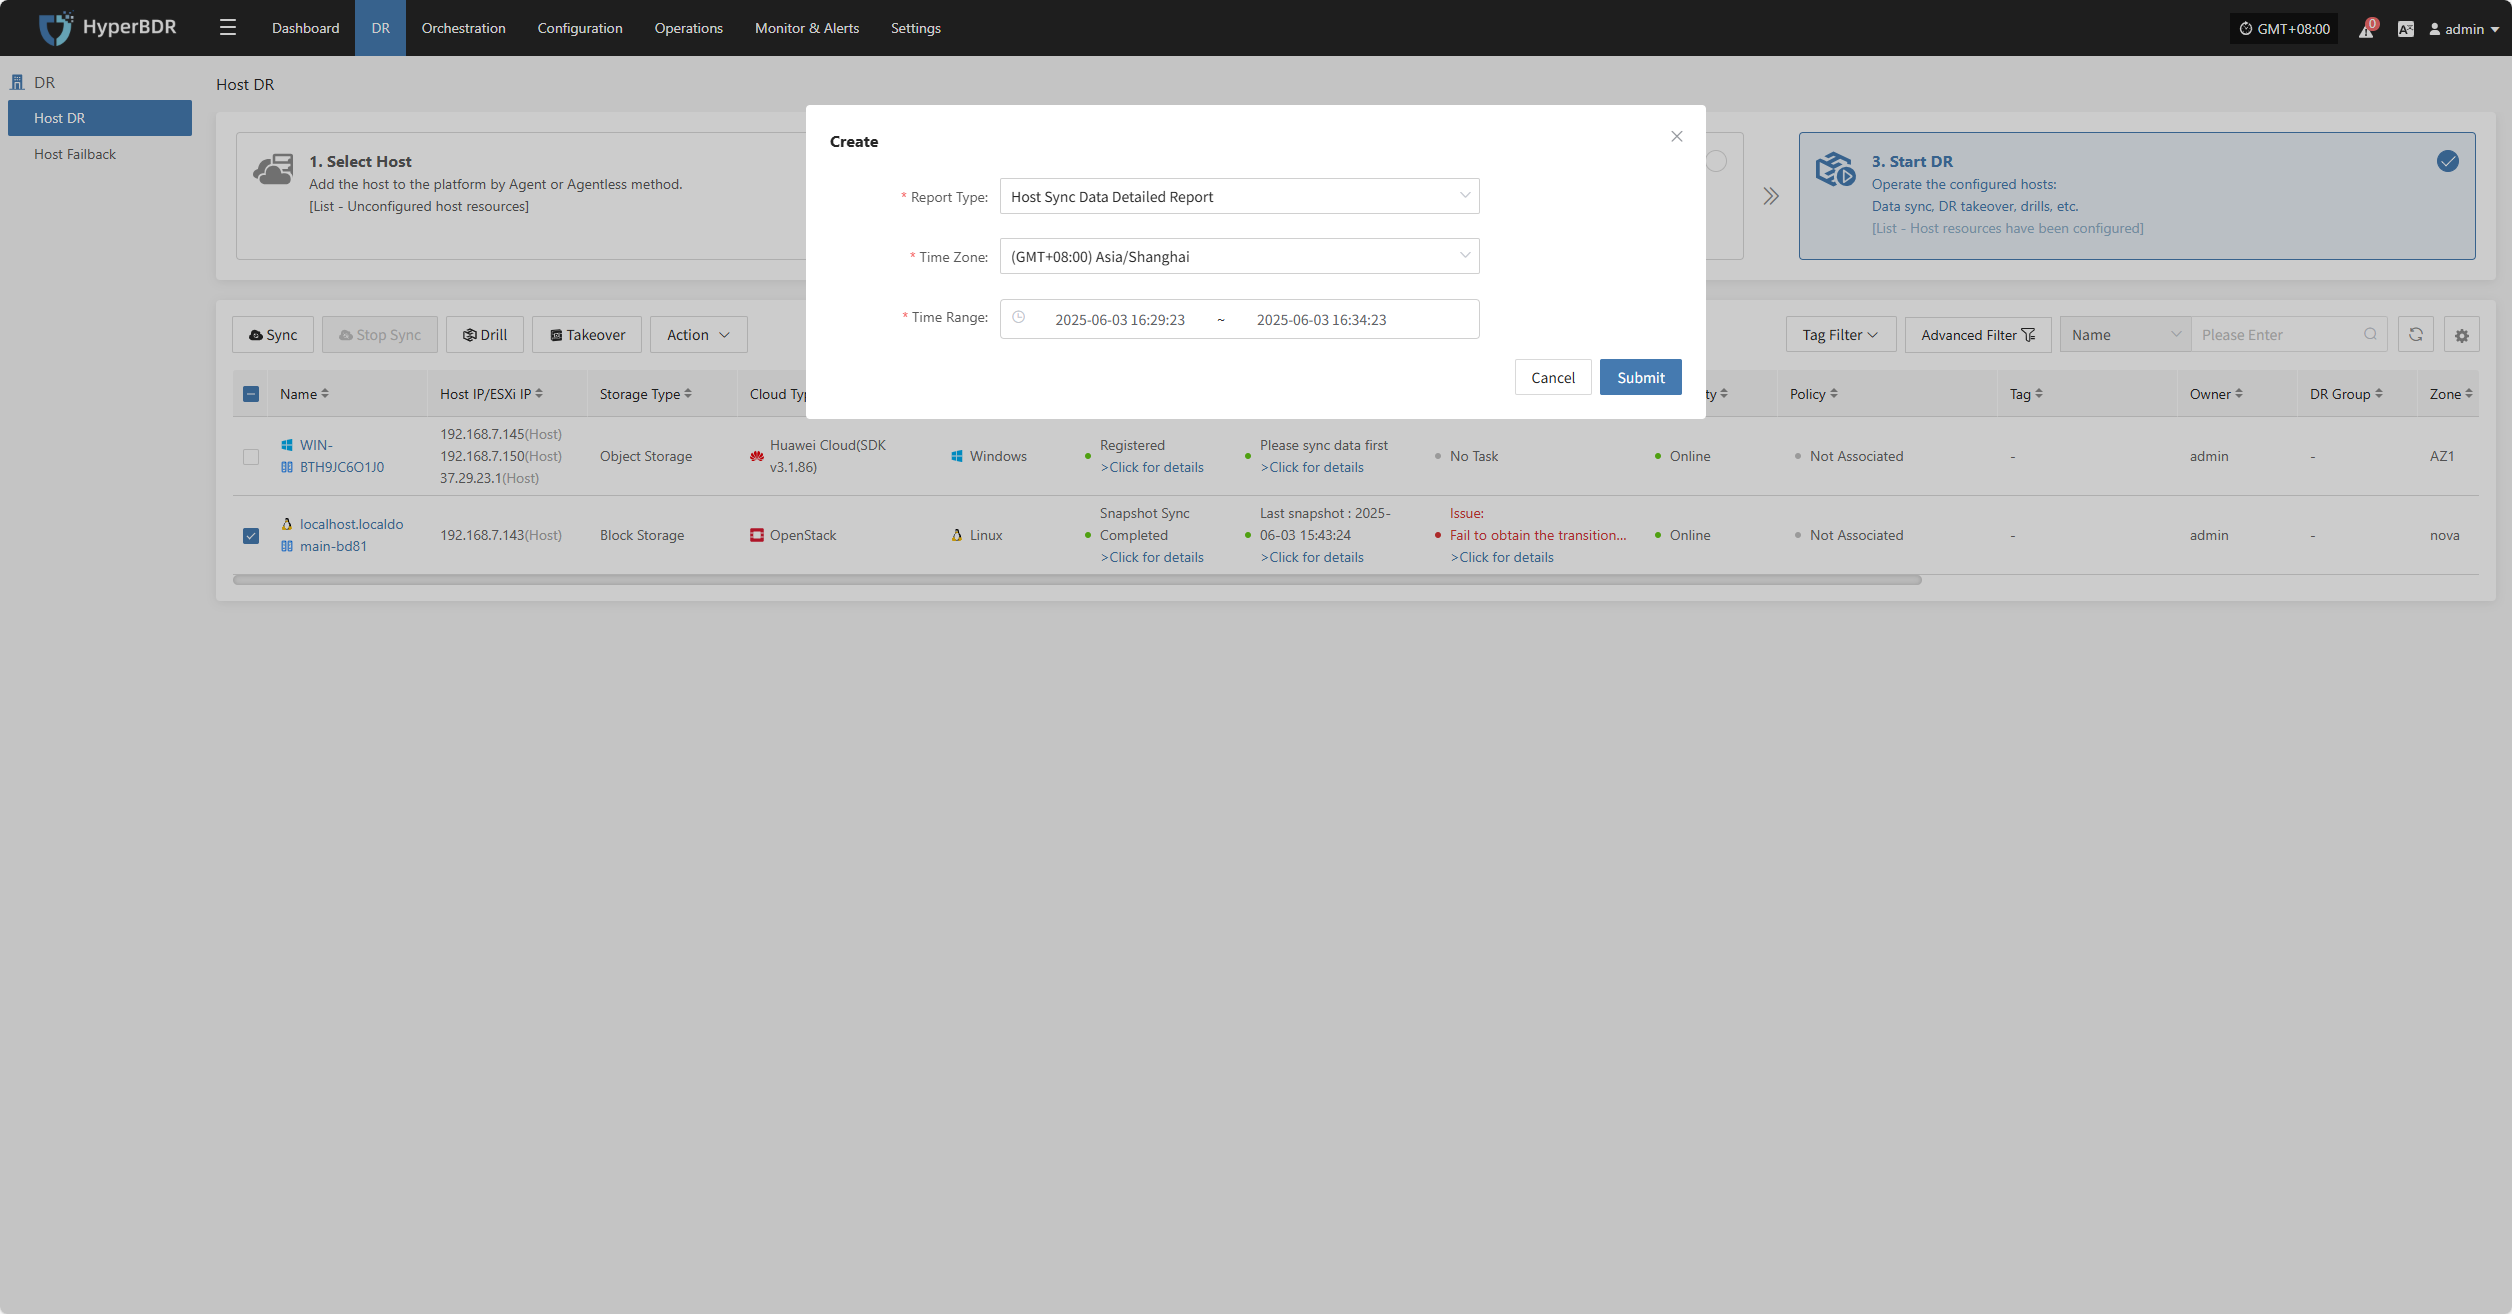
Reports
Click "Report" to open a dialog where you can choose the type of report to export for the selected host. See more: (Report Export)
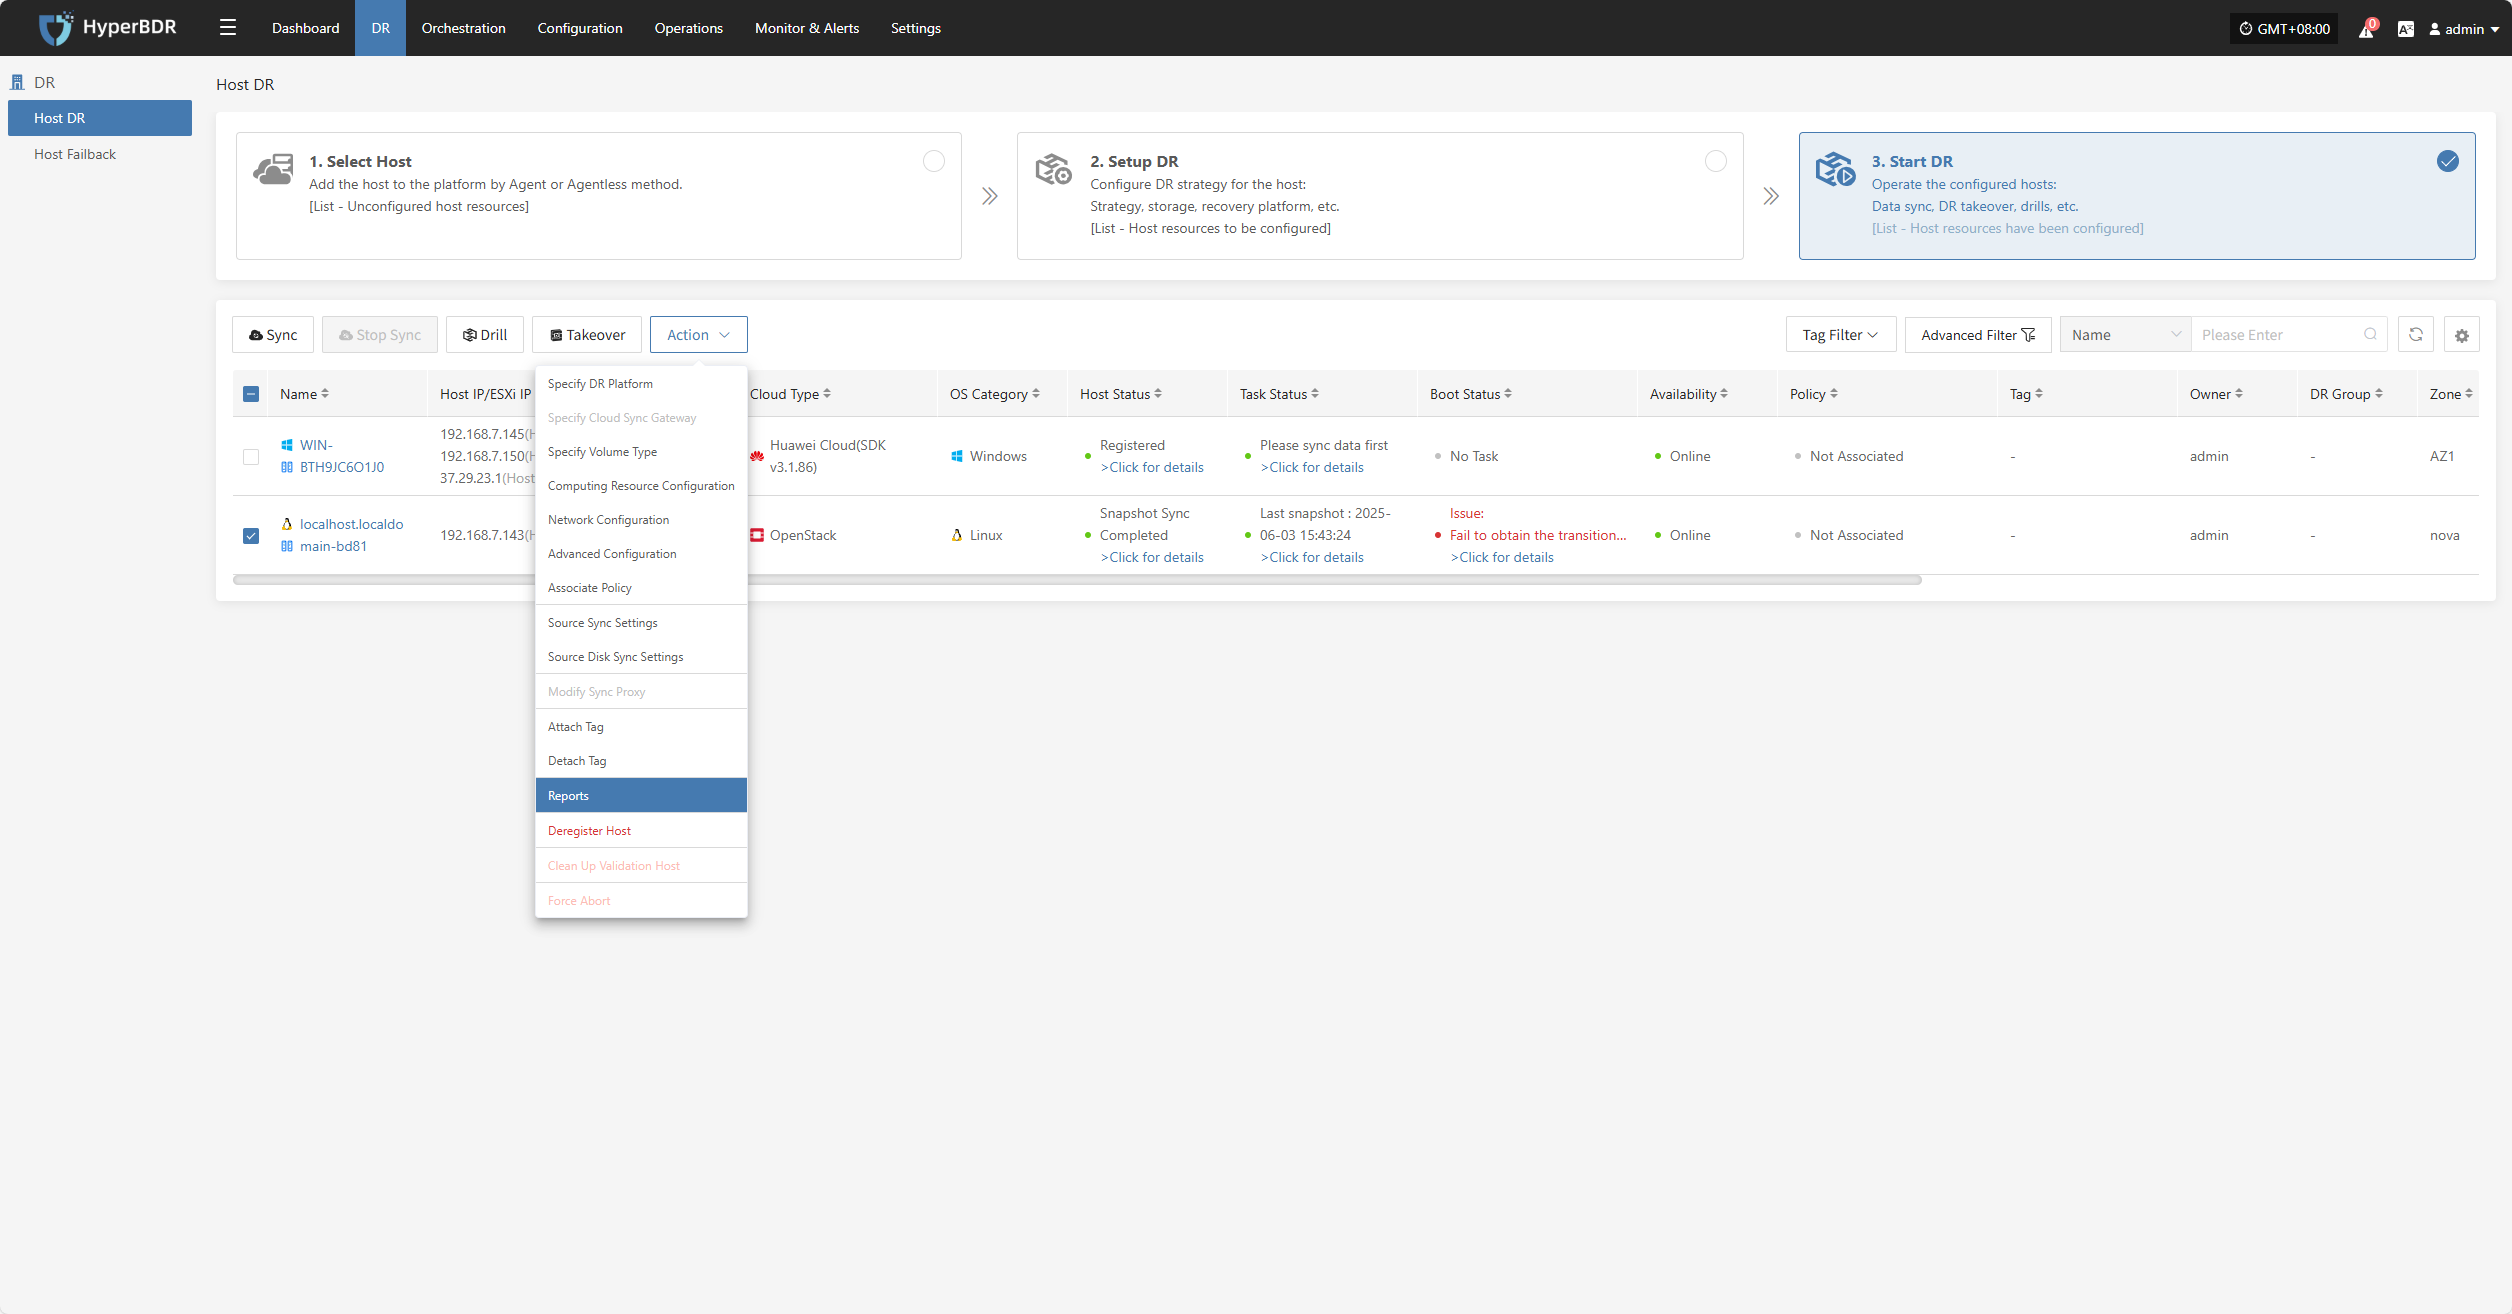
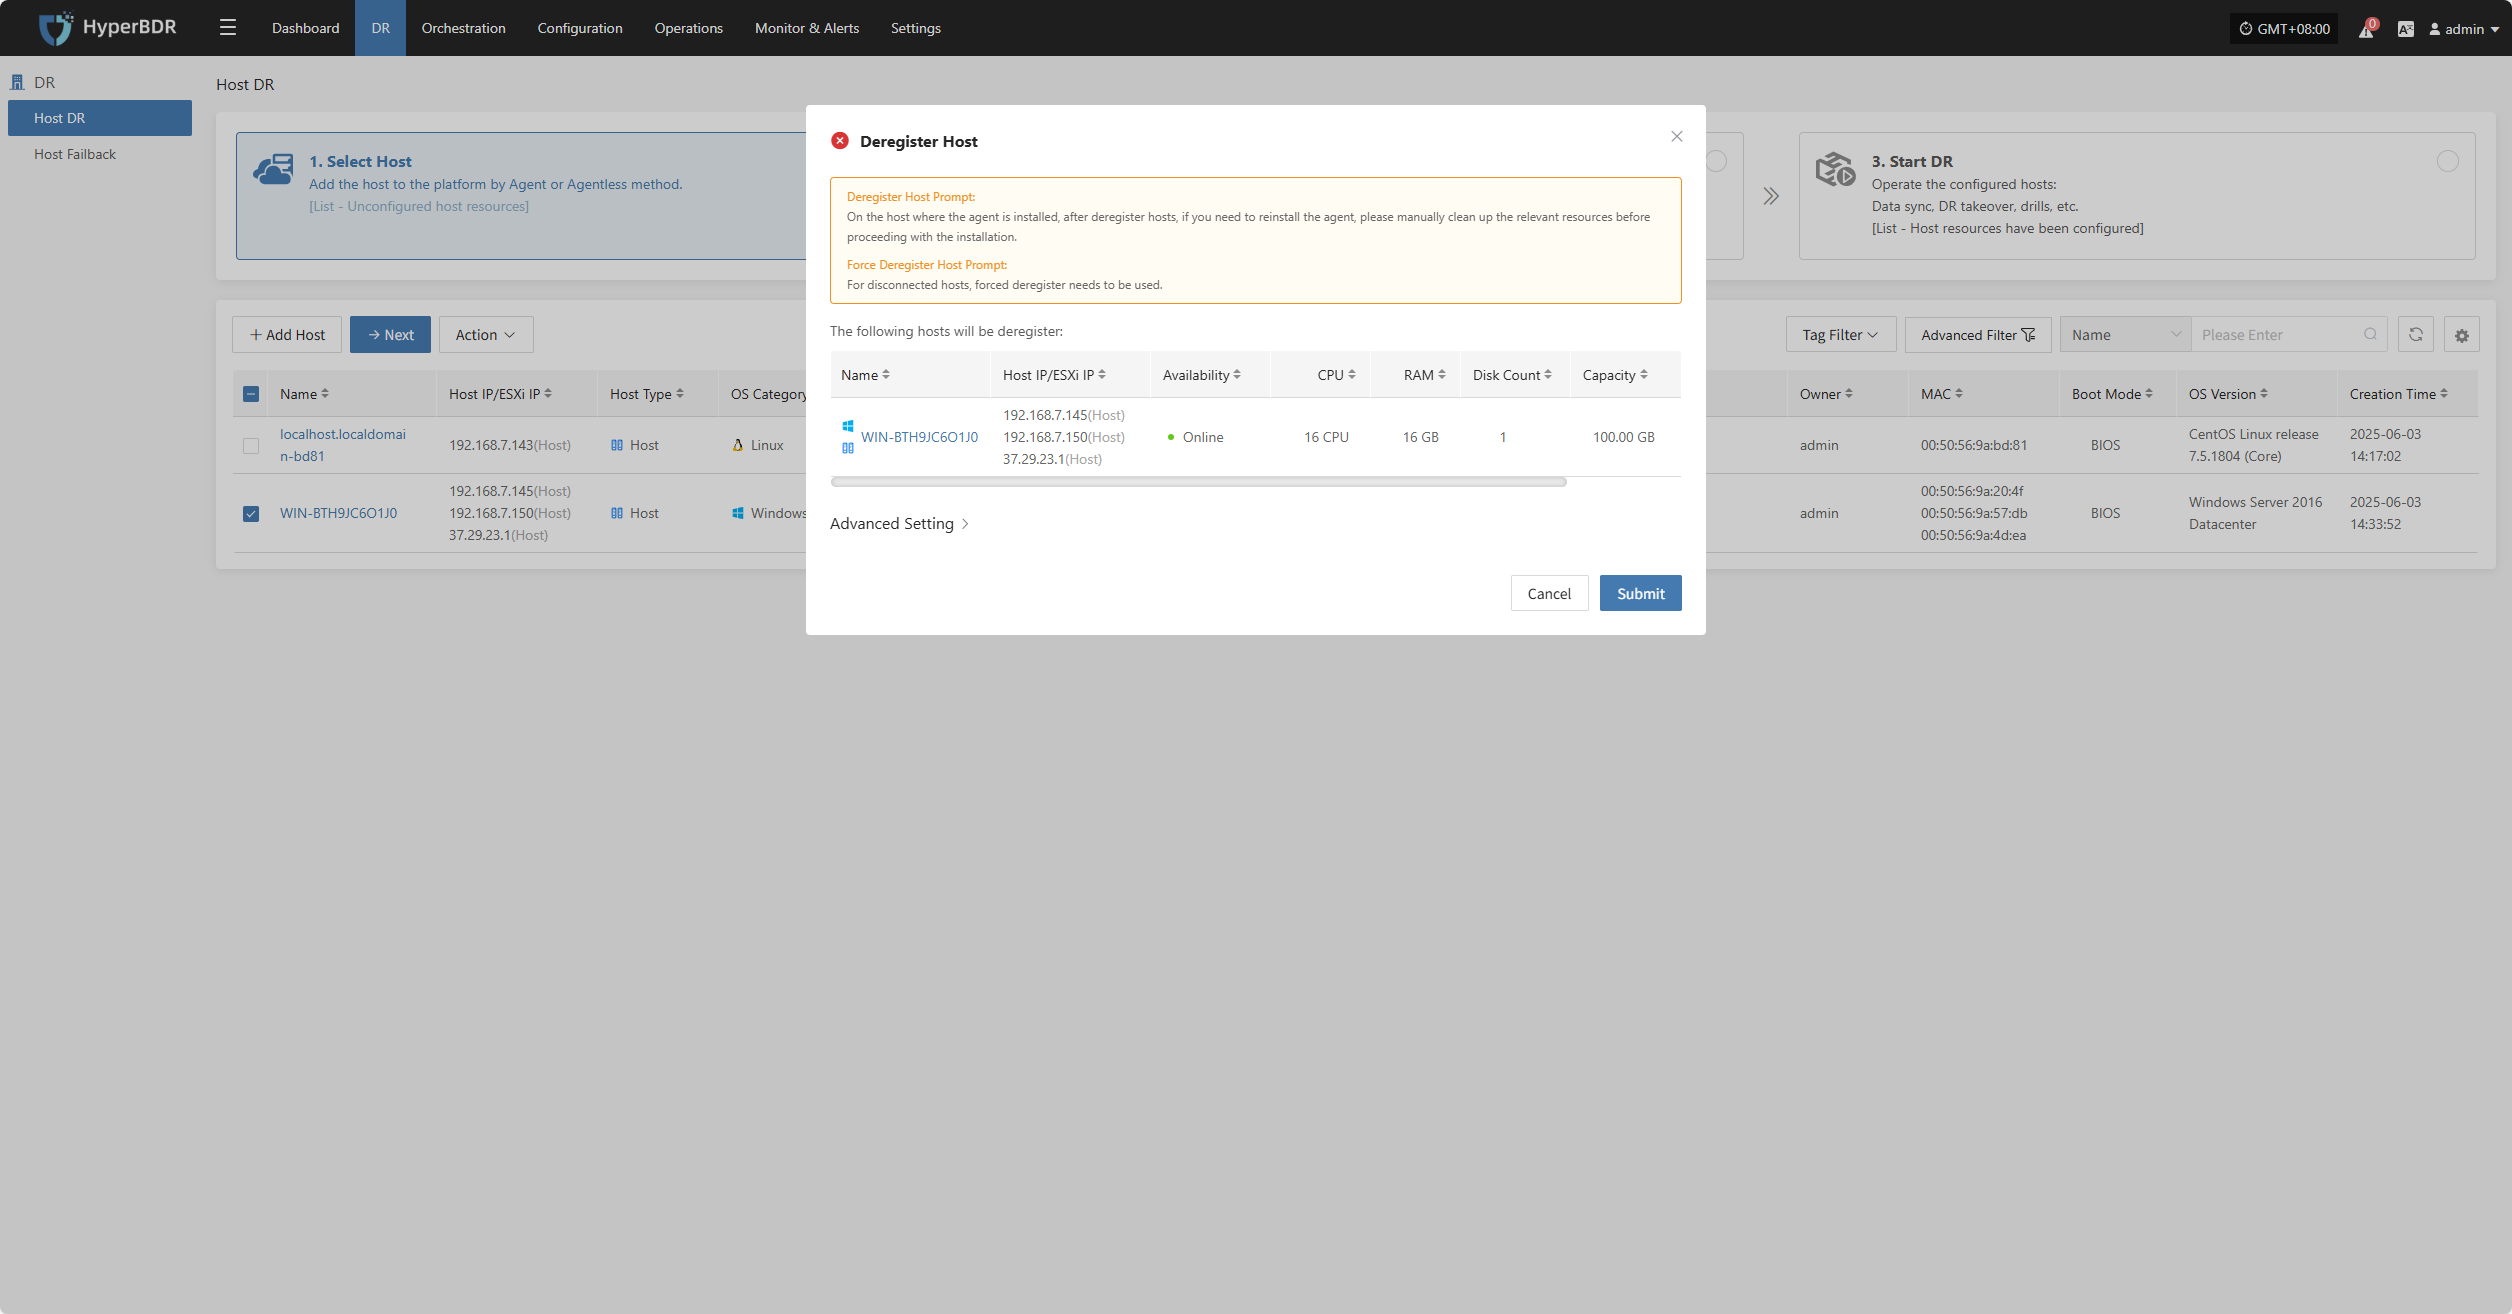
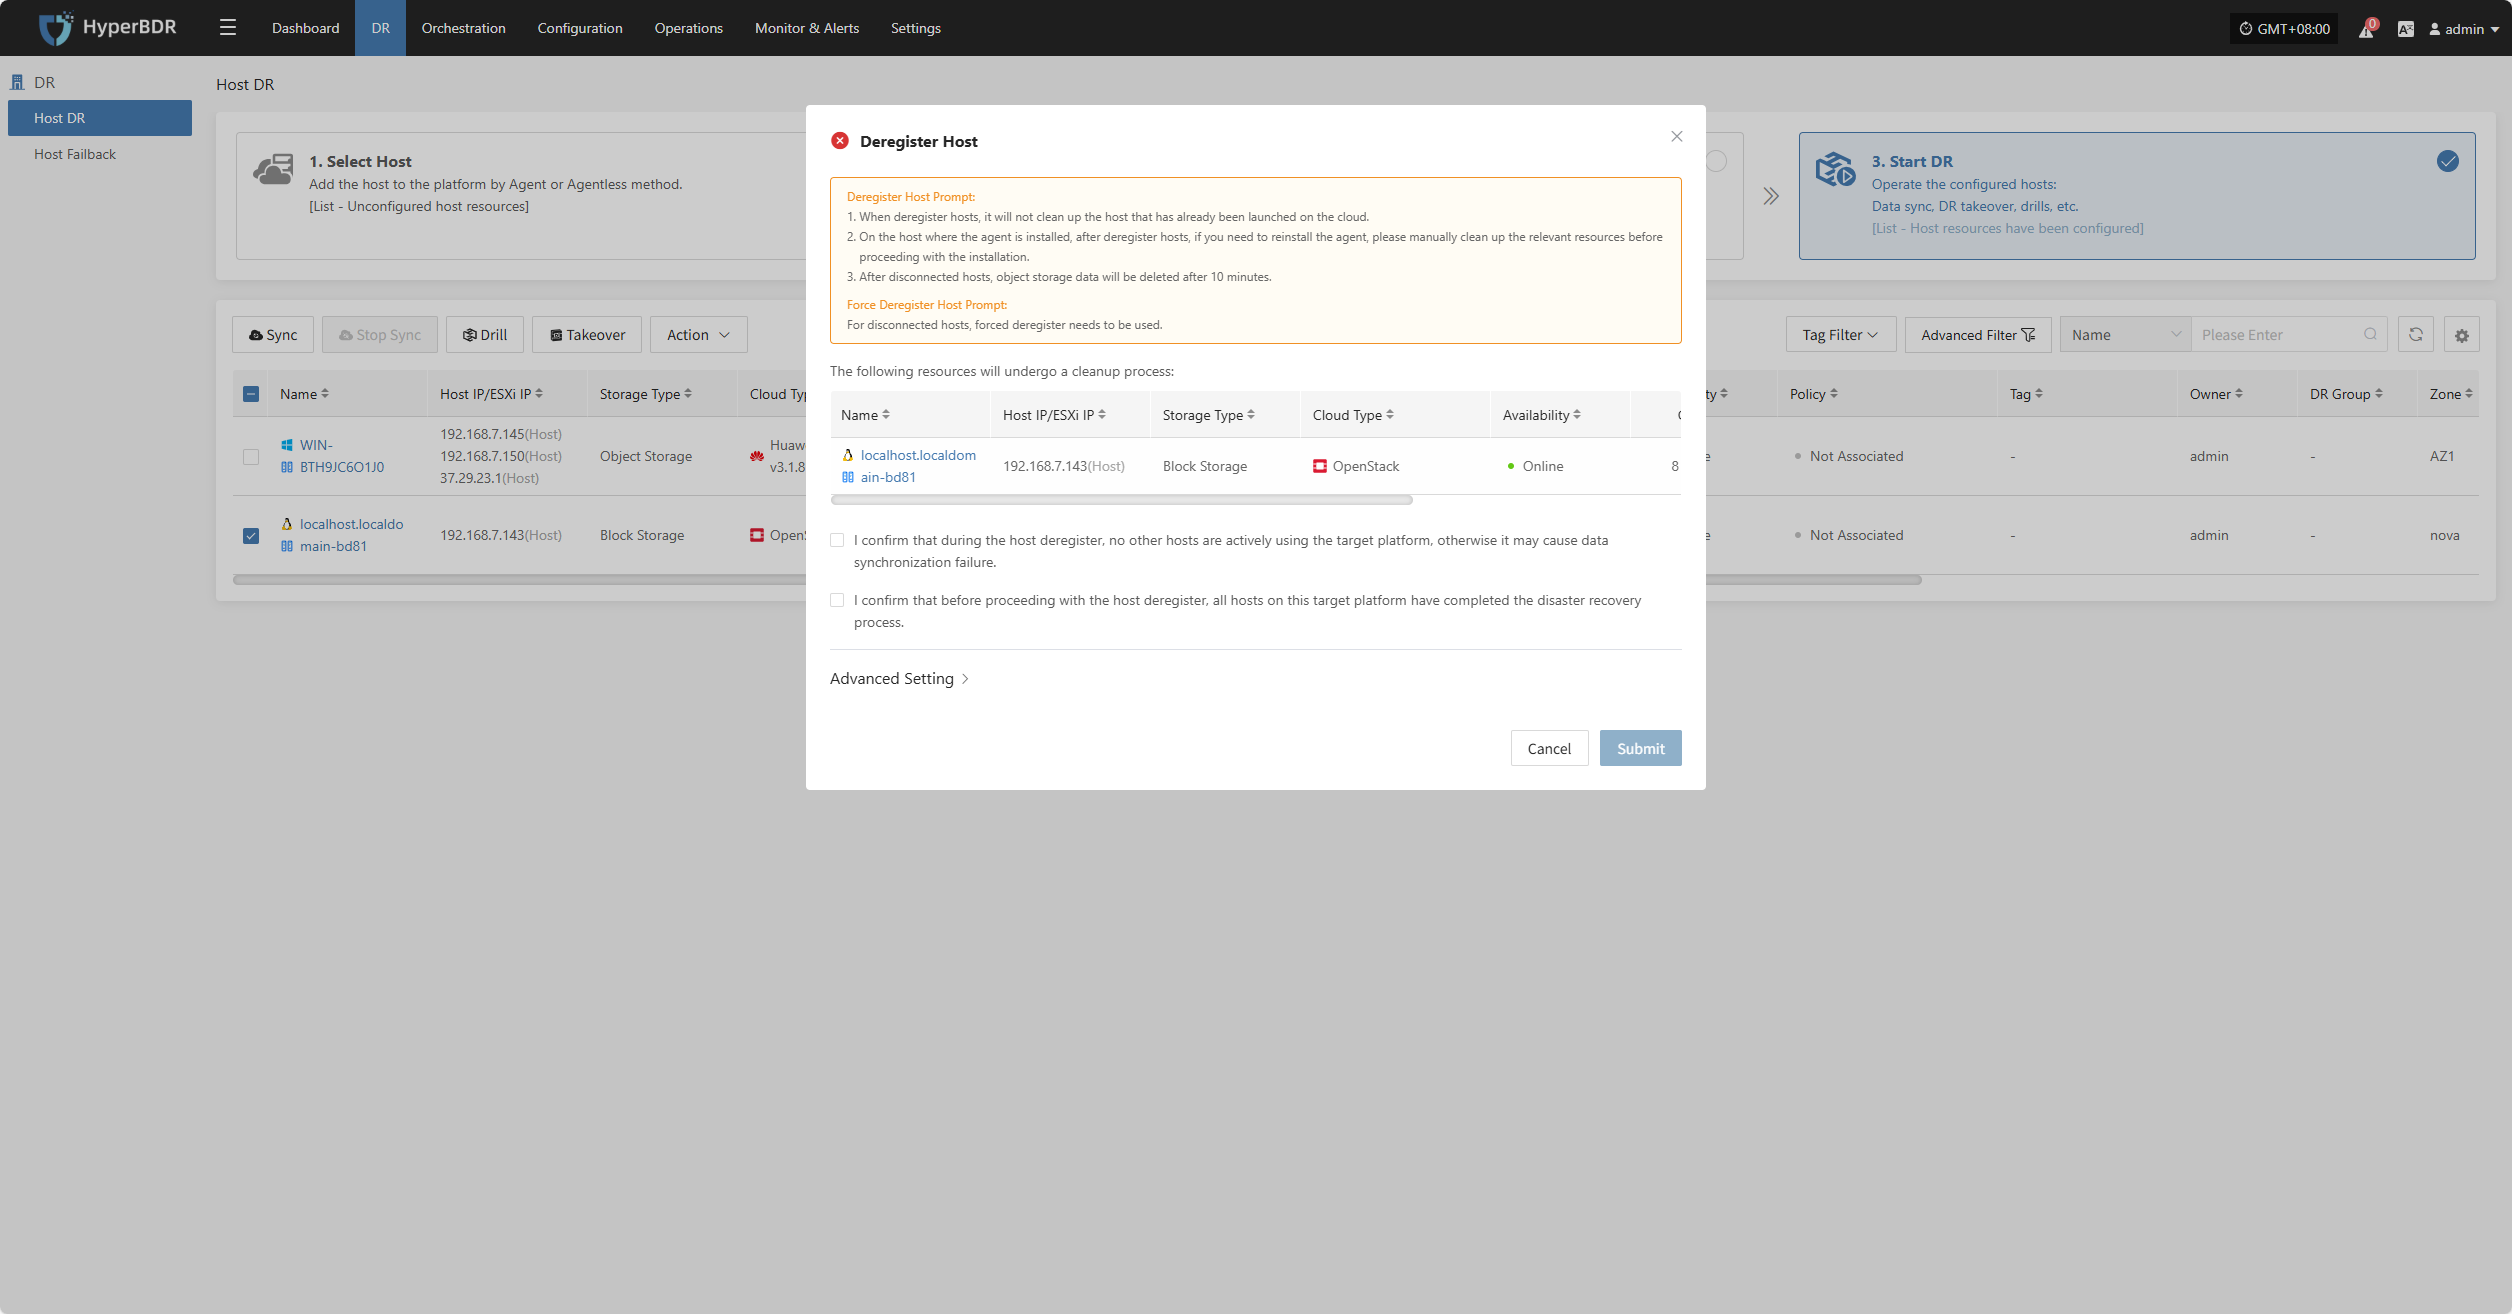
Deregister Host
Note: Deregistration will stop services automatically. You must reload the host or reinstall services based on the mode.
- Agentless Mode: Select Host → Reload Host
- Agent Mode: Reinstall Service
Click the "Deregister Host" button to unregister the host. In the pop-up dialog, check the notice and confirm to proceed.

For hosts that have lost connection, force registration is required.
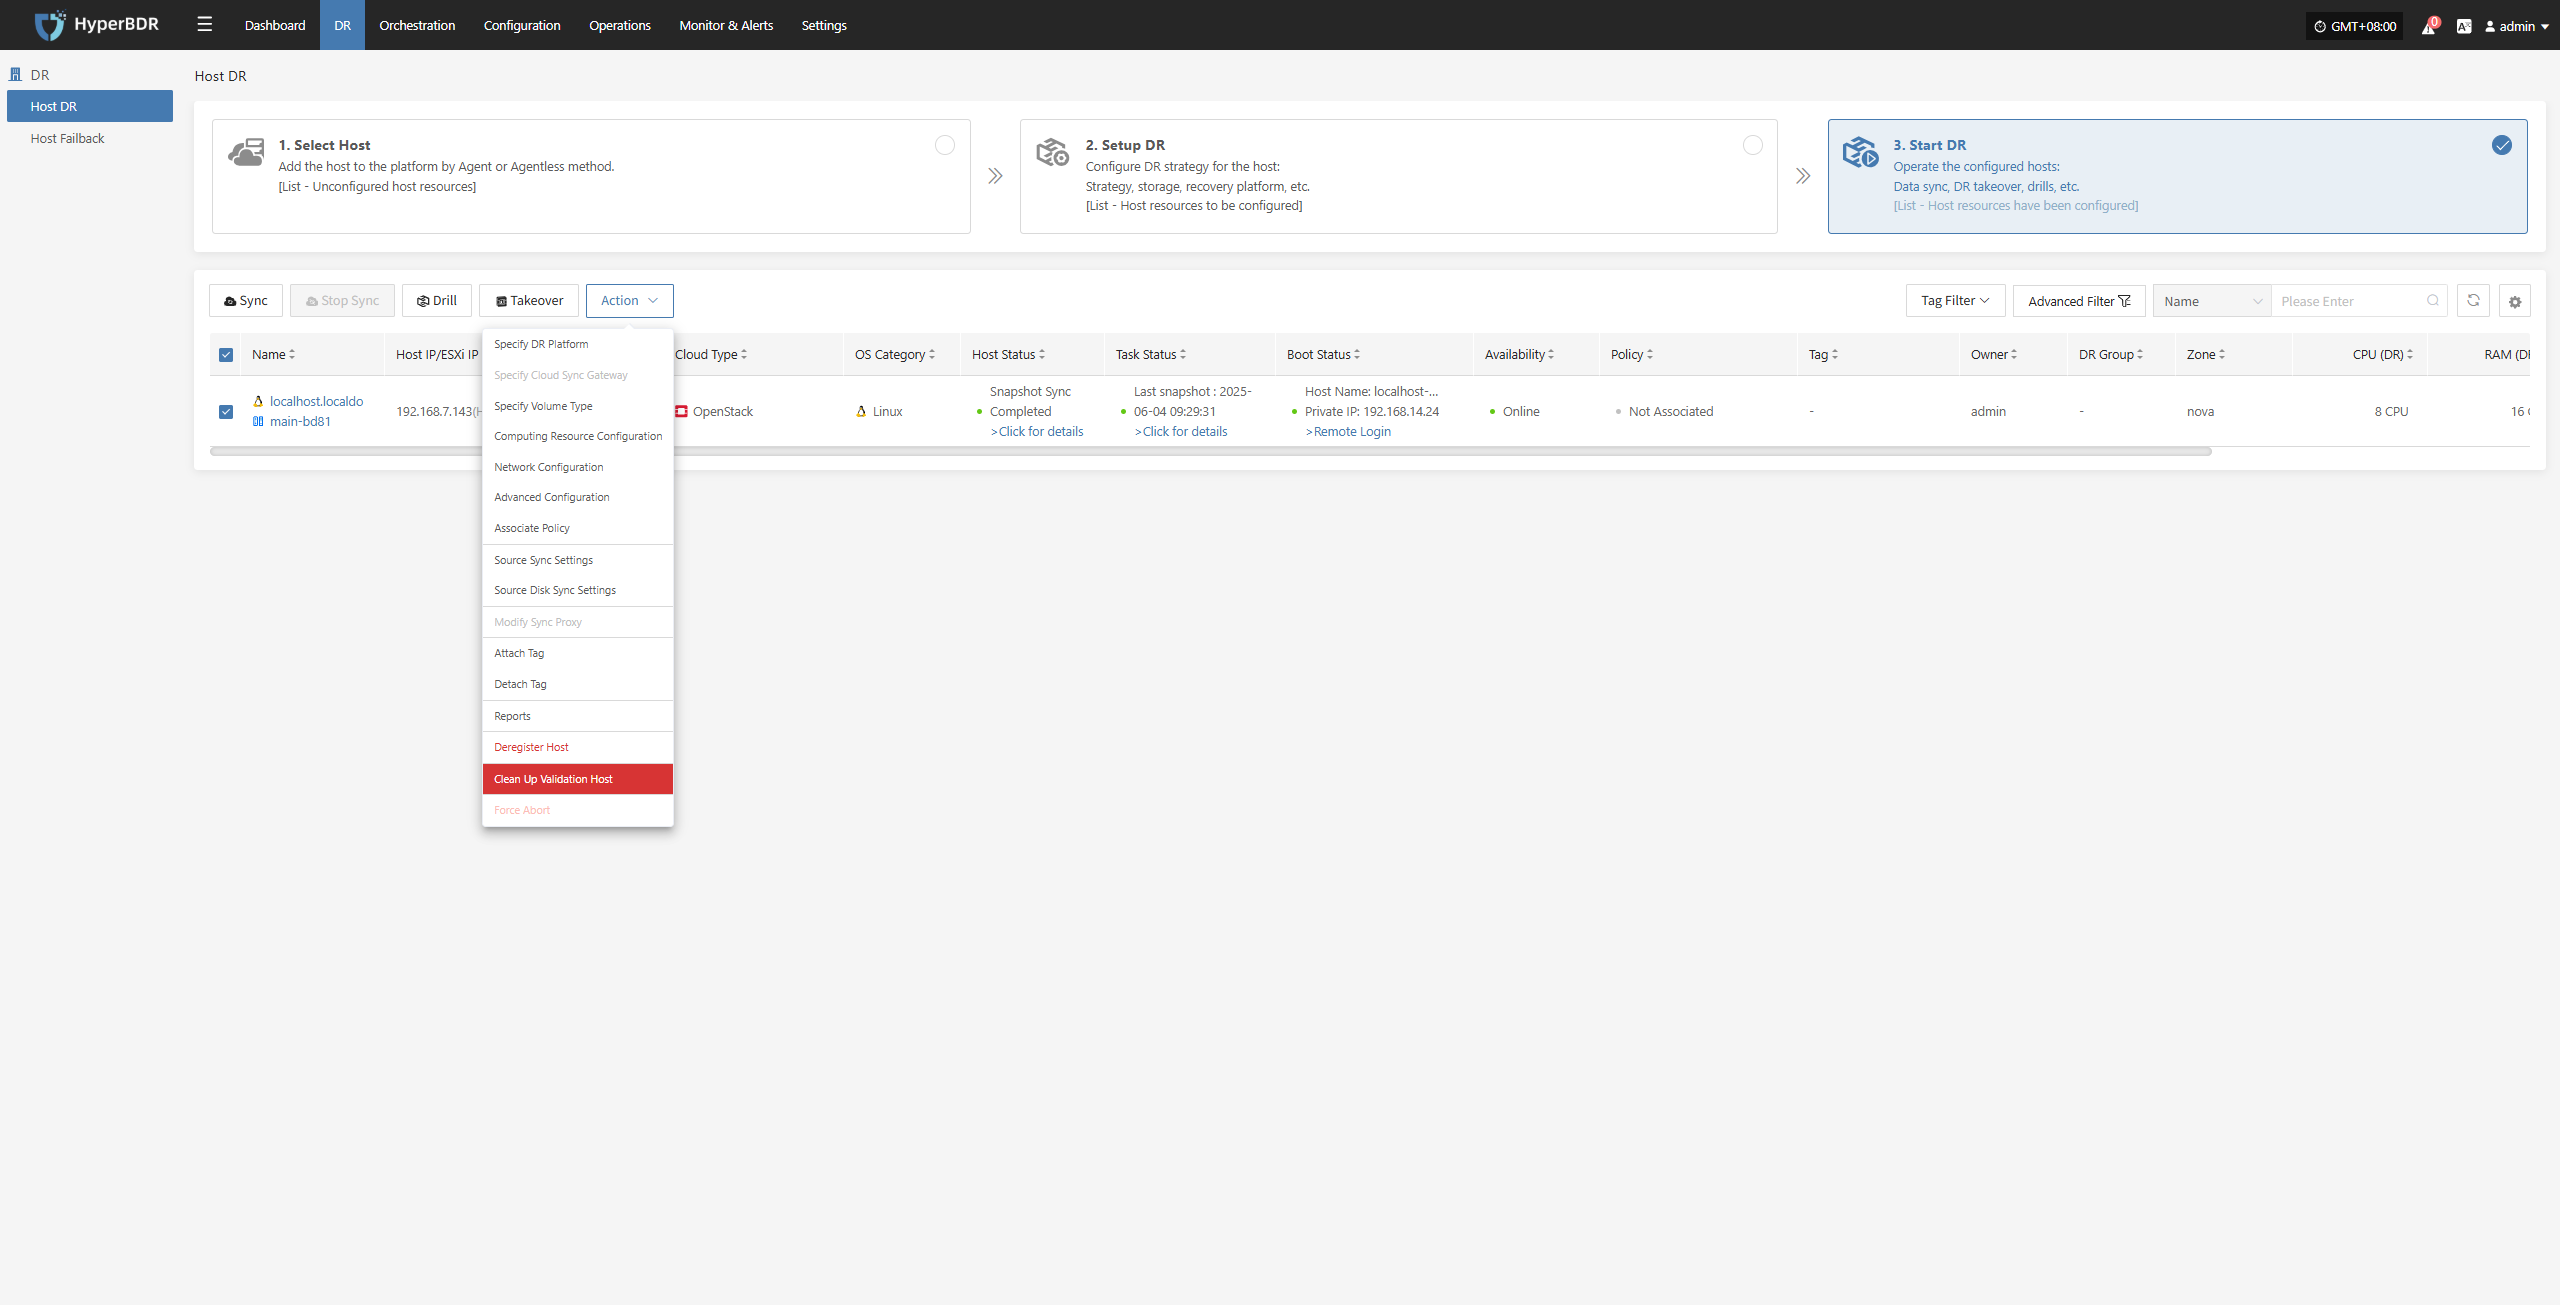
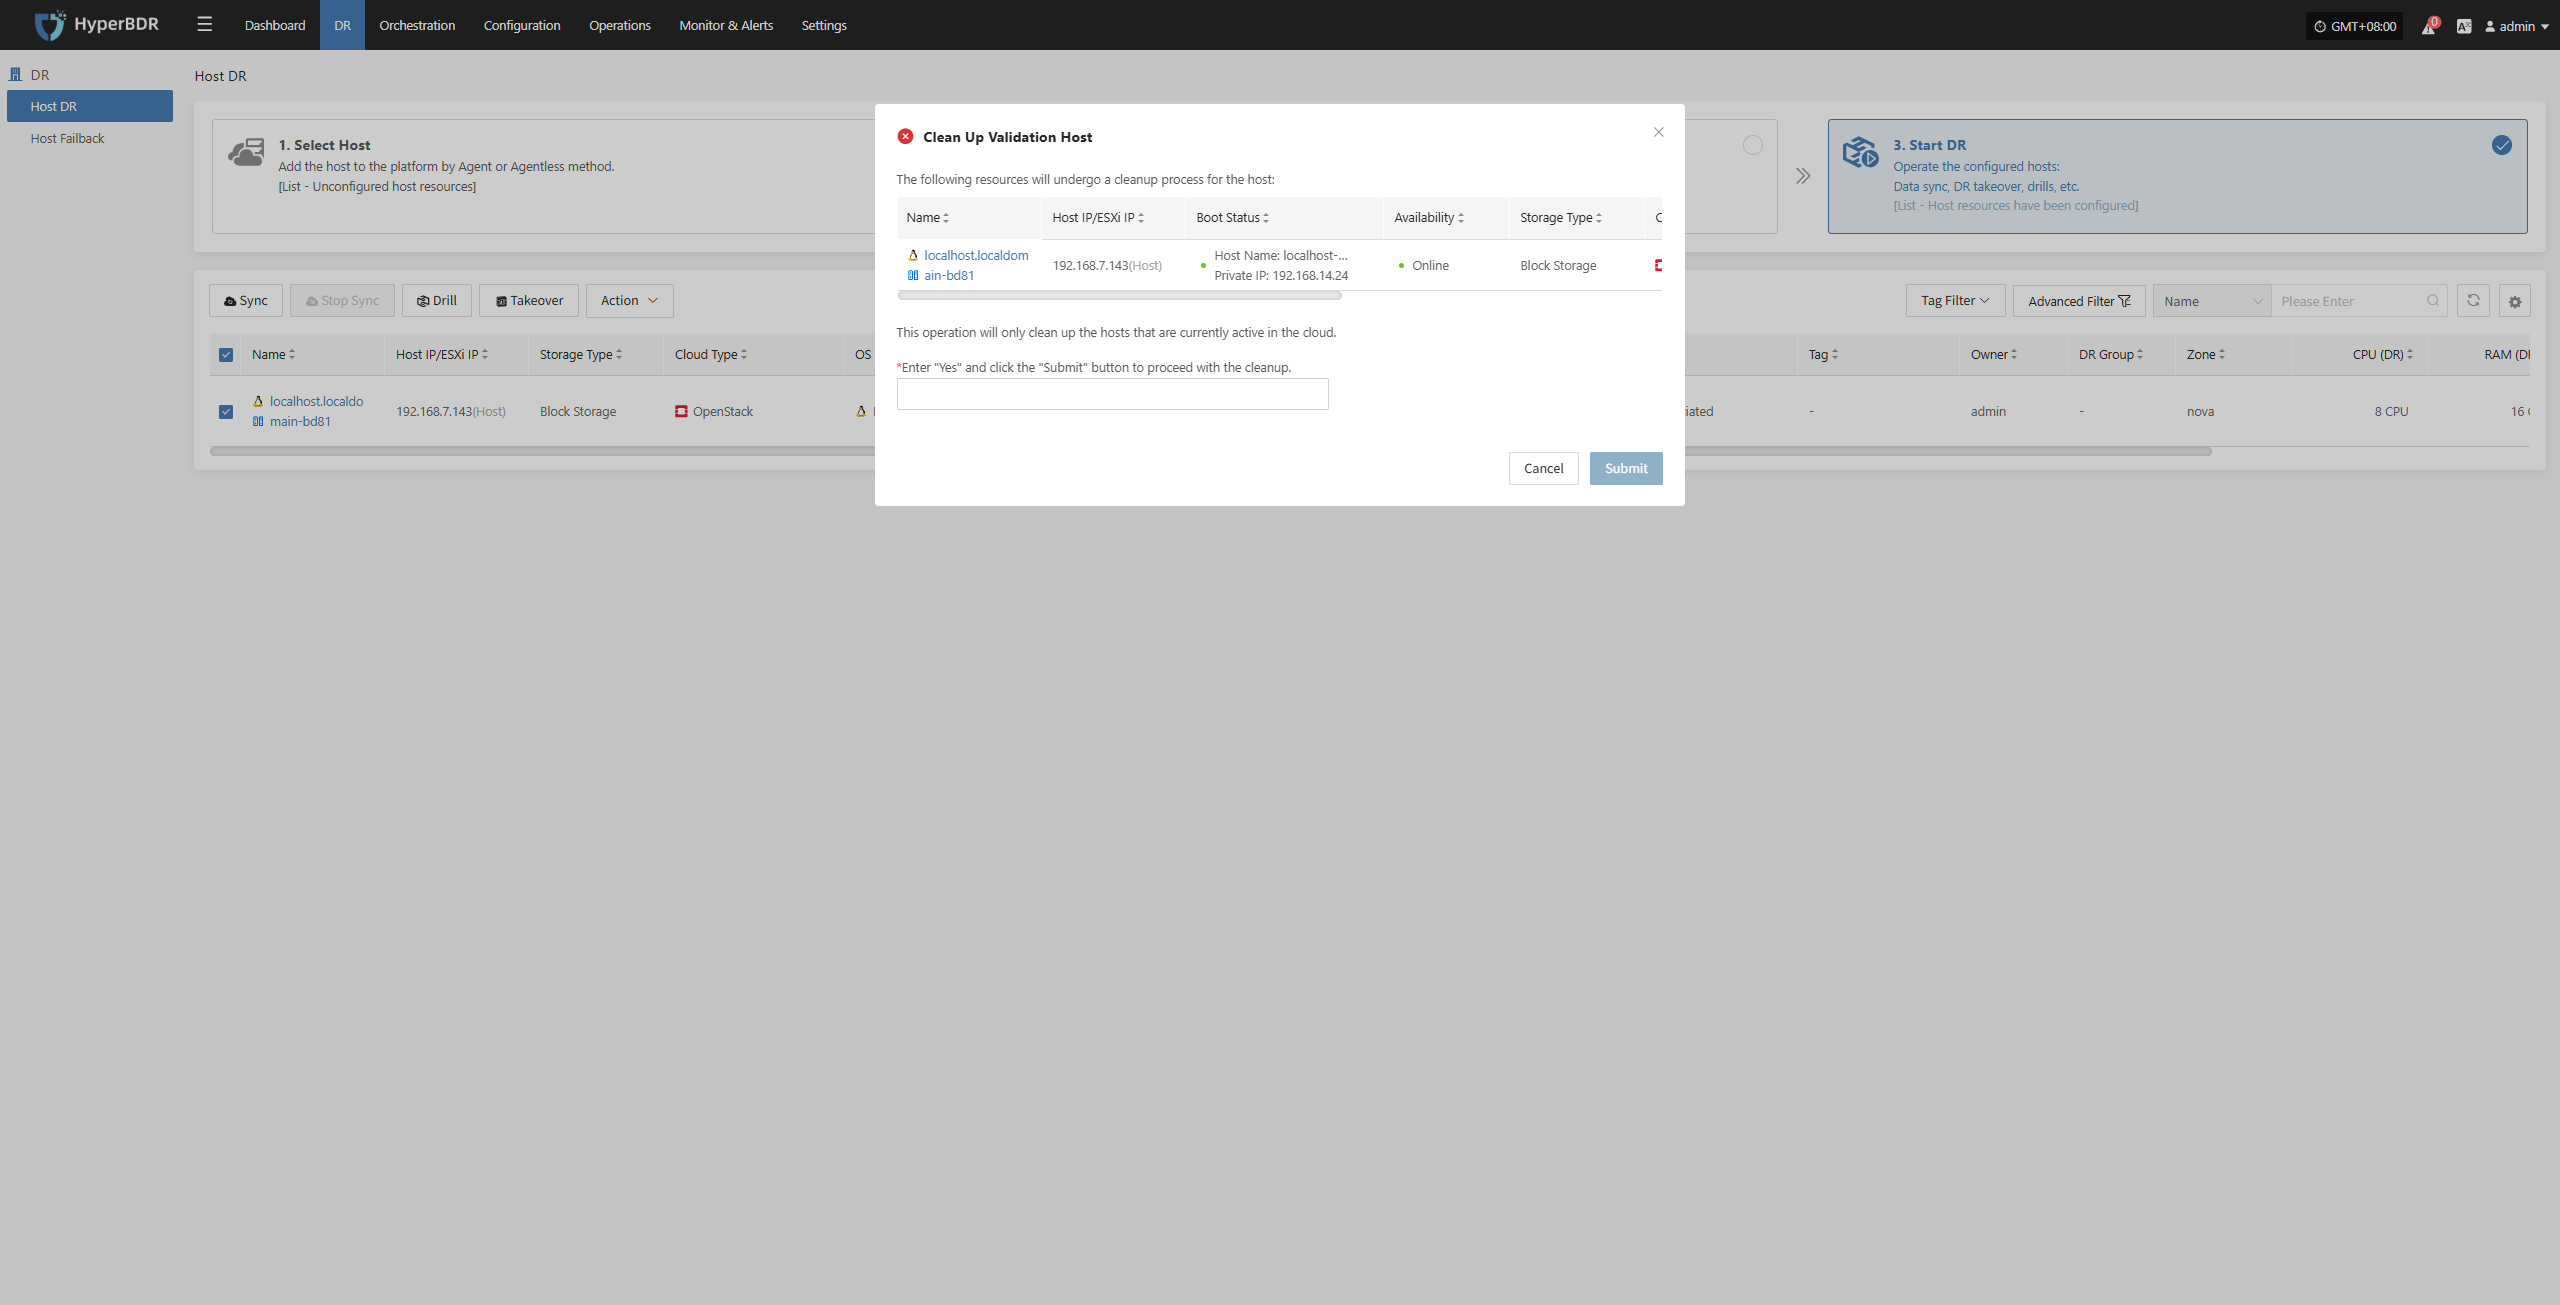
Clean Up Validation Host
Click the “Clean Up Validation Host” button. This operation only cleans up hosts that have started in the cloud. Enter “Yes” in the popup dialog and click confirm to clean up the cloud validation hosts.
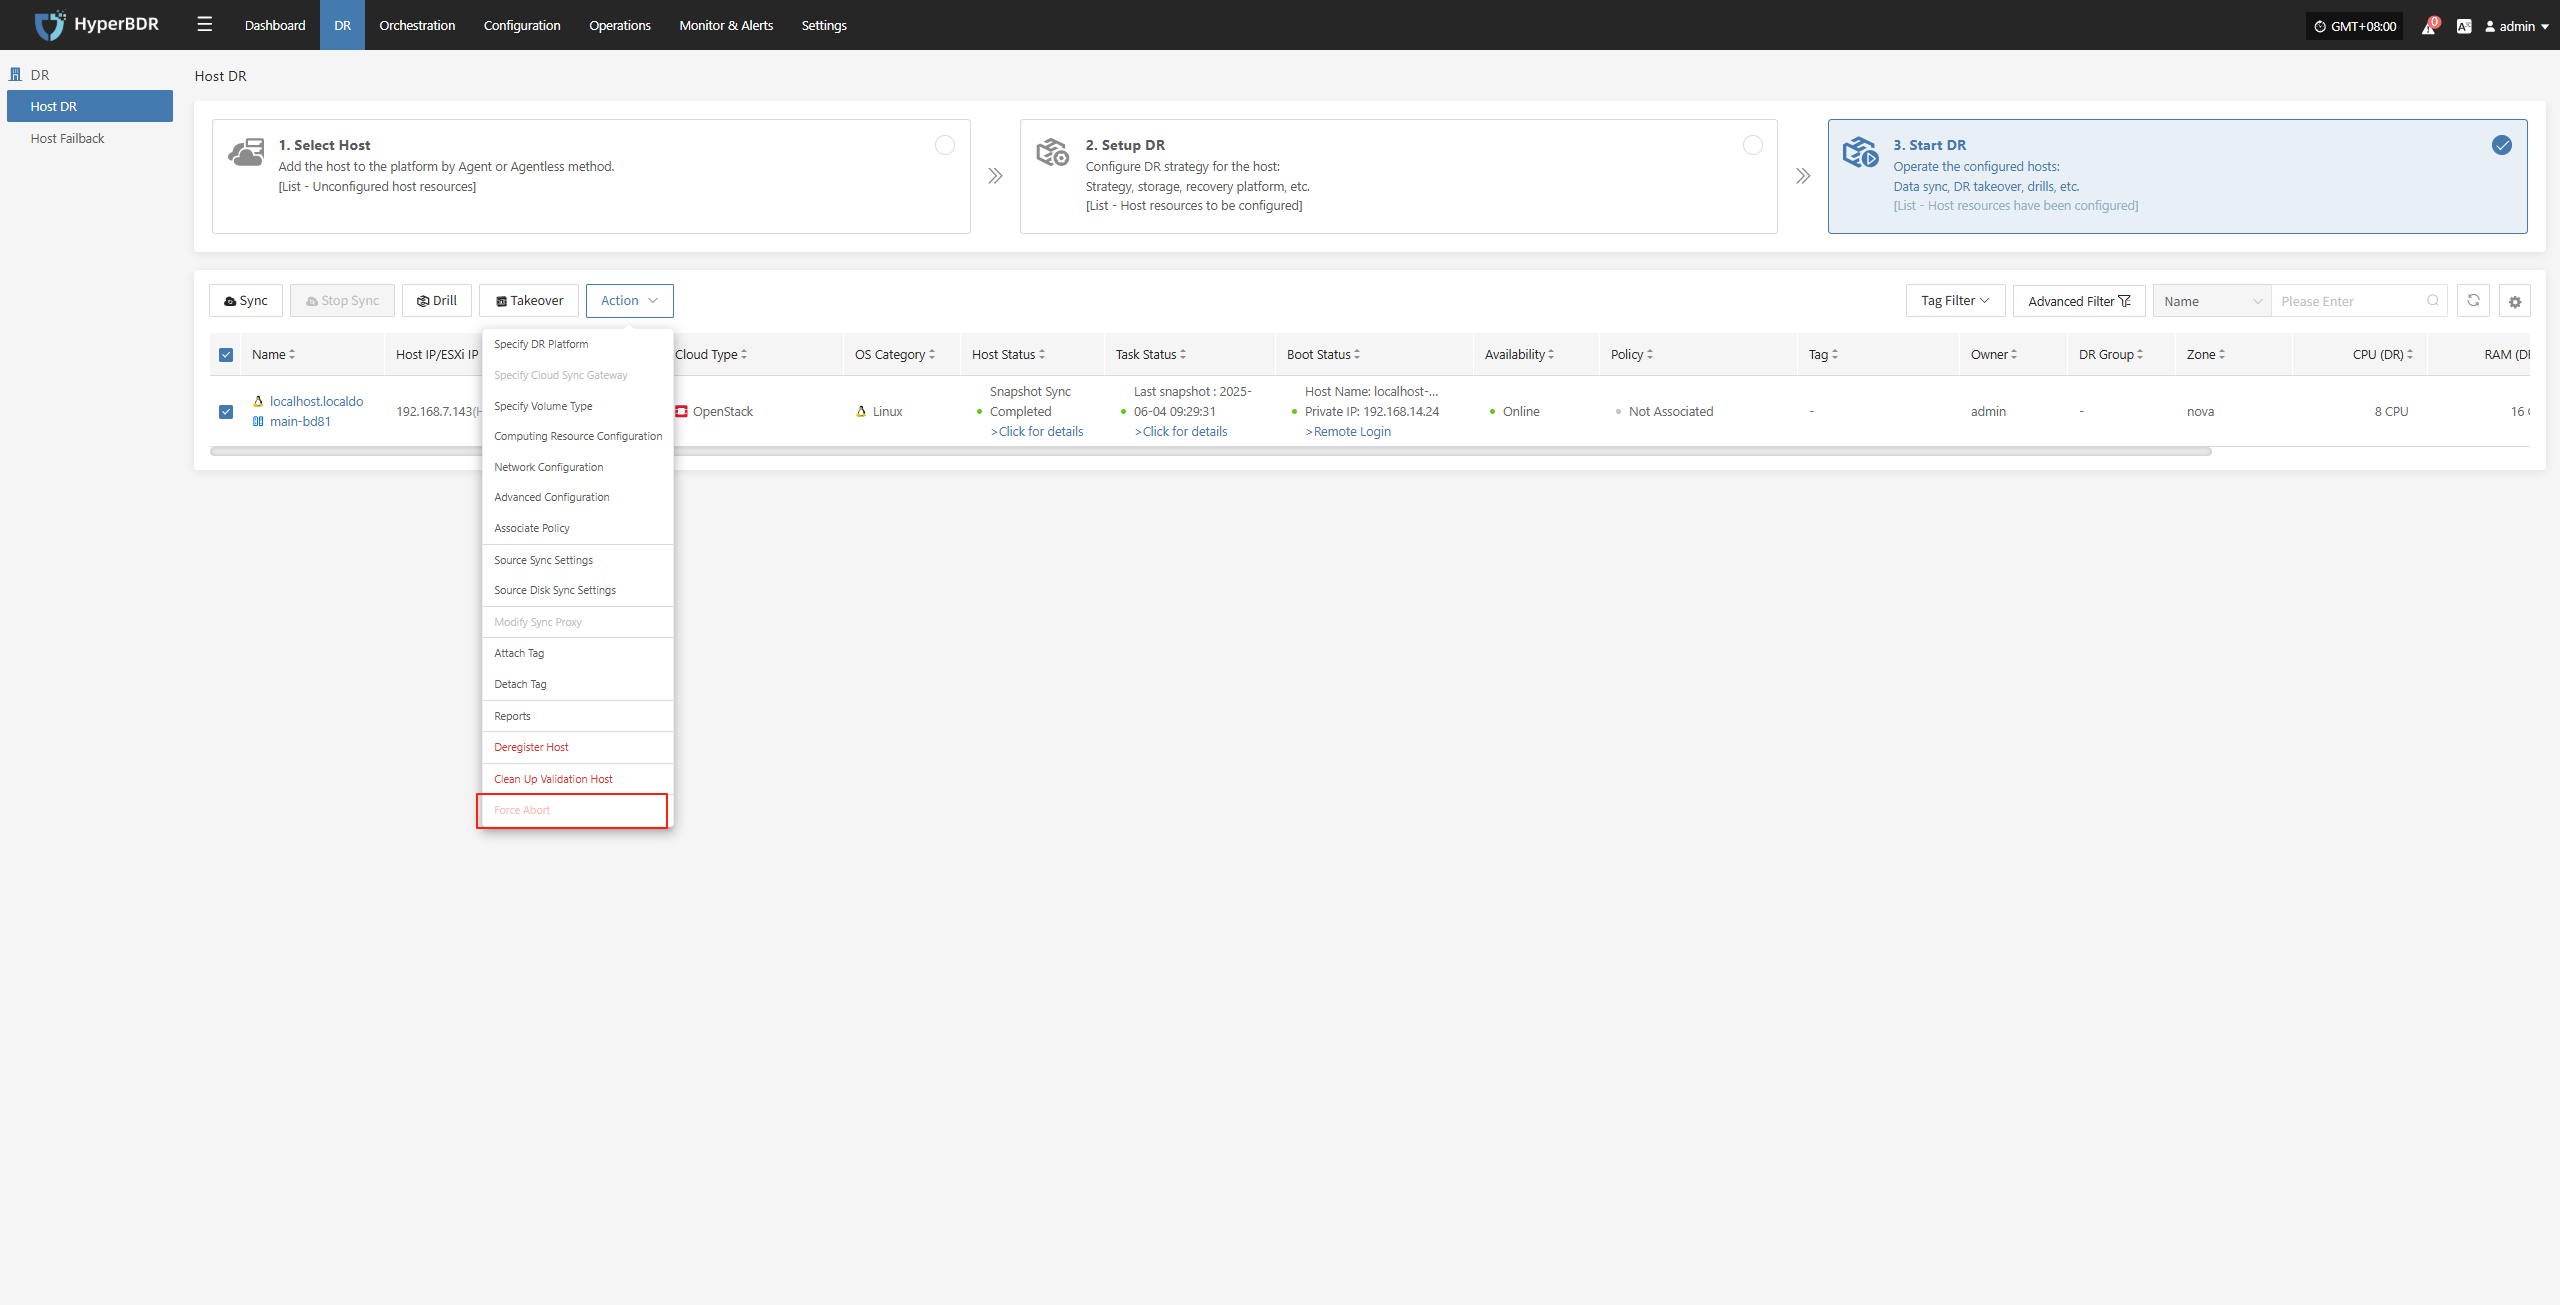
Force Abort
Note: When synchronization, drills, or other operations are stuck for a long time or encounter uncontrollable exceptions, this function can be used to forcibly terminate the task.
Click the “Force Abort” button to immediately stop the current task.
Host Failback
Host Failback provides step-by-step guidance to restore your business to the source production environment after Drill/Takeover is complete and the source environment recovers from failure. The process consists of three main steps: Select Host, Setup Failback, and Start Failback. By following these three steps, you can complete the entire failback process.
Click the "Resource DR" navigation menu at the top, then click the "Host Failback" menu on the left side to perform the failback operations.
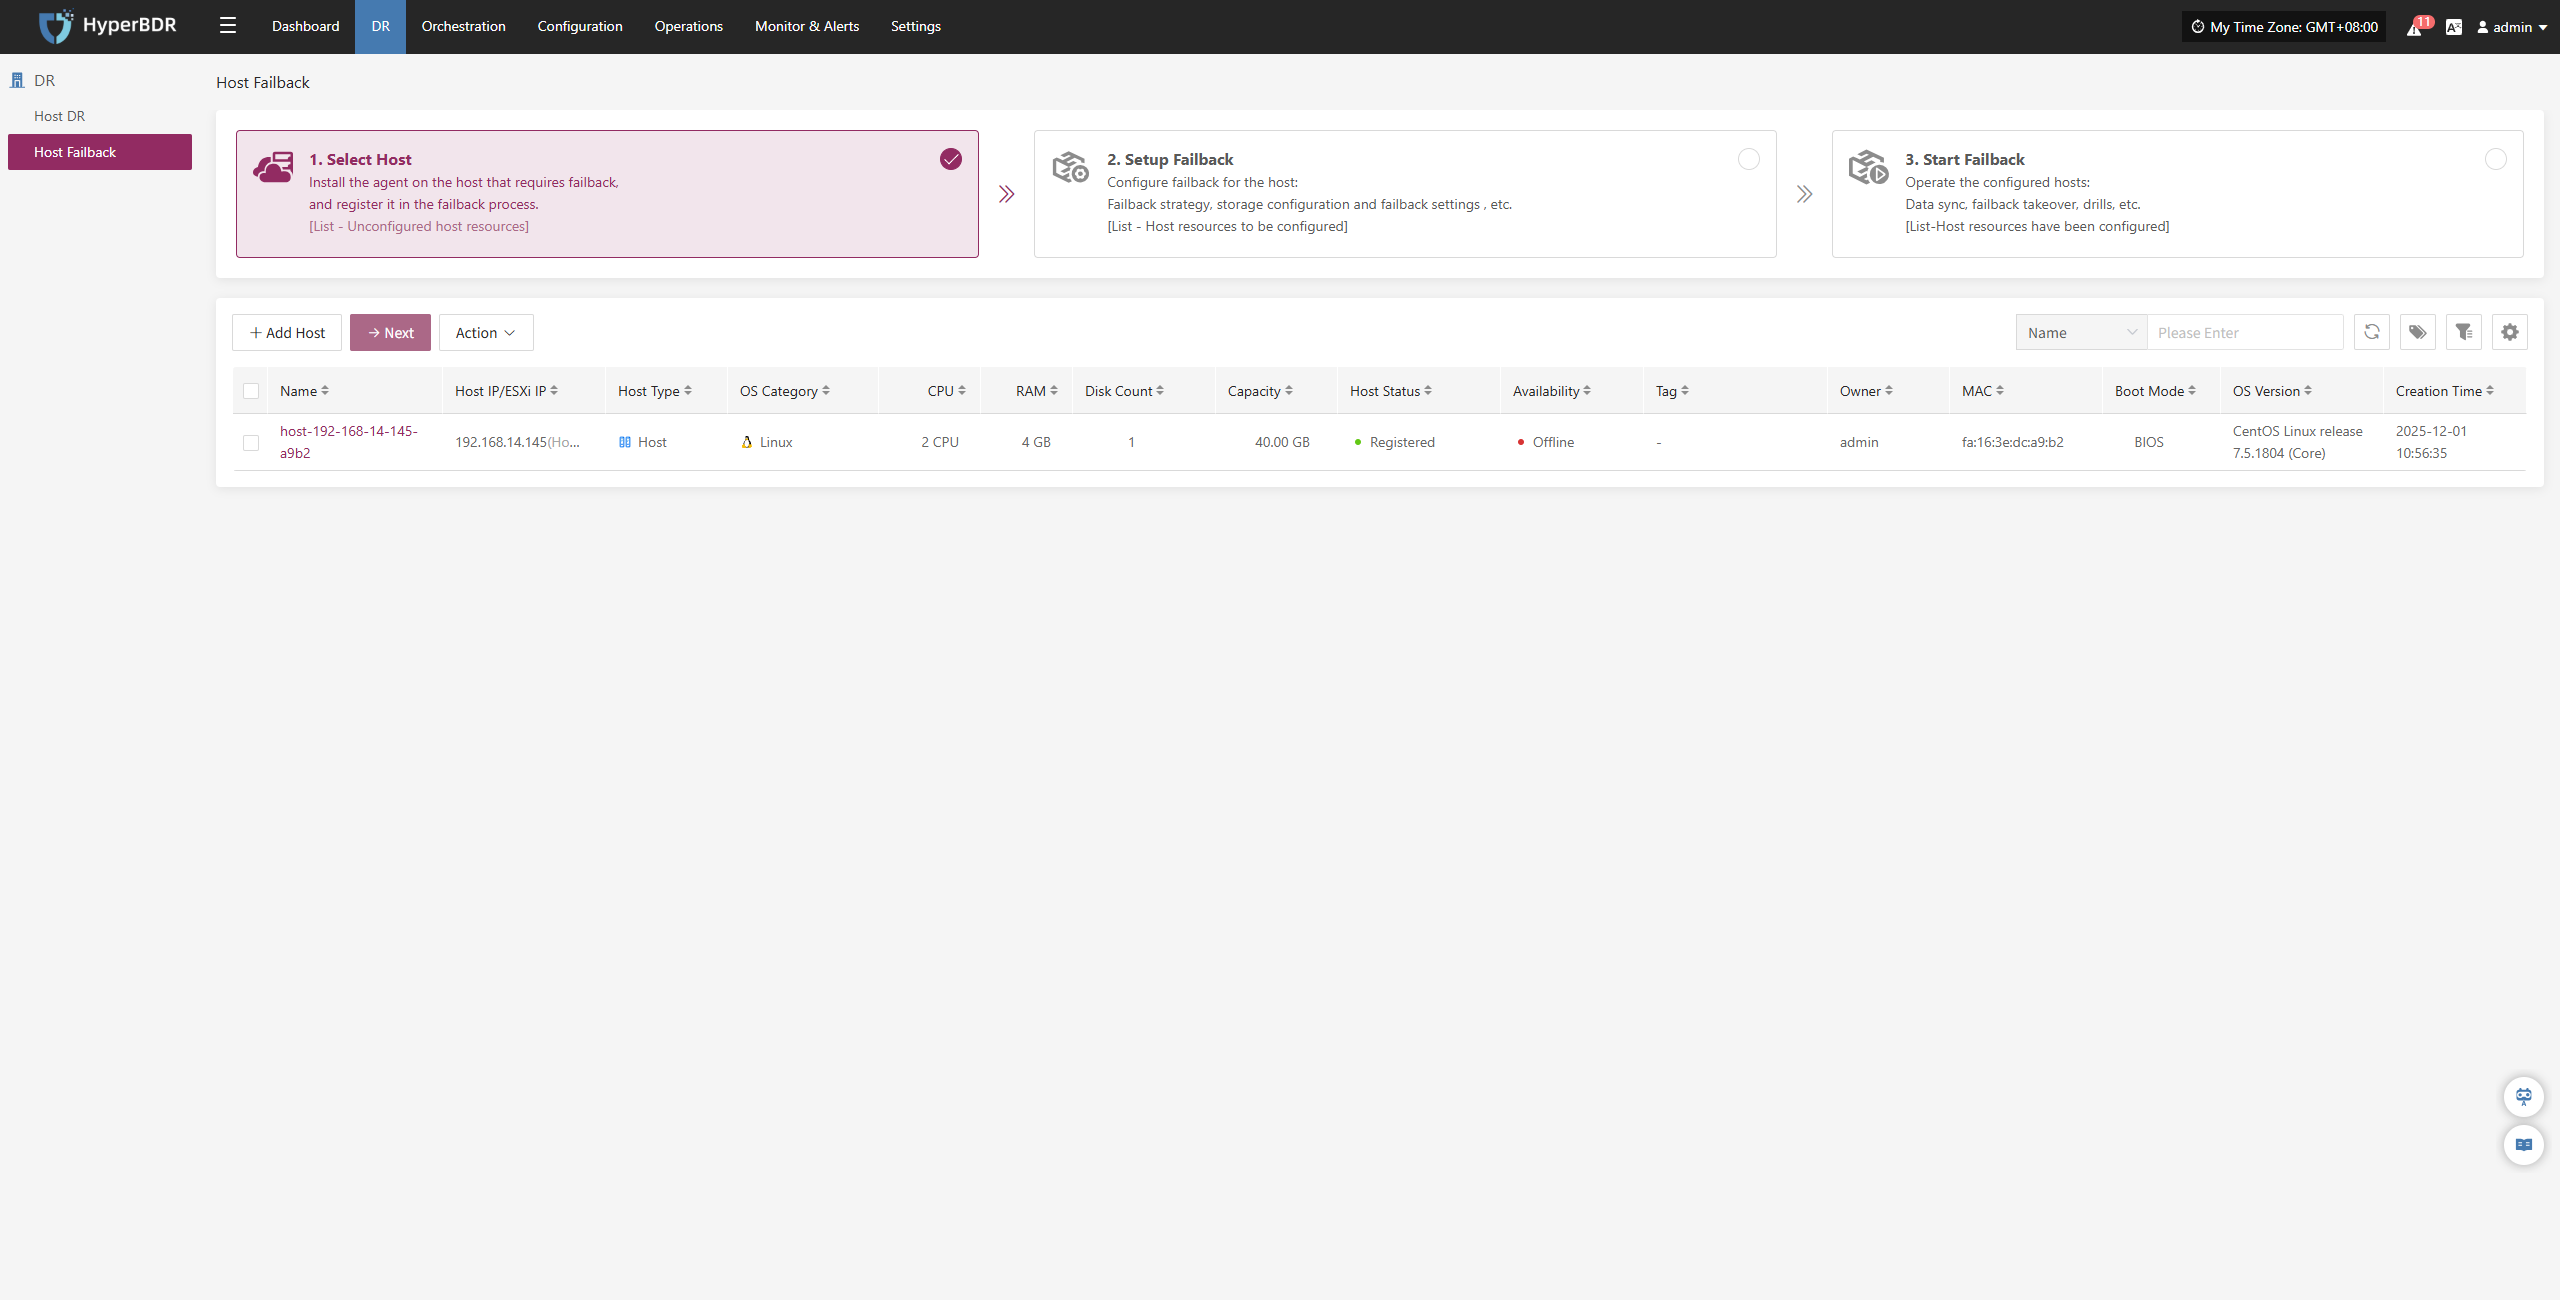
When entering the failback configuration stage, the configuration process is the same as the Host DR workflow. For details on each configuration option and how to use it, refer to the configuration guide in the Host DR section. After completing the required settings, you can proceed with the Failback operation.
Orchestration
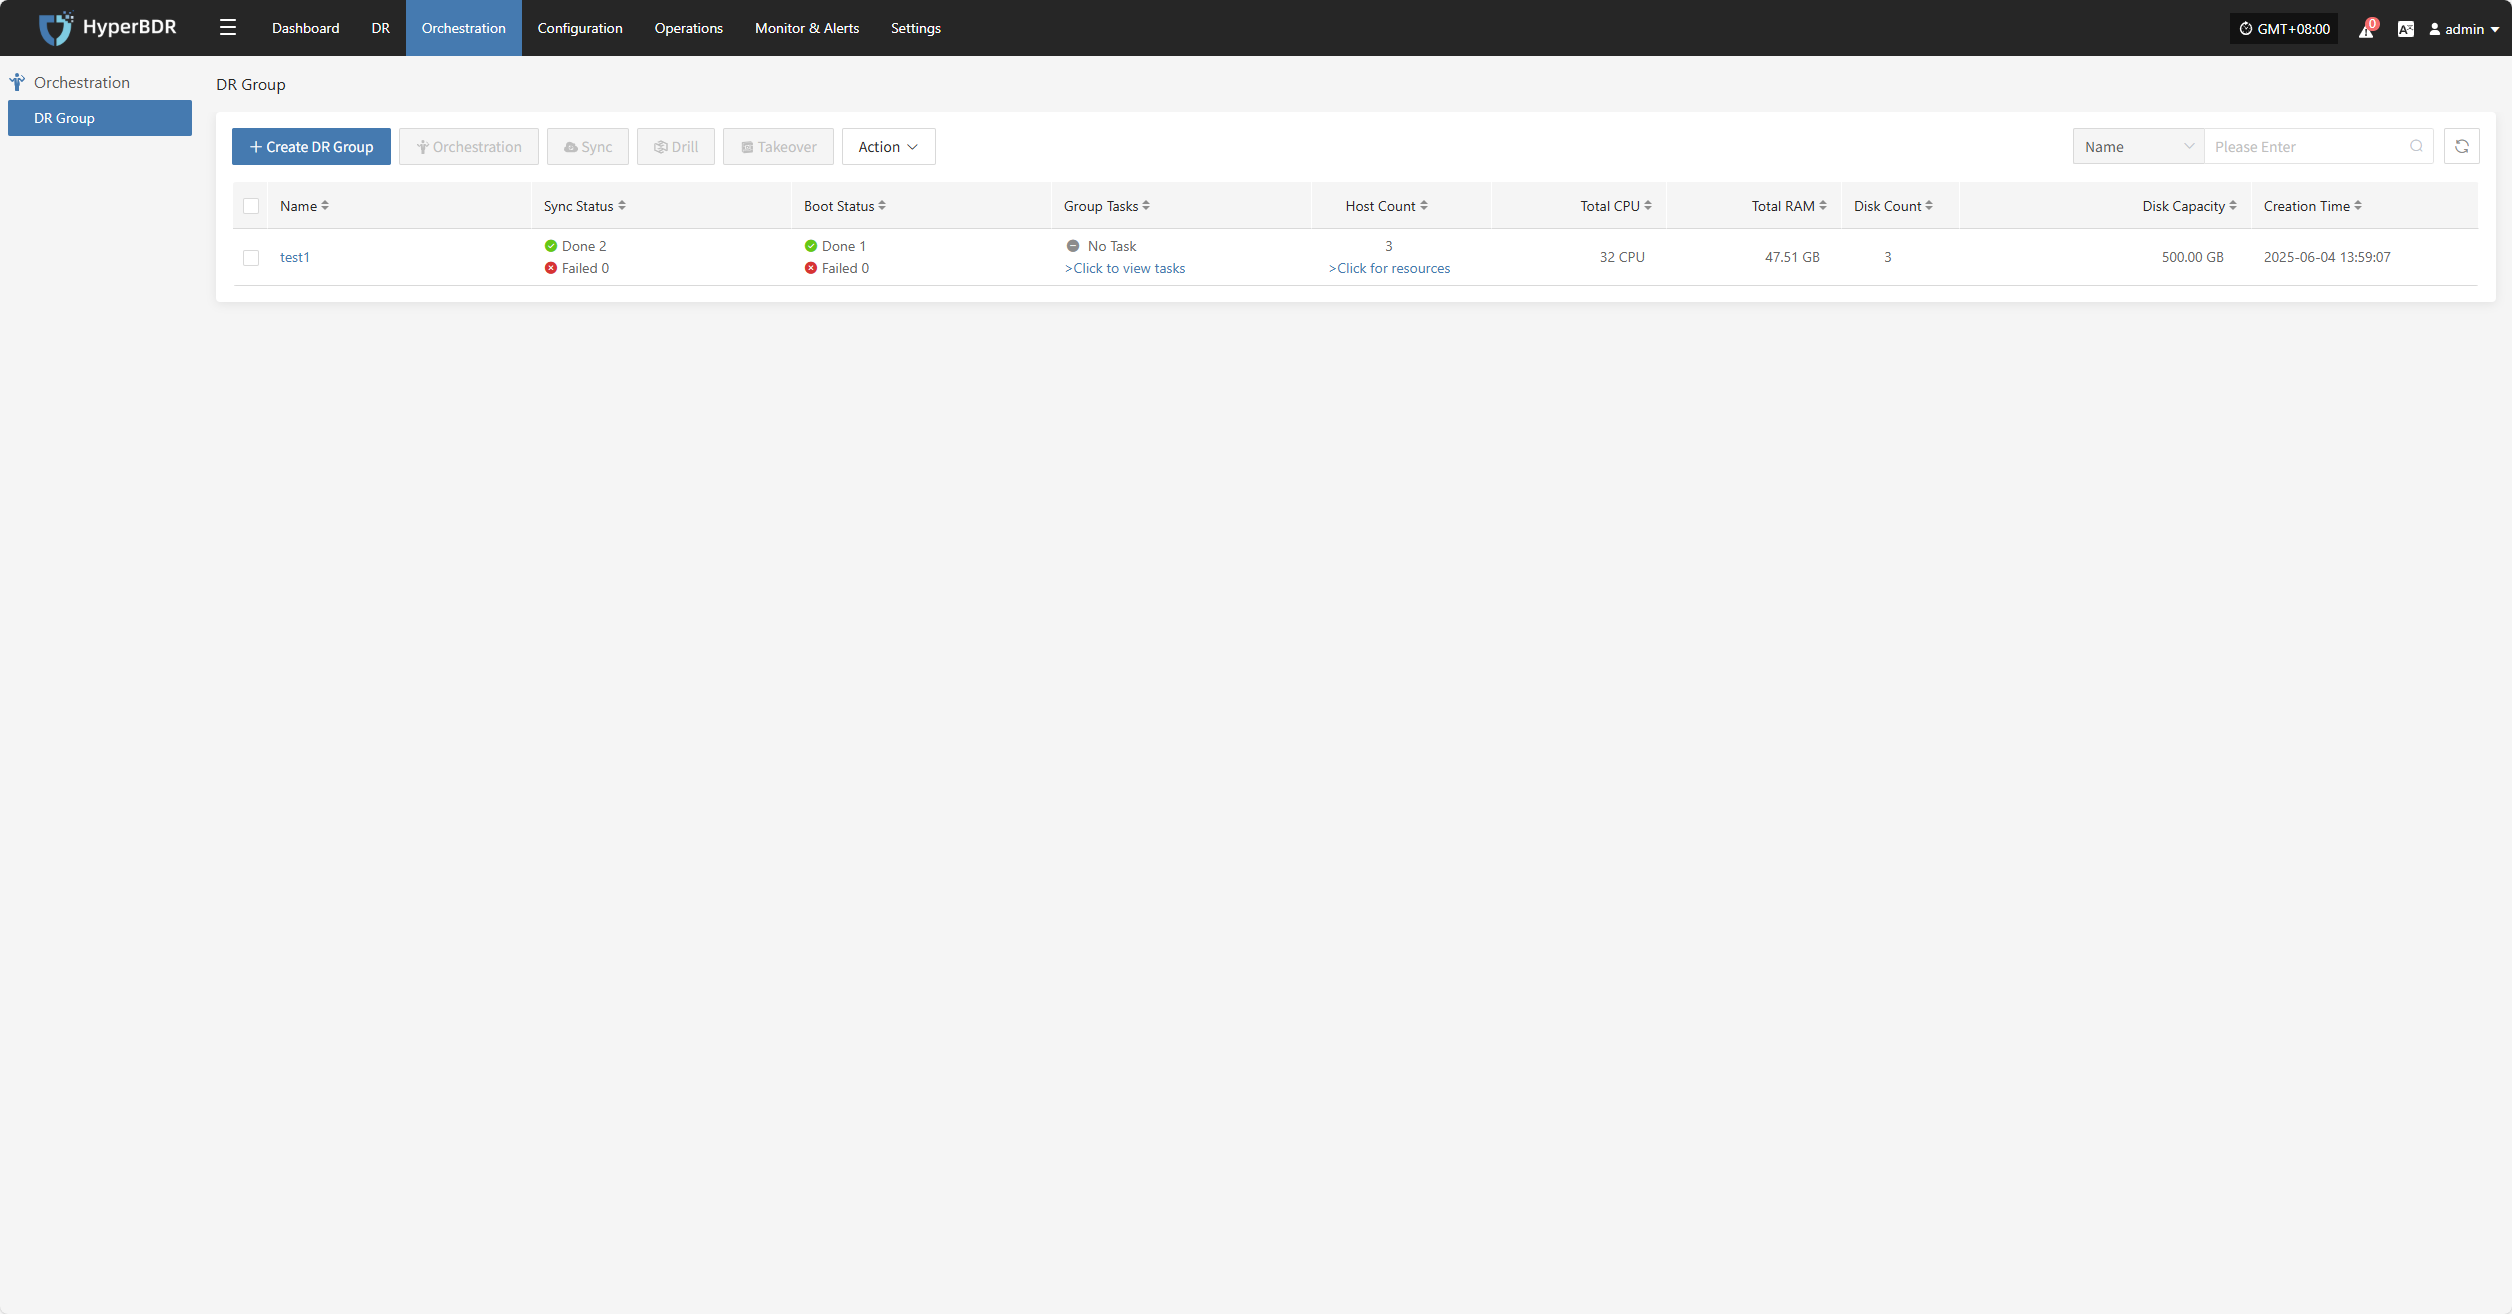
DR Group
The "DR Group" feature allows unified disaster recovery configuration and scheduling at the resource group level. It is suitable for scenarios where multiple related resources (such as hosts, networks, and storage) need to be protected and recovered together.
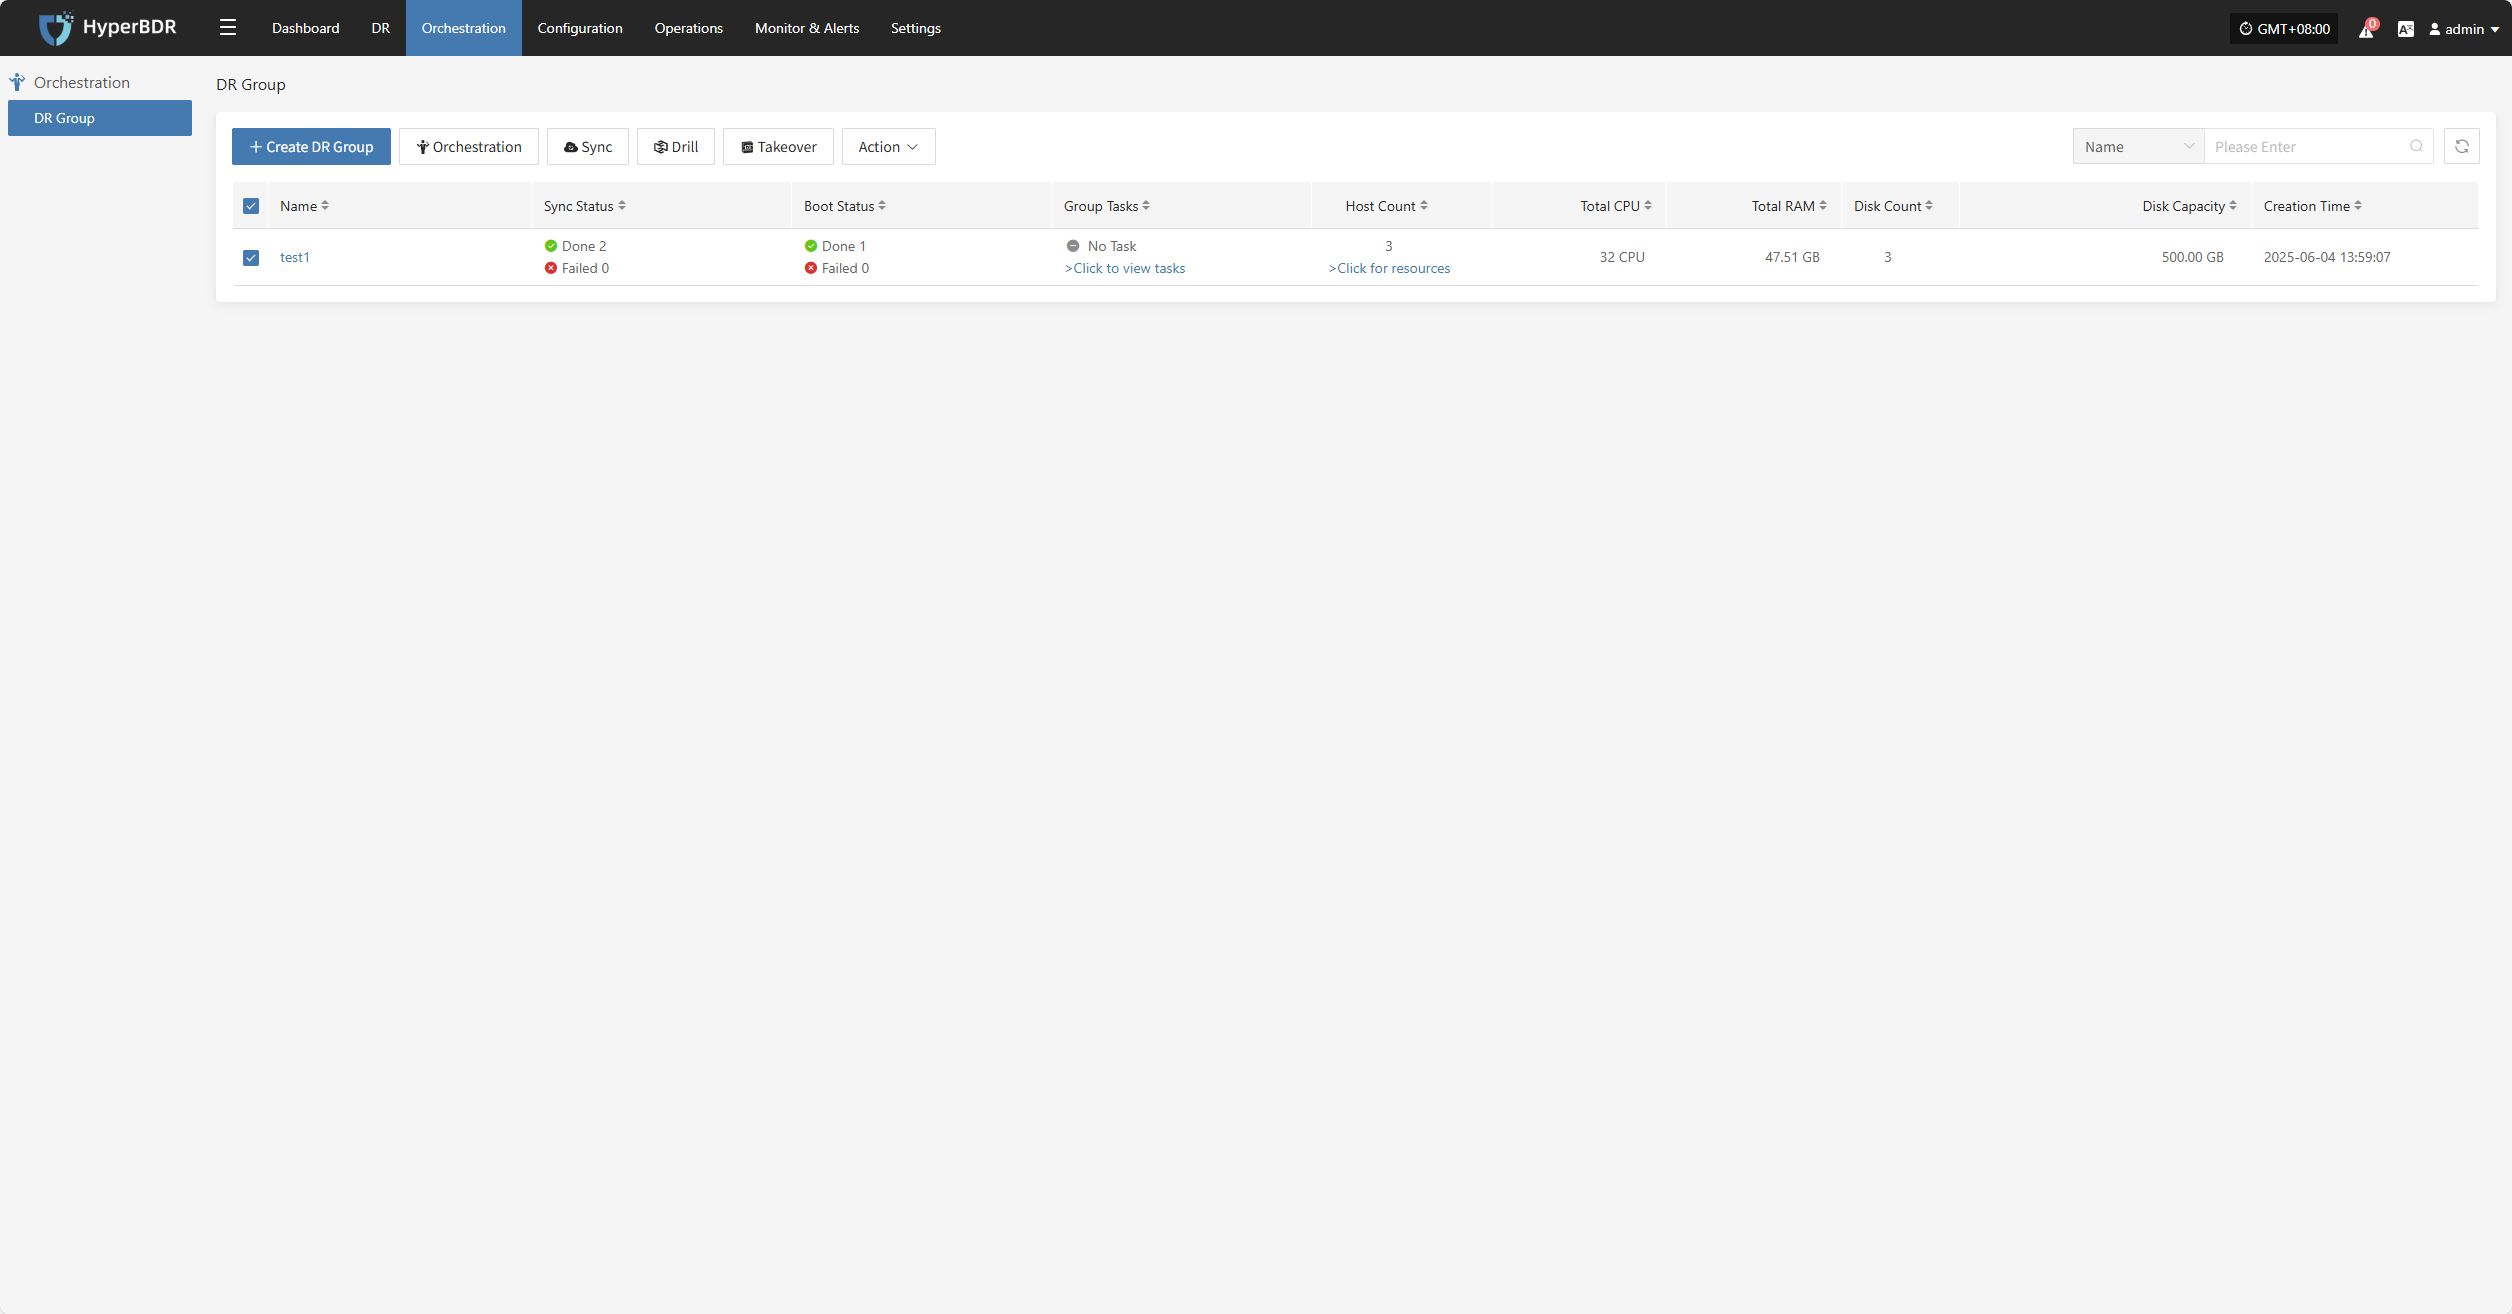
Create DR Group
Click "Create DR Group" to group hosts that have completed resource configuration. This makes it easier to manage and schedule disaster recovery for multiple resources at once.
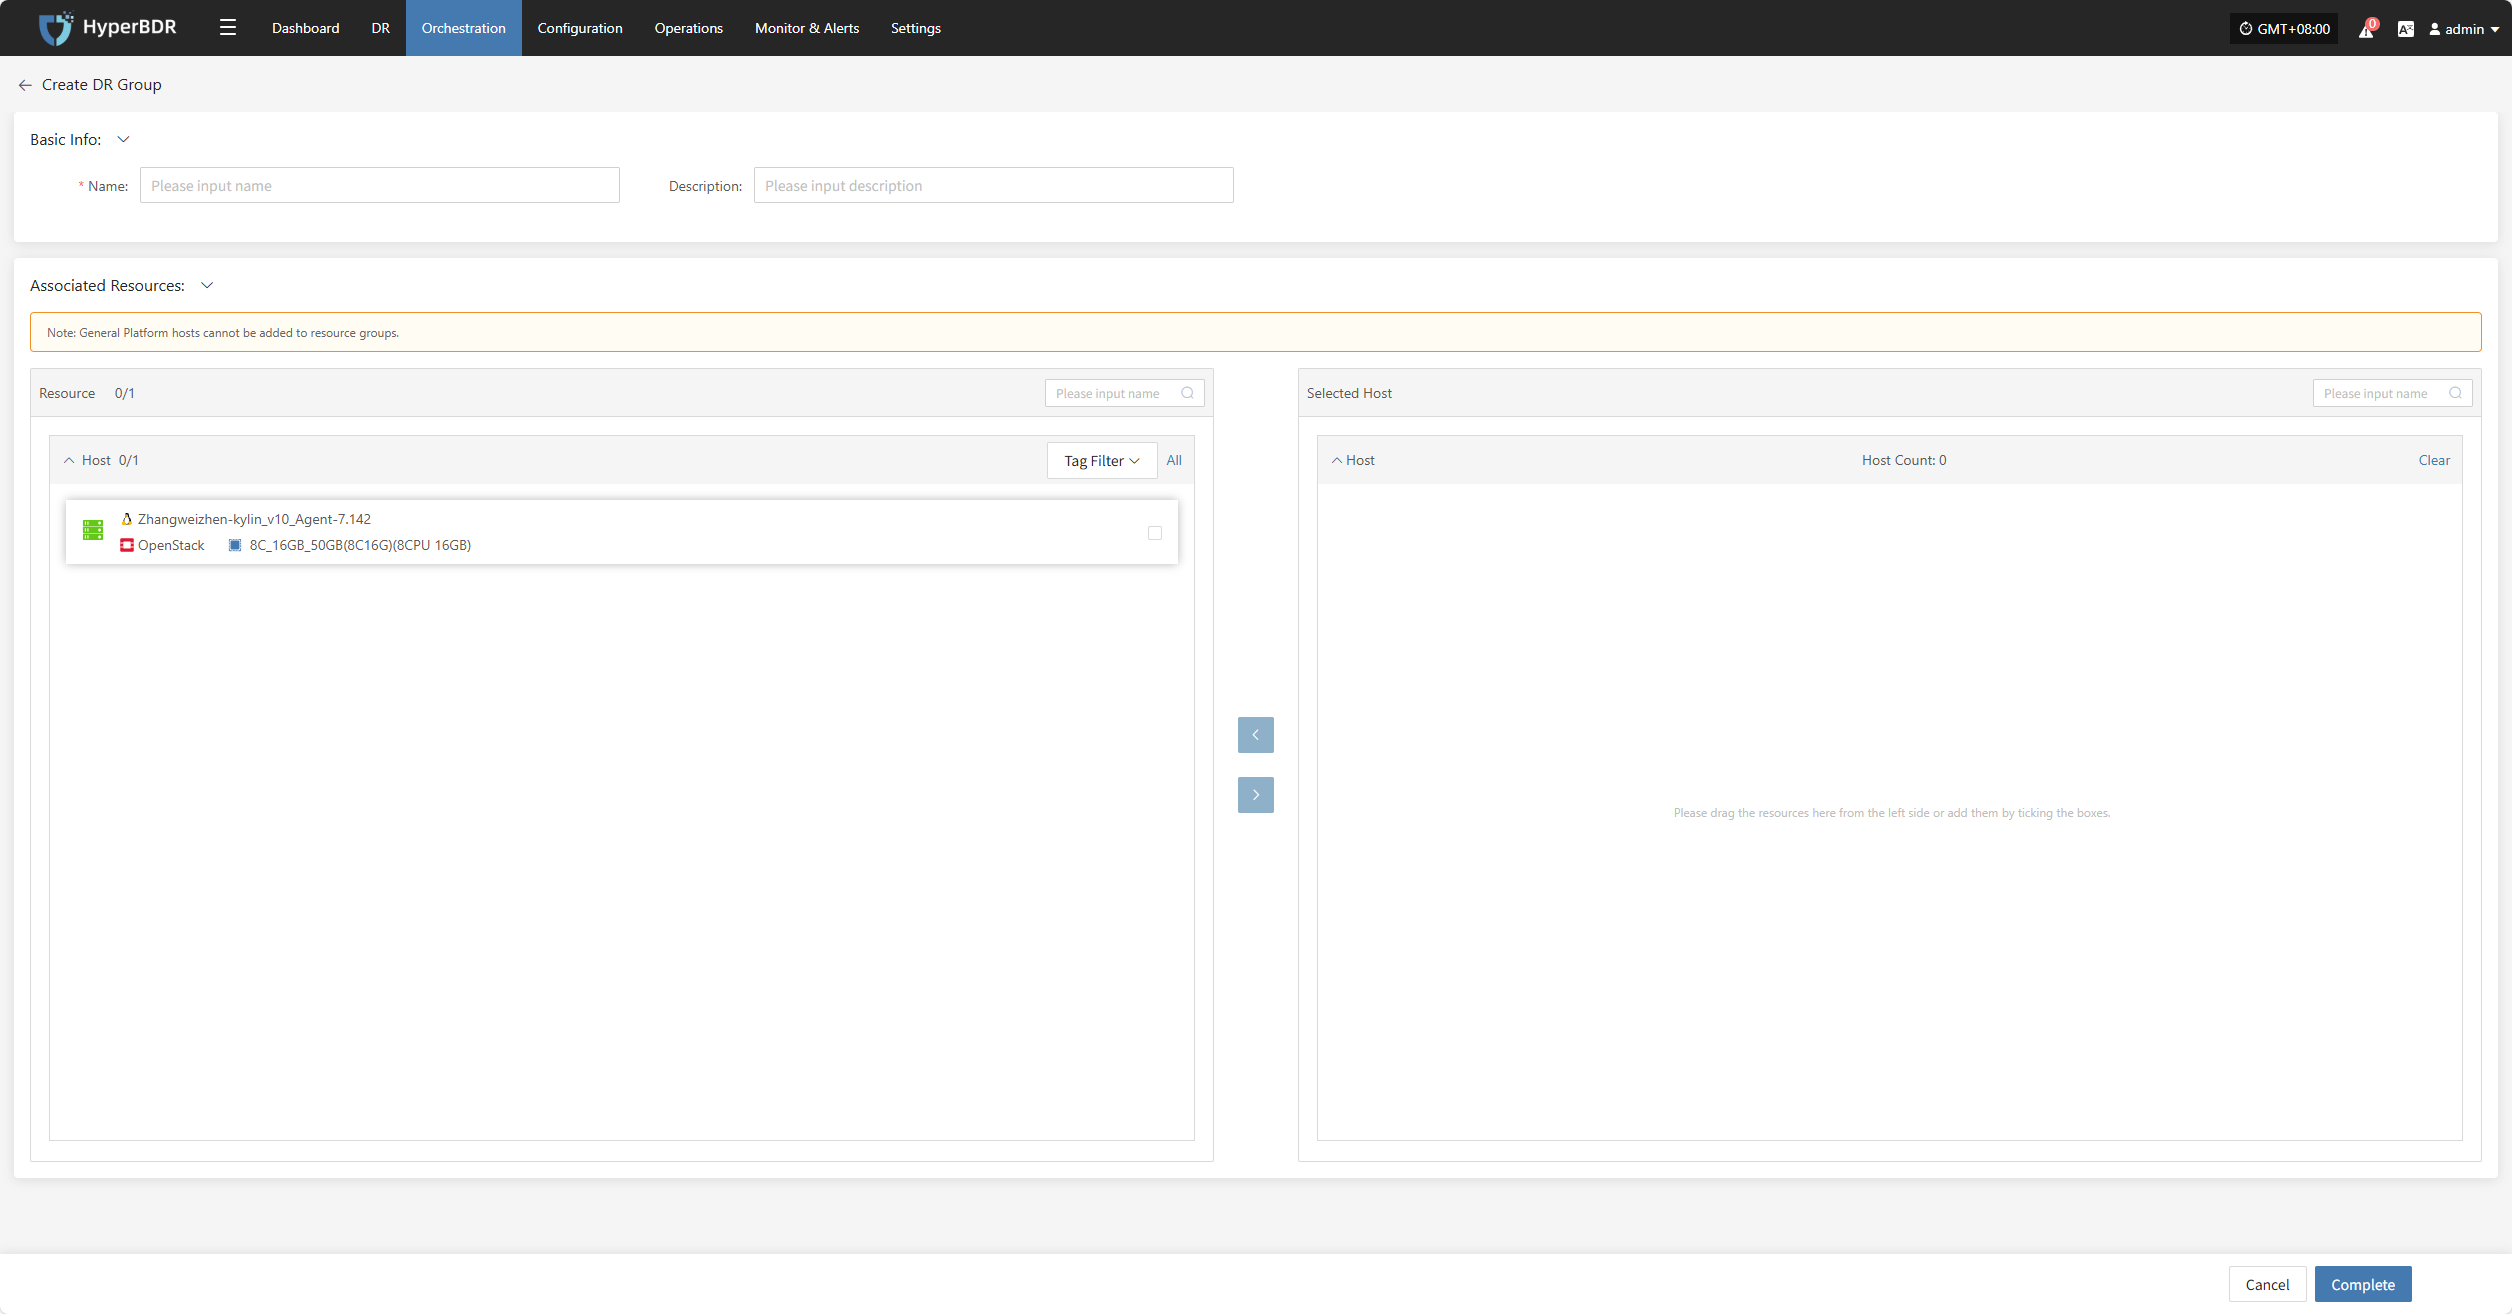
Set the resource group name, add notes, select the corresponding host resources, and click "Finish" to create the resource group.

Orchestration
Resource orchestration lets you predefine the startup order and dependencies of hosts, networks, and storage. This ensures that in the event of a disaster, the system can quickly and orderly recover according to the correct process.
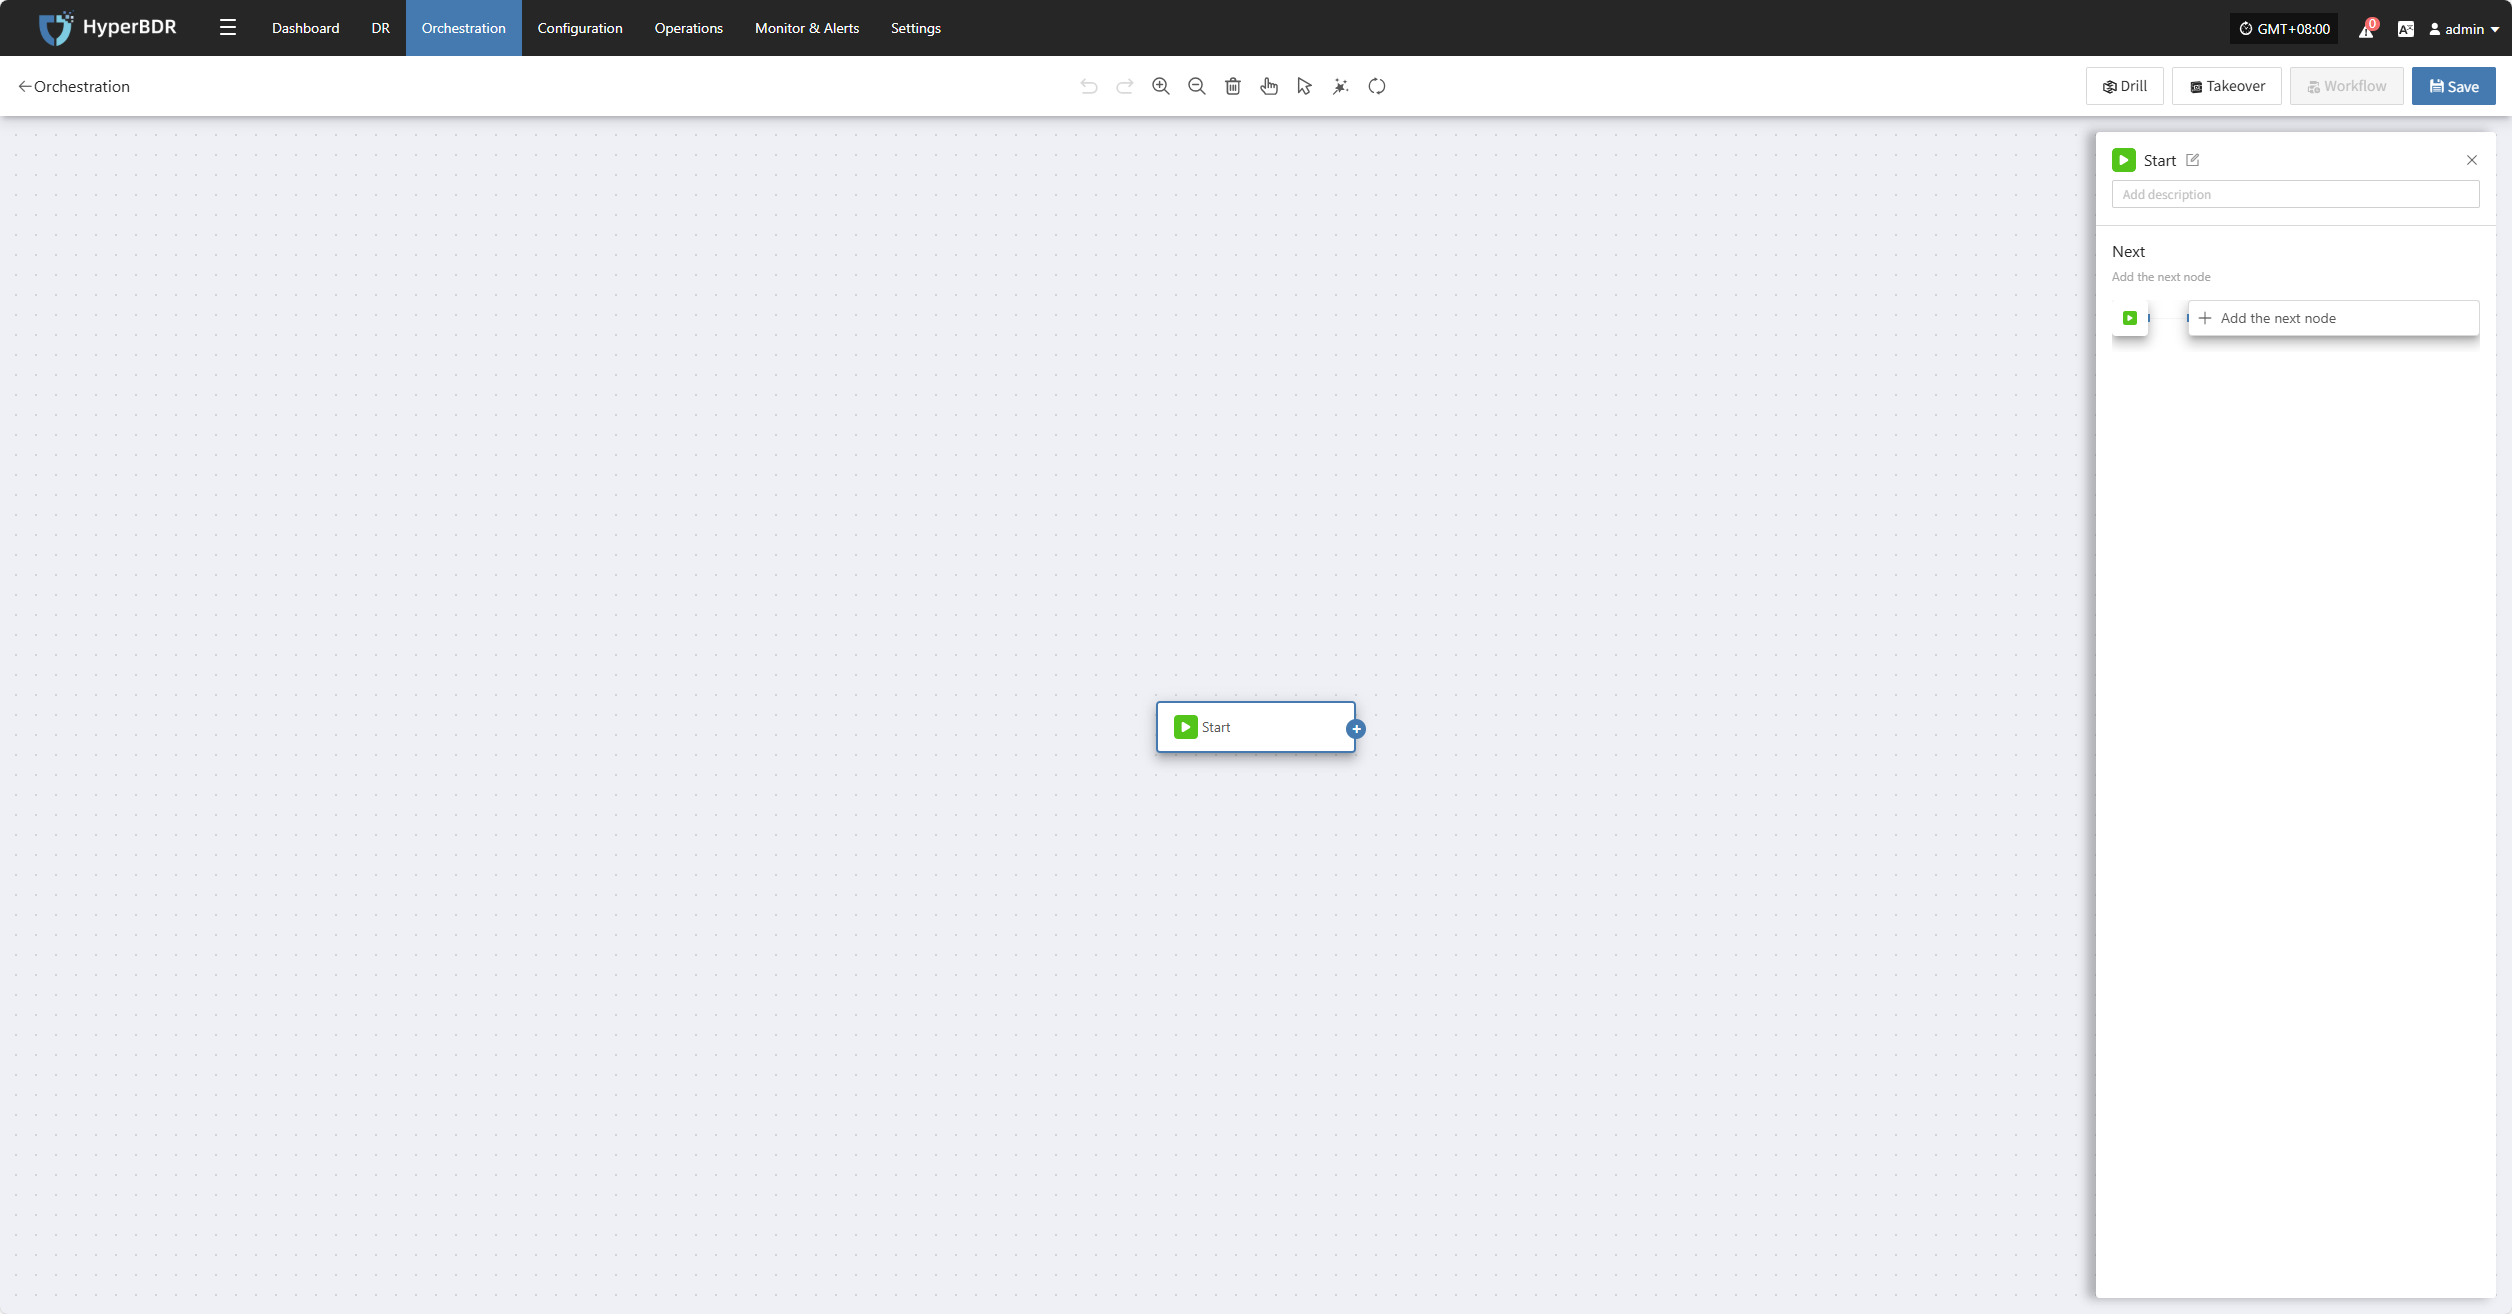
Click the "Start" button to begin adding nodes. Complete the configuration for each node and add them as needed.
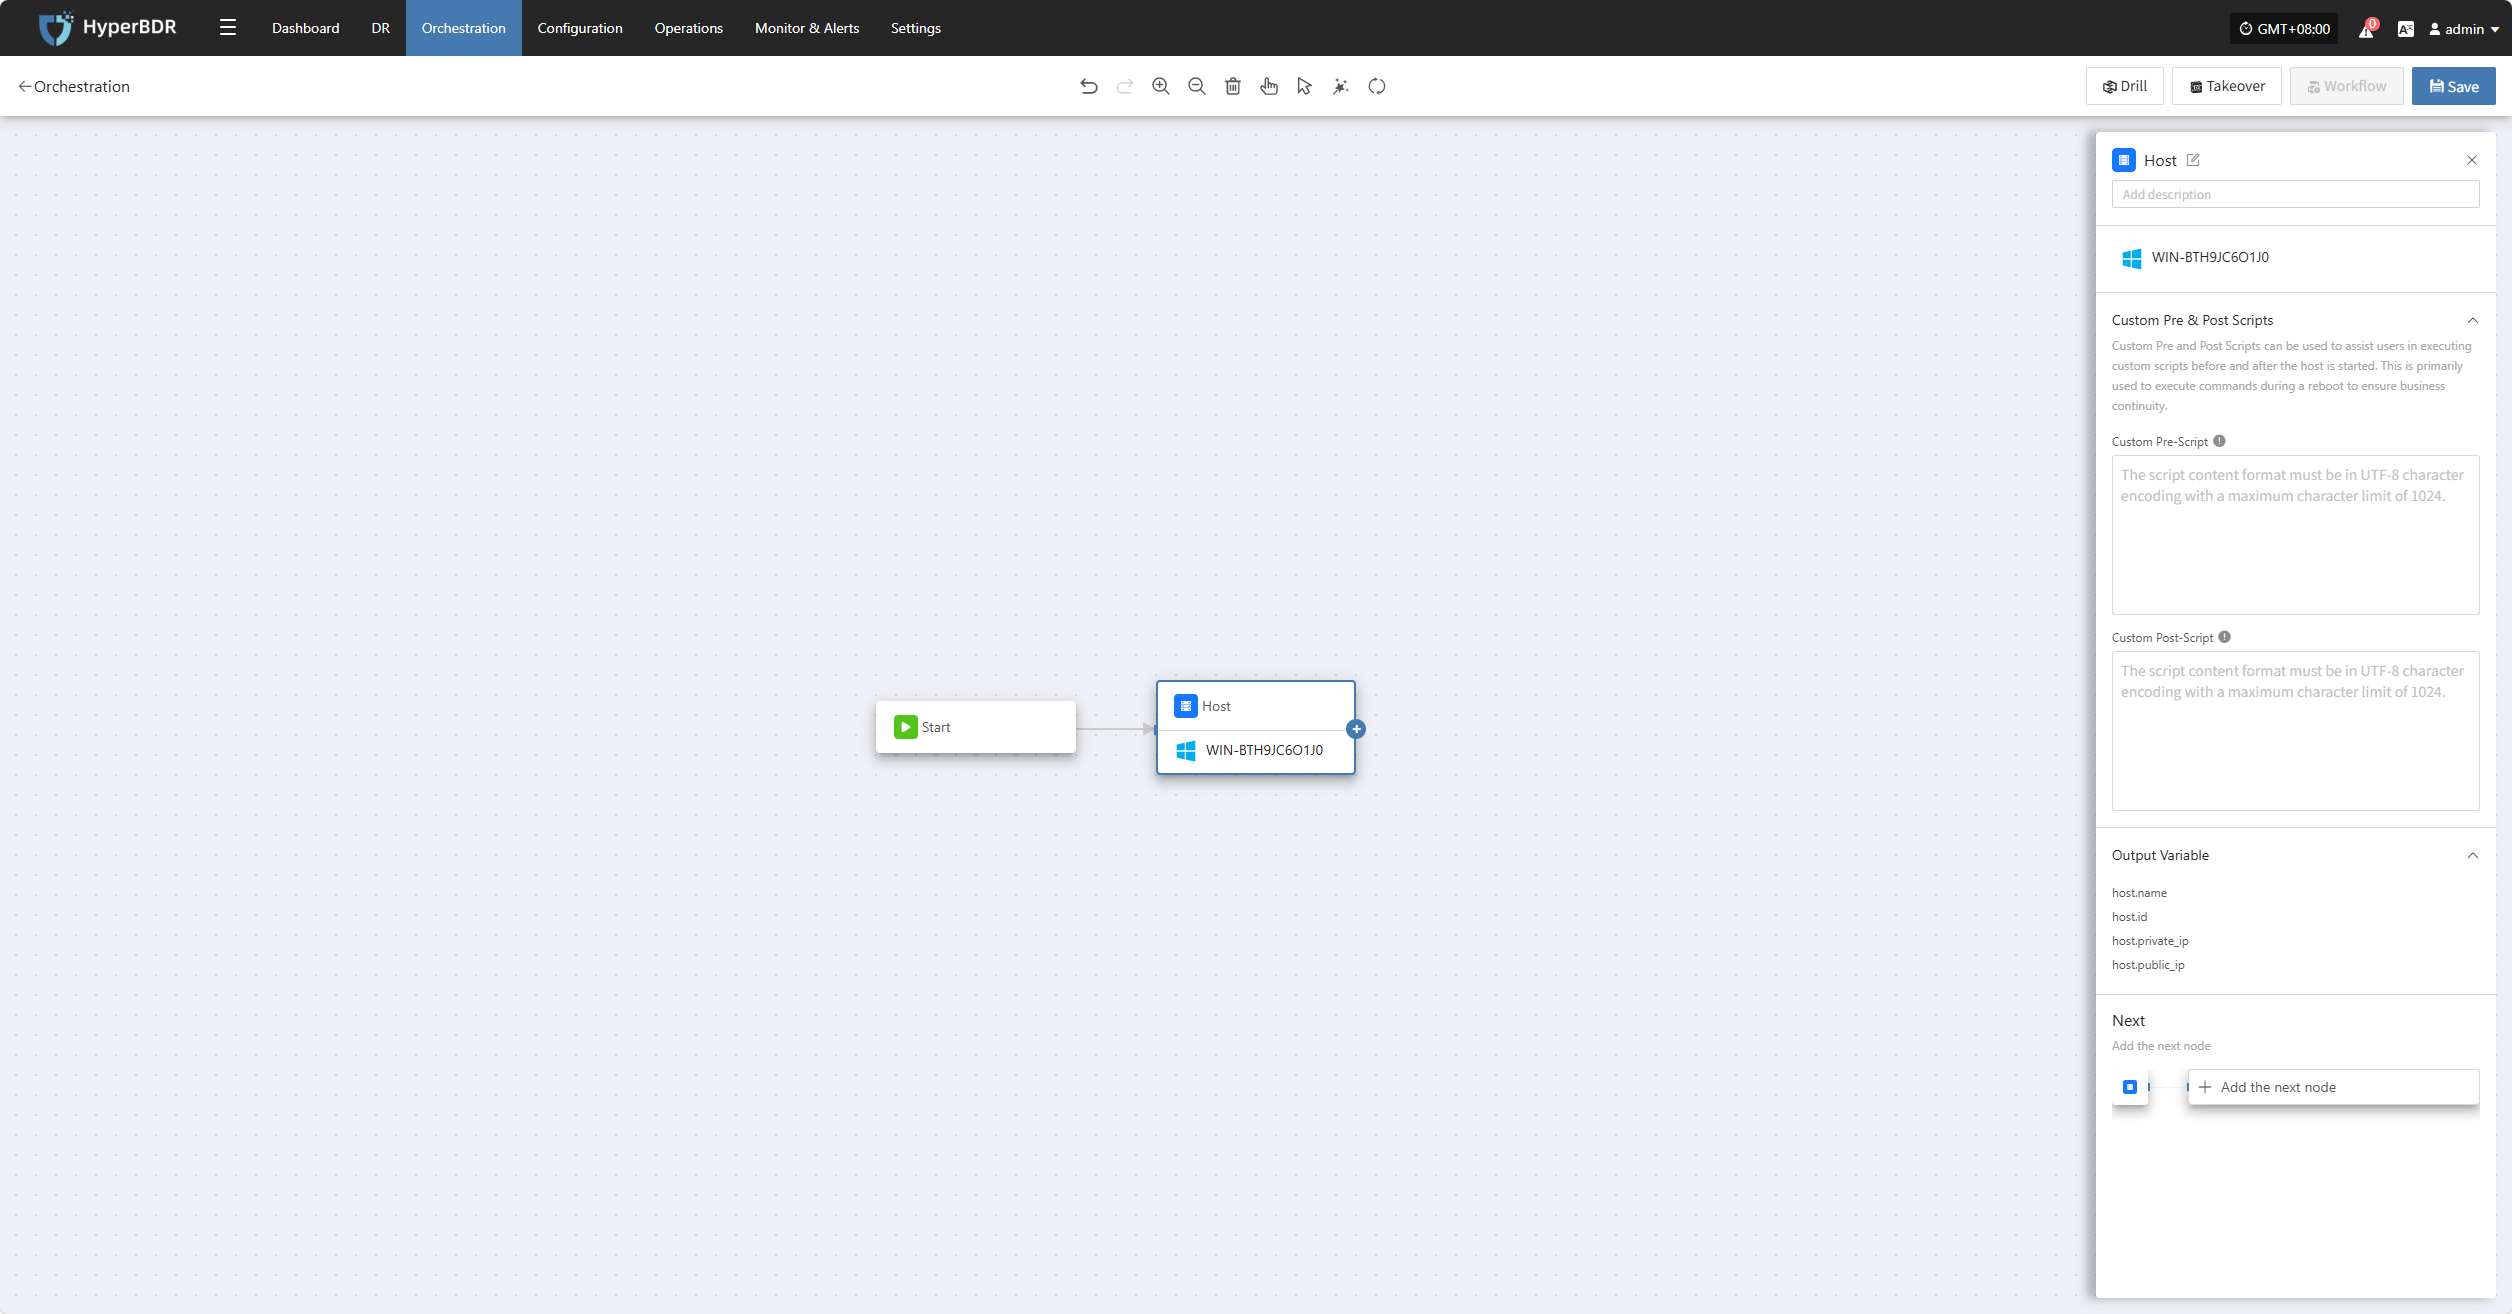
After clicking "Add Host Node," the settings panel will appear on the right. Here, you can add pre-start scripts, post-start scripts, and other configurations before adding the next node or parallel nodes.
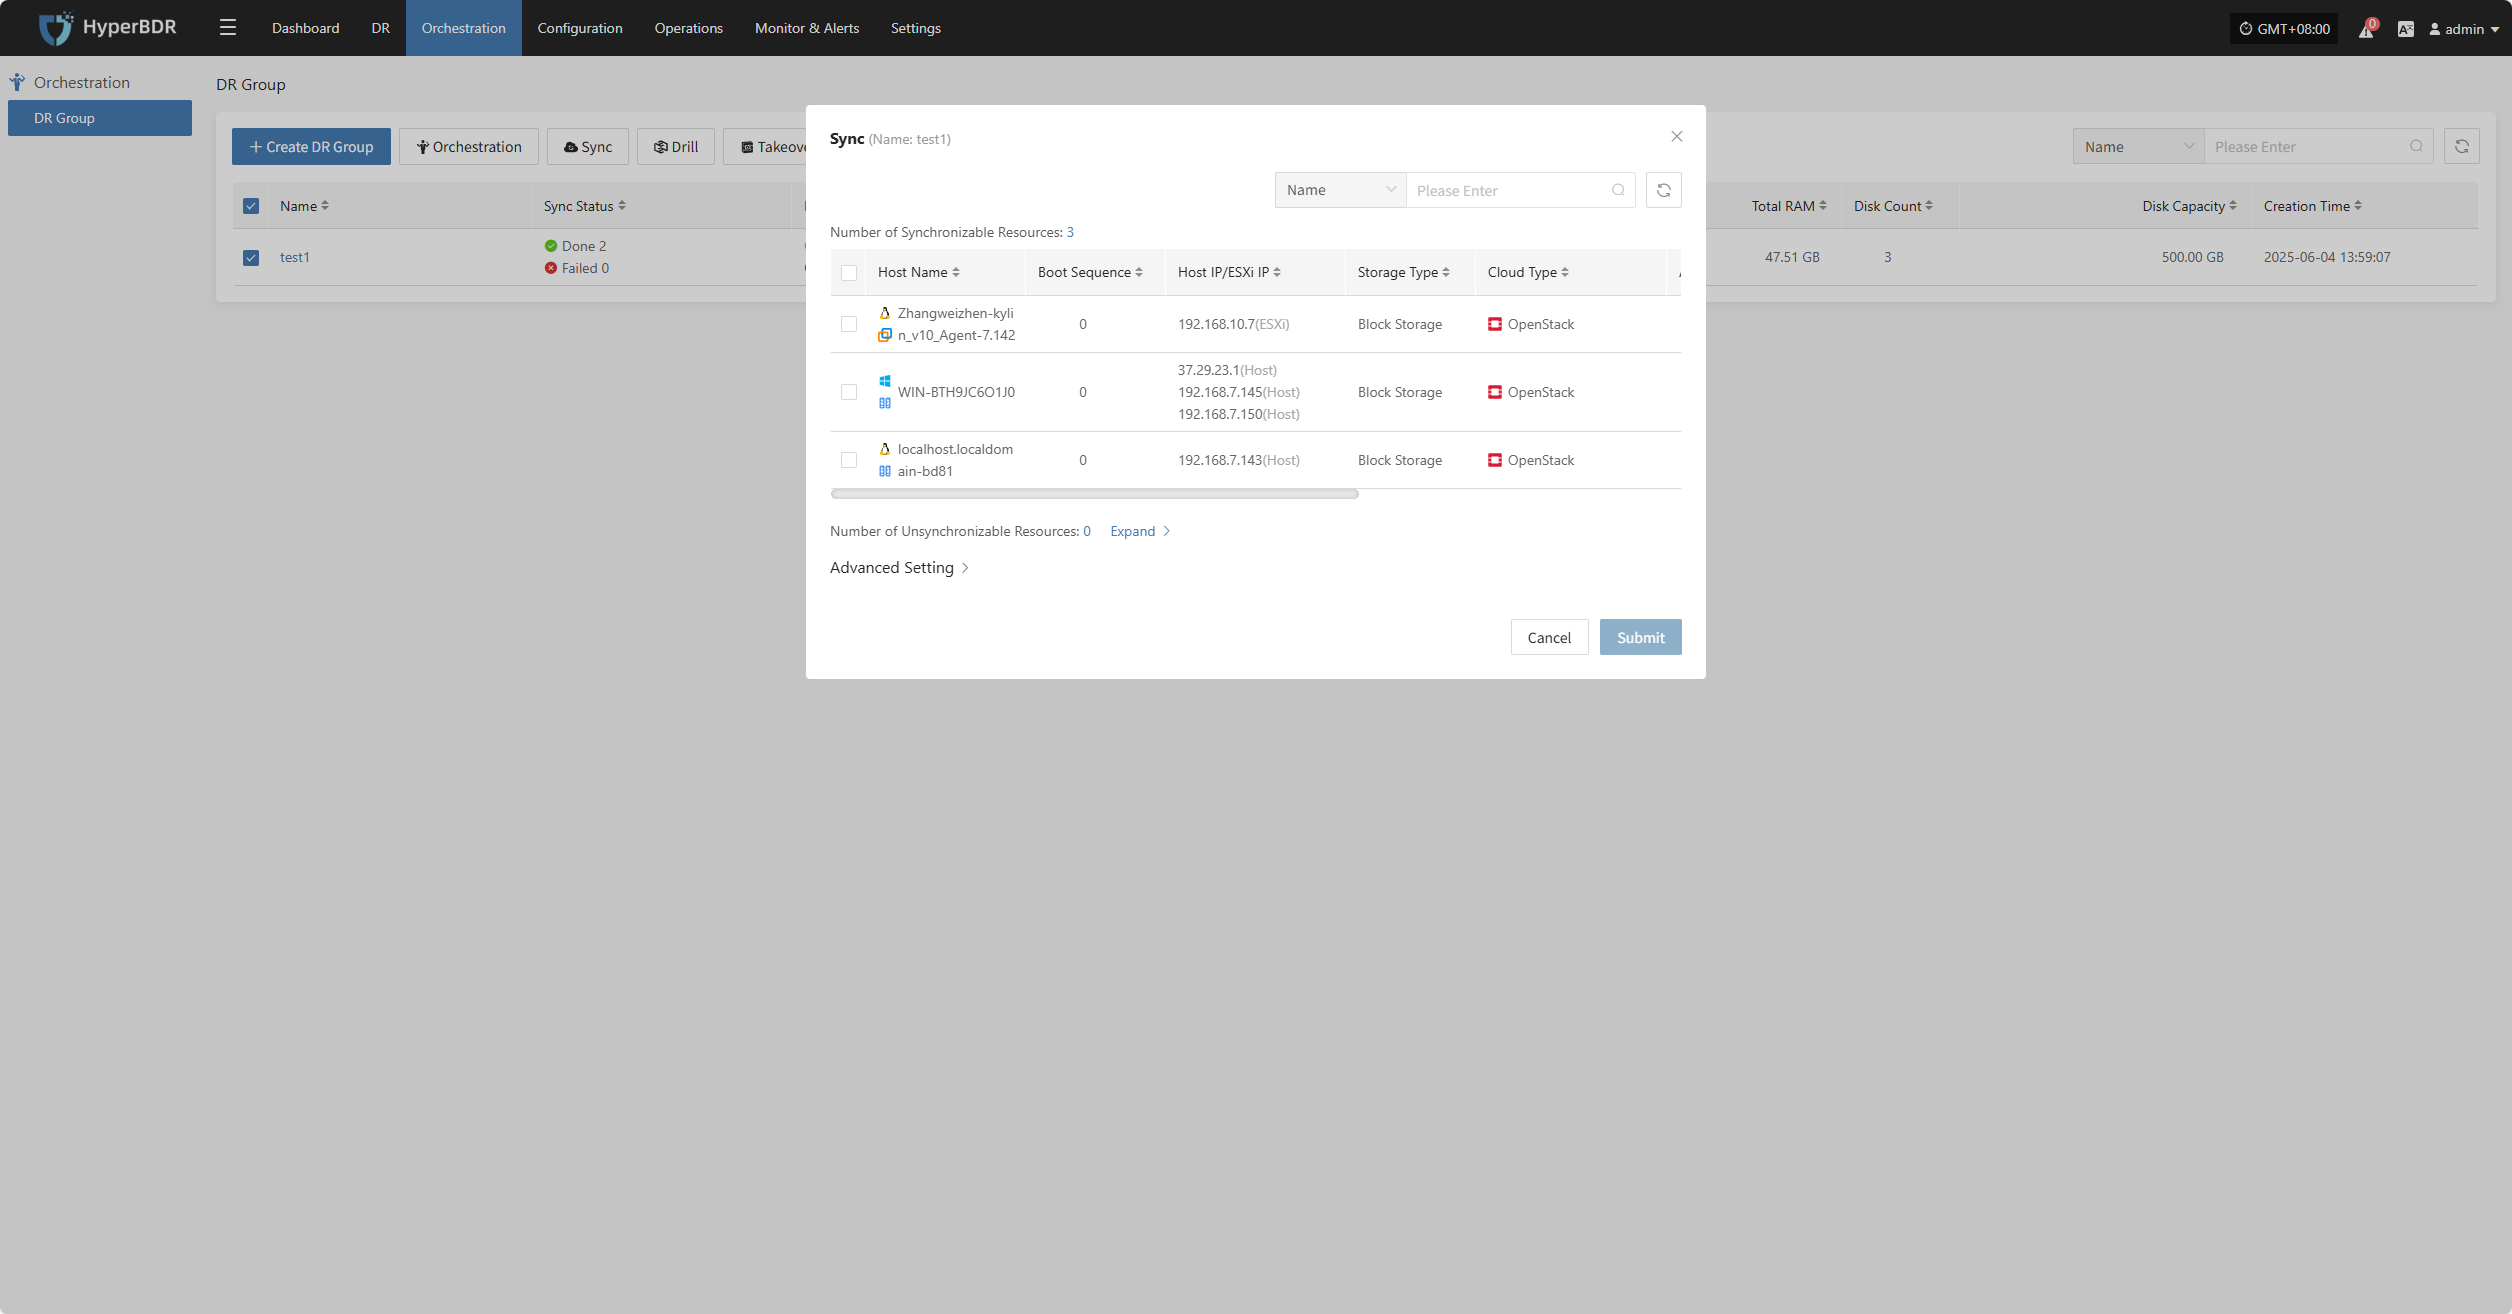
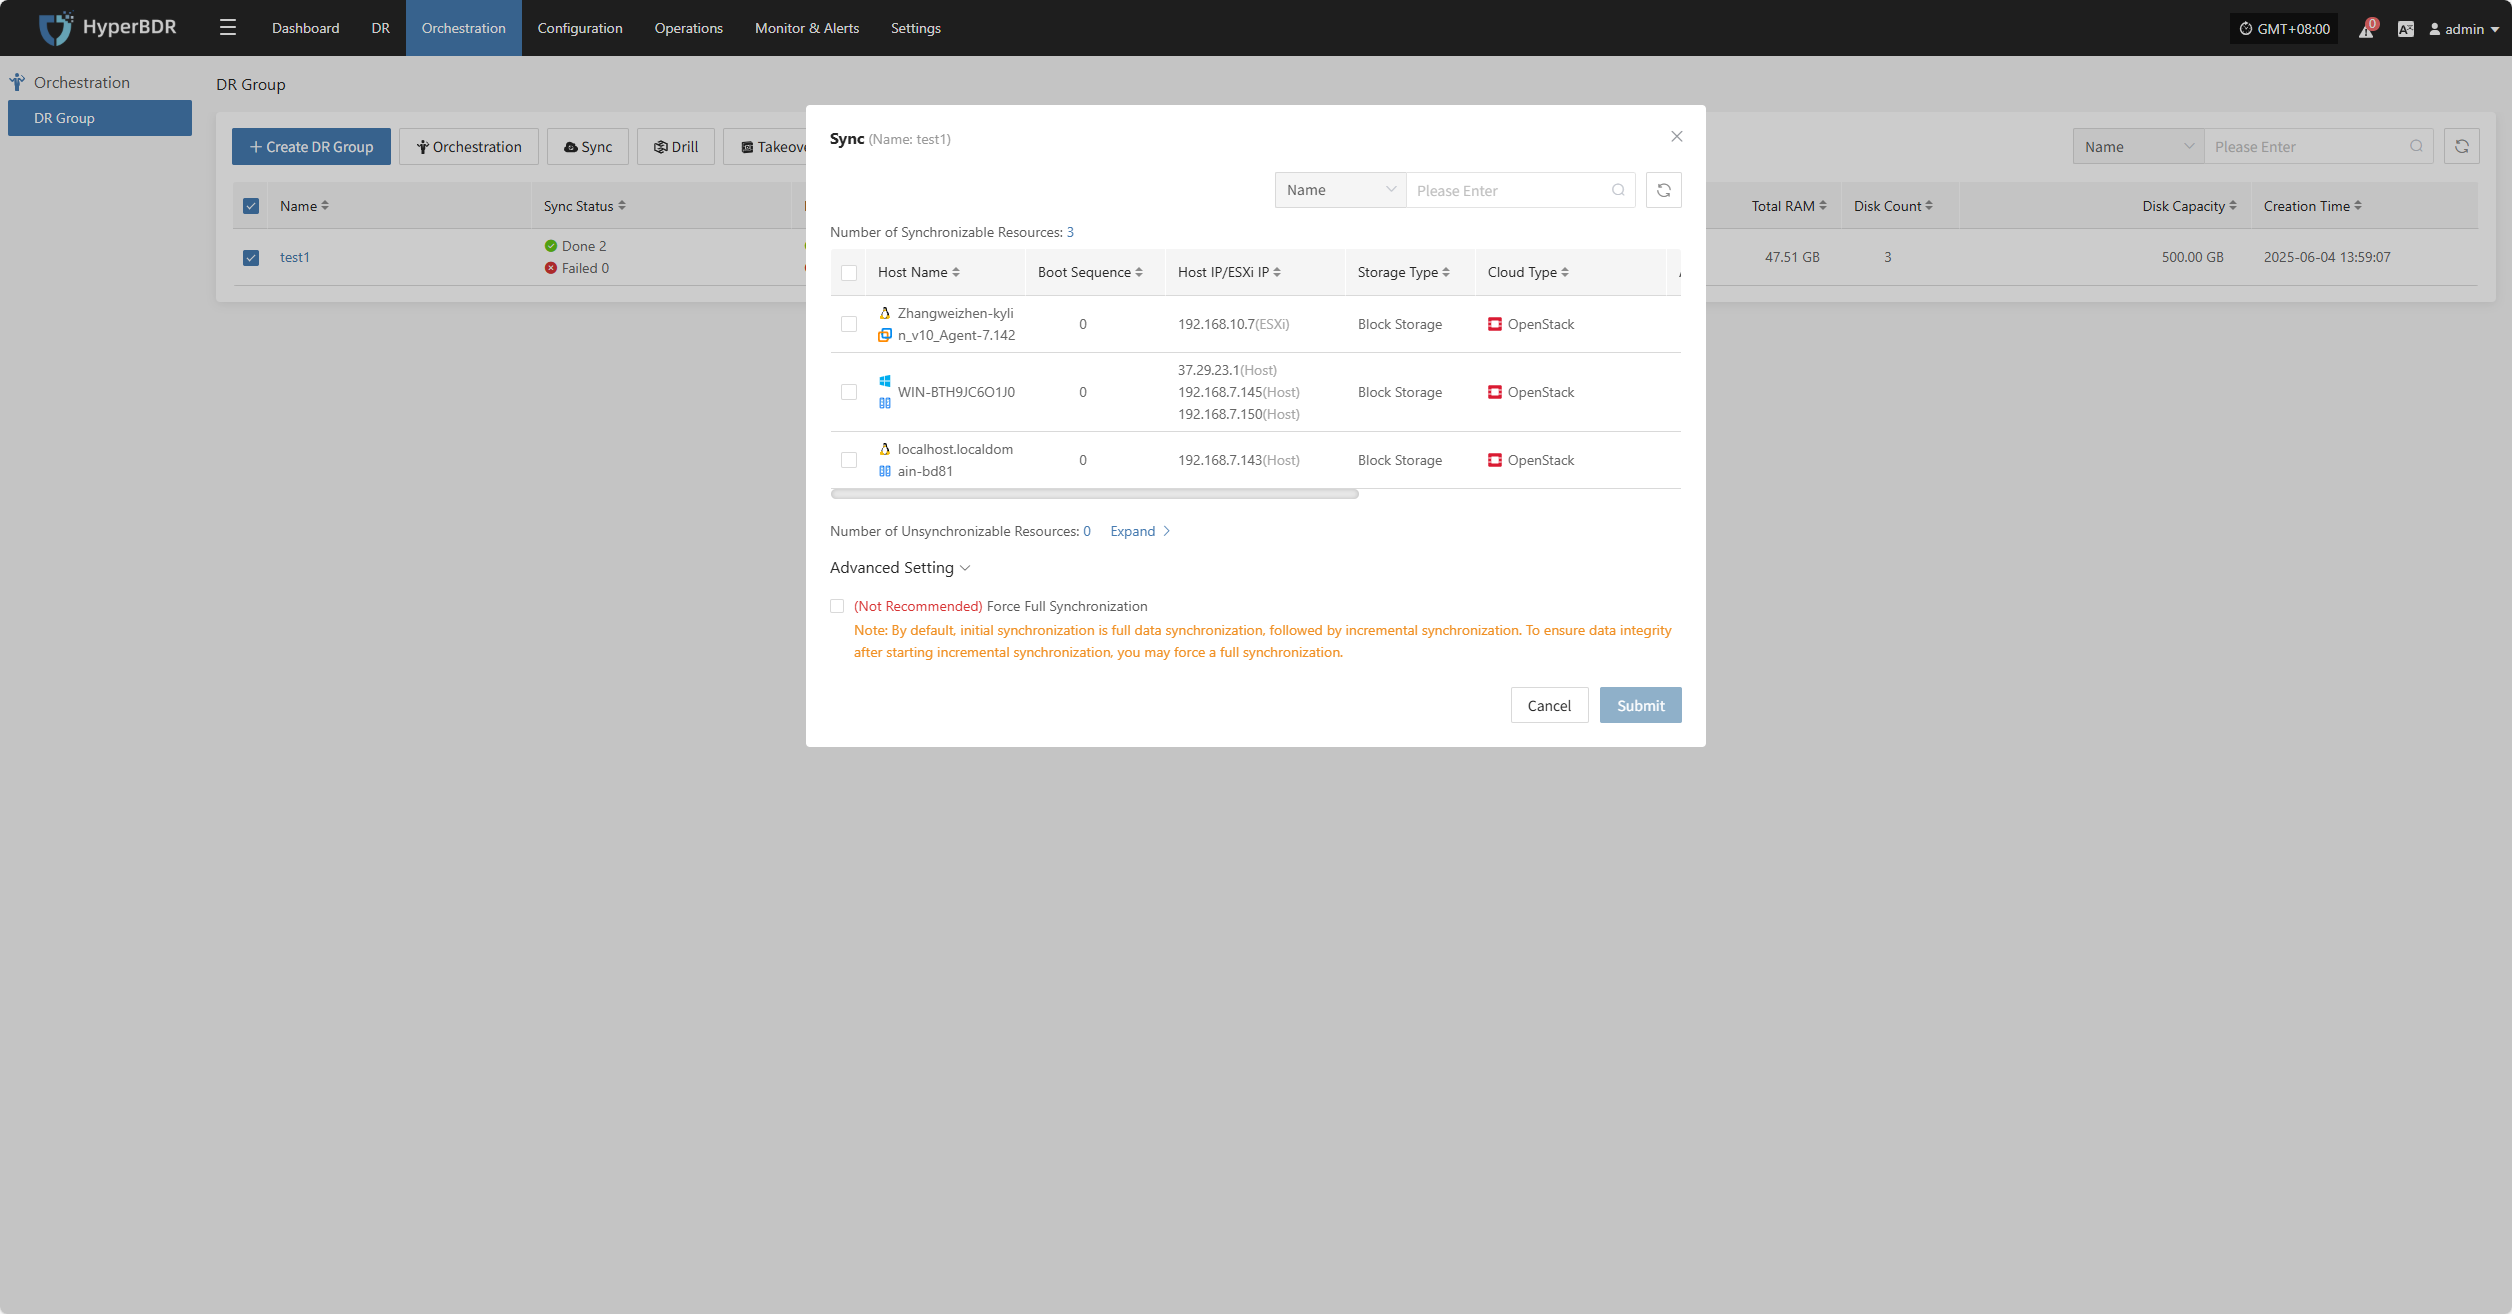
Sync
Select the resource group you want to protect, then click "Sync" to start data synchronization according to your business needs.
Note: By default, the first sync is a full sync. Subsequent syncs are incremental. If you need to perform a full sync again after incremental syncs to ensure data integrity, you can choose to force a full sync.
Advanced Setting
In "Advanced Settings," you can enable the Force Full Synchronization option to ensure all data is fully synchronized again.
Drill
Select the resource group, click "Drill," choose the host and recovery point, and restore the disaster recovery host to the target environment with one click.
Note: Only hosts that have completed synchronization can participate in drills. Hosts with unsynchronized data will be excluded and cannot be started.

The system will automatically create or start the target instances based on the predefined orchestration (compute, storage, network, etc.). Once started, you can log in to the target platform to verify configurations and perform business drills.

After recovery, check if application services, databases, and load balancers are working properly.
Takeover
Select the resource group, click "Takeover", choose the recovery snapshot point, and confirm to proceed.
Note: Only hosts that have completed synchronization can participate in takeover. Hosts with unsynchronized data will be excluded and cannot be started.
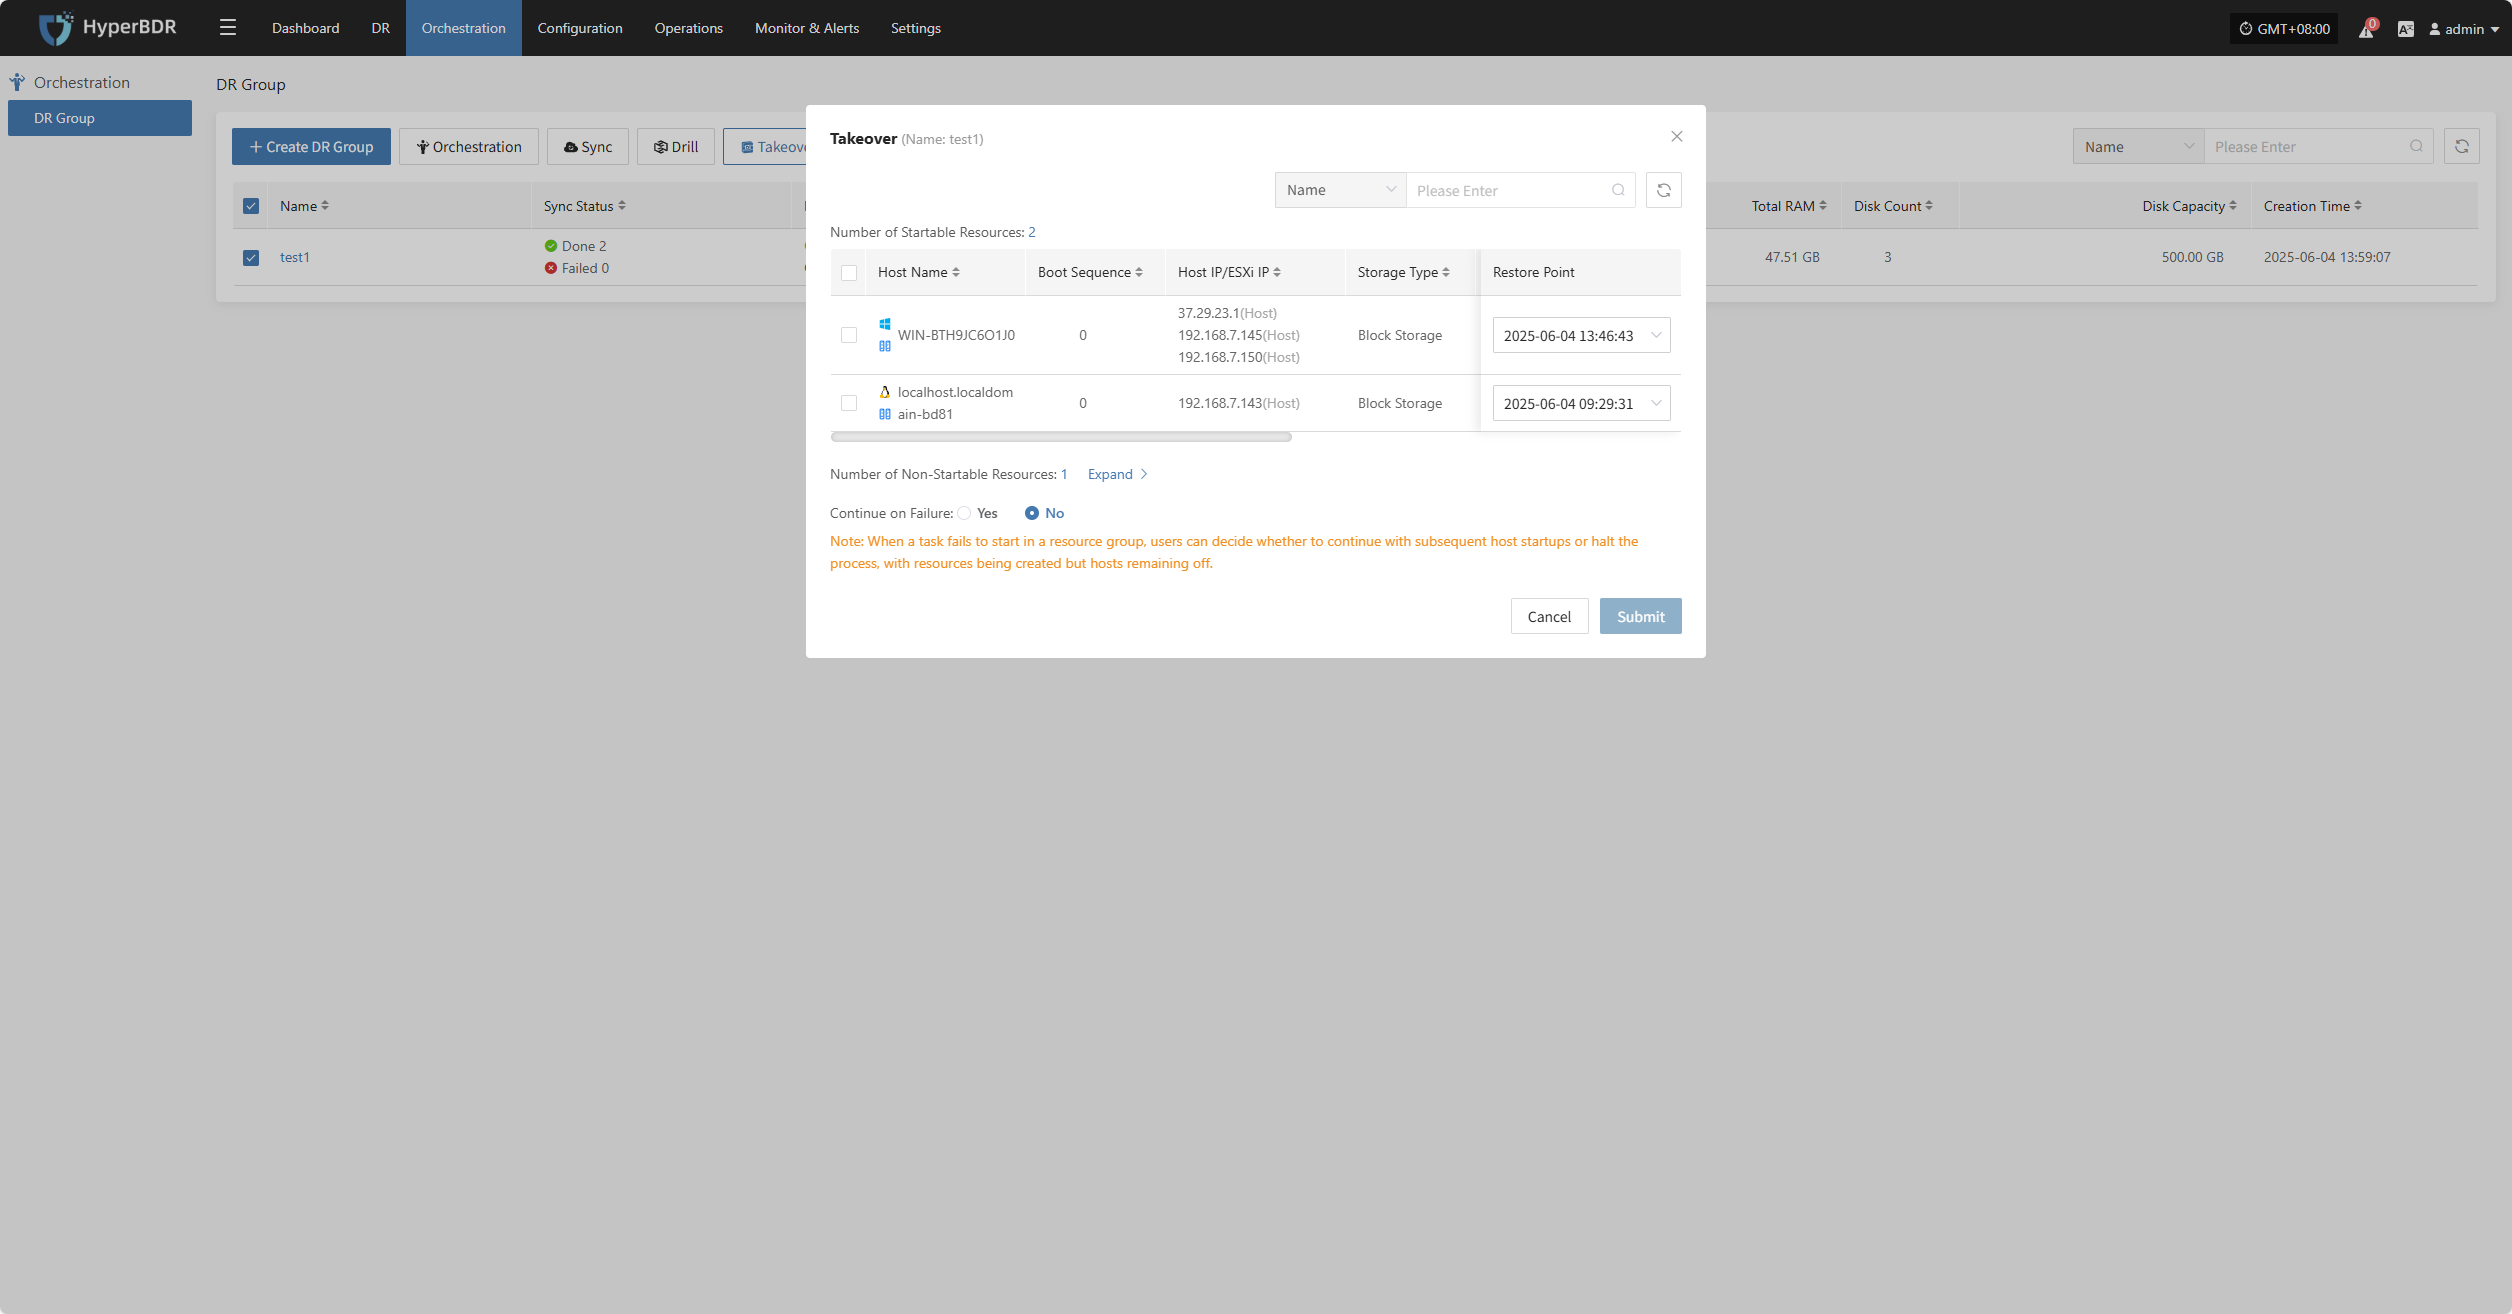
The system will automatically create or start the target instances based on the predefined orchestration (compute, storage, network, etc.). Once started, you can log in to the target platform to verify configurations and take over business operations.
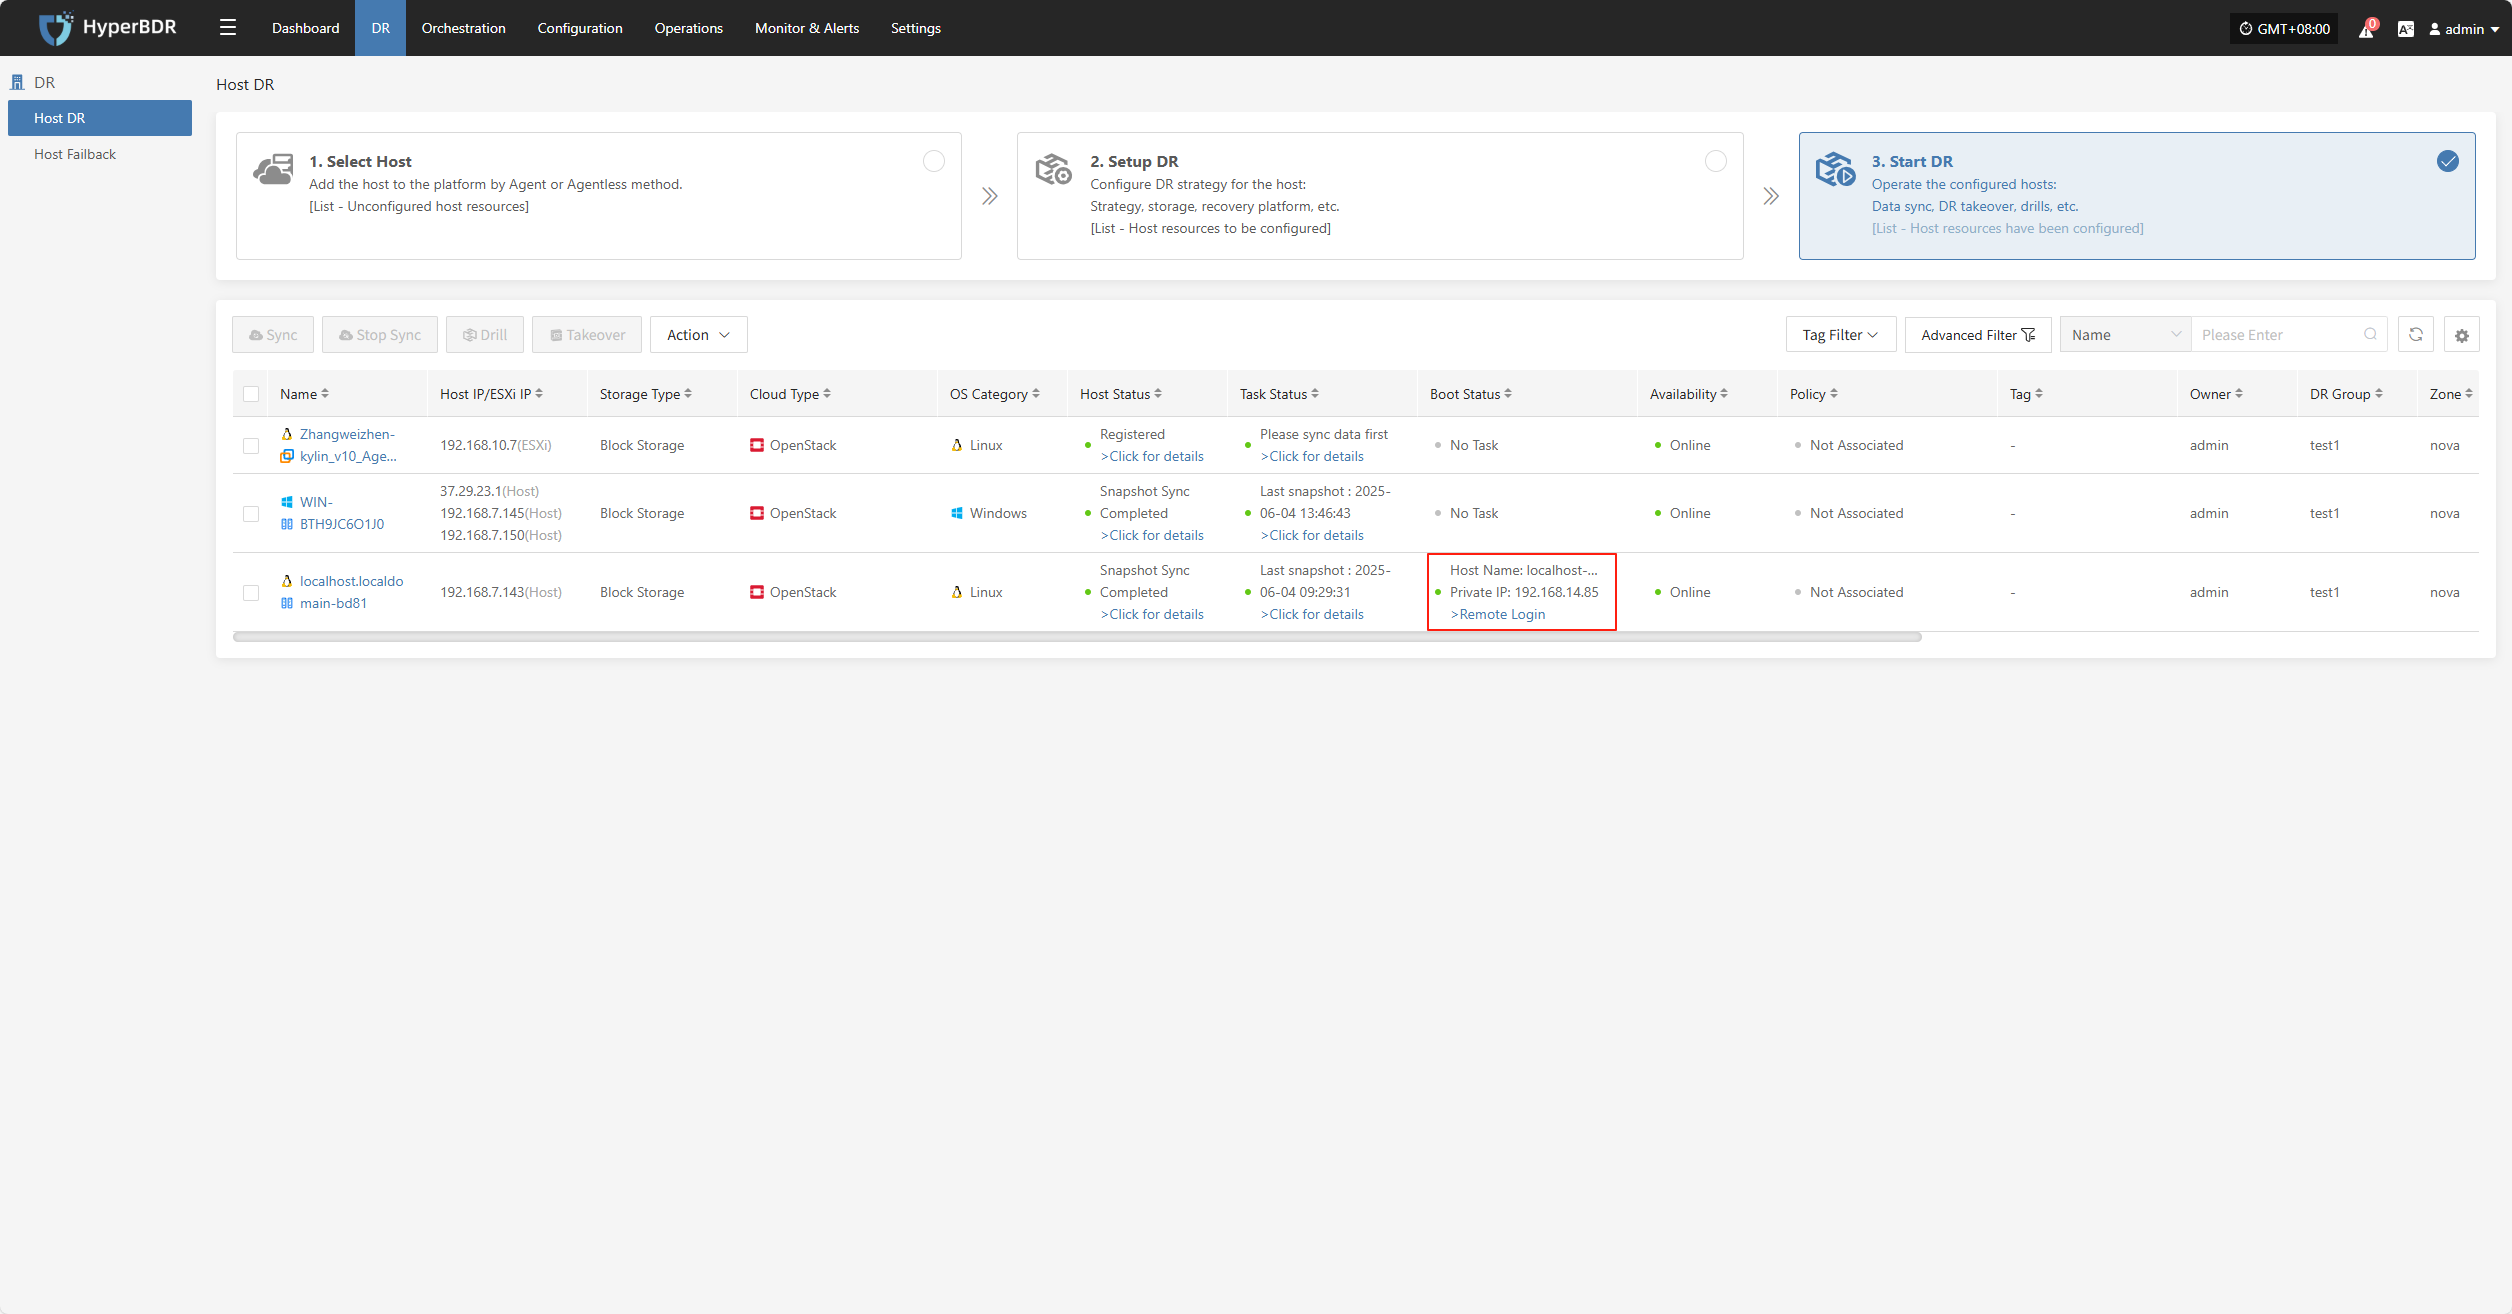
After takeover, check database versions, application service configurations, and dependent services (such as cache and message queues) to ensure everything is working normally.
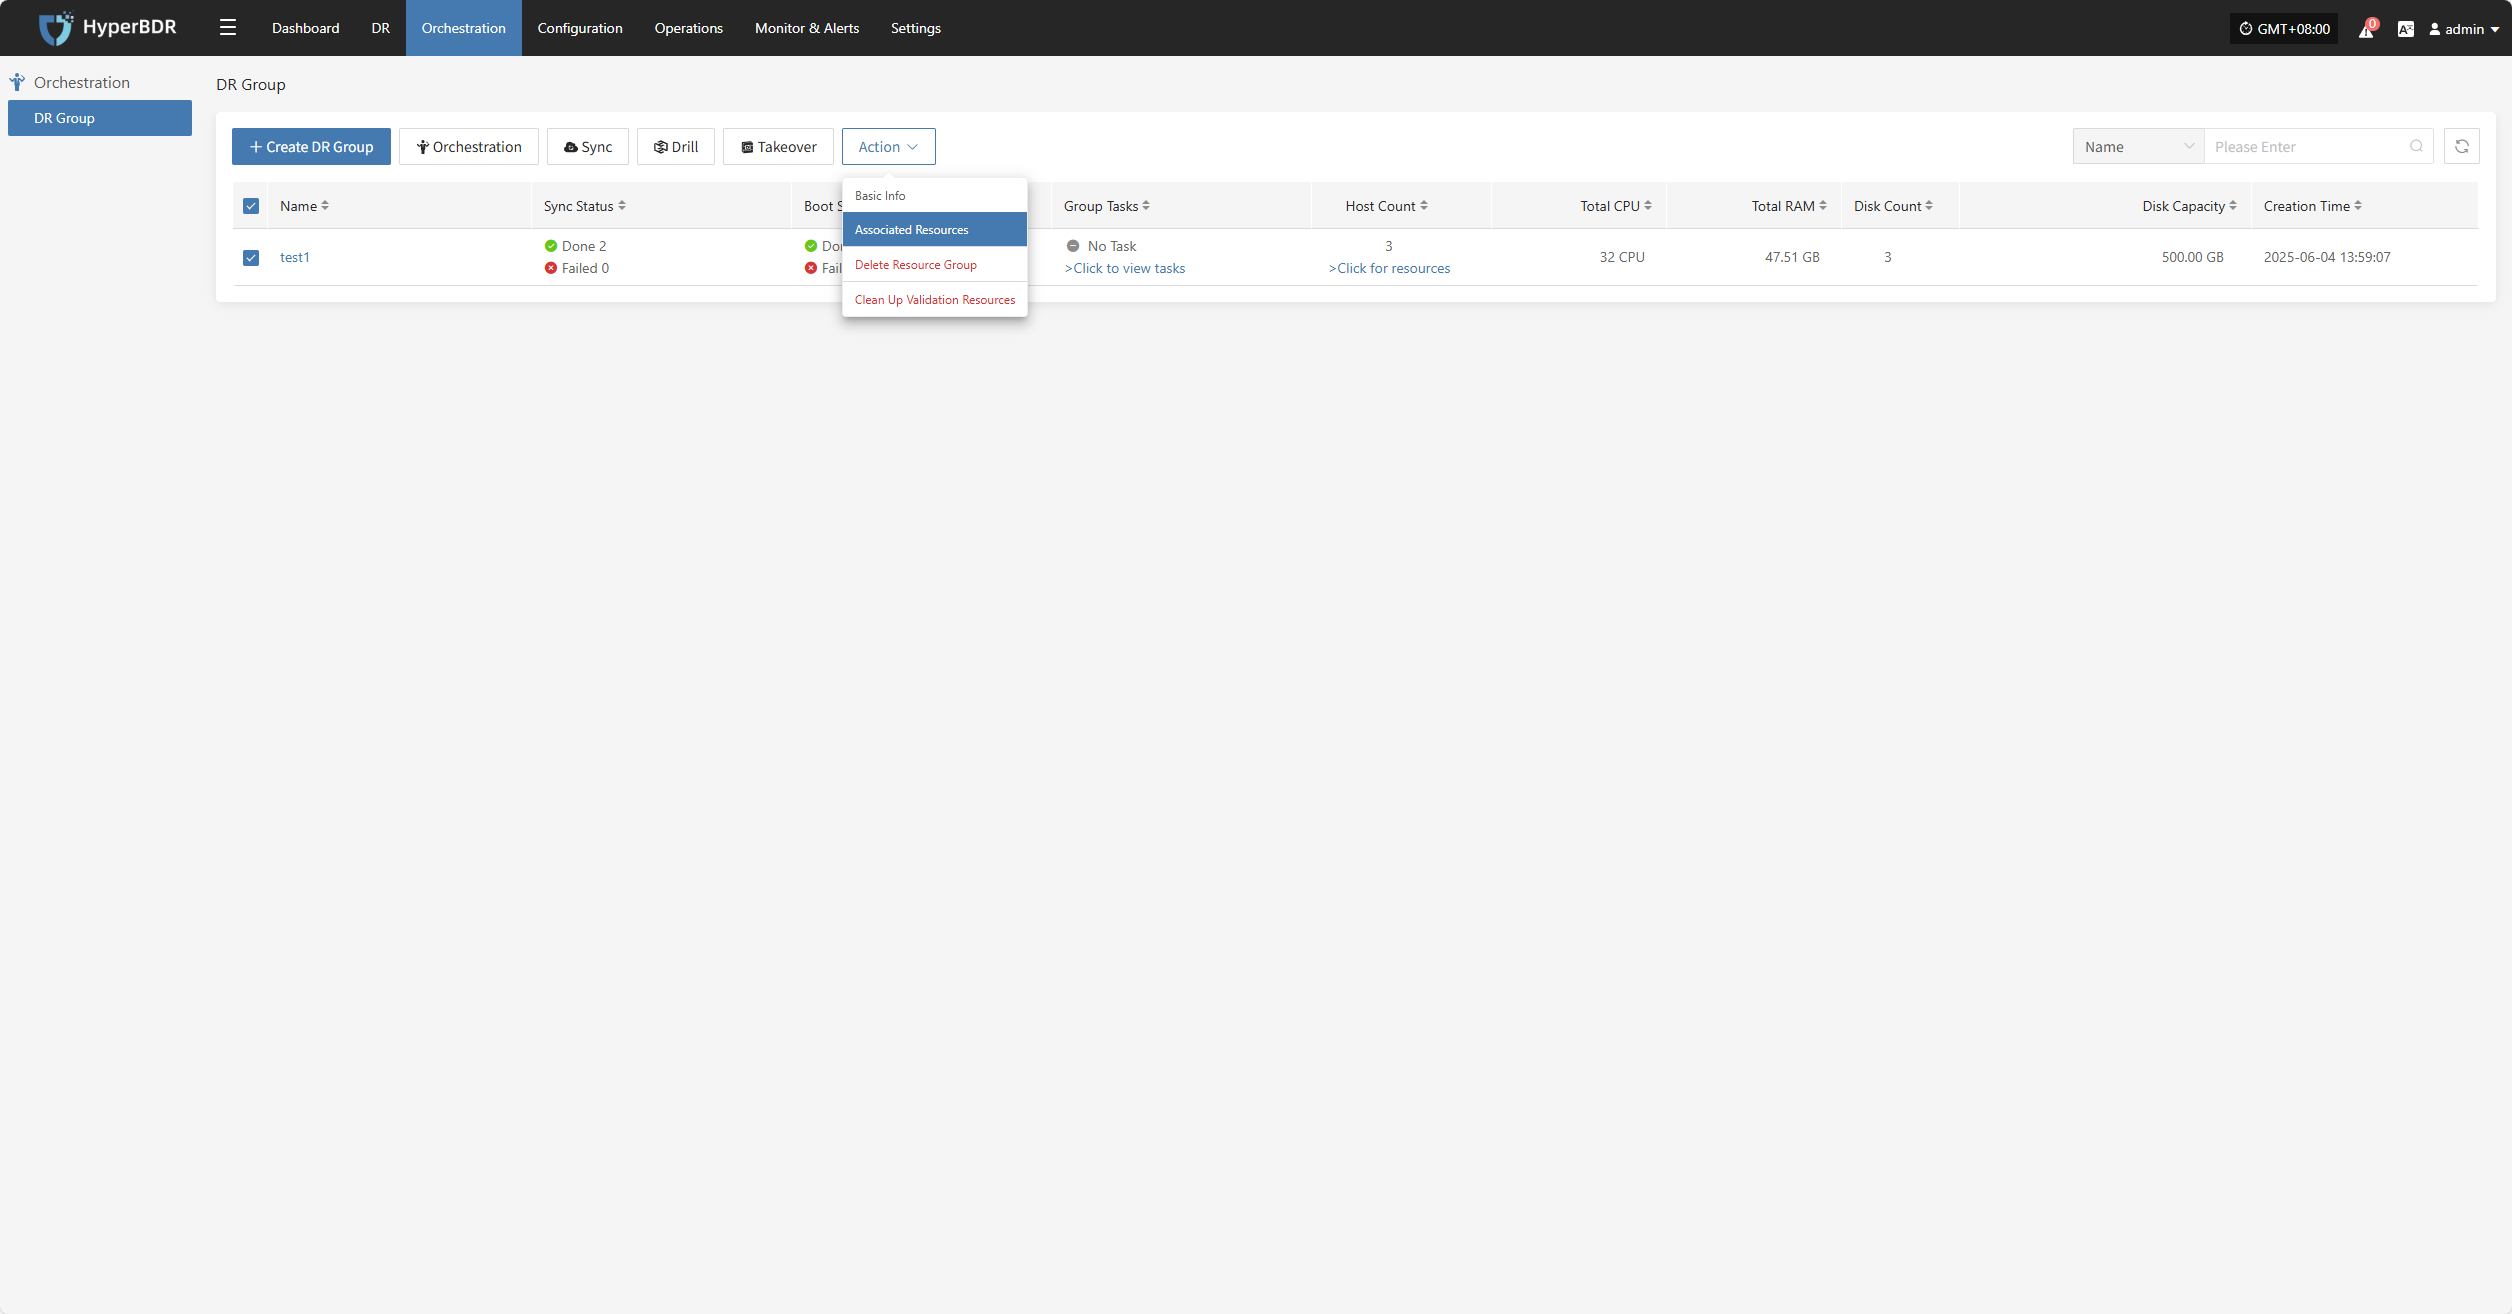
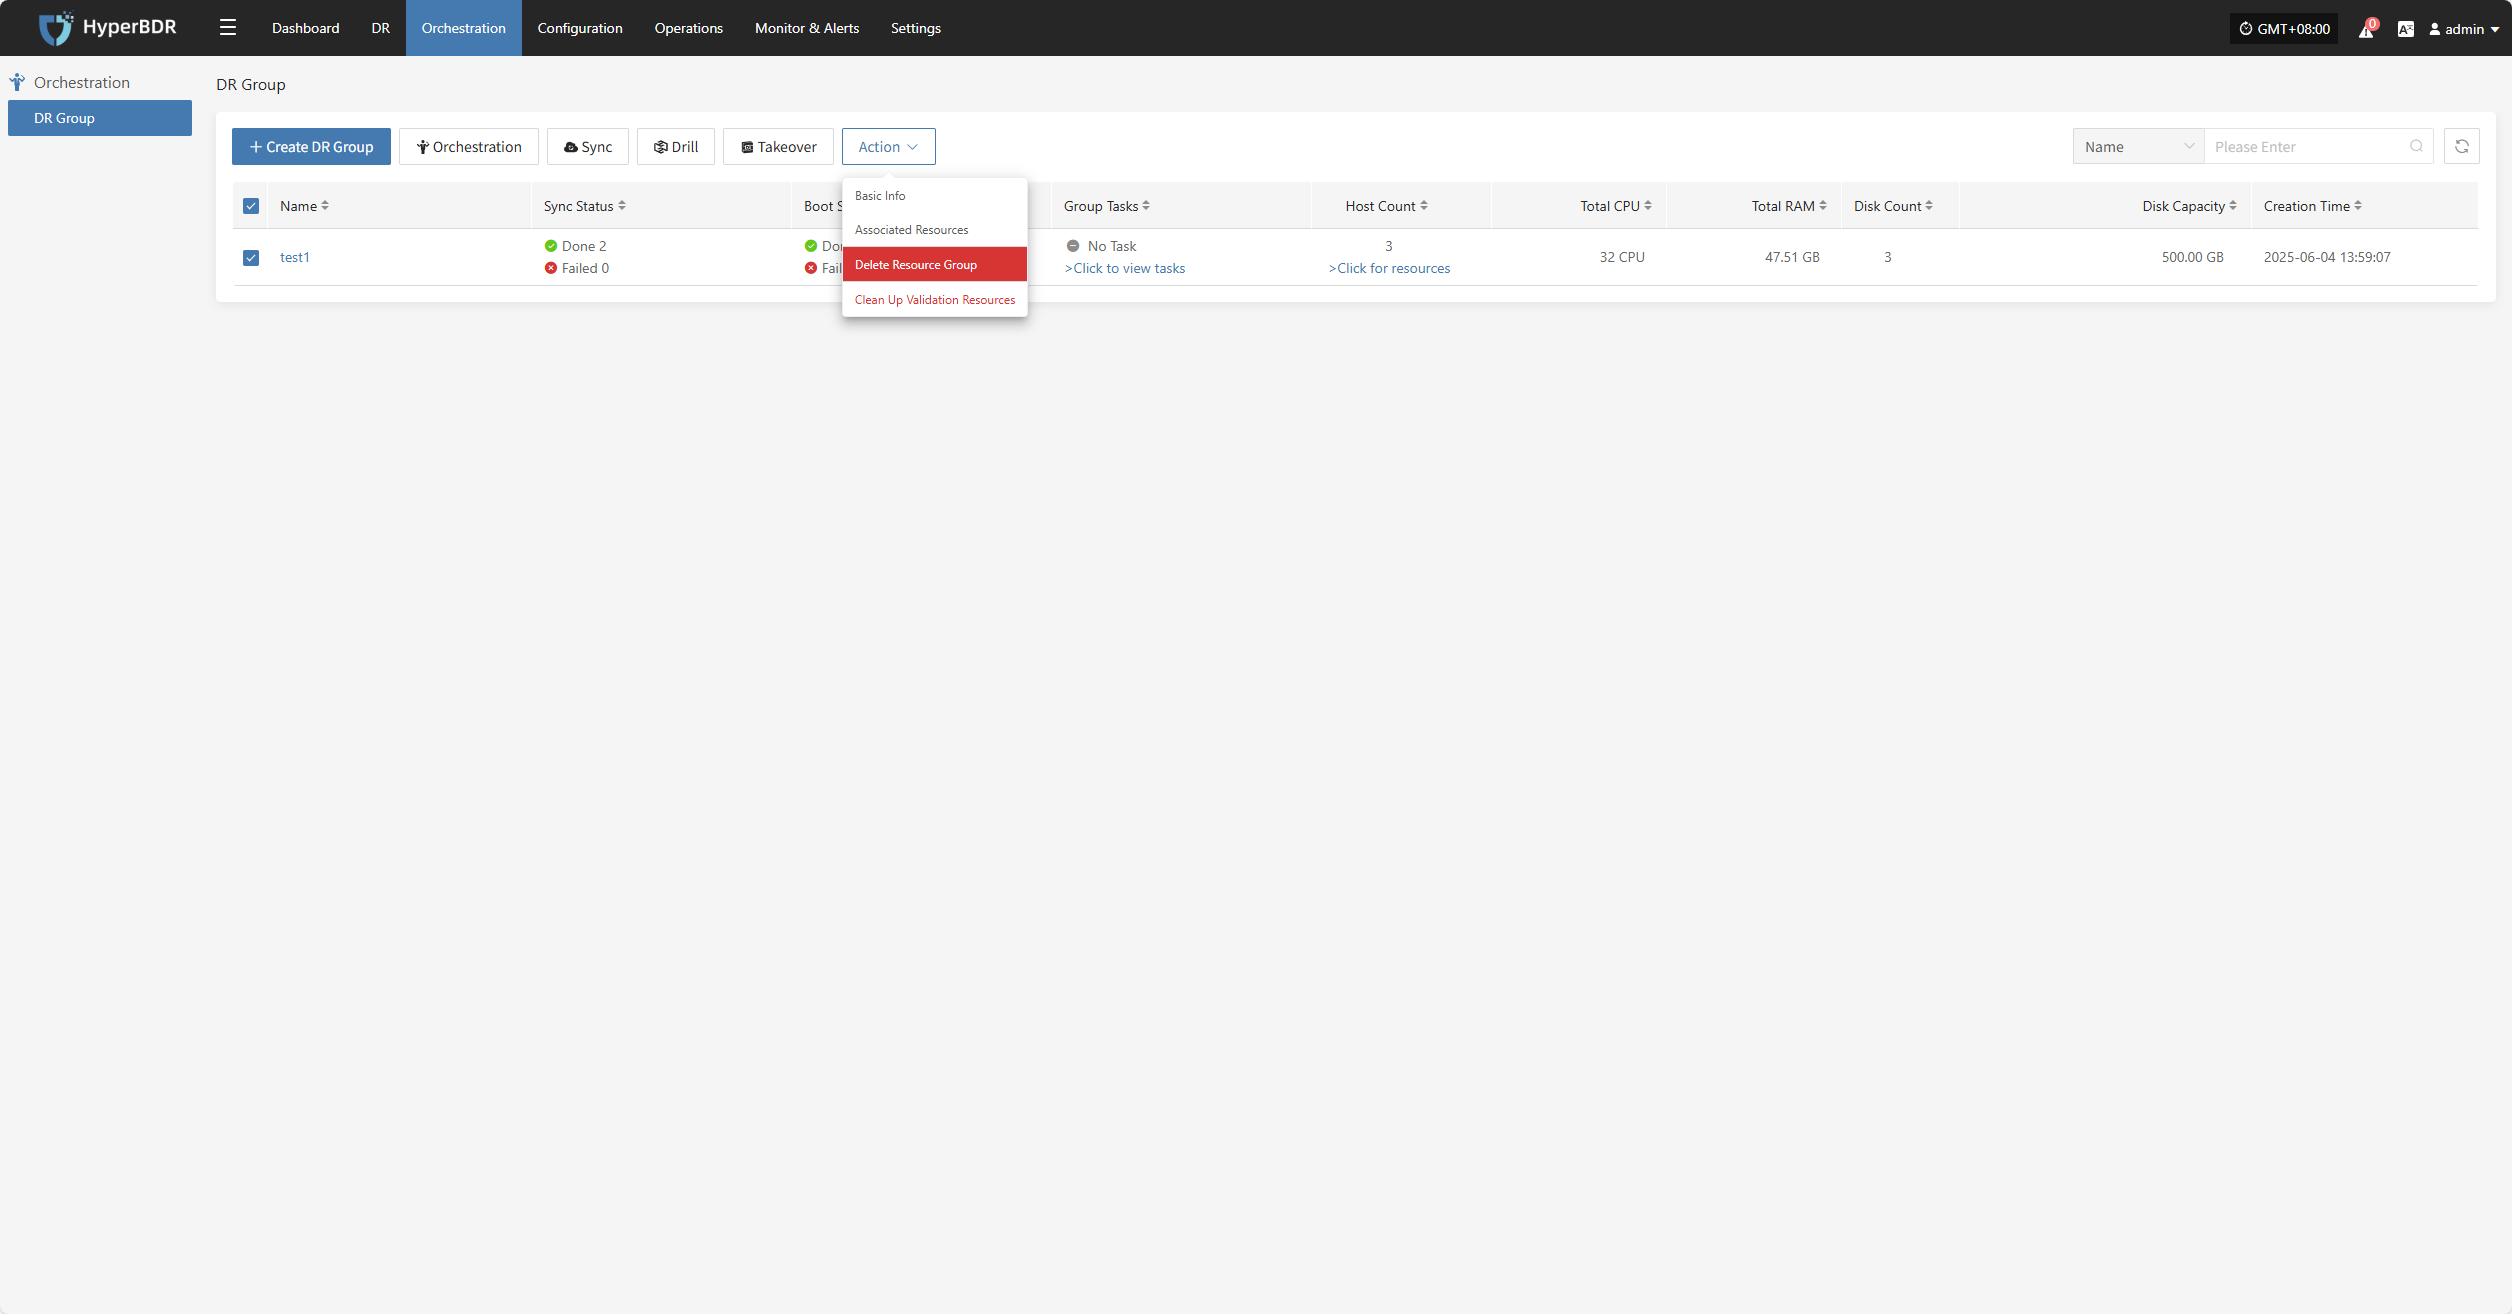
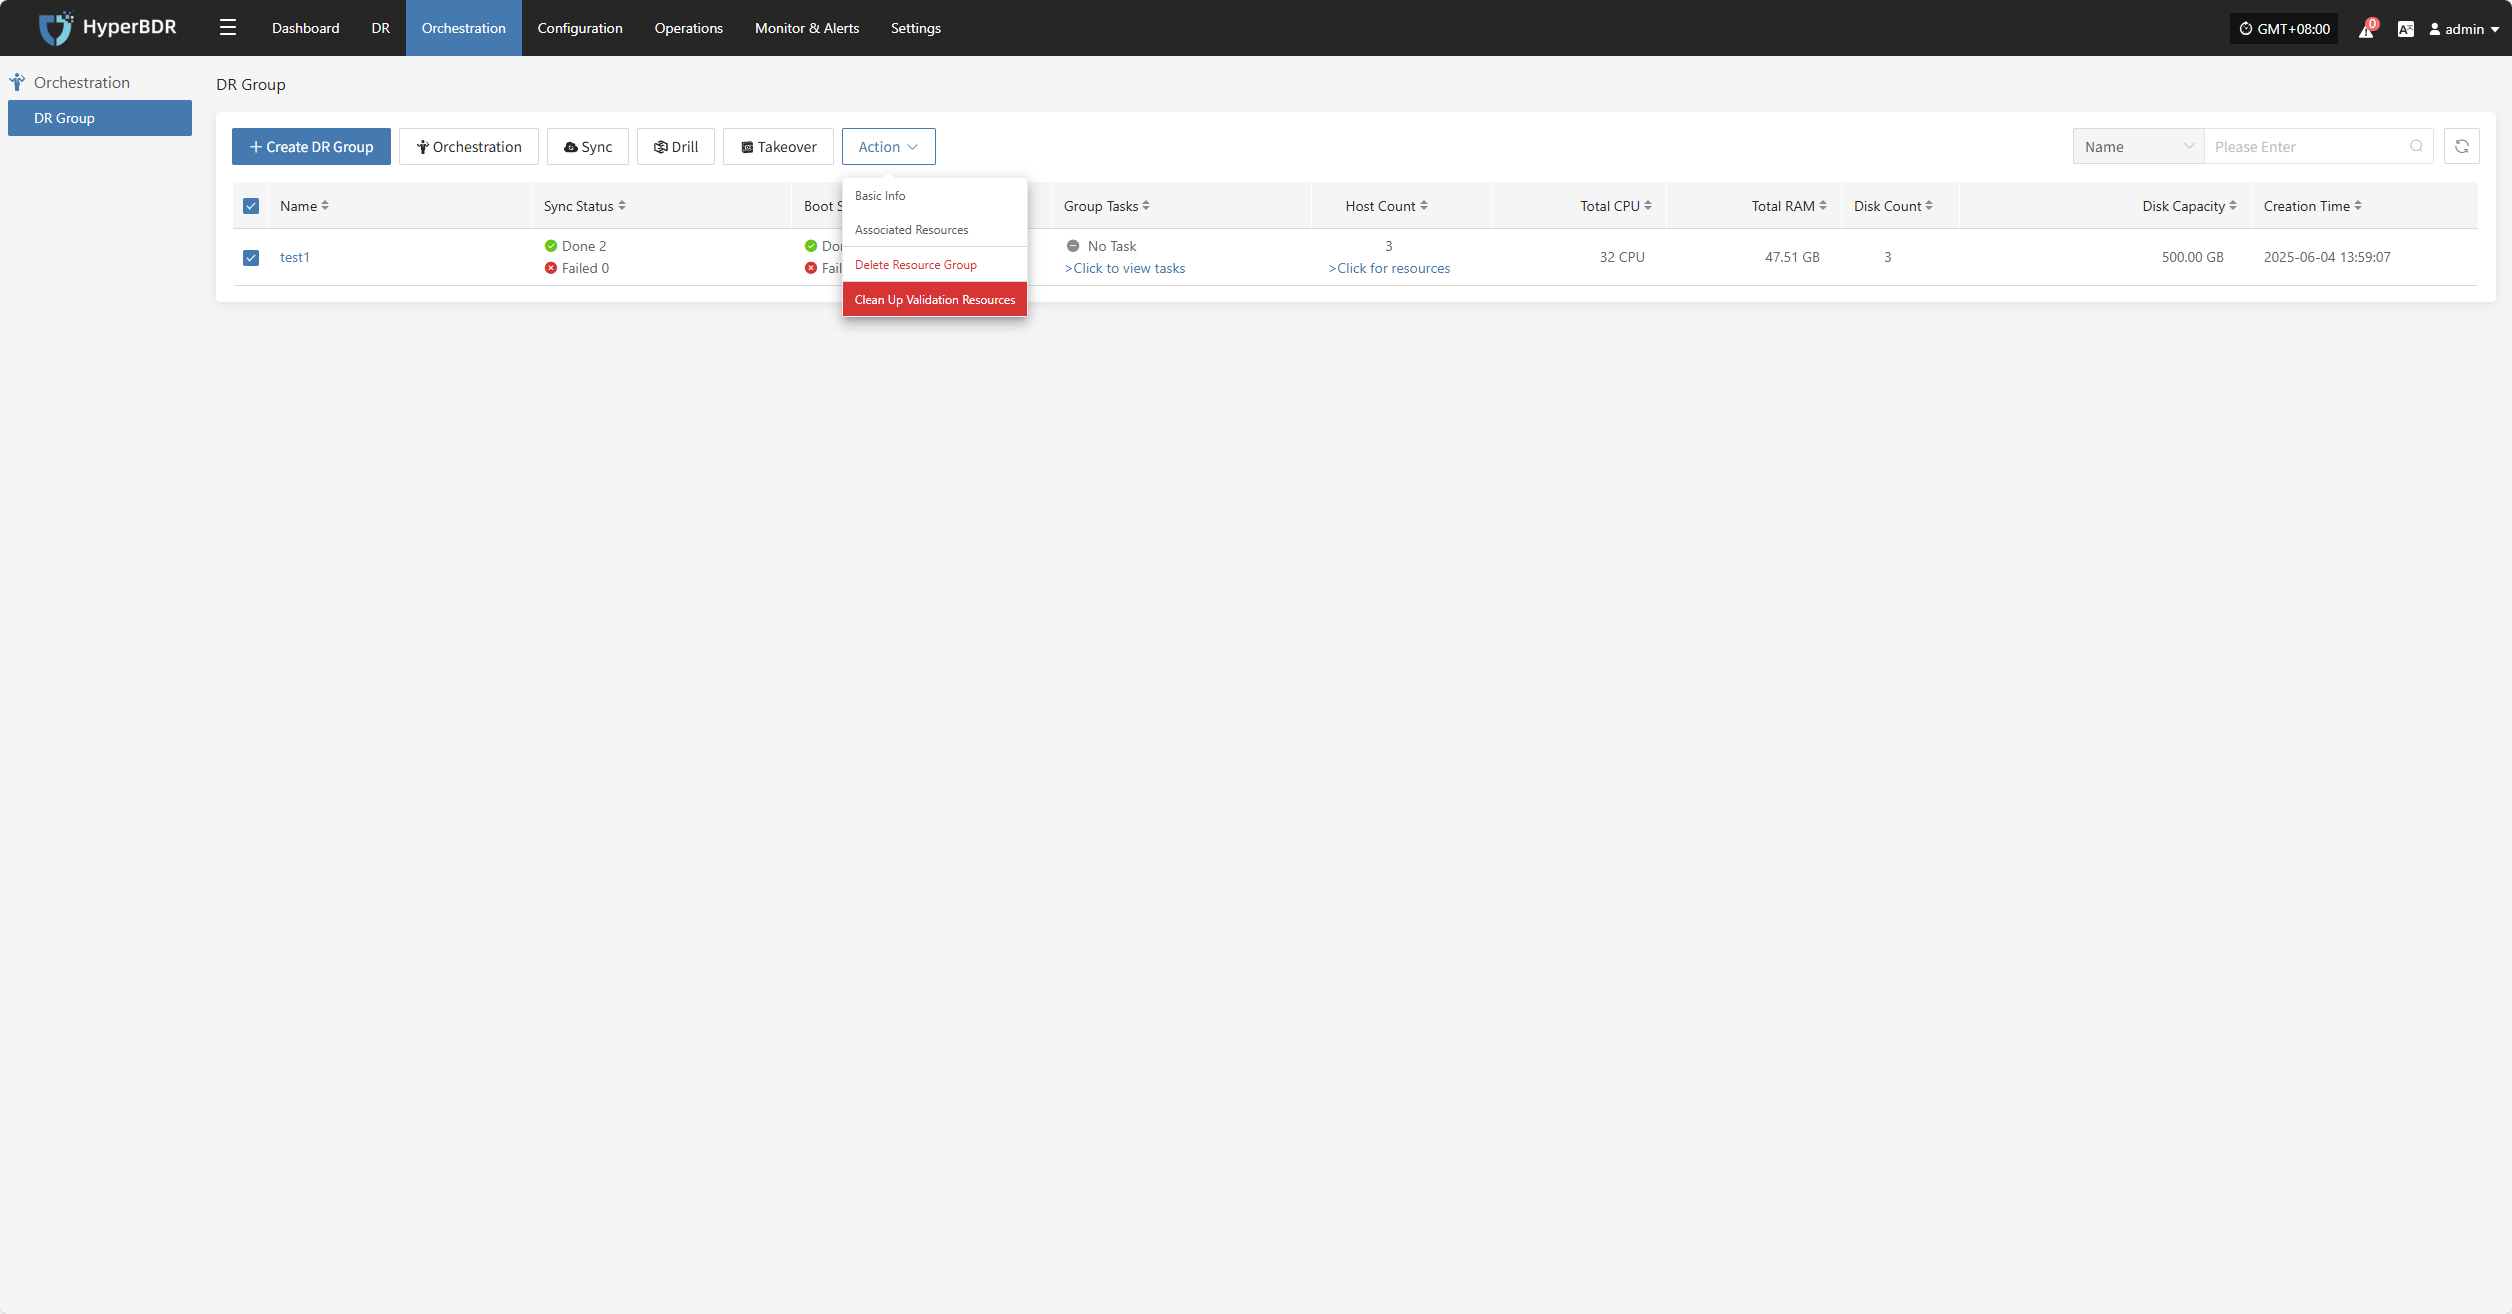
Action
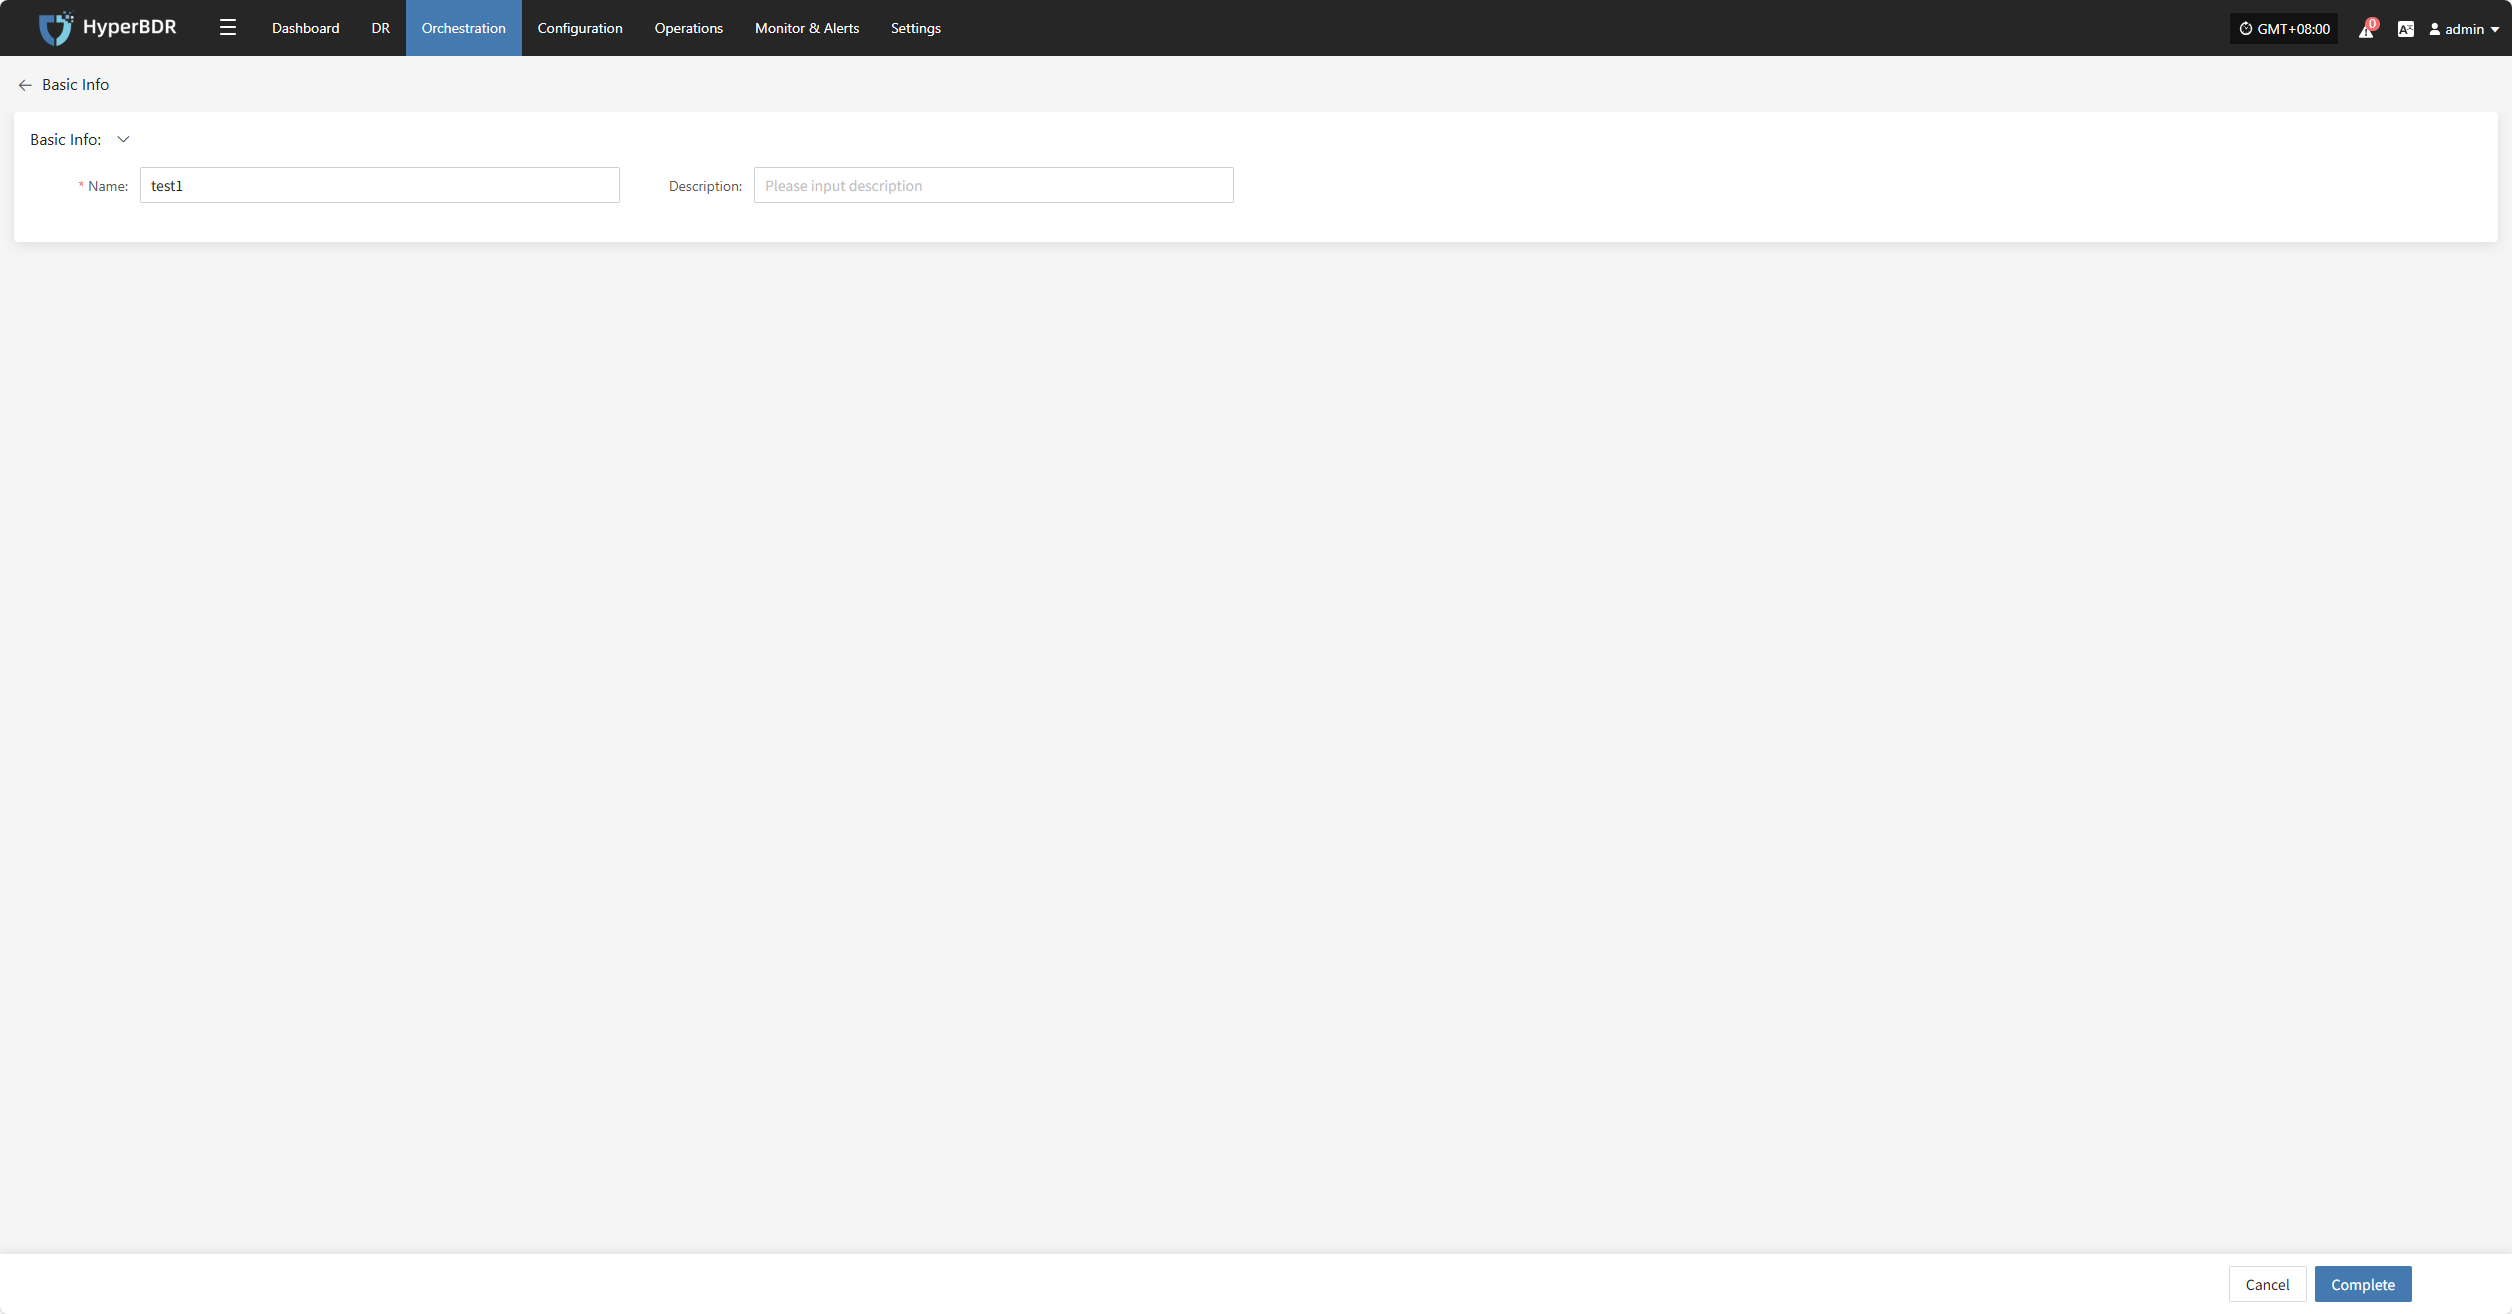
Basic Info
Click "Basic Info" to view the resource group's name, notes, and other information.
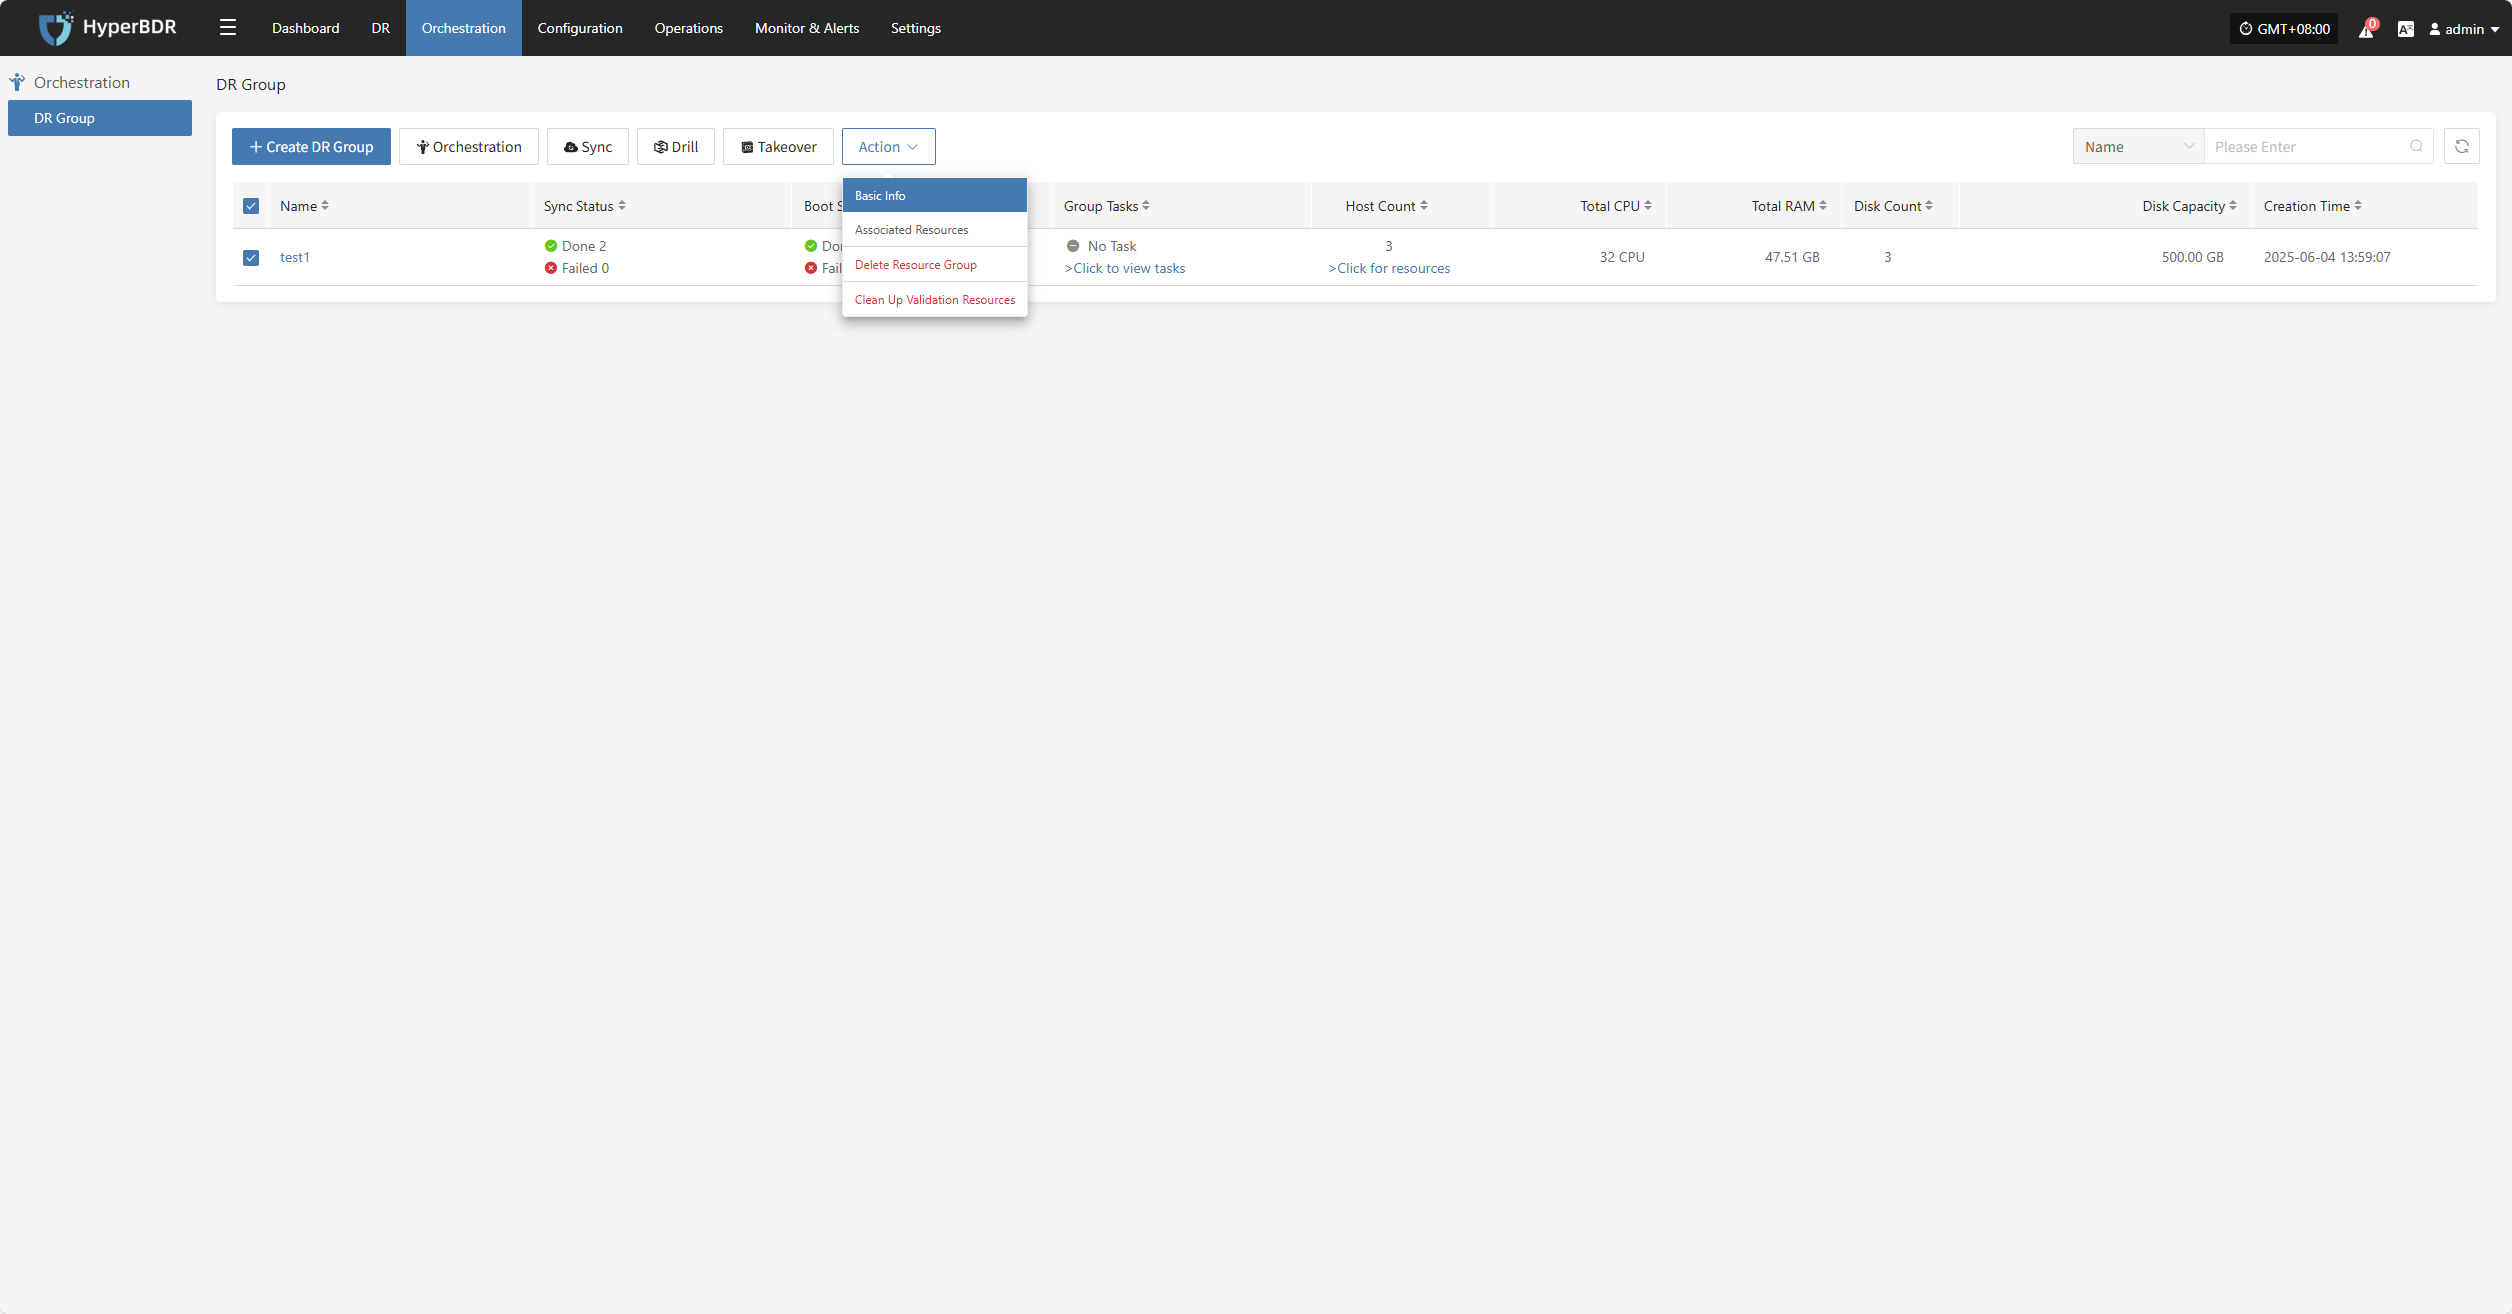
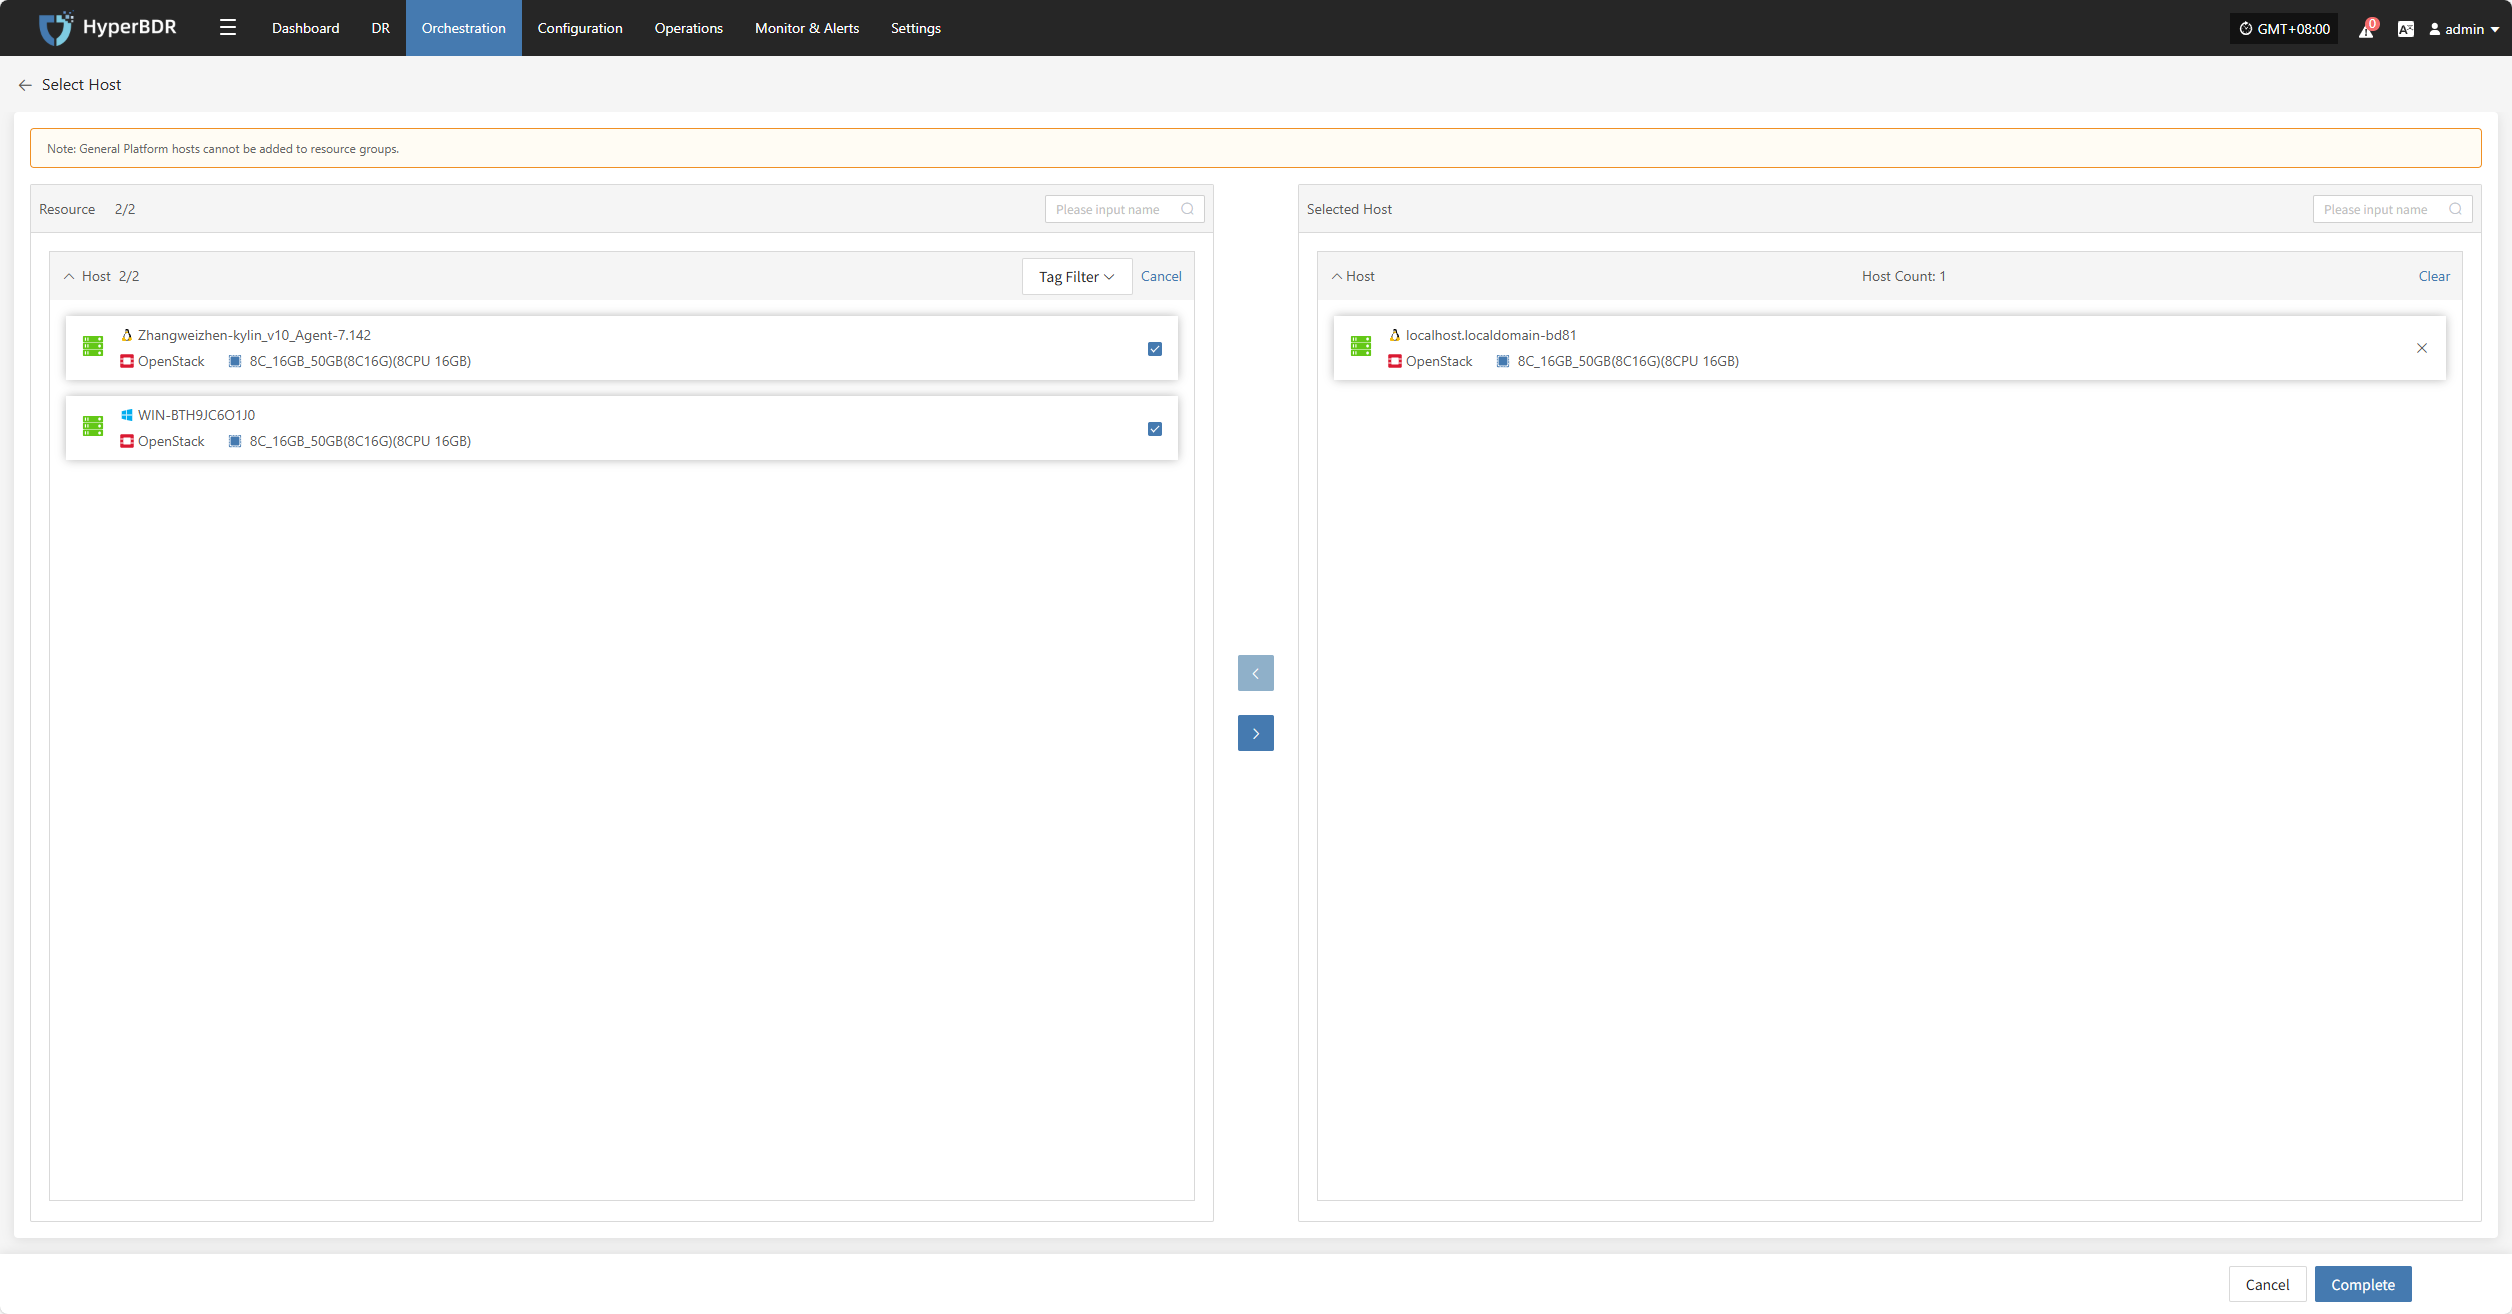
Associated Resources
Click "Associated Resources" to manage the hosts in the resource group. You can add or remove hosts as needed.
To remove a host, click the "x" next to the host in the resource list.

To add a host, select the host and click confirm to add it to the resource group.
Delete Resource Group
Note: This operation only deletes the resource group. The resources within the group will be retained.
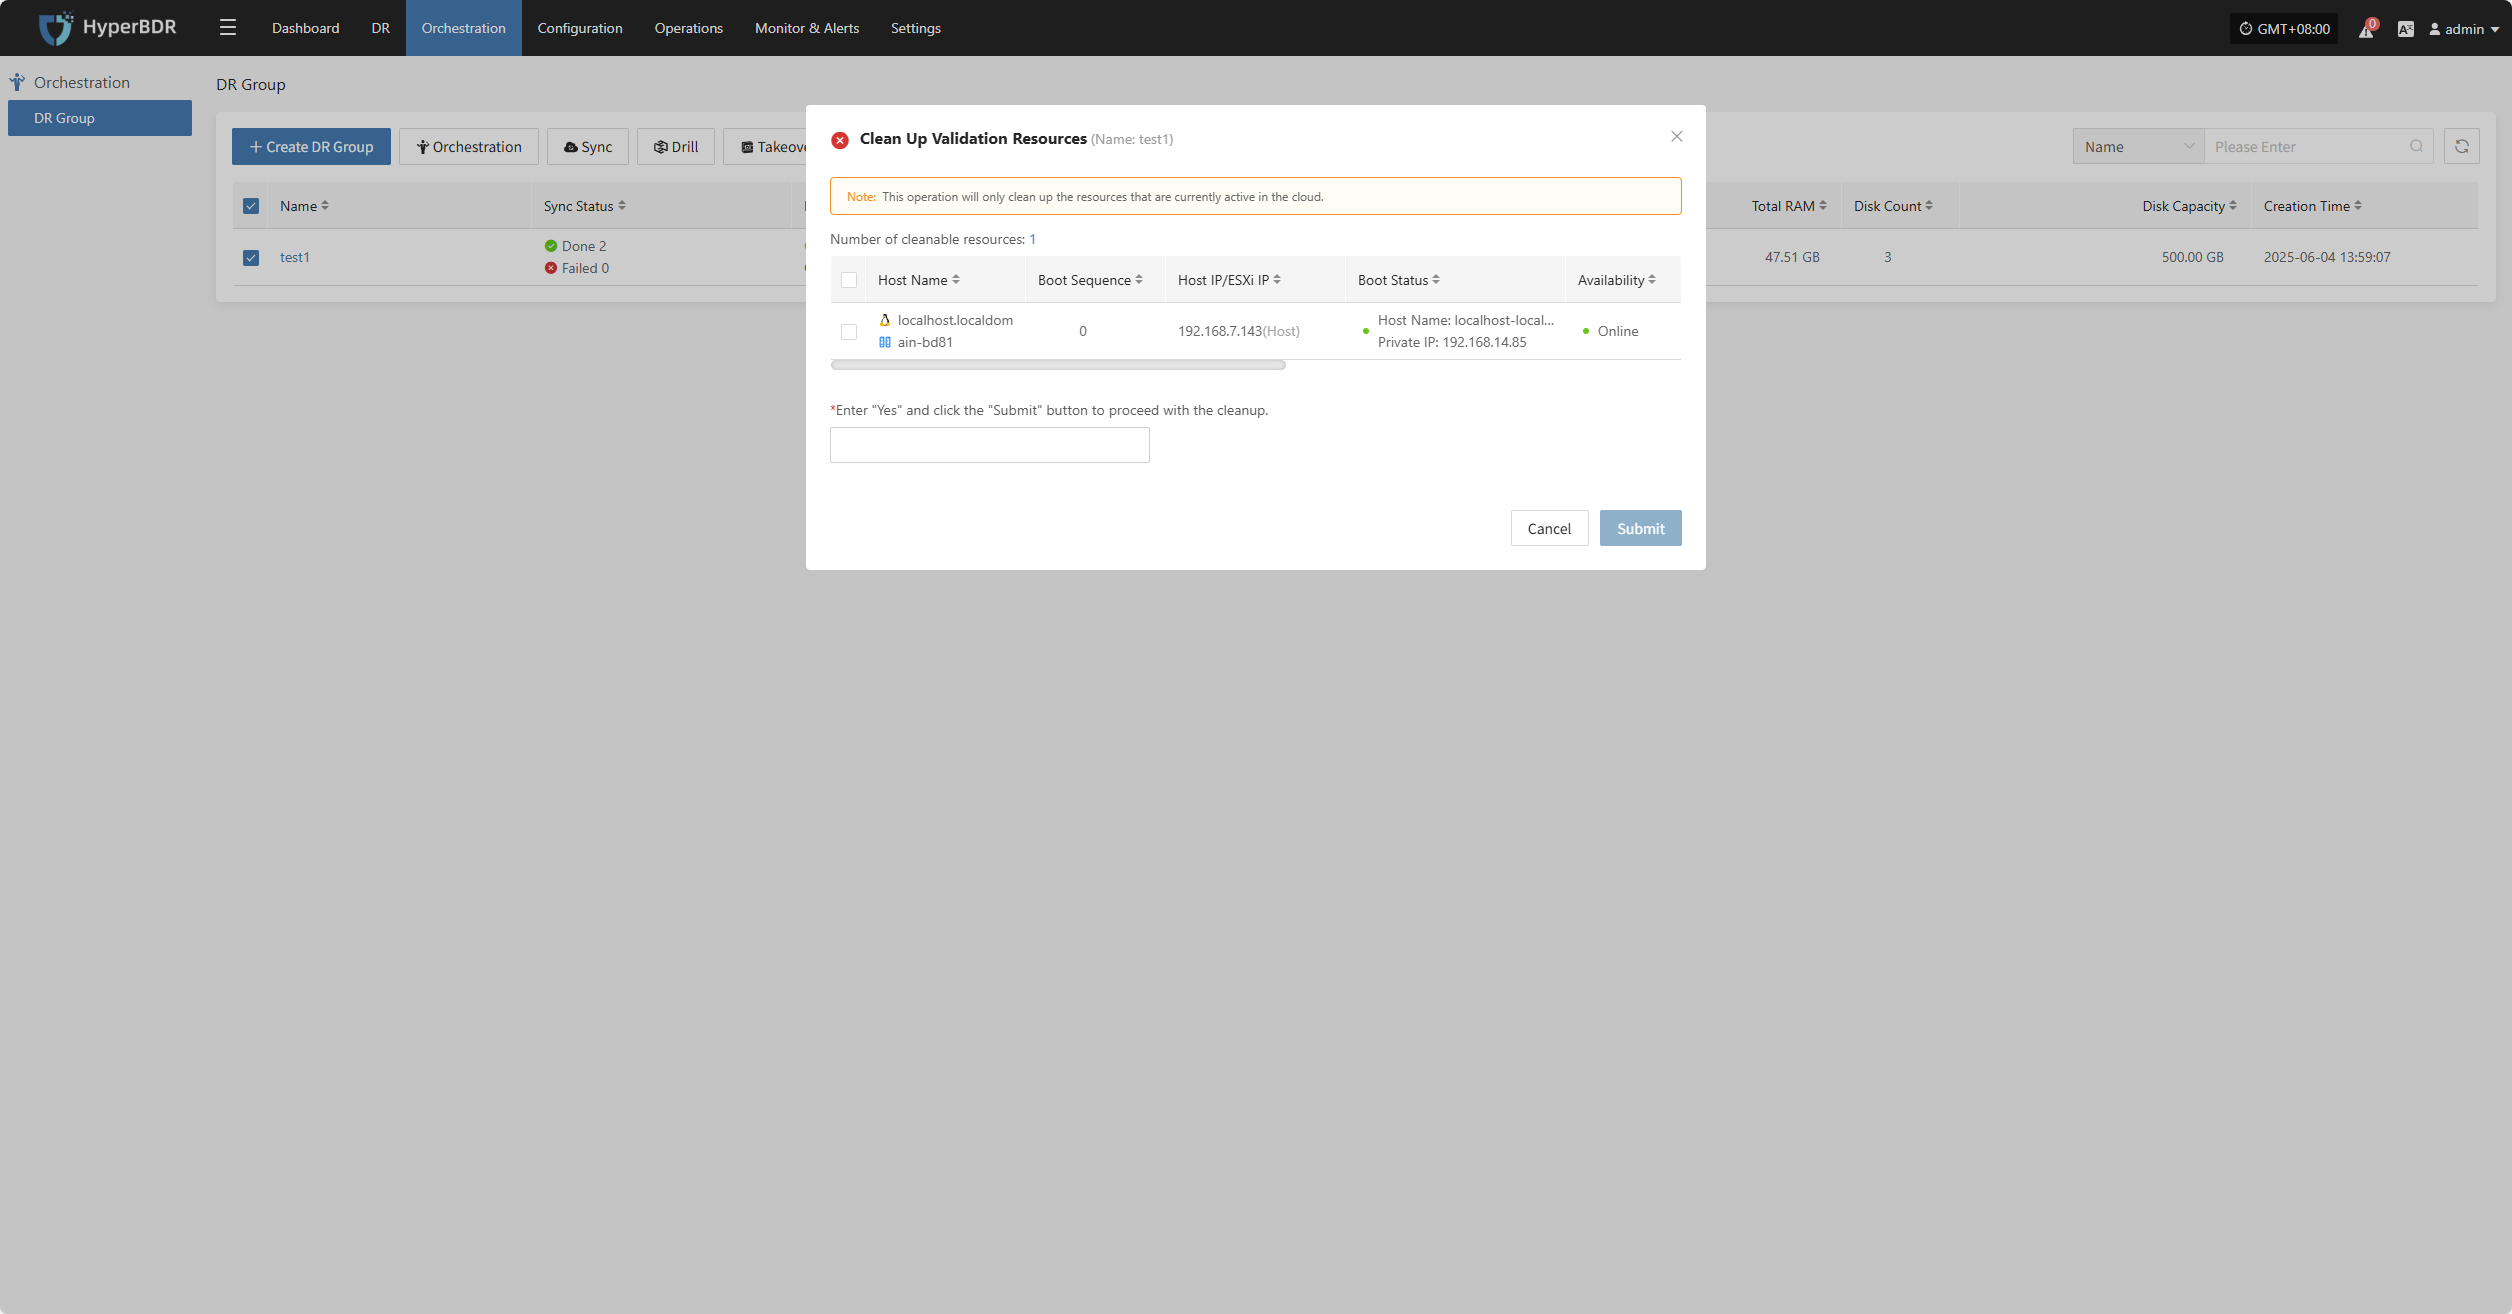
Clean Up Validation Resources
Note: This operation only cleans up resources that have been started in the cloud.
Configuration
Production Site
Currently, the source production platform supports two modes: Agent and Agentless. The Agent mode is relatively universal, requiring the installation of an Agent program inside the source operating system to perform data backup. As the name suggests, Agentless mode does not require installing an agent inside the operating system to complete data backup. However, this requires the source virtualization, private cloud, or cloud platform to provide native API interfaces for external access to read the host's disk data, and the disaster recovery product needs to be adapted and developed to support this.
Scenarios supported by Agent and Agentless
Agent mode is suitable for various source operating system scenarios, including physical machines, virtual machines, and cloud hosts.
Agentless mode supports: VMware, OpenStack + Ceph, AWS EC2, FusionCompute, Oracle Cloud and Huawei Cloud.
Source operating system support matrix
Source Agentless operating system support list:
https://oneprocloud.feishu.cn/sheets/VRqksSPEPhRTPStp3kVcItXNnyh?sheet=0MJNYCSource Agent operating system support list:
https://oneprocloud.feishu.cn/sheets/VRqksSPEPhRTPStp3kVcItXNnyh?sheet=Y9fpqO
DR
VMware
The VMware platform page on the production site is mainly used for adding, deleting, updating, and other related management operations for the VMware platform.
Add VMware Platform
Click "Production Site" in the left navigation bar, select VMware, and click the "Add" button. Follow the steps in the pop-up window to add the platform.

Deploy Sync Proxy
Follow the guided steps below:
Step 1: Download the source sync proxy OVA file.
Click the download link on the page
Internet OVA download link: https://downloads.oneprocloud.com/proxy-agent_BaseOS.ova
Step 2: Use the OVA file to import into the VMware cluster, deploy one or more source sync proxy virtual machines, and configure the IP address.
Step 3: Install the source sync proxy. Log in to the newly created sync proxy VM. The default username and password are (root/Acb@132.Inst)
Step 4: Copy and execute the sync proxy installation command.
Network policy requirements:
| Source | Target | Port | Description |
|---|---|---|---|
| Sync Proxy | HyperBDR Console | 10443 | Authentication port |
| Sync Proxy | HyperBDR Console | 30080 | Installation package download port |
- Sync Proxy resource specifications:
Sync Proxy can be horizontally scaled to multiple hosts to improve backup concurrency and network bandwidth utilization. By default, a single Sync Proxy node can mount up to 50 disks for synchronization. If you need to support more, consider scaling out the number of Sync Proxy nodes.
The following are the specifications for a single Sync Proxy node (supports up to 50 disks):
Sync Proxy expansion can be performed by repeating this operation on multiple nodes. After installation, nodes will automatically register with the platform. You can manage Sync Proxy nodes and bind them to agentless production platforms as needed.
Reference steps: Sync Proxy
| Parameter | Specification |
|---|---|
| OS Version | Ubuntu 24.04 |
| CPU | 4C |
| Memory | 8GB |
| System Disk | 50GB |

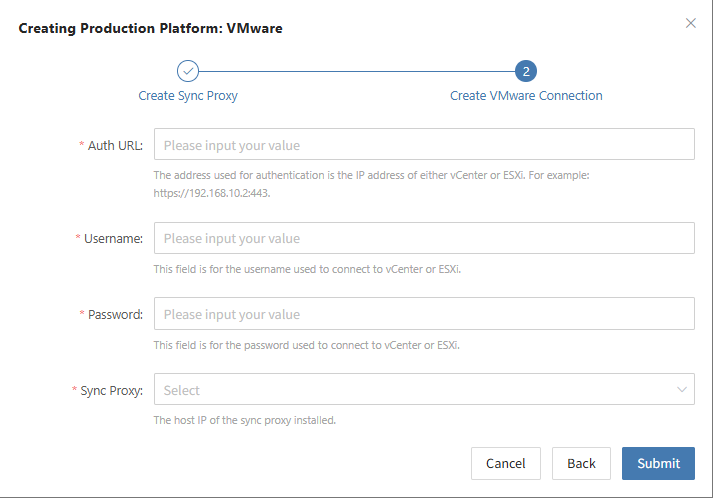
Create VMware Production Platform
- Obtain authentication information
| Parameter | Example | Description |
|---|---|---|
| Auth Address | https://<vCenter/ESXi Host>:443 | When adding a vCenter/ESXi link, if the source uses domain management, you need to obtain the domain and IP mapping in advance and add it to the platform for proper resolution. Reference |
| Username | Username for vCenter/ESXi host | Username for connecting to vCenter or ESXi. |
| Password | Password for vCenter/ESXi host | Password for connecting to vCenter or ESXi. |
| Sync Proxy | Sync Proxy host IP | After installation, you can select from the dropdown, no need to manually add the IP. |
- Network policy requirements
| Source | Target | Port | Description |
|---|---|---|---|
| Sync Proxy | vCenter/ESXi | 443 | Authentication port |
| Sync Proxy | ESXi Hosts | 902 | Data port. If the backup VM runs on multiple ESXi hosts, you need to open port 902 on all relevant ESXi hosts for Sync Proxy access. |
- Permission requirements
HyperBDR uses VMware's CBT (Change Block Tracking) technology to achieve incremental data synchronization. CBT tracks changed blocks on virtual disks, allowing only the changed data to be transferred during backup and replication.
You need relevant VMware permissions to call the APIs. For details on permissions and account creation, refer to: Click to View
After filling in the required authentication information, click the Confirm button to add.
Complete VMware Addition
The VMware production platform configuration is complete. Wait until the platform status is normal and the number of cluster hosts is obtained before proceeding with subsequent steps.
Note: You can repeat the above steps to add multiple VMware clusters, or add a single ESXi host.

OpenStack
The OpenStack page under the Production Platform section is mainly used for managing OpenStack platforms, including adding, deleting, and updating them.
Add OpenStack Platform
Click "Production Site" in the left navigation panel, select OpenStack, and click the "Add" button. Follow the step-by-step instructions in the pop-up window to add a platform.

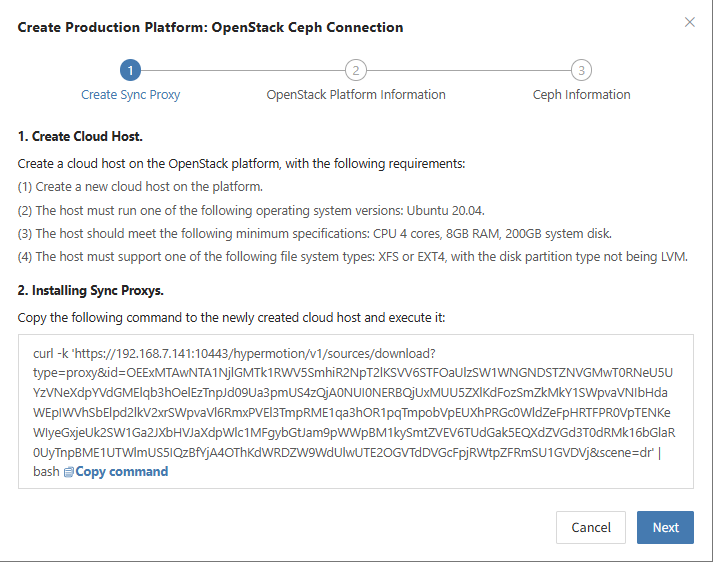
Deploy Sync Proxy
Follow the guided steps below:
- Step 1: Create a cloud virtual machine
You can manually create a VM using the Ubuntu 24.04 operating system. If using an OpenStack platform or other KVM-based virtualization platform, you can download and import a standard Ubuntu 24.04 QCOW2 image.
Ubuntu 24.04 QCOW2 image download link: Click to Start Download
Note: This Ubuntu 24.04 image does not have a default login password. The image includes the cloud-init service, so the cloud platform must support password injection via cloud-init. Otherwise, the image cannot be used.
- Step 2: Copy and execute the Sync Proxy installation command.
- Network Policy Requirements
| Source | Target | Port | Description |
|---|---|---|---|
| Sync Proxy | HyperBDR Console | 10443 | Authentication communication |
| Sync Proxy | HyperBDR Console | 30080 | Installation package access |
- Sync Proxy Resource Specifications
| Parameter | Specification |
|---|---|
| OS Version | Ubuntu 24.04 |
| CPU | 4C |
| Memory | 8GB |
| System Disk | 50GB |
Create OpenStack Production Platform
- Obtaining OpenStack connection information
Reference: <FAQ How to obtain OpenStack authentication information>
| Parameter | Example | Description |
|---|---|---|
| Auth Address | http://192.168.10.201:5000/v3 | Typically the OpenStack Keystone public Endpoint URL. Use DNS resolution if domain names are used. Reference |
| User Domain ID | default | Domain ID of the user connecting to OpenStack |
| Username | Username | Username used to connect to OpenStack |
| Password | Password | Password used to connect to OpenStack |
| Project Domain ID | default | |
| Project Name | admin | Name of the project the OpenStack user belongs to |
| Region Name | RegionOne | Region Name of the OpenStack cluster |
| Sync Proxy | Sync Proxy Host IP | After installation, selectable from dropdown without manual IP |
- Network Policy Requirements
| Source | Target | Ports | Description |
|---|---|---|---|
| Sync Proxy | OpenStack | 5000, 35357, 9696, 8774, 8776, 9292 | OpenStack authentication ports |

- Obtaining Ceph Authentication Information
| Parameter | Example | Description |
|---|---|---|
| Control Node Addresses | 10.0.0.201,10.0.0.202,10.0.0.203 | IP addresses of Ceph control nodes (e.g., 10.0.0.201). Ensure network connectivity. Use commas (,) to separate multiple entries. |
| Enable CephX Auth | Yes | + Yes + No |
| Username | cinder | Ceph username (e.g., cinder or admin). |
| Keyring | AQBBY9hfBc0+AxAAzyy m+6l+MeTpMlgNTbye/A== | Ceph key value. Run cat /etc/ceph/ceph.client.cinder.keyring on the Ceph control node to view it. |
| Storage Pool | volumes | Name of the Ceph storage pool. Be sure to select the pool containing the protected host's data! Run ceph osd ls pools to list pools. |
| Incremental Fetch Type | rbd diff | + rbd diff: Slower but accurate + rbd du: Faster but less accurate |
| Cluster | ceph | Default is ceph. To check, run cat /usr/lib/systemd/system/ceph-mon@.service on the control node. |
| OpenStack Volume Types | DEFAULT_VOLUME_TYPE, ssd, sata | Run openstack volume type list on the OpenStack control node to view available volume types. |
If there are multiple Ceph clusters, you may repeat the above process to add each one.
- Network Policy Requirements
| Source | Target | Port | Description |
|---|---|---|---|
| Sync Proxy | OpenStack Ceph Monitor Node | 6789 | Authentication port. Used for Ceph API access and backup data collection. |
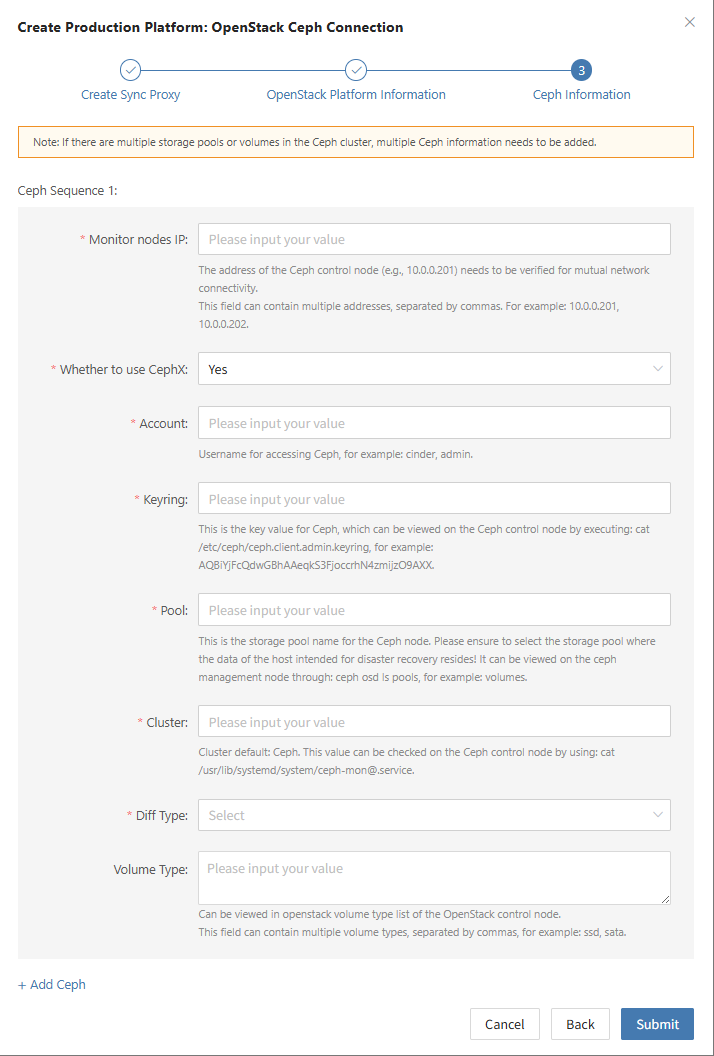
Complete OpenStack Addition
Once the OpenStack production platform configuration is completed and the platform status becomes "Healthy", and the number of cluster hosts has been retrieved, you may proceed to the next steps.
Note: You may repeat the above steps to add multiple OpenStack clusters.
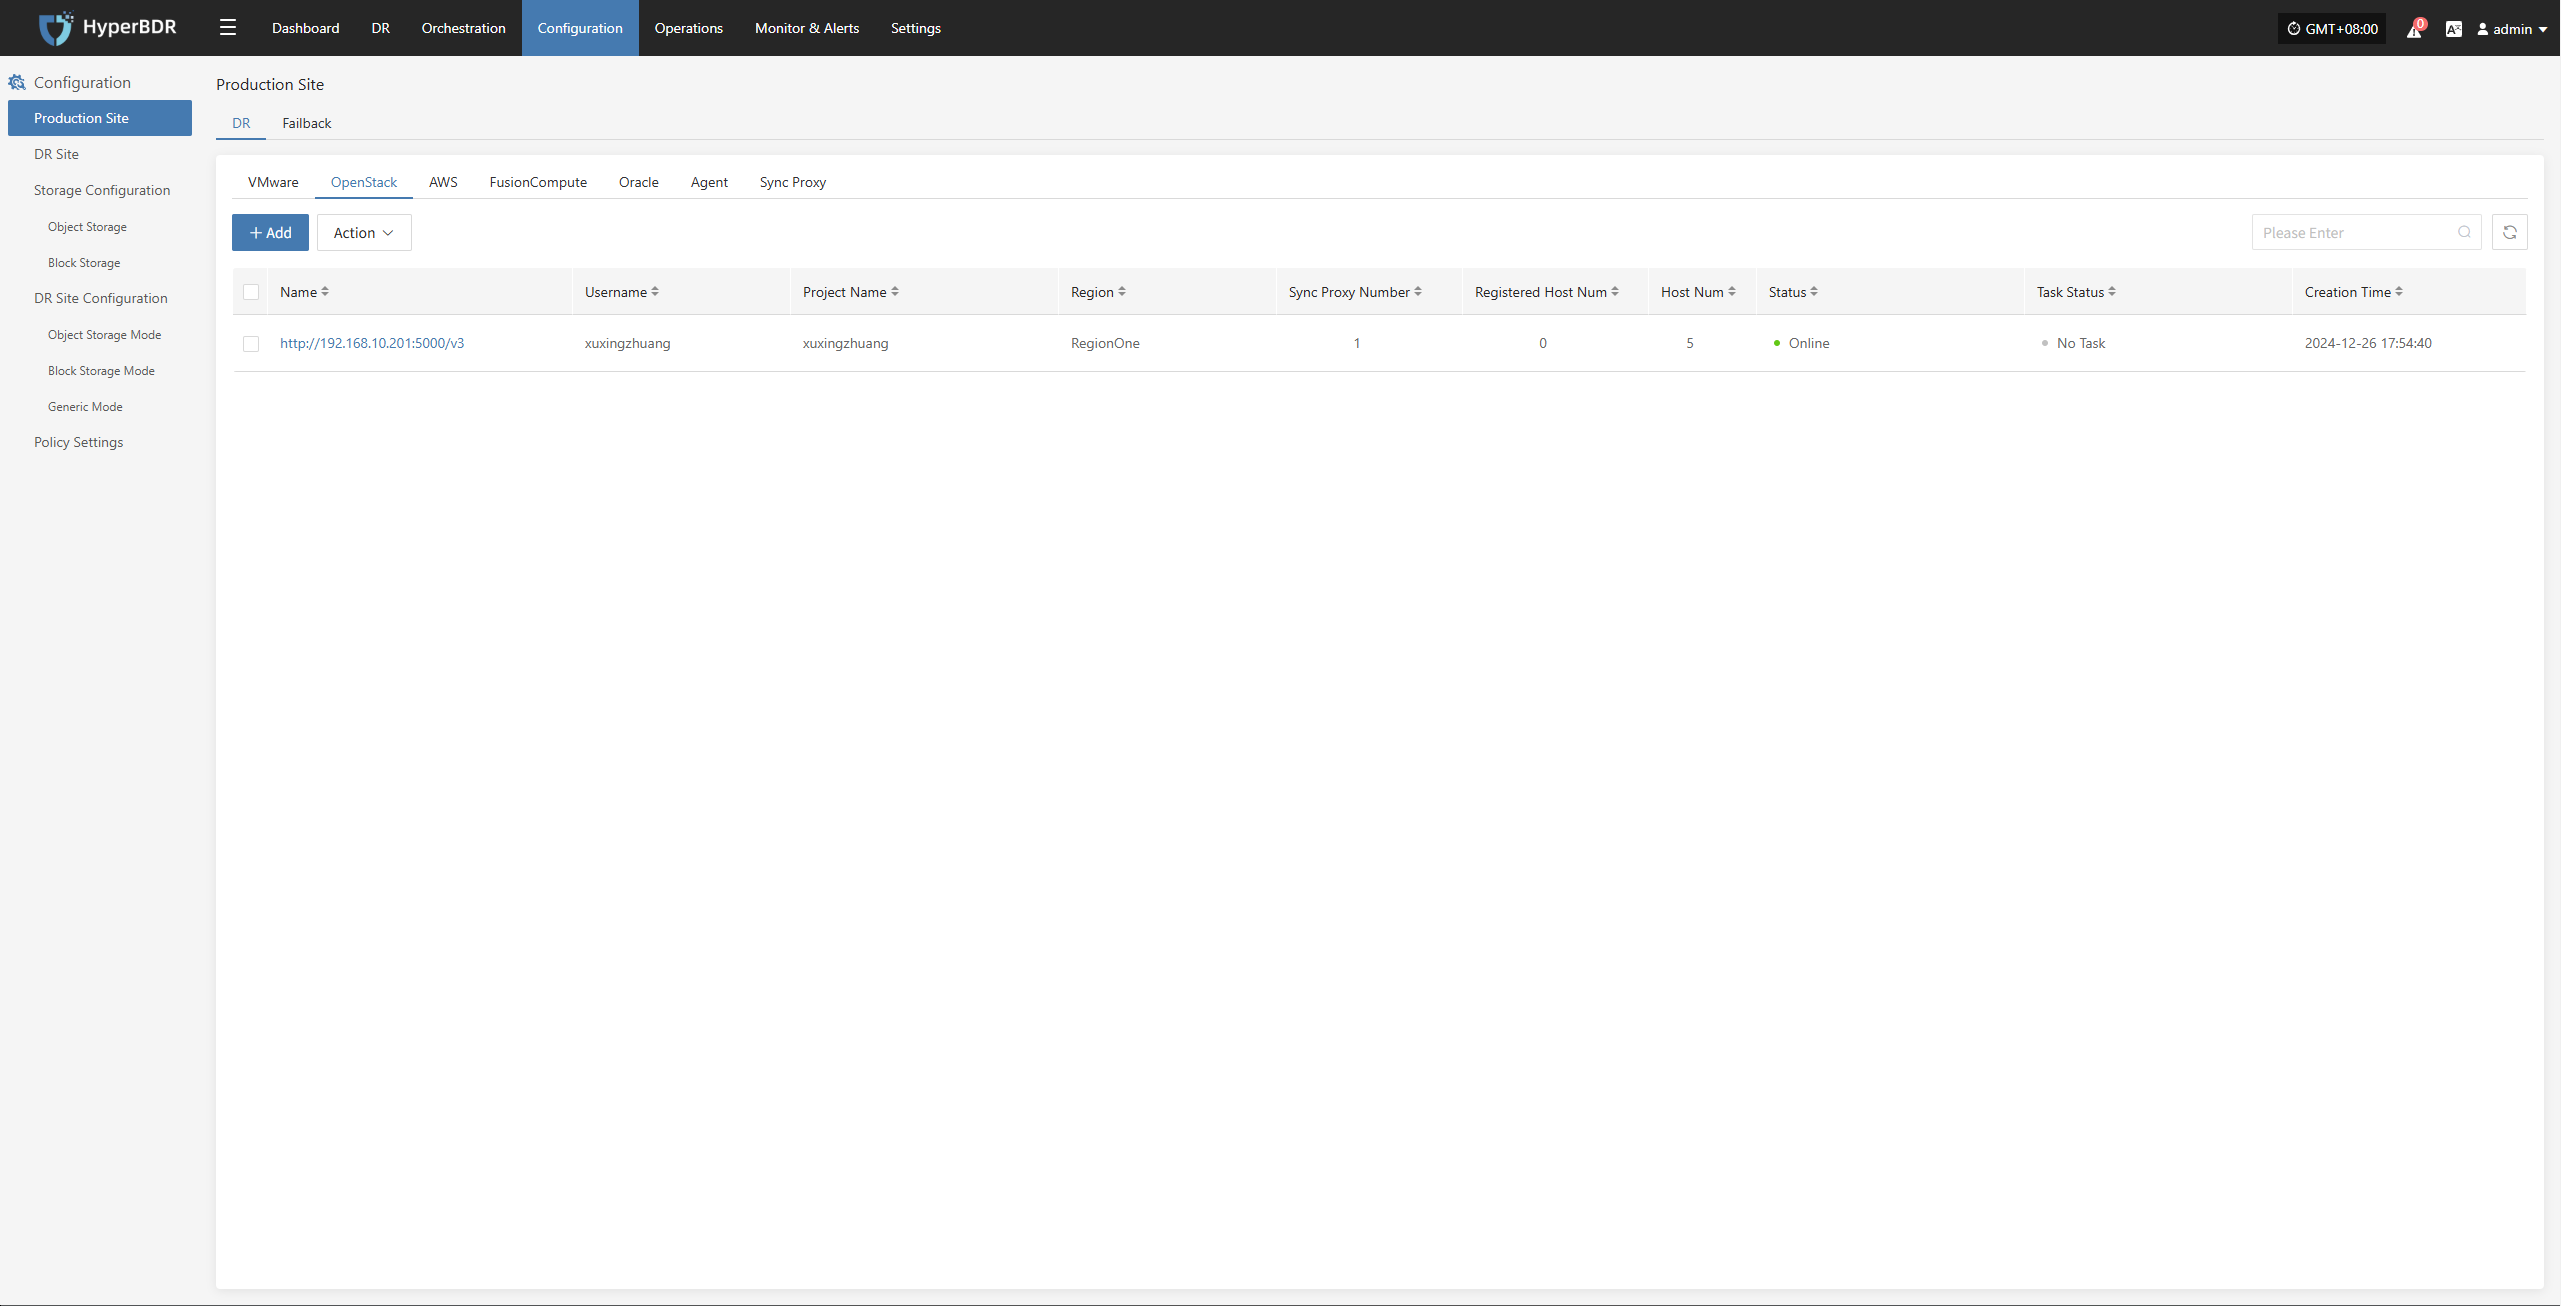
AWS
The AWS production platform page primarily provides functions for adding, deleting, and updating AWS platforms.
Add AWS Platform
Navigate to "Production Site" from the left sidebar, select AWS, and click the "Add" button. Follow the steps in the pop-up dialog to complete the configuration.
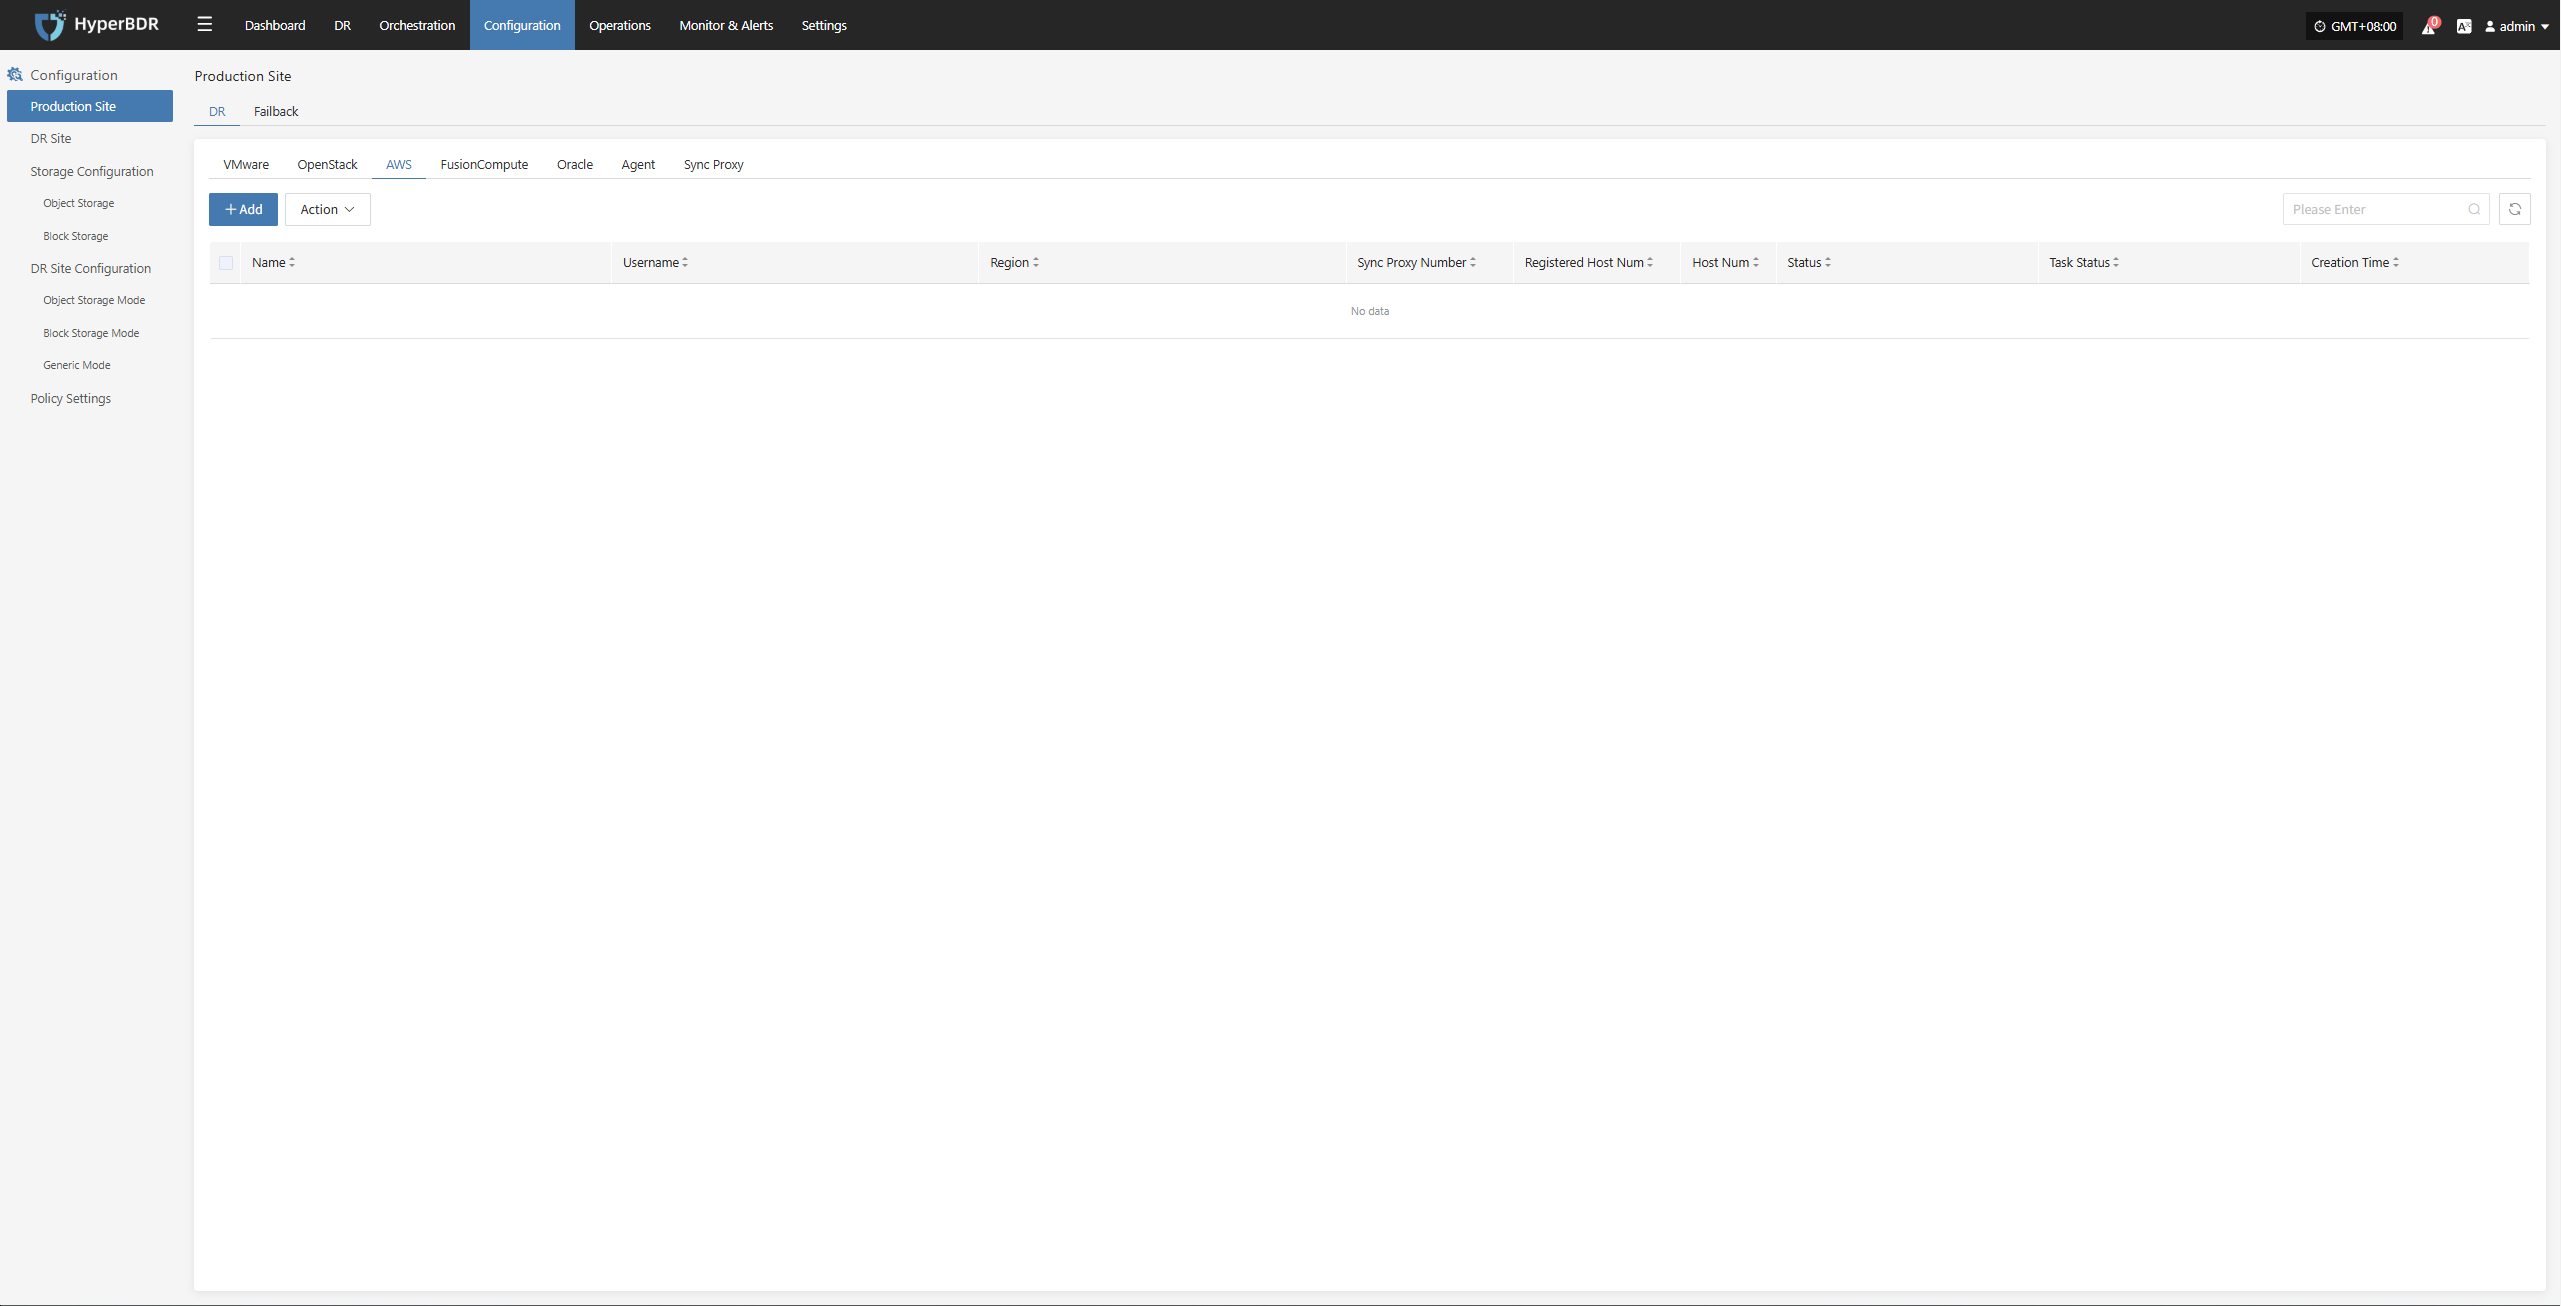
Deploy Sync Proxy
Follow the step-by-step guide to perform the following operations:
- Step 1: Create a Cloud Host
On the AWS platform, create a new cloud host using the native AWS EC2 Ubuntu 24.04 image to deploy the Sync Proxy.
- Step 2: Copy and Execute the Sync Proxy Installation Command
- Network Policy Requirements
| Source | Target | Port(s) | Description |
|---|---|---|---|
| Sync Proxy | HyperBDR Console | 10443 | Authentication communication |
| Sync Proxy | HyperBDR Console | 30080 | Access port for package download |
- Recommended Sync Proxy Specifications
| Parameter | Specification |
|---|---|
| OS Version | Ubuntu 24.04 |
| CPU | 4C |
| Memory | 8GB |
| System Disk | 50GB |

Create AWS Production Platform
- AWS Connection Information
Reference Document: <FAQ - How to obtain AWS authentication information>
| Parameter | Example | Description |
|---|---|---|
| Access Key ID | AWS Access Key ID | The key used to access AWS APIs with full permissions for the account. Log in to the AWS Console → Click your username at the top right corner → Select "Security Credentials" → Choose "Users". |
| Access Key Secret | AWS Access Secret Key | The secret key paired with the Access Key ID, granting full permissions to access AWS APIs. Same access path as above. |
| Region | ap-southeast-1 | The region where the target machine is located. Defaults to auto-detection, refresh to select manually. For manual input, refer to the AWS regional endpoints documentation: AWS Regional Endpoints |
| Source Sync Proxy | 192.168.7.26 | IP address of the host where the sync proxy is installed. |
| Advanced Settings + Name | Custom Name | Custom name for the production platform. You may set it manually or keep the default, which is automatically generated based on region, platform, and timestamp. |
- Network Policy Requirements
| Source | Target | Port | Description |
|---|---|---|---|
| Sync Proxy | AWS EC2 AWS EBS | 443 | Port used for authentication communication with AWS services. Ensure access to AWS EC2 and EBS service addresses: + If accessing via public network, the EC2 instance must have a public IP and a proper public access policy configured. + If accessing via private network, confirm that the EC2 instance supports VPC Endpoint services and can resolve and access EC2 and EBS services via internal DNS. |
- Permission Requirements
When using AWS Direct APIs for data backup, the account must have the required permissions. For permission setup and account creation, refer to:
https://docs.oneprocloud.com/userguide/poc/aws-pre-settings.html#aws-iam-preparation
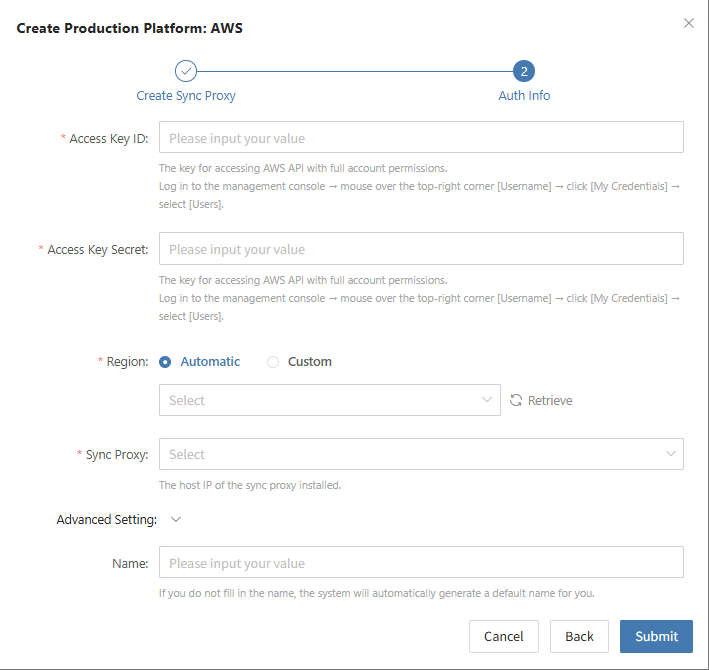
Complete AWS Platform Addition
Once the AWS production platform configuration is complete, wait for the platform status to become "Normal", and for the EC2 instance list to be successfully fetched. After that, you may proceed with additional steps.
Note: You can repeat the above steps to add multiple AWS regions.
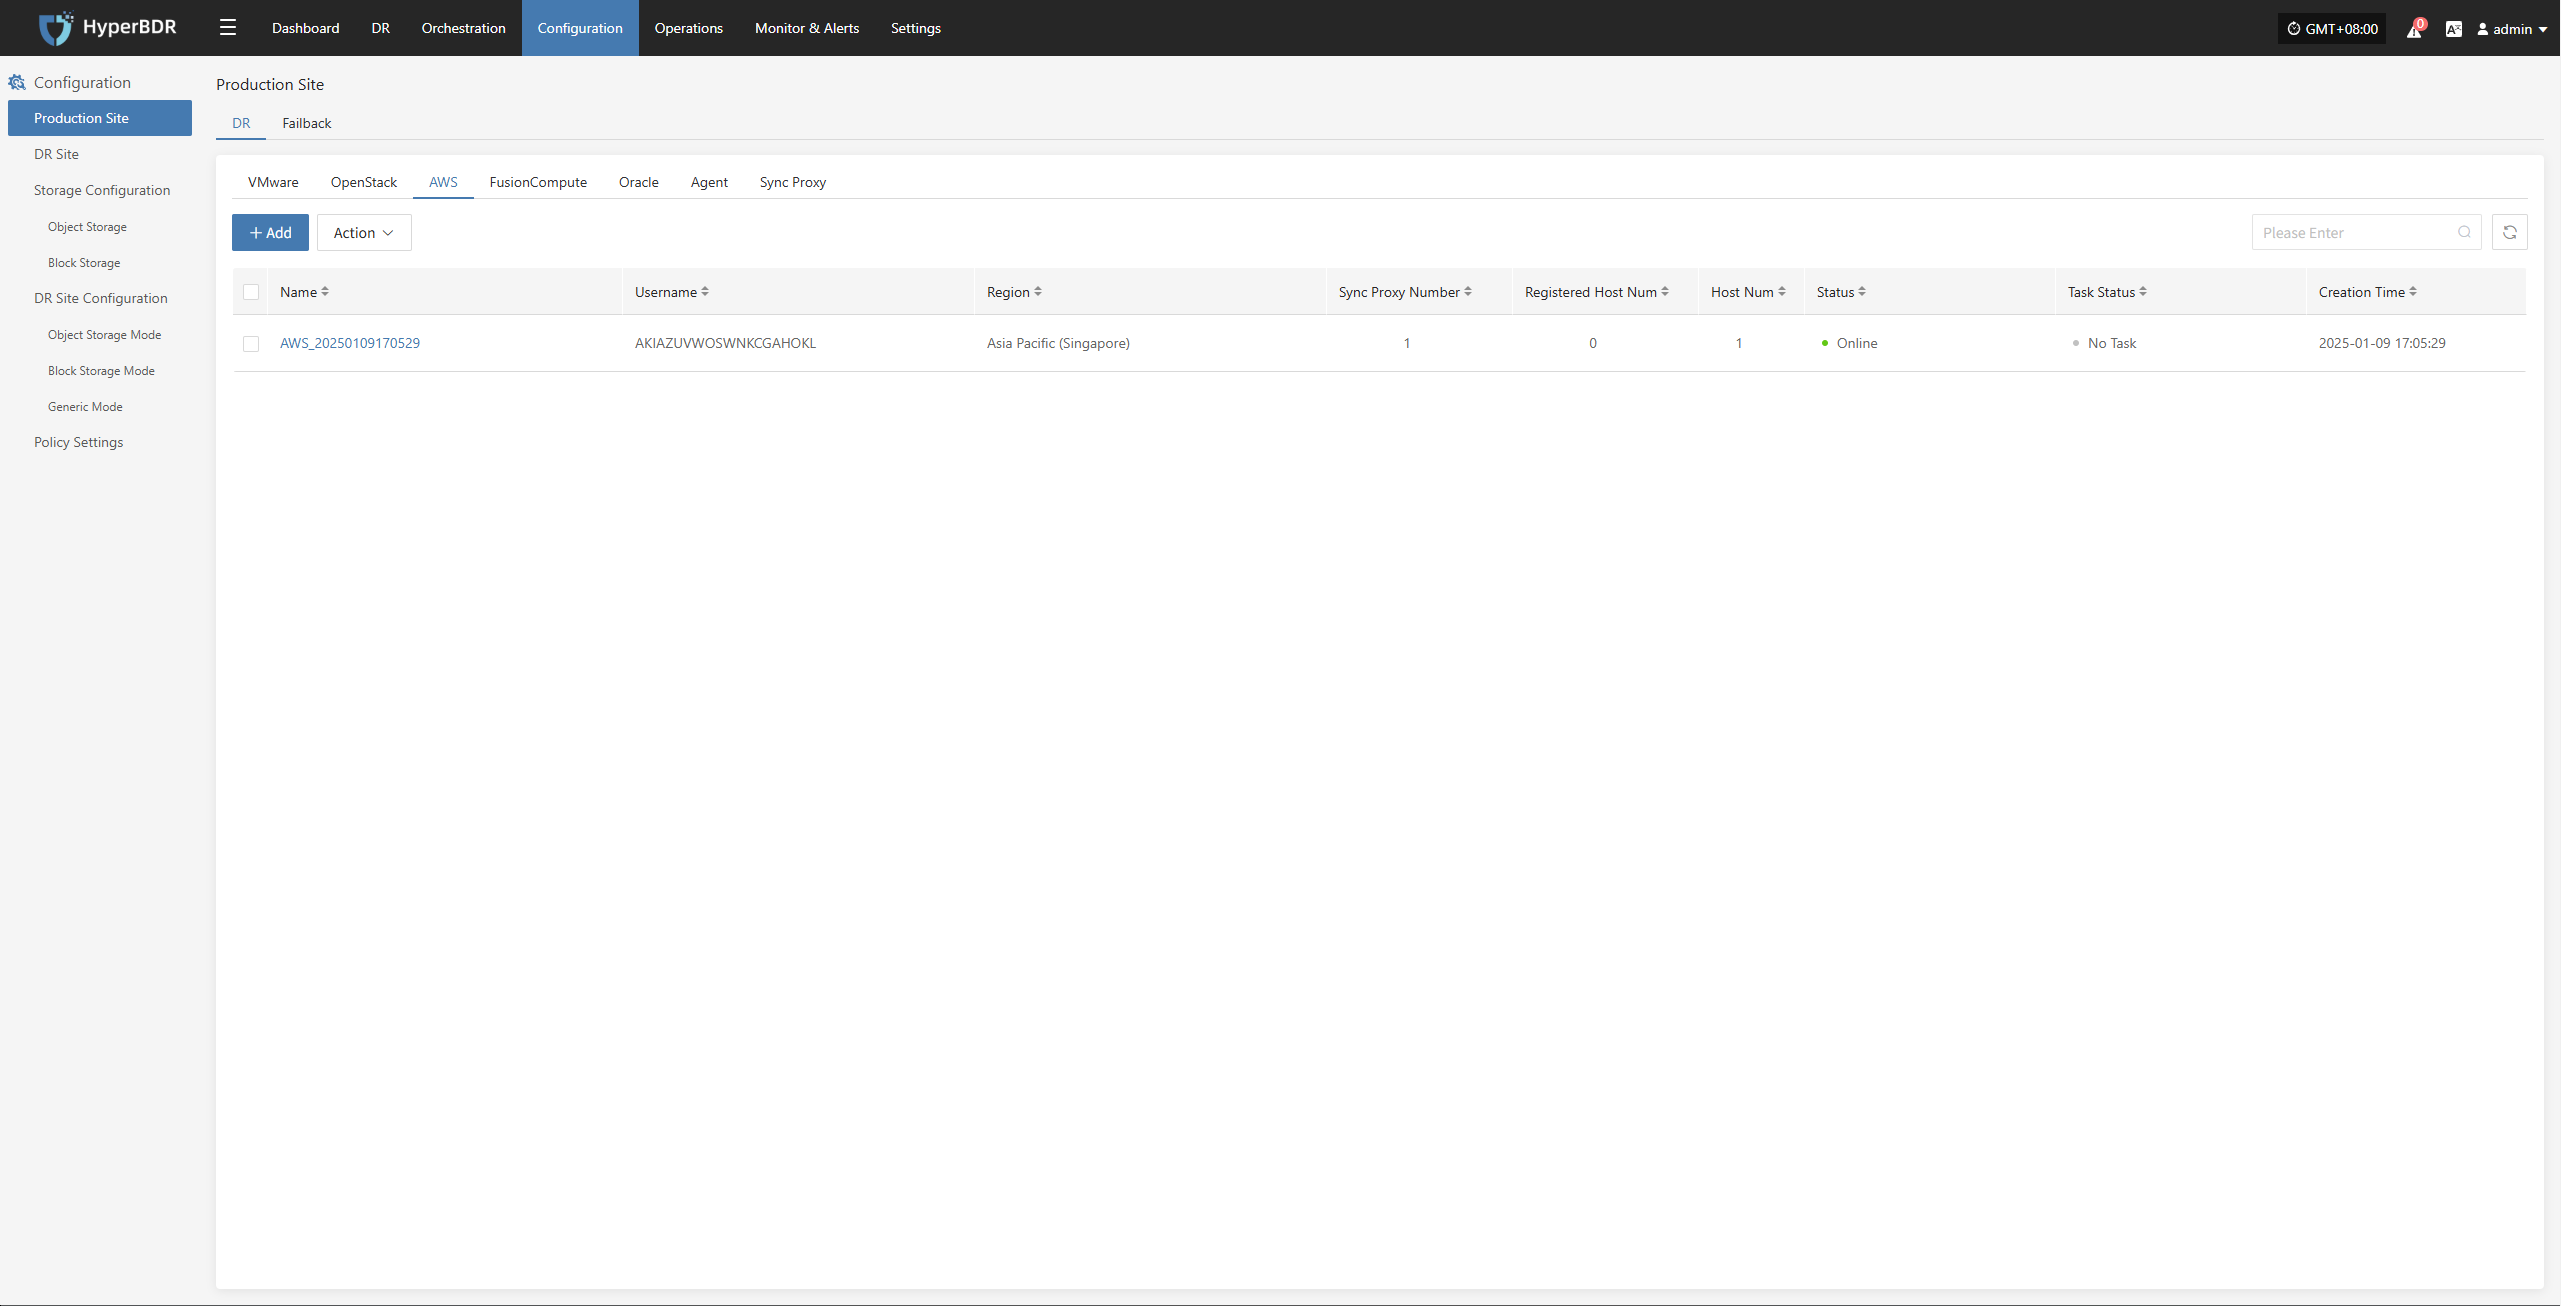
FusionCompute
The FusionCompute production platform page is mainly used for adding, deleting, updating, and other management operations for the FusionCompute platform.
Add FusionCompute Platform
Click "Production Site" in the left navigation bar, select FusionCompute, and click the "Add" button. Follow the step-by-step guide in the pop-up window to add the platform.
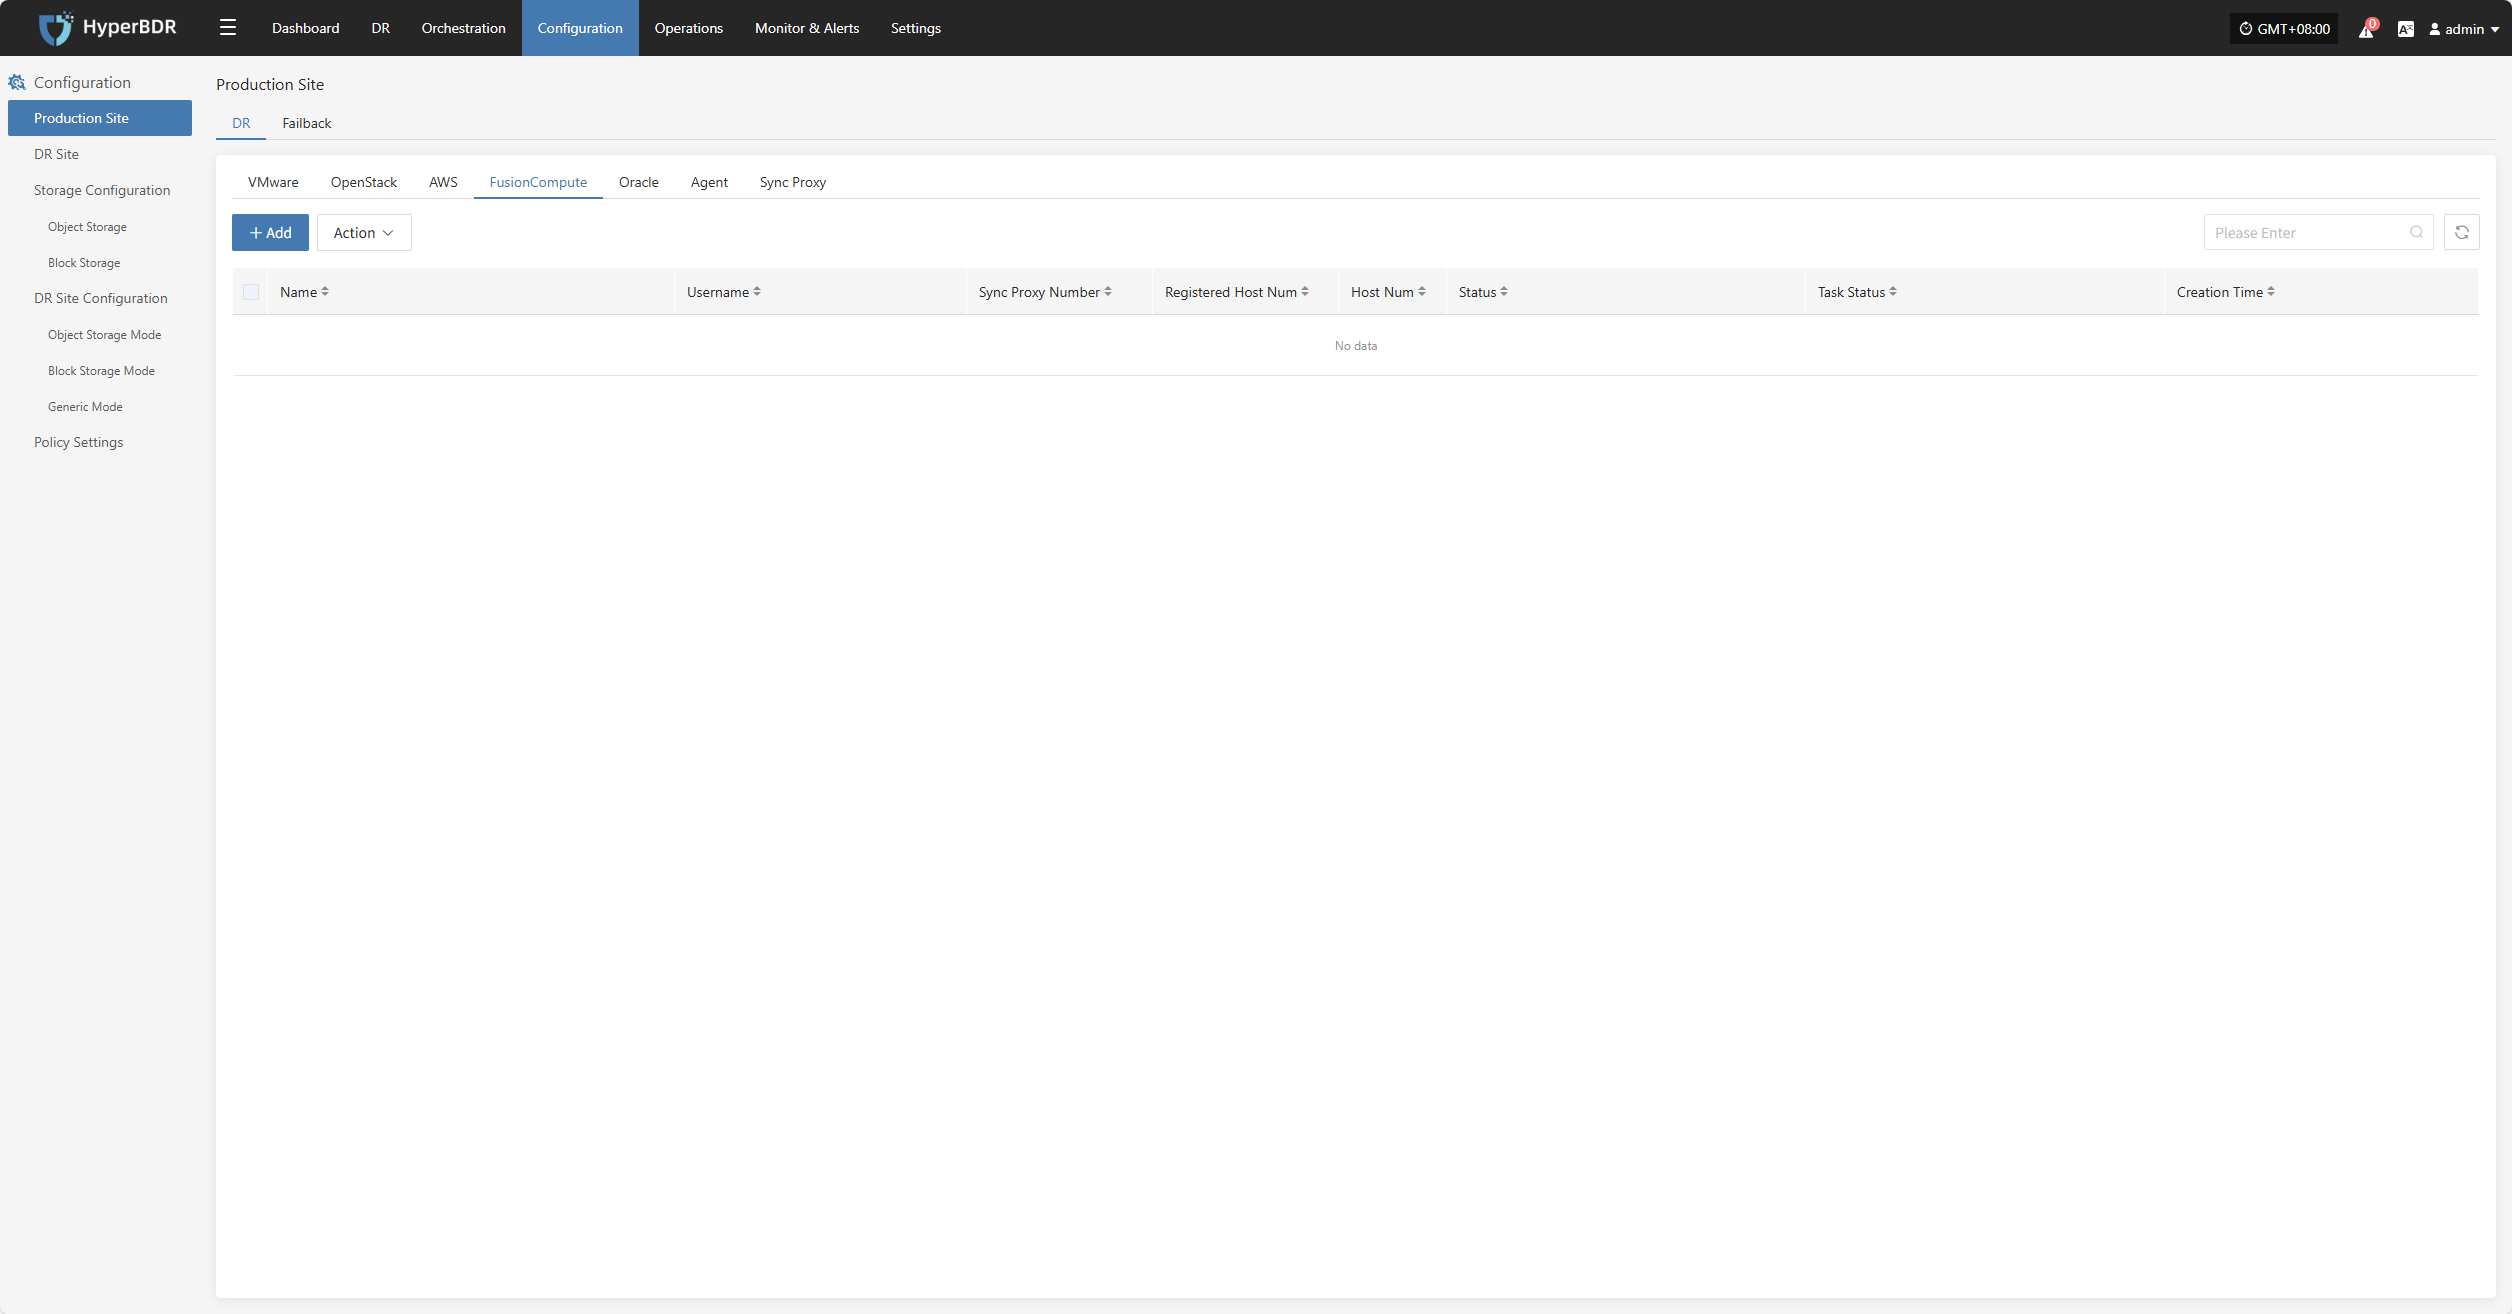
Deploy Sync Proxy
Follow the guided steps below:
Step 1: Download the source sync proxy OVA file.
Click the download link on the page
Internet OVA download link: [Click to Download]
Step 2: Use the OVA file to deploy a virtual machine on the FusionCompute cluster and configure the IP address.
Supported FusionCompute cluster version: FusionCompute 8.6.0
- Usage Notes
| Category | Content |
|---|---|
| Prerequisites | 1. Install and start Tools: The VM must have Tools installed and running to create CBT snapshots. 2. Snapshot limit: Up to 32 snapshots are supported. No new snapshots can be created beyond this limit. 3. VM status: The VM must be in "Running," "Suspended," or "Stopped" state to create a snapshot. 4. VM backup requirement: The backup will fail if the VM is powered off during the process. |
| Limitations | 1. Shared disks not supported for snapshots: VMs using shared disks cannot create snapshots. 2. Independent disks not supported for backup: Independent disks cannot be backed up. 3. CBT failure: After operations like VM HA, snapshot recovery, volume expansion, or compute node reboot, CBT will fail and a full backup is required. 4. Task exclusivity: Creating a backup snapshot must not overlap with actions like starting VMs, online disk binding, VM shutdown, disk expansion, or storage migration. 5. Unsupported snapshot scenarios: Backup cannot be performed on linked clone VMs, template VMs, during storage migration, or disk expansion. 6. Storage space requirement: Sufficient space must be available on the target storage for snapshot merging, supporting up to 8 volumes at once. 7. Storage I/O performance impact: Backup and recovery may affect storage I/O performance. It’s recommended to perform backups during off-peak hours. 8. Cross-storage backup and recovery not supported: Backup and recovery cannot be performed across different storage types (e.g., virtualization storage and FusionStorage). 9. Max 8 Socket connections per host: A maximum of 8 Socket backup connections are supported per host. |
Step 3: Install the source sync proxy. Log in to the newly created sync proxy VM. The default username and password are (root/Acb@132.Inst)
Step 4: Copy and execute the sync proxy installation command.
Network policy requirements:
| Source | Target | Port | Description |
|---|---|---|---|
| Sync Proxy | HyperBDR Console | 10443 | Authentication port |
| Sync Proxy | HyperBDR Console | 30080 | Installation package download port |
- Sync Proxy resource specifications:
| Parameter | Specification |
|---|---|
| OS Version | Ubuntu 24.04 |
| CPU | 4C |
| Memory | 8GB |
| System Disk | 50GB |
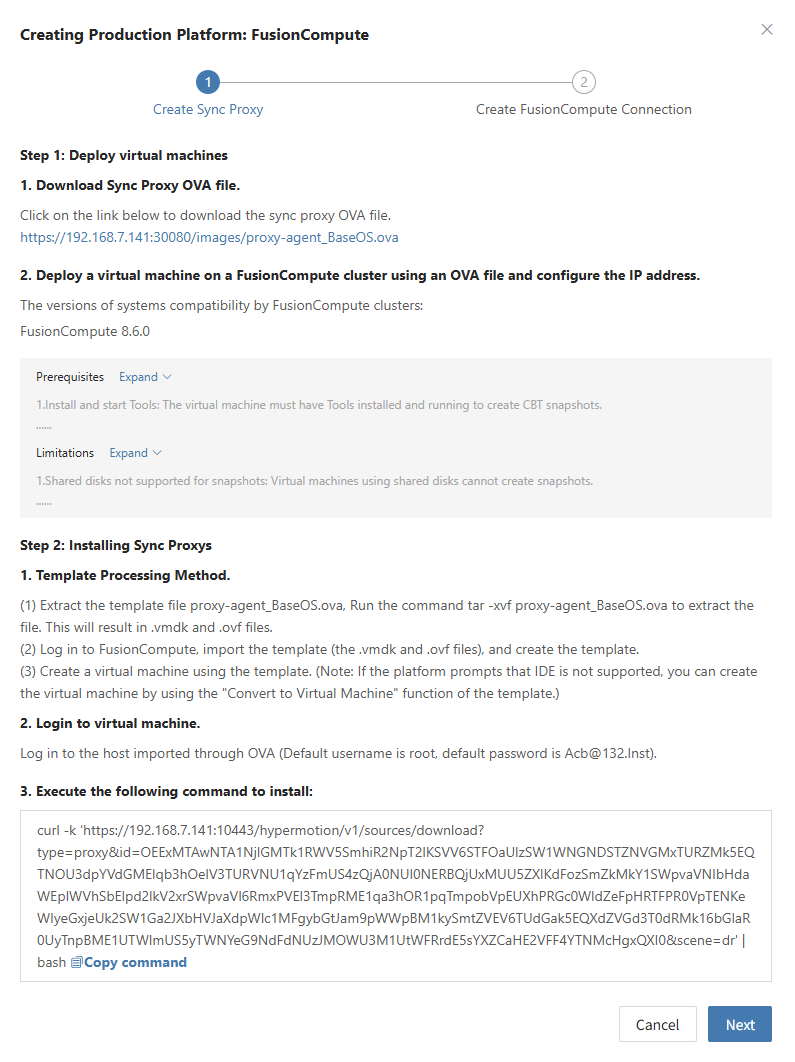
Create FusionCompute Production Platform
- Obtain authentication information
| Parameter | Example | Description |
|---|---|---|
| Auth URL | https://<FusionCompute/Host>:7443 | When adding a FusionCompute link, if the source uses domain management, obtain the domain and IP mapping in advance and add it to the platform for proper resolution. |
| Username | Username for FusionCompute host | Username for connecting to FusionCompute. |
| Password | Password for FusionCompute host | Password for connecting to FusionCompute. |
| Sync Proxy | Sync Proxy host IP | After installation, you can select from the dropdown, no need to manually add the IP. |
- Network policy requirements
| Source | Target | Port | Description |
|---|---|---|---|
| Sync Proxy | FusionCompute Manager | 7443 | Authentication port |
| Sync Proxy | Virtualization Compute Nodes | 21064 | Data port Used for backup data reading. Please ensure Sync Proxy can access port 21064 on all target hosts. |
After filling in the required authentication information, click the Confirm button to add.
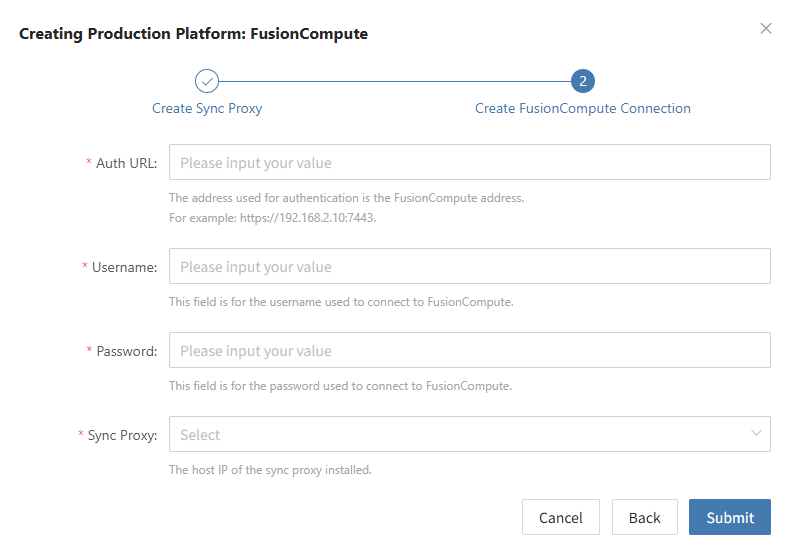
Complete FusionCompute Addition
FusionCompute production platform configuration is complete. Wait until the platform status is normal and the number of cluster hosts is obtained before proceeding with subsequent steps.
Note: You can repeat the above steps to add multiple FusionCompute clusters, or add a single FusionCompute host.
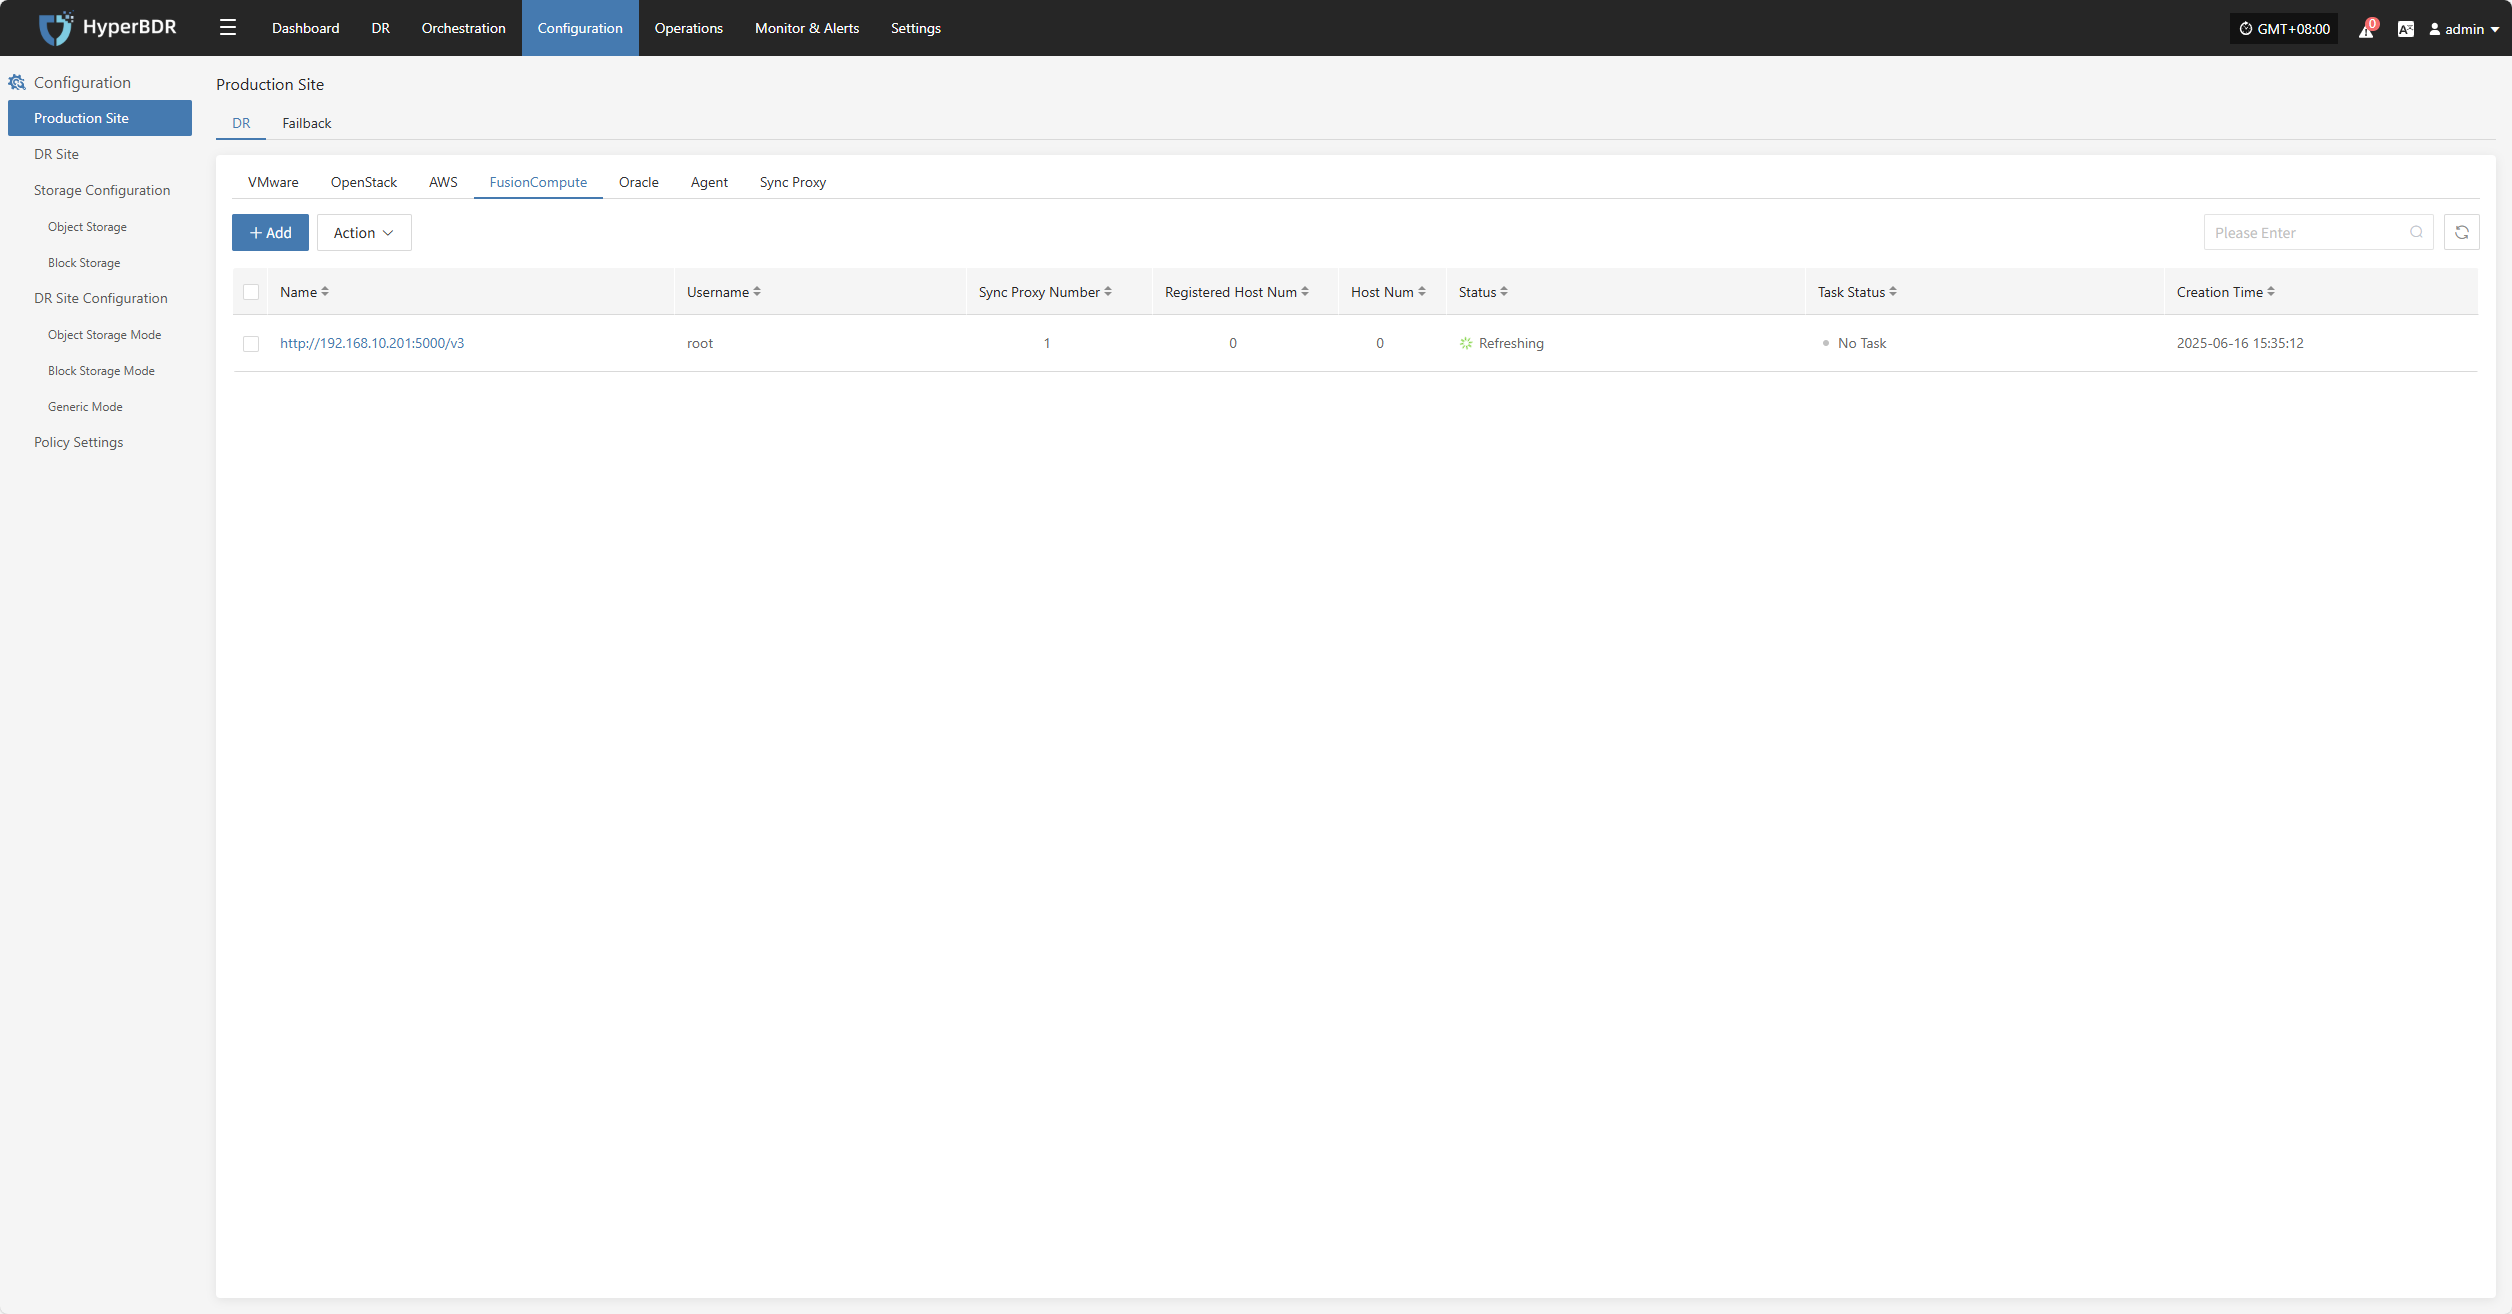
Oracle
The Oracle production platform page is mainly used for adding, deleting, updating, and other management operations for the Oracle platform.
Add Oracle Platform
Click "Production Site" in the left navigation bar, select Oracle, and click the "Add" button. Follow the step-by-step guide in the pop-up window to add the platform.
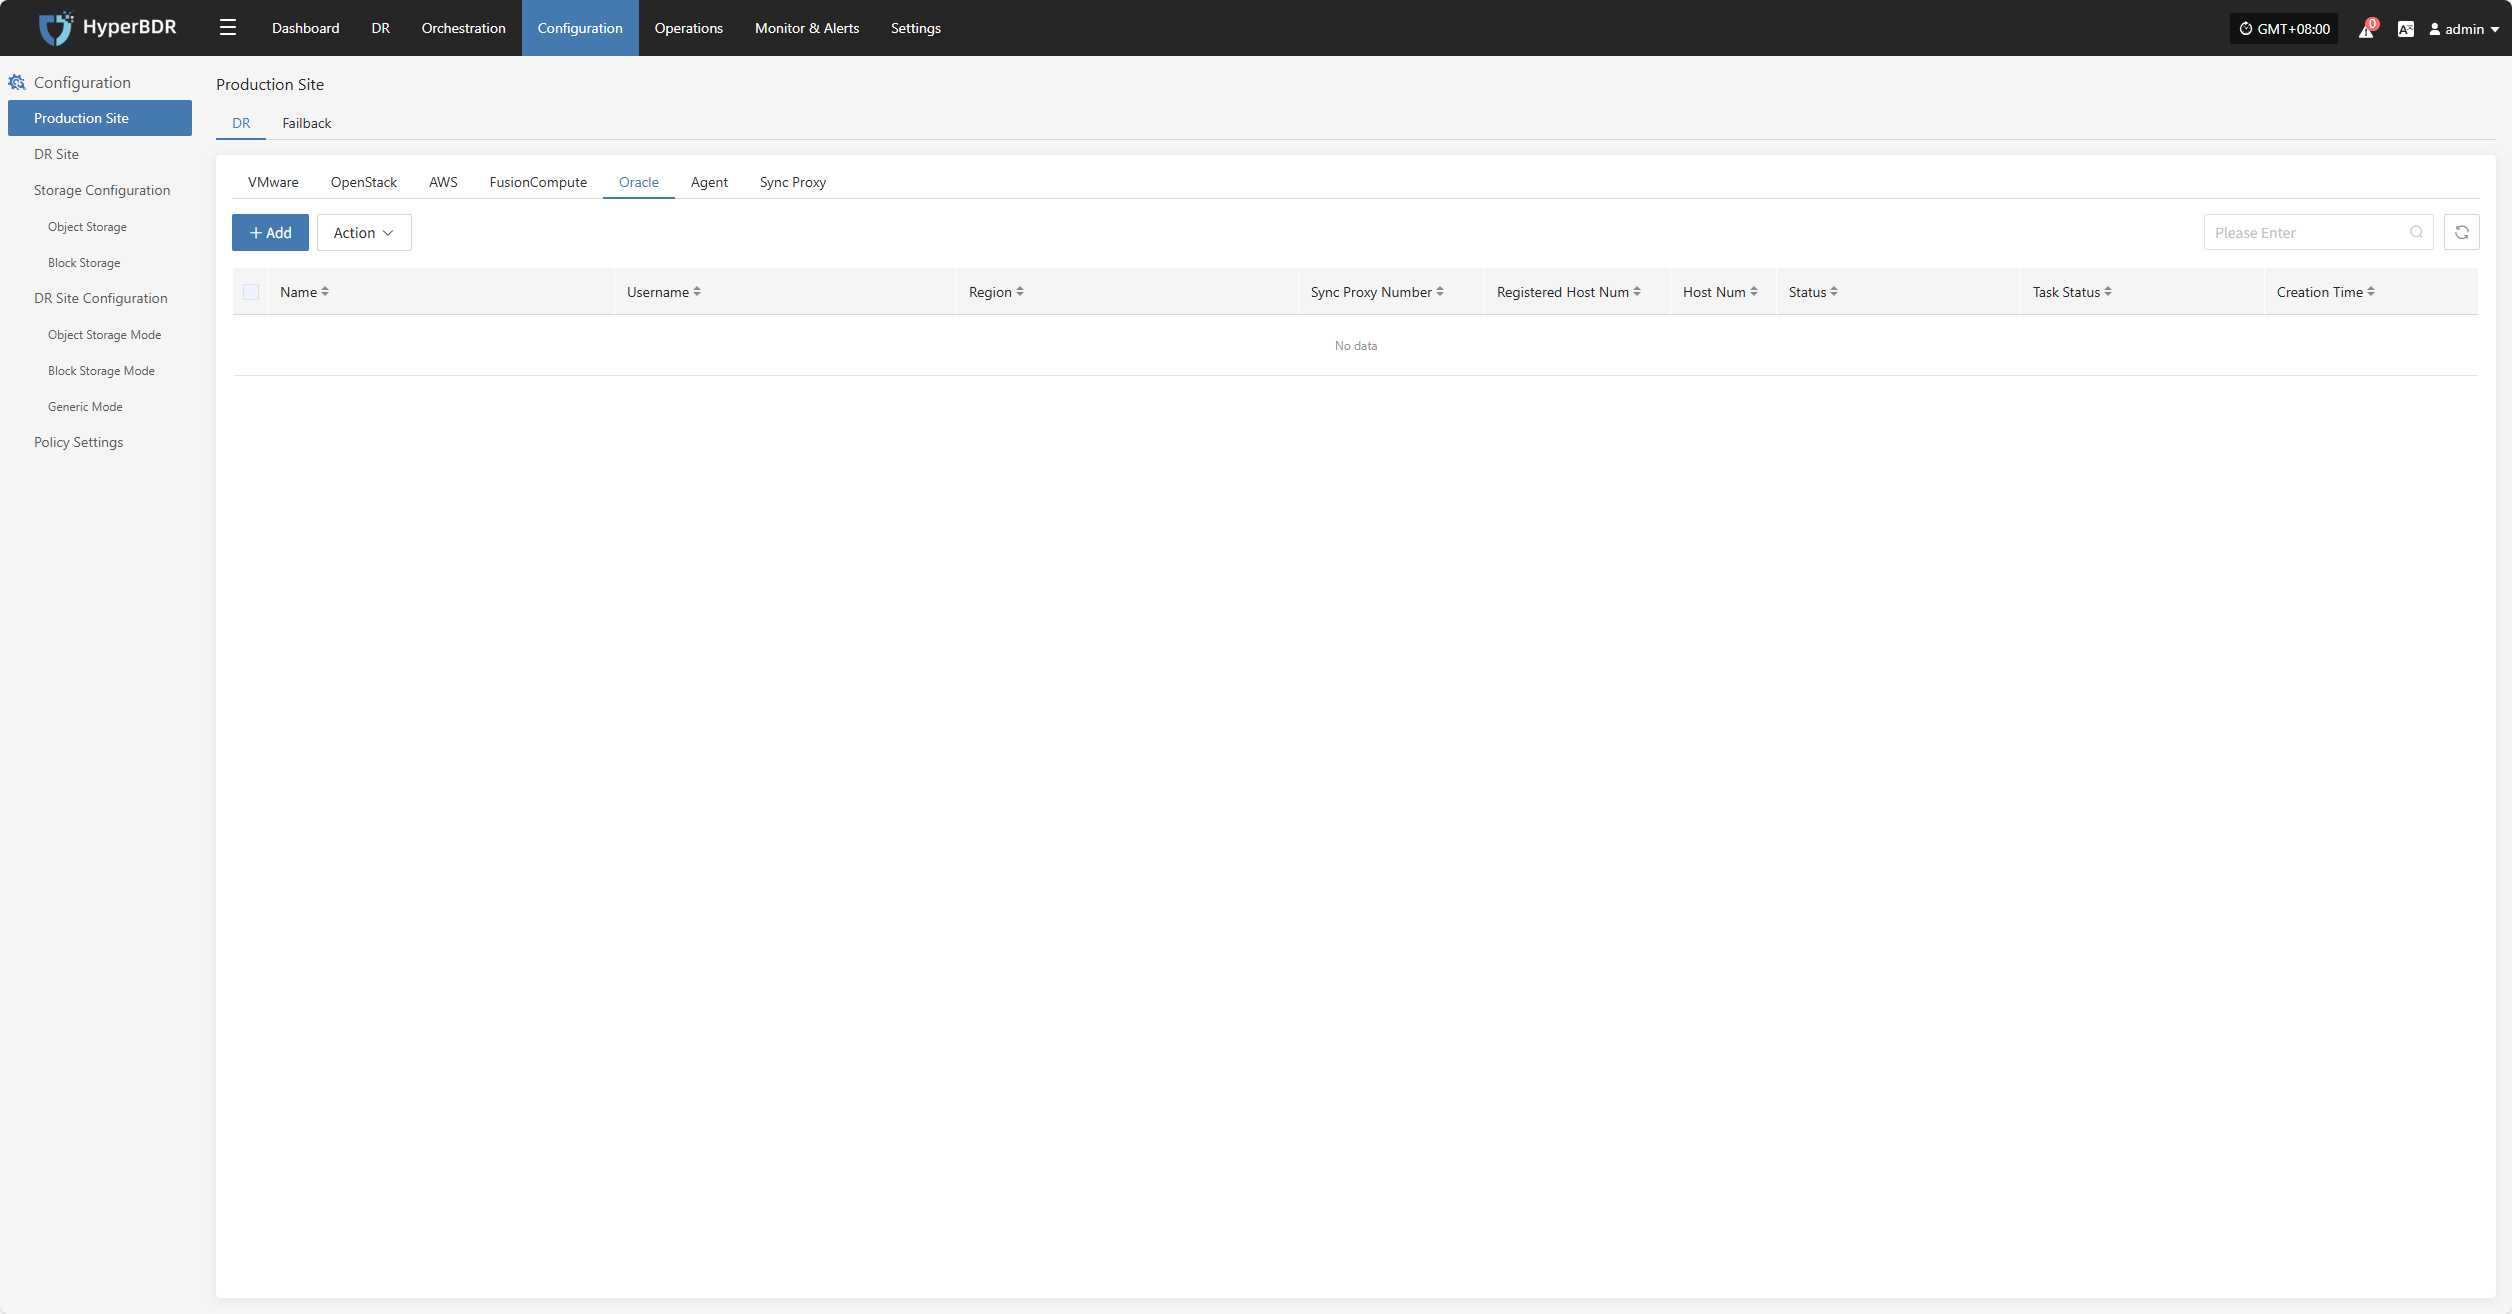
Deploy Sync Proxy
Follow the guided steps below:
- Step 1: Create a cloud host
You can use the native Ubuntu 24.04 OS image to create a new VM on the FusionCompute platform for deploying the sync proxy.
Step 2: Copy and execute the sync proxy installation command
Network policy requirements:
| Source | Target | Port | Description |
|---|---|---|---|
| Sync Proxy | HyperBDR Console | 10443 | Authentication port |
| Sync Proxy | HyperBDR Console | 30080 | Installation package download port |
- Sync Proxy resource specifications:
| Parameter | Specification |
|---|---|
| OS Version | Ubuntu 24.04 |
| CPU | 4C |
| Memory | 8GB |
| System Disk | 50GB |
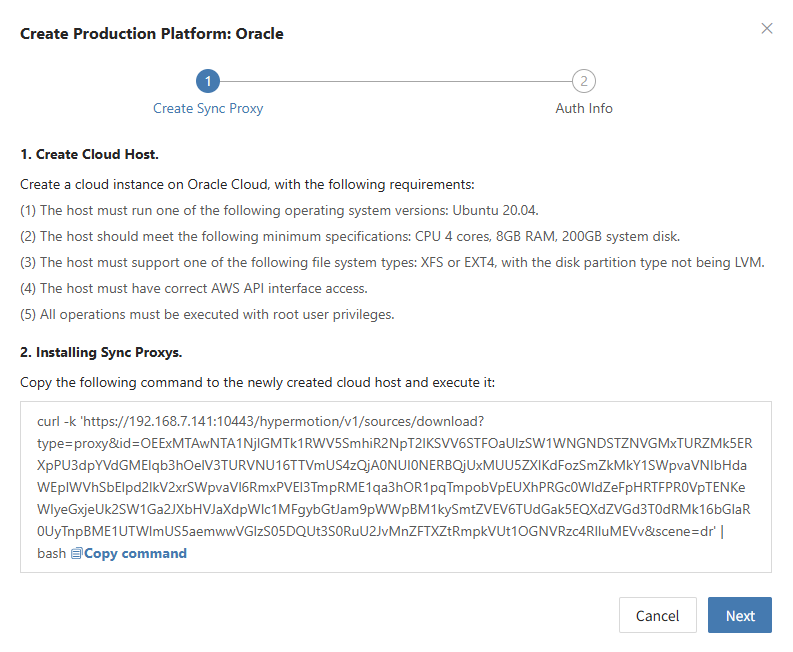
Create Oracle Production Platform
- Obtain authentication information
| Parameter | Example | Description |
|---|---|---|
| Tenancy OCID | ocid1.tenancy.oc1..aaaaaaaaxxxx | Log in to the management console → hover over [Profile] in the top right → click [My profile] → select [API keys] → select a key and [View configuration file] → Field [tenancy] in the config file. |
| User OCID | ocid1.user.oc1..aaaaaaabbbbb | Log in to the management console → hover over [Profile] in the top right → click [My profile] → select [API keys] → select a key and [View configuration file] → Field [user] in the config file. |
| Secret Key | oci_api_key.pem | Log in to the management console → hover over [Profile] in the top right → click [My profile] → select [API keys] → key created or uploaded when [Add API Key]. |
| Secret Key Fingerprint | 20:3b:97:13:55:1c:8c:xx:xx:xx:xx:xx:xx | Log in to the management console → hover over [Profile] in the top right → click [My profile] → select [API keys] → select a key and [View configuration file] → Field [fingerprint] in the config file. |
| Region | ap-singapore-1 | Log in to the management console → hover over [Profile] in the top right → click [My profile] → select [API keys] → select a key and [View configuration file] → Field [region] in the config file. |
| Sync Proxy | 192.168.1.100 | The host IP of the sync proxy installed. |
| Advanced Setting | If not filled, the system will auto-generate a default name | If you do not fill in the name, the system will automatically generate a default name for you. |
- Network policy requirements
| Source | Target | Port | Description |
|---|---|---|---|
| Sync Proxy | FusionCompute Manager | 443 | Authentication port |
| Sync Proxy | Virtualization Compute Nodes | 1522 | Data port Used for backup data reading. Please ensure Sync Proxy can access port 21064 on all target hosts. |
After filling in the required authentication information, click the Confirm button to add.
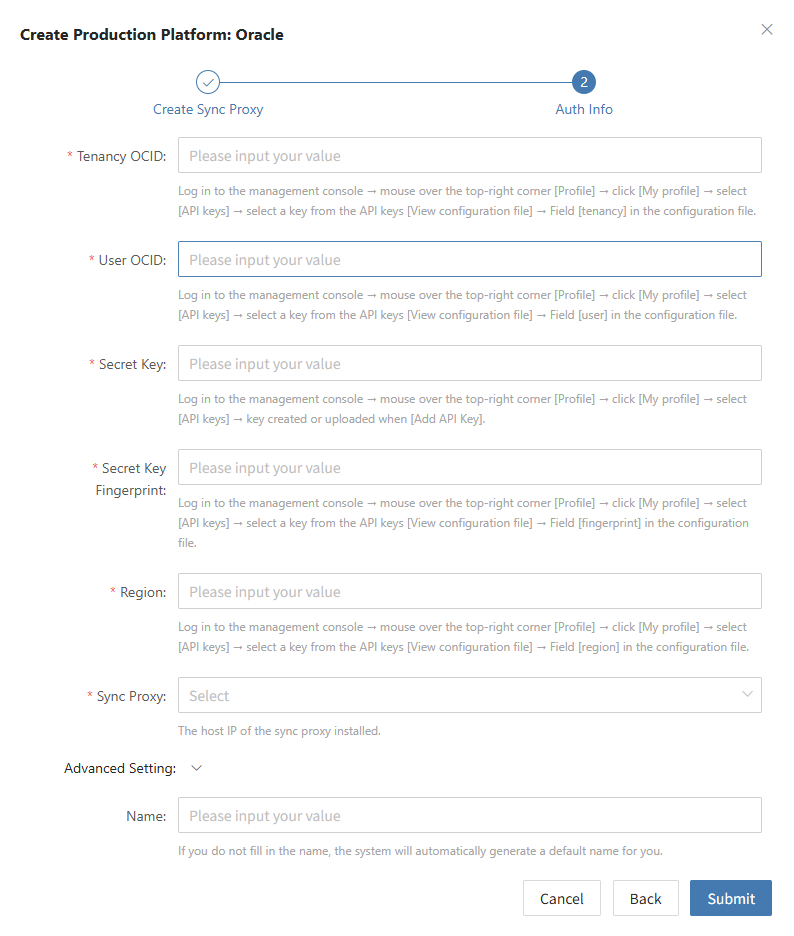
Complete Oracle Addition
Oracle production platform configuration is complete. Wait until the platform status is normal and the number of EC2 hosts is obtained before proceeding with subsequent steps.
Note: You can repeat the above steps to add multiple Oracle regions.
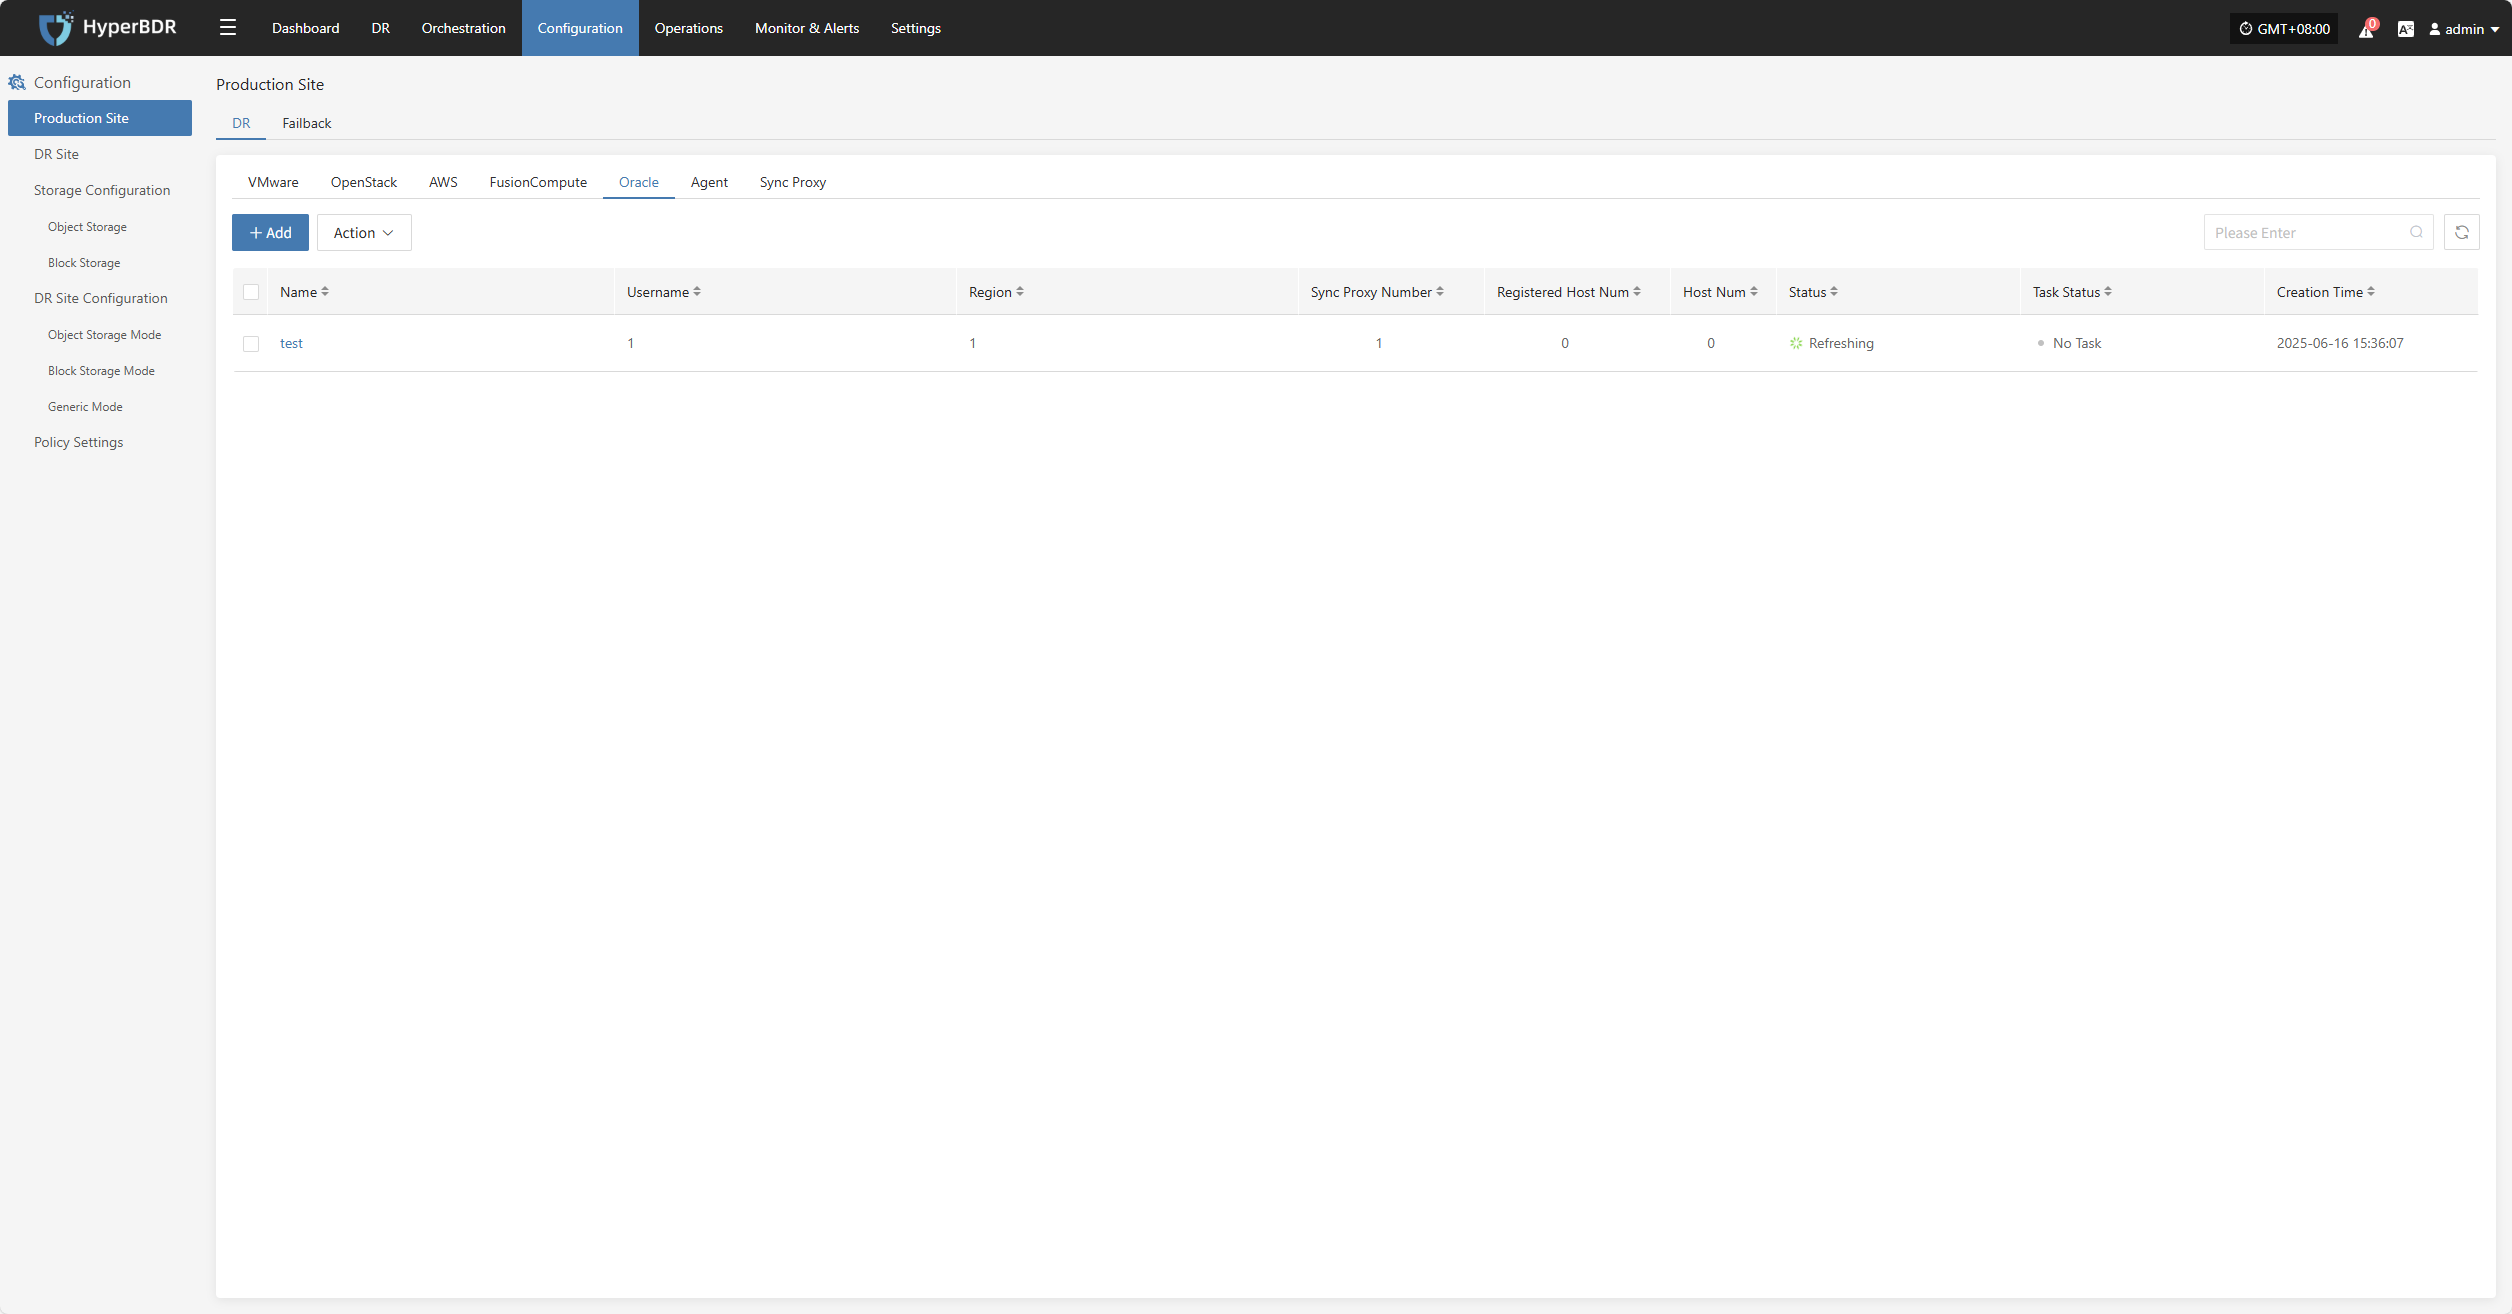
HCS 8.0.2
The HCS 8.0.2 platform page on the production site is mainly used for adding, deleting, updating, and other related management operations for the HCS 8.0.2 platform
Add HCS 8.0.2 Platform
Click "Production Site" in the left navigation bar, select HCS 8.0.2, and click the "Add" button. Follow the steps in the pop-up window to add the platform.

Deploy Sync Proxy
Follow the guided steps below:
Step 1: Download the source sync proxy OVA file.
Click the download link on the page
Internet OVA download link: https://downloads.oneprocloud.com/proxy-agent_BaseOS.ova
Step 2: Use the OVA file to import into the HCS cluster, deploy one or more source sync proxy virtual machines, and configure the IP address.
Note:
1. Currently, the interfaces of Huawei Cloud Stack (HCS) 8.2.x / 8.3.x differ significantly from those of Stack (HCS) 8.0.2; therefore, Stack (HCS) 8.2.x / 8.3.x is not supported at this time.
2. Other models of Dorado storage have not yet been adapted.
Step 3: Install the source sync proxy. Log in to the newly created sync proxy VM. The default username and password are (root/Acb@132.Inst)
Step 4: Copy and execute the sync proxy installation command.
Network policy requirements:
| Source | Target | Port | Description |
|---|---|---|---|
| Sync Proxy | HyperBDR Console | 10443 | Authentication port |
| Sync Proxy | HyperBDR Console | 30080 | Installation package download port |
- Sync Proxy resource specifications:
| Parameter | Specification |
|---|---|
| OS Version | Ubuntu 24.04 |
| CPU | 4C |
| Memory | 8GB |
| System Disk | 50GB |
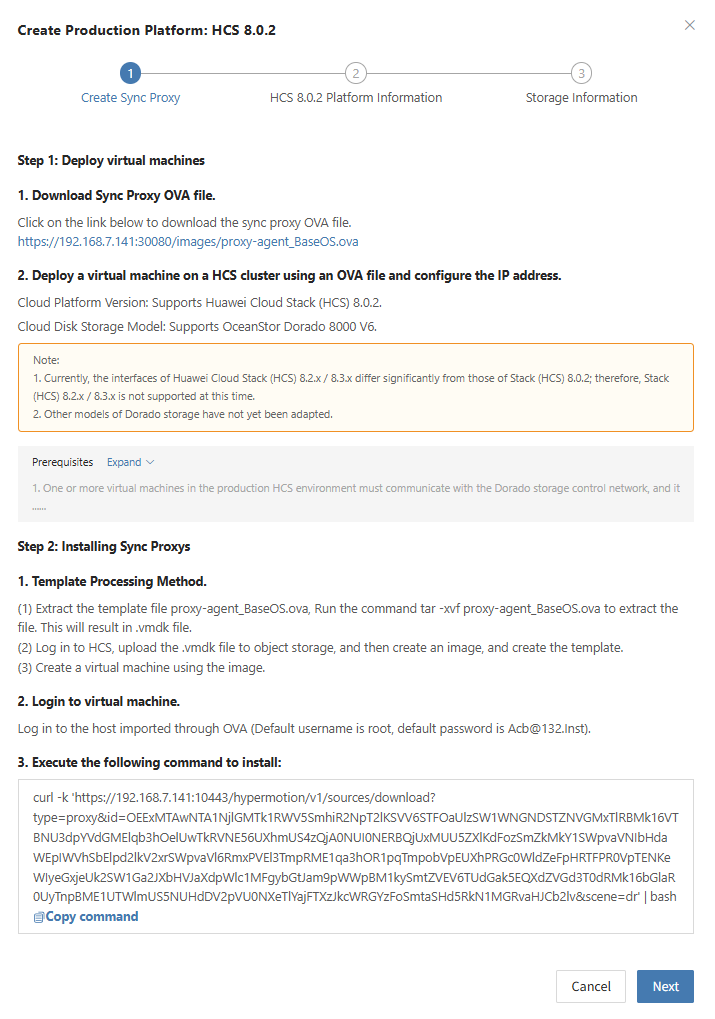
Create HCS 8.0.2 Production Platform
- Obtain authentication information
| Parameter | Example | Description |
|---|---|---|
| Auth URL | https://iam-apigateway-proxy.oneprocloud.com/v3 | The address used for authentication is usually iam-apigateway-proxy.{external_global_domain_name}. Please replace external_global_domain_name with the actual address in the environment. For example, if external_global_domain_name is oneprocloud.com, then this field should be filled in as: https://iam-apigateway-proxy.oneprocloud.com/v3 |
| Tenant ID | HPUAAG0B2••••••••••••••• | Log in platform, click the Username in the upper right corner, and then click [My Settings], Find the [Tenant ID] value on this page. |
| Username | zhangweizhen | Username is displayed in the upper-right corner after logging in to the platform. |
| Password | •••••••••••••• | The login password for the username |
| Project Domain ID | HPUAAG0B2••••••••••••••• | Same as Tenant ID, Click the Username in the upper right corner, then click [My Settings], find the [Tenant ID] value on this page,and the [Tenant ID] will be the "Project Domain ID". This field specifies the Project Domain ID in the OpenStack platform. |
| Project Name | test | Click on the username in the upper right corner, then select [My Settings]. On this page, locate the content displayed under [Project List] and the value shown in the header of the [Name] column. This field specifies the project name in the OpenStack platform. Please fill it in according to your actual situation. |
| Project (Region) | RegionOne | Click the username in the upper right corner, then select [Personal Settings]. On this page, find the content displayed under [Project List]. The value shown in the [Region] column header is the display name, while its corresponding real value is, for example, if the header displays "Aguascalientes", the real value is "mx-ags-1". In the OpenStack platform, this field represents the region name, and its default value is "RegionOne". |
| Sync Proxy | 192.168.7.144 | Select the IP of the host with the Sync Proxy installed from the dropdown list. |
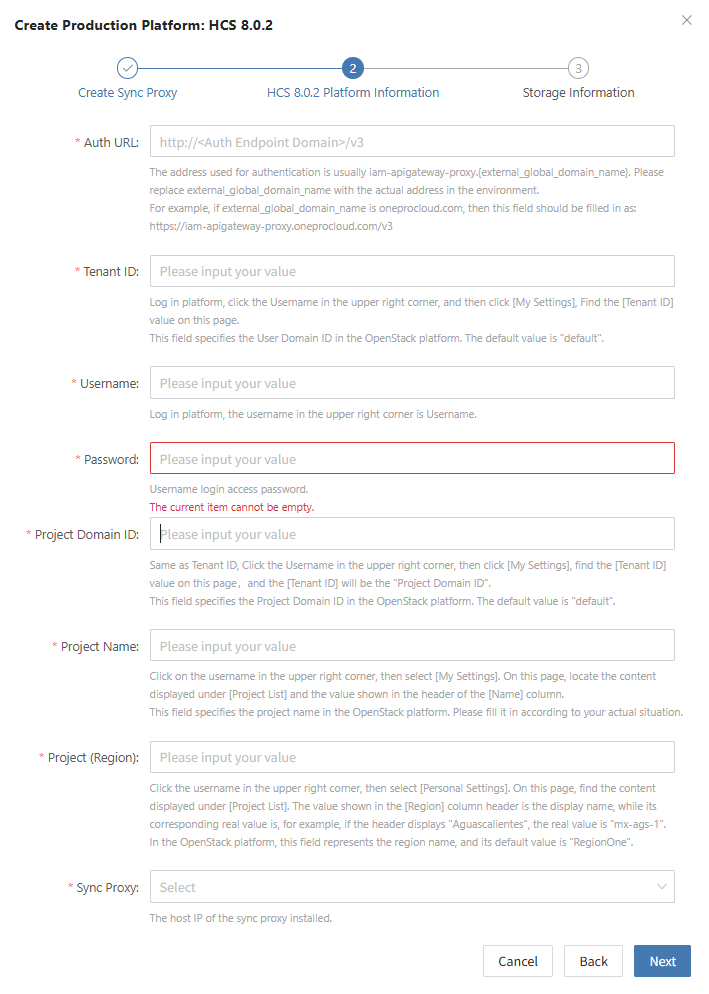
- Storage Information Configuration
Click '+ Add Storage' on the page to select multiple storage configurations.
| Parameter | Example | Description |
|---|---|---|
| Storage Type | DORADO | Select the target storage type from the dropdown list. |
| Dirección Nodo Almacenamiento | https://172.22.192.212:8088 | Address of the storage node |
| Username | zhangweizhen | Username for accessing Storage |
| Password | •••••••••••••• | The password associated with the username |
| User Type | Local User | Indicates an account created locally on the storage system. Optional types: Local User, LDAP User, or RADIUS User. |
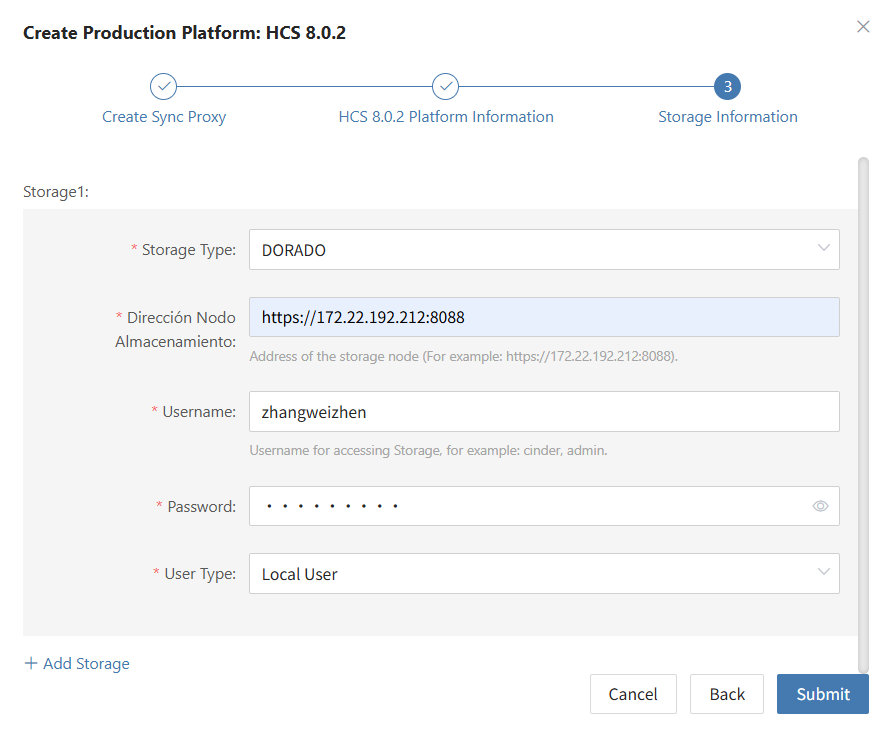
- Network policy requirements
| Source | Target | Port | Description |
|---|---|---|---|
| Sync Proxy | HCS 8.0.2 | 443 | Used to access the API Gateway (APIG) of the HCS platform for management operations such as authentication and task dispatching. |
| Sync Proxy | HCS 8.0.2 | 8088 | Used to access the management interface of the Dorado storage system for operations such as querying storage resources and managing snapshots. |
- Permission requirements
To back up data using the HCS 8.0.2 API, you need to provide an account with full tenant administrator permissions.
Complete HCS 8.0.2 Addition
Once the HCS 8.0.2 production platform has been configured, wait until the platform status becomes 'Normal' and the number of ECS hosts is retrieved. You can then proceed with the subsequent steps. Note: You can repeat the above steps to add multiple HCS 8.0.2 clusters.
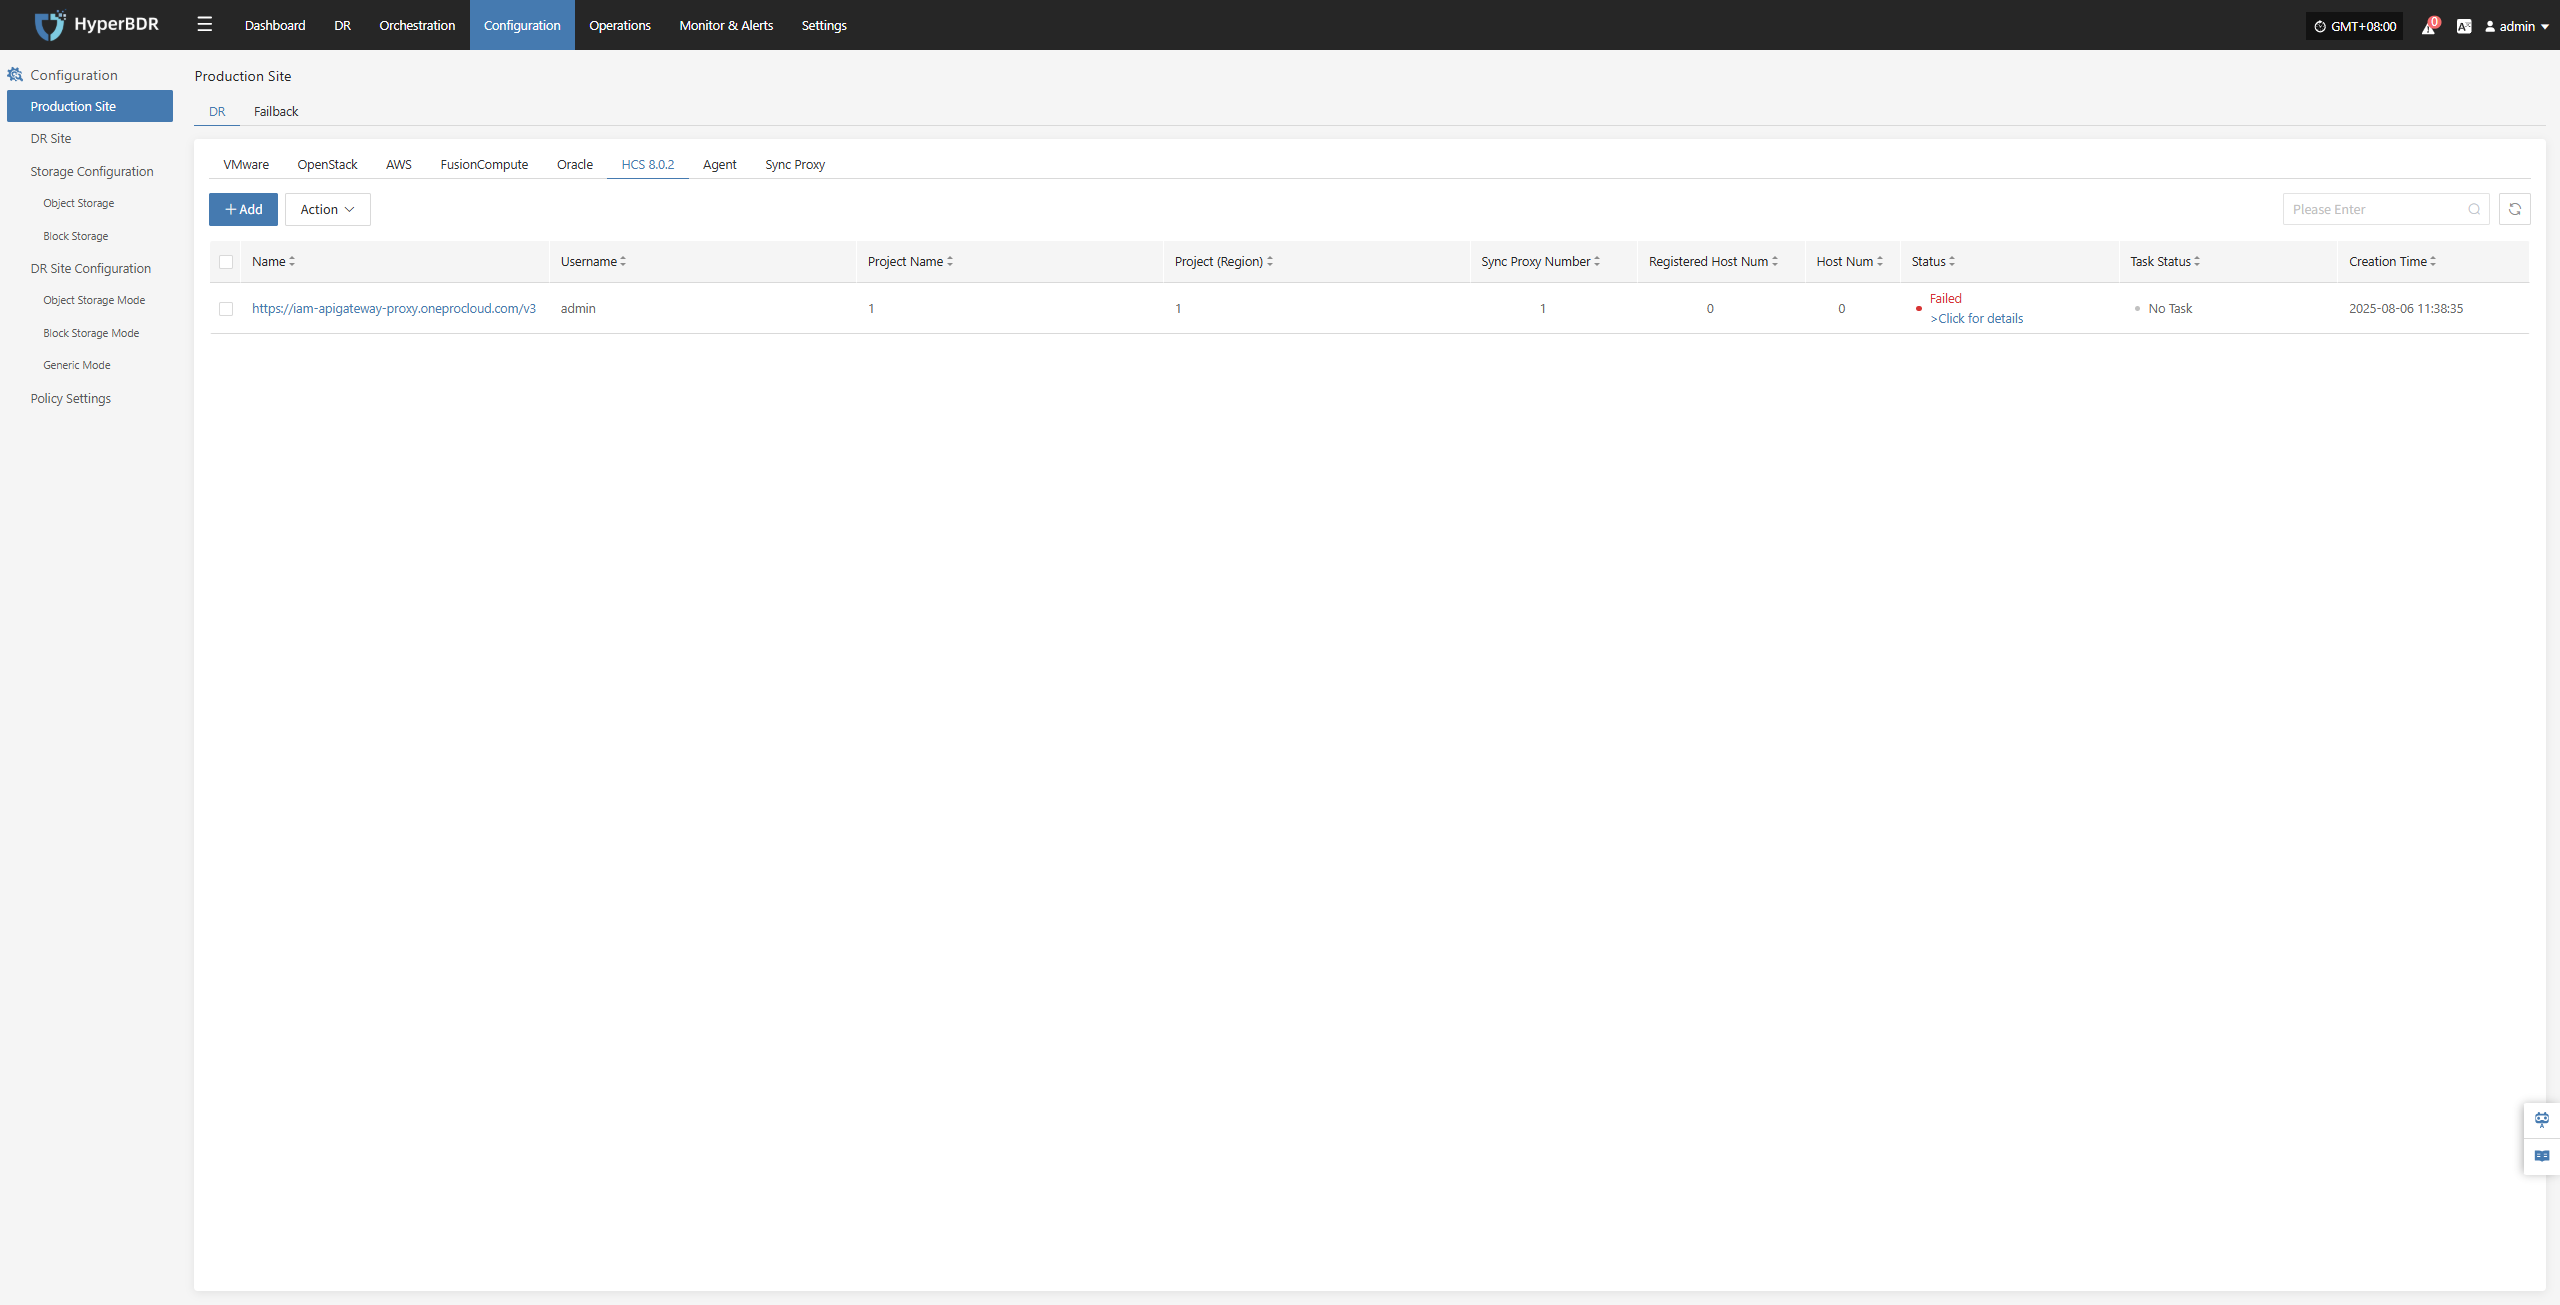
Huawei Cloud
The Huawei Cloud platform page on the production site is mainly used for adding, deleting, updating, and other related management operations for the Huawei Cloud platform.
Warning
As of October 31, 2025, Huawei Cloud has enabled the CBR Standard Snapshot Data Export API and the CBR Standard Snapshot Data Bucket Agency Interface only in certain regions (currently limited to the Shenzhen region, TR-Istanbul and TR-Ankara-PUR). Access to these features requires whitelist approval. To request access, please submit a service ticket through the Huawei Cloud support system.
Add Huawei Cloud Platform
Click "Production Site" in the left navigation bar, select Huawei Cloud, and click the "Add" button. Follow the steps in the pop-up window to add the platform.
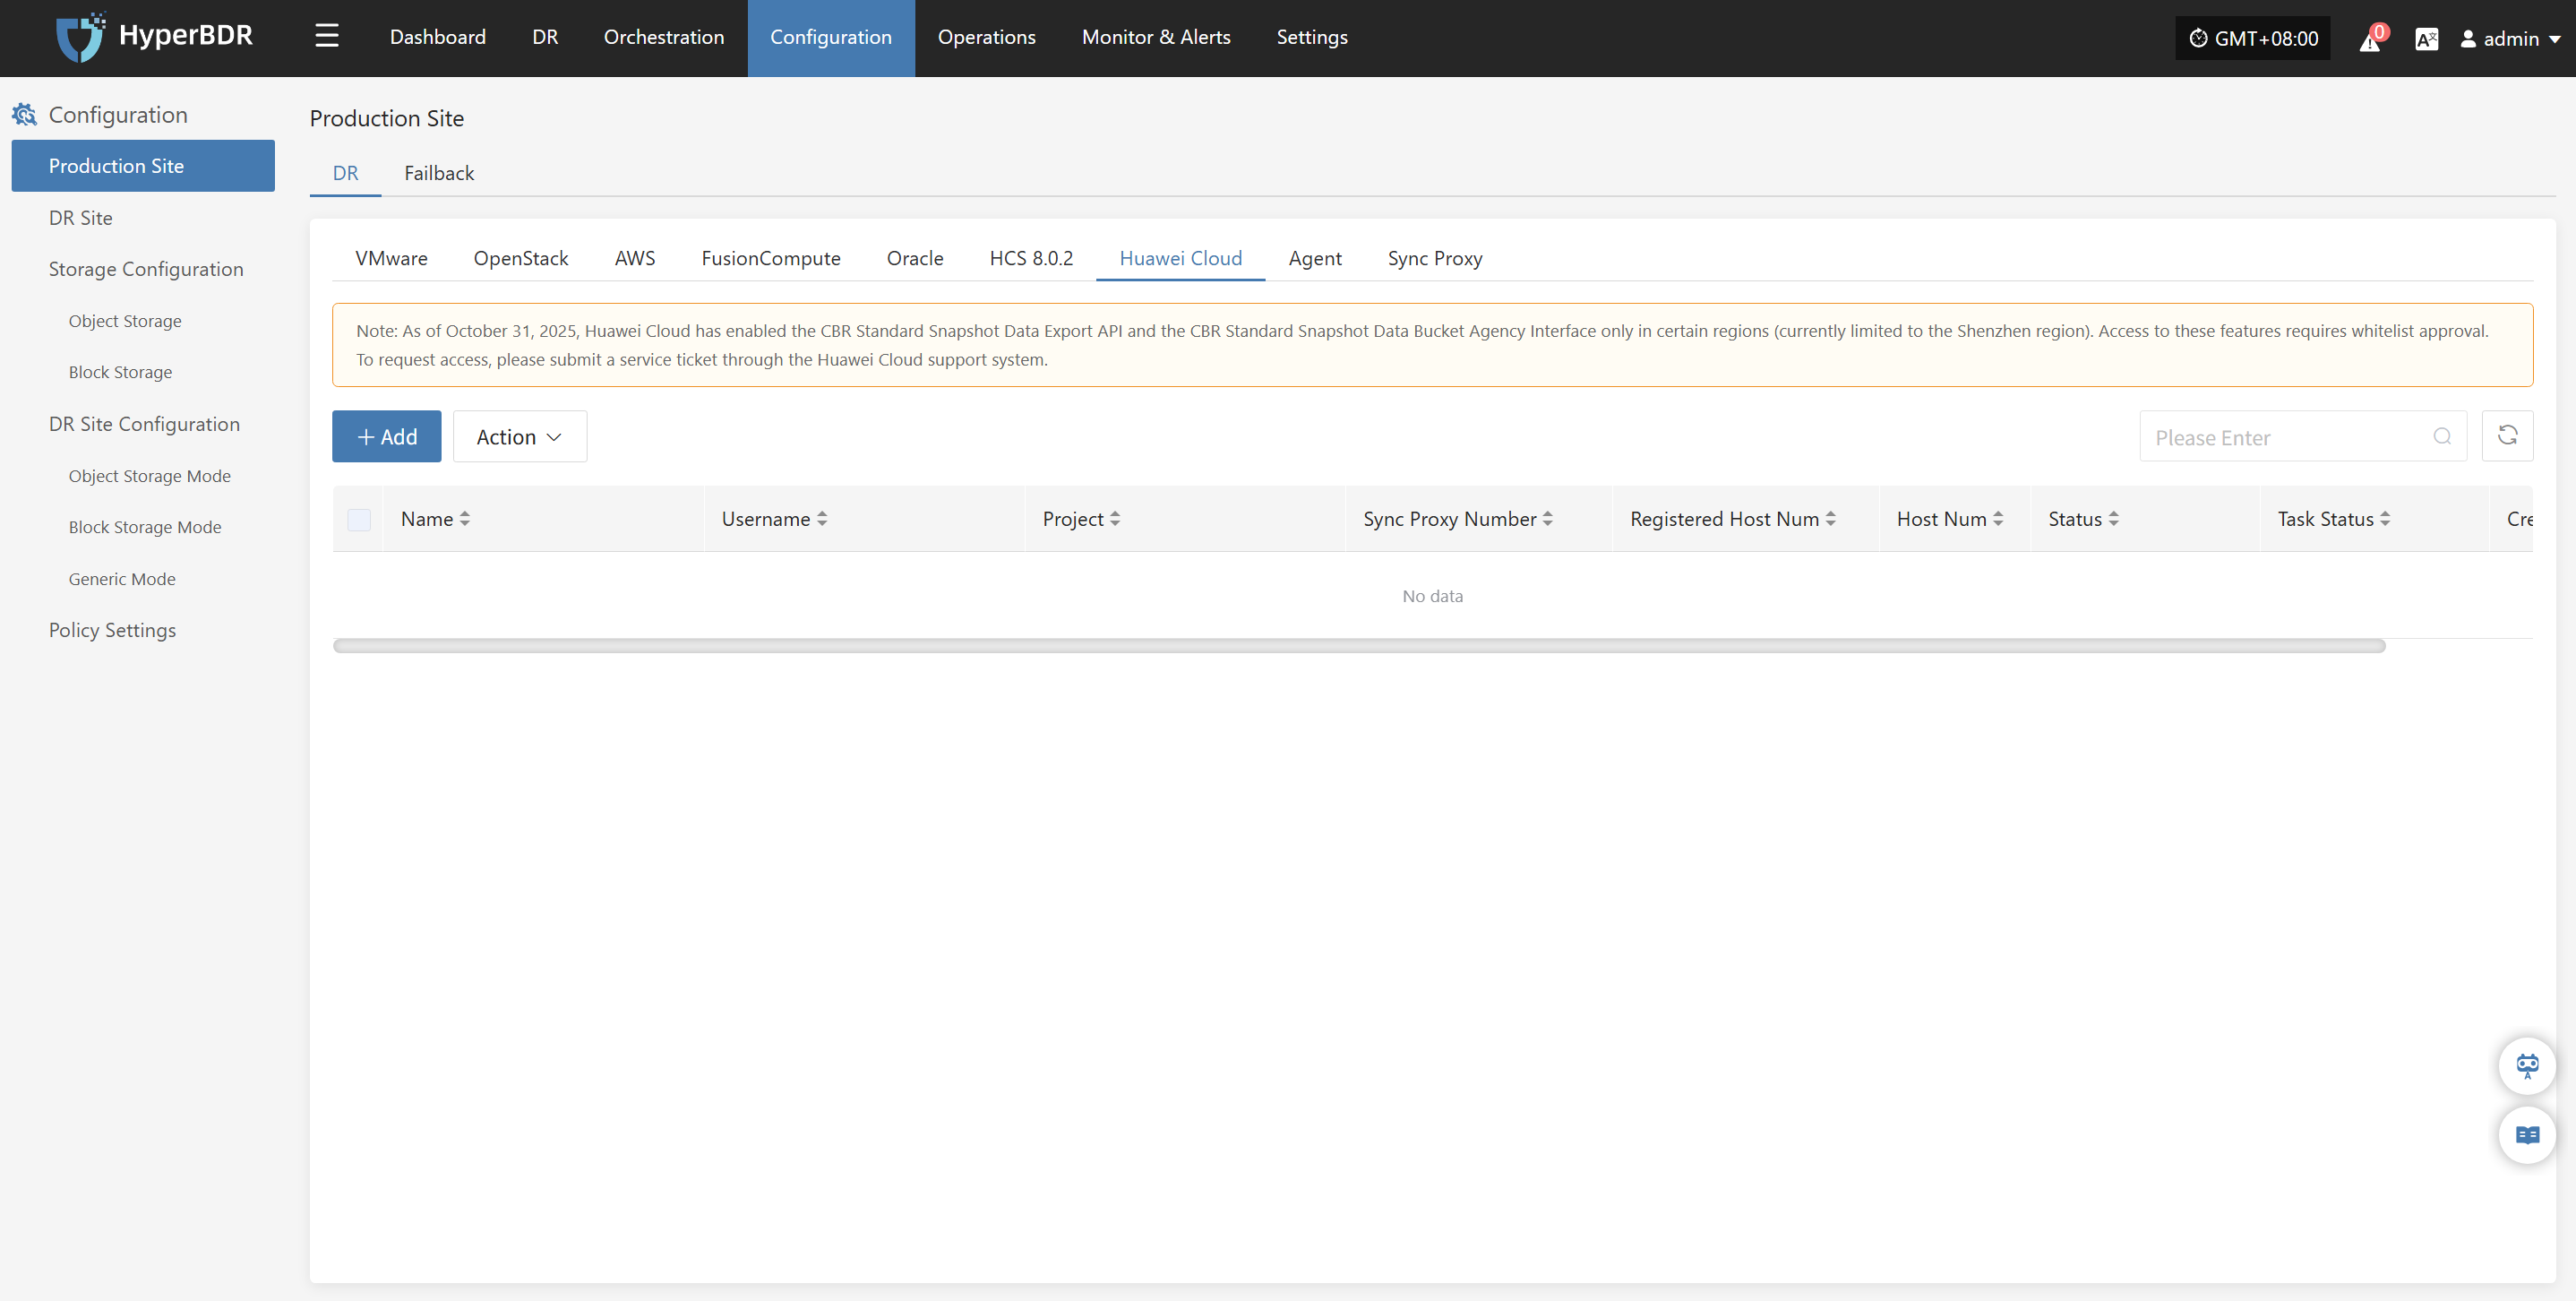
Deploy Sync Proxy
Follow the guided steps below:
- Step 1: Create Cloud Host.
To create a cloud host on the Huawei Cloud platform, the requirements are as follows:
(1) The host must run one of the following operating system versions: Ubuntu 24.04.
(2) The host should meet the following minimum specifications: CPU 4 cores, 8GB RAM, 200GB system disk.
(3) The host must support one of the following file system types: XFS or EXT4, with the disk partition type not being LVM.
(4) The host must have correct Huawei Cloud API interface access.
(5) All operations must be executed with root user privileges.
Step 2: Install the source sync proxy. Copy and execute the sync proxy installation command.
Network policy requirements:
| Source | Target | Port | Description |
|---|---|---|---|
| Sync Proxy | HyperBDR Console | 10443 | Authentication port |
| Sync Proxy | HyperBDR Console | 30080 | Installation package download port |

Create Huawei Cloud Production Platform
- Obtain authentication information
| Parameter | Example | Description |
|---|---|---|
| Access Key ID | H******************K | The key for accessing Huawei Cloud API with full account permissions. Log in to the management console → mouse over the top-right corner [Username] → click [My Credentials] → select [Access Key]. |
| Access Key Secret | 4*************************A | The key for accessing Huawei Cloud API with full account permissions. Log in to the management console → mouse over the top-right corner [Username] → click [My Credentials] → select [Access Key]. |
| Project | tr-west-1 | The key for accessing Huawei Cloud API with full account permissions. Log in to the management console, mouse over the top-right corner [Username] → click [My Credentials] → [API Credentials] → [Project Name]. Note: Please enter the project name (e.g., cn-north-1), not the project ID. |
| Sync Proxy | 192.168.2.75 | The host IP of the sync proxy installed. |
| Name | Huawei Cloud | If you do not fill in the name, the system will automatically generate a default name for you. |
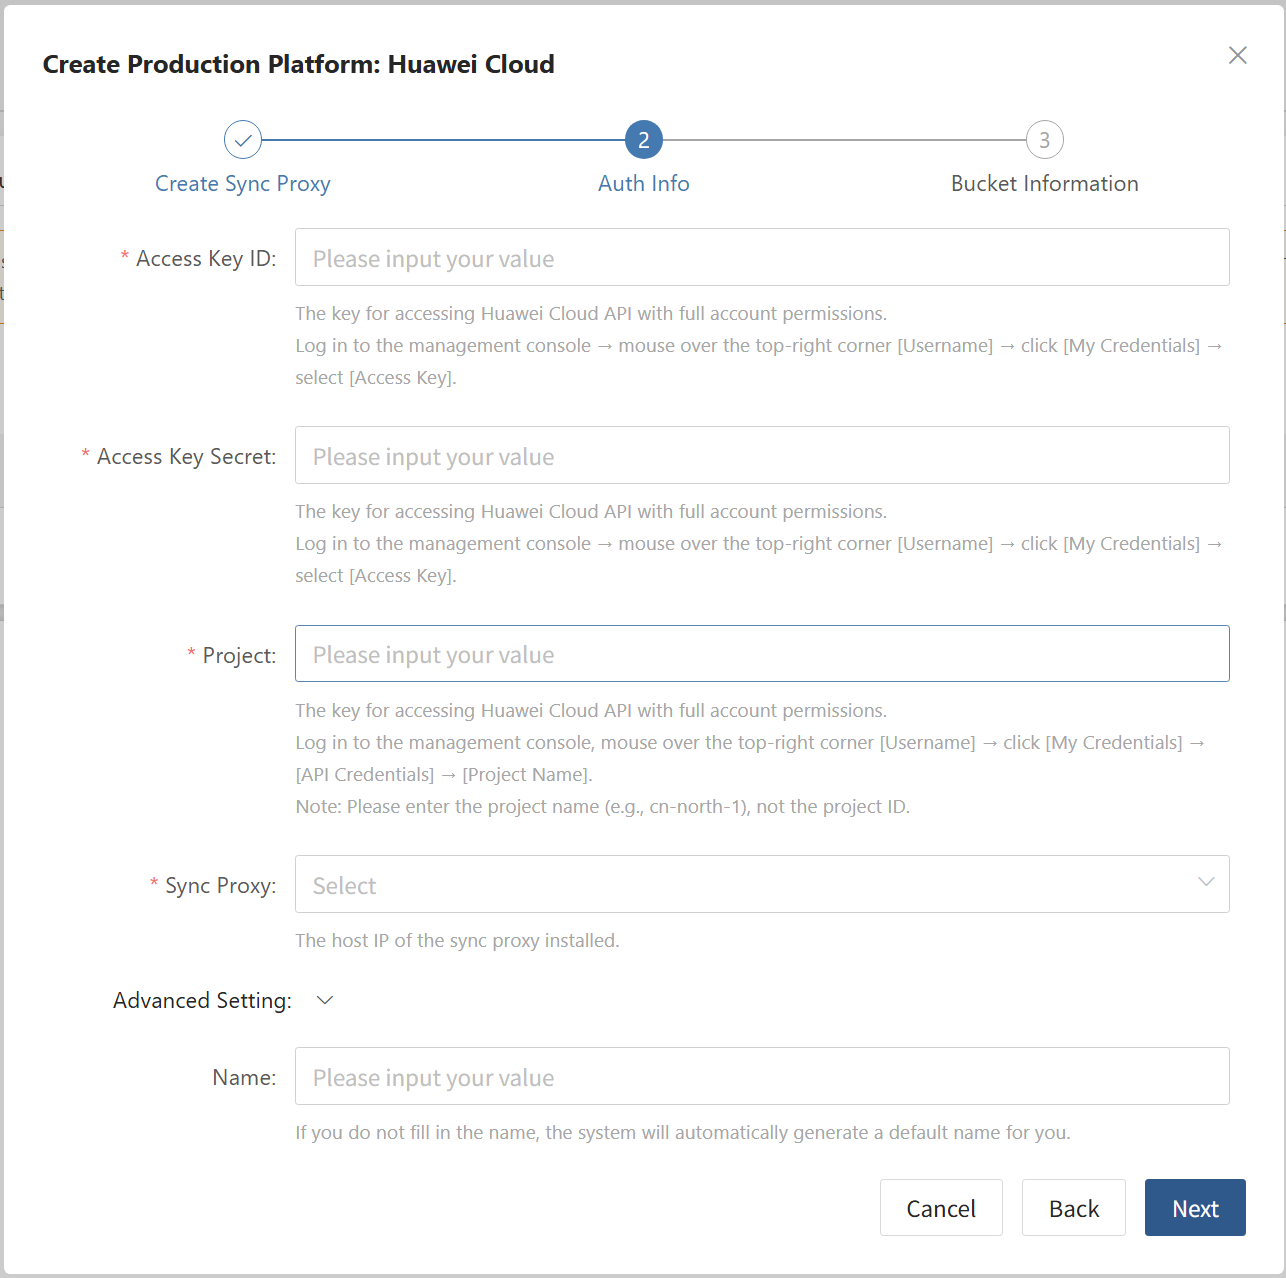
- Bucket Information Configuration
Tips
Buckets can be created or specified.
| Parameter | Example | Description |
|---|---|---|
| Bucket Name | sync-proxy-temp-data-bucket-mhm | This bucket temporarily caches disk data from Huawei Cloud hosts. Billing follows the same standard as Huawei Cloud Object Storage Service (OBS). The cache size equals the real disk data synchronized from Huawei Cloud hosts each time. |
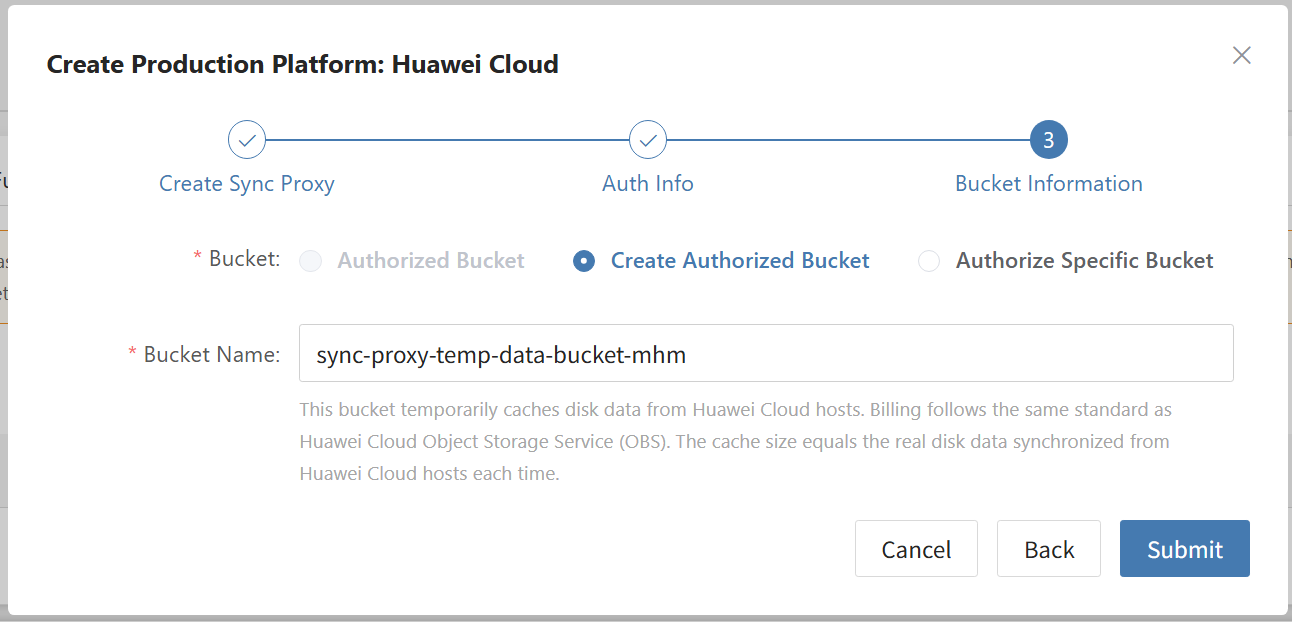
Complete Huawei Cloud Addition
Once the Huawei Cloud production platform configuration is complete, wait for the platform status to become "Normal", and for the ECS instance list to be successfully fetched. After that, you may proceed with additional steps.
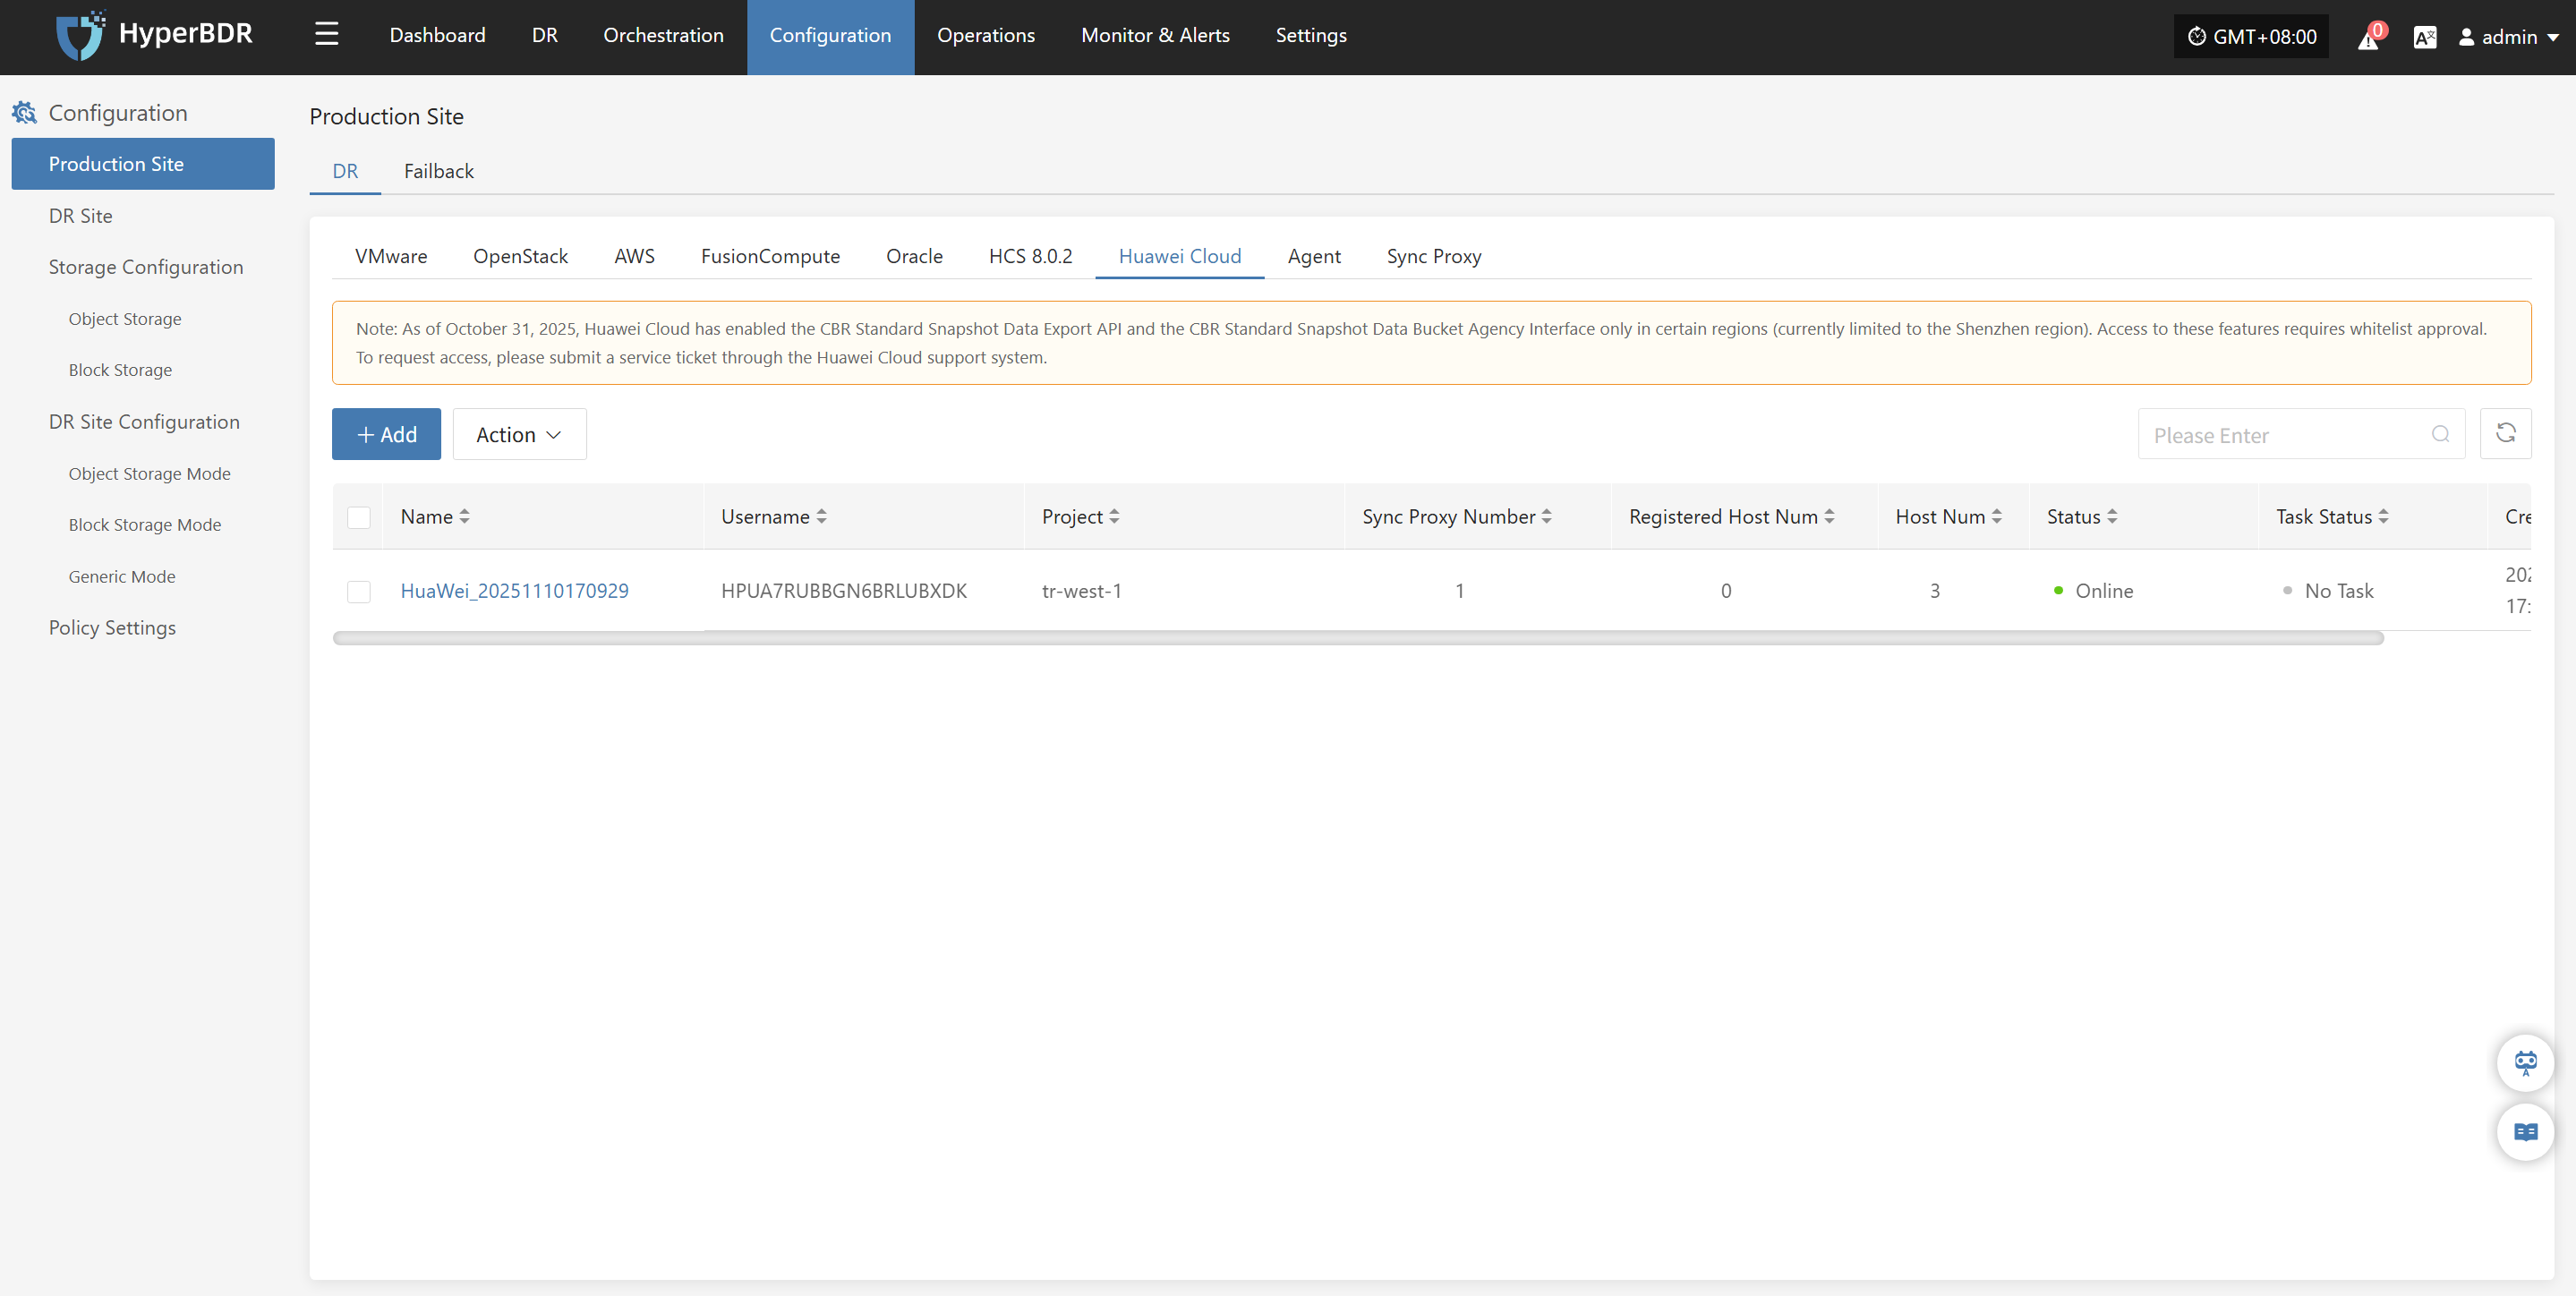
Source Agent
When the source (protected) end is a physical machine or a single virtual machine of various types (such as KVM/Xen/Hyper-V, etc.), relevant configuration is required.
In this scenario, the Agent disaster recovery method needs to be used.
Different operating systems (Windows, Linux) require different Agent.
Agent operating system support matrix: https://oneprocloud.feishu.cn/sheets/VRqksSPEPhRTPStp3kVcItXNnyh?sheet=Y9fpqO
Prerequisites
- There is a host to be protected (x86 physical machine/KVM/Xen/Hyper-V, etc.)
- Host username/password has been obtained (for backup)
- HyperBDR disaster recovery tool has been installed and logged in
- Network policies have been configured to allow the source host to access HyperBDR and Cloud Sync Gateway
- For Windows hosts running security software, please add the Windows Agent program to the whitelist or stop the security software in advance
Network policy requirements
| Source | Target | Port | Description |
|---|---|---|---|
| Windows/Linux Host | HyperBDR Console | 10443 | Authentication communication port |
| Windows/Linux Host | HyperBDR Console | 30080 | Installation package download port |
| Windows/Linux Host | Cloud Sync Gateway | 13260 | Data sync port |
| Windows/Linux Host | Cloud Sync Gateway | 443 | Data sync port (HTTPS protocol) + For block storage HTTPS protocol |
| Windows/Linux Host | Object Storage Services | 443 | Data sync port (object storage HTTPS/HTTP protocol) + For object storage mode Note: If the target object storage uses a domain name during data sync, you need to add DNS or static hosts resolution in advance |
Linux Agent
Install Linux Agent
Click "Configuration Management" in the top menu bar, then click "Production Site" in the left navigation bar, select "Source Agent", and click "Copy Command" to get the Linux Agent installation command.

Log in to the source Linux Host, paste and execute the command in the terminal.
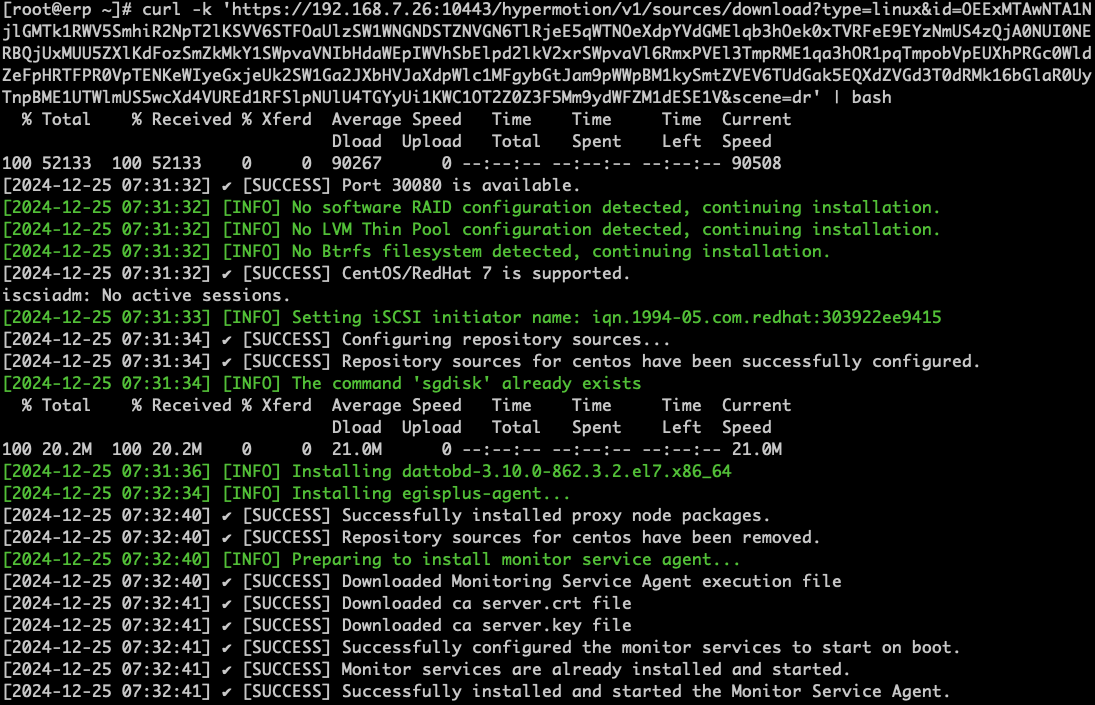
Wait for the command to finish executing. When the installation is successful, you can check the registered host on the platform.
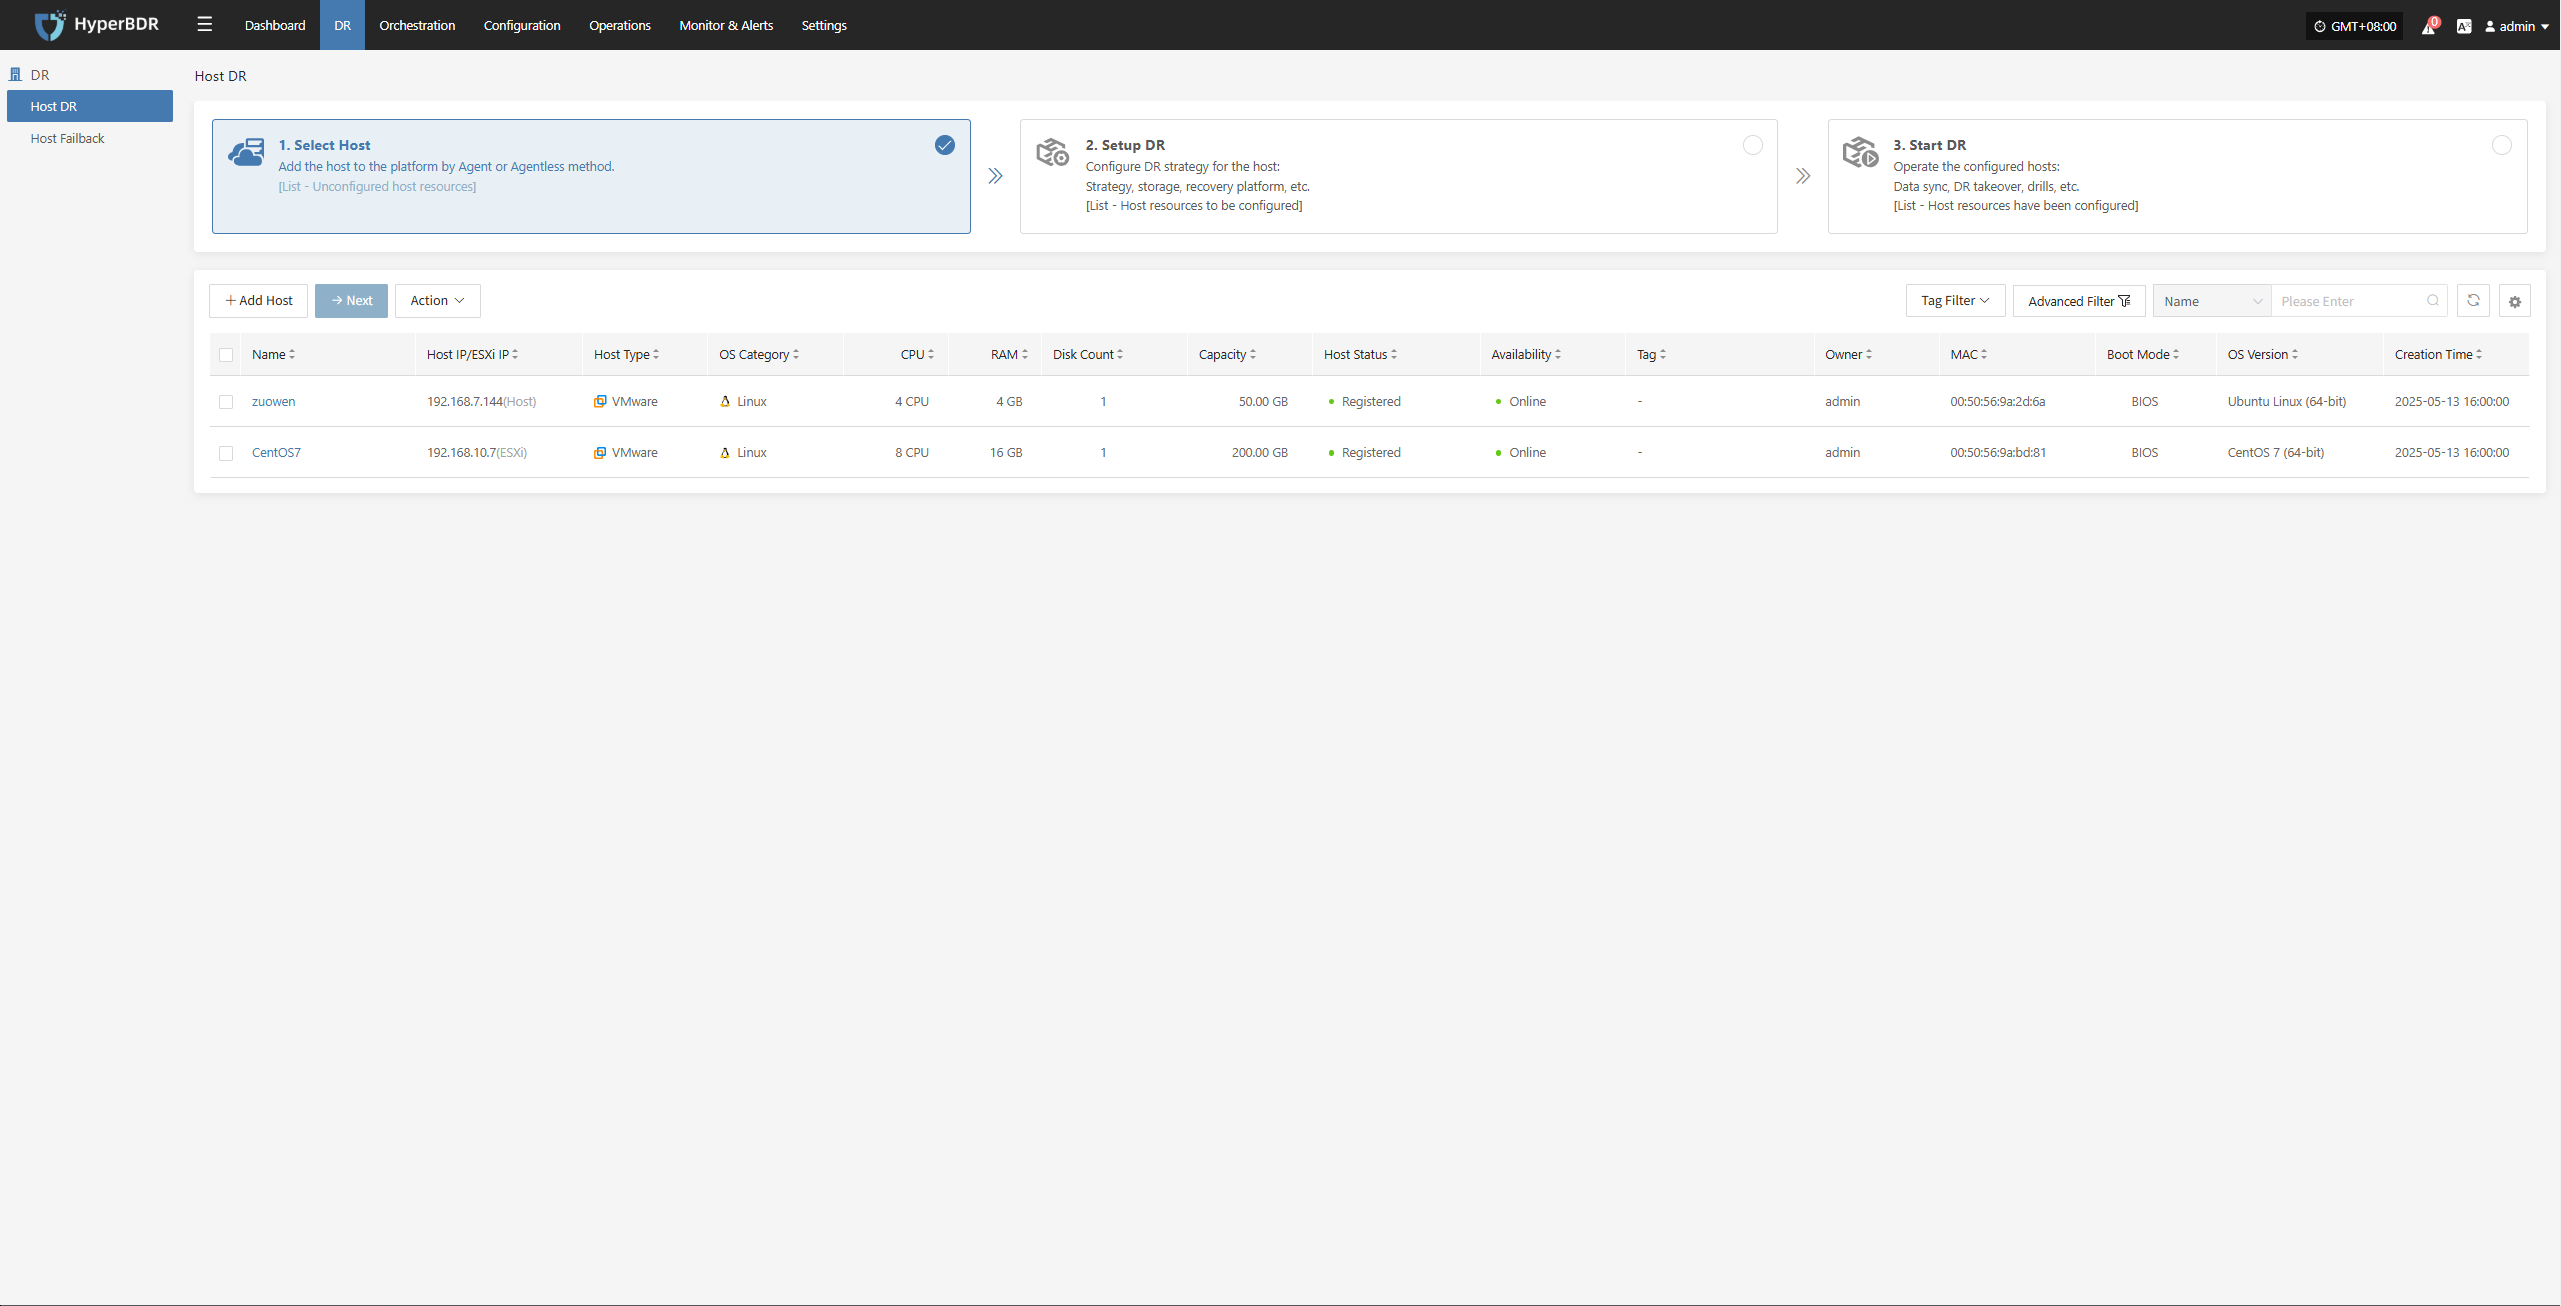
Uninstall Linux Agent
Before uninstalling the Agent, make sure that the Linux host has been deregistered from the HyperBDR platform.
Log in to the source Linux operating system
Execute the uninstall command
bash /var/lib/egisplus-agent/uninstall_agent.shWait for the script to finish executing. If "Uninstall successful" is displayed, it means the Linux Agent has been successfully uninstalled from the source host.
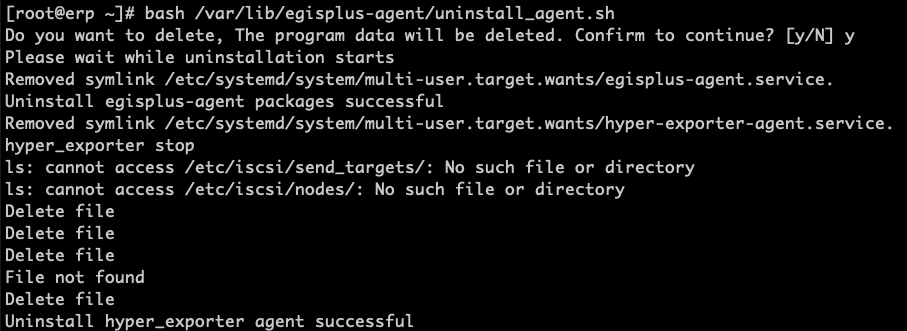
Windows Agent
Install Windows Agent
Click "Configuration Management" in the top menu bar, then click "Production Site" in the left navigation bar, click "Source Agent", and download the Windows Agent installation package according to the source operating system version by clicking the "Download Now" button.
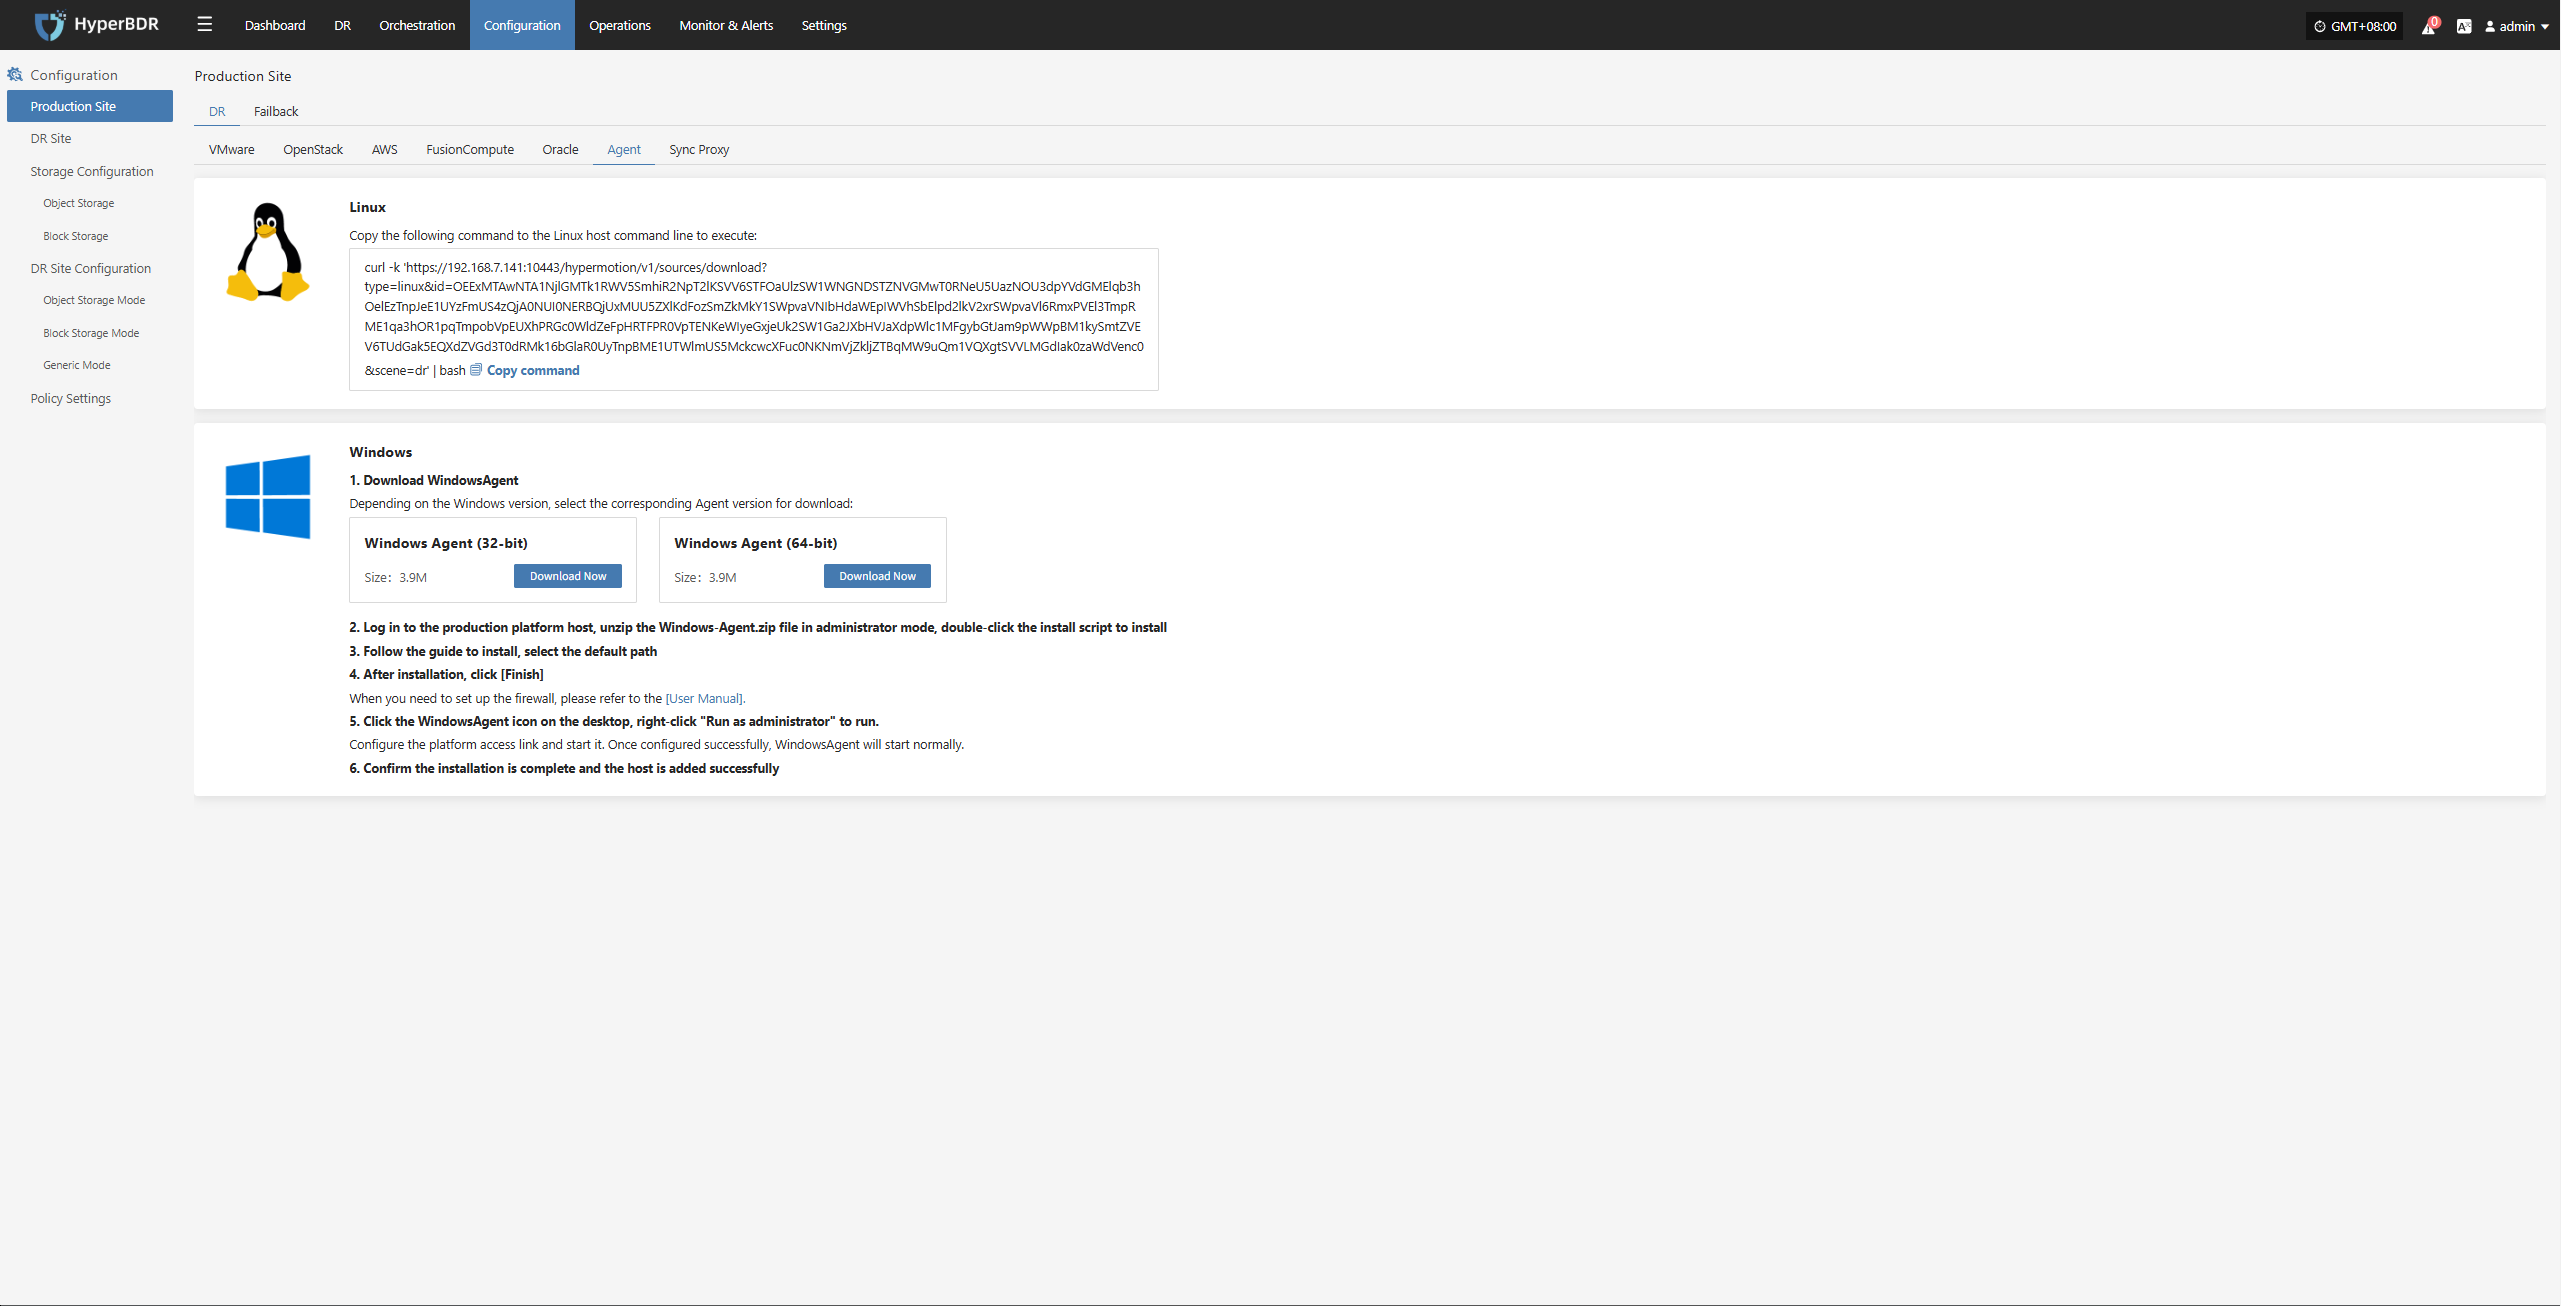
Log in to the source Windows host
Upload the downloaded Windows Agent installation package
Windows Agent installation package: windows-agent.zip
- Extract the Windows Agent installer
Extract the windows-agent.zip file as administrator
- Extract the directory files
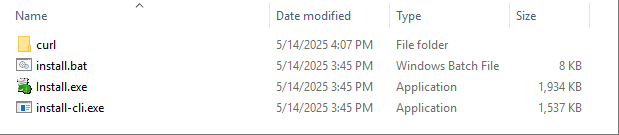
- Run the installer
Run install.exe in the extracted directory as administrator
Right-click the Install.exe program and select "Run as administrator"
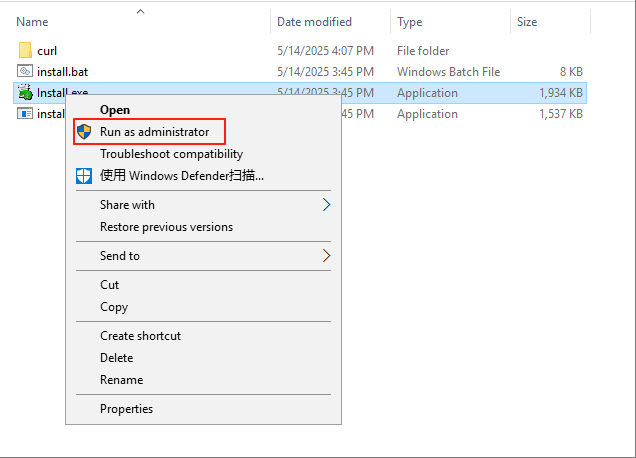
In the pop-up installer window, select "Install >" to start the installation.
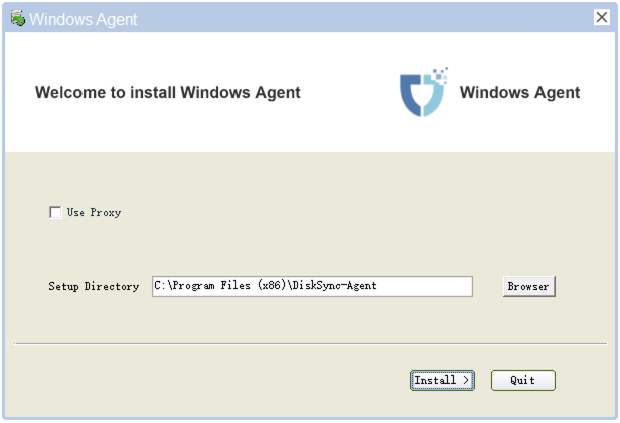
In the pop-up prompt, make sure there is no security software running before installation. If security software is running, it may block the installation and operation of the Windows Agent program, or even identify it as a virus or illegal software and delete it, causing installation failure.
If you have security software running, please add the Windows Agent program to the whitelist before running the installer again.
Due to the diversity of security software, please consult the relevant security vendor or your organization's security administrator for specific whitelist configuration methods.
For reference on adding to the whitelist for some security software: https://docs.oneprocloud.com/userguide/faq/faq.html#configuration-of-antivirus-software-on-windows-agent-source-host
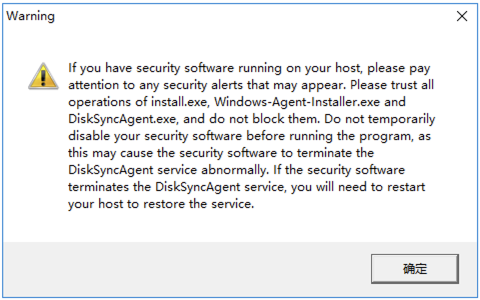
If you have completed the above security settings, click OK to continue the installation.

Wait for the installer to finish. When prompted that the installation is complete, you can click "Yes" to start the Windows Agent service.

Start Windows Agent
On the Windows Agent service startup page, first click "Precheck" in the lower left corner to perform a pre-check before starting the service.
The pre-check mainly verifies the Windows Agent runtime environment and internal dependencies of the host system. After all pre-checks pass, you can proceed to start the Windows Agent.
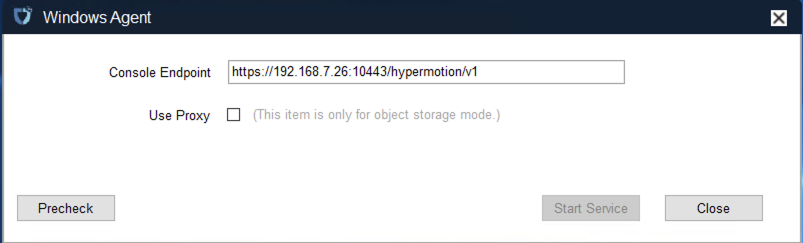
- Precheck item description
| Check Item | Check Description | Explanation | Failure Solution |
|---|---|---|---|
| (1/9) | Check whether there is permission to start Windows services and query the status of Windows services. | Check if there is permission to start Windows services and query their status. | |
| (2/9) | Check whether the display language under the system user can support English. | Check if the display language under the system user supports English. | |
| (3/9) | Check whether there is any security software blocking the creation and deletion of VSS shadows using the vssadmin command. | Check if any security software blocks creation and deletion of VSS shadows via the vssadmin command. | |
| (4/9) | Check whether there is any security software blocking the installation and startup of Windows Agent. | Check if any security software blocks installation and startup of the Windows Agent. | |
| (5/9) | Check whether the volume file system and volume free space meet the synchronization requirements. | Check if the volume file system and free space meet synchronization requirements. | |
| (6/9) | Check whether there are unsupported volume types. (RAID-5, Mirror, Stripe, and Spanned volume types are not supported) | Check if unsupported volume types exist (RAID-5, Mirror, Stripe, and Spanned volumes are not supported). | |
| (7/9) | Check whether the patch KB4474419 has been installed. (This patch must be installed if the operating system is Windows 2008 or Windows 2008 R2) | Check if patch KB4474419 is installed (required for Windows 2008 or 2008 R2). | |
| (8/9) | Check whether there are VSS shadows created by third-party software on the current host. (It is recommended to delete the created VSS snapshots and stop other software from using VSS to create and delete VSS shadows) | Check if VSS shadows created by third-party software exist. It is recommended to delete these snapshots and prevent other software from creating/deleting VSS shadows. | |
| (9/9) | Check whether there are Windows backup schedules. (The execution time of such schedules may lead to synchronization failure. It is recommended to disable them.) | Check if Windows backup schedules exist. These schedules may cause sync failure; disabling them is recommended. |
According to the results of the precheck, handle any issues as prompted. Once all checks have passed, you can click "OK".
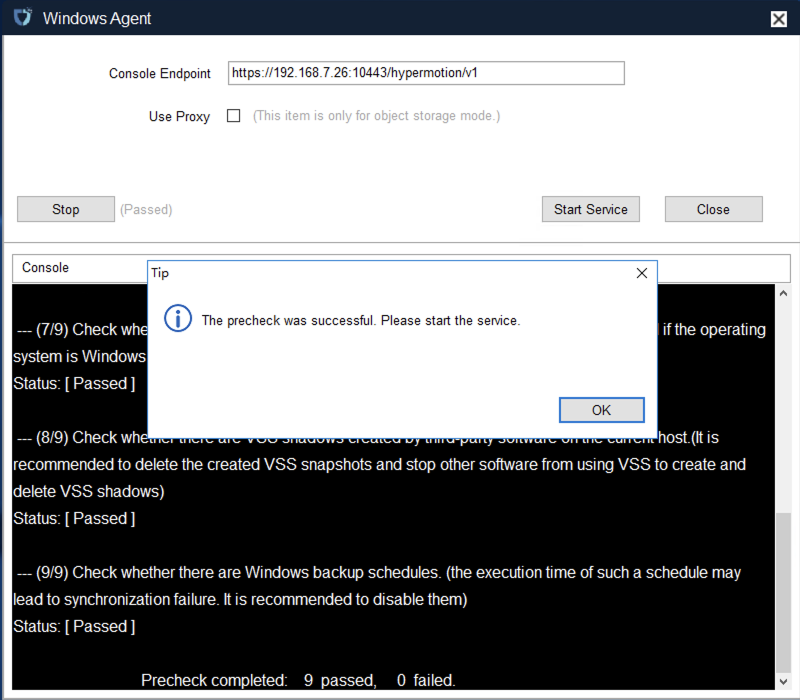
At this point, you can click the "Start Services" button to start the Windows Agent service.
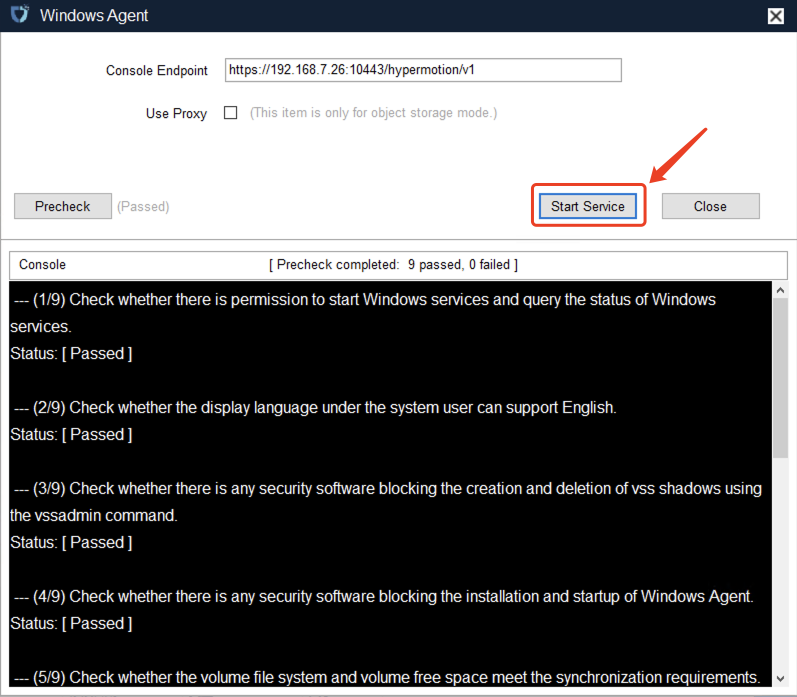
Based on the warning messages, check again for any running security software. You must trust the Windows Agent program to avoid startup failures or data synchronization failures.
If everything is confirmed to be normal, you can click "OK" to complete the startup of the Windows Agent service.
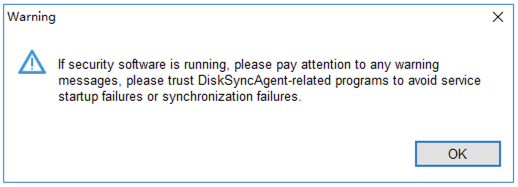
If there are no other prompts, the Windows Agent has started successfully.
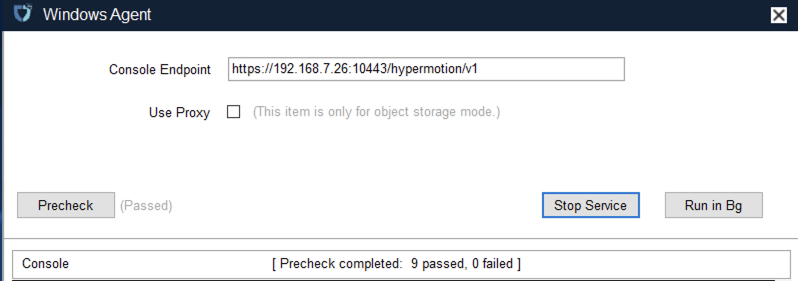
Log in to the HyperBDR console to check the registration status and proceed with subsequent steps.
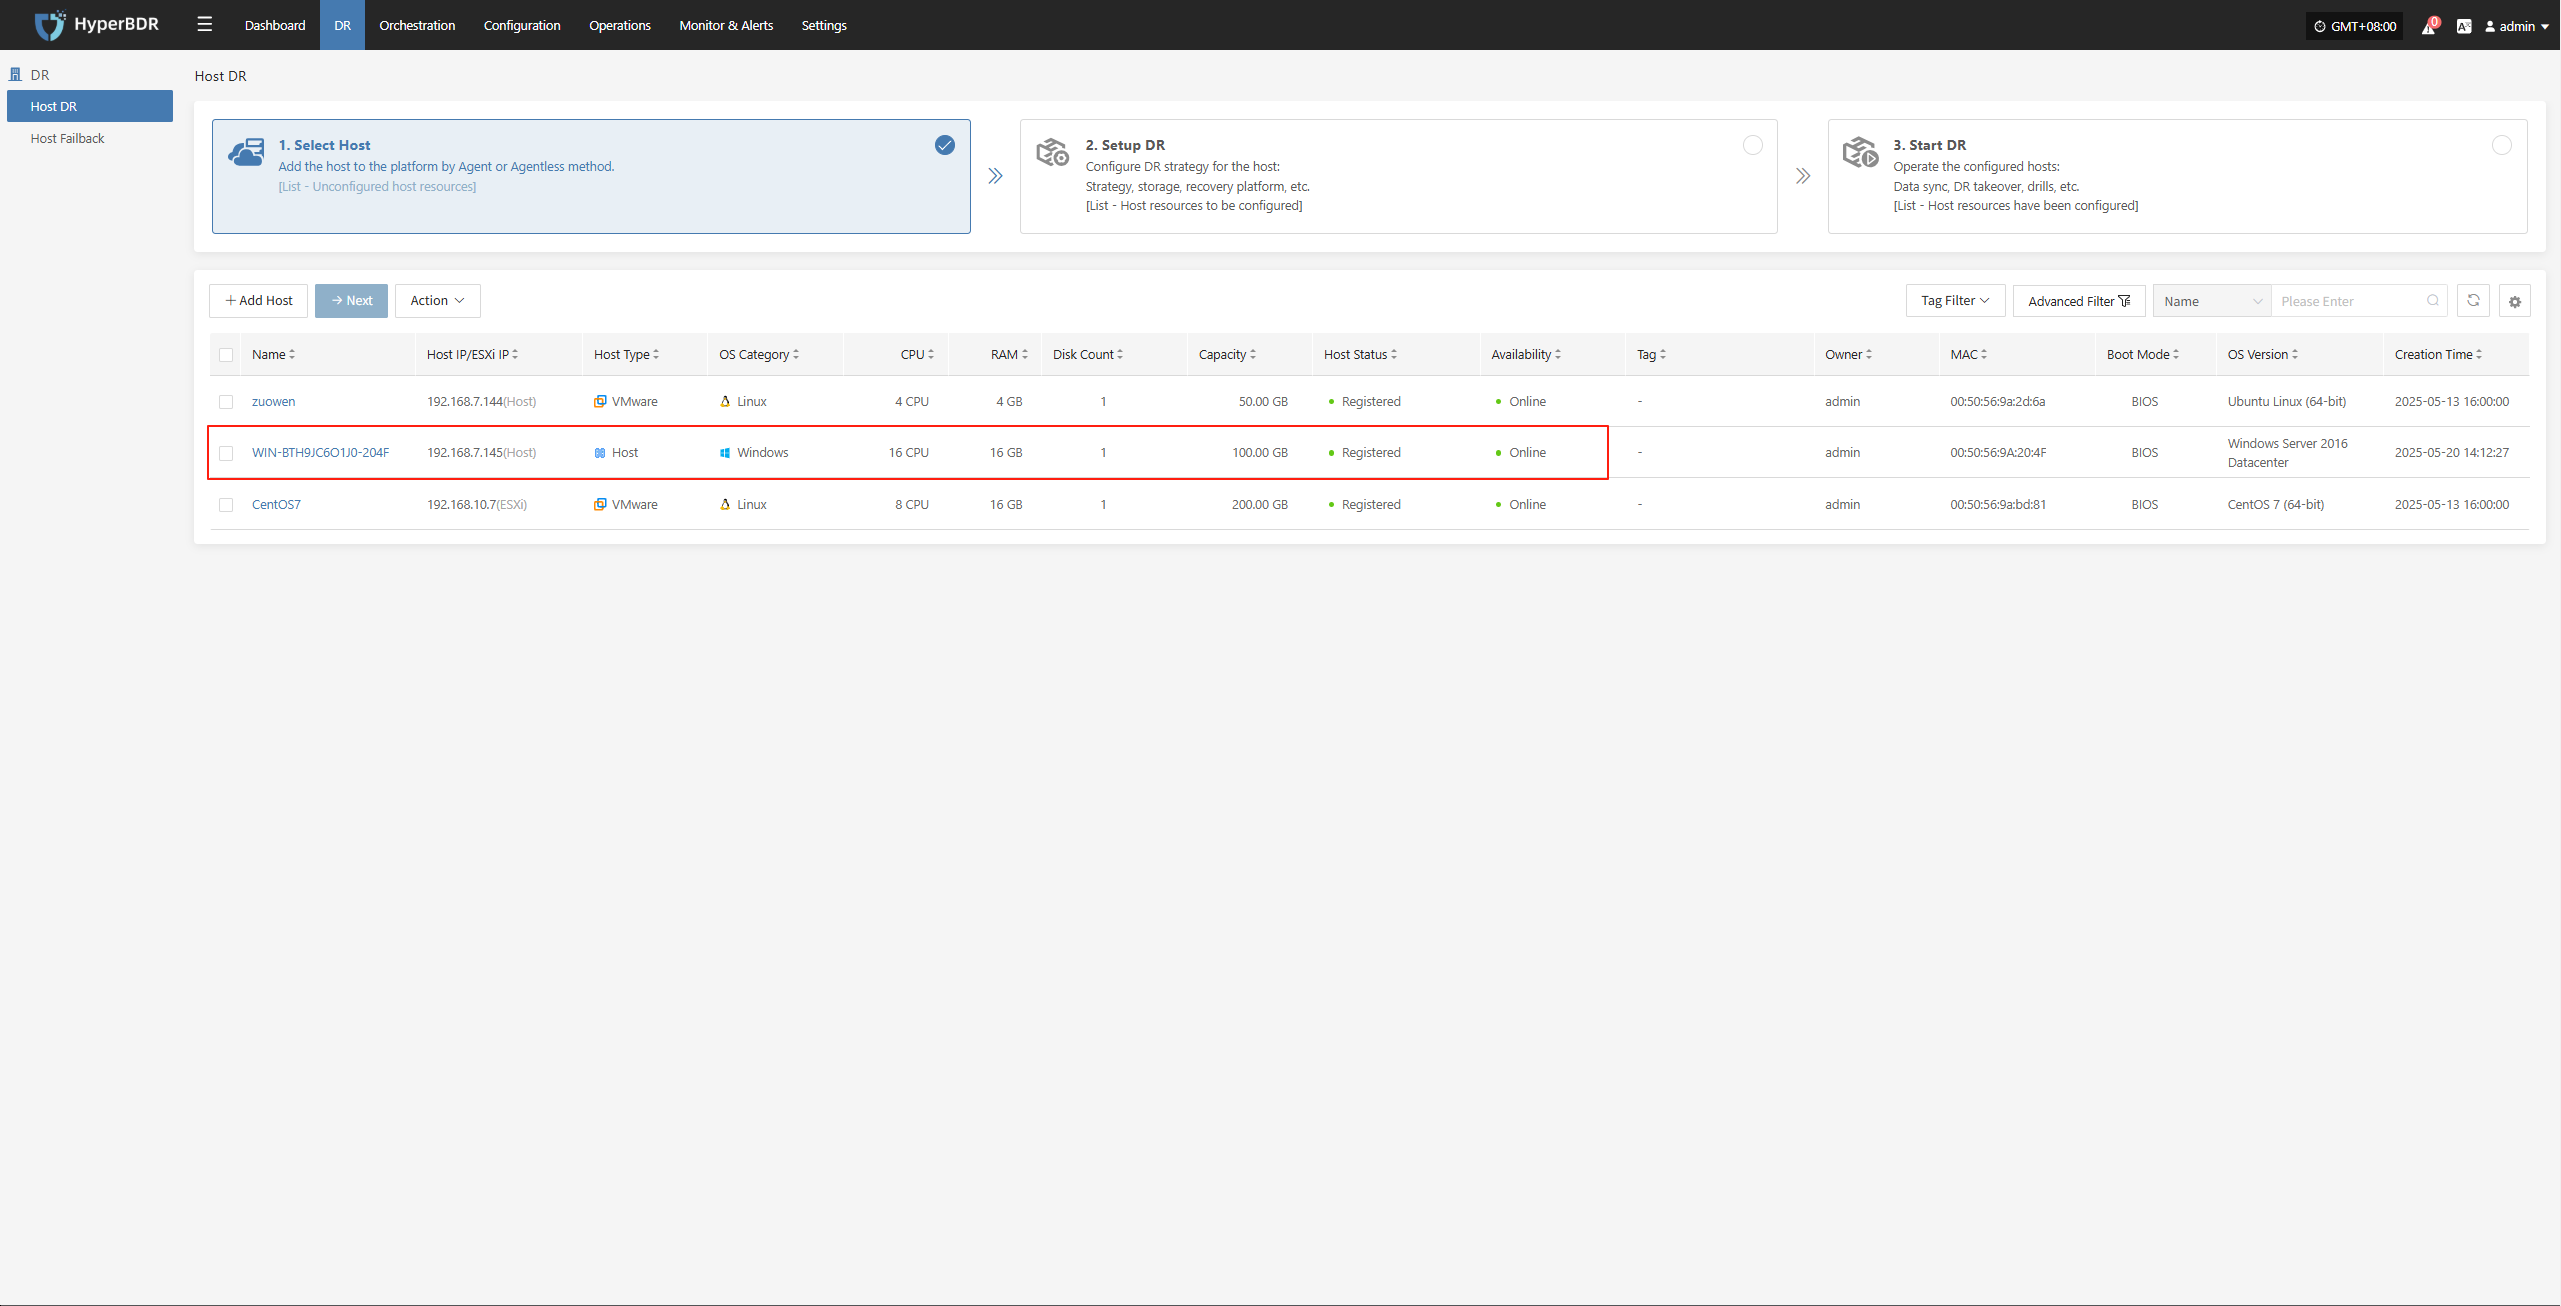
Uninstall Windows Agent
Since uninstalling the Windows Agent follows the standard Windows software uninstallation process, here we demonstrate the steps using one version as an example. For other Windows versions, refer to similar steps.
Click the Windows icon in the lower left corner and select "Control Panel".

In the pop-up page, find "Programs" and click "Uninstall a program".
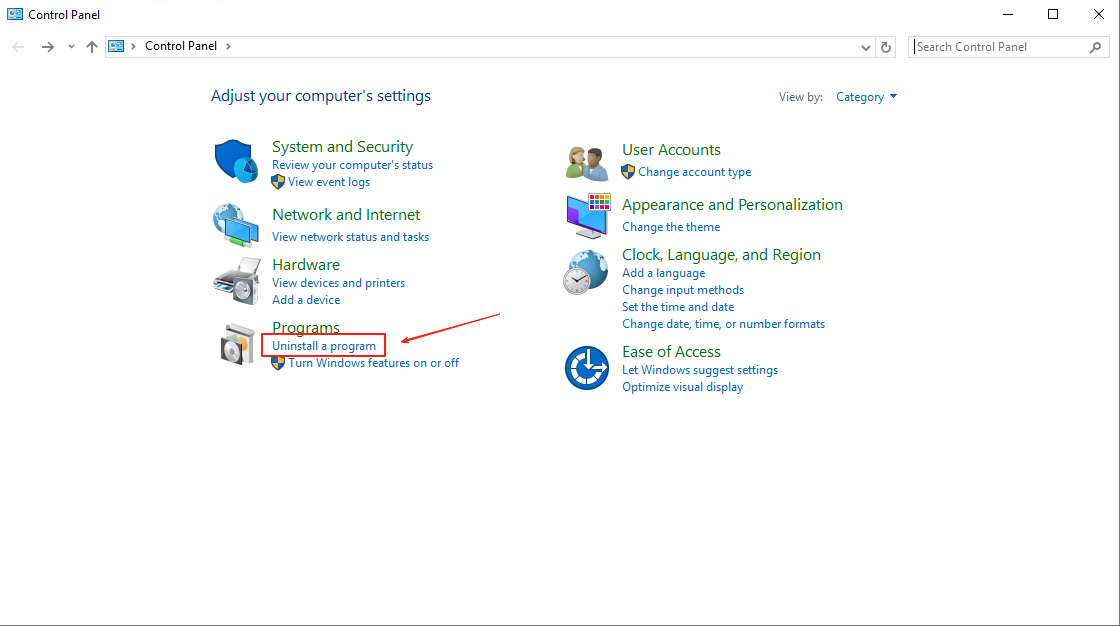
Find Windows_Agent version number, published by OneProCloud, right-click and select "Uninstall/Change (U)".

In the pop-up uninstall dialog, click "Yes" to confirm uninstallation.

Wait for the uninstaller to finish, then click OK to complete the uninstallation of the Windows Agent program.

Source Sync Proxy
Technical Principle Description
Mainly used in scenarios where the source production platform is VMware, OpenStack + Ceph, or AWS. The core function of this component is to deploy an agentless sync program, which performs data backup by calling the interfaces of the source production platform. The Source Sync Proxy is responsible for obtaining data from the source platform and efficiently transferring backup data to the target disaster recovery site over the local network.
It is recommended to deploy the Sync Proxy on the source production platform side, using the internal network for close-range interface calls to avoid security and reliability issues caused by long-distance network calls. During backup, the Sync Proxy acts as a proxy node for outbound backup data from the source.
Internal: The Sync Proxy only needs to access the management and storage networks of the source VMware, OpenStack + Ceph, or AWS platform to call interfaces and obtain data.
External: The Sync Proxy only needs to open network access to the target disaster recovery platform, avoiding direct exposure of the source production platform's network structure.
This architecture is flexible, secure, and reliable, and is suitable for various production platform scenarios.
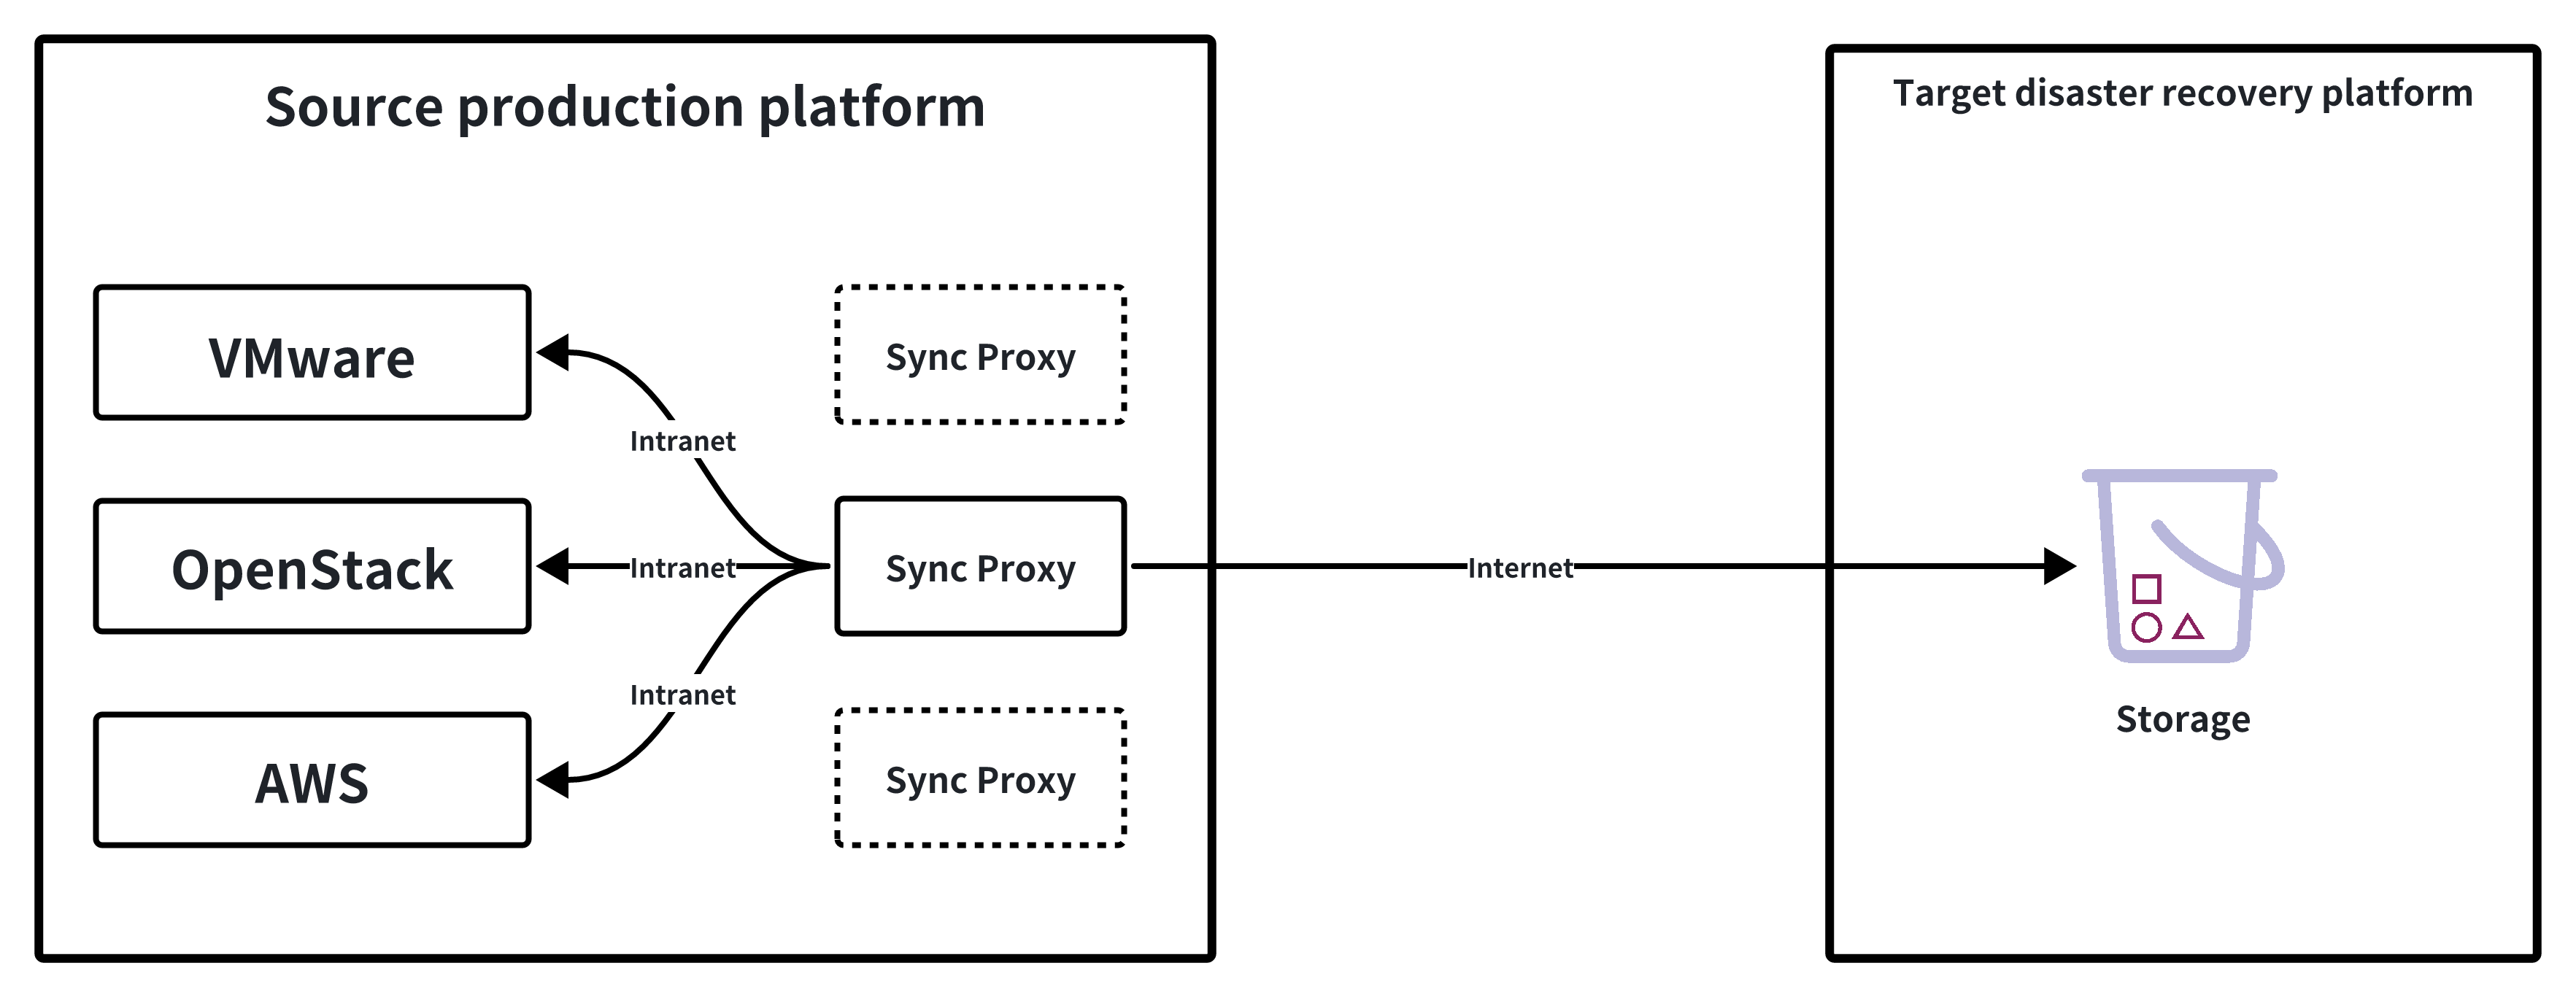
Multiple Sync Proxy nodes can be deployed. One Sync Proxy can be bound to one or more source production platforms, and multiple Sync Proxies can also be bound to a single source production platform.
When multiple Sync Proxies are bound to one source production platform, it means that multiple Sync Proxy nodes will be used to call the source production site for data backup. The backend will balance the load of the Sync Proxy nodes through internal algorithms to ensure concurrency during business backup.
The Source Sync Proxy is mainly used for management operations of agentless sync proxies on the source production side, including basic settings, binding, unbinding, and deletion.
Action
Settings
Select the Source Sync Proxy that has been added to the platform, click the "Actions" button, and select "Settings" to configure the relevant parameters of the Sync Proxy node.

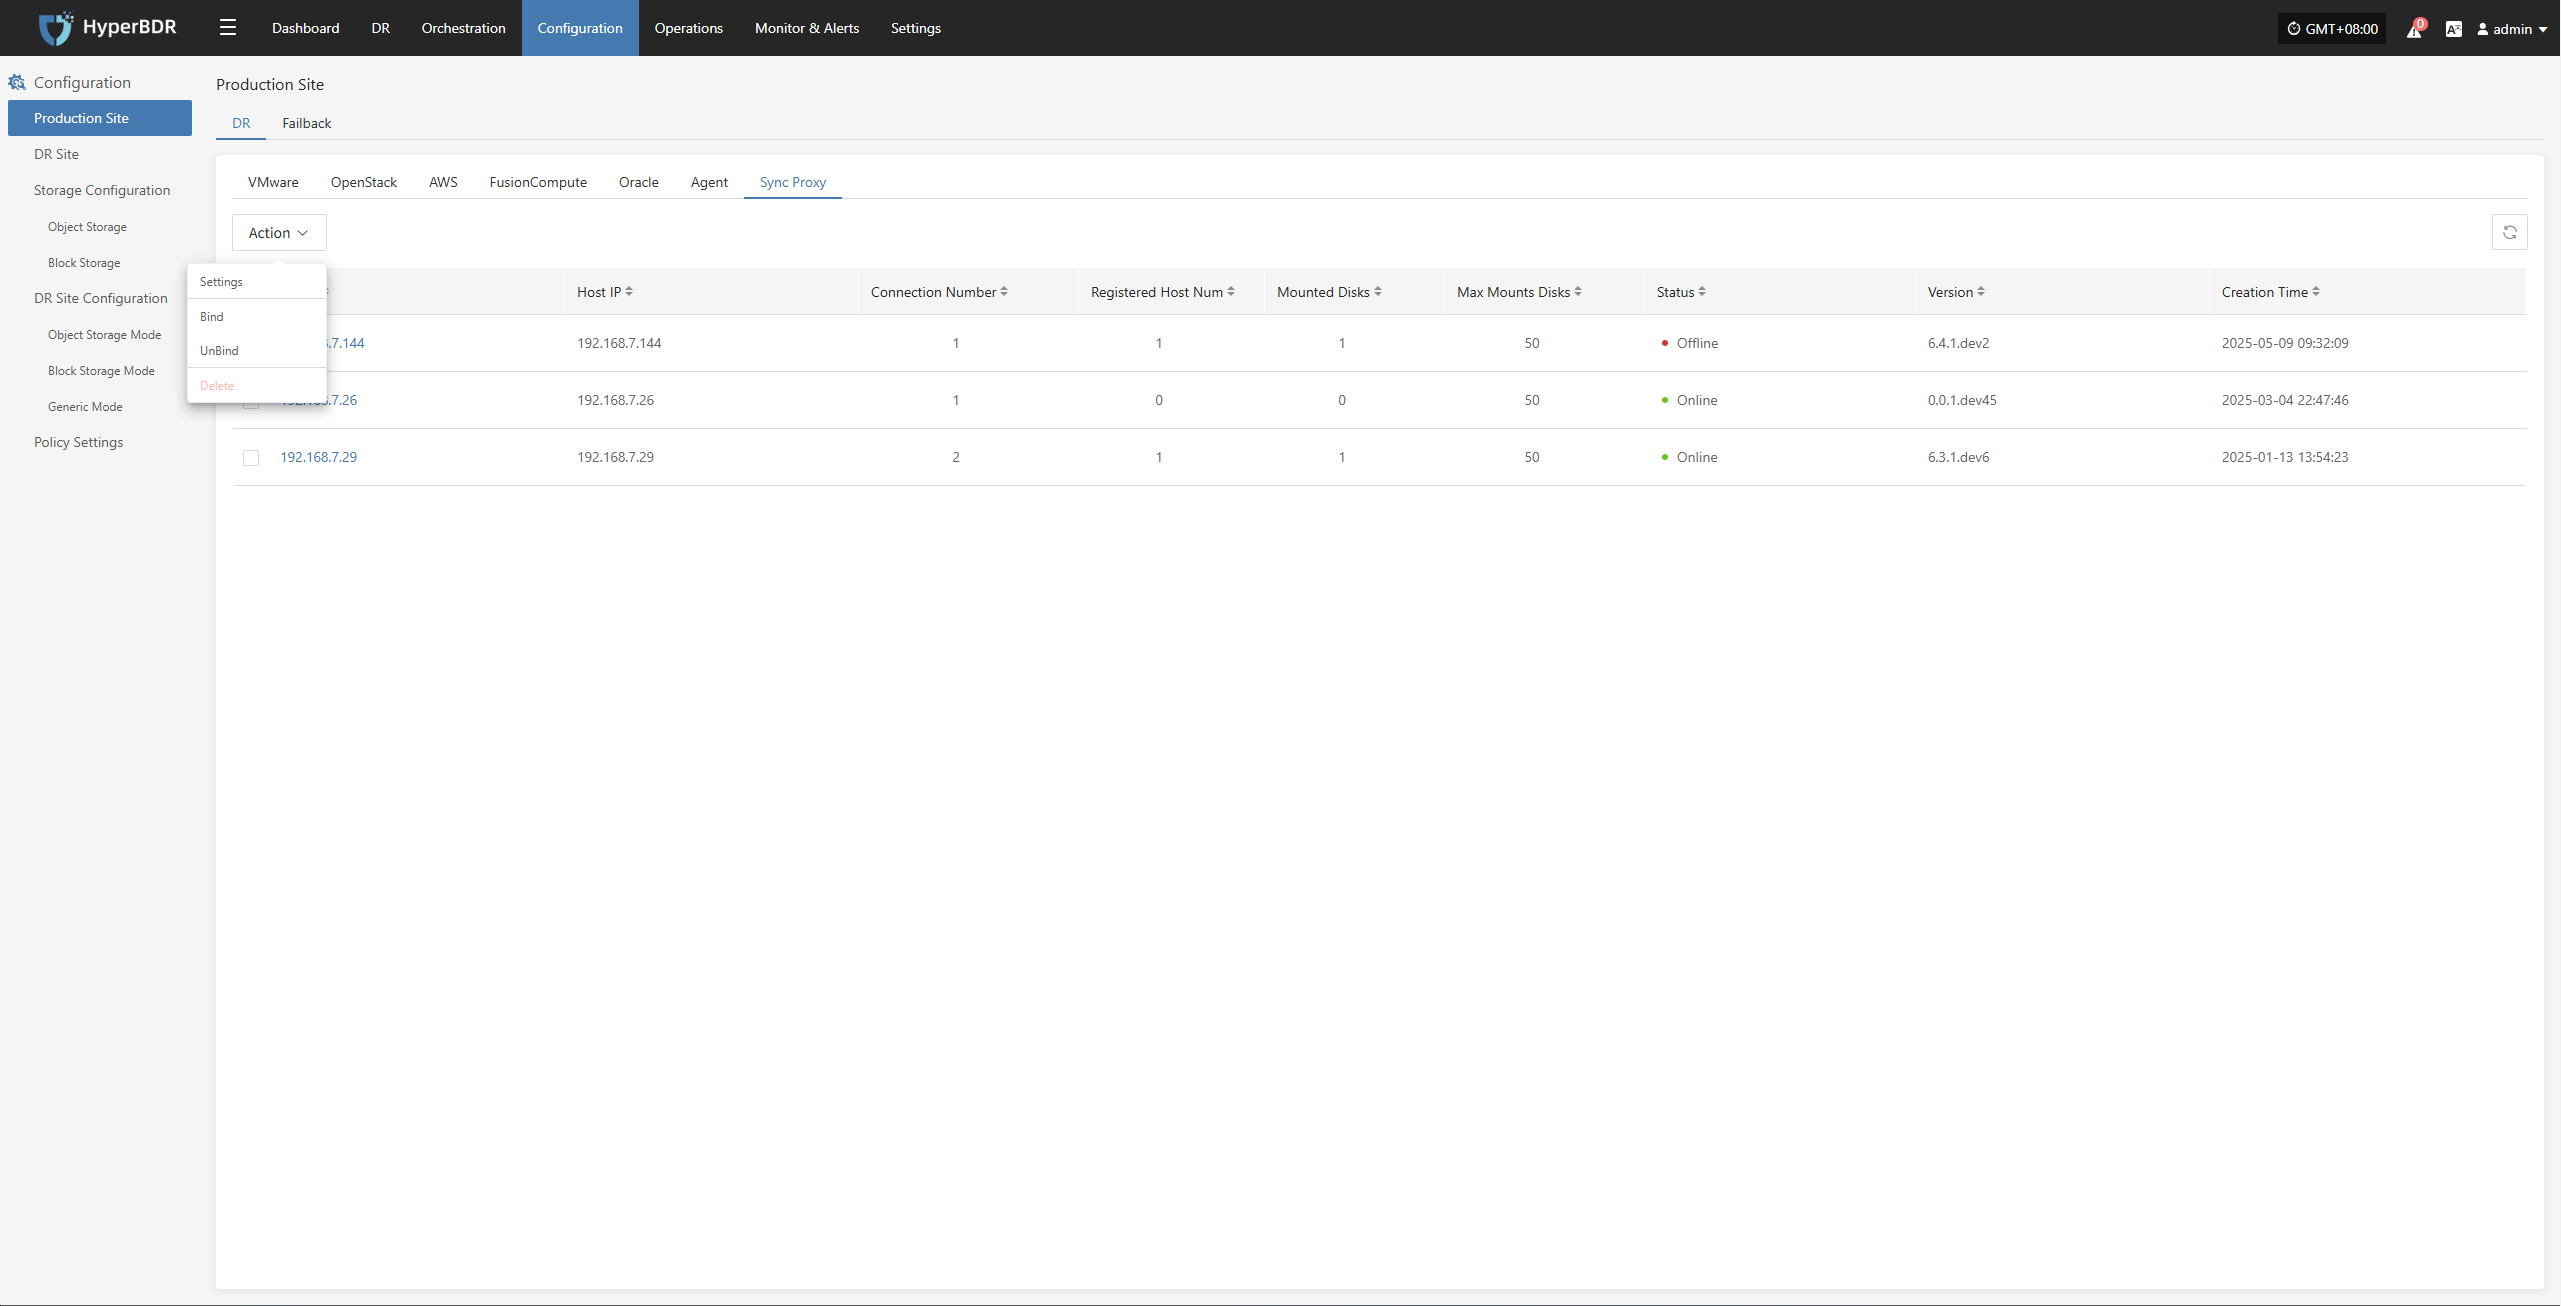
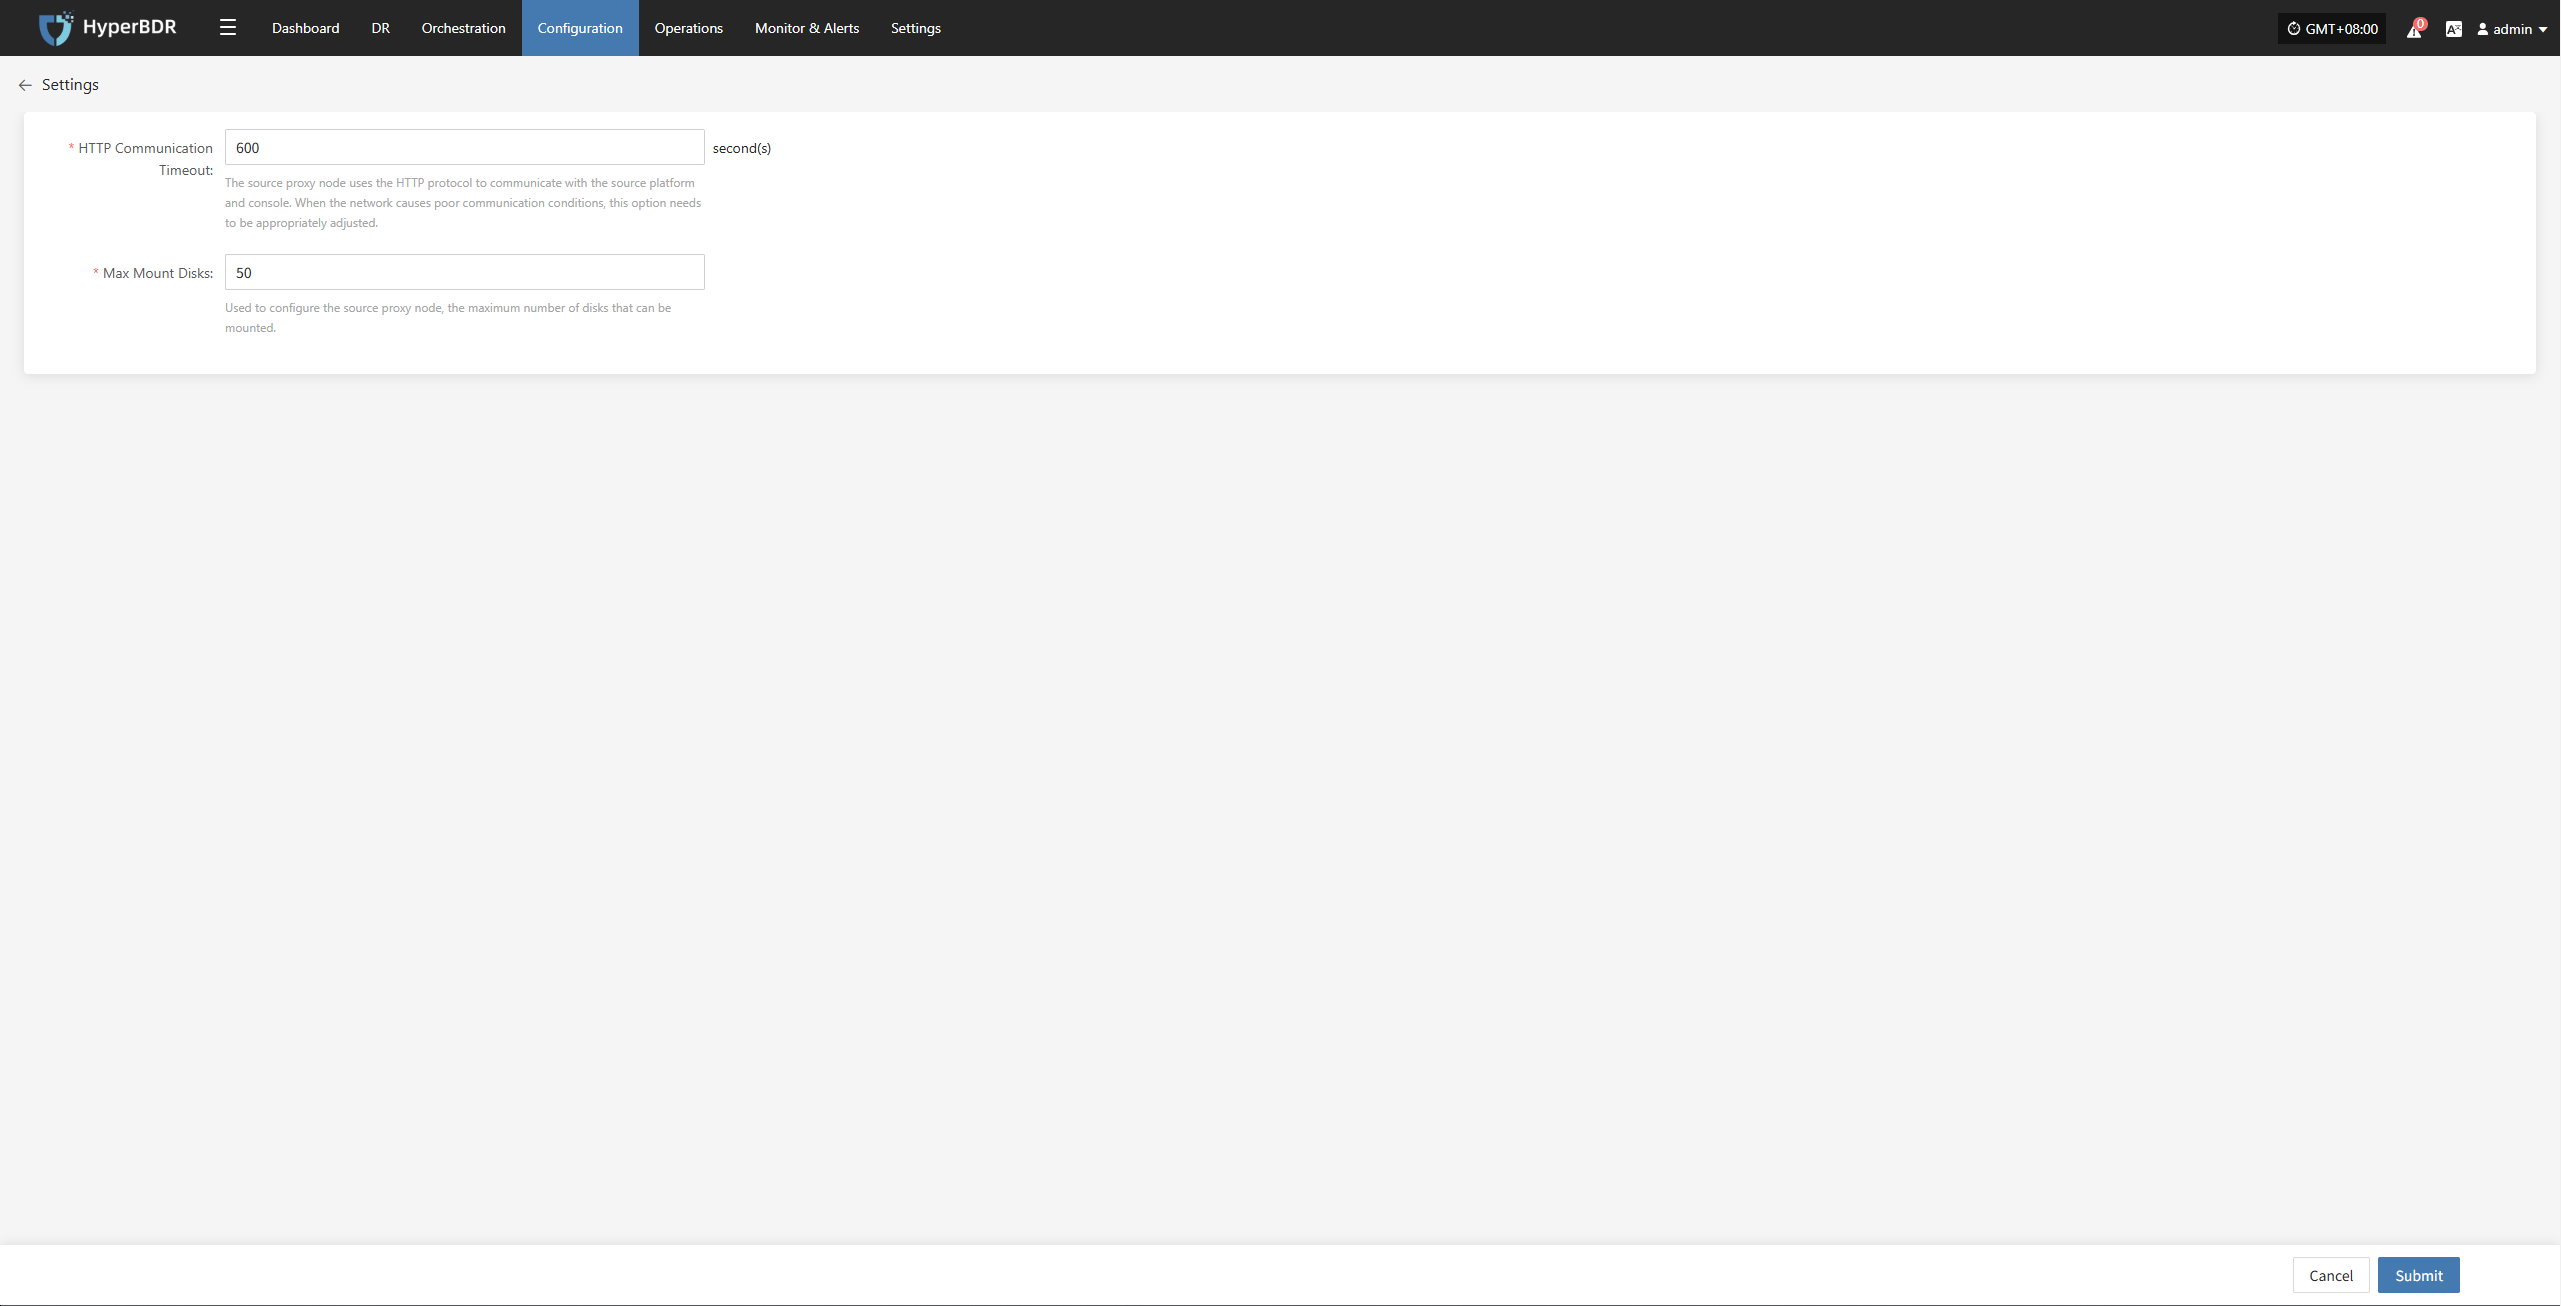
- Description of configuration parameters
| Parameter | Default | Description |
|---|---|---|
| HTTP Communication Timeout | 600 | This setting means: when the source proxy node communicates with the source production platform and console via HTTP, if there is no response for more than 600s, the program will interrupt the connection and mark it as failed. If the network environment is poor, you can increase this value to allow more retry time. |
| Maximum Number of Mounted Disks | 50 | This setting configures the maximum number of disks that can be mounted by the source proxy node. By default, a Sync Proxy can mount up to 50 cloud disks for data synchronization. If you need more, you should scale out the number of Sync Proxy nodes. You can also increase the CPU and memory of the Sync Proxy node and modify this parameter, but it is recommended not to exceed 150. |
Bind
Select the Source Sync Proxy that has been added to the platform, click the "Actions" button, and select "Bind". Choose an already added source production site to bind. After successful binding, this Sync Proxy will act as a node to call the bound source production site for data backup. 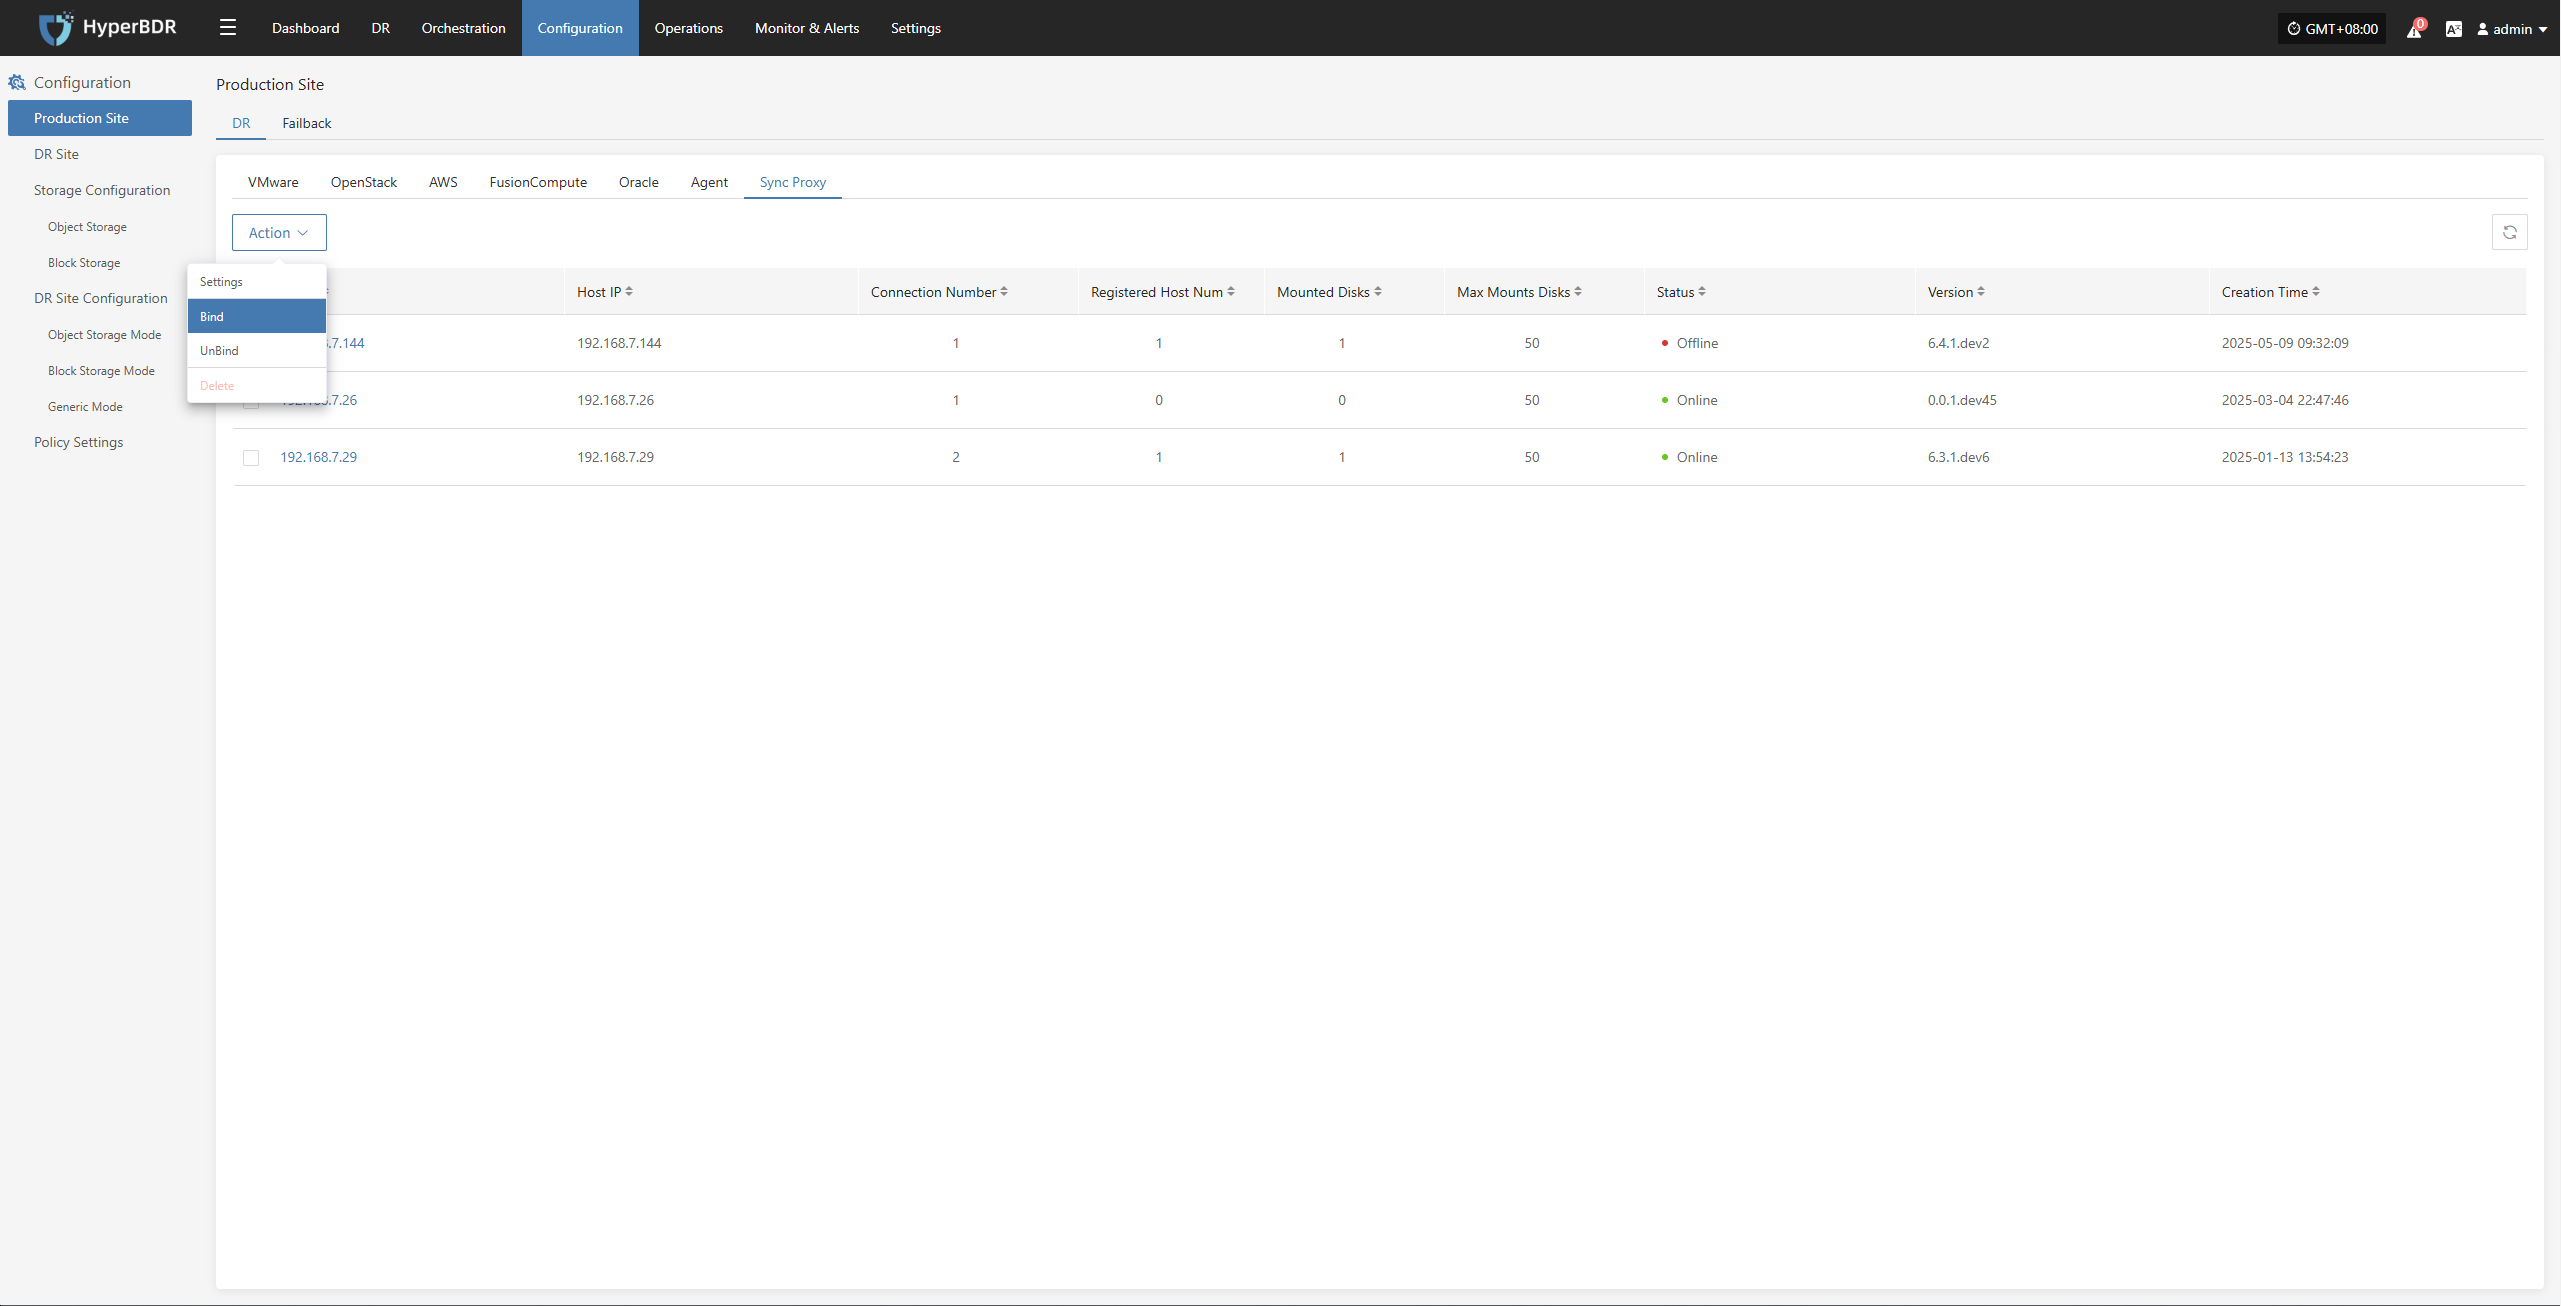

Note:
- One Sync Proxy node can be bound to one or more source production sites.
- Multiple Sync Proxy nodes can be bound to one source production site.
When multiple Sync Proxy nodes are bound to one source production site, it means that multiple Sync Proxy nodes will be used to call the source production site for data backup. The backend will balance the load of the Sync Proxy nodes through internal algorithms to ensure concurrency during business backup.
Attention:
Currently, multiple Sync Proxy nodes do not support failover. They only provide horizontal scaling for concurrent backup capability. If one Sync Proxy node fails, the backup tasks assigned to that node will fail and will not automatically transfer to other nodes. You need to manually recover from the failure.
Unbind
Select the Source Sync Proxy that has been added to the platform, click the "Actions" button, and select "Unbind". Choose a bound source production site to unbind, and click "OK". 
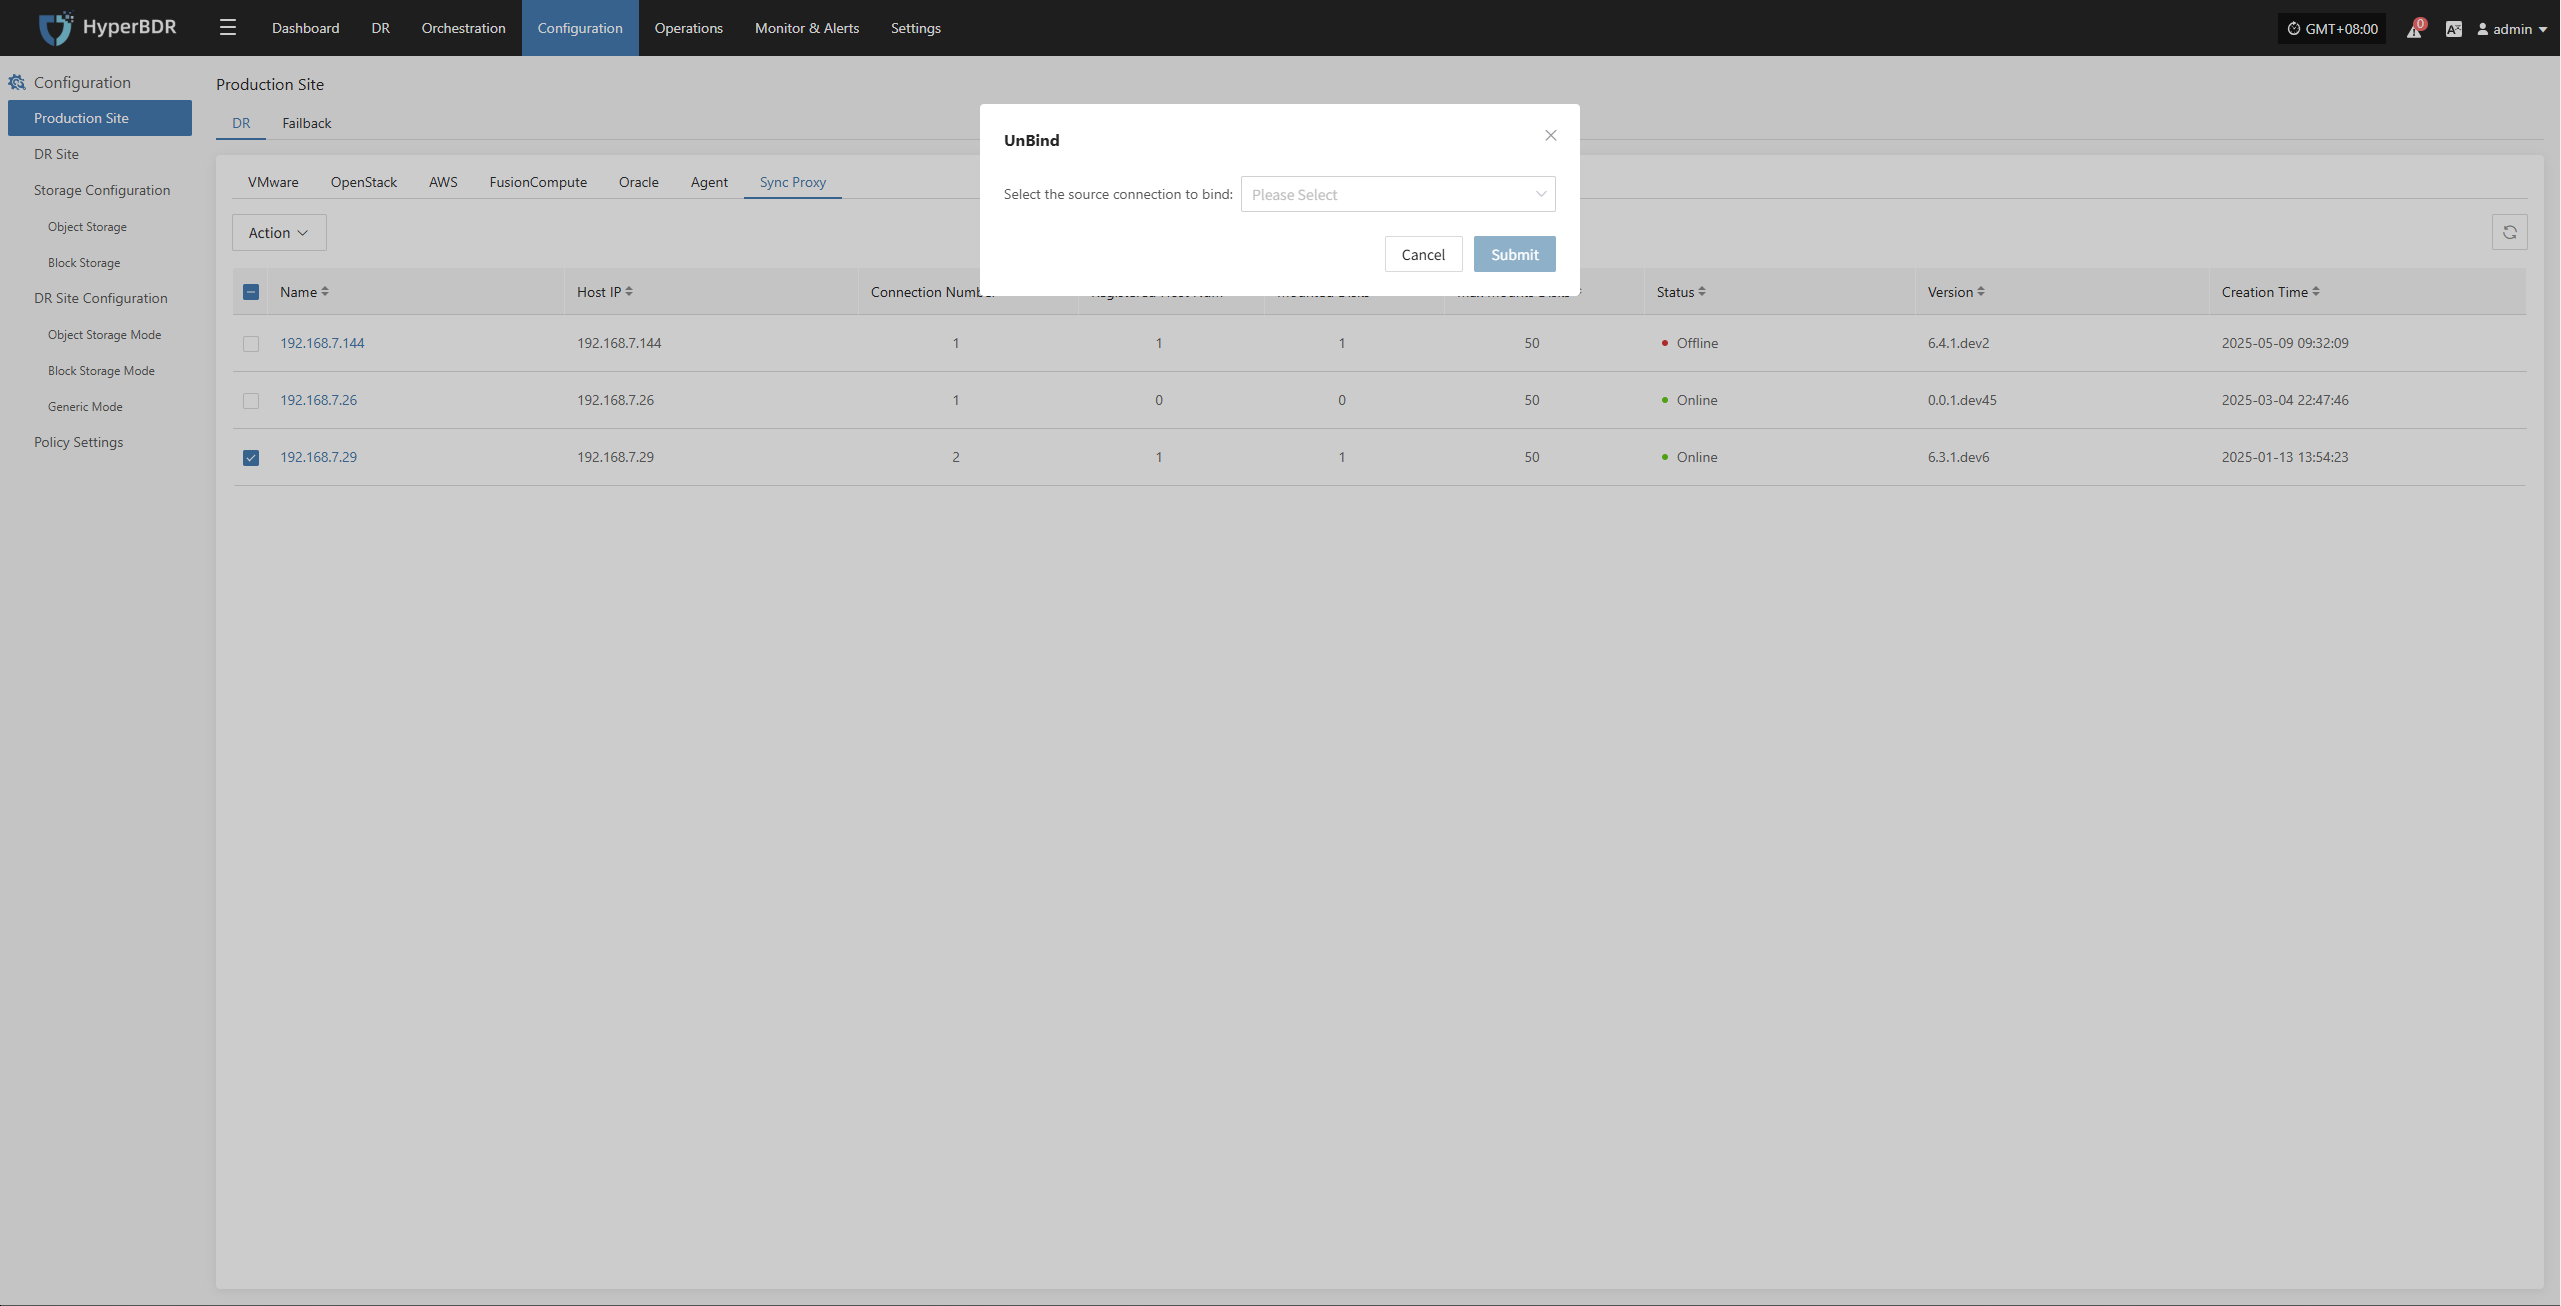
Note:
Before unbinding, make sure that there are no backup tasks bound to the current Sync Proxy node. Only then can you unbind. After successful unbinding, this Sync Proxy can be deleted or continue to be bound to other source production sites for service.
Delete
Select the Source Sync Proxy that has been added to the platform, click the "Actions" button, and select "Delete". Make sure that the current Sync Proxy node is not bound to any source production site. If there are bound source production sites, the delete button will be disabled. You need to "Unbind" first, and after successful unbinding, you can proceed with deletion.

Failback
When configuring the Failback Production Site, the overall configuration logic is consistent with the DR Production Site workflow. The meaning and operation of each parameter can be directly referenced in the DR Production Site section. Once the configuration is complete, you can proceed with the Host Failback operation.
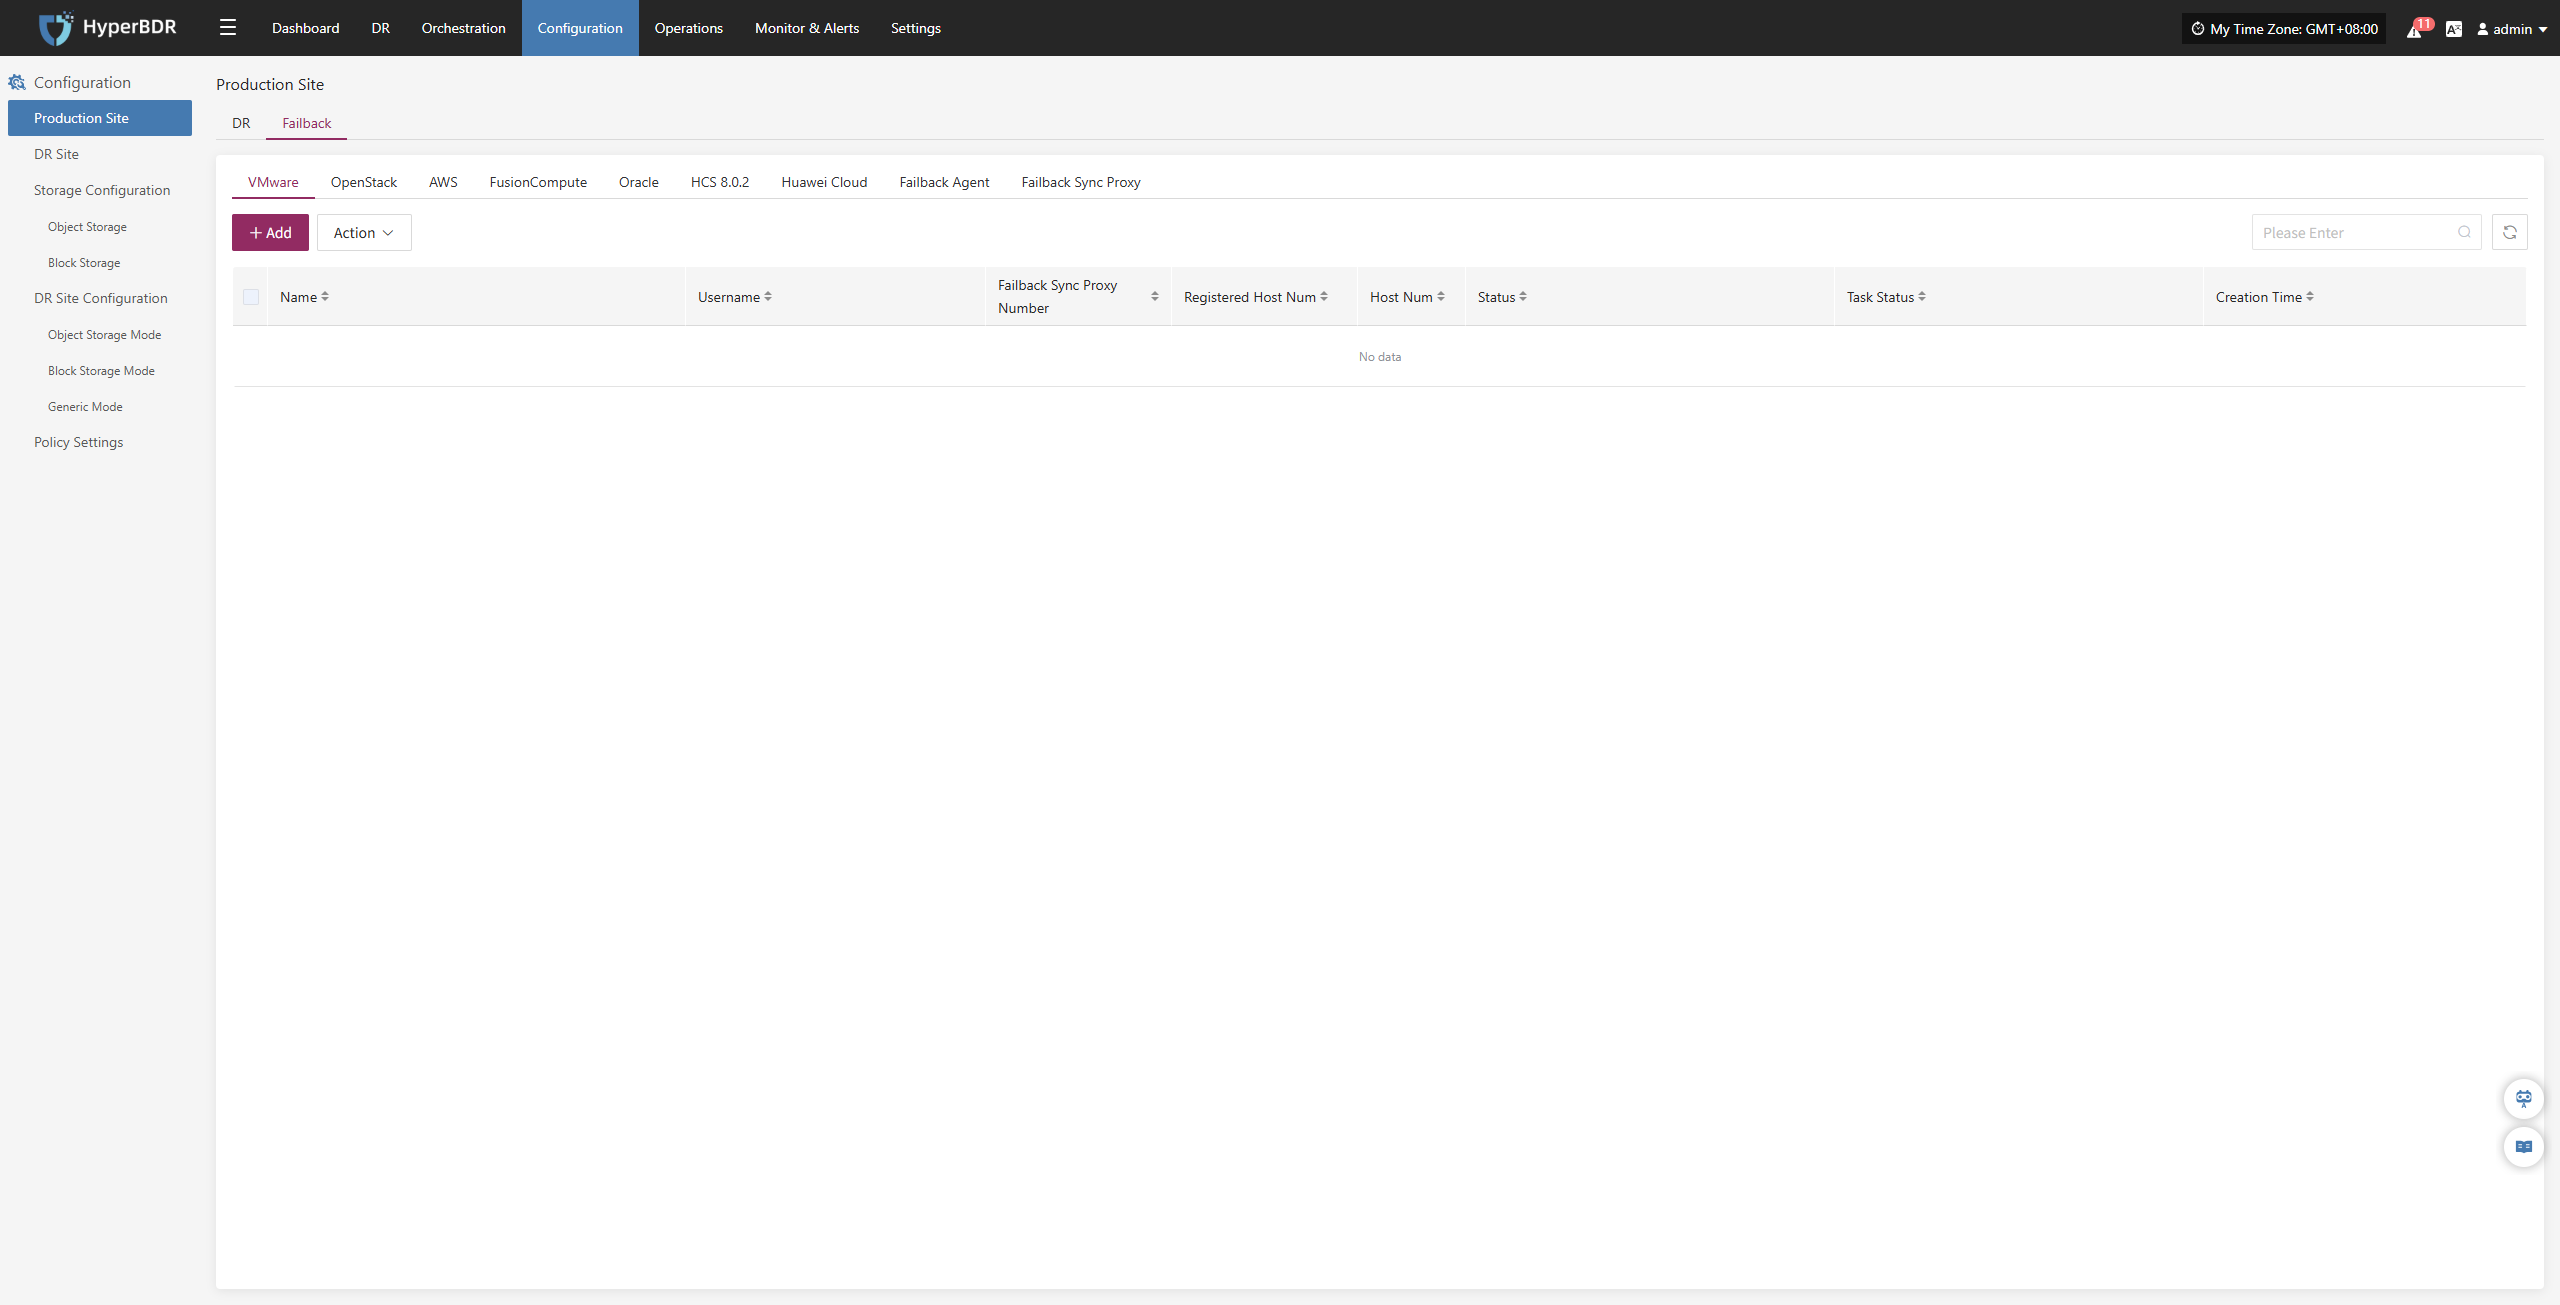
DR Site
Click "Configuration" in the top menu bar, then "DR Site". Select the target platform to add according to the target cloud platform provider, and choose the storage type. Both "Block Storage Mode" and "Object Storage Mode" are supported.
Note: If you can choose both block storage mode and object storage mode in the pop-up storage type selection, it means that the current cloud service provider has been integrated and supports both modes. If only one can be selected, it means that only one mode has been integrated.
Please follow the prompts to enter authentication information to configure the disaster recovery target platform.
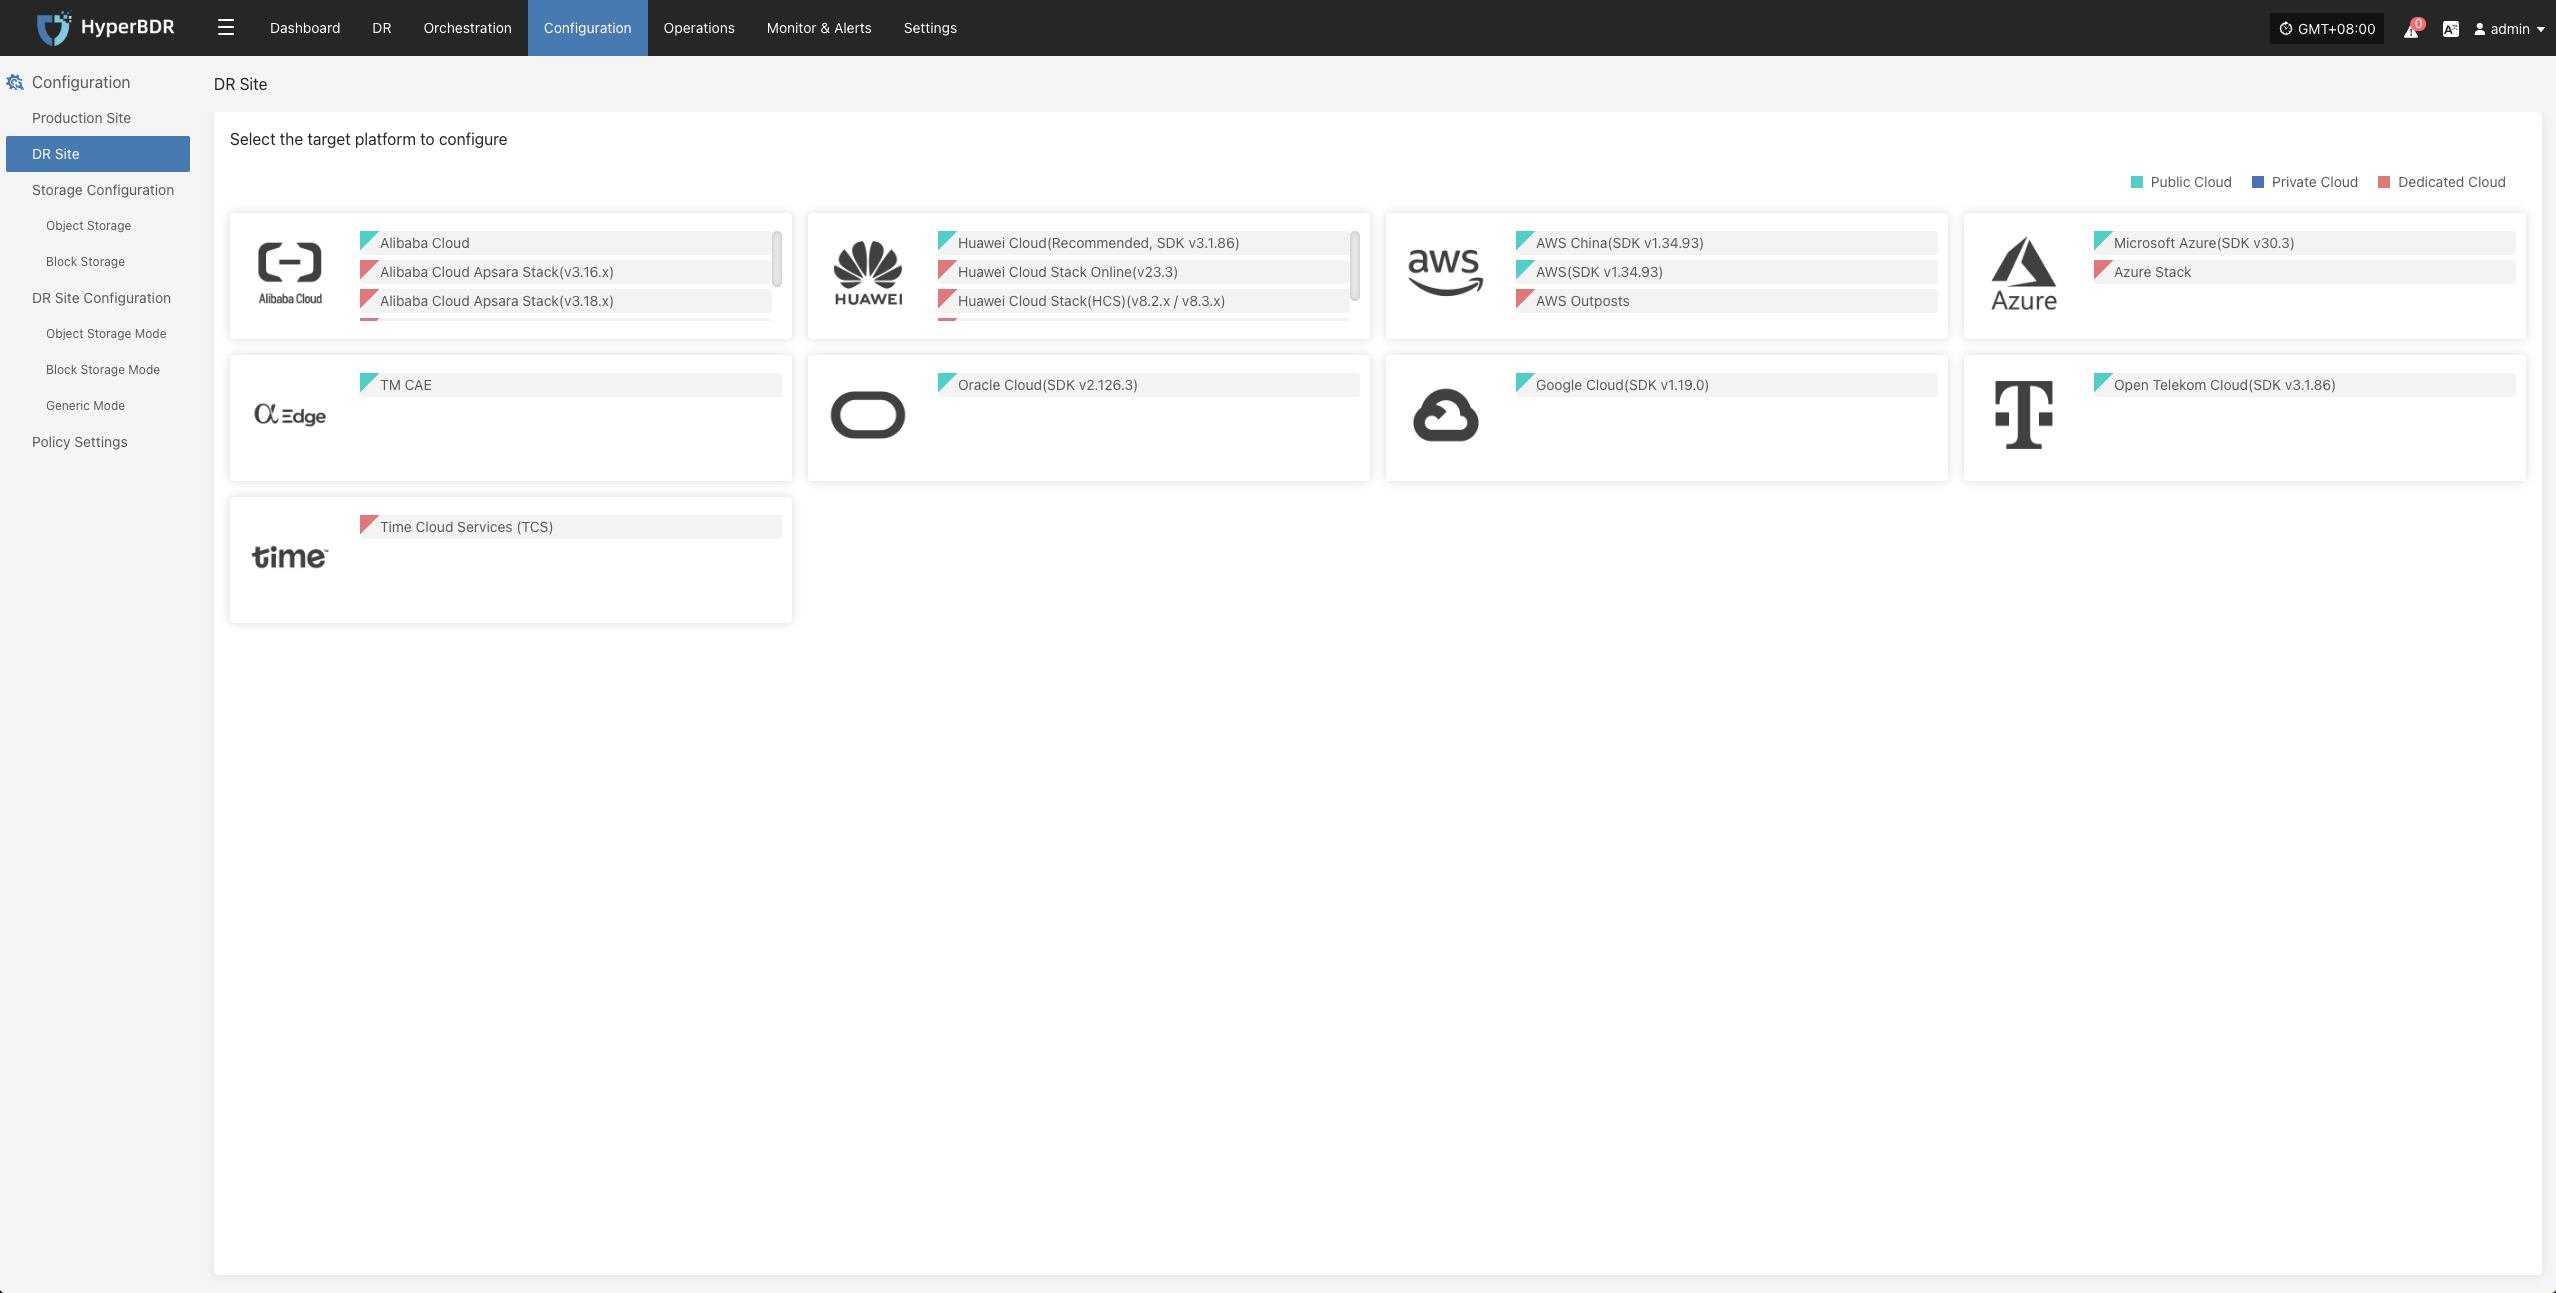
Reference for disaster recovery target configuration cloud providers:
Storage Configuration
Defines the target storage for data during DR or backup. The system currently supports the following types of storage configurations.
Object Storage
Supported Cloud Platforms
| Cloud Vendor |
|---|
| Other Platforms |
| Alibaba Cloud |
| AWS |
| ctyun JC |
| ecloud |
| ecloud JC |
| GDS |
| HCS Online |
| Huawei Cloud |
| Open Telekom Cloud (SDK v3.1.86) |
| Tencent Cloud |
| TM CAE |
| Volcengine |
You can refer to the following 'Configuration Example' to complete the related setup. This article uses Huawei Cloud configuration as an example.
Configuration Example
Add Huawei Cloud
From the top navigation bar, select "Configuration" → "Storage Configuration" → "Object Storage" to enter the object storage page. Click the "Add" button to add a new object storage configuration.
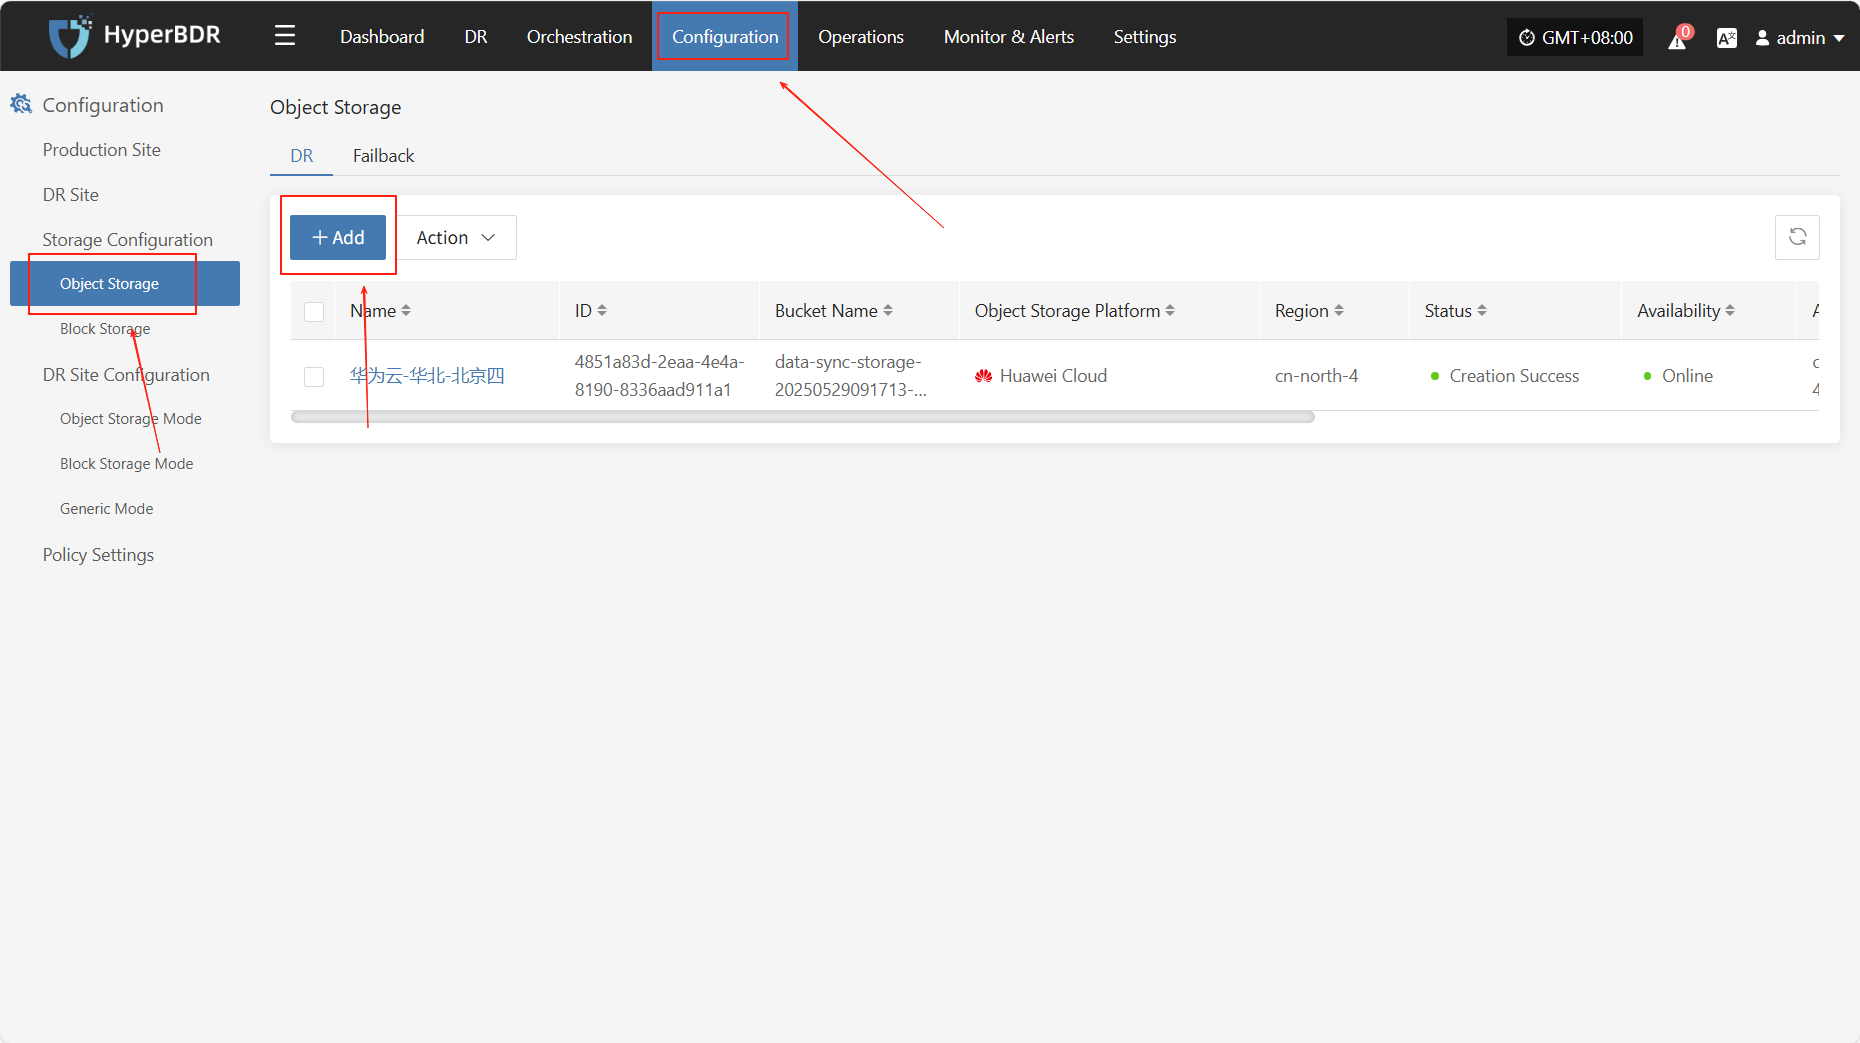
Add Authentication Information
On the object storage configuration page, select "Huawei Cloud" as the platform type, then choose the required region (such as East China, North China, etc.). Fill in the following authentication information according to your actual environment:
| Field | Example Value | Description |
|---|---|---|
| Object Storage Platform | Huawei Cloud-CN North-Beijing4 | Select from the dropdown list, e.g. "Huawei Cloud-North China-Beijing 4" |
| Auth URL | obs.cn-north-4.myhuaweicloud.com | Authentication service address, do not add http:// or https:// prefix |
| Region | cn-north-4 | The region where the object storage is located, e.g. beijing. Leave blank for self-built storage |
| Access Key ID | ygOfXlSs2F4rYBmO | Access key ID for object storage |
| Access Key Secret | •••••••••••••••••••••••••• | Corresponding access key secret, hidden by default, used for authentication only |
| Protocol Type | s3 | Specify the object storage protocol type, currently only s3 is supported |
| S3 URL Style | path style / virtual hosted style | Select the S3 access style |
| Use TLS | Yes / No | Whether to enable encrypted transmission (HTTPS), choose according to your needs |
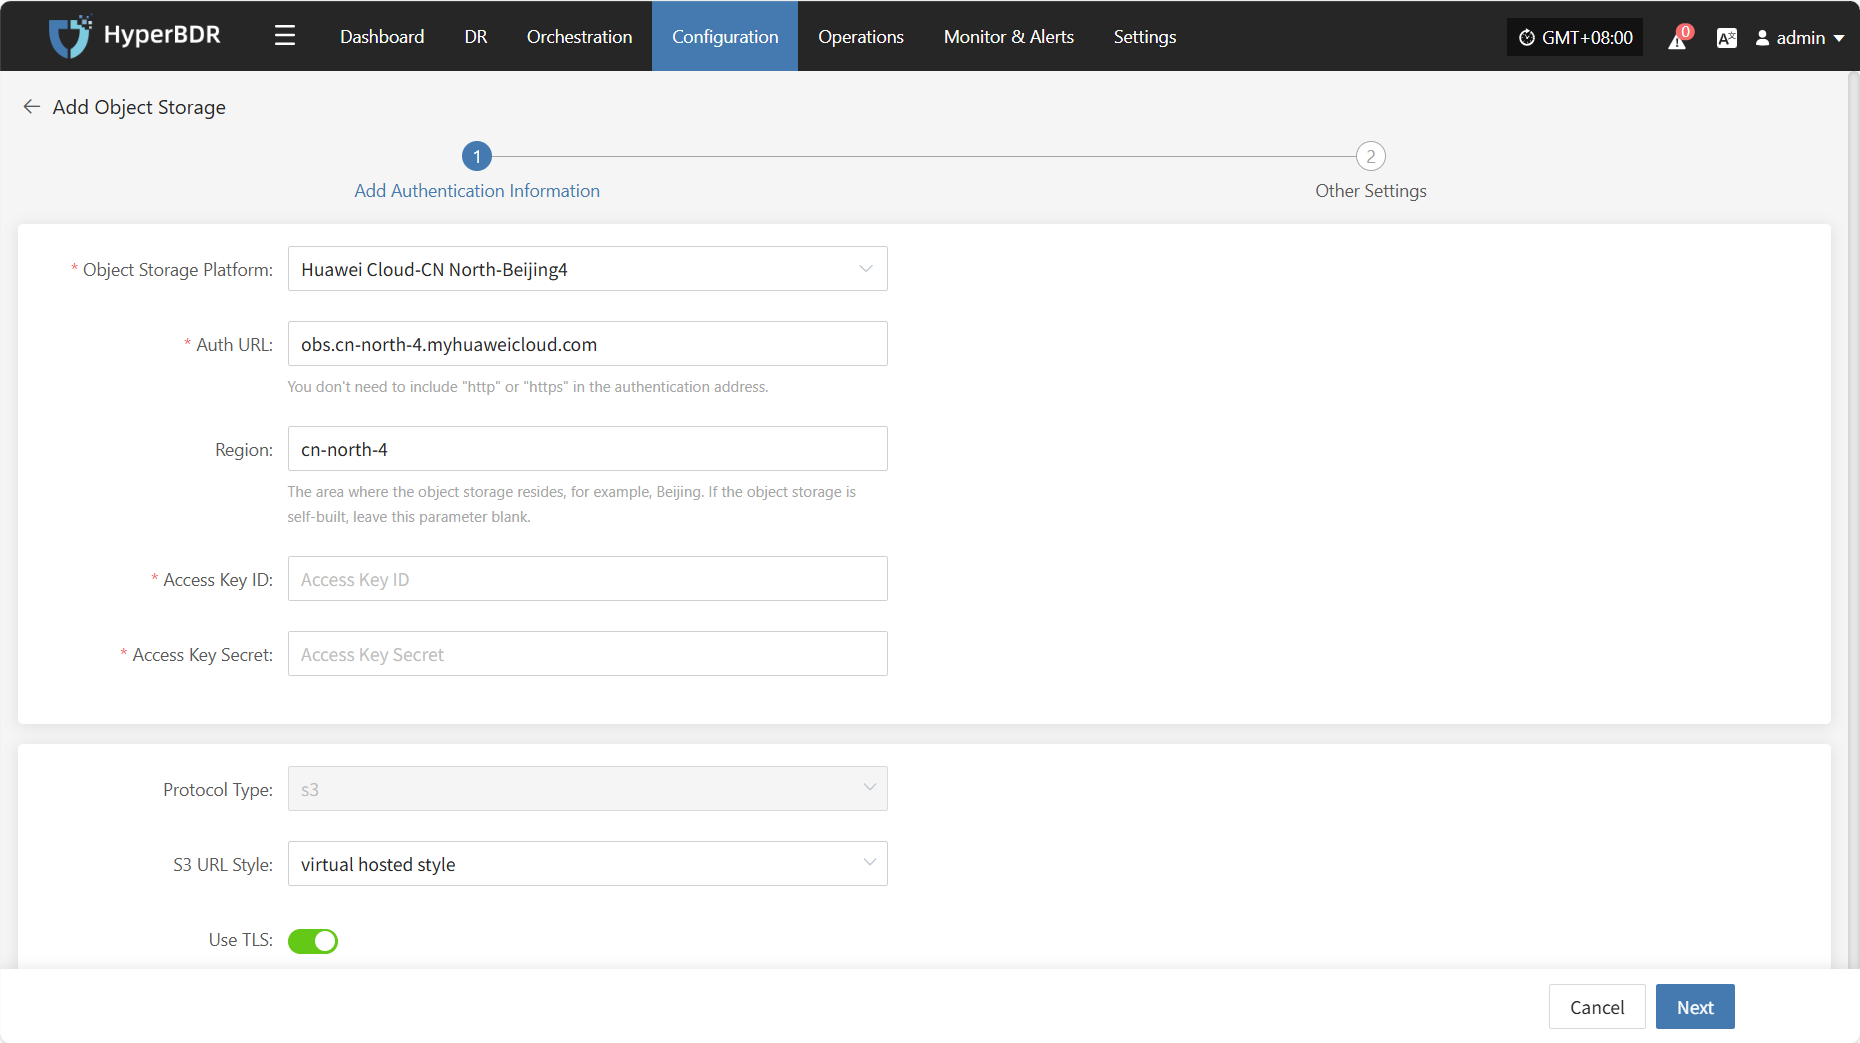
Other Settings
After completing the authentication information, click "Next" to continue configuring the bucket-related parameters and finish connecting the object storage.
| Field | Example Value | Description |
|---|---|---|
| Name | Huawei Cloud-North China-Beijing 4 | The name of the selected object storage platform. By default, it is the platform name chosen in the first step. |
| Bucket | Existing Bucket / New Bucket | Choose how to create the bucket: select an existing bucket or create a new one. |
| Bucket Name | As appropriate | If you select an existing bucket, choose from the dropdown list; if creating a new bucket, enter the name manually. Note: Custom names must be no more than 10 characters, using only numbers and lowercase letters. If left blank, the system will generate one automatically. Note: For Tencent Cloud as the target platform, APPID must be entered. |
| Public Domain | As appropriate | The address for public network access to the bucket. You can customize it or check "Same as Auth Domain Name". |
| Internal Domain | As appropriate | The address for internal network access to the bucket. You can customize it or check "Same as Auth Domain Name". |
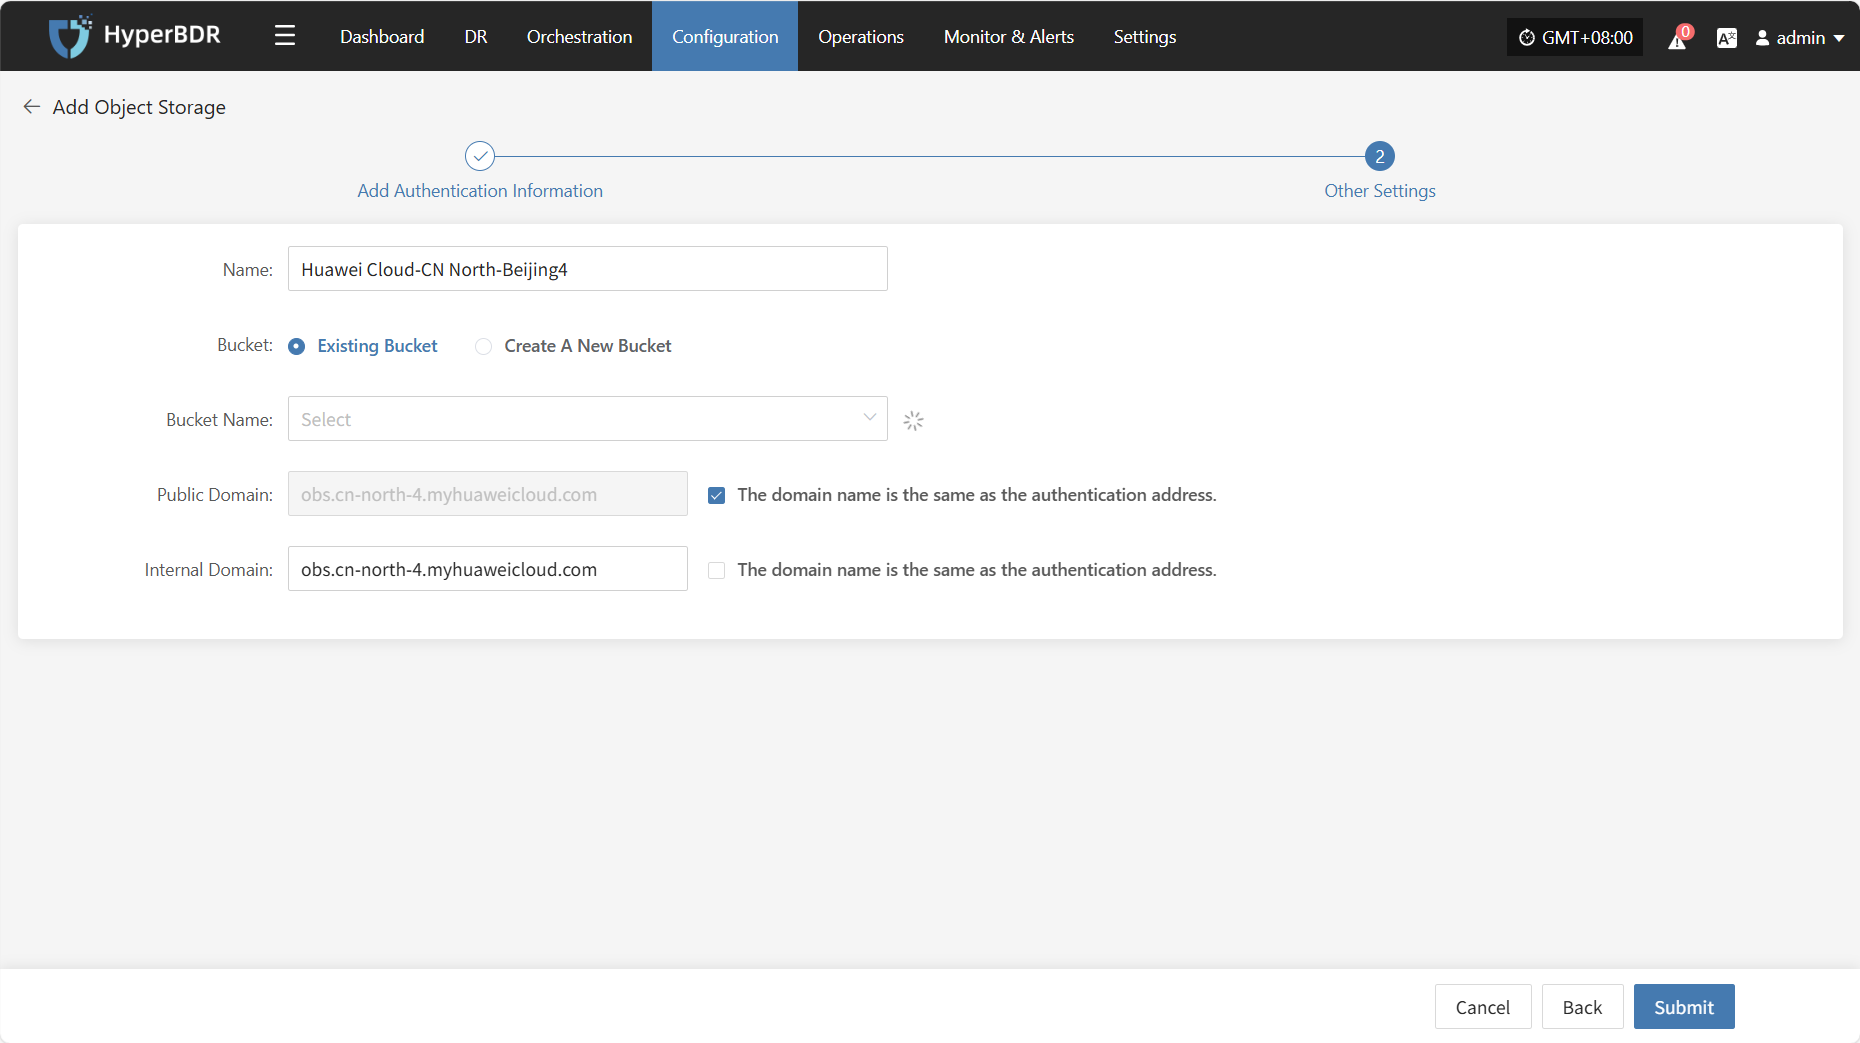
Block Storage
Add Block Storage
From the top navigation bar, select "Configuration" → "Storage Configuration" → "Block Storage" to enter the block storage page. Click the "Add" button in the upper right corner to add a new block storage configuration.
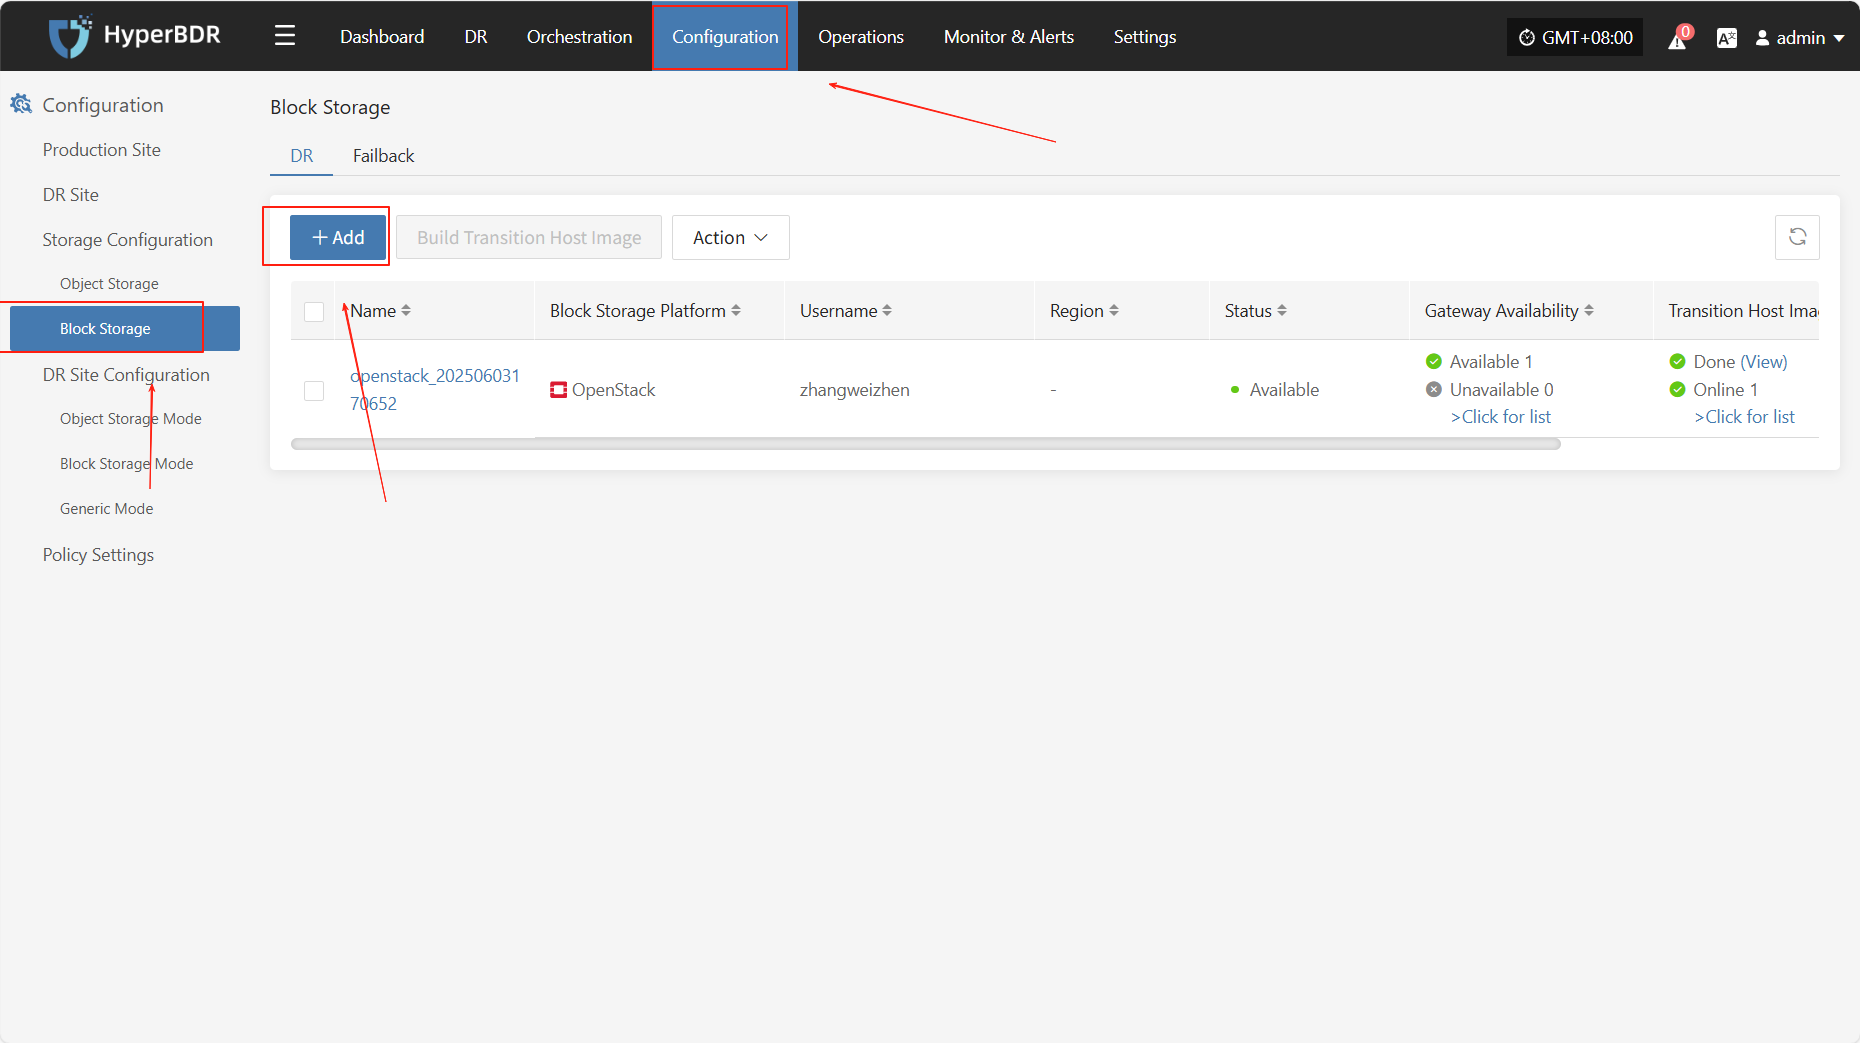
You can click the "Configuration Guide" link next to each cloud platform in the list to view detailed operation steps.
Supported Cloud Platforms
| Cloud Vendor | Notes |
|---|---|
| Alibaba Cloud | Click to View |
| Alibaba Cloud Apsara Stack (v3.16.x) | |
| Alibaba Cloud Apsara Stack (v3.18.x) | |
| AWS China (SDK v1.34.93) | Click to View |
| AWS (SDK v1.34.93) | |
| ecloud | |
| ecloud JC | |
| eSurfingCloud4.0 | |
| FiXo Cloud BS | |
| Google Cloud (SDK v1.19.0) | Click to View |
| GridCloud | |
| Huawei Cloud Stack Online (v23.3) | |
| Huawei Cloud Stack (HCS) (v8.2.x/v8.3.x) | |
| Huawei Cloud (Recommended, SDK v3.1.86) | Click to View |
| Jinshan Cloud | |
| Microsoft Azure (SDK v30.3) | Click to View |
| Open Telekom Cloud (SDK v3.1.86) | |
| OpenStack Community (Uno+) | Click to View |
| Oracle Cloud (SDK v2.126.3) | Click to View |
| QingCloud | |
| SMTX OS (v6.x.x) | |
| Tencent Cloud | Click to View |
| Tencent Cloud Enterprise | Click to View |
| Tencent Cloud TStack Enterprise | |
| Tencent Cloud TStack Ultimate | |
| TM CAE | |
| UCloudStack | |
| XHERE (NeutonOS_3.x) | |
| ZStack (v4.x.x) |
DR Site Configuration
When the primary production site fails, the system can automatically or manually switch to a standby environment. To ensure business continuity and data availability during DR switch, you need to complete the DR platform configuration in advance.
The platform supports two types: DR and Failback, for different business scenarios:
- DR: When the source host fails or is unavailable, quickly switch business to the standby platform to ensure continuity and data safety.
- Failback: After DR is complete, smoothly migrate business back to the source platform to restore the system to its original state.
You can configure DR or failback strategies as needed to achieve end-to-end business continuity management.
Object Storage Mode
Supported Cloud Platforms
| Cloud Vendor | Notes |
|---|---|
| Alibaba Cloud | Click to View |
| Alibaba Cloud Apsara Stack(v3.16.x) | |
| Alibaba Cloud Apsara Stack(v3.18.x) | |
| AWS China(SDK v1.34.93) | Click to View |
| AWS(SDK v1.34.93) | |
| ctyun JC | |
| ecloud | |
| GDS | |
| Huawei Cloud Stack Online(v23.3) | |
| Huawei Cloud (Recommended, SDK v3.1.86) | Click to View |
| Open Telekom Cloud(SDK v3.1.86) | |
| OpenStack Community (Juno+) | |
| Tencent Cloud | Click to View |
| Tencent Cloud Enterprise | Click to View |
| TM CAE | |
| UCloud | |
| VMware | |
| Volcengine | |
| XHERE(NeutonOs_3.x) |
Block Storage Mode
Note: For all operations in [Block Storage Mode], go to [Storage Configuration] -> [Block Storage] -> [DR]. 👉Click to View
Generic Mode (DR)
The Generic Mode is applicable to environments that currently do not support automated migration or disaster recovery processes. In this mode, users need to manually complete some operations
Transition Host
Add Transition Host
Through 【Configuration】 > 【DR Site Configuration】 > 【DR】 > 【Transition Host】 > 【Add】, after entering the "Transition Host" page, click the 【Add】 button in the upper right corner. In the configuration window, please carefully read the notes and prepare the corresponding host according to the page prompts.
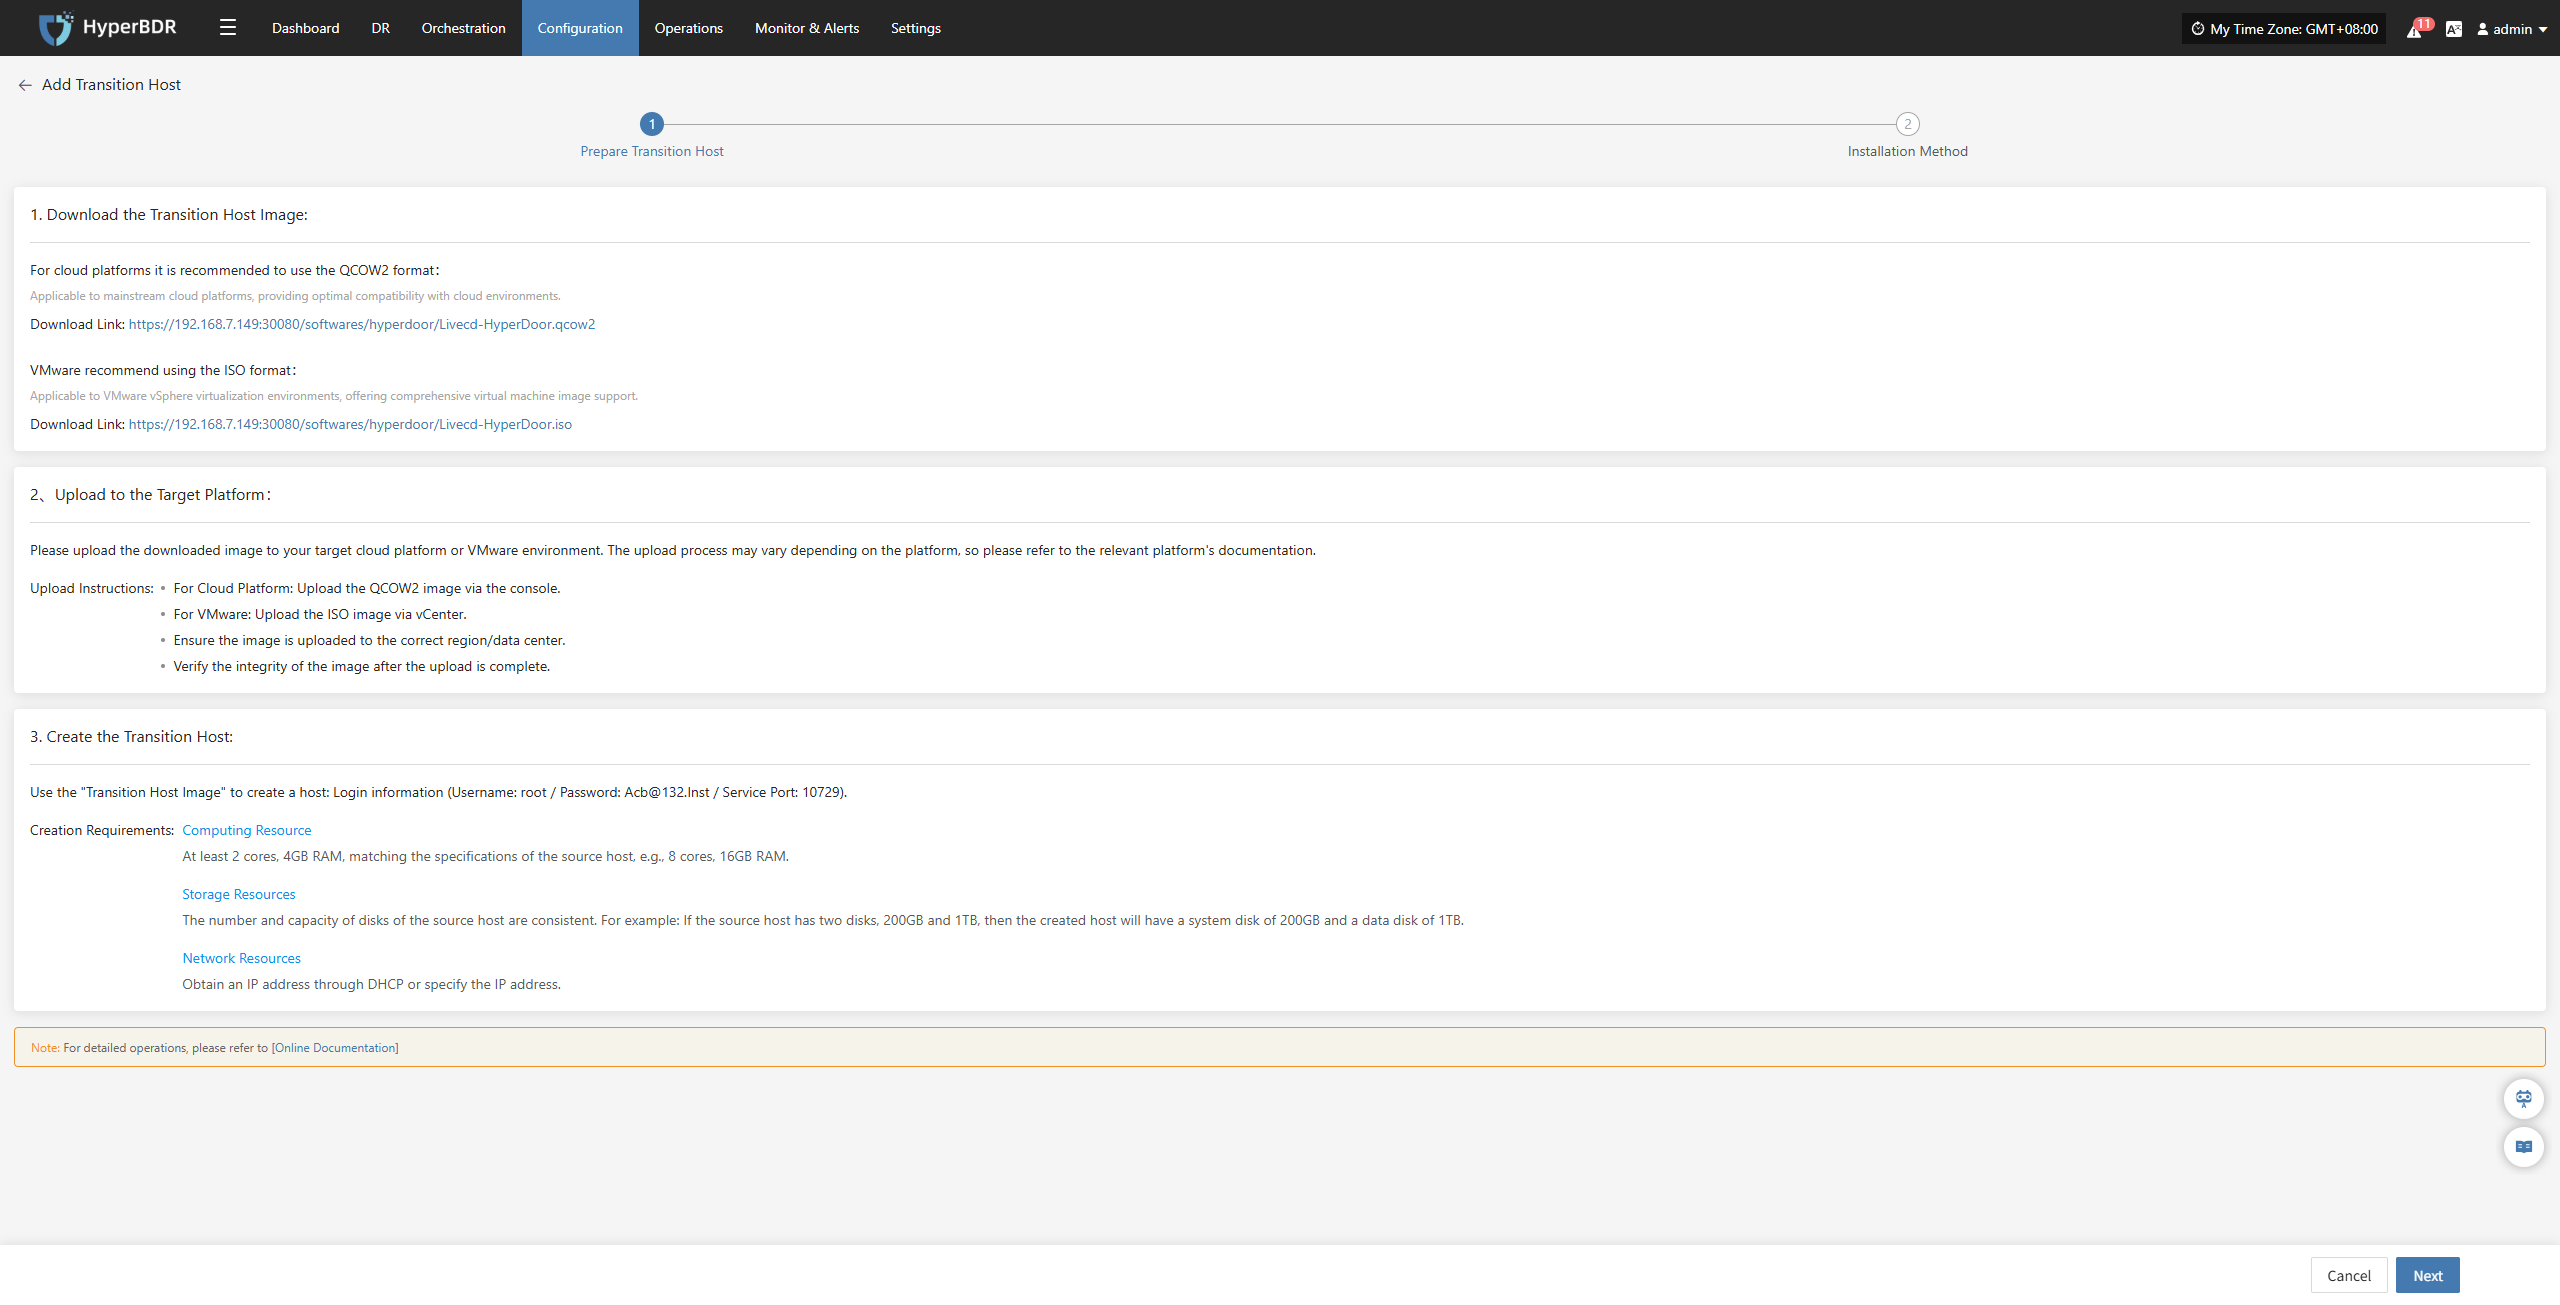
After the target Cloud Computing Platform resources are ready, click 'Next' to continue the configuration process. The system provides two installation methods, and users can choose either one according to the page prompts to complete the configuration.
Installation Method 1: Console Access to Transition Host
The console can actively access the transition host network,The transition host is located on a private network or has a public IP,Data synchronization to the transition host needs to be initiated from the console.
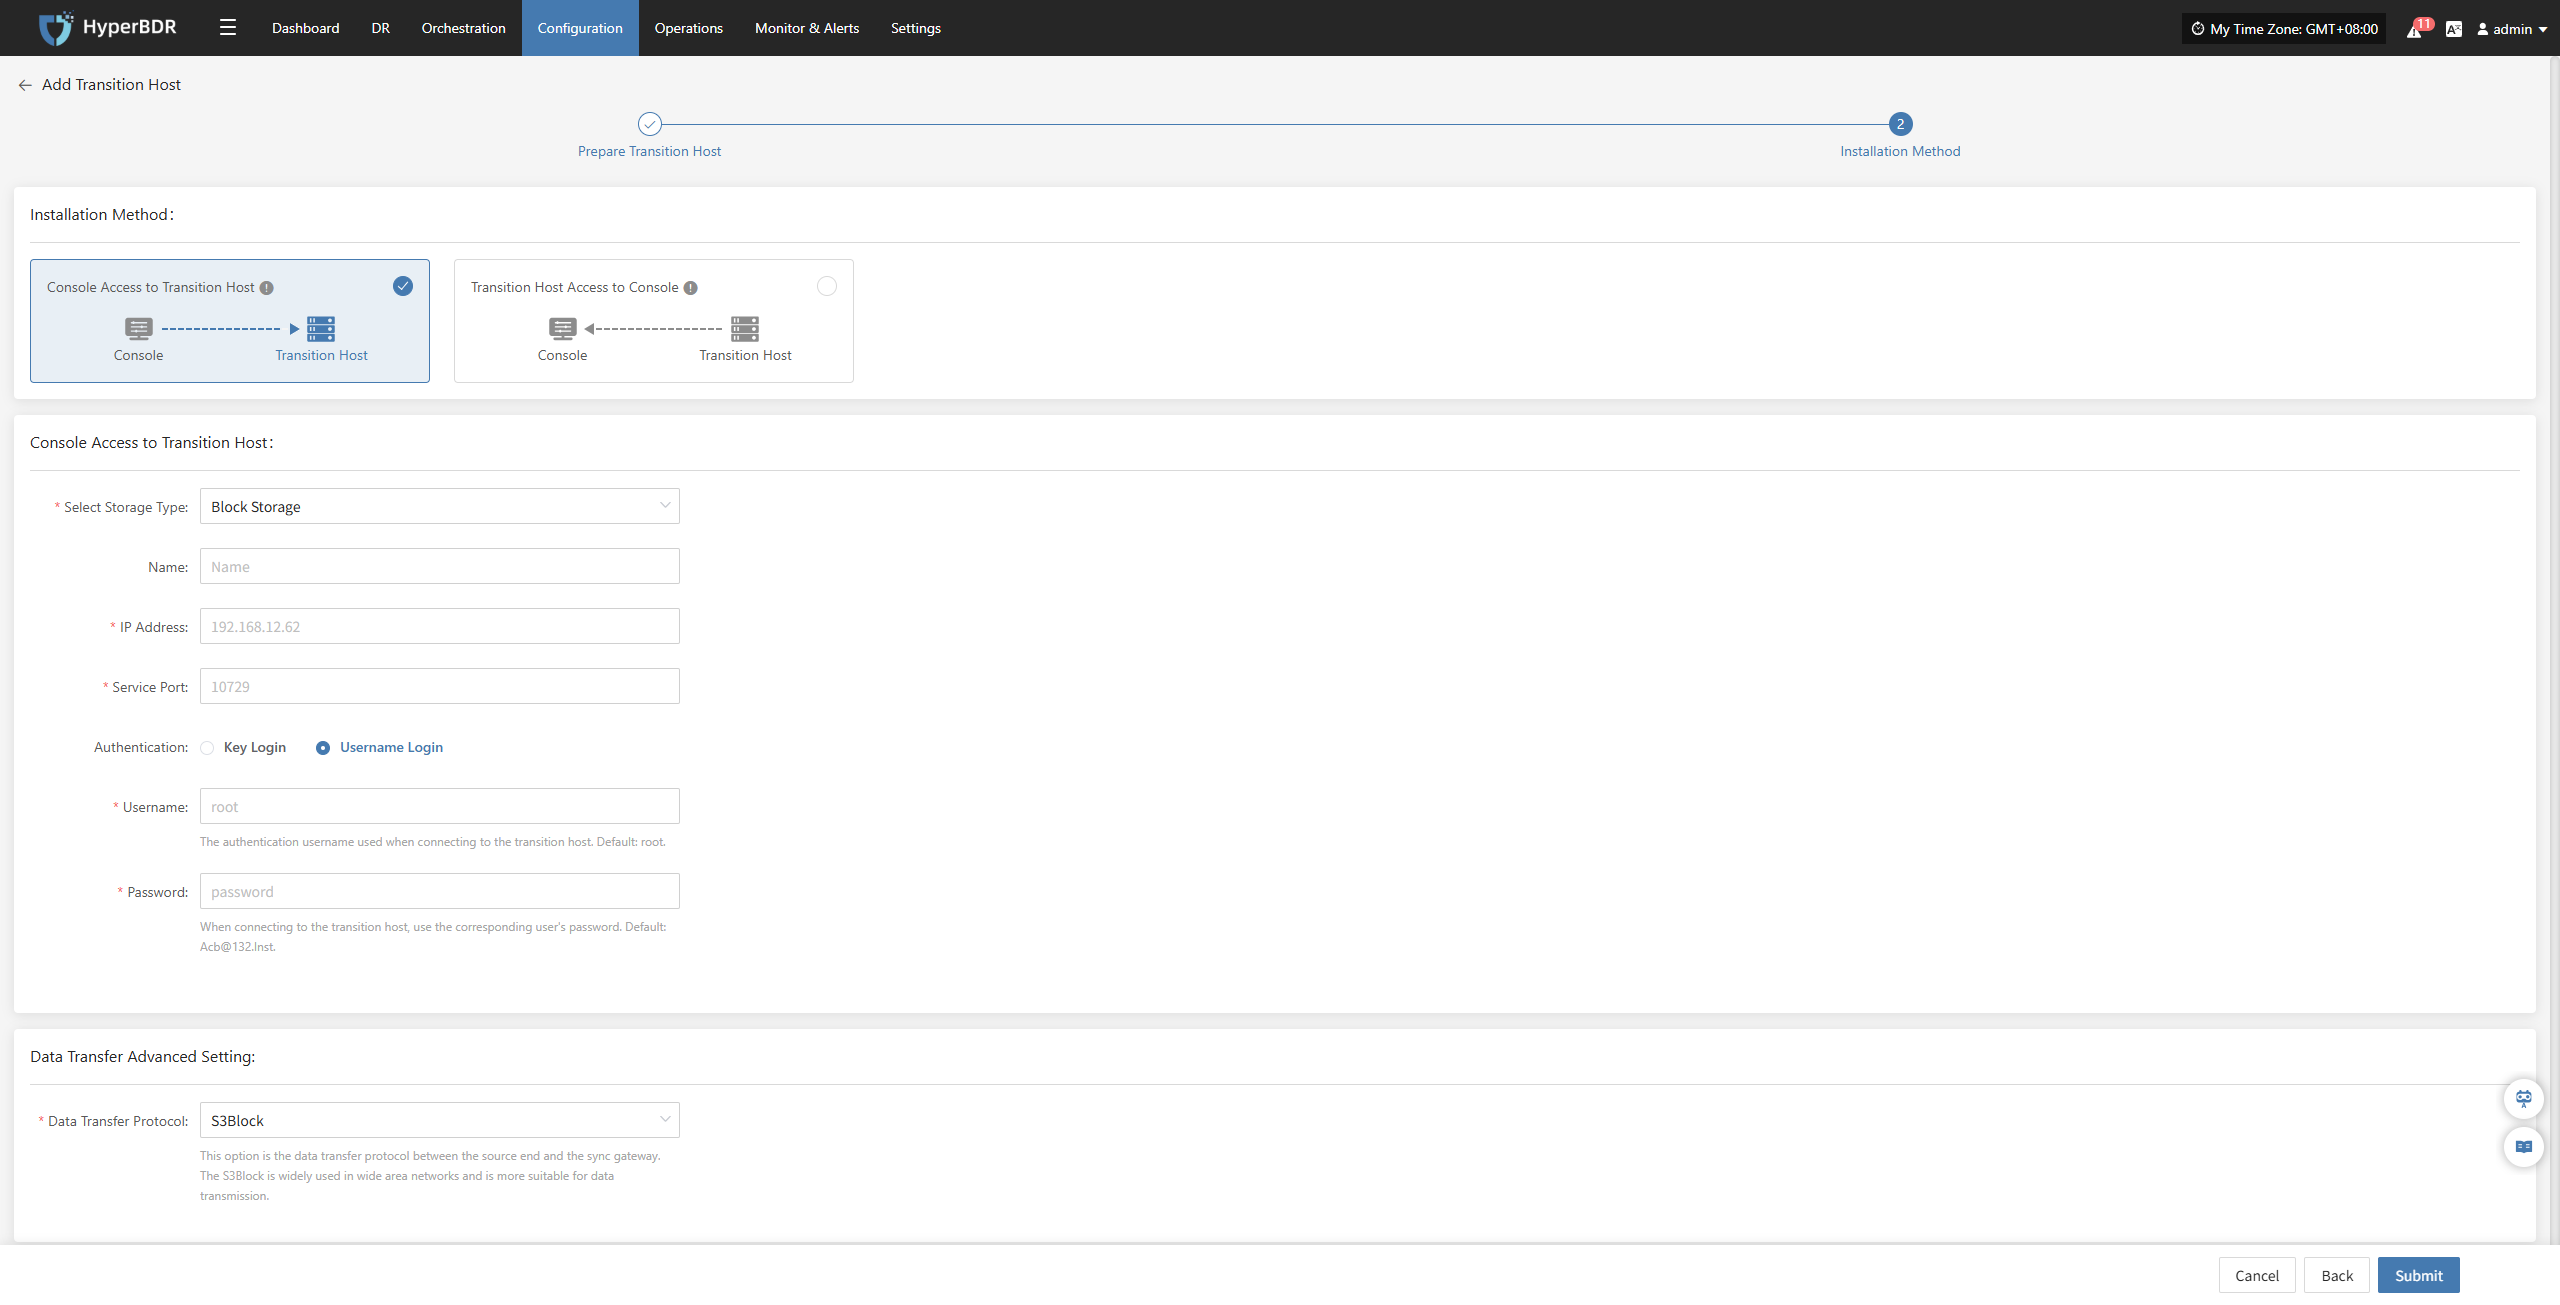
In the configuration window, select the storage method and fill in the information of the temporary transition host, such as name, IP address, service port, etc.
- Transition Host Configuration Instructions
| Configuration Item | Example Value | Description |
|---|---|---|
| Storage Type | Block Storage | Select the storage type for backup data writing, which supports both Block Storage and Object Storage. |
| Name | test | Used to identify and name the host within the HyperBDR platform. |
| IP Address | 192.168.7.146 | The address of the Transition host. |
| Service Port | 10729 | The port number that the storage service listens on, with a default value of 10729. |
| Authentication | Username Login | Authentication login authentication method, currently using username + password. You can choose either key or username/password login method. |
| Username | root | Store the authentication username for the connection. |
| Password | Acb@132.Inst | Store the authentication password for the connection, and it is recommended to modify the default value after deployment. |
| Advanced Settings for Data Transmission | iSCSI | The data transfer protocol between the source and the synchronization gateway supports S3Block and iSCSI: <br> • S3Block: Suitable for wide area network environments, with high transfer efficiency; <br> • iSCSI: Suitable for private network scenarios with stable network environments. <br> Note: This option is unavailable when the storage type is object storage. |
After filling in the information, click "OK", and the system will start creating the transition host. When the status shows "Available", it indicates that the addition is completed, and subsequent operations can be performed.

Installation Method 2: Transition Host Access to Console
The console can actively access the transition host network,The transition host is located on a private network or has a public IP,Data synchronization to the transition host needs to be initiated from the console.
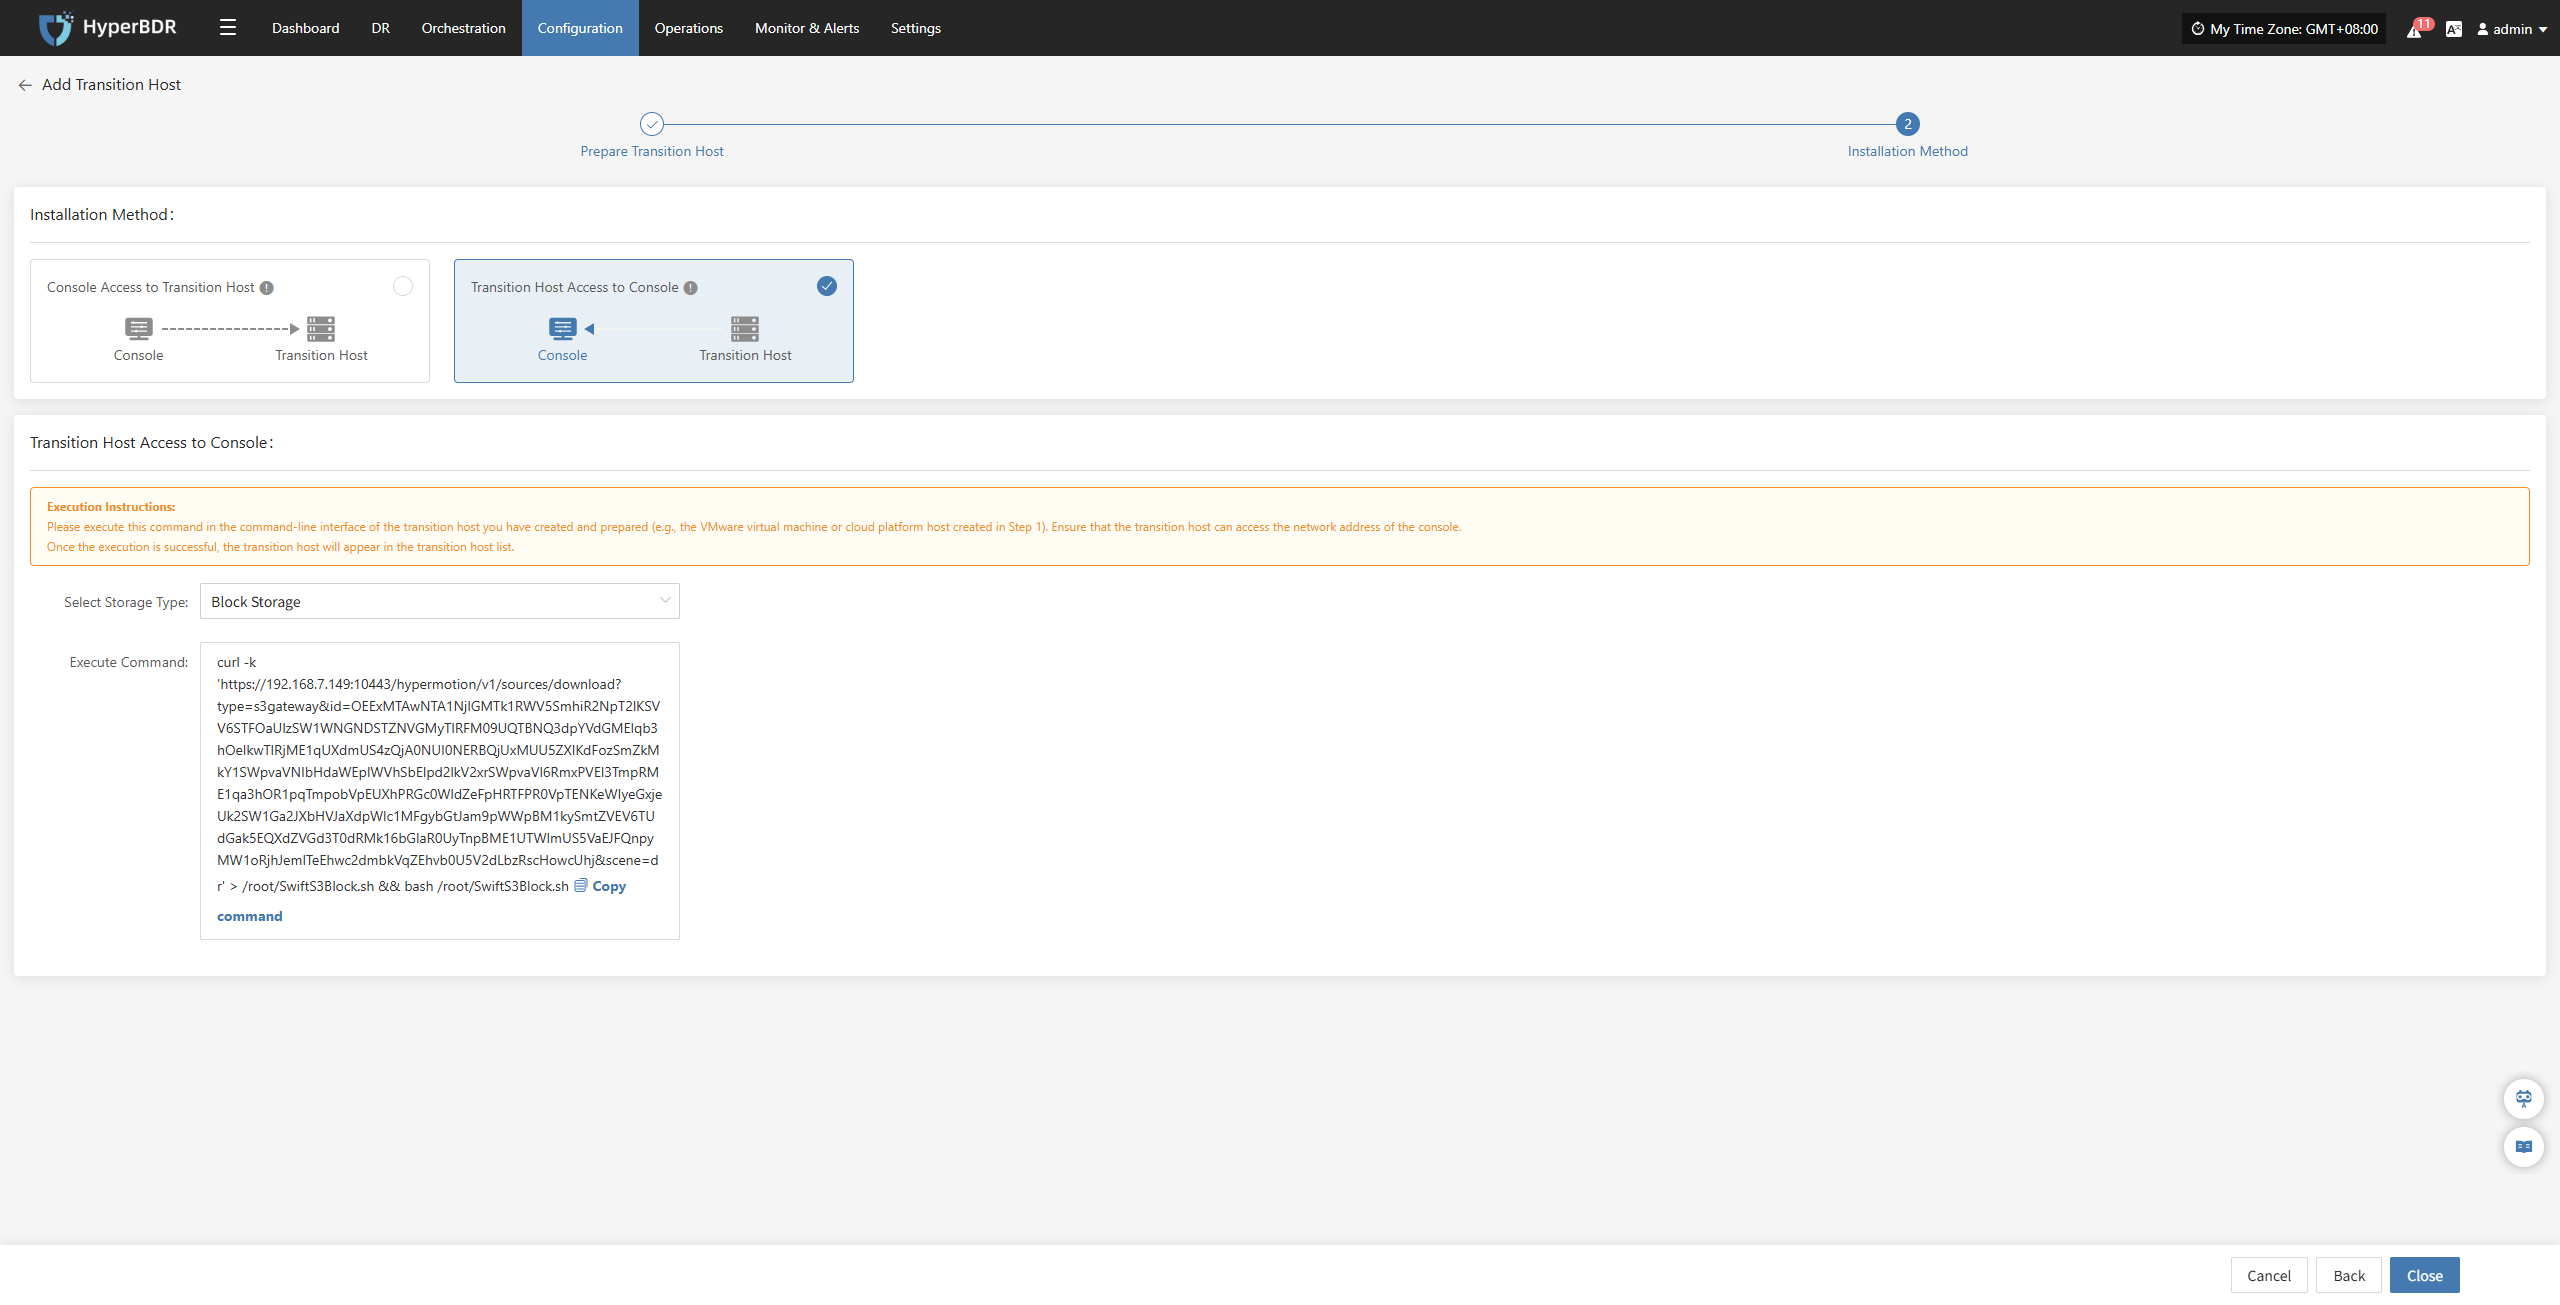
Please copy and execute this command in the command-line interface of the transition host you have created and prepared (e.g., the VMware virtual machine or Cloud Computing Platform host created in the "<Add Transition Host" step). Ensure that the transition host can access the network address of the Console.

After the comparison of the results in the above figure is successfully executed, the transition host will appear in the transition host list.
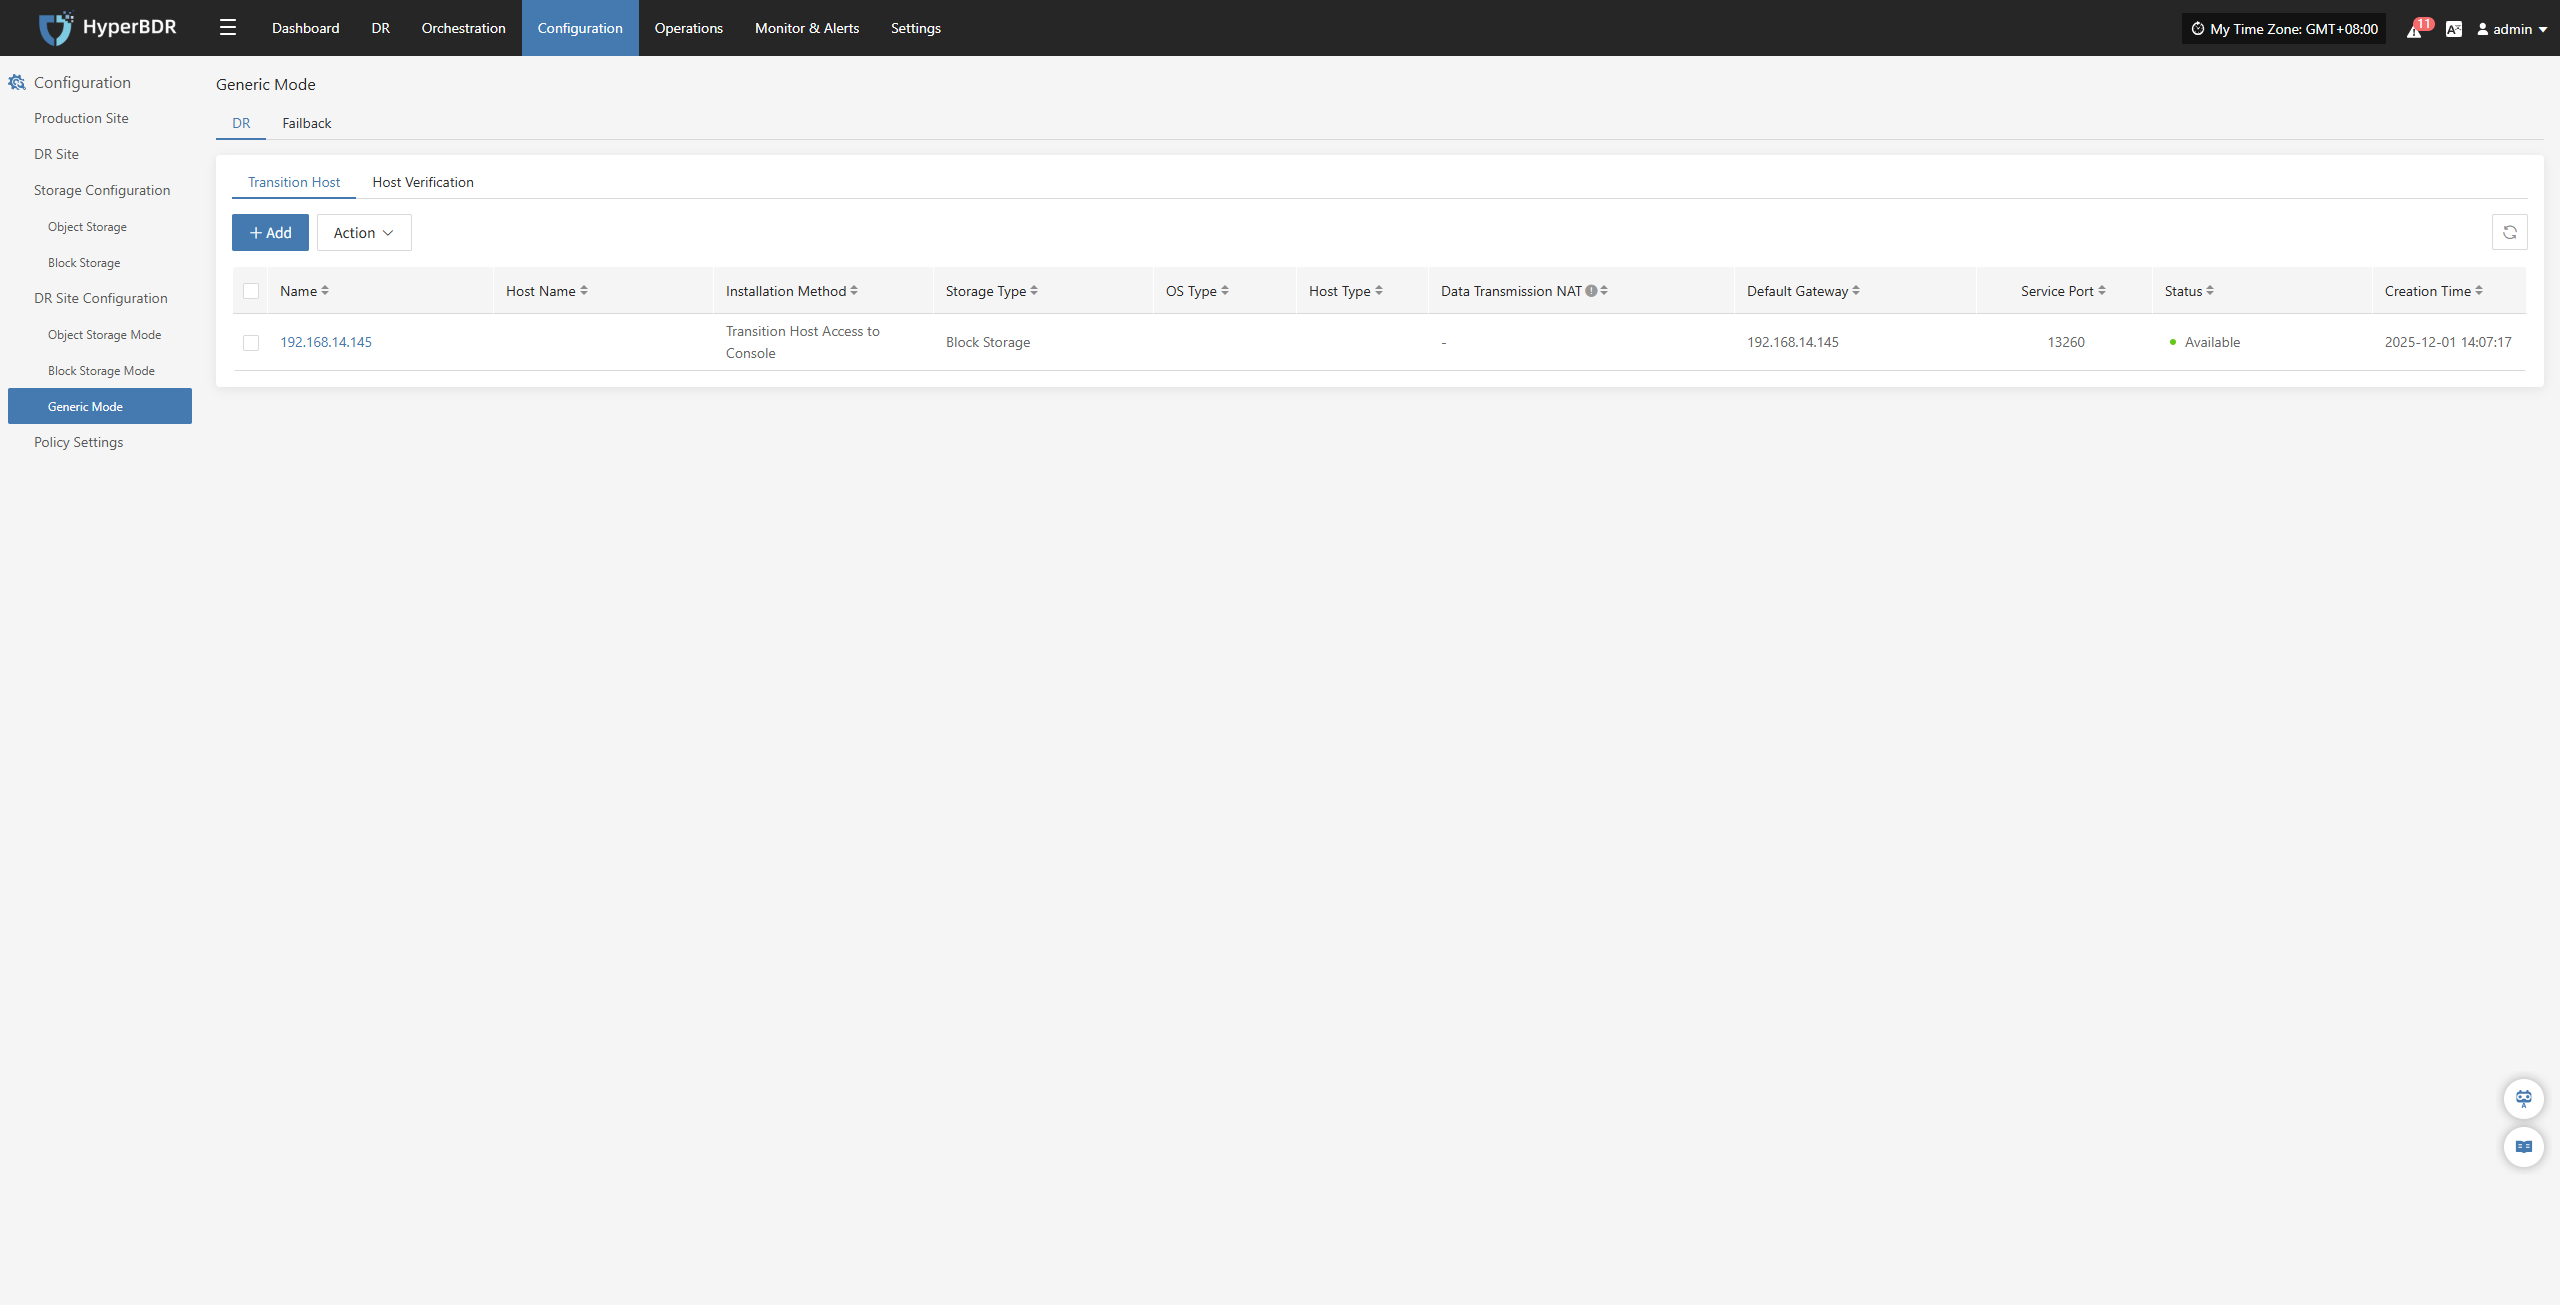
Action
After selecting the target host, click the [Action] button on the page to perform more configurations
Data Transmission NAT
After selecting the target host, click [Action] > [Data Transmission NAT] to specify the external mapped IP address used for data stream synchronization.
Note: This function is mainly used in network environments with internal and external network isolation or NAT conversion to guide data flows to use the correct egress address, thereby ensuring the connectivity of the data transmission link between the source and destination.
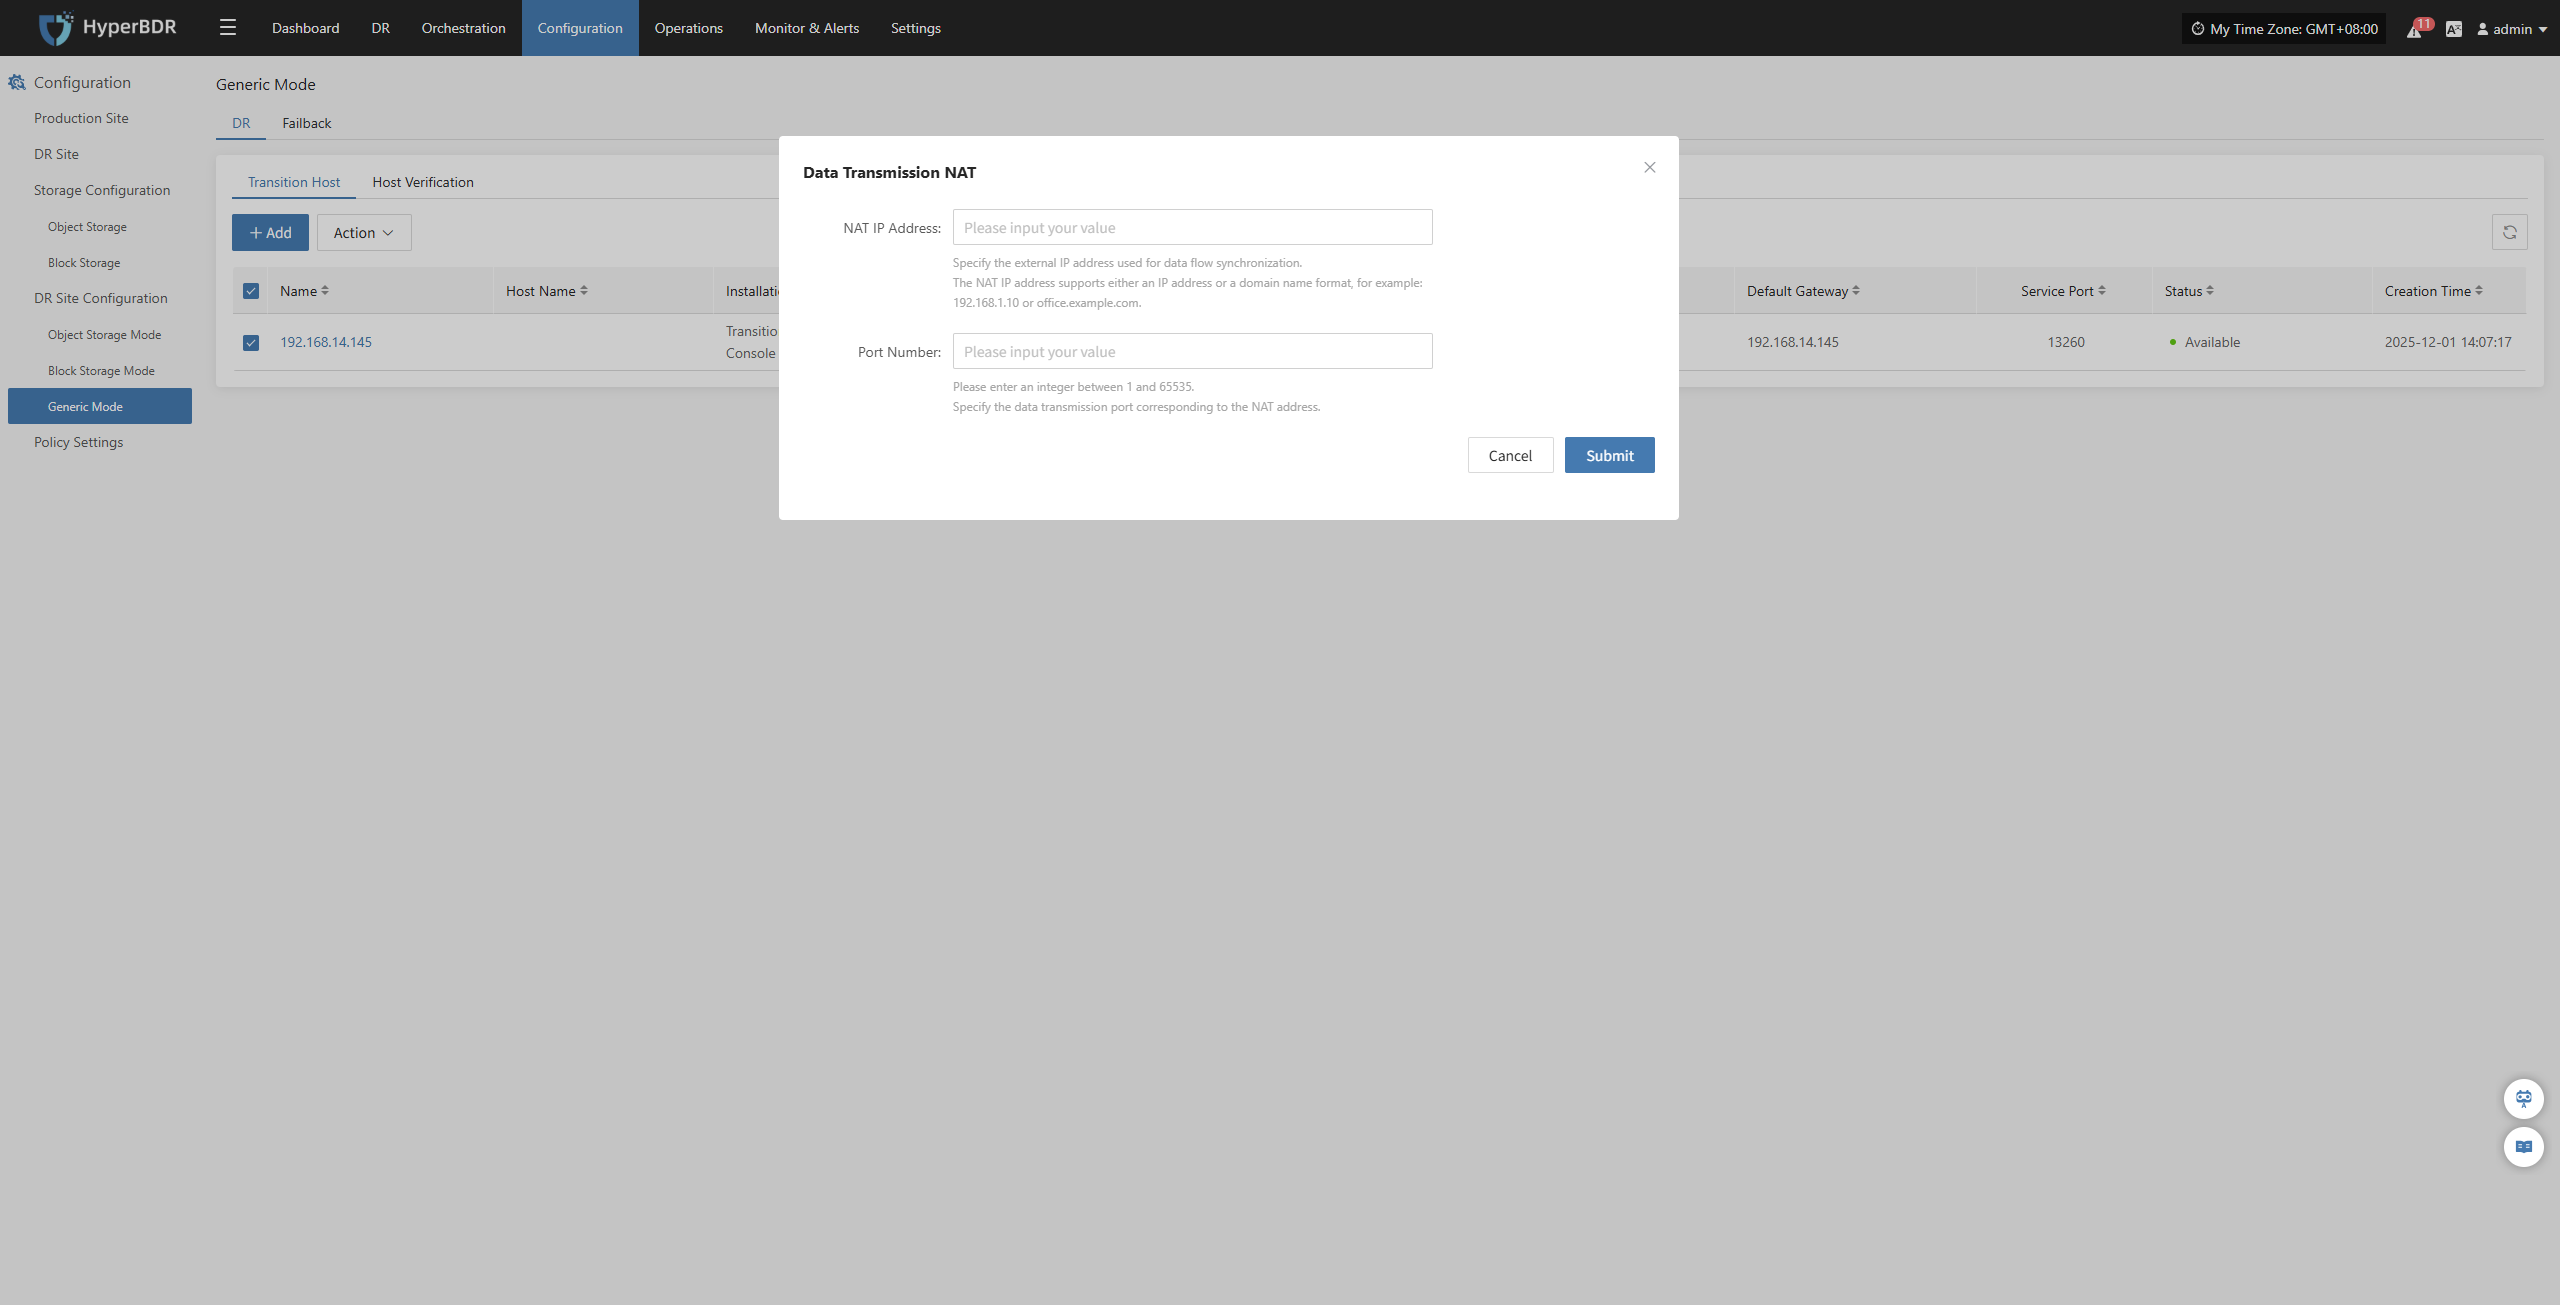
Configure the host NAT mapping address according to the network structure, complete the addition, and ensure that data traffic can be transmitted normally.
Delete
After selecting the target host, click [Action] > [Delete] to remove the transitional host.
Host Verification
Only hosts that have completed the "DR > Sync > Drill" process will appear in the "Host Verification" list. Hosts that have not completed data sync will not appear here.
After starting a DR drill, related hosts will appear in this list. Wait for the verification process to complete before proceeding.
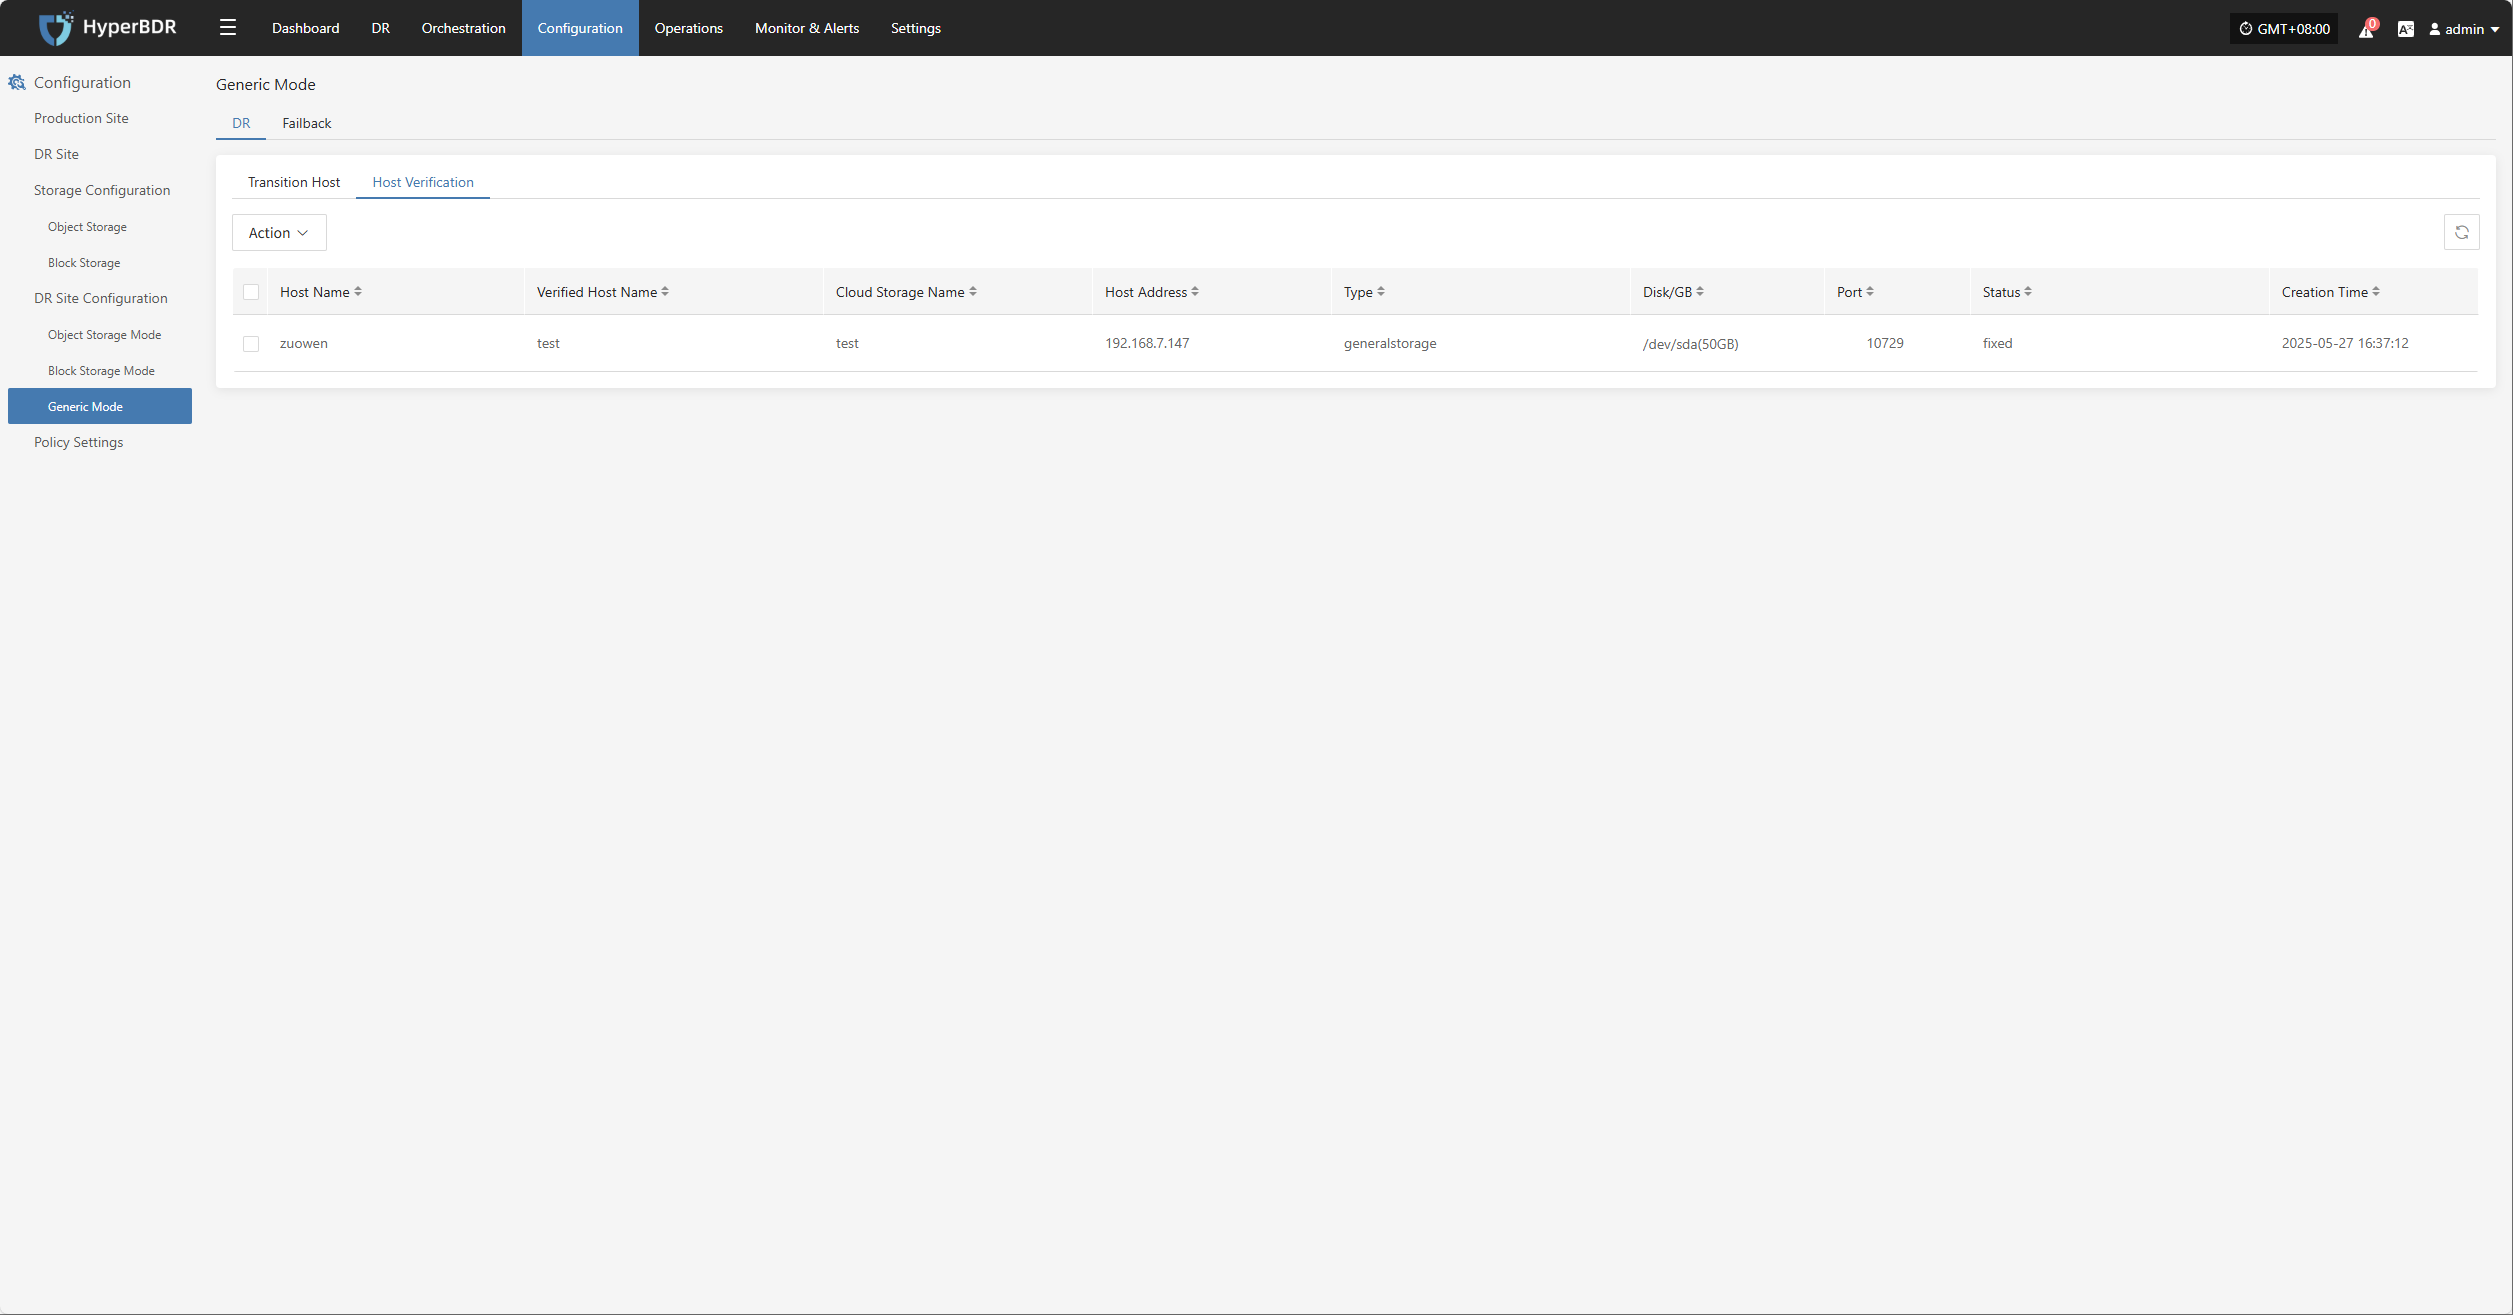
Action
After selecting the target host, click the [Action] button on the page to perform driver injection and deletion operations
Driver Injection
After selecting the target host, click [Action] > [Driver Repair] to inject the necessary drivers into the transition host and complete host recovery

Delete
After selecting the target host, click [Action] > [Delete] to remove the host to be verified.
Generic Mode (Failback)
The Generic Mode is applicable to environments that currently do not support automated migration or disaster recovery processes. In this mode, users need to manually complete some operations
Failback Transition Host
Add Failback Transition Host
Through 【Configuration】 > 【DR Site Configuration】 > 【Failback】 > 【Transition Host】 > 【Add】, after entering the "Transition Host" page, click the 【Add】 button in the upper right corner. In the configuration window, please carefully read the notes and prepare the corresponding host according to the page prompts.
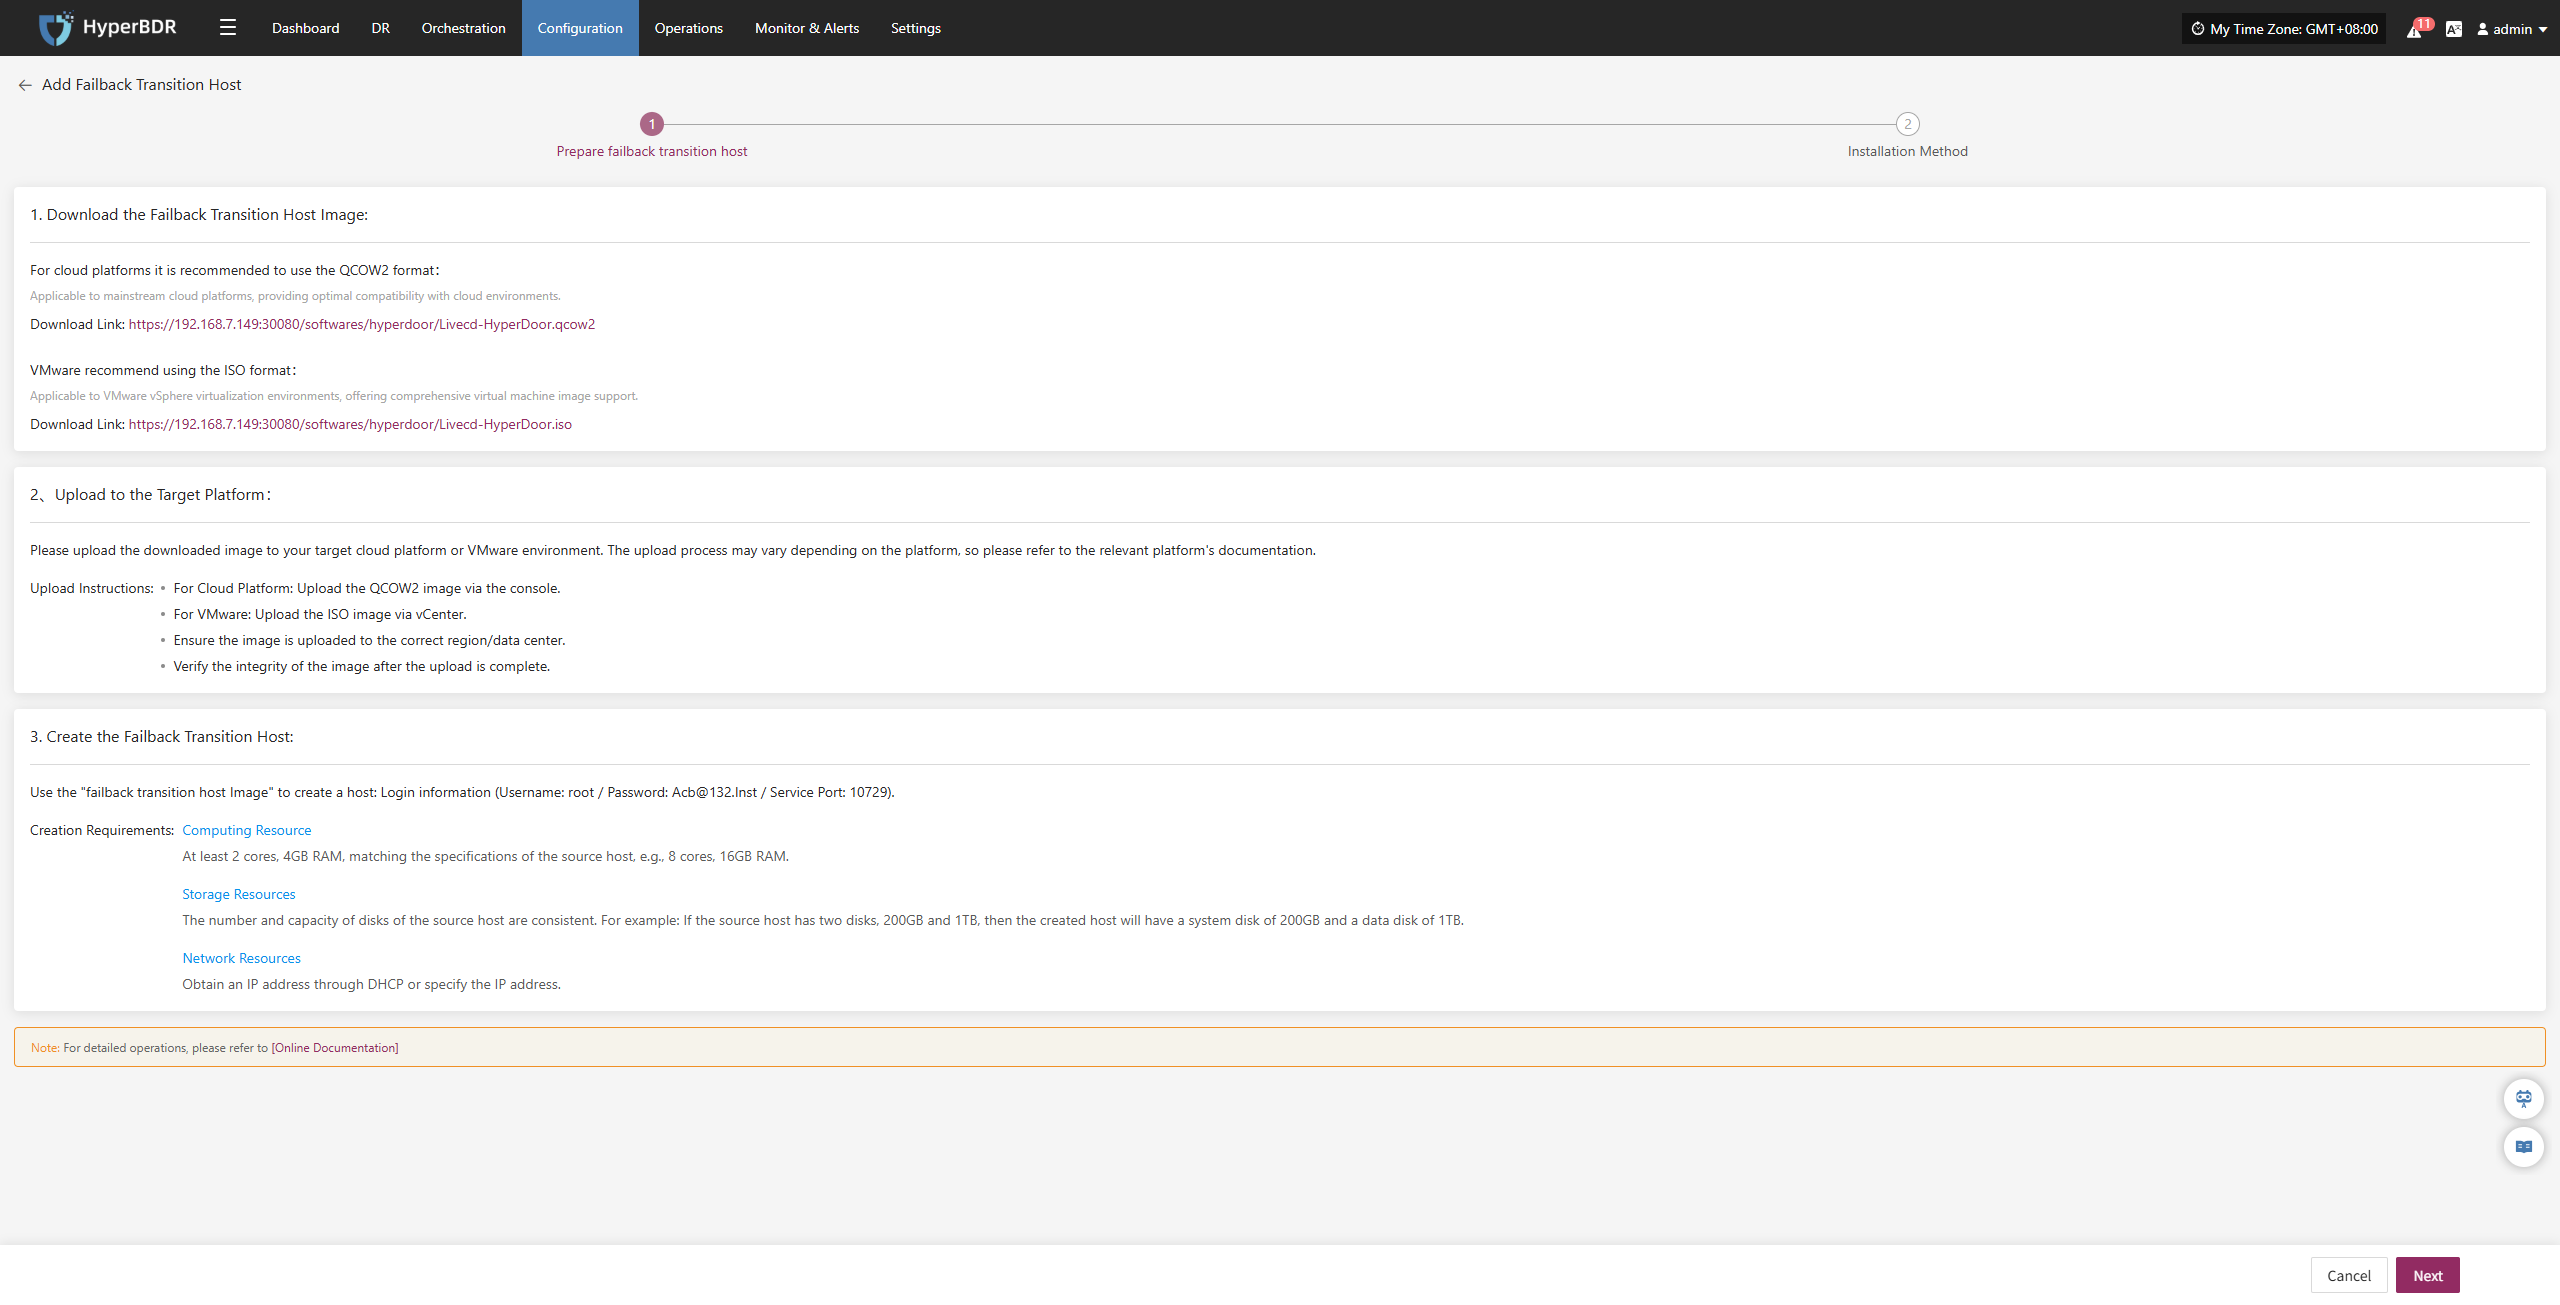
After the target Cloud Computing Platform resources are ready, click 'Next' to continue the configuration process. The system provides two installation methods, and users can choose either one according to the page prompts to complete the configuration.
Installation Method 1: Console Access to Failback Transition Host
The console can actively access the transition host network,The transition host is located on a private network or has a public IP,Data synchronization to the transition host needs to be initiated from the console.
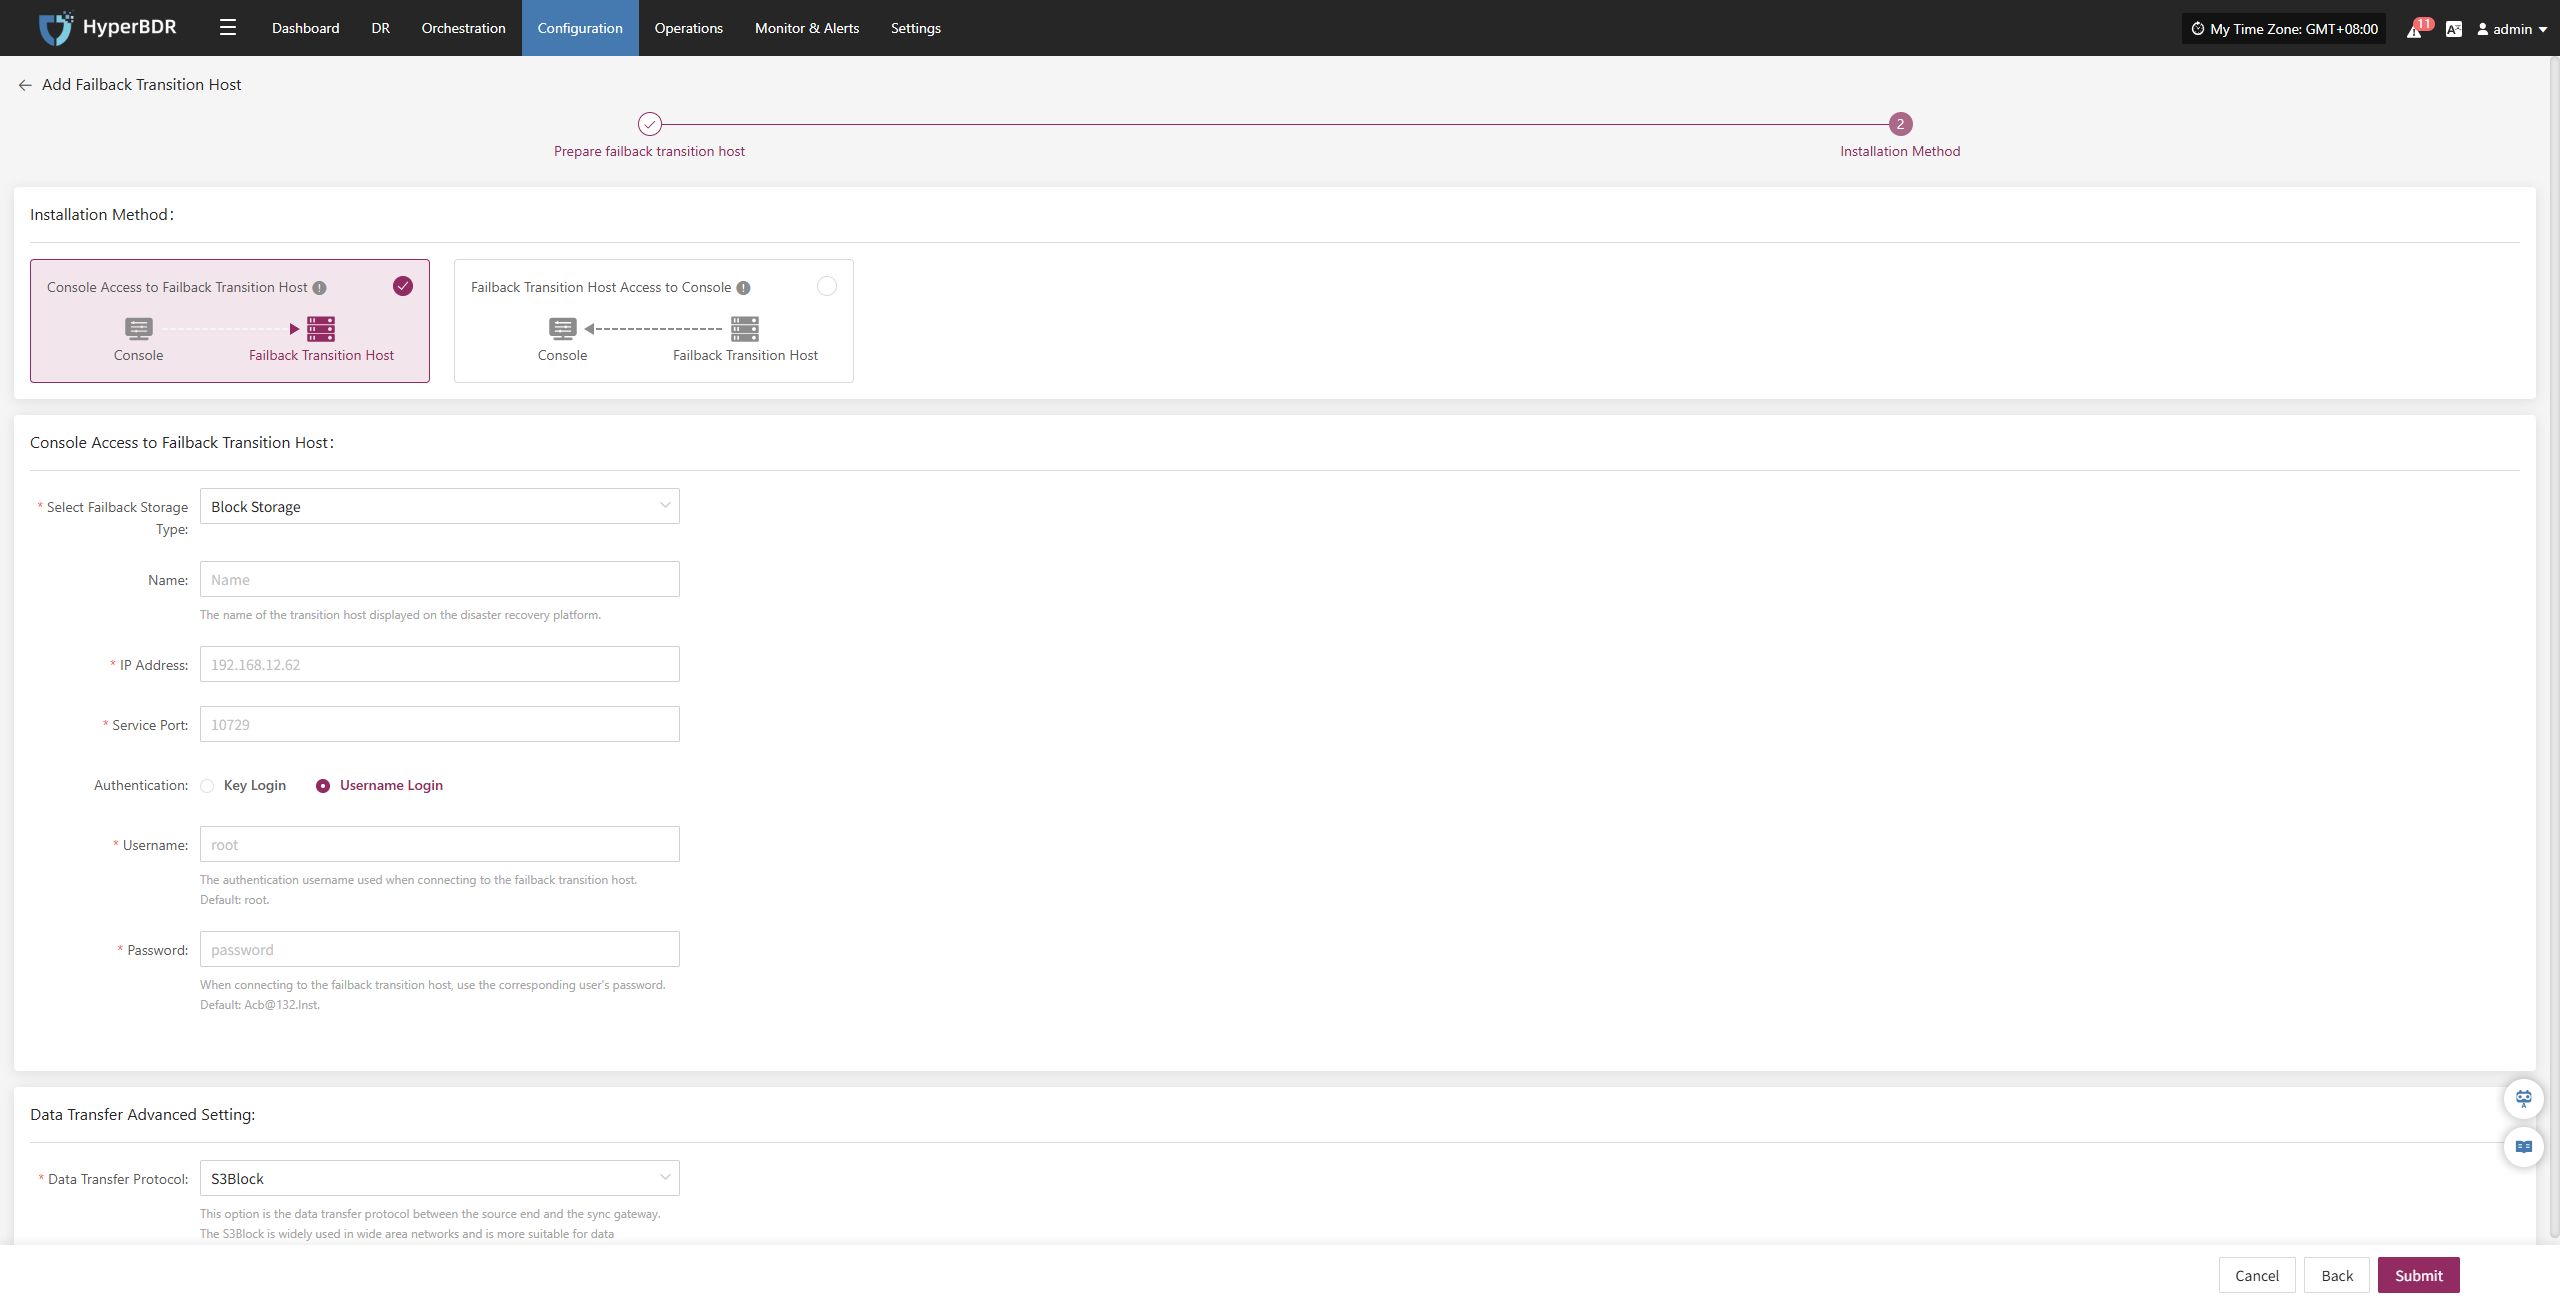
In the configuration window, select the storage method and fill in the information of the temporary transition host, such as name, IP address, service port, etc.
- Transition Host Configuration Instructions
| Configuration Item | Example Value | Description |
|---|---|---|
| Storage Type | Block Storage | Select the storage type for backup data writing, which supports both Block Storage and Object Storage. |
| Name | test | Used to identify and name the host within the HyperBDR platform. |
| IP Address | 192.168.7.146 | The address of the Transition host. |
| Service Port | 10729 | The port number that the storage service listens on, with a default value of 10729. |
| Authentication | Username Login | Authentication login authentication method, currently using username + password. You can choose either key or username/password login method. |
| Username | root | Store the authentication username for the connection. |
| Password | Acb@132.Inst | Store the authentication password for the connection, and it is recommended to modify the default value after deployment. |
| Advanced Settings for Data Transmission | iSCSI | The data transfer protocol between the source and the synchronization gateway supports S3Block and iSCSI: <br> • S3Block: Suitable for wide area network environments, with high transfer efficiency; <br> • iSCSI: Suitable for private network scenarios with stable network environments. <br> Note: This option is unavailable when the storage type is object storage. |
After filling in the information, click "OK", and the system will start creating the transition host. When the status shows "Available", it indicates that the addition is completed, and subsequent operations can be performed.
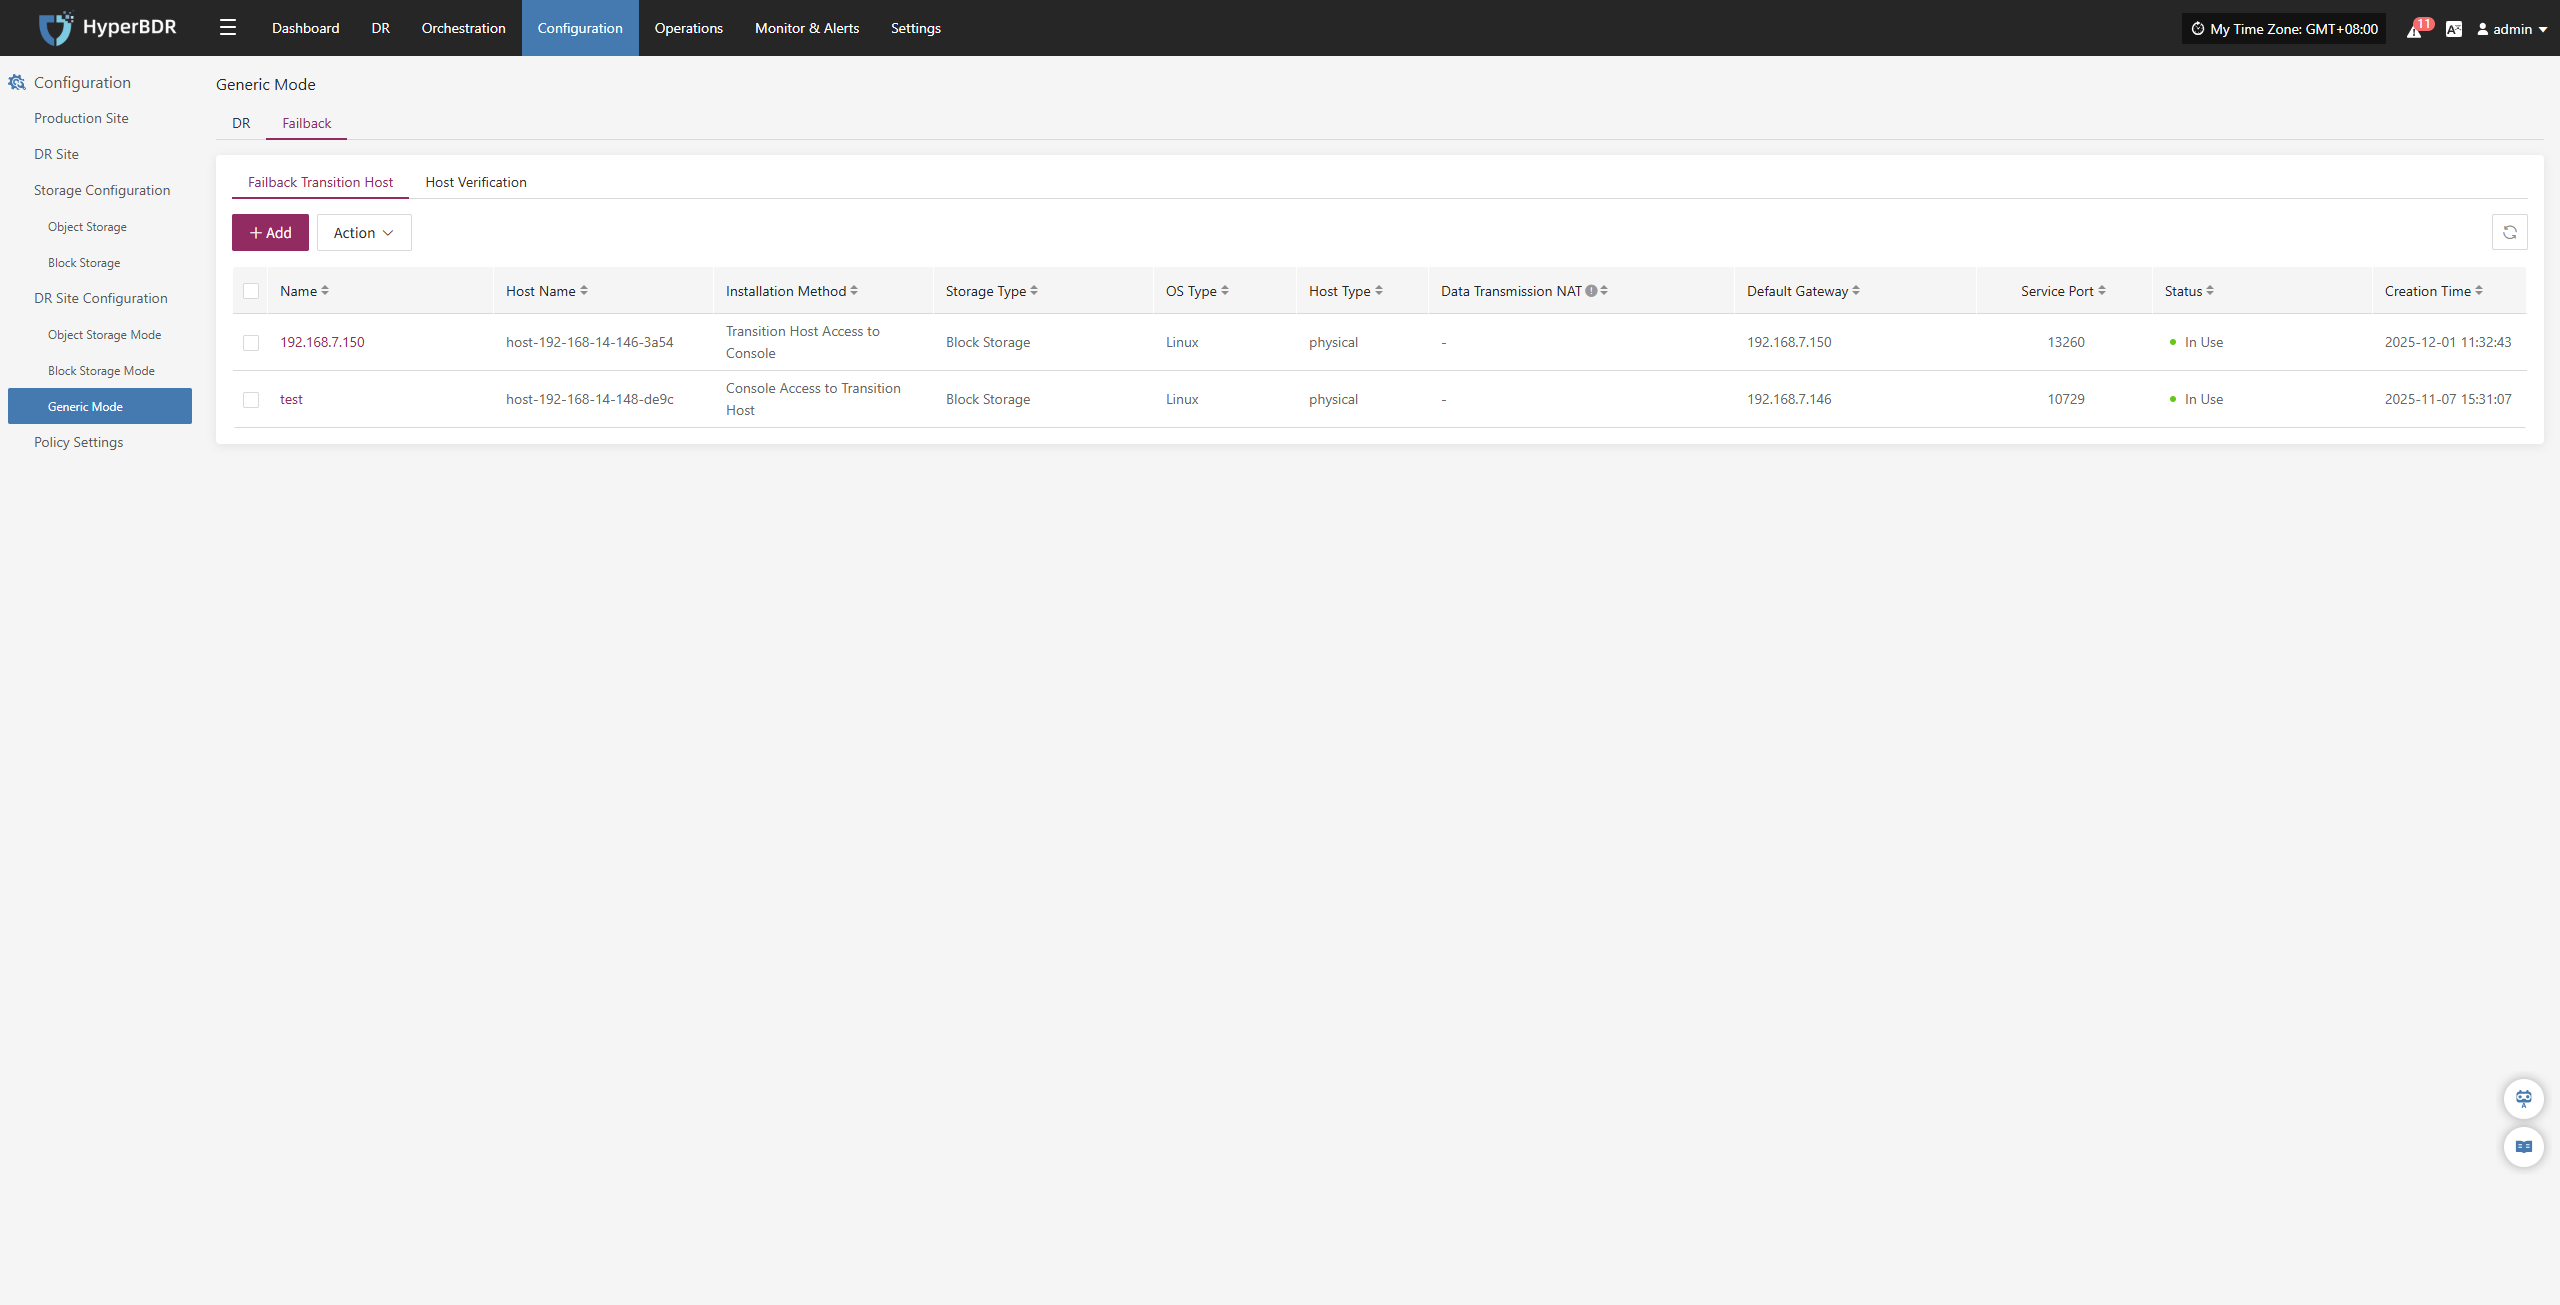
Installation Method 2: Transition Host Access to Console
The console can actively access the transition host network,The transition host is located on a private network or has a public IP,Data synchronization to the transition host needs to be initiated from the console.
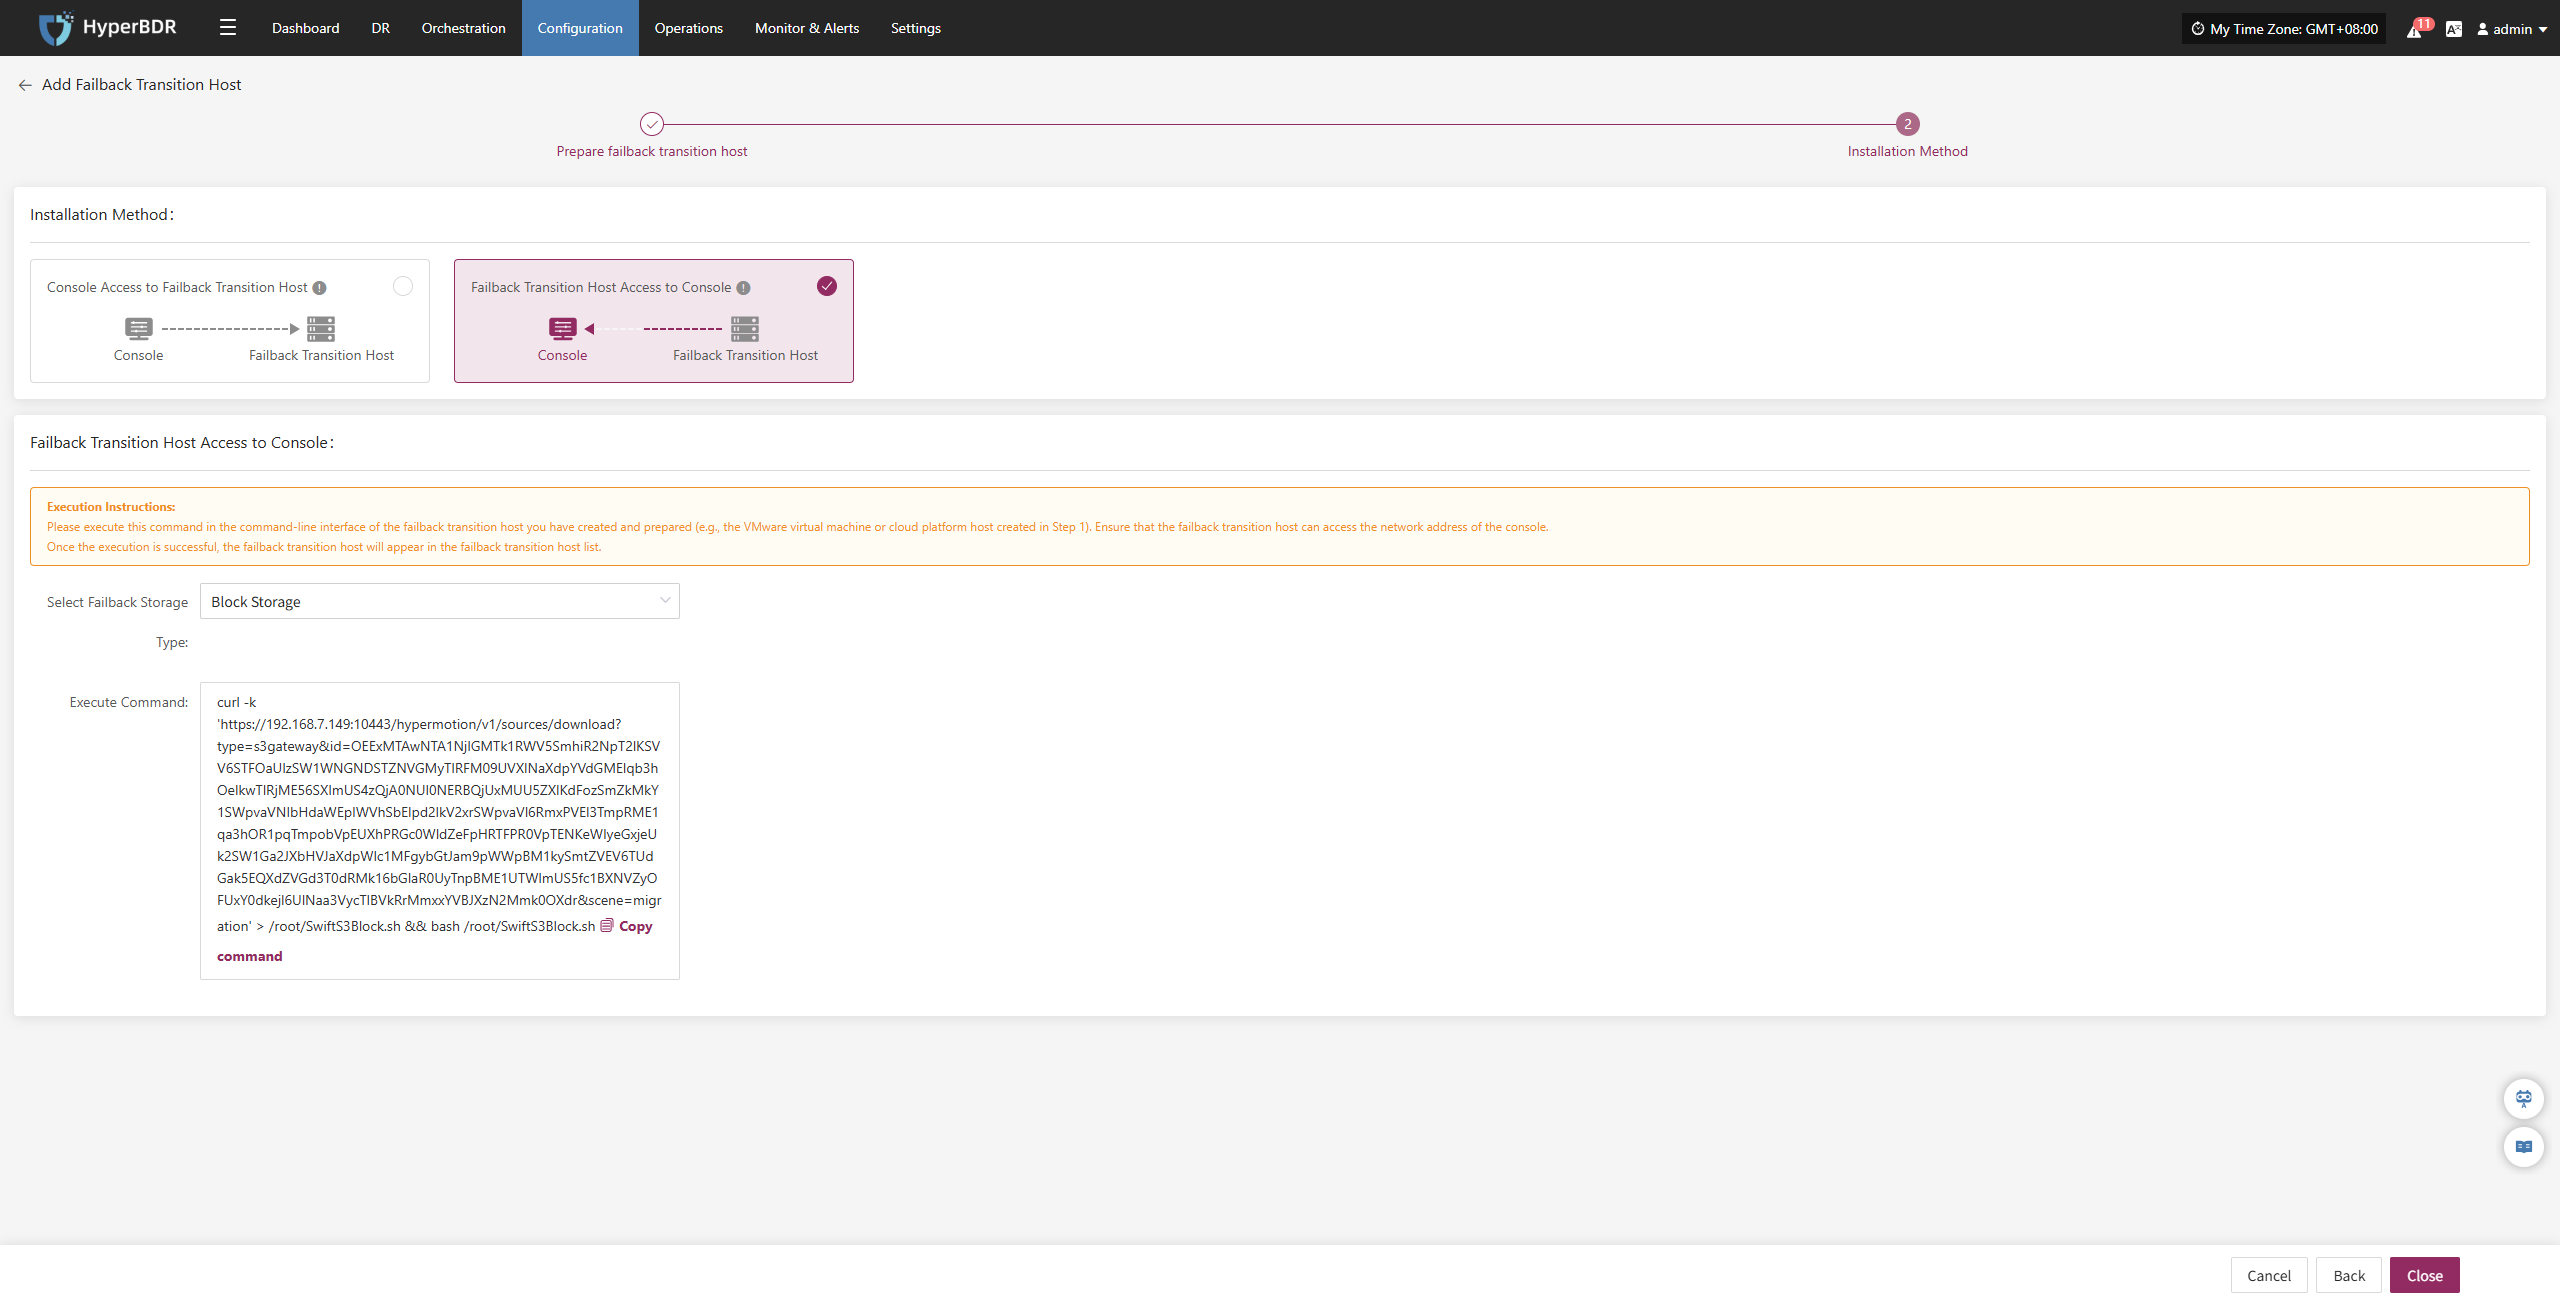
Please copy and execute this command in the command-line interface of the transition host you have created and prepared (e.g., the VMware virtual machine or Cloud Computing Platform host created in the "<Add Transition Host" step). Ensure that the transition host can access the network address of the Console.
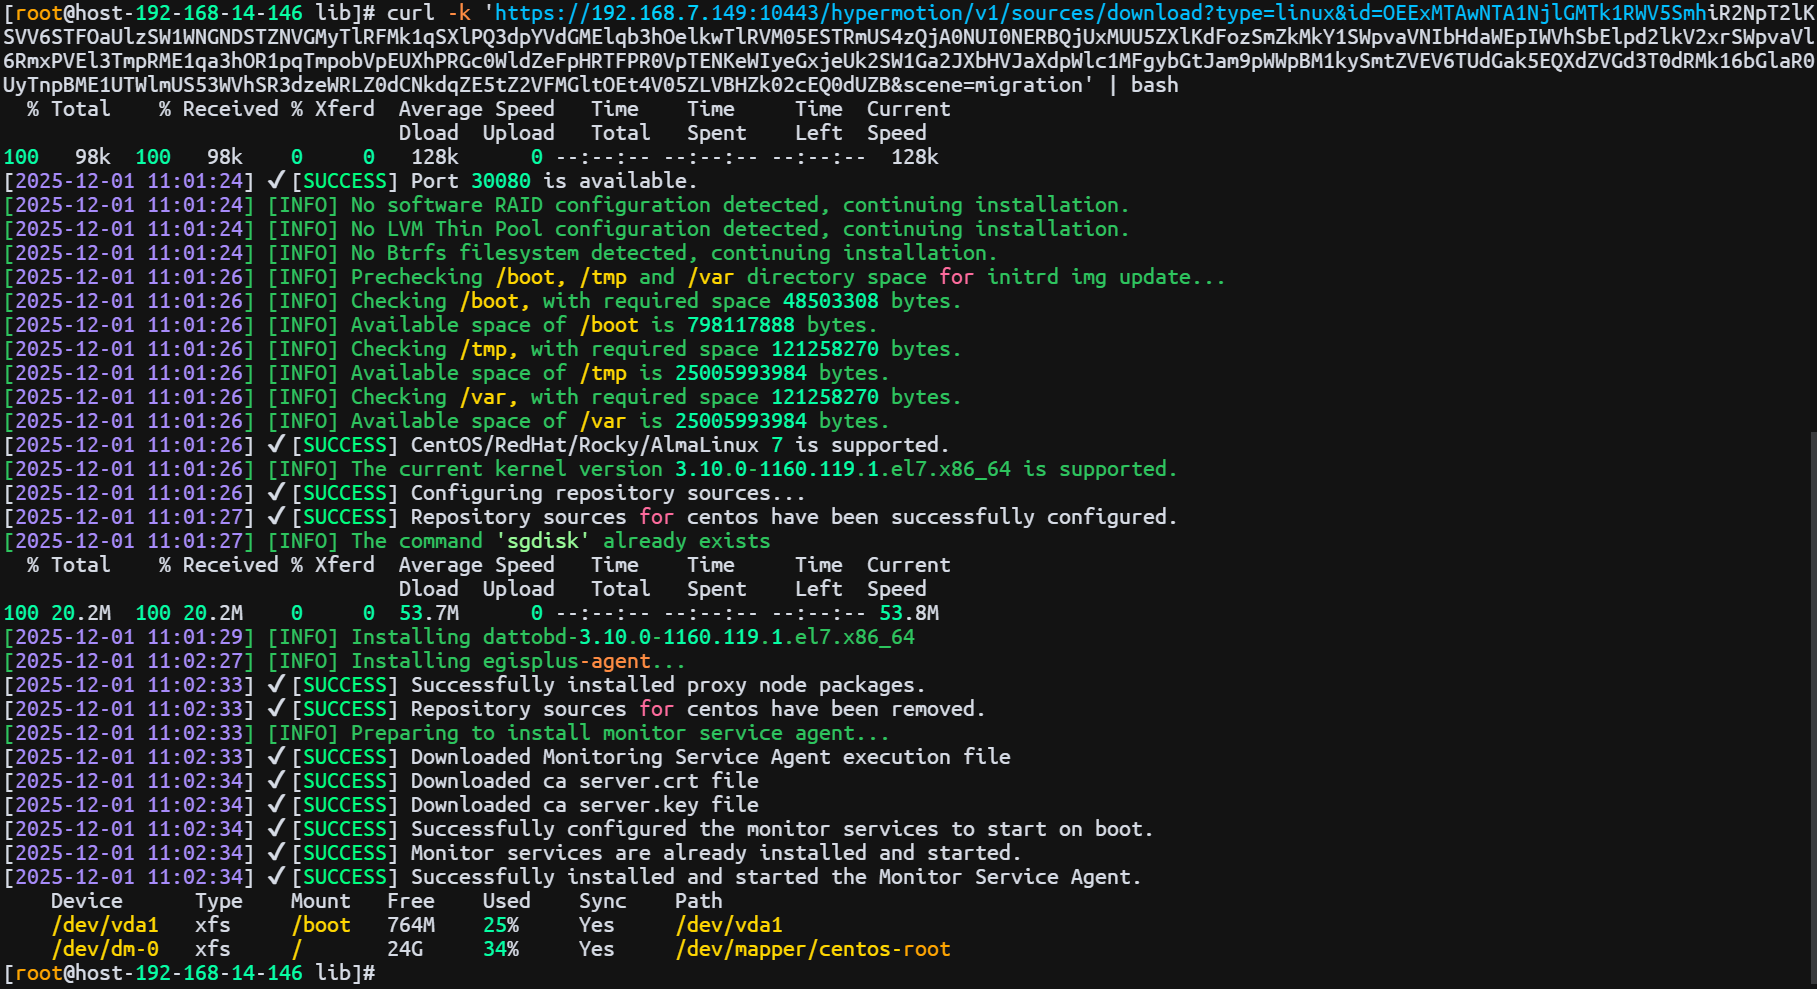
After the comparison of the results in the above figure is successfully executed, the transition host will appear in the transition host list.

Action
After selecting the target host, click the [Action] button on the page to perform more configurations
Data Transmission NAT
After selecting the target host, click [Action] > [Data Transmission NAT] to specify the external mapped IP address used for data stream synchronization.
Note: This function is mainly used in network environments with internal and external network isolation or NAT conversion to guide data flows to use the correct egress address, thereby ensuring the connectivity of the data transmission link between the source and destination.
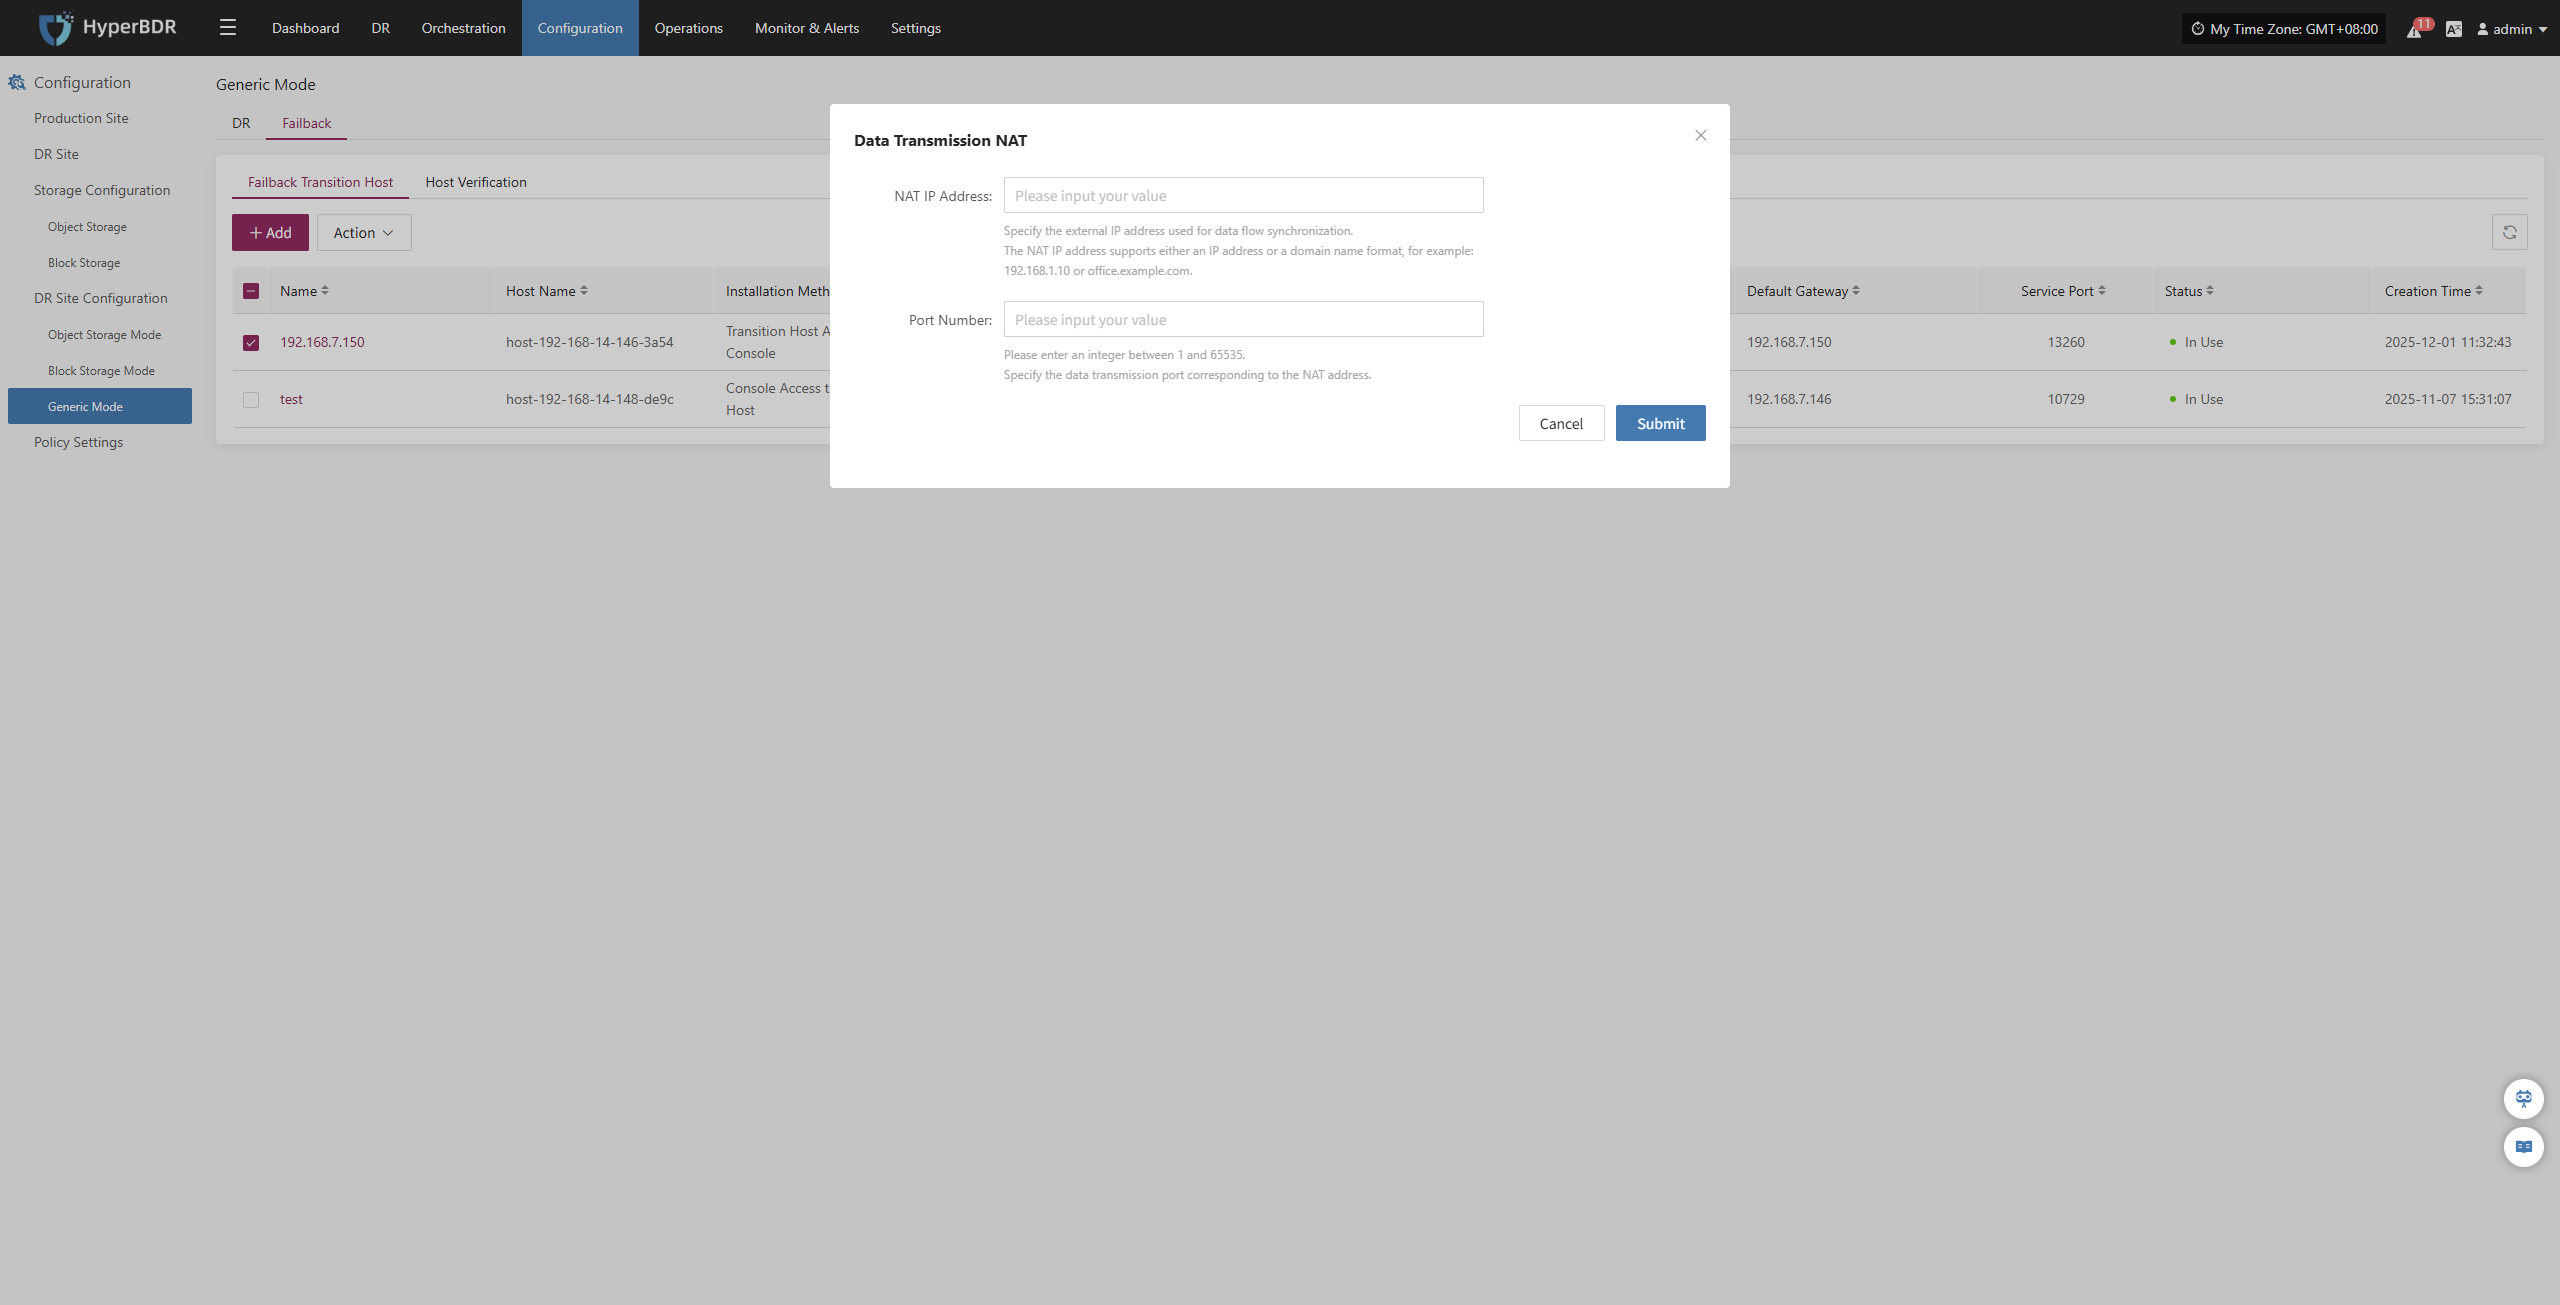
Configure the host NAT mapping address according to the network structure, complete the addition, and ensure that data traffic can be transmitted normally.
Delete
After selecting the target host, click [Action] > [Delete] to remove the transitional host.
Host Verification
Only hosts that have completed the "DR > Sync > Drill" process will appear in the "Host Verification" list. Hosts that have not completed data sync will not appear here.
After starting a DR drill, related hosts will appear in this list. Wait for the verification process to complete before proceeding.
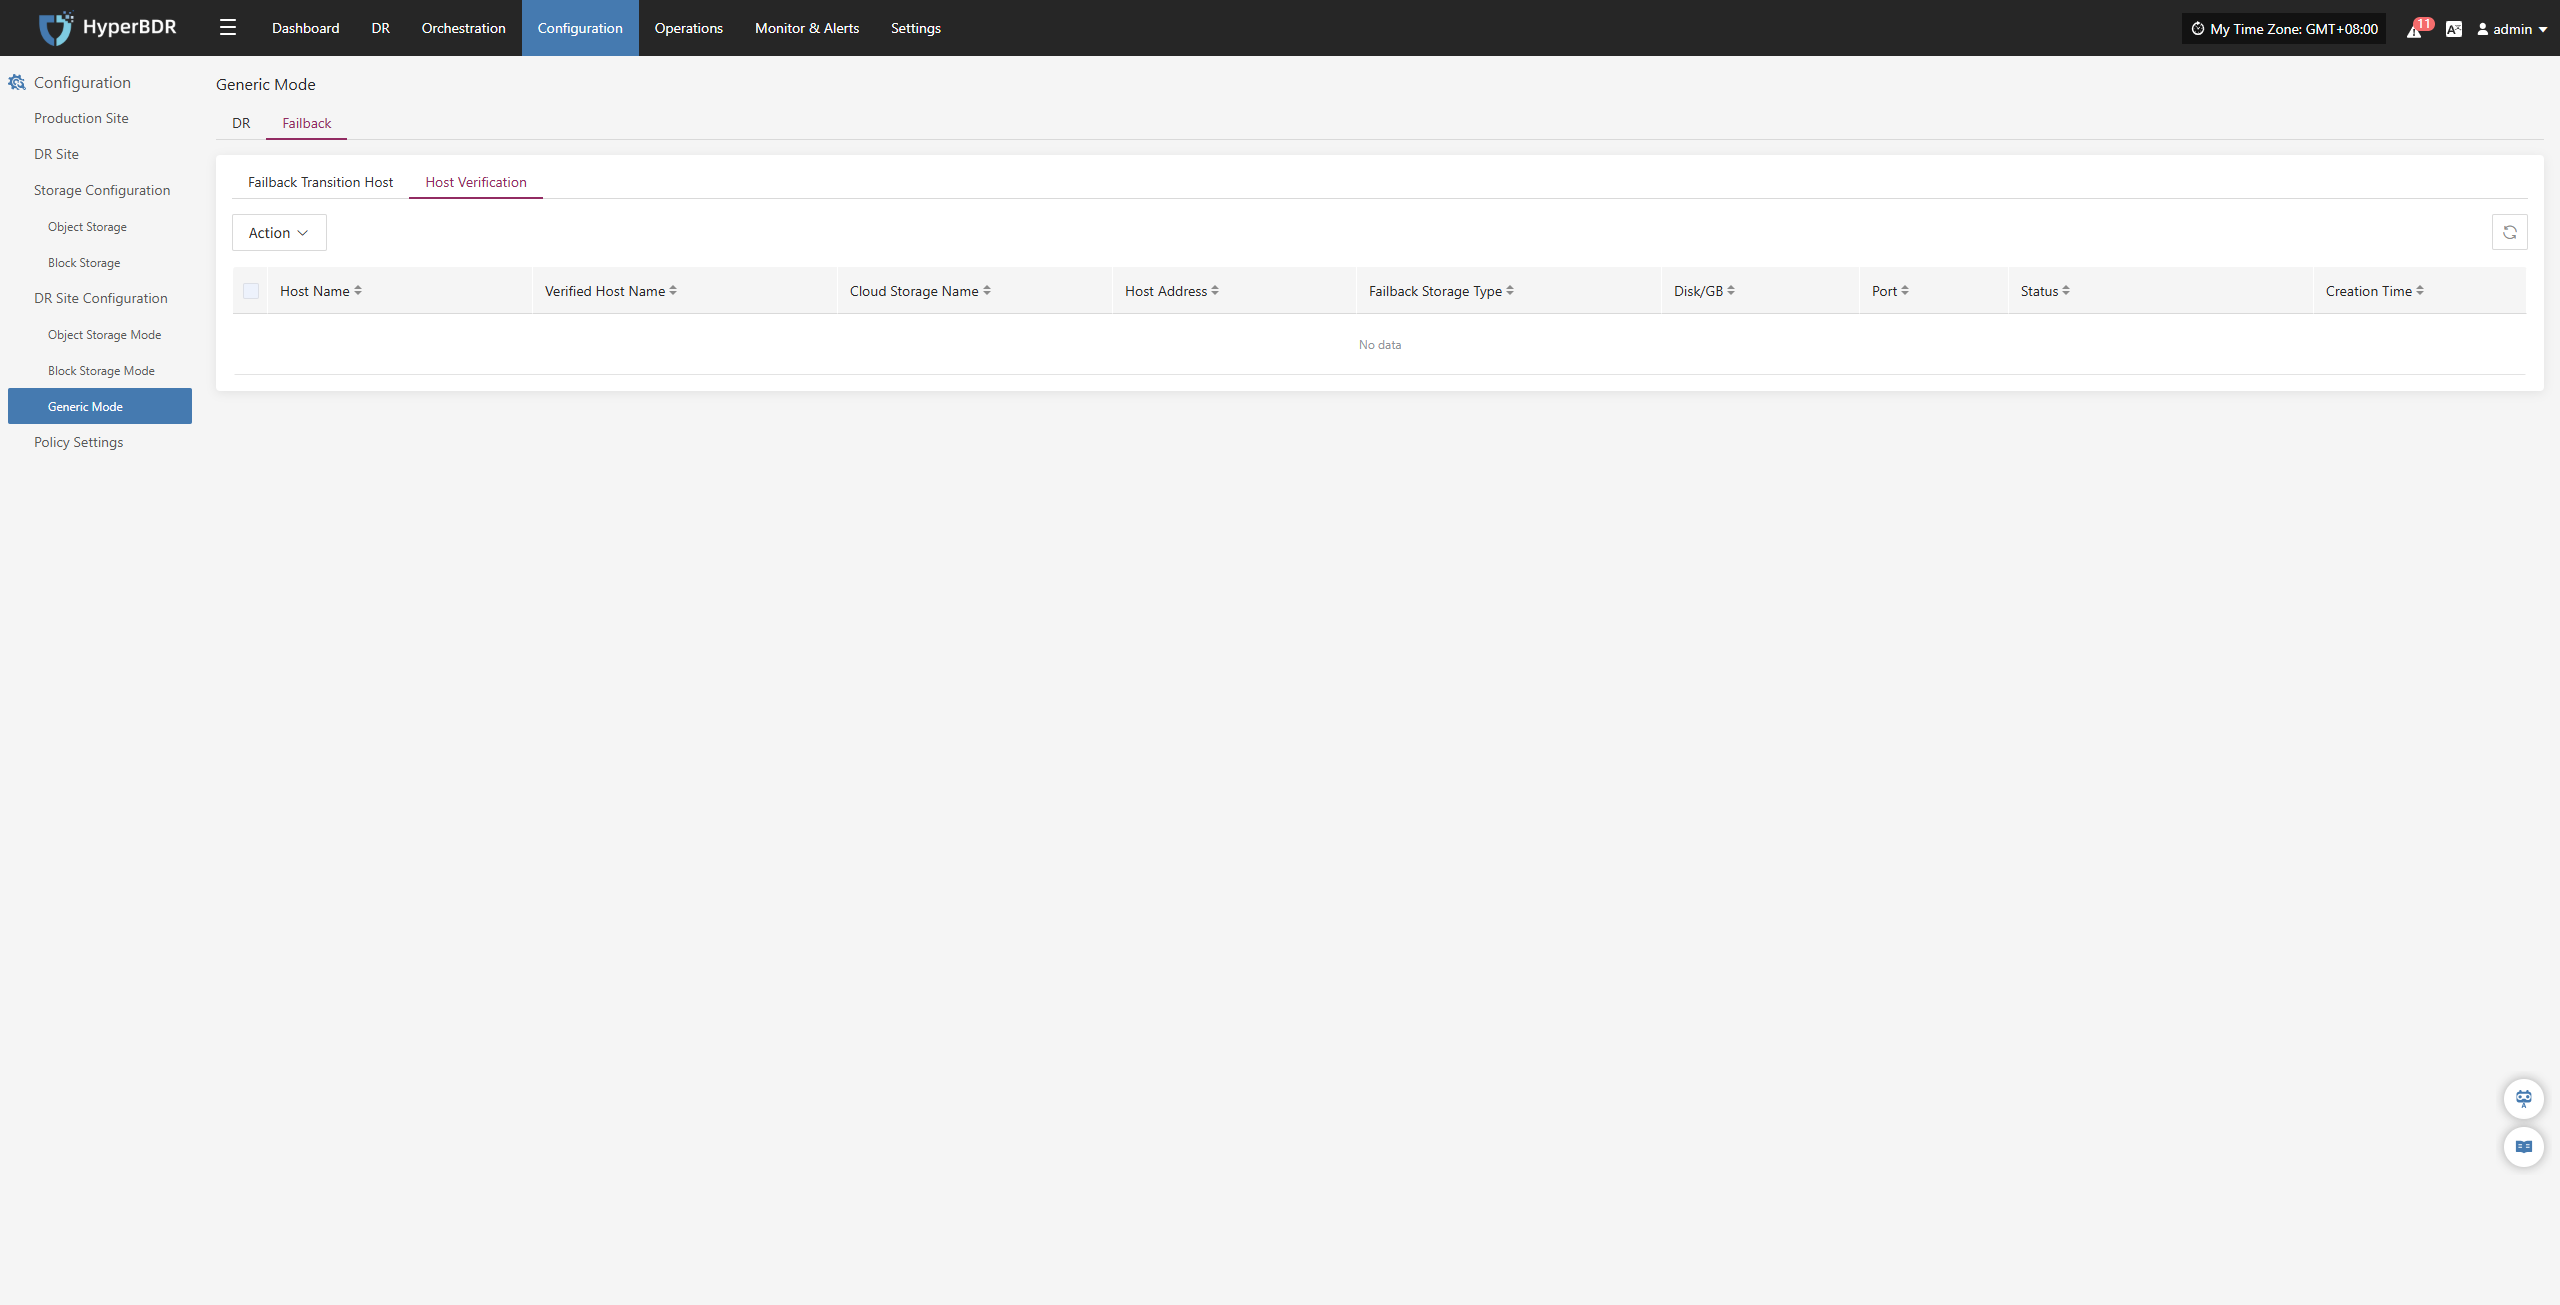
Action
After selecting the target host, click the [Action] button on the page to perform driver injection and deletion operations
Driver Injection
After selecting the target host, click [Action] > [Driver Repair] to inject the necessary drivers into the transition host and complete host recovery
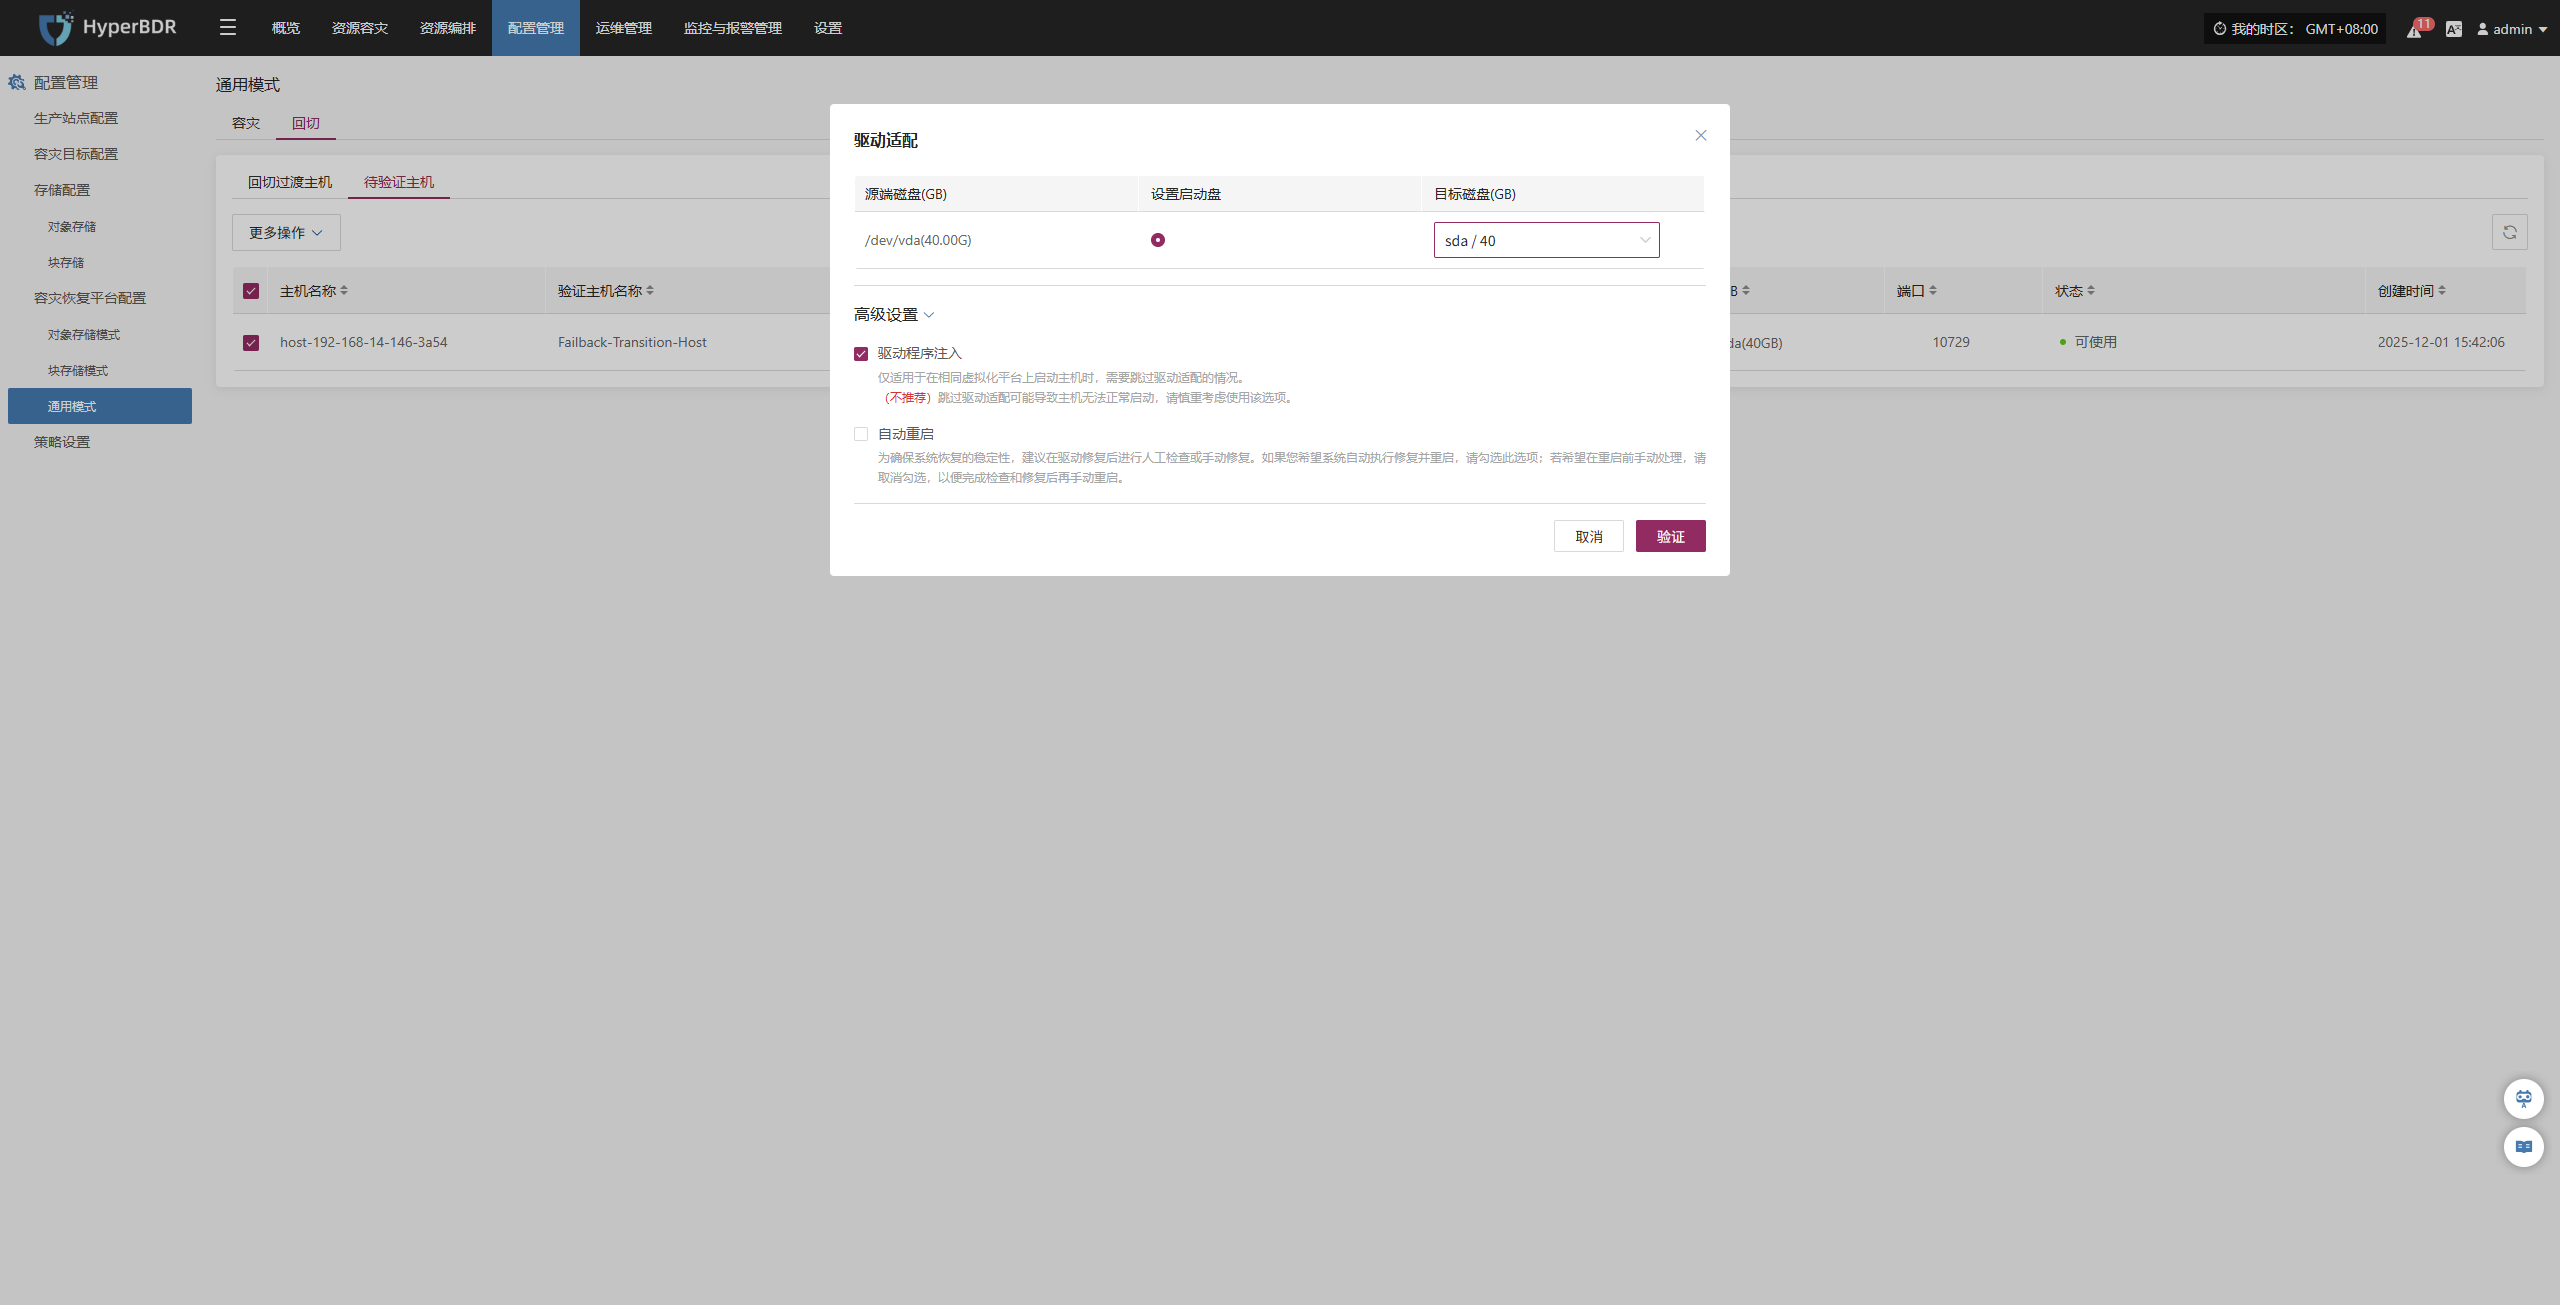
Delete
After selecting the target host, click [Action] > [Delete] to remove the host to be verified.
Policy Settings
The policy settings module is used to centrally configure and manage key control policies for DR processes, helping users flexibly define data sync, resource scheduling, and retention strategies. There are three types of policies: Sync Policy (defines sync frequency and method), Speed Limit Policy (controls network or IO usage during sync), and Retention Policy (sets snapshot or replica retention period and count to optimize storage and ensure recovery needs).
Create Policy
Go to [Configuration] > [Policy Settings]. Users can configure policies for different scenarios in both DR and Failback modules.
Click [Create Policy] to add a new policy label and fill in the required configuration as needed. The system supports multiple policy types at the same time, so you can flexibly manage Sync, Speed Limit, and Retention policies for comprehensive DR and failback control.
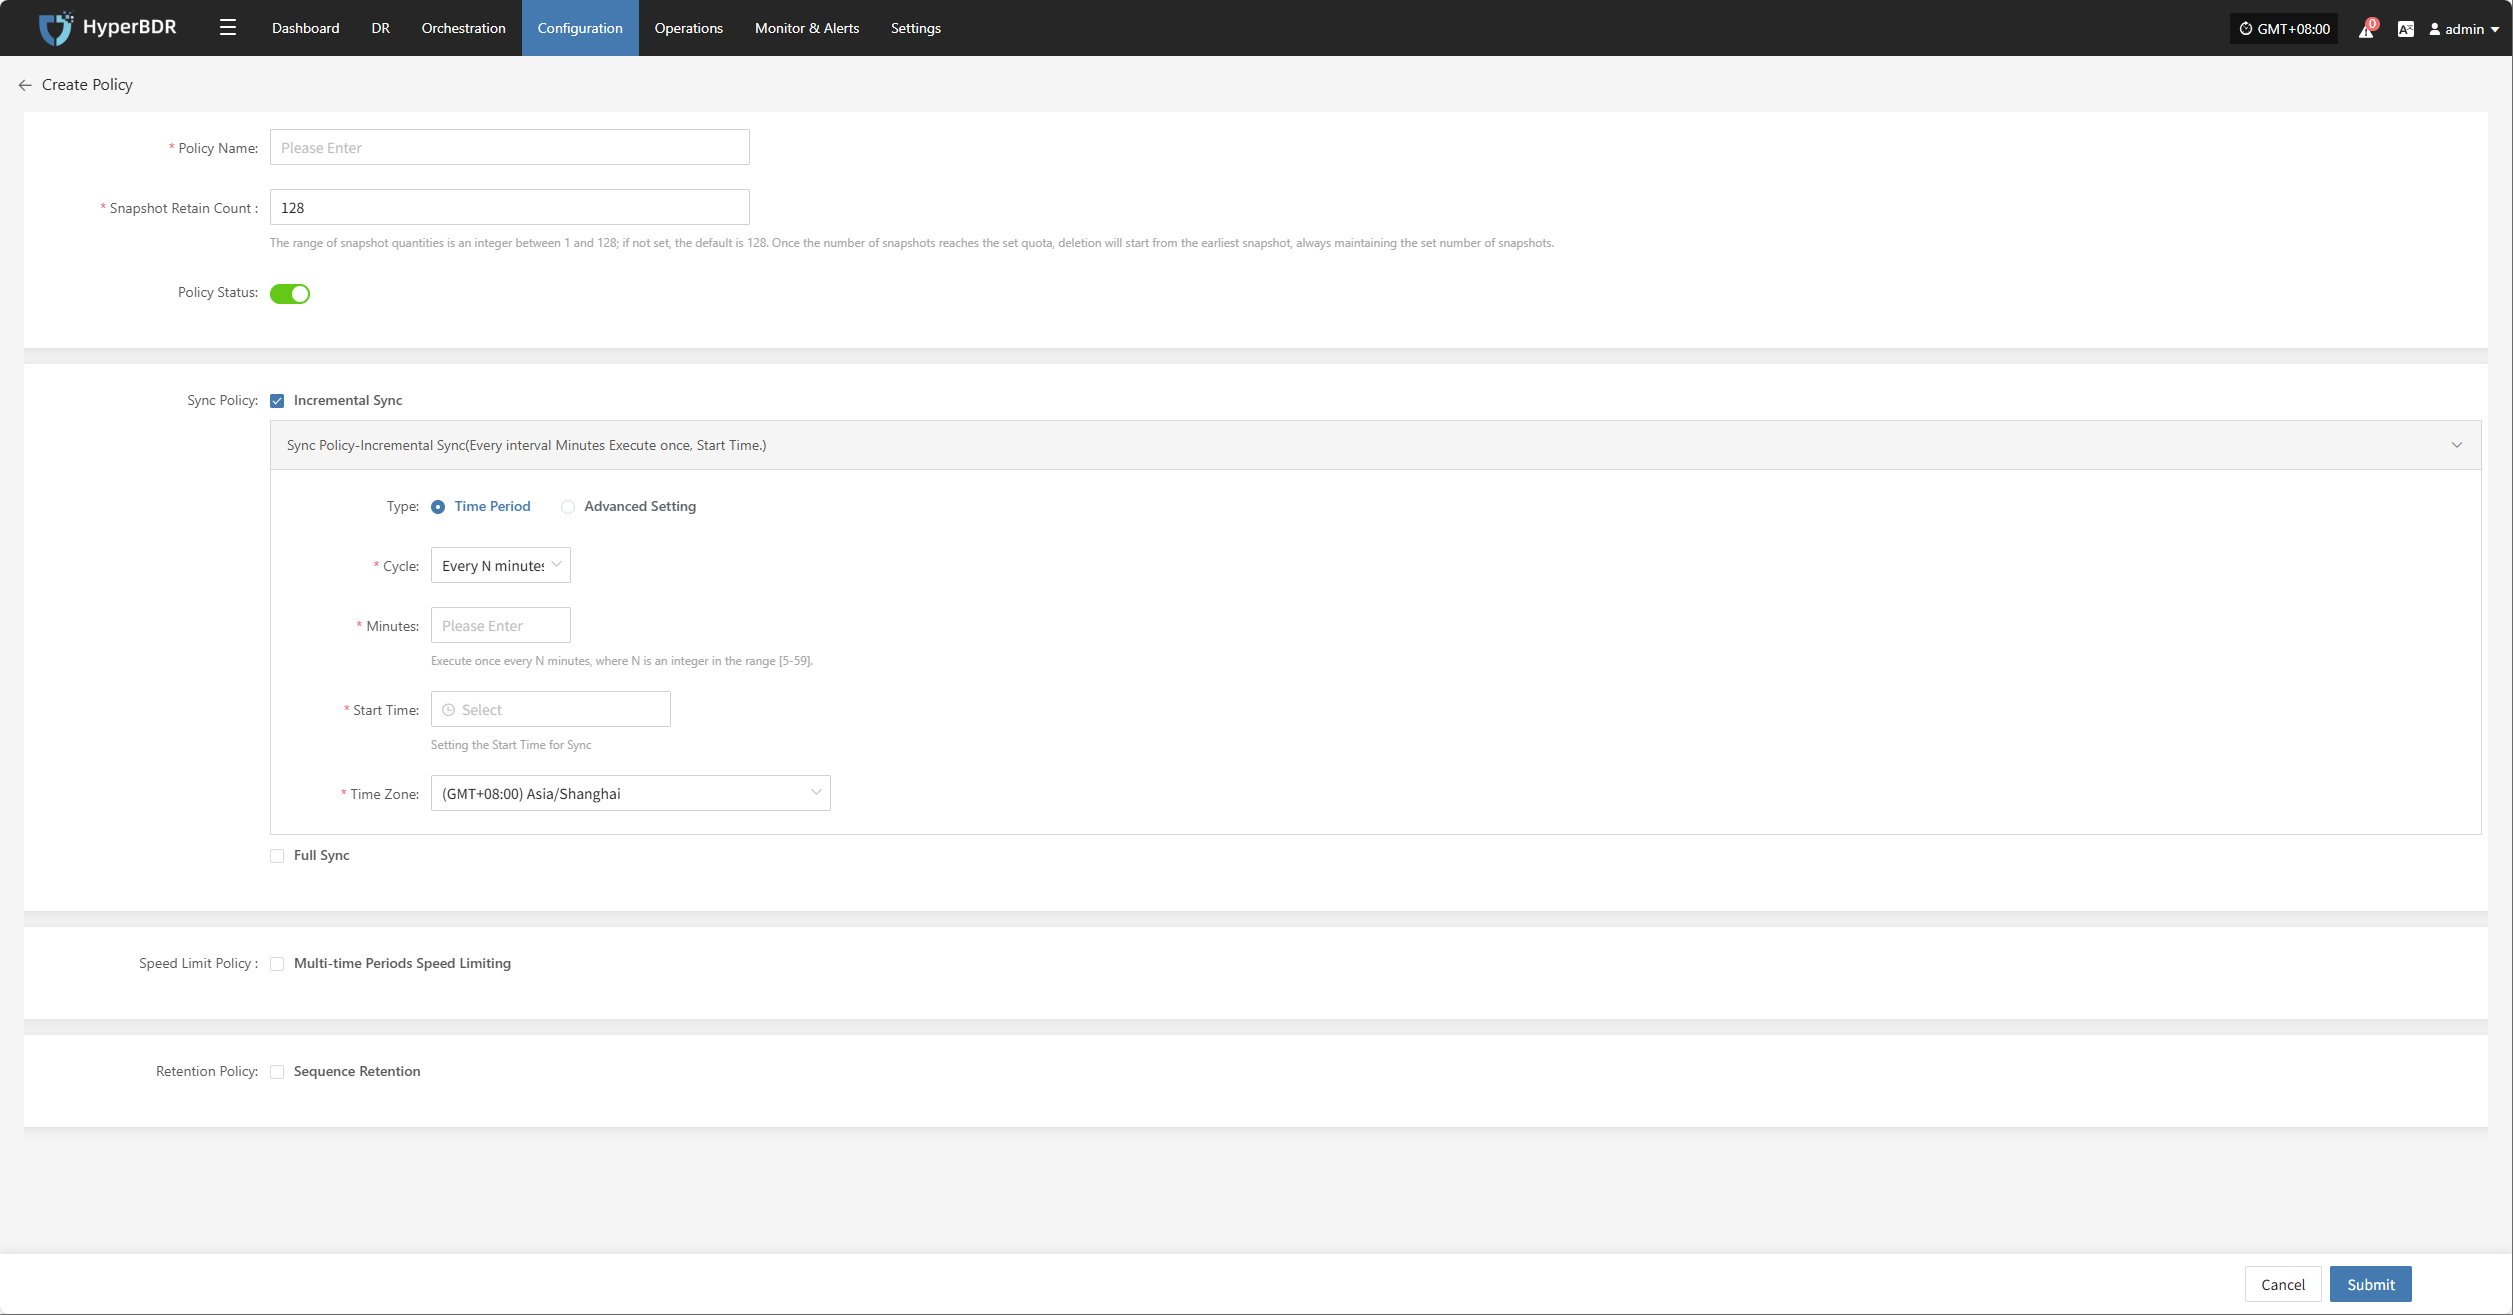
After entering the policy name, setting the snapshot retention count, and selecting the policy status, you can configure the following details.
Sync Policy
You can set up sync policies by choosing a time period or using advanced settings for different types.
Incremental and full sync can be configured in parallel. To ensure tasks run smoothly, avoid overlapping times.
Incremental Sync
Enable incremental sync in the policy. After the initial full sync, the system will run incremental sync tasks at the set frequency or trigger, providing ongoing, lightweight data protection.
Time Period Settings

| Field | Example | Description |
|---|---|---|
| Type | Time Period | Type of sync schedule |
| Cycle | Every N minutes | Runs at a fixed interval |
| Minutes | 30 | Runs every N minutes, N = 5–59 |
| Start Time | 2025-05-27 00:00:00 | First run time, then triggers by cycle |
| Time Zone | (GMT+08:00) Asia/shanghai | Time zone for scheduling, set explicitly |
Advanced Setting
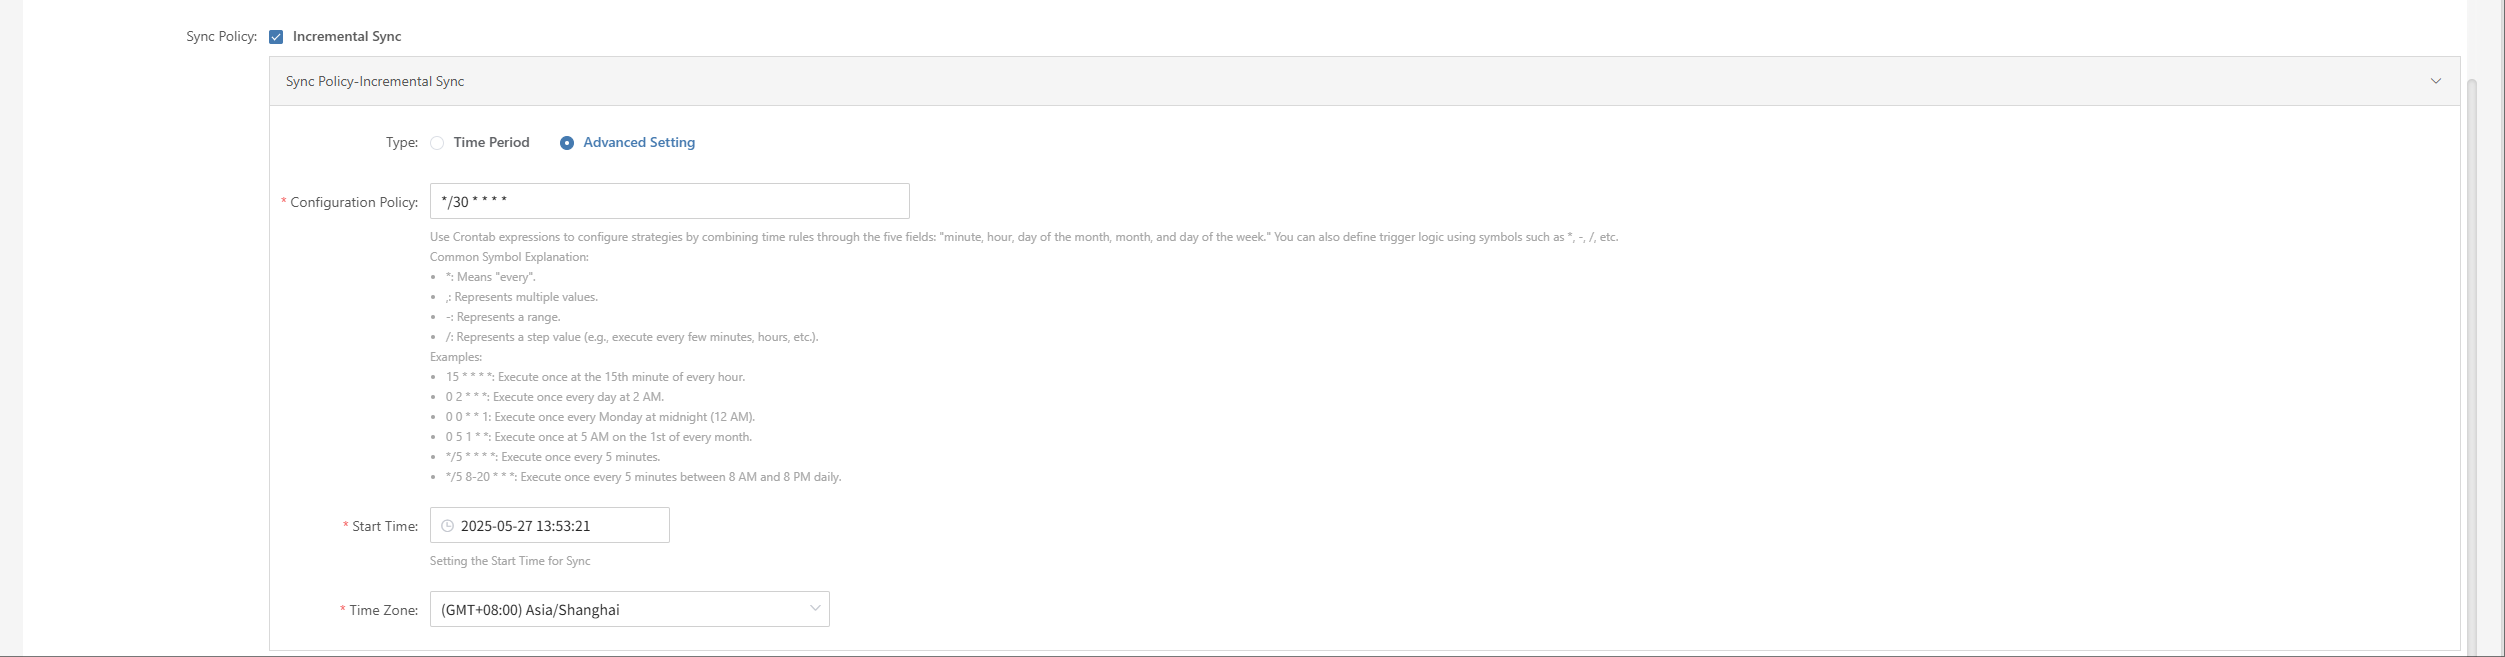
| Field | Example | Description |
|---|---|---|
| Type | Advanced | Use crontab expressions for flexible scheduling. |
| Configuration | */30 * * * * | Use crontab to set rules with minute, hour, day, month, week. Symbols: * every, , multiple, - range, / step. Examples: 15 * * * * 15th min each hour 0 2 * * * 2am daily 0 0 * * 1 Mon midnight 0 5 1 * * 5am 1st monthly */5 * * * * every 5 min */5 8-20 * * * every 5 min 8am-8pm |
| Start Time | 2025-05-27 00:00:00 | First run time |
| Time Zone | (GMT+08:00) Asia/shanghai | Time zone for scheduling, set explicitly |
Full Sync
The system will run a full sync first, so the target has a complete copy of the source. This uses more resources and bandwidth and may take longer, so schedule carefully to avoid business impact.
Time Period Settings

| Field | Example | Description |
|---|---|---|
| Type | Time Period | Type of sync schedule |
| Cycle | Every N minutes | Runs at a fixed interval |
| Minutes | 30 | Runs every N minutes, N = 5–59 |
| Start Time | 2025-05-27 00:00:00 | First run time, then triggers by cycle |
| Time Zone | (GMT+08:00) Asia/shanghai | Time zone for scheduling, set explicitly |
Advanced Setting
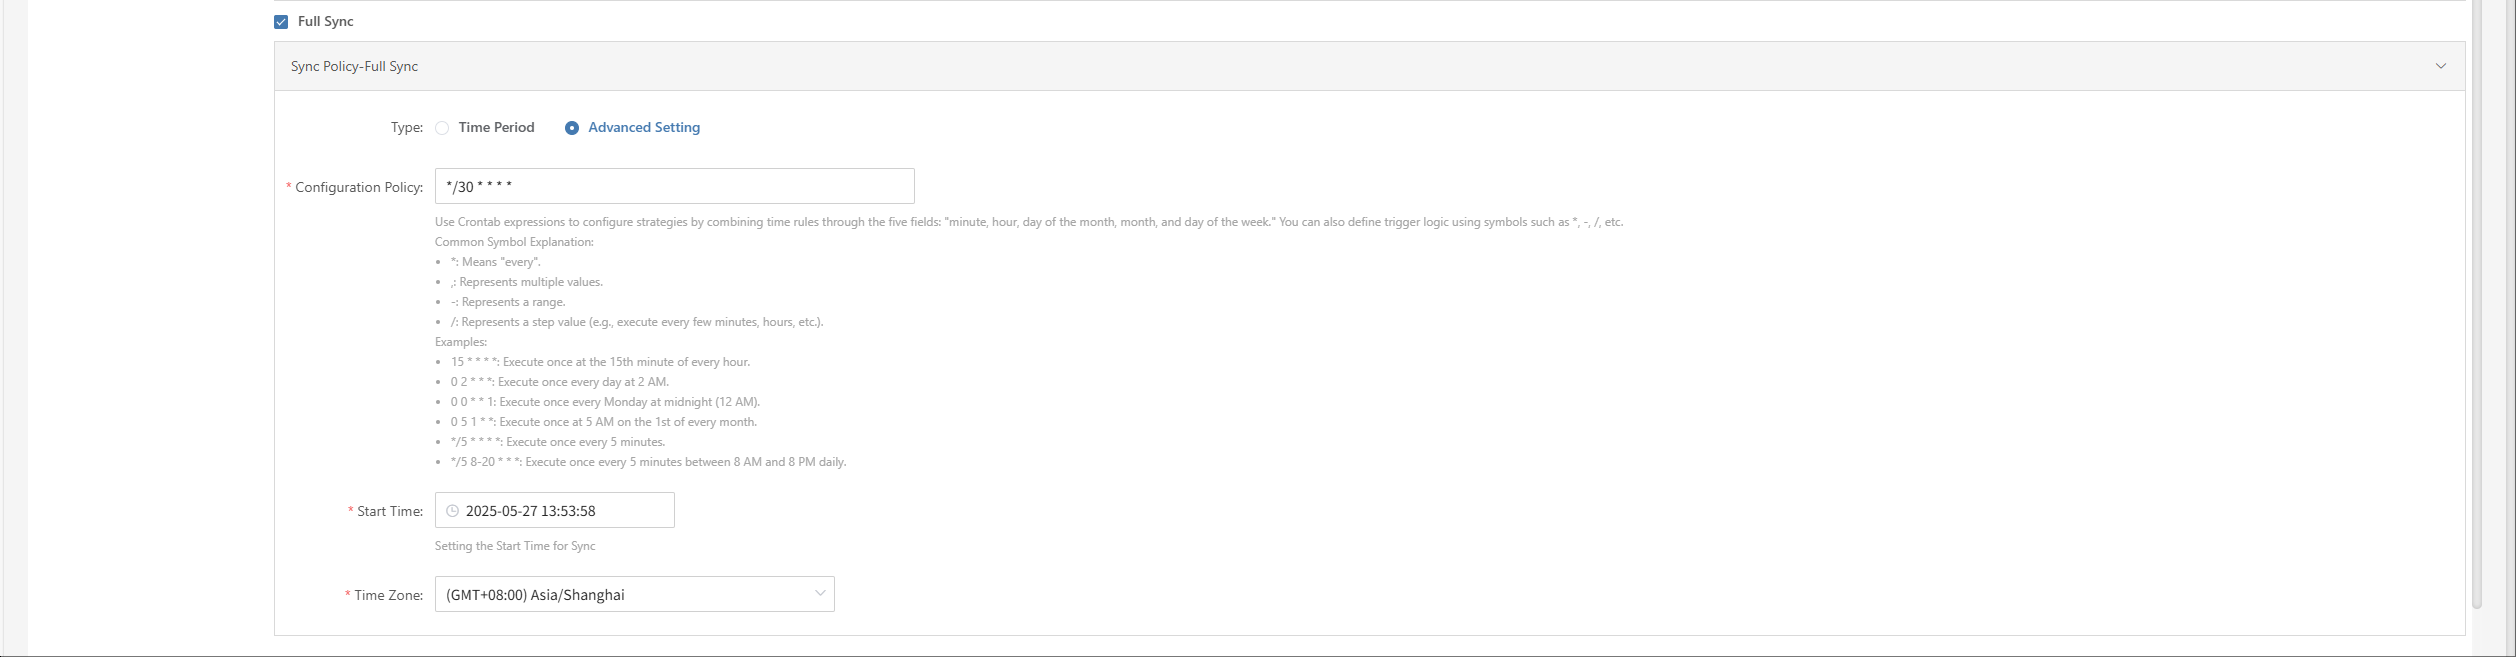
| Field | Example | Description |
|---|---|---|
| Type | Advanced | Use crontab expressions for flexible scheduling. |
| Configuration | */30 * * * * | Use crontab to set rules with minute, hour, day, month, week. Symbols: * every, , multiple, - range, / step. Examples: 15 * * * * 15th min each hour 0 2 * * * 2am daily 0 0 * * 1 Mon midnight 0 5 1 * * 5am 1st monthly */5 * * * * every 5 min */5 8-20 * * * every 5 min 8am-8pm |
| Start Time | 2025-05-27 00:00:00 | First run time |
| Time Zone | (GMT+08:00) Asia/shanghai | Time zone for scheduling, set explicitly |
Speed Limit Policy
You can define multiple time periods, each with its own speed limit, to manage bandwidth during peak and off-peak hours.
You can set different speed limits for different periods in the same cycle. Changing the cycle will clear current speed limit settings.
Multi-time Periods Speed Limiting
Set different bandwidth limits for different time periods to flexibly control sync network usage.
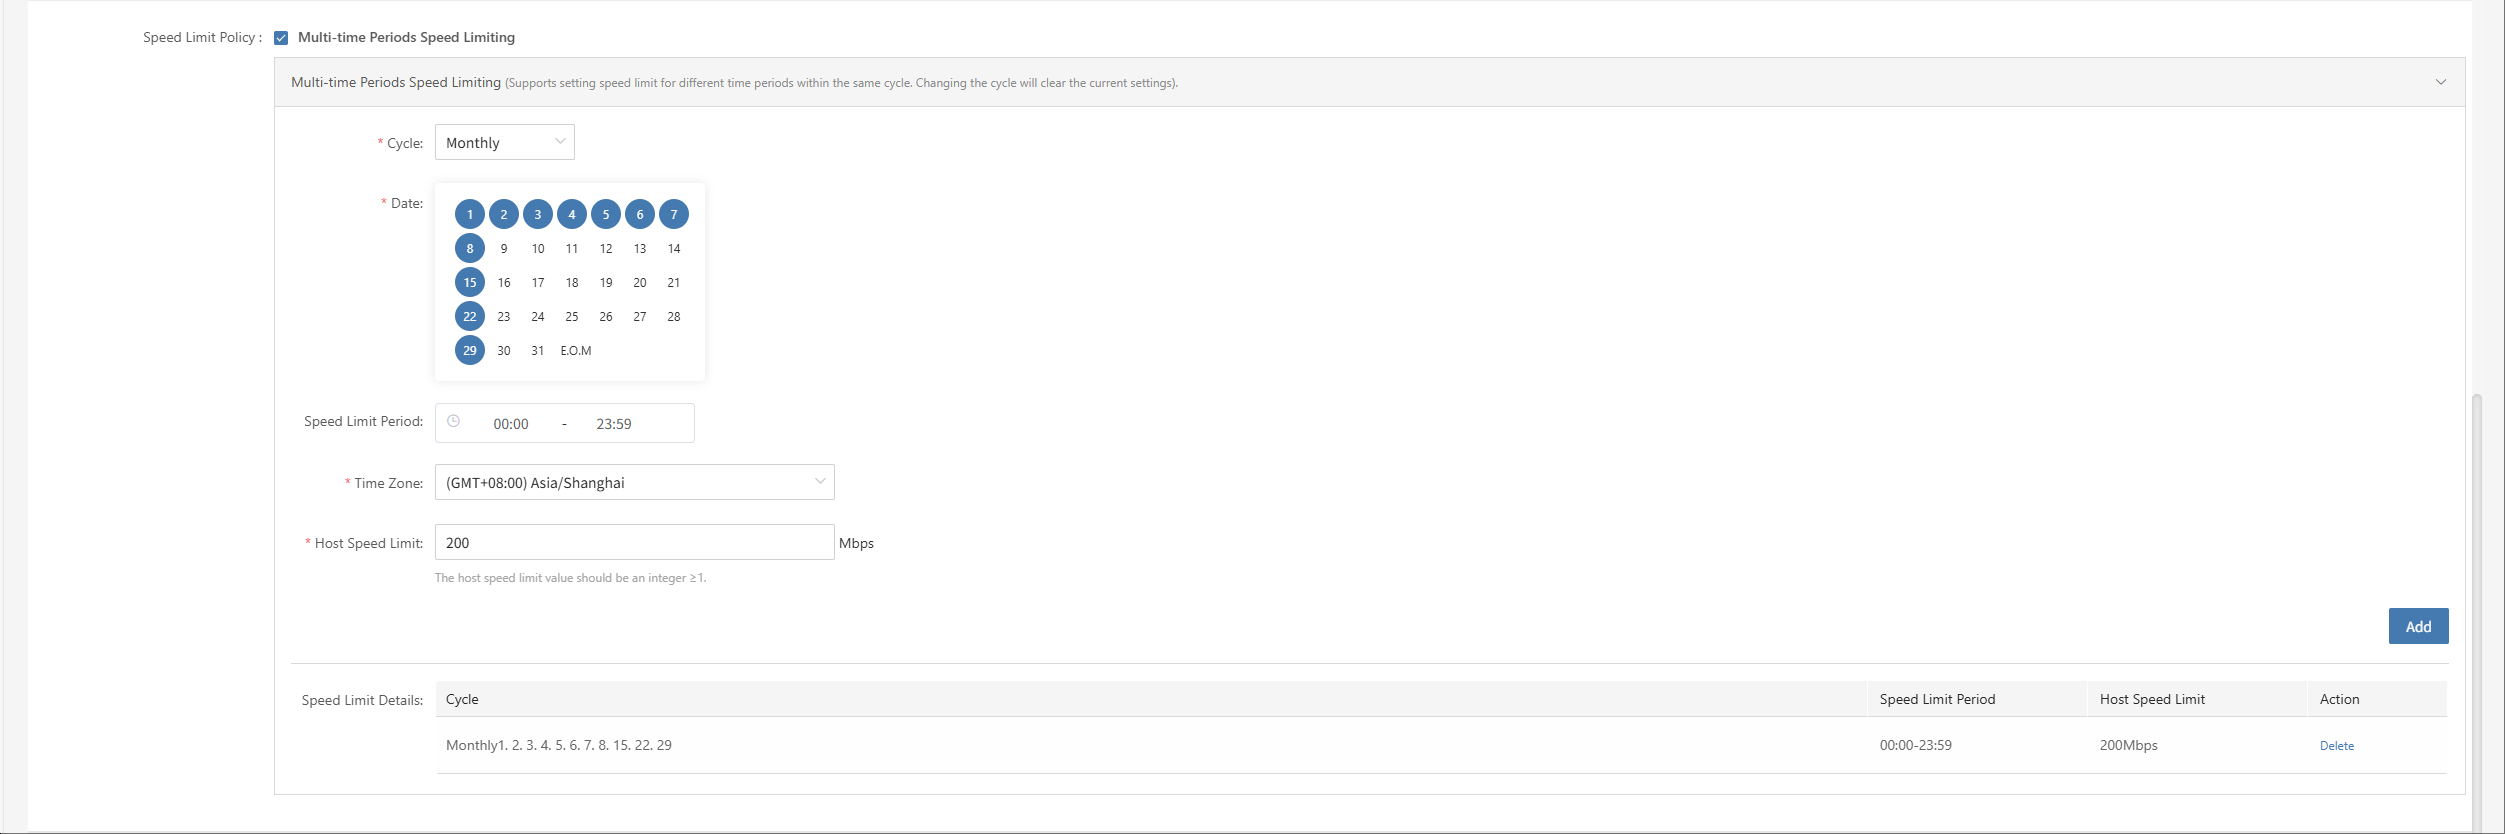
Multi-time Periods Speed Limiting Settings
| Field | Example | Description |
|---|---|---|
| Cycle | Every N days / week / month | Cycle type: daily interval, specific days of week/month |
| Days | 1 | For "every N days", N = 1-30 |
| Date | Monday, Wednesday | For "every week", select days |
| Date | 5th | For "every month", select dates |
| Limit Time | 00:00 - 23:59 | Time period for speed limit |
| Time Zone | (GMT+08:00) Asia/Shanghai | Time zone for limit period |
| Host Limit | 10 Mbps | Max bandwidth per host during sync |
| Speed Limit Details | e.g. "1,2,3,4,5,6,7,8,15,22,29 00:00-23:59 100Mbps" | Shows after adding parameters |
Retention Policy
Retention policy defines how backup or sync data is kept, helping manage storage and avoid waste.
Make sure you have enough quota for new snapshots, or sync will fail.
Sequence Retention
The system keeps the latest copies by time. When the number exceeds the set limit, old data is deleted automatically.

Sequence Retention Settings
You can set how many copies to keep for different time periods using four dropdowns. The system will keep the set number and delete older data.
Note: Minimum is 1, maximum is 129.

Action
Select a policy and click [Actions] to configure or edit.
Modify
Select a policy, click [Actions] > [Modify] to edit the name, snapshot count, or other settings.
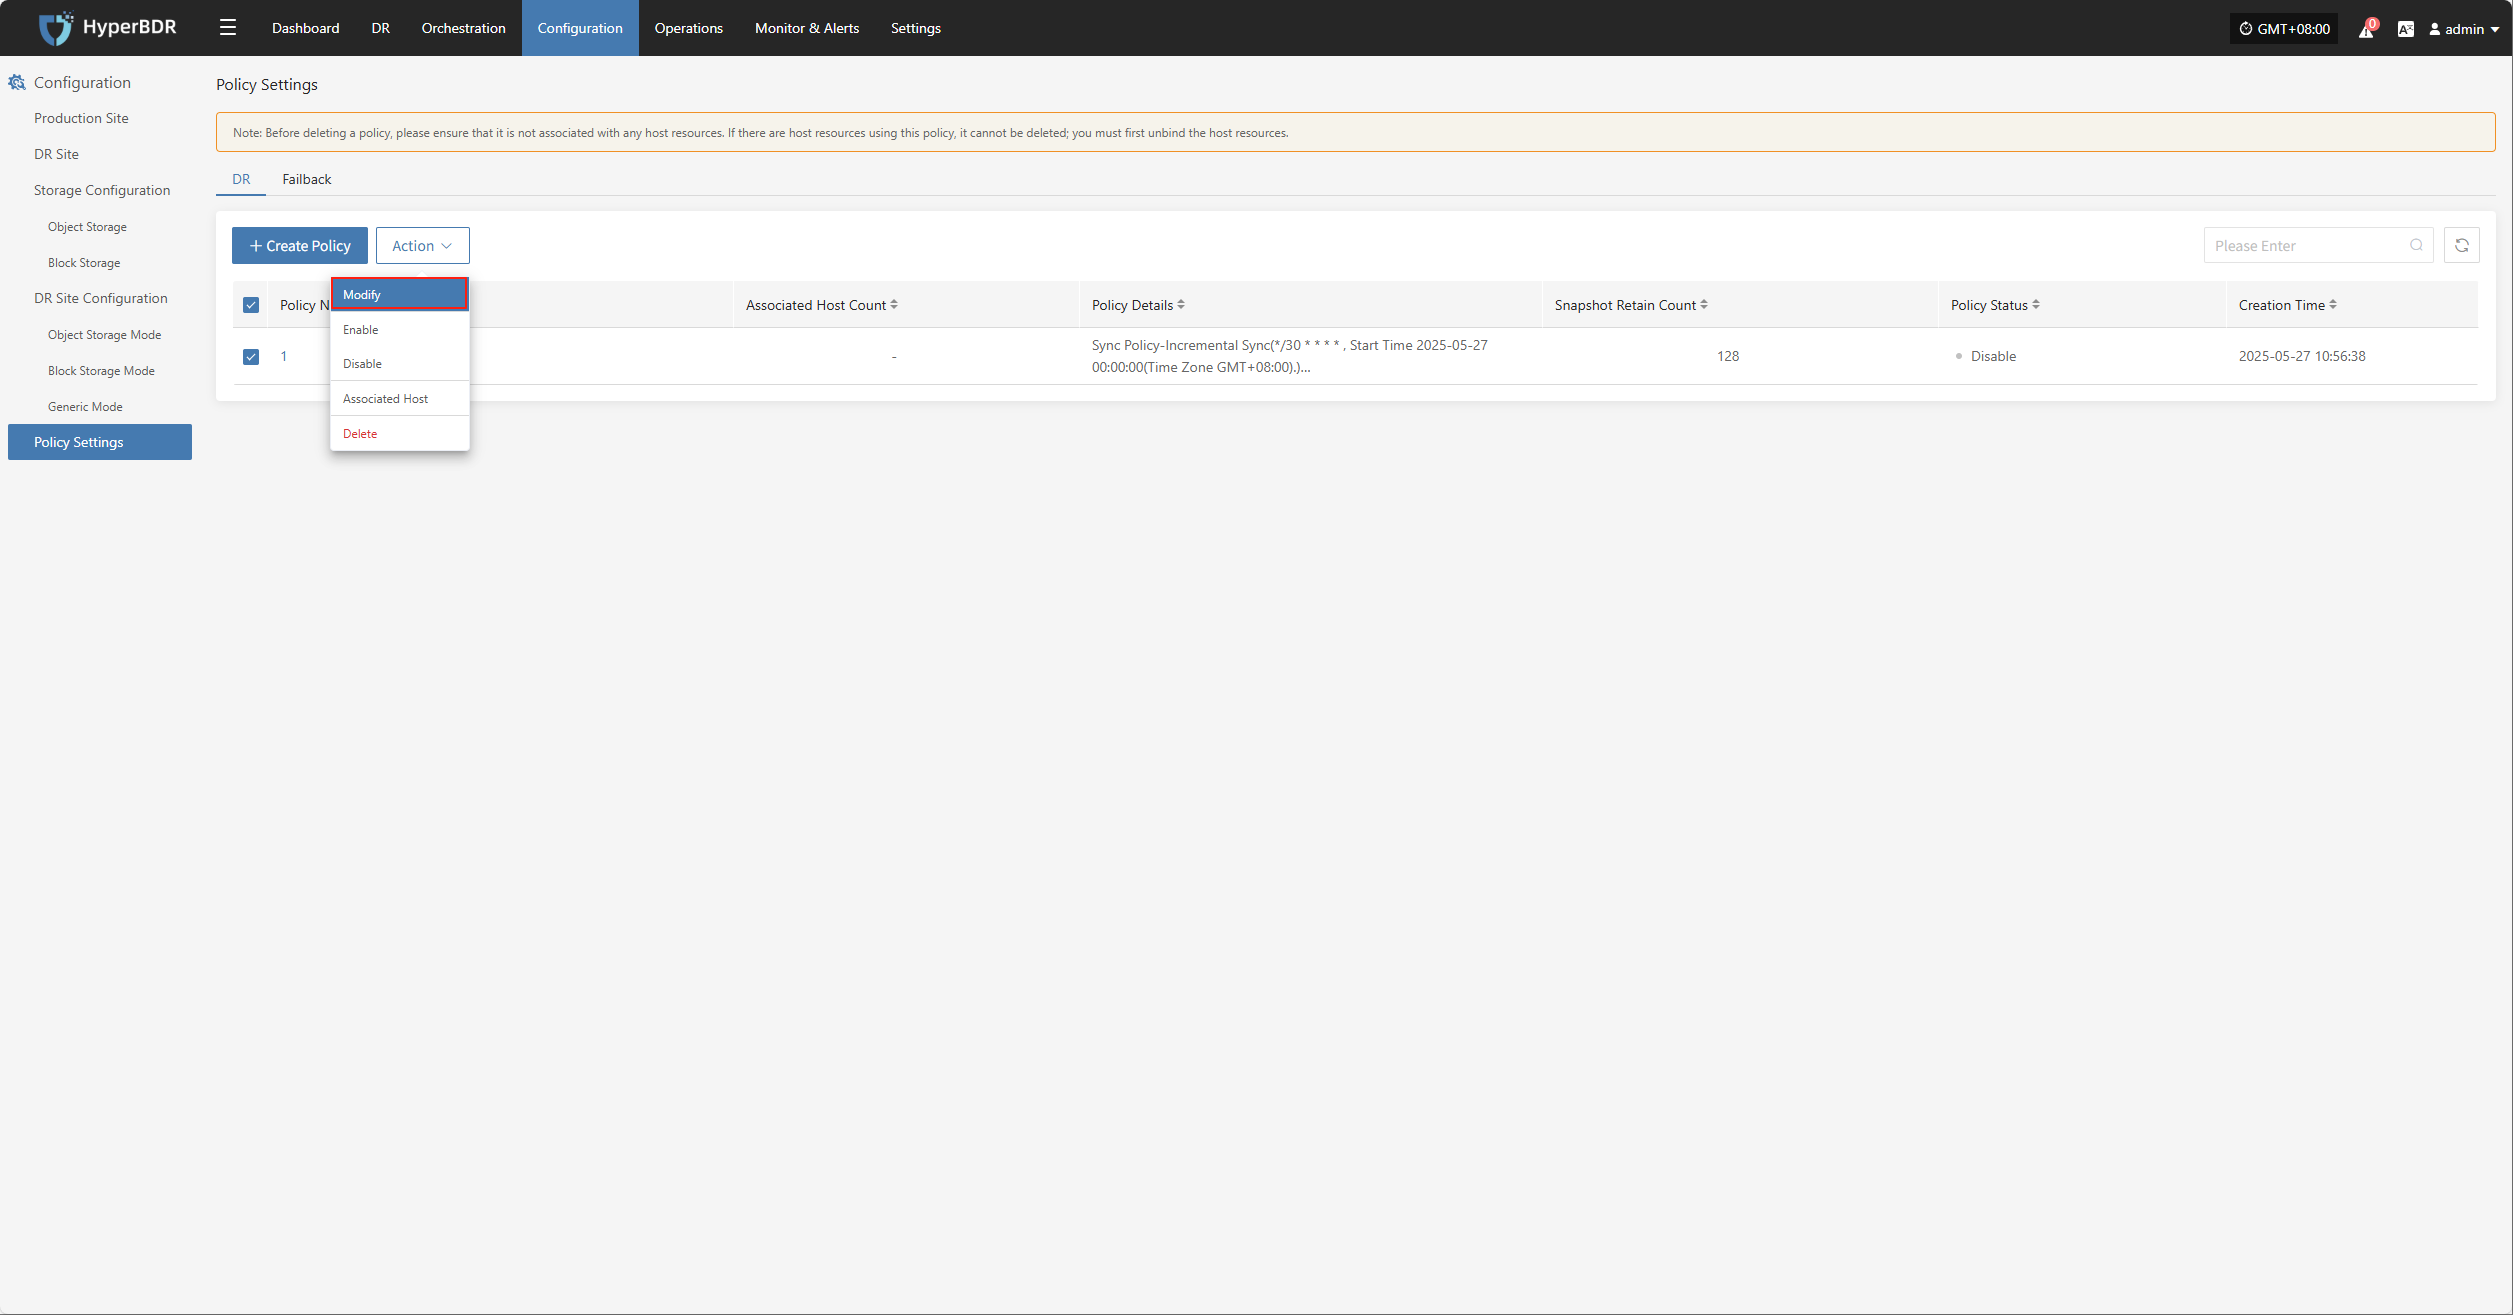
Enable
Select a policy, click [Actions] > [Enable] to change its status.
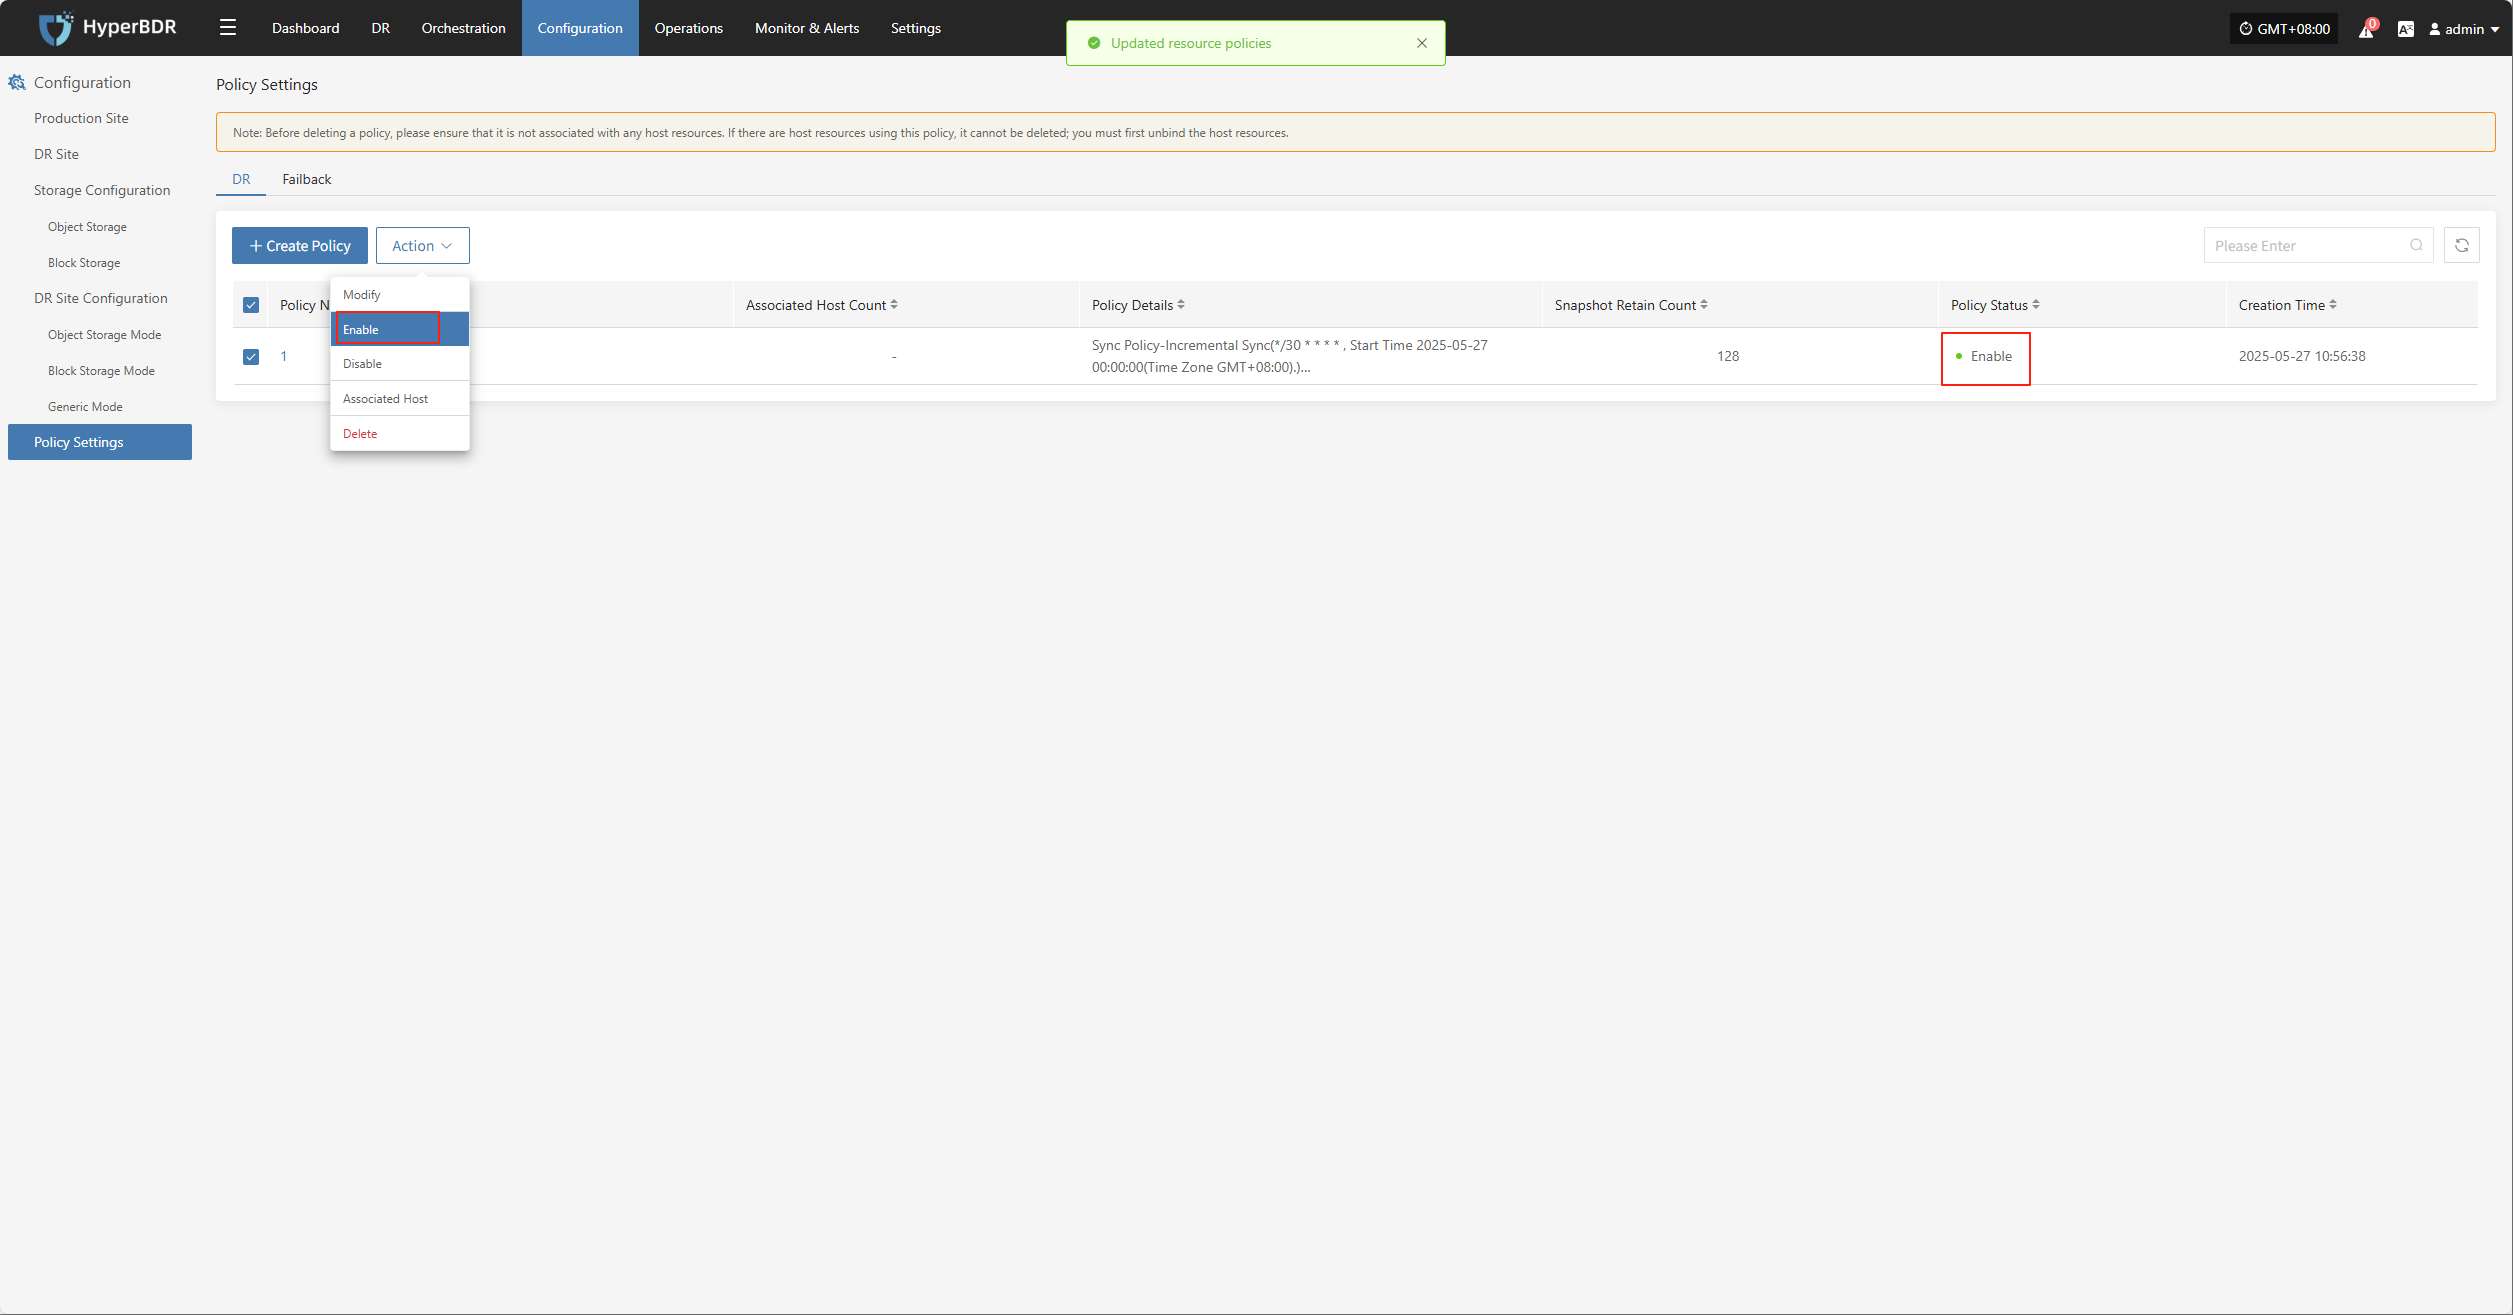
Disable
Select a policy, click [Actions] > [Disable] to change its status.

Associated Host
Select a policy, click [Actions] > [Associated Host] to link hosts to this policy.

Delete
Select a policy, click [Actions] > [Delete] to remove it.
Note: Before deleting, make sure the policy is not linked to any hosts. If it is, unbind the hosts first.

Policy Setting Details
Click a policy name to view its detailed configuration.
Dashboard
On the policy details page, you can view all configuration items, including sync, speed limit, and retention policies.
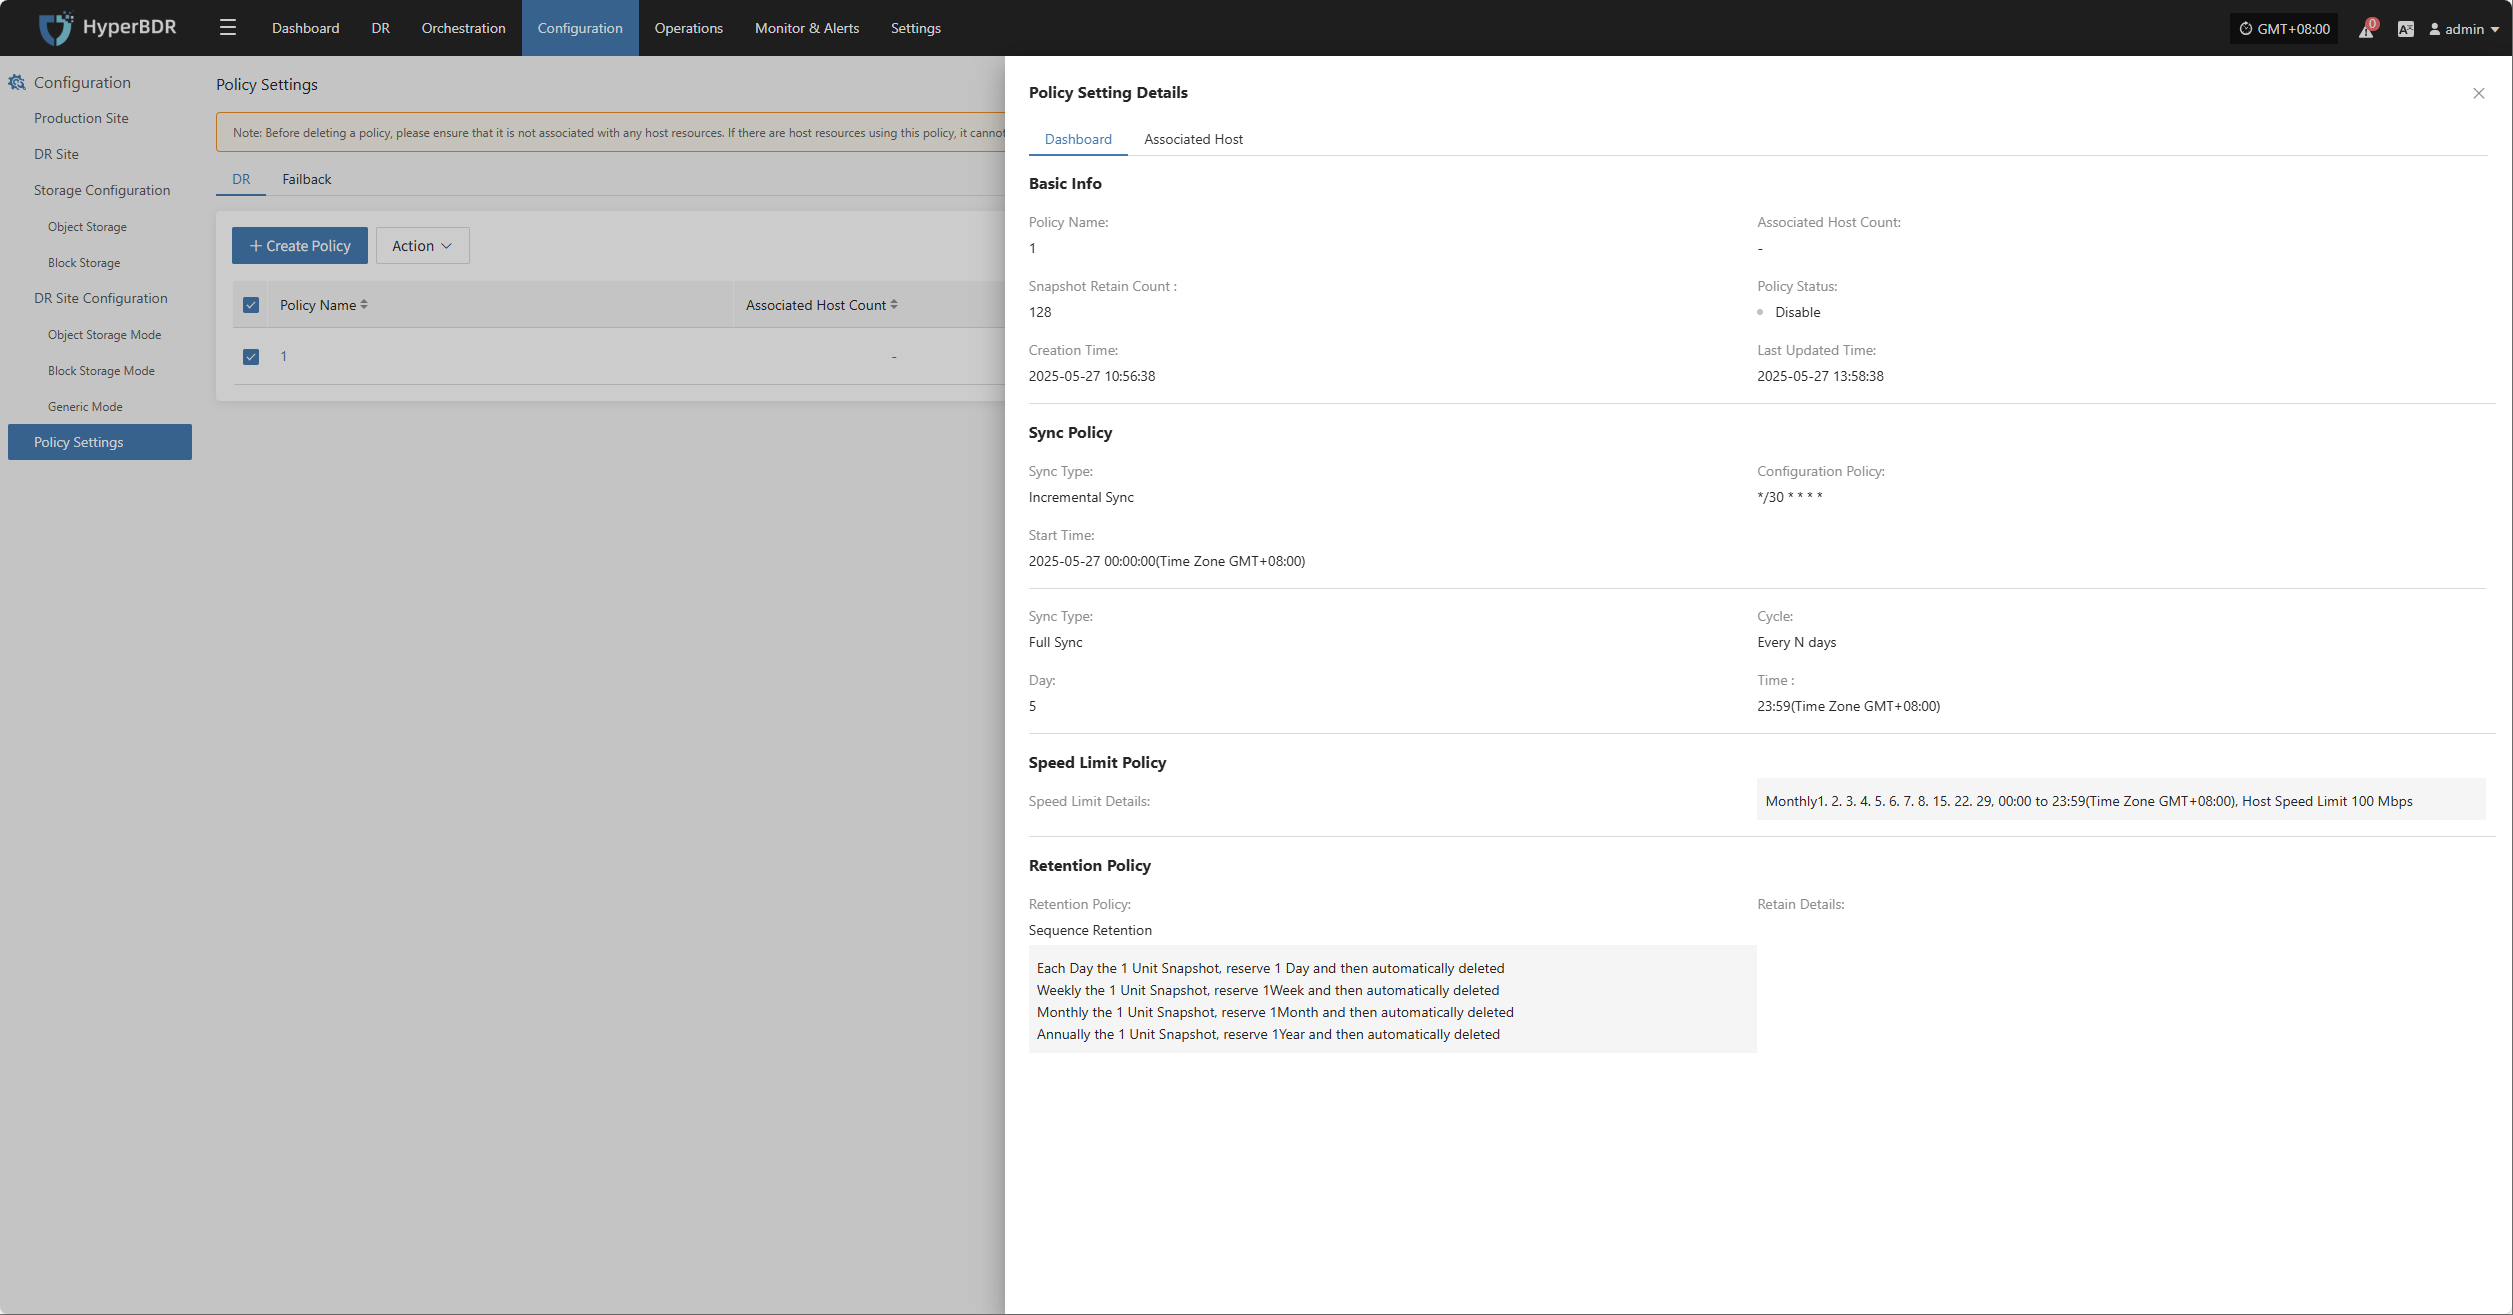
Associated Host
On the associated host page, you can view all hosts linked to this policy, including host name, IP, and other details.
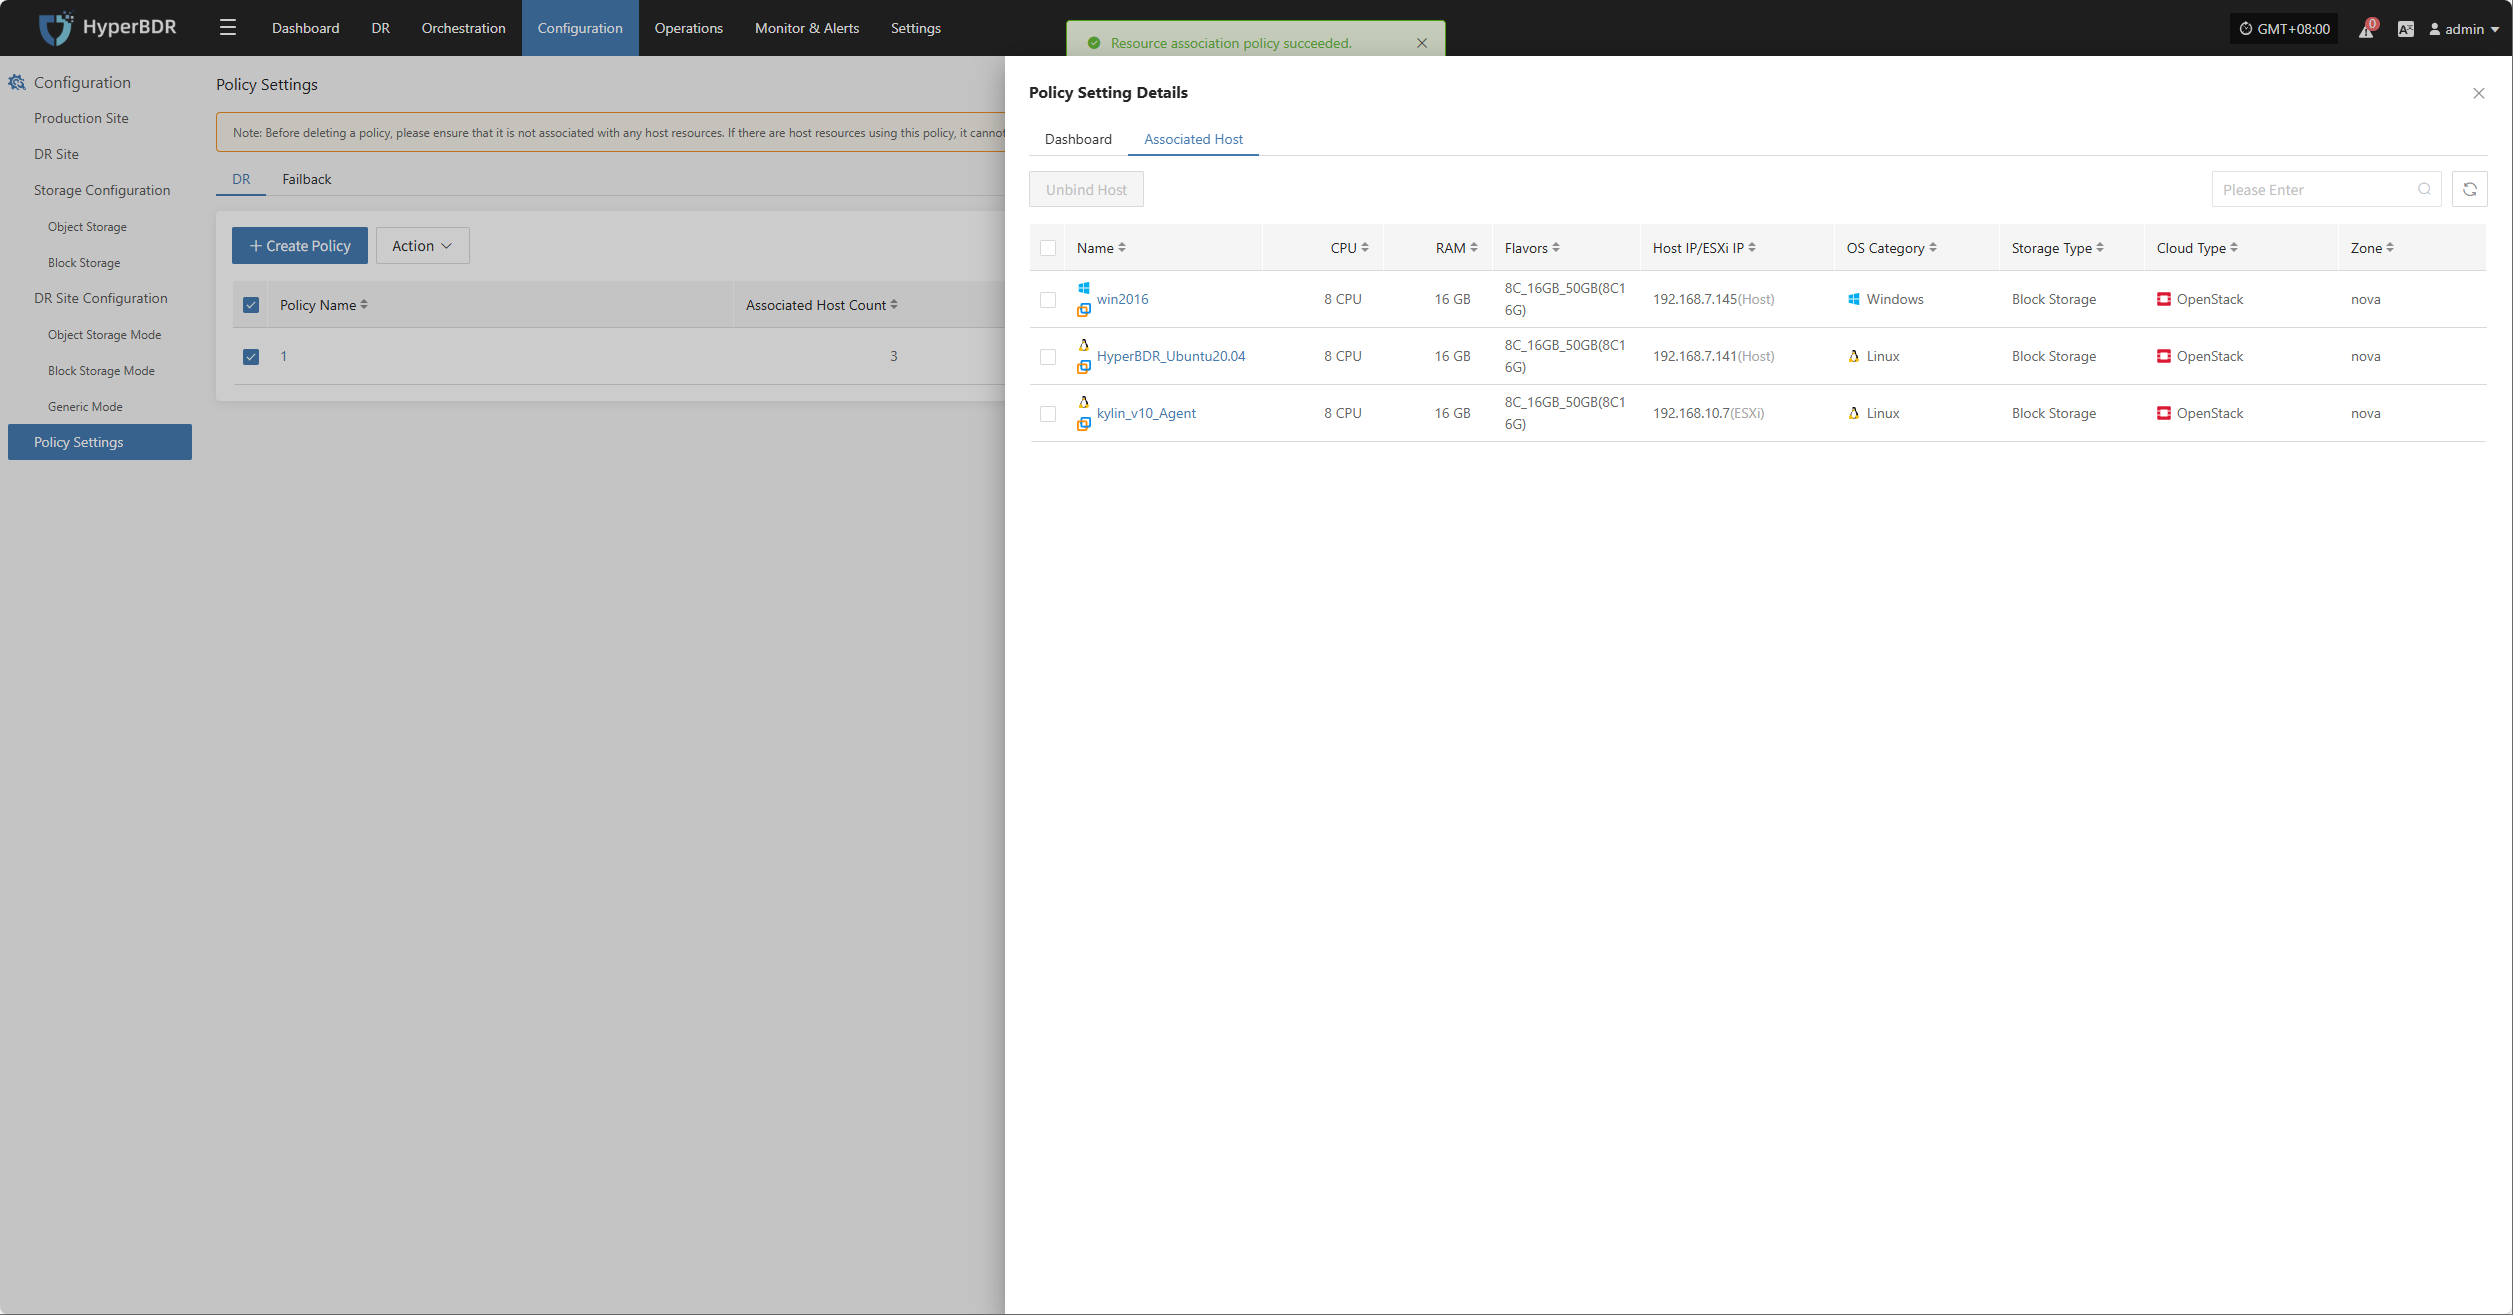
Unbind Host
Select the host you want to unbind, click [Unbind Host], and confirm to complete.
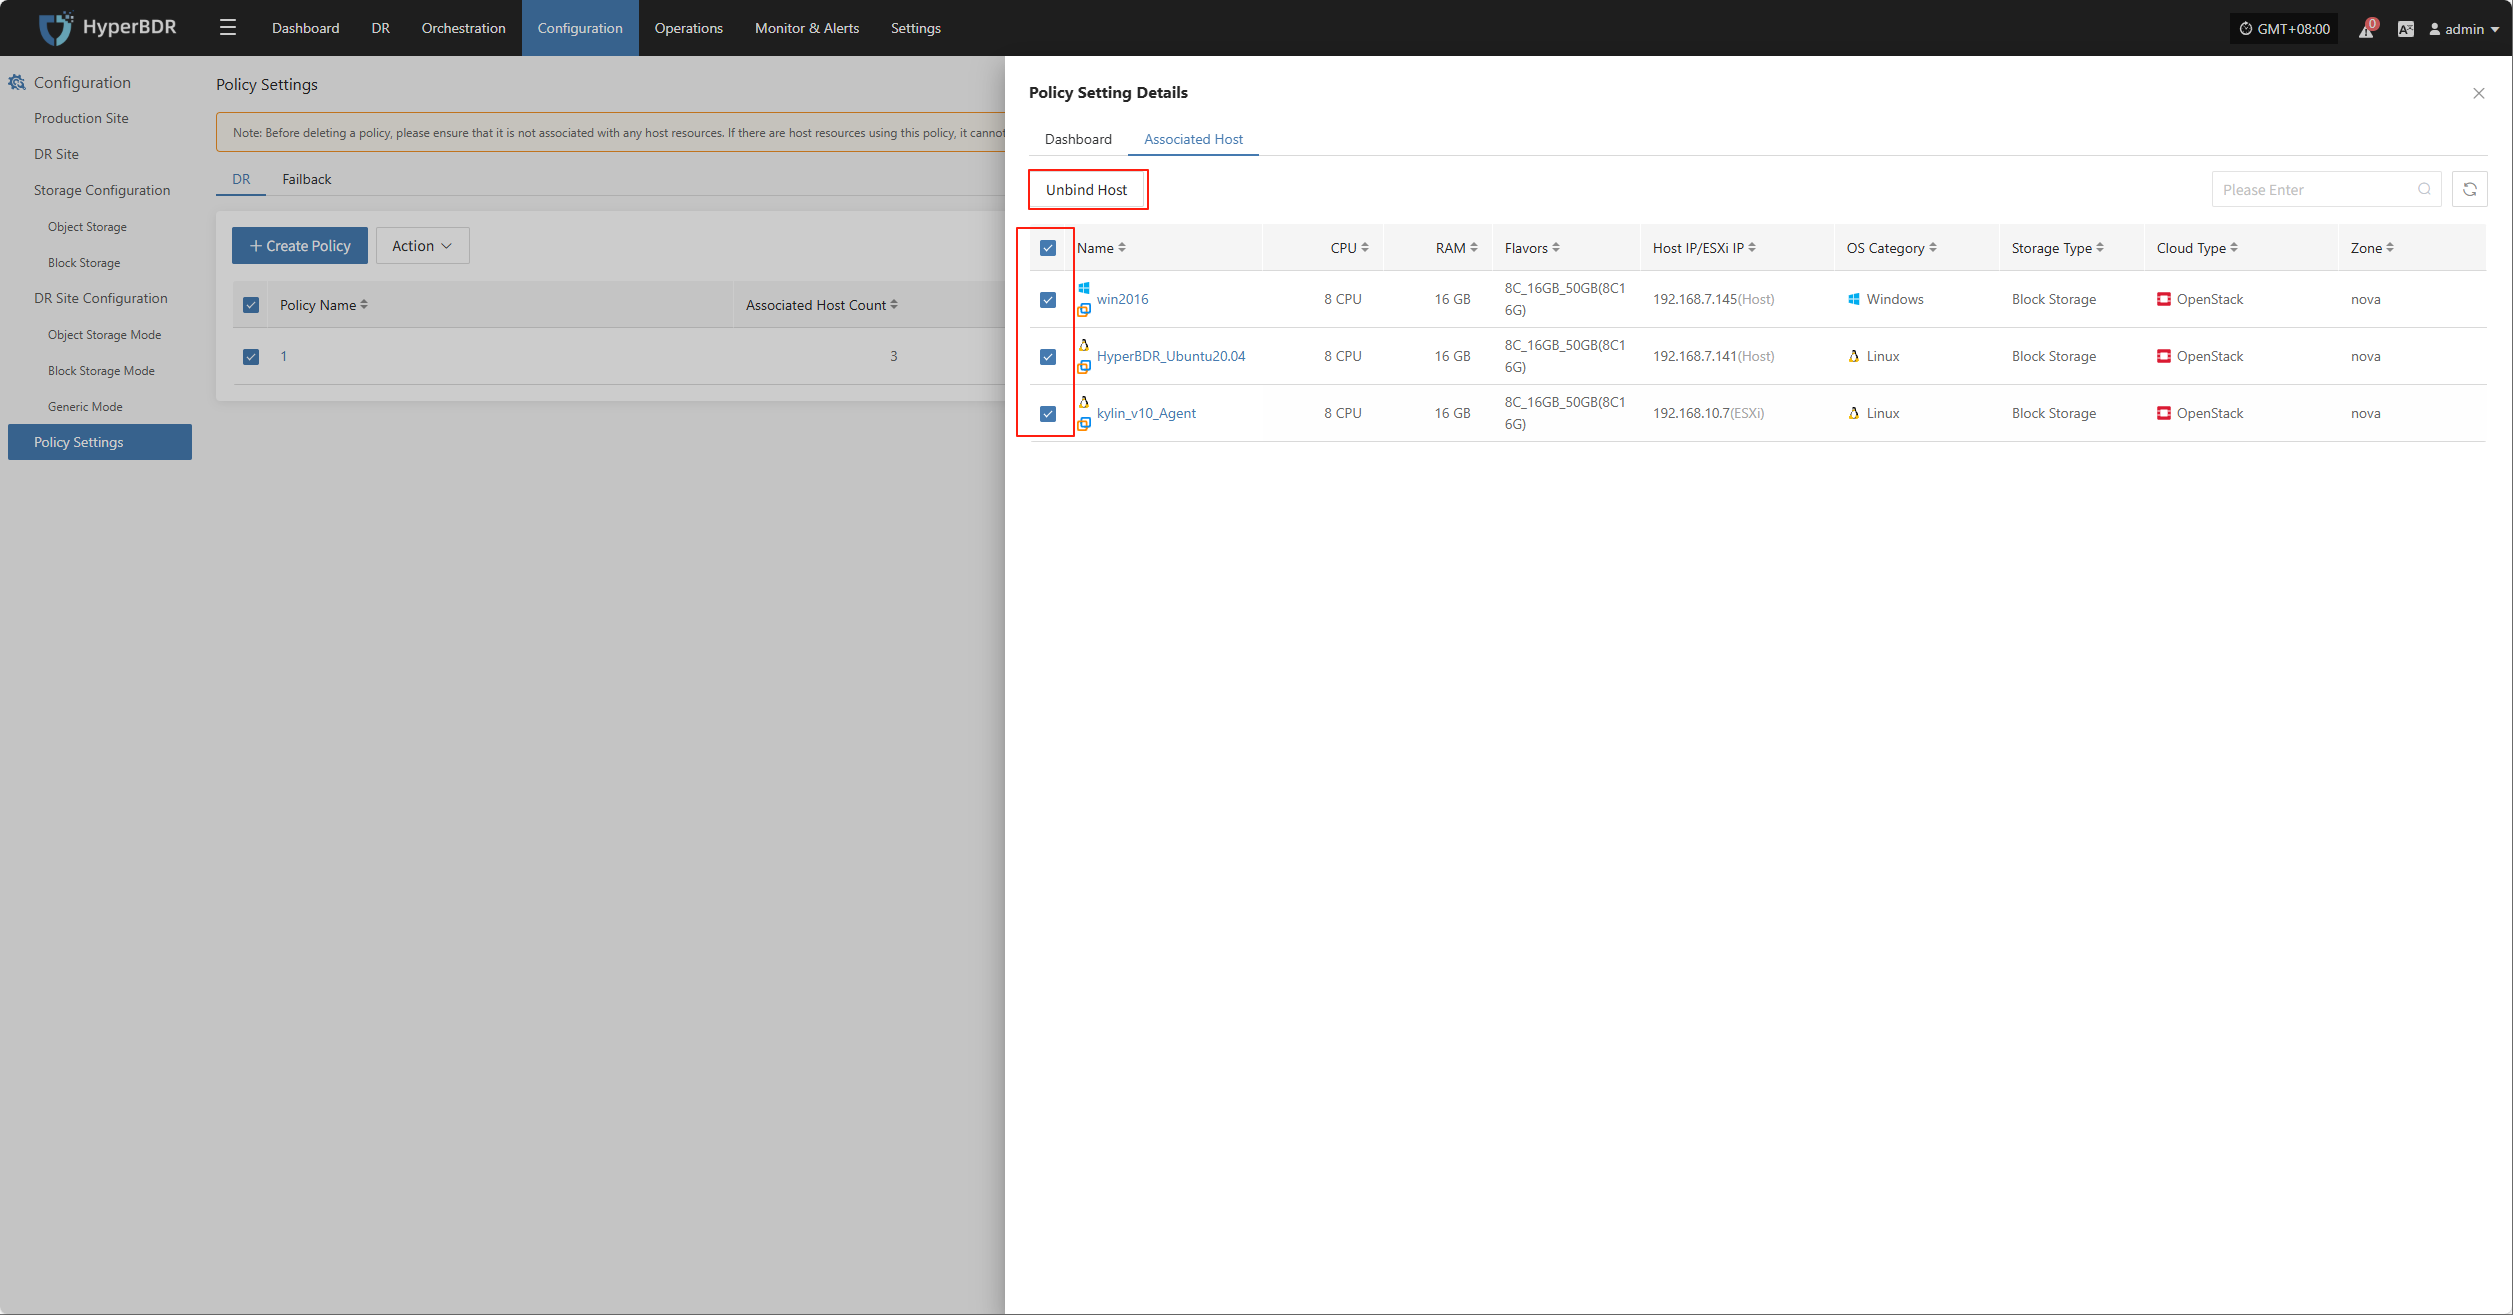
Operations
Audit Logs
In HyperBDR, users can go to "Operations Management > Audit Logs" to view detailed records of all DR and Failback operations on the platform. This page helps O&M staff track actions, audit behavior, and troubleshoot issues.
Page Features
Users can quickly search using the top filter options, supporting log filtering by the following fields:
- Resource Type: Select the type of resource related to the operation (e.g., VM, user resource, etc.)
- Message Name: Filter specific operation events by keyword
- Resource Name: Enter a keyword to find the corresponding resource
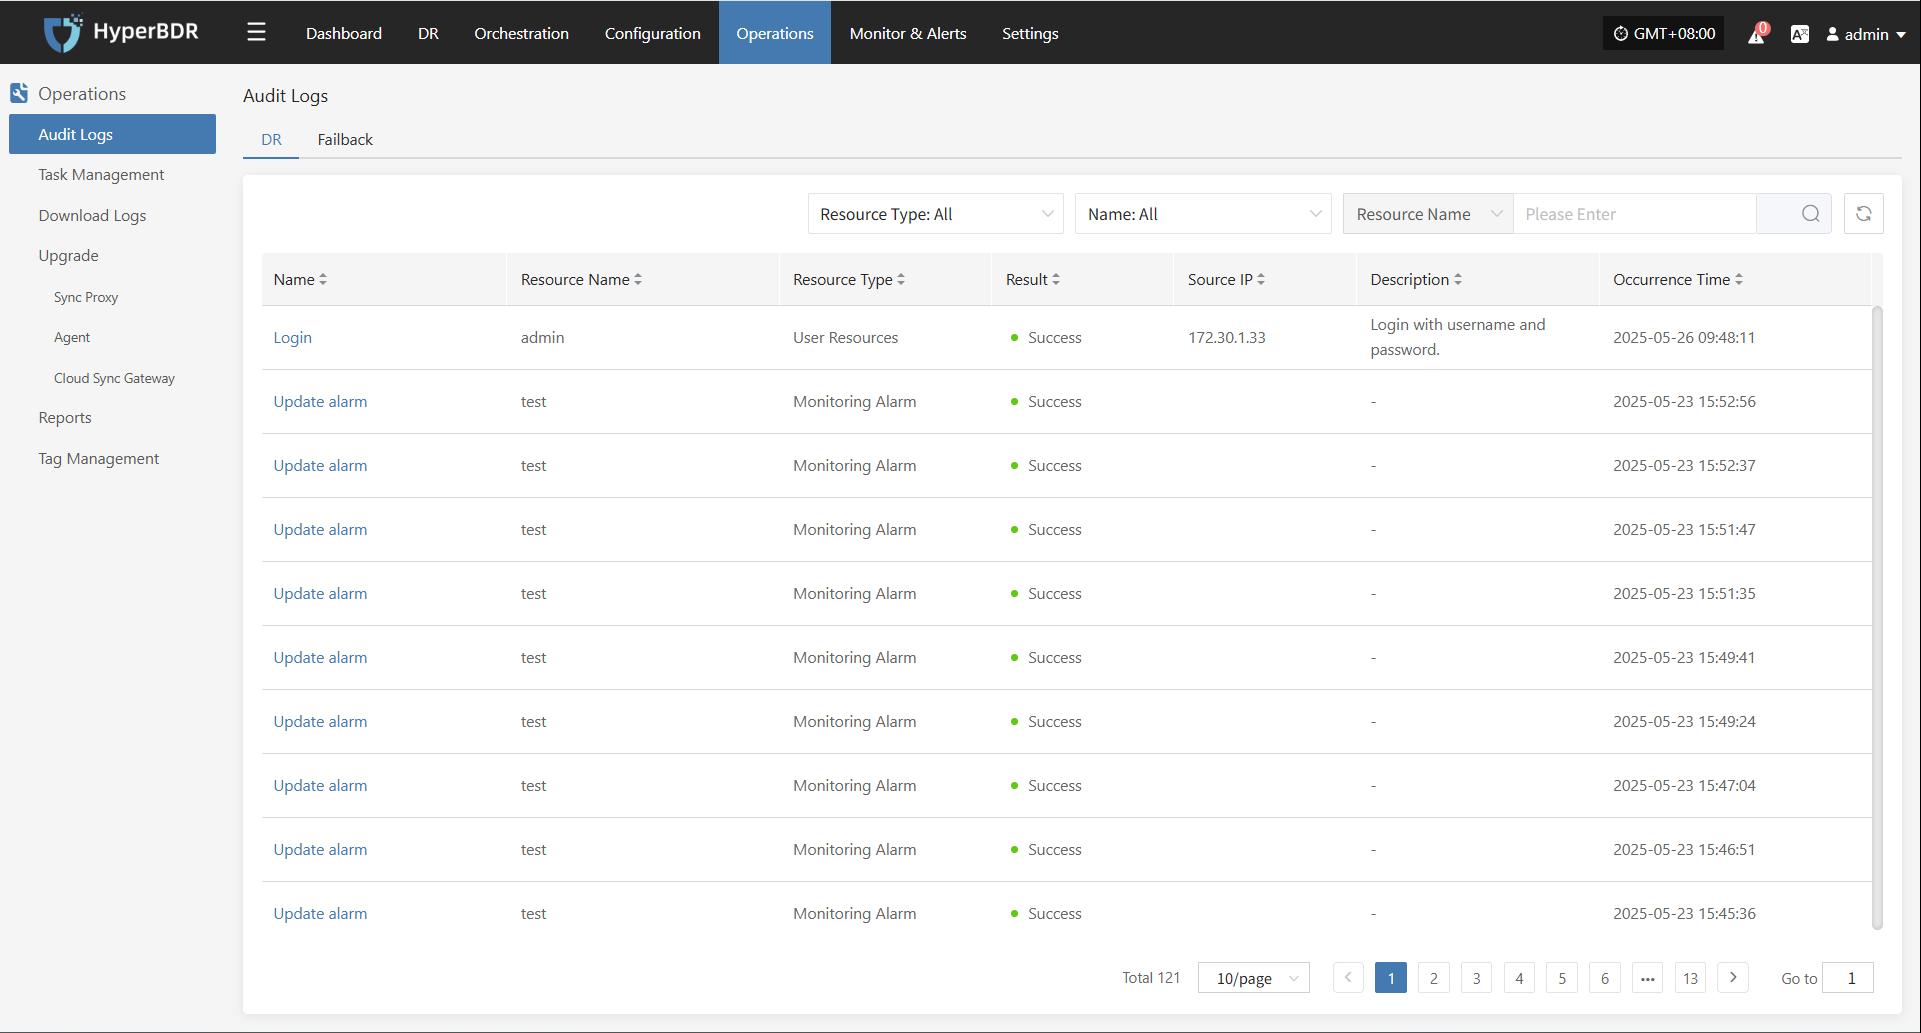
Audit Log Description
| Field Name | Example | Description |
|---|---|---|
| Name | Login | The type of audit event, e.g., user performed a login action. |
| Resource Name | admin | The user or resource that triggered the audit event. |
| Resource Type | User Resource | The category of resource involved, here related to user ops. |
| Result | Success | The result of the operation, usually "Success" or "Failure". |
| Source IP | 172.30.1.33 | The client IP address that initiated the operation. |
| Description | Login with username and password | Brief description of the operation, helps understand intent. |
| Occurrence Time | 2025-05-23 09:54:10 | The exact time the event was recorded, for tracking/audit. |
Click the message name to view details.
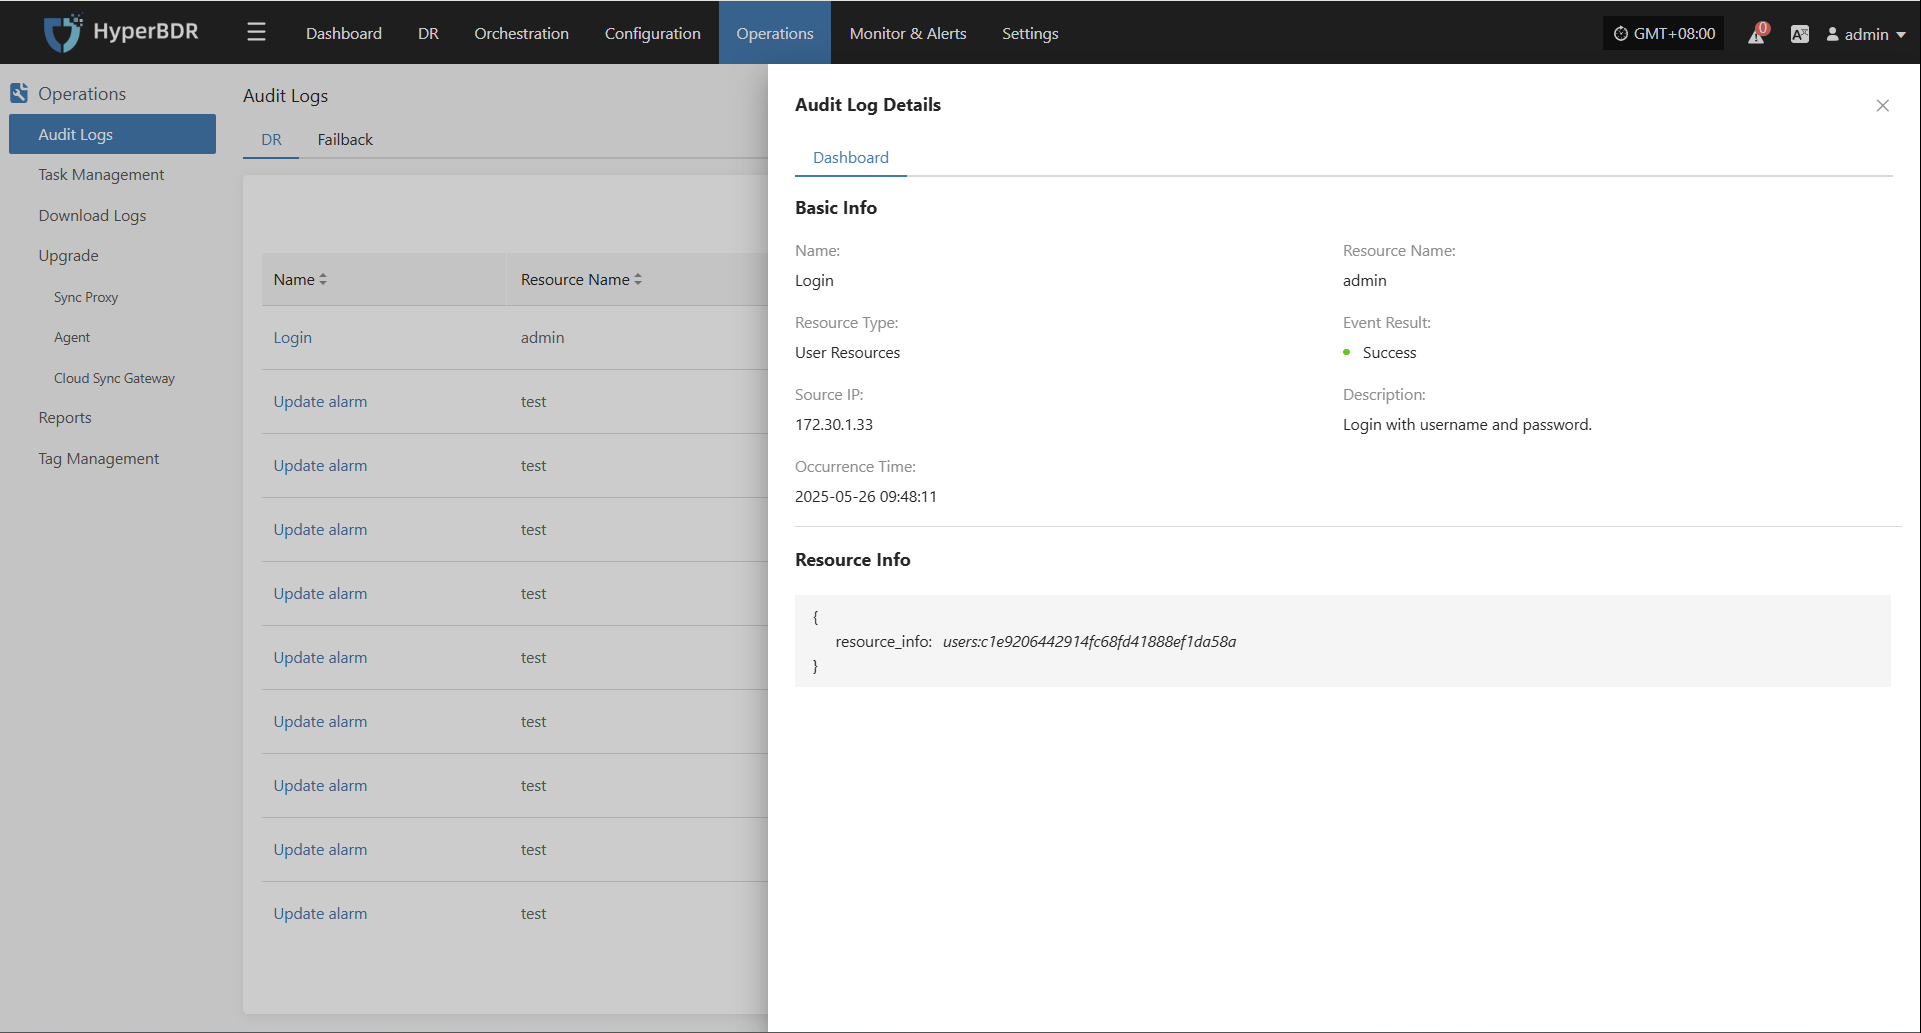
Resource Type Description
| Resource Type | Description |
|---|---|
| User Resource | Resources related to user accounts and actions, e.g., login records, permission changes. |
| DR Host Resource | Hosts involved in DR protection, including configuration and status. |
| License Resource | Management and status of licenses required for system operation. |
| Production Site Resource | Agents, hosts, and services in the production environment. |
| DR Site Resource | Platforms and components in the DR backup environment. |
| Monitoring Alarm | Objects and events related to resource monitoring and alerts. |
| Resource Group | Logical groupings of resources by business or function. |
| Object Storage | Object storage resources for backup, archiving, etc. |
| Resource Policies | Policy objects defining DR behavior, such as sync and failover rules. |
Other Notes
- The page supports pagination, showing 10 records per page by default.
- You can use the search box in the upper right corner for more precise queries.
- Audit logs cannot be edited manually and are only used for system behavior tracking.
Task Management
In HyperBDR, users can go to "Operations Management > Task Management" to view the execution status of all DR and Failback tasks, including key types such as registration, snapshot, and replication. The system supports real-time task status queries, filtering, and detailed views, helping users fully track task progress and results.
Page Features
Users can quickly search using the top filter options, supporting log filtering by the following fields:
- Advanced Filters:
- Task Type: Select the resource type related to the operation (e.g., VM, user resource, etc.)
- Task Status: Filter specific operation events by keyword
- Task Name: Enter a keyword to find the corresponding resource
- End Time: Sort in ascending or descending order
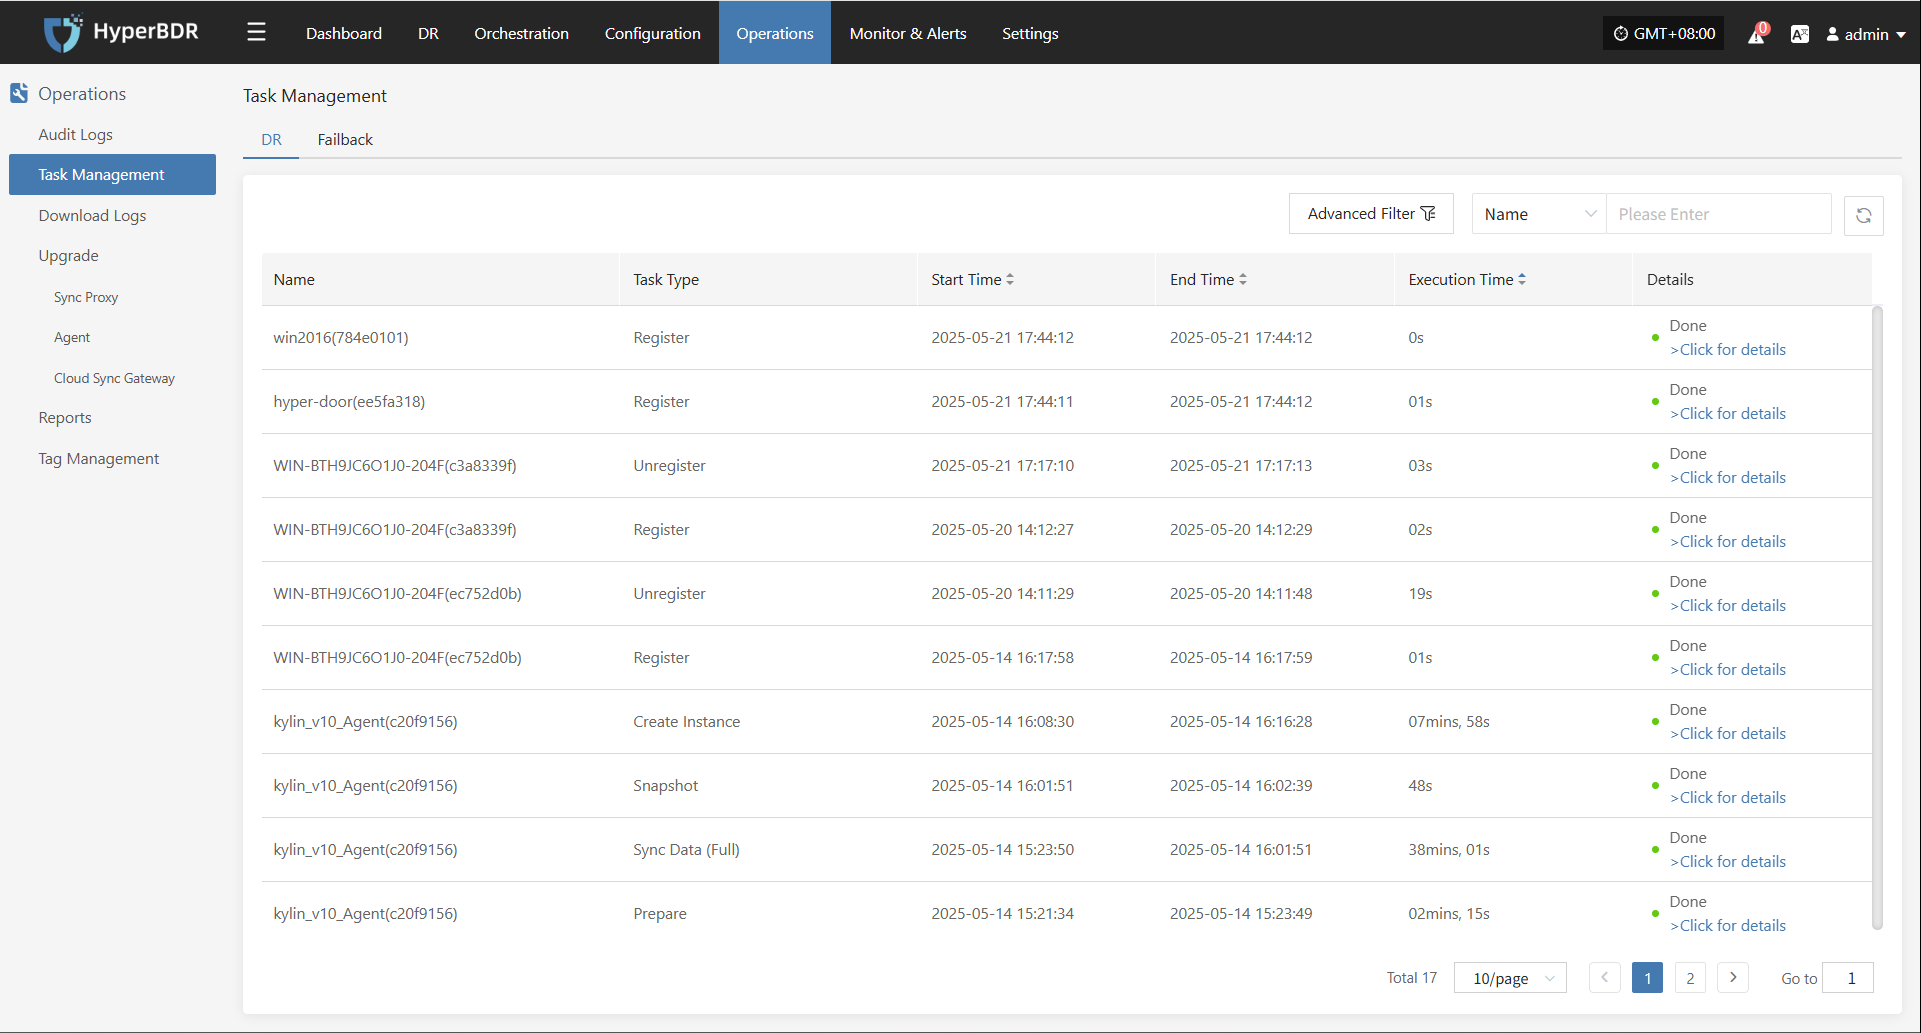
Task Management Description
| Field Name | Description |
|---|---|
| Name | Shows the host or resource name for the task |
| Task Type | Shows the type of task, such as registration, snapshot, sync, or replica creation |
| Start Time | The actual start time of the task |
| End Time | The time the task finished or was interrupted |
| Execution Time | How long the task ran |
| Details | Shows the final result status, with a link to view task details |
Note: Click the status link in the "Task Status" field to go to the task details page for full logs and error information.
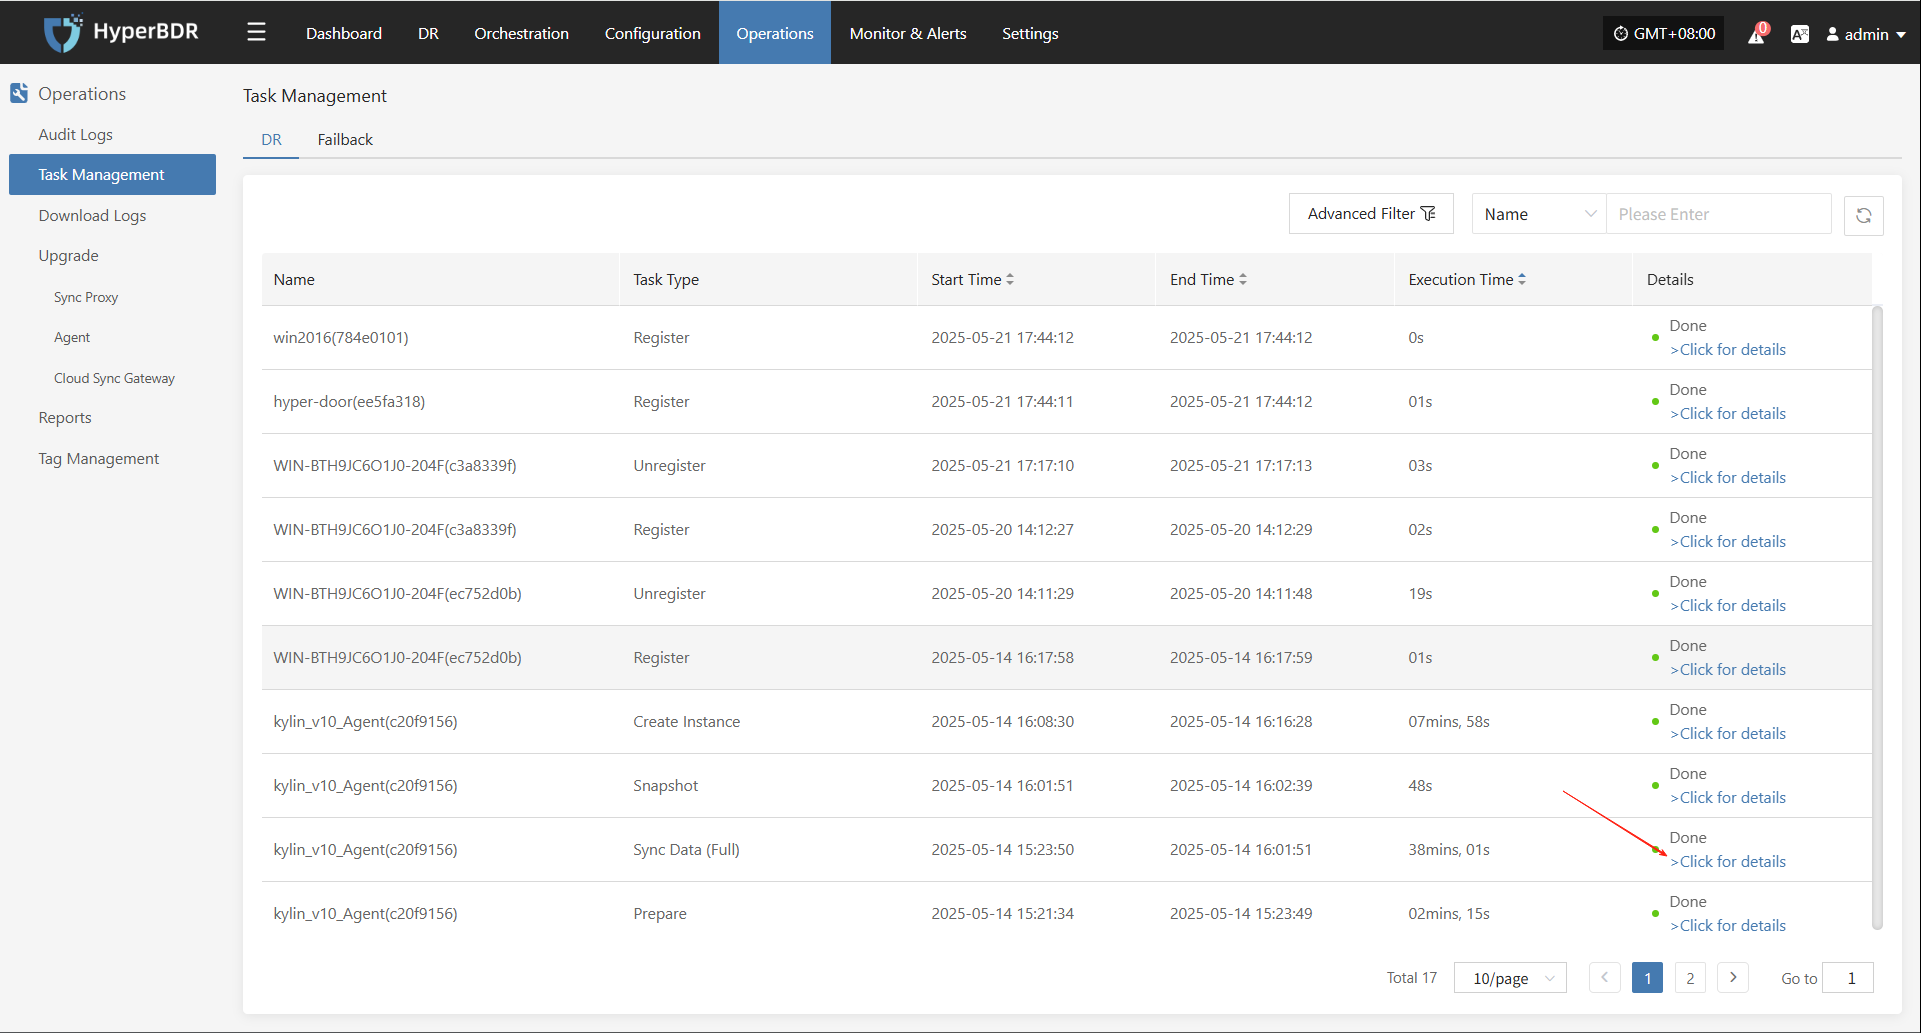
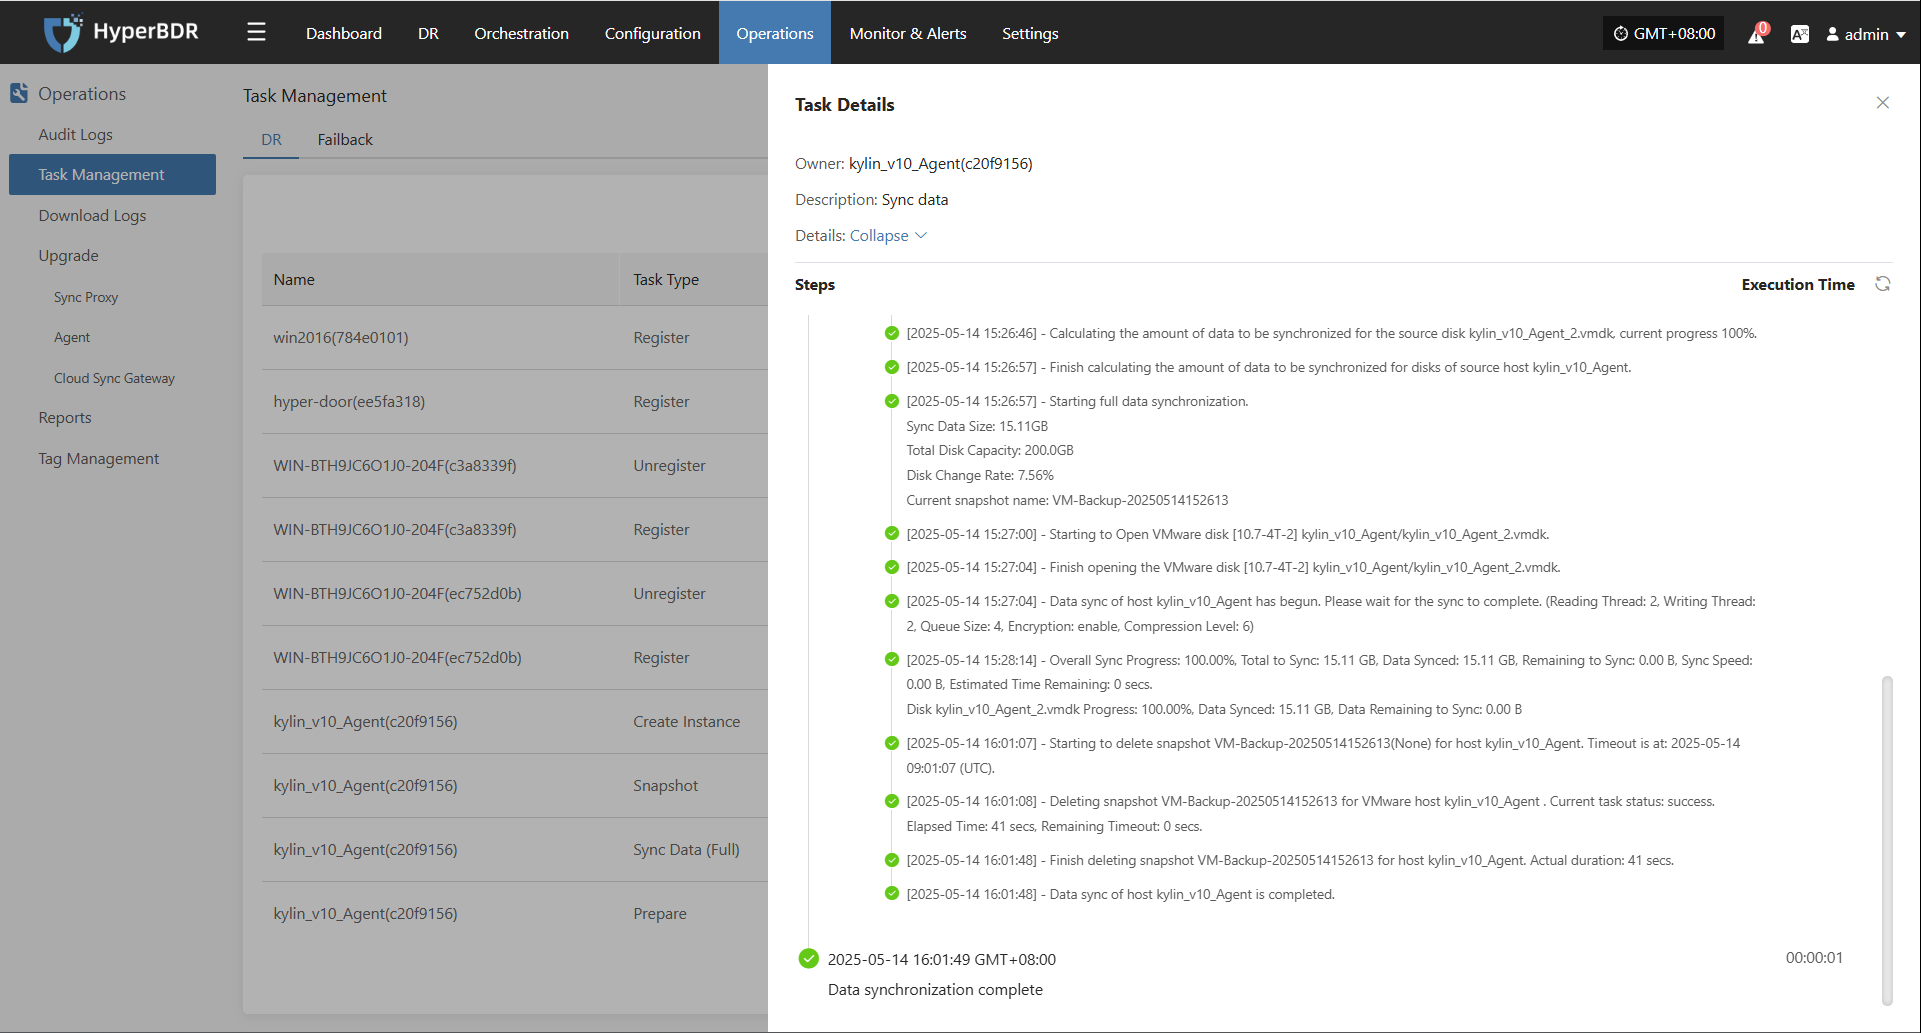
Other Notes
- The page supports pagination, showing 10 records per page by default. Users can adjust the number of records per page or jump to a specific page using the filter bar at the bottom for quick access to needed information.
- Task logs record all actions and results during task execution, keeping a complete operation history for tracking and troubleshooting.
Download Logs
In HyperBDR, users can go to "O&M Management > Download Logs" to quickly collect logs from key components for troubleshooting.
DR
Supported Resource Types
| Resource Type | Description |
|---|---|
| Console | Management node logs, including core platform services |
| Sync Proxy | Agentless hosts deployed via OVA template |
| Linux Host | Logs from Linux hosts with Agent installed |
| Windows Host | Logs from Windows hosts with Agent installed |
| Cloud Sync Gateway | Gateway hosts automatically created at DR start |
Page Field Descriptions
| Field Name | Example | Description |
|---|---|---|
| Host Name | onepro | Name of the host, used to identify the device |
| Host IP | 192.168.7.141 | IP address of the host |
| Status | Online | Current status (offline hosts cannot collect logs) |
| Log Status | Downloadable | Status of host logs (click to view details) |
| Action | Collect | Collect logs |
Collection Example: Console
On the "Download Logs > DR > Console" page, users can collect and download required log files as needed for troubleshooting and monitoring.

Log Collection
Select the target host and click the "Collect" button in the corresponding row.
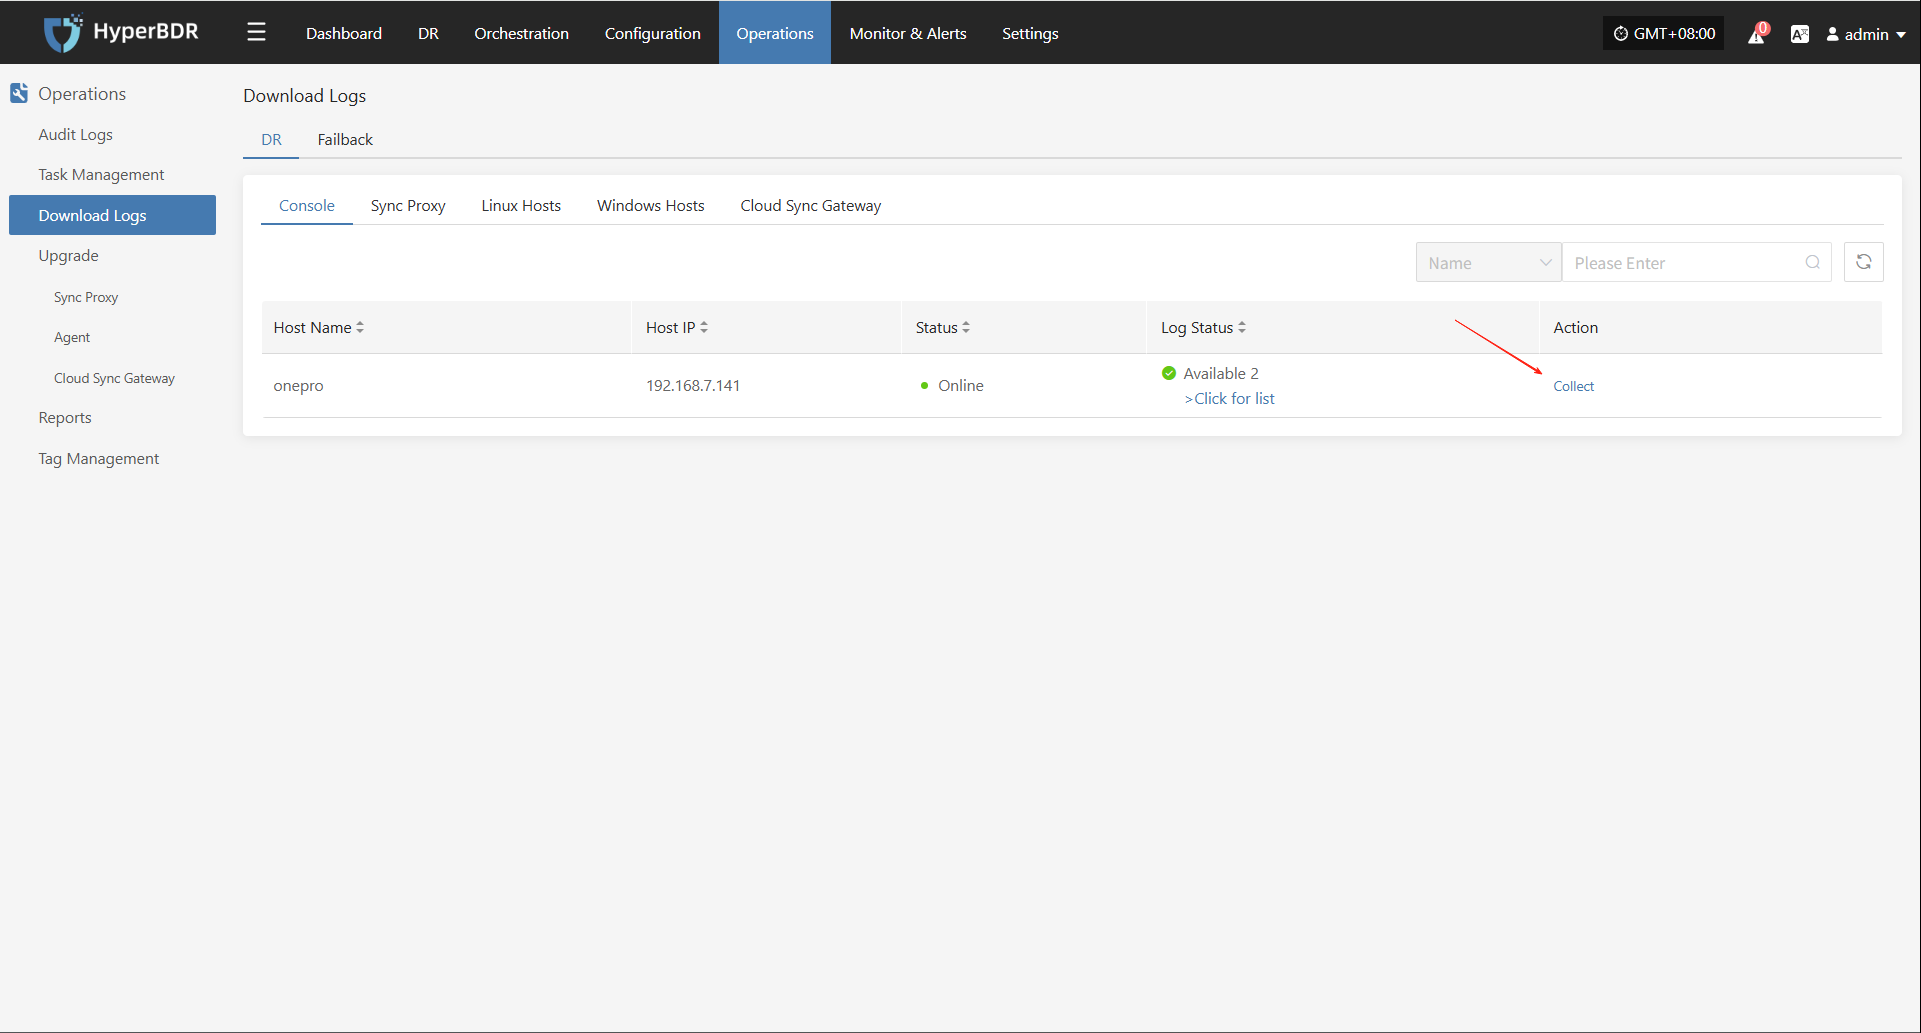
Select Time Range
In the pop-up dialog, set the time range for the logs you want to collect. After confirming, the system will automatically start collecting logs.
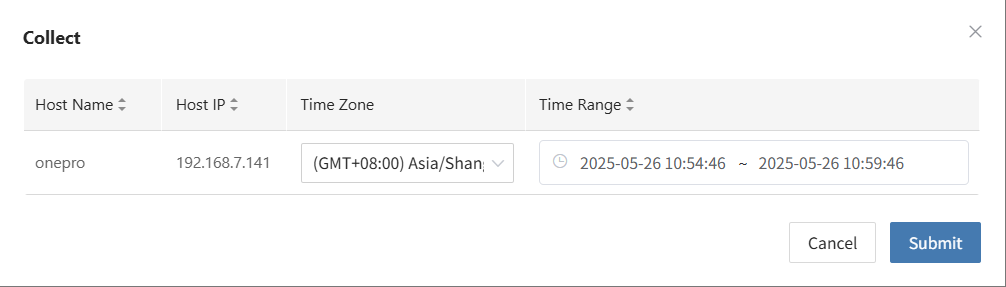
Start Collection
After confirming the time range, the system will automatically start collecting logs, and the log status will change to "Collecting".
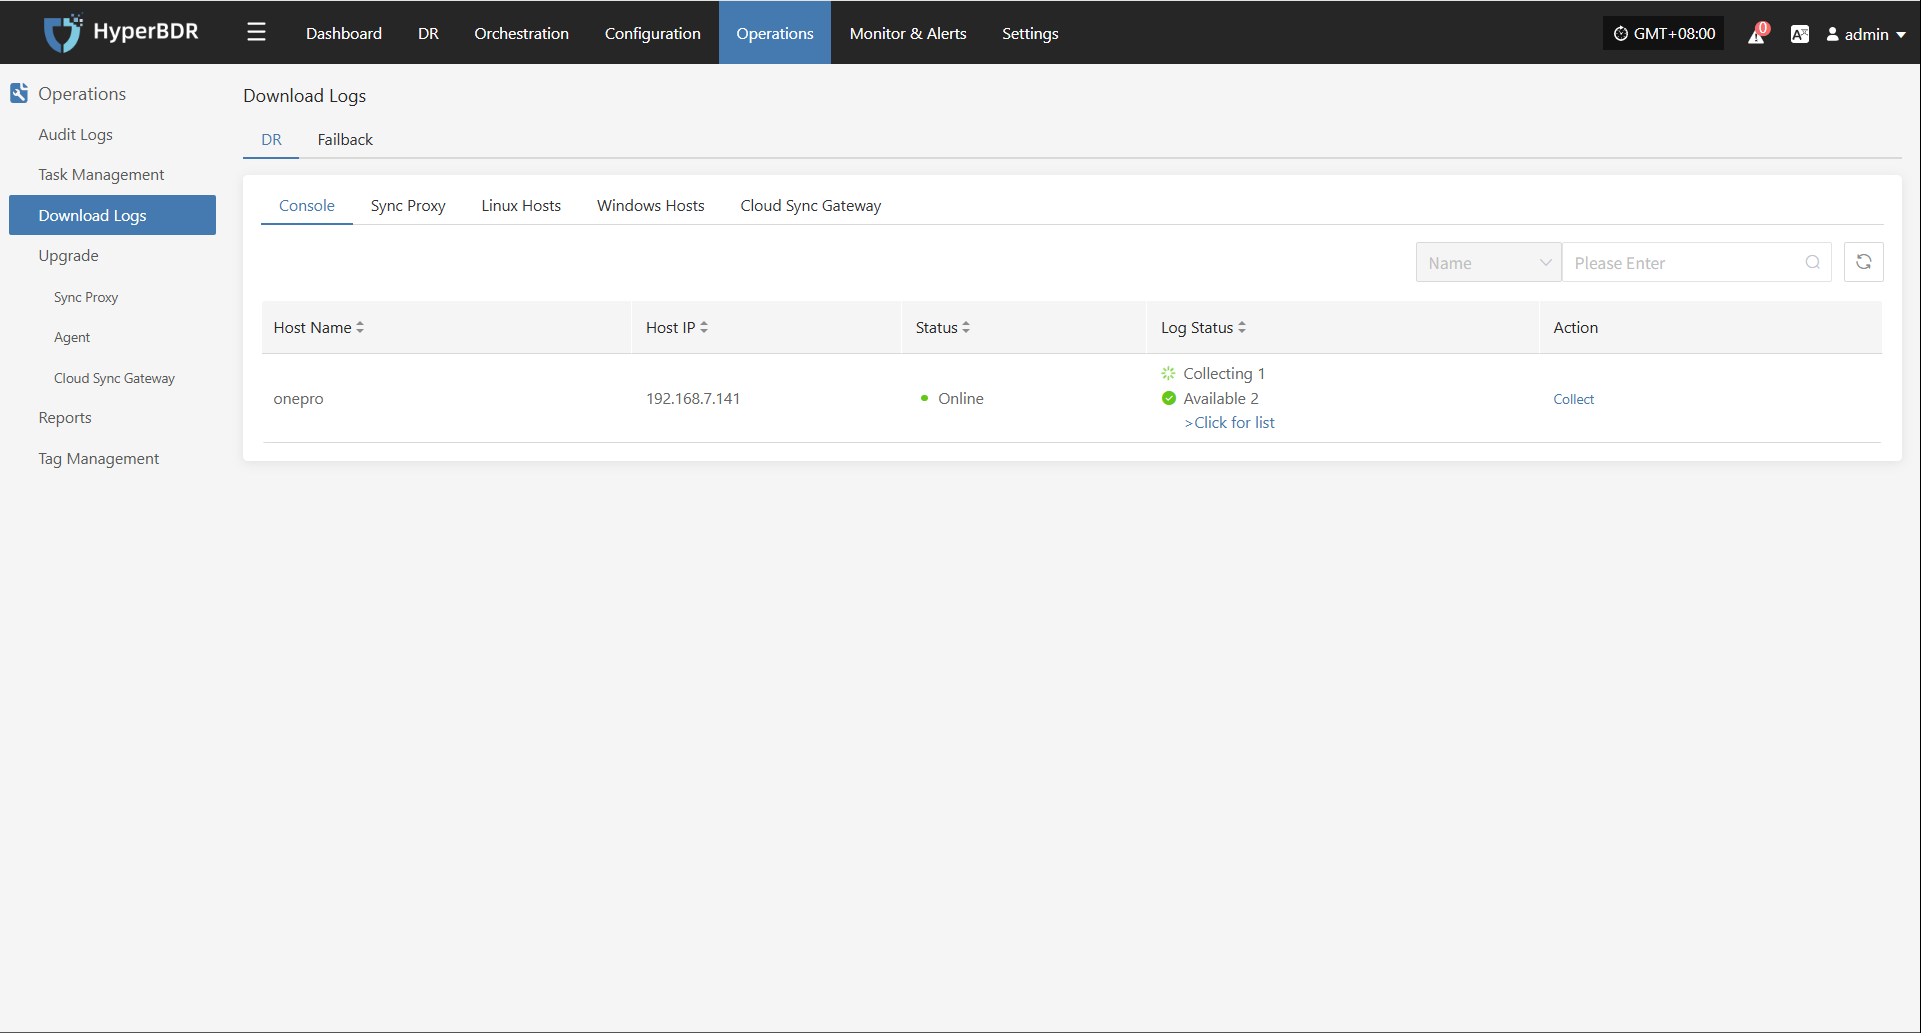
Download Logs
After log collection is complete, the status will update to "Available". Users can click "Click for list" to see the log files and select files to download.
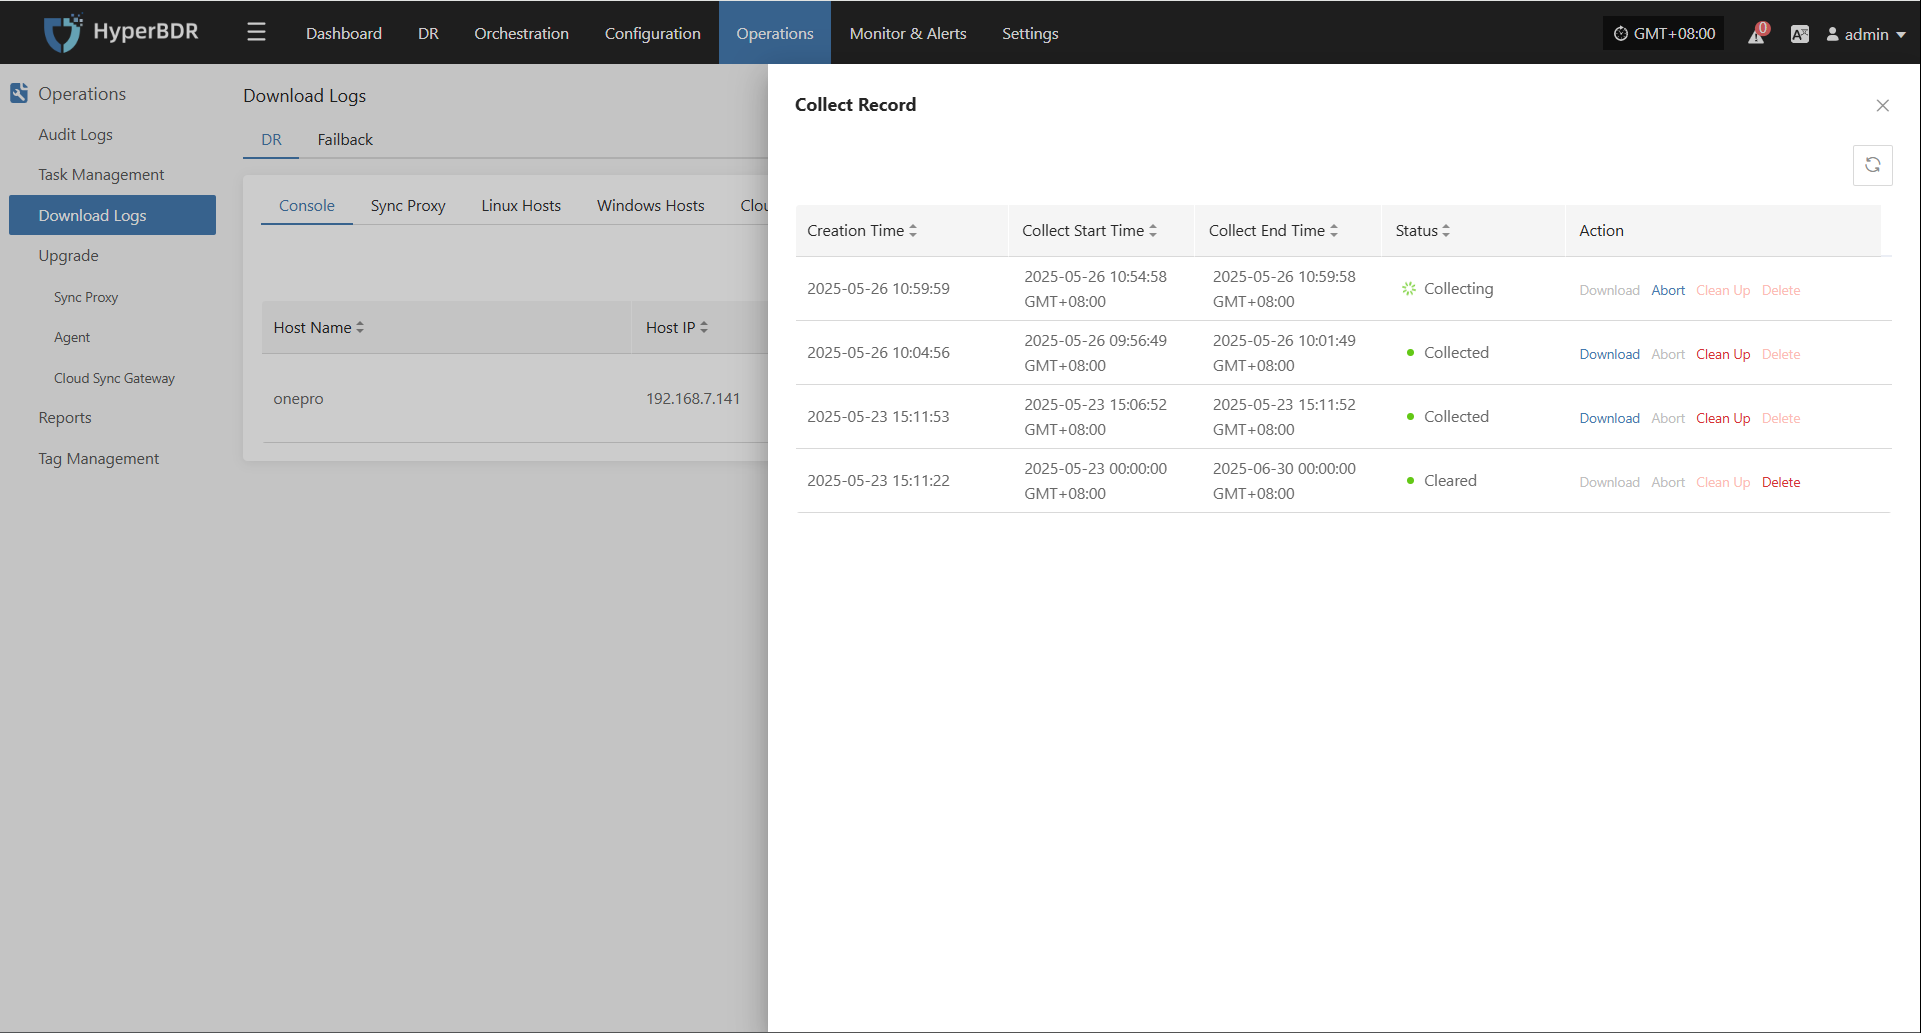
Failback
Supported Resource Types
| Resource Type | Description |
|---|---|
| Failback Sync Proxy | Agentless hosts deployed via OVA template |
| Linux Host | Logs from Linux hosts with Agent installed |
| Windows Host | Logs from Windows hosts with Agent installed |
| Cloud Sync Gateway | Gateway hosts automatically created at failback |
Page Field Descriptions
| Field Name | Example | Description |
|---|---|---|
| Host Name | ubuntu-ova | Name of the host, used to identify the device |
| Host IP | 192.168.7.202 | IP address of the host |
| Status | Online | (Offline hosts cannot collect logs) |
| Log Status | Downloadable | Status of host logs (click to view details) |
| Action | Collect | Collect logs |
Collection Example: Failback Sync Proxy
On the "Download Logs > Failback > Failback Sync Proxy" page, users can collect and download required log files as needed for troubleshooting and monitoring.

Log Collection
Select the target host and click the "Collect" button in the corresponding row.
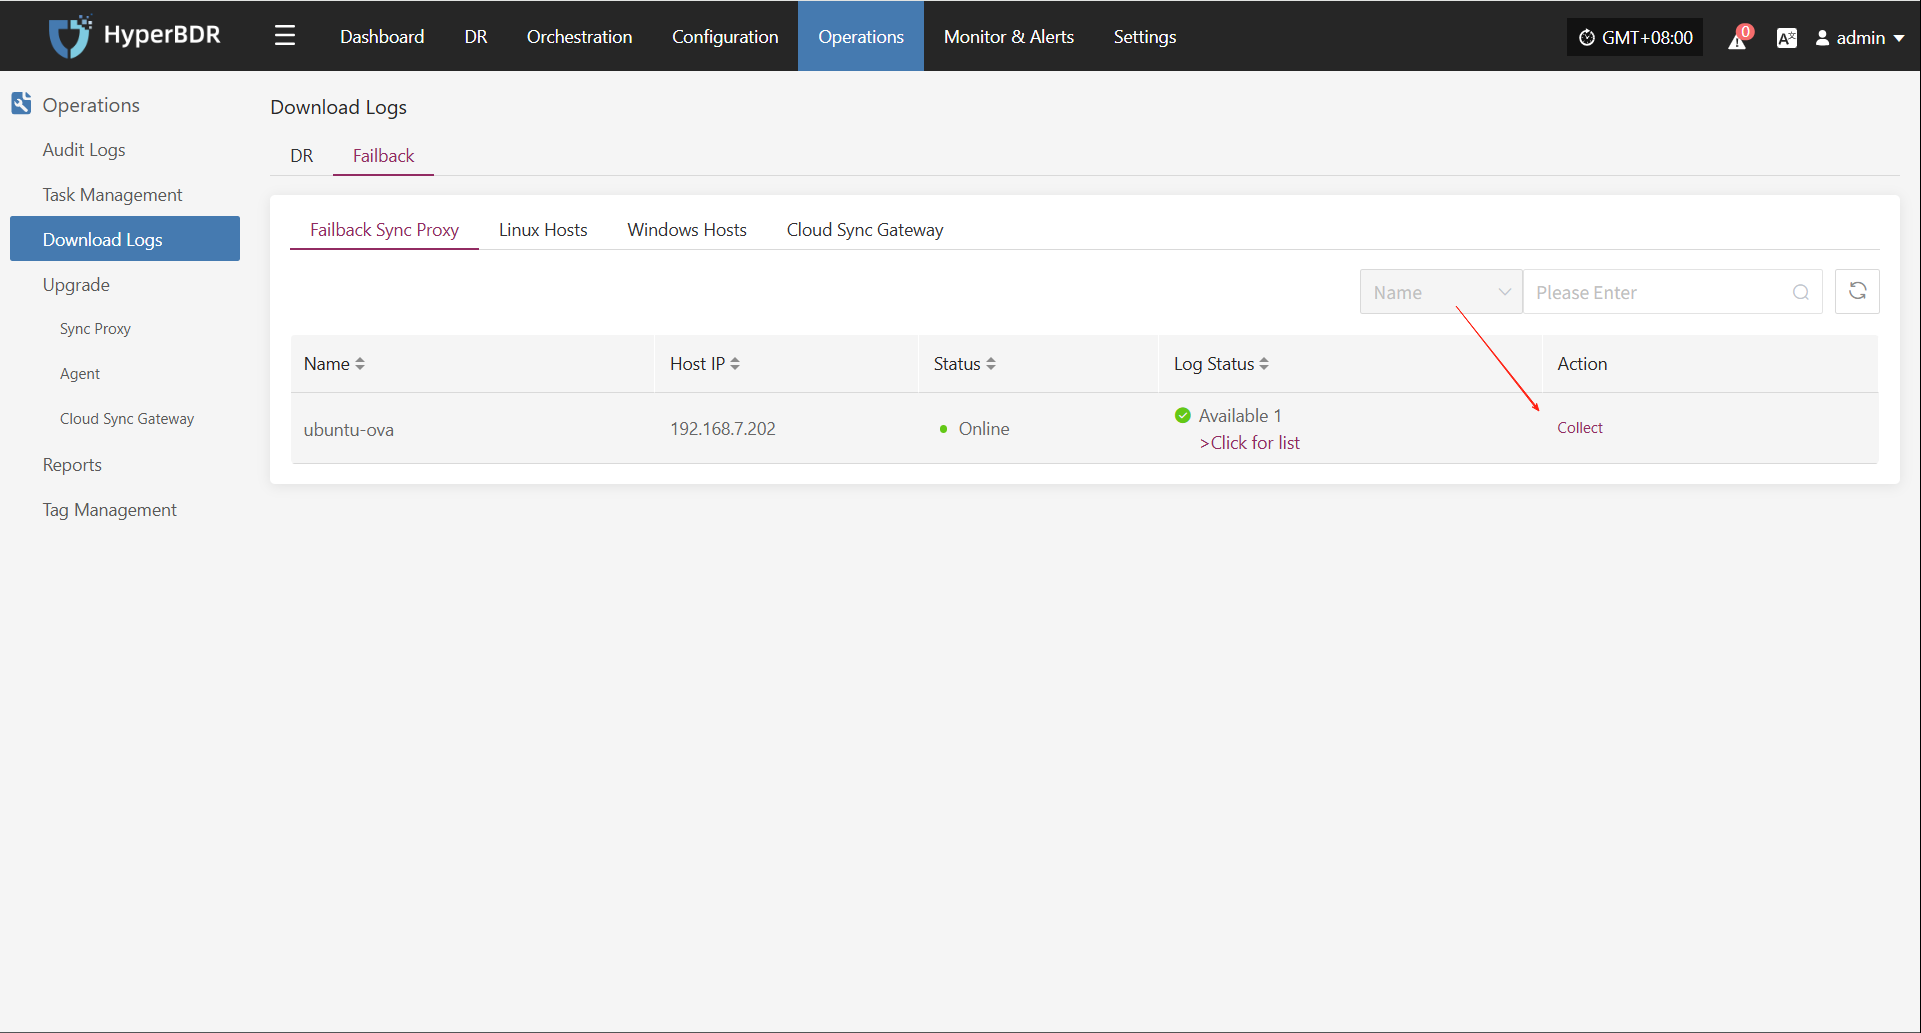
Select Time Range
In the pop-up dialog, set the time range for the logs you want to collect. After confirming, the system will automatically start collecting logs.
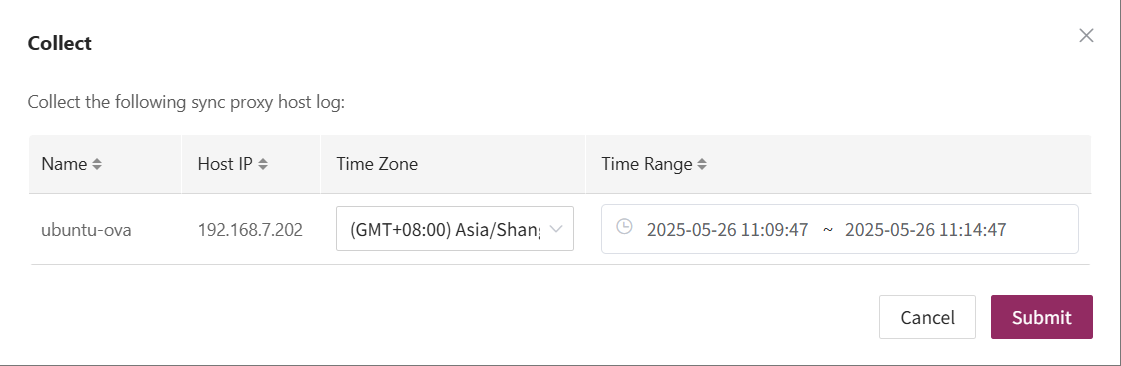
Start Collection
After confirming the time range, the system will automatically start collecting logs, and the log status will change to "Collecting".
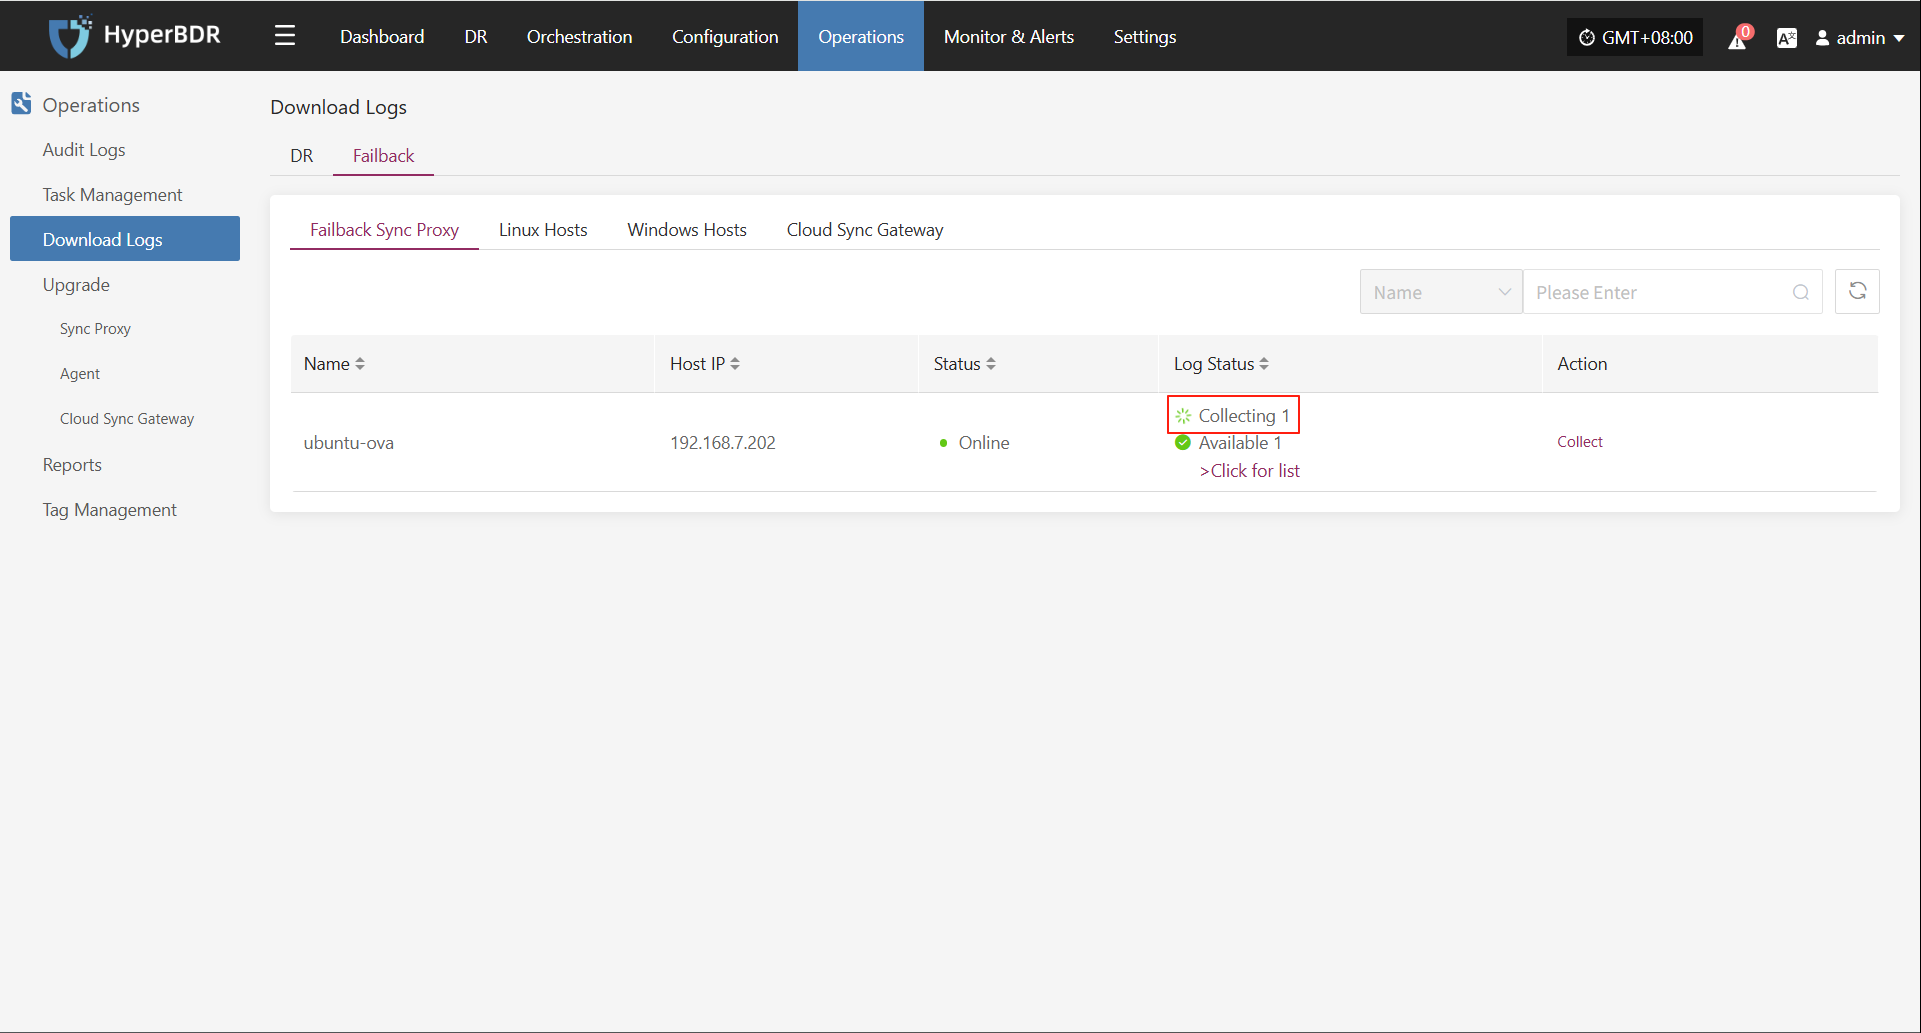
Download Logs
After log collection is complete, the status will update to "Available". Users can click "Click for list" to see the log files and select files to download.
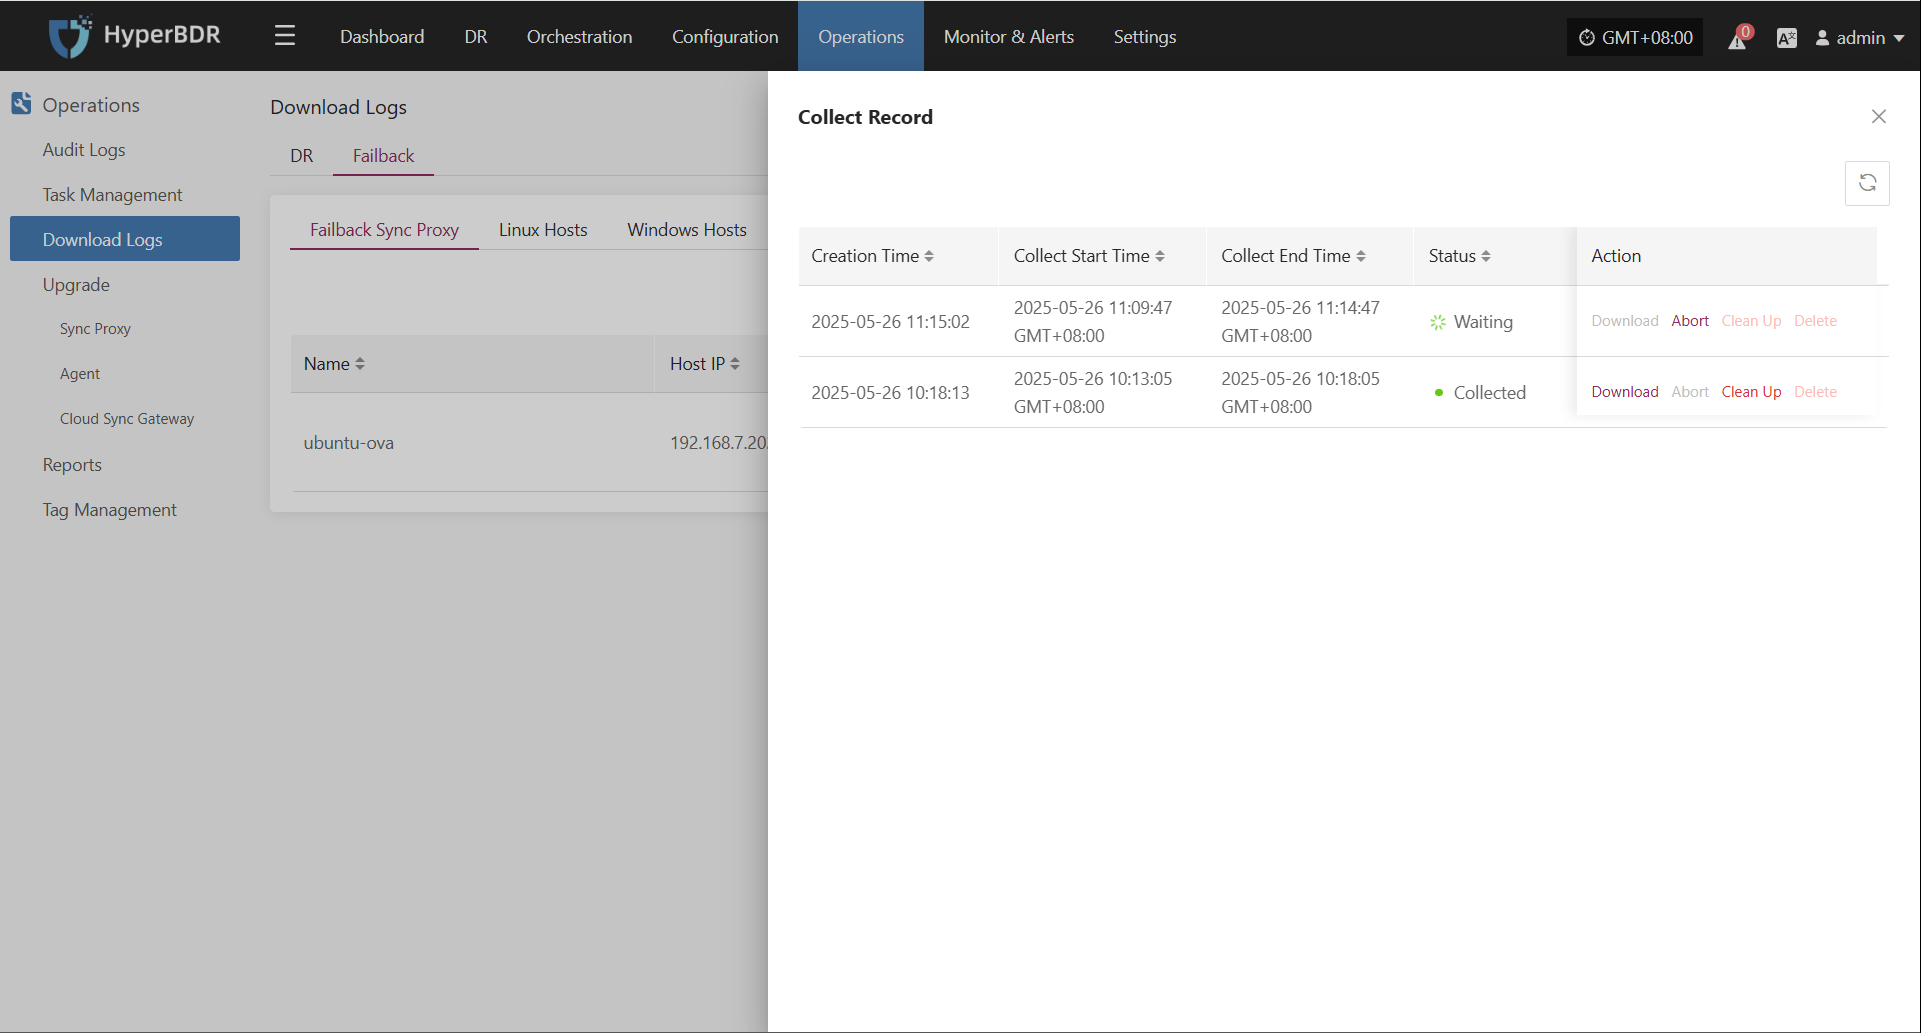
Upgrade
Upgrade provides unified management for updating system components and agent versions, ensuring all modules stay supported and stable. Users can view current version info and perform online upgrades as needed through the platform interface.
Upgrade Preparation
Before upgrading any functional components (such as Sync Proxy, Cloud Sync Gateway, etc.), you must first upgrade the Console version. As the core management module, the Console must be compatible with other components to avoid issues or upgrade failures caused by version mismatches.
Get Installation Package
Online Method:
Log in to the host where the Console is installed and use this method to get the installation package.
### Get the latest HyperBDR package URL.
HYPERBDR_PACKAGE=$(curl -s -k https://install.oneprocloud.com/get_hyperbdr_latest/latest)
echo "HYPERBDR_PACKAGE: ${HYPERBDR_PACKAGE}"

### Get the corresponding MD5 file URL.
HYPERBDR_PACKAGE_MD5="${HYPERBDR_PACKAGE}.md5"
echo "HYPERBDR_PACKAGE_MD5: ${HYPERBDR_PACKAGE_MD5}"

### Extract the package name using string operations.
HYPERBDR_PACKAGE_NAME="${HYPERBDR_PACKAGE##*/}"
echo "HYPERBDR_PACKAGE_NAME: ${HYPERBDR_PACKAGE_NAME}"

### Extract MD5 file name
HYPERBDR_PACKAGE_MD5_NAME="${HYPERBDR_PACKAGE_NAME}.md5"
echo "HYPERBDR_PACKAGE_MD5_NAME: ${HYPERBDR_PACKAGE_MD5_NAME}"

### Start download
curl -k -O "$HYPERBDR_PACKAGE"
curl -k -O "$HYPERBDR_PACKAGE_MD5"
Offline Method:
If you have already obtained the package online, skip this step.
If the installation host cannot access the internet, use another device's browser to visit the following address to get the package link:
After downloading, use Xftp or similar tools to upload the package to the Console host
https://install.oneprocloud.com/get_hyperbdr_latestExtract to Specified Directory
Use the following command to extract it to the specified directory:
tar zxvf <update-package>.tar.gz -C /path/to/extractExecute Upgrade
Run the upgrade command, and the system will automatically load the update content to the running directory /opt/installer/production/venvs:
/opt/installer/production/scripts/hmctl upgrade /<path-to-extracted-package>/installer/venvsDR
Sync Proxy
Upgrade Execution
After completing the prerequisite steps (Upgrade Preparation), the system will automatically display the upgradable proxy components and related prompts in the corresponding position on this page. Users can follow the prompts to complete the upgrade process.
Operations > Upgrade > DR > Sync Proxy
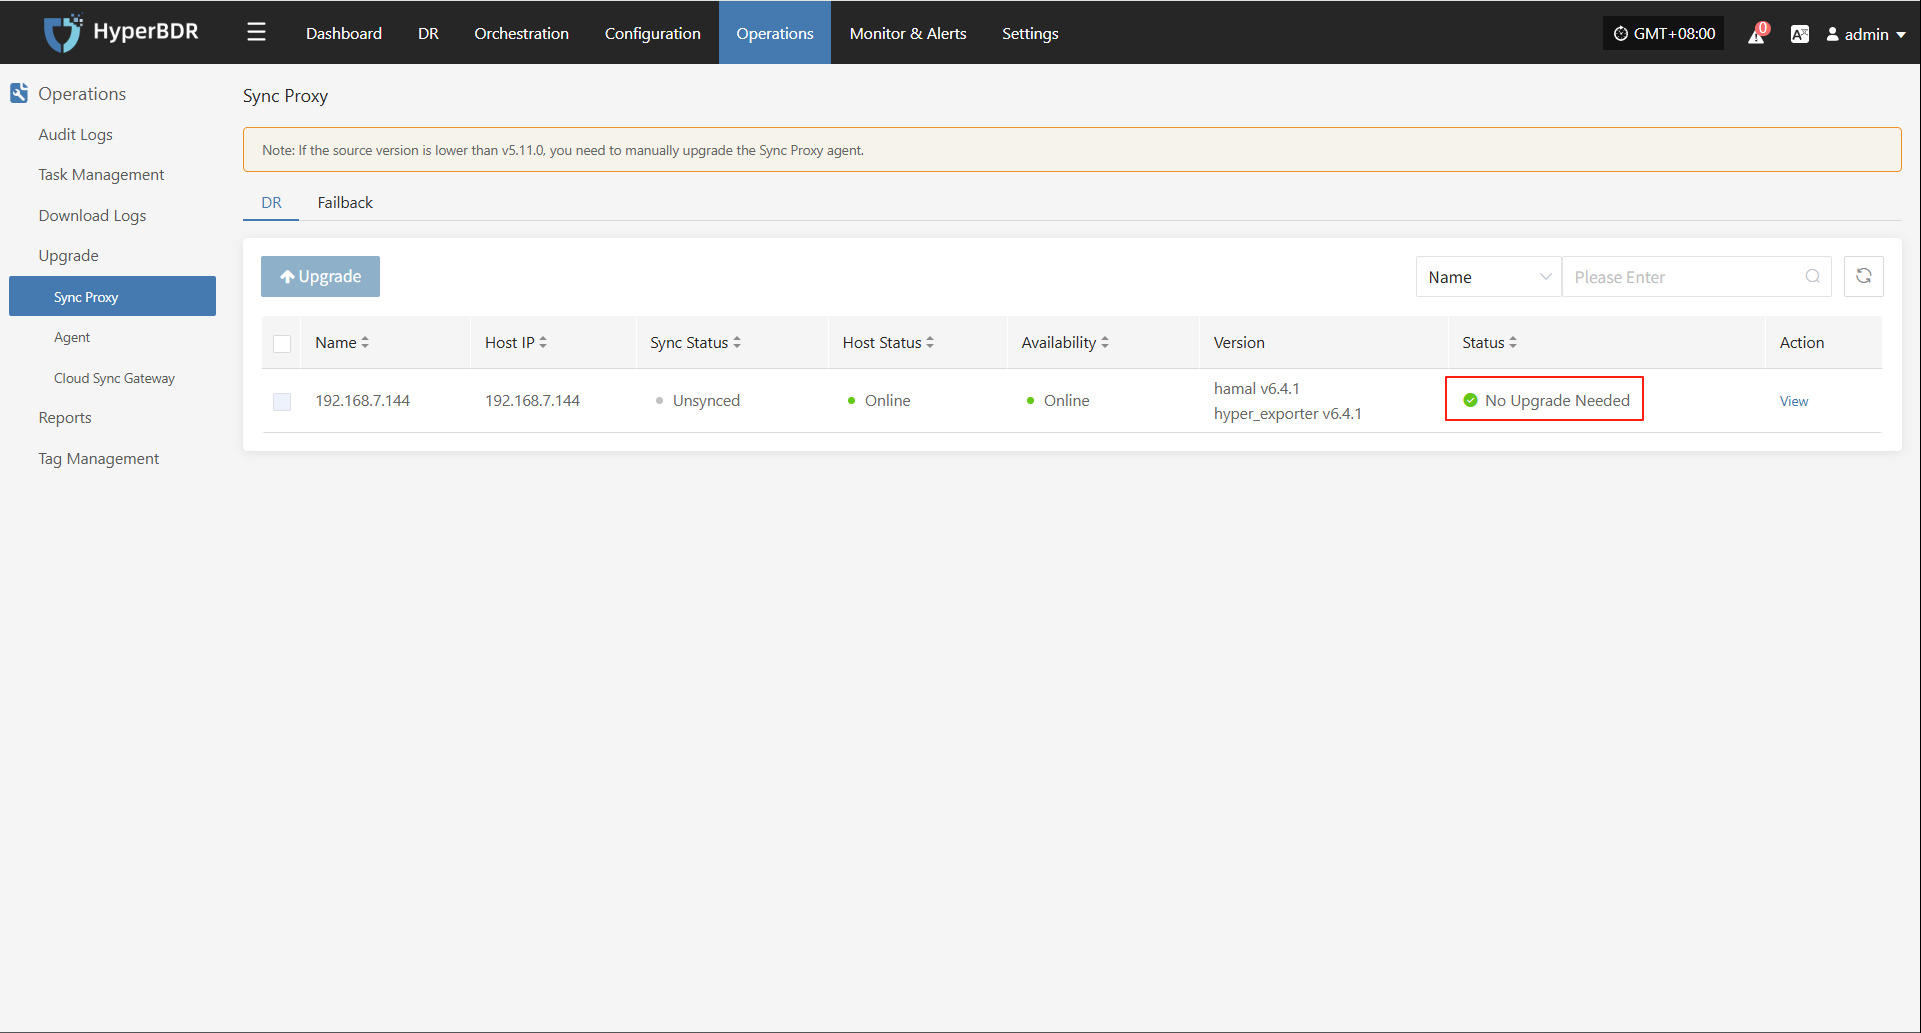
Agent
Upgrade Execution
After completing the prerequisite steps (Upgrade Preparation), the system will automatically display the upgradable agent components and related prompts in the corresponding position on this page. Users can follow the prompts to complete the upgrade process.
Operations > Upgrade > DR > Sync Proxy > Agent

Cloud Sync Gateway
Upgrade Execution
After completing the prerequisite steps (Upgrade Preparation), the system will automatically display the upgradable proxy components and related prompts in the corresponding position on this page. Users can follow the prompts to complete the upgrade process.
Operations > Upgrade > DR > Cloud Sync Gateway

Failback
Sync Proxy
Upgrade Execution
After completing the prerequisite steps (Upgrade Preparation), the system will automatically display the upgradable proxy components and related prompts in the corresponding position on this page. Users can follow the prompts to complete the upgrade process.
Operations > Upgrade > Failback > Sync Proxy
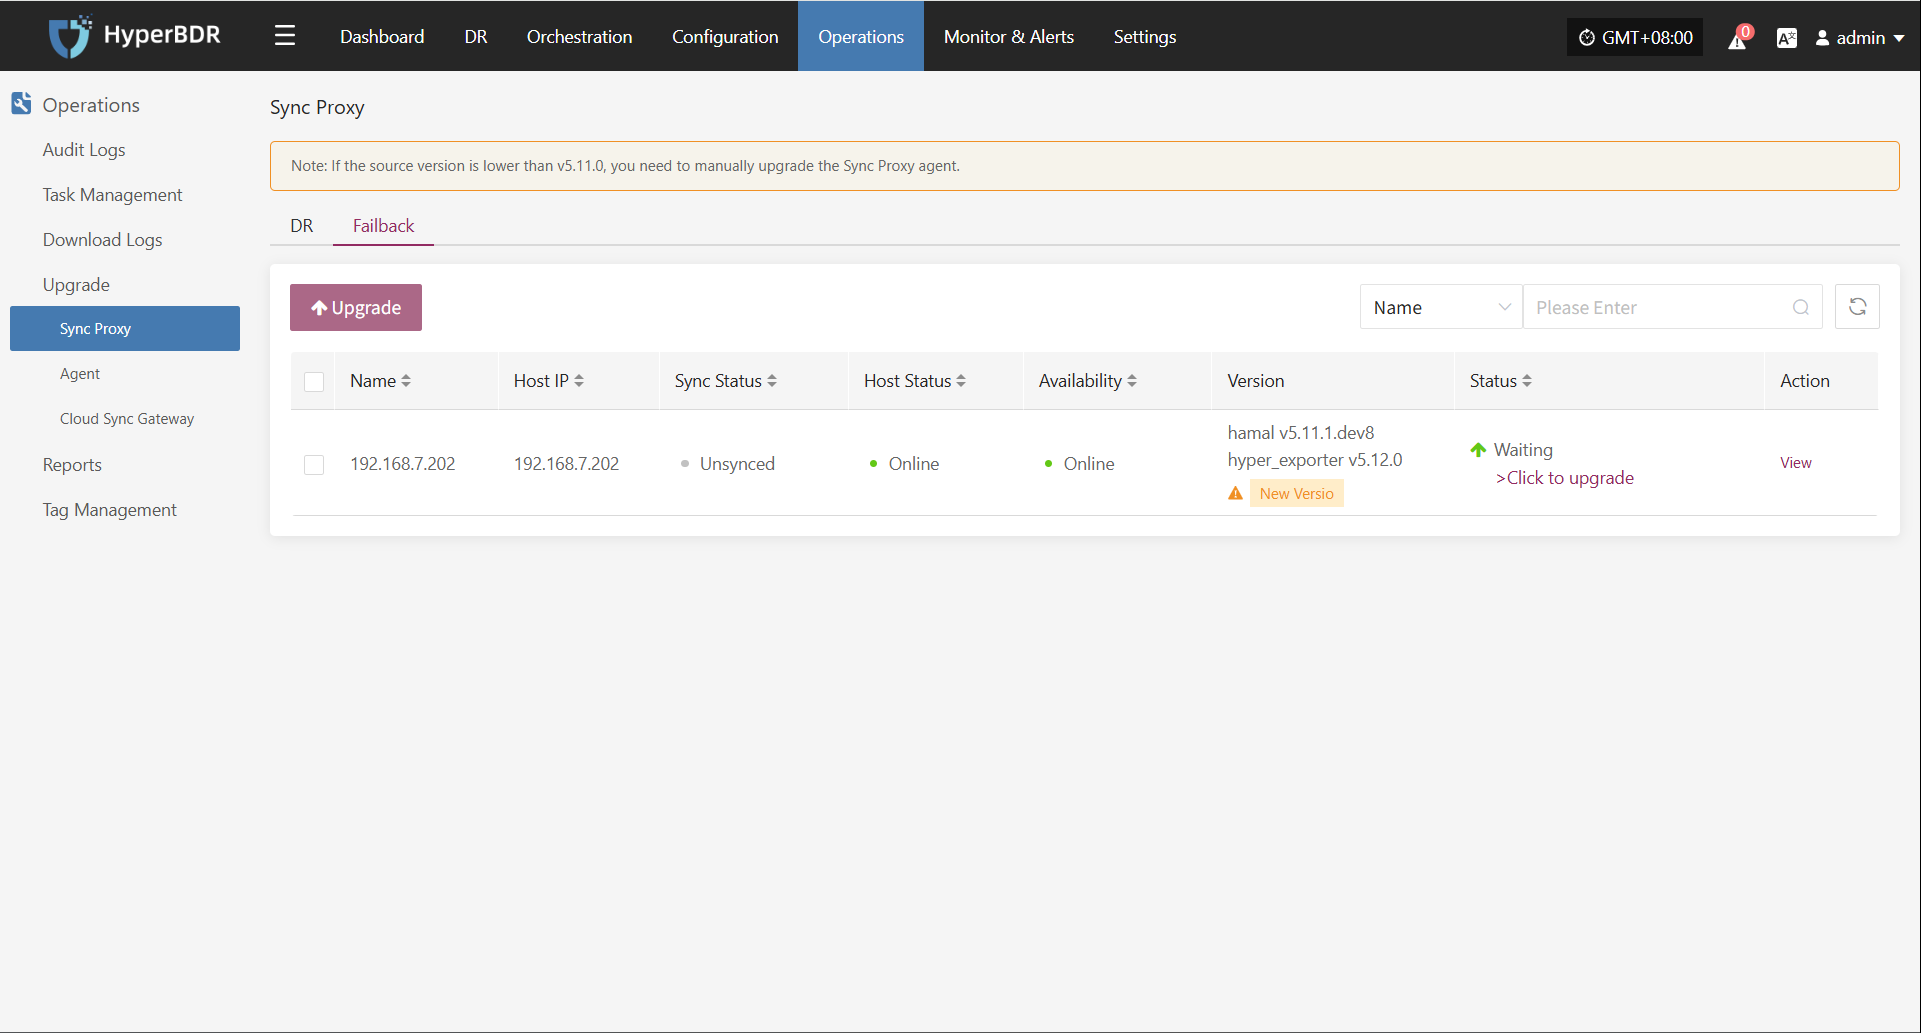
Agent
Upgrade Execution
After completing the prerequisite steps (Upgrade Preparation), the system will automatically display the upgradable agent components and related prompts in the corresponding position on this page. Users can follow the prompts to complete the upgrade process.
Operations > Upgrade > DR > Agent
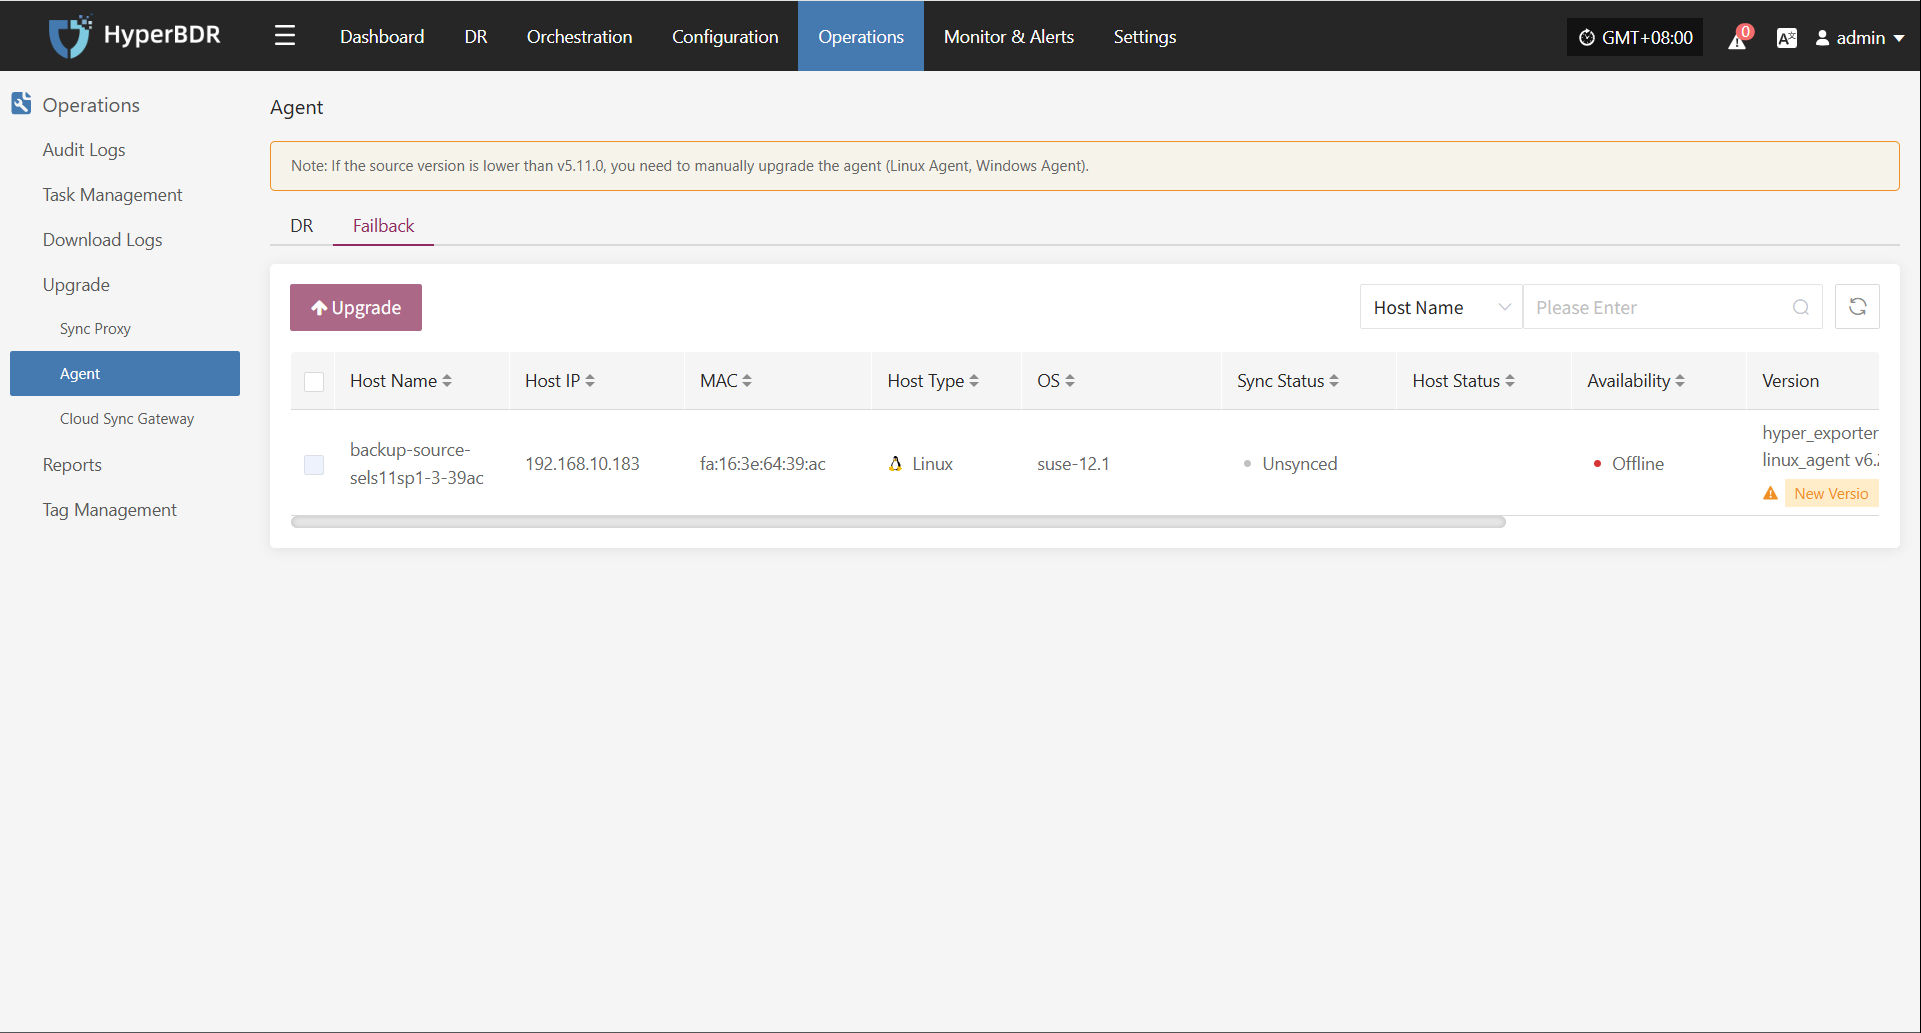
Cloud Sync Gateway
Upgrade Execution
After completing the prerequisite steps (Upgrade Preparation), the system will automatically display the upgradable proxy components and related prompts in the corresponding position on this page. Users can follow the prompts to complete the upgrade process.
Operations > Upgrade > DR > Cloud Sync Gateway

Reports
Currently, users can export various system operation and management reports for DR and Failback processes through the HyperBDR console. This feature helps users perform regular analysis and archiving of platform status, supporting O&M audit, issue tracking, and management evaluation.
Supported Report Types and Descriptions
| Report Type | Description |
|---|---|
| Host DR Summary Report | Summarizes basic info for all registered and unregistered hosts, including sync, drill, takeover counts, OS type, etc. |
| Host Sync Data Detailed Report | Details of sync tasks for all registered and unregistered hosts. |
| Host DR Drill Detailed Report | Details of drill tasks for all registered and unregistered hosts. |
| Host DR Takeover Detailed Report | Details of takeover tasks for all registered and unregistered hosts. |
| Host DR Cycle Summary Report (Day) | Summarizes DR cycles for all registered and unregistered hosts. |
| DR Cloud Sync Gateway Summary Report | Summarizes basic info for all cloud sync gateways. |
| DR Cloud Sync Gateway Detailed Report | Detailed info for all cloud sync gateways, down to each disk. |
Report Export Details
Host DR Summary Report
| Field Name | Description |
|---|---|
| Host Name | Host name, identifies the DR host. |
| Host IP | Host IP address for network identification. |
| Step | Current step number in DR registration. |
| Status | Current task or operation status, e.g., Registered. |
| Host Status | Whether the host is successfully registered. |
| Storage Type | Storage type, e.g., Block Storage or Object Storage. |
| Cloud Type | Cloud platform type and version, e.g., OpenStack Community (Juno+). |
| OS Type | OS type, e.g., Windows or Linux. |
| Sync Count (Succeeded) | Number of successful sync tasks. |
| Sync Count (Failed) | Number of failed sync tasks. |
| Drill Count (Succeeded) | Number of successful drills. |
| Drill Count (Failed) | Number of failed drills. |
| Takeover Count (Succeeded) | Number of successful takeovers. |
| Takeover Count (Failed) | Number of failed takeovers. |
| Sync Size (GB) | Total synced data in GB. |
| Region | Cloud platform region. |
| Zone | Availability zone (if any). |
| Flavors | Host specs (vCPU/memory/disk), e.g., 8 cores, 16GB RAM, 50GB disk. |
| Disk Count | Number of disks on the host. |
| Capacity (GB) | Total disk capacity in GB. |
| Subnet | Subnet name. |
| Network | Network name. |
| Security Group | Security group policy name. |
| Fixed IP | Fixed internal IP (if not assigned, blank). |
| Public IP | Public IP (if not assigned, blank). |
DR Cloud Sync Gateway Detailed Report
| Field Name | Description |
|---|---|
| Created Time | Creation time of the cloud sync gateway. |
| Cloud Sync Gateway Name | Name of the cloud sync gateway. |
| Cloud Account Name | Cloud account bound to the gateway. |
| Block Storage Platform | Cloud platform type, e.g., OpenStack, VMware. |
| User Name | Tenant or user who created the gateway. |
| Status | Current status (e.g., Enabled, Disabled). |
| Health Status | Health status (e.g., Normal, Abnormal). |
| Data Transfer Protocol | Data protocol, e.g., TCP, iSCSI. |
| Region | Cloud platform region. |
| Zone | Cloud platform availability zone. |
| Image | Image name used by the gateway. |
| Flavor | Resource template (CPU/memory/disk specs). |
| System Disk Type | System disk type, e.g., SSD, SATA. |
| System Disk Size | System disk size in GB. |
| Backup Volume | Name of the mounted/used backup volume. |
| Max Backup Volume | Max supported backup volumes or capacity. |
| Volume Name | Name of the current volume. |
| Pool Uuid | Unique ID of the storage pool. |
| Pool Name | Name of the storage pool. |
| Total Volume Capacity (GB) | Total capacity of the current volume in GB. |
| Usage Status | Usage status, e.g., In Use, Idle. |
| Allocation Status | Whether the gateway is associated with a host. |
| Allocation Host | If allocated, the host currently using the gateway. |
DR Cloud Sync Gateway Summary Report
| Field Name | Description |
|---|---|
| Created Time | Creation time (YYYY/MM/DD HH:MM:SS). |
| Cloud Sync Gateway Name | Name or unique ID (often IP address). |
| Cloud Account Name | Cloud service account name. |
| Block Storage Platform | Block storage platform, e.g., OpenStack, AWS. |
| User Name | Username operating the gateway. |
| Status | Status, e.g., "Creation Success" for success. |
| Health Status | Health, e.g., "Online" for online. |
| Data Transfer Protocol | Protocol, e.g., "S3Block" for S3-based block storage. |
| Region | Cloud platform region name. |
| Zone | Availability zone, or "-" if none. |
| Image | Image name and unique ID, usually OS image. |
| Flavor | VM specs (CPU, memory, disk). |
| System Disk Type | System disk type, e.g., "DEFAULT_VOLUME_TYPE". |
| System Disk Size | System disk size in GB. |
| Backup Volume | Number of backup volumes. |
| Max Backup Volume | Max allowed backup volumes. |
| Total Volume Capacity (GB) | Total capacity of all volumes in GB. |
| Hosts Count | Number of associated hosts. |
Host DR Cycle Summary Report (Day)
| Field Name | Description |
|---|---|
| Serial Number | Unique entry number. |
| Period | Time period covered by the report. |
| Host Name | Host name. |
| Host IP | Host IP address. |
| Step | Current step or phase number. |
| Status | Status, e.g., "Registered" for registered. |
| Host Status | Host status, e.g., "Registered" for registered host. |
| Storage Type | Storage type, e.g., "Block Storage". |
| Cloud Type | Cloud platform type, e.g., "OpenStackCommunity(Juno+)". |
| OS Type | OS type, e.g., Windows, Linux. |
| Sync Count(Succeeded) | Successful sync count. |
| Sync Count(Failed) | Failed sync count. |
| Drill Count(Succeeded) | Successful drill count. |
| Drill Count(Failed) | Failed drill count. |
| Takeover Count(Succeeded) | Successful takeover count. |
| Takeover Count(Failed) | Failed takeover count. |
| Sync Size(GB) | Synced data size in GB. |
| Region | Cloud platform region. |
| Zone | Availability zone, or "-" if none. |
| Flavors | VM specs (CPU, memory, disk). |
| Disk Count | Number of disks. |
| Capacity(GB) | Storage capacity in GB. |
| Subnet | Subnet name. |
| Network | Network name. |
| Security Group | Security group name. |
| Fixed IP | Fixed IP, or "-" if none. |
| Public IP | Public IP, or "-" if none. |
Host DR Takeover Detailed Report
| Field Name | Description |
|---|---|
| Host Name | Host name. |
| Host IP | Host IP address. |
| Status | Current status, e.g., task completed, abnormal. |
| Task Status | Task status, reflects takeover progress. |
| Start Time | Task start time. |
| End Time | Task end time. |
| Execution Time | Task duration. |
| Storage Type | Storage type, e.g., Block Storage. |
| Cloud Type | Cloud platform type, e.g., OpenStackCommunity(Juno+). |
| Region | Cloud platform region. |
| Zone | Availability zone, "-" if none. |
| Flavors | VM specs (CPU, memory, disk). |
| Disk Count | Number of disks. |
| Capacity(GB) | Storage capacity in GB. |
| Network | Network name. |
| Subnet | Subnet name. |
| Security Group | Security group name. |
| Fixed IP | Fixed IP, "-" if none. |
| Public IP | Public IP, "-" if none. |
| Task Details | Task details, describes execution info/results. |
Host DR Drill Detailed Report
| Field Name | Description |
|---|---|
| Host Name | Host name. |
| Host IP | Host IP address. |
| Status | Current status, e.g., task completed, abnormal. |
| Task Status | Task status, reflects drill progress. |
| Start Time | Task start time. |
| End Time | Task end time. |
| Execution Time | Task duration. |
| Storage Type | Storage type, e.g., Block Storage. |
| Cloud Type | Cloud platform type, e.g., OpenStackCommunity(Juno+). |
| Region | Cloud platform region. |
| Zone | Availability zone, "-" if none. |
| Flavors | VM specs (CPU, memory, disk). |
| Disk Count | Number of disks. |
| Capacity(GB) | Storage capacity in GB. |
| Network | Network name. |
| Subnet | Subnet name. |
| Security Group | Security group name. |
| Fixed IP | Fixed IP, "-" if none. |
| Public IP | Public IP, "-" if none. |
| Task Details | Task details, describes execution info/results. |
Host Sync Data Detailed Report
| Field Name | Description |
|---|---|
| Host Name | Host name. |
| Host IP | Host IP address. |
| Status | Current status, e.g., task completed, abnormal. |
| Task Status | Task status, reflects sync progress. |
| Start Time | Task start time. |
| End Time | Task end time. |
| Execution Time | Task duration. |
| Capacity Size(GB) | Sync capacity in GB. |
| Sync Mode | Sync mode, e.g., full or incremental. |
| Average Sync Rate(Mbps/s) | Average sync rate in Mbps. |
| Synced Size(GB) | Synced data size in GB. |
| Task Details | Task details, describes execution info/results. |
Report Export Example
Note: To download reports for different tenants, users of each tenant must log in to the console.
Collect Report
- Click [Operations] > [Reports] to enter the report page.
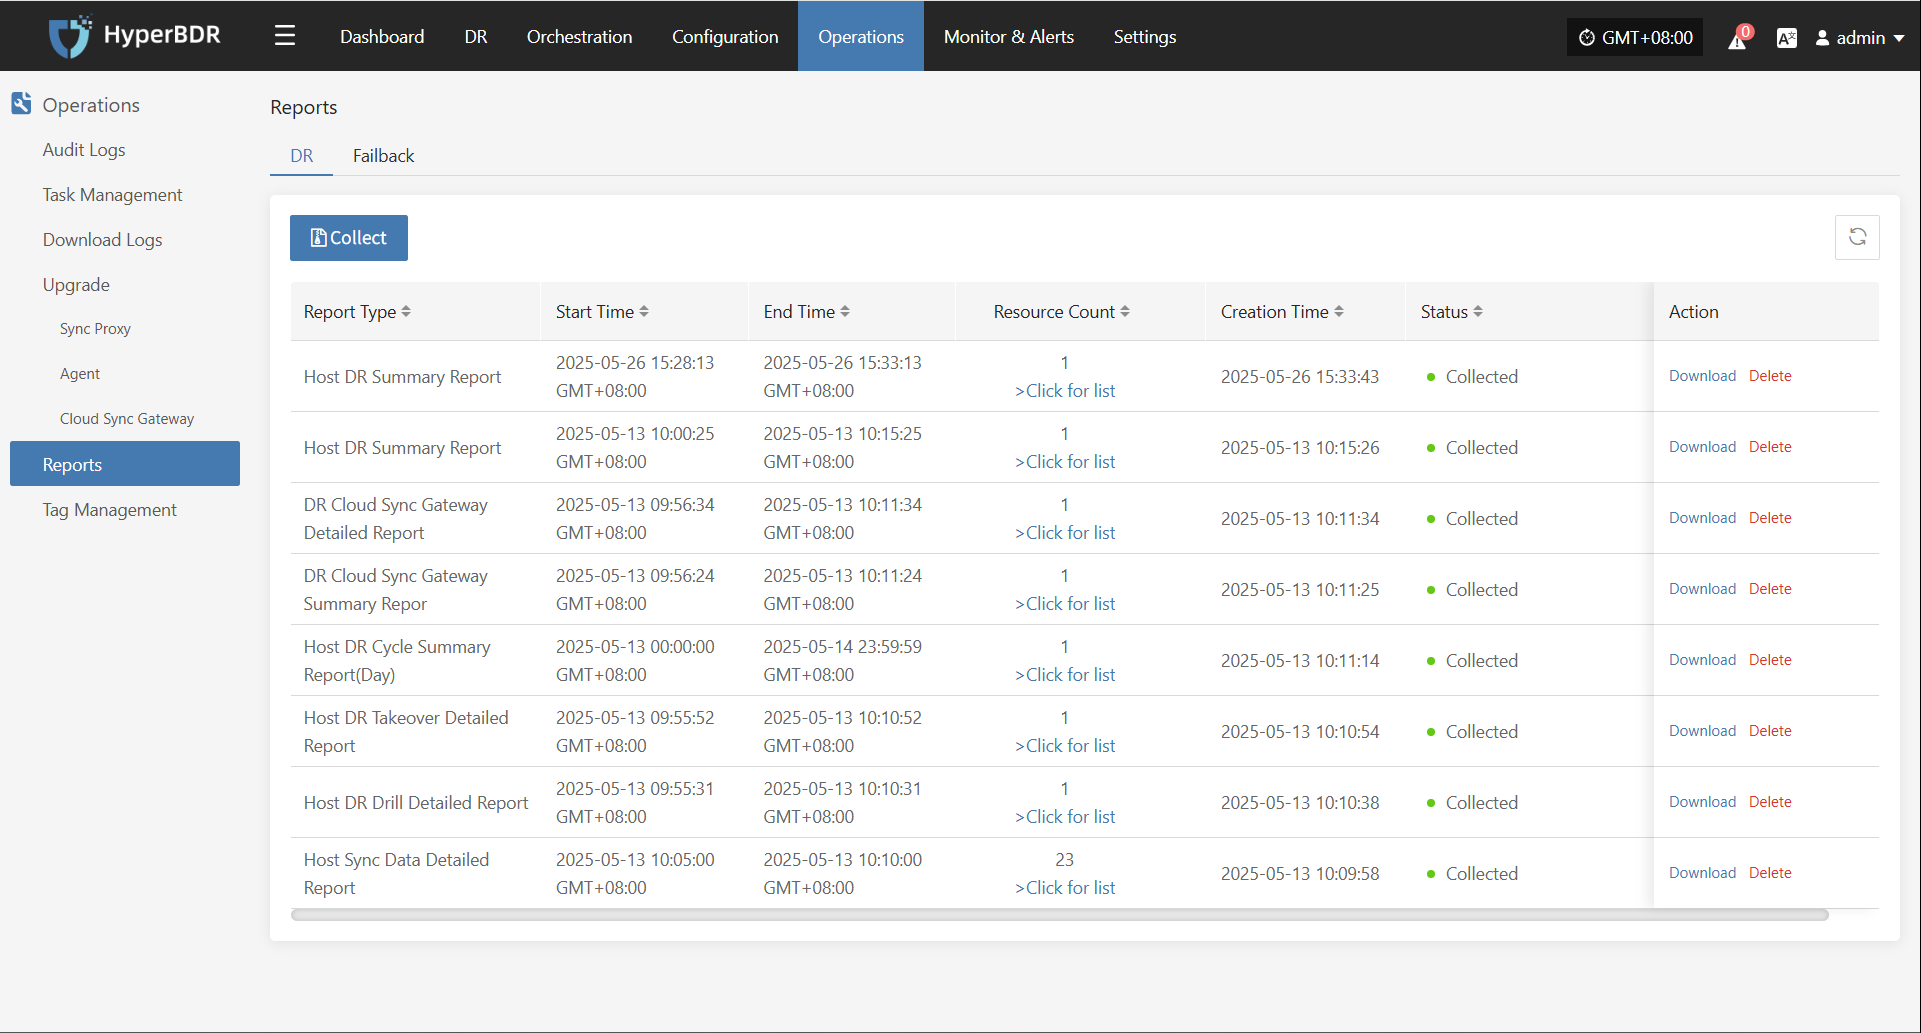
- After clicking collect, select the report type, scope, time zone, time range, host, etc. as needed, then submit.
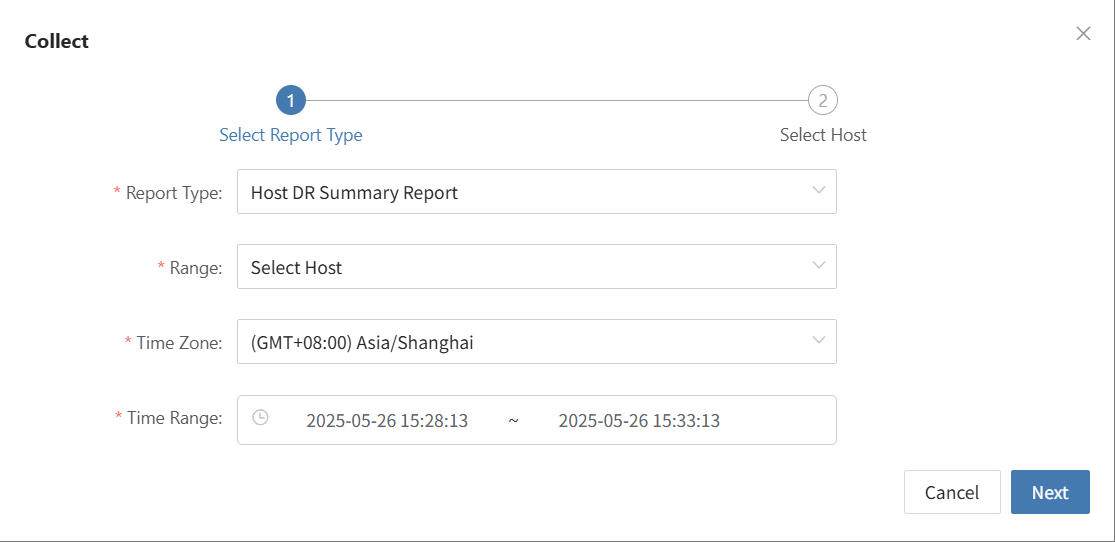
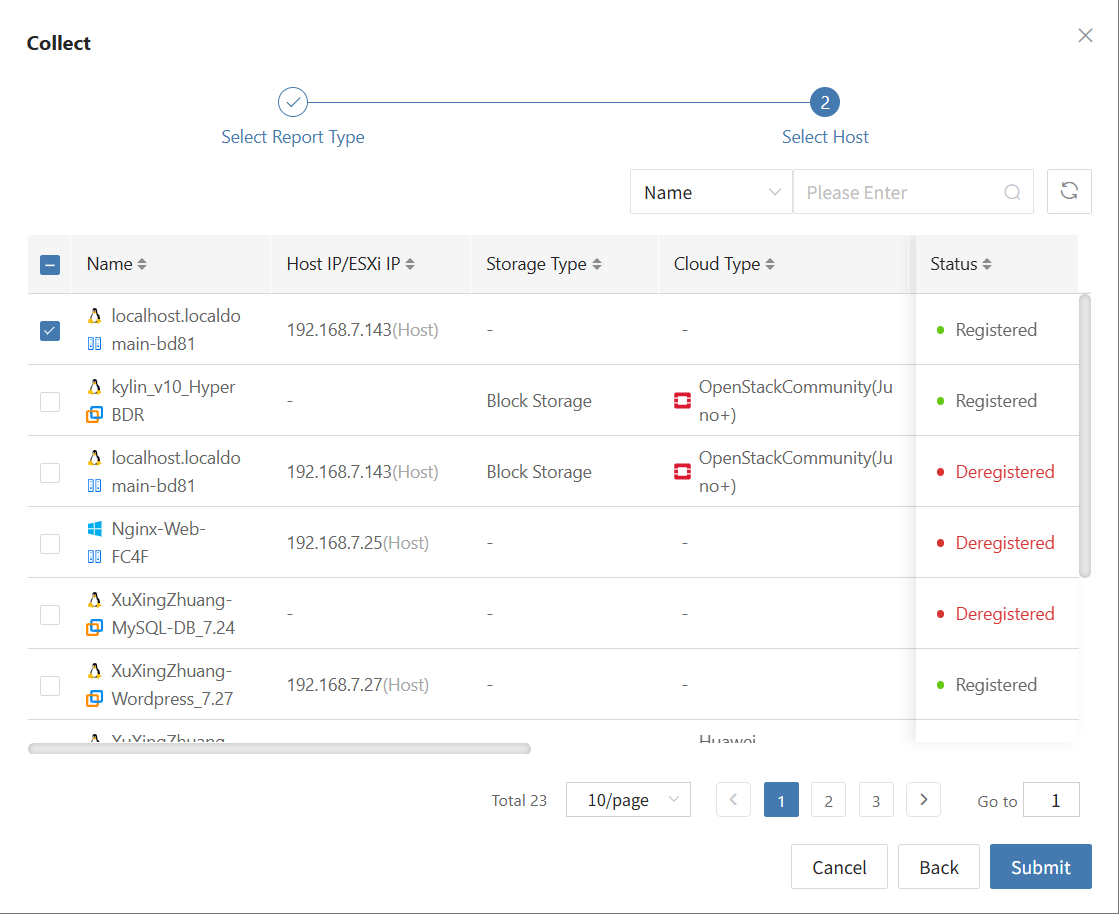
Download Report
Select the report row you want to download and click [Download] to get the report.

Tag Management
The tag management module is used to categorize and label resources or objects in the system, making it easy for users to quickly search, organize, and manage resources, and improve management efficiency.
Tag List
Go to [Operations] > [Tag Management] > [Tag List] to access the tag management page.
Create Tag
Click "Create Tag" to start. In the pop-up, add the tag name, description, and tag color.
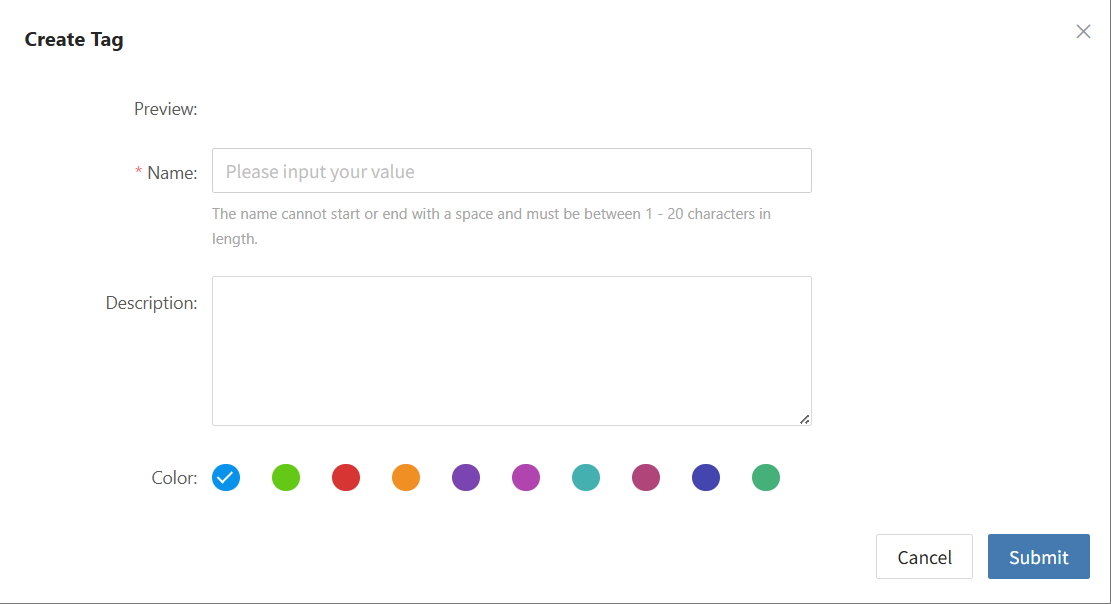
Action
Modify
Select a created tag, click [More Actions] > [Modify], and you can modify the name, description, and color.
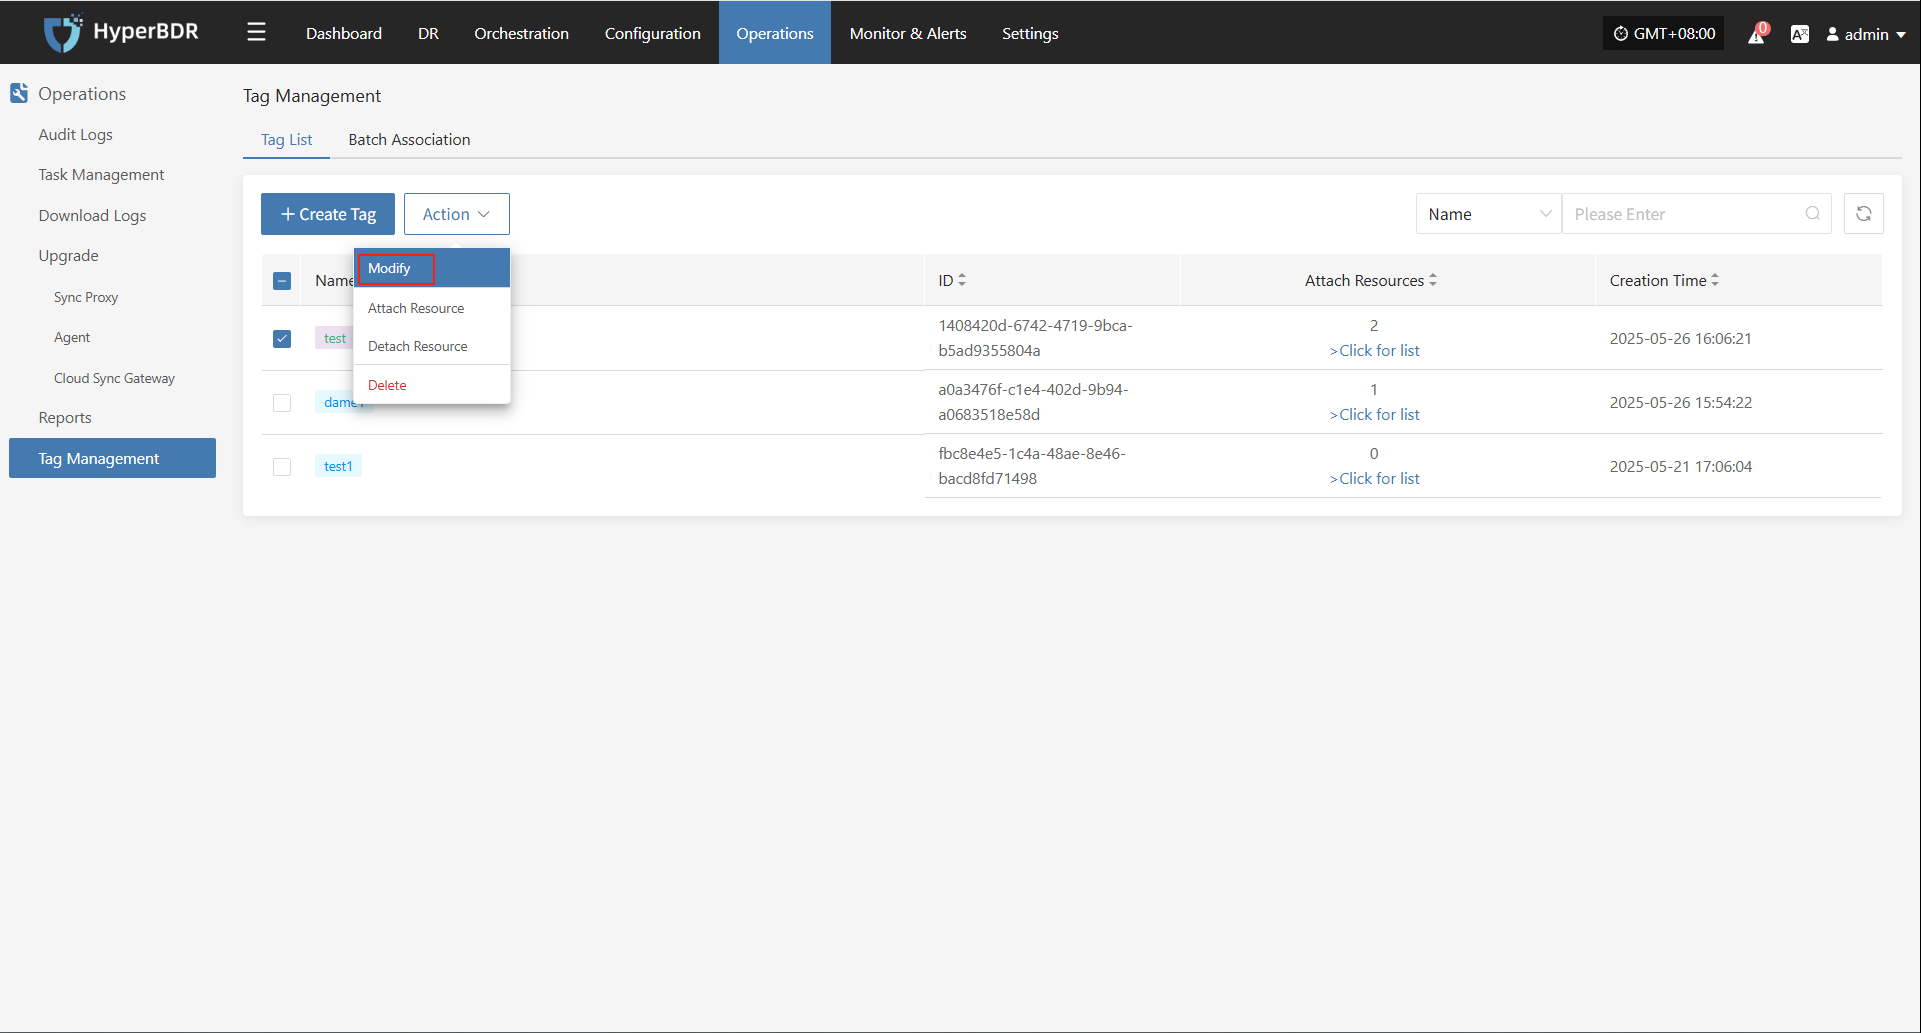
Attach Resource
Select a created tag, click [More Actions] > [Attach Resource], and bind the tag to the target host resource.
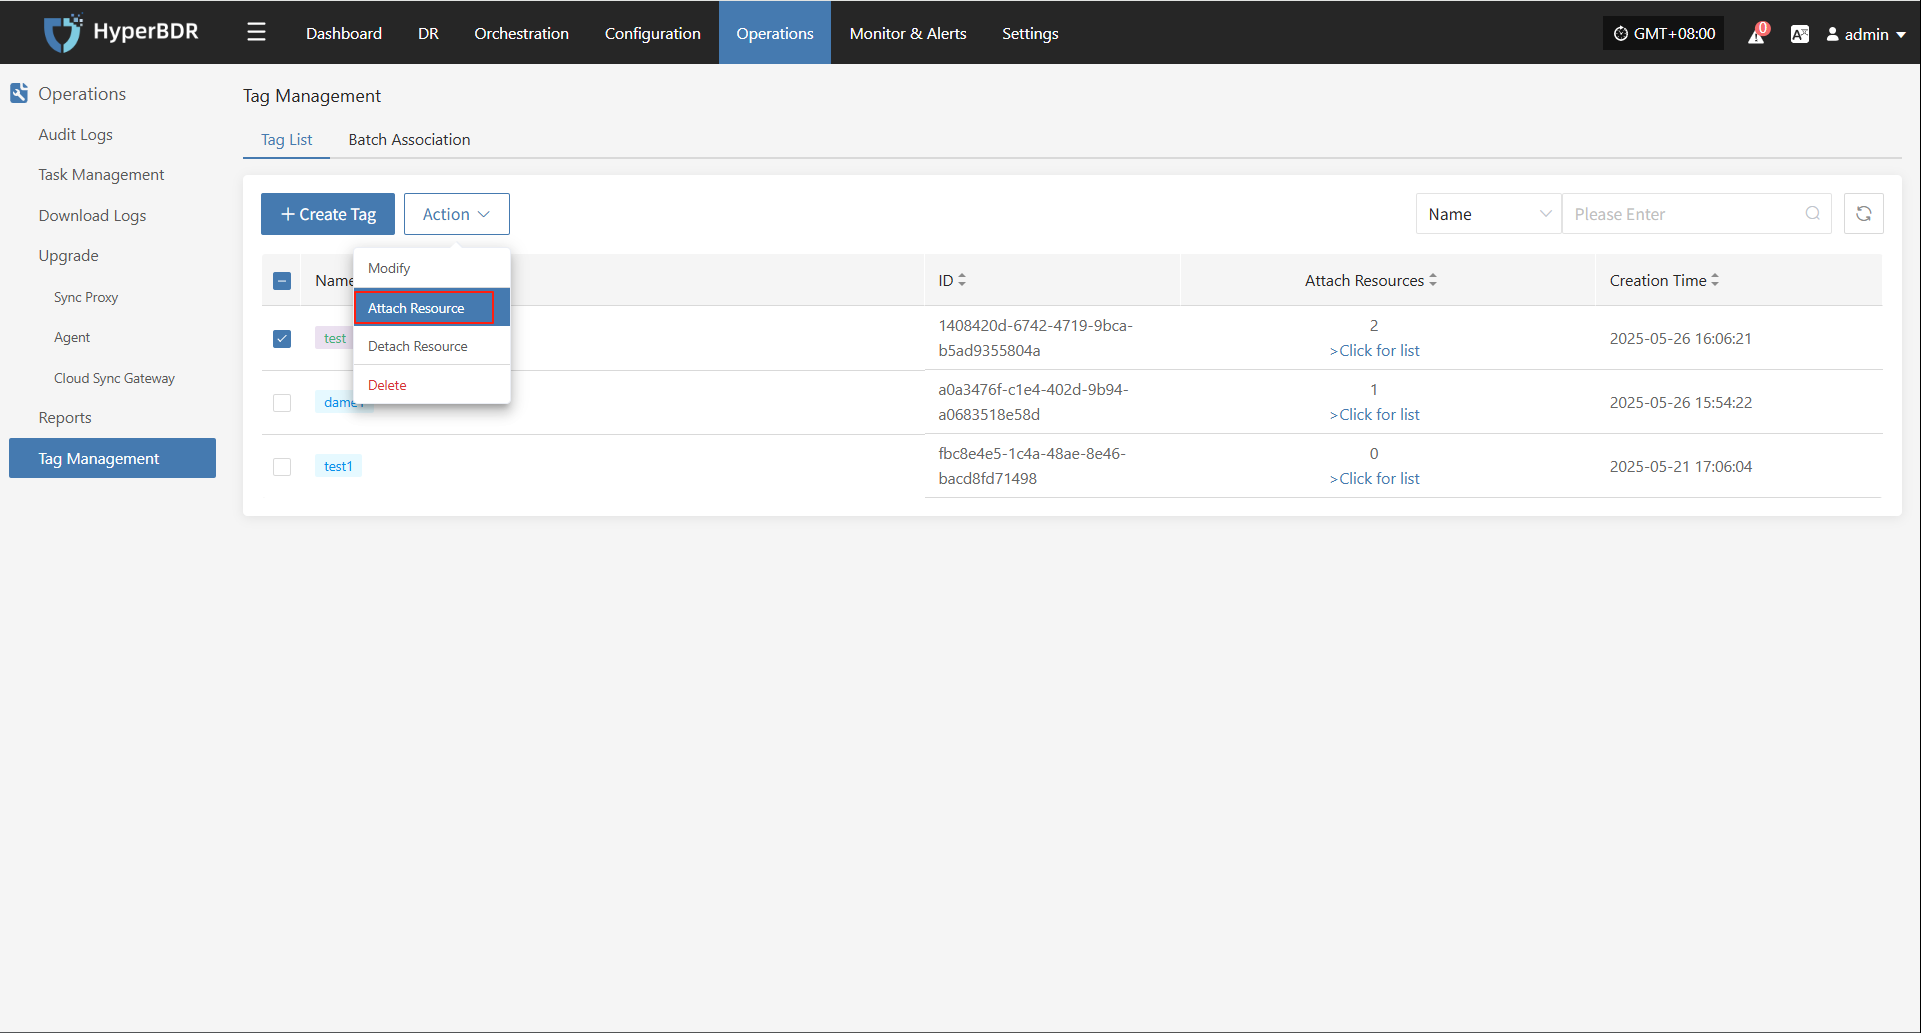
Click [View List] to see the bound host resources.
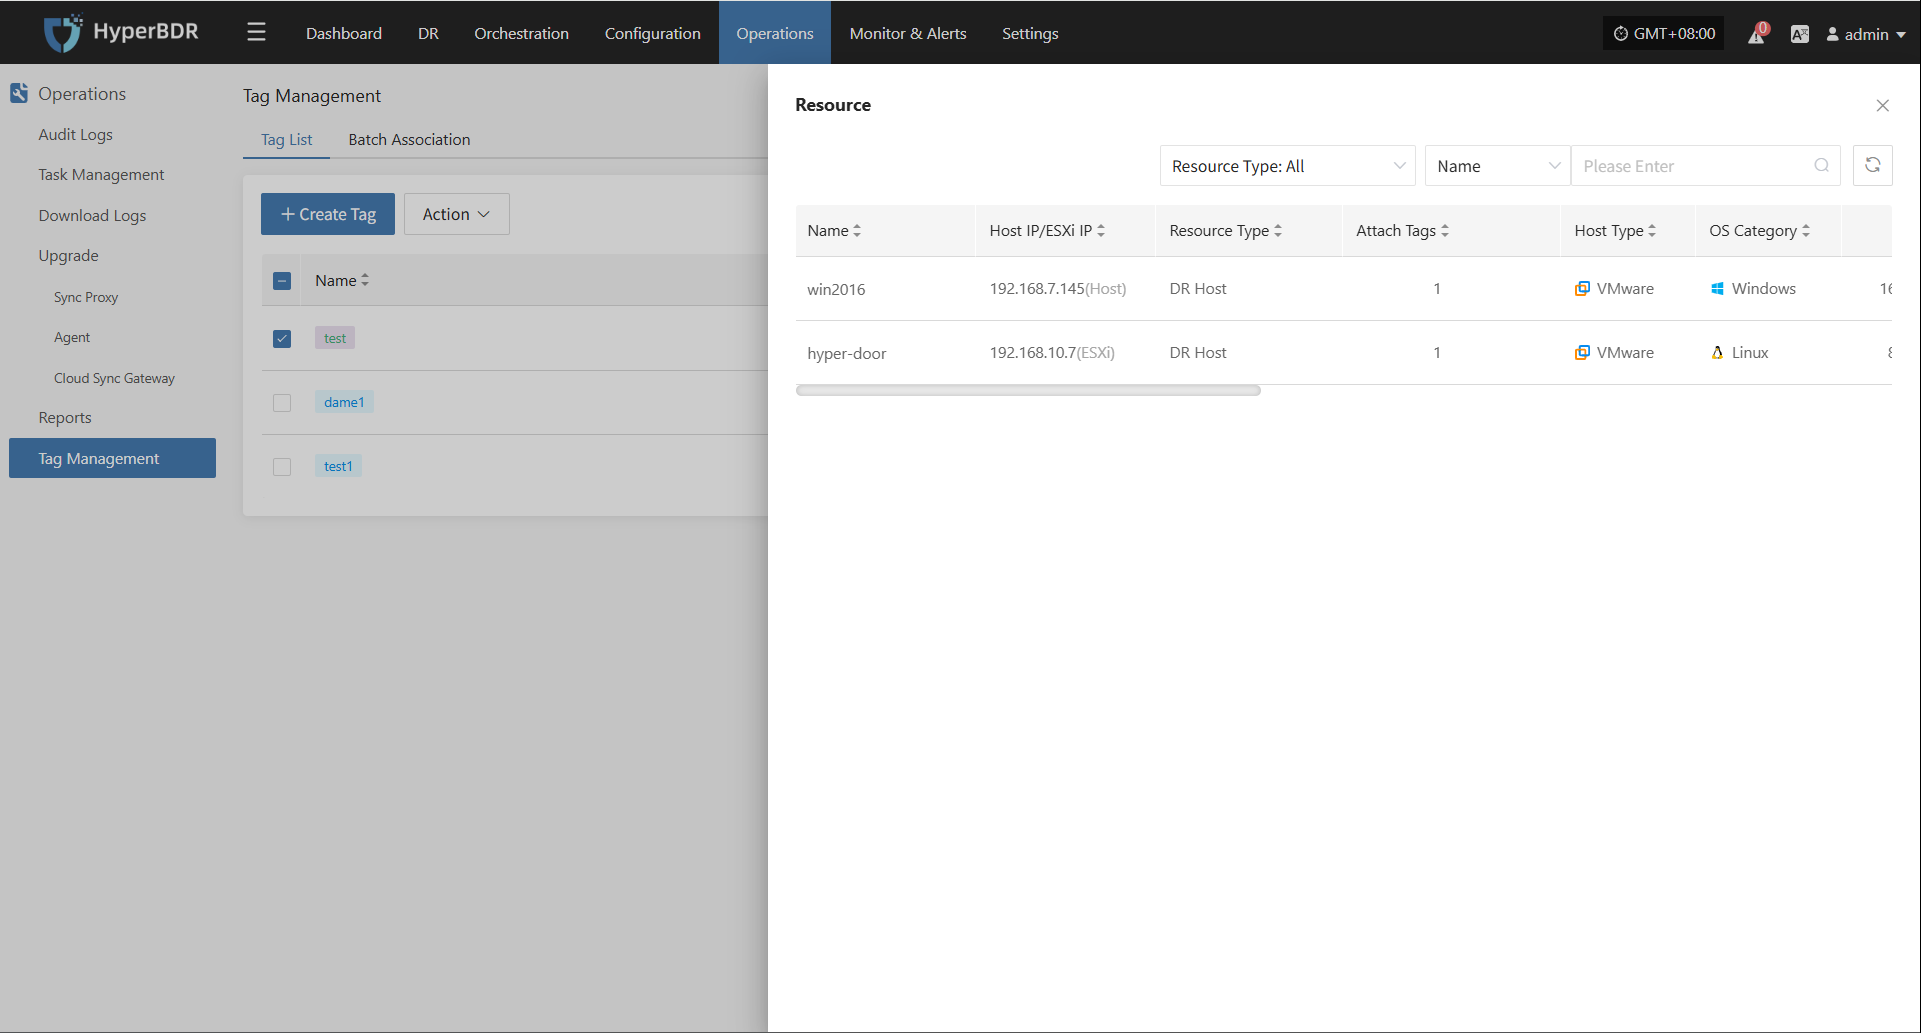
Detach Resource
Select a created tag, click [More Actions] > [Detach Resource], and unbind the tag from the target host resource.
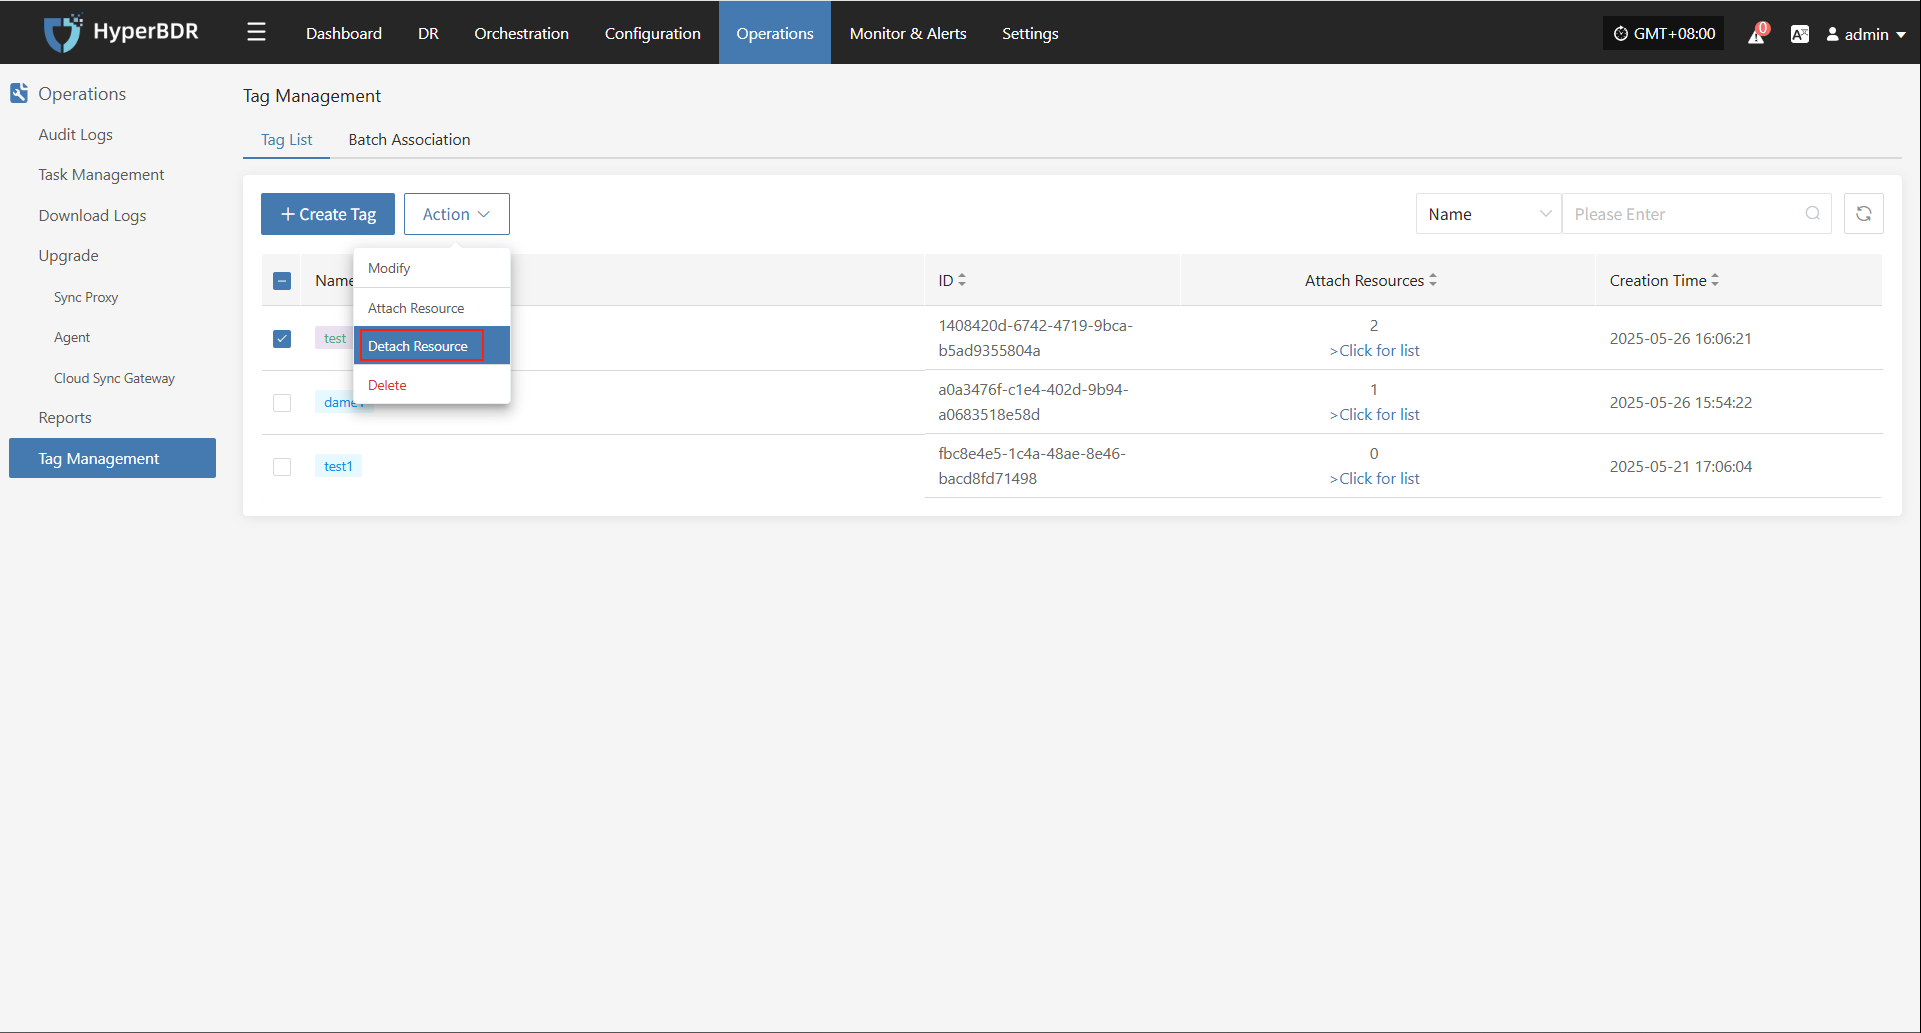
Delete
Select a created tag, click [More Actions] > [Delete] to remove the tag. All resources bound to this tag will be automatically unbound.
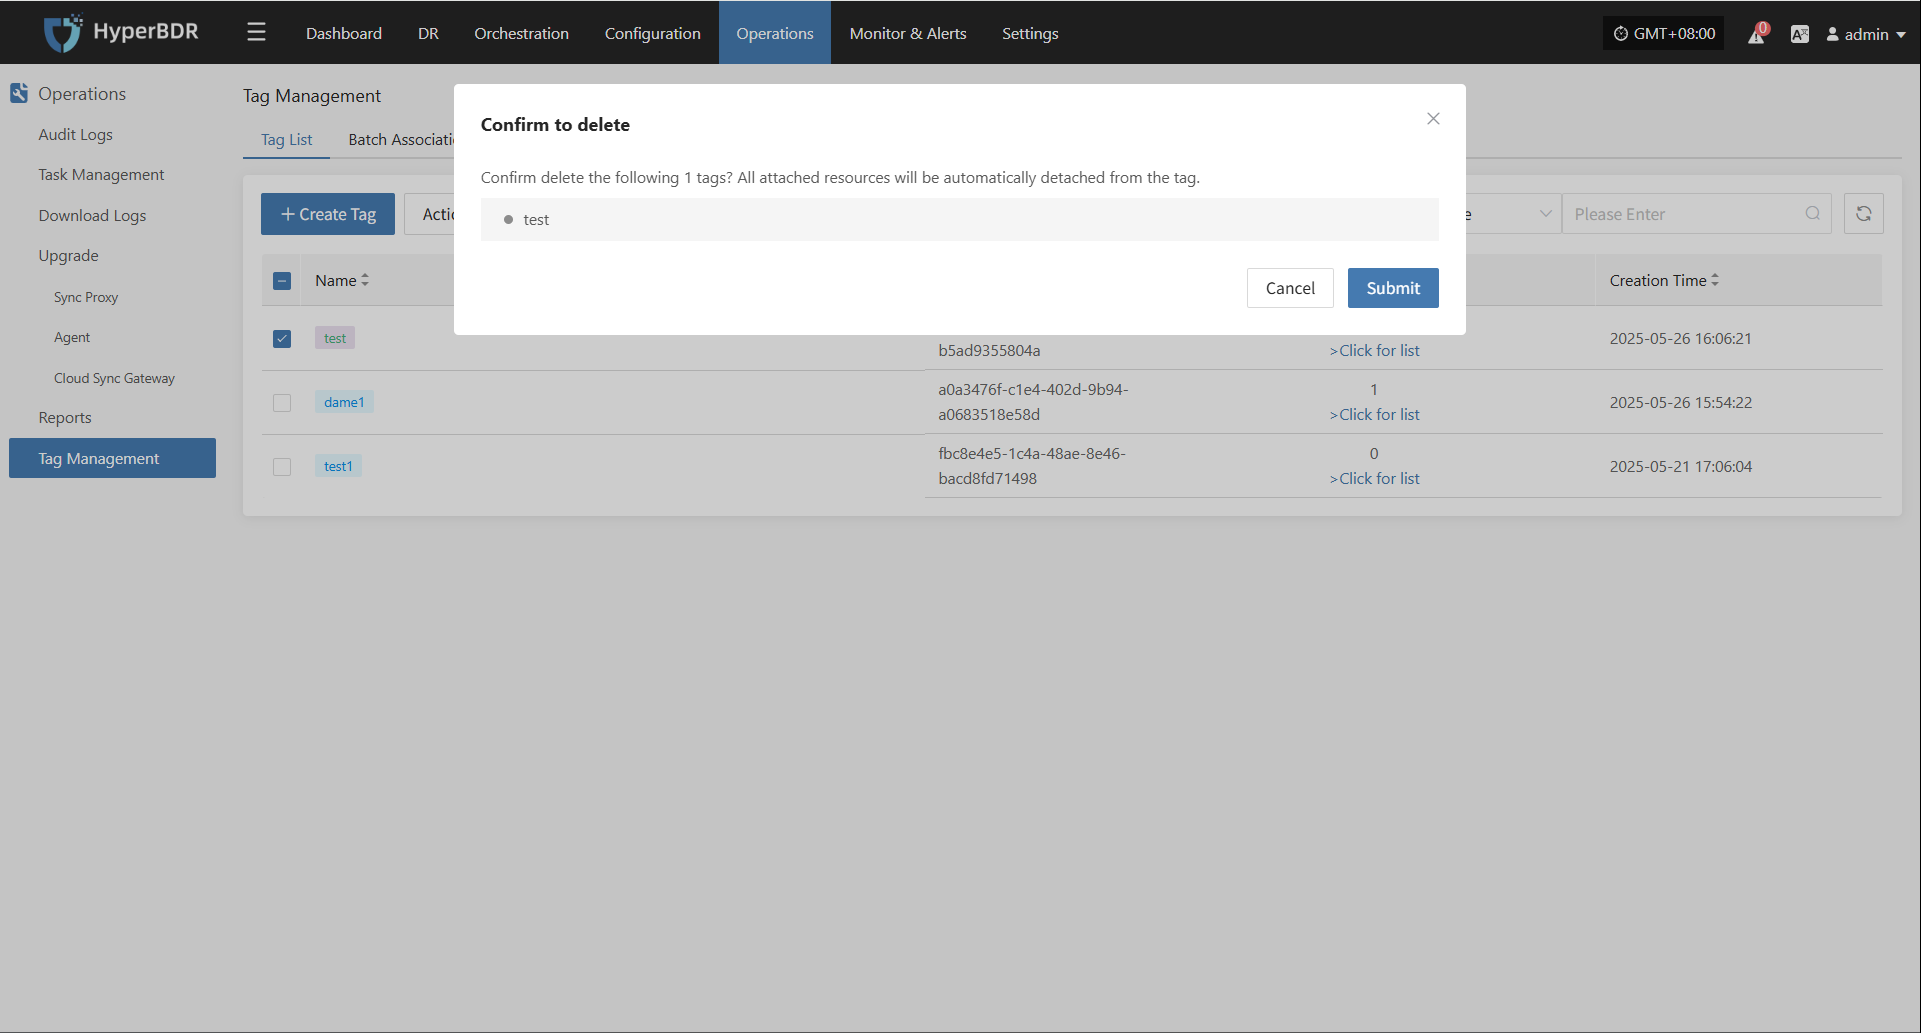
Batch Association
Go to [O&M Management] > [Tag Management] > [Batch Association] to access the batch association page.
Export Template
Click "Export Template" to download the template in XML format.
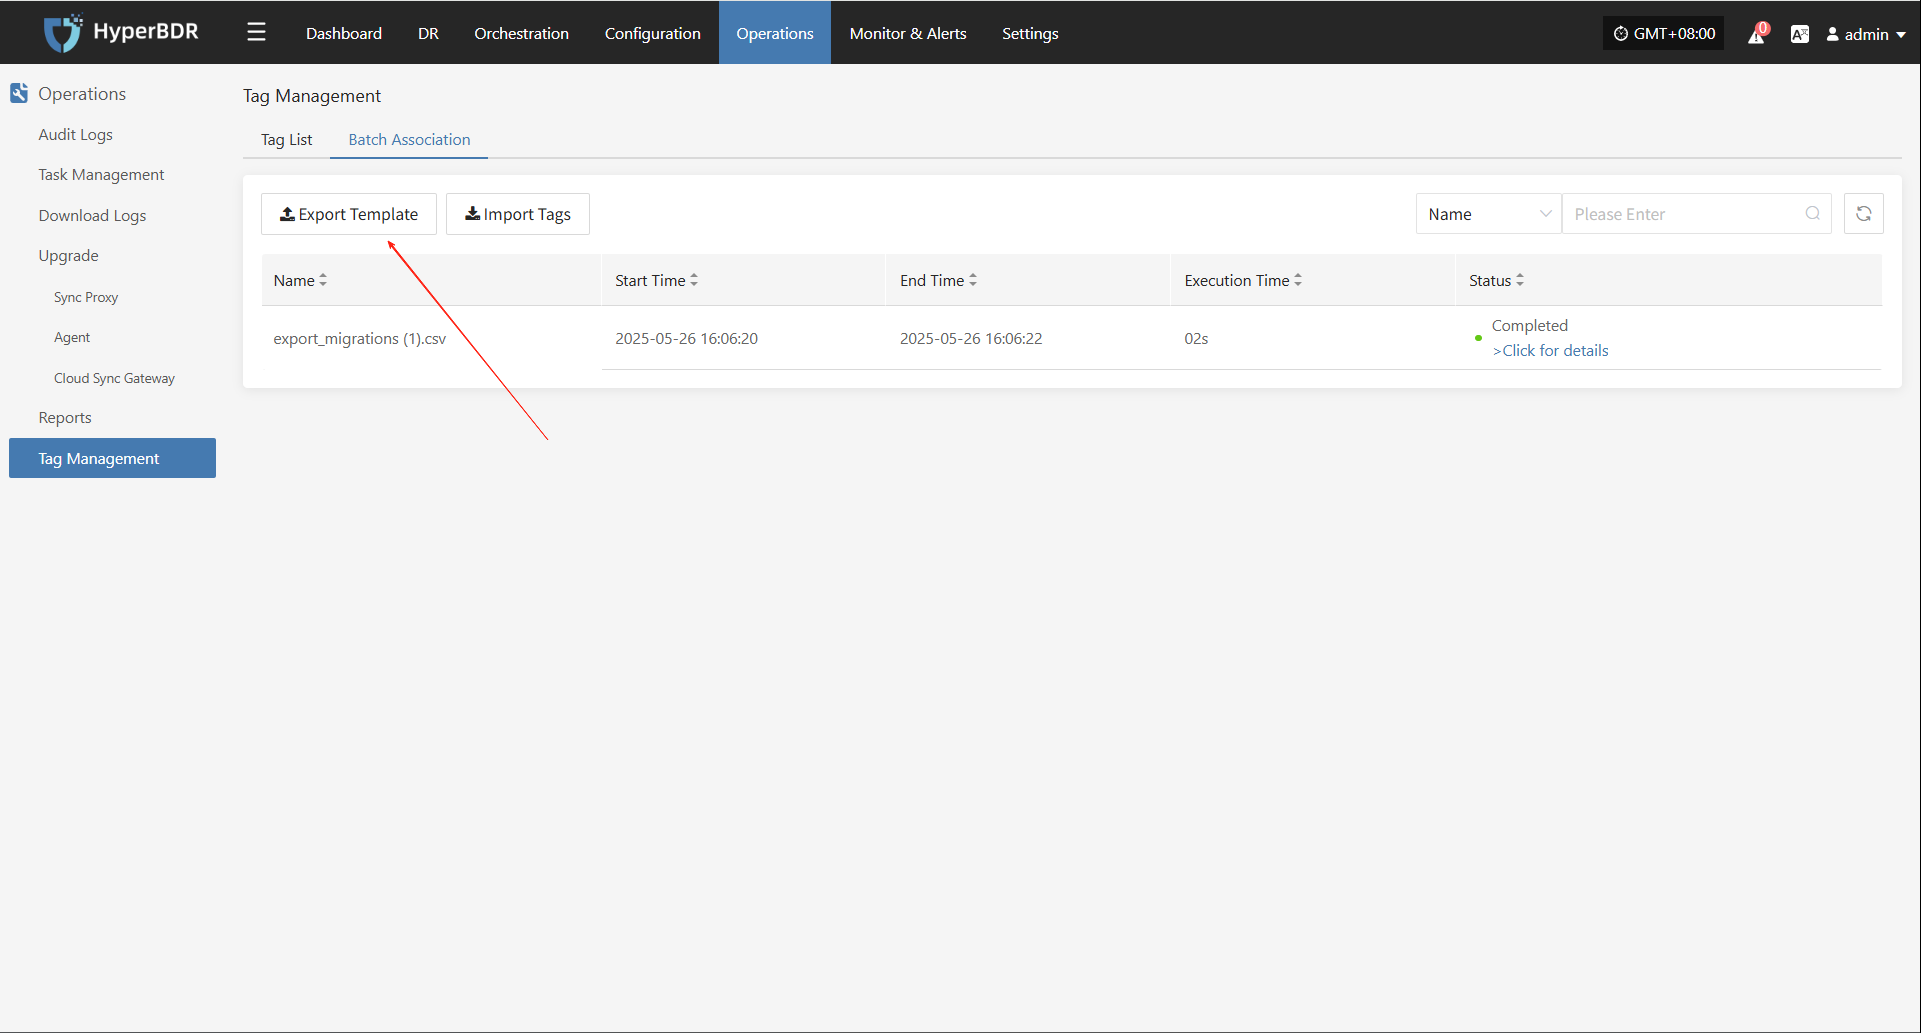
Template Field Description
| Field Name | Description |
|---|---|
| HOST ID | Unique host identifier, usually UUID format |
| NAME | Host name, user-defined or system assigned |
| HOST NAME | Host network name (Hostname) |
| HOST IP | Host IP address |
| HOST MAC | Host MAC address, unique network interface ID |
| HOST TAGS | Host tags for classification/grouping/custom |
Fill in the Template
Fill in the HOST TAGS field with tag names in the exported template and save.

Import Tags
Click "Import Tags" and follow the prompt to drag or upload the file to start importing.
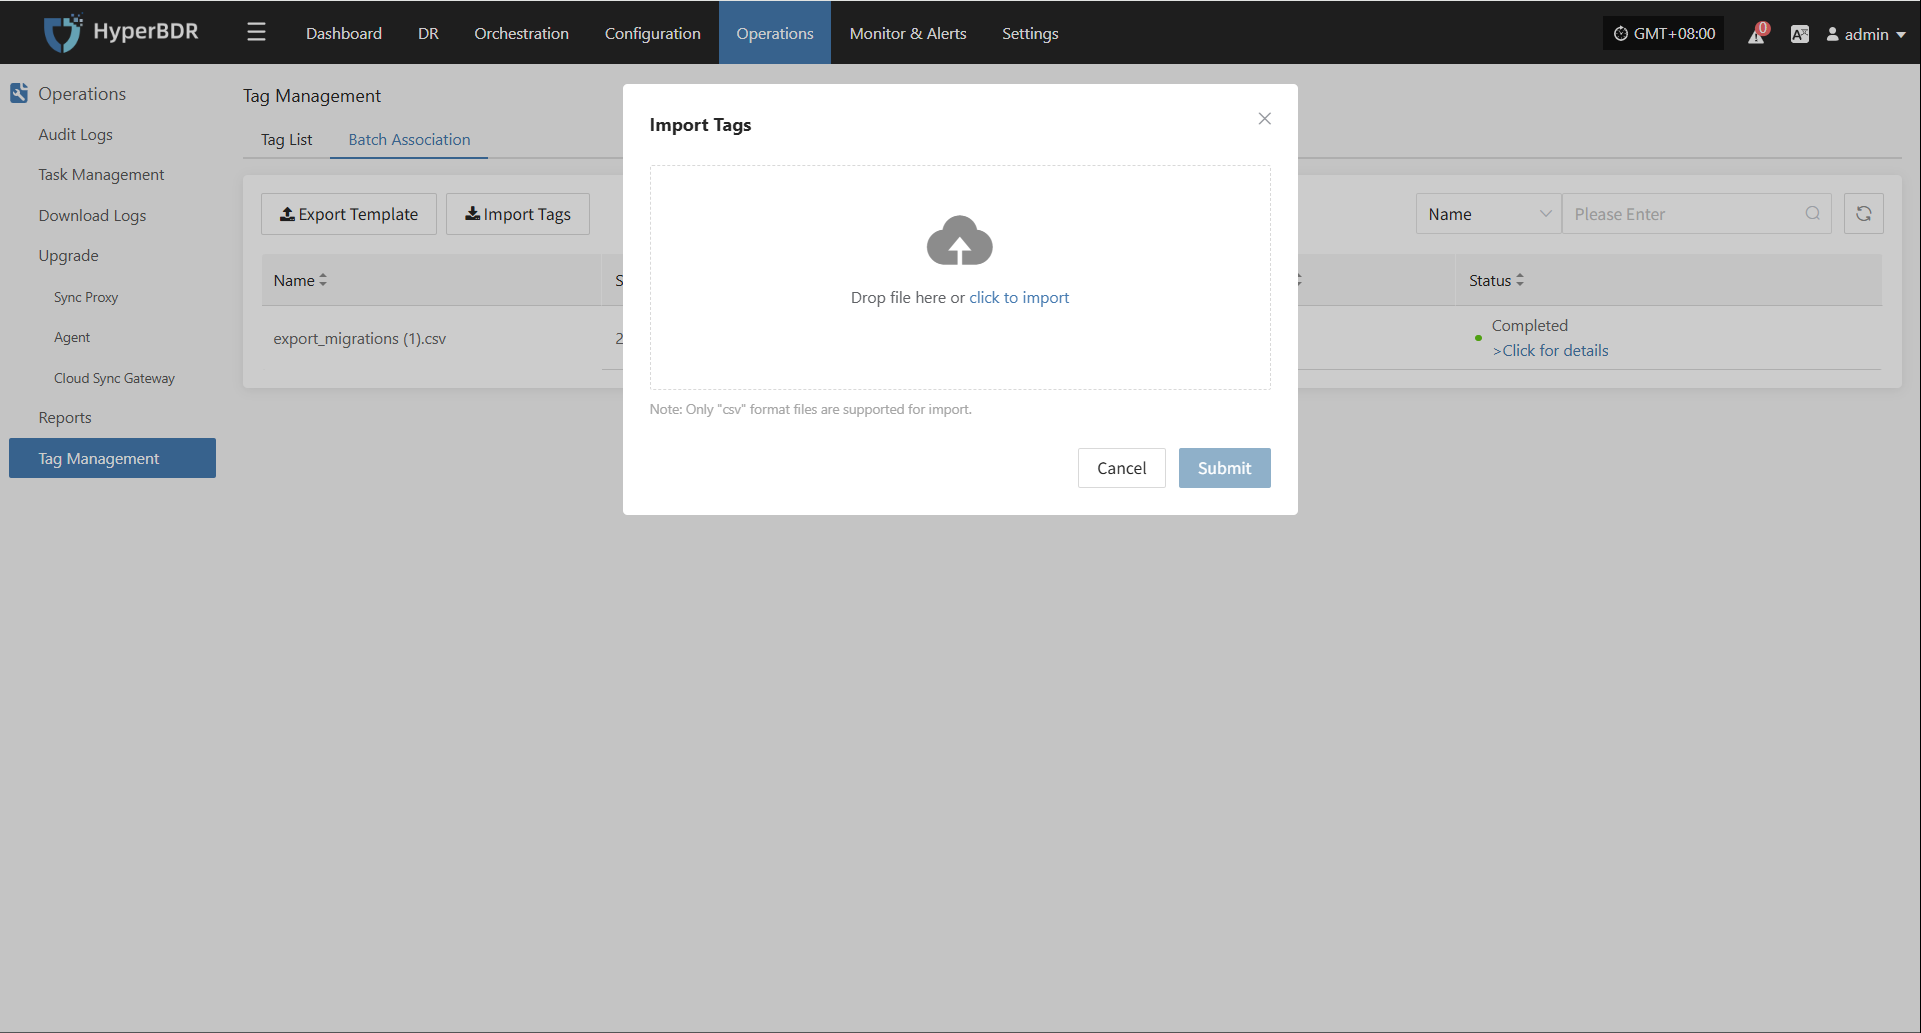
After import, tags will be created automatically and resources will be added to the corresponding tags.

Monitor & Alerts
System Monitor
Provides a visual overview of the operating status of core platform resources, supporting real-time collection of metrics such as CPU, memory, disk, network, and load. This helps administrators fully understand the health of host resources. Users can switch views by resource type and node for unified, hierarchical monitoring.
System Monitoring Features
The system monitoring module offers real-time visualization and performance analysis of key resources on the platform. For example, with "Sync Proxy", users can select a specific host to view detailed metrics for that node, helping to quickly identify resource bottlenecks or potential risks.

Basic Information
- Uptime: Shows how long the sync proxy has been running since startup.
- CPU Cores: Displays the number of physical CPU cores on the current host.
- Total Memory: Shows the total physical memory of the current host.
Resource Usage
The system uses charts to dynamically display the status of various resources, helping users monitor load and performance changes in real time.
| Metric | Description |
|---|---|
| CPU Usage | Line chart showing CPU usage changes over time |
| RAM Info | Displays total, used, and available memory |
| SSystem Average Load | Shows average system load for the past 1, 5, and 15 minutes |
| Network (bytes) | Graph of inbound (In) and outbound (Out) traffic on eth0 |
| Disk Usage | Shows space usage percentage for each mounted disk path |
| Disk Read/Write Capacity per Second | Real-time display of disk read/write throughput |
| Disk Read/Write Speed (IOPS) | Shows disk write frequency in IOPS |
| Count of iSCSI Processes in 'D' State | Displays changes in the number of iSCSI process statuses |
Supports switching views by resource type and host instance for targeted monitoring.
DR
Sync Proxy
Users can go to the "Monitoring & Management" module from the top navigation bar and switch to the DR "Sync Proxy" page to view system resource usage for the selected proxy. This view displays the following key monitoring information:
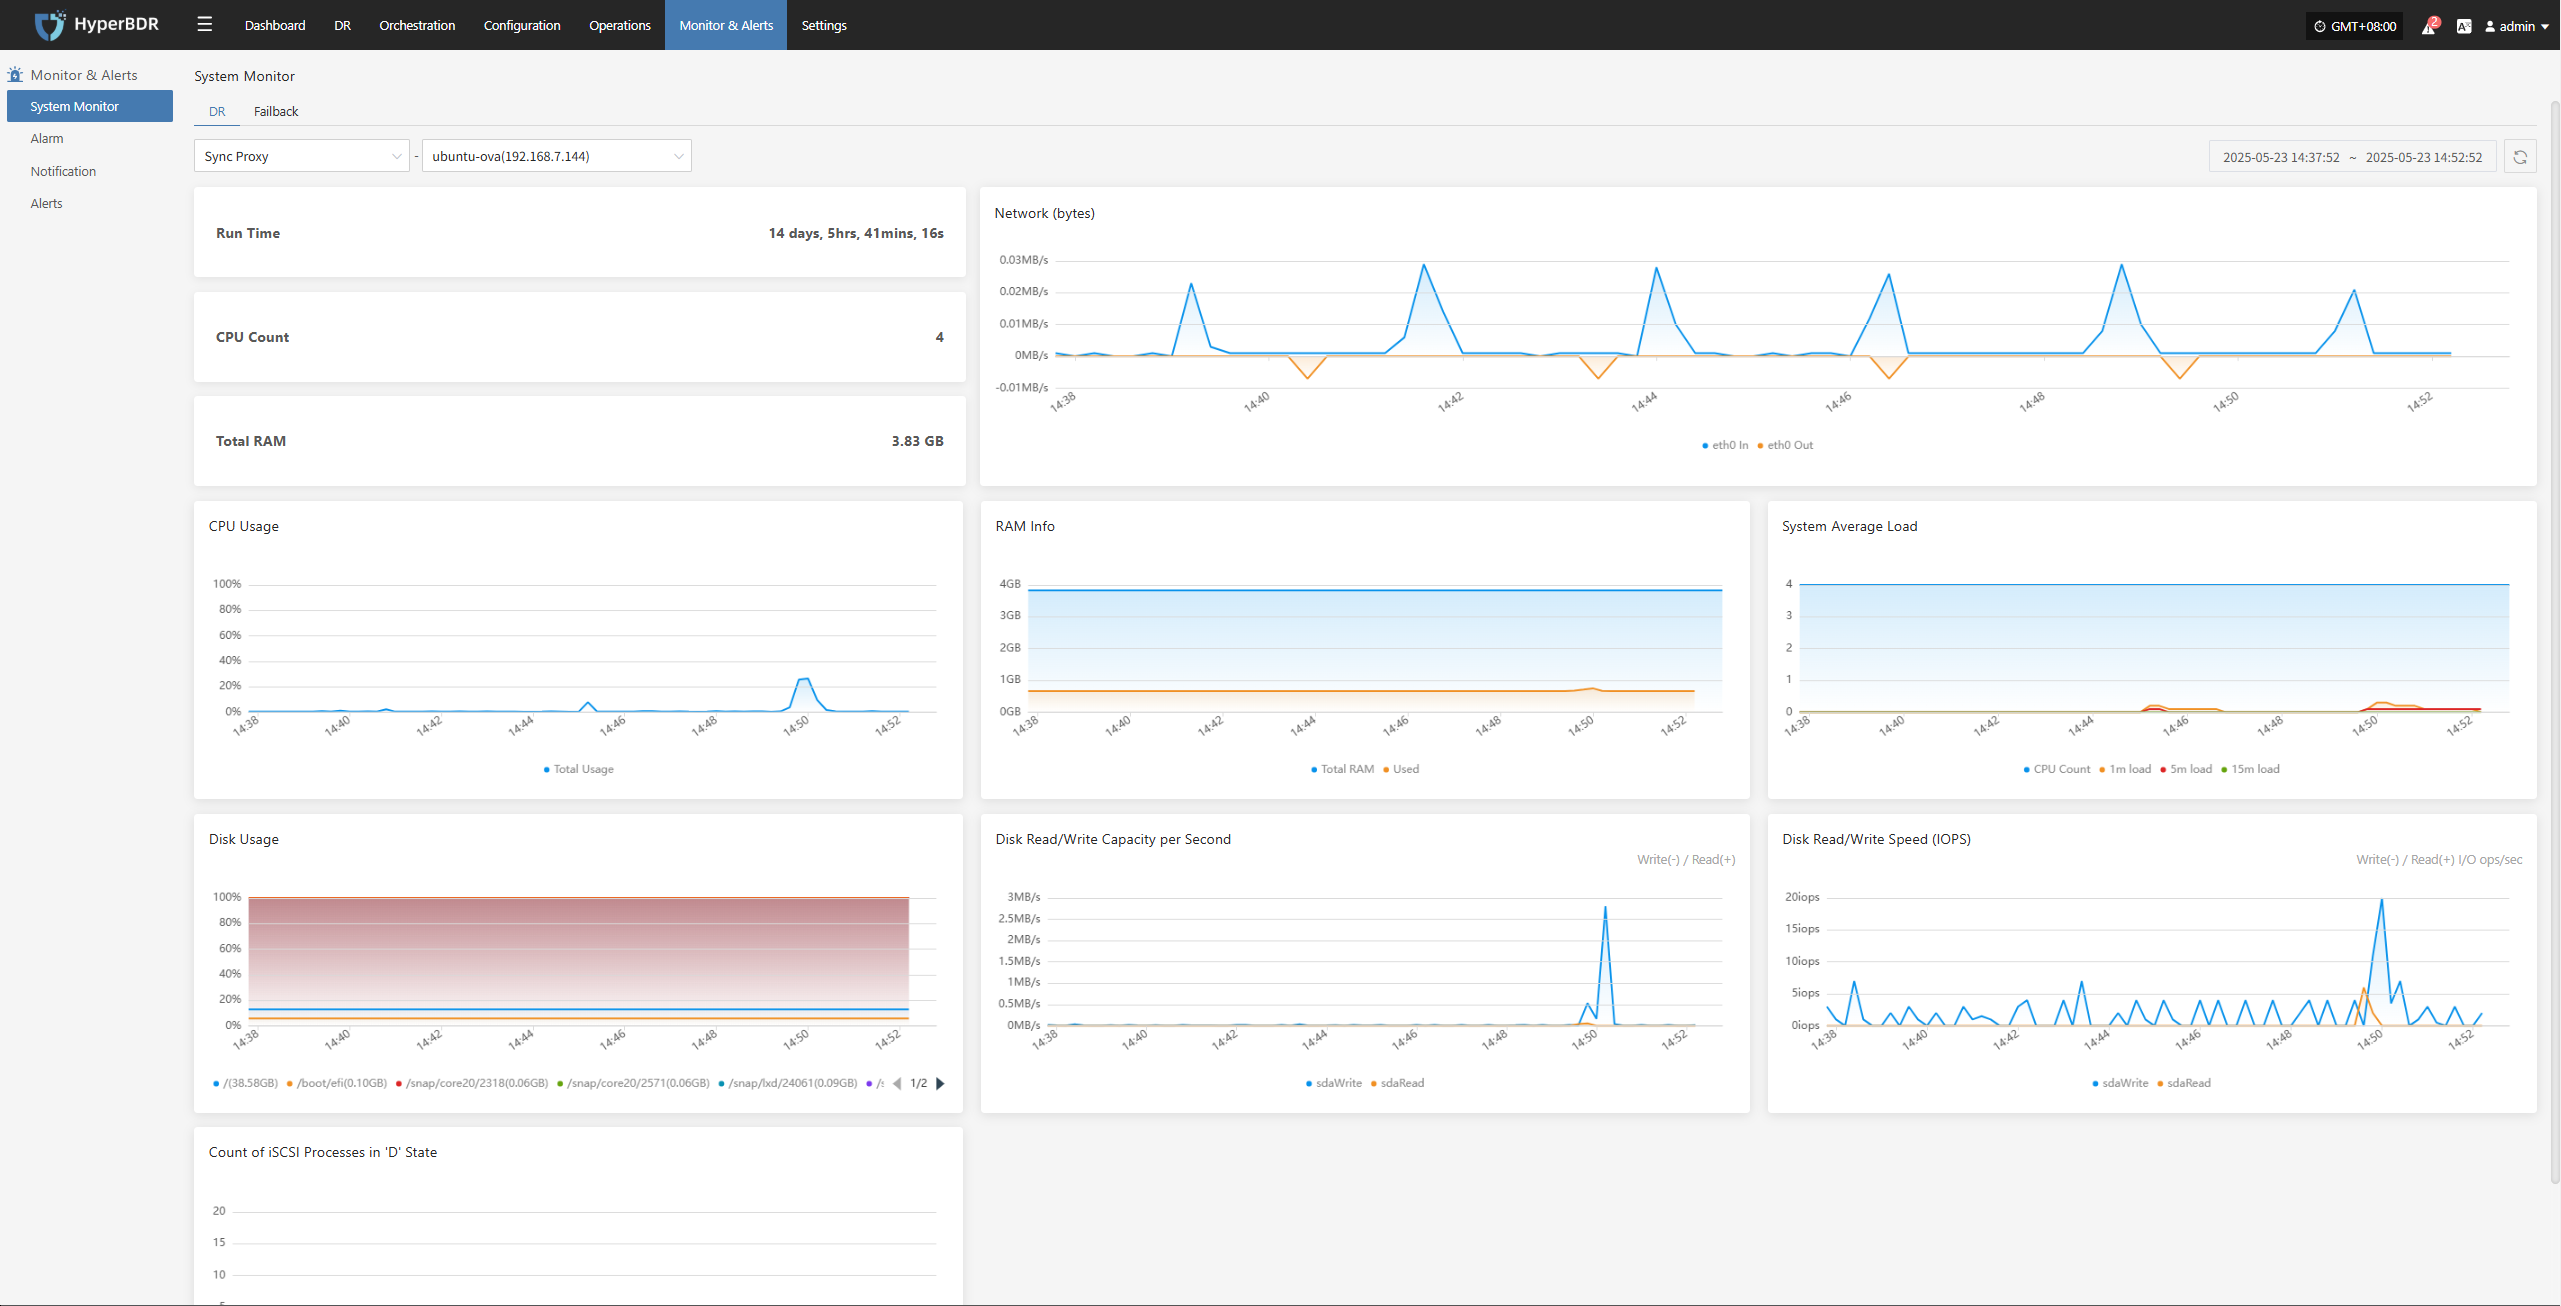
Cloud Sync Gateway
Users can go to the "Monitoring & Management" module from the top navigation bar and switch to the DR "Cloud Sync Gateway" page to view system resource usage for the selected proxy. This view displays the following key monitoring information:

Linux Agent
Users can go to the "Monitoring & Management" module from the top navigation bar and switch to the DR "Linux Agent" page to view system resource usage for the selected proxy. This view displays the following key monitoring information:

Windows Agent
Users can go to the "Monitoring & Management" module from the top navigation bar and switch to the DR "Windows Agent" page to view system resource usage for the selected proxy. This view displays the following key monitoring information:
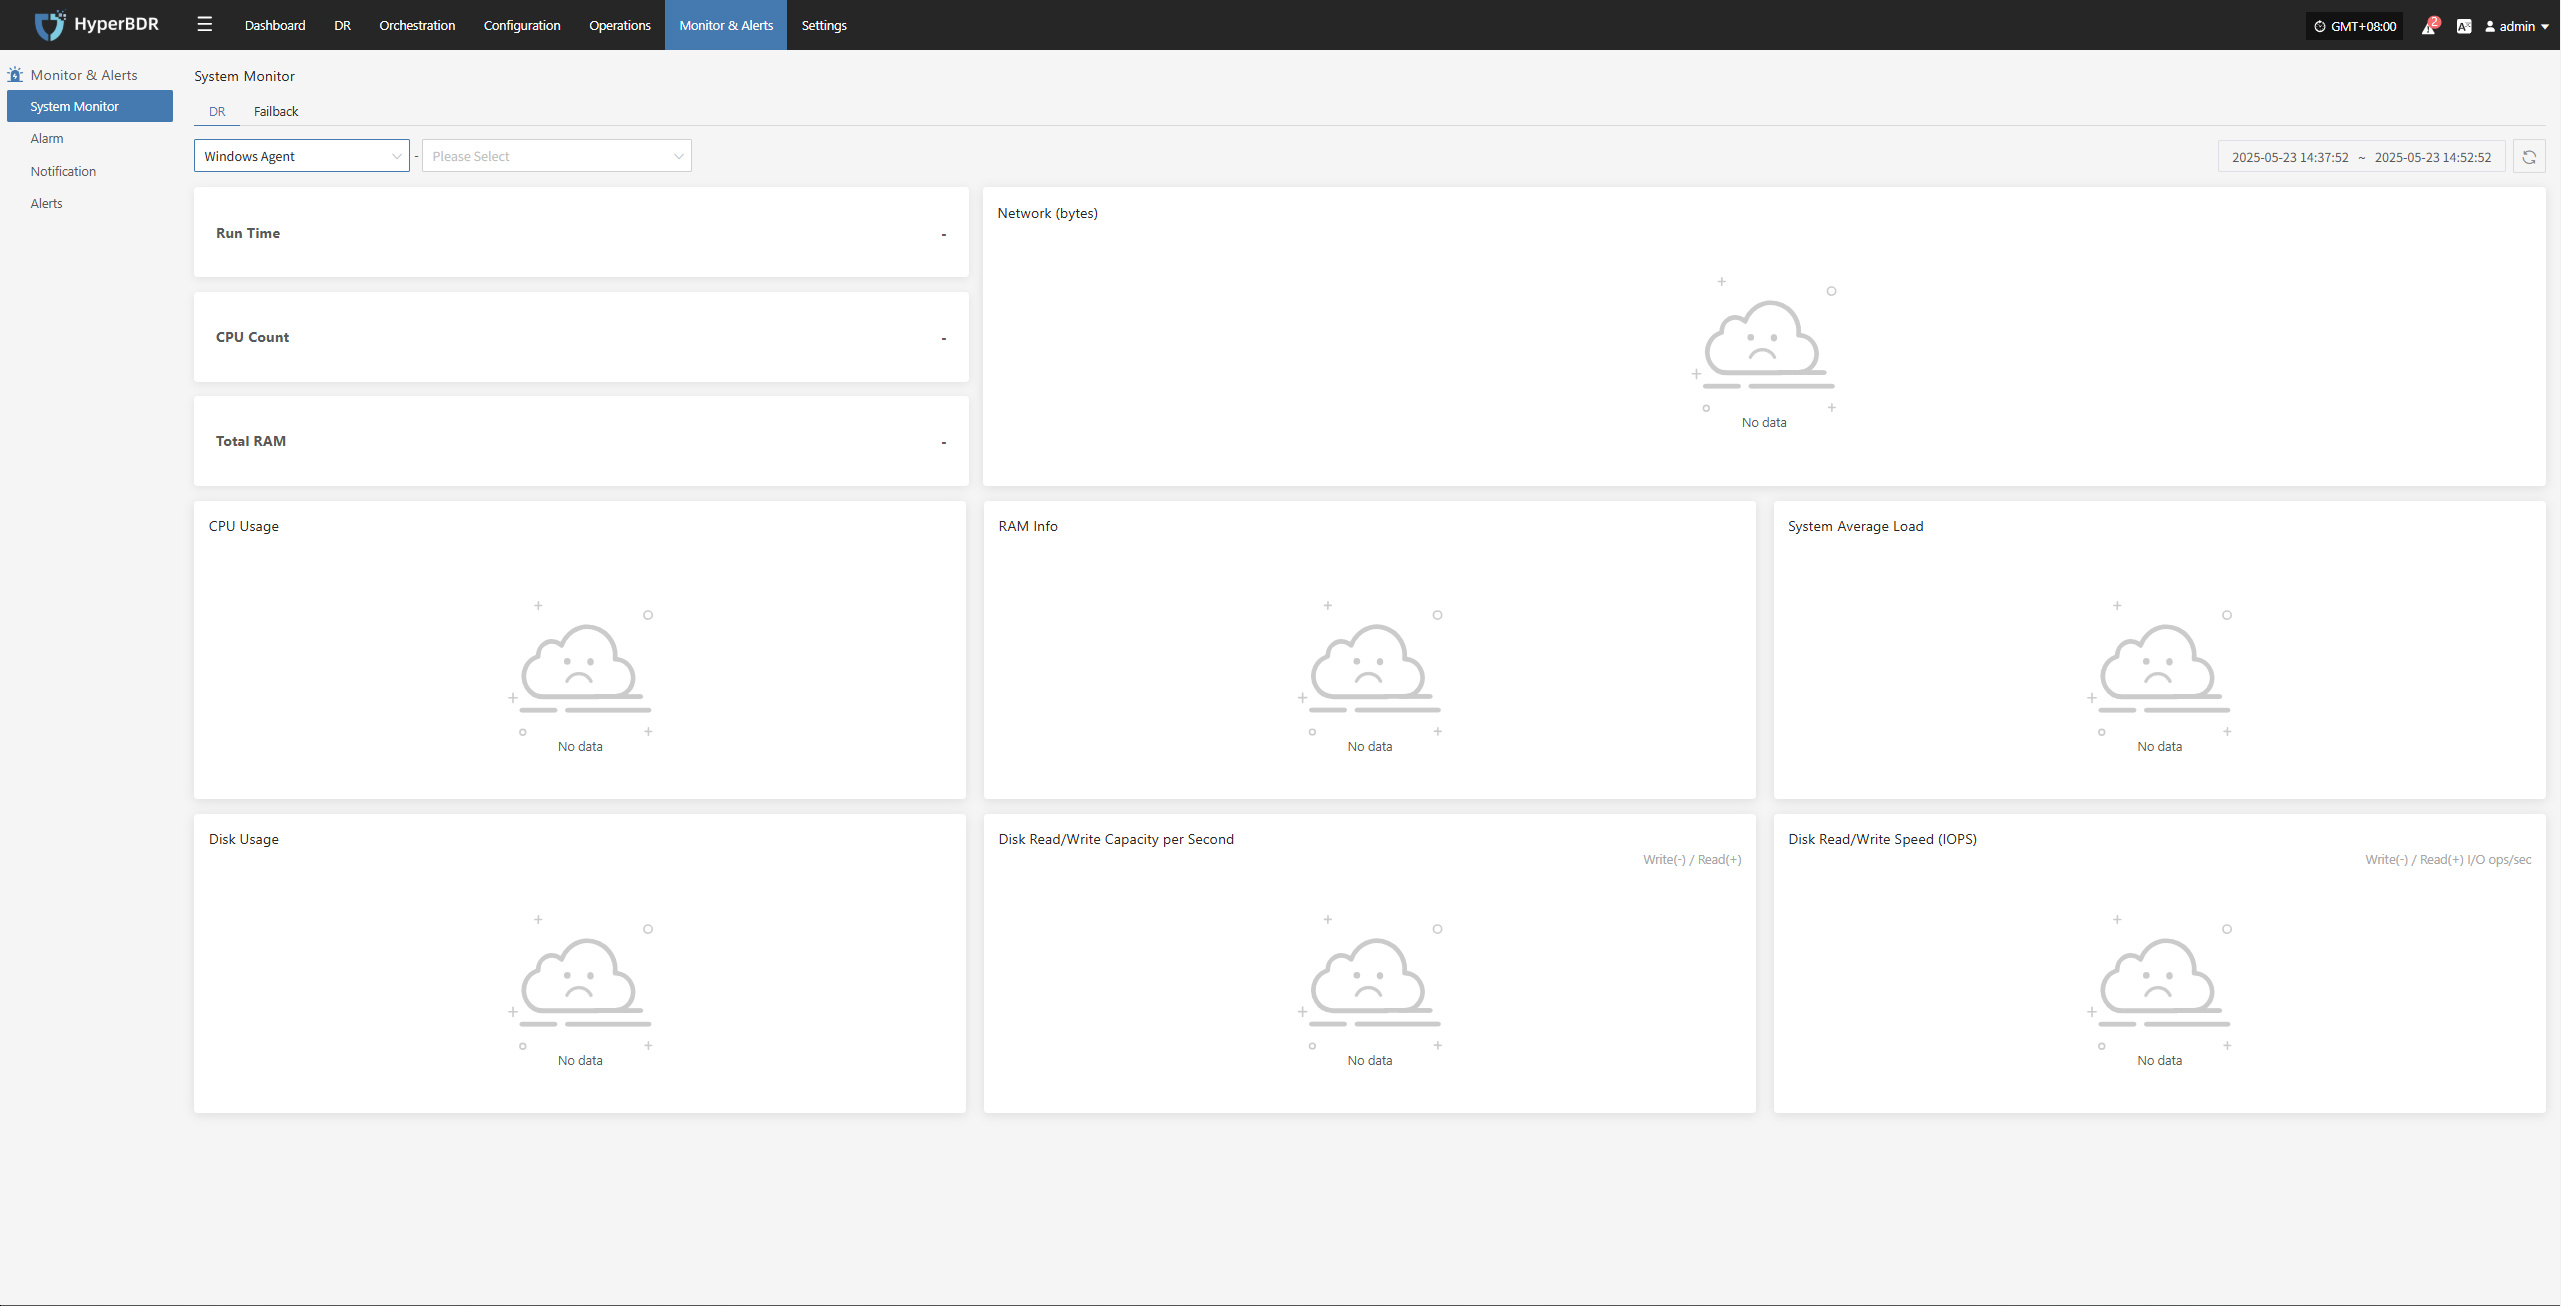
Failback
Failback Sync Proxy
Users can go to the "Monitoring & Management" module from the top navigation bar and switch to the Failback "Failback Sync Proxy" page to view system resource usage for the selected proxy. This view displays the following key monitoring information:

Failback Cloud Sync Gateway
Users can go to the "Monitoring & Management" module from the top navigation bar and switch to the Failback "Failback Cloud Sync Gateway" page to view system resource usage for the selected proxy. This view displays the following key monitoring information:
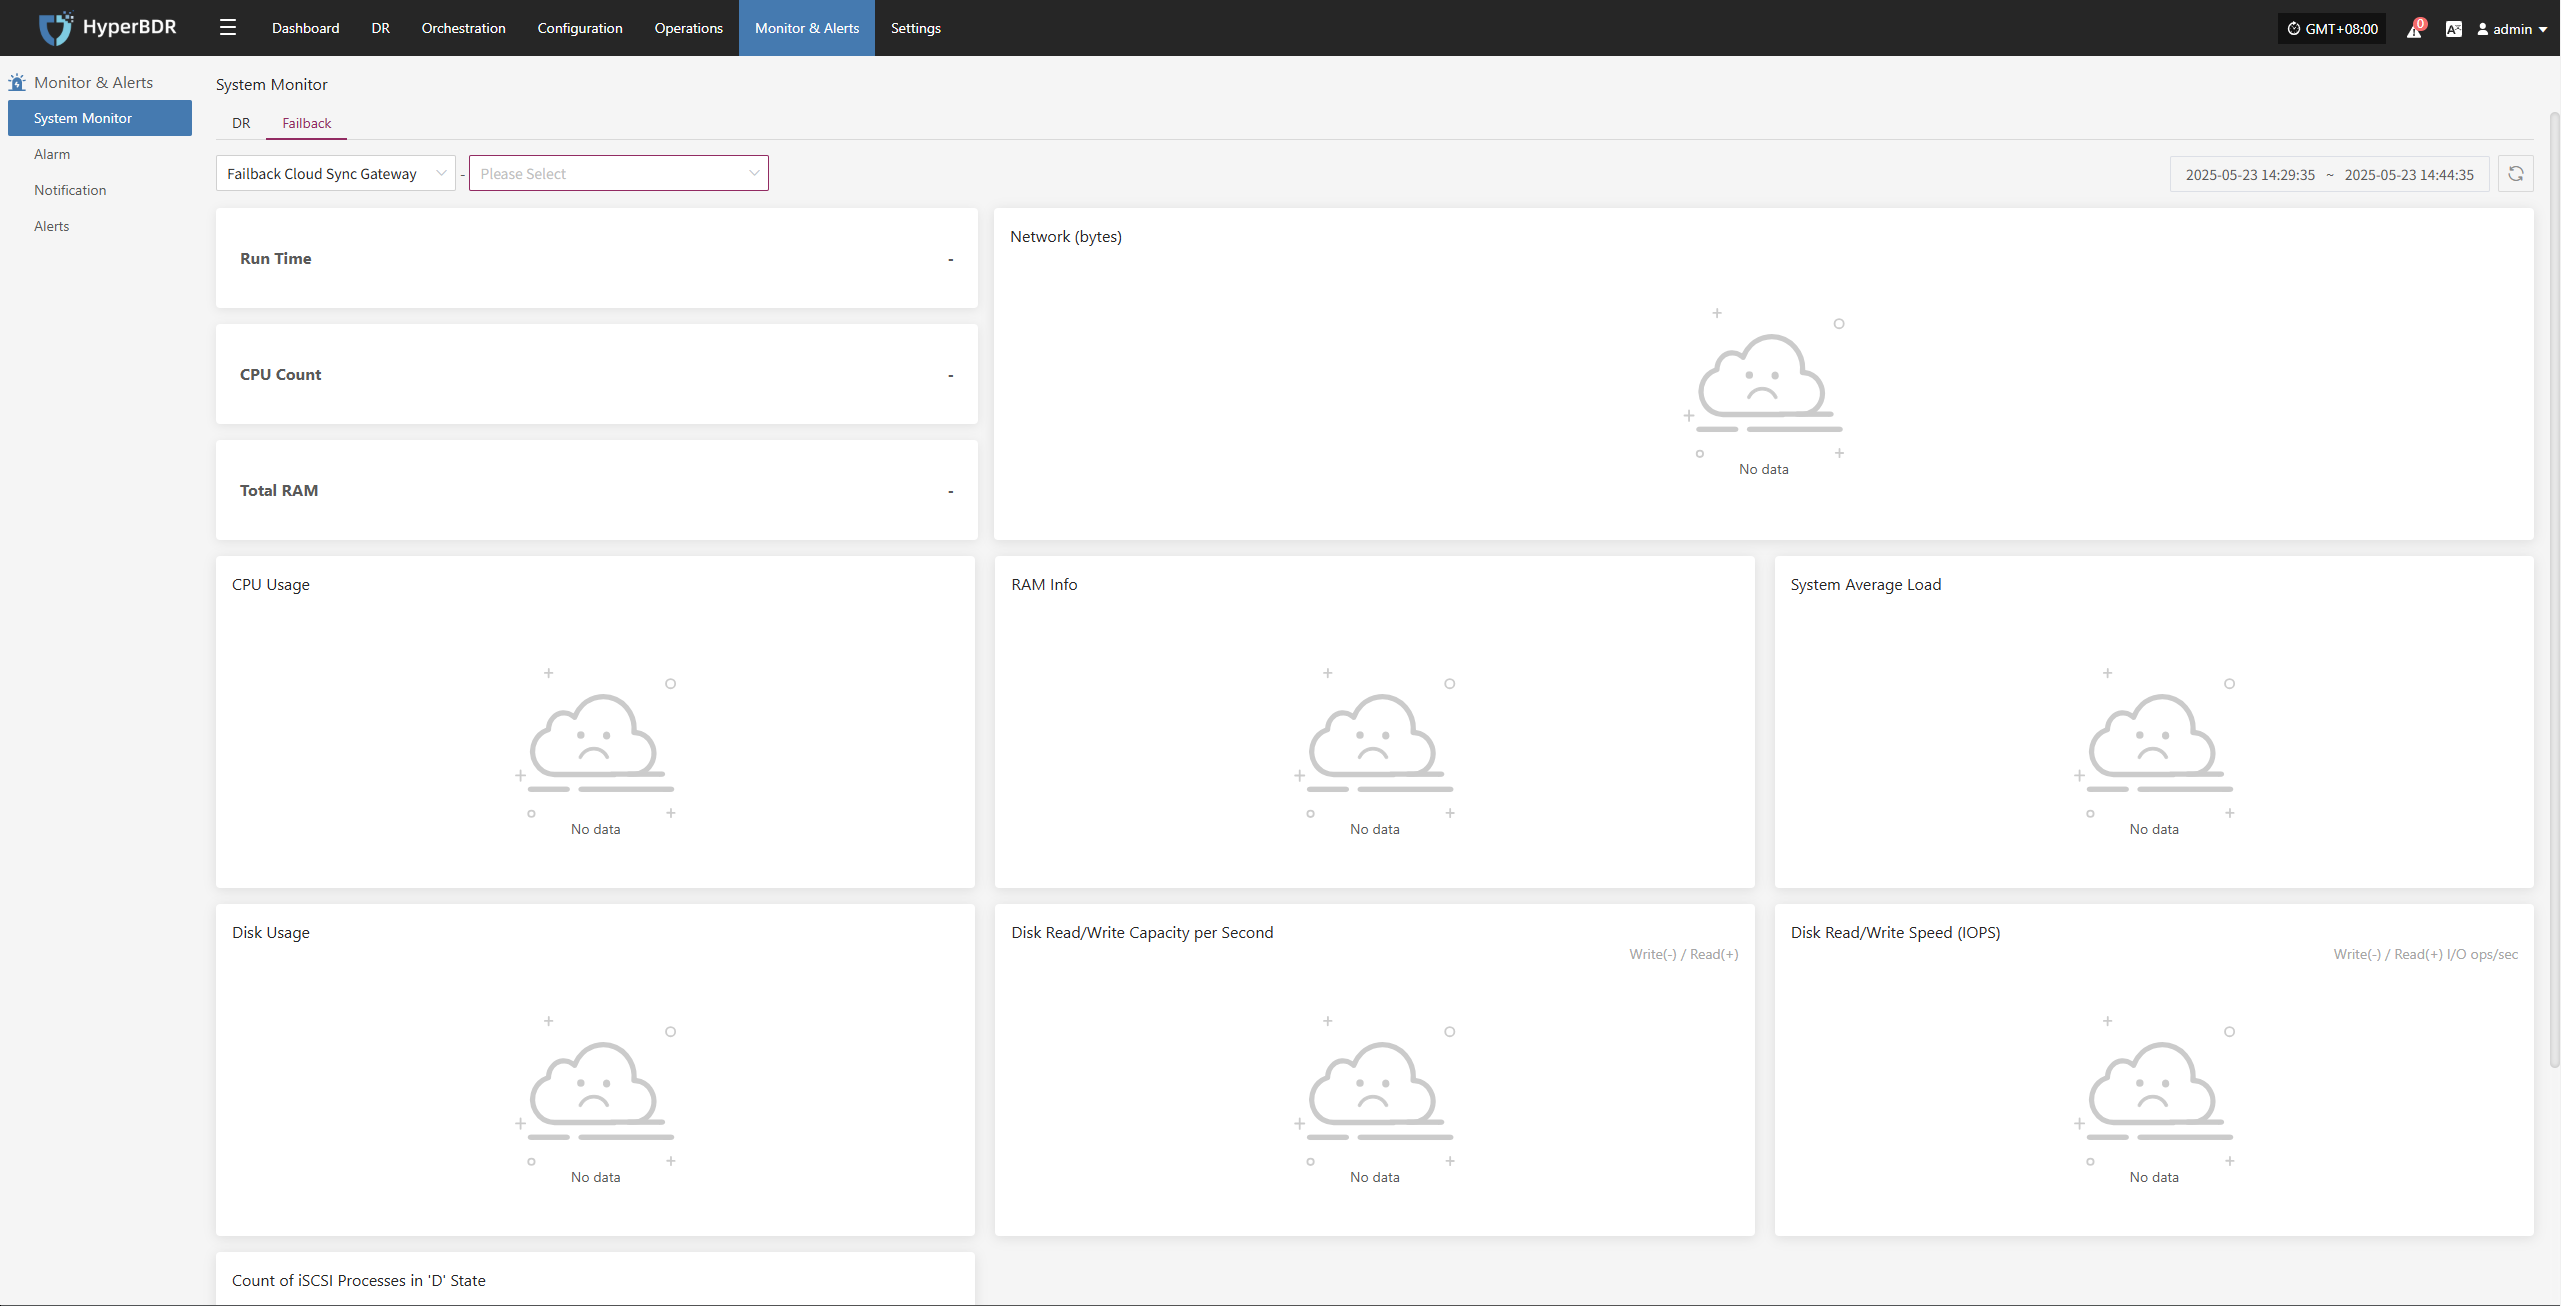
Failback Linux Agent
Users can go to the "Monitoring & Management" module from the top navigation bar and switch to the Failback "Failback Linux Agent" page to view system resource usage for the selected proxy. This view displays the following key monitoring information:

Failback Windows Agent
Users can go to the "Monitoring & Management" module from the top navigation bar and switch to the Failback "Failback Windows Agent" page to view system resource usage for the selected proxy. This view displays the following key monitoring information:
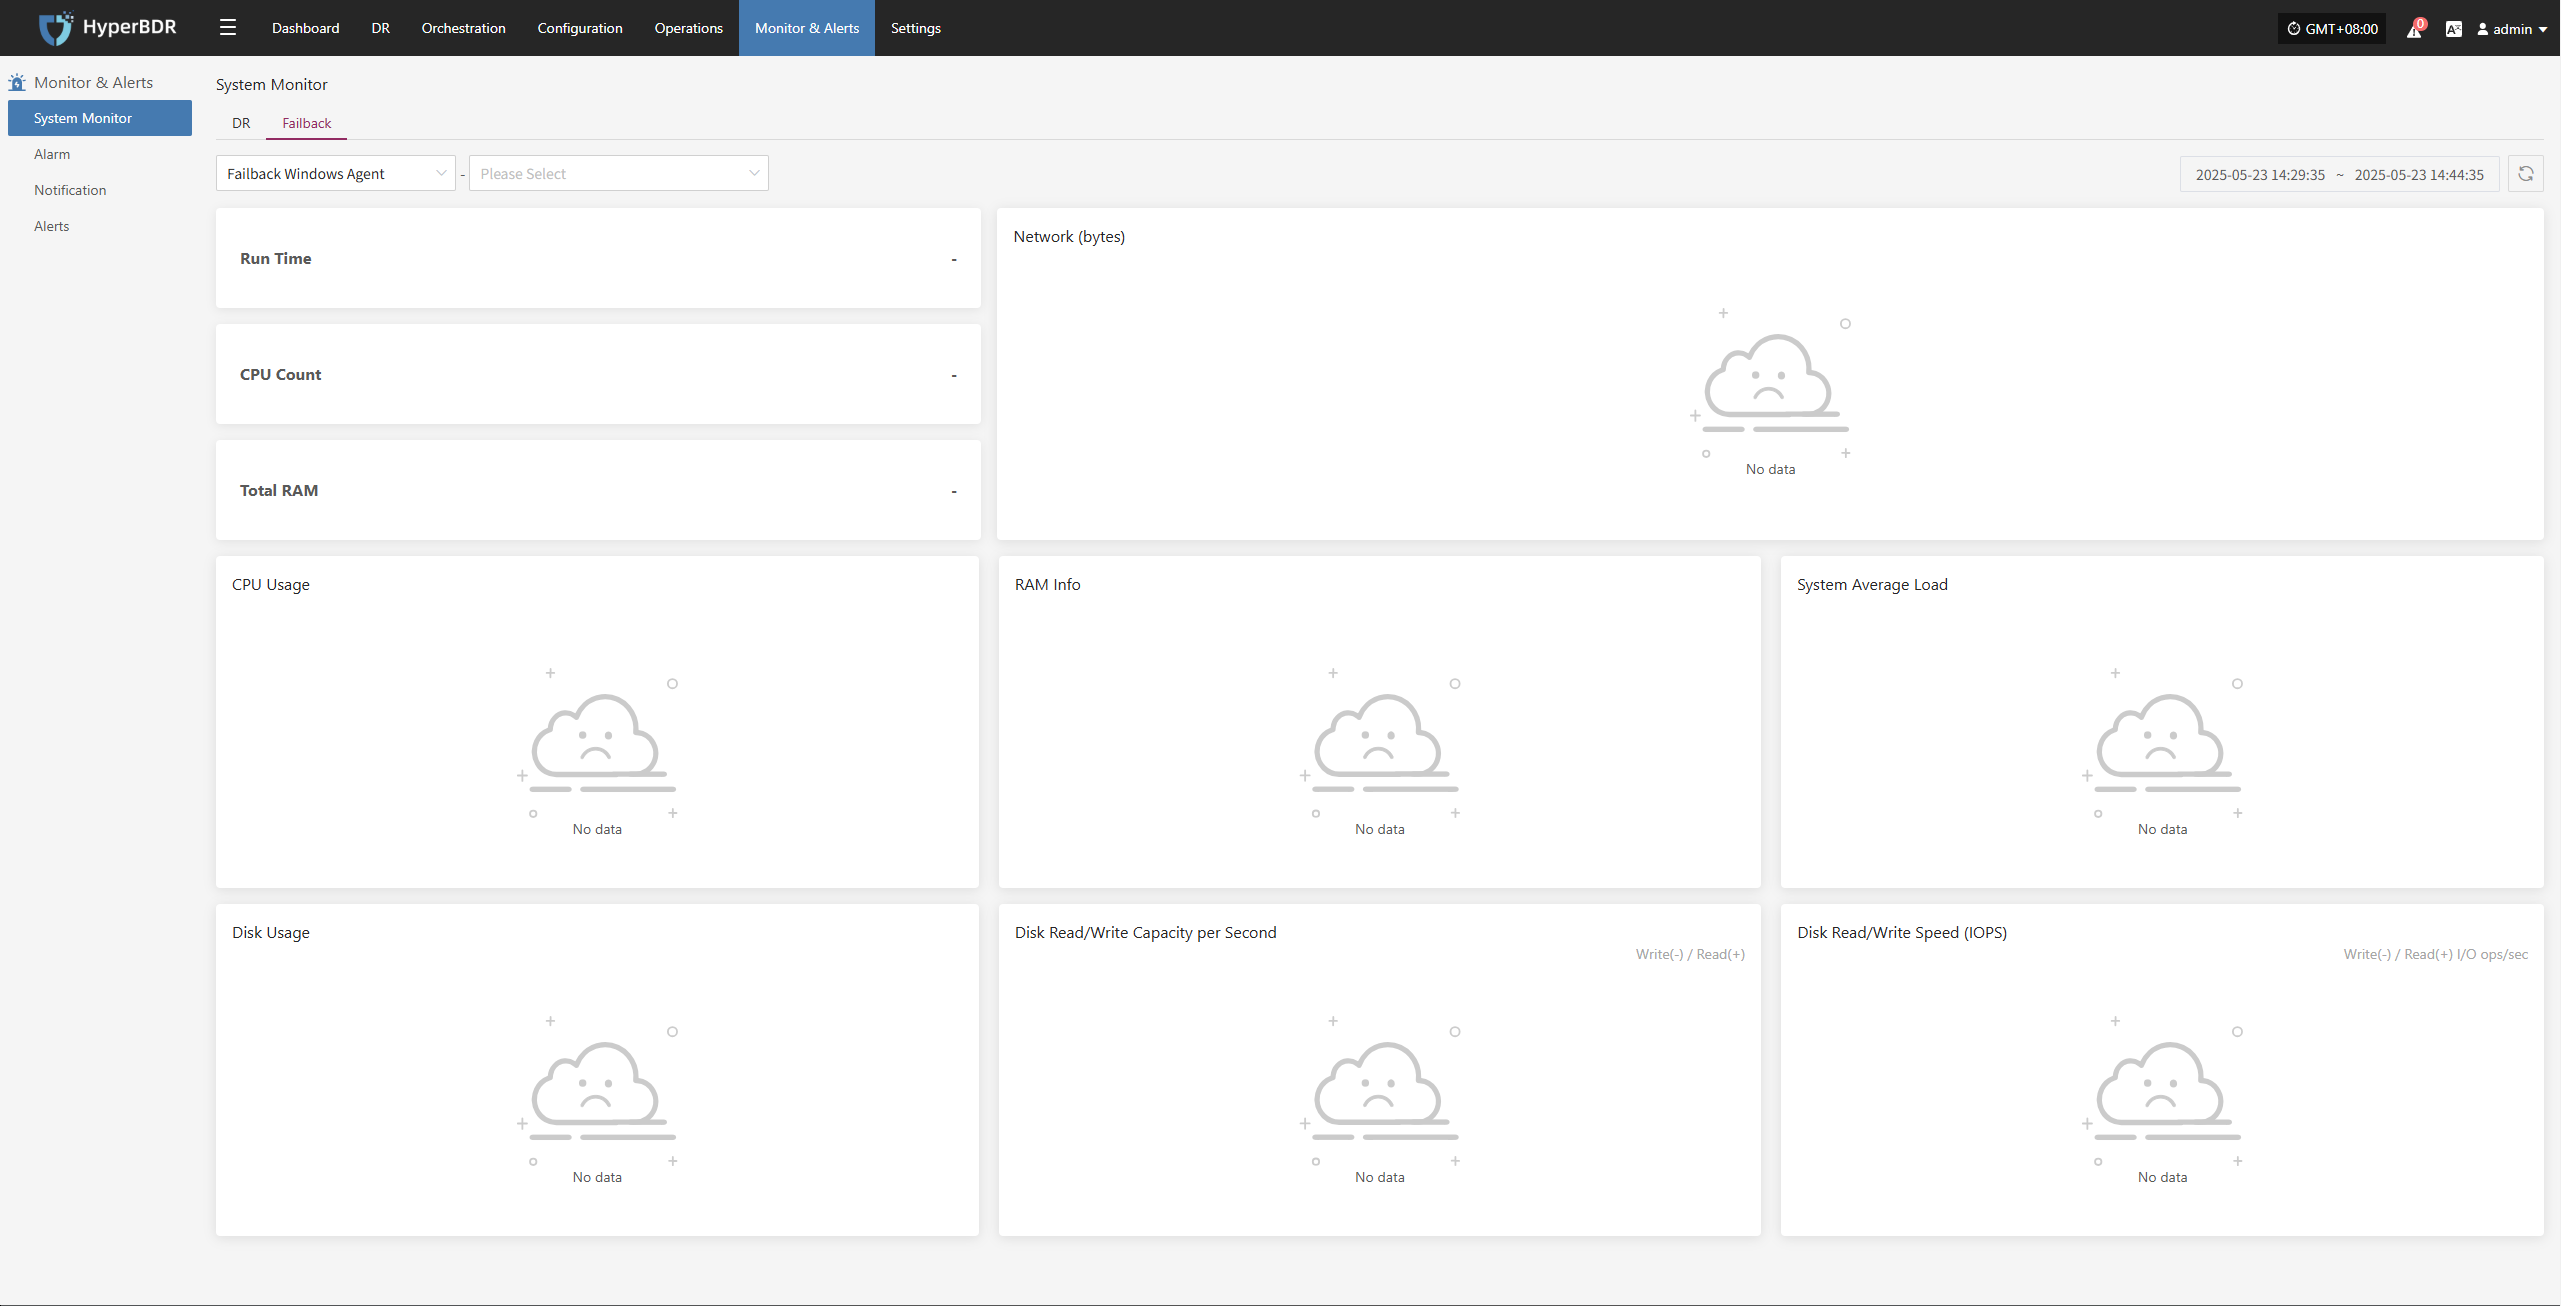
Alarm
To ensure system security, stability, and visibility of key events, the platform includes a built-in alarm feature. It monitors the status and resource usage of DR hosts in real time and triggers alerts when issues are detected, helping O&M staff quickly identify and resolve problems to reduce business impact.
For best practices on alarm configuration, see "Monitoring & Alerts → Alarm Best Practice" in the O&M Guide for detailed advice and instructions.
Resource Alert
Go to: Monitor & Alerts → Alarm → Resource Alert → Create Alert
After navigating to the creation page, configure the required parameters based on your needs, then save to complete the setup of DR and Failback alerts.
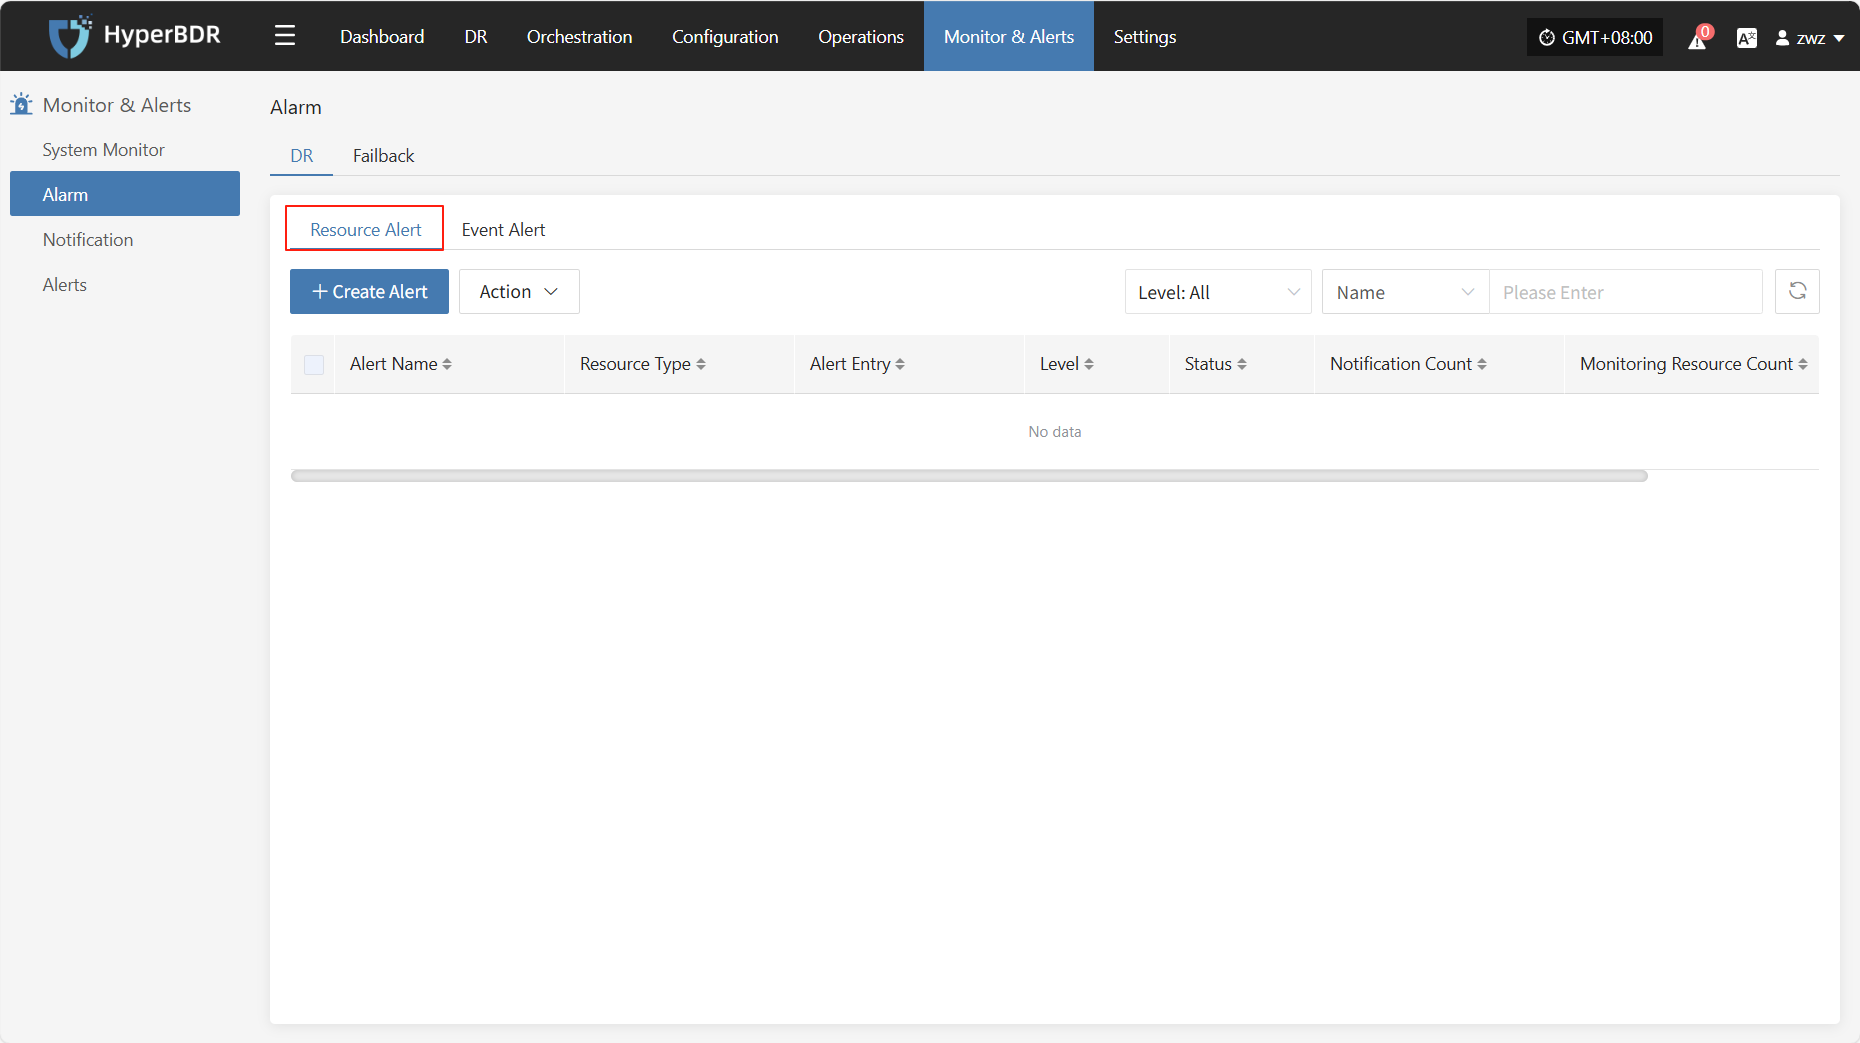
Create Alert
- Alert Configuration Field Description
| Field Name | Example | Description |
|---|---|---|
| Alert Type | Resource Alert | Select the alert category or type, used to distinguish different monitoring strategies. |
| Alert Name | test | Custom alert name for identification and management. |
| Level | Critical | Set the severity level, e.g., Info, Critical, Emergency. |
| Status | Enabled | Enable or disable the alert. When enabled, the system will monitor and alert as configured. |
| Resource Type | Sync Proxy | The type of resource to monitor. Common types: Sync Proxy, Cloud Sync Gateway, Linux Agent, Windows Agent, Object Storage. |
| Monitoring Resources | ubuntu-ova | Select the resource(s) to monitor. The system will continuously monitor these as configured. |
| Entry | CPU | The specific metric to monitor. Supported: CPU, Disk, RAM, Process. |
| Alert Trigger Rule | ≥ 80%, 5 min | Set the alert trigger condition, e.g., when a metric exceeds a value for a certain time. |
| Cycle | 5 min | How often the system checks the metric status. |
| Notification | Who to notify when the alert is triggered (user or group). | |
| Description | Optional. Record the purpose or notes for the alert for easier management. |
- Resource Monitoring Types
| Resource Type | Alarm Items | Description |
|---|---|---|
| Sync Proxy | CPU, RAM, Disk, Process | Monitors resource usage and process status of source sync proxy |
| Cloud Sync Gateway | CPU, RAM, Disk, Process | Monitors resource usage and process status of cloud sync gateway |
| Linux Agent | CPU, RAM, Disk, Process | Monitors resource usage and process status of Linux Agent |
| Windows Agent | CPU, RAM, Disk, Process | Monitors resource usage and process status of Windows Agent |
| Object Storage Resources | Object Storage Capacity | Monitors usage of storage capacity |
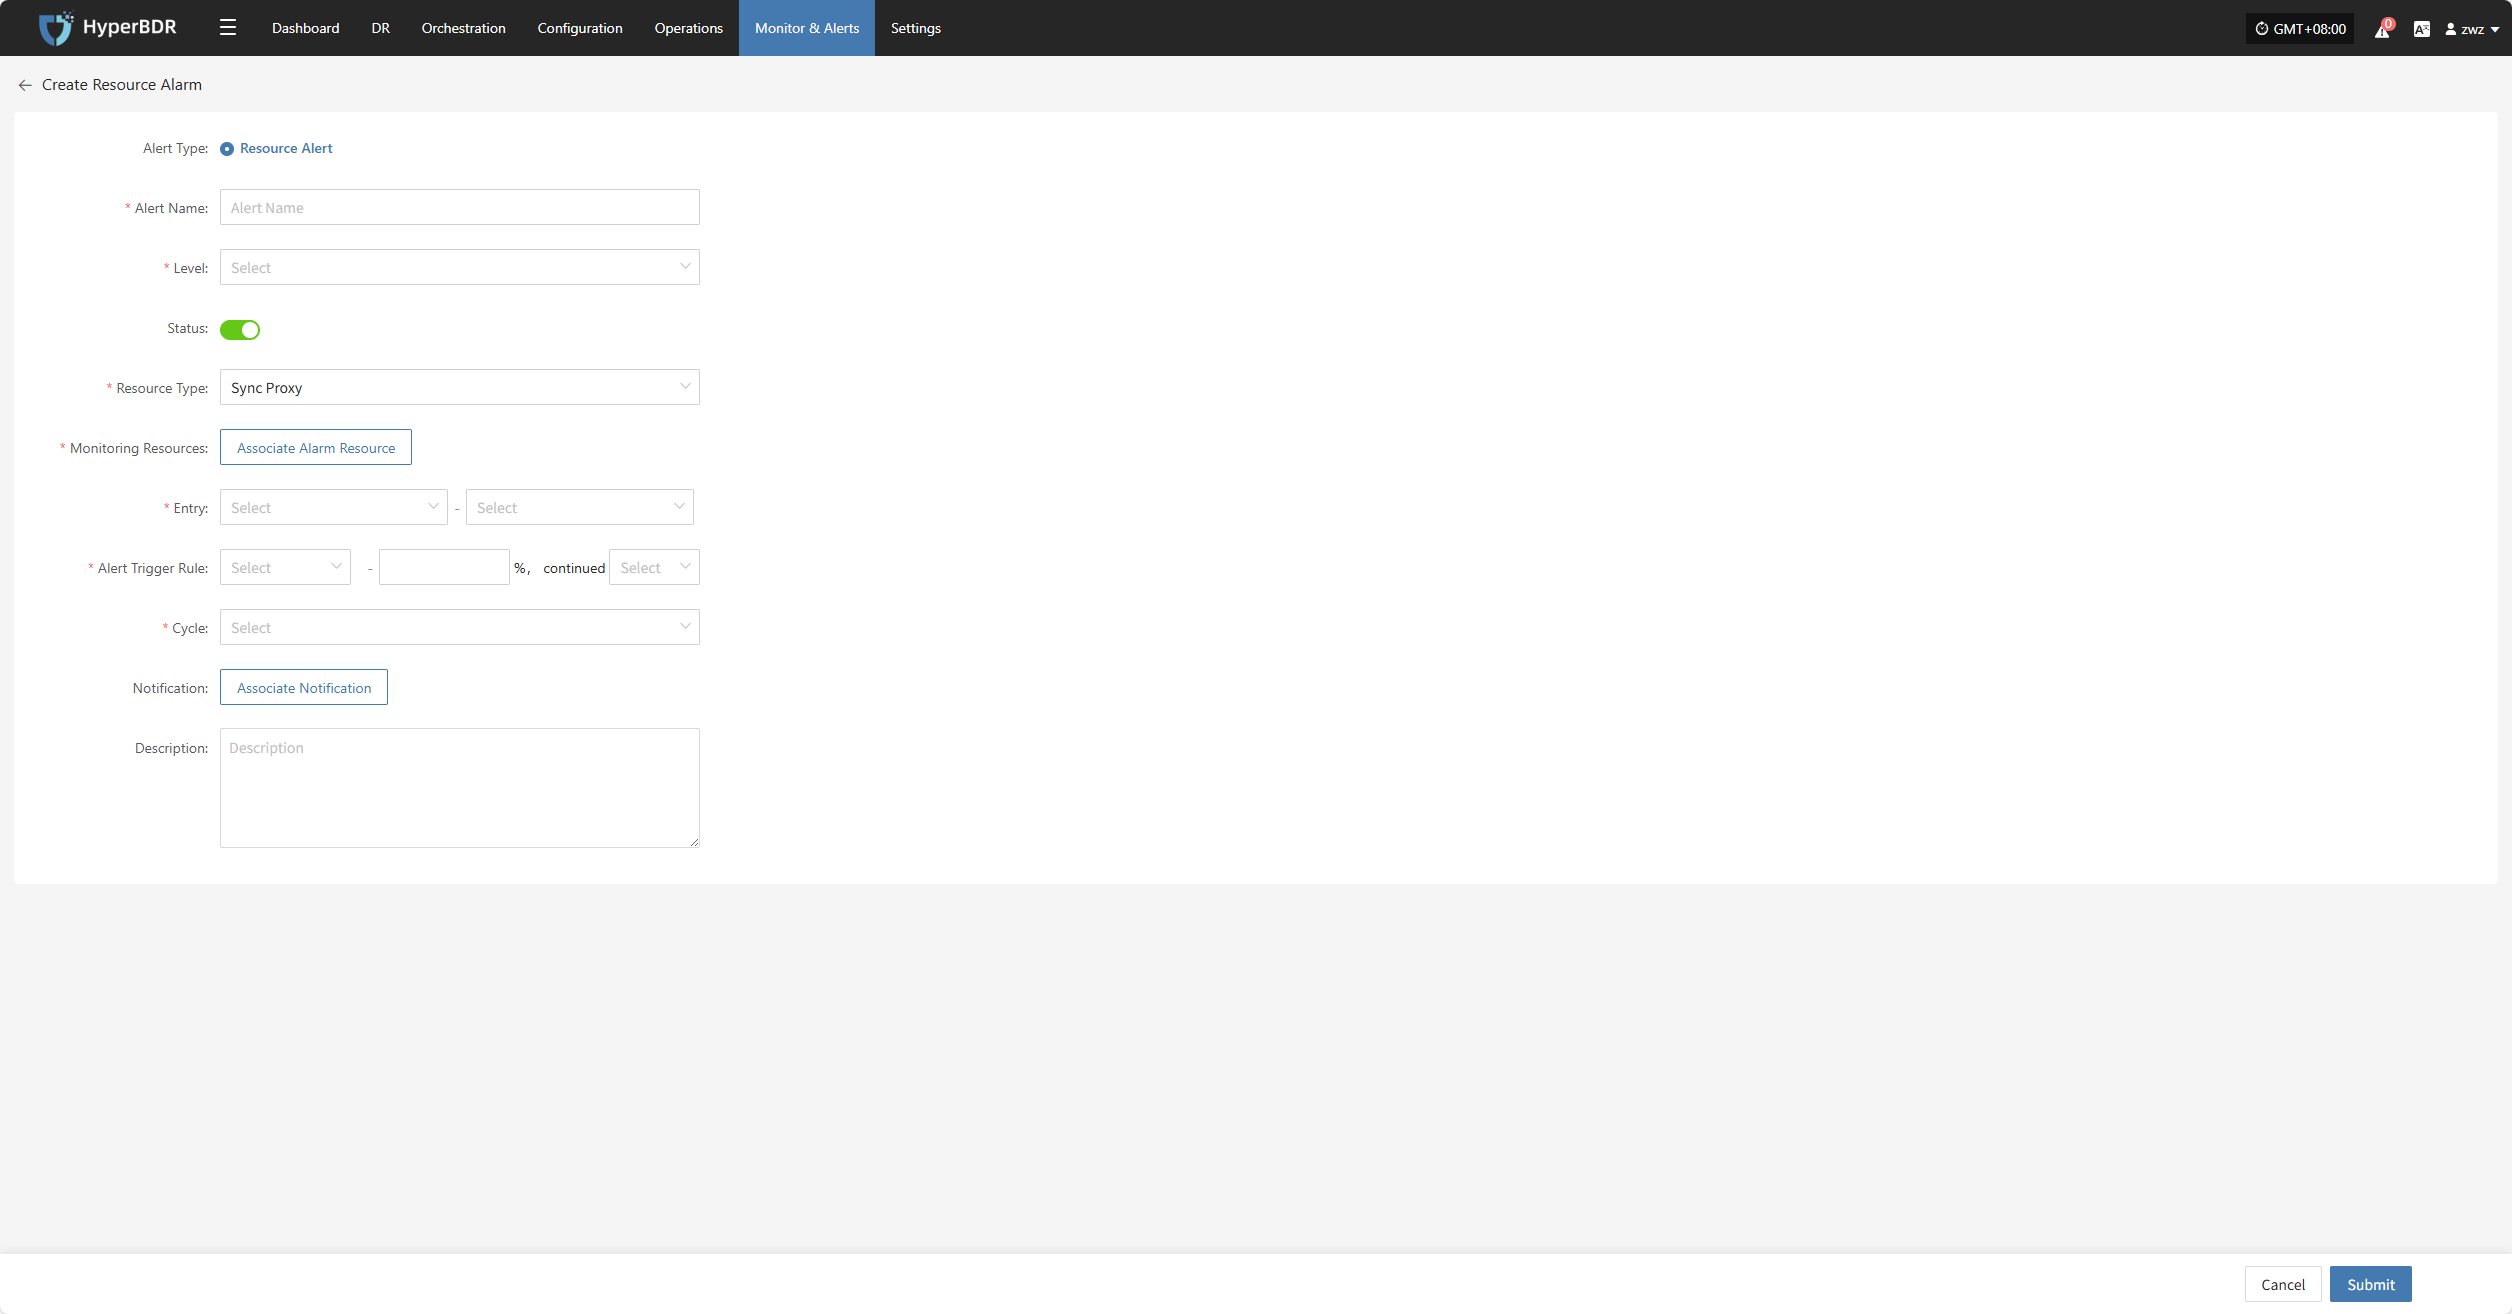
- After the alert is created, the system will automatically trigger it when the event occurs and send notifications to the assigned recipients. Related alert information will also be shown on the "Alert Messages" page for unified management.

Action
Edit
- Click [Edit] to go to the edit page, where you can update the alert configuration.
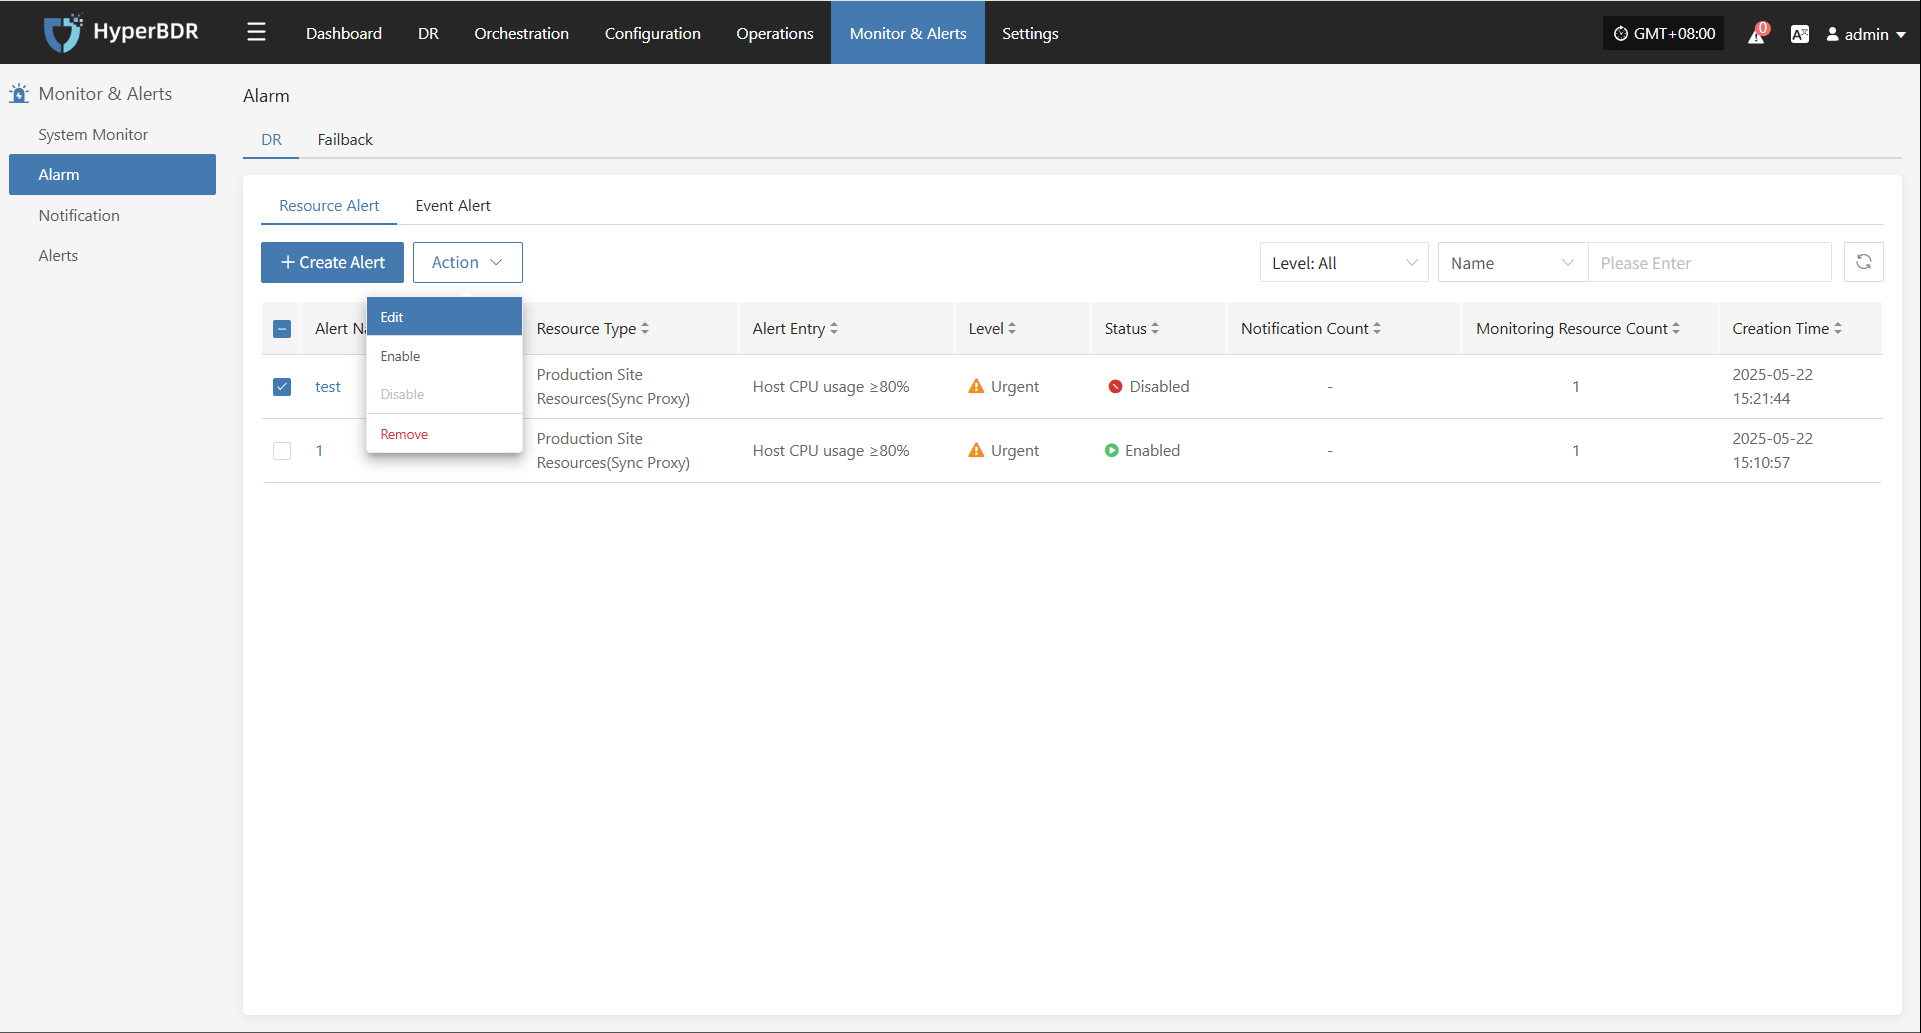
Enable
- Enabled alerts cannot be edited. To change the configuration, please disable the alert first.
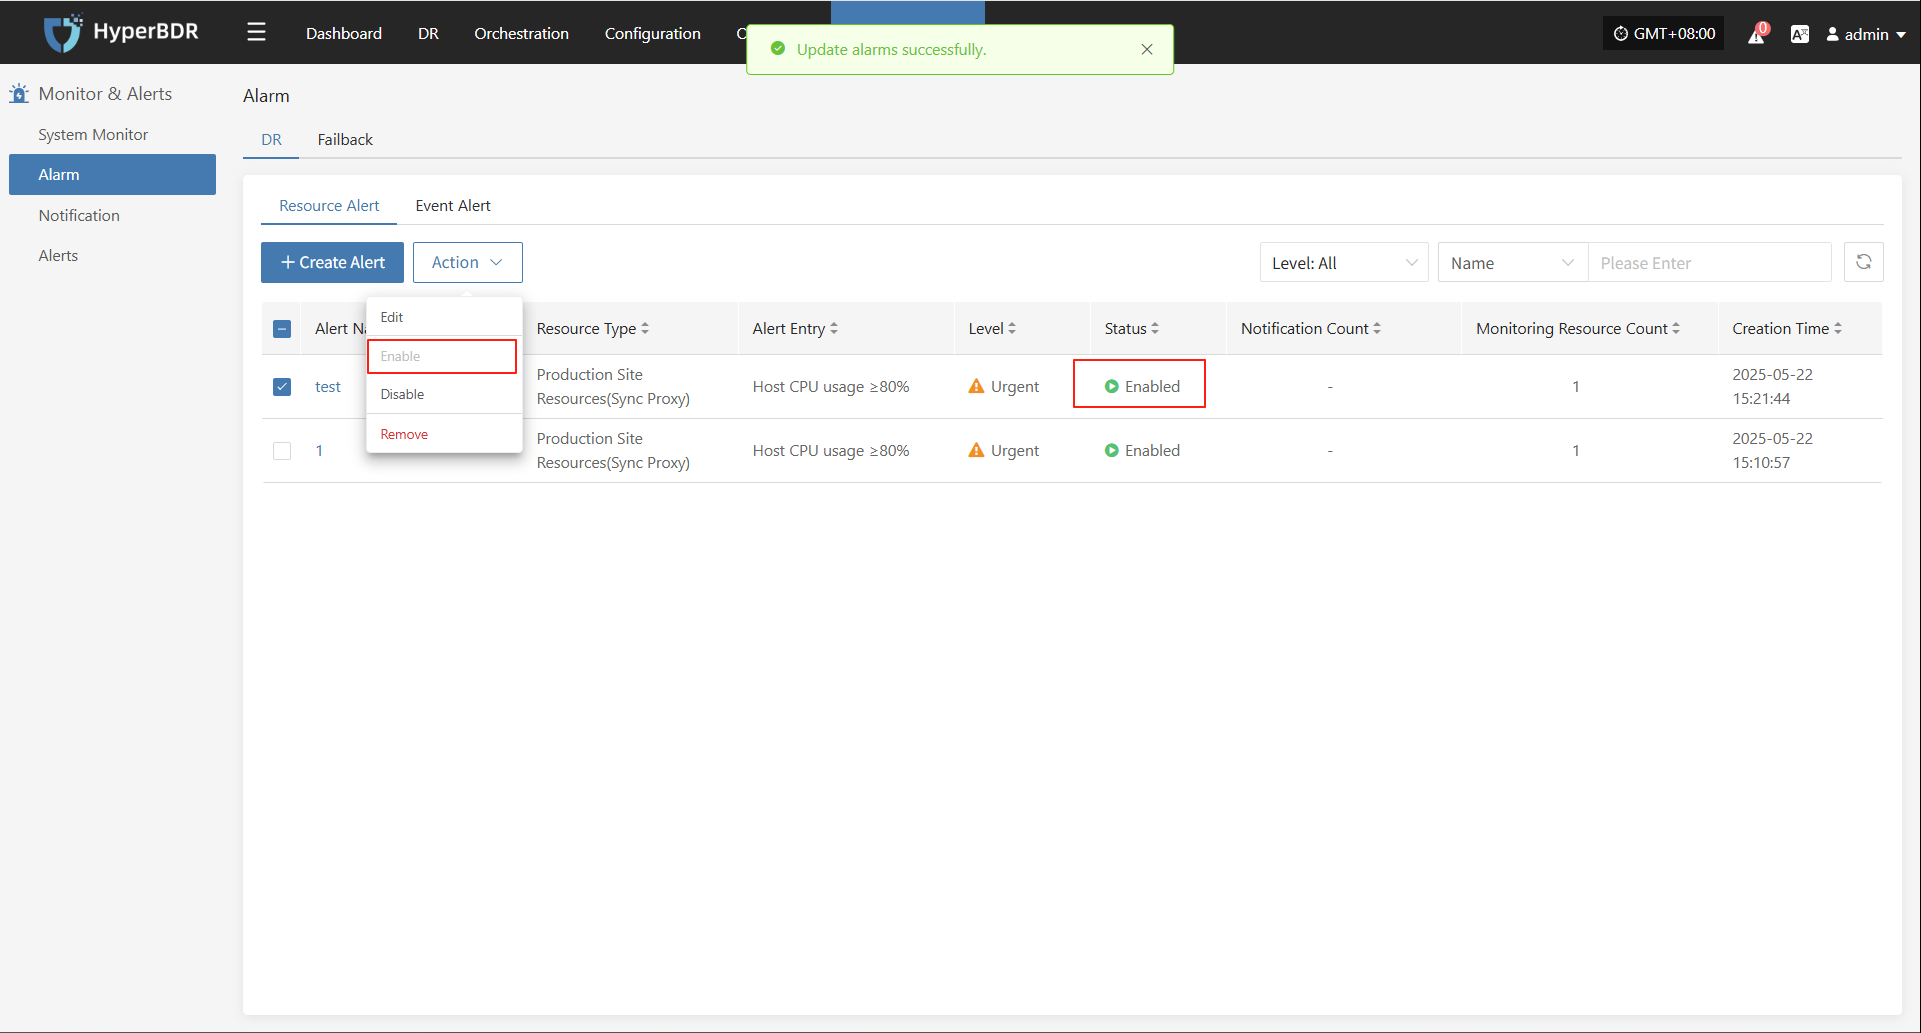
Disable
- Disabled alerts cannot be edited. To change the configuration, please enable the alert first.

Remove
- Click [Remove] to trigger a confirmation. After confirming, the system will delete the alert.
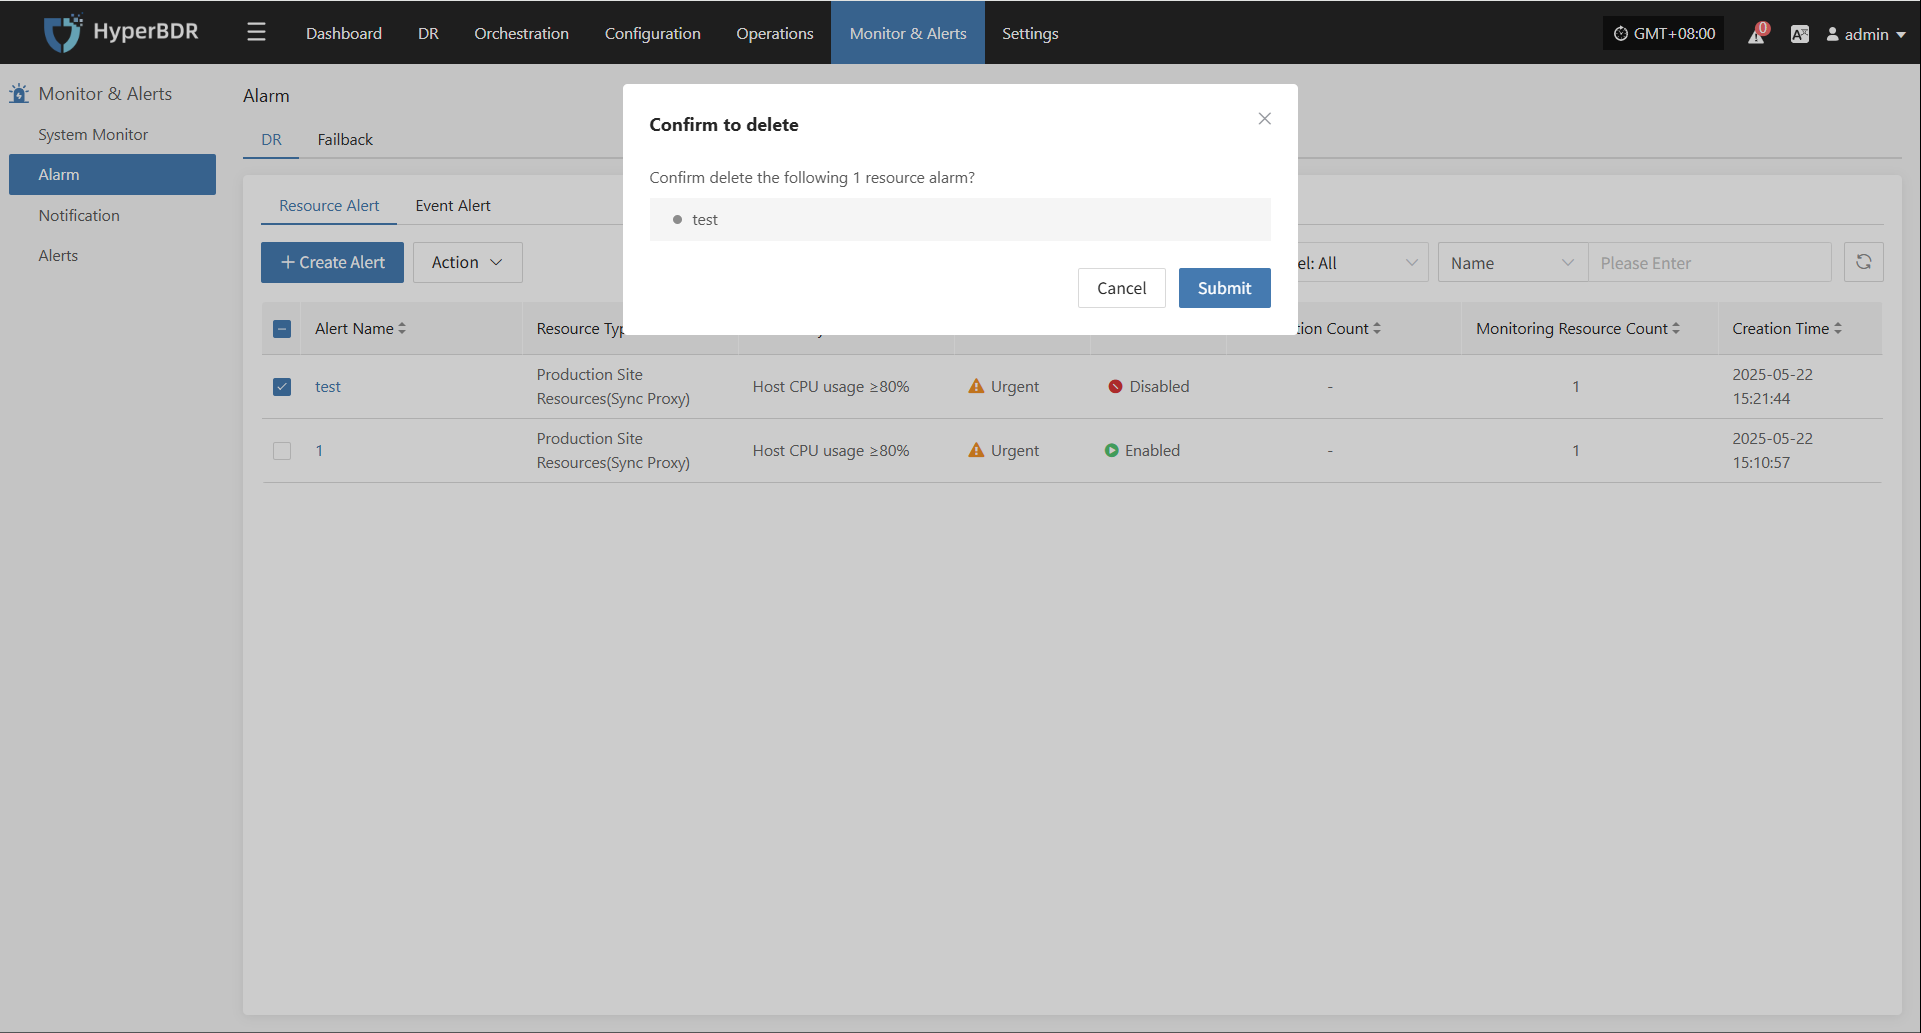
Event Alert
Go to: Monitor & Alerts → Alarm → Event Alert → Create Alert
After navigating to the creation page, configure the required parameters based on your needs, then save to complete the setup of DR and Failback alerts.
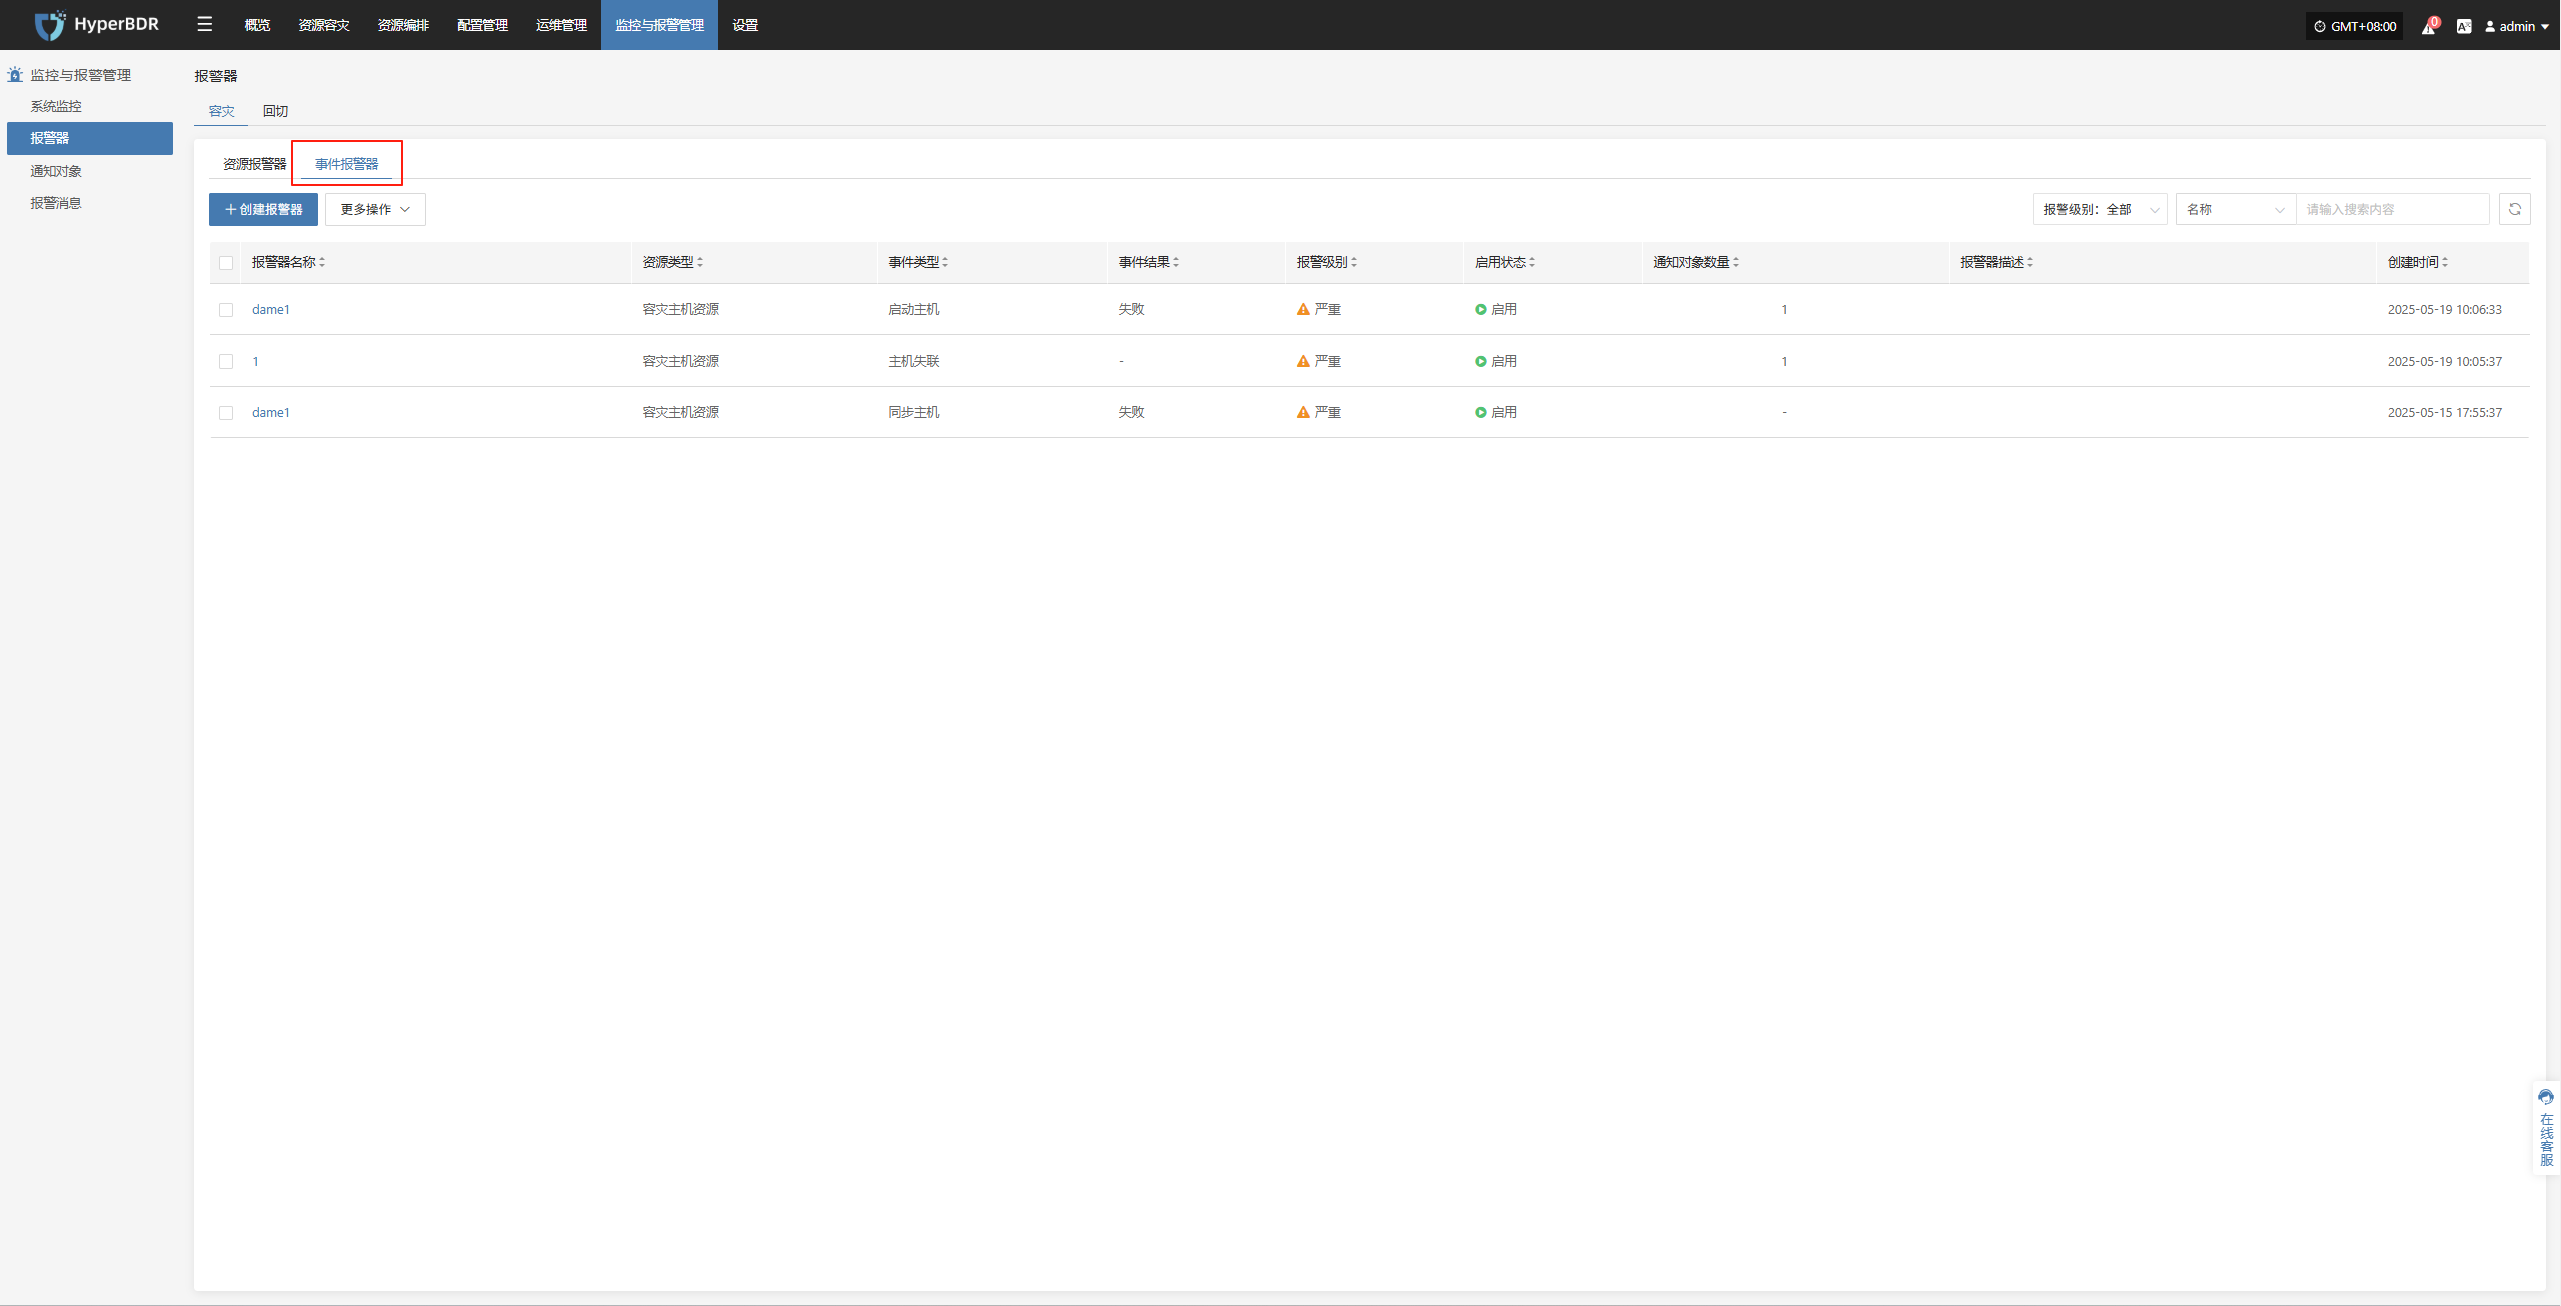
Create Alert
- Alert Configuration Field Description
| Field Name | Example | Description |
|---|---|---|
| Alert Type | Event Alert | Set the alert type. Event alerts monitor key actions and abnormal states, and trigger notifications. |
| Alert Name | test | Custom alert name for identification and management. |
| Level | Critical | Severity level, e.g., Info, Critical, Emergency. |
| Status | Enabled | Whether the alert is enabled. When enabled, the system will monitor and alert as configured. |
| Event Type | User Resource / Login | The event type to monitor. Supported: User Resource, DR Host Resource, License Resource, Production Site Resources, DR Resource, Monitoring Alarm, Object Storage, Resource Policies. |
| Event Result | Success | The event result that triggers the alert. E.g., Success, Failure. |
| Notification | Notification Recipient | Who to notify when the alert is triggered (person or group). |
| Description | — | Briefly describe the alert's function or purpose for easy identification and maintenance. |
- Event Type Descriptions
| Event Type | Alert Conditions (Examples) | Description |
|---|---|---|
| User Resources | Login, Logout, Modify phone number, Change password, Reset password | Events related to user login activities and account updates. |
| DR Host Resources | Add DR host configuration, Boot host, Clean host resource, Forced abort of task, Host disconnected, Host recovery timeout, Sync host, Takeover host, Register host, Limit/Unlimit host resource, Limit/Unlimit transfer rate, Update DR host configuration | Key events for DR host configuration, task execution, and status. |
| License Resources | Add license | Events related to license status and updates. |
| Production Site Resources | Add/Delete Linux or Windows agent, Add/Delete/Bind/Unbind sync proxy or connection, Refresh sync proxy VMs, Update sync proxy connection | Events related to agent deployment and sync proxy configuration. |
| DR Site Resources | Add/Delete/Update cloud account, Create/Delete/Start create/Delete cloud sync gateway | Events related to DR site configuration and cloud sync gateway. |
| Monitoring Alarm | Create/Delete/Update alarm, Create/Delete/Update notification | Events related to alarm rules and notification settings. |
| Resource Groups | Create/Delete resource group, Clean resources, Sync data, Drill/Takeover DR, Start drill/sync/clean/takeover | Events related to grouped resource management and DR operations. |
| Object Storage | Add/Delete/Update object storage, Start add/delete object storage | Events for changes to object storage configuration or access. |
| Resource Policies | Associate/Disassociate/Create/Delete/Update resource policies | Events related to lifecycle management of disaster recovery policies. |
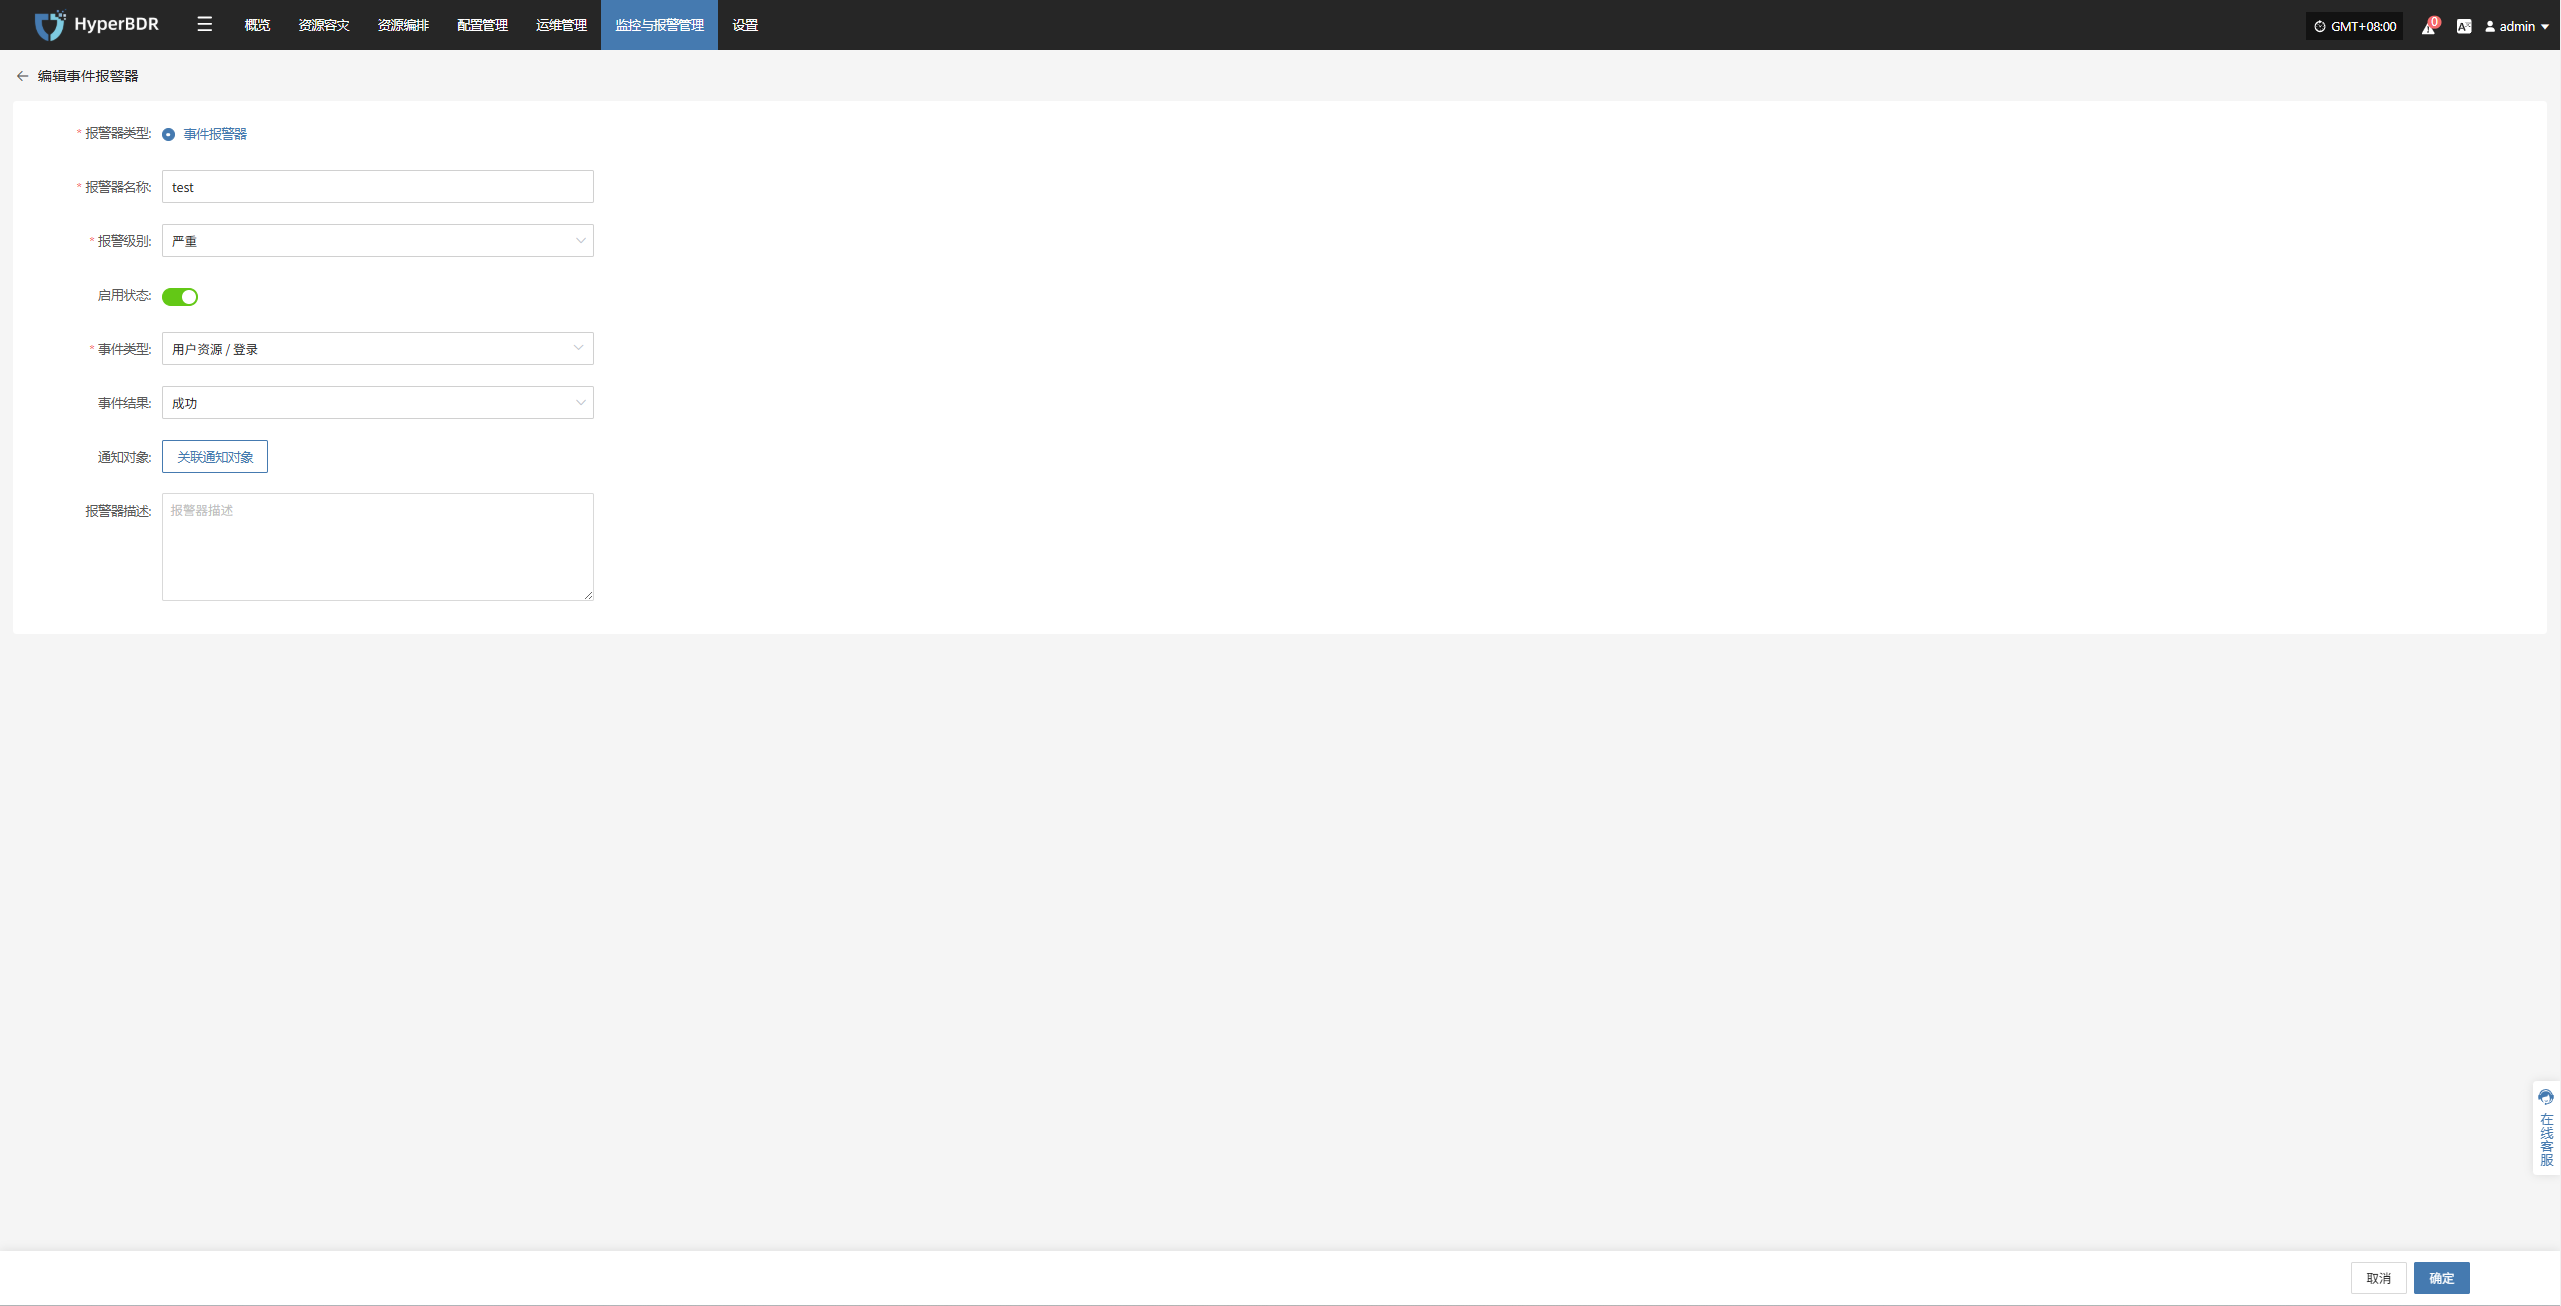
- After the alert is created, the system will automatically trigger it when the event occurs and send notifications to the assigned recipients. Related alert information will also be shown on the "Alert Messages" page for unified management.
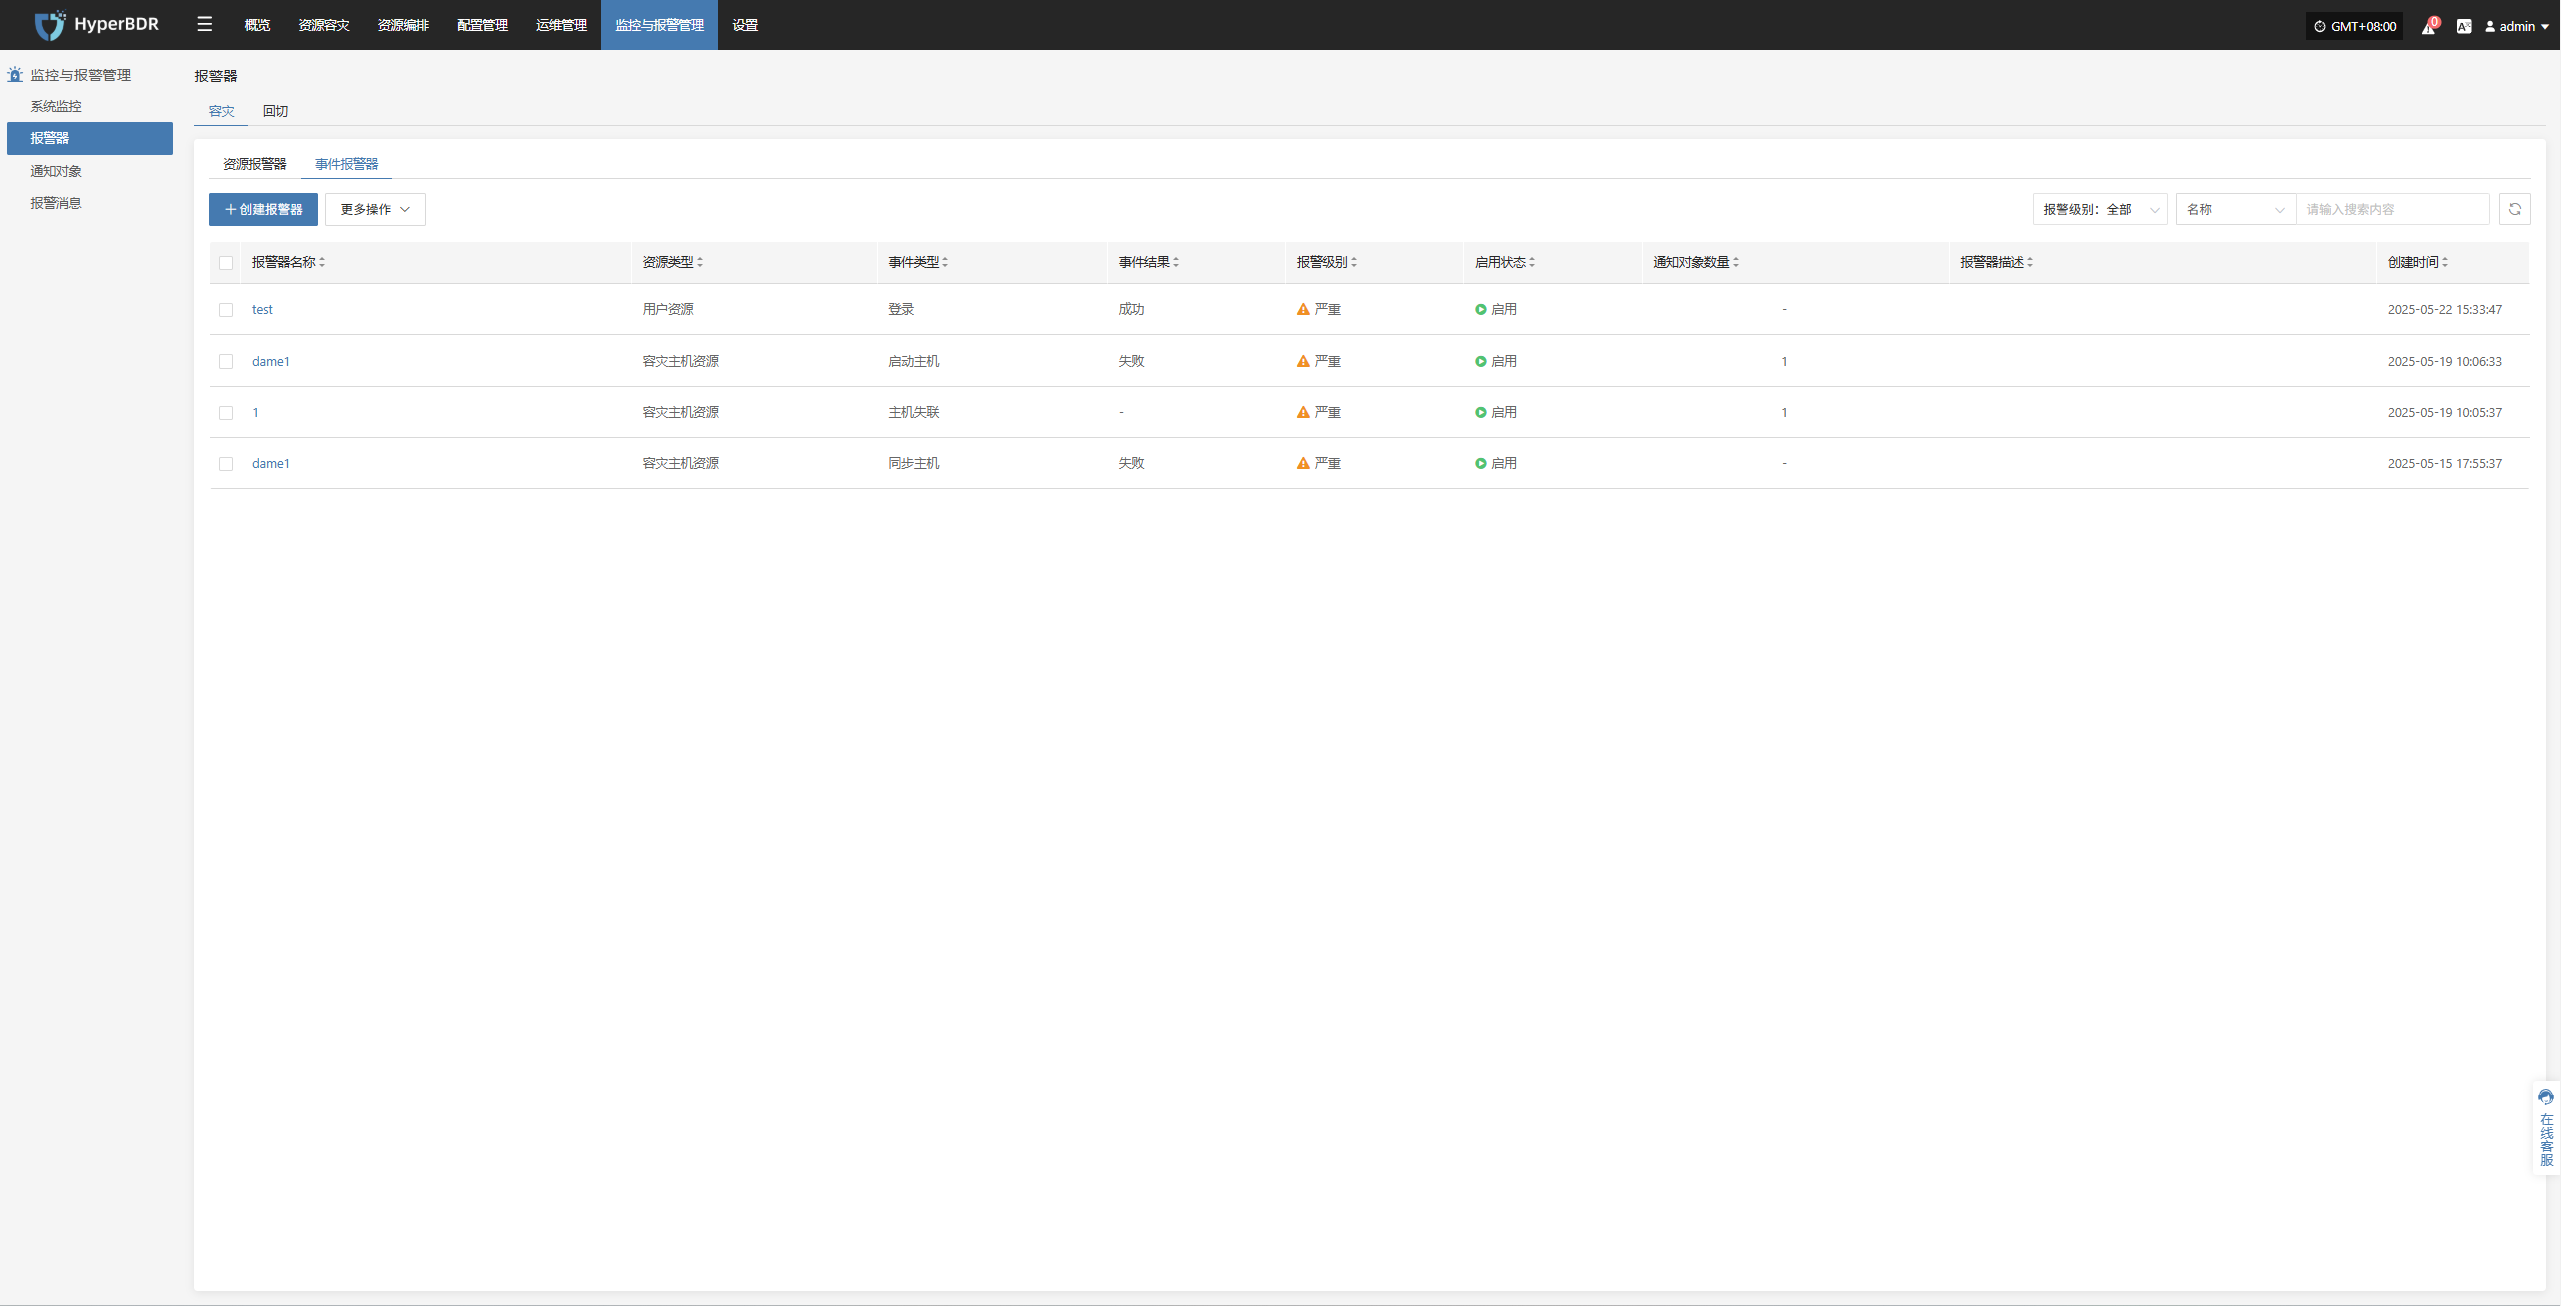
Action
Edit
- Click [Edit] to go to the edit page, where you can update the alert configuration.
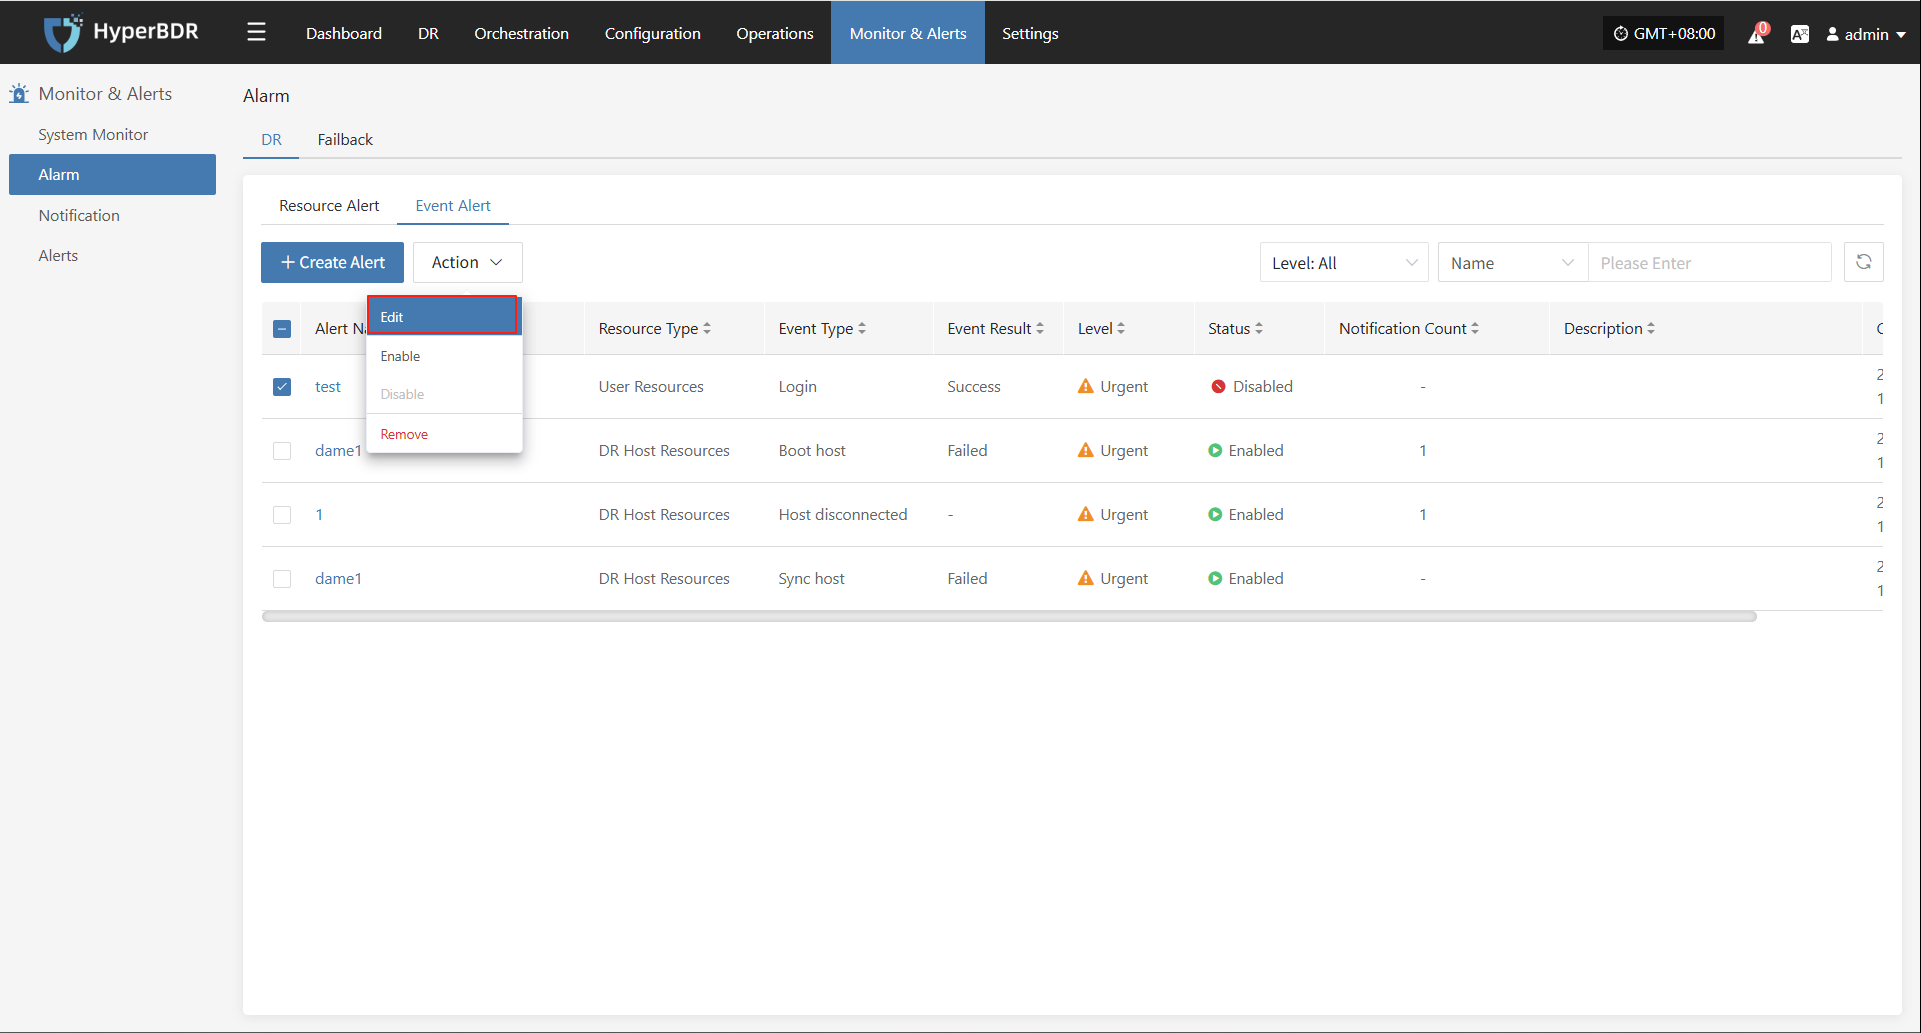
Enable
- Enabled alerts cannot be edited. To change the configuration, please disable the alert first.

Disable
- Disabled alerts cannot be edited. To change the configuration, please enable the alert first.

Remove
- Click [Remove] to trigger a confirmation. After confirming, the system will delete the alert.
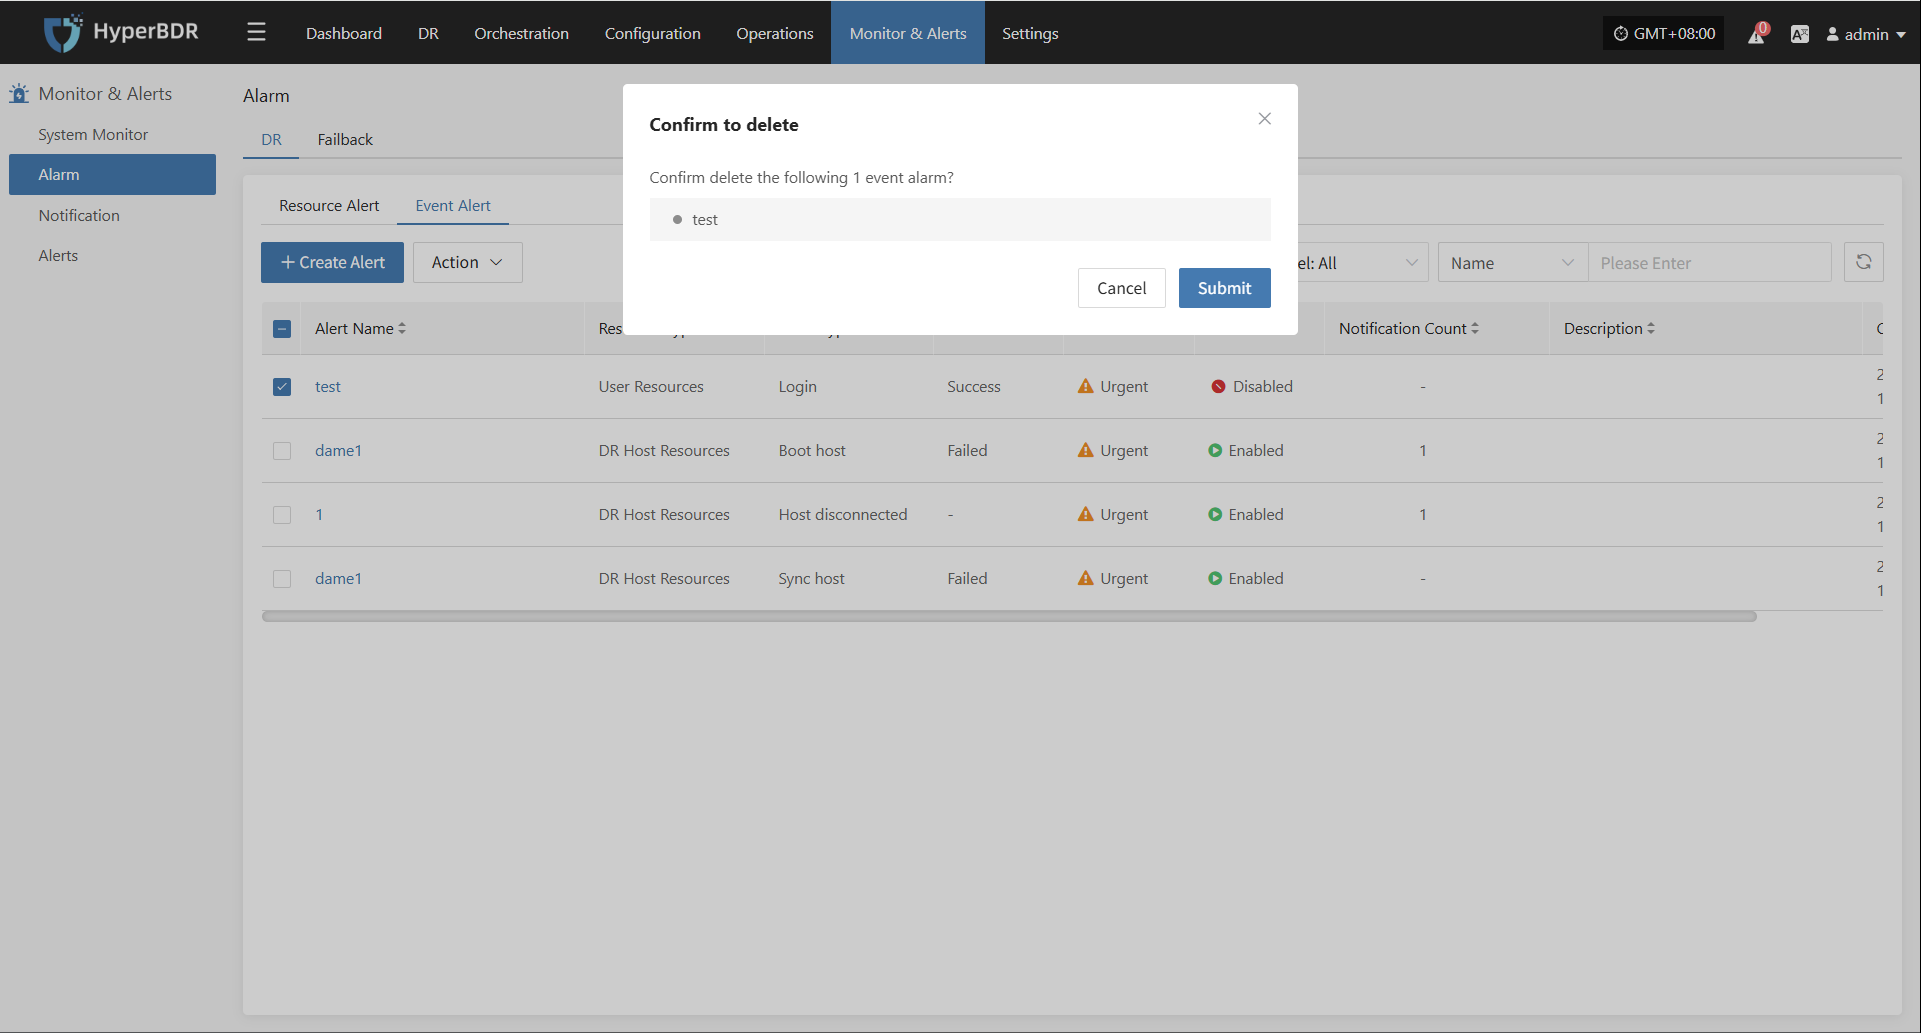
Notification
When an alert occurs, the system will notify designated people or groups. Notification recipients can receive alerts by email, SMS, phone, or other methods to ensure timely awareness and response.
If no email or SMS service is configured for notification recipients, you cannot create notification users. Please go to [O&M Platform] -> [Notification Settings] to configure.
DR
Create Notification
Go to [Monitoring & Alerts], select [Notification Recipients] under [DR], then click [Create Notification Recipient].
Fill in the required information as prompted to complete the notification recipient setup, ensuring that relevant personnel can receive alerts in time.
| Field Name | Field Info | Description |
|---|---|---|
| Notification Name | test | Name of the notification object |
| Status | Enabled | Whether the notification is active |
| Alert | dame1 | Name of the alert rule |
| Sending Channel | dianzheng0410@163.com | Channel for sending notifications, e.g., email address |
| Notification Email | XXX@qq.com | Email(s) to receive notifications (multiple allowed) |
| Description | Additional notes or description |
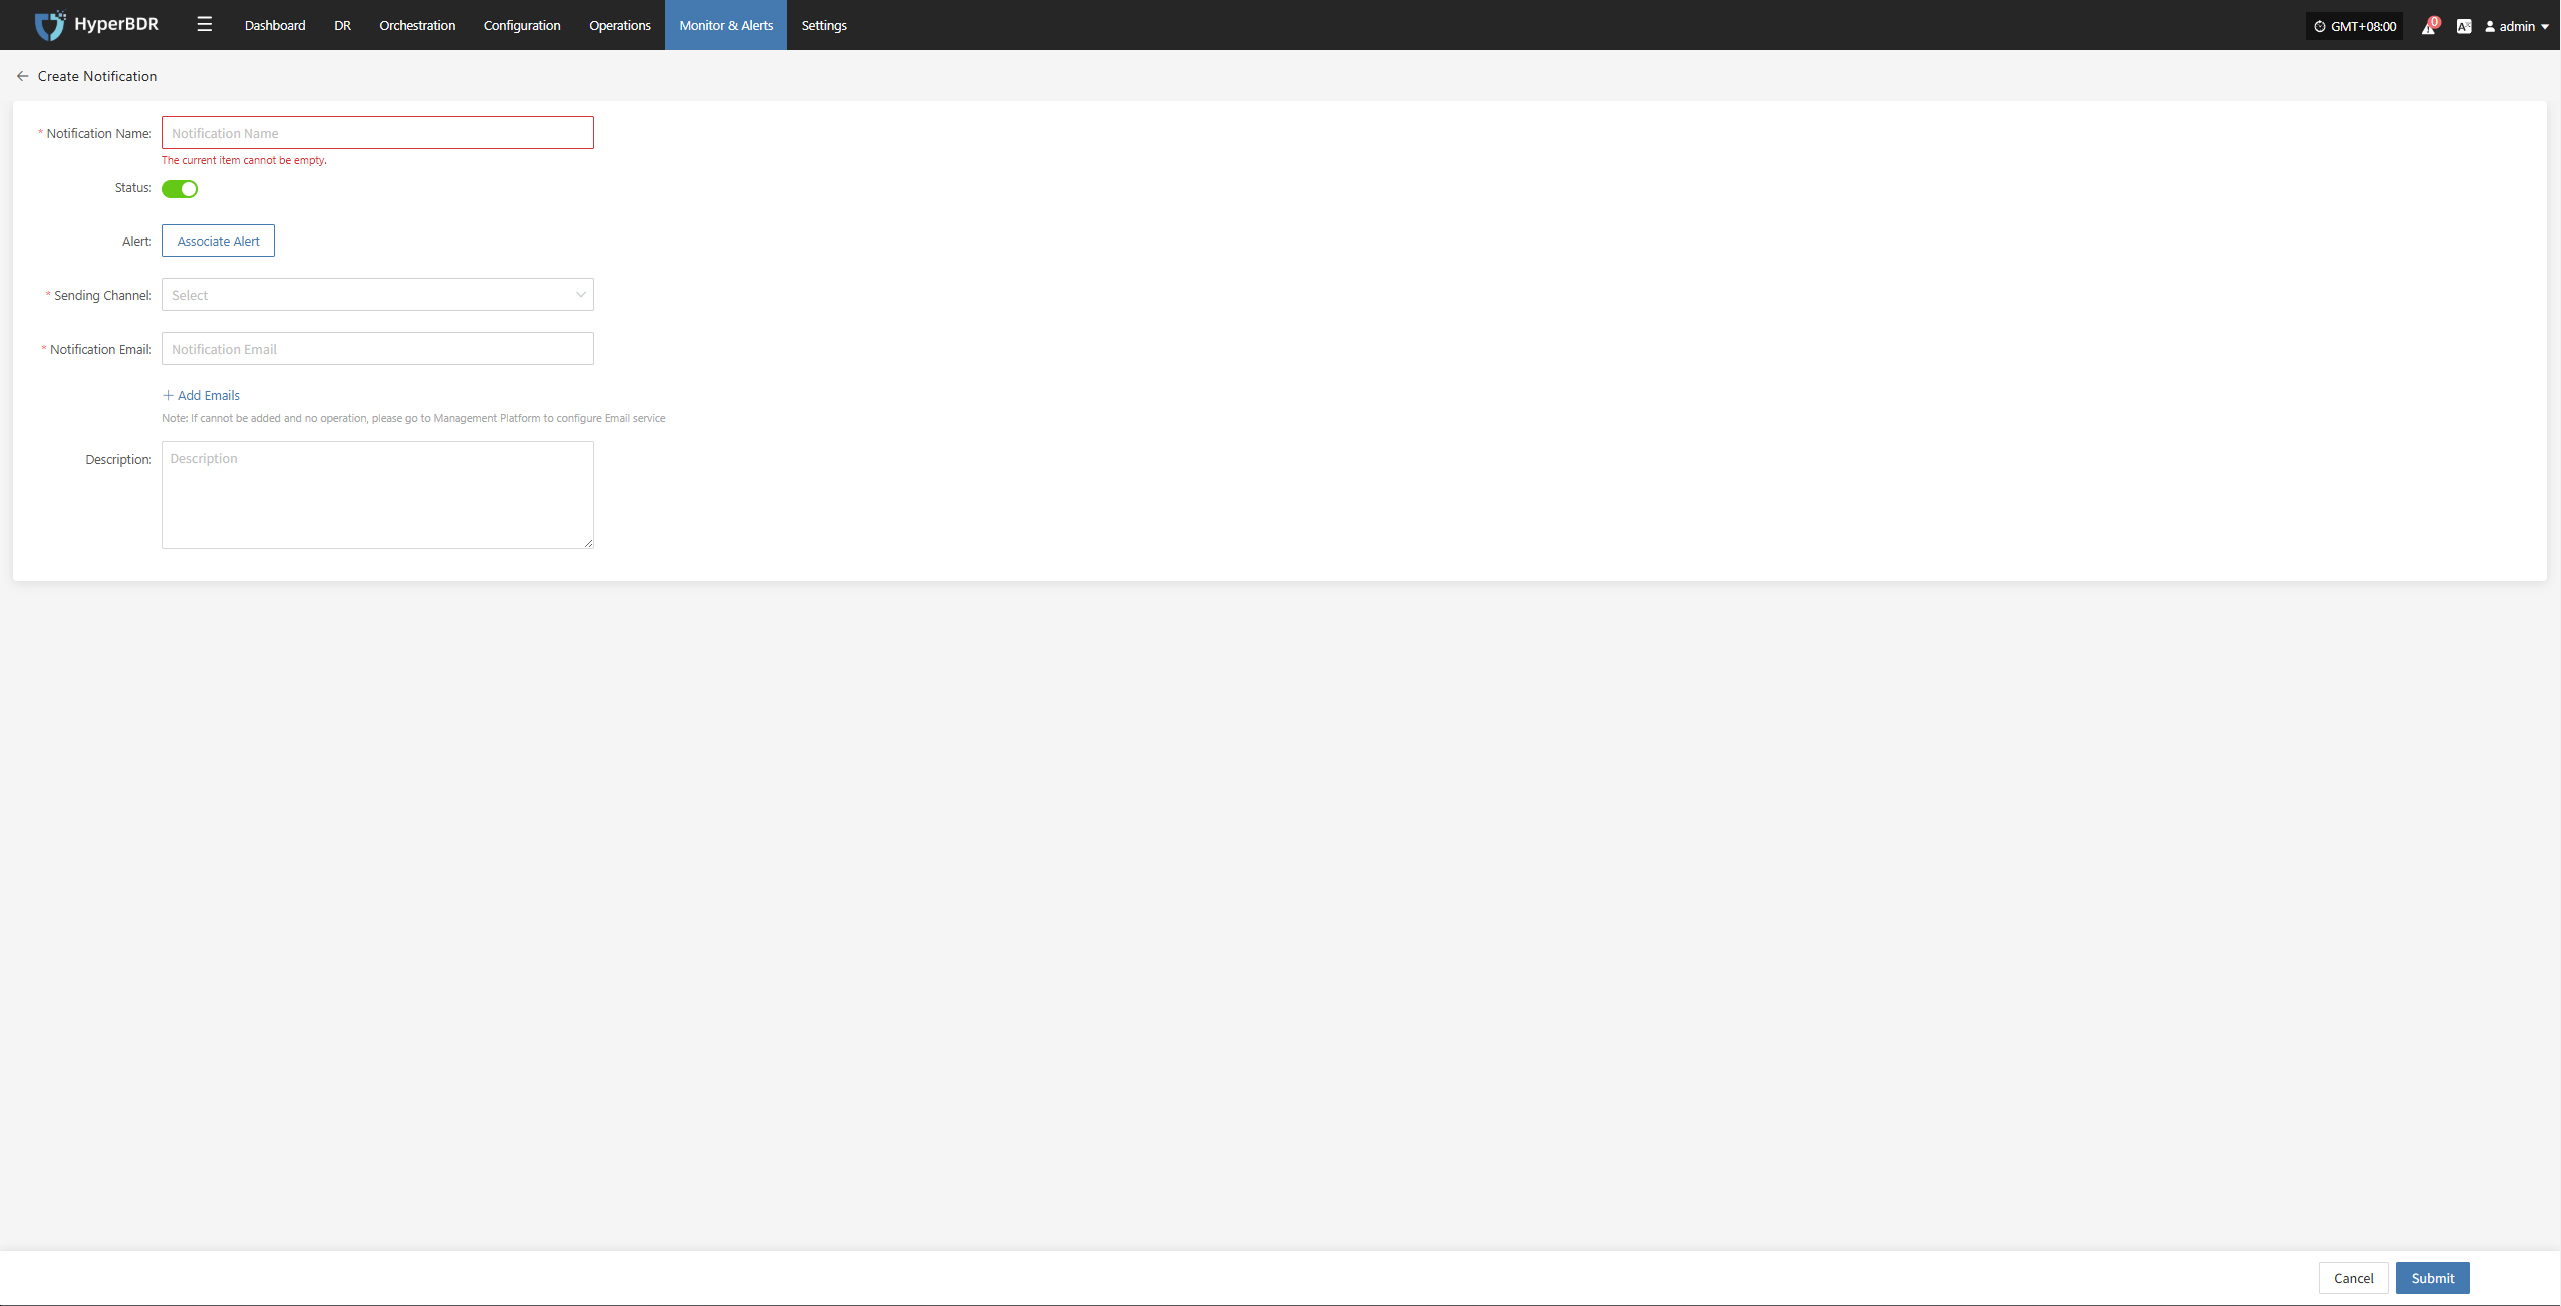
Action
After selecting a notification recipient, you can manage it by editing, enabling, disabling, or removing.
Edit
Click [Edit] to go to the edit page, where you can update the alert configuration.
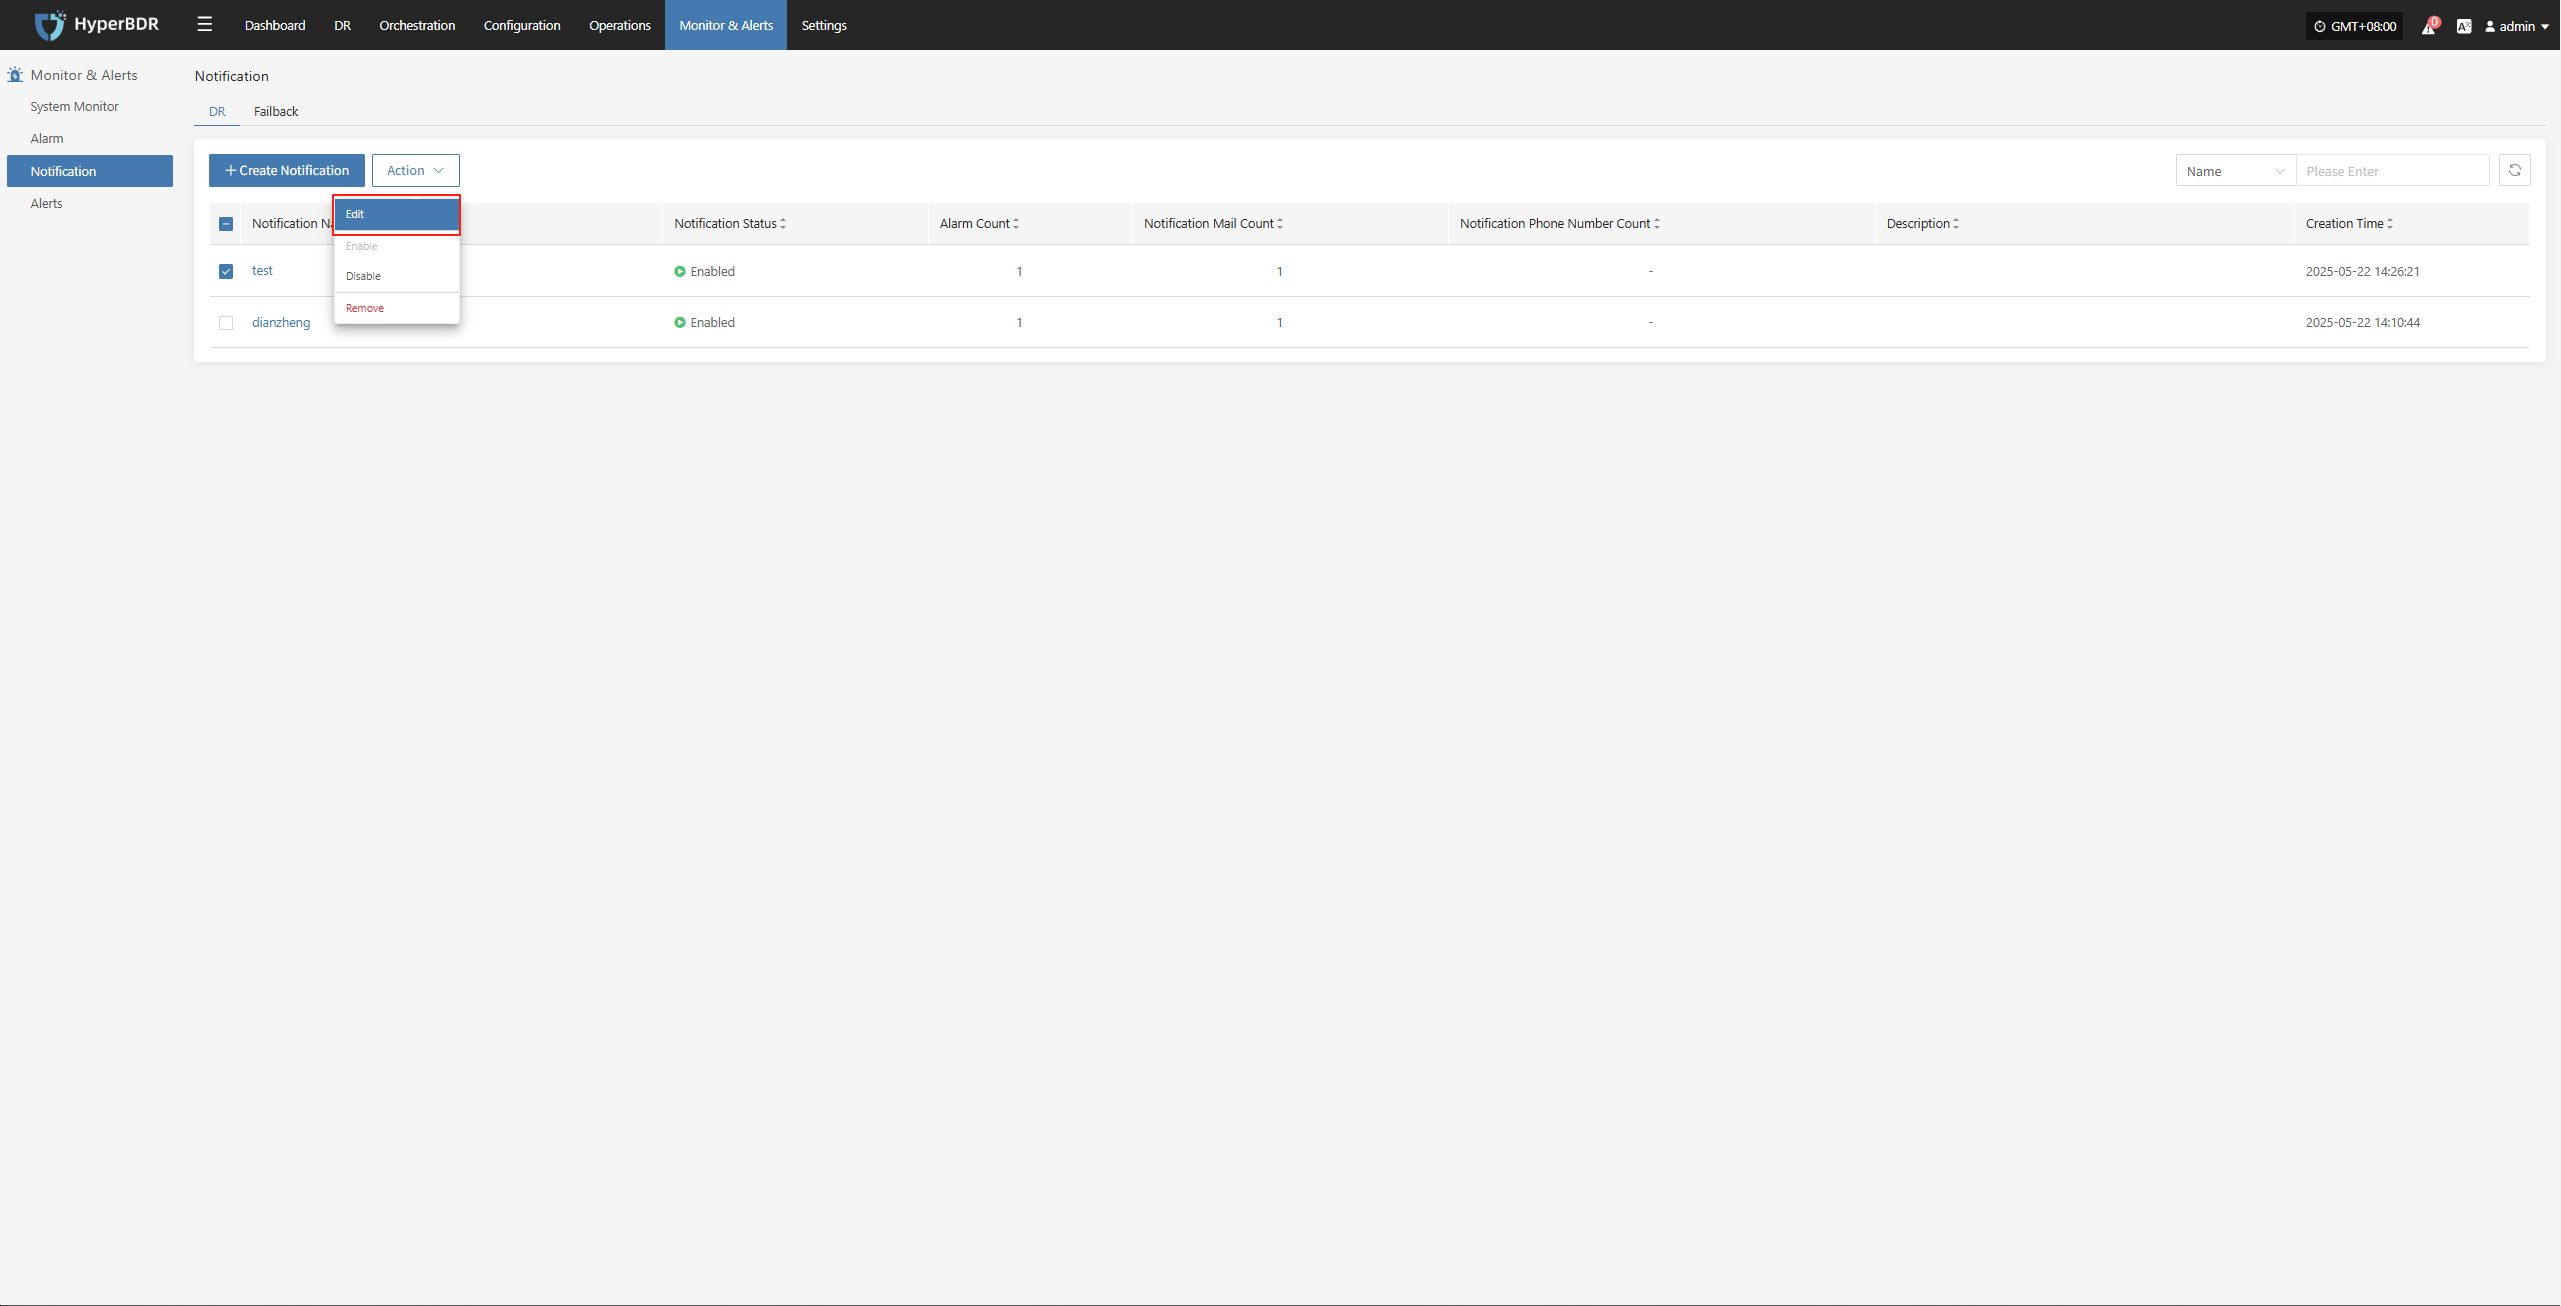
Enable
Enabled notification recipients cannot be edited. To change the configuration, please disable it first.

Disable
Disabled notification recipients cannot be edited. To change the configuration, please enable it first.
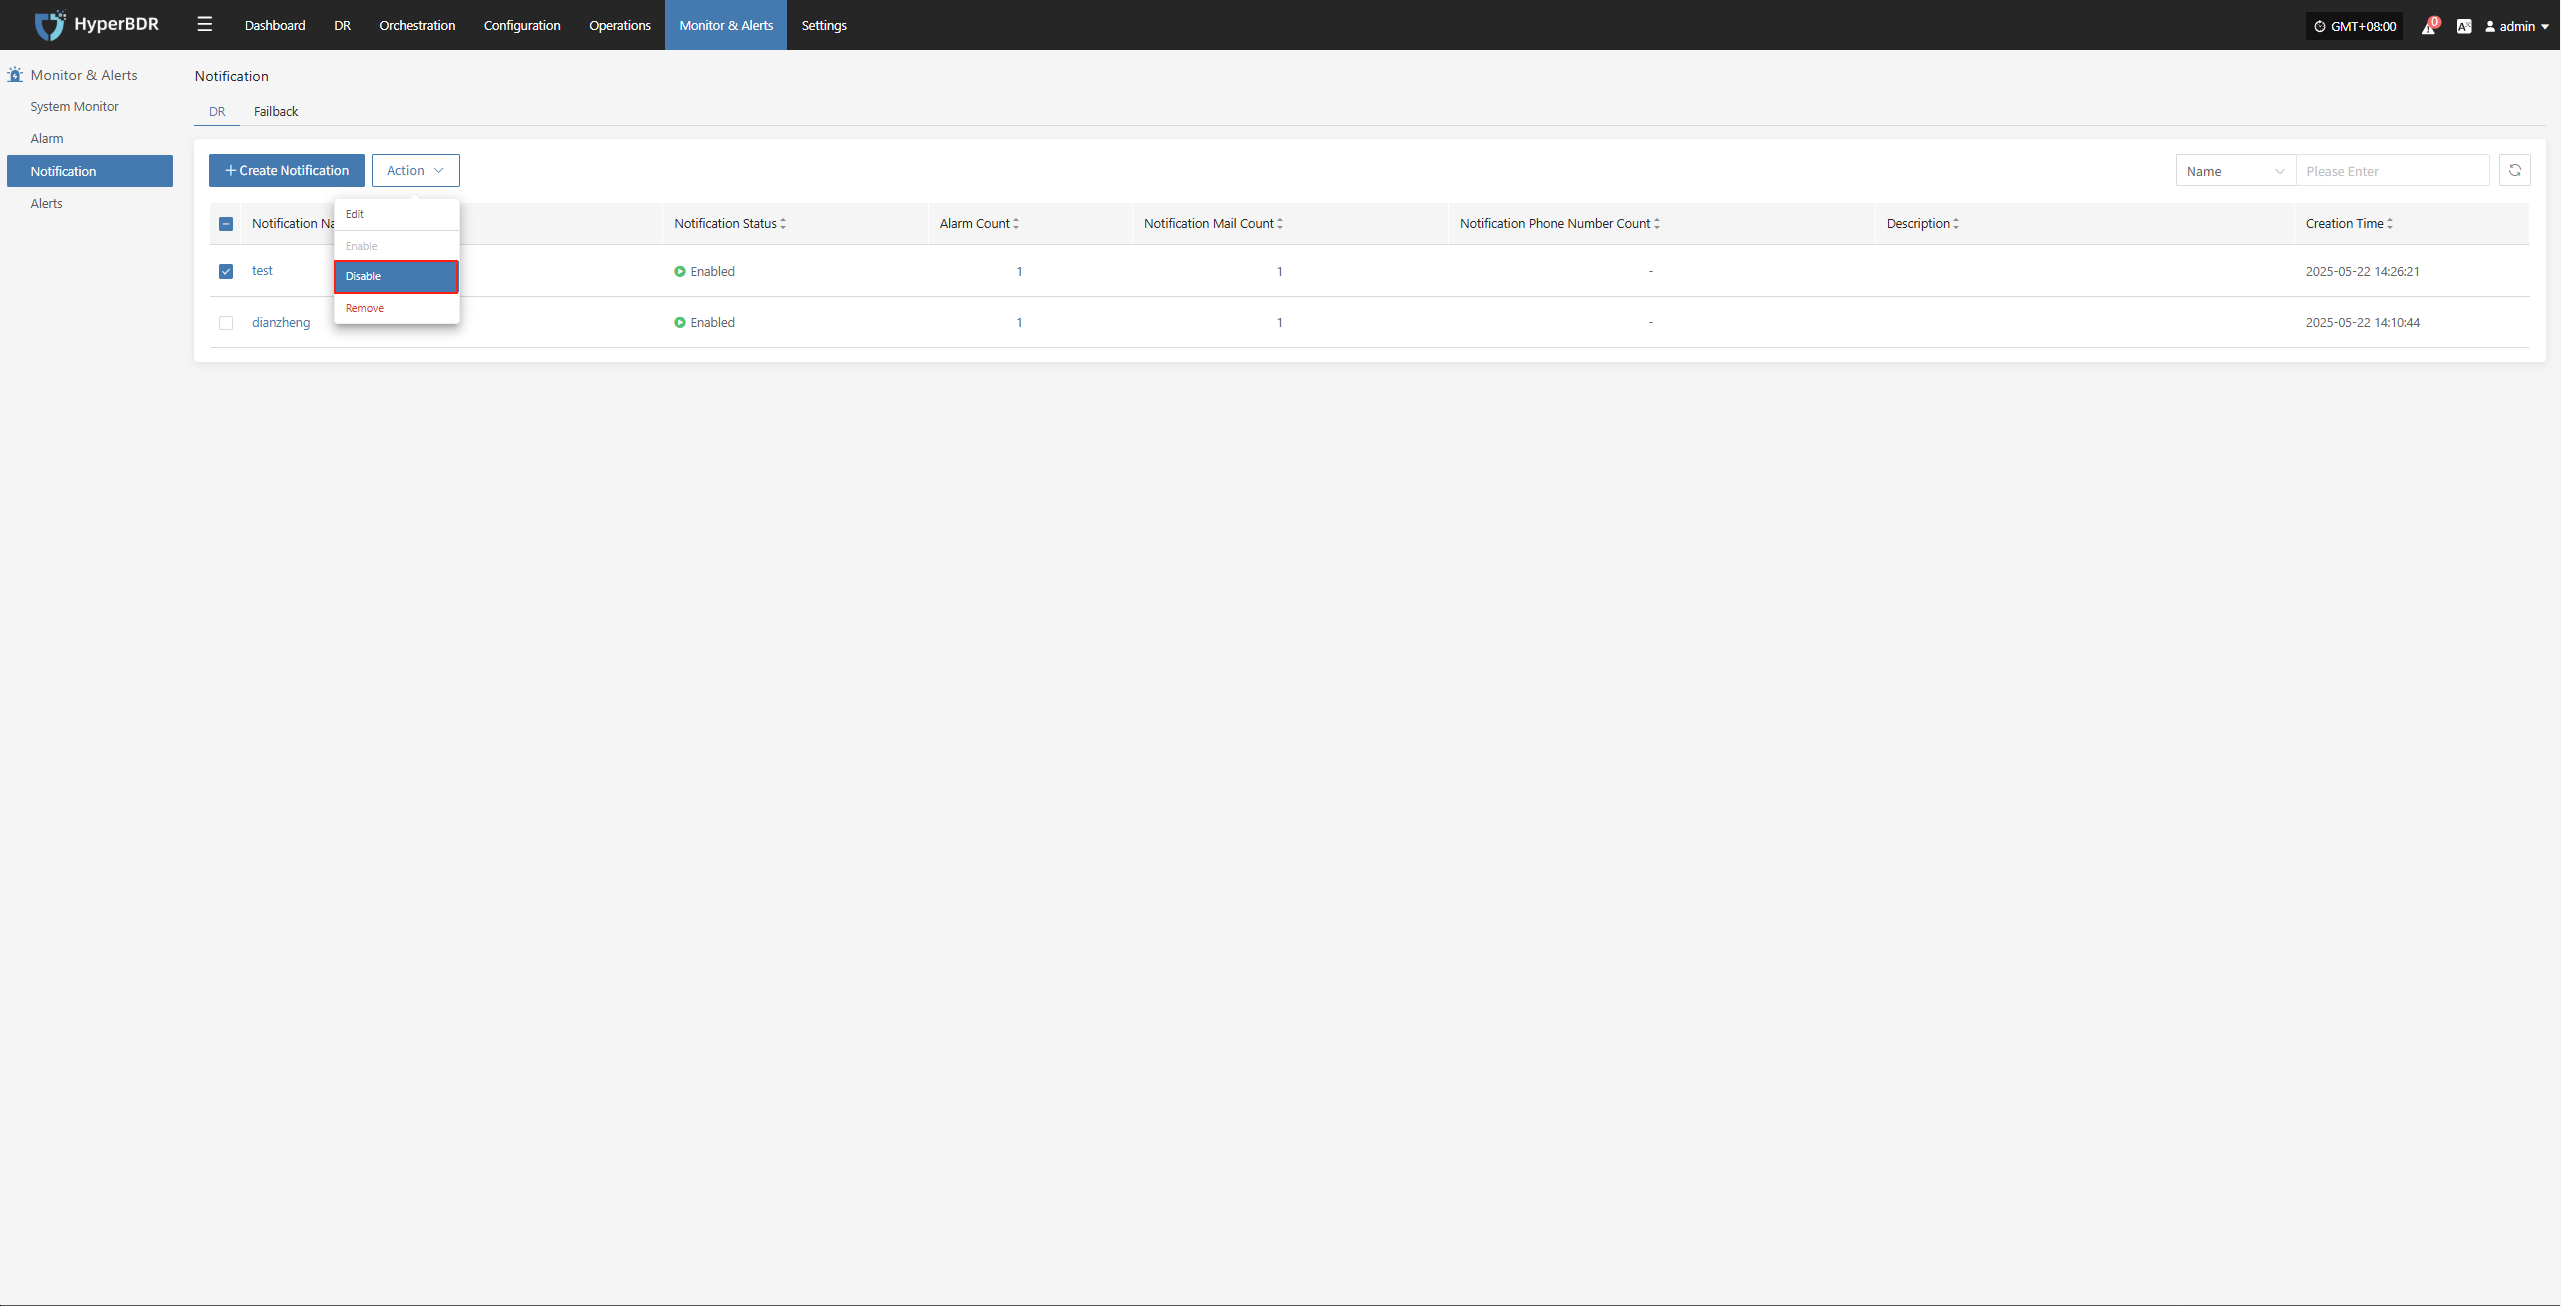
Remove
Click [Remove] to trigger a confirmation. After confirming, the system will delete the notification recipient and remove its association with related alerts.

Failback
Create Notification
Go to [Monitoring & Alerts], select [Notification Recipients] under [Failback], then click [Create Notification Recipient].
Fill in the required information as prompted to complete the notification recipient setup, ensuring that relevant personnel can receive alerts in time.
| Field Name | Field Info | Description |
|---|---|---|
| Notification Name | test | Name of the notification recipient |
| Status | Enabled | Whether the notification is active |
| Alert | dame1 | Click to link an existing alert rule |
| Sending Channel | dianzheng0410@163.com | Channel for sending notifications, e.g., email address |
| Notification Email | XXX@qq.com | Email(s) to receive notifications (multiple allowed) |
| Description | Additional notes or description |
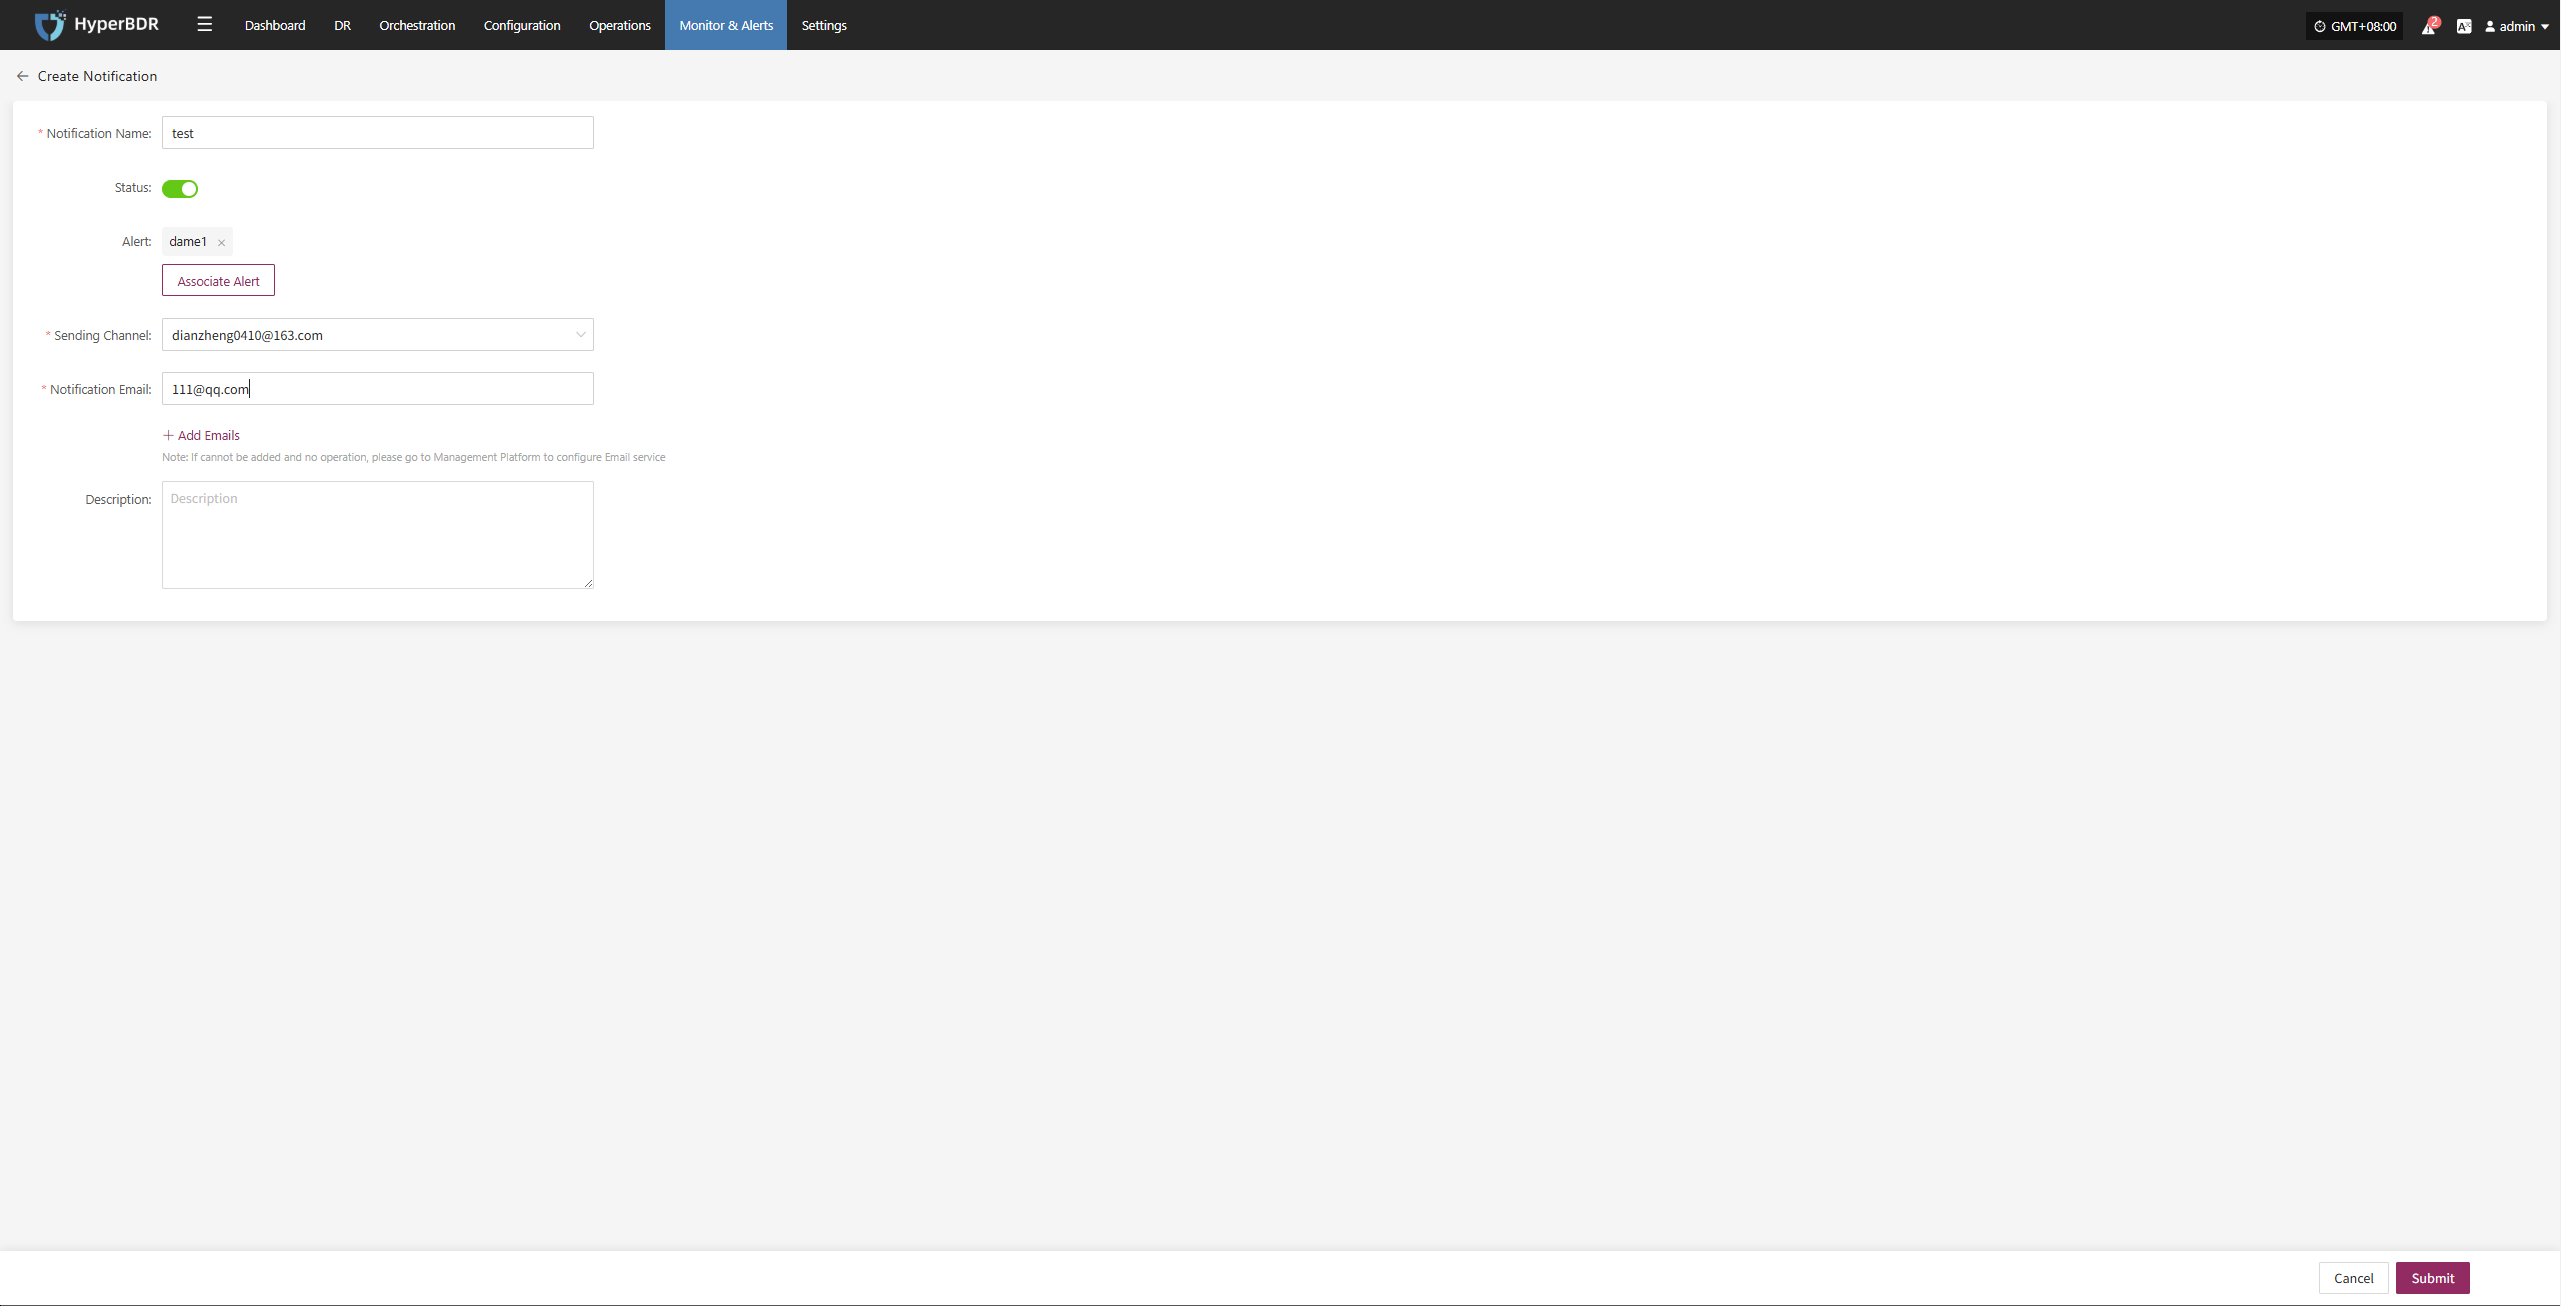
Action
After selecting a notification recipient, you can manage it by editing, enabling, disabling, or removing.
Edit
Click [Edit] to go to the edit page, where you can update the alert configuration.
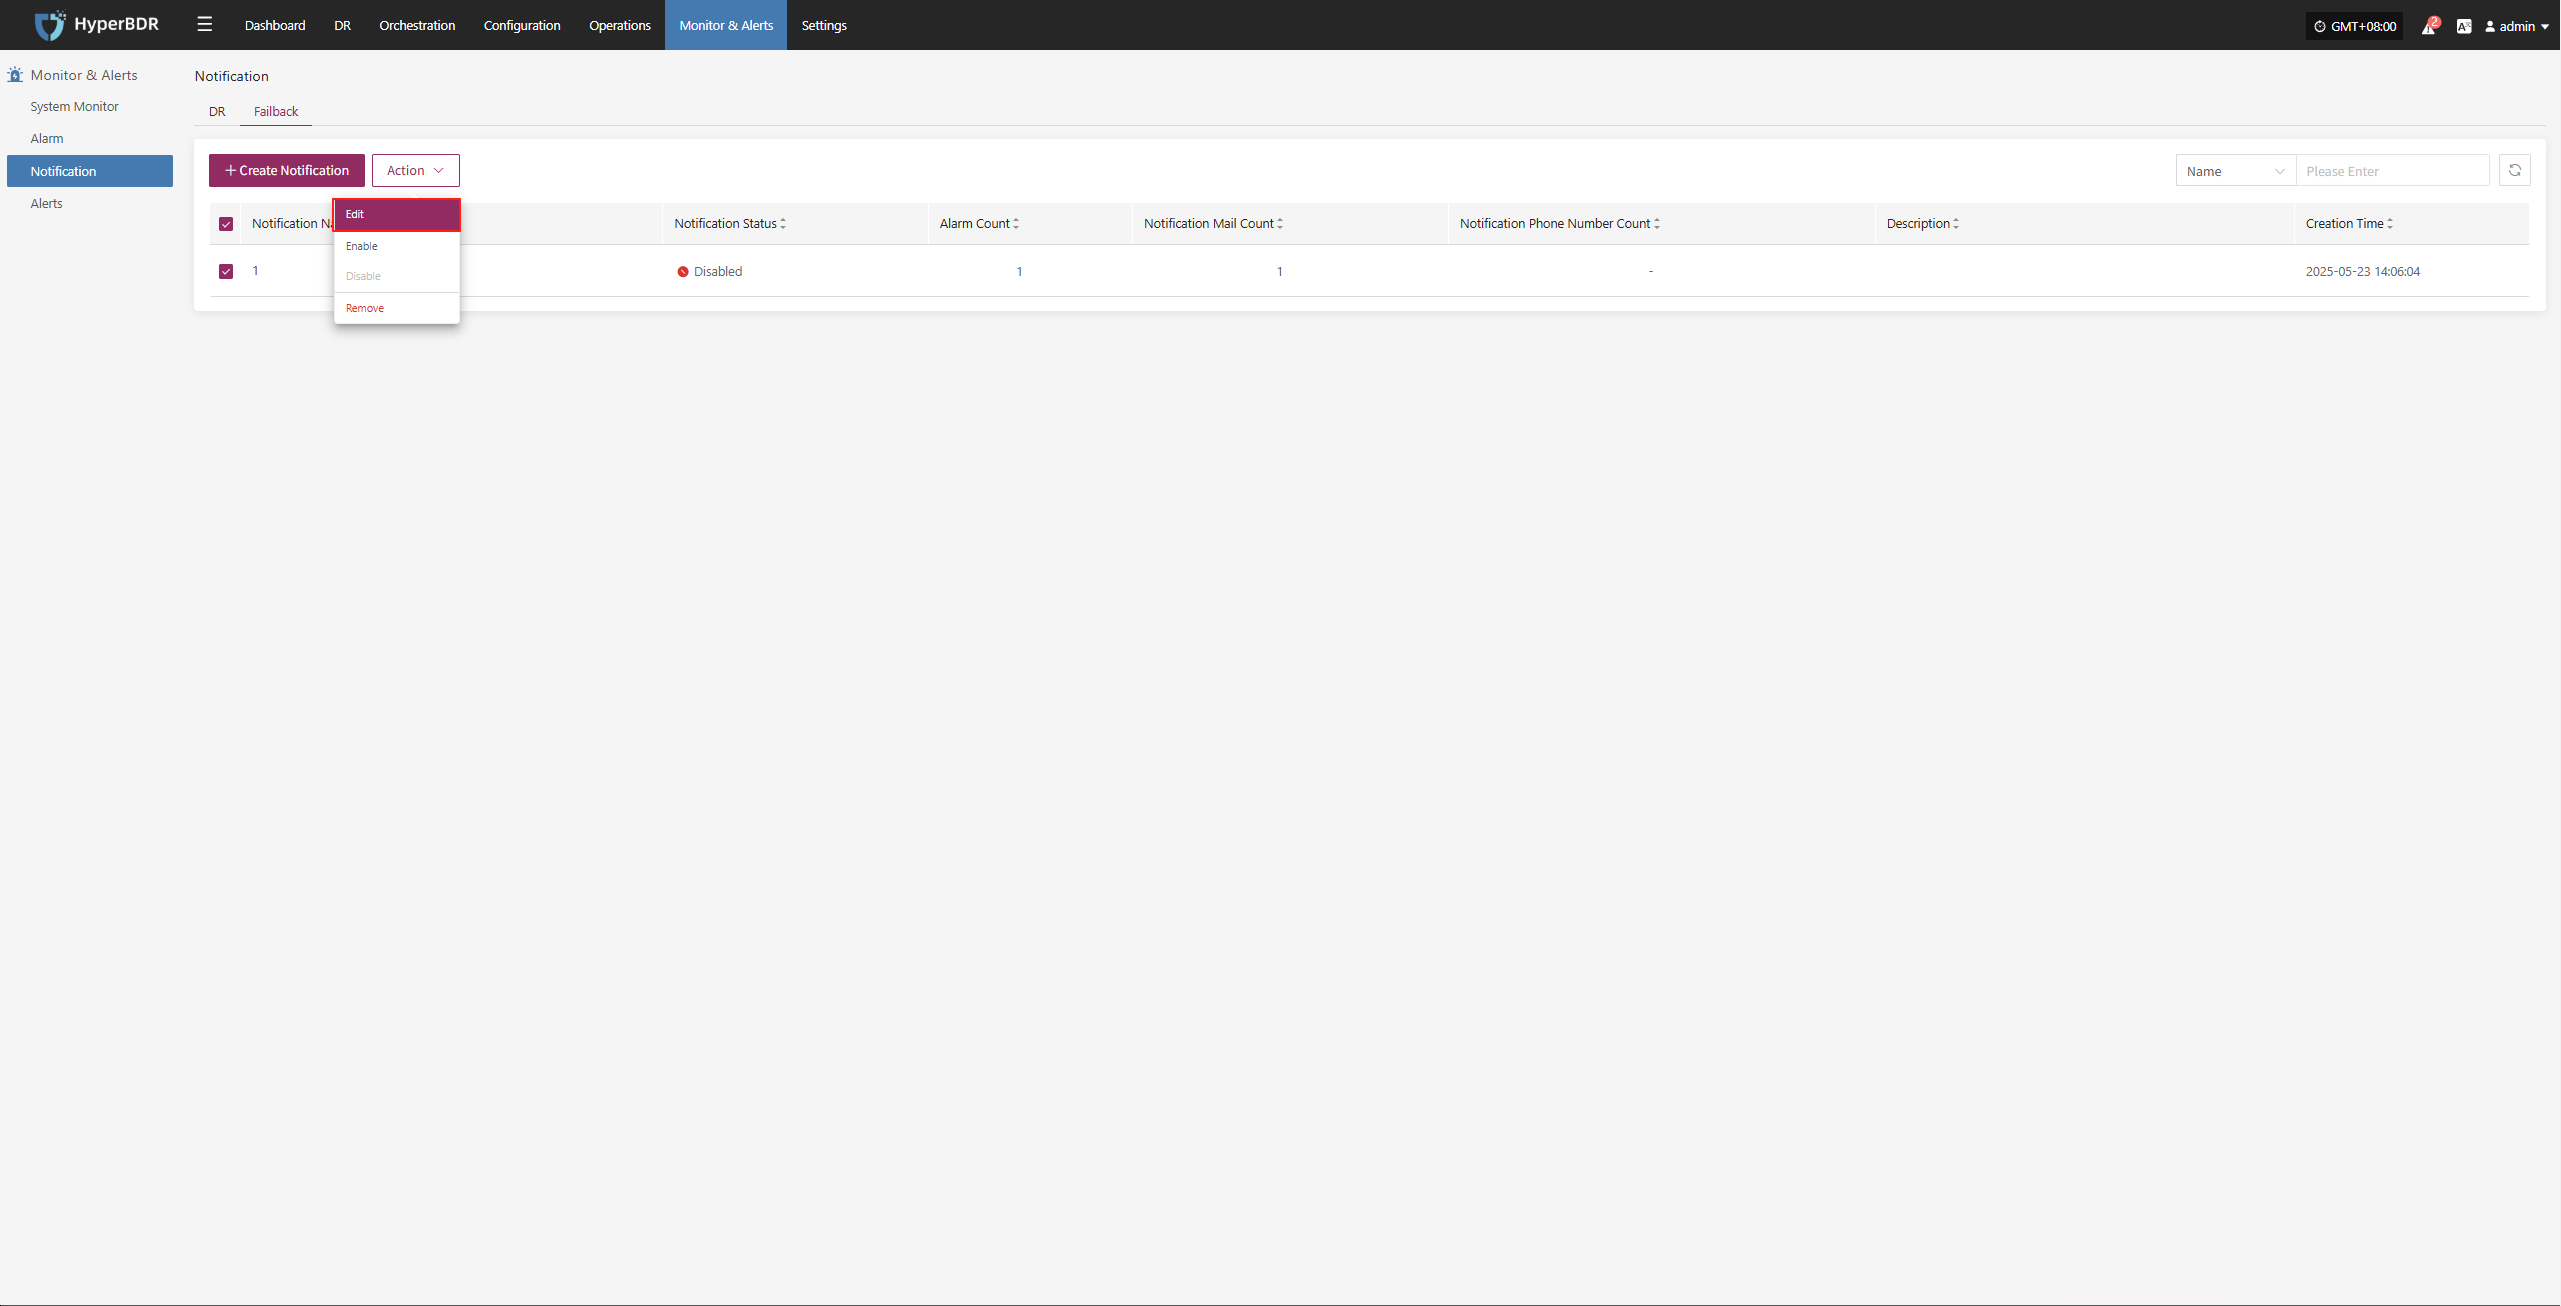
Enable
Enabled notification recipients cannot be edited. To change the configuration, please disable it first.

Disable
Disabled notification recipients cannot be edited. To change the configuration, please enable it first. When disabled, no notifications will be sent.

Remove
Click [Remove] to trigger a confirmation. After confirming, the system will delete the notification recipient and remove its association with related alerts.
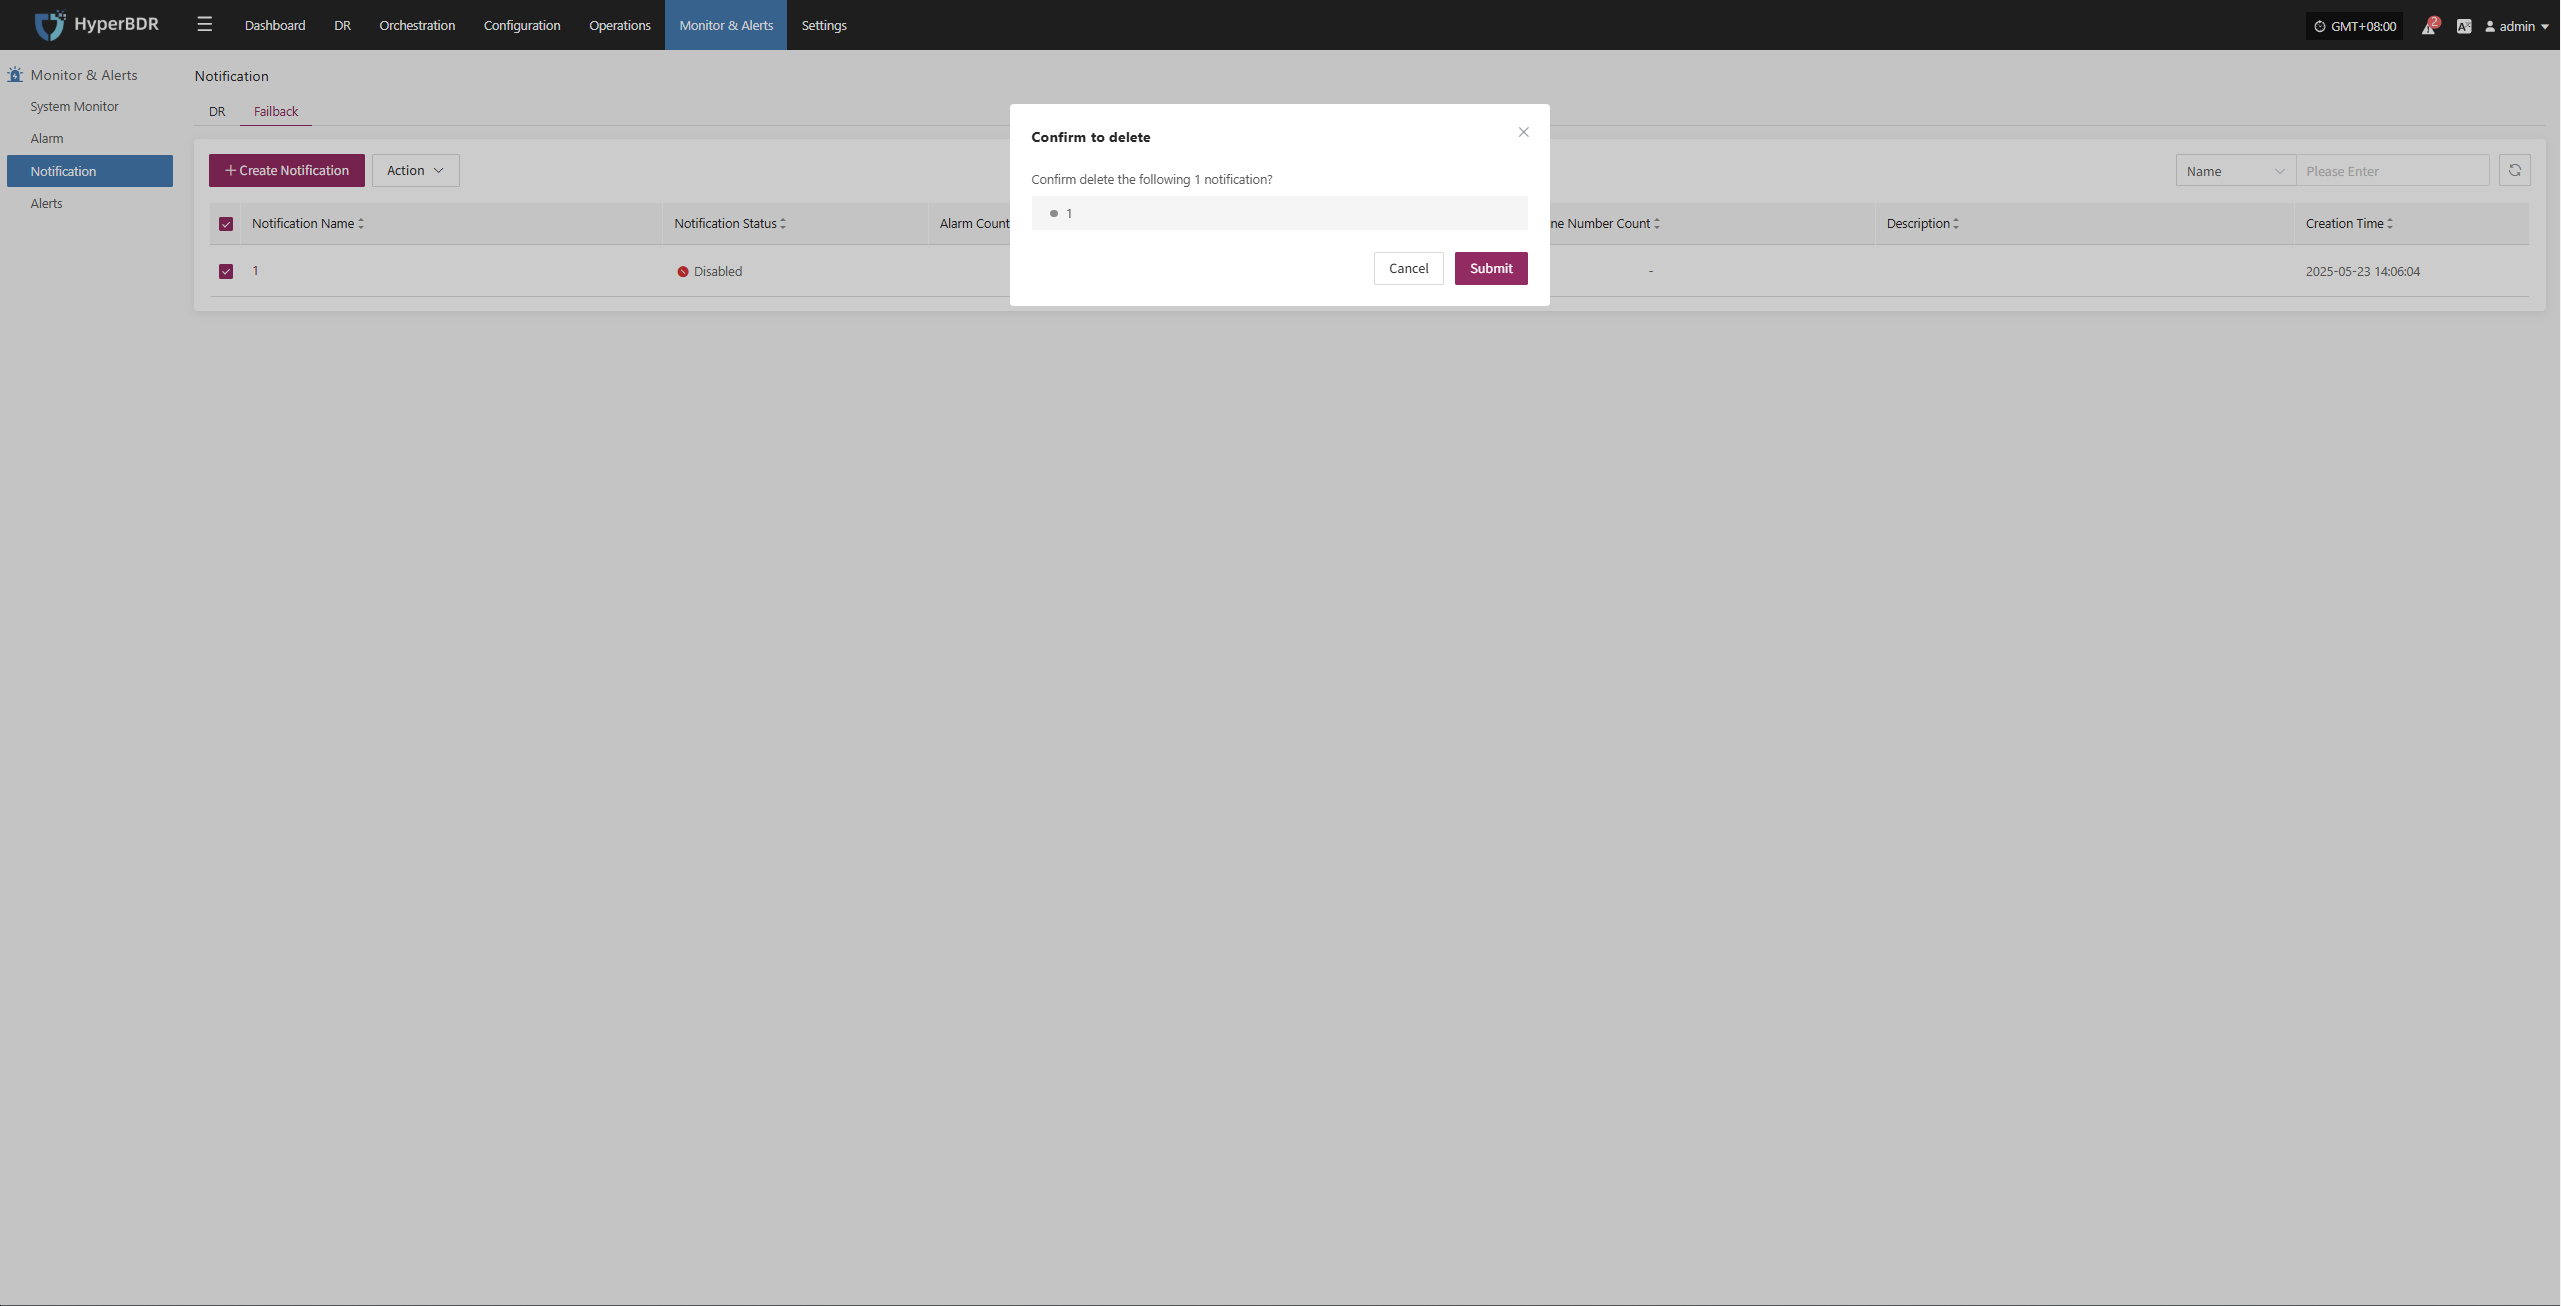
Alerts
The system monitors the status of various resources and key events based on alert rules you set. When abnormal metrics are detected or preset alert conditions are triggered, the platform will automatically generate alert messages.
If you assign notification contacts when creating an alert, the system will notify them by email, SMS, or other methods as appropriate.
DR
- Alert Message Fields
When the system detects a resource issue or event trigger, it generates an alert message. The main fields are:
Here is your table translated into clear, simple English for a disaster recovery product document:
| Field Name | Description |
|---|---|
| Alarm Name | The type of event that triggers the alarm, used to quickly identify the root cause of the issue. |
| Resource Name | The specific resource that triggered the alarm, such as a host name or service name. |
| Status | The current handling status of the alarm, for example, "Unprocessed" or "Processed". |
| Severity Level | The severity of the alarm event, commonly classified as "Info", "Critical", or "Emergency". |
| Alarm Type | The specific category of the alarm, such as "Event Alarm" or "Resource Alarm". |
| Resource Type | The types of resources involved, including: · Object Storage · Disaster Recovery Policy User Resources · Disaster Recovery Host Resources · License Resources · Production Platform Resources · Disaster Recovery Platform Resources · Monitoring Alarms · Resource Groups |
| Occurrence Time | The time when the system first detected the alarm event, used for tracing the issue and analyzing response time. |
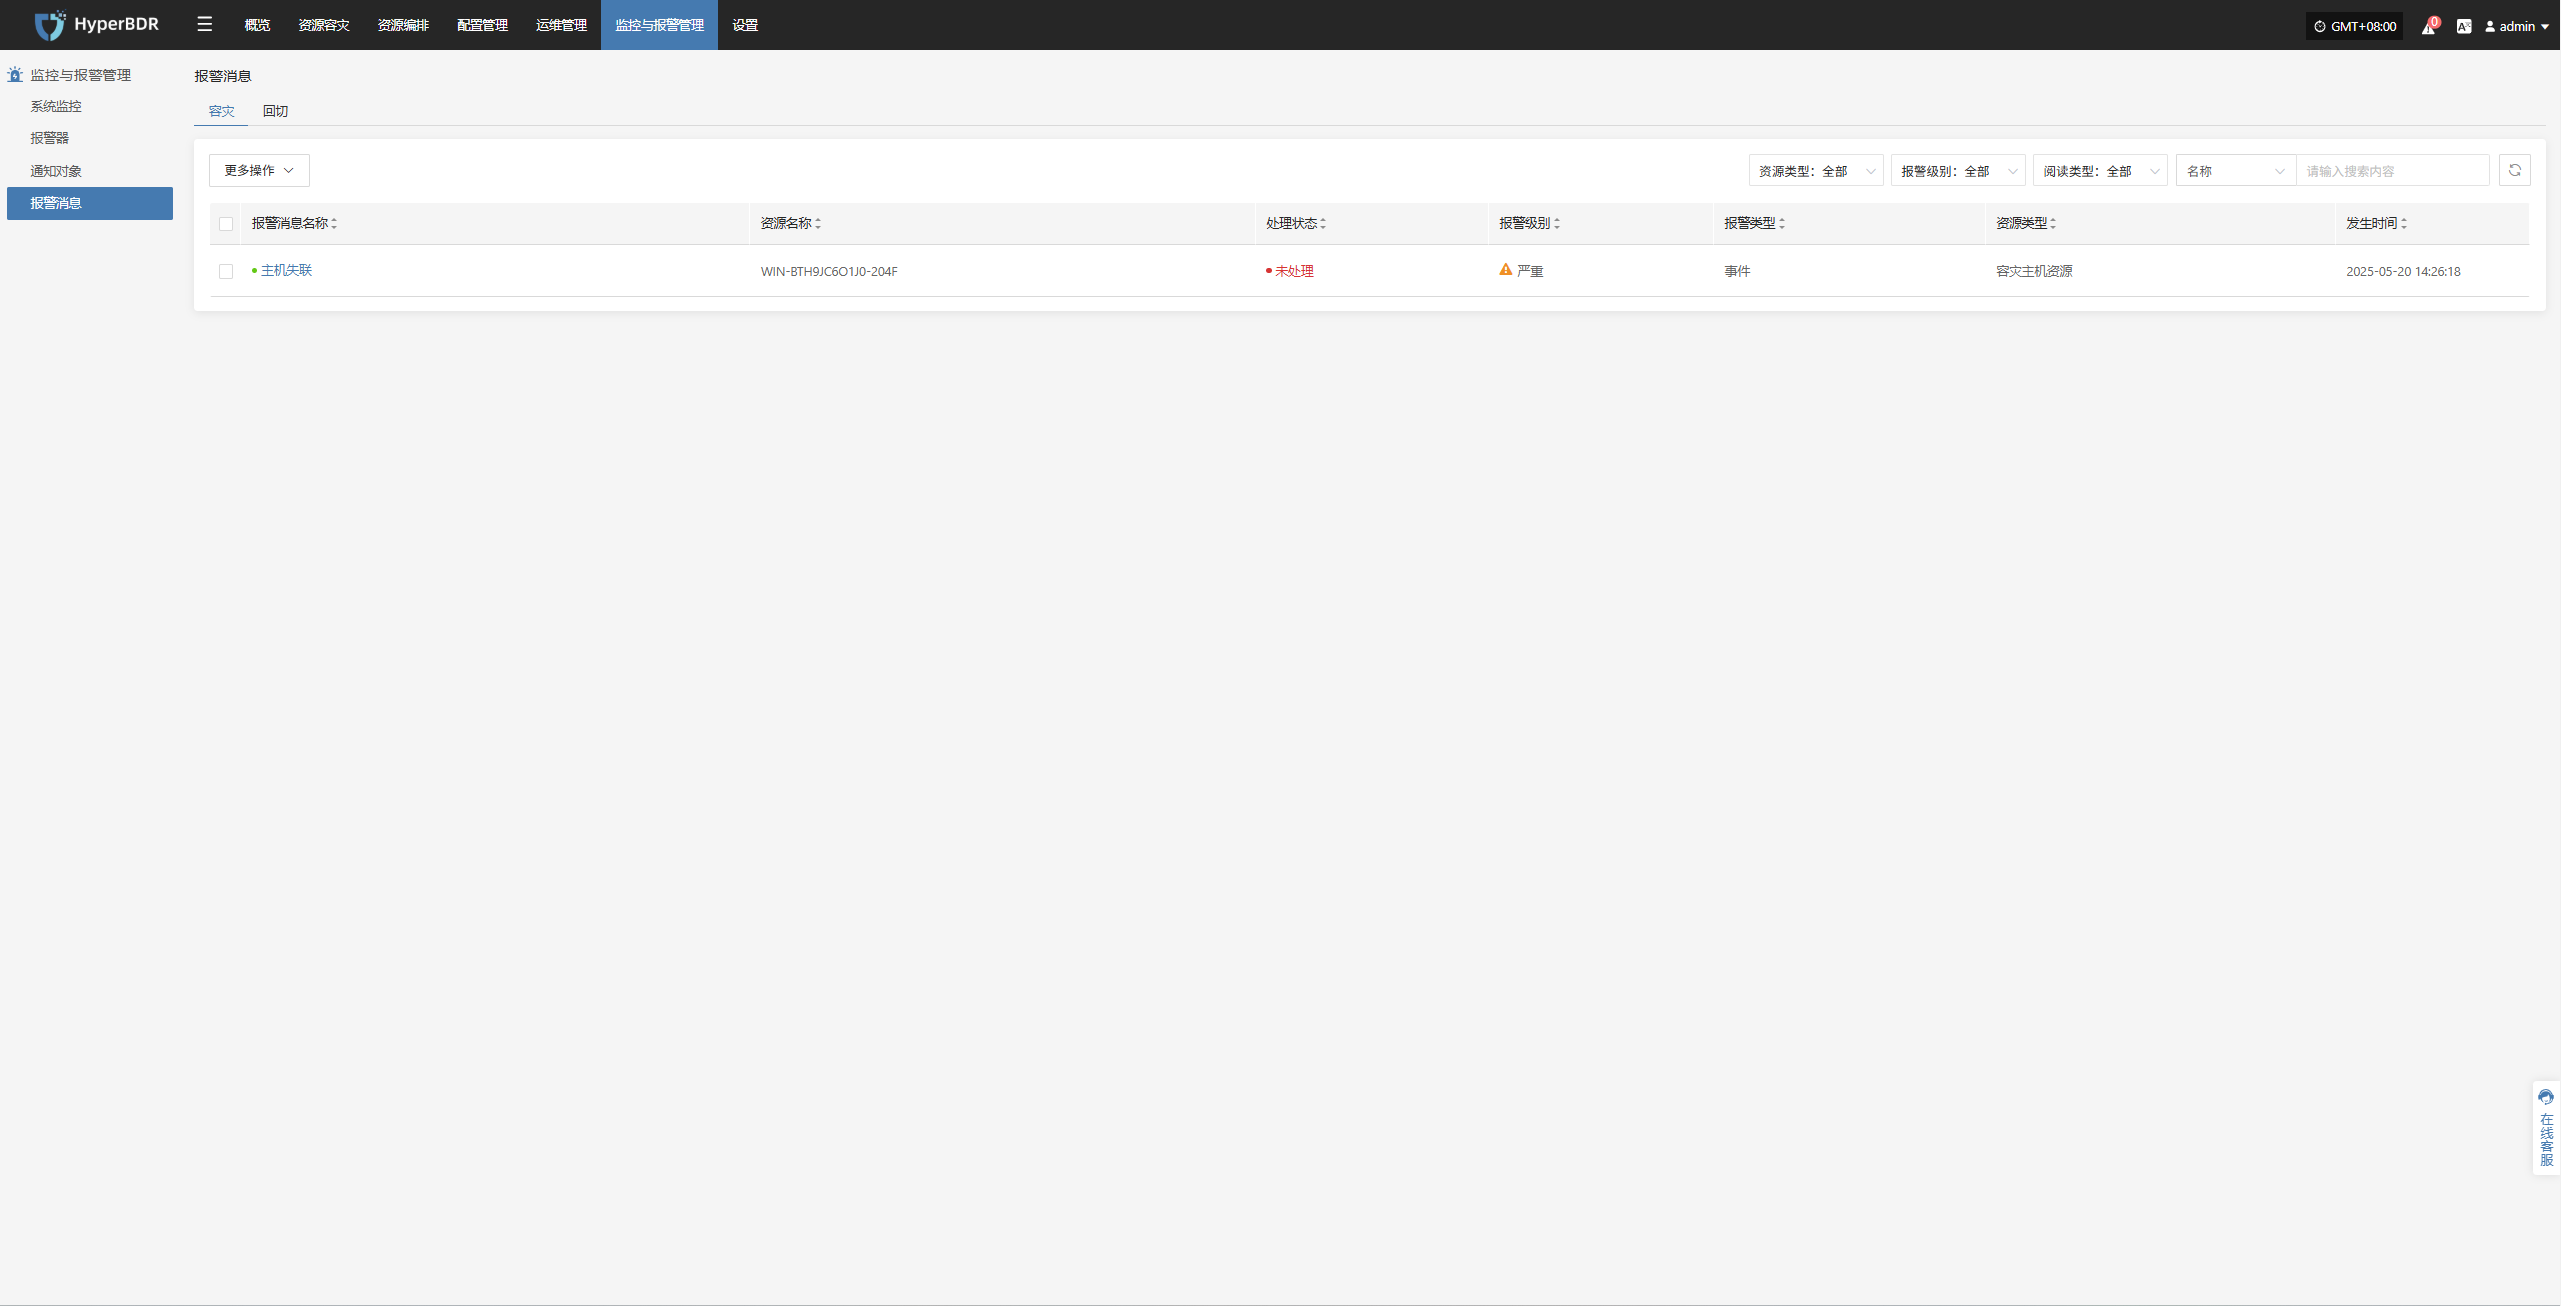
- More Actions
On the alert messages page, you can manage alerts by marking them as "Read" or updating their status for easier tracking and management.
After processing, the status will be updated:

Failback
- Alert Message Fields
When the system detects a resource issue or event trigger, it generates an alert message. The main fields are:
Here is your table translated into clear, simple English for a disaster recovery product document:
| Field Name | Description |
|---|---|
| Alarm Name | The type of event that triggers the alarm, used to quickly identify the root cause of the issue. |
| Resource Name | The specific resource that triggered the alarm, such as a host name or service name. |
| Status | The current handling status of the alarm, for example, "Unprocessed" or "Processed". |
| Severity Level | The severity of the alarm event, commonly classified as "Info", "Critical", or "Emergency". |
| Alarm Type | The specific category of the alarm, such as "Event Alarm" or "Resource Alarm". |
| Resource Type | The types of resources involved, including: · Object Storage · Disaster Recovery Policy User Resources · Disaster Recovery Host Resources · License Resources · Production Platform Resources · Disaster Recovery Platform Resources · Monitoring Alarms · Resource Groups |
| Occurrence Time | The time when the system first detected the alarm event, used for tracing the issue and analyzing response time. |

- More Actions
On the alert messages page, you can manage alerts by marking them as "Read" or updating their status for easier tracking and management.
After processing, the status will be updated:
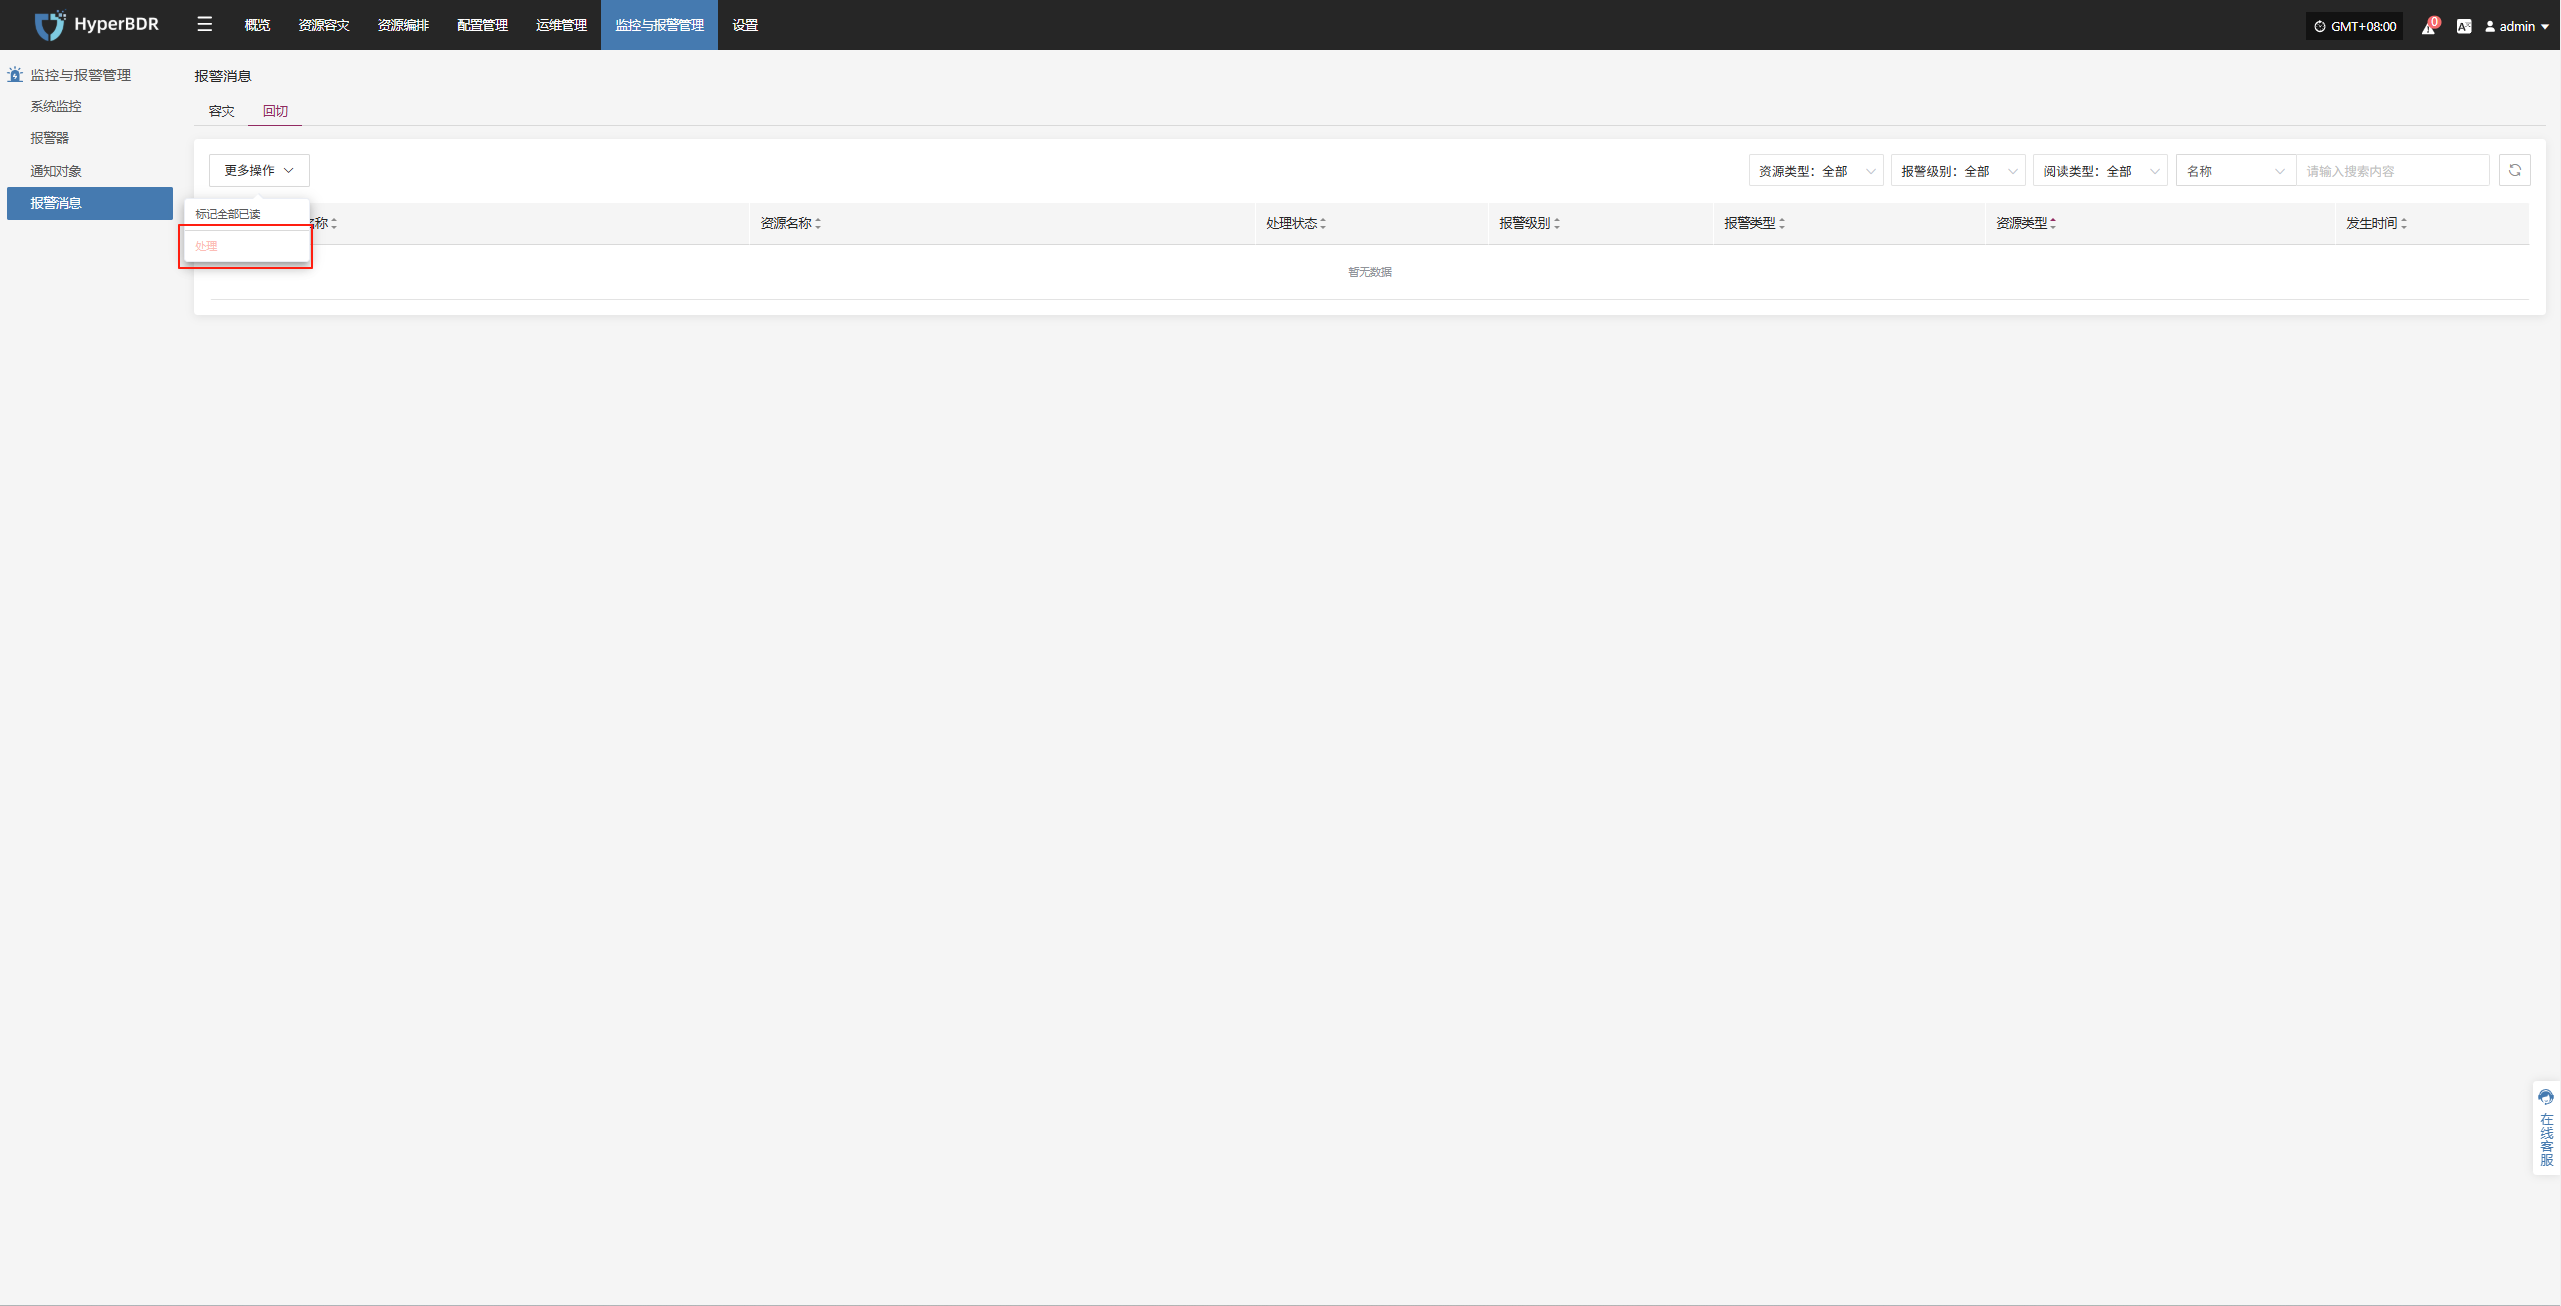
Settings
Global Settings
General Settings
You can configure platform settings as needed, including data display items, language, and more.
- Parameter Description
| Parameter | Options | Description |
|---|---|---|
| Items per page | 10 / 20 / 30 / 40 / 50 / 60 | Set the number of items displayed per page in tables. Default is 10. |
| Language | Simplified Chinese / English / Spanish | Default display language for the platform. Only affects the current user. |
| Notification Language | Simplified Chinese / English | Language used for system alerts (emails, SMS, Webhook, etc.). |
| System Status Refresh Frequency | 1 minute | Default is 1 minute. Cannot be changed in this version. |
| Data Sync Refresh Frequency | 1 minute | Default is 1 minute. Cannot be changed in this version. |
| Data Sync Interval | N/A | Not configurable by default. |
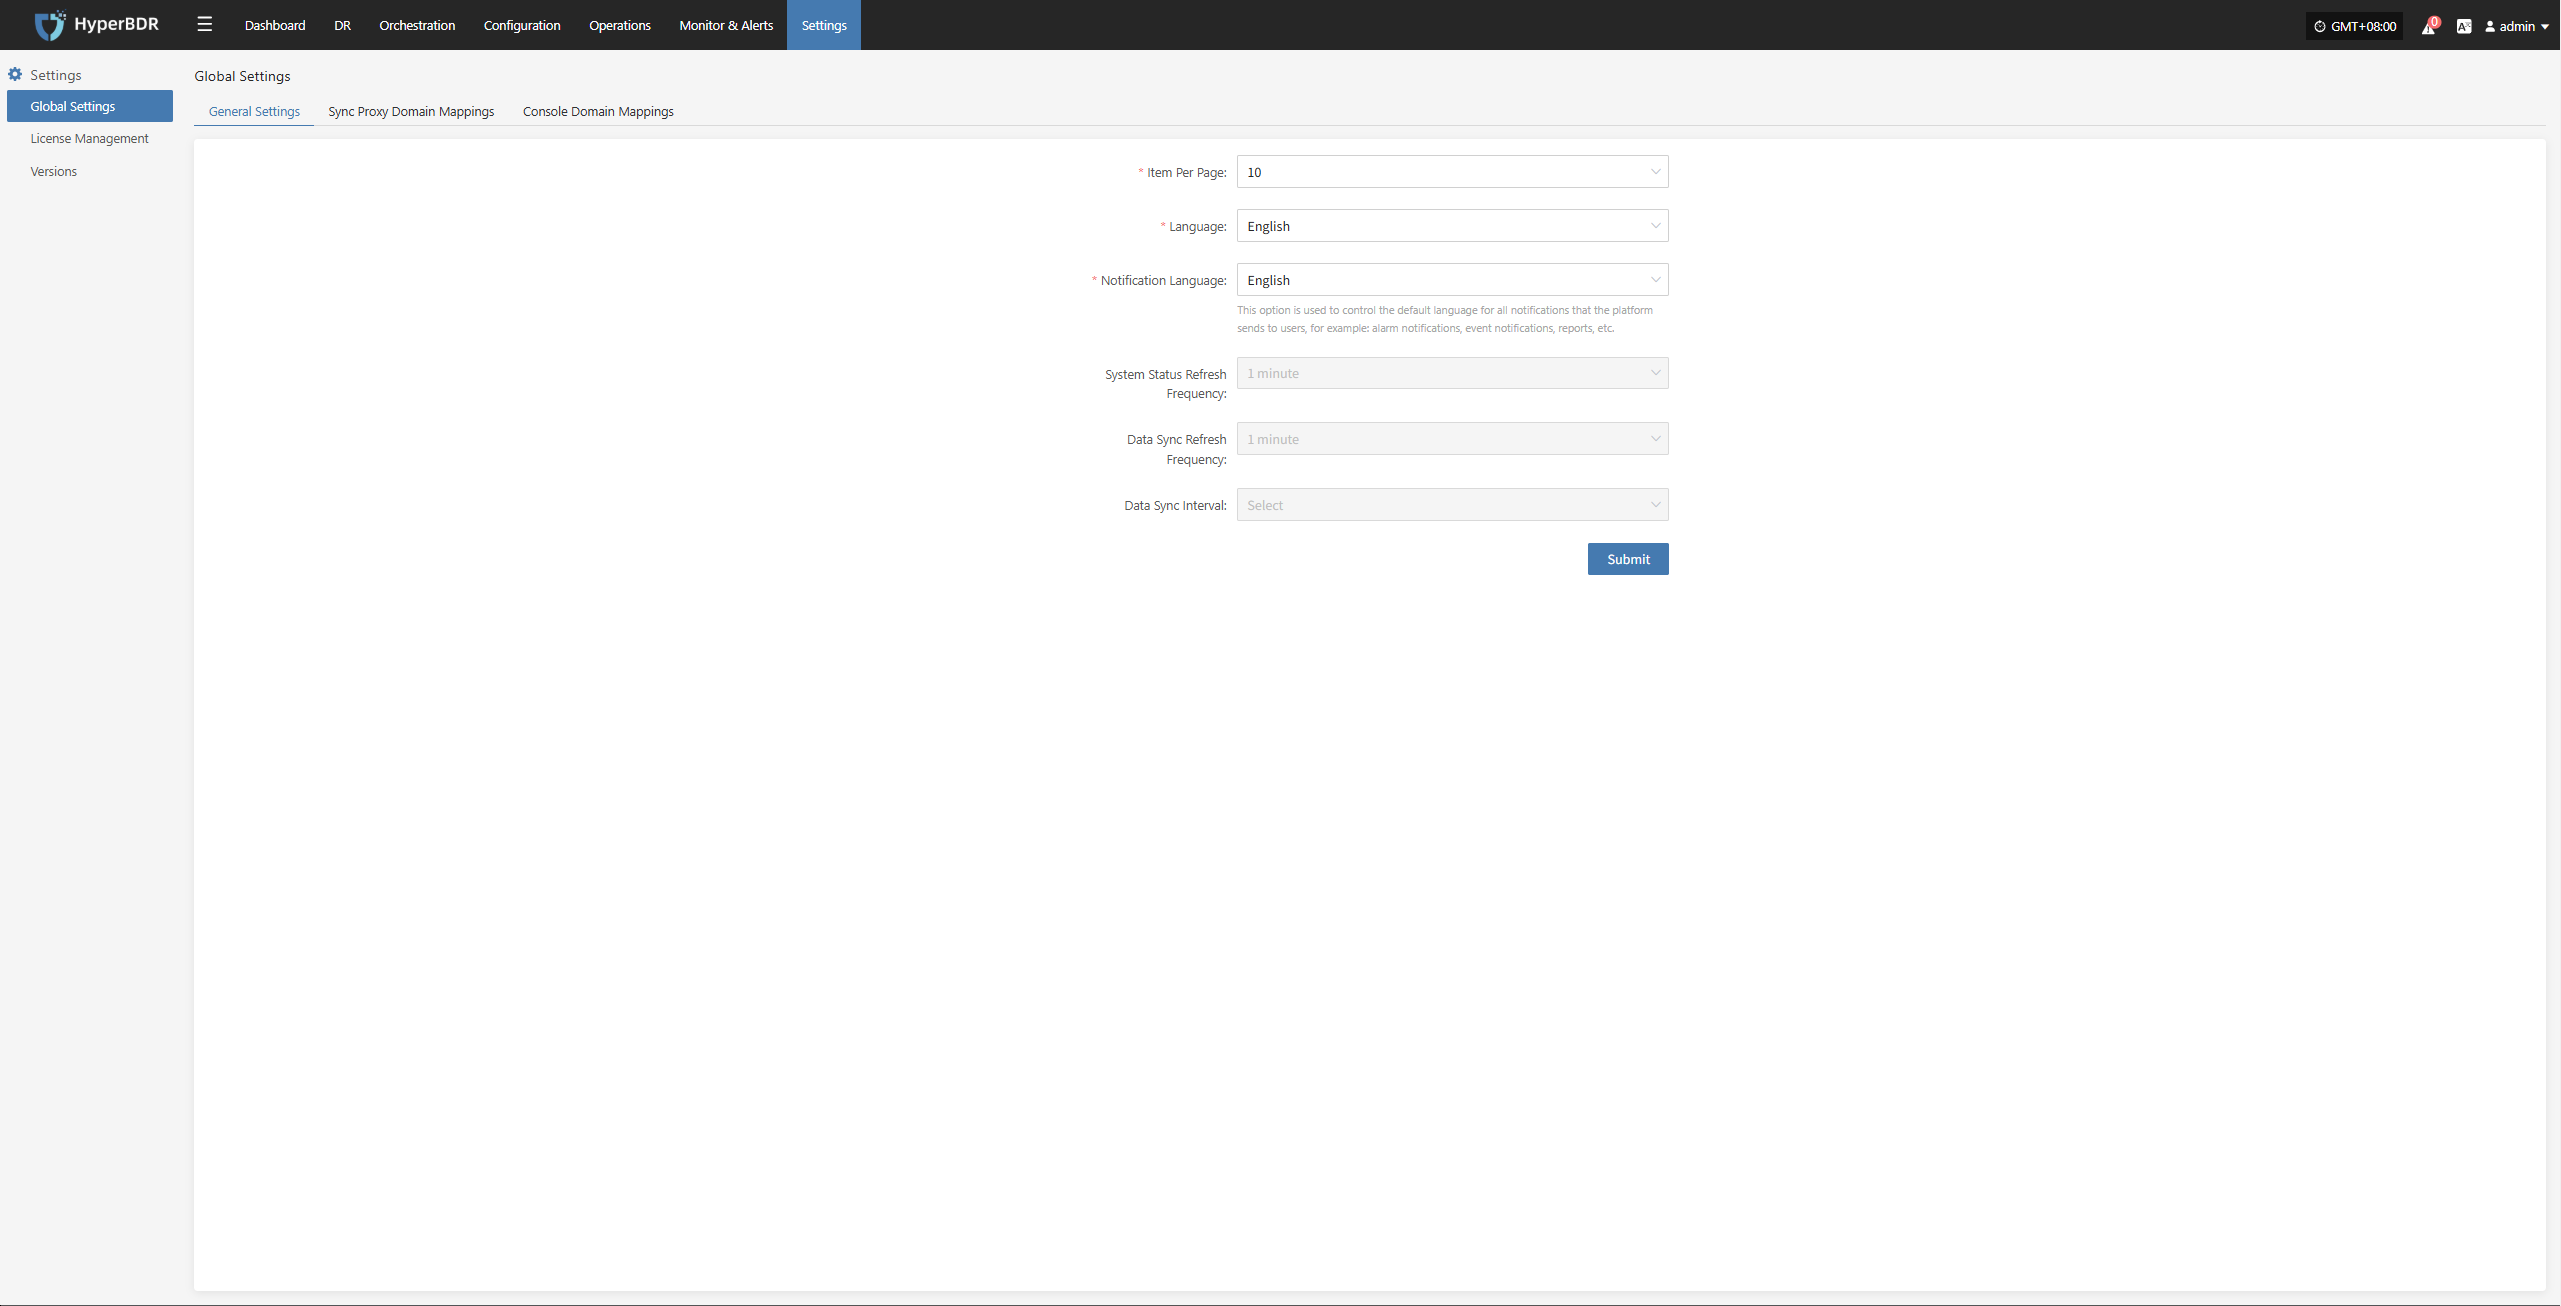
Sync Proxy Domain Mappings
In global settings, click "Sync Proxy Domain Mapping" to add domain and IP mappings for the source production platform. The format is the same as the /etc/hosts file in Linux.
- Parameter Description
This mapping is mainly used when the source needs to connect to vCenter, ESXi, or cloud platform APIs using domain names but DNS is not configured. Without this, the sync proxy cannot synchronize data properly. For example, in a VMware environment with multiple ESXi hosts, you need to configure the IP and domain mapping for each host here. Example:
192.168.1.10 esxi1.example.com
192.168.1.11 esxi2.example.com
192.168.1.12 esxi3.example.com
Note: This setting does not take effect immediately. It will be applied automatically within a few minutes after configuration.
Console Domain Mappings
In global settings, click "Console Domain Mapping" to add domain and IP mappings for the source production platform. The format is the same as the /etc/hosts file in Linux.
- Parameter Description
The main purpose of console domain mapping is to ensure the console can access target platform APIs when domain names are used. For example, on OpenStack, if endpoints use domain names, you need to configure domain mappings for compute, network, storage, and image services here so the console can access the APIs correctly. Example:
192.168.1.100 compute.example.com
192.168.1.101 network.example.com
192.168.1.102 storage.example.com
192.168.1.103 image.example.com
Note: This setting does not take effect immediately. It will be applied automatically within a few minutes after configuration.

License Management
DR License
The DR License controls the use of disaster recovery features for different resources on the platform. It ensures users have the proper authorization to perform disaster recovery, takeover, and data restore operations.
Add License
Go to Settings > License Management > DR License, click "Add", fill in the required information as prompted, and enter a valid license code to complete the authorization.

Failback License
The Failback License is used to manage authorization when moving business operations back from the target site to the original site after a failover. A valid failback license code is required to ensure data migration and business recovery are legal and complete.
Add License
Go to Settings > License Management > Failback License, click Add", enter and activate the license code as prompted to enable the failback feature.
Allocation Log
This page displays basic information and operation status for all connected hosts, helping O&M staff track host lifecycle, license usage, and key operation history.
Export Operation Records
Go to Settings > License Management > Allocation Log, click "Export" to download host information and operation status.
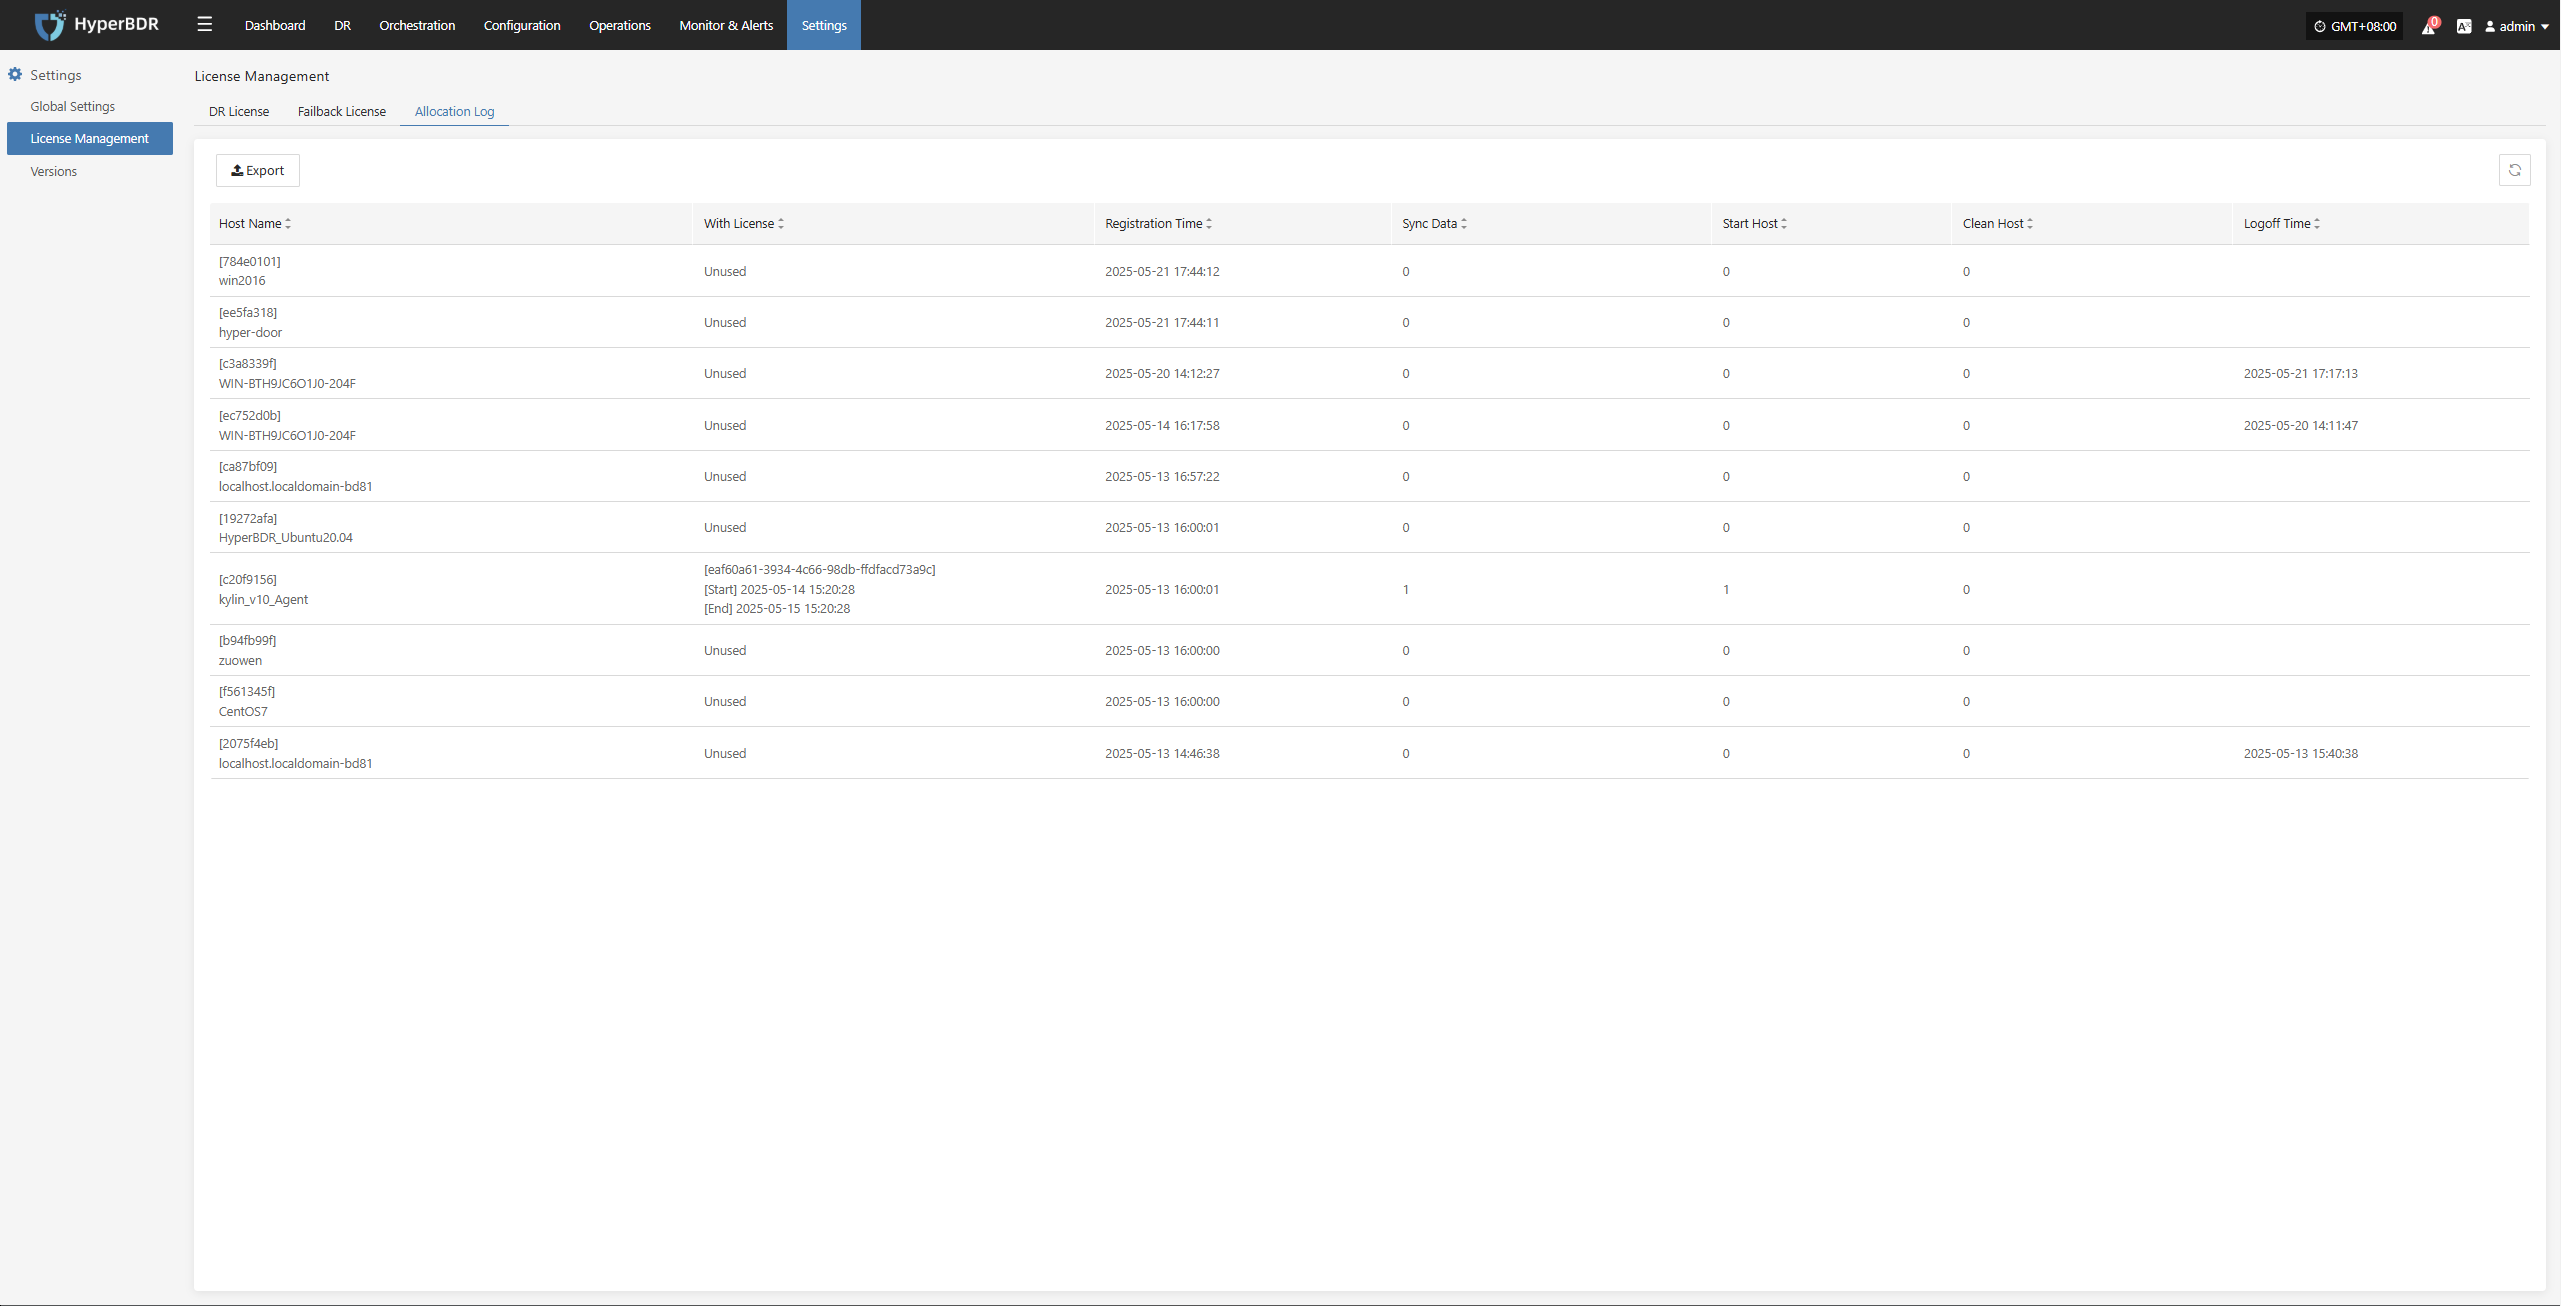
Versions
The Versions page displays detailed version information for the current system platform. This helps O&M staff check software version status, track release history, and provide reference when requesting technical support.
